how to distribute your macros with an addon - official · pdf file5/28/2005 · how...
TRANSCRIPT

How to distribute your macroswith an Addon
Provided Bythe OpenOffice.org Documentation Project

OpenOffice.org Documentation Project How-To
Table of Contents
1 Introduction............................................................................................................... .....41.1 Warning..................................................................................................................................41.2 Document changes.................................................................................................................41.3 What are the capabilities of an addon ?..................................................................................5
2 Tool to create the XML file for an addon..................................................... .................82.1 Preliminaries...........................................................................................................................82.2 Create the configuration file...................................................................................................82.3 Pack the addon.......................................................................................................................82.4 Notes on the information to be provided................................................................................9
a) Addon contents....................................................................................................................9b) Notion of configuration tree................................................................................................9c) Titles....................................................................................................................................9d) Sub-menus...........................................................................................................................9e) Buttons..............................................................................................................................10f) URL....................................................................................................................................10g) Icons..................................................................................................................................10
3 Installing addons............................................................................................. .............123.1 Installation directories..........................................................................................................123.2 Running pkgchk....................................................................................................................12
a) Installing addons for one user............................................................................................12b) Installing one specific addon for one user.........................................................................13c) Installing addons for the network......................................................................................13d) Installing one specific addon for the network...................................................................13e) Deleting an addon..............................................................................................................13
3.3 Batch file example................................................................................................................13
4 Checklist before creating the addon........................................................................ .....14
5 The XML file addon.xcu........................................................................................... ...155.1 Fixed layers...........................................................................................................................155.2 AddonMenu (item in Tools menu).......................................................................................165.3 Submenu...............................................................................................................................17
a) Sub-menu item...................................................................................................................17b) Separator between two sub-menu items............................................................................17c) Opening a secondary sub-menu.........................................................................................18
5.4 OfficeMenubar (item in the main Menu).............................................................................195.5 OfficeToolbar (button in the Tool bar).................................................................................20
http://fr.openoffice.org 2

OpenOffice.org Documentation Project How-To
5.6 OfficeHelp (item in the Help menu).....................................................................................215.7 Images...................................................................................................................................225.8 General structure of a property.............................................................................................235.9 URL property........................................................................................................................235.10 Title property......................................................................................................................235.11 ImageIdentifier property.....................................................................................................24
a) Internal OpenOffice image................................................................................................24b) Image provided with the addon.........................................................................................24c) Image variants...................................................................................................................25
5.12 Target property...................................................................................................................255.13 Context property.................................................................................................................255.14 Property values specific to Images.....................................................................................26
a) URL property in an image node........................................................................................26b) Image properties................................................................................................................26
6 Credits .................................................................................................................. .......28
7 Licences.............................................................................................................. .........297.1 Documentation.....................................................................................................................297.2 Macro libraries.....................................................................................................................29
http://fr.openoffice.org 3

OpenOffice.org Documentation Project How-To
1 IntroductionWhen you create macros providing a new feature to OpenOffice you activate them by menuconfiguration or by adding buttons on a tool bar. Inserting macros and configuring on several PC's is aboring and tricky task. There is a method to automate this, with many capabilities and taking intoaccount the installation (stand-alone PC or network). This method is called Addon. It is officiallyavailable from version 1.1 of OpenOffice (limited operation on OOo 1.0.3).
Addon installation mainly depends on an XML file describing the configuration to be installed. Thisfile is rather complex, so chapter 2 provides you a Basic tool with which you will create this file withoutknowledge of its structure.
The next chapter shows how to insert the addon (or suppress it) in OpenOffice.
The remainder of the document is for the curious reader : a simplified technical explanation of the XMLconfiguration file structure. The information provided here comes from version 1.1RC4 and from whatcan be inferred of the Developer's Guide chapters 4.7.3 and 4.9.1, completed by the analysis of severaladdons which are supposed to work.
1.1 Warning
The information and the tool included in this document were tested with OpenOffice 1.1 and on a stand-alone PC working under Windows XP.
Be careful and check that the created addon is working correctly. Be particularly careful for anetworked installation (see chapter 3.2).
This library is distributed in the hope that it will be useful,but WITHOUT ANYWARRANTY; without even the implied warranty of MERCHANTABILITY orFITNESS FOR A PARTICULAR PURPOSE. See the GNU Lesser General PublicLicense for more details.
Any ground experience which could help me improve this HowTo is welcome.
1.2 Document changes
Main changes since version dated October, 23, 2003
Document
ch 2.4 c).....added : description of titles and accelerator keys
ch 2.4 e).....added : description of buttons and buttons separators
ch 5.11 a)...modification
Tool ( rev 1.1 )
Buttons......Facility to add separators
Menus........The separators are added like in the button dialog
http://fr.openoffice.org 4

OpenOffice.org Documentation Project How-To
1.3 What are the capabilities of an addon ?
An addon achieves the integration of one or more functions into OpenOffice menus and toolbars. Thesefunctions may have been coded with various programming languages, notably OpenOffice Basic. Anaddon is able to :
Insert a macro library into soffice (accessible to any application)
Add a new menu item in the main menu, left of the Window item. This should only be used by reallyimportant and complex features. Take note that a sub-menu is mandatory for this item.
Add a menu item in the menu Tools > Add-ons. On default configuration Add-ons item is shown only ifat least one addon uses this facility and then it opens a sub-menu with one menu item per addon.
At the same time an Add-ons icon shows up on the toolbar which opens the same sub-menu.
http://fr.openoffice.org 5
OpenOffice.org Documentation Project How-To
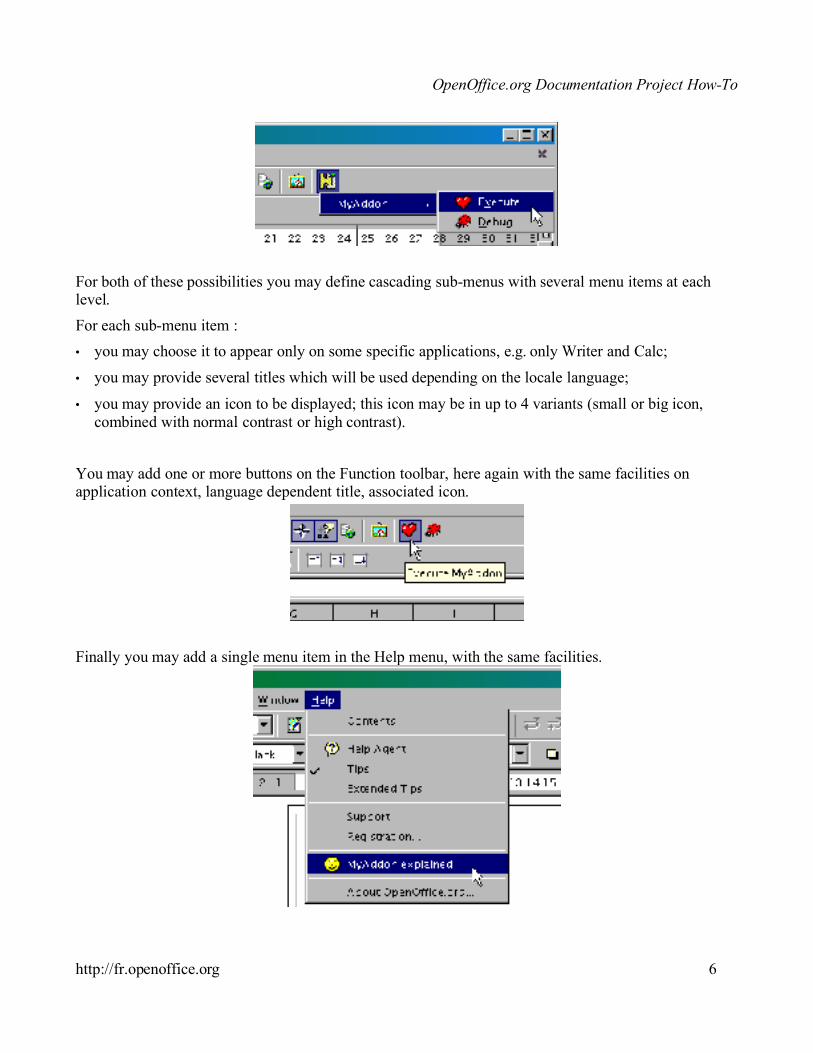
For both of these possibilities you may define cascading sub-menus with several menu items at eachlevel.
For each sub-menu item :
• you may choose it to appear only on some specific applications, e.g. only Writer and Calc;
• you may provide several titles which will be used depending on the locale language;
• you may provide an icon to be displayed; this icon may be in up to 4 variants (small or big icon,combined with normal contrast or high contrast).
You may add one or more buttons on the Function toolbar, here again with the same facilities onapplication context, language dependent title, associated icon.
Finally you may add a single menu item in the Help menu, with the same facilities.
http://fr.openoffice.org 6

OpenOffice.org Documentation Project How-To
Installing the addon into OpenOffice
It is possible to install an addon in a relatively simple manner on a single PC (stand-alone or part of anetworked OpenOffice) or in a centralised manner on a networked OpenOffice.
The addon mechanism simplifies the updates. The installed version will be replaced by the new onewhen you re-execute the installation procedure.
Of course the installation tool can also suppress an addon.
http://fr.openoffice.org 7

OpenOffice.org Documentation Project How-To
2 Tool to create the XML file for an addonThe tool is a set of macros within this HowTo. Although it can be used to create various addon types, Iwill focus on how to integrate macros.
2.1 Preliminaries
Suppose as an example that your macros are gathered in a macro library of soffice which is namedTATA. This library is on the PC with wich you have tested your macros. You find it in the directory{installation}/user/basic/TATA/
In an empty work directory (example : Work/ ), copy the directory containing your library. You get nowa directory Work/TATA/
If you have got image files for the future menus items or buttons make a copy of these into the directoryWork/TATA/ or preferably in one or several sub-directories of it.
With the Organizer for macros delete from your PC the library TATA. You may later append again thelibrary from your copy.
You should have made up your mind on which menu items to create and the title for each.
You should know if you will provide buttons with icons in the function Toolbar, and if you will provideicons for some menu items.
You have prepared a Checklist to make sure you won't forget anything. See in chapter 4 an example ofChecklist.
2.2 Create the configuration file
Click on the button at right and answer the questions with utmost care as it iseasy to make a mistake. Some trials will help you understand the tool. Chapter2.4 offers some more explanations.
In most of the displayed panels there is a text window at top which displays a log of the actionsexecuted so far. Use the vertical scrollbar or Ctrl-End key to see the last actions.
At the end of execution the log is displayed in a big window. Read it with care (spelling mistakes,omission, mistakes). If all is OK, click on “ Addon zipping ” button in the panel. If you feel bad aboutthe result you will have to close and begin from start again, or else you have to wrestle with the manualdissection of addon.xcu file, which you can modify with a text editor. The files addon.xcu andLog.txt are stored in the work directory Work/. You are not compelled to create the zip file now.
Chapter 5 provides you with a general description of addon.xcu file structure. If you want to go furtherinto understanding the code you will have to read chapter 4.7.3 of the Developer's Guide.
2.3 Pack the addon
If you are pleased with your addon.xcu file you have now to create the zip file which will contain theaddon. To do this, click on the button “ Addon zipping ” in the final panel or start again the tool byclicking on the button hereunder.
http://fr.openoffice.org 8
Create XML file
Addon zipping

OpenOffice.org Documentation Project How-To
Following the example you will get TATA.zip in the directory Work/.
Read now the chapter : “ Installing addons ”.
2.4 Notes on the information to be provided
a) Addon contents
You may use or not use the creation of menu items or buttons.
You may design an addon without any menu item, no button, no help : the macro library will only beinstalled and will be available in soffice.
You may design an addon where some buttons or menu items trigger macros belonging to an alreadyinstalled library.
b) Notion of configuration tree
OpenOffice configuration data are stored in a software tree. Under a given node in the tree you will findall the necessary information for a configuration part of OpenOffice. A node is identified by its name; itis mandatory that each configuration domain have an own name so as to avoid a conflict with any otheralready existing configuration. In particular you have to abide by this rule for each addon.
A recommended way of insuring a unique name is to use a “ qualified name ” structure formed byterms separated by a dot, example :
org.openoffice.Office.addon.BernardMarcelly.function1
By choosing this, I hope I am the only one to use the branch BernardMarcelly. If I provide later anotheraddon I may re-use my node BernardMarcelly and add another branch named :
org.openoffice.Office.addon.BernardMarcelly.anotherfunction
Notes
The name of the node remains internal to OpenOffice, it does not appear to the user of the addon.
It is advisable to only use non-accentuated letters (i.e. do not use national characters), digits, dot, andnot use spaces.
c) Titles
The texts of menu items may have accelerator keys (the character appears underlined). In order tochoose the character, put a ~ just before it.
You may define title texts for various languages but if your macros display texts you will have to handlethe translation in your code.
d) Sub-menus
When in a menu item you want to open a secondary level (a sub-menu), choose in the URL panel theoption “ URL opening a sub-menu ”.
You cannot display an icon in a menu item which opens a sub-menu.
If you add an item in the Main menu you will have to open a sub-menu.
http://fr.openoffice.org 9

OpenOffice.org Documentation Project How-To
You may open up to 4 successive levels of sub-menus, but you should try to be more straightforward.
e) Buttons
A button separator is automatically added before the first button of the addon. You may also add aseparator between the buttons of the addon.
f) URL
You may trigger an already installed macro, not solely one of the addon macros.
With the dispatch command you may execute other commands.
The “ display mode ” seems not to change anything. You may leave it as it is.
g) Icons
Use of icons by OpenOffice
When you assign an image to a menu item or a button, OpenOffice remembers the corresponding URL.When you re-use the same URL for another button or another menu item the same image isautomatically assigned to it.
This behaviour is quite logical as only the URL carries out the action, not the button nor a menu item.Usually you will have a menu item leading to an URL and a button leading to the same URL becauseyou provide two means of carrying out an action; you will indicate the image only once.
On the opposite if you do want two different images for two menu items leading to the same macromake sure not to indicate the same URL : either by calling a dummy macro which only calls the mainmacro, or by calling the same macro but from two different modules ! ( in Basic, macros from a moduleare accessible from any other module of the same library).
Structure
The icons you may display on a menu item or button are “ Windows bitmap ” images with a bmpextension. Please note : these are not .ico files !
OpenOffice manages 4 image variants :
1. small icons of 16x16 pixels,
2. big icons of 26x26 pixels,
3. small icons of 16x16 pixels with high contrast,
4. big icons of 26x26 pixels with high contrast.
According to official documentation, when there is no high contrast image OpenOffice uses a normalcontrast image (not verified).
For OpenOffice to display a 16x16 pixels image you have to provide an image and say that it is indeed16x16. In the same way, for OpenOffice to display a 26x26 pixels image (used with option : big icons)you have to provide another image and say that it is indeed 26x26. If the image you provided does nothave the indicated size it will be re-dimensioned for the display. But the result will be worse than animage especially drawn for the format.
http://fr.openoffice.org 10
OpenOffice.org Documentation Project How-To
The color RGB(255, 0, 255) stands for a transparent pixel : the background color will be displayedinstead.
There are several ways to create an addon with an icon on a menu item or on a button. The tool canhandle images of type 1 or of type 2.
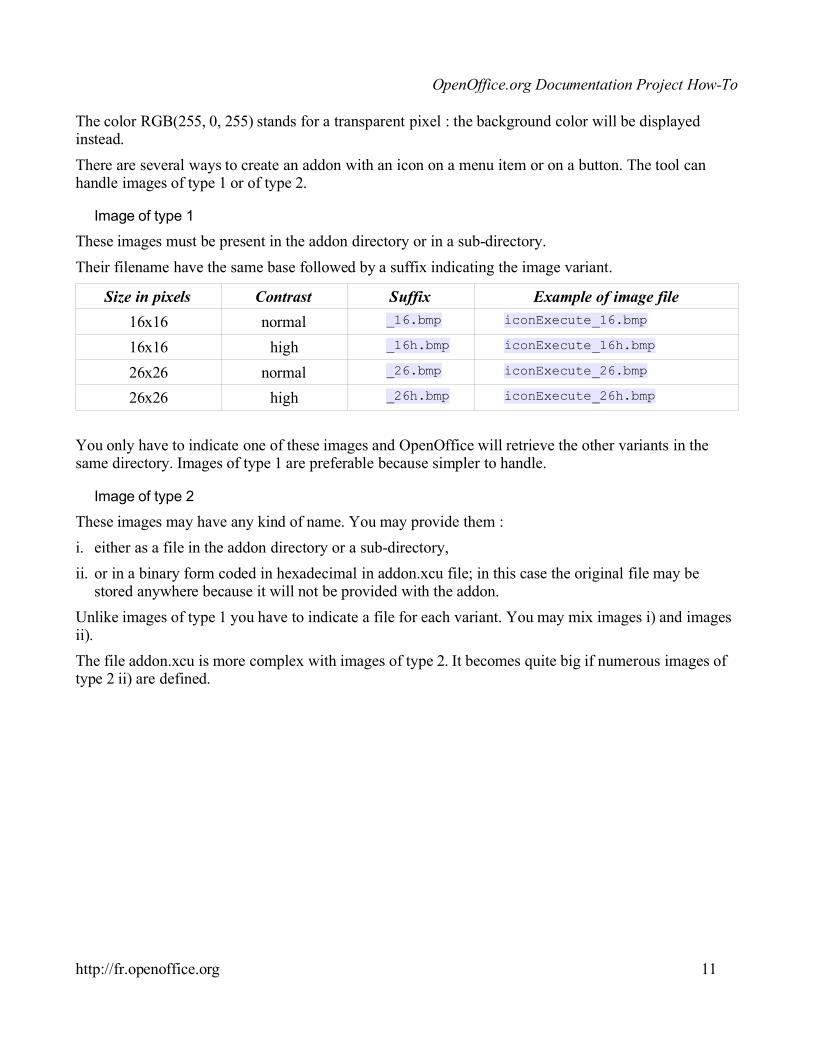
Image of type 1
These images must be present in the addon directory or in a sub-directory.
Their filename have the same base followed by a suffix indicating the image variant.
Size in pixels Contrast Suffix Example of image file
16x16 normal _16.bmp iconExecute_16.bmp
16x16 high _16h.bmp iconExecute_16h.bmp
26x26 normal _26.bmp iconExecute_26.bmp
26x26 high _26h.bmp iconExecute_26h.bmp
You only have to indicate one of these images and OpenOffice will retrieve the other variants in thesame directory. Images of type 1 are preferable because simpler to handle.
Image of type 2
These images may have any kind of name. You may provide them :
i. either as a file in the addon directory or a sub-directory,
ii. or in a binary form coded in hexadecimal in addon.xcu file; in this case the original file may bestored anywhere because it will not be provided with the addon.
Unlike images of type 1 you have to indicate a file for each variant. You may mix images i) and imagesii).
The file addon.xcu is more complex with images of type 2. It becomes quite big if numerous images oftype 2 ii) are defined.
http://fr.openoffice.org 11

OpenOffice.org Documentation Project How-To
3 Installing addonsOpenOffice may be installed :
1. on one specific PC
2. on a network with a core on a server and a light client on every PC.In this case you may install an addon
a) for selected users,
b) or for all users of OpenOffice.
3.1 Installation directories
The command-line tool : pkgchk is used to install addons. It may install :
1. either a specific addon indicated in the command line
2. or all addons it finds in the default directory. There are two default directories :
a) For addons specific to a user the default directory is{installation}/user/uno_packagesthis translates to, for a Windows XP installationC:\Program Files\OpenOffice.org1.1\user\uno_packages
b) For network-wide addons the default directory is{installation}/share/uno_packages
The pkgchk tool is in the directory :{installation}/program
this translates to, for a Windows XP local installationC:\Program Files\OpenOffice.org1.1\program
3.2 Running pkgchk
You have to work at command line to run pkgchk. It is advisable to prepare a batch file (MS-Windows)or a shell script (Unix).
The current directory must be {installation}/program
It is mandatory to stop all execution of OpenOffice before running pkgchk. You must also stopthe QuickStarter of OpenOffice (MS-Windows version). In the network every OpenOffice mustbe stopped. Without these precautions the OpenOffice installation may be damaged. Pkgchktests if OpenOffice runs locally, but it cannot detect this on a network installation.
a) Installing addons for one user
Put the addon(s) into {installation}/user/uno_packages
Run this very simple command :
pkgchk
Or else if you want to display a report during execution, add the option -v :
http://fr.openoffice.org 12
OpenOffice.org Documentation Project How-To
pkgchk -v
b) Installing one specific addon for one user
Put the addon zip file in a directory. As an argument for the command give the path to the addon file.Example for MS-Windows :
pkgchk C:\tests\MyOwnAddon.zip
Still for Windows, if there are spaces in the path name or file name you must enclose the path withdouble quotes like this :
pkgchk "C:\My Documents\MyOwnAddon.zip"
c) Installing addons for the network
Put the addon(s) into {installation}/share/uno_packages
Run the command :
pkgchk --shared
d) Installing one specific addon for the network
Put the addon zip file in a directory. As an argument for the command give the path to the addon file.Example for MS-Windows :
pkgchk --shared C:\tests\MyOwnAddon.zip
e) Deleting an addon
Suppress this addon from the default directory. Note that if you installed the addon with method b) or d)you will also find it in the default directory.
Run command a) or c)
Explanation : pkgchk will update all addons depending on the contents of the default directory. Thosewhich exist no more will be suppressed.
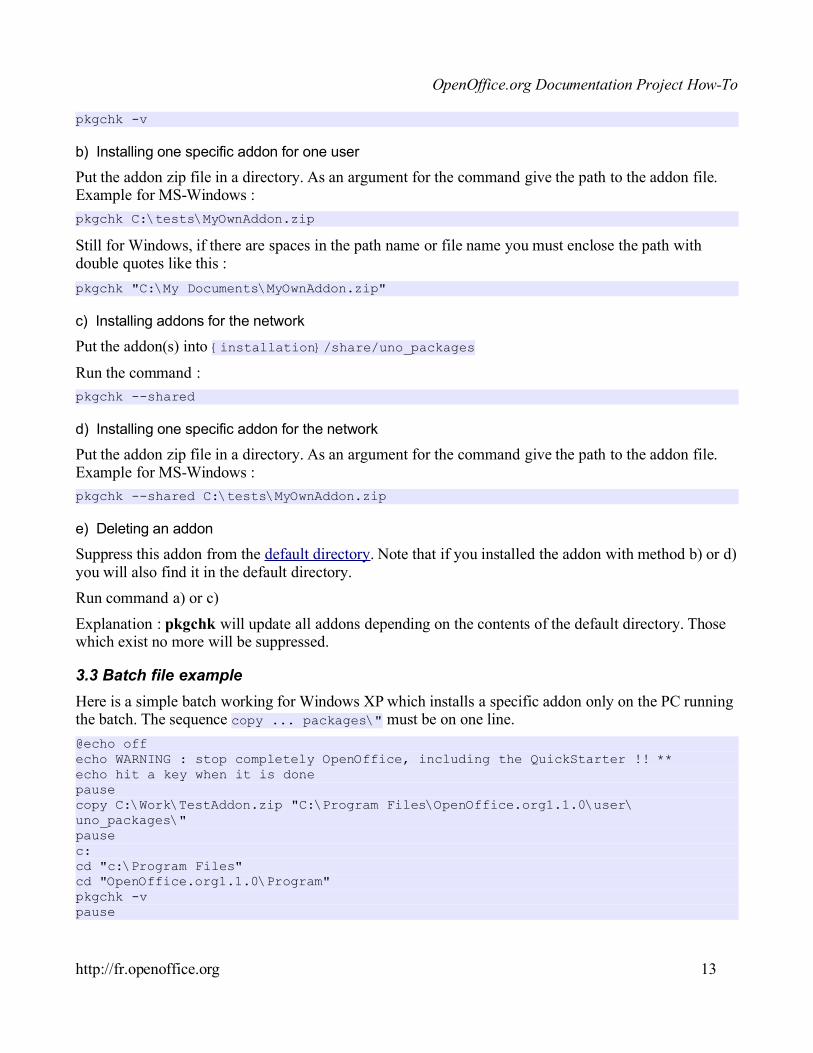
3.3 Batch file example
Here is a simple batch working for Windows XP which installs a specific addon only on the PC runningthe batch. The sequence copy ... packages\" must be on one line.
@echo offecho WARNING : stop completely OpenOffice, including the QuickStarter !! **echo hit a key when it is donepausecopy C:\Work\TestAddon.zip "C:\Program Files\OpenOffice.org1.1.0\user\uno_packages\"pausec:cd "c:\Program Files"cd "OpenOffice.org1.1.0\Program"pkgchk -vpause
http://fr.openoffice.org 13

OpenOffice.org Documentation Project How-To
4 Checklist before creating the addonFor a complex addon it is strongly advised to put on paper the answers before running the creationmacro.
Choose a “ unique name ” which will be specific to your addon. The name must never be identical to thename of another addon, written by you or someone else.
Review each of the basic features :
1. item in the Main menu, sub-menus
2. item in the Tools menu, sub-menus
3. button(s) in the Function Toolbar
4. item in the Help menu
Make up your mind on the titles for the menu items, name of the macro, associated image.
If your addon should appear only for some contexts, choose which context(s) for each menu item andeach button.
For each title you may prepare translation in various languages.
For each associated image you have to choose wether it will be provided as a file in the addon anddecide the filename, or integrated in the xml file; each associated image may be provided with severalvariants, this has to be prepared.
After a run of the tool, if you made a mistake print the log file and note what must be different. Thispaper will serve as a checklist for your next run.
http://fr.openoffice.org 14

OpenOffice.org Documentation Project How-To
5 The XML file addon.xcuThe addon.xcu file is a text file in XML syntax which describes how to integrate the addon toOpenOffice. For more information on XML you may read the book : Learning XML published byO’Reilly & Associates.
This chapter's goal is to help you read and possibly modify this file.
The file makes use of tags which have a meaning and a syntax for their use.
The file is structured in “Russian dolls ”. Describing it implies presenting cascading concepts.
Each of the listed elements is composed of an opening tag, a contents and a closing tag, in the same wayas in HTML documents for example.
5.1 Fixed layers
The three first layers are fixed texts as regards addon description.
Layer “ User Interface Addon ” contains one or more components. The sketch shows the 5 possiblecomponents. The component order is not important, each may appear only once. We are going to studyeach component. But before this, some words on the principle for storage of configurations inOpenOffice.
OpenOffice configuration data are stored in a software tree. Under a given node in the tree you will findall the necessary information for a configuration part of OpenOffice. A node is identified by its name; itis mandatory that each configuration domain have an own name so as to avoid a conflict with any otheralready existing configuration. In particular you have to abide by this rule for each addon.
The same qualified name may be used to name different component of the addon as each component(OfficeMenubar, OfficeToolbar, etc) is itself a top node. As a particular case the Images component ismade of as many sub-components as images to insert. These sub-components will be distinguished byadding a qualifier, for example :
org.openoffice.Office.addon.BernardMarcelly.fonction1.img02
http://fr.openoffice.org 15
File encoding
Addon register
User Interface Addon
OfficeMenubar
OfficeToolbar
AddonMenu
OfficeHelp
Images

OpenOffice.org Documentation Project How-To
5.2 AddonMenu (item in Tools menu)
AddonMenu defines a menu item in Tools > Addons. It is composed of an envelope used to name thisconfiguration un-ambiguously in the configuration tree of OpenOffice. This envelope contains severalproperties, described later on, the order of which is of no importance.
Submenu is a composite element which may or may not exist. It is used to define a deeper level in themenu. Its structure is described in the next chapter.
Note that if Submenu exists the property URL may be omitted or have any contents because no macrowill be triggered. The property ImageIdentifier may also be omitted because it will be ignored and noimage will be displayed.
http://fr.openoffice.org 16
AddonMenuUnique Node
Property : URL
Property : ImageIdentifier
Property : Title
Property : Context
Property : Target
SubmenuItem : unique internal node
Item : unique internal node
etc...

OpenOffice.org Documentation Project How-To
5.3 Submenu
A Submenu defines sub-menu items. It is composed of one or more items.
Each item is composed of an envelope used to name this configuration un-ambiguously in the Submenu.The tool decides of the unique name of the node. The contents of an item has three variants.
a) Sub-menu item
This is the most common case. The order of the properties is of no importance.
b) Separator between two sub-menu items
http://fr.openoffice.org 17
Item : unique internal node
Property : URL
Property : ImageIdentifier
Property : Title
Property : Context
Property : Target
Item : unique internal node
Property : URL (separator)

OpenOffice.org Documentation Project How-To
c) Opening a secondary sub-menu
You recognize the structure of the previous chapter : this is a recursive definition. The tool has a limit of4 levels which should be largely sufficient.
http://fr.openoffice.org 18
Item : unique internal node
Property : URL
Property : ImageIdentifier
Property : Title
Property : Context
Property : Target
SubmenuItem : unique internal node
Item : unique internal node
etc...

OpenOffice.org Documentation Project How-To
5.4 OfficeMenubar (item in the main Menu)
OfficeMenuBar defines a menu item at the highest level, at left of the Window item. It is composed ofan envelope used to name this configuration un-ambiguously in the configuration tree of OpenOffice.This envelope contains two properties, described later on, and a composite element called Submenu,previously described. The order of the properties is of no importance. Note that for OfficeMenubar theSubmenu is mandatory as it is the only way to run a macro.
http://fr.openoffice.org 19
OfficeMenubarUnique node
Property : Title
Property : Context
Submenu
Item : unique internal node
Item : unique internal node
etc...
OpenOffice.org Documentation Project How-To
5.5 OfficeToolbar (button in the Tool bar)
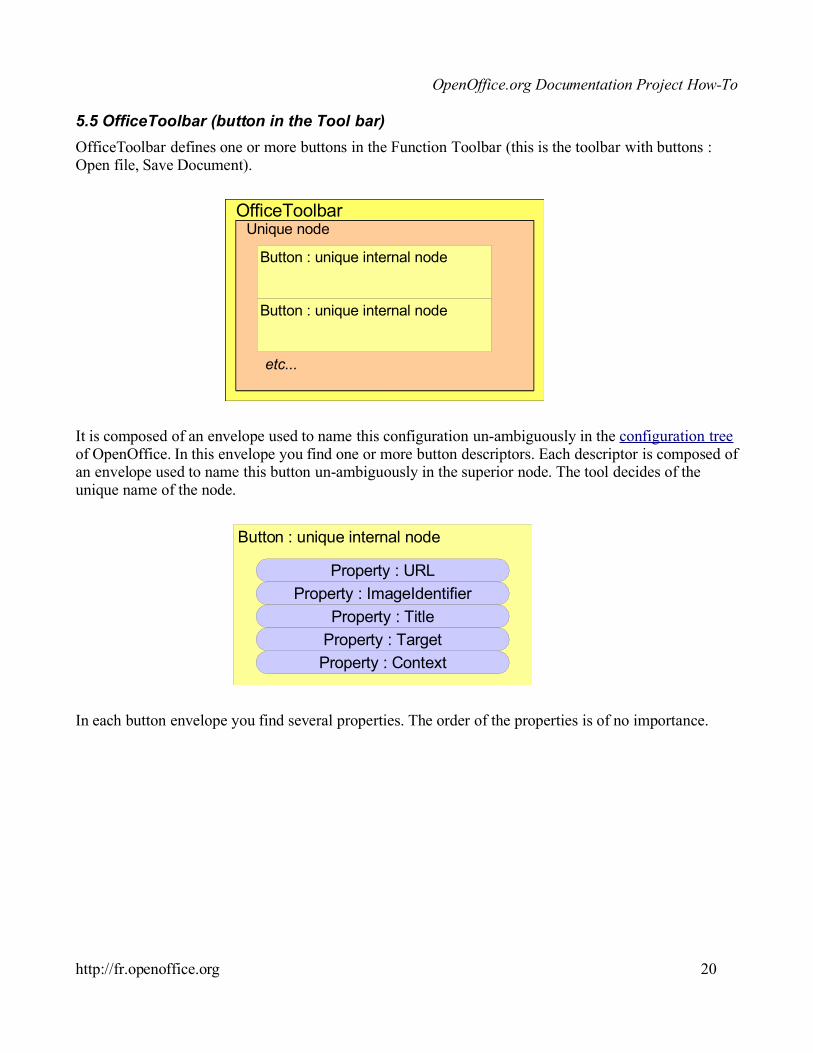
OfficeToolbar defines one or more buttons in the Function Toolbar (this is the toolbar with buttons :Open file, Save Document).
It is composed of an envelope used to name this configuration un-ambiguously in the configuration treeof OpenOffice. In this envelope you find one or more button descriptors. Each descriptor is composed ofan envelope used to name this button un-ambiguously in the superior node. The tool decides of theunique name of the node.
In each button envelope you find several properties. The order of the properties is of no importance.
http://fr.openoffice.org 20
OfficeToolbarUnique node
Button : unique internal node
Button : unique internal node
etc...
Button : unique internal node
Property : URL
Property : ImageIdentifier
Property : Title
Property : Context
Property : Target

OpenOffice.org Documentation Project How-To
5.6 OfficeHelp (item in the Help menu)
OfficeHelp defines a help item which will be inserted in the Help menu, after the item “Registration... ”.It is composed of an envelope used to name this configuration un-ambiguously in the configuration treeof OpenOffice.
In this envelope you find several properties. The order of the properties is of no importance.
http://fr.openoffice.org 21
OfficeHelpUnique node
Property : URL
Property : ImageIdentifier
Property : Title
Property : Context
Property : Target
OpenOffice.org Documentation Project How-To
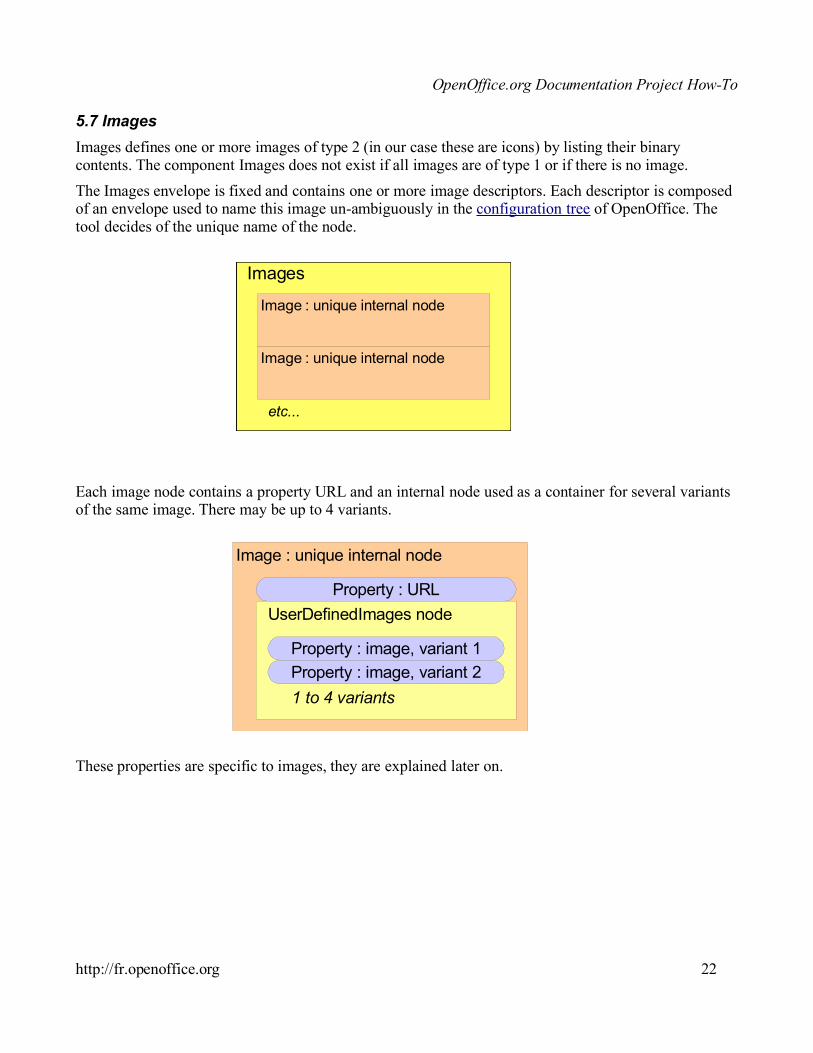
5.7 Images
Images defines one or more images of type 2 (in our case these are icons) by listing their binarycontents. The component Images does not exist if all images are of type 1 or if there is no image.
The Images envelope is fixed and contains one or more image descriptors. Each descriptor is composedof an envelope used to name this image un-ambiguously in the configuration tree of OpenOffice. Thetool decides of the unique name of the node.
Each image node contains a property URL and an internal node used as a container for several variantsof the same image. There may be up to 4 variants.
These properties are specific to images, they are explained later on.
http://fr.openoffice.org 22
Images
Image : unique internal node
Image : unique internal node
etc...
Image : unique internal node
Property : URL
UserDefinedImages node
Property : image, variant 1
Property : image, variant 2
1 to 4 variants

OpenOffice.org Documentation Project How-To
5.8 General structure of a property
A property begins with a tag <prop...> and finishes with a tag </prop>
The opening tag contains the property name. It indicates also that the property value is of the type“ String ”.
Between the two tags lays the property value. It may appear in several aspects :
<value/>
means: no value
<value>blabla blabla etc</value>
the string between the two “ value ” is coded in Unicode UTF-8 so that accentuated ornational characters are converted into couples of characters;
the characters quote, double quote, commercial and, lower, greater, are transcribed intotheir predefined character entity, for example : < becomes <
Other ways of describing the value are used depending on the properties.
5.9 URL property
Usually an URL is used to run a macro when a menu item or a Fonction Toolbar button is activated.The value for URL is written like this :
<value>macro:///MyLib.Module1.Function1</value>
In the example above the macro to be run is Function1 and is stored in module Module1 of the libraryMyLib.
You declare a menu separator or a button separator with the conventional value :
<value>private:separator</value>
5.10 Title property
This is a text visible in the user interface, e.g. the text of a menu item.
You may specify the language locale for which this text applies. Example :
<value>erase</value><value xml:lang="en-UK">rub out</value><value xml:lang="fr">gommer</value>
The first line applies if the current language locale is not one of the provided languages.
The second line applies to United Kingdom english.
The third line applies to french independently of the country (France, Canada, Belgium, Switzerland...)
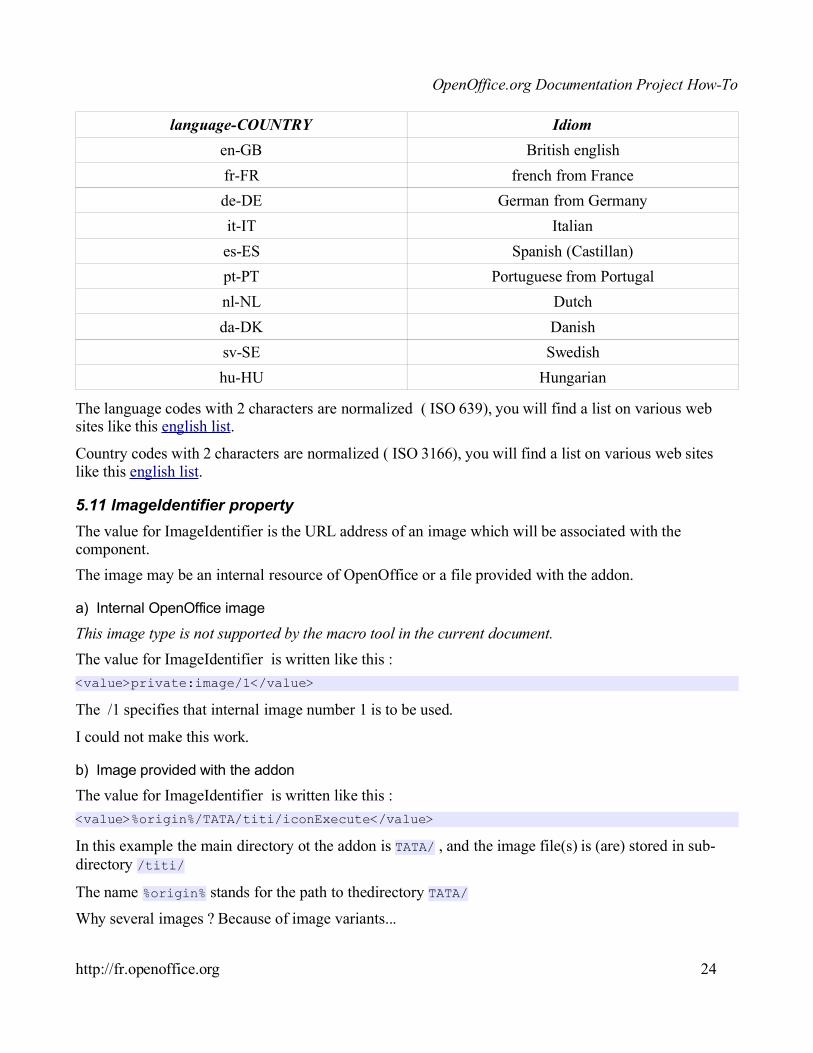
Here are some usual combinations of language-Country :
language-COUNTRY Idiom
en-US United States english
http://fr.openoffice.org 23
OpenOffice.org Documentation Project How-To
language-COUNTRY Idiom
en-GB British english
fr-FR french from France
de-DE German from Germany
it-IT Italian
es-ES Spanish (Castillan)
pt-PT Portuguese from Portugal
nl-NL Dutch
da-DK Danish
sv-SE Swedish
hu-HU Hungarian
The language codes with 2 characters are normalized ( ISO 639), you will find a list on various websites like this english list.
Country codes with 2 characters are normalized ( ISO 3166), you will find a list on various web siteslike this english list.
5.11 ImageIdentifier property
The value for ImageIdentifier is the URL address of an image which will be associated with thecomponent.
The image may be an internal resource of OpenOffice or a file provided with the addon.
a) Internal OpenOffice image
This image type is not supported by the macro tool in the current document.
The value for ImageIdentifier is written like this :
<value>private:image/1</value>
The /1 specifies that internal image number 1 is to be used.
I could not make this work.
b) Image provided with the addon
The value for ImageIdentifier is written like this :
<value>%origin%/TATA/titi/iconExecute</value>
In this example the main directory ot the addon is TATA/ , and the image file(s) is (are) stored in sub-directory /titi/
The name %origin% stands for the path to thedirectory TATA/
Why several images ? Because of image variants...
http://fr.openoffice.org 24
OpenOffice.org Documentation Project How-To
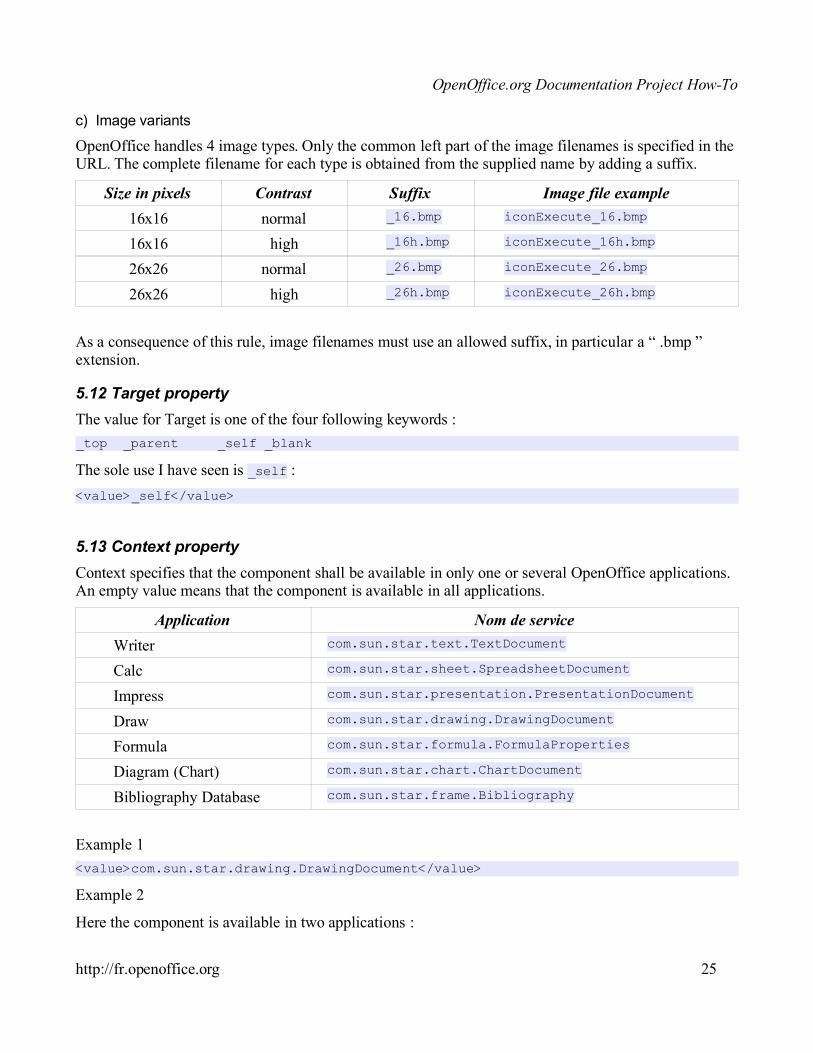
c) Image variants
OpenOffice handles 4 image types. Only the common left part of the image filenames is specified in theURL. The complete filename for each type is obtained from the supplied name by adding a suffix.
Size in pixels Contrast Suffix Image file example
16x16 normal _16.bmp iconExecute_16.bmp
16x16 high _16h.bmp iconExecute_16h.bmp
26x26 normal _26.bmp iconExecute_26.bmp
26x26 high _26h.bmp iconExecute_26h.bmp
As a consequence of this rule, image filenames must use an allowed suffix, in particular a “ .bmp ”extension.
5.12 Target property
The value for Target is one of the four following keywords :
_top _parent _self _blank
The sole use I have seen is _self :
<value>_self</value>
5.13 Context property
Context specifies that the component shall be available in only one or several OpenOffice applications.An empty value means that the component is available in all applications.
Application Nom de service
Writer com.sun.star.text.TextDocument
Calc com.sun.star.sheet.SpreadsheetDocument
Impress com.sun.star.presentation.PresentationDocument
Draw com.sun.star.drawing.DrawingDocument
Formula com.sun.star.formula.FormulaProperties
Diagram (Chart) com.sun.star.chart.ChartDocument
Bibliography Database com.sun.star.frame.Bibliography
Example 1
<value>com.sun.star.drawing.DrawingDocument</value>
Example 2
Here the component is available in two applications :
http://fr.openoffice.org 25
OpenOffice.org Documentation Project How-To
<value>com.sun.star.drawing.DrawingDocument,com.sun.star.presentation.PresentationDocument</value>
Example 3
Here the component is available in any application :
<value/>
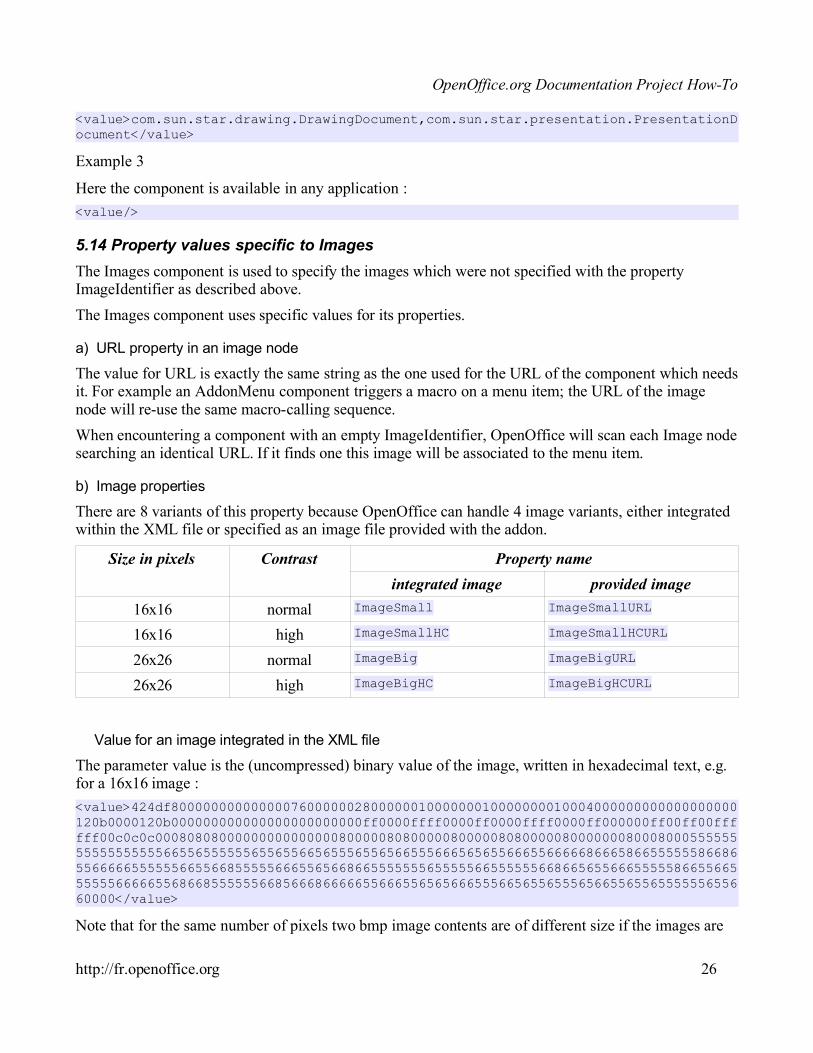
5.14 Property values specific to Images
The Images component is used to specify the images which were not specified with the propertyImageIdentifier as described above.
The Images component uses specific values for its properties.
a) URL property in an image node
The value for URL is exactly the same string as the one used for the URL of the component which needsit. For example an AddonMenu component triggers a macro on a menu item; the URL of the imagenode will re-use the same macro-calling sequence.
When encountering a component with an empty ImageIdentifier, OpenOffice will scan each Image nodesearching an identical URL. If it finds one this image will be associated to the menu item.
b) Image properties
There are 8 variants of this property because OpenOffice can handle 4 image variants, either integratedwithin the XML file or specified as an image file provided with the addon.
Size in pixels Contrast Property name
integrated image provided image
16x16 normal ImageSmall ImageSmallURL
16x16 high ImageSmallHC ImageSmallHCURL
26x26 normal ImageBig ImageBigURL
26x26 high ImageBigHC ImageBigHCURL
Value for an image integrated in the XML file
The parameter value is the (uncompressed) binary value of the image, written in hexadecimal text, e.g.for a 16x16 image :
<value>424df80000000000000076000000280000001000000010000000010004000000000000000000120b0000120b000000000000000000000000ff0000ffff0000ff0000ffff0000ff000000ff00ff00ffffff00c0c0c000808080000000000000008000008080000080000080800000800000008000800055555555555555555665565555556556556656555655656655566656565566655666668666586655555586686556666655555566556685555566655656686655555556555556655555566866565566655555866556655555566666556866855555566856668666665566655656566655566565565556566556556555555655660000</value>
Note that for the same number of pixels two bmp image contents are of different size if the images are
http://fr.openoffice.org 26

OpenOffice.org Documentation Project How-To
coded with different color depths (16 colors, 16 millions colors, etc).
Value for an image provided in the addon
The value is written like this :
<value>%origin%/TATA/titi/iconExecute.bmp</value>
In this example your files *.xlb *.xdl et *.xba are grouped in a directory, e.g. TATA/ , and the image fileis stored in sub-directory /titi/
The name %origin% stands for the path to the directory TATA/
http://fr.openoffice.org 27

OpenOffice.org Documentation Project How-To
6 Credits Author : Bernard Marcelly
Thanks to : Laurent Godard for his tips and help, especially for addon zipping.
Integrated by :
Last modified: November, 19, 2003
Contacts : OpenOffice.org Documentation project http://fr.openoffice.org
Translation : Bernard Marcelly - November, 18, 2003
http://fr.openoffice.org 28

OpenOffice.org Documentation Project How-To
7 Licences
7.1 Documentation
Appendix
Public Documentation License Notice
The contents of this Documentation are subject to the Public Documentation License Version 1.0 (the"License"); you may only use this Documentation if you comply with the terms of this License. A copy of theLicense is available at http://www.openoffice.org/licenses/PDL.html. The Original Documentation is : Commentdiffuser vos macros avec un AddonThe Initial Writer of the Original Documentation is Bernard MarcellyCopyright (C) 2003. All Rights Reserved. (Initial Writer contact(s): [email protected] )
Contributor(s): ______________________________________. Portions created by ______ are Copyright (C)_________[Insert year(s)]. All Rights Reserved. (Contributor contact(s):________________[Insert hyperlink/alias]).
NOTE: The text of this Appendix may differ slightly from the text of the notices in the files of the OriginalDocumentation. You should use the text of this Appendix rather than the text found in the Original Documentation forYour Modifications.
7.2 Macro libraries
General information on LGPL is available on this Web site.
The standard library included in this document is a tool which produces files for an OpenOffice.orgAdd-on. Copyright (C) 2003 Bernard Marcelly
This library is free software; you can redistribute it and/or modify it under the terms of the GNU LesserGeneral Public License as published by the Free Software Foundation; either version 2.1 of the License,or (at your option) any later version.
This library is distributed in the hope that it will be useful,but WITHOUT ANY WARRANTY; withouteven the implied warranty of MERCHANTABILITY or FITNESS FOR A PARTICULAR PURPOSE.See the GNU Lesser General Public License for more details.
You should have received a copy of the GNU Lesser General Public License along with this library; ifnot, write to the Free Software Foundation, Inc., 59 Temple Place, Suite 330, Boston, MA 02111-1307USA
http://fr.openoffice.org 29