how to defrag your files in autodesk inventor -...
TRANSCRIPT

[email protected] www.imaginit.com800.356.9050
TECHNICAL WHITEPAPER
How to Defrag your Files in Autodesk Inventor
IntroductionHow often do you perform a defragmentation on your CAD workstation? Once a day, week, month, year...ever? For the sake of your job production, I hope it’s at least once a month. How about your home PC? Performing a defragmentation or defrag for short, scans and finds all the fragments of your program data scattered around your HD and reorganizes them into nice compact sections thus making your computer run that much faster since it no longer has to scan all over the place looking for these little fragments to run your slot machine game. It’s the very same deal for your CAD files. Have you ever been working in a CAD file that has gone through numerous design changes and then begin to notice it’s acting really weird or really slow and then it begins to work fine again, only to act up later? This is usually a very good sign your CAD file is scattered or “fragmented” all over the disk.
This paper will show you how to perform a defrag on your Autodesk Inventor CAD files, but that’s only half of the equation. Since the word defrag is on your mind, perform a defrag on your machine ASAP, now if you can. Then come back and continue with this paper, we’ll wait… (Cue cheesy elevator music).
ReasonWorking day in, day out on CAD files or any other type of electronic file for that matter, making changes, additions, deletions, save file operations, etc., all cause bits and pieces of the file to be scattered around the computer’s HD. The more this file is modified, the more it becomes fragmented. The effects are usually seen in larger, more complex files, whether they are Part, Assembly, Drawing, or even Animation files in Inventor. Most will simply shrug it off and blame the application or the hardware and some will even use it as an excuse to take a break and do less work.
Inventor, like most CAD programs are history based, all those design iterations, even if deleted, still remain in the memory to some extent. Us old time CAD jockeys recall the days when we had to manually select Regenerate Graphics and then sit back and watch the program go through every command used for that file, with some CAD programs, that included every zoom, rotate or pan, etc., with every command you put in sometimes taking hours to complete. As a matter of fact, I recall back in the early 90’s while using CADDS5i on an Insta-View, we would have to schedule our work day where we would perform an Open File with Regen Graphics as we left the office at 4:30 PM and be thankful when we showed up at 7:00am the next morning if the file was done regenerating its graphics, but I digress. So let’s look into the process of keeping your CAD files nice and clean and acting the way they should.
Table of Contents
■ Introduction
■ Reason
■ Solution(s)
■ Conclusion
■ About the Author: James “Jim” O’Flaherty
Solution(s)Are you aware of Inventor’s Task Scheduler application? Task Scheduler has been offered in Inventor since Release 10. There are a number of uses for the application but we are going to focus on its Migration task. The Migration task will take the file in question, run it through the cleanup and compact options you select (I recommend selecting the ones shown here), and save your file.
Step 1Save and close all files you may have open in Inventor.
Step 2 Close down the Inventor application.
How to Defrag your Files in Autodesk Inventor 2
[email protected] www.imaginit.com800.356.9050
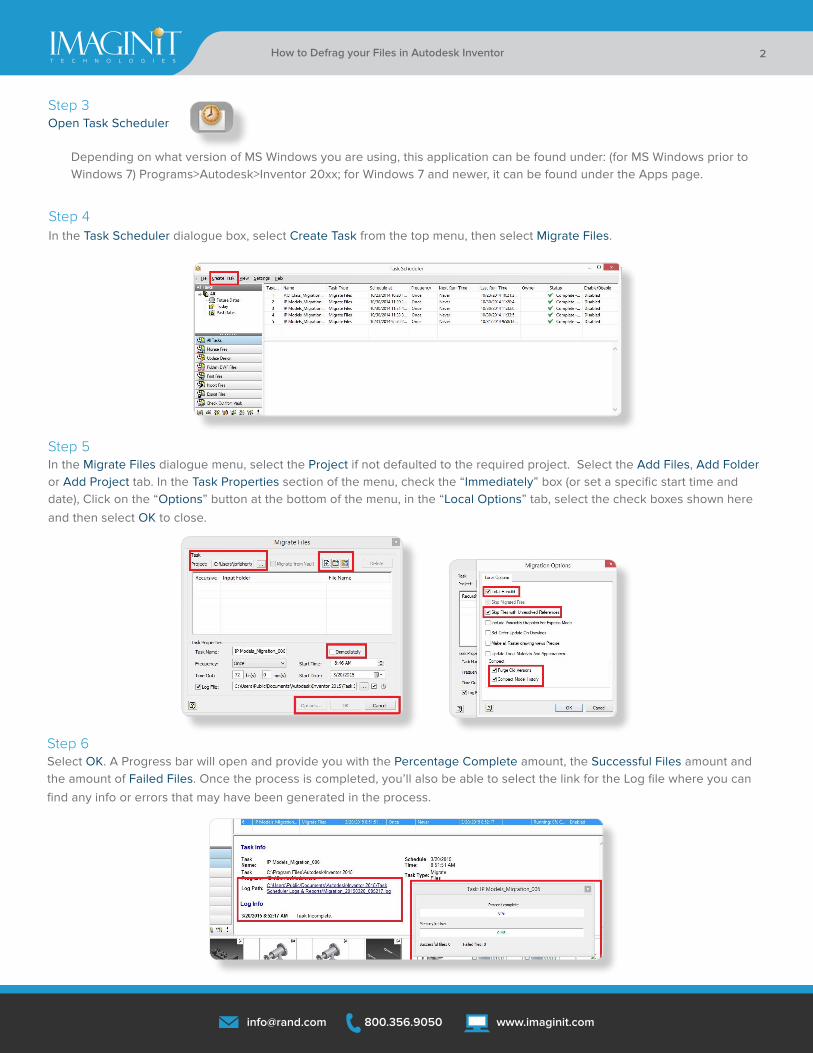
Step 4In the Task Scheduler dialogue box, select Create Task from the top menu, then select Migrate Files.
Step 5In the Migrate Files dialogue menu, select the Project if not defaulted to the required project. Select the Add Files, Add Folder or Add Project tab. In the Task Properties section of the menu, check the “Immediately” box (or set a specific start time and date), Click on the “Options” button at the bottom of the menu, in the “Local Options” tab, select the check boxes shown here and then select OK to close.
Step 3 Open Task Scheduler
Depending on what version of MS Windows you are using, this application can be found under: (for MS Windows prior to Windows 7) Programs>Autodesk>Inventor 20xx; for Windows 7 and newer, it can be found under the Apps page.
Step 6Select OK. A Progress bar will open and provide you with the Percentage Complete amount, the Successful Files amount and the amount of Failed Files. Once the process is completed, you’ll also be able to select the link for the Log file where you can find any info or errors that may have been generated in the process.

3
[email protected] www.imaginit.com800.356.9050
About IMAGINiT TechnologiesIMAGINiT Technologies, a Rand Worldwide Company, is the world’s largest provider of enterprise solutions to the engineering community, including the building, manufacturing, civil and mapping industries. With over 25 years of experience, and 45 offices throughout North America, we provide the expertise, training and support to help companies realize the full power of design technology, maximize ROI and gain competitive advantage.
IMAGINiT is a leading provider of Autodesk software solutions and the largest North American Autodesk Authorized Training Center (ATC) partner. All of our locations are supported by a vast pool of engineering resources focused on developing real-life business solutions for their local clients.
How to Defrag your Files in Autodesk Inventor
Step 7Start Inventor and open the file as you would normally and continue working. You should notice the file acting and responding much better. It has been purged of all the “junk” that was bogging it down prior to the defrag.
Step 8 (Optional)Back in Step 5, you had the option to start the process immediately or schedule a start time. This allows you to run this process on any File, Folder or Project during off-hours if you choose. You can also clear out the temp files created by Inventor (refer to the folder location specified in your Application Options>File>Undo path) and do a defrag on your workstation.
ConclusionIt is always a best practice to keep your files as clean and organized as possible, everybody wins by doing such. It is basic, good housekeeping for your CAD files. Defrag your drive, defrag your CAD files. It all boils down to performance. When your files are clean and organized, errors will be minimized as well as reaction times for each and every command you perform in the file, making you and everyone else more productive.
Step 8 is an ideal option to make sure all your files are kept as clean and organized as possible. I’d even go as far as suggesting setting up this task to run on a regular basis, say every night, run the process on any of the files you worked on that day, or on the entire folder, maybe even the entire Project. Just make sure it doesn’t interfere with scheduled backups, etc., and note that if any user happens to leave a file open, you will get an error that such file could not be processed for that reason. I would consider doing this process once a week on the entire folder, say on a Friday night when you know no one is working on the files. Again, depending on folder size, this could be a long process, be sure there’s enough time allowed to complete the process before a scheduled backup is run. Always inform co-workers of this scheduled process so that they are aware of it as well and they know not to have the files open or attempt to perform work duties on these files during this time frame.
About the Author: James “Jim” O’Flaherty – Manufacturing Applications ExpertJim has more than 35 years in the Mechanical Design field covering industries of Automotive, Power Generation, Industrial, Consumer Goods, Avionics and Hazardous Waste removal. He has been certified on Autodesk’s Inventor since Release 3 and was one of the early adapters of Autodesk’s Vault WorkGroup. Jim was awarded Autodesk’s Expert Elite status in 2014, he is an Autodesk Inventor 2014 Certified Professional and an Autodesk Certified Instructor.