hotel management system standard version guide · · 2012-09-16hotel management system standard...
TRANSCRIPT

Hotel Management System
Standard Version Guide
1
2
1 How to login ..................................................................................................3 2 How to set up a room type ............................................................................4 3 How to set up a room rate.............................................................................9 4 How to manage all rooms/beds of your hotel ..............................................14 5 How to manage your guests .......................................................................17 6 How to make a reservation .........................................................................20 7 How to sell your services ............................................................................30 8 How to manage your users and their permissions ......................................38

1 How to login
If you first start your system, you can use the default administrator to login it. Its password is empty, as the figure 1 shows, you can just click Login button to login your system and get all permissions:
Figure 1 Login as Admin
If you are a staff member of this hotel, you can login with your user name and password. Of course, you should ensure that you already are allowed login this system. If you want to add some users, please refer to Chapter 8.
3

2 How to set up a room type
After you login this system, your first thing is to set up all room types of this hotel. Come on, you can follow these simple steps to set up your room types:
Step 1) Go to Room Types section
Go to the Room Type section, as figure 2 shows:
Figure 2 Go to Room Types section
Step 2) Click Add button
Click the Add button to open the Add RoomType dialog, as figure 3 shows:
4

5
Figure 3 Click Add button
Step 3) Enter All Fields
You can enter all fields in the Add RoomType dialog, as figure 4 shows:
Figure 4 Enter All Fields
There is no default bed type in your system, if you want to add some bed types, you can click the button after the Bed Type editbox, as figure 5 shows:
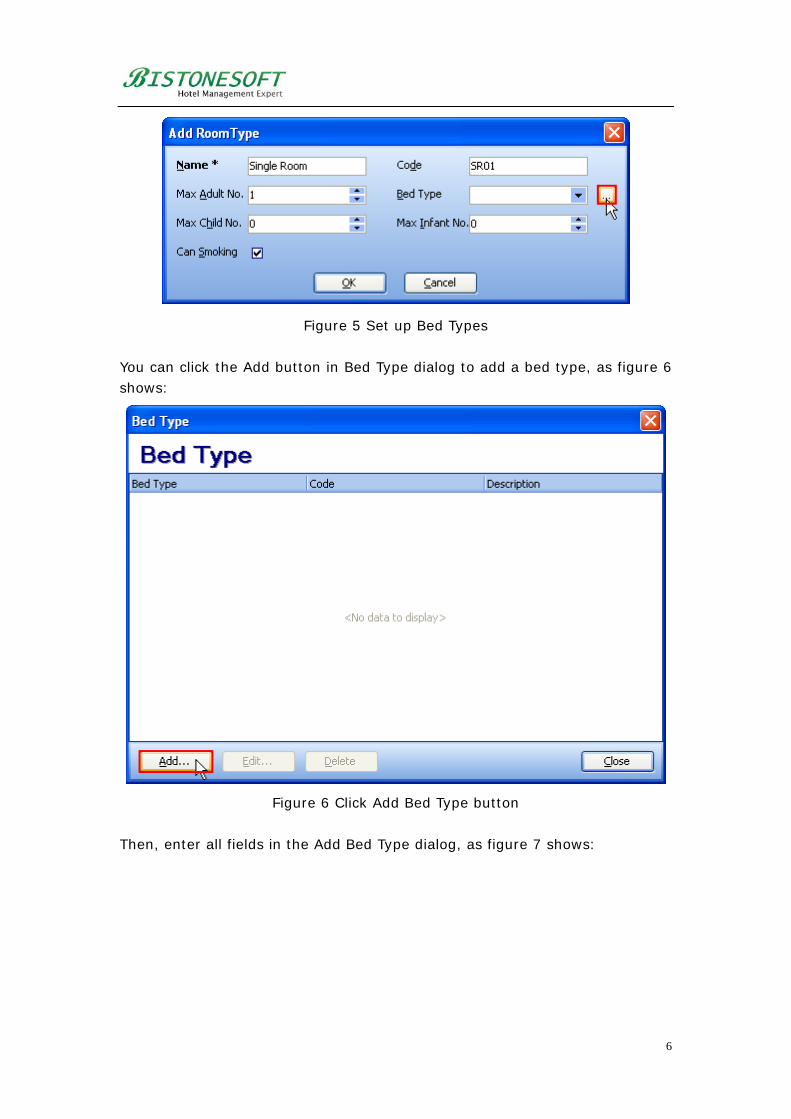
Figure 5 Set up Bed Types You can click the Add button in Bed Type dialog to add a bed type, as figure 6 shows:
Figure 6 Click Add Bed Type button Then, enter all fields in the Add Bed Type dialog, as figure 7 shows:
6
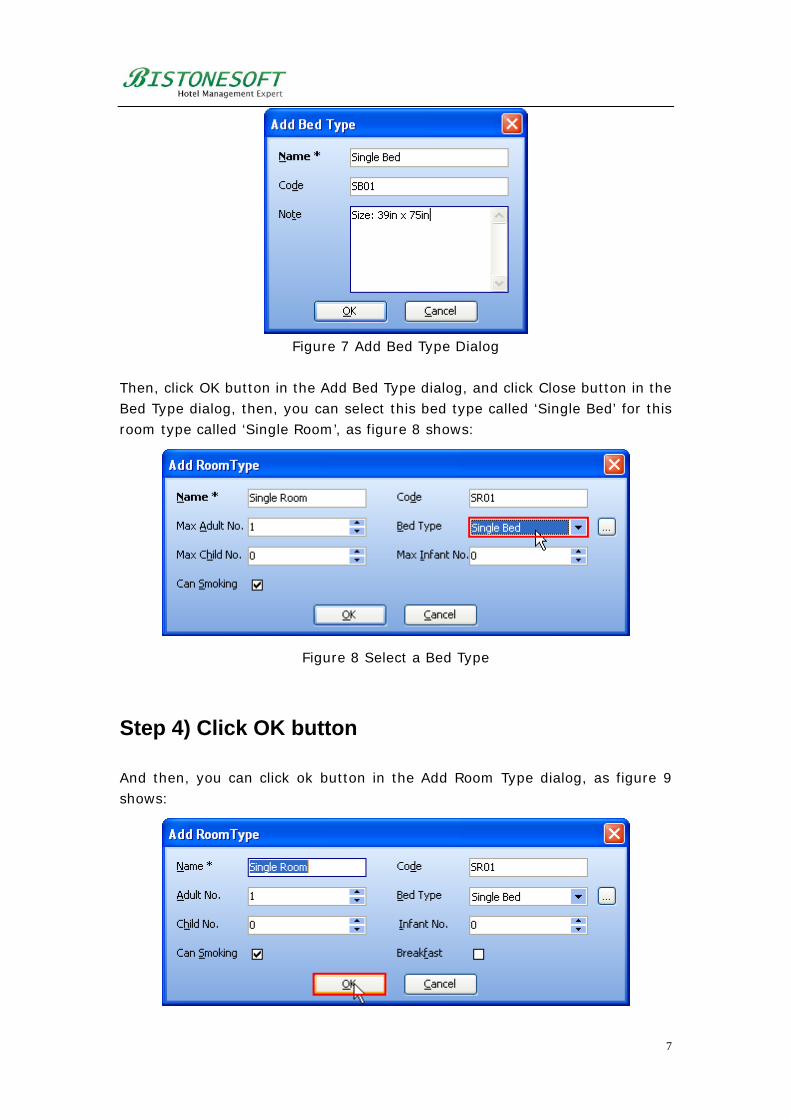
Figure 7 Add Bed Type Dialog
Then, click OK button in the Add Bed Type dialog, and click Close button in the Bed Type dialog, then, you can select this bed type called ‘Single Bed’ for this room type called ‘Single Room’, as figure 8 shows:
Figure 8 Select a Bed Type
Step 4) Click OK button
And then, you can click ok button in the Add Room Type dialog, as figure 9 shows:
7

Figure 9 Click Ok button in Add RoomType Dialog
Then, You can find the following dialog, you can click its OK button to setup the RACK rate of your room type:
Figure 10 Setup RACK Rate Now
When you click the OK button on the RACK rate confirmation dialog, you can get the following dialog:
Figure 11 Edit Rate Plan Dialog
You can enter the Rack Rate of your room type, as the following figure shows:
Figure 12 Enter Rack Rate Value
Then, you can click the OK button, and please wait a while, because your this action is generating rate data of one year (From 2012-09-04 To 2013-09-04). Look, The room type called ‘Single Room’ has been added to the system, you
8

can find it in the room type list, as figure 13 shows:
Figure 13 Room Type List
You can click the Edit button to modify your room type, or click the Delete button to delete the selected room type.
9

3 How to set up a room rate
After setting up room types, we should set up some room rate for these room types. If not, you can not make a reservation. So, if you want to set up some room rates, please follow these simple steps:
Step 1) Go to Room Rates section
Go to Room Rates section, as figure 14 shows:
Figure 14 Room Rates section
Step 2) Right-Click a room type
Right-Click the room type called ‘Single Room’, and then select Add Room Rate Description, as figure 15 shows:
10

11
Figure 15 Select Add Room Rate Description
Step 3) Enter All Fields
Enter all fields in the Add Room Rate dialog, as figure 16 shows:
Figure 16 Enter All Fields
Step 4) Select a room rate
Click OK button in the Add Room Rate dialog, and then select this Room Rate

called ‘Rack Rate’, as figure 17 shows:
Figure 17 Select a room rate
Step 5) Click Edit Rate Button
Click Edit Rate button in the Rate Plan panel, as figure 18 shows:
12

13
Figure 18 Click Edit Rate Button
Step 6) Enter All Fields
Enter all fields in the Edit Rate Plan dialog, as figure 19 shows:
Figure 19 Enter All Fields
From Begin Date to End Date, every Sunday, Monday, Tuesday, Wednesday, Thursday, Friday, Saturday, this room rate is $95. Of course, if you want to set up the room rate of every weekend, you can set up it as figure 20 shows:

Figure 20 Every Weekend Rate
Look, you can see all rates of this rack rate in the rate plan panel, as figure 21 shows:
Figure 21 All Rates in Rate Plan Panel
14

4 How to manage all rooms/beds of your hotel
If you want to manage all rooms or beds of your hotel, please follow these simple steps:
Step 1) Go to Rooms/Beds section
Go to Rooms/Beds section, as figure 22 shows:
Figure 22 Go To Rooms/Beds Section
Step 2) Click Add button
Click the Add button in the Room/Bed panel, as figure 23 shows:
15

16
Figure 23 Click Add Button in Boom/Bed Panel
Step 3) Enter All Fields
Enter all fields in the Add Room dialog, as figure 24 shows:
Figure 24 Enter All Fields in Add Room Dialog
Of course, if you want to add a bed of a 6-bed room, you can enter them as figure 25 shows:

Figure 25 Enter All Fields in Add Bed Dialog
OK, you can see all rooms/beds of your hotel in the room/bed panel, as figure 26 shows:
Figure 26 Room/Bed Panel
You can click Edit button to modify your room or bed, and you can click Delete button to delete the selected room or bed.
17

5 How to manage your guests
OK, when a guest want to reserve your room or bed, you can collect his/her information, and then, follow these simple steps to manage them:
Step 1) Go to Guests Section
Go to Guests section, as figure 27 shows:
Figure 27 Go To Guests Section
Step 2) Click Add Button
Click Add button in the guests panel, as figure 28 shows:
18

19
Figure 28 Click Add button
Step 3) Enter All Fields

Figure 29 Enter All Fields
And then, click OK button in the Add Guest dialog, look, you can see all guests of your hotel in the guests panel, as figure 30 shows:
Figure 30 Guest List
20

6 How to make a reservation
OK, we have added some room types, room rates, rooms or beds and guests. Now, we can follow these simple steps to make a reservation:
Step 1) Go to Reservations section
Go to Reservations section, as figure 31 shows:
Figure 31 Go to Reservations Section
Step 2) Click Add Button
Click add button in the reservations panel, as figure 32 shows:
21

22
Figure 32 Click Add Button
Step 3) Click Room Button
Click the button after the Room EditBox, as figure 33 shows:

23
Figure 33 Click Room Button
Step 4) Select A Room
Select a room in the ‘Select a room’ dialog, as figure 34 shows:

24
Figure 34 Select A Room Dialog And then, click OK button in the Select a room dialog, the room is filled into the reservation automatically, as figure 35 shows:
Figure 35 Fill Room Details

Step 5) Click Guest Button
Click the button after the Guest Name EditBox, as figure 36 shows:
Figure 36 Click Guest Button
Step 6) Select A Guest
Select a guest in the Select a guest dialog, as figure 37 shows:
25

Figure 37 Select a guest Dialog And then, click OK button in the select a guest dialog, the guest filled into this reservation automatically, as figure 38 shows:
Figure 38 Fill Guest Information
26
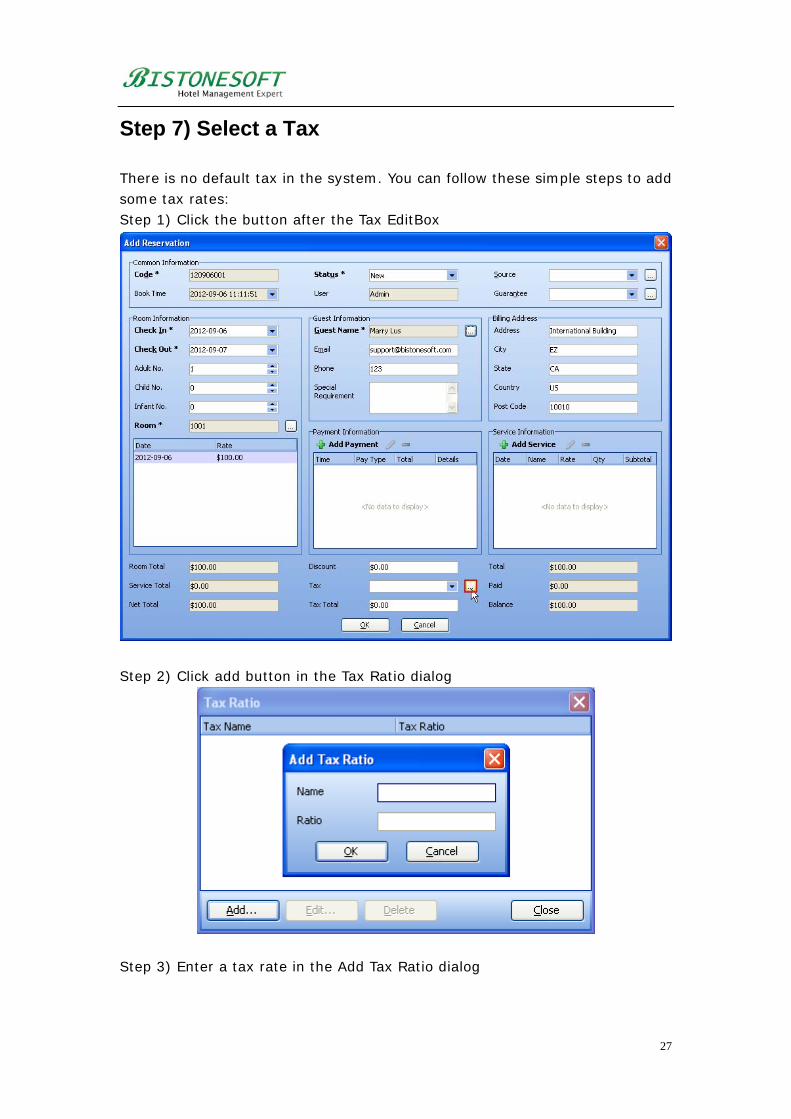
Step 7) Select a Tax
There is no default tax in the system. You can follow these simple steps to add some tax rates: Step 1) Click the button after the Tax EditBox
Step 2) Click add button in the Tax Ratio dialog
Step 3) Enter a tax rate in the Add Tax Ratio dialog
27

And then, you can select a tax rate, as figure 39 shows:
Figure 39 Select a Tax Ratio
And then, you can click ok button to make a reservation, look, you can see this reservation in the reservation list, as figure 40 shows:
28

29
Figure 40 Reservation List
Ok, you can click Edit button to modify this reservation, or click Delete button to delete this reservation.
Step 8) Go to Room/Bed Search Center
You can go to Room/Bed Search Center section to see the rooms/beds occupancy status of your hotel, as figure 41 shows:

30
Figure 41 Room/Bed Search Center

7 How to sell your services
If your hotel has some services like swimming pools, restaurants and so on, you can add these services into the system, and then you can sell them. Please follow these simple steps to sell your services:
Step 1) Go to Services Section
Go to services section, as figure 42 shows:
Figure 42 Go To Services Section
Step 2) Click Add Button
Click add button in the services panel, as figure 43 shows:
31

32
Figure 43 Click Add Button
Step 3) Enter All Fields
Enter all fields in the Add Service dialog, as figure 44 shows:
Figure 44 Enter All Fields And then, click OK button in the Add Service dialog, the service called ‘swimming’ has been added into the system, as figure 45 shows:

33
Figure 45 Service List
Step 4) Go to Reservations Section
Go to Reservations section, and select a reservation, as figure 46 shows:

34
Figure 46 Reservation List
Step 5) Click Edit Button
Click Edit button in the reservations panel, as figure 47 shows:

35
Figure 47 Click Edit Button
Step 6) Click Add Button
Click add button in the Service Information panel, as figure 48 shows:

36
Figure 48 Click Add Service Button
Step 7) Click Service Button
Click the button after the Name EditBox in the Add Service dialog, as figure 49 shows:
Figure 49 Click Service Button

Step 8) Select a Service
Select a service in the Select a Service dialog, as figure 50 shows:
Figure 50 Select a Service Ok, the service information has been filled into the Add Service dialog automatically, as figure 51 shows:
Figure 51 Automatically Fill
You can modify its rate or its quantity, then, please click OK button, and then, you can see the rate of this service has been added into the service total and the total amount, as figure 52 shows:
37

38
Figure 52 Service Total
Ok, you already sold your service called ‘Swimming’!

8 How to manage your users and their permissions
There is no user-number limit in our system. You can add many users as you want. Now, please follow these simple steps to manage your users and their permissions:
Step 1) Go to Staff Management Section
Go to Staff Management section, as figure 53 shows:
Figure 53 Go to Staff Management System
Step 2) Click Add Button
Click Add button in the staffs panel, as figure 54 shows:
39

40
Figure 54 Click Add Button
Step 3) Enter All Fields
Enter all fields in the Add Staff dialog, as figure 55 shows:
Figure 55 Enter All Fields
Then, click ok button, the user called ‘Bistone Support’ has been added into the system, as figure 56 shows:

41
Figure 56 User List
Step 4) Go to Permissions Section
Go to Permissions section, as figure 57 shows:

42
Figure 57 Go To Permissions Section
Step 5) Click Add Button
Click Add button in the permissions panel, as figure 58 shows:
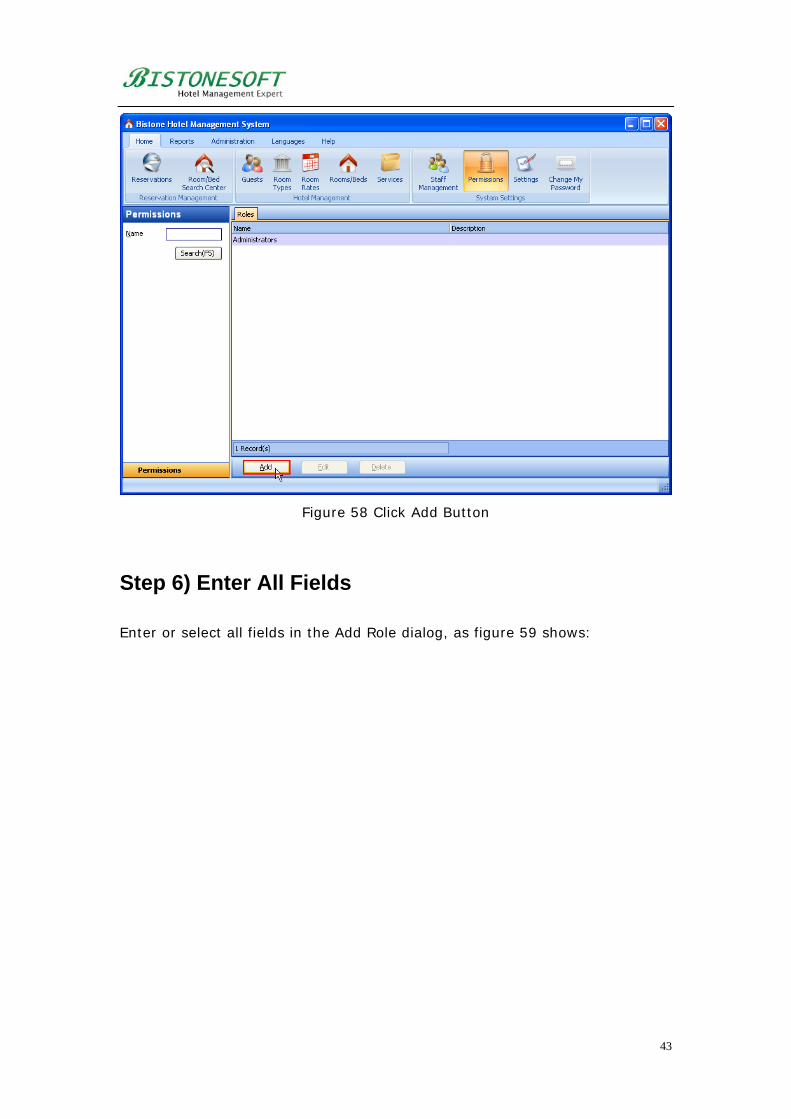
43
Figure 58 Click Add Button
Step 6) Enter All Fields
Enter or select all fields in the Add Role dialog, as figure 59 shows:
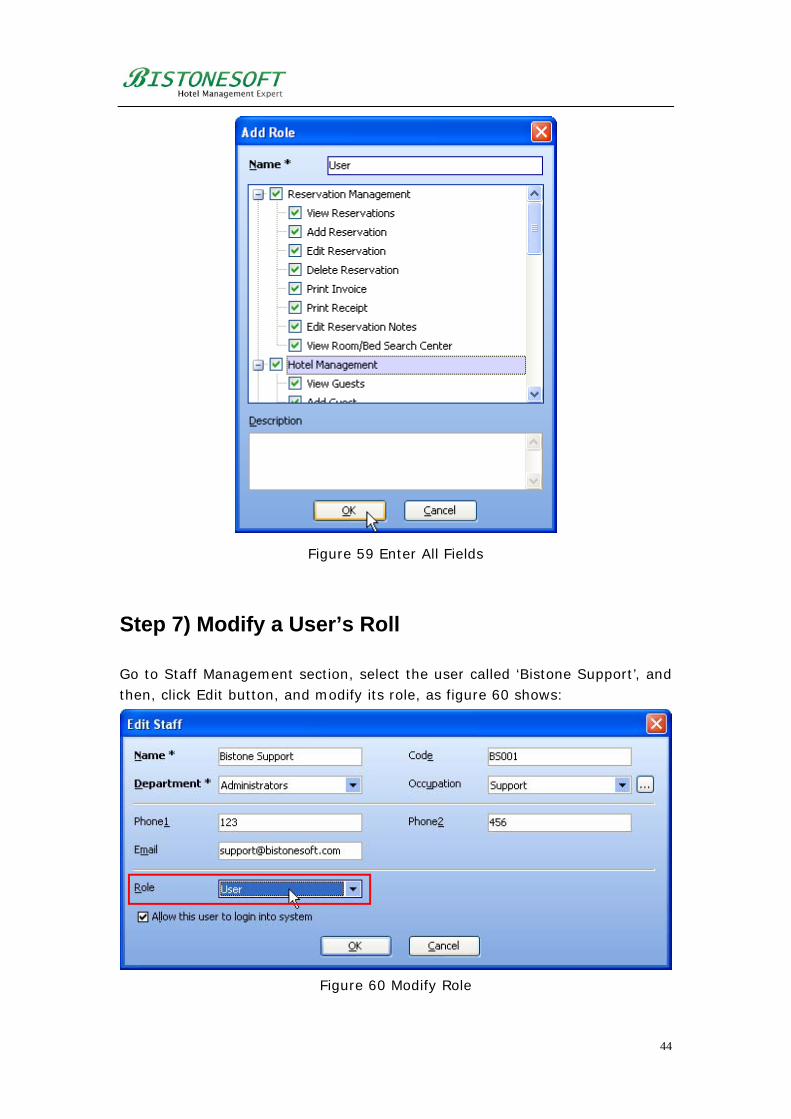
Figure 59 Enter All Fields
Step 7) Modify a User’s Roll
Go to Staff Management section, select the user called ‘Bistone Support’, and then, click Edit button, and modify its role, as figure 60 shows:
Figure 60 Modify Role
44

Ok, when you login system as Bistone Support, you can access several sections, as figure 61 shows:
Figure 61 User Role UI
45