hot point bs61 mk2
DESCRIPTION
Hot Point BS61 MK2TRANSCRIPT
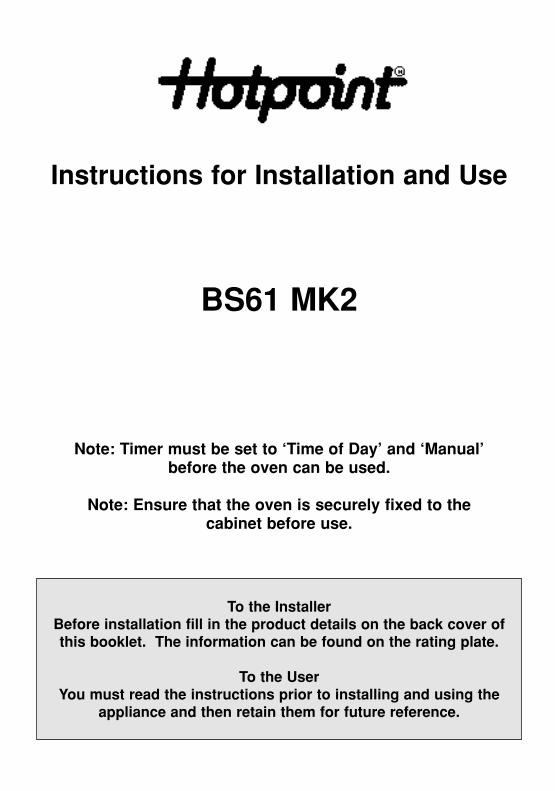
Instructions for Installation and Use
BS61 MK2
To the InstallerBefore installation fill in the product details on the back cover ofthis booklet. The information can be found on the rating plate.
To the UserYou must read the instructions prior to installing and using the
appliance and then retain them for future reference.
Note: Timer must be set to ‘Time of Day’ and ‘Manual’before the oven can be used.
Note: Ensure that the oven is securely fixed to thecabinet before use.
Oven Timer Operation 9-14Grill 15
Using The Oven For Other Functions 23-24
Service Back Cover
Temperature Conversion Scale 25Oven Temperature Charts 26-27Cooking Results Not Satisfactory 28Care And Cleaning 29-32Installation Instructions 33-37Something Wrong 38
Guide To Grilling Successfully 16Using The Oven For Fan Cooking 17-21Fan Grilling Roasting Chart 22
2
CONTENTS
Introduction 3For Your Safety – Always 4For Your Safety – Never 5
Features 6Control Panel 7-8
This appliance conforms to the following EEC Directives:
Low Voltage Equipment73/23/EEC93/68/EEC
Electromagnetic Compatibility89/336/EEC92/31/EEC 93/68/EEC
INTRODUCTION
Your new cooker is guaranteed* and will give lasting service. This guarantee is only applicable if the appliance has been installed in accordance with the installation instructions detailed in this booklet.
To help make best use of your cooking equipment, please read this booklet carefully.
The cooker is designed specifically for domestic use and responsibility will not be accepted for use in any other installation.
To help remove the 'new' smell, heat up the empty oven(s) to maximum for a minimum of two to three hours keeping the oven doors closed. Ensure that the room is well ventilated (e.g. open a window or use an extractor fan) and that persons who may be sensitive to the odour avoid any fumes. It is suggested that any pets be removed from the room until the smell has ceased.
This odour is due to any temporary finish on oven linings and elements and also any moisture absorbed by the insulation.
Note: When the cooker is first used, an odour may be emitted - this will cease after a short period of use
* The guarantee is subject to the provisions that the appliance:
(a) Has been used solely in accordance with the Users Instruction Book.(b) Has been properly connected to a suitable supply voltage as stated on
the rating plate attached to this equipment.(c) Has not been subjected to misuse or accident or been modified or
repaired by any person other than the authorised employee or agent.(d) Has been correctly installed.
3
DISPOSAL OF YOUR PRODUCTTo minimise the risk of injury to children please dispose of your product carefully and safely.Remove all doors and lids (where fitted). Remove the mains cable (where fitted) by cuttingoff flush with the appliance and always ensure that no plug is left in a condition where itcould be connected to the electricity supply.To help the environment, Local Authority instructions should be followed for the disposal ofyour product.
FOR YOUR SAFETY
When used properly, your appliance is completely safe but as with anyelectrical product there are certain precautions that must be observed.
PLEASE READ THE PRECAUTIONS BELOW BEFORE USING YOURAPPLIANCE.
ALWAYS
● Always make sure you remove all packaging and literature from inside the oven/grill compartment before switching on for the first time.
● Always make sure you understand the controls prior to using the appliance.● Always keep children away from the appliance when in use as the surfaces
will get extremely hot during and after cooking.● Always make sure all controls are turned off when you have finished cooking
and when not in use.● Always stand back when opening an oven door to allow any build up of steam
or heat to disperse.● Always use dry, good quality oven gloves when removing items from the
oven/grill.● Always take care to avoid heat/steam burns when operating the controls.● Always turn off the electricity supply at the wall switch before cleaning and
allow the appliance to cool.● Always make sure the shelves are in the correct position before switching on
the oven.● Always keep the oven/grill door closed when the appliance is not in use.● Always keep the appliance clean as a build up of grease or fat from cooking
can cause a fire.● Always follow the basic principles of food handling and hygiene to prevent
the possibility of bacterial growth.● Always keep ventilation slots clear of obstructions.● Always refer servicing to a qualified appliance service engineer.● Always during use the oven becomes hot. Care should be taken to avoid
touching heating elements in the oven.
SAFETY ADVICE
IN THE EVENT OF A CHIP PAN OR ANY OTHER PAN FIRE:
1. TURN OFF THE COOKER APPLIANCE AT THE WALL SWITCH.
2. COVER THE PAN WITH A FIRE BLANKET OR DAMP CLOTH, this will smother the flames and extinguish the fire.
3. LEAVE THE PAN TO COOL FOR AT LEAST 60 MINUTES BEFOREMOVING IT. Injuries are often caused by picking up a hot pan and rushing outside with it.NEVER USE A FIRE EXTINGUISHER TO PUT OUT A PAN FIRE as theforce of the extinguisher is likely to tip the pan over. Never use water toextinguish oil or fat fires.
4
FOR YOUR SAFETY
NEVER
● Never leave children unsupervised where a cooking appliance is installed as all cooking surfaces will be hot during and after use.
● Never allow anyone to sit or stand on any part of the appliance.● Never store items above the appliance that children may attempt to reach.● Never remove the oven shelves whilst the oven is hot.● Never heat up unopened food containers as pressure can build up causing the
container to burst.● Never store chemicals, food stuffs or pressurised containers in or on the
appliance, or in cabinets immediately above or next to the appliance.● Never operate the grill with the door closed as this may cause the appliance
to overheat.● Never use the appliance as a room heater.● Never use the grill to warm plates.● Never dry any items on the oven doors.● Never install the appliance next to curtains or other soft furnishings.● Never allow children to play with the oven controls.● Never line the shelves, floor or sides of the oven or grill with aluminium
foil as overheating and damage may result.
5
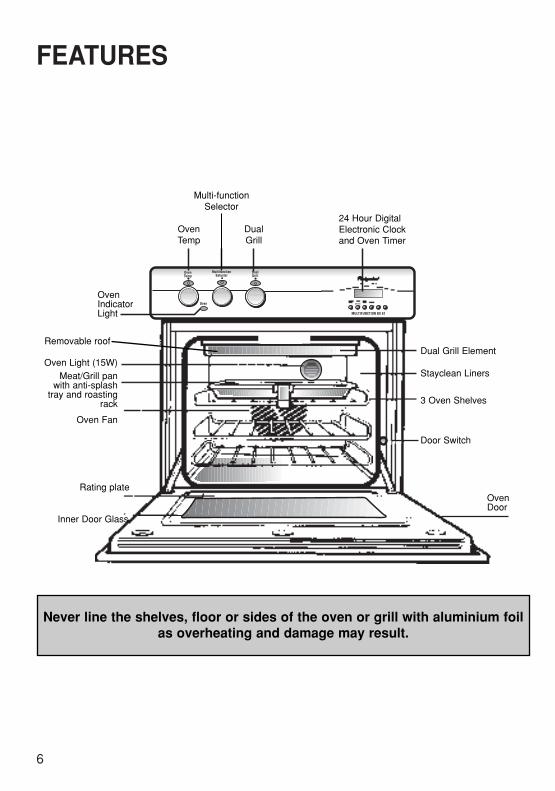
FEATURES
6
MULTIFUNCTION BS 61
period
DualGrill
MultifunctionSelector
OvenTemp
Oven
OvenTemp
DualGrill
Multi-functionSelector
Oven IndicatorLight
24 Hour DigitalElectronic Clockand Oven Timer
Dual Grill Element
Stayclean Liners
3 Oven Shelves
Door Switch
Oven Light (15W)Meat/Grill pan
with anti-splashtray and roasting
rack
Oven Fan
Rating plate
Inner Door Glass
OvenDoor
Removable roof
Never line the shelves, floor or sides of the oven or grill with aluminium foilas overheating and damage may result.
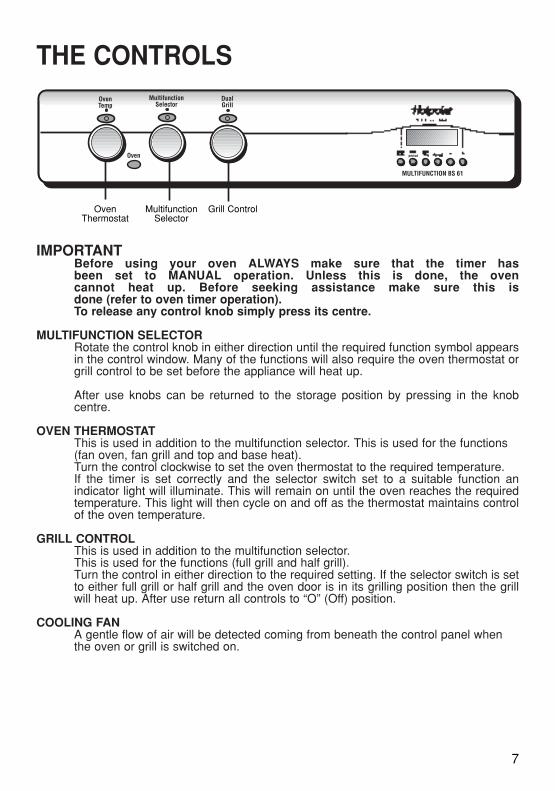
THE CONTROLS
IMPORTANTBefore using your oven ALWAYS make sure that the timer hasbeen set to MANUAL operation. Unless this is done, the ovencannot heat up. Before seeking assistance make sure this isdone (refer to oven timer operation).To release any control knob simply press its centre.
MULTIFUNCTION SELECTORRotate the control knob in either direction until the required function symbol appearsin the control window. Many of the functions will also require the oven thermostat orgrill control to be set before the appliance will heat up.
After use knobs can be returned to the storage position by pressing in the knobcentre.
OVEN THERMOSTATThis is used in addition to the multifunction selector. This is used for the functions (fan oven, fan grill and top and base heat).Turn the control clockwise to set the oven thermostat to the required temperature.If the timer is set correctly and the selector switch set to a suitable function anindicator light will illuminate. This will remain on until the oven reaches the requiredtemperature. This light will then cycle on and off as the thermostat maintains controlof the oven temperature.
GRILL CONTROLThis is used in addition to the multifunction selector.This is used for the functions (full grill and half grill).Turn the control in either direction to the required setting. If the selector switch is setto either full grill or half grill and the oven door is in its grilling position then the grillwill heat up. After use return all controls to “O” (Off) position.
COOLING FANA gentle flow of air will be detected coming from beneath the control panel when the oven or grill is switched on.
7
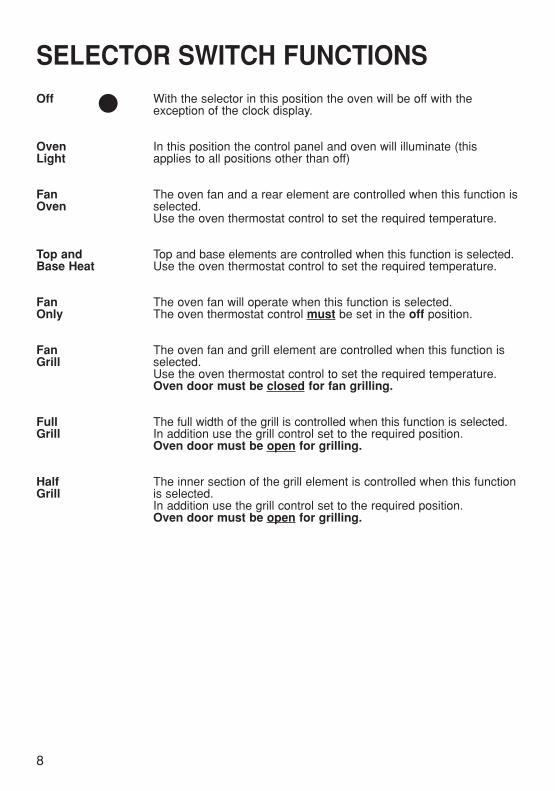
MULTIFUNCTION BS 61
period
DualGrill
MultifunctionSelector
OvenTemp
Oven
OvenThermostat
MultifunctionSelector
Grill Control
SELECTOR SWITCH FUNCTIONSOff With the selector in this position the oven will be off with the
exception of the clock display.
Oven In this position the control panel and oven will illuminate (this Light applies to all positions other than off)
Fan The oven fan and a rear element are controlled when this function isOven selected.
Use the oven thermostat control to set the required temperature.
Top and Top and base elements are controlled when this function is selected.Base Heat Use the oven thermostat control to set the required temperature.
Fan The oven fan will operate when this function is selected.Only The oven thermostat control must be set in the off position.
Fan The oven fan and grill element are controlled when this function isGrill selected.
Use the oven thermostat control to set the required temperature.Oven door must be closed for fan grilling.
Full The full width of the grill is controlled when this function is selected.Grill In addition use the grill control set to the required position.
Oven door must be open for grilling.
Half The inner section of the grill element is controlled when this function Grill is selected.
In addition use the grill control set to the required position.Oven door must be open for grilling.
8
OVEN TIMER OPERATION
AUTOMATIC COOKING
The Oven can be controlled by the Automatic Timer .
HINTS ON AUTOMATIC COOKING
1. Select foods which will require the same cooking time and temperature.2. To ensure food does not cool down and require reheating, set the end time so
the food is ready when you require it.3. Always ensure that meat and poultry is defrosted before placing in the oven.4. Whenever possible, take food out of the refrigerator and keep it as cool as
possible.5. If cooking food that requires frying before placing in the oven for automatic
cooking, keep the delay time to a minimum.6. Never place hot or warm food in the oven for delay start cooking as it could
cause the oven to be warm and produce harmful bacteria in the food.7. We advise that dishes containing left-over cooked poultry or meat, e.g.
Shepherd's Pie, should not be cooked automatically if there is to be a delayperiod.
8. Ensure that delay start times are kept to a minimum to prevent bacterial growth in food.
9. Wine or beer may ferment and cream may curdle during the delay period soit is best to add these ingredients just before serving.
10. Foods which discolour should be protected by coating in fat or tossing inwater to which lemon juice has been added, prior to placing food in the oven.
11. Dishes containing liquid should not be filled too full to prevent boiling over.12. Food should be well sealed (but not airtight) in a container to prevent the loss
of liquid during cooking. Aluminium foil gives a good seal.13. Always ensure that food is piping hot and cooked thoroughly before serving.14. Only reheat food once.
9
Note: Timer must be set to ‘Time of Day’ and ‘Manual’ before the oven can be used.
10
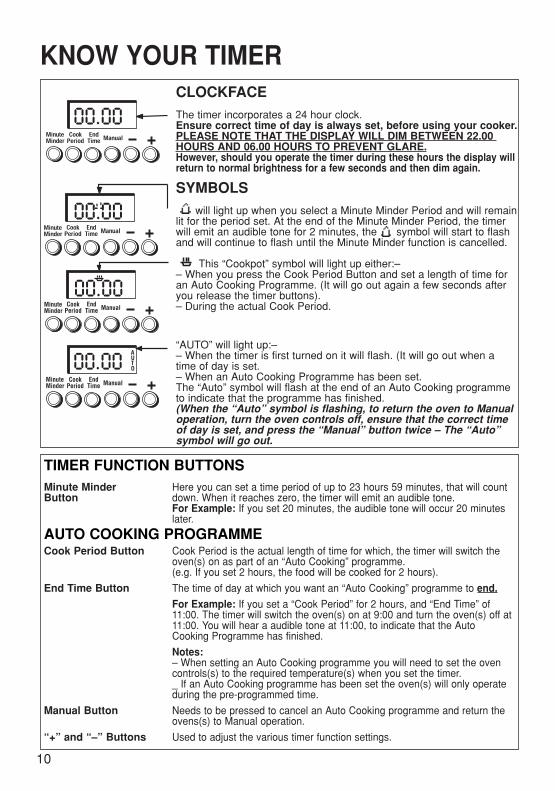
KNOW YOUR TIMER CLOCKFACE
The timer incorporates a 24 hour clock.Ensure correct time of day is always set, before using your cooker.PLEASE NOTE THAT THE DISPLAY WILL DIM BETWEEN 22.00 HOURS AND 06.00 HOURS TO PREVENT GLARE.However, should you operate the timer during these hours the display willreturn to normal brightness for a few seconds and then dim again.
SYMBOLS
will light up when you select a Minute Minder Period and will remain lit for the period set. At the end of the Minute Minder Period, the timerwill emit an audible tone for 2 minutes, the symbol will start to flashand will continue to flash until the Minute Minder function is cancelled.
This “Cookpot” symbol will light up either:–– When you press the Cook Period Button and set a length of time foran Auto Cooking Programme. (It will go out again a few seconds afteryou release the timer buttons). – During the actual Cook Period.
“AUTO” will light up:–– When the timer is first turned on it will flash. (It will go out when atime of day is set.– When an Auto Cooking Programme has been set.The “Auto” symbol will flash at the end of an Auto Cooking programmeto indicate that the programme has finished.(When the “Auto” symbol is flashing, to return the oven to Manual operation, turn the oven controls off, ensure that the correct timeof day is set, and press the “Manual” button twice – The “Auto” symbol will go out.
Here you can set a time period of up to 23 hours 59 minutes, that will countdown. When it reaches zero, the timer will emit an audible tone.For Example: If you set 20 minutes, the audible tone will occur 20 minuteslater.
Cook Period is the actual length of time for which, the timer will switch theoven(s) on as part of an “Auto Cooking” programme.(e.g. If you set 2 hours, the food will be cooked for 2 hours).
The time of day at which you want an “Auto Cooking” programme to end.
For Example: If you set a “Cook Period” for 2 hours, and “End Time” of11:00. The timer will switch the oven(s) on at 9:00 and turn the oven(s) off at11:00. You will hear a audible tone at 11:00, to indicate that the Auto Cooking Programme has finished.
Notes:– When setting an Auto Cooking programme you will need to set the ovencontrols(s) to the required temperature(s) when you set the timer._ If an Auto Cooking programme has been set the oven(s) will only operateduring the pre-programmed time.
Needs to be pressed to cancel an Auto Cooking programme and return theovens(s) to Manual operation.
Used to adjust the various timer function settings.
Minute MinderButton
Cook Period Button
End Time Button
Manual Button
“+” and “–” Buttons
MinuteMinder
CookPeriod
EndTime Manual
AUTO
AUTO
MinuteMinder
CookPeriod
EndTime Manual
TIMER FUNCTION BUTTONS
AUTO COOKING PROGRAMME
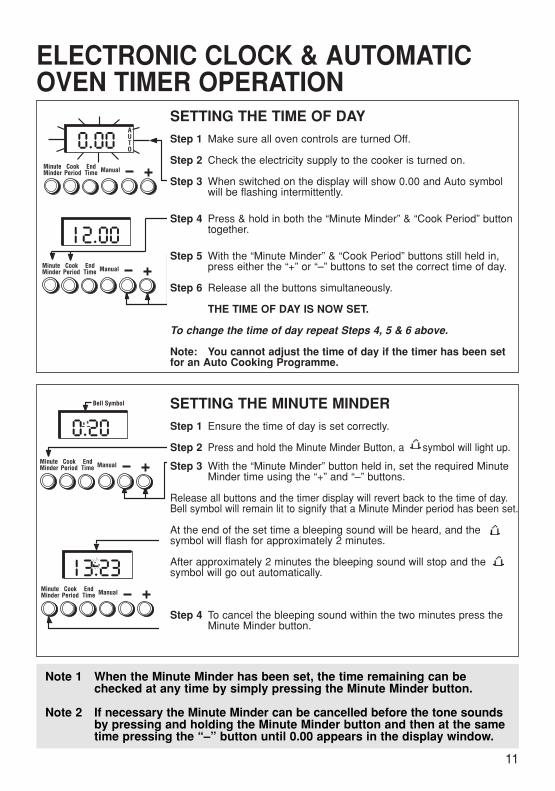
ELECTRONIC CLOCK & AUTOMATICOVEN TIMER OPERATION
11
SETTING THE TIME OF DAY
Step 1 Make sure all oven controls are turned Off.
Step 2 Check the electricity supply to the cooker is turned on.
Step 3 When switched on the display will show 0.00 and Auto symbolwill be flashing intermittently.
Step 4 Press & hold in both the “Minute Minder” & “Cook Period” buttontogether.
Step 5 With the “Minute Minder” & “Cook Period” buttons still held in, press either the “+” or “–” buttons to set the correct time of day.
Step 6 Release all the buttons simultaneously.
THE TIME OF DAY IS NOW SET.
To change the time of day repeat Steps 4, 5 & 6 above.
Note: You cannot adjust the time of day if the timer has been setfor an Auto Cooking Programme.
SETTING THE MINUTE MINDER
Step 1 Ensure the time of day is set correctly.
Step 2 Press and hold the Minute Minder Button, a symbol will light up.
Step 3 With the “Minute Minder” button held in, set the required Minute Minder time using the “+” and “–” buttons.
Release all buttons and the timer display will revert back to the time of day.Bell symbol will remain lit to signify that a Minute Minder period has been set.
At the end of the set time a bleeping sound will be heard, and the symbol will flash for approximately 2 minutes.
After approximately 2 minutes the bleeping sound will stop and the symbol will go out automatically.
Step 4 To cancel the bleeping sound within the two minutes press the Minute Minder button.
AUTO
MinuteMinder
CookPeriod
EndTime Manual
MinuteMinder
CookPeriod
EndTime Manual
Bell Symbol
MinuteMinder
CookPeriod
EndTime Manual
MinuteMinder
CookPeriod
EndTime Manual
Note 1 When the Minute Minder has been set, the time remaining can be checked at any time by simply pressing the Minute Minder button.
Note 2 If necessary the Minute Minder can be cancelled before the tone sounds by pressing and holding the Minute Minder button and then at the same time pressing the “–” button until 0.00 appears in the display window.
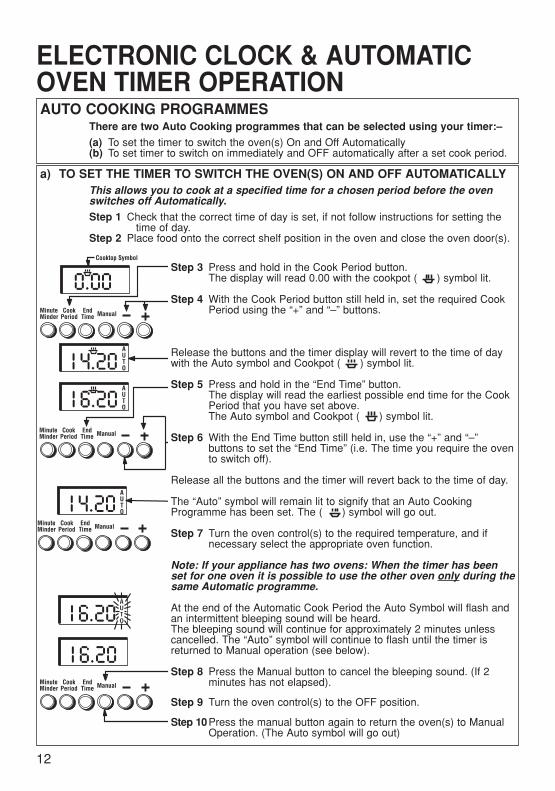
ELECTRONIC CLOCK & AUTOMATICOVEN TIMER OPERATION
12
Step 3 Press and hold in the Cook Period button.The display will read 0.00 with the cookpot ( ) symbol lit.
Step 4 With the Cook Period button still held in, set the required CookPeriod using the “+” and “–” buttons.
Release the buttons and the timer display will revert to the time of daywith the Auto symbol and Cookpot ( ) symbol lit.
Step 5 Press and hold in the “End Time” button.The display will read the earliest possible end time for the Cook Period that you have set above.The Auto symbol and Cookpot ( ) symbol lit.
Step 6 With the End Time button still held in, use the “+” and “–”buttons to set the “End Time” (i.e. The time you require the ovento switch off).
Release all the buttons and the timer will revert back to the time of day.
The “Auto” symbol will remain lit to signify that an Auto CookingProgramme has been set. The ( ) symbol will go out.
Step 7 Turn the oven control(s) to the required temperature, and if necessary select the appropriate oven function.
Note: If your appliance has two ovens: When the timer has beenset for one oven it is possible to use the other oven only during thesame Automatic programme.
At the end of the Automatic Cook Period the Auto Symbol will flash andan intermittent bleeping sound will be heard.The bleeping sound will continue for approximately 2 minutes unless cancelled. The “Auto” symbol will continue to flash until the timer isreturned to Manual operation (see below).
Step 8 Press the Manual button to cancel the bleeping sound. (If 2minutes has not elapsed).
Step 9 Turn the oven control(s) to the OFF position.
Step 10Press the manual button again to return the oven(s) to ManualOperation. (The Auto symbol will go out)
AUTO COOKING PROGRAMMESThere are two Auto Cooking programmes that can be selected using your timer:–
(a) To set the timer to switch the oven(s) On and Off Automatically(b) To set timer to switch on immediately and OFF automatically after a set cook period.
a) TO SET THE TIMER TO SWITCH THE OVEN(S) ON AND OFF AUTOMATICALLYThis allows you to cook at a specified time for a chosen period before the oven switches off Automatically.
Step 1 Check that the correct time of day is set, if not follow instructions for setting the time of day.
Step 2 Place food onto the correct shelf position in the oven and close the oven door(s).
MinuteMinder
CookPeriod
EndTime Manual
Cooktop Symbol
AUTO
AUTO
MinuteMinder
CookPeriod
EndTime Manual
AUTO
MinuteMinder
CookPeriod
EndTime Manual
MinuteMinder
CookPeriod
EndTime Manual
ELECTRONIC CLOCK & AUTOMATICOVEN TIMER OPERATION
13
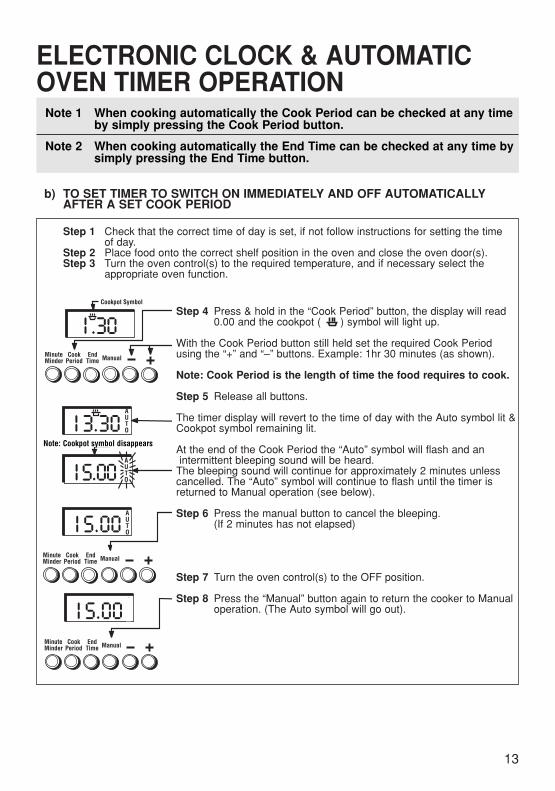
Step 4 Press & hold in the “Cook Period” button, the display will read0.00 and the cookpot ( ) symbol will light up.
With the Cook Period button still held set the required Cook Periodusing the “+” and “–” buttons. Example: 1hr 30 minutes (as shown).
Note: Cook Period is the length of time the food requires to cook.
Step 5 Release all buttons.
The timer display will revert to the time of day with the Auto symbol lit &Cookpot symbol remaining lit.
At the end of the Cook Period the “Auto” symbol will flash and anintermittent bleeping sound will be heard.
The bleeping sound will continue for approximately 2 minutes unless cancelled. The “Auto” symbol will continue to flash until the timer isreturned to Manual operation (see below).
Step 6 Press the manual button to cancel the bleeping.(If 2 minutes has not elapsed)
Step 7 Turn the oven control(s) to the OFF position.
Step 8 Press the “Manual” button again to return the cooker to Manualoperation. (The Auto symbol will go out).
b) TO SET TIMER TO SWITCH ON IMMEDIATELY AND OFF AUTOMATICALLY AFTER A SET COOK PERIOD
Step 1 Check that the correct time of day is set, if not follow instructions for setting the time of day.
Step 2 Place food onto the correct shelf position in the oven and close the oven door(s).Step 3 Turn the oven control(s) to the required temperature, and if necessary select the
appropriate oven function.
AUTO
MinuteMinder
CookPeriod
EndTime Manual
Cookpot Symbol
AUTO
AUTO
MinuteMinder
CookPeriod
EndTime Manual
AUTO
MinuteMinder
CookPeriod
EndTime Manual
Note: Cookpot symbol disappears
Note 1 When cooking automatically the Cook Period can be checked at any timeby simply pressing the Cook Period button.
Note 2 When cooking automatically the End Time can be checked at any time bysimply pressing the End Time button.
ELECTRONIC CLOCK & AUTOMATICOVEN TIMER OPERATION
14
OTHER NOTES ON TIMER OPERATION
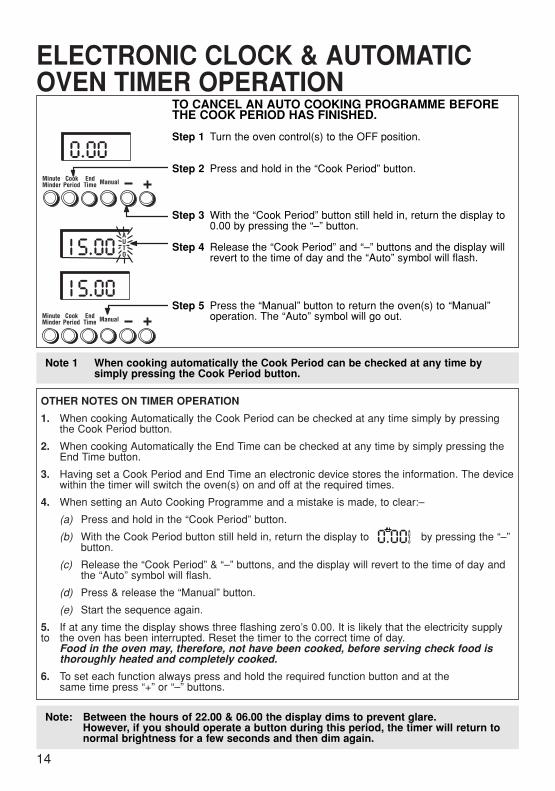
1. When cooking Automatically the Cook Period can be checked at any time simply by pressing the Cook Period button.
2. When cooking Automatically the End Time can be checked at any time by simply pressing the End Time button.
3. Having set a Cook Period and End Time an electronic device stores the information. The devicewithin the timer will switch the oven(s) on and off at the required times.
4. When setting an Auto Cooking Programme and a mistake is made, to clear:–
(a) Press and hold in the “Cook Period” button.
(b) With the Cook Period button still held in, return the display to by pressing the “–” button.
(c) Release the “Cook Period” & “–” buttons, and the display will revert to the time of day and the “Auto” symbol will flash.
(d) Press & release the “Manual” button.
(e) Start the sequence again.
5. If at any time the display shows three flashing zero’s 0.00. It is likely that the electricity supplyto the oven has been interrupted. Reset the timer to the correct time of day.
Food in the oven may, therefore, not have been cooked, before serving check food isthoroughly heated and completely cooked.
6. To set each function always press and hold the required function button and at thesame time press “+” or “–” buttons.
Note: Between the hours of 22.00 & 06.00 the display dims to prevent glare. However, if you should operate a button during this period, the timer will return to normal brightness for a few seconds and then dim again.
AUTO
TO CANCEL AN AUTO COOKING PROGRAMME BEFORE THE COOK PERIOD HAS FINISHED.
Step 1 Turn the oven control(s) to the OFF position.
Step 2 Press and hold in the “Cook Period” button.
Step 3 With the “Cook Period” button still held in, return the display to 0.00 by pressing the “–” button.
Step 4 Release the “Cook Period” and “–” buttons and the display will revert to the time of day and the “Auto” symbol will flash.
Step 5 Press the “Manual” button to return the oven(s) to “Manual” operation. The “Auto” symbol will go out.
MinuteMinder
CookPeriod
EndTime Manual
AUTO
MinuteMinder
CookPeriod
EndTime Manual
Note 1 When cooking automatically the Cook Period can be checked at any time bysimply pressing the Cook Period button.

The grill pan handle is detachable from the pan, to facilitate cleaning and storage.The grill pan handle can be fixed as follows:
Step 1 Remove screw & washers from the grill pan bracket (a).Step 2 Tilt the handle over the recess (b).Step 3 Slide it towards the centre of the pan (c).Step 4 Locate the handle over the bracket (d).
For a fixed handle, replace screw & washers and ensure they are fullytightened up. If a detachable handle is required, do not replace screw &washers.
GRILL PAN FOOD GRID AND ANTI-SPLASH TRAY
DOOR POSITION FOR GRILLING
GRILL PAN & HANDLE
15
Note: If a fixed handle is required, the grill pan is unable to be stored in the oven with the door closed and cannot be used as a meat pan.
Note:Do not grill with the grill/oven doorclosed.
Step 1 Step 2 Step 3 Step 4
(a)(b) (c)
(d)
GRILL PANANTI-SPLASHTRAY
GRILL PANFOOD GRID
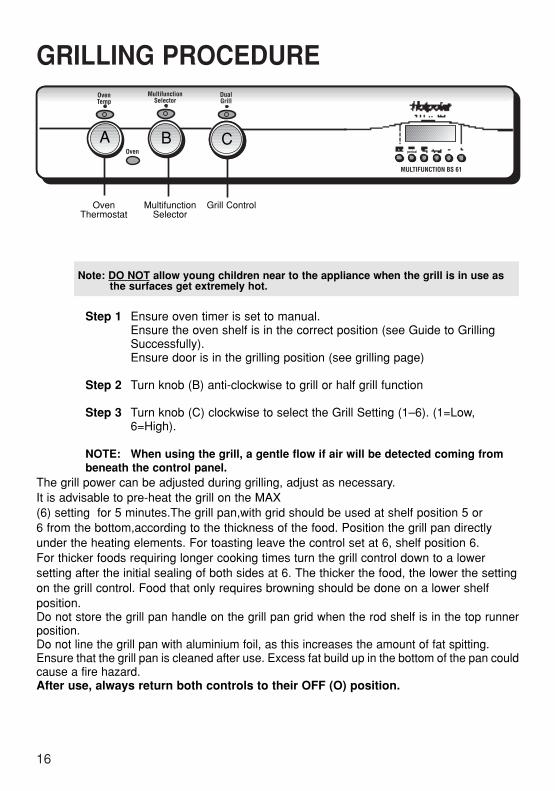
GRILLING PROCEDURE
16
Note: DO NOT allow young children near to the appliance when the grill is in use as the surfaces get extremely hot.
Step 1 Ensure oven timer is set to manual.Ensure the oven shelf is in the correct position (see Guide to Grilling Successfully).Ensure door is in the grilling position (see grilling page)
Step 2 Turn knob (B) anti-clockwise to grill or half grill function
Step 3 Turn knob (C) clockwise to select the Grill Setting (1–6). (1=Low, 6=High).
NOTE: When using the grill, a gentle flow if air will be detected coming from beneath the control panel.
The grill power can be adjusted during grilling, adjust as necessary.It is advisable to pre-heat the grill on the MAX(6) setting for 5 minutes.The grill pan,with grid should be used at shelf position 5 or 6 from the bottom,according to the thickness of the food. Position the grill pan directlyunder the heating elements. For toasting leave the control set at 6, shelf position 6.For thicker foods requiring longer cooking times turn the grill control down to a lowersetting after the initial sealing of both sides at 6. The thicker the food, the lower the settingon the grill control. Food that only requires browning should be done on a lower shelfposition.Do not store the grill pan handle on the grill pan grid when the rod shelf is in the top runnerposition.Do not line the grill pan with aluminium foil, as this increases the amount of fat spitting.Ensure that the grill pan is cleaned after use. Excess fat build up in the bottom of the pan couldcause a fire hazard.After use, always return both controls to their OFF (O) position.
MULTIFUNCTION BS 61
period
DualGrill
MultifunctionSelector
OvenTemp
Oven
OvenThermostat
MultifunctionSelector
Grill Control
A B C
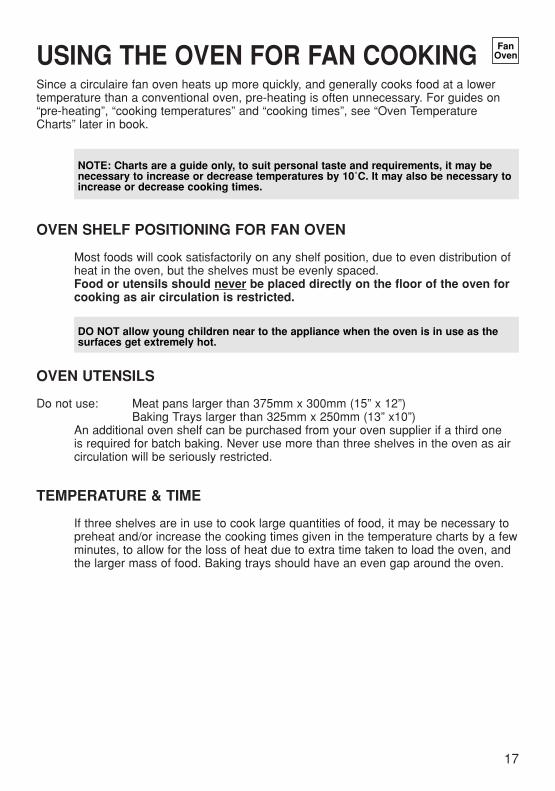
Since a circulaire fan oven heats up more quickly, and generally cooks food at a lowertemperature than a conventional oven, pre-heating is often unnecessary. For guides on“pre-heating”, “cooking temperatures” and “cooking times”, see “Oven TemperatureCharts” later in book.
OVEN SHELF POSITIONING FOR FAN OVEN
Most foods will cook satisfactorily on any shelf position, due to even distribution of heat in the oven, but the shelves must be evenly spaced.Food or utensils should never be placed directly on the floor of the oven for cooking as air circulation is restricted.
OVEN UTENSILS
Do not use: Meat pans larger than 375mm x 300mm (15” x 12”)Baking Trays larger than 325mm x 250mm (13” x10”)
An additional oven shelf can be purchased from your oven supplier if a third one is required for batch baking. Never use more than three shelves in the oven as air circulation will be seriously restricted.
TEMPERATURE & TIME
If three shelves are in use to cook large quantities of food, it may be necessary to preheat and/or increase the cooking times given in the temperature charts by a fewminutes, to allow for the loss of heat due to extra time taken to load the oven, and the larger mass of food. Baking trays should have an even gap around the oven.
USING THE OVEN FOR FAN COOKING
17
NOTE: Charts are a guide only, to suit personal taste and requirements, it may benecessary to increase or decrease temperatures by 10˚C. It may also be necessary toincrease or decrease cooking times.
DO NOT allow young children near to the appliance when the oven is in use as thesurfaces get extremely hot.
FanOven
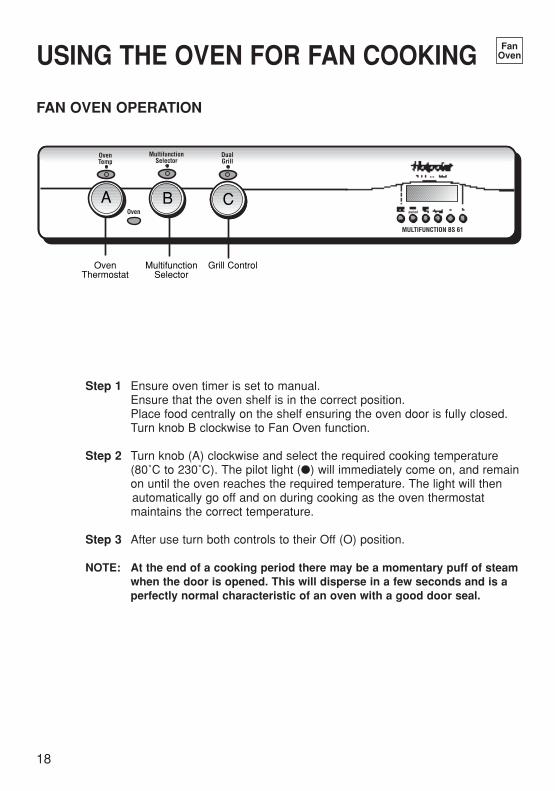
FAN OVEN OPERATION
Step 1 Ensure oven timer is set to manual.Ensure that the oven shelf is in the correct position.Place food centrally on the shelf ensuring the oven door is fully closed. Turn knob B clockwise to Fan Oven function.
Step 2 Turn knob (A) clockwise and select the required cooking temperature (80˚C to 230˚C). The pilot light (●) will immediately come on, and remain on until the oven reaches the required temperature. The light will thenautomatically go off and on during cooking as the oven thermostat maintains the correct temperature.
Step 3 After use turn both controls to their Off (O) position.
NOTE: At the end of a cooking period there may be a momentary puff of steam when the door is opened. This will disperse in a few seconds and is a perfectly normal characteristic of an oven with a good door seal.
USING THE OVEN FOR FAN COOKING FanOven
18
MULTIFUNCTION BS 61
period
DualGrill
MultifunctionSelector
OvenTemp
Oven
OvenThermostat
MultifunctionSelector
Grill Control
A B C
USING THE OVEN FOR OTHER FUNCTIONS
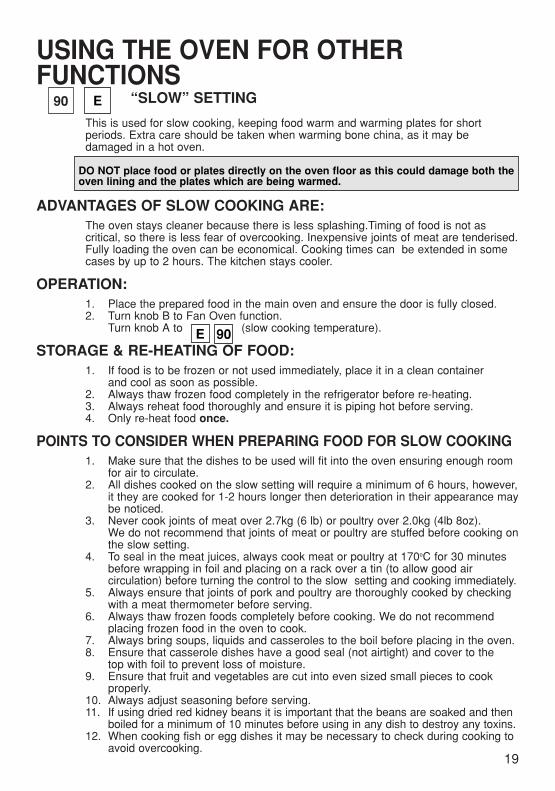
“SLOW” SETTING
This is used for slow cooking, keeping food warm and warming plates for shortperiods. Extra care should be taken when warming bone china, as it may bedamaged in a hot oven.
ADVANTAGES OF SLOW COOKING ARE:The oven stays cleaner because there is less splashing.Timing of food is not as critical, so there is less fear of overcooking. Inexpensive joints of meat are tenderised.Fully loading the oven can be economical. Cooking times can be extended in some cases by up to 2 hours. The kitchen stays cooler.
OPERATION:1. Place the prepared food in the main oven and ensure the door is fully closed.2. Turn knob B to Fan Oven function.
Turn knob A to (slow cooking temperature).
STORAGE & RE-HEATING OF FOOD:1. If food is to be frozen or not used immediately, place it in a clean container
and cool as soon as possible.2. Always thaw frozen food completely in the refrigerator before re-heating.3. Always reheat food thoroughly and ensure it is piping hot before serving.4. Only re-heat food once.
POINTS TO CONSIDER WHEN PREPARING FOOD FOR SLOW COOKING1. Make sure that the dishes to be used will fit into the oven ensuring enough room
for air to circulate.2. All dishes cooked on the slow setting will require a minimum of 6 hours, however,
it they are cooked for 1-2 hours longer then deterioration in their appearance maybe noticed.
3. Never cook joints of meat over 2.7kg (6 lb) or poultry over 2.0kg (4lb 8oz).We do not recommend that joints of meat or poultry are stuffed before cooking onthe slow setting.
4. To seal in the meat juices, always cook meat or poultry at 170oC for 30 minutesbefore wrapping in foil and placing on a rack over a tin (to allow good aircirculation) before turning the control to the slow setting and cooking immediately.
5. Always ensure that joints of pork and poultry are thoroughly cooked by checking with a meat thermometer before serving.
6. Always thaw frozen foods completely before cooking. We do not recommendplacing frozen food in the oven to cook.
7. Always bring soups, liquids and casseroles to the boil before placing in the oven.8. Ensure that casserole dishes have a good seal (not airtight) and cover to the
top with foil to prevent loss of moisture.9. Ensure that fruit and vegetables are cut into even sized small pieces to cook
properly.10. Always adjust seasoning before serving.11. If using dried red kidney beans it is important that the beans are soaked and then
boiled for a minimum of 10 minutes before using in any dish to destroy any toxins.12. When cooking fish or egg dishes it may be necessary to check during cooking to
avoid overcooking.
90
19
DO NOT place food or plates directly on the oven floor as this could damage both theoven lining and the plates which are being warmed.
90E
E
USING THE OVEN FOR OTHER FUNCTIONSFAN GRILLING
Fan grilling is a combination of heat from the grill element and the oven fan circulating the hot air around the food.
Joints of meat and poultry will be browned as if they were cooked on a rotisserie orspit but more economically as the door if left closed.
If required, fan grilling can be timed using the Oven Auto timer. Follow the timer instructions on before selecting fan grill and the required temperature.
If Manual fan grilling is required always ensure the timer is set to Manual.
OPERATING INSTRUCTIONS1. Open the oven door.2. Select the correct shelf position.3. Turn the selector switch B until Fan grill is seen in the window.4. Turn the oven thermostat control A to the required temperature (see Fan Grilling
Roasting Chart)5. Position the meat pan centrally under the grill elements (if using the grill pan
always remove the grill pan handle).6. Close the oven door. Fan grilling will not begin until the door is fully closed.7. After use always return both controls to the off position.8. If the oven timer was used, reset to Manual.
20
USING THE OVEN FOR OTHER FUNCTIONSFAN GRILLING
As with the Circulaire oven fan cooking there is no need to pre-heat the oven – yet another economy feature. Also you can cook more than one thing at a time – even up to 4 small chickens.
TEMPERATURESThese will be similar to those used for the more traditional form of roasting but the guide will give you an indication of which temperature to set the Thermostat. But remember that because of the way the oven is heated this is a more economical wayof roasting.
GENERAL RECOMMENDATIONSMost types of meat and poultry cooked by this method will have an all over brownness and crispness on the outside. The only exceptions are very lean joints,
such as veal, which, because of its low fat content, is better cooked using conventional heating.
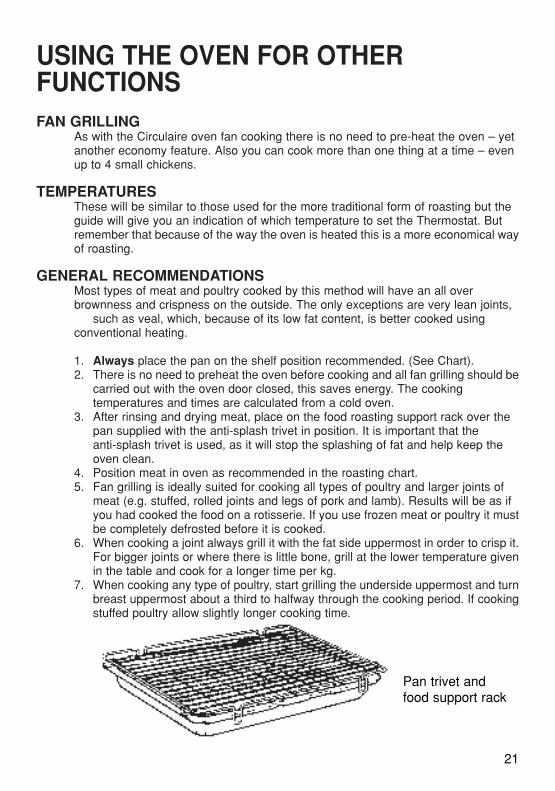
1. Always place the pan on the shelf position recommended. (See Chart).2. There is no need to preheat the oven before cooking and all fan grilling should be
carried out with the oven door closed, this saves energy. The cooking temperatures and times are calculated from a cold oven.
3. After rinsing and drying meat, place on the food roasting support rack over the pan supplied with the anti-splash trivet in position. It is important that the anti-splash trivet is used, as it will stop the splashing of fat and help keep the oven clean.
4. Position meat in oven as recommended in the roasting chart.5. Fan grilling is ideally suited for cooking all types of poultry and larger joints of
meat (e.g. stuffed, rolled joints and legs of pork and lamb). Results will be as if you had cooked the food on a rotisserie. If you use frozen meat or poultry it mustbe completely defrosted before it is cooked.
6. When cooking a joint always grill it with the fat side uppermost in order to crisp it.For bigger joints or where there is little bone, grill at the lower temperature givenin the table and cook for a longer time per kg.
7. When cooking any type of poultry, start grilling the underside uppermost and turnbreast uppermost about a third to halfway through the cooking period. If cookingstuffed poultry allow slightly longer cooking time.
Pan trivet andfood support rack
21
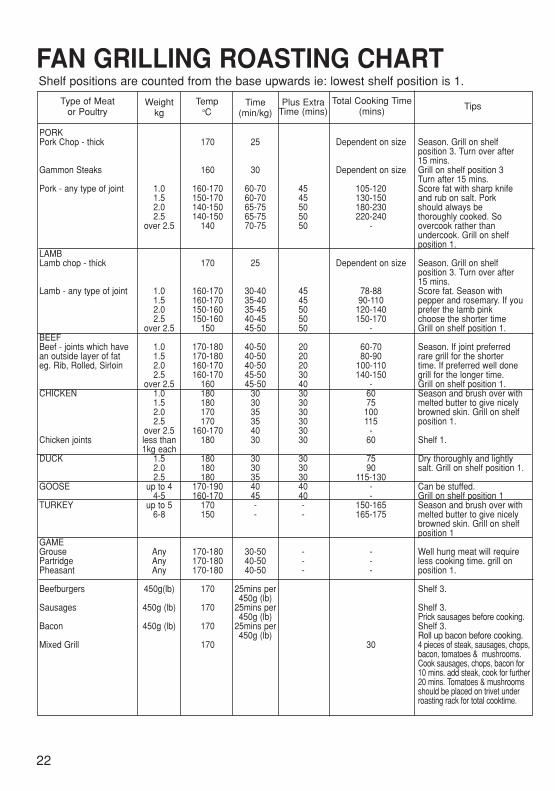
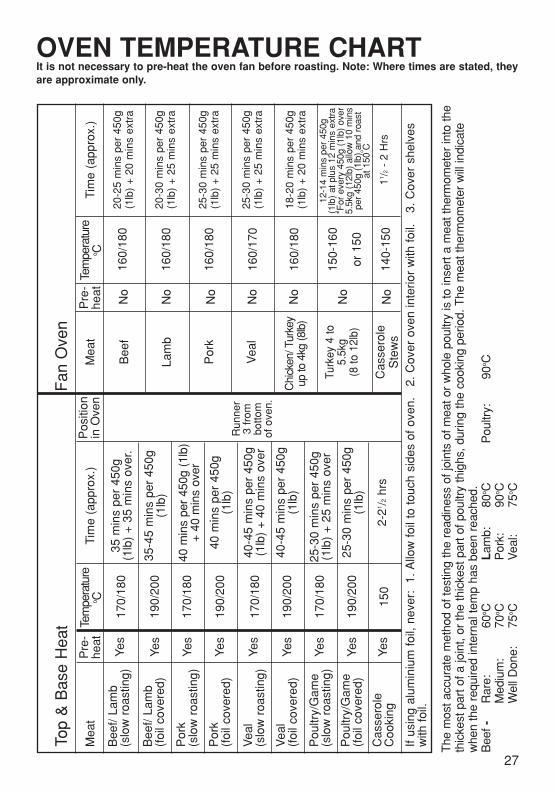
PORKPork Chop - thick 170 25 Dependent on size Season. Grill on shelf
position 3. Turn over after15 mins.
Gammon Steaks 160 30 Dependent on size Grill on shelf position 3Turn after 15 mins.
Pork - any type of joint 1.0 160-170 60-70 45 105-120 Score fat with sharp knife1.5 150-170 60-70 45 130-150 and rub on salt. Pork2.0 140-150 65-75 50 180-230 should always be2.5 140-150 65-75 50 220-240 thoroughly cooked. So
over 2.5 140 70-75 50 - overcook rather than undercook. Grill on shelfposition 1.
LAMBLamb chop - thick 170 25 Dependent on size Season. Grill on shelf
position 3. Turn over after15 mins.
Lamb - any type of joint 1.0 160-170 30-40 45 78-88 Score fat. Season with1.5 160-170 35-40 45 90-110 pepper and rosemary. If you2.0 150-160 35-45 50 120-140 prefer the lamb pink2.5 150-160 40-45 50 150-170 choose the shorter time
over 2.5 150 45-50 50 - Grill on shelf position 1.BEEFBeef - joints which have 1.0 170-180 40-50 20 60-70 Season. If joint preferredan outside layer of fat 1.5 170-180 40-50 20 80-90 rare grill for the shortereg. Rib, Rolled, Sirloin 2.0 160-170 40-50 20 100-110 time. If preferred well done
2.5 160-170 45-50 30 140-150 grill for the longer time.over 2.5 160 45-50 40 - Grill on shelf position 1.
CHICKEN 1.0 180 30 30 60 Season and brush over with1.5 180 30 30 75 melted butter to give nicely2.0 170 35 30 100 browned skin. Grill on shelf 2.5 170 35 30 115 position 1.
over 2.5 160-170 40 30 -Chicken joints less than 180 30 30 60 Shelf 1.
1kg eachDUCK 1.5 180 30 30 75 Dry thoroughly and lightly
2.0 180 30 30 90 salt. Grill on shelf position 1.2.5 180 35 30 115-130
GOOSE up to 4 170-190 40 40 - Can be stuffed.4-5 160-170 45 40 - Grill on shelf position 1
TURKEY up to 5 170 - - 150-165 Season and brush over with6-8 150 - - 165-175 melted butter to give nicely
browned skin. Grill on shelfposition 1
GAMEGrouse Any 170-180 30-50 - - Well hung meat will requirePartridge Any 170-180 40-50 - - less cooking time. grill onPheasant Any 170-180 40-50 - - position 1.
Beefburgers 450g(lb) 170 25mins per Shelf 3.450g (lb)
Sausages 450g (lb) 170 25mins per Shelf 3.450g (lb) Prick sausages before cooking.
Bacon 450g (lb) 170 25mins per Shelf 3.450g (lb) Roll up bacon before cooking.
Mixed Grill 170 30 4 pieces of steak, sausages, chops,bacon, tomatoes & mushrooms. Cook sausages, chops, bacon for 10 mins. add steak, cook for further20 mins. Tomatoes & mushrooms should be placed on trivet under roasting rack for total cooktime.
Type of Meat or Poultry
Weightkg
TempoC
Time(min/kg)
Plus ExtraTime (mins)
Total Cooking Time(mins) Tips
Shelf positions are counted from the base upwards ie: lowest shelf position is 1.FAN GRILLING ROASTING CHART
22

USING THE OVEN FOR OTHER FUNCTIONSFAN ONLY
The oven has a fan only position, which can be used to assist defrosting bycirculating unheated air around the food.
Time to defrost will depend on type and size of the food and the room temperature.
OPERATING PROCEDURE
1. Turn the selector switch until the required fan only symbol is shown in the controlpanel window.
2. The control panel illumination and oven light will remain on.3. After use always return the control to the off position and close the oven door.
DO NOT turn the oven thermostat control on.DO NOT defrost meat and poultry by warming the food through.
Foods ideally suited for fan defrosting (without heat) are those which are normally servedcold, e.g. cream/cream cakes, butter cream filled cakes, gateaux, cheese cakes, iced cakes,quiches, pastries, biscuits, bread croissants, fruit and many delicate frozen foods.
If fish, meat and poultry are to be “fan only” defrosted then where possible the items shouldbe thin e.g. fish fillets, peeled shrimp, cubed or ground meat, sliced meat, thin chops, steaksor liver.
The items should be placed so the maximum amount of surface area is exposed to thecirculating air and turned regularly to ensure even defrosting.
Fan defrosting without heating is only suitable for meat and poultry joints up to a maximumweight of 1.8kg (4 lb).
It is important to wash both roast and cooking utensils before cooking immediatelyafter defrosting.
It is vitally important to strictly adhere to the basic principles of food handling andhygiene to prevent the possibility of bacterial growth.
23
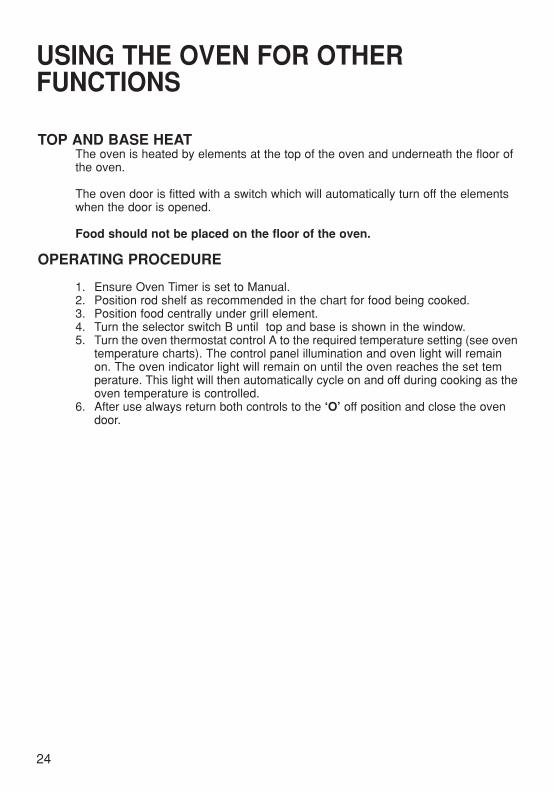
USING THE OVEN FOR OTHER FUNCTIONS
TOP AND BASE HEATThe oven is heated by elements at the top of the oven and underneath the floor of the oven.
The oven door is fitted with a switch which will automatically turn off the elements when the door is opened.
Food should not be placed on the floor of the oven.
OPERATING PROCEDURE
1. Ensure Oven Timer is set to Manual.2. Position rod shelf as recommended in the chart for food being cooked.3. Position food centrally under grill element.4. Turn the selector switch B until top and base is shown in the window.5. Turn the oven thermostat control A to the required temperature setting (see oven
temperature charts). The control panel illumination and oven light will remain on. The oven indicator light will remain on until the oven reaches the set temperature. This light will then automatically cycle on and off during cooking as theoven temperature is controlled.
6. After use always return both controls to the ‘O’ off position and close the oven door.
24
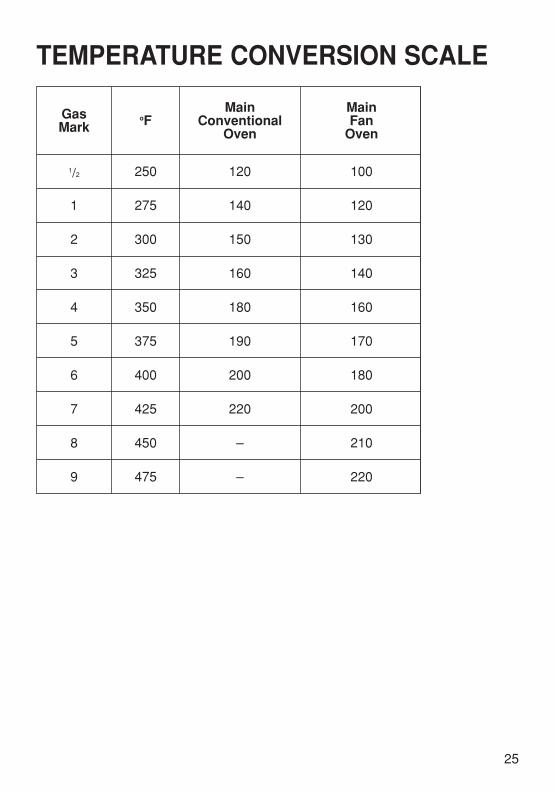
oFGasMark
1/2
1
250 100
120
130
140
160
170
180
200
210
220
120
140
150
160
180
190
200
220
–
–
275
300
325
350
375
400
425
450
475
2
3
4
5
6
7
8
9
MainConventional
Oven
MainFan
Oven
TEMPERATURE CONVERSION SCALE
25
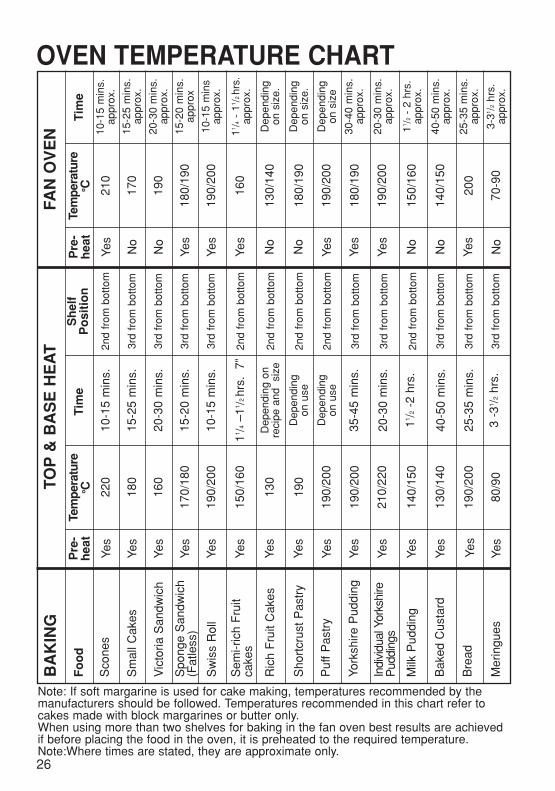
FAN
OV
EN
26
Sco
nes
Fo
od
Pre
-h
eat
Yes
220
10-1
5 m
ins.
2nd
from
bot
tom
3rd
from
bot
tom
3rd
from
bot
tom
3rd
from
bot
tom
3rd
from
bot
tom
2nd
from
bot
tom
2nd
from
bot
tom
2nd
from
bot
tom
2nd
from
bot
tom
3rd
from
bot
tom
3rd
from
bot
tom
2nd
from
bot
tom
3rd
from
bot
tom
3rd
from
bot
tom
3rd
from
bot
tom
15-2
5 m
ins.
20-3
0 m
ins.
15-2
0 m
ins.
10-1
5 m
ins.
11 /4–1
1 /2 h
rs.
7”
Dep
endi
ng o
nre
cipe
and
si
ze
Dep
endi
ngon
use
Dep
endi
ngon
use
35-4
5 m
ins.
20-3
0 m
ins.
11 /2-2
hrs
.
40-5
0 m
ins.
25-3
5 m
ins.
3 -3
1 /2hr
s.
180
160
170/
180
190/
200
150/
160
130
190
190/
200
190/
200
210/
220
140/
150
130/
140
190/
200
80/9
0
Yes
Yes
Yes
Yes
Yes
Yes
Yes
Yes
Yes
Yes
Yes
Yes
Yes
Yes
Tem
per
atu
reoCT
OP
& B
AS
E H
EA
T
Tim
e
BA
KIN
G
Sm
all C
akes
Vic
toria
San
dwic
h
Spo
nge
San
dwic
h(F
atle
ss)
Sw
iss
Rol
l
Sem
i-ric
h F
ruit
cake
s
Ric
h F
ruit
Cak
es
Sho
rtcr
ust
Pas
try
Puf
f P
astr
y
York
shire
Pud
ding
Indi
vidu
al Y
orks
hire
Pud
ding
s
Milk
Pud
ding
Bak
ed C
usta
rd
Bre
ad
Mer
ingu
es
Yes
210
10-1
5 m
ins.
appr
ox.
15-2
5 m
ins.
appr
ox.
20-3
0 m
ins.
appr
ox.
15-2
0 m
ins.
appr
ox
10-1
5 m
ins
appr
ox.
11 /4-
11 /2 h
rs.
appr
ox.
Dep
endi
ngon
siz
e.
Dep
endi
ngon
siz
e.
Dep
endi
ngon
siz
e
30-4
0 m
ins.
appr
ox.
20-3
0 m
ins.
appr
ox.
11 /2-
2 hr
s.ap
prox
.
40-5
0 m
ins.
appr
ox.
25-3
5 m
ins.
appr
ox.
3-31 /2
hrs.
appr
ox.
170
190
180/
190
190/
200
160
130/
140
180/
190
190/
200
180/
190
190/
200
150/
160
140/
150
200
70-9
0
No
No
Yes
Yes
Yes
No
No
Yes
Yes
Yes
No
No
Yes
No
Sh
elf
Po
siti
on
Pre
-h
eat
Tem
per
atu
reoC
Tim
e
Note: If soft margarine is used for cake making, temperatures recommended by themanufacturers should be followed. Temperatures recommended in this chart refer tocakes made with block margarines or butter only.When using more than two shelves for baking in the fan oven best results are achievedif before placing the food in the oven, it is preheated to the required temperature.Note:Where times are stated, they are approximate only.
OVEN TEMPERATURE CHART
Run
ner
3 fr
ombo
ttom
of o
ven.
27
Bee
f/ La
mb
(slo
w r
oast
ing)
Mea
t
170/
180
35 m
ins
per
450g
(1lb
) +
35
min
s ov
er.
35-4
5 m
ins
per
450g
(1lb
)
40 m
ins
per
450g
(1l
b)+
40 m
ins
over
40 m
ins
per
450g
(1lb
)
40-4
5 m
ins
per
450g
(1lb
) +
40
min
s ov
er
40-4
5 m
ins
per
450g
(1lb
)
25-3
0 m
ins
per
450g
(1lb
) +
25
min
s ov
er
25-3
0 m
ins
per
450g
(1lb
)
2-21 /2
hrs
190/
200
170/
180
190/
200
170/
180
190/
200
170/
180
190/
200
150
Tem
pera
ture
o CP
re-
heat
Top
& B
ase
Hea
t F
an O
ven
Tim
e (a
ppro
x.)
Bee
f/ La
mb
(foi
l cov
ered
)
Por
k(s
low
roa
stin
g)
Por
k(f
oil c
over
ed)
Vea
l(s
low
roa
stin
g)
Vea
l(f
oil c
over
ed)
Pou
ltry/
Gam
e(s
low
roa
stin
g)
Pou
ltry/
Gam
e(f
oil c
over
ed)
Cas
sero
leC
ooki
ng
If us
ing
alum
iniu
m f
oil,
neve
r:
1. A
llow
foi
l to
touc
h si
des
of o
ven.
2
. C
over
ove
n in
terio
r w
ith f
oil.
3.
Cov
er s
helv
esw
ith f
oil.
Bee
f
Mea
t
160/
180
20-2
5 m
ins
per
450g
(1lb
) +
20
min
s ex
tra
20-3
0 m
ins
per
450g
(1lb
) +
25
min
s ex
tra
25-3
0 m
ins
per
450g
(1lb
) +
25
min
s ex
tra
25-3
0 m
ins
per
450g
(1lb
) +
25
min
s ex
tra
18-2
0 m
ins
per
450g
(1lb
) +
20
min
s ex
tra
12-1
4 m
ins
per
450g
(1
lb)
at p
lus
12 m
ins
extr
a*F
or e
very
450
g (1
lb)
over
5.5k
g (1
2lb)
allo
w 1
0 m
ins
per
450g
(1l
b) a
nd r
oast
at 1
50o C
11 /2-
2 H
rs
160/
180
160/
180
160/
170
160/
180
140-
150
150-
160
or 1
50
Tem
pera
ture
o CTi
me
(app
rox.
)
Lam
b
Por
k
Vea
l
Chi
cken
/ Tur
key
up to
4kg
(8lb
)
Turk
ey 4
to5.
5kg
(8 to
12l
b)
Cas
sero
leS
tew
s
Pos
ition
in O
ven
The
mos
t acc
urat
e m
etho
d of
test
ing
the
read
ines
s of
join
ts o
f mea
t or
who
le p
oultr
y is
to in
sert
a m
eat t
herm
omet
er in
to th
eth
icke
st p
art o
f a jo
int,
or th
e th
icke
st p
art o
f pou
ltry
thig
hs, d
urin
g th
e co
okin
g pe
riod.
The
mea
t the
rmom
eter
will
indi
cate
whe
n th
e re
quire
d in
tern
al te
mp
has
been
rea
ched
.B
eef -
Rar
e:
60o C
L
amb:
80
o C
Pou
ltry:
90
o CM
ediu
m:
70o C
P
ork:
90
o CW
ell D
one:
75
o C
Vea
l: 75
o C
Yes
Yes
Yes
Yes
Yes
Yes
Yes
Yes
Yes
Pre
-he
at
No
No
No
No
No
No
No
OVEN TEMPERATURE CHARTIt is not necessary to pre-heat the oven fan before roasting. Note: Where times are stated, theyare approximate only.
COOKING RESULTS NOT SATISFACTORY
GRILL
Uneven cooking front to back Ensure that the grill pan is positioned centrally below the grill element.
Fat splattering Ensure that the grill pan is not lined with foil.Ensure that the grill setting is not too high.Remember to use the anti splash tray.
BAKING GENERAL
Uneven rising of cakes Ensure that the oven shelves are level.
Sinking of cakes The following may cause cakes to sink:1. Pre-heating of fan ovens – not always necessary.2. Cooking at too high a temperature – reduce
standard temperatures by 25˚C for fan ovens.3. Using normal creaming method with a soft
margarine. If using soft margarine, use an all in onemethod instead of the traditional creaming of the margarine and sugar. Remember when using a foodmixer or processor not to over-cream soft margarine.
Over/undercooking Refer to the cooking times and temperatures given in the Oven Temperature Charts provided, however, it may be necessary to increase or decrease temperatures by 10˚C to suit personal taste.
Do not use utensils greater than 56mm (2l⁄4'') in height for roasting.
28
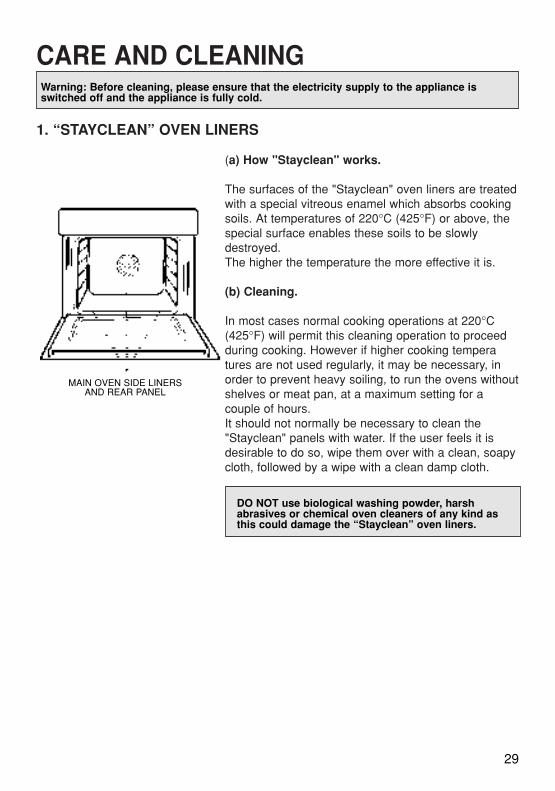
1. “STAYCLEAN” OVEN LINERS
(a) How "Stayclean" works.
The surfaces of the "Stayclean" oven liners are treatedwith a special vitreous enamel which absorbs cookingsoils. At temperatures of 220°C (425°F) or above, thespecial surface enables these soils to be slowly destroyed.The higher the temperature the more effective it is.
(b) Cleaning.
In most cases normal cooking operations at 220°C (425°F) will permit this cleaning operation to proceedduring cooking. However if higher cooking temperatures are not used regularly, it may be necessary, in order to prevent heavy soiling, to run the ovens withoutshelves or meat pan, at a maximum setting for a couple of hours.It should not normally be necessary to clean the"Stayclean" panels with water. If the user feels it isdesirable to do so, wipe them over with a clean, soapycloth, followed by a wipe with a clean damp cloth.
CARE AND CLEANINGWarning: Before cleaning, please ensure that the electricity supply to the appliance isswitched off and the appliance is fully cold.
DO NOT use biological washing powder, harsh abrasives or chemical oven cleaners of any kind asthis could damage the “Stayclean” oven liners.
MAIN OVEN SIDE LINERSAND REAR PANEL
29

2. CLEANING THE OVEN
(a) Base of Main Oven.
Wipe out the oven with a damp soapy cloth. For morestubborn stains on the base of the oven use a well soaped fine steel wool soap pad.
(b) Grill/Meat Pan & Oven Shelves.
To prevent stains from being burnt on to the grill pan,food support and rod shelf, always wash immediatelyafter use in hot soapy water.Use a well soaped fine steel wool soap pad to removestubborn stains from the rod shelves, grill/meat panand the base of the oven.
(c) Removable Grill Roof Panel (not all models).
Pull grill roof panel out slowly, being careful not todamage the elements. Clean using a damp soapy cloth, if stubborn stains remain gently clean with a well soaped fine steel wool soap pad and soapy water, and then wipe over with a damp cloth.
(d) Solarplus Grill (not all models).
To clean the Solarplus grill, use a clean, damp, soapycloth and wipe over. If stubborn stains remain, gentlyclean with a well soaped nylon scouring pad and wipeover with a damp cloth.
CARE AND CLEANING
DO NOT use aerosol cleaners on this oven as theycould adversely affect the fan motor unit, and cannotbe wiped off the fan blade.
REMOVABLE GRILL ROOFPANEL (NOT ALL MODELS ORMODELS FITTED WITH HIGH
SPEED GRILL)
OVENSHELVES
GRILL/MEATPAN
MAINOVENBASE
DO NOT use metal cleaning utensils, wire wool or proprietary oven cleaners on the grill element mesh.
30

3. CONTROL PANEL / TRIMS / INNER DOOR PANEL & GLASS
(a) Control PanelRegularly wipe with a clean, damp cloth and polish with a clean, dry cloth.
(b) TrimsIt is advisable to clean the trims regularly to prevent any build up of soiling which may detract from the appearance of the cooker. The recommended method of cleaning is to wipe over the trims with a clean, soft cloth wrung out in hot water, or mild non abrasive cleaner. (If in doubt try the cleaner on a small area of trim which is not noticeable in normal use), then after wiping with a cloth wrung out in clear water, dry with a clean, soft cloth.
(c) Inner Door Panels & GlassOpen the door fully. The glass panel may now be washed. Stubborn stains can be removed by using a well soaped, fine steel wool soap pad.
4. REPLACEMENT OF THE OVEN LAMP
Open the oven door and remove the oven shelves. Using a thick cloth, grip the lamp lens, unscrew anti-clockwis and remove the lens.Carefully unscrew the bulb anti-clockwise. Fit replacement bulb (15W 300°C SES). Fit replacement bulb and refit lens.
5. HOW TO CLEAN THE LAMP LENS
Open the oven door and remove the oven shelves. Using a thick cloth, grip the lamp lens, unscrew anti-clockwise and remove. Clean with a non-abrasive cleansing cream and refit lamp lens.
CARE AND CLEANING
DO NOT use scouring pads, or abrasive powder, whichwill scratch the glass.
Warning: Before removing lamp lens, please ensure thatthe electricity supply to the appliance is switched off andthe appliance is fully cold.
Warning: Before cleaning lamp lens, please ensure thatthe electricity supply to the appliance is switched off andthe appliance is fully cold.
DO NOT use scouring pads, or abrasive powder, whichwill scratch the glass lens
TRIMS
OVENDOOR
MAIN OVEN LAMP
31MAIN OVEN LAMP

32
CARE AND CLEANINGTake particular care not to damage the inner surface of the door innerglass that is coated with a heat reflective layer. Do not use scouring pads,or abrasive powder, which will scratch the glass. Ensure that the glasspanel is not subjected to any sharp mechanical blows.Stubborn stains can be removed by using a fine steel wool pad. For slight soilingthe inner glass panel may be cleaned, while still warm, without removing it fromthe door. After cleaning, rinse and dry with a soft cloth.
CLEANING THE DOORS
SIDE OPENING DOORSCleaning the door glass is the same as the drop down doors, except takecare to support the weight of the inner glass when removing and refitting.
DROP DOWN DOORSRemove the door inner glass as follows.
1. Open the door fully and unscrew the two screws securing the glass panel sothat the securing brackets can be turned. There is no need to remove the screwscompletely.
2. Turn the brackets so that the glass can beremoved and cleaned at the sink (Fig. 1.)
3. The inside of the outer door glass can now be cleaned while still fitted to thecooker.
NEVER OPERATE THE COOKER WITHOUT THE INNER DOORGLASS IN POSITION.
Refit the door inner glass as follows.
1. NOTE: The inner door glass has a special reflective coating on one side.Replace the door inner glass so that the statement: “IMPORTANT THIS FACETOWARDS THE OVEN” can be read from the inner side of the door.
2. Turn the two securing brackets back to theiroriginal position to retain the glass and tighten the screws. (Fig. 2.)
Glass
Fig. 1.
Fig. 2.
Glass
WARNING: THIS APPLIANCE MUST BE EARTHED.
(a) The oven unit is designed for mounting at a safe level into an oven housingwhich must be secured to the backing wall, or alternatively, in the case of thesingle oven unit, under a worktop with or without a hob unit above.
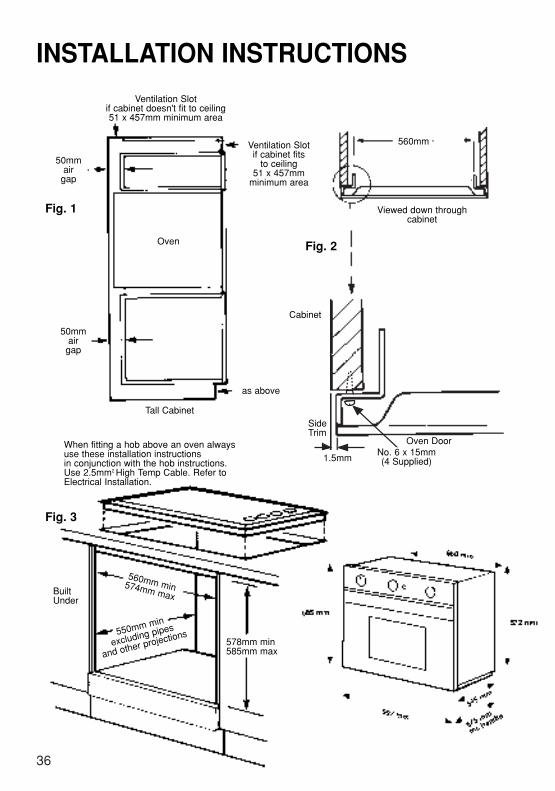
(b) In an oven/hob arrangement where it is proposed to install the oven directlybelow the hob. It is advisable that only slimline hobs are used which have thefollowing maximum depths.
It is most important that the hob installation instructions are strictly observed.
INSTALLATION INSTRUCTIONS
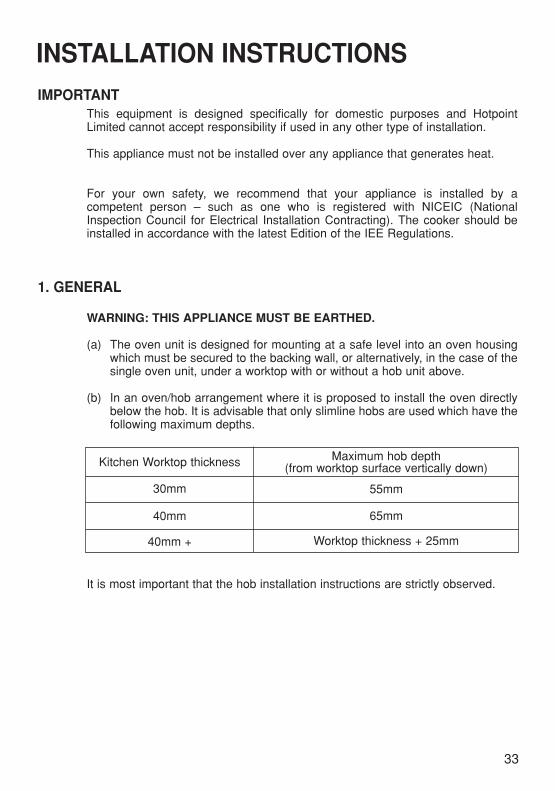
This equipment is designed specifically for domestic purposes and HotpointLimited cannot accept responsibility if used in any other type of installation.
This appliance must not be installed over any appliance that generates heat.
For your own safety, we recommend that your appliance is installed by acompetent person – such as one who is registered with NICEIC (NationalInspection Council for Electrical Installation Contracting). The cooker should beinstalled in accordance with the latest Edition of the IEE Regulations.
IMPORTANT
1. GENERAL
Kitchen Worktop thickness
30mm
40mm
40mm +
Maximum hob depth(from worktop surface vertically down)
55mm
65mm
Worktop thickness + 25mm
33

(a) The oven unit housing cabinet dimensions must comply with Fig. 3 and Fig. 4.(b) An air gap of 50mm minimum must be provided at the rear of any top or
bottom cupboards or shelves for ventilation.(c) Do not obstruct the ventilation slots provided on the oven trim. This is found
adjacent to the bottom of the oven door.
(d) The air gap at the rear allows the warmed air to pass out of the cabinet. Ifcabinets extend up to the ceiling, the warm air must be exhausted throughto the front. Fig. 1.
(e) If an oven unit is installed adjacent to a tall cabinet, steam escaping from theoven when the door is opened could condense on, and perhaps stain theadjacent surface. To prevent permanent staining, the adjacent surface should bemade of a material that is heat resisting and easy to clean. Adjacent tall cabinetsshould not be deeper than the oven housing cabinet.
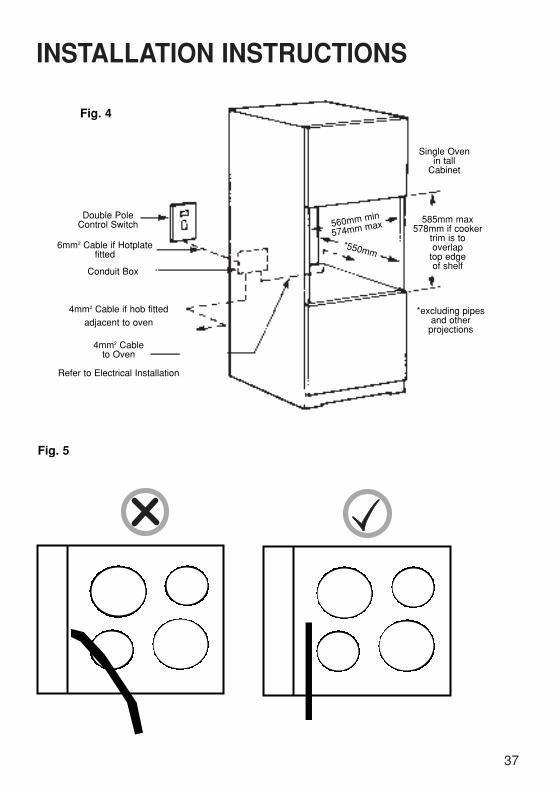
It is essential that the lower cupboard is constructed in the manner illustrated i.e.having side, back and roof panels so joined as to provide no apertures which couldpermit access to the oven unit when installed.
Mains SupplyA 15 amp Double Pole control switch with a minimum contact clearance of 3mmmust be fitted on or recessed in the wall adjacent to the oven housing cabinetry andshould be accessible after installation. If the oven is to be wired into a connector unitthis may be positioned behind the oven providing:–i. The top of the connector unit is not more than 30cm above the base of the
oven recess – see Fig. 4.ii. The depth of the connector unit does not reduce the depth of the oven
recess to less than 55cm.
We recommend that 4mm2 twin and earth PVC insulated cable is used to connectthe cooker to the control unit. This power supply cable must conform to BS 6004.
Alternatively the mains supply can be taken from a household 13 amp switchedfused spur. Having a minimum contact clearance of 3mm which must be fittedadjacent to the oven housing cabinetry and accessible after installation. The ovenmust be fitted with a 3 core cable having a minimum cross sectional area of 1.5mm2
and must conform to BS6500.
The oven must not be connected using a 3 pin 13 amp plug.
INSTALLATION INSTRUCTIONS
3. ELECTRICAL INSTALLATION
IMPORTANT
2. OVEN UNIT HOUSING CABINETS
34
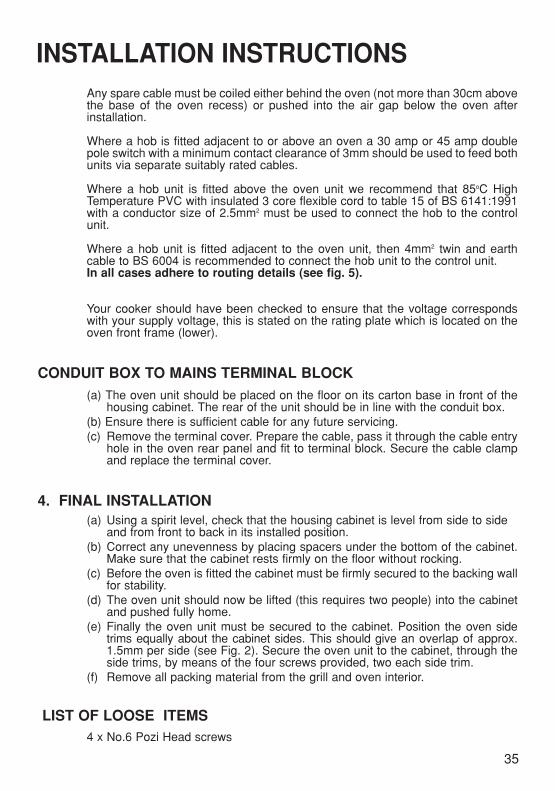
Any spare cable must be coiled either behind the oven (not more than 30cm abovethe base of the oven recess) or pushed into the air gap below the oven afterinstallation.
Where a hob is fitted adjacent to or above an oven a 30 amp or 45 amp doublepole switch with a minimum contact clearance of 3mm should be used to feed bothunits via separate suitably rated cables.
Where a hob unit is fitted above the oven unit we recommend that 85oC HighTemperature PVC with insulated 3 core flexible cord to table 15 of BS 6141:1991with a conductor size of 2.5mm2 must be used to connect the hob to the controlunit.
Where a hob unit is fitted adjacent to the oven unit, then 4mm2 twin and earthcable to BS 6004 is recommended to connect the hob unit to the control unit.In all cases adhere to routing details (see fig. 5).
Your cooker should have been checked to ensure that the voltage correspondswith your supply voltage, this is stated on the rating plate which is located on theoven front frame (lower).
(a) The oven unit should be placed on the floor on its carton base in front of thehousing cabinet. The rear of the unit should be in line with the conduit box.
(b) Ensure there is sufficient cable for any future servicing.(c) Remove the terminal cover. Prepare the cable, pass it through the cable entry
hole in the oven rear panel and fit to terminal block. Secure the cable clampand replace the terminal cover.
(a) Using a spirit level, check that the housing cabinet is level from side to side and from front to back in its installed position.
(b) Correct any unevenness by placing spacers under the bottom of the cabinet.Make sure that the cabinet rests firmly on the floor without rocking.
(c) Before the oven is fitted the cabinet must be firmly secured to the backing wallfor stability.
(d) The oven unit should now be lifted (this requires two people) into the cabinetand pushed fully home.
(e) Finally the oven unit must be secured to the cabinet. Position the oven sidetrims equally about the cabinet sides. This should give an overlap of approx.1.5mm per side (see Fig. 2). Secure the oven unit to the cabinet, through theside trims, by means of the four screws provided, two each side trim.
(f) Remove all packing material from the grill and oven interior.
4 x No.6 Pozi Head screws
CONDUIT BOX TO MAINS TERMINAL BLOCK
4. FINAL INSTALLATION
LIST OF LOOSE ITEMS
35
INSTALLATION INSTRUCTIONS
36
Ventilation Slotif cabinet doesn't fit to ceiling51 x 457mm minimum area
Ventilation Slotif cabinet fits
to ceiling51 x 457mm
minimum area
50mmair
gap
50mmair
gap
Tall Cabinet
as above
Cabinet
SideTrim
BuiltUnder
560mm min574mm max
550mm min
excluding pipes
and other projections578mm min585mm max
When fitting a hob above an oven alwaysuse these installation instructionsin conjunction with the hob instructions.Use 2.5mm2 High Temp Cable. Refer toElectrical Installation.
Oven Door
Viewed down throughcabinet
560mm
Oven
Fig. 1
Fig. 3
Fig. 2
No. 6 x 15mm(4 Supplied)1.5mm
INSTALLATION INSTRUCTIONS
37
INSTALLATION INSTRUCTIONS
Double PoleControl Switch
Single Ovenin tall
Cabinet
585mm max578mm if cooker
trim is tooverlap
top edgeof shelf
*excluding pipesand other
projections
6mm2 Cable if Hotplatefitted
Conduit Box
4mm2 Cable if hob fittedadjacent to oven
4mm2 Cableto Oven
Refer to Electrical Installation
560mm min
574mm max
*550mm
Fig. 4
Fig. 5
Before calling a Service Engineer, please check through the following lists.THERE MAY BE NOTHING WRONG.
SOMETHING WRONG?
Problem
Nothing works.
Display shows 0.00 AUTO.
Main Oven and Grill do not work
Main Oven and Grill do not work.
Oven does not work.
Grill does not work.
Grill keeps turning on and off.
Can not set an “Auto Cook” pro-gramme
Draught from beneath controlpanel.
Timer buzzer/bleeper operatescontinually
Check
(a) CheckIf you find :-
Display is blank.
Then it is likely that there is no electricity supply to your oven.
Check: (i) That the main cooker wall switch is turned on.(ii) Check other appliances to see if you have a power
cut.(iii) Check the main circuit breaker for the property.(iv) With the selector switch (B) turned the oven light does not illuminate.
The power supply to your oven has possibly been interrupted, buthas now come back on again. Reset the timer to the correct timeof day and "Manual" operation using instructions given in the timersection of the book.
Check the following to ensure that the timer is in Manual Mode:
Check that the Auto Symbol is not lit up and is not flashing.
See timer section for instructions on how to return timer to"Manual".
Operating the cooker under the following conditions may cause asafety device to operate.
(a) Grilling with the door closed - always grill with the door open to the correct position - see grilling.(b) Grilling for an excessively long period at maximum setting - see grilling guide.(c) Grilling with inadequate ventilation in the cabinet - see
installation instructions.
Check that the selector switch (B) is set and that thetemperature control (A) is set to the correct temperature.
Check that you have selected :- "Grill" function on the "Oven/GrillSelect" knob (B) and a Grill setting on the Temperature ControlKnob (C) - see grilling page.
When the Temperature control (C) is operating at less than "6", thegrill will cycle on and off, this is normal and is not a fault.
Remember: "Cook Period" is the actual length of time for which,the timer will switch the oven on as part of an "Auto Cooking" pro-gramme.
A gentle flow of air will be blown from beneath the control panelwhen the appliance is used.
Buzzer/Bleeper should stop automatically after 2 minutes. If not,press minute minder button to silence.
If you have been through the above list and there is still a problem; You should identify yourService Agent using the list on the back page and contact your Local Service Office.
38


PRINTED BY SIMLEX - FOUR ASHES, WOLVERHAMPTON. April 2001 Part no. 482800159-05
Key ContactsService
Hotpoint has the largest appliance manufacturer’s service team inEurope, trained specialists directly employed by us to ensure your com-
plete confidence.
Repair ServiceUK: 08709 066 066
Republic of Ireland: 1850 302 220You will be asked for the following information:-
Name, address and postcode.Telephone number
Model / Serial number of the applianceClear and concise details of the query or fault
Place and Date of purchase
(Please keep the receipt as evidence will be required when the engineer calls).
Extended WarrantyTo join: UK 08709 088 088
Republic of Ireland: 1850 502 220
Genuine Parts & AccessoriesMail Order Hotline
UK: 08709 077 077
Republic of Ireland: (01) 842 6836
For further product information 08701 506070
All Hotpoint Services are offered as an extra benefit and do not affect your statutory rights.
General Domestic Appliances Limited, Morley Way, Peterborough, PE2 9JB