honda hs35 snowthrower
TRANSCRIPT


The high-performance HONDA SNOW THROWER HS 35 is designed to be compact and light. It is engineered for ease of handling and safety.
BEFOREUSINGTHE SNOWTHROWER,READTHEINSTRUCTIONS ON SAFETYANDCLEARLYUNDERSTANDTHEPROPER‘OPERAT- INGPROCEDURE.
Pay special attention to statements preceded by the following words:
m Indicates a strong possibility of severe personal injury or loss of life if instructions are not followed.
CAUTION: Indicates a possibility of personal injury or equipment damage if instruc- tions are not followed.
NOTE: Gives helpful information.
This manual should be considered a permanent part of the vehicle and should remain with the vehicle when resold.
NOTE: Specifications of components may change for improvement without
prior notice.
1
SAFETY INSTRUCTIONS-OBSERVE THESE PRECAUTIONS .................................... 3 WARNING LABEL LOCATION ....................... 7
LEARN THE NAMES OF COMPONENTS AND THEIR OPERATIONS ..................................... 8
Engineswitchknob ............................... 10
Fuelvalveknob .................................. 10
Chokeknob ..................................... 11
Chute crank ..................................... 11 Starter grip ...................................... 12
Auger clutch lever ................................ 12
Chuteguide ................................... :. 13
ITEMS TO BE CHECKED BEFORE STARTING THE ENGINE .......................................... 14
Fuellevel ....................................... 14
Engine oil level ................................... 16
STARTING INSTRUCTIONS ......................... 17
CLEARING SNOW - THE PROPER WAY ............... 20
STOPPING THE ENGINE - THE PROPER WAY .......... 23
High altitude operation ............................ 23
PERIODIC MAINTENANCE .......................... 24
Check daily ..................................... 24
Check during the first month of operation .............. 24
Check periodically ................................ 25
MAINTENANCE PROCEDURES ...................... 26
Tools ........................................... 26
Engine oil change ................................. 27
Spark plug’- cleaning and adjustment ................. 28
Auger clutch cable - adjustment ..................... 29
Auger rubber parts - replacement .................... 30
Auger housing guard - adjustment and replacement PREPARING SNOW THROWER FOR STORAGE .
HOW TO FOLD THE HANDLE OF THE SNOW THROWER . . . . . . . . . . . . . . . . . . . . . . . . . . . . . . . . TROUBLESHOOTING . . . . . . . . . . . . . . . . . . . . . . . ORDERING REPLACEMENT PARTS . . . . . . . . . . . SPECIFICATIONS . . . . . . . . . . . . . . . . . . . . . . .
2
. . . . . 32
. . . . . 33
. . . . . 35
. . . . . 37
. . . . . 39
. . . . . 40

SAFETY INSTRUCTIONS - OBSERVE THESE PRECAUTIONS.
* Before operating the snowthrower, inspect the area in which you are going to clear snow. Remove debris and other obstacles the snowthrower might strike or throw, as that may cause injury or damage to the snowthrower.
* Inspect the snowthrower before operating it. Repair any damage and correct any malfunction before operation. If you hit an obstacle while operating the snow- thrower, stop the engine immediately, and check for damage. Damaged equipment may increase the possibility of injury during operation.
* Do not use the snowthrower when visibility. is poor. Under conditions of poor visibility, there is a greater risk of striking an obstacle or causing injury.
* Never use the snowthrower to clear snow from a gravel road or driveway, as rocks may be picked up and thrown. They may cause injury to bystanders.
3

Adjust the snow discharge chute to avoid hitting the operator, bystanders, windows, and other objects with thrown snow. Stay clear of the snow discharge chute while the engine is running.
Children and pets must be kept away from the area of operation to avoid injury from flying debris and contact with the snowthrower.
To avoid overturning, be careful when changing the direction of the snowthrower while operating it on a slope. Do not use the snowthrower to remove snow from roofs. The snowthrower may overturn on steep slopes if left unattended, causing injury to the operator or bystanders.
Know how to stop the snowthrower quickly,and understand theoperation of all controls.
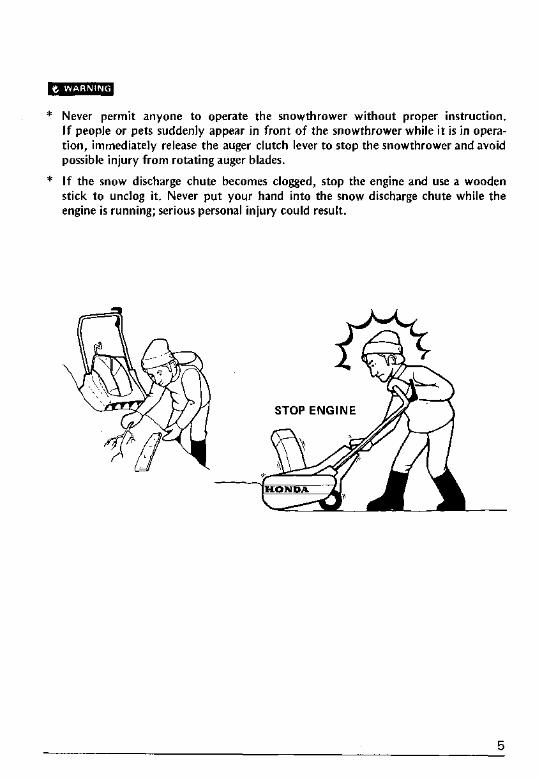
* Never permit anyone to operate the snowthrower without proper instruction. If people or pets suddenly appear in front of the snowthrower while it is in opera- tion, immediately release the auger clutch lever to stop the snowthrower and avoid possible injury from rotating auger blades.
* If the snow discharge chute becomes clogged, stop the engine and use a wooden stick to unclog it. Never put your hand into the snow discharge chute while the engine is running; serious personal injury could result.
STOP ENGINE

* Gasoline is extremely flammable and is explosive under certain conditions. Do not smoke or allow flames or sparks where the snowthrower is refueled or where gasoline is stored. Refuel in a well-ventilated area with the engine stopped. Do not overfill the fuel tank, and make sure the filler cap is closed securely after refueling.
* Never run the engine in a closed garage or confined area. Exhaust gas contains
poisonous carbon monoxide; exposure may cause loss of consciousness and may lead to death.
* The muffler becomes very hot during operation, and remains hot for a while after stopping the engine. Be careful not to touch the muffler while it is hot. Let the engine cool before storing the snowthrower indoors.
NOTE: While operating the snowthrower, hold the handle firmly, and walk, don’t run. Wear suitable winter boots that resist slipping.
KEEP AWAY
6
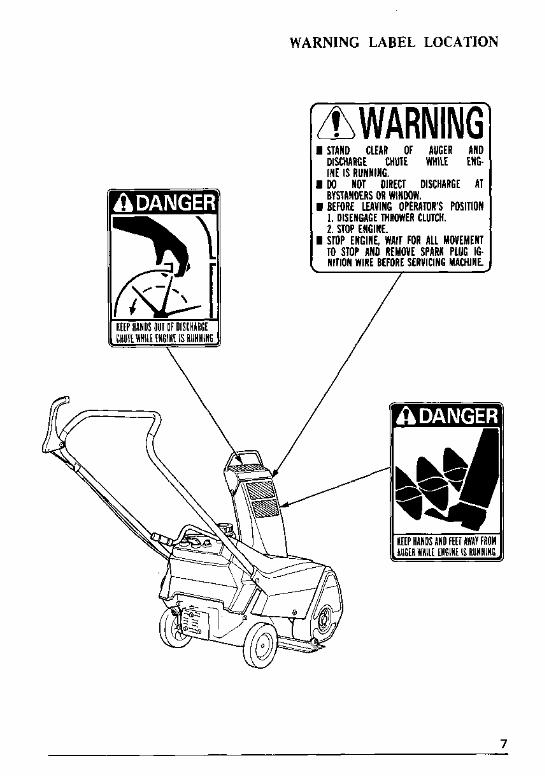
WARNING LABEL LOCATION
AWARNING I STAND CLEAR OF AUGER EA;;
DISCHARGE CHUTE WHILE INE IS RUNNING.
I DO NOT DIRECT DISCHARGE AT BYSTANDERS OR WINDOW.
I BEFORE LEAVING OPERATOR’S POSITION 1. DISENGAGE THROWER CLUTCH. 2. STOP ENGINE.
I STOP ENGINE, WAIT FOR A11 MOVEMENT TO STOP AND REMOVE SPARK PLUG IG- NITION WIRE BEFORE SERVICING MACHINE.
7

LEARN THE NAMES OF COMPONENTS AND THEIR OPERATIONS.
Fuel cap
Starter grip Auger clutch lever I I I I I
I I
Auger rubber1
Chute
Spark plug cover
Blower rubber 1 IAuger housing guard
8

Chute guide handle
guide Chute 1
d
Oil filler cap and dipstick
9

ENGINE SWITCH KNOB
Use the engine switch to START and STOP the engine.
M--yON’(Op;rating )
-
FUEL VALVE KNOB
I Engine switch knob
This knob opens and closes the fuel line leading from the fuel tank tb the carburetor. Make sure that the knob is positioned exactly on either the ON or OFF position.
ON-
NOTE: Before transporting, storing or tilting the snow thrower, be sure.to turn the knob to OFF to prevent possible fuel leaks.
10
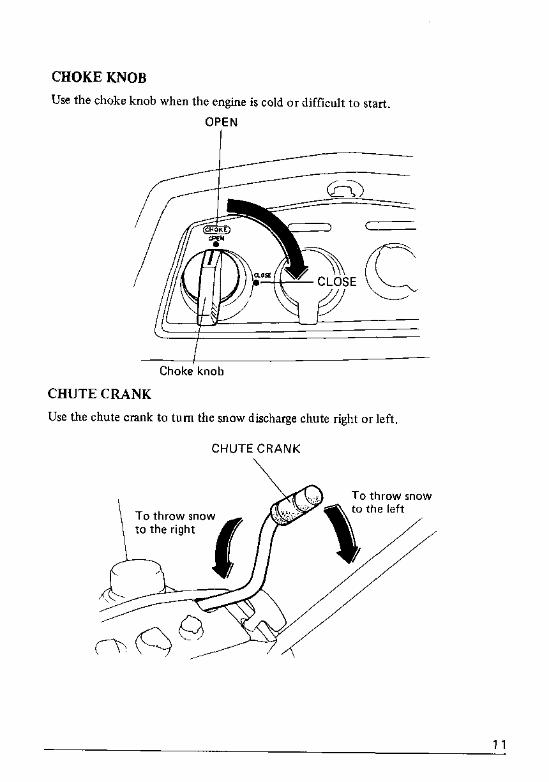
CHOKE KNOB
Use the choke knob when the engine is cold or difficult to start.
OPEN
I
I Choke knob
CHUTE CRANK
Use the chute crank to turn the snow discharge chute right or left.
CHUTE CRANK
To throw snow &, to the right
To throw snow
11

STARTER GRIP
Pull this grip to start the engine.
AUGER CLUTCH LEVER
When the clutch lever is squeezed, the snow throwing mechanism is put into operation, and the snow thrower moves forward.
Operates stops
Auge; clutch lever
NOTE: Never squeeze auger clutch on cleared ground; the snow thrower will start suddenly.
12

CHUTE GUIDE
The chute guide controls the snow discharge angle.
Low and
High and far
13

ITEMS TO BE CHECKED BEFORE STARTING THE ENGINE.
Stop the engine before inspecting the engine. The snow thrower must be placed on a
level surface before inspecting it.
FUEL LEVEL
Inspection: Unscrew the fuel cap. If the fuel level is not up near the cap, add gasoline to the UPPER LIMIT as shown.
Your engine is designed to use any gasoline that has a pump octane number (F) of 86 or higher, or that has a research octane number of 91 or higher. Gasoline pumps at service station normally display the pump octane number. We recommend that you use unleaded fuel because it produces fewer engine and spark plug deposits and extends the life of exhaust system components.
Never use stale or contaminated gasoline or an oil/gasoline mixture. Avoid getting dirt, dust or water in the fuel tank. Use of a lower octane gasoline can cause persistent “pinging” or heavy “spark knock” (a metallic rapping noise) which, if severe, can lead to engine damage.
CAUTION: If “spark knock” or “pinging” occurs at a steady engine speed under normal load, change brands of gasoline. If spark knock or pinging persists, consult your authorized Honda dealer. Failure to do so is considered misuse, and damage caused by misuse is not covered by Honda’s Limited Warranty.
Occasionally you may experience light spark knock while operating under heavy loads. This is no cause for concern, it simply means your engine is operating efficiently.
Fuel cap Fuel inlet
Mouth of fuel inlet
- Gasoline - --
14
l Gasoline is extremely flammable and is explosive under certain conditions. l Refuel in a well-ventilated area with the engine stopped. Do not smoke or allow
flames or sparks in the area where the engine is refueled or where gasoline is stored. l Do not overfill the fuel tank (there should be no fuel in the filler neck). After
refueling, make sure the tank cap is closed properly and securely. l Be careful not to spill fuel when refueling. Spilled fuel or fuel vapor may ignite. If
any fuel is spilled, make sure the area is dry before starting the engine. l Avoid repeated or prolonged contact with skin or breathing of vapor.
KEEP OUT OF REACH OF CHILDREN.
GASOLINES CONTAINING ALCOHOL
If you decide to use a gasoline containing alcohol (gasohol), be sure it’s octance rating is at least as high as that recommended by Honda. There are two types of “gasohol”: one containing ethanol, and the other containing methanol. Do not use gasohol that contains more than 10% ethanol. Do not use gasoline containing methanol (methyl or wood alcohol) that does not also contain cosolvents and corrosion inhibitors for methanol. Never use gasoline containing more than 5% methanol, even if it has cosolvents and corrosion inhibitors.
NOTE: l Fuel system damage or engine performance problems resulting from the use of fuels
that contain alcohol is not covered under the warranty. Honda cannot endorse the use of fuels containing methanol since evidence of their suitability is as yet incomplete.
l Before buying fuel from an unfamiliar station, try to find out if the fuel contains alcohol, if it does, confirm the type and percentage of alcohol used. If you notice any undesirable operating symptoms while using a gasoline that contains alcohol, or one that you think contains alcohol, switch to a gasoline that you know does not contain alcohol.
15

ENGINE OIL LEVEL Inspection: With the snow thrower on a level surface, remove the oil filler gauge. If the level is low, add the recommended oil (see below) to the “upper” mark on the level gauge. Do not overfill; excess oil will result in power loss and smoking.
-20 0 20 40 WF
.-30 -20 -10 0 1OT
Oil filler cap and dipstick
Oil inlet
Upper limit Lower limit
Oil filler gauge
Replenishing oil:
CAUTION.
* Engine oil is a major factor affecting engine performance and service life. Non-
detergent or vegetable oils are not recommended.
* Running the engine with insufficient oil can cause serious engine damage.
Use HONDA 4-stroke, or an equivalent high detergent, premium quality motor oil certified to meet or exceed U.S.. automobile manufacturers’ requirements for service classification SE. (Motor oils classified SE will show this designation on the container.) SAE 5 W-30 is recommended for general, all-temperature use. If single viscosity oil is used, select the appropriate viscosity for fhe average temperature in your area.
16

STARTING INSTRUCTIONS.
1. Turn the engine switch to the ON position.
ON I -
-T- \ / .---l
0 ) OFF 0
‘L.-l
-1 Engine switch
2. Turn the fuel valve to the ON position.
Fuel valve
17

3. In cold weather and when the engine is cold, turn the choke knob to the CLOSE position.
OPEN
I I Choke knob
4. Pull the starter grip lightly until you feel resistance, the? pull briskly.
NOTE: Don’t allow the rope to snap back; return it ge’ntly by hand. Otherwise, the starting mechanism might be damaged. While the engine is in operation, don’t pull the starter grip or damage may result.
18
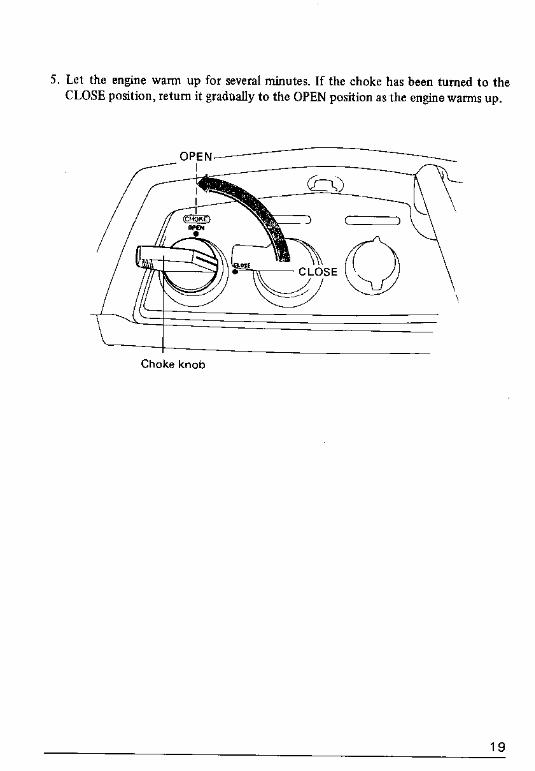
5. Let the engine warm up for several minutes. If the choke has been turned to the CLOSE position, return it gradually to the OPEN position as the engine warms up.
OPEN- /-----I --
h 1 L
\
\
I
Choke knob
19

CLEARING SNOW - THE PROPER WAY.
Before operating the snow thrower, please read the following instructions on its safe operation:
THE CORRECT PROCEDURE FOR OPERATING THE SNOW THROWER
1. Hold the handle firmly with your right hand. 2. When you squeeze the auger clutch lever with your left hand, the snow-throwing
mechanism will commence operation. When you release your hand, it will stop.
Auger stops
Auger dutch lever
3. The snow thrower will move forward as long as the auger contacts the ground. To stop, push down on the handle to pivot the auger up and away from the ground, or release the auger clutch lever.
NOTE: Make sure that the auger clutch lever is functioning correctly. If not, stop the engine and readjust the auger clutch cable. (For adjustment, see page 29).
When you are operating the snow thrower, be sure your footing is secure and keep your hands firmly on the handle. Walk, never run with the machine.
20
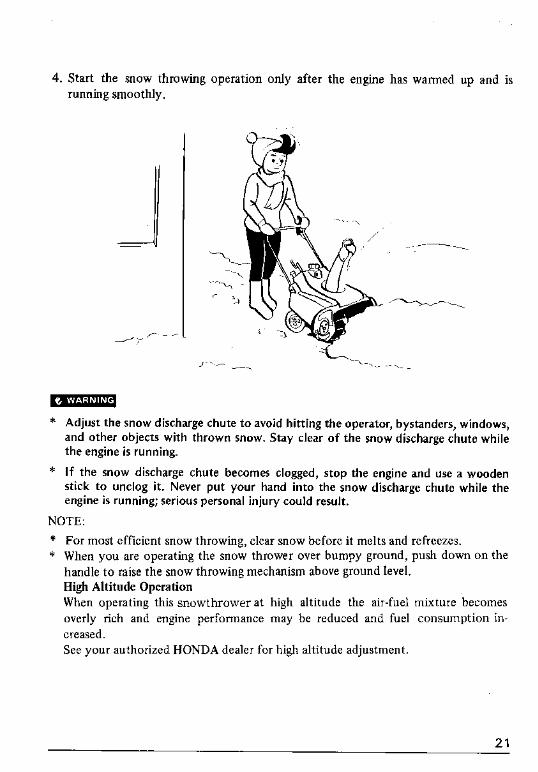
4. Start the snow throwing operation only after the engine has warmed up and is running smoothly.
* Adjust the snow discharge chute to avoid hitting the operator, bystanders, windows, and other objects with thrown snow. Stay clear of the snow discharge chute while the engine is running.
* If the snow discharge chute becomes clogged, stop the engine and use a wooden stick to unclog it. Never put your hand into the snow discharge chute while the engine is running; serious personal injury could result.
NOTE:
* For most efficient snow throwing, clear snow before it melts and refreezes. * When you are operating the snow thrower over bumpy ground, push down on the
handle to raise the snow throwing mechanism above ground level. High Altitude Operation When operating this snowthrower at high altitude the air-fuel mixture becomes overly rich and engine performance may be reduced and fuel consumption in- creased. See your authorized HONDA dealer for high altitude adjustment.
21

5. When the temperature is high, and the snow is wet and heavy, operate at reduced speed.
.\2’\ /‘,/ 0 A- /-
/* ‘/ ,\;-- ’ I \ I I
* Walk the snow thrower slowly to remove hard or deep snow. Push handle for addi- tional traction and overlap each swath if necessary.
6. When the height of the snow is greater than the height of the snow-throwing mech- anism, push the snow thrower back and forth to remove snow gradually.
22
STOPPING THE ENGINE - THE PROPER WAY.
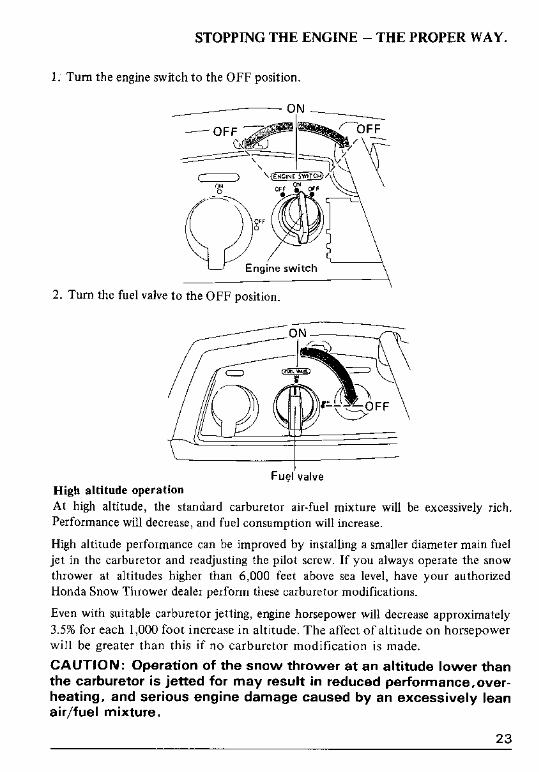
1. Turn the engine switch to the OFF position.
2. Turn the fuel valve to the OFF position.
High altitude operation Fuel’valve
At high altitude, the standard carburetor air-fuel mixture will be excessively rich. Performance will decrease, and fuel consumption will increase.
High altitude performance can be improved by installing a smaller diameter main fuel jet in the carburetor and readjusting the pilot screw. If you always operate the snow thrower at altitudes higher than 6,000 feet above sea level, have your authorized Honda Snow Thrower dealer perform these carburetor modifications.
Even with suitable carburetor jetting, engine horsepower will decrease approximately 3.5% for each 1,000 foot increase in altitude. The affect of altitude on horsepower will be greater than this if no carburetor modification is made.
CAUTION: Operation of the snow thrower at an altitude lower than the carburetor is jetted for may result in reduced performance,over- heating, and serious engine damage caused by an excessively lean air/fuel mixture.
23

PERIODIC MAINTENANCE - THE PROPER PROCEDURE.
CHECK DAILY: Check the following points daily to ensure safe, reliable operation
Engine oil: Check to see if the oil is at the correct level. Check whether any oil is leaking. Gasoline: Check the level of the gasoline.
Nuts, bolts and screws: Check to see that they are tight. Snow-throwing components: Check to see that the rubber parts of the auger and auger housing guard are in good condition, If there are any problems, see your authorized HONDA dealer.
Rubber parts of the auger and blower
,Auger housing guard
CHECK DURING THE FIRST MONTH OF OPERATION:
* Check the rubber parts of the auger and blower. * Tighten nuts, bolts, parts, etc.
24

MAINTENANCE SCHEDULE
Periodic inspection and adjustment of the Honda snowthrower is essential if high level
performance is to be maintained. Regular maintenance will also ensure a long service
life. The required service intervals and the kind of maintenance to be performed are
described in the following chart.
Every 3 years (2)
Combustion chamber
NOTE: (1) These parts may require more frequent inspection and replacement under heavy use. (2) These items should be serviced by an authorized Honda dealer, unless the owner has
the proper tools and is mechanically proficient. See the Honda Shop Manual.
25
MAINTENANCE PROCEDURES.
BS top the engine of the snow thrower, remove the high tension wire
from the spark plug, and place it on a level surface before checking or performing
maintenance service.
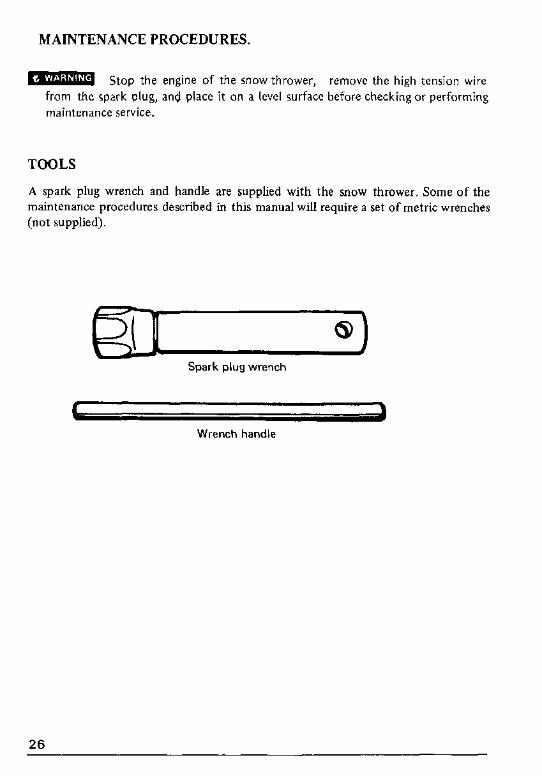
TOOLS
A spark plug wrench and handle are supplied with the snow thrower. Some of the maintenance procedures described in this manual will require a set of metric wrenches (not supplied).
Spark plug wrench
c Wrench handle
26
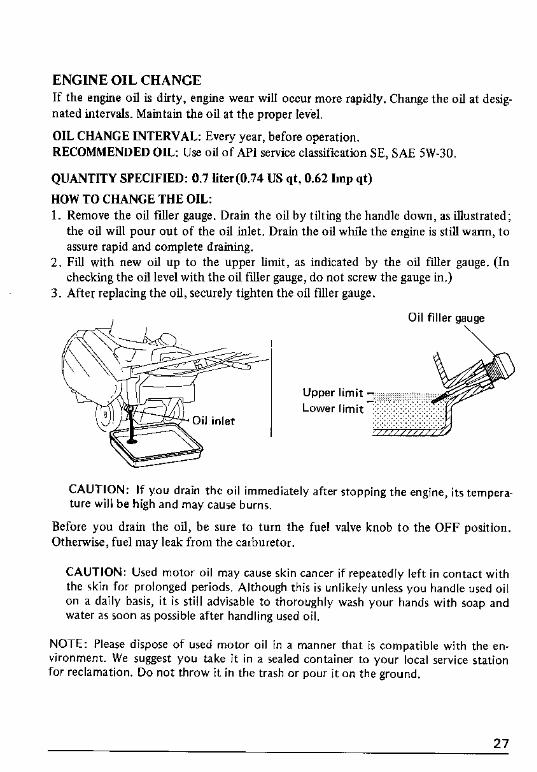
ENGINE OIL CHANGE
If the engine oil is dirty, engine wear will occur more rapidly. Change the oil at desig- nated intervals. Maintain the oil at the proper lev’el.
OIL CHANGE INTERVAL: Every year, before operation. RECOMMENDED OIL: Use oil of API service classification SE, SAE 5W-30.
QUANTITY SPECIFIED: 0.7 liter(0.74 US qt, 0.62 Imp qt)
HOW TO CHANGE THE OIL: 1.
2.
3.
Remove the oil filler gauge. Drain the oil by tilting the handle down, as illustrated; the oil will pour out of the oil inlet. Drain the oil while the engine is still warm, to assure rapid and complete draining. Fill with new oil up to the upper limit, as indicated by the oil filler gauge. (In checking the oil level with the oil filler gauge, do not screw the gauge in.) After replacing the oil, securely tighten the oil filler gauge.
Oil filler gauge
Upper limit - -_ :: Lower limit .:.:.:.:.:.:.:.:.:.:.:.:.
CAUTION: If YOU drain the oil immediately after stopping the engine, its tempera- ture will be high and may cause burns.
Before you drain the oil, be sure to turn the fuel valve knob to the OFF position. Otherwise, fuel may leak from the carburetor.
CAUTION: Used motor oil may cause skin cancer if repeatedly left in contact with the skin for prolonged periods. Although this is unlikely unless you handle used oil on a daily basis, it is still advisable to thoroughly wash your hands with soap and water as soon as possible after handling used oil.
NOTE: Please dispose of used motor oil in a manner that is compatible with the en- vironment. We suggest you take it in a sealed container to your local service station for reclamation. Do not throw it in the trash or pour it on the ground.
27
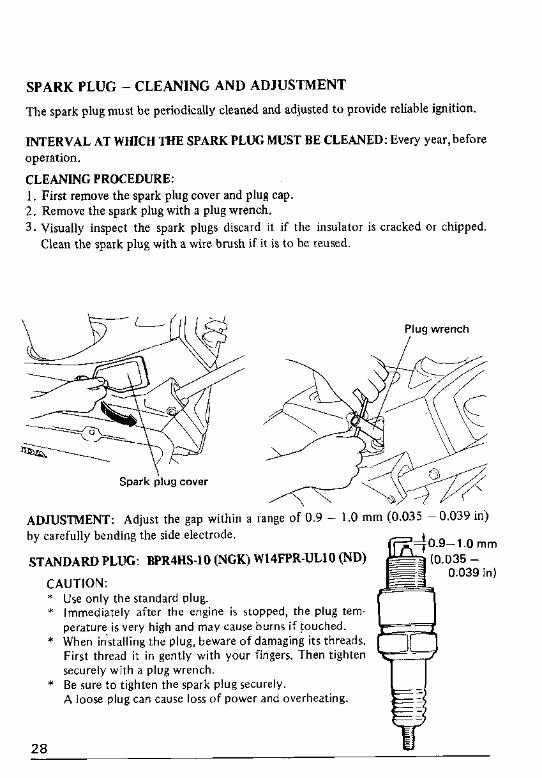
SPARK PLUG - CLEANING AND ADJUSTMENT
The spark plug must be periodically cleaned and adjusted to provide reliable ignition.
INTERVAL AT WHICH THE SPARK PLUG MUST BE CLEANED: Every year, before operation.
CLEANING PROCEDURE: 1. First remove the spark plug cover and plug cap. 2. Remove the spark plug with a plug wrench.
3. Visually inspect the spark plugs discard it if the insulator is cracked or chipped. Clean the spark plug with a wire brush if it is to be reused.
Spark plug cover
Plug wrench
/
ADJUSTMENT: Adjust the gap within a range of 0.9 - 1.0 mm (0.035 - 0.039 in) by carefully bending the side electrode.
STANDARD PLUG: BPR4HS-10 (NGK) W14FPR-ULlO (ND)
CAUTION: Use only the standard plug.
*
Immediately after the engine is stopped, the plug tem- perature is very high and may cause burns if touched. When installing the plug, beware of damaging its threads. First thread it in gently with your fingers. Then tighten securely with a plug wrench. Be sure to tighten the spark plug securely. A loose plug can cause loss of power and overheating.
28
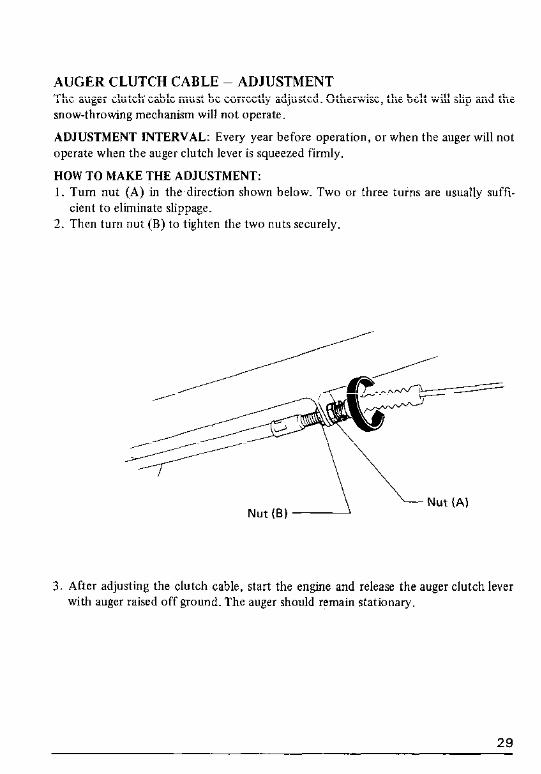
AUGER CLUTCH CABLE - ADJUSTMENT The auger clutch cable must be correctly adjusted. Otherwise, the belt will slip and the snow-throwing mechanism will not operate.
ADJUSTMENT INTERVAL: Every year before operation, or when the auger will not operate when the auger clutch lever is squeezed firmly.
HOW TO MAKE THE ADJUSTMENT: 1. Turn nut (A) in the-direction shown below. Two or three turns are usually suffi-
cient to eliminate slippage. 2. Then turn nut (B) to tighten the two nuts securely.
3. After adjusting the clutch cable, start the engine and release the auger clutch lever with auger raised off ground. The auger should remain stationary.
29

AUGERRUBBERPARTS-REPLACEMENT
When the rubber parts of the auger wear out, the snow thrower’s efficiency will decline and it will cease to move ahead.
REPLACEMENT INTERVAL: Every 5 years, or when the machine ceases to move
forward or its snow throwing efficiency declines.
CHECKING: When the distance from the auger shaft to the edge of the auger rubber is worn to less than 87 mm (3.4 in), replace it.
HOWTOREPLACE:
1. Remove auger and auger rubber attaching bolts and nuts. 2. Push collars into holes in new rubbers. 3. Install rubbers with symbols facing forward as shown.
Apply soapy water to the rubbers if the collars are difficult to install. Never apply engine oil to the auger and auger rubbers, as oil will ruin rubber parts.
Forward direction V
Symbols
\ Auger rubber
Scale Service Limit: 87 mm (3.4 in)
30
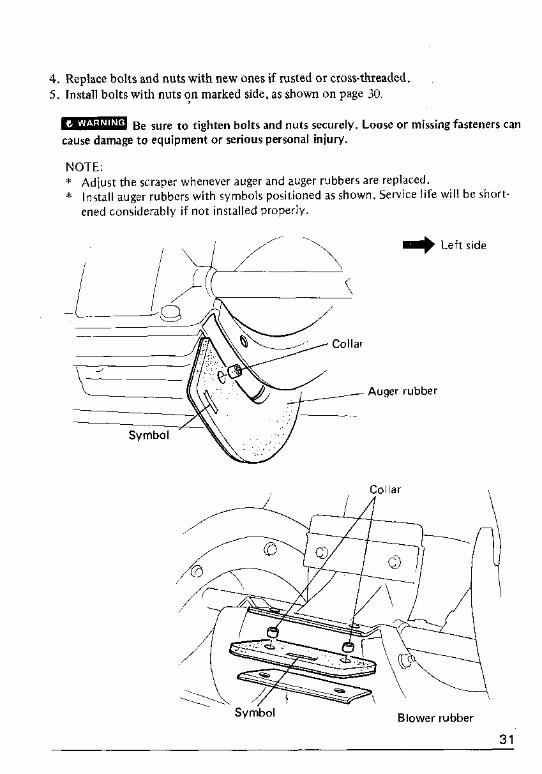
4. Replace bolts and nuts with new ones if rusted or cross-threaded. 5. Install bolts with nuts ?n marked side, as shown on page 30.
-B e sure to tighten bolts and nuts securely. Loose or missing fasteners can
cause damage to equipment or serious personal injury.
NOTE:
* Adjust the scraper whenever auger and auger rubbers are replaced. * Install auger rubbers with symbols positioned as shown. Service life will be short-
ened considerably if not installed properly.
Auger rubber
Left side
Symbol Blower rubber
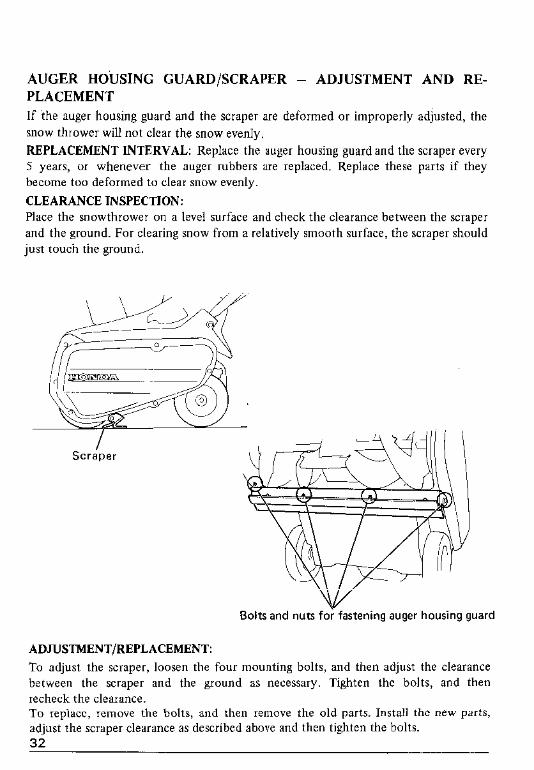
AUGER HOUSING GUARD/SCRAPER - ADJUSTMENT AND RE- PLACEMENT
If the auger housing guard and the scraper are de.formed or improperly adjusted, the
snow thrower will not clear the snow evenly.
REPLACEMENT INTERVAL: Replace the auger housing guard and the scraper every 5 years, or whenever the auger rubbers are replaced. Replace these parts if they become too deformed to clear snow evenly.
CLEARANCE INSPECTION: Place the snowthrower on a level surface and check the clearance between the scraper and the ground. For clearing snow from a relatively smooth surface, the scraper should just touch the ground.
Scraper
Bolts and nuts for fastening auger housing guard
ADJUSTMENT/REPLACEMENT:
To adjust the scraper, loosen the four mounting bolts, and then adjust the clearance between the scraper and the ground as necessary. Tighten the bolts, and then recheck the clearance. To replace, remove the bolts, and then remove the old parts. Install the new parts, adjust the scraper clearance as described above and then tighten the bolts. 32
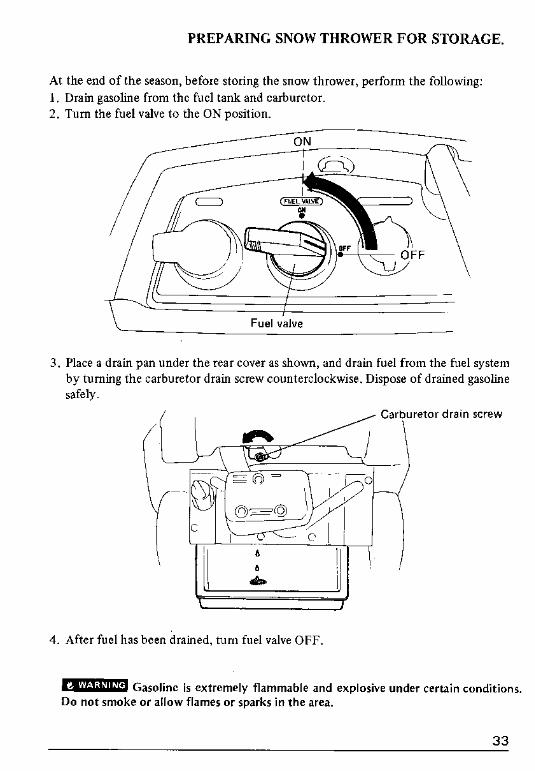
PREPARING SNOW THROWER FOR STORAGE.
At the end of the season, before storing the snow thrower, perform the following:
1. Drain gasoline from the fuel tank and carburetor. 2. Turn the fuel valve to the ON position.
3. Place a drain pan under the rear cover as shown, and drain fuel from the fuel system by turning the carburetor drain screw counterclockwise. Dispose of drained gasoline safely.
4. After fuel has been drained, turn fuel valve OFF.
-G I’ aso me is extremely flammable and explosive under certain conditions. Do not smoke or allow flames or sparks in the area.
33

Remove the spark plug and pour three tablespoonful of clean motor oil into the cylin- der. Pull the starter rope slowly two or three times to distribute the oil. Reinstall the spark plug.
Pull the starter grip until resistance is felt. This closes the valves and protects them from dust and corrosion.
34
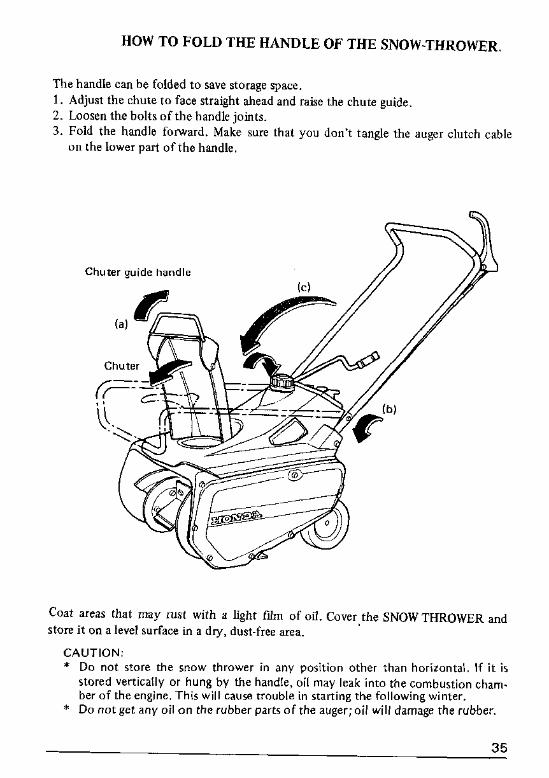
HOW TO FOLD THE HANDLE OF THE SNOW-THROWER.
The handle can be folded to save storage space. 1. Adjust the chute to face straight ahead and raise the chute guide. 2. Loosen the bolts of the handle joints. 3. Fold the handle forward. Make sure that you don’t tangle the auger clutch cable
on the lower part of the handle.
Chuter guide handle
Coat areas that may rust with a light film of oil. Cover the SNOW THROWER and
store it on a level surface in a dry, dust-free area.
CAUTION: * Do not store the snow thrower in any position other than horizontal. If it is
stored vertically or hung by the handle, oil may leak into the combustion cham. ber of the engine. This will cause trouble in starting the following winter.
* Do not get any oil on the rubber parts of the auger; oil will damage the rubber.
35

Prior to extended storage, lubricate the parts indicated.
36

TROUBLE SHOOTING.
ENGINE DOES NOT START * Is there gasoline in the fuel tank? * Are you starting the engine in accordance with instructions in the Owner’s Manual? * Does the spark plug spark? To test the plug, remove the plug cover and plug. At-
tach the high-tension wire to the plug cap. Ground the plug to the engine. (To avoid electric shock, don’t touch any part of the plug except its cap.) Turn the engine switch knob to the ON position. Pull the starter grip vigorously. Check to see that sparks appear between the electrodes of the plug.
B Before you check the plug, make sure that there is no gasoline on the cyl- inder or other parts. If there is any gasoline on the engine, it may catch fire from the sparks. Wipe away the gasoline with a rag and wait until every trace of the gasoline dries before testing the plug.
Perform the above checking in a well ventilated location.
37

OPERATING PROBLEMS
l Snow throwing performance is extremely poor.
l Ordinary snow gets easily clogged - Auger clutch cable Adjustment (P. 29) in the machine.
l The engine does not stop when the auger stops after getting stuck in the snow.
l Snow is not cleared evenly
1
Scraper check (P. 32) Auger housing guard Adjustment (P. 30)
l Thrower does not move under its own
-{
Auger rubber check (P. 30) power or it is very heavy to push. Auger housing Adjustment (P.32)
l The chute is hard to move or will Disassemble and clean the chute not move at all. Apply grease
* For repair work, see your authorized HONDA dealer.
38

ORDERING REPLACEMENT PARTS.
When ordering replacement parts, always specify model, serial number, part num- ber, description and quantity required.
\ \ \ ?A J G, \ \ \
FLANGE BOLT 6x20 95700-06020-08 2243 I-727-003
72552-730-003 72521-730-003
39
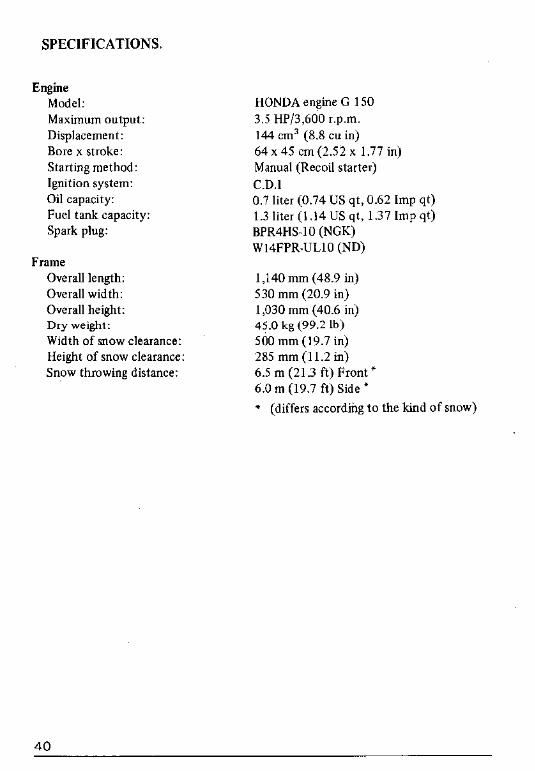
SPECIFICATIONS.
Engine Model: Maximum output: Displacement: Bore x stroke: Starting method: Ignition system: Oil capacity: Fuel tank capacity: Spark plug:
Frame Overall length: Overall width: Overall height: Dry weight: Width of snow clearance: Height of snow clearance: Snow throwing distance:
HONDA engine G 150
3.5 HP/3,600 r.p.m.
144 cm3 (8.8 cu in) 64 x 45 cm (2.52 x 1.77 in) Manual (Recoil starter)
C.D.1 0.7 liter (0.74 US qt, 0.62 Imp qt) 1.3 liter (1.14 US qt, 1.37 Imp qt) BPR4HS 10 (NGK) W14FPRULlO (ND)
1,140 mm (48.9 in) 530 mm (20.9 in) 1,030 mm (40.6 in) 45 .O kg (99.2 lb) 500 mm (19.7 in) 285 mm(11.2 in) 6.5 m (21.3 ft) Front * 6.0 m (19.7 ft) Side *
+ (differs according to the kind of snow)
40
Warranty Service
Owner Satisfaction
Your satisfaction and goodwill are important to your dealer and to us. All Honda warranty details are explained in the Distributor’s Limited Warranty. Normally, any problems concerning the product will be handled by your dealer’s service dapartment. If you have a warranty problem that has not been handled to your satisfaction, we suggest you take the following action:
l Discuss your problem with a member of dealership manage- ment. Often complaints can be quickly resolved at that level. If the problem has already been reviewed with the Service Man- ager, contact the owner of the dealership or the General Man-
ager. l lf your problem still has not been resolved to your Satisfaction,
Power Equipment Customer Relations Department of American Honda Motor Co., Inc.
American Honda Motor Co., Inc. Power Equipment Customer Relations Department P.O. Box 50 Gardena, California 90247-0805 Telephone: (213) 604-2400
We will need the following information in order to assist you:
-Your name, address, and telephone number -Product model and serial number -Date of purchase -Dealer name and address -Nature of the problem
After reviewing all the facts involved, you will be advised of what action can be taken. Please bear in mind that your problem will likely be resolved at the dealership, using the dealer’s facilities, equipment, and personnel, so it is very important that your initial contact be with the dealer.
Your purchase of a Honda product is greatly appreciated by both your dealer and American Honda Motor Co., Inc. We want to assist you in every way possible to assure your complete satisfac- tion with your purchase.
41

Current customer service contact information: United States, Puerto Rico, and U.S. Virgin Islands: Honda Power Equipment dealership personnel are trained professionals. They should be able to answer any question you may have. If you encounter a problem that your dealer does not solve to your satisfaction, please discuss it with the dealership's management. The Service Manager or General Manager can help. Almost all problems are solved in this way.
If you are dissatisfied with the decision made by the dealership's management, contact the Honda Power Equipment Customer Relations Office. You can write:
American Honda Motor Co., Inc. Power Equipment Division Customer Relations Office 4900 Marconi Drive Alpharetta, GA 30005-8847
Or telephone: (770) 497-6400 M-F, 8:30 am - 7:00 pm EST
When you write or call, please provide the following information:
• Model and serial numbers
• Name of the dealer who sold the Honda power equipment to you
• Name and address of the dealer who services your equipment
• Date of purchase
• Your name, address, and telephone number
• A detailed description of the problem