home wit super saver - red heart ed.pdf · 21blue skies crochet bedspread grannies set on point...
TRANSCRIPT
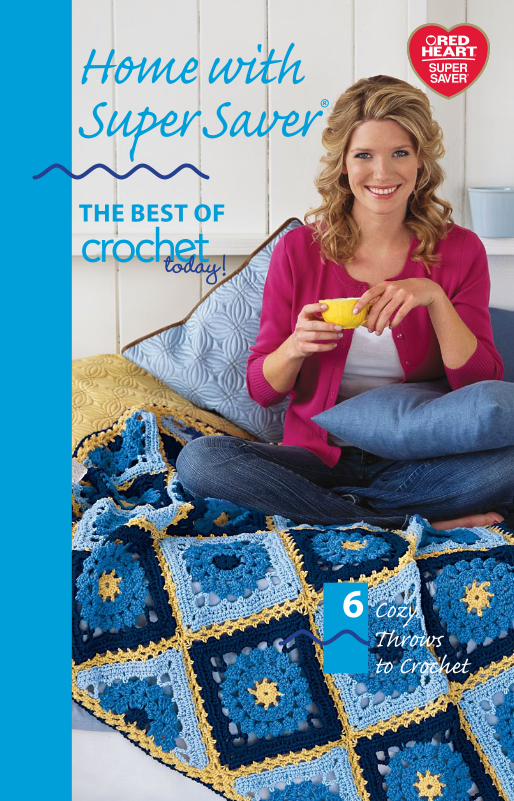
THE BEST OF
6 Cozy Throws to Crochet
Home withSuper Saver®
today!

2 Graphic Granny
6 Blue Skies
10 Blushing Grannies
14 Rose Garden
18 Classic Cabled Sampler
25 Patchwork
28 How to Crochet
30 Standard Yarn Weight System
31 Abbreviations
32 Skill Levels & Gauge Explained
CONTENTS
www.redheart.comVisit www.redheart.com for more information and inspiration!
We also recommend these sites:www.coatsandclark.comwww.crochettoday.com

Who doesn’t love getting cozy with a handmade afghan? Here at Crochet Today, we know that afghans and throws are among the most popular projects to crochet, so we decided to give you our very best Super Saver® blanket patterns all in one handy place.These projects represent our best-loved afghan patterns - from quick-and-easy throws to heirloom-worthy blankets and everything in between; you’re sure to find something here you love next time you want to stitch up something comfy and warm. If you like these patterns, there’s plenty more where they came from! Subscribe to Crochet Today to get loads of inspiration and instruction, six times a year. Just visit our website, www.crochettoday.com, to sign up. I hope you enjoy this collection of our greatest afghans. Have fun, and happy crocheting!
Brett Bara, Editor in Chief
Yarn Info
RED HEART® “Super Saver”: Art. E300Solids: 100% Acrylic; 7 ounces (198 g); approximately 364 yards (333 m) Prints & Multis: 100% Acrylic; 5 ounces (141 g); approximately 244 yards (223 m)Flecks: 96% Acrylic/4% Other Fibers; 5 ounces (141 g); approximately 260 yards (238 m)Machine wash and dry.
The projects in this book were created with RED HEART® yarns. For best results, we recommend following the pattern exactly as written. All instructions have been checked for accuracy; however, Coats & Clark is not responsible for typographical errors, differences in individual interpretation or other variances in work.
lETTER FROm THE EDITOR
www.redheart.com 1
Visit www.redheart.com for more information and inspiration!
We also recommend these sites:www.coatsandclark.comwww.crochettoday.com
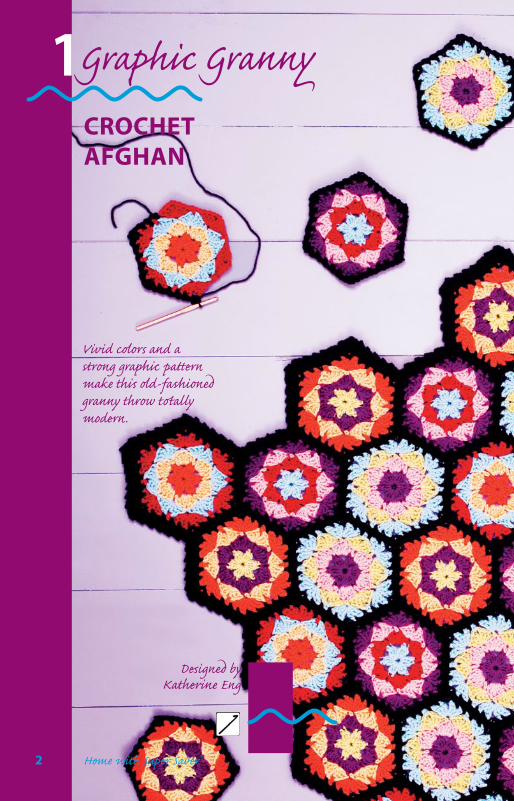
1CROCHET AFgHAN
1
Designed by Katherine Eng
Vivid colors and a strong graphic pattern make this old-fashioned granny throw totally modern.
Graphic Granny
2 Home with Super Saver®

Continued on next page
Graphic Granny Crochet Afghan Instructions
Skill level:
Afghan approximately 41” x 61”/104 x 155cm
materials:
Medium weight yarn: 2 skeins mC, 1 skein each A,B, C, D, E, F and g.
Project shown is stitched with Red Heart® “Super Saver®” in 312 Black mC, 256 Carrot A, 320 Cornmeal B, 883 Spa Blue C, 332 Ranch Red D, 661 Frosty Green E, 776 Dark Orchid F and 374 Country Rose g.
Crochet Hook: Size I/9 (5.5mm).
Extras: Yarn needle.
gauge: One granny hexagon measures 71⁄2”/19cm from point to point using size I/9 (5.5mm) crochet hook. CHECK YOUR GAUGE. Use any size hook to obtain the specified gauge.
Abreviations used in this pattern:ch: chain(s) sl st: slip stitchdc: double crochet sp(s): space(s)lp(s): loop(s) st(s): stitch(es)mC: main color yo: yarn over hooksc: single crochet*Repeat directions following * as many times as indicated.[ ] Repeat the directions inside brackets as many times as indicated.( ) Work directions inside parentheses into stitch indicated.
Special Abbreviations2Cl: (2 dc cluster stitch) [Yo, insert hook into sp and draw up a lp. Yo and draw through 2 lps on hook] twice, yo and draw through all 3 lps on hook.3Cl: (3 dc cluster stitch) [Yo, insert hook into sp and draw up a lp. Yo and draw through 2 lps on hook] 3 times, yo and draw through all 4 lps on hook.S-Shell: (small shell) Work 5 dc in same sp.l-Shell: (large shell) Work (3 dc, ch 2, 3 dc) in same st or sp.
BASIC gRANNY HExAgONWith first color, ch 4. Join ch with a sl st forming a ringRound 1 (right side): Ch 3 (counts as 1 dc), work 2CL in ring, ch 3, [work 3CL in ring, ch 3] 5 times, join round with a sl st in top of beginning 2CL—6 CL sts. Fasten off.Round 2: With right side facing, join next color with a sl st in same st as joining, ch 1, sc in same sp, work S-Shell in next ch-3 sp, [sc in top of next CL st, work S-Shell in next ch-3 sp] 5 times, join round with a sl st in first sc—6 S-Shells. Fasten off.Round 3: With right side facing, join next color with a sl st in center dc of any shell, ch 1, sc in same dc, work L-Shell in next sc, [sc in center dc of next shell, L-Shell in next sc] 5 times, join round with a sl st in first sc—6 L-Shells. Fasten off.Round 4: With right side facing, join next color with a sl st in ch-2 sp of any shell, ch 1, sc in same sp, ch 1, work L-Shell in next sc, [ch 1, sc in ch-2 sp of next shell, ch 1, L-Shell in next sc] 5 times, ch 1, join round with a sl st in first sc—6 L-Shells. Fasten off.
www.redheart.com 3
graphic granny Crochet Afghan Instructions1
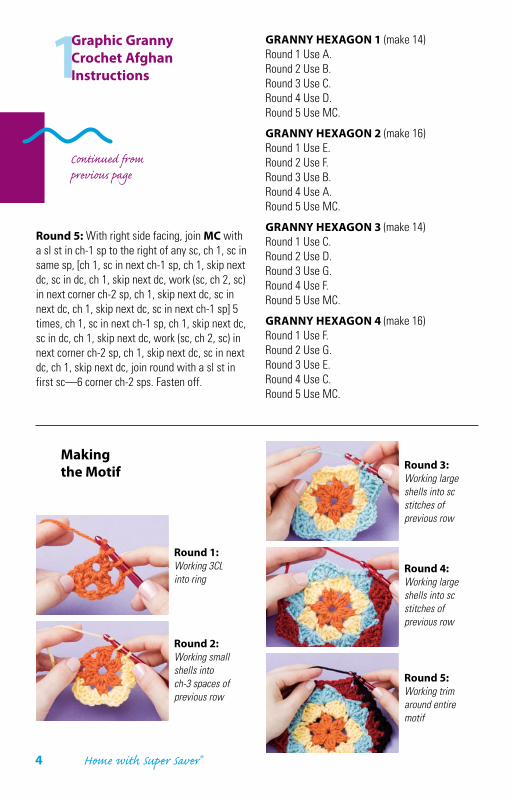
Round 5: With right side facing, join mC with a sl st in ch-1 sp to the right of any sc, ch 1, sc in same sp, [ch 1, sc in next ch-1 sp, ch 1, skip next dc, sc in dc, ch 1, skip next dc, work (sc, ch 2, sc) in next corner ch-2 sp, ch 1, skip next dc, sc in next dc, ch 1, skip next dc, sc in next ch-1 sp] 5 times, ch 1, sc in next ch-1 sp, ch 1, skip next dc, sc in dc, ch 1, skip next dc, work (sc, ch 2, sc) in next corner ch-2 sp, ch 1, skip next dc, sc in next dc, ch 1, skip next dc, join round with a sl st in first sc—6 corner ch-2 sps. Fasten off.
gRANNY HExAgON 1 (make 14)Round 1 Use A.Round 2 Use B.Round 3 Use C.Round 4 Use D.Round 5 Use MC.
gRANNY HExAgON 2 (make 16)Round 1 Use E.Round 2 Use F.Round 3 Use B.Round 4 Use A.Round 5 Use MC.
gRANNY HExAgON 3 (make 14)Round 1 Use C.Round 2 Use D.Round 3 Use G.Round 4 Use F.Round 5 Use MC.
gRANNY HExAgON 4 (make 16)Round 1 Use F.Round 2 Use G.Round 3 Use E.Round 4 Use C.Round 5 Use MC.
Continued from previous page
Round 1: Working 3CL into ring
Round 2: Working small shells into ch-3 spaces of previous row
Round 3: Working large shells into sc stitches of previous row
Round 4: Working large shells into sc stitches of previous row
Round 5: Working trim around entire motif
making the motif
1
4 Home with Super Saver®

graphic granny Crochet Afghan Instructions
1
2
1
2
1
2
1
2
1
3
4
3
4
4
3
4
3
3
4
3
4
4
3
4
3
2
4
2
4
3
4
2
4
2
2
4
2
4
3
4
2
4
2
3
1
3
1
1
3
1
3
1
2
1
2
1
2
1
2
1
HEXAGON AFGHANASSEMBLY DIAGRAM
ASSEMBLY DIAGRAM
FinishingWeave in all loose ends. Referring to assembly diagram, whipstitch granny hexagons together using 2 strands of MC as follows: place two hexagons together, wrong sides facing and edges even. Whipstitch through first front loop of hexagon at front and corresponding back loop of hexagon at back. Continue to whipstitch in each back loop and cor-responding front loop across. Working in this manner, continue to join hexagons together as indicated.
Edging Round 1 (right side): With right side facing, join mC with a sl st in bottom right corner ch-2 sp, ch 1, work (sc, ch 2, sc) in same sp, then continue along right side edge as follows: ** *[ch 1, sc in next ch-1 sp] 5 times, ch 1, work (sc, ch 2, sc) in next corner ch-2 sp, [ch 1, sc in next ch-1 sp] 5 times, ch 1*, sc in corner ch-2 sp before seam, then sc in corner ch-2 sp after seam**, repeat from ** to ** 7 times more, then repeat from * to * once more to top right corner ch-2 sp. Work (sc, ch 2, sc) in top right corner ch-2 sp, then continue across top edge as follows: ** *[ch 1, sc in next ch-1 sp] 5 times, ch 1, work (sc, ch 2, sc) in next corner ch-2 sp, [ch 1, sc in next ch-1 sp] 5 times, ch 1*, sc in corner ch-2 sp before seam, then sc in corner ch-2 sp after seam, [ch 1, sc in next ch-1 sp] 5 times, sc in corner ch-2 sp before seam, then sc in corner ch-2 sp after seam**, repeat from ** to ** twice more, then repeat from * to * once more to top
left corner ch-2 sp. Work (sc, ch 2, sc) in top left corner ch-2 sp, then continue along left side edge as for right side edge to bottom left corner ch-2 sp. Work (sc, ch 2, sc) in bottom left corner ch-2 sp, then continue along bottom edge as for top edge to bottom right corner ch-2 sp, join round with a sl st in first st.Round 2: Sl st in first corner ch-2 sp, ch 1, work (sc, ch 2, sc) in same sp, continue to work as follows: *work (sc, ch 2, sc) in each ch-1 sp and ch-2 sp, to the ch-1 sp to the right of seam, sc in this ch-1 sp, then sc in ch-1 sp to the left of seam; repeat from * around, join round with a sl st in first sc. Fasten off. Weave in remaining loose ends.
Assembly Diagram
www.redheart.com 5

12Blue SkiesCROCHET BEDSpREAD
Grannies set on point create a diamond effect in this colorful ’ghan. Shades of blue accented with pops of yellow bring to mind the sunny skies of spring.
Designed by Joyce Nordstrom
6 Home with Super Saver®

Blue Skies Crochet Bedspread Instructions
Skill level:
Bedspread approximately 53"/134.6cm wide x 67"/170cm long.
materials:
Medium weight yarn: 2 skeins each A,B, C, and D.
Project shown is stitched with Red Heart® “Super Saver®” in 320 Cornmeal A, 885 Delft Blue B, 381 Light Blue C and 387 Soft Navy D.
Crochet Hook: Size I/9 (5.5mm).
Extras: Yarn needle.
gauge: Rounds 1– 4 of Square = 6"/15cm diameter; 1 Square (including join-ing border) = 81⁄2 x 81⁄2"/ 21.6cm x 21.6cm using size I/9 (5.5mm) crochet hook.CHECK YOUR GAUGE. Use any size hook to obtain the specified gauge.
Abbreviations used in this pattern:ch: chain sc: single crochetdc: double crochet sk: skipdtr: double treble crochet sl st: slip stitchhdc: half double crochet st(s): stitch(es)rev sc: reverse single tr: treble crochet
crochet* Repeat directions following * as many times as indicated.( ) Work directions in parentheses into stitch indicated.[ ] Work directions in brackets number of times indicated.
Special Abbreviationsslanted-group Ch 3, 3 dc around post of dc just made.
How to make a gauge swatchCh 4; join with sl st in first ch to form a ring.Rounds 1–4 Work Rounds 1–4 of Square. Resulting gauge swatch should measure approx 6"/15cm diameter. Adjust hook size if necessary to obtain correct gauge.
SQUARE 1 (make 20)Work squares in the following color sequence: Work Rounds 1 and 2 with A, Rounds 3 and 4 with B, and Rounds 5–7 with C. With first color, ch 4; join with sl st in first ch to form a ring. Round 1: Ch 1, work 16 sc in ring; join with sl st in first sc—16 sc.Round 2: Ch 5 (counts as hdc, ch 3), *sk next st, hdc in next st, ch 3; repeat from * around; join with sl st in 2nd ch of beginning ch—8 hdc and 8 ch-3 spaces. Fasten off first color.Round 3: Join 2nd color with sl st in any ch-3 space, ch 3 (counts as dc), 3 dc in same space, *sk next st, 4 dc in next ch-3 space; repeat from * around; join with sl st in top of beginning ch—32 dc.Round 4: Ch 3, dc in same st as join, work slanted-group around dc just made and beginning ch (hold dc and beginning ch together and work around both at the same time), sk next dc, [dc in next dc, work slanted-group around dc just made, sk next dc] 15 times; join with sl st in top of beginning ch—16 slanted-groups. Fasten off 2nd color.
Round 5: Join third color in top of ch-3 of any slanted-group, ch 8 (counts as tr, ch 4), sc in top of next ch-3, [ch 4, sc in top of next ch-3] 2 times, (ch 4, (tr, ch 4, tr) in top of next ch-3
Continued on next page
www.redheart.com 7

(corner made), [ch 4, sc in top of next ch-3) 3 times] 3 times, ch 4, tr in base of beginning ch; join with ch 2, hdc in 4th ch of beginning ch (counts as ch-4 space)—8 tr, 12 sc, and 20 ch-4 spaces.Round 6: Ch 2, turn, 3 hdc in space just made (formed by ch-2, hdc join of previous round), [4 hdc in next 4 ch-4 spaces, (4 hdc, ch 3, 4 hdc) in next ch-4 space (corner)] 3 times, 4 hdc in next 4 ch-4 spaces, 4 hdc in beginning space; join with ch 2, hdc in top of beginning ch—4 ch-4 space, and 24 hdc on each side.Round 7: Ch 2, turn, hdc in space just made (formed by ch-2, hdc join of previous round), [hdc in next 24 hdc, (2 hdc, ch 3, 2 hdc) in next ch-3 space (corner)] 3 times, hdc in next 24 hdc, 2 hdc in beginning space, ch 3; join with sl st in top of beginning ch—4 ch-3 spaces, and 28 hdc on each side. Fasten of 3rd color.
SQUARE 2 (make 12)Work as for Square 1 in the following color sequence: Work Rounds 1 and 2 with C, Rounds 3 and 4 with B, and Rounds 5–7 with A.
HAlF SQUARE (make 14)With D, ch 4; join with sl st in first ch to form a ring.Row 1: (right side) Ch 1, work 9 sc in ring.Row 2: Ch 5 (counts as hdc, ch 3), turn, sk next sc, hdc in next sc, [ch 3, sk next sc, hdc in next sc] 3 times—5 hdc and 4 ch-3 spaces. Fasten off D.With right side facing, join B in top of first hdc.Row 3: (right side) Ch 3 (counts as dc), 3 dc in next ch-3 space, [sk next hdc, 4 dc in next ch-3 space] 3 times, dc in 2nd ch of turning ch—17 dc.
Row 4: Ch 3 (counts as dc), turn, dc in same st, work slanted-group around dc just made, [sk next st, dc in next st, work slanted-group around dc just made] 8 times—9 slanted-groups. Fasten off B.With right side facing join C in top of first ch-3.Row 5: (right side) Ch 8 (counts as dtr, ch 3), tr in same st (corner), [ch 4, sc in top of next ch-3] 3 times, ch 4, (tr, ch 3, tr) in next ch-3 (corner), [ch 4, sc in top of next ch-3] 3 times, ch 4, (tr, ch 3, dtr) in last ch-3 (for corner)—3 corners, 6 sc, 8 ch-4 spaces.Row 6: Ch 1, turn, sl st in first ch-3 space, ch 2 (counts as hdc), 3 hdc in same ch-3 space, 4 hdc in next 4 ch-4 spaces, (4 hdc, ch 3, 4 hdc) in next ch-3 space (corner), 4 hdc in next 4 ch-4 spaces, 3 hdc in next ch-3 space (corner), hdc in 5th ch of turning ch—1 ch-3 space, 24 hdc on each side.Row 7: Ch 2, turn, hdc in each hdc to ch-3 space, (4 hdc, ch 3, 4 hdc) in ch-3 space (corner), hdc in each hdc to end—1 ch-3 space and 28 hdc on each side.
FinishingJoin squaresA ch-3 border is worked around the first square. As the border is worked around the next square, the ch-3’s are joined along one or more edges. Refer to the assembly diagram to determine which squares and edges to join. Join the full squares first then join the half squares.
First squareWith right side facing, join A with sc in any corner ch-3 space.Round 1 Ch 3, sc in same ch-3 space, ch 3, sk next 3 sts, sc in next st, [ch 3, sk next 2 sts, sc in next st] 7 times, ch 3, sk next 3 sts, *(sc, ch 3, sc) in corner ch-3 space, ch 3, sk next 3 sts, sc in next st, [ch 3, sk next 2 sts, sc in next st] 7 times, ch 3, sk next 3 sts; repeat from * around; join with sl st in first sc. Fasten off.
Next squaresWith right side facing, join A with sc in any corner ch-3 space. Work border, as for first square, around non-joining edges. Join edge(s)
12Continued from previous page
Blue Skies Crochet Bedspread Instructions
8 Home with Super Saver®
to neighbor squares according to assembly diagram. To join an edge, begin with sc in ch-3 space, and work as follows.
Joining Edge Ch 1, sc in corresponding corner ch-3 space of previous square(s), ch 1, sc in same corner ch-3 space of current square; ch 1, sc in next ch-3 space of previous square, ch 1, sk next 3 sts of current square, *sc in next st of current square, ch 1, sc in next ch-3 space of previous square(s), ch 1, sk next 2 sts of current square; repeat from * across to next corner ch-3 space of current square, sc in corner ch-3 space of current square.Join all squares according to assembly diagram.
Join Half SquarePosition half block as shown in assembly diagram. With right side facing, join A with sc in side corner space of half square.Round 1: Ch 1, sc in corresponding corner space of previous square, ch 1, sc in same corner space of current half square, *ch 1, sc in next ch-3 space of previous square, ch 1, sk next 3 sts of current half square, sc in next st of current half square, [ch 1, sc in next ch-3 space of previous square, ch 1, sk next 2 sts of current half square, sc in next st of current half square] 7 times, ch 1, sc in next ch-3 space of previous square, ch 1, sk next 3 sts of current half square, sc in corner ch-3 space of current half square, ch 1, sc in corresponding corner space of previous square(s), ch 1, sc in same corner space of current half square; repeat from * one more time. Fasten off. Leave long edge of half square unworked.
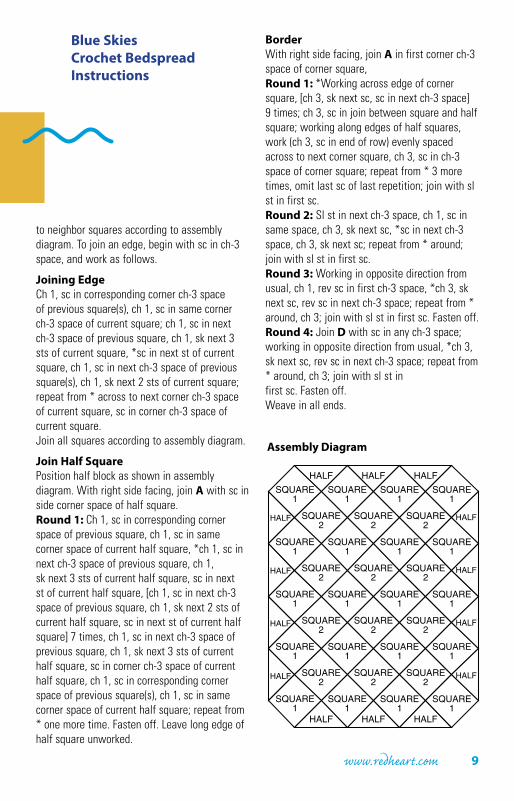
BorderWith right side facing, join A in first corner ch-3 space of corner square, Round 1: *Working across edge of corner square, [ch 3, sk next sc, sc in next ch-3 space] 9 times; ch 3, sc in join between square and half square; working along edges of half squares, work (ch 3, sc in end of row) evenly spaced across to next corner square, ch 3, sc in ch-3 space of corner square; repeat from * 3 more times, omit last sc of last repetition; join with sl st in first sc.Round 2: Sl st in next ch-3 space, ch 1, sc in same space, ch 3, sk next sc, *sc in next ch-3 space, ch 3, sk next sc; repeat from * around; join with sl st in first sc.Round 3: Working in opposite direction from usual, ch 1, rev sc in first ch-3 space, *ch 3, sk next sc, rev sc in next ch-3 space; repeat from * around, ch 3; join with sl st in first sc. Fasten off.Round 4: Join D with sc in any ch-3 space; working in opposite direction from usual, *ch 3, sk next sc, rev sc in next ch-3 space; repeat from * around, ch 3; join with sl st in first sc. Fasten off.Weave in all ends.
SQUARE1
HALF
HALF
HALF
HALF
HALF
HALF
HALF
HALF
HALF HALF HALF
HALF HALF HALF
SQUARE1
SQUARE1
SQUARE1
SQUARE2
SQUARE2
SQUARE2
SQUARE2
SQUARE1
SQUARE1
SQUARE1
SQUARE1
SQUARE1
SQUARE2
SQUARE2
SQUARE2
SQUARE2
SQUARE1
SQUARE1
SQUARE1
SQUARE1
SQUARE1
SQUARE2
SQUARE2
SQUARE2
SQUARE2
SQUARE1
SQUARE1
SQUARE1
SQUARE1
SQUARE1
SQUARE1
FLORIDA SUNSHINE & SEA AFGHANDIAGRAM 2CONSTRUCTION DIAGRAM
CONSTRUCTION DIAGRAM
Blue Skies Crochet Bedspread Instructions
Assembly Diagram
www.redheart.com 9

13Blushing GranniesCROCHET THROw
We’re turning shades of red over this darling granny square throw. Old-fashioned charm and easy construction make it a pure pleasure to stitch!.
Designed by Michele Wilcox
10 Home with Super Saver®

Blushing Grannies Crochet Throw Instructions
Skill level:
Throw approximately 36"/ 91.5cm x 50"/127cm.
materials:
Medium weight yarn: 2 skeins C, 1 skein each A and B.
Project shown is stitched with Red Heart® “Super Saver®” in 332 Ranch Red A, 376 Burgundy B, and 378 Claret C.
Crochet Hook: Size I/9 (5.5mm).
Extras: Yarn needle.
gauge: Rounds 1-3 of square = 3½" x 3½"/9cm x 9cm Full square = 6¾" x 6¾"/17cm x 17cm.CHECK YOUR GAUGE. Use any size hook to obtain the specified gauge.
Abbreviations used in this pattern:ch: chaindc: double crochetlp(s): loop(s)sc: single crochetsk: skipsl st(s): slip stitch(es)sp(s): space(s) st(s): stitch(es)* Repeat directions following * as many times as indicated.( ) Work directions inside parentheses into stitch or space indicated.
How to make a gauge swatchWith A, ch 5. Join with sl st in first ch to form a ring.Work Rounds 1-3 of square. Swatch should measure 31⁄2" x 31⁄2"/9cm x 9cm. Adjust hook size if necessary to obtain correct gauge.
Square (make 35) With A, ch 5. Join with sl st in first ch to form a ring.Round 1: Ch 3 (counts as dc), work 15 dc in ring; join with sl st in 3rd ch of beginning ch-3 – 16 dc.Round 2: Ch 1, sc in same ch as joining; *ch 4, sk next dc**; sc in next dc; repeat from * around, ending final repeat at **; join with sl st in first sc – 8 sc and 8 ch-4 sps.Round 3: Ch 1, sc in same sc as joining; *2 sc in next ch-4 sp, (2 dc, ch 2, 2 dc) in next sc, 2 sc in next ch-4 sp**; sc in next sc; repeat from * around, ending final repeat at **; join with sl st in first sc – 20 sc, 16 dc and 4 corner ch-2 sps. Fasten off A.Round 4: Join B with sl st in any corner ch-2 sp, ch 3 (counts as dc), (dc, ch 2, 2 dc) in same ch-2 sp as joining; *dc in next 9 sts**; (2 dc, ch 2, 2 dc) in next corner ch-2 sp; repeat from * around, ending final repeat at **; join with sl st in 3rd ch of beginning ch-3 – 52 dc and 4 corner ch-2 sps.Round 5: *Ch 2, sk next dc, (sl st, ch 2, sl st) in next corner ch-2 sp**; (ch 2, sk next dc, sl st in next dc) 6 times; repeat from * around, ending final repeat at **; (ch 2, sk next dc, sl st in next dc) 5 times; ch 2, sk next dc; join with sl st in joining sl st – 32 sl sts and 32 ch-2 sps. Fasten off B.Round 6: Join C with sl st in any corner ch-2 sp, ch 3 (counts as dc), (dc, ch 2, 2 dc) in same ch-2 sp as joining; *2 dc in each of next 7 ch-2
Continued on page 13
www.redheart.com 11

13Blushing grannies Crochet Throw
Tip: If red isn't your cup of tea, try using three shades of any color for this throw.
12 Home with Super Saver®

sps**; (2 dc, ch 2, 2 dc) in next corner ch-2 sp; repeat from * around, ending final repeat at **; join with sl st in 3rd ch of beginning ch-3 – 72 dc and 4 corner ch-2 sps.Round 7: Ch 1, sc in same ch as joining, sc in next dc; *(sc, ch 2, sc) in next corner ch-2 sp**; sc in next 18 dc; repeat from * around, ending final repeat at **; sc in last 16 dc; join with sl st in first sc – 80 sc and 4 corner ch-2 sps. Fasten off C, leaving a long end for sewing.
FinishingWeave in all loose ends, except long end. Sew squares together through both lps of last round into 5 rows of 7 squares each. Sew rows together.
EdgingRound 1: Join C with sc in any sc on edge of afghan, sc in next sc and in each sc around all 4 edges of afghan, working 2 sc in each ch-2 sp at corners of joined squares and 3 sc in each of 4 corner ch-2 sps of afghan; join with sl st in first sc – 532 sc.Round 2: Ch 1, sc in same sc as joining; *ch 3, sk next sc, sc in next sc; repeat from * around; join with sl st in first sc – 266 sc and 266 ch-3 sps.Round 3: *Work 2 sc in next ch-3 sp, sl st in next sc; repeat from * around, ending final repeat with sl st in joining sl st – 532 sc and 266 sl sts. Fasten off. Weave in ends.
Blushing grannies Crochet Throw Instructions Round 1:
Completed
Round 2: Completed
Round 3: Completed
Round 4: Completed
Round 5: Completed
Round 6: Completed
Round 7: Completed
Stitching the granniesFollow along with the photos on the right as you
crochet each round to be sure you're on track.
Continued from page 11
www.redheart.com 13

14Rose GardenCROCHET AFgHAN
Filet stitches create a romantic rose motif in this lightweight but cozy throw.
Designed by Katherine Eng
14 Home with Super Saver®

Rose Garden Crochet Afghan Instructions
Skill level:
Throw approximately 42"/106.5cm x 63"/160cm.
materials:
Medium weight yarn: 5 skeins.
Project shown is stitched with Red Heart® “Super Saver®” in 313 Aran.
Crochet Hook: Size I/9 (5.5mm).
Extras: Yarn needle.
gauge: 15 dc + 7 rows = 4"/10cm.CHECK YOUR GAUGE. Use any size hook to obtain the specified gauge.
Abbreviations used in this pattern:ch: chaindc: double crochetrem: remain(ing)sc: single crochetsk: skip(ped)sl st: slip stitchsp(s): space(s) st(s): stitch(es)* Repeat directions following * as many times as indicated.( ) Work directions inside parentheses into stitch indicated.[ ] Repeat directions inside brackets as many times as indicated.
Special Abbreviationsopen mesh: Ch 2, sk next 2 sts, dc in next dc.closed mesh: Dc in next 3 sts.shell: Work (2 dc, ch 2, 2 dc) in specified st or sp.
How to make a gauge swatchCh 17.
Row 1: Dc in 4th ch from hook (sk chs count as dc), dc in each rem ch across – 15 dc. Ch 3 (counts as dc on next row now and throughout), turn.
Rows 2–7: Dc in next dc and in each dc across. Ch 3, turn. Swatch should measure approx 4"/10cm square. Adjust hook size if necessary to obtain correct gauge.
AFgHANCh 144 loosely.
Row 1 (right side): Working in back bar of chs, dc in 4th ch from hook (sk chs count as dc), dc in each rem ch across – 142 dc (47 closed mesh). Ch 3 (counts as dc on next row now and throughout), turn.
Row 2: Dc in next 3 dc (closed mesh made); *[ch 2, sk next 2 sts, dc in next dc] 19 times (19 open mesh made), dc in next 3 dc (closed mesh made)*; [ch 2, sk next 2 sts, dc in next dc] 5 times (5 open mesh made), dc in next 3 dc (closed mesh made); repeat from * to * once – 43 open mesh and 4 closed mesh. Ch 3, turn.
Rows 3–27: Work open and closed mesh following chart. Odd numbered rows are read from right to left and even numbered rows are read from left to right on chart. At end of each row, ch 3, turn.
Continued on next page
www.redheart.com 15

1
Rows 28–103: Repeat Rows 2–27 two times more, then repeat Rows 2–25 once more. At end of last row, ch 1, turn.
Row 104: Sc in each dc across – 142 sc. Fasten off.
Bottom Row: With wrong side facing, join with sc in free lps of 3rd sk ch at beginning of Row 1, sc in free lps of each foundation ch across – 142 sc. Ch 1, turn.
EdgingRound 1 (right side): Working across bottom, sc in first sc; *ch 2, sk next 2 sc, sc
in next sc; *repeat from * to * across, ending with ch 2, sk next 2 sc, (sc, ch 2, sc) in last sc (corner ch-2 sp made); working across side, ch 1, sc in top of first dc on side; **ch 1, sc in top of next dc on side**; repeat from ** to ** across, ending with ch 1, sk top of last dc, (sc, ch 2, sc) in first sc on top row (corner ch-2 sp made); repeat from * across top and other side, beginning other side with ch 1, sk top of first dc, sc in top of next dc on side and ending other side with ch 1, sc in same sc as first sc worked, ch 2 (corner ch-2 sp made) – 47 ch-2 sps on top and bottom, 103 ch-1 sps on each side and 4 corner ch-2 sps. Join with sl st in first sc.
4Continued from previous page
Rose garden Crochet Afghan Instructions
16 Home with Super Saver®
27252321191715131197531
2624222018161412108642
REPEAT
CHART
ROSE FILET AFGHANDIAGRAM 1
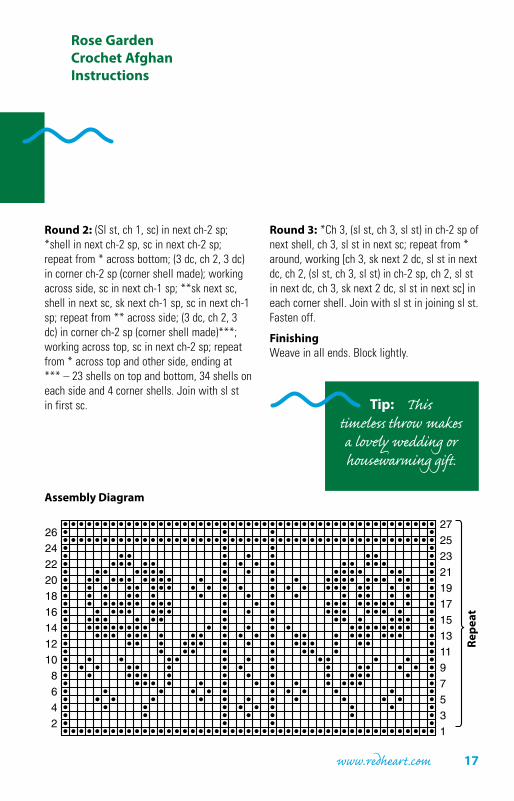
Round 2: (Sl st, ch 1, sc) in next ch-2 sp; *shell in next ch-2 sp, sc in next ch-2 sp; repeat from * across bottom; (3 dc, ch 2, 3 dc) in corner ch-2 sp (corner shell made); working across side, sc in next ch-1 sp; **sk next sc, shell in next sc, sk next ch-1 sp, sc in next ch-1 sp; repeat from ** across side; (3 dc, ch 2, 3 dc) in corner ch-2 sp (corner shell made)***; working across top, sc in next ch-2 sp; repeat from * across top and other side, ending at *** – 23 shells on top and bottom, 34 shells on each side and 4 corner shells. Join with sl st in first sc.
Round 3: *Ch 3, (sl st, ch 3, sl st) in ch-2 sp of next shell, ch 3, sl st in next sc; repeat from * around, working [ch 3, sk next 2 dc, sl st in next dc, ch 2, (sl st, ch 3, sl st) in ch-2 sp, ch 2, sl st in next dc, ch 3, sk next 2 dc, sl st in next sc] in each corner shell. Join with sl st in joining sl st. Fasten off.
FinishingWeave in all ends. Block lightly.
Repe
at
Assembly Diagram
Rose garden Crochet Afghan Instructions
Tip: This timeless throw makes a lovely wedding or housewarming gift.
www.redheart.com 17

15 Classic CabledCROCHET SAmplER
Designed by Joyce Nordstrom
18 Home with Super Saver®

Try out several stitch patterns and showcase your cable skills in this show-stopping sampler afghan.
Instructions on next page
www.redheart.com 19

1Classic Cabled Crochet Sampler Instructions
Skill level:
Throw approximately 46"/116.5cm wide x 57"/144.5cm long.
materials:
Medium weight yarn: 8 skeins.
Project shown is stitched with Red Heart® “Super Saver®” in 330 Linen.
Crochet Hook: Size I/9 (5.5mm).
Extras: Yarn needle.
gauge: 1 Block = 11"/28cm square using size I/9 (5.5mm) crochet hook.CHECK YOUR GAUGE. Use any size hook to obtain the specified gauge.
Abbreviations used in this pattern:sk(ed): skip(ped)ch: chaindc: double crochethdc: half double crochetrev sc: reverse single crochetsc: single crochetsl st: slip stitchst(s): stitch(es)yo: yarn over* Repeat directions following * as many times as indicated.
Special AbbreviationsFpdc (Front post double crochet): Yo, insert hook from front to back to front around post of indicated stitch; yo and draw up loop, [yo and draw through 2 loops on hook] twice. Skip stitch behind FPdc.Fptr (Front post treble crochet): Yo twice, insert hook from front to back to front around post of indicated st; yo and draw up loop, [yo and draw through 2 loops on hook] 3 times. Skip stitch behind FPtr.
NoteAlways remember to sk the st behind all FPdc and FPtr stitches.
BlOCk 1: 3-post Cables (make 4)Ch 33.
Row 1 (right side): Hdc in 3rd ch from hook and each ch across - 31 hdc.
Row 2 and all even (wrong side) rows: Ch 2, turn, hdc in each st across.
Row 3: Ch 2, turn, hdc in first hdc, FPdc around next hdc 2 rows below; *hdc in next 3 hdc, FPdc around next 3 hdc 2 rows below; repeat from * 3 more times, hdc in next 3 hdc; FPdc around next hdc 2 rows below, hdc in last hdc - 31 sts.
Row 5: Ch 2, turn, hdc in first hdc, FPdc around FPdc 2 rows below; *hdc in next 3 hdc, sk first FPdc 2 rows below, FPdc around next 2 FPdc 2 rows below; working in front of previous 2 FPdc, FPdc around sked FPdc 2 rows below; repeat from * 3 more times, hdc in next 3 hdc; FPdc around next FPdc 2 rows below, hdc in last hdc.
5
20 Home with Super Saver®

Row 7: Ch 2, turn, hdc in first hdc, FPdc around FPdc 2 rows below; *hdc in next 3 hdc, FPdc around next 3 FPdc 2 rows below; repeat from * 4 more times, hdc in next 3 hdc; FPdc around next FPdc 2 rows below, hdc in last hdc.Repeat Rows 4-7 until piece measures approx 101⁄2"/26.5cm from beginning.
Edging (wrong side): Ch 2, turn, [hdc, ch 2, hdc] in first st, hdc in next 29 sts, [hdc, ch 2, hdc] in last st; pivot work to work in ends of rows along side, work 29 hdc in ends of rows evenly spaced along side; pivot work to work along opposite side of beginning ch, [hdc, ch 2, hdc] in first ch, hdc in next 29 ch, [hdc, ch 2, hdc] in last ch; pivot work to work in ends of rows along side, work 29 hdc in ends of rows evenly spaced along side; join with sl st in top of first hdc.Fasten off.
BlOCk 2: lattice Cables (make 4)Ch 33.
Row 1 (right side): Hdc in 3rd ch from hook and each ch across - 31 hdc.
Row 2 (wrong side) and all even rows: Ch 2, turn, hdc in each st across.
Row 3: Ch 2, turn, hdc in first hdc, FPdc around next hdc 2 rows below; *sk 2 hdc, FPtr around next hdc 2 rows below; working behind previous FPtr, hdc in 2nd sked hdc; working in front of previous FPtr, FPtr around first sked hdc 2 rows below, hdc in next hdc; repeat from * 5 more times; sk 2 hdc, FPtr around next hdc 2 rows below; working behind previous FPtr, hdc in 2nd sked hdc; working in front of previous FPtr, FPtr around first sked hdc 2 rows below; FPdc around next hdc 2 rows below, hdc in last hdc - 31 sts.
Row 5: Ch 2, turn, hdc in first hdc, FPdc around FPdc 2 rows below; hdc in next 2 hdc, *sk 2 hdc, FPtr around next FPtr 2 rows below; working behind previous FPtr, hdc in 2nd sked hdc; working in front of previous FPtr, FPtr around sked FPtr 2 rows below, hdc in next hdc; repeat from * 5 more times; hdc in next hdc; FPdc around next FPdc 2 rows below, hdc in last hdc.
Row 7: Ch 2, turn, hdc in first hdc, FPdc around FPdc 2 rows below; sk 2 sts, FPtr around next FPtr 2 rows below; working behind previous FPtr, hdc in 2nd sked hdc; working in front of previous
Continued on next page
Classic Cabled Crochet Sampler Instructions
Tip: Always remember to skip the stitch behind all FPdc and FPtr stitches.
www.redheart.com 21

1
FPtr, FPtr around first sked hdc 2 rows below, hdc in next hdc, *sk 2 sts, FPtr around next FPtr 2 rows below; working behind previous FPtr, hdc in 2nd sked hdc; working in front of previous FPtr, FPtr around sked FPtr 2 rows below, hdc in next hdc; repeat from * 4 more times; sk 2 sts, FPtr around next hdc 2 rows below; working behind previous FPtr, hdc in 2nd sked hdc; working in front of previous FPtr, FPtr around sked FPtr 2 rows below; FPdc around next FPdc 2 rows below, hdc in last hdc.
Repeat Rows: 4-7 until piece measures approx 10 1/2"/26.5cm from beginning.
Edging (wrong side): Work as for Block #1 edging.
BlOCk 3: Stored Canoes (make 4)Ch 33.
Row 1 (right side): Hdc in 3rd ch from hook and each ch across - 31 hdc.
Row 2 (wrong side) and all even rows: Ch 2, turn, hdc in each st across.
Row 3: Ch 2, turn, hdc in first hdc, FPdc around next hdc 2 rows below; hdc in next hdc, *hdc in next 3 hdc, FPdc around next 2 hdc 2 rows below, hdc in next 4 hdc, FPdc around next 2 hdc 2 rows below; repeat from * once more; hdc in next 4 hdc; FPdc around next hdc 2 rows below, hdc in last hdc - 31 sts.
Row 5: Ch 2, turn, hdc in first hdc, FPdc around FPdc 2 rows below; *hdc in next 5 hdc, FPdc around next 2 FPdc 2 rows below (slanted FPdc), hdc in next 2 hdc, FPdc around next 2 FPdc 2 rows below (slanted FPdc); repeat from * once more, hdc in next 5 hdc; FPdc around next FPdc 2 rows below, hdc in last hdc.
Row 7 Ch 2, turn, hdc in first hdc, FPdc around FPdc 2 rows below; hdc in next 5 hdc, *hdc in next hdc, sk 2 FPdc 2 rows below, sk 2 hdc 2 rows below, FPtr around next 2 FPdc 2 rows below; working in front of previous 2 FPtr, FPtr around 2 sked FPdc 2 rows below (cable made), hdc in next 6 hdc, repeat from * once more; FPdc around next FPdc 2 rows below, hdc in last hdc.
Repeat Rows: 2-7 three more times, then work Row 2 once.
last Row Ch 2, turn, hdc in first hdc, FPdc around FPdc 2 rows below; hdc in each st across to last 2 sts; FPdc around next FPdc 2 rows below, hdc in last hdc.
Edging (wrong side) Work as for Block #1 edging.
Classic Cabled Crochet Sampler Instructions
Continued from previous page
Tip: You can make a bigger afghan, just add more blocks. 25 blocks will make a 60"/152.5cm blanket.
5
22 Home with Super Saver®

BlOCk 4: Tuscan Cables (make 4)Ch 33.
Row 1 (right side): Hdc in 3rd ch from hook and each ch across - 31 hdc.
Row 2 (wrong side): and all even rows Ch 2, turn, hdc in each st across.
Row 3: Ch 2, turn, hdc in first hdc, *FPdc around next hdc 2 rows below; hdc in next 4 hdc, sk 2 hdc, FPtr around next 2 hdc 2 rows below; working in front of previous 2 FPtr, FPtr around 2 sked hdc 2 rows below, hdc in next 4 hdc; FPdc around next hdc 2 rows below, hdc in next hdc; repeat from * one more time.
Row 5: Ch 2, turn, hdc in first hdc, *FPdc around FPdc 2 rows below; hdc in next 3 hdc, FPtr around next 2 FPtr 2 rows below (slanted FPtr), hdc in next 2 hdc, FPtr around next 2 FPtr 2 rows below (slanted FPtr), hdc in next 3 hdc; FPdc around next FPdc 2 rows below, hdc in next
hdc; repeat from * one more time.
Row 7: Ch 2, turn, hdc in first hdc, *FPdc around FPdc 2 rows below; hdc in next 2 hdc, FPtr around next 2 FPtr 2 rows below (slanted FPtr), hdc in next 4 hdc, FPtr around next 2 FPtr 2 rows below (slanted FPtr), hdc in next 2 hdc; FPdc around next FPdc 2 rows below, hdc in next hdc; repeat from * one more time.
Row 9: Repeat Row 5.
Row 11: Ch 2, turn, hdc in first hdc, *FPdc around FPdc 2 rows below. hdc in next 4 hdc, sk 2 FPtr 2 rows below, FPtr around next 2 FPtr 2 rows below; working in front of previous FPtr, FPtr around 2 sked FPtr 2 rows below, hdc in next 4 hdc; FPdc around next FPdc 2 rows below, hdc in next hdc; repeat from * one more time.
Repeat Rows: 4-11 two more times.
last Row: Ch 2, turn, hdc in first hdc, *FPdc around FPdc 2 rows below, hdc in next 11 hdc, FPdc around FPdc 2 rows below], hdc in next hdc; repeat from * one more time.
Edging (wrong side) Work as for Block #1 edging.
BlOCk 5: Baby Cables (make 4)
Ch 34.
Classic Cabled Crochet Sampler Instructions
Continued on next page
www.redheart.com 23

1
Row 1: (right side) Hdc in 3rd ch from hook and each ch across - 32 hdc.
Row 2 (wrong side) and all even rows: Ch 2, turn, hdc in each st across.
Row 3: Ch 2, turn, hdc in first hdc, FPdc around next hdc 2 rows below; hdc in next hdc, *sk 1 hdc, FPdc around next hdc 2 rows below; working in front of previous FPdc, FPdc around sked hdc 2 rows below (baby cable made), hdc in next hdc; repeat from * 8 more times; FPdc around next hdc 2 rows below, hdc in last hdc - 9 baby cables.
Row 5: Ch 2, turn, hdc in first hdc, FPdc around next FPdc; hdc in next hdc, *sk 1 FPdc 2 rows below, FPdc around next FPdc 2 rows below; working in front of previous FPdc, FPdc around sked FPdc 2 rows below (baby cable made), hdc in next hdc, FPdc around next 2 FPdc 2 rows below (open cable made), hdc in next hdc; repeat from * 3 more times; sk 1 FPdc 2 rows below, FPdc around next FPdc 2 rows below; working in front of previous FPdc, FPdc around sked FPdc 2 rows below (baby cable made); FPdc around next FPdc, hdc in last hdc - 5 baby cables and 4 open cables.
Repeat Rows: 2-5 until piece measures approx 10 1/2"/26.5cm; end with Row 3. Repeat Row 2 once more.
last Row: Ch 2, turn, hdc in first hdc, FPdc around FPdc 2 rows below; hdc in each st across to last 2 sts; FPdc around next FPdc 2 rows below, hdc in last hdc.
Edging (wrong side): Work as for Block #1 edging.
FinishingArrange blocks as shown in diagram. With wrong sides facing, sl st through adjoining back loops of each hdc of block edging.
Border With right side facing, join yarn in any stitch on edge.
Row 1 (right side): Ch 1, sc in same st and each hdc and ch-sp around, working [sc, ch 2, sc] in each corner ch-2 sp; join with sl st in first sc.
Row 2 (wrong side): Ch 2, turn, hdc in front loop only of each st around, working [hdc, ch 2, hdc] in each corner ch-2 sp; join with sl st in top of first hdc.
Row 3 (right side): Repeat Row 1.
Row 4 (right side): Do not turn, working from left to right, rev sc in first sc, *ch 2, sk 1 sc, rev sc in next sc; repeat from * around. Fasten off.Weave in all ends.
Assembly Diagram
Continued from previous page
Classic Cabled Crochet Sampler Instructions5
1 5 3 2
4 1 5 3
2 4 1 5
3 2 4 1
5 3 2 4
24 Home with Super Saver®

6 PatchworkCROCHET THROw
Super-easy stitches add up to stunning results with this charming afghan. Stitch the squares one at a time, then sew them together later.
Designed by Marianne Forrestal
www.redheart.com 25

1Patchwork Crochet Throw Instructions
Skill level:
Throw approximately 54"/137cm wide x 68"/172.5cm long.
materials:
Medium weight yarn: 3 skeins each of A, B, C and D.
Project shown is stitched with Red Heart® “Super Saver®” in 776 Dark Orchid A, 332 Red Ranch B, 376 Burgundy C and 631 Light Sage D.
Crochet Hook: Size K/10½ (6.5mm).
Extras: Yarn needle.
gauge: 11 dc and 6 rows = 4"/10cm using size K/10½ (6.5mm) crochet hook.CHECK YOUR GAUGE. Use any size hook to obtain the specified gauge.
Abbreviations used in this pattern:ch: chaindc: double crochetsc: single crochetsl st: slip stitchst(s): stitch(es)[ ] Work directions in brackets number of times indicated.
Special Abbreviationsx-st (cross stitch): Skip next 2 sts, dc in next st, ch 1; working in front of the last dc made, dc in first skipped st, leaving other skipped st unworked.
How to make a gauge swatchCh 13, work Rows 1 through 6 of Square instructions (below). Resulting gauge swatch should measure approx 4" x 4"/10cm x 10cm. Adjust hook size if necessary to obtain correct gauge.
AFgHAN SQUARE (make 5 of each color - 20 total)Ch 35.
Row 1: Dc in 4th ch from hook (3 skipped chains count as first dc), dc in next ch and each ch across – 33 dc.
Rows 2–18: Ch 3 (counts as first dc here and throughout), turn, dc in each st across.
Round 19: Ch 1, do not turn; pivot to work along side, work 31 sc evenly spaced along side; pivot to work in free loops along opposite side of foundation ch, 3 sc in first ch, sc in next 31 ch, 3 sc in next ch; pivot to work along other side, work 31 sc evenly spaced along side; pivot to work along sts of Row 18, 3 sc in first st, sc in next 31 sts, 3 sc in last st; join with sl st in first sc.Fasten off.
Finishing AssemblyArrange squares into 5 rows of 4 squares each, mixing the colors randomly and alternating squares so that one square has the rows running horizontally and the next square has the rows running vertically, as shown in the assembly diagram. Whipstitch squares together with matching color yarn.
6
26 Home with Super Saver®

Decorative StitchingWith contrasting color yarn and working into the spaces between stitches on either side of a seam, work a row of cross-stitches over each whipstitched seam.
BorderWith right side facing, join A with sl st in top corner st.
Row 1: Working across top edge of Afghan, ch 1, work 3 sc in same st as join, *work 34 sc evenly spaced along edge of each of next 4 squares, work 3 sc in corner sc; pivot to work along side of Afghan, work 34 sc evenly spaced along edge of next square, [work 35 sc evenly spaced along edge of next square, work 34 sc evenly spaced along edge of next square] twice*, work 3 sc in corner sc; pivot to work along lower edge of Afghan; repeat between * and *; join with sl st in first sc – 628 sc.
Row 2: Ch 3, 2 dc in same st as join, work 46 X-sts along top edge, work 3 dc in next st (corner); pivot to work along side of Afghan,
work 58 X-sts along side, work 3 dc in next st (corner); pivot to work along lower edge of Afghan, work 46 X-sts along lower edge, work 3 dc in next st (corner); pivot to work along other side of Afghan, work 58 X-sts along side; join with sl st in top of beginning ch-3.Weave in all ends.
patchwork Crochet ThrowInstructions
CONSTRUCTION DIAGRAM
PATCHWORK AFGHANCONSTRUCTION DIAGRAM
Assembly Diagram
www.redheart.com 27

11Chain (ch)Make a slip knot (see how to knit) and place on the hook. Wrap yarn around hook (yarn over—yo) and pull through loop (lp) on hook. Repeat to form as many chains as required. Do not count the original slip knot.
Slip stitch (sl st)Insert hook into specified stitch, yarn over and pull through in one movement.
Single crochet (sc)Insert hook into specified st, yarn over and draw through the stitch, yarn over and pull through both loops on hook.
Half double crochet (hdc)Yarn over and insert hook into specified stitch, yarn over and draw up a loop, yarn over and pull through all 3 loops on hook.
Double crochet (dc)Yarn over and insert hook into specified stitch, yarn over and draw up a loop, yarn over and pull through the first 2 loops on hook, yarn over and pull through the remaining 2 loops on hook.
How to Crochet
28 Home with Super Saver®

Treble crochet (tr)Yarn over twice and insert hook into specified stitch, yarn over and draw up a loop, yarn over and pull through the first 2 loops on hook, yarn over and pull through the next 2 loops on hook, yarn over and pull through the remaining 2 loops on hook.
Single crochet 2 together (sc2tog)Insert hook into each of next 2 stitches, yarn over and pull through all 3 loops on hook (1 stitch decreased).
Double crochet 2 together (dc2tog)[Yarn over, insert hook into the next stitch and draw up a loop, yarn over and pull through first 2 loops on hook] twice, yarn over and pull through all 3 loops on hook (1 stitch decreased)
Front loop (front lp); back loop (back lp)Unless otherwise instructed, work under both loops of the top of the stitch.
Reverse single crochet (reverse sc)Insert hook into next stitch to the right and pull up a loop, yarn over and pull through both loops on hook.
www.redheart.com 29

1
Categories of yarn, gauge ranges and recommended needle and hook sizes
* GUIDELINES ONLY: The above reflect the most commonly used gauges and needle or hook sizes for specific yarn categories.
StandardYARN wEIgHT SYSTEm
30 Home with Super Saver®

bet ............................................. between
A, B, C, etc. ................Color A, B, C, etc.
ch(s) ............................................ chain(s)
dec .....................................decrease(ing)
dc ......................................double crochet
dtr..........................double treble crochet
hdc ........................... half double crochet
inc ........................................ increase(ing)
lp(s) ............................................... loop(s)
pat ................................................pattern
rem ........................................ remain(ing)
rev sc ...................reverse single crochet
sc ........................................single crochet
sk ....................................................... skip
sl .........................................................slip
sl st ...........................................slip stitch
sp(s) ........................................... space(s)
st(s) ...........................................stitch(es)
tog ..............................................together
tr ........................................ treble crochet
yo ...............................................yarn over
* = repeat directions folowing * as many times as indicated[ ] = work directions in brackets the number of times indicated( ) = work directions inside parentheses into stitch indicated
ABBREvIATIONS
Reference
www.redheart.com 31

1
Perfect for new knitters and crocheters, these projects use basic stitches and minimal shaping.
These projects use basic stitches, repetitive stitch patterns, simple color changes, and simple shaping and finishing. It’s easy!
These projects use a variety of techniques, such as basic lace patterns or mid-level shaping. Great for learning new skills.
For more experienced stitchers, these projects feature intricate stitch patterns, more advanced techniques, or detailed shaping. Do you like a challenge?
SkIll lEvElS
Gauge is the number of stitches (and spaces) per inch and the number of rows (or rounds) per inch. Your gauge and the gauge listed at the beginning of the pattern should be the same so that your project will finish to the correct size and so you will not run out of yarn.
Before starting your pattern, check your gauge! Using the same yarn, hook and pattern stitch specified in the instructions, make a swatch that is approximately 6” square.
Using pins, mark off a section of stitches in the center of the swatch that measures 4” square. Count the number of stitches and rows in this 4” section. If they match the gauge, you can start right in on your pattern.
If you have too few stitches, you are working too loosely—change to a smaller hook or needle size and make another swatch. If you have too many stitches, you are working too tightly—change to a larger hook or needle size and make another swatch.
gAUgE
32 Home with Super Saver®

Save 50% offthe cover price of $4.99!
One year: $14.97Two Years: $26.97
Best deals can be found online at
crochettoday.comSubscribe today!
Get hooked on
Try our risk-free offer! If you are unsatisfied at any time, you can cancel and receive a full refund for all unsent copies.
today!Buy 3 issues and get 3 more FREE!Each issue is jam-packed with style, inspiration and easy-to-follow diagrams – exactly what you need to create today's top fashion and home décor styles!

Home withSuper Saver®
6 10 14
18 25
Art. J27, Book 0009Second edition – 0109 Printed in USA
© 2008 Coats & Clark
6 CozyThrows to Crochet
2
Coats & ClarkP.O. Box 12229
Greenville, SC 29612-0229www.coatsandclark.com
distributed in Canada by Coats & Clark, Vaughan, Canada CA00051
www.redheart.com
THE BEST OF
today!