home studio handbook beginner edition
DESCRIPTION
Home Studio HandbookTRANSCRIPT

SET UP YOUR HOME STUDIO / RECORD GUITARS, BASS, DRUMS & VOCALS / WRITE CATCHY SONGS / BUY AFFORDABLE GEAR PLUS… LEARN TO MIX & MASTER / GET YOUR MUSIC HEARD
GUIDE TO RECORDING YOUR MUSIC AT HOMEEverything you’ll ever need
to write and record from scratch
THE EASY
START RECORDING TODAY! FROM THE MAKERS OF
B E G I N N E R E D I T I O N
B E G I N N E R E D I T I O N

BEGINNER HOME STUDIO HANDBOOK | 3
ABOUT
EDITOR-IN-CHIEF Daniel Griffiths
EDITOR Claire Davies
ASSISTANT EDITOR Chris Barnes
ART EDITOR Andy McGregor
PRODUCTION EDITOR Chris Burke
OTHER CONTRIBUTORS INCLUDE: Simon Arblaster, Michael
Brown, Jono Buchanan, Skip Curtis, James Hester, Elena
Kay, Tim Oliver, Rob Power, Ben Rogerson, Joe Rossiter,
Ian Shepherd, Robbie Stamp, James Uings, Stuart Williams
We are committed to only using magazine paper which is derived fromwell managed, certified forestry and chlorine-free manufacture. FuturePublishing and its paper suppliers have been independently certified inaccordance with the rules of the FSC (Forest Stewardship Council).
Never before has it been so easy and enjoyable to write, record and polish your own
music at home. Music technology has come such a long way, meaning that what
was once the sole domain of recording studios is now within the grasp of everyday
musicians. In fact, home recordists are one of the fastest-growing groups in music;
even professional bands are building their own home studios (or cool garden pods
filled with studio gear and instruments), moving away from spending days, or even
weeks or months, in traditional recording studios.
The reasons why beginners like you choose to record music at home varies – some of you may
need to keep costs to a minimum, some of you may crave greater creative control over sounds,
processes and the finished article, and some of you may simply want to record music in private
without anyone else (namely a producer or engineer) hearing it. Whatever your reason for
recording from home, the Beginner Home Studio Handbook can help you.
In this beginner edition, we have packed in a goldmine of information to help you create the
music you have always dreamed of. Don’t know what kind of gear you need in order to record
from home, or what to do with that gear when you do buy it? Unsure how songs are structured,
or stuck for inspiration on where to begin with songwriting? Confused as to what DAW means,
or intimidated at the thought of miking up a drum kit? Don’t be! We address all of those
scenarios, situations and more with the Beginner Home Studio Handbook.
Aimed at newcomers, this Handbook will walk you through the whole home recording shebang,
from buying affordable hardware and instruments, through to setting up your recording space,
writing songs, laying down epic tracks and honing them afterwards. And when you’re ready for
recording at a pro level, we’ll be there to help you with the Expert Home Studio Handbook.
Life is too short to ignore your dreams and passions. If you have always wanted to create,
record and release your own music, let us help you begin doing so right now.
CLAIRE DAVIES, EDITOR
WELCOME TO…
All contents copyright © 2015 Future Publishing Limited or published under licence. All rights reserved. No part of this magazine may be reproduced, stored, transmitted
or used in any way without the prior written permission of the publisher. Future Publishing Limited (company number 2008885) is registered in England and Wales.
Registered office: Registered office: Quay House, The Ambury, Bath, BA1 1UA. All information contained in this publication is for information only and is, as far as we are aware,
correct at the time of going to press. Future cannot accept any responsibility for errors or inaccuracies in such information. You are advised to contact manufacturers and
retailers directly with regard to the price and other details of products or services referred to in this publication. Apps and websites mentioned in this publication are not under
our control. We are not responsible for their contents or any changes or updates to them. If you submit unsolicited material to us, you automatically grant Future a licence to
publish your submission in whole or in part in all editions of the magazine, including licensed editions worldwide and in any physical or digital format throughout the world. Any
material you submit is sent at your risk and, although every care is taken, neither Future nor its employees, agents or subcontractors shall be liable for loss or damage.

4 | BEGINNER HOME STUDIO HANDBOOK
CONTENTS
FIRST STUDIO
7 ........ YOUR FIRST STUDIO
12 ...... YOUR COMPUTER & DAW
14 ...... GUIDE TO MICROPHONES
16 ...... HARDWARE SET-UP
18 ...... INTRO TO HEADPHONES
BUYER’S GUIDES
24 ..... HANDHELD RECORDERS
26 ..... AUDIO INTERFACES
28 ..... MONITORS
30 ..... HEADPHONES
32 ..... MICROPHONES
36 ..... AMPLIFIERS
38 ..... ELECTRIC GUITARS
42 ..... ACOUSTIC GUITARS
46 ..... BASS GUITARS
48 ..... DRUM KITS
50 ..... CYMBALS
SONGWRITING
55 ..... SONGWRITING BASICS
62 ..... FIND YOUR GUITAR SOUND
66 ..... MOBILE RECORDING
7
62
48
28
12

BEGINNER HOME STUDIO HANDBOOK | 5
CONTENTS
SETTING UP
71 ...... SETTING UP TO RECORD
78 ..... PREP YOUR DRUM KIT
81 ...... PREP YOUR VOCALS
84 ..... RECORDING CHECKLIST
RECORDING
88 ..... DAW PRINCIPLES
90 ..... BEGINNER’S GUIDE TO FX
92 ..... RECORD ACOUSTIC GUITAR
100 ... RECORD ELECTRIC GUITAR
110 .... RECORD BASS GUITAR
114..... RECORD DRUMS
122 .... RECORD VOCALS
132 .... MIXING BASICS
136.... MASTERING BASICS
138.... TROUBLESHOOTING
BUSINESS OF MUSIC
141..... GET YOUR MUSIC HEARD
78
114
110
141
12281

6 | BEGINNER HOME STUDIO HANDBOOK
YOUR FIRST HOME STUDIO
YOUR FIRST HOME STUDIO
So, you’re about to take your very first steps into the big world of home recording. If it all looks a little daunting, don’t worry – we’re here to help! Over the next few pages we’ll take you through everything you’ll need
to start recording music at home. From the hardware and software you’ll require, through to the physical space you’ll be recording in, as well as the method of capture and monitoring, our expert advice will help you realise your dream and get the sounds in your head down on record. We’ll explain everything you’re likely to encounter as you set up your studio, such as choosing the right DAW, mics, and headphones, as well as talking you through the ins and outs of getting your music onto your computer. Let’s go!

BEGINNER HOME STUDIO HANDBOOK | 7
THE BASICS | YOUR FIRST HOME STUDIO
Whether you’re in a band, or you’re a singer-songwriter or budding producer, putting together a home recording
set-up has never been easier or more affordable. Here we discuss what you’ll need to get started
The rather romantic vision of a
recording studio is one that’s
full of expensive gear: mixers,
vintage keyboards, racks full of
effects, beautiful microphones
and much more besides.
While these places still exist
– and some great records continue to be
made in them – the wonderful reality is
that, if you’re a band or a solo musician
who wants to record music, you can set
up your own ‘home facility’ for hundreds,
rather than thousands, of pounds.
As with so many things, this big change
has been driven by the digital revolution.
Whereas once all recording gear had to
exist in physical form and each of your
performances were captured on tape,
the vast majority of it has now been
‘virtualised’ and can run as software on
your computer. Yes, there are some things
that will always remain ‘real’ – speakers,
mics and instruments that you want to get
your hands on and play, for example – but
in many cases, a box that used to cost
thousands can now be replicated with a
tiny download from the internet.
One piece of hardware you’re definitely
going to need, however, is a computer. If
you’re used to old-school methods of
recording, the idea of plugging your guitar
into a Mac or PC and capturing your ideas
in a piece of software might sound
daunting, but the whole process is far
simpler than it was even five years ago.
That said, we can’t deny that, if you do
want to record to computer, there are a
few more bits and pieces to consider than
if you go down the standalone recorder
route. As well as the machine itself, you’ll
need a piece of DAW software (if it helps,
you can start by thinking of this as a
powerful multitrack recorder) and an
interface that will give you the inputs and
outputs you need to plug in your
YOUR FIRST HOME STUDIOTHE BASICS

8 | BEGINNER HOME STUDIO HANDBOOK
YOUR FIRST HOME STUDIO | THE BASICS
instruments, mics and other bits of gear.
Once you’ve got the software installed
(which is easy) and the interface hooked
up, the world is your oyster.
With a computer and a DAW you can
not only record, edit and arrange tracks,
you can manipulate them in all manner of
different ways, and all on a big interface
(your monitor) using a mouse. Yes, music
software does crash sometimes (though
far less than it used to), and there might
WHAT A BANDWILL NEEDIt almost goes without saying that,
once you’ve got your line-up sorted,
the first things your band are going
to need are the ability to play in time
together, and some decent songs.
There’s also the matter of gear
to be considered, too, so let’s run
through each member’s essential
gear must-haves (you can find lots
of buying advice starting on p. 23).
SINGEROther than vocal ability and swagger,
your frontman/woman doesn’t
necessarily have to bring a great deal
of gear with them. A mic is one of the
essentials, though, and possibly a
vocalist-specific multi-effects unit for
pitch correction or backing vocals.
GUITARISTSAt least one guitar, an amp/cab, leads
(the best quality you can afford),
spare strings and a selection of effects
pedals or a multi-effects unit should
be on every guitarist’s shopping list.
The type of guitar and amp you
choose will depend on the music you
make and – let’s be frank – the image
you want to present in the band. A mic
that’s suitable for sticking in front of
your amp will come in handy as well.
DRUMMERThe endless boxes of stands, drums
and cymbals are unavoidable if you’re
the sticksman in your band, though
you might want to consider a decent
electronic kit for recording if you have
noise-averse neighbours. If you’ll only
be using a live kit when recording, a
set of drum mics is needed.
BASSISTA trusty four-string is going to be your
first purchase, or investigate the extra
flexibility a five-string allows if your
music demands it. Bass amps and
speakers can be costly, but once
they’re purchased you’re ready to go.
There’s also an increasing number
of bass-specific pedals if you like to
experiment with different effects.
KEYBOARD PLAYERPlenty of synths arranged on
right-angled stands always look the
part, but more soulful or introspective
players will more likely remain seated
at a stage piano or workstation-style
keyboard. Alternatively, you could
keep it more modern by generating
sounds in software on a laptop and
then playing them from a controller.
SOLO ARTISTThe term ‘solo artist’ might refer to an
acoustic guitar strumming
singer-songwriter type, such as Ed
Sheeran (when he doesn’t have a
backing band with him, naturally), a
Prince-style multi-instrumentalist, or
a pop artist like Gotye who wants to
make music at the cutting edge.
Either a computer with some
recording software or a standalone
hardware recorder is essential here.
After that, you’re looking at monitor
speakers, an audio interface, mics,
acoustic treatment for your recording
room, and any instruments that you
might want to play (such as guitar,
keys or bass).
Remember, too, that one of the big
advantages of software is that it can
give you not only the sounds of a lot of
instruments, but a way of generating
virtual performances on them. As
such, you can put together a complete
song that sounds as though it was
played by a real band, even if it was
just you and a laptop.
good tone, this whole myth of ‘Neve this’
and ‘preamp that’… Nah, you haven’t
got to do it.”
MICS ON A BUDGETIF YOU want to record any kind of sound
that can’t be produced by an instrument
with an audio output on it, you’re going to
need a microphone. It might be tempting
to walk into a consumer electronics store
and just buy the cheapest one you can
find, but this is an area in which it really
does pay to make the right choice.
We discuss microphones in depth on
page 14, but there are three main types
that you need to be aware of: dynamic,
condenser and ribbon. Dynamic mics are
the most rugged and reliable, offering
great value for money and being suitable
for live and basic studio work. Condenser
mics are the most widely used in the
studio: they’re more delicate than
dynamic mics, but have a wide frequency
be bits of it that you don’t understand, but
as long as you can use the elements of it
that do matter you’ll be fine.
These are the basics of home recording
in 2015, and over the next few pages we’re
going to focus on the finer details of what
you’ll need in your recording set-up,
starting with gear...
.
PICK UP SOME GEAR WHEN IT comes to buying gear we will
always advise you to get the best you can
afford, but as renowned heavy metal
producer Andy Sneap points out, don’t
cash in your life’s savings.
“You don’t need to spend megabucks,”
he reveals. “I used to make great
recordings on Mackies [mixing desks]
and ADATs [digital recorders]. When you
think of the quality of mic preamps now
compared to what you had 20 years ago,
you’re gonna get results. As long as your
micis in the right place and you’ve got
Many bands record their live sets as a way to monitor their progression
You will need microphones to record instruments that don’t have an audio output

BEGINNER HOME STUDIO HANDBOOK | 9
THE BASICS | YOUR FIRST HOME STUDIO
response that makes them great for
capturing vocals and instruments in
greater detail. A ribbon mic is typically the
third type you’d add to your collection;
again, these are designed for studio use,
but offer an alternative to condensers.
When you buy a mic, make sure it’s
suitable for plugging into your recording
gear. If you choose a condenser mic, for
example, you’ll need phantom power on
your audio interface.
AUDIO INTERFACESYOUR AUDIO interface serves as the technical
bridge between the sounds that you make
in the real world (for example, sounds
from an instrument or your mouth) and
your computer. Sound can flow the other
way across this bridge, too – from the
computer to your speakers or into your
headphones. All of which is a roundabout
way of saying that your audio interface will
have both inputs and outputs on it.
The number of each of these will
depend on the model you choose;
musicians who produce the majority of
their songs ‘in the box’ tend not to bother
with too many inputs, but if you want to
capture your five-piece rock band, a box
with more ‘ins’ will be appropriate. Also,
choose a model that has the right kind of
inputs – ones that are designed to accept
mics and guitars, for example.
The more you pay, the better the
preamps you’re likely to get, which will
influence the quality of the recordings you
can make, and the analogue-to-digital and
digital-to-analogue conversion will
improve. You’re also likely to get more
advanced built-in mixing and routing
capabilities, and possibly even effects.
Most interfaces these days are
connected over USB, though some use
FireWire or other connectivity options.
MONITORSWHILE A decent mic and audio
interface will help you to make
better recordings, there’s no
point in doing this if you
compromise on quality by
listening to them through a
low-quality or inappropriate
speaker setup.
This is where dedicated
music monitoring speakers
come in. These are designed
HOW TO MAKE A DIY ABSORPTION PANELThere are times in music production when you have to become a bit of a DIY enthusiast. Constructing your
own basic absorption panel to alter the acoustics of your room is a pretty easy task, provided you have the
right materials. Fancy making one for your recording space? Here’s a list of what you’ll need:
1. Planed timber or planks of MDF
to make a frame.
2. Medium density cavity wall
insulation slabs (not loft
insulation), plus appropriate
dust mask and gloves.
3. Acoustically transparent cloth to
cover it with (something you can
blow through should be fine).
4. Some screws, nails and fittings
for holding the frame together,
and a staple gun to fix the
fabric in place.
5. Hardboard to hold the slabs in
position at the back.
Start by making a frame with the timber and brackets. Lay the fabric out on the floor, placing the frame over
the fabric. Next, pull the fabric back over the frame and staple it firmly in place, making sure that it’s nice and
tight. Once this is done, put on your dust mask and gloves before laying the insulation slabs in place. Finish off
by nailing on the hardboard back.
Alternatively, there are some companies making DIY bags to which you can add your own acoustic
insulation slabs. If you’re simply looking for some absorbent slabs to place in corners of your space, you can
bundle up a pack of medium density cavity wall insulation in some fabric, or even re-use an old bean bag.
not to ‘flatter’ your music, as many hi-fi
speakers do, but to give you a true
representation of how it all really sounds.
If you can trust your speakers, you should
be able to produce better mixes that will
translate well to other systems.
You might think it would hold true that
the more you pay for monitors the better
they sound, but this isn’t always the case.
What’s more, monitor choice is a personal
thing so, if at all possible, make sure you
actually get to listen to the models that
you are considering buying.
SOFTWAREAUDIO RECORDING and sequencing software,
also known as a DAW (Digital Audio
Workstation), resembles a studio setup
A DIY absorption panel can help to alter the acoustics of your recording room or space
An audio interface is the bridge between your sounds and the computer

10 | BEGINNER HOME STUDIO HANDBOOK
YOUR FIRST HOME STUDIO | THE BASICS
on your screen. It records audio
and MIDI, plus it often contains
loops and samples and a host of
common effects for use on your
songs. Mac users will probably
already own GarageBand
(which is more than enough to
get going with), but you might
consider upgrading to its big
brother, Apple’s Logic Studio.
Cubase and Pro Tools are the
two other main DAWs that work
on both PC or Mac, but there are loads of
other options including Sonar, PreSonus
Studio One and Ableton Live. There are
plenty of free options available, too.
CHOOSE YOUR ROOM WHEN RECORDING at home, lo-fi production
king Steve Albini [Nirvana, The Stooges]
says that experimentation is key. “With
acoustic guitar, the acoustics of the room
matter because the mic is not going to be
hearing the guitar exclusively – it’ll be
hearing the sound bouncing around in the
room,” he says. “If you play and listen
without being concerned about recording,
you’ll find that in some environments your
guitar sounds better than in others.
“Wander around your house with the
guitar and find the spot that sounds really
good. Kitchens can be good for acoustic
guitar because they have a lot of irregular
hard surfaces. Not like bathrooms where
the walls are typically close together with
parallel hard surfaces.”
If you’ve ever had noisy neighbours,
you’ll know that sound travels. But before
you get sidetracked repaying the, erm,
compliment, remember that it’s the sound
travelling inside the room that concerns
us when recording. In the simplest terms,
if you put up a couple of mics in a room
they will pick up everything from their
perspective. That includes the instrument
they’re closest to and, to a lesser degree,
any other instrument playing at the same
time, as well as other sounds that are
occurring in the room.
The other main factor that influences
the way we set up a recording space is
GET ORGANISEDWhatever the size of your setup, keep your workspace tidy with these handy tips
GROUP YOUR CABLINGThis will make fault-finding easier, allow gear
to be moved and patched quicker, and help
reduce cable-borne noise problems. Keep
cables grouped together by type (audio,
mains, MIDI, and so on) as this will make it
quicker to find a particular line.
TIDY YOUR CABLINGUse Velcro cable ties, easy release plastic ties,
or flexible trunking to keep your grouped
cables together. This can allow the bunches
to be arranged for maximum floor space and
minimal cable treading.
LABEL EVERYTHINGInvest in an office labeller with a variety of
label tape sizes to keep track of your cable
connectors and mains plugs, etc. We use ours
to label equipment when a repair is made so
that we know what work’s been carried out.
START A ‘FAULTY’ BOXEvery dodgy cable or faulty stompbox should
be stored separately for repair or recycling of
its components, instead of being put back in
the collection only to disappoint you again.
STREAMLINE YOUR GEARSpace is always at a premium in a home
studio, so identify any items that you don’t
use and consider selling or swapping them.
For example, are there items that you don’t
make use of because they’re not wired up?
GEAR ACCESS AND ELBOW ROOM Spend some time considering the layout of
your equipment with regards to working
practice. Make sure that the items you use
regularly are within arm’s reach of your seat
and that the controls and displays do not
require you to bend and stretch too much.
WRITE THINGS DOWNThere’s always an office somewhere throwing
out a perfectly good whiteboard, and these
can prove useful in the studio – use them for
writing ‘to do’ lists for your tracks, or for
jotting down lyrics or gear repair lists.
To record at home you will need a computer with a DAW (Digital Audio Workstation)
Each of your rooms will sound different, so wander around your house with a guitar to find the spot that sounds best. Kitchens have irregular hard surfaces, while bathrooms are more closed in

BEGINNER HOME STUDIO HANDBOOK | 11
THE BASICS | YOUR FIRST HOME STUDIO
acoustics. How significant this is depends
upon what you’re recording. Generally, the
louder the instrument the more it will
reveal the room’s acoustics. From a
practical perspective, domestic spaces
can be excellent for many recording tasks,
and each room in your home will have its
own unique character. Soft furnishings
such as carpets, curtains and sofas do an
excellent job of soaking up frequencies,
particularly mid to high ones, and you can
use this to your benefit. Similarly, a tiled
bathroom will be at the other end of the
spectrum – bright, brash, lively.
Finally, it’s worth remembering that if
sound can travel out, it can also travel in.
Trains, planes (and noisy neighbours) can
all add unwanted noise to your recordings,
including low frequency rumble or
vibration. Fans, monitor screens and
ambient sounds that we’re normally
oblivious to can all add a layer of unwanted
background noise. If you can’t get these
things out of your recording space, at least
try to keep away from them. Ideally, you
will use a directional mic that will reject
sound emanating from behind it.
ARRANGING YOUR SPACEA GOOD starting point for any recording
set-up is to arrange things so that all the
performers can see each other. If you’re in
a band, this may mean you will all be
facing inwards. There may be times when
you have to compromise, but if you’re
recording yourself it’s not an issue.
Next up, consider the two factors of
isolation and acoustics. In situations
where there are multi-instruments, with
players facing into the room, using
directional mics (pointing away from the
centre of the room) will give you good
initial isolation of each instrument, but the
sound of the instruments bouncing off the
walls back into the mics will cause a
problem. A good trick in this instance is to
dampen the space behind each player
with acoustic panels. Soft furnishings and
duvets and so on can do a cracking job.
Quite often, acoustic panels will be all
you’ll need and this approach may give
better results than artificially trying to give
each performer a separate space –
something that’s often done in large
studios using acoustic divider screens.
See the boxout on p.9 that walks you
FINAL FOOD FOR THOUGHTDon’t give up! Look, we’ve all been there. You get your hands on a bunch of shiny new gear, you set it up, sit
back and then... you feel like a caveman gawping at a monolith – it’s a big vertical learning curve. But don’t feel
bad, and don’t get too bogged down in jargon and technology either. Throw a weekend and a truckload of
coffee at it and you’ll be amazed at how quickly the mist starts to clear.
As time goes on, you can dig as deep as you like into every aspect of this guide – be that audio interfaces,
microphones or software – and that’s all in addition to the advice you’ll find on writing your own songs,
creating huge guitar sounds or aping classic drums sounds, and more. There’s always lots to learn, but
remember that Rome wasn’t built in a day. Every journey starts with the first step, so take yours slowly.
through making
your own panel.
You may be
beginning to get a
feeling of space
envy, particularly if
you’re planning to
squeeze a whole
band into your
living room. But
remember, some
of the greatest ever
recordings have
been made in tiny
spaces (check out Motown’s Hit Factory
studio). You can always open the door and
mic up the hallway for added distance.
One subject that ties in with room layout
is volume. Although a well-rehearsed band
might give their best performance if
they’re all playing in the same room, you
can’t rely on this for recording if some
instruments are much louder than others
– recording an acoustic guitar in the same
room as a drum kit is asking for trouble! If
you do need to record a group playing
together to capture the performance, it’s
best to treat some of the instruments as
‘guides’ to be replaced later.
TO SOUNDPROOF OR NOT?SO FAR our discussion has centred on
treating the acoustics of your room, but
now we’ll look briefly at the subject of
soundproofing. If you’ve ever lived next
door to a musician, you’ll know how
important this is. For our purposes, it also
demonstrates the two-way nature of the
problem: if sound is capable of escaping
your room or house, it can also penetrate
someone else’s. And that’s not cool.
Probably the most annoying noise
pollution is produced by bass frequencies,
which are transferred structurally. Mid and
high frequencies, on the other hand, use
the available medium (air), so leaving a
window or door open really can make a big
difference to their transmission. At a
professional level, dealing with these two
types of acoustic isolation can be rather
complex. What’s more, the resultant
spaces are often heavily upholstered and
oppressive, with little or no natural light.
Assuming you haven’t just won the
lottery, things in your recording space will
likely be more modest. So what are the
options? Probably the easiest way to get a
quick improvement is to seal your doors
and windows. Although double glazing can
improve isolation, it’s often the sealed
nature of replacement casement windows
that improves their effectiveness. If you
have older windows, consider DIY sealing
strips, which can also help around door
frames, and don’t forget the gaps at the
top and bottom of the door.
Once you’ve done this, you may find
that typical ‘studio odour’ – stale and
slightly whiffy – creeping in. If you can’t
afford proper air conditioning, regularly
opening the doors and windows when
you’re not making any noise is effective.
Keep your cabling tidy to maximise floor space

12 | BEGINNER HOME STUDIO HANDBOOK
YOUR FIRST HOME STUDIO | YOUR COMPUTER AND DAW
Combined with the right software, your computer can be a seriously powerful music making tool. Find out what you’ll need right here…
Rather like Clark Kent, your
computer has a dual identity.
On the one hand, it can be
used for everyday tasks such
as sending email, browsing
the internet and watching
videos of skateboarding cats.
On the other, it’s a creative powerhouse
that can help you to make pro-quality
music. Providing it isn’t a decade-old
machine, your current PC or Mac should
be fine to start making music on.
As a general rule, more powerful
machines will be able to cope with more
complex projects and run the latest
software, but whether you’ve got a Mac or
PC, releasing your existing computer’s
music-making potential doesn’t have to be
costly or difficult. You can start creating
songs with a few free pieces of software
and one or two bits of kit.
WHAT IS A DAW?DAW STANDS for Digital Audio Workstation,
which is a computer-based system for
recording, editing, mixing and playing
back audio. While it’s true that Digital
Audio Workstation could in fact refer
to your whole system, including the
hardware components, here we’re
focusing solely on software. A DAW
reproduces all the components
necessary for recording in software.
Breaking it down further, a DAW is for
recording anything you want. It has a
multitrack recorder capable of recording
any audio through your audio interface
(the number of tracks you can record
simultaneously usually depends on the
number of channels your interface has).
What’s more, some DAWs have virtual
instruments that you can use to create
additional backing.
These instruments can each have their
own track alongside the audio tracks,
YOUR COMPUTER AND DAW

BEGINNER HOME STUDIO HANDBOOK | 13
YOUR COMPUTER AND DAW | YOUR FIRST HOME STUDIO
but the sounds are played using MIDI
data – you can either play the notes on
a keyboard, or enter them graphically
onto a grid. There’s a wide range of virtual
instruments, running from drums, violins,
pianos, and other such conventional
instruments, through to programmable
synths. In addition, some DAWs come
with a number of audio loops that you
can use to build backing tracks.
When it comes to the computer
you’re using, the more powerful it
is the better as there is a lot of
processing to take care of.
However, you need to check the
DAW manufacturer’s website for
minimum computer requirements and
recommendations: the type of computer
you need, and maybe its speed in GHz,
will be listed on there, along with the
operating system information.
You will also need to know about RAM
and hard disk space. Most DAWs typically
need between 2GB and 4GB of RAM to
operate efficiently, and you will need a
certain amount of hard drive space for
installation of the program and any
supplied extras, such as audio loops.
You’ll also need to have enough capacity
on your hard drive to store recorded
audio, or invest in an extra drive that’s
dedicated to audio storage.
All DAWs give you a range of effects
– naturally, some provide a more
comprehensive range than others. These
effects are generically known as plugins
because they can be plugged in at
various points in your software mixer’s
configuration – they can be used on
individual audio tracks or applied to a
range of tracks (if you set them up as
send-and-return effects).
If you want a wider range of effects –
perhaps some guitar amp sims if your
DAW doesn’t provide them – you may be
able to buy more, usually from third-party
developers like Native Instruments, the
maker of Guitar Rig, or IK Multimedia, the
company behind AmpliTube. Plugins
come in a range of formats and each
DAW will support one or more.
DAWs offer a full production
environment: once you’ve recorded
guitar, vocals, drums or the like, all of
the tracks can be seen on screen in
a software mixer, which is a virtual
copy of a hardware one but can
often be more flexible.
As well as your effects, you’ll have
EQ and virtual faders, and in some DAWs
you can put these under automation so
that any fader moves made during a song
can be recorded and reproduced each
time it’s played back. You can mix your
song down to stereo and even add a final
layer of polish and glitz with some pretty
nifty mastering effects, leaving you free
afterwards to do whatever you want with
the resulting audio file.
GARAGEBANDFree with your Mac
Apple Logic’s little brother,
Garageband is an easy to use, yet
surprisingly powerful, DAW that many bands record
with. It doesn’t pack the breadth of features that
Logic boasts, but it’s a great starting point for
beginners. The best part? It comes free with your
Mac, so you can spend your cash on gear instead.
www.apple.com
APPLE LOGIC PRO X£149.99
If you’re a Mac user and you feel as
though you’re starting to outgrow
GarageBand, this is the natural next step for you.
Its comprehensive features set and the huge roster
of built-in instruments and effects make it a big
favourite among recording pros, and it’s now
available at a ridiculously cheap, instantly
downloadable price on the Mac App Store.
www.apple.com
STEINBERG CUBASEFrom £73
If you’ve been aware of music
technology for a while, you may
remember Cubase from as long ago as 1989,
when it made its debut on the venerable Atari ST.
26 years of development later and it’s every bit as
comprehensive as you might expect, sporting
plenty of state-of-the-art features. On the
downside, it is expensive, though as with many
DAWs there are different versions available to suit
the needs and budget of every type of musician.
www.steinberg.net
PROPELLERHEAD REASON From £85
Reason used to be a complete no-no
for bands because it wasn’t capable
of recording audio. That’s all changed now and
recording in Reason is actually reassuringly simple,
plus its fabulous built-in mixer is ‘inspired’ by a
classic studio console. The software can’t host
standard VST or AU plugins, but additional
instruments and effects can now be purchased in
the form of Rack Extensions.
www.propellerheads.se
AVID PRO TOOLS£599
Still considered an industry
standard, Pro Tools has been
challenged from all quarters in recent years. Avid’s
response has been to make it more ‘open’, in that
you no longer need special hardware in order to run
the flagship version, and more file formats are now
supported. When it comes to recording and mixing,
Pro Tools takes some beating.
www.avid.com
PRESONUS STUDIO ONE 3From £69
PreSonus’ Studio One 3 is a relative
newcomer to the fray and, despite its
‘free with an audio interface’ beginnings, it’s a
fantastically powerful tool. Studio One 3 is available
in two versions: Artist (for singer-songwriters) and
Professional. It’s also easier to use than the likes of
Logic and Cubase. Written from the ground up for
quality, its built-in effects are world class. Worth a
look if you’re not getting along with the big boys.
www.presonus.com
RECOMMENDED DAWSIt’s important to note that, while all DAWs have
their strengths and weaknesses and work in
slightly different ways, there is no definitive ‘best’
product on the market and no software is going to
magically turn a bad track into a good one. These
are just tools that are there to do a job – it’s up to
you to use them well.
Releasing your computer’s music-making potential doesn’t have to
be costly or difficult

14 | BEGINNER HOME STUDIO HANDBOOK
YOUR FIRST HOME STUDIO | UNDERSTANDING MICROPHONES
With so many different models available, choosing the right mics for your recording space can be a pretty daunting task. This handy guide will make it easier...
Microphones come in all
shapes and sizes, and if
you’re a newcomer to
recording you may well
wonder if there’s really
much difference from
one mic to the next.
Well, there is – not only in the way they
work, but also in the way they sound.
There’s also a massive variation in how
much different mics can cost.
If your budget limits you to just one or
two mics, having a full understanding of
how they actually work will put you in a
much better position to choose the ones
that suit your needs. In this guide we’ll
aim to give you a good understanding of
all the different factors to consider when
choosing mics. Then our comprehensive
buying guide (p.32) will help you find the
best mics for vocals, guitar and drums.
THE BASICS SOME MICS, typically condensers, need to
be powered to work. These require either
48-volt phantom power or a separate
power supply. Dynamic mics come in two
types: ribbon, which are very fragile, and
moving coil, which are extremely rugged.
Mics also vary in what they actually
‘hear’, as determined by their pickup (aka
polar) patterns. The main types are
cardioid, which mainly pick up sounds
arriving from the front; figure-8, which
pick up equally from front and back; and
omnidirectional, which pick up sounds
arriving from all directions equally. There
are variations on these basic types, such
as super- and hyper-cardioid, and some
mics offer a choice of multiple polar
patterns that can be selected by the user.
A mic’s frequency response also needs
to be taken into consideration. Some
mics are quite bright, others are ideal for
low frequency sounds such as bass and
kick drums, while others have a boost in
the midrange that accentuates speech.
Options such as low cut filters and level
trims (‘pads’) feature on some models.
Factoring in the massive variation in
price, it’s easy to understand why picking
‘the one’ may seem like a headache. Keep
in mind that budget mics can do a good
job, and in many cases costs are saved in
the peripherals and trimmings rather
than in the fundamentals.
Gaining a basic understanding of how
microphones function will make it clear
why various types sound and behave the
way they do. It will also give you an idea of
how you’ll need to handle them. Mics are
precision (and often delicate) items, so if
you don’t want to spend cash getting
them fixed regularly, it’s time to listen up!
DYNAMICONE OF the most familiar microphone
types is the moving-coil dynamic. These
work on the principle of electromagnetic
induction. A small induction coil is
attached to a movable diaphragm, and
the whole mechanism sits in the
magnetic field of a fixed magnet. Sound
waves move the diaphragm and this
induces a current in the coil that can be
extracted as an audio signal. The concept
is simple enough that manufacturing
robust mics is easy. The downside is that
the physical nature of the design can
compromise the frequency response,
and the sensitivity is less than a typical
condenser. This makes them less useful
for quiet or distant sources.
CONDENSERTRADITIONALLY MORE intricate and expensive
than dynamic mics, the increasing
availability of good, affordable models
has made the condenser (or capacitor)
the most common mic. A flexible capsule
diaphragm and rigid backplate make a
parallel-plate capacitor. Changes in the
distance between the two caused by
sound vibrations produce changing
capacitance and voltage, which can be
extracted as an audio signal. This relies
on the plates being consistently charged,
requiring typically 48-volt phantom
power sent down the mic cable from your
mic preamp. If the mic includes a valve, a
dedicated power supply will provide
power for the valve and the plate charge.
With electret condenser mics, a
permanently charged material is used in
a capsule akin to a traditional condenser.
Although the capsule itself doesn’t need
power, the output electronics do.
Condenser mics come in all shapes
and sizes, from tiny lapel mics to the
large capsule mics for vocals. They
typically have good high frequency
response but are susceptible to wind
noise and vibration. Through careful
capsule, body and grille design, the
frequency response and pickup pattern
can be tailored – particularly with the
larger capsule designs (over 1-inch
UNDERSTANDING MICROPHONES

BEGINNER HOME STUDIO HANDBOOK | 15
UNDERSTANDING MICROPHONES | YOUR FIRST HOME STUDIO
capsule diameter), the frequency
response can vary massively.
RIBBONLIKE MOVING-COIL dynamics, ribbon mics
rely on electromagnetic induction, but
here the soundwave vibrates a thin
conductive metal ribbon. With this sitting
inside a magnet, you have another form
of dynamic mic. As the ribbon needs to
be light, it’s also delicate, so ribbon mics
tend to be less rugged than moving-coil
dynamics. However, modern compact
neodymium magnets have made it
possible to make these mics less bulky.
OTHER TYPESRARER TYPES of mic include carbon, laser
and liquid mics, and ceramic or crystal
mics, but their performance isn’t great. If
you encounter these it’s most likely to be
in the form of instrument contact (‘bug’)
mics or acoustic guitar bridge pickups.
VALVE VS SOLID-STATEYOU’LL OFTEN hear music producers talk of
how they got an amazing sound by using
a valve mic, and an abundance of more
affordable models has now made valve
mics accessible to everyone, including
the home recordist.
The valve-based amp circuit can
impart some pleasant colouration to
the sound, especially at higher levels.
This is technically known as second
harmonic distortion and gives both a
‘warm’ and ‘smooth’ sound in contrast to
the harsher sound of third harmonic
distortion, more typical of transistor
designs. Valve mics need a dedicated
power supply, which can make them
cumbersome. Also, as the body contains
a small valve, they’re not indestructible,
and the valve becomes an additional
component that may break down.
PICKUP PATTERNSTHE OTHER fundamental aspect of a mic’s
design is its pickup or polar pattern. As
mentioned earlier, the main types are
cardioid, omnidirectional and figure-8.
You may also come across options that
fall somewhere in between these types,
while some of the more advanced mics
offer a selection of patterns, or even a
continuously variable controller all the
way from omni to figure-8.
Achieving the different polar patterns
is an integral part of mic design, and both
physical and electrical techniques are
utilised. Ribbon mics produce a figure-8
pattern because sound hits the ribbon
from both sides. For diaphragm-based
mics, the physical design affects the
pattern. If the mic capsule is sealed apart
from the diaphragm side, you have a
pressure-only design and hence an
omnidirectional pickup pattern. Open up
access to the back of the capsule and
sound waves will hit both sides, resulting
in a pressure-gradient design and a more
cardioid pickup pattern. If two capsules
are positioned back to back, their outputs
can be electronically combined to
produce a variety of pickup patterns.
One of the biggest issues with polar
patterns is inconsistent frequency
response. For example, a cardioid is
designed to pick up sound mainly from
the front, and although midrange
frequencies will be rejected at the back,
low frequencies will be picked up from all
around and high frequencies may also
get picked up at the back.
USB MICSCOMBINING MIC, converter and powering all
in one, the new breed of USB mics offer a
simple ‘plug and play’ solution that’s
attractive to computer-based musicians.
On the downside, you may be limited by
the quality of the onboard converters,
and the selection currently is limited.
MIC TYPES AT A GLANCE DYNAMIC
SMALL CAPSULE CONDENSER
LARGE CAPSULE CONDENSER RIBBON
COST Cheap to make and therefore cheap to buy
Made with intricate compact components, so they can be expensive to buy
From cheap upwards; valve types and multi-pattern versions cost more
Intricate design, so mid-price upwards
BUILD Robust mechanical design, low handling noise, can handle high SPLs
Susceptible to vibration and handling noise
Susceptible to vibration, diaphragm sensitive to humidity. Low self noise
Delicate ribbon, prone to wind and plosives. Some of them have heavy magnets
PICKUP PATTERN Cardioid, hyper-cardioid Omni, cardioid, hyper-cardioid, figure-8
Cardioid or multi-pattern Figure-8, cardioid
SOUND Upfront, can lack high frequency accuracy
Uncoloured and sensitive with good high frequency response
More coloured than small capsule designs
Smooth response with tail-off in the high frequencies
GOOD FOR Live vocals, guitar and bass amps, most drums
Quiet sources, ambient and stereo miking, strings, piano
Vocals, guitar amps, drum overheads, feature instruments
Speech, guitar amps, taming complex high frequencies
NOT GOOD FOR Quiet sources or where you want accuracy
Rather awkward for remote recording environments with no phantom power
Damp or windy conditions, cramped spaces
Challenging or particularly windy environments
EXAMPLES Shure SM58Sennheiser MD421Beyerdynamic M201
AKG C451SE Electronics SE4DPA 4011
AKG C3000Neumann TLM103Rode NTK
SE Electronics Ribbon R1 Karma K6Coles 4038

16 | BEGINNER HOME STUDIO HANDBOOK
YOUR FIRST HOME STUDIO | GET TING THE AUDIO INTO YOUR COMPUTER
Sort out the technology early on and your recording sessions will run much more smoothly
Ideally, when you’re recording music
you want the technology to fade
into the background so that you
can concentrate on creating and
capturing the moment. Whether
you’re working on your own or with
other musicians, the slightest
gear-related hiccup can bring your
session grinding to a halt and scupper
the spark of performance or creativity.
The key is, of course, preparation, but
good recording sessions also require a
flexible approach and the ability to
modify and make adjustments to your
setup on the fly. To do that, whether
you’re recording a band or a solo voice,
there are some fundamentals you will
need to get to grips with.
In a recording studio setup, the
so-called ‘signal flow’ simply refers to the
various stages of the journey of a sound
from the instrument or voice being
recorded to an audio track in your DAW.
If you’re using a single mic, or recording
direct into your interface via a preamp,
this process should be a pretty simple
one, even for the beginner. But as soon as
you go multiplying the number of mics,
preamps and tracks involved, things can
easily get a whole lot more confusing.
What’s more, if you’re planning on
arranging a complex recording session
involving lots of musicians, all of their
instruments and possibly even a
hardware mixing desk, then you’ll need to
get to grips with the signal flow of the
desk as a separate piece of equipment.
Now, if that’s all beginning to sound a bit
daunting, try to remember that, in
essence, it’s the same process as before,
but duplicated. So hang in there, keep
reading and it will all become clear soon.
RECORD AND MONITORIN ANY recording setup, you have two types
of signal: the record signal from the mic
or audio interface input, and the monitor
signal returning from your audio recorder
(ie, your computer). You need to be able
to listen to your record signal accurately
so that you can be confident that what
you’re hearing is what’s being captured.
You also need to be able to monitor what
you’ve already recorded (monitor signal)
while adding or overdubbing more parts.
If you’re planning on connecting one
instrument or mic to your computer and
recording that signal on one track, or
even if you’re using a few inputs in this
way, things are pretty simple. But what if
you have a guitar amp with two mics, plus
a DI, that you want to combine into one
signal? Or if you have 20 mics on a drum
kit and want to record the drums on eight
tracks? Grouping is the solution.
When it comes to mixing, software is
excellent at this and you’ll often find you
have endless buses at your disposal. But
at the input stage, software struggles. If
you’re recording many inputs and need
to group or bus signals together, while
monitoring the recording in real time, the
simplest option may be a hardware desk.
Look at the signal flow diagrams opposite
and you’ll see that as the setup becomes
more complex, so does the signal path.
PLUG ME INLIKE COMPUTERS and hi-fi equipment,
recording gear has its own set of
connection protocols. Although these
may at first seem like an arbitrary
mish-mash, you’ll quickly realise there
are certain pointers to keep you in check
when you’re plugging things up.
Mics typically use XLR connectors and
usually you’ll find the same type on
preamps. XLRs contain three wires (two
for the signal and one for the ground)
that form a balanced connection, which
eliminates noise interference. They use
male and female plugs and these indicate
the direction of the signal – male is an
output and female an input.
When it comes to the line level signals
that connect preamps, interfaces and
monitoring, things are less clear, with
jacks, phonos and XLRs all in common
use. The important thing to be aware of is
whether the connections are balanced or
unbalanced. Phonos are unbalanced and
XLRs balanced, while jacks can be either,
sporting three rings for balanced, two for
unbalanced. In most cases, connecting
from one jack type to the other shouldn’t
cause problems, but bear in mind that
operating levels may differ between the
+4dB operating level of professional
‘balanced’ equipment and the -10dBu
level of unbalanced ‘consumer’ gear.
Plugging a +4dB level signal into a
consumer -10dBu unit could overload it,
causing undesirable distortion.
Finally, always check that the phantom
power is switched off before you connect
or disconnect anything. Apart from the
loud noise that you will experience
through your monitors, microphones and
preamps can be damaged by accidental
phantom powering.
GETTING THE AUDIO INTO YOUR COMPUTER
BEGINNER HOME STUDIO HANDBOOK | 17
GET TING THE AUDIO INTO YOUR COMPUTER | YOUR FIRST HOME STUDIO
PREAMP
INTERFACE
MONITORS MONITORS
HEADPHONES
COMPUTER COMPUTERMONITORS MONITORS
INTERFACE
HEADPHONE AMP & SPLITTER
GUITARIST
VOCALIST
HEADPHONES
HEADPHONES
MONITORS MONITORSCOMPUTER
VOCALIST/GUITARIST
INTERFACE
DRUMMER
12 INPUTS OUTPUTS
BASSIST
MIXING DESK
DI
DI
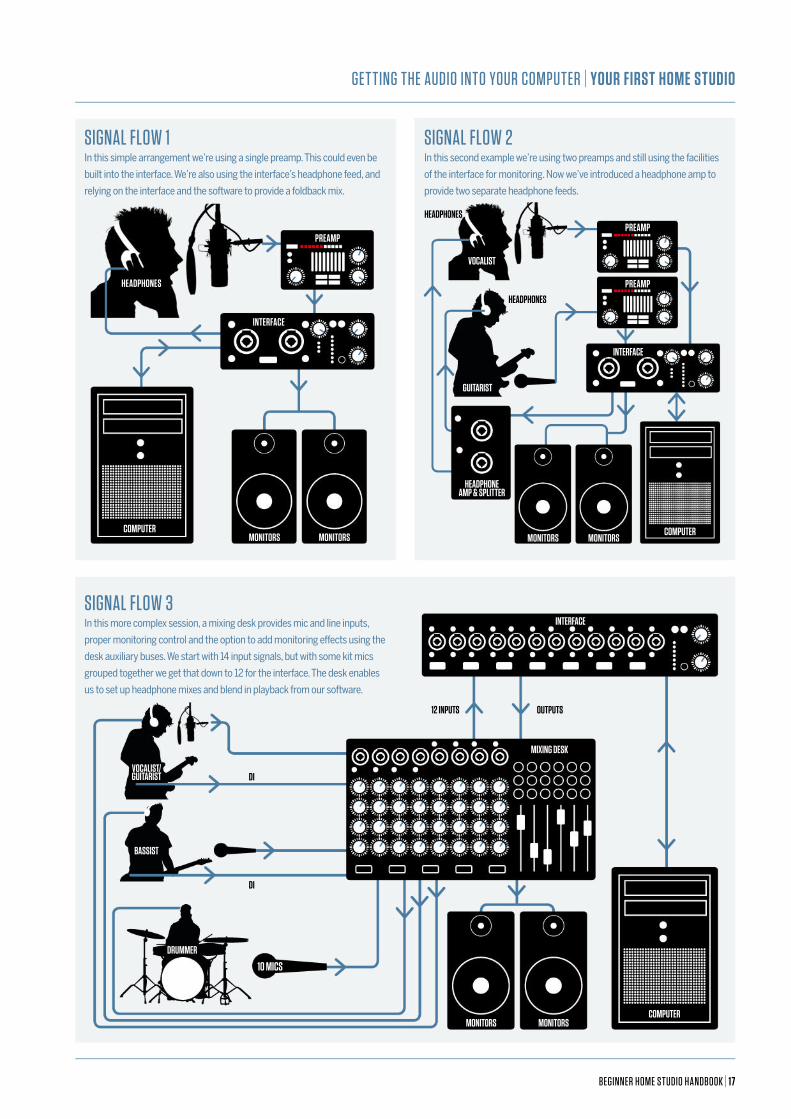
SIGNAL FLOW 1In this simple arrangement we’re using a single preamp. This could even be
built into the interface. We’re also using the interface’s headphone feed, and
relying on the interface and the software to provide a foldback mix.
SIGNAL FLOW 2In this second example we’re using two preamps and still using the facilities
of the interface for monitoring. Now we’ve introduced a headphone amp to
provide two separate headphone feeds.
SIGNAL FLOW 3In this more complex session, a mixing desk provides mic and line inputs,
proper monitoring control and the option to add monitoring effects using the
desk auxiliary buses. We start with 14 input signals, but with some kit mics
grouped together we get that down to 12 for the interface. The desk enables
us to set up headphone mixes and blend in playback from our software.
PREAMP
PREAMP
10 MICS

18 | BEGINNER HOME STUDIO HANDBOOK
YOUR FIRST HOME STUDIO | THE PRODUCER’S GUIDE TO HEADPHONES
When recording music, there will be times when you’ll need to use headphones. The trick is to avoid hearing their use in your finished work. Here’s how to ensure
you’re only using headphones to improve your music...
Alarge proportion of the music
we listen to is heard through
headphones and earbuds, yet
the received wisdom is to
never mix solely on them no
matter how high-quality your
headphones might be.
Just like speakers, headphones are
surprisingly complex solutions to a
seemingly simple problem. There are
many designs available to suit the needs
and budgets of an equally large range of
users, from joggers and commuters
through to DJs and mixing engineers.
Here we’ll look at how headphones
work, how you can use them when
recording your music, and how you can
find a pair that will work best for you.
HEADPHONE MECHANICSTHE BASIC headphone design has remained
unchanged for decades: encased
dynamic (moving coil) drivers to be
placed either over (headphones) or
within (earphones) the listener’s ears. In
essence, the moving coil driver found in
headphones is the same as in any
loudspeaker, with a signal voltage
conducted across a coil of wire
suspended within a permanent magnetic
field. The coil is attached to a diaphragm
that moves in and out as the voltage
opposes the magnetic field.
The more voltage, the further the
diaphragm moves and therefore the
larger the pressure it exerts on the ear,
THE PRODUCER’S GUIDE TO HEADPHONES
There’s more to working with headphones than just popping them on

BEGINNER HOME STUDIO HANDBOOK | 19
THE PRODUCER’S GUIDE TO HEADPHONES | YOUR FIRST HOME STUDIO
which we perceive as loudness. The
speed or velocity of the movement
dictates the frequency that’s transmitted
– the waveform in your DAW is a direct
map of the in/out movement any speaker
will have to make to reproduce it.
Outside of this basic driver mechanism
the design parameters for headphones
differ hugely, so let’s narrow the field
down and say that, for the purposes of
making and mixing music, we’ll discount
in-ear headphones. Why? Because they
have a frequency response that’s entirely
at the mercy of your own ear canal
architecture and how far you have
managed to stuff them in. The slightest
tug and the low frequency response
changes in a way you would probably
only get from a studio monitor if you
threw it on the floor or left the room.
There are plenty of high quality in-ear
monitoring systems for performers, but
you won’t find them being used in the
studio. On-ear (supra-aural) headphones,
which sit against the ear lobe via a foam
cushion, may be lightweight but their
suitability is compromised by several
factors – their pressure on the ear lobe
over extended periods, for example, can
cause discomfort. The fundamental sonic
problem with this design is that the lack
of enclosure around the ear makes it
difficult to produce the necessary bass
resonance with the requisite damping
factor – it’s like having a monitor speaker
without the box (sealed or ported).
This poor frequency response is also
coupled with a lack of isolation from
external sound sources, which further
reduces their potential uses. This leaves
the classic over-ear, or circum-aural,
design as the king of headphones.
GET THE BALANCE RIGHTTHE CIRCUM-AURAL headphone completely
encloses the ear lobe with a cushioned
pad that presses (lightly) on the area
around it. A cushioned, adjustable
headband helps spread this load across
the top of the head, therefore reducing
the lateral pressure.
Modern lightweight materials are
improving the comfort aspect of these
headphones, though mass and isolation
are interrelated properties, so there’s a
point at which the increased lightness will
reduce isolation. These are just a few of
the rather intricate balances that face a
headphone designer!
OPEN OR CLOSED?YOU CAN buy circum-aural headphones in
open-back and closed-back formats, with
some semi-open back designs. The ‘back’
is the outer ear cup. A closed-back design
is used to maximise isolation from any
external noise sources and can act as a
resonant space for the driver to work in.
This sealed space is pressurised so that
the driver is well damped and that there
is a force of inertia keeping the driver
diaphragm from ringing-on when the
input voltage has ceased.
Well-damped systems are perceived as
‘tight’. The disadvantage of the resonant
box effect is that it’s prone to frequency
response peaks and troughs based on
the ‘modes’ within the ear cup, in the
same way as any room will support
standing waves based on its dimensions.
These occur at higher frequencies than in
a room, but their intermodulation
distortions can also create unwanted
artifacts at low frequencies. Like rooms
and speaker cabinets, the quality of the
design dictates the quality of the result.
Open-back headphones are far less
prone to the ill effects of resonant modes
and can achieve a smoother frequency
response due to the driver’s pressure
zone extending outside the ear cup. The
driver has to work harder as a greater
proportion of its energy is not entering
the listener’s ear canal, and with less
damping the driver has to have a higher
self-damping factor. The open-back
design offers very little isolation from
external noise sources, which can be a
disadvantage, but if such noise isn’t a
problem then this design can provide a
more natural listening environment.
The demands on the headphone driver
are large as they cover the whole audio
range (20Hz to 20kHz), though many pro
headphones’ specs extend well beyond
this in both directions. Speaker cabinets
use two or more drivers to produce such
a range, but there are few examples of
headphones using multiple drivers. When
they do use multiple drivers, it isn’t to
cover different frequency ranges but to
improve power handling and manipulate
phase shift (the latter for a more ‘natural’
listening experience).
Improvements in speaker technology
and magnetics have meant the trade-off
between power, sensitivity and frequency
range has become less extreme and
problematic, leading to occasionally
stunning clarity.
The poor frequency response of on-ear headphones coupled with a lack of isolation leaves the classic over-ear design the king of the headphones
Basic headphone design has remained unchanged
for decades

20 | BEGINNER HOME STUDIO HANDBOOK
YOUR FIRST HOME STUDIO | WORKING WITH HEADPHONES
The acoustic isolation provided
by headphones can often be
misleading and, by robbing
you of a regular reference (for
example, background noise
levels you are used to), it’s
easy to creep up the volume
as you become immersed in listening.
Over time your threshold of discomfort
begins shifting to accommodate a louder
monitoring level, which is how the spiral
into hearing damage starts. Take regular
breaks and go and listen to sounds you
know well in order to reset your auditory
system, even if it’s traffic noise or birds
singing in the garden. When you go back
to working with your headphones, you’ll
know if they’re too loud or not.
There are many music related uses for
headphones, but here we’ll look at three
major ways in which to best use them:
recording/tracking, editing and mixing.
TRACKING AND PERFORMINGFOR THIS kind of work, closed-back
headphones are the best choice for
reducing background noise and bleed
from the cans onto the mic. Some
performers (singers and string, brass
or woodwind players) prefer to hang
one headphone off the ear so that they
can pitch their instrument naturally –
headphones with a single-sided cable
are the option best for this.
Durability and comfort can often
trump fidelity in this application, though
the trade off between isolation and
weight is an issue. Due to the high SPLs
headphones are expected to deliver,
you don’t want an expensive model that
will cost more than £30 or so to repair
after one session too many. Wear and
tear is a big factor, so is the availability of
replacement parts. The tendency to turn
the headphones up high to overcome
external noise makes hearing damage
a real problem in this situation. Some
manufacturers have designed models
that have increased isolation to -30dB
SPL. High SPLs also mean high power
handling, which means low impedance is
best alongside high power amplifiers.
Performers who pitch by ear, such as
singers, can find it hard to stay in tune
under headphones. Pitch perception
is influenced by pressure levels or
loudness, with high dB SPLs causing
us to perceive the pitch of most low-
to mid-range instruments as getting
lower with increased intensity (pitch
perception with intensity is not linear
– higher pitches often seem to get
sharper with loudness). If the performer
is hearing their instrument through loud
headphones, they tend to pitch sharp to
compensate for the perceived flattening.
Therefore, isolation and background
noise control can make all the difference
to performance when using headphones.
EDITINGEDITING TASKS can range from comping
vocal tracks and voice-overs, to creating
loops for sample collections, de-noising
archive materials or tightening up drum
multitracks. All these tasks require a
clear view of the material, which means
screening out the external world of
noise, but many of us can’t afford a
properly designed studio control/
mix room with high-end monitoring.
WORKING WITH HEADPHONESHeadphones are useful during editing tasks, but only if you invest your cash in a high-quality pair

BEGINNER HOME STUDIO HANDBOOK | 21
WORKING WITH HEADPHONES | YOUR FIRST HOME STUDIO
Luckily, headphones can do a similar
job, but like monitors this is dependent
on their quality. Sensitivity is key to the
headphones’ usefulness as the tiny clips,
clicks and crackles that need nipping out
can be tens of dBs lower than the mean
signal level that surrounds them.
This transient sensitivity is aided by
the isolation headphones can bring,
though high sensitivity and accuracy
can be found in open back designs that
offer much reduced isolation. A wide
frequency spectrum is also key, as so
many problems occur at the extremes
of our hearing range, from mic stand
rumbles to electronic noise in the final
10kHz-20kHz octave.
Distortions, mostly of the clipping
variety, can often appear much starker
on a good pair of headphones, and its
location in the stereo field is also easily
identified in the close-up world they
provide. Phase coherency is also brought
into sharp focus on headphones, making
them a brilliant tool for editing multi-
channel and multi-microphone material
before it hits the mix.
Because there’s only a ‘phantom’
centre image on headphones – ie, no
crosstalk – balancing an out of phase
stereo mic recording can be a lot easier.
It’s the same in reverse if you want to
use phase to either reduce or move the
centre information.
MIXINGIT’S OFTEN said that good mixes can’t
be achieved on headphones. However,
there’s quite a lot that headphones are
good for when it comes to mixing. They
can be useful for spotting overcooked
bass, for example, as the physical effect
of the lower frequencies is removed
and only their ear-detectable effects
become apparent. This tends to help with
the unknitting of masking/overlapping
bass elements in a mix. As with editing,
headphones allow you to zoom in on mix
elements, especially in the stereo field.
Phase shift problems, as well as the
effects of panning, can be quickly worked
on, and off-centre sources are easily
identified (for example, a mis-panned
kick). Reverbs and room acoustics
are also more accessible as there’s
no competing or masking acoustic
information (ie, the room/monitor
acoustic relationship).
Headphones are great for resetting
your ears’ relationship to your monitors
mid-session, too, though be careful of
jumping too quickly and too often as this
can lead to tail-chasing and constantly
trying to ‘split the difference’.
CHOOSING YOUR HEADPHONESThis handy guide will give you an idea of what to keep an eye (or ear) out for when shopping for headphones
DECIDE UPON A BUDGET Factor in how much you will be relying on
headphones and what that’s worth to you.
Do you really need new headphones, or are
your monitors in need of improvement?
SEPARATE AMPLIFIER? It will require more research to match
amplifier and headphones, as you’ll want
them to be in the same quality bracket –
the combination will only sound as good as
the worst component.
YOUR USAGE Using headphones primarily for editing and
mixing work? Consider open or semi-open
back models for the most natural sound. Is
background noise an issue? Closed-back is
a must. Performing musician? Prioritise
power handling; go for a lower impedance
model with high isolation (measured in dB
SPL – look for 20dB or more). There are
special models available for drummers
and other high-noise users (for example,
the Beyerdynamic DT770M).
WEIGHT OR MASSIf you are going to spend long periods
wearing a pair of headphones, look for a
comfortable, lightweight design, as there’s
no point if they sound great but your head
and neck hurt when you’re working.
TRY THEM AT A STORETry everything the store has to offer, but
don’t stray too far from your budget. If
you’re planning a large investment, buy
from an established manufacturer as
their product will carry a warranty.
At the mixing stage, headphones can be useful in identifying problems such as overcooked bass or phase shift problems


BEGINNER HOME STUDIO HANDBOOK | 23
BUYER’S GUIDE
HOME STUDIO GEAR GUIDE
There are so many different types and brands of gear out there that it can be a minefield for the wannabe studio recordist to choose what’s best for the task at hand. Especially as there are going to be a ton of factors that
will decide what you’re going to need, from the sound you’re after to the method you’ll be employing to get your music into your DAW, to suitability for the songs you’re recording, and pure considerations of budget. Let us help you decide what’s best with some expert guidance on everything from the best studio guitars, amps and drums to the interfaces you’ll need, best mics for the job and more. Once you’ve made the right gear choices, you can get down to the business of capturing your music!

24 | BEGINNER HOME STUDIO HANDBOOK
BUYER’S GUIDE | HANDHELD RECORDERS
APPLE IPHONEFrom £539 (version 6, handset only)
iPhone’s built-in mic handles basic recording tasks. iOS provides the Voice
Memo app, recording mono files in mp3 format. Widely available, the iPhone
is perfect for quickly capturing ideas and transferring them to a computer.
www.apple.com
BLUE MICROPHONES MIKEY DIGITAL£99
If you love the idea of recording on an iPhone but crave even better quality, the
Mikey Digital will sing to your inner perfectionist. Connecting to your iOS device’s
30-pin or Lightning dock, it handles loud sounds and has a line input for guitar.
www.bluemic.com
HANDHELD RECORDERSW
e’ve all noodled on guitar, come up with something
brilliant and then… promptly forgotten it. Having a
recorder running while playing, or even carrying one
around in your bag for those on-the-go flashes of inspiration,
means you’ll never lose a riff again. With handheld recorders,
audio is usually presented as a wav file that can be transferred
via a USB link to your computer. Once there, it can be edited,
and perhaps even added into a DAW, enabling you to add
overdubs and create a bigger production. Here are the best
handheld recorders to capture your moments of inspiration…

BEGINNER HOME STUDIO HANDBOOK | 25
HANDHELD RECORDERS | BUYER’S GUIDE
FOCUSRITE iTRACK POCKET£69
It’s not quite handheld, but the iTrack Pocket features a built-in stereo recorder,
and also cradles an iPhone to allow you to easily film and edit musical
performances using the iTrack app.
www.focusrite.com
OLYMPUS LS-12 & LS-14£144 (LS-12), £199 (LS-14)
Both offer a tuner and three modes. Quick mode equals instant recording,
Manual lets you set the recording level, and Smart adjusts to the optimum
level after ‘hearing’ the audio.
www.olympus.co.uk
YAMAHA POCKETRAK PR7£131
Lightweight, this battery-powered stereo recorder features a crossed X/Y
microphone and you can also plug in an external mic. Setting up for recording
is simple with five preset modes.
uk.yamaha.com
ZOOM H2N£129
The H2n packs mid-side stereo recording and X/Y mics to deliver a huge stereo
field, as well as a number of built-in effects, including auto-gain, a compressor/
limiter and low-cut filter.
www.zoom.co.jp

26 | BEGINNER HOME STUDIO HANDBOOK
BUYER’S GUIDE | AUDIO INTERFACES
FOCUSRITE SCARLETT 2I2£99
2-in, 2-out USB interface with the same low-noise and low-distortion preamps
as Focusrite’s Saffire. Bundled with emulations of the Red 2 equaliser and Red 3
compressor, plus Scarlett Suite featuring compression, gating, EQ and reverb.
http://uk.focusrite.com
IK MULTIMEDIA IRIG PRO£110
Portable all-in-one solution for Apple users. Featuring a balanced input for a
mic, unbalanced input for line-level or Hi-Z source via XLR/1/4" combo jack
connector, and 48V phantom power provided by included 9V battery.
www.ikmultimedia.com
AUDIO INTERFACES W
hen recording to a digital device, your analogue signal (ie:
music) must be converted to digital. An audio interface
does that. Plug in your guitar or mic and the interface
converts your signal to digital data that’s recorded to your
DAW. Most audio interfaces have a standard high impedance
jack input, plus an XLR mic input, preferably with switchable
48V phantom power for condenser mic connection. For stereo
recording with two mics, you will need two XLR inputs.

BEGINNER HOME STUDIO HANDBOOK | 27
AUDIO INTERFACES | BUYER’S GUIDE
AUDIENT ID14£199
Featuring highly sought-after AD-DA conversion from Audient, the iD14
includes two Audient console mic pre’s and JFET D.I. The two channel input can
be expanded via the optical input connector, supporting both ADAT or S/PDIF.
www.audient.com
STEINBERG UR44£257
Anyone with the need to record multi-channel audio, including drums might
want to consider the UR44, a 6-in/4-out USB 2.0 interface including MIDI and
onboard DSP. The plethora of I/O is crammed into a compact yet sturdy chassis.
www.steinberg.net
M-AUDIO M TRACK PLUS£89
M-Audio’s M Track Plus is a no nonsense desktop option that is rugged enough
for those on their travels. Featuring a front-panel meter bridge, the USB 2.0
interface includes Waves plug-ins and ‘lite’ editions of Cubase and Ableton.
www.m-audio.com
ZOOM TAC-2R£270
Compact 2-in, 2-out audio interface and possibly the cheapest Thunderbolt
audio converter around. Also featuring MIDI I/O, it offers ultra-low latency and
a resolution up to 24-bit/192kHz. USB 3.0 version available for PC too.
www.zoom.co.jp

28 | BEGINNER HOME STUDIO HANDBOOK
BUYER’S GUIDE | STUDIO MONITORS
FLUID FX8£299 (pair)
Nearfield coaxial monitors with 8" bass drivers, and coaxial mounted 1.2" silk
dome high frequency drivers with integrated waveguides all for under £300
– the FX8s are great value.
www.fluidaudio.net
M-AUDIO BX5 CARBON£178 (pair)
Compact, solid and surprisingly loud, this is an ideal affordable monitor for
smaller spaces. It includes three Acoustic Space settings (Flat, -2dB and -4dB),
which helps with bass response when positioning near to walls or in corners.
www.m-audio.com
STUDIO MONITORSW
hen making music, it’s vital that you can hear it clearly in
order to make important decisions about the mix. For this
you will need dedicated studio reference monitors
designed to be both accurate and truthful. The whole point of
mixing music is to get it to sound good no matter what it’s
played on, and if you can get it to sound good on a familiar set
of studio monitors it should translate well to other systems,
too. Here are some options that don't cost the earth.

BEGINNER HOME STUDIO HANDBOOK | 29
STUDIO MONITORS | BUYER’S GUIDE
ADAM F7£509 (pair)
The F-series monitors represent the more affordable end of the market at
Adam Audio, but they are no more inferior. Adam have cut costs in the right
places and created a budget speaker with genuinely non-budget sound.
www.adam-audio.com
GENELEC 8010A£259 (each)
High-quality monitoring that combines portability and durability at a sensible
price. 50 watts of bi-amplified and ported power driving a 76mm low frequency
cone and 19mm high frequency metal dome. At home in large and small spaces.
www.genelec.com
TANNOY REVEAL 802£418 (pair)
Good stereo imaging, with a wide listening sweet spot and pleasing depth of
field. A consistent response at both loud and quiet monitoring levels. Gives the
big players in the mid-price active monitor market some serious competition.
www.tannoystudio.com
EQUATOR AUDIO D5£349 (pair)
Sitting pretty in the mid-price range, the Equator D5s have internal DSP,
ensuring the left and right monitors are accurately matched to result in
stable stereo imaging.
www.equatoraudio.com

30 | BEGINNER HOME STUDIO HANDBOOK
BUYER’S GUIDE | HEADPHONES
BEYERDYNAMIC DT 770 PRO£119
With an open and balanced sound, the DT 770 headphones are a great
all-rounder choice – a fine investment for leisure listening as well as for
carrying out varied studio work.
europe.beyerdynamic.com
AUDIO TECHNICA ATH-M50X£159
An update to a classic. Comparing the M50x to the old M50, the difference hits
home as soon as you tax them with big rock tracks and dense electronic tracks.
M50x goes deeper and feels clearer and more airy.
eu.audio-technica.com
HEADPHONEST
he cheap in-ears made available with mobiles or mp3
players aren’t up to serious recording. Better are the larger
sets that cover the ears fully, comfortably, and with good
sound isolation both in and out. The general opinion from
professionals is that headphones should play a secondary role
to quality monitor speakers. That said, many recordists edit
and mix on the road, making headphones a must. Here we
take a look at the sub-£200 market.

BEGINNER HOME STUDIO HANDBOOK | 31
HEADPHONES | BUYER’S GUIDE
FOSTEX T40RP MKII£132
The robust T40RP MkII headphones won’t let you down on a tracking session.
Exceptionally sturdy, this pair would best survive being thrown across the room
by a diva guitarist who can’t nail their solo!
www.fostexinternational.com
M-AUDIO HDH-50£114
Solid and comfortable construction surrounding the 50mm drivers with a wide
frequency response of 12Hz to 24kHz. The impressive HDH-50s align
themselves with the likes of AKG and Sennheiser.
www.m-audio.com
AKG K 271 MKII£110
Lightweight, stylish and supremely comfortable, the AKG K271s represent our
choice for extended studio graft thanks to their clear balance of frequencies
and extra practicality for professional use.
uk.akg.com
SENNHEISER HD 280 PRO£140
Closed-back, circum-aural headphones designed for professional monitoring
applications. The 32 dB attenuation of external noise makes the HD 280 Pro
particularly useful for use in a high-noise environment.
en-uk.sennheiser.com

32 | BEGINNER HOME STUDIO HANDBOOK
BUYER’S GUIDE | MICROPHONES
SHURE SM57£85
This benchmark dynamic mic’s snub nose is a familiar sight in studios the
world over. For close miking at higher sound pressure levels than would suit
a condenser, it’s the complete all-rounder and a bonafide classic.
www.shure.co.uk
MICROPHONES
SE ELECTRONICS MAGNETO£79
Entry-level condenser, supplying plenty of detail with quite a neutral character.
There’s an airy top end present but not over-emphasised, while lower-end
warmth is not quite as prominent as in some more expensive models.
www.seelectronics.com
Confused by which microphone does what in the studio?
It’s understandable as there are various options when it
comes to microphones, and what you ultimately use
depends on the recording scenario as well as your budget.
Whether you want a trusty workhorse mic for capturing a
variety of instruments, or a mic tailored for a particular task,
there will be options for you. Here’s our handy guide to
microphones: the names you’ll hear regularly, what they do,
and some suggestions of our favourites on the market,
ensuring your performances sound the best possible.

BEGINNER HOME STUDIO HANDBOOK | 33
MICROPHONES | BUYER’S GUIDE
RODE NT1-A£150
Large-diaphragm condenser that’s something of an entry-level staple. It’s a
flattering though still impressively neutral-sounding mic, useful for acoustic
guitars, vocals and more. It’ll run off either 24V or 48V phantom power supplies.
www.rode.com
AUDIO TECHNICA AT2020£99
Large-diaphragm cardioid condenser that far outperforms its modest price
tag. Broad frequency response and solid build quality make it a great choice for
a variety of vocal and instrument applications. USB version also available.
www.audio-technica.com
AKG D5£90
A direct competitor to Shure’s famous SM58, this full and detailed dynamic mic
is a good choice if you want something that’s equally at home on the stage as it
is in the studio. Its supercardioid pickup pattern helps tame feedback, too.
uk.akg.com
SONTRONICS HALO£129
With retro looks to die for, this cardioid dynamic mic is spring-mounted within
its distinctive circular frame. It’s tailored for use with the frequencies typical of
amplified guitar tone, meaning less fixing in the mix should be required.
www.sontronics.com

34 | BEGINNER HOME STUDIO HANDBOOK
BUYER’S GUIDE | MICROPHONES
AVANT ELECTRONICS AVANTONE CR-14£220
Ribbon microphones have an exceptionally natural sound, almost like that
of our own ears, and typically feature a figure-8 polar pattern to pick up
signal evenly at both the front and back. They are typically ‘darker’ than
most condensers and, unlike dynamics, work well at distance from the
source. This affordable, retro-style mic is packed full of character, with a
warm, dark, vintage tone that responds well to EQ boosting in the top end.
As with all ribbon mics, though, it’s rather sensitive to air pressure, and so
needs to be handled with care.
www.avantonepro.com
SENNHEISER E602 II£110
Most multi-purpose microphones feature a natural bass roll-off, and aren’t
always built to withstand overly-high SPL levels, so we recommend you look at
investing in a dedicated cardioid bass mic if you want to capture the loudest,
lowest frequencies of kick drums, floor toms or bass cabs. The Sennheiser’s
e602 II is one of the most popular choices for this task: its impressive low
frequency extension reproduces and enhances subsonic weight, while its
midrange scoop and enhanced high-mid emphasis really bring out click and
beater tones while reducing mud.
en-uk.sennheiser.com
GEAR 4 MUSIC FIVE-PIECE DRUM MIC SET£79.99
Pre-packed drum mic sets, usually comprising at least mics for kick, snare
and overheads, can be a great value entry point into the recording world,
giving you everything you need to get started – and often at very
reasonable prices. Here’s an extremely pocket-friendly five-piece set that
retails for less than many single mics. This no-frills, cased selection of
robust mics features two condensers for overhead use and three
dynamics for kick, snare and toms, that excel at capturing the natural
sound of your drums. An ideal kit to have as you begin your journey into the
world of drum recording.
www.gear4music.com

BEGINNER HOME STUDIO HANDBOOK | 35
MICROPHONES | BUYER’S GUIDE
NEUMANN TLM102£419
Neumann microphones are the Rolls Royce of the recording world, with
the vast majority of their mics sitting out of reach of most beginner
budgets. The TL102, however, is their mid-priced solution: a surprisingly
compact large diaphragm condenser with a huge sound. There’s no
roll-off, pad, polarity switch or shock mount, but its frequency response is
full and bright without the harshness associated with cheaper alternatives.
This may be the most expensive mic on our list, but can be considered a
worthwhile investment for anyone looking to capture professional-
sounding vocals, guitar or acoustic instruments.
www.neumann.com
SE ELECTRONICS SE2200A II£209
This is a multi-pattern condenser with a 1" diaphragm that works well on
acoustic guitars and as a distance mic for cabs. Sports a roll-off switch and
-10dB pad for safe use on louder sources. The 2200a is known for its
reasonably bright sound, and the MkII is very similar – however, there is
also a solid fatness to the output and, overall, the balance works well for
vocals. Combine this with the multi-pattern option (a more affordable
fixed-pattern cardioid version is also available), and the 2200a MkII is
more desirable than ever.
www.seelectronics.com
SAMSON 7 KIT DRUM MICS £199
Included in the kit are five dynamic mics, plus two condenser mics. The
five dynamic models are for close miking and dedicated to bass drum,
snare and toms (x3), while the pair of condensers is for cymbal and
general overhead duties. Each mic turns in a decent performance and,
particularly in the case of the kick and condenser mics, delivers pro-level
performance. Also included are four DMC100 mic clips for positioning the
snare and tom mics, and all of the components come housed in a sturdy
foam-lined hard case.
www.samsontech.com

36 | BEGINNER HOME STUDIO HANDBOOK
BUYER’S GUIDE | BUDGET STUDIO AMPS
VOX AC10£359
This newly released lower-wattage version of the classic AC design is a killer
do-it-all option for anything short of metal. From The Beatles to Brian May and
U2, it’s all in here and at a great price.
www.voxamps.com
FENDER BLUES JUNIOR III£490
The Blues Junior is one of the best-selling amps in the world, thanks to a great
clean tone, reverb, and a sizeable palette of medium-drive tones for blues, rock,
’60s pop and loads more besides.
www.fender.co.uk
BUDGET STUDIO AMPST
he key to a good home studio amp is output power – lower-
wattage amps allow you to get the kind of cranked valve
amp tones you hear on classic rock records without blowing
your eardrums. Some modern heads and combos offer cabinet
emulation and silent recording outputs, perfect for late-night
sessions and which might negate the need to mic up entirely.
These low-wattage amps, along with a few modern options,
deliver serious tone at recording-friendly volume levels.

BEGINNER HOME STUDIO HANDBOOK | 37
BUDGET STUDIO AMPS | BUYER’S GUIDE
LANEY IRONHEART IRT-STUDIO£399
15 watts of valve power, plus USB connectivity for re-amping and silent recording
make the IRT-Studio an incredibly useful rock and metal amp to have kicking
around for your sessions at home.
www.laney.co.uk
ORANGE MICRO TERROR£99
Packs 20 watts into an unbelievably tiny chassis thanks to a solid-state Class D
power stage. Sounds best when wound up to levels that are loud enough to
compete with a drummer, but there’s no denying the quality of its tonal palette.
www.orangeamps.com
BLACKSTAR HT-5R£349
Infinite Shape Feature enables you to get British and American-style valve tones,
while the onboard digital stereo reverb comes into its own in conjunction with the
speaker-emulated output – switchable between 1 x 12 and 4 x 12 cabinet voicings.
www.blackstaramps.com
HUGHES & KETTNER TUBEMEISTER 18 HEAD£549
With an integrated Power Soak for silent recording, plus the near-legendary
Red Box speaker emulation, the TM upholds H&K’s well-deserved reputation
for high standards. It has an exceptionally versatile set of onboard sounds, too.
www.hughes-and-kettner.com

38 | BEGINNER HOME STUDIO HANDBOOK
BUYER’S GUIDE | BUDGET ELECTRIC GUITARS
SQUIER CLASSIC VIBE TELECASTER ’50S£359
The Telecaster is one of the definitive electric outlines, and this Classic Vibe
edition nails the ’50s sound courtesy of a vintage-tilt maple neck and custom
single coils that do the business for country, blues, rock and jazz.
www.fender.com
EPIPHONE DOT STUDIO£229
If you’re after an incredibly well-priced thinline semi-acoustic, you can’t go
wrong with Epiphone’s version of Gibson’s venerable ES-335. Resonant, airy
humbucker tones and slick playability thanks to its SlimTaper neck.
www.epiphone.com
BUDGET ELECTRIC GUITARSS
o, what is a studio guitar? Well, almost any serviceable
guitar that stays in tune could make the cut when it
comes to recording, but some guitars will help you
reference classic tones a little more easily. Back in the 1950s,
Fender, Gibson, Gretsch and other heritage brands established
the sonic templates for electric tone that most of us still work
to today, so it pays to at least consider guitars that command
those tones for your studio. Here you’ll find a selection of
models that won’t break the bank, but will get you close to
those iconic sounds.

BEGINNER HOME STUDIO HANDBOOK | 39
BUDGET ELECTRIC GUITARS | BUYER’S GUIDE
YAMAHA PACIFICA 611HFM£475
Since the late ’80s, the Pacifica has been one of the go-to budget guitars. The
611HFM brings a Seymour Duncan SP90-1N neck pickup for single coil-meets-
humbucker sounds, while the bridge TB-14 delivers hot PAF-style tones.
uk.yamaha.com
SCHECTER STEALTH C-1£449
Part of Schecter’s Diamond Series, the Stealth C-1 has a smooth satin-finished
neck that puts speed to the fore, while coil-splittable SuperRock-II humbuckers
wring every last drop of rock-ready tone from the formula.
www.schecterguitars.com
GRETSCH ELECTROMATIC DOUBLE JET WITH BIGSBY£445
A classic Gretsch design at an affordable price-point. The Double Jet gives you
twangsome Black Top Filter’Tron pickups, which, combined with the Bigsby
Licensed B50 vibrato, offer country and rockabilly thrills aplenty.
www.gretschguitars.com
IBANEZ IRON LABEL RGIR20E£479
The Japanese company has always leant towards metal and shred, and the Iron
Label series packs high-output EMG active humbuckers, the option of hardtail
bridge or Edge-Zero II vibrato, plus lightning-quick Nitro Wizard necks.
www.ibanez.com

40 | BEGINNER HOME STUDIO HANDBOOK
BUYER’S GUIDE | BUDGET ELECTRIC GUITARS
EPIPHONE LES PAUL STANDARD PLUSTOP PRO£379
Where would the likes of Jimmy Page, Joe Perry and Slash be without the
Les Paul? The PlusTop Pro is one of Epiphone’s top-end LPs, delivering
Gibson-like specs for an affordable price. You get a AAA-grade flame
maple top on a mahogany body, Grover tuners for rock-solid tuning
stability, plus rock-orientated ProBucker humbuckers, based on the
original Les Paul’s PAF Patent Applied For pickups. Add in coil-splits for
single-coil-like sounds, and the PlusTop Pro delivers all the Les Paul tones
you could want and a whole lot more.
www.epiphone.com
PRS SE STANDARD 24£399
Although it’s Paul Reed Smith’s most affordable offering yet, the Indonesian-
made Standard 24 still delivers many of the features that made its Custom 24
forebear such a hit. The neck is most worthy of note, delivering 24 frets across
a 25" scale length (halfway between a Les Paul’s 24.75 and a Strat’s 25.5), while
the thoughtful cutaway around the top of the fingerboard makes tracking those
tricky solos a breeze. Key to the 24’s versatility are its coil-splits, which enable
you to cover clean funk, jazz and blues just as capably as high-gain rock, metal
and even shred.
www.prsguitars.com
SQUIER CLASSIC VIBE STRATOCASTER ’60S£360
This isn’t the cheapest Strat in the Squier catalogue, but it’s one of the
best. The Classic Vibe models aim to capture the intricacies of Leo
Fender’s golden-era instruments while maintaining a strict budget, and
this ’60s example does a fine job. Its C-shaped maple neck offers
comfortable playability for the vast majority of players, while the Alnico V
single coils – which are slightly hotter than regular singles – combined
with the alder body offer good approximations of classic tones with which
legends such as Hendrix, Knopfler and Gilmour made their names.
www.fender.com


42 | BEGINNER HOME STUDIO HANDBOOK
BUYER’S GUIDE | BUDGET ACOUSTIC GUITARS
FAITH NAKED MERCURY PARLOUR£399
Faith’s affordable acoustic line doesn’t compromise on quality. This compact,
parlour-sized guitar has a deeper body than most, lending its solid Engelmann
spruce top and mahogany back and sides a balanced tone that sits well in a mix.
www.faithguitars.com
BUDGET ACOUSTIC GUITARS
EPIPHONE DR-500MCE VS MASTERBILT£449
Vintage-style visual appointments, and the solid Sitka spruce top and solid
mahogany back and sides deliver a pronounced lower midrange and rich
projection for strumming, amplified by the flexible eSonic 2 preamp.
www.epiphone.com
Choosing an acoustic guitar at the lower end of the market
can be a bit of a minefield; the quality of wood can vary
greatly, which can affect the recorded tone of the
instrument. Thankfully, there are no such problems with the
options we’ve listed here, all of which feature solid tops for
livelier resonance and sustain. Some of the guitars also
feature built-in electro preamps, and while for most purposes
we’d recommend recording with a condenser mic, it’s worth
experimenting with these sound sources in order to add
different timbres to your mixes.

BEGINNER HOME STUDIO HANDBOOK | 43
BUDGET ACOUSTIC GUITARS | BUYER’S GUIDE
FENDER SONORAN SCE£310
This ‘tight’ dreadnought screams fun with its colourful finishes, but delivers
serious tone, with a rich bass courtesy of a solid spruce top and scalloped X
bracing, plus Fishman’s Isys III preamp and under-saddle Sonicore pickup.
www.fender.com
MARTIN LX1E LITTLE MARTIN£409
Features a solid Sitka spruce top with High Pressure Laminate sides, which put
out a powerful output when strummed and a nuanced sweetness when
fingerpicked, plus the impressive Fishman Isys T preamp.
www.martinguitar.com
VINTAGE V400N£179
A solid spruce top is paired with Eastern mahogany back and sides for a classic
big dread tone which, while not as rich as more expensive models, is ideal for
your first mic’d recordings.
www.jhs.co.uk
ARIA 511£499
Made of pure solid woods, the 511 delivers serious VFM, and its classic pairing
of a Sitka spruce top with Indonesian mahogany back and sides makes for a
punchy output and impressive sustain when strumming big open chords.
www.ariaguitars.com

44 | BEGINNER HOME STUDIO HANDBOOK
BUYER’S GUIDE | BUDGET ACOUSTIC GUITARS
SIGMA S000M-15£499
Formerly Martin’s affordable sub-brand in the ’70s, Sigma now offers a
wealth of value-for-money acoustics among its ranks, including this
000-shaped all-mahogany beauty. Mahogany produces a darker,
mellower tone than spruce, making it popular for fingerpicking styles such
as folk, country and blues. In addition, the 000 size lends the S000M-15 a
trimmer waist and tighter low-end than dreadnoughts, with more of a
focus on upper-mid frequencies, making the acoustic sound pop out of a
mix. A Fishman Sonitone under-saddle transducer is also included,
producing an honest representation of the guitar while avoiding much of
the typical piezo high-end ‘ping’.
www.sigma-guitars.com
TAYLOR GS MINI£399
This travel version of legendary builder Taylor’s Grand Symphony-sized
acoustic has proved incredibly popular, largely thanks to its surprisingly full
sound. The guitar’s compact body features a solid Sitka spruce top and
laminate sapele back and sides, projecting a tight low-end and musical voice,
which ensures it sits well in a mix with bass and drums, honing in on the guitar’s
essential mid frequencies while still delivering some high-end sparkle. The GS
Mini is also compatible with Taylor’s ES-Go pickup, which can be more
electric-sounding but produces a modern, alternative voicing for recording.
www.taylorguitars.com
YAMAHA LJ6 ARE£513
Part of a redesign of the company’s ever-popular L Series, the LJ6 features
a medium jumbo body with bass-enhancing X-bracing, which offers a tone
well suited to strumming, with a sweet top-end. While the guitar has
laminated back and sides, its solid Engelmann spruce top boasts
Yamaha’s Acoustic Resonance Enhancement, designed to emulate a
well-played-in acoustic, as well as a passive pickup system that – despite
offering no onboard control – delivers a convincing plugged-in sound.
Everything about the LJ6 points towards a much more expensive guitar,
from the stunning sunburst finish to the record-ready tone.
uk.yamaha.com


46 | BEGINNER HOME STUDIO HANDBOOK
BUYER’S GUIDE | BUDGET BASS GUITARS
EPIPHONE THUNDERBIRD-IV BASS£229
Possibly the coolest looking bass on the planet with that ‘reversed’ zig-zag
body, but it also delivers the tonal goods thanks to a pair of punchy Epiphone
TB Plus bass humbuckers, a maple neck and mahogany body ‘wings’.
www.epiphone.com
BUDGET BASS GUITARS
SQUIER VINTAGE MODIFIED PRECISION BASS PJ£280
The P-Bass is perhaps the bass guitar, and the PJ gives you extra versatility with
a Jazz Bass bridge pickup plus the P-Bass split-neck pickup, ensuring it covers
most genres with ease. The modern C profile neck makes it an easy player.
www.fender.com
Like the guitar market, the quality of budget basses has vastly
improved over the past couple of decades. If you’re just
recording bass at home, your focus should be the sound, and
all of the options here have tones that will punch through a mix;
something that’s especially important when DI’ing or using amp
sims. The tonal variety isn’t quite as wide as it is with guitars, but
there’s still plenty of choice. As always, decide what kind of tone
you’re after before you invest your cash.

BEGINNER HOME STUDIO HANDBOOK | 47
BUDGET BASS GUITARS | BUYER’S GUIDE
STERLING BY MUSIC MAN S.U.B. RAY 4£334
A cut-price version of Music Man’s ever-popular StingRay 4 bass, the S.U.B. Ray
features an onboard two-band preamp, low-noise humbucking pickups and a
smooth satin neck finish for modern playability and hi-fi sounds.
www.sterlingbymusicman.com
SQUIER VINTAGE MODIFIED JAZZ BASS ‘70S£280
If you seek old-school tones, this ’70s-style Jazz Bass will get you there. Its pair
of single-coil pickups offers a defined bass tone with plenty of cut, further
emphasised by the maple neck and fingerboard.
www.fender.com
LTD F-104£308
Purpose-built for heavier styles, the F-104’s extended 35" scale length makes
down-tuning a cinch, while two ESP-designed pickups and a two-band active EQ
means you’ll have no problems retaining definition in lower registers.
www.espguitars.com
YAMAHA TRBX174£183
With modern styling and a low price tag, the TRBX174’s alder body, paired with
split-coil and single-coil pickups, offers serious versatility, while Yamaha’s
ever-reliable build quality ensures it will withstand countless sessions.
uk.yamaha.com

48 | BEGINNER HOME STUDIO HANDBOOK
BUYER’S GUIDE | DRUM KITS
PDP MAINSTAGE £525
At just over £500 the Mainstage kit is at the upper end of entry-level, but still
represents good value for money if budget is tight. As we’ve come to expect
from PDP, DW’s little brother, the build quality and sound is faultless.
www.pacificdrums.com
TAMA CUSTOM SUPERSTAR HYPERDRIVE£1,219
It may stretch your budget, but this kit has it all – a thumping sound and
excellent build quality. The 2015 model is all-maple and features die-cast hoops
and an undrilled bass drum, plus two toms, two floors and a matching snare.
www.tama.com
DRUM KITST
he more you spend the better the quality of wood, shell
construction, shell hardware etc, which will make them
easier to keep in tune. Most shells will be based around
maple or birch. Maple delivers a warmer, deeper sound, and
birch is brighter with more attack. If you play prog you may
need a seven-piece kit, but for rock a four-piece should suffice,
so only buy what you need. Sub-£1,000 kits often come with
generic factory heads so you may want to invest in new skins.
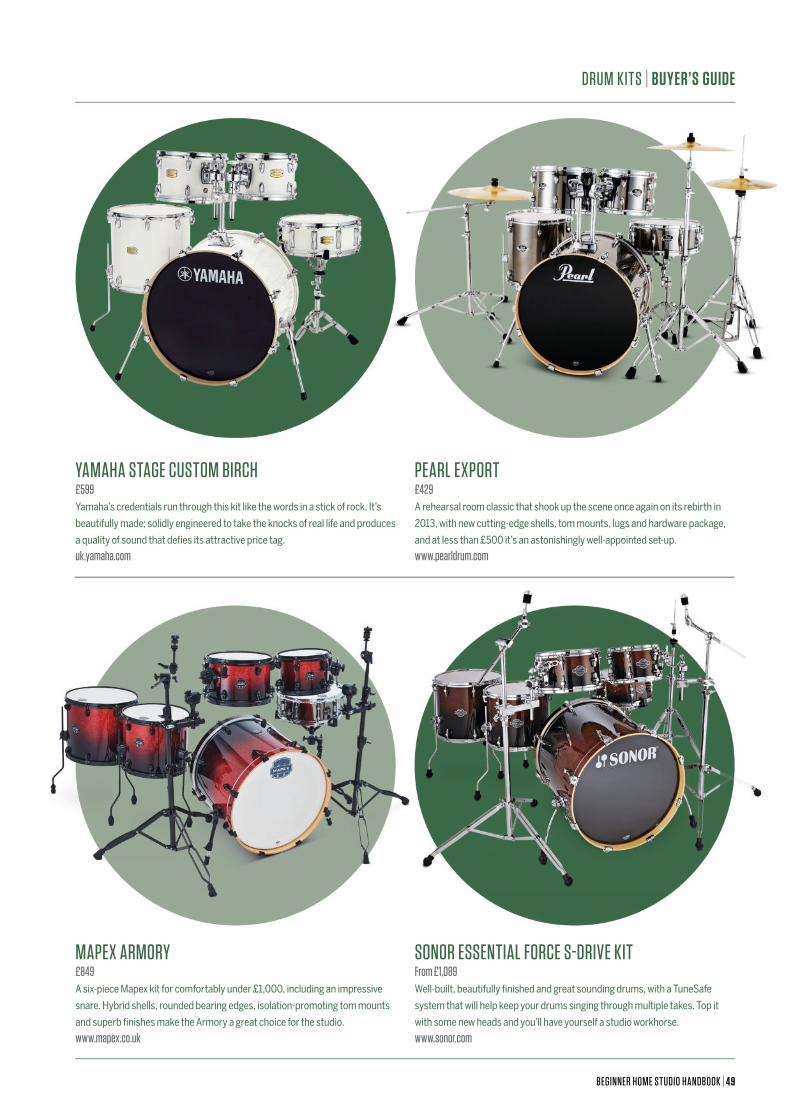
BEGINNER HOME STUDIO HANDBOOK | 49
DRUM KITS | BUYER’S GUIDE
SONOR ESSENTIAL FORCE S-DRIVE KITFrom £1,089
Well-built, beautifully finished and great sounding drums, with a TuneSafe
system that will help keep your drums singing through multiple takes. Top it
with some new heads and you’ll have yourself a studio workhorse.
www.sonor.com
MAPEX ARMORY£849
A six-piece Mapex kit for comfortably under £1,000, including an impressive
snare. Hybrid shells, rounded bearing edges, isolation-promoting tom mounts
and superb finishes make the Armory a great choice for the studio.
www.mapex.co.uk
PEARL EXPORT£429
A rehearsal room classic that shook up the scene once again on its rebirth in
2013, with new cutting-edge shells, tom mounts, lugs and hardware package,
and at less than £500 it’s an astonishingly well-appointed set-up.
www.pearldrum.com
YAMAHA STAGE CUSTOM BIRCH£599
Yamaha’s credentials run through this kit like the words in a stick of rock. It’s
beautifully made; solidly engineered to take the knocks of real life and produces
a quality of sound that defies its attractive price tag.
uk.yamaha.com

50 | BEGINNER HOME STUDIO HANDBOOK
BUYER’S GUIDE | CYMBALS
ZILDJIAN ZHTFrom £67
Zildjian’s most musical sheet bronze series yet boasting some fantastic, rich and
pro-sounding crashes and rides. With single options and box sets available you’re
guaranteed to find something that works on your recordings.
www.zildjian.com
SABIAN B8XFrom £53
A boosted version of the cymbal brand’s best-selling B8 range, boasting more
hammering, adjusted profiles and smoother bell lathing. Suited for rock and
metal players, with plenty of size and model options.
www.sabian.com
CYMBALSA
side from your drums, cymbals represent a large portion of
the percussion ‘voice’ on your tracks, particularly the hi-hats
and ride cymbal. Prioritise these when buying, before
moving onto crashes and further effects-style sounds such as
splashes and chinas - if you really need them. If you’re adding
to an existing collection we’d recommend trying new cymbals
alongside your own metals to ensure they are complementary.
Often a pre-packed set, usually containing at least hi-hats, a
crash and a ride, is the most cost-effective route to great
sounds, but if you can’t afford new cymbals then consider
second-hand, rental or a loan from a local drummer, because
quality increases dramatically the more you spend.

BEGINNER HOME STUDIO HANDBOOK | 51
CYMBALS | BUYER’S GUIDE
DREAM IGNITION£365
There’s not much of a range on offer, but the 14" hats, 16" crash and 20" ride of
this cymbal set offer classic sounds at a reasonable price, especially considering
they are cast B20 bronze that’s been hand hammered and lathed.
www.dreamcymbals.com
STAGG SENSA CYMBALSFrom £29
Stagg is fast becoming known for its quality instruments, and its first complete
new series since 2005 offers versatility at a moderate price. Tonally positioned
halfway between dark and bright, Sensa will perfectly complement your set-up.
www.staggmusic.com
MEINL MB8 CYMBALSFrom £76
Contemporary-sounding cymbals that sit happily within touching distance of
Meinl’s pro ranges. The high level of automation built into the manufacturing
process guarantees consistent quality and sound across the range.
www.meinlcymbals.com
PAISTE PST8From £57
Using the same alloy as Paiste’s classic 2002 line, these are superbly made and
quality sounding cymbals with enough variety across the range to offer warm
and dark sounds, right up to lively and bright.
www.paiste.com


54 | BEGINNER HOME STUDIO HANDBOOK
SONGWRITING
GET STARTED WITH SONGWRITING
You can have all the production know-how in the world – and a studio to rival the biggest rock producer – but it won’t mean much if you’re lacking great songs to record. Crafting a song that will stick in people’s
minds, make them want to buy your music and come to your gigs is hugely important. In this section we’ll be giving you pointers on how to write stand-out tracks. We’ll be looking at the anatomy of the song – breaking it down into key components – and suggesting 10 simple songwriting chords to get you started. Lower Than Atlantis’ Mike Duce is also on hand to share his experience of writing for LTA, 5 Seconds of Summer and The X Factor’s Luke Friend. So grab a pen and a notebook, and let’s dive in...

BEGINNER HOME STUDIO HANDBOOK | 55
THE BASICS OF SONGWRITING | SONGWRITING
Lower Than Atlantis’ Mike Duce is fast becoming hot property on the UK songwriting scene. We recently spoke with him to find out more,
and to get some tips for you to use when writing
With four successful
albums under his belt,
Lower Than Atlantis
frontman and guitarist
Mike Duce is racking up
a wealth of songwriting
experience and nouse.
In fact, Mike has recently been linked to
songwriting circles that have worked with
both indie and major label recording acts,
including some high profile pop bands
such as 5 Seconds Of Summer.
But in the beginning Mike wasn’t so
different to you. He started off writing
songs at home, gradually building up the
confidence and knowledge to walk into a
‘proper’ recording studio and work on the
same level with award-wining producers.
Sure, he’ll sometimes write something
that’s not up to scratch, but he doesn’t
waste anything. And that’s one of the
take-home messages you’ll get from
Mike here: keep everything you work on
when writing, because one day that riff
you consider too technical for your
current project might actually be the
hook to your biggest-selling single.
THE BASICS OF SONGWRITING
LTA’s Mike Duce has also written for chart toppers 5 Seconds Of Summer

56 | BEGINNER HOME STUDIO HANDBOOK
SONGWRITING | THE BASICS OF SONGWRITING
WHAT INSTRUMENT DO YOU PREFER WRITING SONGS ON AND WHY? “It’s mainly acoustic guitar, a Martin
DRS1. There’s just more romance to
writing on acoustic. I like the way it
sounds, too, like it almost sounds
distorted if you’re strumming it hard
enough. Plus, I can walk around and
play – I normally walk around when
I’m writing. When I’m on tour, I like to
write outside. Songwriting is the main
part of music for me. Second to that is
recording and making something I’ve
created sound as good as it can.”
IS IT IMPORTANT TO HAVE A WORKING KNOWLEDGE OF OTHER INSTRUMENTS TO HELP WITH SONGWRITING?“Well, I also play bass. I normally work
with a producer when I’m writing and
he’ll program the drums for me, but I’ll
talk to him about what I want. If you sat
me behind the kit I’d be awful, but I know
what drums should be doing; not just
beats but fills as well. So yeah, you’ve
got to understand the workings of a song
in its basic form. Even when I was a kid,
writing silly little songs, I’d nod my head
and know where the kick and snare were
going to fall. I recently wrote a song called
Weirdo that stemmed from a little slap
bass thing. This is one of the ways I write.
If it sounds like a Mariachi band, I’ll go
with that vibe lyrically.
“Other times I’ll write something that’s
a cool starting point. It could be a word, a
one-liner perhaps, that becomes a tagline
in a song. Normally I’ll come up with a
chorus first, some epic chords or a nice
sounding chord progression, then I’ll hum
over it. Then I’ll do about three toplines
[melodies], pick the best bits and sew
them together. Once I’ve got the chorus,
the verses seem to write themselves. I
think a lot of people rush the middle-
eights, but I like an interesting mid-eight
so I spend as much time on them as
possible. I work in ‘pop structure’ most of
the time. Whether there’s an intro or not,
I’ll usually go for verse, pre and chorus,
maybe a little post-chorus, verse chorus,
mid-eight, chorus, end.”
HOW DO YOU GET YOUR IDEAS DOWN? “I use Voice Memos on my iPhone. For a
while I tried getting my head around
Logic, but if I’m not great at something
straight away it p**ses me off. Ben
[Sansom, lead guitarist for Lower Than
Atlantis] knows how to record music, and
most of the people I work with have a
decent level of production skill, so I just
leave them to it.
“With lyrics, I always write them by
hand. I can’t stand it when I’m in a
session and someone hands me an
iPad or something to write on. I like
seeing the words on the paper – it
helps me channel better. I love it when
I’ve got the lyrics down and they’re just
scribbled out everywhere, with the good
lines squished in wherever there’s space,
and I then get a fresh sheet of paper later
to write them out properly.”
AT WHAT STAGE DO YOU TAKE YOUR NEW SONG IDEAS TO THE BAND?“Normally when the structure is sorted
and the topline is there. I’ll write the
lyrics later on. It’s different when I’m
“Lyric writing is like therapy: it helps me get closure on something”
© W
ill Ir
elan
d
While Mike plays electric guitar live, he mostly writes on a Martin DRS1

BEGINNER HOME STUDIO HANDBOOK | 57
THE BASICS OF SONGWRITING | SONGWRITING
writing for other people, though. A lot
of the time I’ll be writing for a pop act
and I’ll have about two days in a [writing]
session with them, with the song needing
to be finished by the end of that session.
I don’t like that as much.
“You can get the structure of a song
to roughly where it needs to be, but the
lyrics have to be on point. There are
even a couple of songs on our new
album that I don’t think are very good
because I was rushed. It’s like a painting:
when is it really finished? The longer
you leave it to breathe, especially lyrics,
the better it’s going to be.”
DO YOU THINK THAT SONGWRITING IS AN INNATE ABILITY, OR CAN IT BE LEARNED? “All music is subjective. Who’s to say
something is s**t or not? It’s all down
to who’s listening to it. Who’s to say
that someone is a great songwriter or
not? Is it based on how many copies of an
album they’ve sold? I think anyone is
capable of writing, but certain people
might not enjoy doing it.”
WHAT’S YOUR BIGGEST MOTIVATOR IN TERMS OF LYRICS? “I only noticed this a few weeks ago, but
I’ve got quite a lot of love songs. I don’t
often get romantically involved – I’m a bit
of a loner – so I guess when I do [get
involved] it’s a big deal for me. Lyric
writing is like therapy: it helps me get
closure on a subject once I’ve written
about it. I’m running out of things to write
about now because we’ve got a fair few
songs. I need some new experiences.”
HOW DO YOU KNOW WHEN YOU’VE WRITTEN A GREAT SONG? “Here We Go, our biggest single to date,
was originally meant to be a B-side. When
it was finished we thought it was better
than that. We never thought it would be a
single or anything, but that maybe we’d
put it on the album. I sent it over to my
manager, who loved it, and our radio
“Once I’ve got the chorus, the verses seem to write themselves. I like an interesting mid-eight so I spend as much time on them as possible”
You only need a few basic chords for your songs, and these 10 are ideal!
10 SIMPLE SONGWRITING CHORDS
x
A
‘EASY’ F
oo
1 2 3
1
o
Am
G
ox
32
1
o
E
C
o o
32
1
x
F
D
x
1
2
3
2
o o o
1
3
1
x x
3
2
x
1
x x o
3
2
2
o
Em
Dm
o o
3
o
2
x o
1
3
o
1
ox x
3
2
plugger said, ‘This is the single; we have
to go to radio with it tomorrow.’ So that
song was written, recorded and out to
radio in three days. Music for us is a
passionate process. For others, like our
manager and radio plugger, it comes
more from an industry perspective.”
HOW MANY IDEAS DO YOU SCRAP WHEN WRITING?“If I think something is s**t I’ll sack it off
straight away without working further on
it, but I never scrap stuff that I’ve spent
time on. I’ve got so many things on the
back burner – riffs from four years ago. I
have this one riff that’s real intricate and
technical. I want to try building a song
around this riff, it’s that good.”
HOW DID YOU WRITING FOR 5 SECONDS OF SUMMER COME ABOUT? “I wrote a song called Emily with The
Invisible Men [Grammy-nominated music
and production trio], and it was looking
like Lower Than Atlantis were going to
break up. The Invisible Men were like,
‘We love this song. Is it ok if we put it to
this boy band we know?’ At the time I
thought, ‘Why not? I’ve got nothing to
lose’, so they put it out to One Direction.
“Then The Invisible Men got a session
with 5 Seconds Of Summer. I went to the
session and we recorded over the two
days they were in with us. We finished a
track [Heartache On the Big Screen] that
became the B-side to a single that went
to number one in about 40 countries.
“After that I worked with McBusted,
and me and my friend Dan Lancaster
worked on Luke Friend from X Factor’s
album [Hole In My Heart] – we’ve got five
or six songs on there. I’ve also been
working with Nick Hodgson [ex-Kaiser
Chiefs drummer] and Sam Preston from
The Ordinary Boys, who had a couple
of number ones with Olly Murs.”
WHO ARE YOUR SONGWRITING INSPIRATIONS? “I have a really eclectic music taste,
which is a cliché to say but I really do
listen to all kinds of music. I think that
subconsciously I take little things in
and then do my own thing. And I pay
attention to what’s going on around me.
I take it all in.”

58 | BEGINNER HOME STUDIO HANDBOOK
SONGWRITING | ANATOMY OF A SONG
ANATOMY OF A SONGHere we break the song down into its individual
sections to see what makes each one tick
Song arrangements are often
commonly referred to as
ABABCBB, for example, or
some variation thereof. A, B
and C sections are verses,
choruses, and bridges or
middle-eights, or sometimes
intros, outros or solos. The right kind of
structure will keep people listening and
ensure your hooks get under their skin.
Here we’ll be looking in detail at each of
the different components of a song – the
intro, the outro, the verse, the chorus, the
bridge and the middle-eight.
By the end of this you’ll hopefully be
able to create a song structure that has a
journey, gives the listener what they want,
and doesn’t ramble on. So, what do we
know? Well, we know that a classic pop
song should be over by around three
minutes and 30 seconds, and that the
chorus should always happen within the
first minute, but really the listener needs
to be hooked within the first 10 seconds
of the song. For new artists and writers
especially, there can be no compromise
– if the song is going to be a hit, it has to
hit the mark instantly. Here’s how...
THE INTROTHE START of the song presents some of
the big components of the track and
establishes the groove and the feel. This
can be conveyed by a full band or by the
strumming of an acoustic guitar, for
example. The pace of playing here sets
© Jo
by S
essi
ons

BEGINNER HOME STUDIO HANDBOOK | 59
ANATOMY OF A SONG | SONGWRITING
the energy level of the song. Use the intro
to show the listener what their experience
of the whole song is going to be. If you’re
stuck, use an instrumental version of the
chorus as a springboard for ideas.
A killer bassline can be established
along with the groove. This gives you a
great kick-off point into the first verse,
and it’s a hook in itself. If the song is
based around a chord sequence then
use this, but if it takes longer than 15
seconds double the pace of it – this will
still establish the harmonic landscape
ready for the verse.
Of course, there’s always room
for more hooks, whether vocal or
instrumental, and an energetic, hook-
laden intro means you can relax a bit
when making the transition to the verse.
For true ‘power songwriting’, craft the
intro so that it also works immediately
after the chorus – this gives
you a chance to repeat intro
hooks in the body of the song
and it also helps everyone
prepare for the drop to the
second verse, because it’s
the same as the first time.
THE VERSEYOUR JOB here is to settle into the main
groove and musical environment of the
song, whether it’s bassline-led, a chord
sequence or a riff of some kind. After
what was hopefully a catchy intro, there’s
often a step down into the first verse,
enabling listeners to begin climbing back
up to the energy of the chorus. Musically,
the key elements should continue so that
the groove stays intact and keeps the
momentum going, but instrumentation
can be stripped back to allow space for
the verse vocal to be heard. The vocal in
the chorus is probably going to be loud,
high and multiplied, so the verse vocal will
usually start off lower in pitch and with
lower energy levels so that it can
gradually climb up again.
If the music of the verse and chorus is
essentially the same, the verse melody
needs to be different to the chorus
melody. A good way to achieve this is to
simply play opposites: if the chorus is
busy, make the verse sparse, and if the
chorus is legato or smooth, make the
verse staccato or stabby. These opposites
will help balance the song out and create
contrast between verse and chorus.
Try to make the verse as hooky as the
chorus, even though the energy is lower.
Internal rhythms and rhymes, and the use
of short, memorable phrases, will help
with this. Lyrically, you have a chance to
draw the listener in with some killer first
lines. Good examples are “Roll away your
stone,” [Mumford & Sons], where the title
of the song is the first line; and the first
verse of Bob Dylan’s Make You Feel My
Love, where the entire concept of the
song is delivered in the first four lines.
THE CHORUSTHIS IS what your song is all about. The
chorus is the part that crystallises the
message of the song, and it’s the only bit
those in the business care about. A great
chorus can make up for a rubbish verse,
but the best verse in the world will not
make up for a flatlining chorus.
The chorus is the bit people carry
around in their heads as they go about
their day. This means one thing: hooks,
hooks, hooks! The chorus is the place to
break out the biggest hooks you can
come up with. Musically, the chorus is
usually the most powerful section. If
you’re at a gig, this is the part everybody
sings along to. Melodically, the chorus
should be ‘up’ in terms of pitch and
energy, whilst also being easy to sing
along with and easy to remember. Great
choruses stick in your brain after one
hearing. Again, short phrases are the
key to making them memorable, and
repetition is the hammer that drives the
hooks into the listeners’ heads – just
listen to Bon Jovi’s Livin’ On A Prayer.
When you’re working on your chorus,
try and imagine a crazed mob singing it
back at you. Lyrically you should be
thinking simply – the fewer lyrics the
better. ‘Ooohs’, ‘Wooohs’ and ‘Yeeeaaaahs’
are also great crowd pleasers, and they
can be combined with sparse statements
to great effect. Always deal with basic
human emotion, try not to be negative,
and think about who you’re writing for.
THE MIDDLE-EIGHTIF OCCURRING at all, the middle-eight is
traditionally placed after the second
chorus. The idea is that it introduces
something new into the verse/chorus /
verse/chorus situation, and not only
keeps things interesting but also allows
you to go on a little journey that leads the
listener neatly back to the last chorus.
The middle-eight can include a new
chord sequence, a new topline melody, a
rhythmic shift such as going half-time, or
a sonic change brought about by the
introduction of new sounds. It doesn’t
have to feature a complete vocal; it could
have some abstract vocal improvisation,
some spoken word or no vocal at all. It
doesn’t even have to be eight bars in
length, but it does need to
allow you to bring in your last
chorus at about two minutes
40 seconds, otherwise you’ll
be pushed to round off the
last choruses in under three
minutes 30 seconds.
A good middle-eight will begin its
journey straight away, so it’s best to
change key from the off. Don’t just go
back to the root chord and start a new
progression, try a related key such as the
relative minor (eg, if you’re in C major, the
relative minor will be A minor – it’s always
three semitones below the root major.)
This key change sets up a different
atmosphere, which in turn will make the
chorus sound extra-juicy when it returns.
Sometimes what’s required to change
the landscape is an instrumental or solo
section. This can vary from the virtuoso
performer playing over a verse or chorus
part, through to a simple but interesting
instrumental. If you need some space in
the song but a solo or new middle-eight
part isn’t working, try a simple breakdown
– usually the beats are left in and a bare
minimum of the instrumental elements
are kept going, then vocal elements,
usually the chorus, are re-introduced.
THE BRIDGETHE BRIDGE (sometimes referred to as the
pre-chorus, lift or climb) isn’t an essential
part of the song, but it can help to build
The chorus is the bit people carry around in their heads as they go about their day.
This means hooks, hooks, hooks!

60 | BEGINNER HOME STUDIO HANDBOOK
SONGWRITING | ANATOMY OF A SONG
energy and set the scene for the chorus
to have more impact than it would have
coming straight from the verse.
The bridge generally works in three
different ways. Firstly, it begins raising the
pitch and energy of the melody from the
lower reaches of the verse to the high
energy of the chorus. Secondly, it begins
increasing the dynamic levels of the track
(making it louder). Thirdly, it can be an
opportunity to use the lyrics to enhance
or contextualise what has been said in
the verses, and to make the chorus more
poignant when it finally hits.
When writing the instrumentation for a
bridge, there are a few rules to follow. The
melody of the bridge should be different
from that of the verse and chorus. If the
verses have been flowing, the bridge
melody should be more percussive and
build up energy. In a fast-moving track
the bridge should provide some respite.
Lyrically, the bridge can help twist the
emotional knife, softening the listener up
for the killer blow of the chorus.
THE OUTROTHE OUTRO can be a chance to add a few
more barbs to that big chorus hook, and
can allow you to re-introduce some
elements from earlier in the song. More
often than not the last chorus gets
repeated twice and just carries on for a
while, perhaps even losing the vocal and
introducing a solo.
The simple repeated chorus makes
a perfectly good outro, and sometimes
the chorus can get bigger, in terms of
adding voices and instruments, or
develop in other ways. For example,
the vocal can simplify into a single
repeated final hook that continues
over the chorus chords – check out
Nirvana’s grunge classic Smells Like
Teen Spirit, for example.
Developing the outro chorus can
allow melodies from earlier in the song to
make a dramatic re-entry. Sometimes,
whether by accident or design, the verse,
bridge or middle-eight melody will sound
great over the chorus chords and provide
a whole new twist for the end of the song.
In the Red Hot Chili Peppers’ Under The
Bridge, for example, the chorus develops
chordally and melodically and veers off in
a new direction.
The outro can also be a ‘bookend’
and simply mirror the intro of the
song, as in James Bay’s Hold Back The
River. This has the added advantage
HAVE YOU WRITTEN A CLASSIC?Our handy checklist will help you find out:
THE SONG MOVES YOU, THE WRITER IT HAS A GOOD TITLE THERE’S A CATCHY INTRO NO LONGER THAN I5 SECONDS THERE ARE HOOKS ALL THE WAY THROUGH, RIGHT FROM THE START THE LYRICS ARE SIMPLE WITH MEMORABLE PHRASES THE SUPER CATCHY CHORUS IS IN BY THE ONE MINUTE MARK THERE’S IMMEDIATE MEANING PEOPLE CAN RELATE TO IT THE SONG HAS NO MORE THAN THREE MAIN SECTIONS THE LAST CHORUS IS IN BY TWO MINUTES AND 40 SECONDS THE OUTRO MAKES YOU WANT TO REWIND AND PLAY IT AGAIN IS THERE BALANCE (LOUD/QUIET, RAP/VOCAL, SMOOTH/SHARP)? IS THERE LYRICAL CONTRAST? (MAKE SURE THE LYRICS AREN’T ONE-DIMENSIONAL)
of setting up a subconscious ‘rewind’
factor in the listener, who then wants
the intro to continue into the entire
song all over again. Another outro option
is to break down to a stripped-back,
slower, quieter version of the chorus or
first couple of lines of the song, often with
just a vocal and piano/strings. This device
makes for a rather calm ending where the
lyric has one final chance to plant its big
emotional hook.
The studio is where you can enjoy bringing your songs to full life
© A
dam
Gas
son


62 | BEGINNER HOME STUDIO HANDBOOK
SONGWRITING | GUITAR SOUNDS
As part of your songwriting process, it’s important to have an idea of how you want your parts to sound to get the best out of your recordings
When writing songs on
guitar, having a killer riff
or chord progression is
only half the battle. And
while capturing your
playing in the studio
can be simple enough
for the most part, it can often lack the
big, wide and distinctive sound found
on pro recordings, so think about your
sound before you start recording.
There are many ways to make your
electric or acoustic guitar recordings
sound much thicker, wider and altogether
bigger, as well as a whole world of effects
and amp settings that mean you can
dial-in the most appropriate, impactful
sound for your songs. So, grab your
acoustic or electric guitar and spend
some time experimenting. First up, let’s
look at some essential guitar effects…
CONSIDER YOUR GUITAR SOUND BEFORE HITTING
THE STUDIO
OVERDRIVEWHAT IT SOUNDS LIKE Fuzz, distortion and
overdrive are three types of gain effects that all
‘distort’ a clean guitar signal in different ways.
Overdrive is the mildest of the three, and attempts
to recreate the effect of a valve amplifier being
‘overdriven’, creating those warm, slightly crunchy rhythm sounds (think AC/DC)
and the singing, sustaining lead tones (think Stevie Ray Vaughan) that our ears
have become accustomed to for over half a century of blues and rock guitar.
USAGE TIP For a heavy overdrive sound, set the ‘gain’ or ‘drive’ control high and
the ‘level’ or ‘output’ lower. For more of a clean boost effect, do the opposite.
DELAYWHAT IT SOUNDS LIKE The pedal records a note,
then repeats it either once or multiple times at a
predetermined time spacing. Delay is used in
everything from early rock’n’roll to modern rock
and pop. Some modern stompboxes attempt to
provide the warmth and majesty of analogue and tape delays alongside the crisp
and pristine clarity of versatile digital delays, with a range of lo-fi emulations,
modulated sounds, and special effects like ping-pong and reverse.
USAGE TIP Set up two amps and experiment with the stereo settings on delay
units such as the DL-4, the Flashback or Vox DelayLab. Limitless fun awaits!
DISTORTIONWHAT IT SOUNDS LIKE Evil, loud and edgy.
Distortion – in all its menacing, jagged glory – is
the sound of a guitar signal possessed. The first
distortion boxes were the 1960s fuzzes; they were
uncomplicated and unforgiving beasts. Since then
we’ve come to think of distortion in a more modern sense with the development
of more refined sounds and circuits. Distortion underpins everything from The
Rolling Stones to Jimi Hendrix to Nirvana, to the heaviest of modern metal.
USAGE TIP Try using your guitar’s volume control to regulate the amount of
distortion and volume – effective for moving between rhythm and solo sounds.
REVERBWHAT IT SOUNDS LIKE Reverb simulates the
reverberations and reflections of sounds as they
bounce off surfaces, and decay as they’re then
absorbed. This ‘sense of space’ is what we perceive
reverb contributes to a guitar sound, and types of
reverb are often named after the spaces they emulate (cathedral, room etc). Used
on practically every recorded sound you hear, its heyday was the ’60s surf guitar
craze when the likes of Dick Dale used it to conjure up images of crashing waves.
USAGE TIP Think of ways to drop it in and out and vary it. Use it as an effect
rather than a component part of your sound.

BEGINNER HOME STUDIO HANDBOOK | 63
GUITAR SOUNDS | SONGWRITING
FLANGERWHAT IT SOUNDS LIKE Anything from a jet
taking off at one extreme, to a slower, ‘wobblier’
version of the phaser that’s thicker and more
machine-like at the other. Though it’s often
associated with rock and metal players from Van
Halen to Metallica, one of the best examples of the flanger effect ever committed
to record is The Cure’s A Forest, which, according to its producer Mike Hedges,
features up to seven units at once!
USAGE TIP Try setting the speed of flanger so that the complete modulation
starts and finishes either every two or four beats of your song.
PITCH SHIFTERWHAT IT SOUNDS LIKE Pitch shifting can be
using a device to create note harmonies as you
play, or transposing your guitar to another key
entirely, or the otherworldly noise of bending and
squealing demonstrated no better than by Rage
Against The Machine’s Tom Morello on Killing In The Name. Names such as
Eventide and DigiTech (Whammy) dominate the genre. Octave pedals are pitch
shifters, as are the kind of complex harmoniser units used by Steve Vai.
USAGE TIP Combine pitch-shifting pedals with delay and tremolo for eerie guitar
sounds, or pitch shift chords to add unexpected glissando to rhythm parts.
CHORUSWHAT IT SOUNDS LIKE Chorus is related in
sound to flanger and phaser, in that it relies on
phase cancellation to create a characteristic
swirling sound. However, rather than create a
sweeping frequency change over time it simulates
the narrower variations in pitch and timbre that typically happen when a group of
similar instruments perform the same part in unison. This shimmering, warbling
fluctuation can be heard on songs such as Nirvana’s Come As You Are.
USAGE TIP For subtle effects, set the depth medium/high and the speed (rate) to
minimum. For more sea sickness, increase both rate and depth. Woah…
TREMOLOWHAT IT SOUNDS LIKE Tremolo is the classic,
oft-heard effect of a guitar sound’s volume cutting
in and out at a variety of speeds. It’s exemplified
by the surf guitar sounds of the ’60s when it
was used alongside reverb to conjure up those
crashing waves, and it was wonderfully revived by The Smiths’ 1980s classic How
Soon Is Now?, Radiohead’s Planet Telex from The Bends, REM’s What’s The
Frequency, Kenneth? from Monster and countless others. Volume up and down,
in time: it’s as simple as that.
USAGE TIP Try setting your tremolo pulses in time with the music. This can be
particularly effective with on/off staccato sounds.
PHASERWHAT IT SOUNDS LIKE The earliest phaser
effect, the Uni-Vibe, was developed to create a
sound akin to the Doppler-esque movement of a
rotary speaker. Phasing sounds like a swirling,
psychedelic sweep, with a detectable cycle
between different frequencies (eg: warm and bassy, trebly and hollow). It was a
popular ’70s pedalboard addition, bringing texture and movement to rhythm and
lead parts. Brian May’s playing on Sheer Heart Attack typifies the effect.
USAGE TIP The faster you set the rate control, the more the effect will change
from cycling swirl to flutter. Try extremes of both for some classic ’70s sounds.
OCTAVEWHAT IT SOUNDS LIKE Jimi Hendrix’s solo in
Purple Haze, played with a driver in front of Roger
Mayer’s early Octavia effect, is still one of the most
arresting effects moments in music. The addition
of notes generated an octave above the lead line
creates a rich, warm, otherworldly and psychedelic tone. Though used sparingly
today, Jack White’s riffs on Blue Orchid and Seven Nation Army prove that the
octave effect can still take simple riffs to a much higher plane.
USAGE TIP If your octave pedal is not polyphonic you’ll only be able to play single
notes. If you try chords, it’ll turn into a great big horrible mush.
COMPRESSIONWHAT IT SOUNDS LIKE Guitarists use
compression pedals ingeniously and creatively.
Whether it’s to provide the long sustain for soaring,
expressive lead notes, to increase the percussive
punch and attack that’s come to characterise
funky rhythm, or to even out the dynamics of fingerpicked chord-melody styles,
these unassuming and deceptively simple boxes have been used in the true spirit
of ‘effects’ pedals; to add character to a guitar part, and create an impact.
USAGE TIP For the most compressed sound, set the sensitivity (compression)
knob high and the output low. For a clean boost, do the opposite.
VIBRATOWHAT IT SOUNDS LIKE Vibrato was first
introduced in early guitar amps from Magnatone,
Gibson, Fender and Vox. It is not the same as
tremolo. Vibrato is modulation in pitch, tremolo is
modulation in volume. Any confusion could be
down to historical mislabelling: Fender’s Synchronized Tremolo fitted to the
Stratocaster, for example, is in fact a vibrato unit. Think of the vocalist’s vibrato, or
what you do with your fretting hand when you use vibrato on notes. Famous users
are as diverse as Blur’s Graham Coxon through to blues legend Robert Cray.
USAGE TIP Slow vibrato can produce ethereal sounds when used over sustaining
arpeggio notes or ringing chords. Faster speeds have an obvious wobbling effect.

64 | BEGINNER HOME STUDIO HANDBOOK
SONGWRITING | GUITAR SOUNDS
Stuck for guitar tone ideas? We’ve worked out the amp settings for 10 legendary tones that have made an impact on modern guitar players
and appeared on undeniably classic recordings
10 CLASSIC AMP SETTINGS
EFFECTS: DISTORTION PEDAL We recommend using the middle pickup of a
Strat type guitar, and a good distortion pedal is essential if you really want to nail
his grungy sound. Kurt used a Pro Co Rat and a Boss DS-1.
EFFECTS: NONE Dimebag preferred to use solid-state (as opposed to valve)
amps, and put his guitar signal through a parametric EQ before his amp. Try it
centred on 90Hz, 180Hz and 360Hz with maximum bandwidth and cut.
EFFECTS: EQ BOOST BEFORE AMP A home-made mid boost emphasised the
mid frequencies of Brian’s guitar. Try boosting the mids with an EQ pedal (rather
than using your amp’s EQ). A large room reverb completes the sound.
EFFECTS: DELAY SET TO 400MS WITH THREE REPEATS On this track Noel
probably used his trusty Epiphone Riviera on the bridge pickup. On the second
half of the solo he adds a touch of delay.
EFFECTS: NONE Use the neck pickup of a Gibson Les Paul plugged into a
Marshall JCM800 stack for the full effect. Pull back on the drive control if it
sounds fizzy at higher settings.
EFFECTS: COMPRESSION SET TO FAST ATTACK, MEDIUM RELEASE AND
SUSTAIN Frusciante uses the neck pickup on a Strat or Jaguar. Have the drive up
higher and turn the guitar volume down to get the subtle, slightly distorted sound.
EFFECTS: FUZZ PEDAL The intro to Purple Haze was played on a Fender Strat
plugged into a Marshall 100-watt amp and 4x12 speaker cabinet. The fuzz pedal
really pushes the mid frequencies and, combined with the middle pickup, it
produces a thick tone.
EFFECTS: PITCHSHIFTER, COMPRESSION, CHORUS Set the pedals up in this
order (guitar to amp): compression (medium attack and release, lower sustain),
chorus (speed: 4; depth: 2) and pitchshifter set an octave up.
EFFECTS: NONE The pushed mids here give the famous Whole Lotta Love riff a
thick quality and ensure the reverb washes into spaces left in the rhythm. If you
use a separate reverb pedal, try to EQ the tone of the reverb so it’s not too bright.
EFFECTS: FUZZBOX-TYPE DISTORTION, DIGITECH WHAMMY Matt Bellamy’s
intro to Muse’s Origins Of Symmetry classic Plug In Baby was played using a
DigiTech Whammy pedal. Be careful when adding reverb, though – the idea is to
just lift the sound, so don’t overdo it.
KURT COBAIN SMELLS LIKES TEEN SPIRIT (NIRVANA) DIMEBAG DARRELL COWBOYS FROM HELL (PANTERA)
BRIAN MAY TIE YOUR MOTHER DOWN (QUEEN)NOEL GALLAGHER DON’T LOOK BACK IN ANGER (OASIS)
SLASH SWEET CHILD O’ MINE (GUNS N’ ROSES)
JOHN FRUSCIANTE UNDER THE BRIDGE (RHCP)
JIMI HENDRIX PURPLE HAZE (JIMI HENDRIX EXPERIENCE)
ED O’BRIEN MY IRON LUNG (RADIOHEAD)
JIMMY PAGE WHOLE LOTTA LOVE (LED ZEPPELIN)
MATT BELLAMY PLUG IN BABY (MUSE)
GAIN GAIN
GAINGAIN
GAIN
GAIN
GAIN
GAIN
GAIN
GAIN
0
00
0
0
0
0
0
0
10
1010
10
10
10
10
10
10
6
66
6
6
6
6
6
6
7
77
7
7
7
7
7
7
8
88
8
8
8
8
8
8
9
99
9
9
9
9
9
9
4
44
4
4
4
4
4
4
3
2
3
2
3
2
3
2
1
11
1
1
1
1
1
1
BASS BASS
BASSBASS
BASS
BASS
BASS
BASS
BASS
BASS
0
00
0
0
0
0
0
0
10
1010
10
10
10
10
10
10
6
66
6
6
6
6
6
6
7
77
7
7
7
7
7
7
8
88
8
8
8
8
8
8
9
99
9
9
9
9
9
9
4
44
4
4
4
4
4
4
33
33
3
3
3
3
3
3
22
22
2
2
2
2
2
2
1
11
1
1
1
1
1
1
MID MID
MIDMID
MID
MID
MID
MID
MID
MID
0
00
0
0
0
0
0
0
10
1010
10
10
10
10
10
10
6
66
6
6
6
6
6
6
7
77
7
7
7
7
7
7
8
88
8
8
8
8
8
8
9
99
9
9
9
9
9
9
4
44
4
4
4
4
4
4
3
33
3
3
3
3
3
3
2
22
2
2
2
2
2
2
1
11
1
1
1
1
1
1
TREBLE TREBLE
TREBLETREBLE
TREBLE
TREBLE
TREBLE
TREBLE
TREBLE
TREBLE
0
00
0
0
0
0
0
0
10
1010
10
10
10
10
10
10
6
66
6
6
6
6
6
6
7
77
7
7
7
7
7
7
8
88
8
8
8
8
8
8
9
99
9
9
9
9
9
9
4
44
4
4
4
4
4
4
3
33
3
3
3
3
3
3
2
22
2
2
2
2
2
2
1
11
1
1
1
1
1
1
REVERB REVERB
REVERBREVERB
REVERB
REVERB
REVERB
REVERB
REVERB
REVERB
0
00
0
0
0
0
0
0
10
1010
10
10
10
10
10
10
6
66
6
6
6
6
6
6
7
77
7
7
7
7
7
7
8
88
8
8
8
8
8
8
9
99
9
9
9
9
9
9
4
44
4
4
4
4
4
4
3
33
3
3
3
3
3
3
2
22
2
2
2
2
2
2
1
11
1
1
1
1
1
1
0 10
6
7
8
9
4
3
2
3
2
3
2
3
2
3
2
1
0 10
6
7
8
9
4
3
2
1
0 10
6
7
8
9
4
3
2
1
0 10
6
7
8
9
4
3
2
1
0 10
6
7
8
9
4
3
2
1

BEGINNER HOME STUDIO HANDBOOK | 65
GUITAR SOUNDS | SONGWRITING
How are you going to give your tracks the impact they require when it comes to recording them? Here are some
ideas to think about when you’re writing…
GET A HUGE SOUND
GET IT RIGHT AT THE SOURCEBEFORE YOU start fiddling with settings,
make sure you have the right sound as
a foundation. If it doesn’t sound great to
begin with, it’s probably not the right
tone. The meat of everything is in the
tone and the player; once those two are
in harmony, all you’re doing is trying to
get that extra five per cent in your sound.
INVERSIONSPLAYING THE same notes but at different
points on the guitar is a sure-fire way to
fatten up your overall sound. Try playing
the same chord progression in two
different ways: one as you’ve written it,
and again using different inversions
(open chords instead of barre chords,
for example).
KEEP IT INTERESTINGPERCEPTION IS powerful, and in the same
way that the jumpy parts in a horror film
are normally preceded by silence, you
can add the perception of loudness and
power by creating dynamics. Look at your
song like a movie or a story. You’ve got to
have things happen – you can’t just have
everything full blast from start to finish. If
you’ve got piles of guitars going on in the
verse, when you get to the chorus the
guitars may not seem so wide. Have a
look at the arrangement and see where
you want the guitars to be wide, and this
will help you to have a better chance of
creating the impact in the places you
want it to happen.
TRY RETUNINGPLAYING IN lower tunings makes your tone
fatter. Even if your song is in standard
tuning, you can still add some extra girth
by recording one of your tracks in a
dropped tuning. For example, try playing
in drop D and transposing your part so
that the pitch is correct.
LAYER AN ACOUSTICTHIS IS a trick that’s used to add extra
depth to rhythm parts. Don’t worry about
the sonic qualities so much; you’re after
the percussive element of the acoustic’s
strings rather than a full-bodied sound.
EXPERIMENT WITH YOUR GEARYOU’RE NEVER going to gig with one, but
many artists have utilised the raspy tone
of a practice amp to add aggression to
their tracks. It really makes an impact,
even at lower levels, so give it a go.
USE AMP MODELLING!WHAT USED to be a dirty word to tone
purists has now become a staple of
recording. The good news is that amp
modelling is affordable and practical, and
is no longer viewed as ‘faking it’. This is a
great and quick way of trying out many
different amp sounds without needing to
have loads of gear at your disposal.
There are many tricks guitarists can use to power
up their sound on a song

66 | BEGINNER HOME STUDIO HANDBOOK
SONGWRITING | GO MOBILE!
The digital revolution is well upon us, offering up an even easier route into the recording world
When Apple launched the
App Store in 2008, the
world duly reacted by
making Facebook
available everywhere,
and creating games
where you fire birds at
pigs. For musicians, though, it was the
birth of a new way of using devices.
Suddenly, our phones and tablets were
capable of everything from tuning our
guitars to simulating amps; even giving
us entire studios in our pockets via apps
like Garageband.
As common as these apps have now
become, there’s still a little confusion
about if – and precisely how – you can
integrate your mobile device into your
recording process. When it comes to
songwriting and getting your ideas down
before a proper session, going mobile is
definitely the way forward. So sit back and
allow us to tell you everything you need to
know about playing and recording with
your mobile device, and which apps and
accessories you will need to do it.
A DIY REVOLUTIONWHEN IT was first announced back in 2004,
GarageBand was hailed as a revolution in
DIY music-making. Its inclusion with every
new Mac meant that everyone buying one
of these machines could write and record
songs. GarageBand for iPad brings the
DAW’s best features to Apple’s tablet and,
at the mere price of £2.99, it has proved
to be as important as the original in terms
of introducing music software to a new
generation of artists.
We’ve seen several DAW-style apps on
the iPad, but GarageBand is still the best.
Neatly designed and featuring software
instruments and audio functions to suit
most musicians, the app makes a great
portable sketchpad for working on ideas.
The touchscreen does a remarkably good
job of controlling it all,while the audio
capabilities of the iPad make it easy to
record real instruments, too. One of the
most attractive features for existing
GarageBand users is the fact that songs
can be transferred to the program’s
desktop version. Audio recordings can
then be edited, tweaked and perfected
using the features of the full GarageBand
app, allowing rough sketches and demos
to be worked into fully-finished songs.
It certainly doesn’t replace the full Mac
version of the program, so it’s best to
think of it as more of a complementary
tool. For most of us, GarageBand for iPad
will be called into action when we need to
work on song ideas at those times when
we’re away from our computers.
With a good mic or audio interface, the
app can be used like a modern version
of the classic TASCAM Portastudio,
enabling you to layer up to eight tracks of
audio on top of each other. GarageBand’s
sound quality is superb and its editing
features are superior to most portable
multitrack recorders.
GO MOBILE!
caption in here caption in here caption in here caption in here caption in here caption in here

BEGINNER HOME STUDIO HANDBOOK | 67
GO MOBILE! | SONGWRITING
GETTING STARTEDBEFORE YOU can start recording, you will
need to get your guitar or vocal into your
device. That means it’s time to choose an
audio interface.
An audio interface is a bit of technology
that enables you to perform into a PC or
iOS device. Over the last couple of years,
there have been many developments in
i-device interfaces, and your decision on
which one to buy will come down to the
types of sources that you want to record,
analogue or digital input to your device
(better signal quality), and which apps
you will be using (some apps require
bespoke hardware to run). The interfaces
below are some of our favourites.
COMPUTER INTERFACESIt’s possible to use your existing USB interface with the help of Apple’s own 30-pin/Lightning to USB converters and a powered USB hub. Your interface needs to be class compliant (so it doesn’t need specialist drivers to run) and powered by a hub running off the mains.
DIGITAL MICROPHONESIf you’re only in need of one mic and a portable set-up for recording acoustic guitars, vocals or miking your amp, it’s worth considering one of the many great digital condenser microphones now available to buy. Products like the Blue Microphones Spark Digital (featured right) or the Apogee MiC include a built-in interface and connect directly to your iPad or iPhone digitally for sheer ease of use. Take your time to research the different options.
GUITAR ONLYThere are plenty of guitar-only guitar interfaces out there from the likes of Peavey, Apogee, IK Multimedia and Line 6, and most of these companies produce analogue and digital versions. The analogue interfaces connect via your device’s headphone socket, while the digital ones plug in to the 30-pin or Lightning port.
GUITAR AND MICROPHONEIf you’re going to be recording from more than one source (guitar and microphones), you will need a microphone input on your interface. Focusrite’s iTrack Studio and Roland’s Duo-Capture will let you record from either of these sources, individually or together, and they will also work on PC or Mac.

68 | BEGINNER HOME STUDIO HANDBOOK
SONGWRITING | GO MOBILE!
RECORDING IN GARAGEBANDRegardless of which method you use, recording audio into GarageBand is essentially the same process
1 GarageBand saves your projects as Songs. When
you load up, you will be presented with the demo
tune. Press the My Songs button featured in the top
left corner of the screen. On the next screen, you
should then press the ‘+’ button and select New
Song to get going.
4 Set your recording levels by using your
interface’s input controls. You don’t want the
audio to clip because this will produce nasty digital
distortion. Play the loudest part of your song and
make sure that the audio levels are coming in at
just under the red.
7 You’ll want to mix your song before export.
Expanding the instrument panel on the left gives
you volume sliders for each channel. GarageBand
also contains a master mixer with two effects that
can be applied to every channel. Add or remove
these to or from each track by clicking the mixer tab
along the top right of the screen.
8 Once you’re happy with the balance of your tracks, you need
to get a stereo mix of your song out of your device. Return
to the My Songs screen, then tap and hold on the song you want
to export. Apple’s Share button will appear in the top left. Press
this, and choose the way you want to share the file. GarageBand
can send your song straight to SoundCloud or you can email it
direct to another person.
2 GarageBand will ask you what kind of track you
want to create. You can program a drum track,
select a synth/keyboard patch, or use its virtual
Smart Guitar. If you want to record your acoustic
guitar, amp or vocals from a mic, choose Audio
Recorder for your first track.
5 Before recording, you may want to make more
tweaks. From the main arrangement screen,
select the Wrench tool in order to access your song’s
settings. Ensure Metronome is switched on and then
tap your song’s tempo. Turn on the Count In option
to get a four-click count-in.
3 If you’d rather record your guitar straight in
using GarageBand’s amps and effects, choose
the Guitar Amp option. This will load up an audio
track with an amp and up to three effects pedals.
There are loads of presets to choose from, and you
can also tweak them.
6 Now that you’re ready to go, hit record and lay
down your first track. Once you’re totally happy
with your performance, move on to the next track.
Repeat the second and third steps depending upon
what sources you are recording until you have built
up your tracks.

BEGINNER HOME STUDIO HANDBOOK | 69
GO MOBILE! | SONGWRITING
AMP MODELLERSNo amp? No problem! Perfect for recording in a hurry or on the move, grab an audio interface and turn your tablet into your favourite amp with these modellers
PEAVEY/AGILE PARTNERS AMPKIT£free
Peavey’s free amp modeller comes with one amp, two stompboxes and a couple
of mic models. You can buy the AmpKit+ package for £14.99, which includes four
amps, ten effects, plus access to over 100 pieces of gear to add later. You’ll need
to use Line 6’s Sonic Port or Mobile In interface.
IK MULTIMEDIA AMPLITUBE£free/£14.99
Since it was released, the AmpliTube software has evolved from an amp modeller
into a complete, all-singing, all-dancing app, offering recording and drum tracks.
In addition to the included five amps, five speaker cabs, two mics and 11 effects,
you can also add a whole load of gear through in-app purchases.
LINE 6 MOBILE POD£free
Straight off the shelf of the App Store, it’s hard not to be impressed with Line 6’s
Mobile POD app. It packs the power of the teeny red kidney bean into your phone
with 32 amps, 16 speaker cabs and 16 effects – yep, that’s the same as the POD 2.
As before, you’ll need to use Line 6’s Sonic Port or Mobile In.
POSITIVE GRID JAMUP PRO £3.99
The excellent JamUp by Positive Grid comes loaded with six amps and 16 effects,
but as with other modelling apps you can add more by making purchases within
the app. We love JamUp’s sound quality, and the control layout is nice and large,
so any tweaks you need to make are easy.
ABOUT ANDROIDWhile we’d love to have included Android apps and devices, developers are yet to make really usable apps for them because there are so many different devices capable of running Android (each one with different hardware specs), making compatibility across the board difficult.

70 | BEGINNER HOME STUDIO HANDBOOK
SETTING UP
BEFORE YOU RECORD
You’ve set-up your recording space, assembled your band, and you’re ready to hit ‘record’. But unless you want to waste your time and that of the other musicians by making a sub-par recording of that perfect
performance, there are a number of things to consider when setting up a recording session. Over the following pages, we’ll show you how to capture the energy of a band performance when you’re all recording in the same room.We’ll also run you through optimal mic positioning, monitoring and foldback, show you how to get the best guitar sounds, record great vocals, prep drums for recording and much more. Just remember, the key to a successful recording session is preparation.

BEGINNER HOME STUDIO HANDBOOK | 71
HOW TO RECORD IN THE SAME ROOM | SETTING UP
Having already looked at your
first recording space (p.7-11),
here’s how you and all of your
bandmates should be setting
up if you’re intending to all
play together in the same
space. Remember, it’s the
sound travelling inside the room that
concerns us when we’re recording. In the
simplest terms, if you put up some mics
in a room they will pick up everything
from their perspective. That includes the
instrument they’re closest to and, to a
lesser degree, any other instrument
playing at the same time, as well as any
other sounds occurring in the room.
A key factor that influences the way we
set up a recording space is acoustics.
Generally, the louder the instrument the
more it will reveal the room’s acoustics.
Domestic spaces can be excellent for
many recording tasks, and each room in
your home will have its own character.
If sound can travel out, it can also travel
in. Trains, planes (and noisy neighbours)
can all add unwanted noise to your
recordings, including low frequency
rumble or vibration. Fans, monitor
screens and ambient sounds that we’re
normally oblivious to can add unwanted
background noise. If you can’t get these
things out of your recording space, at
least try to keep away from them. Ideally,
use a directional mic that will reject
sound coming from behind it.
Arrange the performers so they can
see each other. For a band, this may
mean they’ll all be facing inwards. But
even if you’re recording one vocalist in
the same room as your computer, visual
contact can be beneficial. There may be
times you have to compromise, but if
you’re recording yourself it’s not an issue.
First, consider isolation and acoustics.
With players facing into the room, using
directional mics (pointing away from the
centre of the room) will give you good
initial isolation of each instrument, but
the sound of the instruments bouncing
off the walls back into the mics will cause
a problem. A good trick is to dampen the
space behind each player with acoustic
panels. Soft furnishings, duvets and the
like can also do a great job. Often this will
be all you need, and this approach may
give better results than artificially trying
HOW TO RECORD IN THE SAME ROOM
Recording together is a brilliant way to capture the energy of a full band, but you must set up correctly. Here’s how to do it…
to give each performer a separate space
– something that’s often done in large
studios using acoustic divider screens.
Although a well-rehearsed band might
give their best performance if they’re all
playing in the same room, you can’t rely
on this for recording if some of the
instruments are much louder than
others. For example, trying to record an
acoustic guitar in the same room as a
drum kit is asking for trouble. If you do
need to record a group playing together
to capture the basics of the performance,
it’s best to treat some of the instruments
as ‘guides’ to be replaced later on.
VOCAL
ONE-ROOM SETUPIn our full band setup, using cardioid mics will help reduce the spill you record as sounds arrive off-axis (green).
Using acoustic panels behind each player reduces reflections coming back into the front of the mics (red).
GUITARDRUMS
BASS (DI)

72 | BEGINNER HOME STUDIO HANDBOOK
SETTING UP | HOW TO RECORD IN THE SAME ROOM
IT’S ALL well and good knowing which
mics to buy and how to connect them
up, but when it comes to recording the
real skill lies in where you point them.
And the optimum position very much
depends on a combination of factors
that varies with each recording scenario.
The following process is one that will
help you deal with any situation:
1. LOOKFIRST UP, you need to consider how the
instrument you’re recording makes its
sound and where that sound comes
from. You may think this is obvious – an
acoustic guitar, for example, has a sound
hole, so the sound comes from there,
right? Well, in part, but it also resonates
through the body, the sound board and
even the strings up the neck. Most
instruments produce sound from a
number of places, so pointing a mic
directly at one part will capture just one
aspect of the overall sound that you
have become accustomed to hearing.
2. LISTENFOLLOWING ON from this, the next step in
achieving the perfect mic position is to
actually listen to the instrument from
specific locations. Get your ear in as
close as possible – without damaging
your hearing in the process – and you
will discover how coloured the sound is
at specific points. More often than not
you will find it bears little resemblance to
the balanced sound image you’ll hear
when walking around the room.
3. SELECT A MIC TYPECHOOSING THE right microphone for the
job in hand usually begins with you
choosing between a dynamic and a
condenser mic. As a general rule of
thumb, condenser mics produce more
accurate results with better high
frequency response, and are certainly
more sensitive, which is particularly
great if you’re going to be recording
anything quiet or from a distance.
The downside is that they’re also
more sensitive to handling noise,
vibration and wind noise, and don’t
respond to being dropped, kicked or
spat at (no, really). So it’s no surprise
that you’ll see drum kits, for example,
miked mainly with dynamics, with
condensers used to capture the added
sparkle of cymbals and hi-hats.
What about ribbon mics, you ask?
Well, it’s certainly renaissance time for
these old-school microphones. But, in
contrast to condensers, they can be
lacking in top-end response, they don’t
deal particularly well with close plosives
and wind, and they are typically a
figure-8 pattern. On the plus side they
sound smooth, can be great for taming
edgy or bright instruments, and sound
good when EQ’d. All things you should
consider before choosing one.
4. SELECT A PICKUP PATTERNTHE OTHER important consideration when
choosing a microphone is its pickup (or
polar) pattern. The main patterns are
cardioid, omnidirectional and figure-8,
MIKING UP: FINDING THE BEST POSITION
LOW STRINGS
HIGH STRINGS
MIC POSITION 1: DISTANCEJust putting a mic up in front of something will usually give
you some kind of useable result, but the real skill comes from
fine-tuning the position and that becomes more important the
closer you get to the sound source. If you’re after a tight, close
sound, adjust the frequency balance of the instrument by
pointing at the appropriate part.
MIC POSITION 2: ANGLEAnother consideration with mics is
their off-axis response. You can use
this to your advantage by subtly
angling the capsule slightly away from
the sound source. For a cardioid, this
will typically reduce the high frequency
response slightly and can be great for
taming sibilance from singers.
MIC POSITION 3: PROTECTIONMicrophones can be very prone to
wind plosives. The best protection is
offered by placing a pop shield
halfway between the sound source
and the mic. If that proves awkward,
a foam windscreen is also an option,
but you may notice this causes a
change in the response.
MICROPHONE POSITIONING

BEGINNER HOME STUDIO HANDBOOK | 73
HOW TO RECORD IN THE SAME ROOM | SETTING UP
TECHNICAL TIPS PHANTOM POWERCertain condenser mics require 48V
phantom power, which can be supplied
from your mic preamp or audio interface.
You’ll usually find some indication on the
body of the mic that this is the case. If not,
check the manual. Typically, valve mics
(which have their own power supplies),
dynamics and ribbons don’t need phantom
power. Avoid sending phantom power to
mics that don’t need it.
VIBRATION NOISECondenser mics can easily pick up
vibration noise from the floor and some of
them therefore include on-body low cut or
roll-off switches. Failing that, a suspension
cradle is your best bet.
VOLUMEAlthough most mics can handle high SPLs
(sound pressure levels), close-miking a loud
source can overload the mic electronics.
Sometimes you’ll find onboard cut switches
or even, on small condensers, capsule
insert collars. These ‘pads’ typically reduce
the signal by 10-20dB.
MIC STANDSWhen setting up a stand, try holding the
mic itself in one hand while you slacken off
the clamps with your other hand. Now
position the mic, then tighten the clamps
again. That will help you get the mic exactly
where you want it to be.
WINDThe microphone popshield is a common
sight when recording vocals. When it comes
to positioning it, place the mic popshield
halfway between the sound source and the
mic for best effect. Slightly less effective is
the foam windscreen that fits over the
capsule grille.
MIC CABLESOnce you’re happy with your mic positions,
take the time to tidy up your mic cables –
stick them down with some tape if
necessary. This will help to prevent any
horrible or expensive accidents, as well as
any unwanted movement of the mics
during recording sessions.
Don’t be afraid to experiment with miking techniques – here a
DI’d guitar sound is livened up with some ‘picking’ noise
and these are augmented by variations
like hypercardioid and supercardioid.
By far the most commonly used type
is cardioid. Designed to pick up sounds
arriving mainly from the front and sides
(on-axis) while rejecting sounds from
the rear (off-axis), cardioids enable you
to better isolate instruments, which can
be useful for small recording spaces.
Keep in mind that the degree of isolation
varies with different frequencies, and a
typical cardioid actually picks up very
low frequencies fairly evenly from every
side. Overall, a cardioid mic delivers a
sound incorporating a ‘coloured’ room
sound element.
5. POSITIONNOW THAT you’ve done the groundwork,
you’re ready to actually point that mic at
something. Recording multitrack music
requires the close-miking of most
elements (unless your recording space
is extremely ‘dead’ acoustically), as
multiple layers of ambience can easily
become problematic when recording.
But what do we mean by ‘close’? A
good starting point is between 9 inches
and 12 inches, but it’s also perfectly
acceptable to move right in to a couple
of inches, or move further away. The
point is that at this proximity you’ll be
mostly capturing the direct sound of the
instrument and little of the ambience of
the room. The downside to this method
is that the closer you get to the source,
the more accurate you need to be with
the positioning.
For a vocal, this shouldn’t be too
problematic as long as the vocalist
doesn’t move around too much. With
instruments such as hi-hats, snare
drums, acoustic guitars and guitar
amps, a few inches to the left or right
can make a big difference. Ultimately, if
things don’t sound right or you don’t
think you’re capturing the balanced
sound you want, just back away a bit.
The other thing you might notice is
what’s called the ‘proximity effect’. With
a directional microphone, when you get
right up close there’s often a significant
boost in the low frequencies. On the one
hand this can be quite desirable for
vocals, but on the other hand it can
make acoustic guitars sound horribly
boomy. If you want the closeness
without the boom, an on-body or
preamp low-cut switch should do the
trick. Alternatively, you could try using
an insert EQ, or simply back the mic
away a little bit.
When it comes to microphone
positioning, there’s no substitute for
experimentation and experience, so get
plenty of both and you’ll build up your
own personal bag of techniques to suit
your instruments and setup.

74 | BEGINNER HOME STUDIO HANDBOOK
SETTING UP | HOW TO RECORD IN THE SAME ROOM
MONITORING AND foldback are vital aspects
of the recording process. You need to be
able to hear as accurately as possible
what you’re recording – if this is sorted,
you can be confident that when you play
it back it will sound the same. You will also
need to provide a decent foldback so that
you or whoever you’re recording can hear
both the pre-recorded tracks and also
themselves playing at the same time.
In our signal flow section (p.17) we
suggested that when it comes to complex
multi-mic situations, a hardware mixing
desk is often the simplest option. When it
comes to providing effective headphone
foldback, things can become even more
complicated. The main reason is latency
(processing delay), a consequence of the
buffered route the signal has to take in
MONITORING AND FOLDBACK: HOW TO CLEARLY HEAR WHAT YOU’RE RECORDING
and out of the computer. If you’re playing
an instrument that makes an audible
sound in a room, the sound you hear will
be a combination of the foldback through
your headphones and the direct sound in
the room. So if the foldback sound is
delayed by even 20ms, it’s confusing.
Through headphones (and with low
buffer settings, for example, 32 or 64
samples), this can sound like a chorus
effect. With higher buffer settings (for
instance, 512 or 1024) it will sound like a
slap-back delay. Remember that when
monitoring a record signal it’s going into
the computer and back out again, so the
buffer delay is doubled.
There’s no standard solution to this,
and you’ll find both hardware and
software options, which vary between
manufacturers. We’ve grouped things
together into two options: hardware
based and computer based. Of course,
you could use a combination of the two.
HARDWARE BASED METHODUSING A mixing desk (and its onboard
preamps), you can set up your foldback
mix prior to the audio interface stage,
adding effects if necessary. Then it’s
simply a case of routing the signals from
the desk to the interface. As well as the
bus systems we mentioned earlier, desks
often have direct sends on each channel
for this purpose.
This method – similar to that used with
hardware multitrack machines pre-
computer recording – will work with any
software platform. The downside is that
you will need to come up with a solution
for dropping in when overdubbing. You’ll
need a headphone mix that combines
playback from the computer of both the
part you’re overdubbing and the rest of
the track. When you drop in to record,
you will want the overdub track to stop
playing back.
One option is simply to mute the
overdub track at the point where you
drop in. Alternatively, set up an extra
track on your sequencer and use it as
a slave for the foldback, then you can
choose when it will stop playing in
advance. Both options work, but are
fiddly. Many music producers who use
CUE MIXThe idea with a cue or headphone mix is that you are
able to set up a balance for a musician specifically for
their set of headphones. On a mixing desk this can be
easily done using auxiliaries, but many interfaces will
now have monitoring software. This usually enables
you to set up specific balances for each of the
physical interface outputs, combining audio from
both your software and also from inputs such as
microphones or DIs.
OUTPUTS 1 & 2 (MAIN MONITORS) OUTPUTS 3 & 4 (HEADPHONES)
SOFTWARE OUTPUTS HARDWARE INPUTS
In our main monitors, the recording engineer simply wants to hear a small amount of the input signal.
SOFTWARE OUTPUTS HARDWARE INPUTS
Our headphone mix for the performer has a different balance from our software and much more of the input signal.

BEGINNER HOME STUDIO HANDBOOK | 75
HOW TO RECORD IN THE SAME ROOM | SETTING UP
Aside from getting things working on a purely
technical level, good foldback can be a tricky
thing to achieve. It’s not unusual for a perfectly
good track balance to elicit the complaint, “I
can’t hear myself!” Performers hear themselves
as a combination of the sound in the room and
their foldback. This is the case even if the
headphones are of the closed-back, sealed
variety. So to keep the studio atmosphere
harmonious, here’s a list of practical tips:
SOLID RHYTHMTo get a performance that’s in time, a good solid
tempo reference is needed. Often this will need
to be louder than you initially think, and a simple
headphone balance that avoids unnecessary
effects will help.
RELIABLE PITCHAny instrument that you pitch by ear (the voice,
for example) needs something to pitch to. A
good, solid pitch reference is essential. If your
track is sparse with only bass and beats, it’s
always worth considering adding a guide
keyboard track to help with this.
TWO’S COMPANYSome performers struggle if they’re sent off to
another room to perform. If this is the case,
bring them into the room with you and both
wear headphones.
OUT OF PHASE TRICKOn rare occasions, some performers may ditch
headphones altogether in favour of standing in
front of the monitors. To avoid unacceptable spill
into the microphone, an option is to wire one of
your monitors out of phase with the other and
angle them so that the sound meets where your
performer is standing. Be careful, though, as this
is something of an unpredictable technique.
BEWARE HEADPHONE SPILLOn quiet sections of a track it’s very easy for a
mic to pick up headphone spill, especially if
you’re using a solid click or rhythm in your
headphone mix. Play back these sections to
check they sound fine.
OFF-BEATSAlthough drummers tend to pull and push
against a click track, it’s sometimes difficult for
them to hear an on-beat click unless it’s very
loud. Try programming something that perhaps
emphasises the off-beat so that they can easily
hear it in the gaps.
VERB FOR VIBEMany people like to feel they’re performing to a
final mix, karaoke-style. This doesn’t often
produce the best recordings, but one thing that
does help is reverb, especially for vocals. Even a
touch will help yield much better results.
HEADPHONES ON YOURSELFIf you regularly struggle to get an acceptable
headphone mix, try monitoring with headphones
yourself. You may find it sounds a little strange
when you subsequently listen on speakers, but it
will put you in a similar place to the performer.
“I CAN’T HEAR MYSELF!”
Sometimes even closed-back headphones can’t save you from a cumulative foldback calamity!
hardware mixing desks with a DAW have
given up on the concept of dropping in,
preferring instead to do lots of separate
takes and comp them afterwards.
COMPUTER BASED METHODGIVEN THE potential for awkwardness with
the hardware option, both software and
interface manufacturers have tried to find
alternative solutions. These vary both in
functionality and success. However, they
all rest on one method: routing the input
signals to the outputs without going via
the computer’s CPU.
On interfaces from the likes of MOTU
and RME, this is achieved via the
incorporation of a processor-based
routing system into the interface. This is
controlled by proprietary software
(MOTU’s is suitably called the CueMix)
that enables you to set up a full mix
combining inputs to the interface and
outputs from your software. On cheaper
interfaces, you will often find more basic
versions of the same idea.
PC users may have encountered ASIO
Direct Monitoring (ADM). Assuming your
software and hardware support this
protocol, it enables the software to switch
the hardware into a temporary routing
configuration when recording, mirroring
an input back to its corresponding
output. So, for example, if your mic is
coming in on input 3, when you go into
record it gets routed back to output 3
without an extended trip around the CPU.
On the Pro Tools platform, meanwhile,
things also vary. Some Pro Tools LE
interfaces support a system called Low
Latency Monitoring that’s not unlike the
ADM system above. Others (Mbox, for
example) offer simpler onboard
headphone mixers. But unsurprisingly,
the most successful hard/soft system
comes from Pro Tools TDM. This on-card
DSP routing system allows you full
zero-latency monitoring from within
Pro Tools software – as well as when
using an auxiliary bus. This enables you
to work easily in the traditional way,
overdubbing and dropping in with no
problems. And your monitoring balance
is saved within the session. When it
comes to recording sessions, this is a
major strength and attraction of this
otherwise particularly pricey system.

76 | BEGINNER HOME STUDIO HANDBOOK
SETTING UP | BACKING UP
BACKING UPYour gear is set up. You’re almost ready to record. But how will you
ensure the music you create is secure? Here’s a word on data backup
Say you’ve been recording for a
couple of days and you’ve
created some of the best
music of your career to date.
What would happen if your
computer’s hard drive failed?
Where would you stand? And
what about all of your applications? Do
you have all of your installation files
stored offline? Serial numbers and
authorisation codes? How hard would it
be to replace all of that stuff if you had
to start fresh with a new hard drive or
even a whole new computer?
It’s the nightmare scenario for the
desktop artist, but it needn’t be anywhere
near as painful as all that. You see, in an
ideal world you could simply pop in a new
drive, fire it up and be ready to begin right
where you left off. Well, that all depends
on the strength of your backup.
Once upon a time, backing up one’s
computer was quick and easy, involving
little more than slipping a floppy into a
disk drive. However, modern productions
on today’s machines push around far
more high-quality audio data to and from
your drive. Copying gigabytes – maybe
even terabytes – out to a backup medium
takes a lot of time, and there’s no denying
that it can be a major pain. Still, it must
be done, and in this feature you’ll learn
about storage mediums, offsite and
online storage options, plus the potential
pitfalls and solutions. Your work is very
important, so make sure it’s protected.
WHAT AND WHEN?SO WHAT exactly should be included in a
backup? Ideally, everything. You should
be keeping at least one clone of your
entire system drive for a start – ie, your
operating system and any essential data
such as drivers that you need alongside
it. This type of backup needs to be done
intermittently. It will allow you to restore
your entire system or migrate to a new
one if your old machine, system drive or
the computer on which it resides is
damaged or replaced.
FILE ORGANISATIONSOME USERS don’t separate their system
files out from their projects and other
documents, but many do, and doing so
can be quite convenient. You might keep
the two on completely separate drives or
merely separate partitions. You don’t
have to – that particular practice stems
from a time when drives were smaller
and slower – but it can still help to keep
things organised.
Copying an entire drive is sometimes
known as ‘ghosting’, and there are certain
applications dedicated to making the
task easier. If you have ever suffered a
catastrophic system drive failure without
a backup, you’ll be aware of the complete
hassle of re-downloading, reinstalling and
re-authorising all of your applications.
TIMETABLINGSPECIALISED BACKUP software might allow
you to schedule periodic backups, but
some apps have their own ideas about
when they ought to be snapping at your
bits. Apple’s Time Machine, for instance,
is automatically configured to keep
hourly backups for the previous 24 hours,
daily backups for a month, and weekly
backups for all previous months. This is
not a fool-proof backup system, though
– it’s intended as a means by which your
system can be restored to a previous
state, though that does serve essentially
the same purpose, up to a point.
You see, Time Machine will start
deleting the oldest backups when your
backup disc gets full. Nevertheless,
Apple’s schedule isn’t unrealistic and

BEGINNER HOME STUDIO HANDBOOK | 77
BACKING UP | SETTING UP
gives you a pretty good example of a
reasonable timetable – though hourly
backups might be overkill, especially if
they’re starting to munch away at your
production power.
GET SERIOUSTHE GENERAL rule is that if you’re working in
the studio each day, you should make a
backup copy of your work each day. You
don’t need to clone your whole system
– just keep a backup of your daily work. If
you’re an intermittent studio dabbler, you
might be better off making a backup
once a week or even once a month. It
depends on your production schedule.
We’d recommend making multiple
backups, on multiple formats, if possible.
We also very emphatically suggest that
you keep one or two extra copies of your
most precious files offsite – way offsite if
possible. Mail them to an out-of-town
friend or a relative for extra safe keeping.
Disasters can and do strike. We hope they
never happen to you, but they have to be
considered. What if your home burns to
the ground while you’re at work? What if
Mother Nature hits your area with some
natural catastrophe? What if your
production laptop gets lost/stolen? Your
latest song will likely be the last thing on
your mind, but when you do get back on
your feet you’ll still have a copy available.
BACKUP TOOLSTHERE ARE many ways to go about making
a backup, and we polled a number of
musicians to find out what methods they
preferred. A distressing number of those
polled have never made a system-wide
backup but have instead copied their
most important files piecemeal onto an
external drive. It’s reasonable to grab
your most essential files en masse, but
the number of people regularly taking
more fundamental backups is small,
which is strange when it’s so easy to do.
The aforementioned Time Machine is
installed on every Apple computer sold,
and Windows users have access to
Windows Backup, at the very least.
Third-party options include Macrium
Reflect (for Windows) and Clonezilla.
The free version of Macrium (find it at
macrium.com/reflectfree.aspx) is easy to
use and will get the job done. The slightly
fiddlier Clonezilla (check out clonezilla.
org) is a free and open-source solution
for Windows, Mac and Linux users.
XXClone (good for Windows users) is
free for personal and private use and
allows you to copy the volume ID to your
target drive so that you can boot from it
(visit www.xxclone.com/index.htm). Mac
users who don’t want to use OS X’s Disk
Utility can get Carbon Copy Cloner. It will
make bootable clones, and you can even
schedule it to wake or power up your Mac
to make a clone (visit www.bombich.
com/index.html).
BIT BY BITSO NOW that we know making occasional
clones of your entire system drive is
necessary and actually very simple, how
about taking care of those smaller daily
or weekly backups? Many of the software
options we’ve listed can run scheduled
backups, but often you’ll be doing just as
our polled musicians do: copying files
and projects one at a time to an external
storage disk. This is the method you’ll
want to use for files that get changed or
updated a lot: think works-in-progress,
sample collections, plugin folders and
even presets.
Be aware that most DAWs’ primary file
formats don’t save everything you do. For
example, their primary file format will
likely merely point to any audio files
recorded or imported into the project.
These are usually kept in a specific folder,
often a sub-folder of the project itself. You
could simply copy the project folder, but
that will likely also copy bad takes and
unused audio over, too, which will rapidly
munch up space. Some DAWs allow you
to purge unused audio, so take advantage
of that before you back up: Live’s ‘Collect
All and Save’ and Cubase’s ‘Back up
Project’ commands, for example.
Furthermore, many DAWs provide a
packaged file format that will roll all audio
and pertinent data into a single, self-
contained file/package – Cakewalk’s
BUN files, for example, or Logic Pro X’s
Package files.
However you store your projects, you’ll
want to back these up every time you
make a major change to one. Make
copies and archive them safely when
you’ve finished the project.
MAINSTREAM MEDIAWe’ve seen plenty of digital storage options
come and go over the years. Nothing is
future-proof. Currently, our hope lies not in
the media itself, but in the way it connects
to our computers. USB 3.0 is fast and
reliable and there are tons of external
storage options available, primarily in the
forms of the thumb drive, external hard
drives and solid state drives. Prices are
plummeting on the latter two, with a
couple of terabytes of hard disk storage
available for well under £100. Apple very
much want to provide you with another
option in the form of Thunderbolt
peripherals. This lightning-quick
connection protocol hasn’t yet become
ubiquitous, but Apple users have the
option of Thunderbolt-based drives and
drive arrays. Many third-party drives offer
compatibility with both USB and
Thunderbolt ports.
These solutions are ideal for the
massive storage needs of desktop music
producers and are especially good for
backing up your entire system, your apps,
OS and all. USB thumb or stick drives are
likely suitable only for less demanding
tasks. You can indeed get one with a full
terabyte of storage, but it could set you
back nearly £1,000. Still, for intermittent
and safety backups of your projects and
documents, the thumb drive remains an
inexpensive and convenient option.
WHAT ELSE?SPEND SOME time examining your work
drive in detail. Thoroughly go through
your documents folder, go through your
project and application folders, and make
a big old checklist of everything you use
frequently. Do you swap out lyrics? Do
you maintain a growing collection of band
photos? Do you make your own videos?
Back ’em up!
The same goes for important industry
contacts. If at any time you’re unsure
whether something is worth backing up,
ask yourself this question: “What would I
do if this specific data were to vanish
today?” If you’ll miss it, back it up.

78 | BEGINNER HOME STUDIO HANDBOOK
SETTING UP | HOW TO PREP YOUR DRUM KIT FOR RECORDING
Power up your drum takes with a little pre-session effort
Just like any other instrument,
drum kits aren’t always set-up
for the perfect recording. A more
experienced drummer will have
evolved and enhanced their kit;
they may have found a favourite
snare or two, collected a few
good cymbals, and will have set up their
kit so that it feels right to play live.
A drum kit will sound different in any
room, and any song will call for a distinct
drum sound, so for every session you will
need to fine-tune the kit and the room for
that specific demand. Every aspect of the
kit has to be addressed and this feature
takes you through all the issues that
should be ironed out prior to you hitting
the record button.
There’s no substitute for experience,
but this guide will help to ground you in
the basics of the drum session, speed up
the learning process, and give you a feel
for how to get the kit tuned so that its
sound wins through in the final mix.
CHOICE OF KITAS WITH any instrument the quality of
manufacture has a huge impact on the
sound it makes. Any drummer worth
their salt will have evolved a good fettled
kit around them, but their playing ability
might occasionally outstrip their ability
to pay for a good kit. If your kit works for
you then great, but if not you might want
to consider borrowing one from a
generous mate or even hiring one for
your session. The same goes for drum
mics – aim to get hold of the best quality
you can. A poor sounding kit will sound
exactly that on your recordings.
The better recording kits include
Gretsch, Ludwig, DW and Yamaha, and
HOW TO PREP YOUR DRUM KIT FOR RECORDING

BEGINNER HOME STUDIO HANDBOOK | 79
HOW TO PREP YOUR DRUM KIT FOR RECORDING | SETTING UP
some makers are famous for individual
drums. For example, Noble and Cooley
snares, Ludwig kick drums and Zildjian
cymbals. The Ludwig Black Beauty snare
is a timeless classic recording snare. A
good drummer will have a selection of
snare drums and cymbals and the choice
will be determined ultimately by the song
you are going to record.
It’s the job of the drummer and the
producer to make gear choices based on
how you want the end result to sound.
Ask yourself questions such as, ‘Does the
song need a deep fat snare or a high
snappy one?’ Make changes to suit. If
you’re not sure what sound you’re after,
listen to some of your favourite albums to
give you inspiration. Maybe you want
your drums to sound big and boomy like
John Bonham’s, or tight and crisp like
Travis Barker’s, or even dry and punchy
like Questlove’s. The more
you know and prepare in
advance, the less chance
there is of you and your
band feeling disappointed
with the end result.
DRUM HEADSSKINS SHOULD always be brand new, or
thereabouts, for a recording session.
Drum heads soon lose life after repeated
beatings, so make sure you have spare
heads with you. Undoubtedly every
drummer has their favourite heads but,
as a general rule, coated heads record
better – their tone is warmer and they
still have a good ‘skin’ attack. And
although its always a personal choice,
two-ply heads tend to sound much better
than single-ply.
Clear heads tend to be overly bright
and without body on the top side, but
they work well for the bottom resonant
heads where thinner is better. Once new
heads are installed, ensure they are
properly bedded in with some playing
and stretching so that they don’t lose
their tune during the session.
TUNINGWITH DECENT tuning and a good set of
heads, most drum kits can sound and
record brilliantly. Learn the basic
principles of tuning, or get friendly with
someone in the know. Our basic rule of
thumb is to finger-tighten all tension
bolts, working in opposites. Once
finger-tight, use a key to tighten using a
full turn on each opposite tension bolt
until the head is fully stretched and
cranked up and you can hear the glue
cracking on the hoop, then leave it to
stretch-in and settle. Repeat for each
drum until complete.
Turn the drums over to begin with the
resonant head. Tap the head at each lug
and tighten the bolts until you get a
consistent equal tone. Once done, turn
the drum over to the batter head and
begin de-tuning. De-tune each lug by half
a turn until the batter head is half a turn
below your desired pitch and then
gradually increase the tension until you
are at your desired pitch level. Remember
that a higher-tuned resonant head means
a shorter, shallower note; a higher batter
head means a deep note with long
sustain and a good stick response, and if
they are both tuned the same you get a
longer sustained and pure note.
STICKSYOUR CHOICE of sticks is determined by the
song and the weight of playing required.
A drummer should carry a selection of
weights and varieties of wooden sticks,
and you should have a feel for which stick
is required. You may find that a softer
song requires brushes or mallets. A good
in-between solution are ‘hot-rods’, a
bunch of thin sticks lashed together
which make a more diffused but clear hit.
Or why not try nylon tips instead of wood
tips for more attack, or play with the butt
end of the stick?
You could even arrive at a combination
solution with a stick in one hand and a
brush or hot-rod in the other.
DAMPENINGMOON GELS and gaffer tape are essential
items for the studio to help dampen
unwanted overtones and excessive ring.
At this stage it’s also worth keeping in
mind that things like a towel over the floor
tom, or your wallet placed on the snare
drum will eliminate ring and produce a
‘dead’ drum sound, as popularised by
drummers such as Ringo Starr.
HEADPHONESHEADPHONES ARE a necessary evil unless
you go all-out for a live-style recording
with PA and wedges and embrace the
spill. But considering how you will be
recording at home (or perhaps in a
garden shed or pod-style recording
environment), that’s an unlikely scenario!
Most drum sessions will be done using
headphones and to avoid spill they
should be of the closed-cup variety. The
long-time classic studio headphone is the
Beyer DT100. They’re hardy and not too
bright for high-volume listening. That
said, there are better-
sounding cheaper
headphones to be had,
particularly from the likes of
Audio Technica.
KNOW YOUR PARTSA LOT of time can be lost during
a session because some band members
aren’t completely clued up on their
individual parts. There will always be the
opportunity to change something when
you’re recording if a part really isn’t
working for the song, but you really
should have a solid idea of what you’re
going to play once the record button is
pressed. After all, there’s nothing worse
for the rest of the band than waiting
around while their drummer tries to nail
a new fill idea.
PHYSICAL PREPARATIONIF YOU’VE never warmed up before playing,
now’s a good time to start. You want your
takes to sound natural and flowing. If
you’re stiff and pent-up, your playing will
be rigid and lack life. Remember, this isn’t
a gig so you won’t have an hour to get
warm. You want to be ready to go for take
one, so hit the practice pad or do a couple
of run-throughs before you record.
Get a decent sleep and eat well the
night before, too, as you’ll be more alert
and less likely to tire out when the ninth
take of track 11 comes around.
You really should have a good idea of what
you’re going to play once the record button is
pressed. There’s nothing worse than waiting
while the drummer tries to nail a new fill idea

MAG/DVD
Future Music is the mag for the latest gear and how today’s cutting-edge music makers use it. We’ve been making the future since 1992. Make sure that you’re part of it.

BEGINNER HOME STUDIO HANDBOOK | 81
PREPARING YOUR VOCALS | SETTING UP
So, you’ve set up your home
studio and you’ve chosen
which songs to record.
You’ve got your DAW and
microphone ready, but you
aren’t quite sure where to
begin. Have you ever
wondered what professional singers
do before they go into the studio? Well,
Elena Kay has been there and done it.
A professionally trained singer who
taught vocals at BIMM, with some
of her former students going on to
perform with music legends including
PREPARING YOUR VOCALSVocal coach and singer Elena Kay offers her top 10 do’s and don’ts
before heading into a vocals recording session
Led Zep’s Robert Plant, Elena is the
perfect teacher to help you on your way.
So, if you’re new to singing and
recording vocals, make sure you
follow her essential 10 do’s and don’ts
before you even think about hitting
the record button.

82 | BEGINNER HOME STUDIO HANDBOOK
SETTING UP | PREPARING YOUR VOCALS
DO LEARN YOUR MATERIAL THOROUGHLY "OKAY, WE’RE guessing that
you already know your songs, but do
try singing them by heart if you haven’t
yet – a lot of singers find that they can
focus more on the meaning behind the
lyrics when they don’t have the sheet
in front of them. Stay true to the story
you are singing. Which words would you
like to emphasise? You will also need to
think about where to take your breaths
so that you have the stamina to sing until
the end of each phrase. After all, you
don’t want to have to breathe in the
middle of a word!"
DON’T SING WITHOUT WARMING UP FIRST"A LOT of vocalists
underestimate the strain they put their
vocal cords under when singing without a
good warm-up. Ideally you want the
warm-up to last for about 20 minutes
and cover your entire vocal range. Sing a
few scales (do-re-mi-fa-so-la-ti-do) and
arpeggios, starting from a comfortable
pitch and repeating it up a semitone each
time. Do take it easy when you reach the
high notes, as you don’t want to be
belting straight away, and don’t forget to
warm up your lower range too."
DO PRACTISE MICROPHONE TECHNIQUE "SING THE songs using your
studio microphone to make sure you’re
happy with your sound. Start by
standing about six inches away from the
microphone and record a few takes to
hear how you sound – you might have
to experiment with your position to hear
how it changes the volume of your vocals.
Standing too close, for example, could
make your vocals sound quite loud and
even distorted. A solution? You could
move away from the mic during the
parts of the song where you have to belt.
And remember not to point your mic
towards a speaker otherwise it could
cause nasty feedback,"
DON’T DRINK TEA, COFFEE OR ALCOHOL"CAFFEINATED AND alcoholic
drinks can make you dehydrated,
which can have an effect on your
vocal cords. You might notice that
your larynx feels dry and irritated after
you have had too much caffeine, for
instance. Make sure you stay well
hydrated before and during your
recording. Have a bottle of water with
you and drink regularly, but avoid ice-
cold water because this will tighten
your vocal cords."
DO KEEP YOUR ENERGY LEVELS HIGH "RECORDING A song on your
own without the buzz of an audience
can be a different experience from
singing on stage. This can have an
effect on your tone and you might not
project enough. Thinking of how you
would perform your songs in front of
an audience can lift your energy levels
during a recording session and this will
be reflected in your sound. You could
even practise some small movements
in front of the microphone, although
try not to move too far away from the
microphone, as this will interfere with
your volume."

BEGINNER HOME STUDIO HANDBOOK | 83
PREPARING YOUR VOCALS | SETTING UP
DON’T EAT CHOCOLATE"SADLY, CHOCOLATE – and dairy
foods in general – can irritate
your throat. This is because your body
tends to produce excess mucus (phlegm)
when you eat dairy, which can result in
coughing. Some professional singers
eliminate dairy from their diets
completely, although you can just avoid
having them when you practise and
record your songs to see if you notice
any difference. Mint flavoured chewing
gum can also dry out your throat, so it’s
best to replace it with a fruity alternative.
And, of course, avoid smoking."
DO CHECK YOUR POSTURE "PRACTISING IN front of a mirror
can feel a bit awkward, but
it will help you to see how your body
works and to see if you are carrying any
tension. Make sure your shoulders aren’t
too tight and that you stand straight, with
your legs slightly apart. Balance on both
legs, push your shoulders and head back,
and imagine your body standing and
feeling taller. Check for any tension in
your neck, jaw and shoulders. If tension
is present, use some gentle massage
to release it."
DON’T STAY UP TOO LATE THE NIGHT BEFORE"AVOID GOING out to places with
loud music before a recording session;
you must avoid shouting and wearing
your voice out. A tired throat can lead to
an unpleasant, croaking sound or even
hoarseness. Get a good night’s sleep, as
you don’t want to be drinking too many
teas and coffees the next day to prop up
your energy levels when recording."
DO PRACTISE DIAPHRAGMATIC BREATHING "A DEEP diaphragmatic breath
can help you produce a strong, well-
projected sound and can help you
support a high note without damaging
your voice. It can also help you to relax if
you feel nervous before recording. Sit on a
comfy chair to start with. Take a few long
breaths, making sure the air fills up your
lungs and tummy. Putting one hand on
your stomach will enable you to feel if it’s
filling up with air. Ensure your shoulders
are relaxed. If they lift up when you inhale,
your vocal cords will tense. Exhale with a
long hissing sound ('sss') till all the air
finishes. Repeat a few times. You can then
experiment using other consonants and
vowels ('vvv', 'mmm', etc)."
DON’T OVERDO IT "FINALLY, TAKE regular breaks if
you feel your voice is getting
tired while you practise. Singing too
much before a recording can tire out your
vocal cords. You really want to be able to
hit those high notes, so make sure you
don’t always sing on top of your voice
when you rehearse. Just take it easy!"
A deep diaphragmatic breath can help you produce a
strong, well-projected sound and support a high note
without damaging your voice. It can also help you relax

84 | BEGINNER HOME STUDIO HANDBOOK
SETTING UP | RECORDING CHECKLIST
Putting in the work on your music before hitting the studio will pay dividends on finished tracks. Here’s some
important questions to ask yourself before you start…
You’ve chosen the room you
will be recording in, you’ve
thought about acoustics and
soundproofing, and you’ve
rigged up all your gear. You’re
tantalisingly close to pushing
‘record’ but, the fact that you
now have to lay down heroic takes, and
with all the pressures studio work brings
with it, you find yourself ill-prepared.
Just getting the actual job done in the
recording studio often gets in the way of
getting the right job done. The role of a
producer is to keep everyone on track.
Whether you’re producing yourself or
you’re working with a producer or other
musicians, you need to get to grips with
this criteria for helping to decide what
material will make it onto a record, and
what will be consigned to the bin.
WHAT’S THIS RECORDING FOR?THIS QUESTION will affect every single thing
you do on the day. Although you should
be aiming for the best work you can
possibly muster, inevitably there will be
some compromises, often down to the
amount of time available. If you’re making
recordings for commercial release, for
BEFORE YOU RECORD
DON’T FORGET TO EAT!Recording sessions can stretch for hours, so ensure you have the fundamentals coveredBasic needs can be sorely overlooked
in the passion for recording an album.
Too many sessions are spoiled where
everyone is hyped on coffee but
struggling to cope with not eating for
12 hours. When recording at home, you
can stock up the fridge and cupboards
in advance so that you’re not relying
on takeaways.
Factor in at a least a 30-minute
lunch break where you do actually eat,
and have meals at the time you would
normally eat – not five hours later or
past midnight – otherwise you may
not have sufficient energy to record,
let alone make it to the edit stage.
example,no corners can be cut. If, on the
other hand, these are simply demos to
help you get gigs, you could argue that
it’s all about vibe over quality.
IS THIS TAKE IN TIME? TIMING AFFECTS the sense of excitement
and power in your recording. Be well
rehearsed and avoid relying on retiming
your work via the computer. Audiences
are sensitive to scrappy playing, so do
your best to ensure that everything’s
tight without losing feel.
IS THIS TAKE IN TUNE? CHECK GUITAR tunings between every take.
Insist that your drummer tunes his toms,
snare and kick. Be particularly careful
with bass instruments and analogue
synthesisers that can drift without notice
– they will suffer particularly hard if you
have to retune them later.
IS THIS TAKE EXCITING? YOU COULD argue that if production was
just about tuning and timing, you could
get a computer to do it. You’d be right,
but ultimately one of the key skills lies is
in knowing the difference between an
exciting take and a merely adequate one.
It should go without saying that only the
exciting takes should make your record.
IS THE SONG INCOMPLETE? YOU ROLL up with writing left to be done
to the song. This aspect of the creative
process takes lots of time to get right,
so don’t do it with a studio clock ticking
– it will freak you out so much that you
won’t be able to write! Instead, get all of
your parts structured and fully worked
out before you start the actual recording.
LAST MINUTE CHANGES TO A SONGYOUR BASS player suddenly throws out the
bassline he’s played for years and doesn’t
tell you until you’re in the studio and all
set to record. This changes the whole feel
of the tune, but your bassist is adamant
it’s an improvement. That’s a big mistake!
Get all of your parts agreed in advance.
BAND NOT REHEARSEDYOU CAN correct pitch and timing in the
DAW, but the end result will sound like
pitched and timed recordings with any
sense of feel removed. Spend at least
the same amount of time in rehearsal
© iS
tock

BEGINNER HOME STUDIO HANDBOOK | 85
RECORDING CHECKLIST | SETTING UP
as you have set ahead for recording your
songs. Trust us, you’ll need it.
BAND NOT PRESENTIF YOU’RE recording your band, all of you
should be in your home studio or nearby
so that any artistic decisions can be
agreed upon. One exception to this can
be when the engineer or producer – that
may well be you – is attending to
technical issues such as editing, EQing,
and programming. This is tedious work
to witness, so perhaps ask your band to
leave you to it and return with a fresh set
of ears the next day.
STUDIO NOT EQUIPPEDYOUR HOME studio should have all of the
equipment you require to bring your
music to life. Again, if you’re recording
with others you may want a place to
play live together for a raw, live feel. Is
there space in your home studio to
accommodate that? On that note, do
you have enough mics for the process?
Can you isolate the bass guitar and
drums, for example, so that there isn’t
any problematic ‘bleed’ from them that
will be a nightmare come mixing time?
EQUIPMENT NOT WORKINGCHECK ALL of your equipment to ensure it
actually does what you require it to do
before you start recording. Stock up on
strings, leads, drumheads, sticks and
batteries and keep them to hand.
LOST MUSIC FILESDO YOU know exactly where your prelim
work is, and are you confident that it will
load up correctly come recording time?
Think through the tasks
you need to achieve and
plan to spend the requisite
time on each task. Then
factor in a contingency…
LAY OFF THE BOOZEAt least until after the session!Alcohol affects your hearing
significantly: medical research has
demonstrated that it raises the
threshold of perception for lower
frequencies all the way up to the higher
midrange spectra (around 1KHz). This
‘numbness’ means you’re likely to add
more bass and boom to your mixes
even though this is already present in
the mix – you simply don’t hear it. The
end result can be a peculiarly dull mix.
Some players swear that they play
better with Jack Daniels, but this is an
illusion. Coordination and judgement,
essential for skilful playing, are both
compromised by a remarkably small
amount of alcohol. Leave the drinking
until after you’re done recording.
Preparing your reference files in advance
will save you valuable studio time.
NOT ENOUGH TIME THINK THROUGH the tasks you need to
achieve carefully and plan to spend the
requisite amount of time on each task.
Then factor in a contingency of a couple
of hours on top of that just in case.
ILL HEALTHMUSICIANS HAVE a habit of pushing on
through the most hideous of viruses in
order to record, but sometimes you just
have to cancel the session. Luckily your
home studio won’t charge a cancellation
feel, so be honest about how you (and
any others) are feeling. This way, you
won’t be wasting your time recording
vocals when you have a head cold – you
will sound terrible and you will only need
to reschedule later anyway.
THE STRENGTH OF STRINGSUNSURPRISINGLY, OLD strings sound old.
They dull over time, quickly drift out of
tune when played and they lose the
vibrancy that’s essential for a great take.
This is especially true for bass strings.
Take the time to restring all of your
guitars a day or two before the session.
New strings need to stretch and settle
before use, so rehearse your parts for
an hour to ensure they are ‘played in’.
LYRICSTHE VOCAL is the most important
component of a song. The quality of
the singing is crucial to the success of
the session; it’s what your listeners will
be zoning in on no matter how great
your bassline. Despite this, it’s tempting
to leave lyric writing to the very last
minute, with some songwriters even
rushing them out in the studio. Lyrics
are the actual content of the song, the
meaning behind the music and the
aspect of the composition that fans will
most likely focus on. Therefore, your
lyrics need to have the highest priority.
Complete your lyrics in advance of the
recording and rehearse them properly.
BACKUPNO PERSON ever regrets making a backup.
On Macs you can use the Time Machine
facility to make incremental backups
through the day, although hard drive
activity can interfere with the actual
recording process, slowing down your
Mac. Another common approach is to
set your recording path to a folder that’s
regularly updating to the cloud via a
service such as Drop Box, but bear in
mind that this isn’t a true backup. If you
change a file and later need to revert it
back to an earlier stage, DropBox will only
store the most current version of the file.
Ultimately, it would be wise of you to
invest in a rugged external hard drive.
And remember, it’s not the backup that’s
important but the ‘restore’.
© iS
tock

AVAILABLE IN PRINT & DIGITALLY NOW
THAN ANY OTHER UK GUITAR MAG!
M ORE TABS
MORE BACKING TRACKS
BETTER VALUE
FROM £2.50
TAB’SBACK!

BEGINNER HOME STUDIO HANDBOOK | 87
RECORDING
HOME STUDIO RECORDING
Hopefully by now you’re well-prepared and well kitted-out, and you know your way around your home recording set-up and DAW. But now, as they say, it’s business time. Over the next few pages we’ll take you
through the actual recording process itself, from DAW principles to the specifics of recording guitars, bass, drums and vocals. We’ll show you how to add real professional polish to a recording, with an explanation of effects processors and when and how to employ compression, delay and more to sweeten, tame or bend your recorded sounds to your will. Then we’ll show you some best practices for mixing, and take you through the basics of mastering that finished recording.

88 | BEGINNER HOME STUDIO HANDBOOK
RECORDING | SET TING UP YOUR DAW
For recording, your main goal is
to record and play back your
required track count cleanly,
without glitches. This can be
influenced by a number of
things including your audio
interface drivers and operating
system, so ensure they’re up to date.
Keep an eye on audio buffer size. A
small buffer size will reduce the round-
trip latency (the time it takes the signal to
travel from inputs to output) via the CPU,
but it will also tax your system more,
which can result in instability or glitches.
Run a multi-track test session, recording
1 Many DAWs include stock templates to get you started. Here we’re using the
Multitrack Stereo Production template in Logic Pro 9 (it looks different in
Logic Pro X, but the process is the same). This gets us up and running quickly, and
we can then modify it to suit our exact requirements.
3 Now we need to label everything up, working through our drum kit first and
then moving on to the other instruments. We’re using guides for bass, guitar
and vocals while tracking our drums, but we can also set up tracks for the ‘keeper’
takes, taking care to assign the correct inputs. We’ll also colour-code our tracks.
2 The template features a set of sequential inputs and tracks, including a
ready-made, pre-fader headphone send on bus 20. We still need to tweak
things to match our layout, however. First we switch our drum room and overhead
tracks to stereo and reassign the inputs.
4 Now let’s get our buffer size set up. Rather helpfully, Logic tells us the
round-trip latency for each setting. A good solid setting for our system is 256
samples, which quotes a round-trip delay of 11.6ms. Finally, we record a set of
tracks and check that our system can handle them without any glitches.
STEP BY STEP PREPARING A DAW RECORDING SESSION
and overdubbing multiple tracks and
observing how everything behaves. If
things get a bit sticky, try bouncing down
a few stems for overdubbing and then
reuniting everything for mixing.
Plan your track layout. Keep your
physical track inputs and track layout
roughly the same. For a drum kit, use
sequential interface inputs assigned to
sequential arrangement tracks, working
logically through the kit from kick to room
mics so that you know where all of your
connections are, whether you’re looking
at your screen or audio interface. Label
the tracks and colour-code them for ease
of navigation, and decide whether you
want to record any stereo mics to stereo
tracks or keep them on mono ones.
When using multiple mics on the same
instrument, grouping the tracks can be
useful when creating new tracks for
recording (eg, playlists in Pro Tools) and
can retain phase coherence when editing
(eg, phase-locked editing in Logic Pro).
When preparing for overdubbing,
consider setting up extra tracks for
multiple takes. Some DAWs have
bespoke overdubbing and editing
systems for stacking or for handling
multiple takes on the same track.
SETTING UP YOUR DAW

BEGINNER HOME STUDIO HANDBOOK | 89
CUE MONITORING | RECORDING
When recording and
overdubbing, it’s of
paramount importance
to make sure that
everyone can hear the
track or click reference
and, if necessary, each
other. Most DAWs include extensive
internal bussing, so in theory the
necessary flexibility is there.
In practice, however, things can still get
pretty complicated, particularly when
you’re recording multiple instruments at
the same time in separate spaces. In
cases like these, everyone will need their
own headphone feed with its own level
and possibly its own blend control (for
example, drummers usually want their
headphones louder than everyone else’s,
which is understandable).
As already noted, DAWs all have plenty
of routing options, enabling you to create
individually bussed cue mixes for your
players and the control room. However,
during recording, all DAWs route signals
via their CPU, so when you monitor an
input signal via the DAW, you’ll find it
introduces a delay (latency). The length
of this delay is
dependent on the
audio driver buffer
size and any delay
introduced by
plugins in the signal
path, and while
you’ll generally
need this to be as
small as possible,
under stress a
really small buffer
size could
introduce
instability and
audio glitches.
DEALING WITH LATENCYIF YOU’RE doing electric guitar overdubs
using a DI and the guitarist is listening via
the studio monitors, a buffer size of 128
samples may be workable. However, with
sound-producing instruments rather
than DIs, any significant difference in
timing between the headphones and
what the musician can hear from the
room will usually manifest itself as a delay
or chorus effect. This will be most
pronounced for vocalists as they can
hear their own voice internally, via the
headphones and via the room – this is
offputting. The only way around the
problem is to have some kind of zero- or
near-zero-latency monitoring set-up.
While we’re here to promote the
advantages of computer based
recording, the simplest option is probably
a hardware mixing desk. Certainly, if
you’re recording only a few mics and one
or two players at a time, a small desk can
be a cheap, quick and flexible alternative.
Alternatively, you can go for a DAW that
incorporates some form of hardware-
based routing (see Direct Monitoring,
left). The gold standard in this case is Pro
Tools HD, but there are plenty of other
solutions including software-controlled
cue mix systems from the likes of MOTU,
RME, Focusrite and others.
Finally, you might want to look at a
hardware desk that incorporates an
audio interface – the Mackie Onyx, for
example. The main benefit with these is
that setting up levels and headphone
feeds becomes a far more tactile
process, but you also get the convenient
integration of an audio interface. Even so,
this won’t provide the multiple mix set-up
flexibility that you can get from a good
software mixer like MOTU’s CueMix.
CUE MONITORING
DIRECT MONITORINGMost DAWs feature direct
monitoring, whereby the input
audio is re-routed at the (direct
monitoring-compatible) audio
interface. This is to avoid the
round-trip latency through the
computer, giving effectively
zero-latency monitoring.
By augmenting this capability
with software control, some
interface manufacturers have
worked in additional functionality,
allowing multiple recallable cue
mixes that combine interface
inputs and DAW outputs. Good
examples are MOTU’s CueMix,
Focusrite’s MixControl and also
RME’s Total Mix. The only
downside with this approach is
that you can’t apply plugin
processing to input signals.
For PC users, the ASIO 2.0
protocol also includes its own
direct monitoring capability.
When implemented properly,
this controls the interface from
within your DAW.
Cubase implements this
functionality pretty well, with
three behavioural variations,
including one that works like the
auto input monitor option of a
tape machine. Remember,
though, that you’ll still need to
set up a cue mix incorporating
the input signal.
Unsurprisingly, the most
elegant monitoring solutions are
those found in cases where both
the hardware and software come
from the same manufacturers.
Probably the best example is of
this is Pro Tools HD or HDX, but
you will also find great Cubase
integration with Steinberg’s new
MR Series interface, as well as
some rather excellent cue mix
options presented in PreSonus
Studio One 3 when used with
certain PreSonus interfaces.
Mackie’s Onyx range of mixers – of which this is an extreme example! – combine tactile mixing with audio interface functionality, but they don’t give you the multiple mix set-ups of a well-designed software mixer

90 | BEGINNER HOME STUDIO HANDBOOK
RECORDING | BEGINNER’S GUIDE TO EFFECTS
Effects processors play a significant role in professionally engineered recordings. Here’s our rundown of the most
common examples...
Exactly what is it that makes a
professionally recorded track
sound so, well, pro? Surely it
can’t simply be a matter of
sticking a microphone in front
of a singer, or plugging in a
guitar before hitting record?
Actually it can, given the right material,
circumstances and environment.
A stripped-back folk guitar track, for
example, might be recorded live with no
embellishments. That said, the great
majority of recordings employ a vast
number of available gadgets that are
used to tame or sweeten the sound
coming in and going out. These devices
are called effects processors and come in
both hardware and software incarnations.
There are a number of different types
of effects. Some are utilitarian and are
meant to control a signal being recorded,
while others are designed to artificially
add a sense of space. Still other effects
can be thought of as ‘wow’ effects that
are brought in to add layers of interest
and excitement to a recording.
Since most popular hardware effects
had already long been based on digital
technology, effects processors were
among the first to get the software
emulation treatment and accounted for
the bulk of the first wave of plugins to hit.
The industry was soon rife with both
emulations of classic effects and entirely
new processing tools.
Most software sequencer packages
come bundled with the essential effects,
and there are plenty more available
online and through your local retailer.
BEGINNER’S GUIDE TO EFFECTS

BEGINNER HOME STUDIO HANDBOOK | 91
BEGINNER’S GUIDE TO EFFECTS | RECORDING
However, you don’t have to lay out cash
to build an effects arsenal – there are
hundreds out there for free, thanks to
talented software developers who are
kind enough to create them.
REVERBWHAT DOES IT DO? Reverberation is a
ubiquitous effect – you hear it all around
you every day. You can’t have failed to
notice, for instance, that your voice
sounds different in a stairwell than it does
in a tiled bathroom. That’s because
sound bounces off the smooth surfaces
and moves around each space in a
specific way. In essence, reverb gives a
sense of space or distance to a sound.
A nicely placed reverb can be the glue
that holds your mix together.
Overdone, though, and it can
make it sound muddy and
confusing. If you’re trying to
create the sound of a band
playing in the same room,
use one or two master
reverb effects. This way, you
will be applying the same environment
to your whole mix.
USE IT ON Reverb can be used on
everything you want to put in a ‘space’.
Use it sparingly on lead vocals and
instruments, though, since it will cause
them to sound further away. If you have
guitar in a band, it will work great on
drums to give a sense of cohesion.
DELAYWHAT DOES IT DO? Delay is perhaps one of
the simplest effects and, in fact, delay
serves as the basis for many other more
complex effects. A delay processor does
exactly as the name suggests: it delays
the incoming signal, sending it out later
than it came in. Sometimes it’s used as a
corrective tool. More often, however, it
serves as a sound-enhancing effect.
When combined with the un-delayed
signal it creates a cool echo effect.
Sometimes many copies of the echo
will be present, and (usually) each will
be successively lower in volume than
the preceding one. You might hear this
effect on, say, the last line of a vocal or
on a guitar line. U2 guitarist The Edge is
famous for his use of delay.
USE IT ON Short delays sound awesome
on vocals – they were often used to treat
the vocals on John Lennon and Buddy
Holly records, for example. They also
sound great on rhythm and lead guitars.
COMPRESSIONWHAT DOES IT DO? A compressor is a
dynamics processor – it helps to
maintain a steady volume even when
the incoming signal is fluctuating wildly.
As a tool, compression will reduce the
large peaks in your performance and
leave you with an even dynamic. This is
great for smoothing out an erratically-
strummed acoustic part. Gentle
compression will also help two parts
sit together more naturally, or you can
also use it to add more snap or sustain
to your notes. However, an overdriven
guitar part is already compressed when
it leaves your amp, and you might be left
with a squashed sound if you heavily
compress driven/saturated guitars. The
answer is, quite simply, to use your ears.
USE IT ON Use compression on everything
that requires taming. Vocals are a given,
unless you or your singer has great
microphone skills. Entire mixes are often
(over-) compressed to make them sound
louder. Go easy here because too much
compression or limiting can suck the life
out of your tracks.
EQ AND FILTERSWHAT DO THEY DO? An EQ allows you to
control the amount of low-, high- and
mid-range frequencies in your tracks.
Some are simple bass and treble
controls, while others are splayed across
eight, 16 or even 32 frequency bands,
each with a slider to cut or boost a
specific frequency or set of frequencies.
EQs and filters are essentially the same
thing, except that a filter is designed to
attenuate (or reduce) rather than boost
levels of specified frequencies. These
handy tools allow you to then shape the
tone of your tracks.
USE IT ON You can apply equalisation to
make room in your mix, or to correct
missing frequencies in recordings. For
instance, does your vocal and guitar
fight for dominance? If so, try cutting
the upper mids in the guitar to make
room for the voice.
MODULATION EFFECTSWHAT DO THEY DO? Chorus, flanger and
phaser effects are all considered to be
modulation effects. Flanging sounds as if
the frequency spectrum is sweeping up
and down. The Small Faces’ Itchycoo
Park contains the classic example of this
sound. Chorus effects do
just what you think – they
simulate multiple copies of
the input signal playing
simultaneously, though
each with a slightly different
pitch and time. Nirvana’s
Come As You Are is rife with
chorused guitars.
Phasers sound similar to flangers, but
there’s a sweeping ‘notched’ sound in
play, giving them their characteristically
metallic, piercing tone.
USE THEM ON These effects are ideal for
sweeping guitars, electric pianos and
even the occasional bass track.
DISTORTIONWHAT DOES IT DO? The studio is a funny
place. Engineers spend thousands of
hours ensuring the truest, purest
recording of the source material, while
the material itself might be an unholy wail
of screeching guitars or distorted vocals.
Let’s face it, we all like distortion. We like
raw, crunchy sounds that spit and growl.
And we can achieve these gritty sounds
through various types of distortion, such
as overdrive, fuzz and clipping.
USE IT ON Distortion is primarily used for
guitars, but it can also be very effective
when used on vocals – just ask Nine Inch
Nails frontman Trent Reznor. Used subtly,
it can spice up digital drum tracks or
loops, too, and some folks even love the
sound of fuzz bass.
Compression will leave you with an even
dynamic. Gentle compression will help two
parts sit together more naturally, or you can
use it to add more snap to your notes

92 | BEGINNER HOME STUDIO HANDBOOK
RECORDING | HOW TO RECORD ACOUSTIC GUITAR
For such a simple instrument, the acoustic guitar can be a tricky beast to record. Have no fear, though – our easy
step-by-step tutorial will show you how it’s done…
HOW TO RECORD ACOUSTIC GUITAR

BEGINNER HOME STUDIO HANDBOOK | 93
HOW TO RECORD ACOUSTIC GUITAR | RECORDING
Acoustic guitar is one of the
mainstays of modern music
and, alongside piano, it’s
one of the most popular
instruments for budding
musicians to learn to play –
and yet recording it can
be a fiddly business. Often, putting
a guitarist’s playing under the
microscope reveals limitations in the
instrument itself – such as tuning and
intonation – alongside inadequacies in
their playing, such as timing, string
noise and tuning again.
Whether any of this is a problem or not
depends on how important the guitar is
to your track, and you may be able to
mask some or all of these issues quite
easily – your DAW includes plenty of
audio editing tools, so through careful
comping and editing, it is possible to fix
iffy acoustic guitar parts to a certain
extent. Even so, getting things as good as
possible at the source should always be
your initial goal, since a well-recorded
guitar part will always sound better than
one that’s been edited into shape.
STRING THEORYACOUSTIC GUITARS come in a range of
shapes and sizes, including steel- and
nylon-strung and electro-acoustic with
pickups. In this in-depth feature we’ll
demonstrate how to approach all
of these, playing to each guitar’s
own strengths.
The size of the guitar itself influences
not only the sound, but also how easy it is
to record. Dreadnoughts and jumbos, for
example, are loud and can be boomy if
miked too closely near the sound hole.
By contrast, smaller ‘parlour’ sizes, or
the Little Martin types favoured by Ed
Sheeran, produce a more focused sound.
Strings come in various gauges, and
this will influence the sound as well as
how easy the guitar is to play. A mid
gauge has better projection for finger-
picking but can be tough for barre
chords, while the thinnest gauge can
sound fizzy with less body.
Finally, we should mention playing
styles. Strummed guitar can be pretty
loud, while finger-picking can be
surprisingly quiet. Either way, the goal
when recording guitar is to capture a
balanced sound, so super-close miking
may not always work. In essence, miking
a guitar is a trade-off between achieving
a balanced direct sound and picking up
some of the room ambience.
THE RIGHT SOUNDTHERE’S NO doubt acoustic guitars are
among the most tonally rich and
beautiful of instruments. It’s a stern heart
that can’t be melted by Salma Hayek’s
ode to Antonio in Desperado. This being
the case, it follows that the first step to
getting great acoustic guitar recordings is
getting a great acoustic guitar sound. To
the trained ear, different guitars, strings
and even plectrums can make a massive
difference to the sound. So before you go
any further, make sure things sound good
to your ears. If they don’t, there’s
absolutely no chance that you’ll be happy
with the recording, no matter how skilled
you are. Even if you have to sell your
stamp collection, get your hands on a
suitable guitar for recording.
THE RIGHT SPOTACOUSTIC GUITARS are generally heard in
real spaces and have long release times
that blend brilliantly with natural reverb.
Consequently, overly dry signals will
sound dull and lifeless in a way that few
conventional algorithms can repair, and
it’s this failing that most commonly
singles out bedroom recordings. The
solution, as with most recording
techniques, is simple: pick a brighter
spot. You want a large room, preferably
with wooden floors and hard surfaces.
If your floors are carpeted, try putting
some MDF under the player, or change
the room. And be sure to place your
player near some reflective surfaces.
RATTLE AND HUMFINALLY, THE only right place for guitar
recordings is as far away as possible from
shirt buttons, jean studs, belt buckles,
zips, belly button piercings, watches and
just about anything else that might bash
against the guitar body and ruin an
otherwise perfect take.

94 | BEGINNER HOME STUDIO HANDBOOK
RECORDING | HOW TO RECORD ACOUSTIC GUITAR
OUR BASIC acoustic guitar recording
technique is a combination of solid advice
and trial and error. However, we’ll keep
the latter within pretty tight limits, so you
should get the right result pretty quickly.
What we’re describing certainly isn’t the
only way of doing things, but it is a reliable
one, and although we’ll cover various
multi-mic options later, this simple,
effective technique uses just one mic.
In terms of microphone type, the best
option is a cardioid condenser, which,
being directional, keeps most of the room
ambience at bay. Also, being quite
sensitive, it will serve for both strumming
and picking duties. Whether you use
large-diaphragm or small-diaphragm
mics is a matter of taste, although the
large-diaphragm will more likely have a
nice ‘curve’ to its frequency response,
emphasising upper mids and high
frequencies, while the small-diaphragm
will be flatter. As an aside, if you want
a more earthy sound you can use a
dynamic mic, but these can be a bit too
crunchy in the mid frequencies and are
less sensitive, resulting in more gain and
noise at the mic preamp stage.
The basic miking process, then, is as
follows. Get the guitarist sat down and
playing, preferably on a chair or stool that
doesn’t move or make any noise. Look at
the guitar between the point where the
neck joins the body and about halfway
across the sound hole. The width of the
fretboard, and a few centimetres above
and below it, is your golden area for
miking. Moving towards the sound hole
will give you a bigger sound, while moving
towards the neck will deliver a smaller
sound. Upwards, towards the low strings,
will be bassier; lower, towards the high
strings, will result in a brighter tone.
This just leaves distance as a
consideration, and that will depend on
the style of playing and how much room
ambience you want to capture. For quiet
finger-picking you can go right in to 20cm.
For strumming, start at about 30-40cm.
Finally, be aware that hard floors
in smaller rooms can produce quite
dominant early reflections. If these get
too unpleasant, position the guitarist and
microphone on a rug or mat.
BASIC TECHNIQUE

BEGINNER HOME STUDIO HANDBOOK | 95
HOW TO RECORD ACOUSTIC GUITAR | RECORDING
STEP BY STEP ACOUSTIC GUITAR RECORDING FUNDAMENTALS
1 First, select a suitable microphone. Here we’re using a quality large-capsule
tube cardioid condenser, which we know has a slightly enhanced top end. For
a flatter response, a small-capsule cardioid can be better. Remember, this mic
includes its own power supply, but regular condensers use phantom power, so
make sure your mic preamp is suitably equipped.
3 With the main position established, it’s time to decide how close to get. For a
really intimate sound you can go right in to 20cm, but for most situations
keeping the mic about 30-40cm away will be absolutely fine. How ambient this
sounds will depend on the room, but in a small room early reflections can be quite
obvious, even at 40cm.
2 Our basic technique requires miking up the sweet spot, which is roughly from
where the neck joins the body to about halfway across the sound hole. Right
in the middle of this spot will usually suffice, but with a boomy guitar you may find
that moving further towards the neck reduces the low frequencies. Don’t be afraid
to experiment by moving the mic aroud within these areas.
4 Finally, when close miking, tiny positional changes can be significant, so
angle the mic either towards the bass or treble strings to change the overall
guitar sound at source. By the same token, encourage your guitarist not to shift
position – or capture all your takes in one sitting. Keeping a reference photo of the
playing position can be handy.
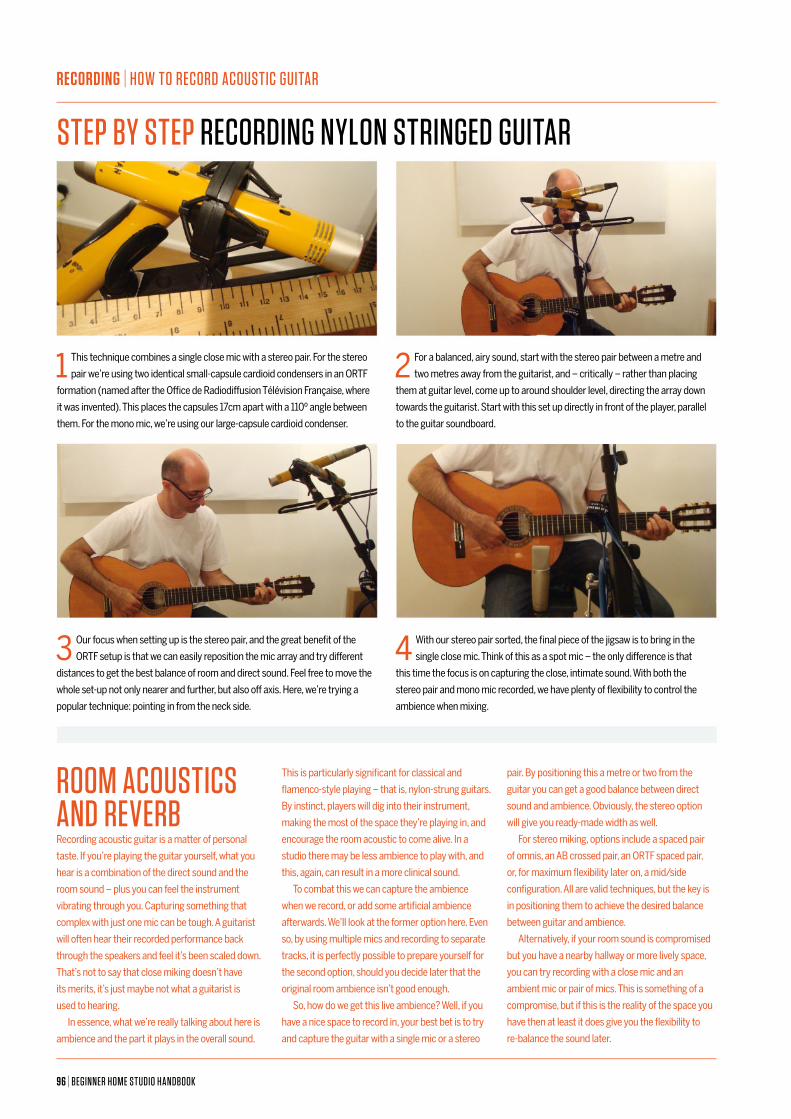
96 | BEGINNER HOME STUDIO HANDBOOK
RECORDING | HOW TO RECORD ACOUSTIC GUITAR
STEP BY STEP RECORDING NYLON STRINGED GUITAR
1 This technique combines a single close mic with a stereo pair. For the stereo
pair we’re using two identical small-capsule cardioid condensers in an ORTF
formation (named after the Office de Radiodiffusion Télévision Française, where
it was invented). This places the capsules 17cm apart with a 110º angle between
them. For the mono mic, we’re using our large-capsule cardioid condenser.
3 Our focus when setting up is the stereo pair, and the great benefit of the
ORTF setup is that we can easily reposition the mic array and try different
distances to get the best balance of room and direct sound. Feel free to move the
whole set-up not only nearer and further, but also off axis. Here, we’re trying a
popular technique: pointing in from the neck side.
2 For a balanced, airy sound, start with the stereo pair between a metre and
two metres away from the guitarist, and – critically – rather than placing
them at guitar level, come up to around shoulder level, directing the array down
towards the guitarist. Start with this set up directly in front of the player, parallel
to the guitar soundboard.
4 With our stereo pair sorted, the final piece of the jigsaw is to bring in the
single close mic. Think of this as a spot mic – the only difference is that
this time the focus is on capturing the close, intimate sound. With both the
stereo pair and mono mic recorded, we have plenty of flexibility to control the
ambience when mixing.
ROOM ACOUSTICS AND REVERBRecording acoustic guitar is a matter of personal
taste. If you’re playing the guitar yourself, what you
hear is a combination of the direct sound and the
room sound – plus you can feel the instrument
vibrating through you. Capturing something that
complex with just one mic can be tough. A guitarist
will often hear their recorded performance back
through the speakers and feel it’s been scaled down.
That’s not to say that close miking doesn’t have
its merits, it’s just maybe not what a guitarist is
used to hearing.
In essence, what we’re really talking about here is
ambience and the part it plays in the overall sound.
This is particularly significant for classical and
flamenco-style playing – that is, nylon-strung guitars.
By instinct, players will dig into their instrument,
making the most of the space they’re playing in, and
encourage the room acoustic to come alive. In a
studio there may be less ambience to play with, and
this, again, can result in a more clinical sound.
To combat this we can capture the ambience
when we record, or add some artificial ambience
afterwards. We’ll look at the former option here. Even
so, by using multiple mics and recording to separate
tracks, it is perfectly possible to prepare yourself for
the second option, should you decide later that the
original room ambience isn’t good enough.
So, how do we get this live ambience? Well, if you
have a nice space to record in, your best bet is to try
and capture the guitar with a single mic or a stereo
pair. By positioning this a metre or two from the
guitar you can get a good balance between direct
sound and ambience. Obviously, the stereo option
will give you ready-made width as well.
For stereo miking, options include a spaced pair
of omnis, an AB crossed pair, an ORTF spaced pair,
or, for maximum flexibility later on, a mid/side
configuration. All are valid techniques, but the key is
in positioning them to achieve the desired balance
between guitar and ambience.
Alternatively, if your room sound is compromised
but you have a nearby hallway or more lively space,
you can try recording with a close mic and an
ambient mic or pair of mics. This is something of a
compromise, but if this is the reality of the space you
have then at least it does give you the flexibility to
re-balance the sound later.

BEGINNER HOME STUDIO HANDBOOK | 97
HOW TO RECORD ACOUSTIC GUITAR | RECORDING
STEP BY STEP RECORDING A DI GUITAR SIGNAL
1 Let’s assume we’re aiming to record an electro-acoustic via both a single mic,
as described earlier, and the direct feed from its pickup. Here we’ll cover the
pickup aspect only, since we’ve already covered the mic part. Stage one is to
connect up to our preamp, either via a high-impedance input/DI or a line input
if the impedance is suitable.
3 You’ll also find that the active preamp includes its own EQ settings. These
are tailored for acoustic guitar, and are great for shaping low and high
frequencies. Even so, if you’re using a decent preamp, why not continue to shape
the sound there?
2 Our guitar includes its own battery-powered preamp circuitry. It’s always
wise to check that the battery is fresh – if it isn’t, you’ll probably notice some
distortion in the signal. These active designs can usually handle different preamp
inputs, but be prepared to adjust the volume output based on the type of input
you’re using.
4 Finally, when combining DI and mic signals, the mic signal can be delayed
slightly, resulting in frequency cancellations when you combine the two.
There are some hardware solutions for fixing this, or you can live with it while
recording and use a track delay setting or phase rotation plugin when mixing.
ELECTRO-ACOUSTIC GUITARS are often viewed
as having poorer sound quality, but we
now see far more guitars factory-fitted
with decent pickups from companies like
Fishman and LR Baggs. Sometimes, the
plug-and-play convenience is welcome,
particularly if isolation is an issue.
Electro-acoustics can vary a great deal
in their technical configuration, with
options including both passive and
active transducers, the latter often
accompanied by a battery-powered
preamp, complete with onboard EQ.
Further options include retro-fitted sound
hole pickups and transducers with
accompanying internal mics. Electro-
acoustic pickups are designed for stage
playing, so you’d expect to plug them into
guitar amps or PAs. However, output
impedances vary, and you may need to
step these down prior to plugging into
your mic preamp. You can do this with a
DI box or high-impedance instrument
input on your mic pre. Output
impedances vary from high for passive
designs to more regular impedances for
active designs, so for the latter, you can
often plug straight in at line level. If you do
have a bad impedance mismatch, it will
usually manifest itself as distortion.
From a creative perspective, the DI
signal can be quite useful, providing a
tight, edgy and upfront sound that can
blend pretty well with a miked sound. The
only thing to bear in mind is that there will
be slight timing differences between the
mic and the DI, and it will be necessary to
shift one slightly. The other thing to bear
in mind is that the transducer signal can
be worked at source on the active
controls, or on your mic pre using EQ. If
you’re confident in your EQing abilities,
why not sculpt the sound straight off?
In the tutorial below, we’re going to
assume you’ve got a handle on basic mic
technique already and focus solely on the
DI, with a view to blending the two signals
for the final guitar sound.
RECORDING ELECTRO-ACOUSTIC GUITAR

98 | BEGINNER HOME STUDIO HANDBOOK
RECORDING | HOW TO RECORD ACOUSTIC GUITAR
STEP BY STEP MID/SIDE STEREO MIKING
3 Our focus here is slightly different to that for the classical guitar, as we want
our central mic to capture the direct sound much like a spot mic. So, we’re
back to setting the mic array up at the same level as the guitar rather than at
shoulder height. Once again, for hard floors, a mat or rug can tame unwanted
early reflections.
1 If your acoustic guitar is a featured instrument destined for its own space in
the mix, it can be a good idea to record it in stereo. Stereo techniques are
many and varied, including an X/Y pair (pictured) and the classic ORTF technique.
For our steel-strung acoustic we’re using mid/side, as it allows us to adjust the
ambience balance when mixing.
5 One downside with M/S is that the two signals are effectively encoded when
recording, and need decoding to be heard in stereo. This means that
monitoring how it sounds requires decoding just for monitoring purposes. You
can do this by splitting the figure-8 signal using two channels, phase-reversing
one side and balancing with the mid signal.
4 As an M/S setup combines the two separate mic capsules, it’s important
when setting up to get the capsules as close as possible. You should focus on
where the actual capsules are within the headstock, and if you do M/S recording
regularly, there are also a number of special M/S-only single-point mics that are
worth considering.
2 To record in M/S you need two different types of mics: a figure-8 for the sides
and a cardioid for the middle. The next stage is to set up the mic array in a
coincident formation, ready to position. Although we’re using a large-capsule
mic for our figure-8, a ribbon mic can also be an excellent choice if you can get
hold of one.
6 More purpose-built options for this particular job include hardware decoders
(you’ll often find these on location mixers) and the many plugin decoders
on the market. Here we’re using the freebie MSED from Voxengo. By putting this
on a stereo auxiliary and panning and routing both tracks, we get an instant
L/R decode.

BEGINNER HOME STUDIO HANDBOOK | 99
HOW TO RECORD ACOUSTIC GUITAR | RECORDING
Give these ideas a shot to get the recorded tone you’ve always dreamed of…
1 FINGERS OR PICK?Alternate between picking and fingering
techniques when recording – does one sound
better on the recording than the other? And if
picking seems too obtrusive, does moving the
microphone help?
2 TRY A DIFFERENT GUITARWhether you choose from your extensive
collection, or you borrow a guitar from a mate,
it’s worth trying at least a couple of different
guitars when recording: they can sound
radically different.
3 PRACTICE MAKES BETTERThis is obvious. If you know what you’re
playing and you’re playing it confidently, it
will sound better by default. If you don’t, it
won’t and all the tonal ‘trouble’ you’re having
will snowball.
4 BE AWARE OF REFLECTIONSWhat’s beneath you, to your sides and
above you when recording? For example,
you’ll notice that recording on a hard floor
sounds very different than when you’re on
a thick carpet, because of the reflected
10
PRO TIPS
sound (or not) coming back to the microphone.
Experiment, listen, learn – you don’t have to kill the
reflections, but you do have to be aware of what
they’re doing.
5 SOMETIMES, LO-FI WORKSJez Williams, Doves: “Sometimes, in the studio,
I like the [acoustic] guitars to sound quite trashy,
like an early Bowie sort of sound, and you can get
that by using dictaphone microphones, and
blending it with an expensive mic signal. It puts a
load of middle crunch on it.”
6 TRY A DIFFERENT PLECTRUMIf you’re layering a strummed rhythm part,
try using a thin plectrum. Different thickness
picks can have a remarkable effect on tone, so
before you stampede for the EQ knobs or buy
that expensive mic, first try shelling out 79p on
a thin pick.
7 EQ GENTLYIf you find you’re needing to EQ things radically,
you probably have a fundamental issue with
microphone choice and placement. Get that right
in the first place and you’ll save yourself a great
deal of work.
8 CUT BASSYou might like your acoustic all fat and bassy. It
can be good when solo, but it’s a problem in a band
mix because the acoustic may clash with the bass.
Try rolling off frequencies below 100Hz, creeping
up to around 350Hz to taste. Notice how mixing
just got easier?
9 FLOCK OF SEAGULLS?If you’ve ever tried to mic up a guitar with
brand-new strings, you’ll know all about finger
noises: we call them seagulls. To avoid them, get a
good few hours on the strings before recording.
Coated strings can reduce squawks too.
10 JUST FEEL ITDan Auerbach, The Black Keys: “I just put the
mic in front of me, it really doesn’t matter. Some of
my favourite acoustic sounds are field recordings, a
really cheap mic picking up the vocal and the
acoustic. I don’t like perfection; it really bores the
s**t out of me.”

100 | BEGINNER HOME STUDIO HANDBOOK
RECORDING | RECORD YOUR ELECTRIC GUITAR
Recording killer guitar parts the right way doesn’t have to be taxing, as this guide will show you
There’s a difference between
recording electric guitars and
acoustics. How? You’ll most
likely be miking up an amp,
for starters, though many of
the same ideas can apply.
Either way, the goal is to
produce a great sounding, well played,
well captured performance. There are
many ways of achieving your desired
sound, and of getting that sound into
your computer or recording device.
Over the next few pages we’ll discuss
how to find the right method for you,
and how to get a first take underway.
Guitars are like many other instruments,
in that getting them to sound right starts
with the instrument itself – and if that
instrument is amplified, the amp will also
play an important role in the equation.
So, even if you’re not a guitarist, it still
helps to know that a guitar with twin-coil
pickups (say, a Gibson Les Paul) will
produce a thicker tone than one with
single-coil pickups (like a Fender Strat).
At the same time, a rock-style amp, such
as a Marshall, will have a crunchier tone
than a Fender. For bass, a MusicMan will
produce a smoother tone than a Fender
Precision, with its more upfront sound.
A quality, in-tune instrument with
decent pickups and fresh strings, played
well and plugged into a decent amp, will
sound excellent at source, but chip away
too much at each of those variables and
you will find that the results may begin to
deteriorate rapidly, irrespective of how
you record them.
Beyond that, there’s a vast range of
other things for you to consider when
recording, including not just how to
record (mic, DI or both) but also what
to record (effects, overdrive, room and
so on). There’s an awful lot to learn, so
let’s get busy recording your electric!
RECORD YOUR ELECTRIC GUITAR

BEGINNER HOME STUDIO HANDBOOK | 101
RECORD YOUR ELECTRIC GUITAR | RECORDING
RECORDING WITH AN AMP AND MICSFIRST OF all, you’ll want to decide whether
recording with an amp and mics is right
for you. The pros: great tone if you get it
right; it‘s simple; great player feedback.
The cons: the noise can be disruptive;
you have to live with the sound forever;
it requires lots of space; good amps and
mics can be expensive.
LISTEN CLOSELYGET YOUR amp sounding right in the room
first. Spend a bit of time thinking about
the kind of sound you want to achieve
and listen objectively. This is the time to
experiment – getting it right at the first
stage will make miking a lot easier. Try
your amp in different areas of your room
at the volume you’re going to record at.
Sweep your amp’s tone controls through
their range while playing and stop each
one when it sounds right. Once you have
set up your sound, it’s time to position
the microphone.
GET CLOSEMANY ENGINEERS like to close-mic amps and
cabs with a dynamic mic. Believe it or
not, placing the mic at different points in
front of your speaker has a huge effect on
the sound you capture. Start with the mic
placed one-three centimetres away from
the grille, pointing halfway between the
centre and edge of the speaker. Moving
the mic by just a couple of centimetres
will change the sound. As a general rule,
miking the centre gives you a bright
sound, while moving the mic towards the
edge of the cone makes things sound
darker. Moving the mic away from the
amp introduces ambience to the sound.
MAKE YOUR MARKONCE YOU’VE found the position in which
you’re going to place the mic, use some
tape (any kind is fine as long as you can
easily see it) to mark the exact spot on
the speaker grille. This will save you much
time if your mic gets moved during the
recording and you need to reposition it.
Obviously, if you’re using a cab without
a grille, it’s advisable to skip this step.
SHED SOME LIGHTIF YOU can’t see through your amp’s
speaker grille, carefully feel around
the edge of the grille to work out where
it’s positioned inside the cab. Another
option involves shining a torch through
the grille cloth. When doing this, you
should be able to make out the outline
and centre of the speakers.
DUAL MICSBOTH DYNAMIC and condenser mics are
suitable, and a cardioid pattern is
advisable. With very close miking you
may also be able to gain some proximity
effect to bolster those low frequencies.
For more flexibility, it’s also possible to
use a pair of coincident mics, blending
them to achieve various different sounds.
And for ambience, you can add in a room
mic, too. Be prepared to use additional
room damping or set up a dead isolation
space for the amp, though. And just bear
in mind that loud overdriven guitar, of
which feedback is part of the sound,
requires physical proximity of the guitar
player to the amp, so you’ll need to put
the player in the room with the amp and
then have them wearing a pair of loud
headphones for monitoring.
DON’T SOLOWHEN YOU’RE trying to carefully balance the
instruments in your mix, you will need to
listen to each of them in isolation from
time to time. However, when you make
tonal adjustments to a specific part,
always check to see how it sounds in
context with the other tracks in your
song. Sometimes, what sounds right on
its own won’t fit in a busy mix.
LOSE THE BASSDON’T TRY and cram a load of low-end in on
the guitar. It’s got to have some low-end,
obviously, but the bass guitar needs to
have its space as well.
STEP BY STEP BASIC SINGLE MIC TECHNIQUE
1 Grab a good quality dynamic mic and seek out
the speaker cone. Here we’re using a torch to
pinpoint where the cone is. As you can see, the
centre of the cone is quite small. With this found, we
can now set our mic up pointing right at the centre.
3 The speaker tends to be set back from the cloth,
so even if you’re up against it you’ll still be about
ten centimetres from the cone centre. Even at this
distance the sound can be harsh, so try starting up
to 20 centimeters from the cloth. Here you’ll find
small changes in mic position have less impact.
2 Imagine a horizontal line through the centre of
the cone and try different mic positions, moving
towards the outer edge. You’ll get an increasingly
mellow tone, with the cone centre becoming slightly
off-axis. To make it more so, angle the mic away.
4 Finally, if things aren’t working, don’t be afraid
to try a different type of mic – such as a ribbon
mic, which will give you a nice smooth tail-off in the
high frequencies – or you can adjust the amp sound.
Here we’re modifying our amp tone controls to
deliver a warmer tone.

102 | BEGINNER HOME STUDIO HANDBOOK
RECORDING | RECORD YOUR ELECTRIC GUITAR
STEP BY STEP TWO MICS ARE BETTER THAN ONE… SOMETIMES
1 There are various ways you can approach using two mics on an amp, including
spaced stereo pairs. However, our technique actually uses a coincident pair of
different mics with the goal of blending them into a mono signal at the mixdown
stage. By balancing the two mic characteristics, you can achieve many sounds.
3 This is a coincident technique, so the capsules must be as close to each other
as possible and pointing in the same direction. The idea is to minimise phase
cancellation when they’re balanced evenly. If necessary, set up a cue mix, put on
some cans and move the mics while the guitarist plays to help find the sweet spot.
5 Next, route each mic to its own track and get their levels closely balanced.
This requires a bit of trial and error, but essentially you adjust the mic pre
gain for each with your faders at unity or equal gain. Then you can rebalance
the monitor faders to hear how different blends affect the tonality.
2 The first step is to choose your mics and get them set up. We’re using our
trusty Shure SM57 for upper-mid articulation, and a valve condenser for
low-frequency proximity and a more ‘hi-fi’ top end. Both mics should occupy
the close-in position that we used for our single-mic technique.
4 Much like our single-mic technique, you’ll still need to position the pair of
mics in relation to the speaker cone. It can be tough making this uniform if
the mics are side by side, so we’re actually putting one above the other. Now,
when we move the whole array towards the cone edge, there’s more consistency.
6 Finally, with our two tracks recorded, we can further explore the multitude of
sounds available. It may be that we opt for just one of the mics on its own, or
we might just blend in a tiny amount of the second. We can even phase-reverse
one track to create further interesting combinations.

BEST OF BOTH WORLDSSo far we’ve recorded one or two mics, possibly
blended prior to recording, but essentially we’ve
been capturing the guitarist’s live sound. However,
there is another option, which involves recording a DI
(direct injection or direct input) signal either in
isolation or in conjunction with the miked sound.
So what are the advantages of this approach?
Well, first of all, if you split the DI immediately after
the guitar or bass output you have a completely
clean signal that you can blend in with the amped
sound, reprocess or even use on its own. You may
think that this last option sounds absurd, but with
bass guitar, a clean DI’ed sound can often be worked
effectively with some EQ and compression into the
punchy, tight low-end glue a track needs. And if
you’re after funky, clean picked guitar, a DI can be
just the ticket for that as well.
As noted, you can blend the DI with an amped
sound for more clarity, or even use it as a re-amping
source. Re-amping gives you the flexibility to compile
a number of takes and
then send the clean DI
source back out to an
amp. Of course, you’re
then free to try out all
sorts of different amps,
mic positions and so on.
This is a tried and tested
technique that predates
software amp simulations.
And speaking of amp sims, those, too, are of course
an attractive reason for recording a clean DI (see
Software Amp Modelling, later in this feature).
It’s worth noting that DIs can be taken at other
points in the signal chain – after the guitarist’s pedal
board, for example. You’ll also find amps (particularly
bass amps) with DI outputs onboard, and these can
be useful if you want to capture the drive of the input
section. Be careful, as the DI can be tapped from
various different places in the preamp, including
before and after any EQ or onboard processing, or be
artificially enhanced to sound like it’s been through a
speaker. Either way the amp sound, particularly for
guitars, is heavily influenced by the speakers, so
tapping the signal just before that can sound odd.
Finally, you might find that blending DI and miked
signals may highlight a slight delay between one and
the other. If this occurs, you’ll need to delay or phase
rotate one of the signals to get things working, as
switching the polarity of one signal is usually too big
a change to be effective. There are some hardware
units that can do this, but this part of the process is
best left until you’re mixing.
DIs can be taken at any point in the signal chain, after the guitarist’s pedal board for example
BEGINNER HOME STUDIO HANDBOOK | 103
RECORD YOUR ELECTRIC GUITAR | RECORDING
STEP BY STEP DI SPLIT RECORDING
1 The most obvious point at which to DI your signal is immediately after the
guitar output, using the DIs balanced out to feed the mic input of your mic pre
via an XLR lead, and the pass-through connector to continue the signal to pedals
and amp. (Note: our DI is active and powered by phantom power or battery.)
3 We also have a guitar multi-effects unit and preamp modeller in our chain.
Here we’re using it solely for its effects (chorus, delay, and so on), and it’s
connected to the effects loop of the amp. So, with our DI split prior to the amp
and effects loop, we get a clean DI but still hear the effects via the amp.
2 Some pedals work well at source – wah-wah is the perfect example of this as
the playing and pedal interaction are vital to the overall effect. Here we’re
taking our DI split straight after the wah and prior to the guitar amp, so that the DI
will include the wah-wah effect but nothing else later in the chain.
4 It’s worth checking out the options offered by your amp. Ours gives us a
post-preamp DI feed and a post-preamp ‘recording compensated’ output.
The latter is lower-level but also has a thinner sound than the DI, so each can have
its uses, as long as we’re aware of how they sound and take that into account.

104 | BEGINNER HOME STUDIO HANDBOOK
RECORDING | RECORD YOUR ELECTRIC GUITAR
PRE-PROCESSING ELECTRIC GUITARMOST GUITARISTS and bass players sculpt
their sound at source using pedals and
their amp’s onboard EQ, reverb, drive and
so on. But when recording, you have to
ask yourself which of these elements
could be problematic when mixing and
which you might be able to improve on
using better plugin effects. So, which bits
should you record, and which parts would
it be better to bypass?
As a general rule, though, try to avoid
too much reverb. You could be recording
some spring reverb-drenched surf guitar
à la Dick Dale, but being tied to a fixed
reverb balance can be pretty tough when
mixing. So, the first step is to make sure
the reverb is turned down or off.
Next, it’s delays and modulation. Delay
can have a huge influence on the way a
guitarist plays (think of U2’s The Edge,
for example), particularly when tempo-
synced. The best advice here is to simply
not record these sorts of delays with the
signal. By tapping the DI off prior to the
delay, the player will still hear the effect
via the amp.
Modulation effects such as chorus are
less time-critical. If you have a great-
sounding chorus or phaser pedal that’s
integral to the sound, consider recording
it with the signal. Tone-shaping effects
like wah-wah tend to be inextricably
linked to playing, so we would advise
recording these as part of the signal
unless you’re confident that you have the
tools and skills to replicate them later.
DRIVE TIMETYPICALLY, DRIVE is added by both distortion
pedals and preamps. Many amps allow
you to tap a DI off after the preamp stage,
but these can sound edgy. If you do want
drive in your recorded signal, use a pedal
for it and tap the DI off straight after.
Compression and EQ can both play an
important role in the source sound, and
bass players often squash their tone to
deliver a more consistent feel. This can
be a bit extreme, but don’t discard it
outright. Often, it’s best to go for a more
conservative version of their sound, and
pre-process with better-quality outboard
EQ and compression if available.

BEGINNER HOME STUDIO HANDBOOK | 105
RECORD YOUR ELECTRIC GUITAR | RECORDING
1 It may seem counter-intuitive, but miking the back of a guitar cabinet as
well as the front is a great way to get a slightly different sound. For this
technique you will need an open-backed amp such as a typical combo, and two
microphones. You should move the cabinet away from the wall to minimise
unnecessary early reflections.
3 In this position, your rear mic is picking up a phase-inverted version of the
front mic to some degree, as the cone will be moving away from the rear mic
when it’s moving towards the front mic. It’s good practice to phase-invert the rear
mic at source. If you can’t do this, make a note that it needs inverting on its track.
2 The positioning for the front mic should be the same as in our standard
single-mic technique. The rear mic can be harder to position, though – you’ll
typically find the amp’s valves in the corresponding space at the rear of the amp,
and in an all-valve amp they’ll be large and hot. Even so, try and access the rear of
the cone at the same position and distance as your front mic.
4 If you have the option to monitor the two mics with one phase-inverted, you
will appreciate the range of sounds you can achieve by balancing them in
different ways. At times, the scooped hollow nature of just the rear mic itself can
also be pretty usable.
STEP BY STEP MIKING THE BACK AND FRONT OF THE AMP
RE-AMPINGWhile we’re on the subject of DIs, another great technique is re-amping. By sending the same DI from your
DAW back to an amp or pedal chain, you can mic up the results and tweak settings while judging the results
in context. Probably the most indulgent option is to set up the pedals and amp head in the control room, with
the cabinet isolated elsewhere. However, to achieve this successfully with correct impedance matching and
minimal noise, you will need a suitably equipped DI box (check out units from Radial and Little Labs).
Finally, another slightly odd-sounding technique that can be particularly good for rhythm guitar is to
actually mic up the electric guitar strings, as if the guitar were an acoustic. This adds extra poke and attack
to the sound that you can blend with the amp into mono, or even pan against the amp sound. The only thing
to remember here is that you’ll need to isolate the amp in another room in order to avoid spill.

106 | BEGINNER HOME STUDIO HANDBOOK
RECORDING | RECORD YOUR ELECTRIC GUITAR
SOFTWARE AMP MODELLINGUP UNTIL now we’ve focused on capturing
your guitar sounds through your amp
with a mic or via DI. Of course, these
methods aren’t going to be practical for
everyone. If you’re planning on recording
at unsociable hours, or you can’t crank
an amp at home, amp modelling could
be your new best friend.
One of the benefits of software amp
modellers is that they keep everything
inside your computer, meaning that you
can run multiple instances of them
(computer power permitting). And the
best thing? You can tweak your settings
after you’ve recorded your guitar sounds.
Most software will be set up to record
the sound coming in from the interface
as a dry track. So even though you are
hearing the sound of your guitar being
fed through a virtual amp, it’s actually
being added when you play back, rather
than to the recorded file. This means your
sound remains totally flexible throughout
– a bit like re-amping. But tread carefully
here, because it’s easy to get caught up in
endless tweaking!
On the plus side, there are hundreds of
available sounds, recording is silent, it’s
space efficient, and you can change
sounds after you have recorded. And the
cons? It requires a powerful computer;
there’s less player feedback than you’d
get from a ‘real’ amp; it can sound
processed and artificial.
HOW TO STEAL THAT SOUNDEver heard a gorgeous guitar tone and
then spent ages tweaking your EQ controls
to try and match it? By using an EQ with
an analyser it’s possible to quickly get into
the right tonal ballpark you’re aiming for.
Firstly, import the audio track of the
guitar sound you like into your DAW.
Next, select an EQ with an analyser, or you
could choose a spectrum analyser plug-in
(most DAWs have one included these days).
Play the track and take a good look at the
EQ curve. Then, try to match it with an EQ
plug-in on your own guitar track. It won’t
tell you things such as pickup type, tuning
or gain settings, but you should be able
to get pretty close.

BEGINNER HOME STUDIO HANDBOOK | 107
RECORD YOUR ELECTRIC GUITAR | RECORDING
1 The electric guitar has a relatively low output
volume so, in order to provide some boost, you
will need to connect it to the hi-Z (hi-impedance) or
instrument input on your soundcard. Now, select
and arm the corresponding input in your sequencer
for recording. The guitar is mono, so we’ve set our
audio track to record only the left channel.
4 Now that you’ve got a healthy signal, record all
of your takes without adjusting the input gain
settings. If you want to record a louder or quieter
section, follow the previous steps again to ensure
your signal remains at the optimum level. If you want
to record an entire song in one pass, set the input
gain for the loudest section.
2 The input meter should register your playing.
You’ll need to adjust the gain control on your
soundcard to accommodate the type of material
you want to record, whether that’s a rather heavily
strummed chorus or a softer, picked intro. Play the
section a little harder than you normally would and
increase the gain until it peaks constantly.
5 After each take, listen back to the recording to
make sure no digital clipping has occurred, and
also check that the signal was strong enough to
mask any background hum that may have been
present. Finally, zoom in on the waveform for a visual
reference. Note that the signal is healthy throughout
our take, yet it isn’t slammed up to 0dB.
3 Once your signal is clipping, gradually reduce
the input gain until only one or two peaks
register. Now, play the section normally and be sure
to check that the input level never goes into the red
– if it does, reduce the input gain by a small amount
only, play your sequence again and then check to
make sure that no peaks occur.
6 Now you can employ your favourite amp
simulator and add effects. We didn’t put any
additional strain on our computer’s CPU during
recording by applying effects. With the recording
finally done, you’re free to use compression, reverb
and anything else your heart desires to sweeten your
epic guitar take!
STEP BY STEP GETTING YOUR GUITAR INTO THE COMPUTER
TRADITIONALLY, ENGINEERS miked up acoustic
guitars or amplified electrics. Since the
advent of amp simulators, we can bypass
this process and concentrate on getting a
healthy guitar signal straight into the
computer without having to resort to a
multitude of outboard processors and
effects pedals.
These, of course, used to be recorded
onto the track itself and couldn’t be
changed afterwards, which meant your
sound had to be perfected before
recording. Nowadays there’s no need to
spend hours setting up your gear – you
can focus on getting your moments of
inspiration down and have all the time in
the world to reconfigure the sound once
it’s inside the computer.
Needless to say, your guitar still needs
to be set up properly and tuned before
each and every take. Quality cabling is
also vital, to carry your signal from the
guitar straight to the computer without
degradation or interference. Lastly, your
soundcard – which works to convert the
analogue signal of the guitar into a digital
one – should be the best you can afford,
although it needn’t be extortionate if
you’re recording one instrument (or
vocal) at a time.
But if you’re not getting the best signal
into your sequencer, then a brilliant
performance can be ruined, no matter
what sonic trickery is employed at a later
stage. Our goal, then, is to record a strong
signal to mask any background hum, yet
one that never reaches 0dB or suffers
from digital clipping. Below, we explain
how to do it…
Getting a good signal from guitar to computer is absolutely essential, so here’s how to do it right
LEVELLING UP
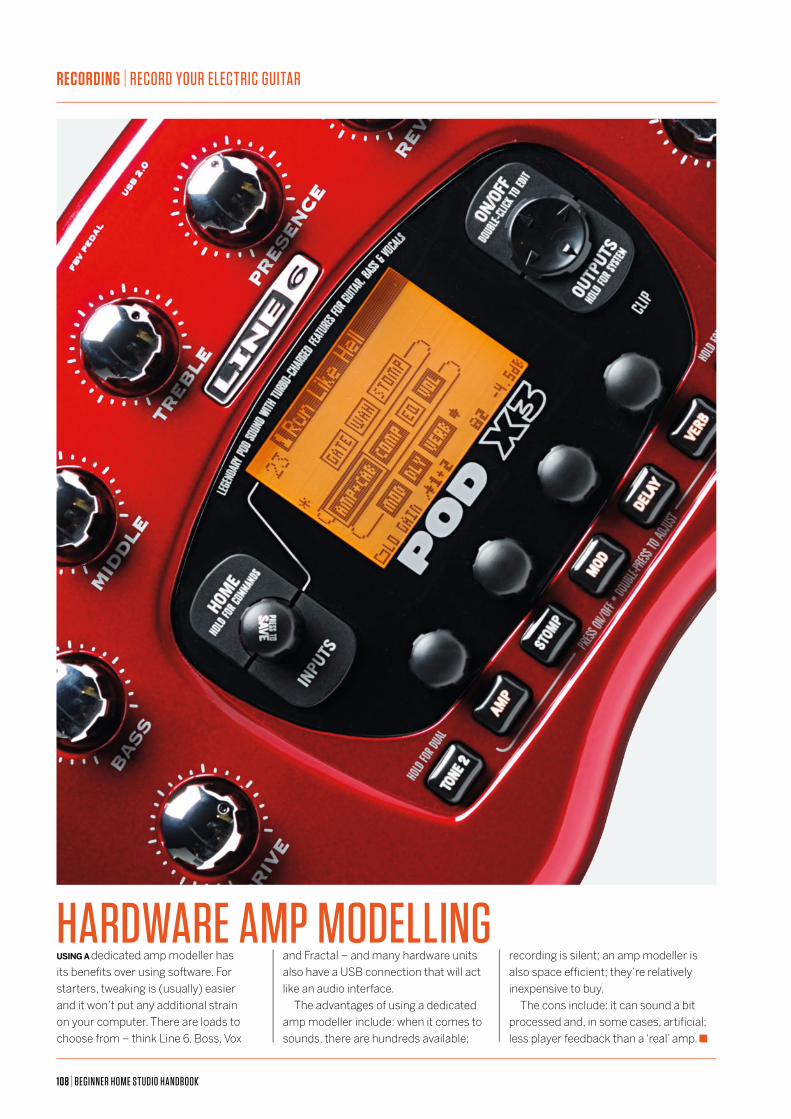
108 | BEGINNER HOME STUDIO HANDBOOK
RECORDING | RECORD YOUR ELECTRIC GUITAR
HARDWARE AMP MODELLINGUSING A dedicated amp modeller has
its benefits over using software. For
starters, tweaking is (usually) easier
and it won’t put any additional strain
on your computer. There are loads to
choose from – think Line 6, Boss, Vox
and Fractal – and many hardware units
also have a USB connection that will act
like an audio interface.
The advantages of using a dedicated
amp modeller include: when it comes to
sounds, there are hundreds available;
recording is silent; an amp modeller is
also space efficient; they’re relatively
inexpensive to buy.
The cons include: it can sound a bit
processed and, in some cases, artificial;
less player feedback than a ‘real’ amp.

BEGINNER HOME STUDIO HANDBOOK | 109
RECORD YOUR ELECTRIC GUITAR | RECORDING
Tuner
Strings
Picks
E-bow (magnetic device for infinite sustain)
Straps
Strap locks
Capo
Bottleneck (for playing slide guitar)
Guitar stand
Cables
Fuses
9v batteries
Chord book
Well stocked iPod for reference; there are some
great phone apps, too – check out Guitar Toolkit
TECHNIQUES FOR YOU TO TRYBy now you should have an idea of how you’re going to record your guitar. Here are some other ideas to boost your recordings...
LAYERINGVery few recordings these days are created using
only one guitar track for rhythm and one track for
lead. If you want your guitars to sound bigger, you
will need to start building up layers.
JAM WITH YOURSELFUnless you’re a robot, you will never play the
same part in the exact same way, and just as
multiple violins in an orchestra sound huge, the
tiny fluctuations in timing and tuning that occur
when double-tracking combine to create a
sense of fullness. Of course, you will want to play
the part as tightly as possible, and also tune up
between takes.
DOUBLE TRACKINGDouble-tracking is one of the most common and
simplest ways of beefing up your guitar recordings,
and if you’re not already doing it, prepare to be
enlightened. The principle is simple: record your
guitar part, then record it again. With two very similar
guitar tracks on separate channels, set them to equal
levels on your mixer. Pan one track hard to the left,
and pan one track to the right so they’re not taking
up the same sonic space, and you should find that
your whole sound becomes clearer.
VARY YOUR SETUPRemember what we said about small changes having
the biggest impact? By changing elements of your
setup in between takes, you can easily add a subtle
sense of variation to your tracks. Try a different
guitar, pickup position, pedal, mic (or mic placement)
to add further interest to your tracks.
DON’T CUT AND PASTEResist the temptation to simply cut and paste the
same audio take into multiple layers: it won’t gain you
anything. In fact, you could even end up taking away
from your sound’s fullness. This is because your
parts will be perfectly in sync with each other, and
they will contain the same harmonic information,
causing phasing. As the two parts coincide with each
other, you’ll notice certain frequencies start to
disappear, leaving you with a thin, swirly mess.
LOWER YOUR WATTAGETo get that cranked-amp sound at home volume
levels, it’s often better to drive a smaller amp harder.
Use cool-sounding smaller amps so that the actual
volume is not killing and destroying. What happens
to your ears when you hear something really loud?
They close down.
ESSENTIAL GUITAR TOOLKITYou’re not a real guitarist until you’ve got this lot and you know how to use it all

110 | BEGINNER HOME STUDIO HANDBOOK
RECORDING | BASS GUITAR: THE LOWDOWN
Whether recording or programming your parts, become an ace of bass with our guide to low-end production
When it comes to guitars,
it’s usually those of the
six-stringed variety that
tend to steal all of the
limelight. But without
someone solid holding
down the bottom end
and keeping things moving, guitarists
wouldn’t have the freedom to go off and
do their thing, making the bass guitar a
vital part of any band.
These days software enables us to
record, edit, tune, shape and manipulate
guitar sounds quickly and effectively, and
that includes bass guitar as well. Today’s
amplifier-modeling software emulates
such classic amp rigs as Ampeg’s SVT
(IK Multimedia Ampeg SVX) and more
boutique-style offerings like Mark Bass
(Overloud’s Mark Studio 2). These often
include bass-specific effects pedals as
well as cabinets, both contributing to the
overall sound achieved.
Great though these tools may be, they
aren’t going to be much use if your raw
bass sound isn’t up to scratch. Playing
style, instrument and strings, as well as
the amp and mic choice, pickup choice
and the quality of your preamp/DI
front-end, will all have an effect on the
final bass sound quality.
In this feature we’ll start with what
makes a good bass sound, and then we'll
move on to consider how you can refine
and even combine things to get the exact
sound you’re after. We’ll take a look at
bass-specific software, including the likes
of virtual amps and pedals, as well as
more esoteric plugins like phase shifters.
As well as processing recorded parts,
software can also provide you with the
raw bass tones themselves via sample-
based ROMplers – these are a godsend if
you don’t have a bass guitar or a bassist
yet still want to get a ‘played’ sound on
your final track.
Finally, with all that sorted, we’ll finish
up with a little info on mixing, focusing on
both the essential processes such as EQ
and compression, as well as additive
effects like reverb.
BASS GUITAR: THE LOWDOWN
DIFFERENT TYPES of bass each have their
own unique sound, character and genre
suitability. At the rockier end you've got
the thick, rounded Fender Precision (aka
‘P Bass’) and the edgy Rickenbacker
4000 Series; while for funk and pop
sounds there’s the refined upper mids
of the Fender Jazz and the punchy Music
Man StingRay. Beyond those you’ll find
a bewildering array of bespoke, modded
and visually stylish instruments by Wal,
Status, Warwick, Alembic and so on.
Many of them have five or even six
strings, extending the playing range,
tonality and technical complexity of the
instrument even further.
Pickup configurations also vary, and
this, along with the onboard tone controls
and choice of active or passive internal
electronics, further influences the sounds
that individual instruments can make.
A bass guitar generally comes from the
factory equipped with ‘round wound’
strings. These are much like the low
strings on a guitar, made of a solid core
with a thin wire wound around it, and they
produce the brightest sound. There are
also flat wound strings which elicit less
finger noise but aren’t as bright as round
wound, and thus are best suited to
fretless and double bass. Ground wound
offer a smoother alternative to round
wound, but tend to be pricier. Strings also
come in a range of thicknesses (gauge),
further influencing tone and sustain.
PLUGGING, PLAYING AND RECORDINGFOR AMPLIFICATION, you can use anything
from a cabinet with a separate head to a
single-speaker combo. The amp stage
can be super clean, overdriven, tube or
solid-state and invariably includes
tone-shaping. The sound you hear in a
room will depend on the way the room
interacts with the amp, and this will be
influenced by the volume you dial in. Low
frequencies also tend to cancel out in
untreated rooms, so you may find the
sound you get varies depending on the
amp’s position.
Your bass sound will also be affected
by the style in which it’s played. Finger
playing gives a solid legato sound; picked
playing, more percussive articulation.
The most percussive technique is slap,
which generates not only a mid-range
percussive sound but serious low-end
thump. There are ‘ancillary’ techniques
like slides, bends, hammer-ons and
pull-offs, the proficient delivery of which
can turn a simple bass part into a fluid,
pro performance. Playing near the bridge
can produce a brighter, pokier sound.
Recording highlights issues such as
tuning (check your tuning regularly) and
intonation, which concerns the tuning
consistency at different points along the
neck, and from string to string. Ensure
your bass has been set up properly.
Be aware that pickups can capture
buzz, hum and interference from phones,
monitors, lights and ground loops. You
might find that moving around reduces
this, while some amps include a ‘ground
lift’ option to fix ground loop problems.
Finally, playing inconsistencies such as
string scrapes can become very annoying
further down the line.
BACK TO BASS-ICS

BEGINNER HOME STUDIO HANDBOOK | 111
BASS GUITAR: THE LOWDOWN | RECORDING
1 Let’s kick things off here with a DI bass sound.
We have done some editing on the performance
because the timing is slightly out in places. We’ve
also gone for the picked sound as our starting point
because we like the brighter attack – it's more suited
to the sound and style we're after.
4 Now we set about adjusting the sound with our
pedal board. The first stop is the compressor.
With a fast (lower) Attack and Release, we can add
sustain to the sound and emphasise the pick sound.
Some Chorus can also fill the sound out, adding
subtle richness – a little goes a long way, though,
so be careful here.
1 For a full, rounded sound, fingered playing is the
best option and you will hear it in all forms of
music from pop to fusion. It’s a playing style that
requires focus to develop speed at, however, and
fast notes can get a bit lost unless you have really
good playing technique.
2 Next, we load up an amp sim plugin (here its
Mark Studio 2). This patch includes a tube
preamp and a 6"x10" cabinet with a 1" tweeter. The
sound instantly becomes bigger, rounder and closer
to what we’re after. Much of the sound comes from
the miked cabinet, so we’ll try to improve that next.
5 Our amp model is pretty clean, so to dirty up
the sound and add some edge the distortion
pedal is our next port of call. Care is required with
this one so we only add the tiniest amount of Gain
and keep the Tone setting clear of excessive high
frequencies. It's easy to go overboard, so step back
every now and then to listen to what you're doing.
2 Picked bass has more attack and thus cuts
through the mix much better. It’s a technique
often used by rock players and it sounds particularly
good with a P Bass or Rickenbacker. Pick precision
also makes it great for fast, aggressive playing. This
approach can work well with groove parts, too.
3 Although we like the sound, it’s just too big.
We can adjust the cabinet in a few ways,
starting with mic position Far and cone Border
settings. For extra attack we could also switch to
a dynamic microphone. We like the sound of the
ribbon, though, so we stick with it.
6 Our plugin lets us blend in the original DI signal
nicely and without any fuss, and here we want
to try phase shifting it as well. In a relatively simple
process we copy the audio onto a new track and
then load up our phase alignment plugin. Once this
is done, it's clear to hear how the sound changes as
we rotate the phase.
3 Playing position also has an effect on the sound
that you make with your bass. One technique
you could try is playing near the bridge (as shown
above) for a poky, more cutting sound, or playing
where the guitar neck joins the body in order to
achieve a warmer tone.
STEP BY STEP CREATING A GREAT BASS SOUND
STEP BY STEP BASS PLAYING STYLES

112 | BEGINNER HOME STUDIO HANDBOOK
RECORDING | BASS GUITAR: THE LOWDOWN
WHEN RECORDING guitars, you’ll often take a
clean DI (direct input) signal as well as
the amplified one, giving you the option
to reprocess the sound later. With bass,
the DI is often the more useful signal, and
when a solid, clean sound is your goal it
may be the only sound you use.
Many bass amps incorporate DI
outputs, making splitting the signal at the
source much simpler. However, these DIs
sometimes follow the initial preamp
stage, so the sound could be influenced
by it. For a totally clean signal, a simple DI
box enables you to split the signal into
two before it gets to the amp. If you’re
only recording the DI sound, many audio
interfaces include high impedance (Hi-Z)
inputs to facilitate this.
MIC OR DI?WHETHER YOU’RE recording a bass amp in a
room or using a software emulation to
amplify a recorded DI signal, you will
probably end up wondering which one
you should use: the amp or DI version.
For the most part it comes down to genre,
but bear in mind the character of the
other instruments in your music. If you
have overdriven guitars in your mix, for
example, your bass should probably be
kept pretty clean.
However, you don’t have to choose
between amp and DI – you can use both.
By combining the solid, clean sound of
the DI and the driven, edgy sound of the
amp/cab, you can get both flavour and
precision. Unless you have supreme
confidence in your ears, it’s advisable for
you to keep the two signals separate,
rather than blending them at the
recording stage, so that you can adjust
their balance throughout the mixing
process if necessary, and process each
one differently in turn. If you’re using an
amp sim rather than a real one, you may
also be able to simply blend the DI and
amplified sounds within the plugin.
PHASE CONSIDERATIONSTHE PARALLEL DI/amp approach is great,
but it can raise phase issues. If you’re
recording the amp cabinet live, mic
position can influence the phase
relationship between the cabinet signal
and the DI, and you may notice certain
notes sound louder or quieter than they
should. You can address this later by
marginally shifting one of the audio parts
or using a corrective plugin (see below).
There are hardware solutions, including
mic preamps with continuous phase
adjustment or DI boxes with flexible
phase adjustment options. Whichever
solution you choose, be aware of phase
issues if you’re planning to blend DI and
miked sounds.
IF YOU only have a DI signal to work with, it
needn’t be a problem thanks to the many
software amp and pedal emulations
available. If you don’t have the means to
record a real bass at all, there are some
truly excellent bass ROMplers that can
sound every bit as good as a real bass.
AMPS AND PEDALSBASS AMP plugins are less commonplace
than their guitar amp counterparts, but
you may find that your guitar amp sim
includes some bass amp options. It’s a
similar story with virtual stompboxes,
most of which are bundled with amp
plugins and not available separately.
Waves GTR3 covers all bases, with
seven bass amps and six bass cabs, as
well as 25 amps and 26 pedals for guitar.
It can also run in standalone mode.
Native Instruments’ Guitar Rig 5 includes
a bass amp and cab, along with a ton of
general-purpose effects.
Overloud’s Mark Studio 2 is a full-on
emulation of the Mark Bass amplification
system, boasting six amps, nine cabinets
and five pedals. Cabinet options include
various mic positions and a rear bass
port level control. Studio Devil’s Virtual
Bass Amp Pro takes a slightly different
approach and features two discreet amp
channels, each with its own compressor,
preamp and power amp. These can be
mixed, or you can use the adjustable
crossover to bi-amp them. Finish that off
with chorus, reverb, a 12-band graphic EQ
and one of three cabinet emulations or DI
emulation. Softube’s Bass Amp Room
only includes one bass amp and three
cabinets, but the click-and-drag mic
positioning is pretty flexible. It includes
three tone controls and a DI mix fader.
Ampeg SVX is a well-established bass
plugin boasting four amps, six cabinets
(including six mic types) and eight pedals
(including Ampeg-certified Octaver and
Overdrive). It’s now augmented with IK’s
awesome Custom Shop, with add-on
options including amps and cabs based
on classics from Trace Elliot, Orange,
Fender Bassman and Gallien-Krueger.
OTHER PLUGINSAS TOUCHED on earlier, phase differences
between miked and DI signals can often
create problems with your low end. You
can resolve this by either delaying one
signal to better align it or by ‘rotating’ its
phase using an all-pass filter. Applying
the latter process essentially means that
different frequencies are delayed by
different amounts, and Universal Audio’s
plugin emulation of the Little Labs IBP
(InBetween Phase) is a good option, with
a time delay control so you can use either
technique on its own, or both together.
Voxengo’s PHA-979 takes a similar
approach (delay and phase rotation), but
also offers individual left/right phase
control. Waves’ InPhase is a bit more
complex, being capable of handling
two-channel audio – either a stereo pair
or two mono channels using the
sidechain input. With zoomable
waveform displays for each signal and
both delay and adjustable filter-based
phase shifting, it’s a powerful plugin.
Finally, we have the Sound Radix
Auto-Align and Pi plugins. Auto-Align
automatically adjusts timing to correct
phase relationships, while the Pi plugin
dynamically rotates phase for the very
same purpose, working to enhance
punch and coherence.
RECORDING OPTIONS
BASS PLUGINS

BEGINNER HOME STUDIO HANDBOOK | 113
BASS GUITAR: THE LOWDOWN | RECORDING
STEP BY STEP MIXING BASS
1 At the mix stage, bass comes either as a single mono
track or as two or more layers that make up the whole
part. Here we have two tracks of bass; the first stage is to
buss them together so that we can process them both
individually and as a blend, so we route both tracks to the
same bus (aka group channel).
3 The DI track is providing more of the true low end,
and we can enhance this slightly with EQ. Here we
are using a low shelf to boost at 110Hz and below. We can
also curtail some of the higher frequencies with a high
shelf cut. This is a gentler, more musical solution than a
high-cut filter.
5 For additional finessing we follow the VCA compressor
with a gentler compressor. We go for a valve model,
just tickling the gain reduction circuit by no more than 2dB.
This gels the sound further, particularly at the release stage,
and imparts a touch of valve-style warmth.
2 We zone in on the EQ of each individual track. It’s clear
that the amp sound is providing the mid-range edge
and the DI is supplying the low-end. To tidy up the amp
sound, we use low- and high-cut filters. The low-cut will help
avoid very low frequency cancellation when blended with
the DI, while the high-cut gets rid of extraneous noise.
4 By compressing the two tracks together as a
sub-group we can make them gel as a unit. Our first
compressor, Cytomic’s The Glue, is a punchy VCA design,
and with a quickish Attack (0.3ms) and fast Release
(200ms), it adds punch to our sound and slams the
pokiness a little, making the sound fatter overall.
6 At this stage it’s not unusual for the sound to feel too
narrow in terms of stereo field. An excellent way to add
subtle width enhancement is with a small ambience reverb.
We keep the Decay time short (about 100ms) and set a
high-cut at 1.7kHz to contain the higher frequencies.
ADVANCED BASS EQIf you need to EQ the bass
heavily at the mix stage, you
need to address very low
sub-bass frequencies, which
are the lower mids that fill
out the sound, and the
frequencies near or on top of
the kick drum. Without big
monitors or a subwoofer you
won’t be able to hear the sub
frequencies in the bass. Once
you start adding some
low-frequency EQ or
combining two bass sounds,
you can end up with peaks
and troughs competing with
other sounds. It’s preferable
to be able to hear these (a
subwoofer helps) and/or
view them using a spectrum
analyser. Focus on 75Hz
downwards and combine
suspect parts gradually to
detect any cancellations or
peaks. Try notching the
problem frequencies out.
If your bass lacks fullness,
focus on 500Hz down to
150Hz. Sweep a bell-shaped
EQ boost through this range
to zone in on the problem.
Often a broad boost of a few
dB will add the low-mid glue
you need. If your mix sounds
too full in the low frequencies,
it’s often this same area that’s
to blame. It could be down to
other instruments, so you’ll
need to modify each one to
provide space for the bass.
Bass guitar and kick drums
can clash, so you might need
to notch out some of the kick
frequencies from the bass
part. A frequency analyser can
assist in finding the kick
frequency (90Hz is a good
place to start). Try pulling out
just a few dB from the bass
with a narrow Q at the kick
frequency to begin with.

114 | BEGINNER HOME STUDIO HANDBOOK
RECORDING | EASY GUIDE TO RECORDING DRUMS
Everything you need to know to get the best from both drums and drummer for that all important kit recording
session. From sticks and skins to mics and miking, it’s all here in this definitive guide
Although at first it might
not seem like the case,
recording drums is actually
surprisingly easy. Admittedly,
it’s often the sound of a badly
recorded kit that makes an
otherwise great track sound
like a ‘demo’, but if you follow some
simple rules, you can avoid the pitfalls.
Of course, a posh recording studio
would make things easier, but we are
going to be recording at home and
turning our DAW into a drum studio
with nothing more than a basic set of
microphones, an audio interface and a
set of headphones!
Apart from the recording gear, the
drum kit and the room, there is, of
course, one more vital component: the
drummer! If your drummer’s not up to
scratch, all your efforts will be wasted.
There’s no point listening to a great
recording of something that’s badly
played. So make sure your drummer
knows how to tune his kit, hits well, and
can play with a click. Ready to go? Then
let’s get some mics on your kit...
THE EASY GUIDE TO RECORDING DRUMS

BEGINNER HOME STUDIO HANDBOOK | 115
EASY GUIDE TO RECORDING DRUMS | RECORDING
MIKING THE KITTHERE’S NO ‘right’ or ‘wrong’ way to place
mics on your drum kit but if you stick to
the following guidelines you’ll be well on
the way to getting a pro sound in no time.
BASS DRUMTHE ORTHODOX position is on the non-pedal
side of the bass drum about level with
the rim and slightly off-centre. Some
drummers cut a small hole out of this
head for the mic to get a look-in, while
others don’t use a head on this side at all.
Bass drum mics have an exaggerated
low frequency peak for the boom and a
high frequency peak for the click, and
because these peaks are at slightly
different frequencies, different mics can
suit different bass drums – so it’s worth
trying different options if you can.
HI-HATTHE BRIGHT crispness of the hi-hat is best
captured by a condenser microphone.
Great choices include the AKG C451 and
C414 and the Rode NT5. Neumann pencil
mics in the KM range are also great if you
can get your hands on one.
Place it 4-6 inches above, half way
between the bell and edge and away from
the snare drum as much as possible
to restrict the snare spill. In the ’80s
when isolation was everything you’d
often find rugs hung on a mic stand
arm between hat and snare mic as
further anti-spill measures.
TOMSA SPOT mic on each tom is the orthodox
way to go. Position in a similar manner
to the snare drum, a couple of inches
above the skin and just inside the rim,
directed at the centre. The rack tom
always suffers from snare spill and all
toms suffer from cymbal spill but
A spot mic placed 1-3" above the head is the usual way to mic a tom
Different mics can suit different kick drums, so
it’s worth experimenting
Keep the hi-hat mic as much away from the snare drum as possible to avoid snare spill
Overhead condenser mics capture the overall kit sound and cymbals

116 | BEGINNER HOME STUDIO HANDBOOK
RECORDING | EASY GUIDE TO RECORDING DRUMS
generally toms aren’t used much so can
be gated out after the event.
OVERHEADSTO CAPTURE the top of the kit in general and
more specifically the cymbal work, a pair
of condenser mics are used over the top
of the kit. They’re useful for providing a
coherent picture to the whole kit into
which you can place the spot mics.
Without them the kit is a disparate bunch
of unconnected sounds. Use a matched
pair of the best condenser mics you can
lay your hands on.
Depending on the height of the ceiling,
place them 6-8ft above the floor either
side of the kit angled down to the centre
of the playing area.
ROOM MICSA MICROPHONE or two to pick up the general
room ambience is vital to add colour and
character to the overall sound of your kit.
A pair of room mics can be processed
heavily and just added in slightly to the
mix to give it the required energy levels as
well as reinforcing the sense of space. A
single mic works okay but for best results
try a pair.
Ribbon mics are popular here, and
have a mid-range character that brings
the best out in a room. Good condensers
and valve mics are also up to the job.
Start in the middle of the room with the
pair equidistant from the kick drum. The
brighter condensers and valve mics fare
better nearer the ground to lessen the
impact of bright cymbals. Ribbon mics
work well around head height or lower.
SNAREPLACING THE snare drum microphones
can be tricky for a couple of reasons:
firstly, you want to avoid as much spill
as possible from the hi-hat mic and
secondly, it’s hard to weave the mic stand
in between rack tom and hi-hat. A good
starting position is one-to-three inches
above the head just inside the rim
pointing into the centre of the skin. Angle
it away from the hi-hat if you can and
below the level of the rack tom rim.
A mic underneath the snare (phase
inverted) is a great way to capture the
brightness from the buzz of the snare
wires. Place it close to the skin and
directly at the wires. Spill from the bass
drum is a problem despite the fact that
you can safely roll-off the low frequencies
so try and angle away from it.
RIDE CYMBALDEPENDING ON the drum part, be prepared
to put a spot mic on the ride cymbal
because their detailing tends to be out of
the overhead’s earshot. The choice of mic
is similar to the hi-hat and is placed
between the bell and edge and as far
away from tom spill as possible.
BEFORE YOUR FIRST TAKETO START with get the drummer to hit each
drum individually for a while. This will also
start the drummer warming up. Consider
whether you’re hearing the drum at its
best. Does it sound the same as it does in
the room? Could the mic position be
better? Dial up a rough record level,
bearing in mind the drummer will hit it a
lot harder during a live take. Use EQ to
improve the tone once you’re convinced
the mic’s in the right place. This can be
done on the way to ‘tape’ if you’re blessed
with good EQs but otherwise it’s generally
better on the playback side. The same
goes for compression – you can’t undo
bad compression, so leave it to the
playback side.
Overheads won’t always pick up the ride, so place a spot mic over the cymbal
Room mics will pick up the room’s natural ambience and add colour
and character to your kit sound
Snare mics should be positioned 1-3" above the head pointing to
the centre of the skin

BEGINNER HOME STUDIO HANDBOOK | 117
EASY GUIDE TO RECORDING DRUMS | RECORDING
1 Plug the mics into your audio interface. The overheads go to inputs 1 and 2
and will need 48-volt phantom power (unless you’re using ribbon mics – in
which case, don’t touch that switch!). Bass drum in and out go to inputs 3 and 4,
while snare top and bottom go to 5 and 6. The ambient (hopefully a condenser, so
requiring phantom power) goes into 7, and the floor tom mic into 8.
3 Once your levels are sorted, it’s a good idea to run a test take to check for silly
mistakes and any uninvited hum, hiss, clicks or crackles. You can also use the
test recording to check the phase of the mics and ensure a fully-fat sound on
playback. Even though the theory of phase is complex, the practice is easy…
5 Now turn down the kicks and bring up the overheads, panned centre. Try
inverting the phase of one of them. If the overheads sound fatter with just
one channel phase inverted, leave it like that. Bring the kicks back in and blend
them with the overheads. Change the phase on both the overheads now, and
leave them set at wherever the kick sounds fattest.
2 Get the drummer to beat the hell out of the drum kit. They always play
louder on the actual takes, so don’t worry about getting too hot a signal –
having the highest peaks spike at around -5dB is a good target. There is
something to be gained from clipping, but not on the way into the interface –
keep it clean.
4 Insert a trim or gain plug-in into each of your eight drum channels. Bring up
the first kick mic, followed by the second. When the two are balanced, try
inverting the phase on the second kick channel (the button labelled with a circle
with a diagonal line through it). Leave the button set where the sound is best.
6 Balance in the top snare mic and switch the phase to whichever setting
sounds fattest with the kick and overheads. Bring up the bottom snare mic
and set the phase to the opposite of whatever the top is set to. Repeat this
process with the floor tom and ambient mics. This is quick ’n’ dirty, but now you’re
set to record.
STEP BY STEP GETTING A GREAT RECORDING

118 | BEGINNER HOME STUDIO HANDBOOK
RECORDING EASY GUIDE TOS|
Once you’re happy with the individual
drum sounds, get the drummer to play
the whole kit. Check levels and balance
the kit for monitoring purposes. Make
sure there aren’t any odd noises and the
whole thing feels consonant. Record a bit
of their playing and let them hear it so
you can discuss the sound and its merits
for the track you’re about to record. Be
prepared to make changes to any of the
above factors. Now is the time to
experiment and evolve the sound. It’s
unlikely to come good just like that.
DAMPINGONCE THE kit’s in tune listen to the
drummer playing the whole thing. You’re
listening out for how the drums interact
with each other and in particular the ring
of the toms, the liveliness and ring of the
snare drum and the boom and tightness
of the kick drum. Invariably some drums
will ring unpleasantly despite not being
hit and will require dampening. How
much is partly down to the liveliness of
the kit and room and partly down to the
sound required.
A product called Moongel is a useful
tool. These little squares of blue jelly can
be placed on toms and snares to dampen
the ring. By lightly touching around the
outer edge of the top skin and at the
same time hitting the drum you’ll hear a
sweet spot where the decay is just right
and that’s where to put the gel. There are
of course other similar alternatives to
Moongel available. You can also use gaffer
tape and rolled up toilet paper on the
same sweet spot but it takes more time
to put on and take off when you want to
try another spot. Gaffer tape is necessary
to dampen the bottom head if you want
to do that, either over wads of toilet paper
or concertina’d into three or four fins that
hang down and absorb the resonance.
Damping the bottom skin is good for that
thuddy ‘duf’ sound that goes in and out of
favour. Bear in mind for an ambient live
kit sound you may not need to dampen
the drums at all.
For snare drums, O-rings are great.
Take an old snare head and cut around
the edge at the point where it starts to
curve up to the rim. Then cut a concentric
circle about an inch inside the first
leaving a circular ring which you simply
place directly on top of the drum head
without adhesive. It works well to cut
down the ring if that’s what you want.
In the old days of pudgy dead snare
drums you’d even find dusters and tea
towels taped across a section of the
snare head.
Kick drum damping again depends on
the kick sound you’re after. For the more
common tight punchy kick drum a pillow
or cushion placed inside the drum lightly
against the front head will suffice.
Lessening the damping will increase
the after-boom. If you want a very boomy
kick drum, as in jazz for example, you can
use the tom approach with gaffer tape
and toilet tissue to shape the tail.
Drummers with double-headed kicks
often mount a strip of felt on the inside
against the back head which works well.
FINAL DRUM TWEAKSWHILE THE drummer plays the kit, listen for
buzzes and rattles. If for example they’re
not using a rear skin on the kick drum the
loose lugs can rattle and these might
need to be taped up. Listen for squeaky
kick drum and hi-hat pedals and be ready
with WD40.
Check with the drummer that they’re
using all the drums and any not being
used should be taken away or damped
with a cushion or something so they
don’t add to the general resonant hum
of the kit.
Although you’ll prepare everything
thoroughly before you set up mics and
start recording, all the previous factors
(drum choice, heads, sticks, tuning,
damping etc) are all flexible and open
to change right up to the last recording
take. The ultimate consideration is to the
song being recorded so although one
set-up perfectly suits one song, you
might have to re-approach the kit set-up
for another to get the sound you want at
source. Don’t fall into the trap of thinking
that one sound covers all and you can
Moongel can be placed on toms and snares to dampen ringing and unwanted overtones
Check the kit for buzzes, rattles and squeaks that the microphones could pick up

BEGINNER HOME STUDIO HANDBOOK | 119
EASY GUIDE TO RECORDING DRUMS | RECORDING
1 Although you won’t create your final drum sound until the mixdown, you’ll
need to get your mix half-decent for recording. Here’s some CPU-friendly
advice to help you get it right. Create two auxiliary sends and returns from the
ambience track. Insert a delay plug-in over the first return and set the L and R
Delay times to 30ms and 60ms.
3 Take your individual drum channels and the two new aux returns and
set their outputs to a new bus. Create a new aux return for this bus and call
it ‘Kit master’. This is your main drum channel. Now create two or three more
busses and returns for the rest of your recorded track stems (guitars, bass,
vocals, etc).
2 Next, insert a room reverb over the second aux return, set to around
0.6s Decay time. Compress this and then add a harmonic distortion
effect like SPL TwinTube. This artificial space will help the kit sound more
‘finished’ while you’re tracking – and a more exciting sound will make your
drummer play better.
4 You should now have five or six ‘master’ faders, making it easy to create a
good working balance and hear the drums properly in context. You can also
create a separate sub-mix for the drummer by adding aux sends to the master
faders and routing them discreetly to the headphones output. To minimise
latency, you want your audio interface buffer size to be as small as possible.
STEP BY STEP SETTING UP A ROUGH LIVE MIX
fine-tune it in post-production. The
source sound is king.
CLICK TRACKCLICK OR no click is always a big point of
debate. The decision should take into
account the needs of the song, the
drummer’s ability and the feelings of the
producer and the band. The results are
always very different so the decision
shouldn’t be taken lightly. Using a click
track always makes editing so much
easier but that shouldn’t have a bearing
in the debate. If you decide on a click,
establish with the drummer the best
sound for them to latch onto, the interval
(quarter-note, 16th note etc) and level of
accents for downbeats. You don’t want to
be hearing the click in the control room so
route it out of a discreet output. You also
don’t want to hear strains of click spill on
the drum overheads as the cymbals
decay at the end so always try to map the
click with automation, turning it down in
quiet sections and off on the last beat.
That means making sure the drummer
always starts at the same point on the
click. For example, tell them to hear one
bar of click, stick hit the next and come
in on bar three.
GUIDE TRACKSTHE DRUMMER’S going to need something to
drum along to if you’re not doing a full
band live session. For getting the best
performance you can’t beat playing along
with other people, ideally with a visual
connection. With other players in the
drum room you have to think about spill.
If you can screen them off, great. If they’re
playing electric instruments you can DI
them. A guide instrument on the room

120 | BEGINNER HOME STUDIO HANDBOOK
RECORDING | EASY GUIDE TO RECORDING DRUMS
TRY THIS!BOTTOM HEADS ON TOMSWherever there are two heads, there are three
possibilities. If you tune the bottom (resonant)
head of a tom to the same pitch as the top
(batter) head, you’ll get a purer tone with more
sustain – perfect for jazz and its derivatives. If
you tune the resonant lower, you get a slight
pitch drop-off and less decay – great for rock.
Tuning the resonant higher shortens the decay
further, which can be great for close miking. A
good starting interval for the difference in pitch
between heads is a minor third – ie: three
semitones either way.
FRONT HEAD ON THE KICK OR NOT?The front (resonant) skin on the kick drum is
important for creating a good, meaty tone.
Jazzers love it, and most rock/poppers have a
hole cut in it to allow microphones and
dampening material (a small blanket, say) to be
placed inside. For metal styles, where you’re
mainly looking for click and thud, you may as
well just remove the front head so that you
can get a mic right in on the beater point.
TIGHTEN THE KICK DRUMIt’s possible to create a little kick
drum chamber
using, blankets,
duvets or a coat.
These are draped
over the kick
drum, and any
microphones are
placed in and in
front of it. Use a
couple of small
mic stands to hold
the blankets up.
The chamber
prevents spill from
the cymbals and
snare getting into
the kick drum
mics, making it
easier to boost the
high frequencies at
the mix stage and
thus enhance the
‘clickiness’ without
adding harshness
from the cymbals.
GET A CRAPPY MICTape recorders used to come with built-in
condenser or electret microphones. Put one
of these old machines into record/pause mode
and take the output into your DAW for an
exciting, super-crunchy sound. Sometimes,
rubbishy old battery-powered mics can sound
good too. Put these types of mic in a place
where they can hear the whole kit. The
corners of the room can offer interesting
results – experiment!
RECORD WITHOUT CYMBALSRecording a kit in a difficult space without
ideal equipment can be a fruitful and rewarding
experience, but you might still feel that your
results sound amateurish. One of the classic
drum sound problems is too much cymbal
spill. This happens in the best of studios, and
when it does, the pros just record the crashes
afterwards. That way you can bring up all the
exciting roominess of the drums themselves in
the mix, then blend in perfectly recorded
cymbals afterwards. As long as they share the
same buss compressor no one will ever know
(although your drummer will hate playing
without cymbals).
ESSENTIAL GUBBINS FOR A TROUBLE-FREE DRUM SESSION
Moon Gel, for
damping; 3-in-One
oil, for squeaky
pedals; a drum
key (because the
drummer will forget
theirs); an adjustable
spanner, for rattly
stands; gaffer tape,
for holding stuff;
masking tape, for
attaching damping
materials and the
like; empty cigarette
packets and J-Cloths,
for that ’70s sound;
blankets; stage weight
or sandbag; and
Japanese cooking
chopsticks – great for
tom parts!
and overhead mics is a no-no. Fine up
to a point if you’re doing live takes but
not for something that isn’t going to be
in the final mix.
You can always resort to just an aural
connection and have other players
in another room and everyone on
headphones. If you’re using a click track
you can always record the guide parts
initially in the room with the drummer
and then re-record the drummer
overdubbing to those guides. Not ideal
for performance but it works well.
ESTABLISHING TEMPOTHE BEST way to do this is to get the band
to play free until you have the right feel
and capture the tempo from that
performance. You can usually do this on
the tempo counter of your DAW but if not
there are plenty of phone apps that do it.
If the natural playing speeds up and
slows down through sections you’ll have
to carefully program the click to do the
same. This is the sort of thing that would
be best worked out in rehearsal because
it can take time. Above all rehearse and
settle into your performance before you
begin recording. Good luck!
MAKE SOME ROOMBEFORE YOU hit the record button, you need
to prepare your session. Working with a
sprawling production featuring 20 tracks
of backing vocals and tons of plugins is
going to mean complications down the
line. By bouncing down the key elements
of your track as new audio files, you can
unload all plugins from the session. This
will prevent latency problems, so that the
drummer will hear everything right in his
headphones and there won’t be any
complicated latency compensation
processes happening in the background.
You should aim to end up with a few
bounced ‘stems’ – guide drums, bass,
guitars, keys, vocals. Make sure they all
start on bar 3 or later, so that you have at
least a couple of bars of count-in. The
click or guide drum loop can be MIDI-
triggered or printed as audio. These few
tracks then need to be turned down to
around -15dB – this will leave plenty of
headroom for the click to be clearly heard
by the drummer over the backing track
and the drums.
3-In-One oil is handy for getting rid of unwanted squeaks

BEGINNER HOME STUDIO HANDBOOK | 121
EASY GUIDE TO RECORDING DRUMS | RECORDING
GET ORGANISED10 top tips for recording a drum kit
1 Once you’ve got all your drum tracks,
recording levels and playback
processing, save the session as a template
so you can import it as a start point for
other songs in the drum session.
2 Group the drum tracks together so
you can duplicate them all or create a
fresh playlist with one click and keep the
session flowing.
3 If you’re using a click try to ensure
the drummer always starts at the
same bar.
4 Do one or two takes then have a
playback to discuss sound, parts,
performance etc. It will also give the
drummer an objective view and a breather.
5 Continue with a couple of takes at a
time followed by a playback until you’re
happy you have all the parts available for a
compilation edit.
6 Always offer encouragement, feedback
and advice and keep the drummer as
fresh as possible.
7 Listen for energy, tightness, groove/
feel, fills.
8 Don’t be afraid to try big brush-stroke
changes if things aren’t working.
9 Always remember you can overdub
additional drum parts – tom fills,
cymbal crashes, hi-hats.
10 Keep an ear on the foldback mix
and suggest any changes you think
could help their performance.
LET’S RECORD!YOU SHOULD now be ready to press the
record button, safe in the knowledge
that you have the sound of the drums
completely nailed. Of course, there’s a
whole bunch of stuff to do post recording
to turn the raw drum takes into a mixed
kit. First, though, we have to make sure
we record everything we need.
There’s nothing worse than putting
up your drum recordings, long after the
drummer has packed up and left, only to
find that the bottom snare mic hasn’t
recorded or that your middle section
has click track from the headphones
spilling all over it. That’s why a test take is
important; here are a few tips on how to
get the most out of the session...
GET LOTS OF TAKESWITHOUT GOING overboard, the more you
can get the better. If possible, use folders
or playlists to keep your takes sorted, and
make notes as you go as to what each
take was and why you did it: ‘Take 4, felt
beater instead of wood’, ‘Take 9, keep hats
closed’, etc. Ultimately you may find it
best to edit a selection of different parts
together to build the perfect take.
RECORD SINGLE HITSAT THE end of your drum session, record
individual hits of each drum and cymbal
at different volumes. Allow plenty of time
for toms to ring and cymbals to decay.
These backup components can then be
used to help you repair almost anything
after the event – invaluable for moments
when the drum stool creaked or a
motorbike went by and ruined an
otherwise perfect take.
PREPARE TO BUILD A MIXONCE YOU’VE got your recordings, you need
to get the drums sounding killer in the
mix, so get the session well organised.
Work with your stem session to start
with, then bring the rest of your
multitrack back in. Organise the key
elements of the mix into auxiliary busses,
and bring them all down to -10dB. As a
rough guide, your kick drum should be
metering between -12 and -7dB. This will
leave you with loads of headroom to build
a punchy drum sound without clipping
your master outputs.
Do a test take to make sure every part of your kit is recording as it should
Kick drum damping, and how you achieve it, will depend on the kick sound you’re after

122 | BEGINNER HOME STUDIO HANDBOOK
RECORDING | HOW TO RECORD VOCALS
Recording the human voice isn’t just a matter of kit and technique – it’s also about getting a great performance
out of your singer
Truthfully, if there’s one single
element of your song that
should demand the majority of
your focus, it’s the vocal. The
vocal, over and above anything
else, is the first thing anyone
listens to. An underwhelming
vocal gives a poor first impression of the
whole track, and once that happens
there’s usually no coming back.
The first and most important aspect of
a vocal is the performance. If a singer
delivers a passionate and believable
performance, you can get away with
imperfections in tuning or sound quality.
If they’re timid in their performance, on
the other hand, poor tuning, tone and
timing are made all the more apparent.
Getting the best performance out of a
singer involves many considerations
– psychological, aesthetic, technical and
physical, to name but a few – and a good
producer will cover all of these areas,
building confidence, setting the right
ambience, offering advice and generally
guiding the performer through what can
be a nerve-wracking task.
Then there’s the technical side of the
vocal to think about. Picking a mic and
preamp to suit the singer, getting a
headphone balance they can comfortably
sing with, and getting a good quality
signal in the can are all vital.
Once you have captured a good
performance, you then have a lot of
post-production processing to get
through. This means compiling a
definitive vocal from all of your source
takes and editing that into a smooth
performance, making any tuning and
timing tweaks that might also be needed
to improve the result, plus a whole host
of other more minor considerations.
Once you have your perfect lead vocal,
the next thing to think about is backing
vocals. A double-track vocal to the lead
can add strength and size when needed;
harmonies are superb for adding a sense
of depth and musicality that works in
certain situations, and counter-melodies
can really imprint a song. As Brian Eno
likes to point out, 90 per cent of hit
records have backing vocals, while 90
per cent of non-hit records don’t.
HOW TO RECORD VOCALS

BEGINNER HOME STUDIO HANDBOOK | 123
HOW TO RECORD VOCALS | RECORDING
1 The physical environment is vastly important.
First of all, decide where the vocal mic is going to
go, ideally giving yourself a visual connection to your
recording position. The prime consideration is the
sound, so don’t place the mic up against a window in
an effort to see the singer.
2 A music stand is necessary for lyric sheets and
making notes. A comfortable chair and side
table (not to mention a rug underfoot) will not only
create a homely feel, but they will also give the singer
somewhere to sit during playback over headphones.
Don’t forget a jug or bottle of water and a glass.
3 If your room isn’t ideal acoustically, or you’re
hearing too much of the room when you record,
you might need to buy or borrow a Reflexion Filter.
SE make the original, but there are alternatives.
These shelter the mic from room reflections and
enable you to record vocals in adverse conditions.
STEP BY STEP PREPARING THE ROOM
AS THE producer or engineer, recording the
vocal is just one small step in a number of
tasks that you have to carry out in order
to achieve your goal of a finished record.
For the singer, it’s their moment, and it’s
huge. Rarely do you come across a singer
who’s keen to get in the recording room
and start singing. On the whole singers
are nervous, insecure and fraught with
self-doubt, and those are the more
confident ones!
At any time there can be a complex
group of psychological issues involved,
so always approach a vocal recording
sensitively, placing a calm focus on the
vocalist but being careful not to put too
much importance on the situation at
hand. There’s nothing worse for a session
than an anxious producer: you’re the one
who should be radiating calm vibes and
serenity for the singer to feed off.
In fact, your job is to create the best
environment for the singer to perform in.
One important consideration, especially
in a band situation, is who should and
shouldn’t be present at the session.
Some singers like the banter of a whole
group because it can help to dissipate the
intensity, but a more nervous singer will
feel much too pressured with everyone
watching. It’s down to you to read the
situation and, if necessary, ask everyone
else to leave the room while vocals are
being recorded. You can get the others
back in the control room once a few
passes have been recorded to discuss
the merits and way forward, if you feel
democratically inclined. Otherwise, get
them back in once you’ve comped the
vocal to present the finished article.
GOING FOR A SONGSIT DOWN with the singer and talk through
the objectives. If there are a number of
vocals to do, decide upon the first one
to work on – ideally one that’s not too
demanding. Discuss all of your practical
intentions: a lead vocal, a double-tracked
vocal in parts, possible harmonies and
how you’ll go about recording them,
whether it be with full takes or dropping
in line by line. Discuss the approach and
attitude you’d like to hear from the singer
– it can be useful to reference tracks by
other artists. Play them songs that are
close to what you have in mind in terms
of production and overall sound, so they
get a sense of their required contribution.
Play artists with the sort of attitude and
delivery you think would work for the
track. This kind of guidance should give
them an idea of what they need to do,
and it can make the task seem easier.
Inspire them into a creative moment.
Singing is a muscular activity, which
means singers are minor athletes. An
experienced or trained singer will have
a warm-up routine to prepare their vocal
chords for the work ahead, but you’ll be
surprised at how many go into the studio
without any warm-up and expect to belt
out an amazing vocal. Give them five or
10 minutes alone in the recording room
to acclimatise their voice.
PREPARING THE SINGER TO PERFORM
As producer, it’s your job to give the singer the ideal physical, technical and emotional environment to work in

124 | BEGINNER HOME STUDIO HANDBOOK
RECORDING | HOW TO RECORD VOCALS
STEP BY STEP GETTING A GREAT RECORDING
1 Your mic needs coupling with a good preamp if
you’re to capture the best sound. Many audio
interfaces come with mic pre’s built in, but their
quality varies. Don’t assume it’s OK because you can
plug a mic into it – check the specs and compare
with those of other preamps you can get access to.
1 The human voice is one of the most harmonically
complex sounds you’re ever likely to record, and the
human ear has naturally evolved a great sensitivity to all
of its nuances, so in most situations you’ll use your best
microphone – but not always. It’s worth trying out as many
as you have because different singers suit different mics.
3 Normally you’ll use a large-diaphragm condenser mic
for vocal recording because of its sensitivity and the
harmonic detailing it picks up. The Neumann U87 and AKG
C414 are at the top of the list here, although there are much
cheaper ones that do a good job from SE, Rode and others.
Use them set to a cardioid pattern.
2 Although it certainly isn’t these days, the mixing
console was once the main supply of mic
preamps: you’d plug into a desk channel, add EQ and
route it to the multitrack. Some desks, such as the
Mackie Onyx, have good-quality pre’s, but most
cheaper ones should be avoided if at all possible.
2 If a singer is ridiculously loud, or if they like to
hand-hold the mic, and if the song’s on the heavier side
of rock, a dynamic mic such as the Shure SM58 can be a
very usable vocal mic. It’s predominantly built for live use,
but it records well, stands up to abuse and loud levels, and
sounds pretty good.
4 If you have the option, vintage valve mics such as the
Neumann U47 or U67 are renowned for their warmth,
clarity and definition. There are other valve mics to choose
from, but none are better. Whichever you choose, put a pop
shield in front of it. This can be shop-bought or made from a
wire coat-hanger and tights.
3 A standalone dedicated preamp is by far the
best option. If you have a choice, test them each
on your singer with the mic of choice, as different
combinations can give different results. Neves are
well-known because they’re excellent, but there are
many others of a similar standard available.
STEP BY STEP VOCAL PREAMPS
MONITORINGMany singers go to pieces
when isolated and listening
on headphones. It’s worth
exploring monitoring options.
Like speakers, headphones
all sound different: the classic
Beyer DT100s are dull and
lifeless, and a brighter, livelier
set can do the trick. The
Audio-Technica ATH M-series
are great low-budget options.
Try getting your vocalist to
sing along to a loudspeaker
playback. Bono famously did
a lot of his vocals in front of
the monitors in the control
room with a handheld SM58.
Try it in the recording room,
feeding the foldback mix to a
monitor at a volume the
singer is comfortable with.
You can phase-cancel the
spill afterwards: with the mic
and speaker in the same
position, play back the
foldback mix exactly as it
was, including the vocal and
any reverb. Record it, flip the
phase 180° and mix it in with
the main vocal track. It won’t
kill the spill completely, but it
will get rid of a lot of it.

BEGINNER HOME STUDIO HANDBOOK | 125
HOW TO RECORD VOCALS | RECORDING
SINGERS CAN’T carry on ‘playing’ for hours
like their instrumental colleagues. There’s
an optimum window for capturing the
best performance between the singer
warming up their voice and tiring
themselves out, and sadly it’s all too
narrow. Once the singer is warmed up
and ready to go, you will need to quickly
get them comfortable with their specific
headphone mix. While they’re doing their
warm-up routine in the recording room,
you should be anticipating a rough
foldback mix for them, ideally using the
same model of headphones they are
using, creating a few vocal tracks in your
DAW so that you can quickly go from one
take to another, and setting up any in-line
hardware processing that you might be
using, as well as any monitor processing
– reverb and delay, usually. You should
also guess a rough recording level so that
when they finally hit the mic you’re
recording everything.
Go into the recording room and check
that the singer is feeling good and ready.
Make sure the pop shield isn’t touching
the mic and that it’s in position, and that
there aren’t any other headphones still
plugged in from previous overdubs that
will spill onto the vocal track. Before you
begin the actual recording, get the
singer’s headphone volume right and
check they’re hearing everything they
need to hear, making initial adjustments
to the mix based on that feedback. Ask
them if they want any reverb or delay for
monitoring and set that up.
WARMING UPRECORD AN initial warm-up pass; this
serves many purposes. First, it allows you
to get a good record level, although bear
in mind that the vocalist will probably
sing a lot louder in later takes, so err on
the side of caution by about 3-6dB. Urge
the singer to tell you about any changes
they want during the pass, particularly to
their own voice and effects levels. Listen
to the sound quality of the vocal: is it
clear? Check it’s not distorting on peaks.
Listen to the tuning – if it’s consistently
sharp, try turning the vocal up relative to
the backing track; in contrast, if the
vocalist is singing consistently flat try
nudging them down a bit. If the vocal is
both flat and sharp, they’re clearly
struggling to fit in with the mix while
hearing themselves. Get them to take
one headphone off an ear so that they
can hear themselves in the room – ask
them to place it against the back of their
head to prevent spill.
Also during the warm-up phase, listen
to the dynamics of the singing and the
mic technique of the singer. If they’re not
already doing so, ask them to move into
the mic for quiet sections so that they’re
two to three inches from it, and back off
18-24 inches for louder sections.
If you’re using a cardioid mic, get the
vocalist to notice how their tone warms
up as they move in, and urge them to use
that creatively, without moving in so close
that it becomes boomy. When they move
out for loud moments, listen to how
much of the room sound you get in the
mic. If it’s too roomy, tell them not to
move back so much.
CAPTURING THE VOCAL PERFORMANCE
Your singer should move in close to the mic for quiet sections, and back away from it for louder parts
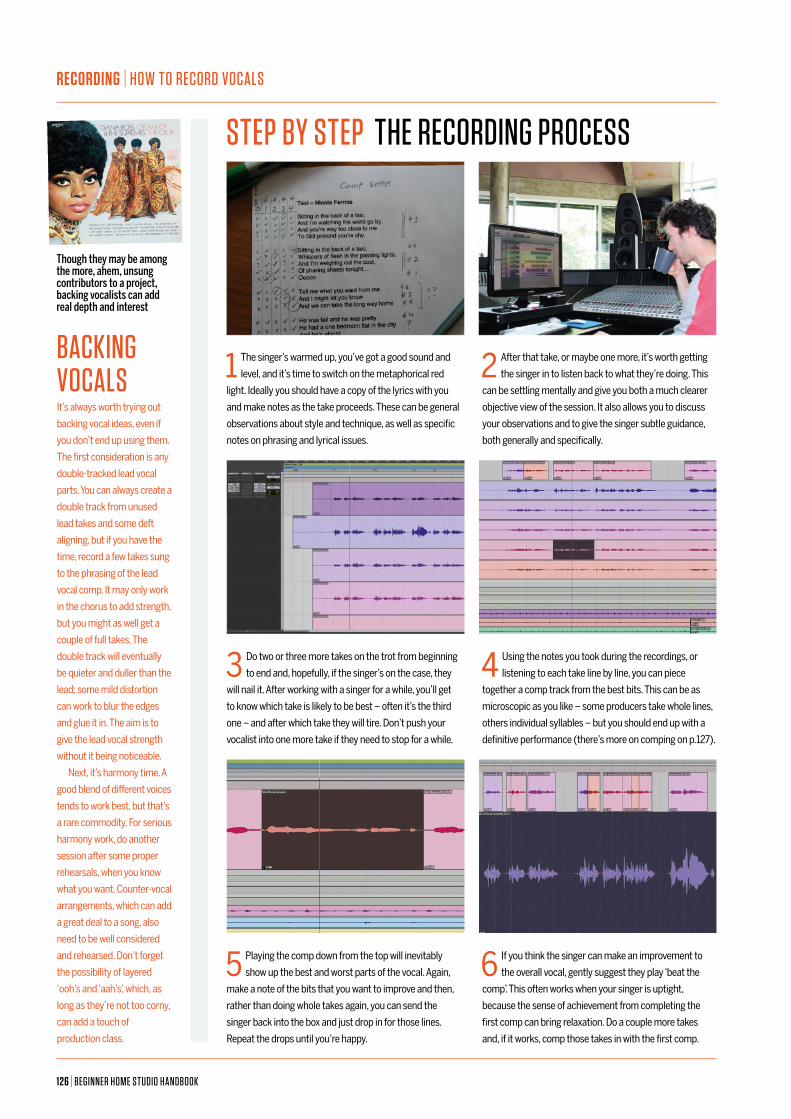
126 | BEGINNER HOME STUDIO HANDBOOK
RECORDING | HOW TO RECORD VOCALS
STEP BY STEP THE RECORDING PROCESS
1 The singer’s warmed up, you’ve got a good sound and
level, and it’s time to switch on the metaphorical red
light. Ideally you should have a copy of the lyrics with you
and make notes as the take proceeds. These can be general
observations about style and technique, as well as specific
notes on phrasing and lyrical issues.
3 Do two or three more takes on the trot from beginning
to end and, hopefully, if the singer’s on the case, they
will nail it. After working with a singer for a while, you’ll get
to know which take is likely to be best – often it’s the third
one – and after which take they will tire. Don’t push your
vocalist into one more take if they need to stop for a while.
5 Playing the comp down from the top will inevitably
show up the best and worst parts of the vocal. Again,
make a note of the bits that you want to improve and then,
rather than doing whole takes again, you can send the
singer back into the box and just drop in for those lines.
Repeat the drops until you’re happy.
2 After that take, or maybe one more, it’s worth getting
the singer in to listen back to what they’re doing. This
can be settling mentally and give you both a much clearer
objective view of the session. It also allows you to discuss
your observations and to give the singer subtle guidance,
both generally and specifically.
4 Using the notes you took during the recordings, or
listening to each take line by line, you can piece
together a comp track from the best bits. This can be as
microscopic as you like – some producers take whole lines,
others individual syllables – but you should end up with a
definitive performance (there’s more on comping on p.127).
6 If you think the singer can make an improvement to
the overall vocal, gently suggest they play ‘beat the
comp’. This often works when your singer is uptight,
because the sense of achievement from completing the
first comp can bring relaxation. Do a couple more takes
and, if it works, comp those takes in with the first comp.
BACKING VOCALSIt’s always worth trying out
backing vocal ideas, even if
you don’t end up using them.
The first consideration is any
double-tracked lead vocal
parts. You can always create a
double track from unused
lead takes and some deft
aligning, but if you have the
time, record a few takes sung
to the phrasing of the lead
vocal comp. It may only work
in the chorus to add strength,
but you might as well get a
couple of full takes. The
double track will eventually
be quieter and duller than the
lead; some mild distortion
can work to blur the edges
and glue it in. The aim is to
give the lead vocal strength
without it being noticeable.
Next, it’s harmony time. A
good blend of different voices
tends to work best, but that’s
a rare commodity. For serious
harmony work, do another
session after some proper
rehearsals, when you know
what you want. Counter-vocal
arrangements, which can add
a great deal to a song, also
need to be well considered
and rehearsed. Don’t forget
the possibility of layered
‘ooh’s and ‘aah’s’, which, as
long as they’re not too corny,
can add a touch of
production class.
Though they may be among the more, ahem, unsung contributors to a project, backing vocalists can add real depth and interest

BEGINNER HOME STUDIO HANDBOOK | 127
HOW TO RECORD VOCALS | RECORDING
1 The main vocal comp has to be seamless and
sound as though it was a continuous take. Listen
through it in solo, making sure there are no double
breaths and that all the breaths are intact. Put
mini-crossfades over every edit and listen for
natural phrasing and timing between edits.
4 If you don’t have offline processing, route your
vocal to another track with the same high-pass
filter inserted and record the offending section. Drag
that back on to the main vocal track and draw the
processed audio back to just encompass the pop.
Apply a smooth crossfade on either side – job done.
7 Melodyne is also useful for minor phrasing and
timing adjustments. For example, if you want a
word to carry on longer and have the following word
come in slightly later, drag the first out and shift the
second further down the track. For timing, it’s a case
of selecting the words and moving them in time.
2 Even with pop shields, inevitably there will be
some plosives in the vocal, which can be an ugly
distraction. A high-pass filter set to around 80Hz can
take the very low, windy ones off, but for the big ones
you’ll need to do some momentary EQing to the
offending pop.
5 For a vocal that’s at all ‘tuney’, now’s the time to
dig out a pitch correction device. Don’t use an
auto-tuning function unless you’re pushed for time.
Instead, use manual tuning, which enables you to
manipulate the vocal in very precise ways. Celemony
Melodyne is the best tool for this job.
8 Double-track vocals generally work better when
their phrasing is tight to the lead vocal. The
same applies to harmonies. It’s hard to achieve and
can take a lot of time to get right, so for convenience
you can just get the backing vocals close enough
and let Synchro Arts’ VocAlign plugin do the rest.
3 If your DAW can do offline processing, the job of
‘de-popping’ is made so much easier. Zoom in
and highlight a selection wider than the area of the
pop. Use a steep high-pass filter set to about 300Hz
to render the piece and you should see the waveform
diminish spectacularly.
6 Transfer the passage you want to retune into
Melodyne. Using the Pitch Drag tool in non-grid
mode you can pull the pitchy bit into a tuning that
sounds right, though it won’t necessarily be perfectly
pitched. Melodyne will also retain vibrato and any
pitch slide in and out of the note, or flatten them.
9 Again, this is much easier if you have offline
processing. Highlight the area of the lead vocal
that you want to tighten up and hit the Guide capture
button. Move the highlighted area onto the backing
vocal track and capture the Dub. Hit the Align button
to magically tighten it up. Neaten with crossfades.
STEP BY STEP VOCAL POST-PRODUCTION

128 | BEGINNER HOME STUDIO HANDBOOK
RECORDING | HOW TO RECORD VOCALS
WHEN IT comes to recording, everyone
develops their own go-to techniques for
specific situations. To keep things simple
here, though, we’re offering you two
overall approaches – ‘as live’ or ‘overdub’.
Which one you go for depends upon the
sort of music you want to make and the
proficiency of your performers. It may
also affect precisely what bits of
equipment you will need.
Along the way, you’ll also need to
consider whether you want to keep
things rigid by using a click or rhythm
track, and whether or not to process your
signals at source using channel strip
options such as EQ and compression.
‘OVERDUB’ OR ‘AS LIVE’?IF YOU’RE trying to replicate a warts ’n’ all
live performance, recording the guitar
and voice together is definitely the way to
go. From a technical perspective, this will
require you to capture the guitar and the
singer using two mics via two separate
preamps. It also enables you to record
without any headphone cue set up,
making things a bit more straightforward.
The main downside is that each sound
source (guitar and voice) will, to some
extent, be picked up by both mics. In
itself this isn’t a disaster, but if you want
to repair anything by overdubbing one or
other element on its own, you’ll struggle
to edit this in without it being obvious.
One solution is to record a number of
takes and edit them ‘as one’, so that voice
and guitar always stay together – just
make sure that each take is at the same
tempo and that the tuning is consistent. If
wandering tempo is a problem, you will
benefit from listening to a click track
through headphones. Overall, the better
and more consistent the performer the
more successful this technique will be.
Overdubbing is the more widely-used
recording technique, enabling you to
compile ‘perfect’ takes for voice and
guitar. Overdubbing simply means
recording one track on top of another.
From a technical perspective, you can
use the same mic for both guitar and
vocals, so you’ll only need one preamp.
However, headphones will be needed for
a cue mix while overdubbing. As you may
have gathered, the best way to go about
this is to record and edit the guitar first
and then add the vocal. It will benefit you
to use a click track in this case.
CLICK CONSIDERATIONSEVEN MUSICIANS with a good sense of
rhythm struggle to replicate the same
tempo each and every time over multiple
takes. So if you’re planning to record
things in free time, it’s still a good idea to
use a metronome reference prior to the
performance. However, to really lock
things down, a click or rhythm track is
well worth considering. This doesn’t have
to be completely rigid, and can include
tempo changes for different sections of
the song, but it’ll keep each take closer to
the ‘clock’, making editing much simpler.
It’s often easier to play over a percussion
pattern rather than a click. You’ll probably
find a basic drum machine that’s capable
of producing a shaker or clave in your
DAW, so use it to play a basic groove that
fits with your song.
Finally, if you’re using a separate
preamp strip or mixer channel, you’ll
have the option to apply EQ and possibly
compression as you record. The best
advice we can give you here is to keep
things simple, employing the former to
remove unwanted low frequencies or add
high-frequency sparkle, and the latter to
contain any sudden peaks. But if you’re
not entirely comfortable with either of
these techniques, just record everything
completely ‘flat’. You can always process
later with plugins.
RECORDING VOCALS AND ACOUSTIC GUITAR
Do you want to record your guitar and vocals together or in separate takes? The choice is yours

BEGINNER HOME STUDIO HANDBOOK | 129
HOW TO RECORD VOCALS | RECORDING
1 The first step is to position your guitar mic. To
assist with separation, it’s best to get in as close
as you can, but you still need a balanced instrument
sound. A good spot is about nine inches out from
where the guitar neck joins the body.
2 For the vocals we’re using a dynamic mic with a
supercardioid pickup. Its tight pattern helps
keep out some of the guitar, but because it’s a
dynamic mic we can get right in close with no pop
shield. This on its own helps with isolation.
3 If you’re recording yourself and monitoring on
headphones, move the guitar to get the desired
mic sound. If you’re recording someone else, make
sure they’re comfortable and not going to move, then
angle or move the mic to change the tonal balance.
STEP BY STEP MIKING UP VOICE AND GUITAR
STEP BY STEP GETTING SIGNALS INTO A DAW
1 With your mics set up, the next stage is to get their
signals into your computer. Make sure your mic preamp
is turned right down and the phantom power is off before
plugging in the cables. Check which mics need phantom
power and then switch it on for those mics only.
3 Set up some tracks in your DAW and assign the inputs
to match those of your interface, making sure that you
know which track is fed by which mic. You’ll find with most
applications that putting a track into record mode will
automatically activate the input meters.
2 One advantage of using the mic preamps in your audio
interface is the signals get routed straight to your DAW
and should be numbered sequentially to match the interface.
If you’ve opted for the standalone mic preamp option, you’ll
need to connect it to your interface with a separate cable.
4 Finally, start playing and singing so that you can set
the mic gain. Start off low, increasing gradually until
you reach the level you need, but don’t let the meters peak.
If you’re recording near your monitors, keep them low to
avoid spill and feedback. You’re now ready for take one!
HOW TO MONITOR – THE LATENCY ISSUEWith an ‘as live’ recording,
you can set up a couple of
mics and record in one go
without any headphone cue
feeds. But as soon as the
performer wants or needs to
hear themselves (eg, when
overdubbing), you’ll hit audio
interface latency. For a
headphone cue feed, you
need to be able to hear the
mic you’re recording and
possibly an already-recorded
track at the same time.
If you try and monitor the
mic signal via your DAW
software, a delay (latency)
will be introduced. Even with
small audio buffer settings
you’ll hear an echo. Many of
the cheaper audio interfaces
include a headphone mix
control, so you can create an
instant blend between mic
input and DAW output. The
more complex interfaces
now include their own
latency-free mixing software
and effects. You could use a
small analogue mixing desk
with mic preamps and
headphone facilities.

130 | BEGINNER HOME STUDIO HANDBOOK
RECORDING | HOW TO RECORD VOCALS
ONCE YOU’VE got your performance in the
bag, or at least compiled it from a number
of takes, you’re ready to get mixing. You
may be wondering what this involves and
why you need to bother, particularly given
that we’re only dealing with a small group
of tracks. Essentially, mixing enables you
to rebalance the elements of your track.
Beyond this, there are plenty of other
techniques and tools at your disposal.
From simply panning elements within
the stereo field, through to applying EQ,
compression, reverb, delay and various
other effects, your DAW is packed full of
powerful tools. The basic deal is to use
these wisely and your track will end up
sounding way better. It’s possible to go
too far and ruin things, but remember
that every plugin has a bypass switch,
so always use it to check the ‘before’ and
‘after’, and make sure your changes are
positive for the song as a whole.
BASIC TOOLSEQ IS the most frequently used mixing
processor, and it’s likely you will need to
EQ every track in your mix at least a little.
You’ll probably need to process the whole,
combined mix as well. EQ is essentially a
glorified tone control with which you can
shape the frequency content of a sound
in subtle or extreme ways. This could
involve brightening something up (by
adding higher frequencies) or removing
low-frequency rumble (which might well
be caused by a mic stand), but you can
be much more extreme with EQ if you like.
Most plugins of this type include a visual
display to help you see your changes.
A compressor can be thought of as an
automatic level control. With the slider or
threshold knob, you can set it to affect
only the parts that exceed a certain
volume. The other controls (primarily
ratio, attack and release) influence how
it does this. With the kind of music we’re
dealing with here you should be using
compressors to reduce the extreme
dynamics that live instruments and the
human voice produce, so that all aspects
of each sound can be clearly heard.
EQ and compressor plugins are
designed to completely replace the
original sound with the processed one,
so you typically use them as ‘insert’
effects on a channel. The other main
category of effects – reverb and delay
– are added to sounds, which is typically
done by using an auxiliary ‘send’ control
on a mixer channel to send a portion of
the signal to a separate return channel
into which the effect is inserted. The
outputs of these two channels can then
be adjusted until the correct balance
between the unprocessed (dry) and
processed (wet) sound is found.
At a basic level, reverb replicates the
complex reflections of a sound in a
physical space, while delay tackles the
related concept of echo. Your DAW will
contain numerous reverb and delay
plugins that will each work hard to give
you an incredible amount of control over
the ‘virtual’ context of your recordings,
from small rooms through to wide-open
concert arenas.
FANCY TOOLSBEYOND THE basics, there are also a whole
host of effects plug-ins available that are
capable of seriously changing the way
your tracks sound. From phasing to
flanging, and bit crushing to distortion,
these effects can be used both brutally
or subtly. If you’re aiming for a natural,
live feel, go carefully.
Even so, light use of chorus can be
great for thickening up sounds, such as
voice and guitar. And if you’re feeling
creative, phaser and flanger effects
typically evoke the styles of the 1960s.
Needless to say, you will find all of these
and more present in most DAWs, so if you
want to know how they sound, load them
up and have a play.
GET PREPAREDWITH ALL of this to think about, it can be
tempting to dive straight in, but a little
preparation now will save you heaps of
time later on. So make sure that you’re
happy with your edits, using crossfades
to smooth any clicking out where parts
meet. Then load and bypass an EQ and
compressor on each channel, including
the master. Finally, set up two reverbs
and one delay on auxiliary return (aka
FX return) channels.
MIXING GUITAR AND VOCALS
However you choose to approach your recording session, here are a few more things to consider for getting the best out of your vocals:
1 Many vocalists sing better when they tilt
their head back a little, as it opens up their
vocal chords. The easiest way to take
advantage of this is to place the mic slightly
higher than the singer’s mouth, angled down
towards them – this will encourage them to tilt
their head back as they sing.
2 Make sure you keep track of your
singer’s position (even if your singer is
you). You will often find yourself taking
breaks, or coming back to re-record a line, and it’s
important to make sure the vocals are coming
from the exact same position each time – if not,
they might not sound the same. It goes without
saying that you should also keep track of where
the mic was on the previous take.
3 Chorus effects are great, but one of the
best ways to achieve chorusing is to
actually record multiple takes of the
vocal. You can then take a few of these and layer
them – try panning a couple slightly and leaving
one centred, or thinning out the underlying pair
with EQ and more heavily compressing the
central one for added impact.
20
PROFESSIONAL
VOCAL TIPS

BEGINNER HOME STUDIO HANDBOOK | 131
HOW TO RECORD VOCALS | RECORDING
4 One of the great ways to keep a vocal
punchy but still interesting is to use some
of your additional takes to layer key words.
These could be words that are significant in a lyrical
sense, or that work well with the groove, or that
enhance the arrangement. Just be sure not to
overdo it – use them sparingly enough that they
keep their impact when they appear.
5 Breath noise can be problematic, but it’s
also vital on some vocals – completely
removing it can make a vocal sound
artificial and over-processed. Sometimes the words
and breaths will slide between each other, so make
sure you set any gain reduction carefully to leave
some of the vocal in the track.
6 It’s always worth trying a vocal in a different
key, just to see how it sounds. It can be easy
to get stuck in your ways, but it only takes a
minute to sing a line in a different key. You might
decide it sounds horrible, but you could also be
pleasantly surprised. You might even decide to put
a key change in the track.
7 Remember, your vocal is not just another
part of your track - it is your track. There will
be musical elements that people like, and
riffs that people love, but it’s best to treat your vocal
as the hook in almost every instance, as that is quite
simply how most other people will view it.
8 Processing is great for adding emphasis to
a vocal, but you can also add interest by
using some real gear. For example, try
recording a version of your vocal into an iPhone
(you can set this up to run at the same time as
you’re capturing the vocal with a proper mic), or
you might want to consider recording through a
megaphone or guitar amp.
9 Try capturing vocals in different places.
Generally dry is good, but if you have a
great echoing hallway, or even a roof or a
field… Why not? When recording outside, however,
your nemesis will be the wind so you’ll need to either
invest in wind baffles or a foam cover. If you want a
completely dry vocal that’s free from reverb and
reflection, it’s hard to beat the middle of a field on
a misty morning!
10 Giving your vocalist a little reverb in
their headphones will help them tell
whether they are singing in key. It will
also keep their confidence high by giving them a
good impression of their own voice. Your vocalist
can’t listen and sing at the same time – at least,
not like the engineer can listen - but with reverb
they can hear the pitch.
11 No matter how carefully you’ve set your
initial input level, singers will sometimes
stray into louder territory than you
planned, so even if you’ve tested their loudest note
and left ample headroom, keep a stern eye on the
incoming level to watch for clipping.
12 Generally speaking, the place for a
vocal is in the centre of a mix. It may
sound obvious to say it, but listen to
almost any great rock or pop recording and you will
hear that, while the instruments might be dotted all
over the place, the vocals are usually centred. The
vocal is normally the main element of any song, so
centring it keeps it, well, central. We’re also used to
people speaking to us from the front, so it feels
much more personal.
13 Be wary of anything that makes noise
when recording. Even quiet noise will
be amplified, including the slightest
rustle of paper – this is why it’s handy for the
vocalist to have all of their lyrics memorised, as
opposed to reading them off of a sheet of rustling
paper. Other culprits include rattling bracelets and
necklaces, as well as change or keys in pockets. Tell
your singer to ditch them before recording starts.
14 It’s great to take chances and
experiment, but if you’re going for a
specific type of track, chances are
there will be a specific type of processing that goes
best with it. Spend a bit of time listening to the types
of effects that are used in comparable tracks – don’t
just use the same old effects on every vocal.
15 We’ve said it before, but compression
is key with vocals. If you want your
vocal to cut through a mix, you’ll need
some level of compression to get consistent weight
– how much depends on the track. A soft vocal
needs some dynamic range, but if your singer is
belting it over a shredding backing track, don’t be
afraid to push the compression up to limiting.
16 Reverb is a great tool for giving extra
space and width to vocals, but it can
also be a dominating effect. As an
alternative option, try some subtle delay. The key to
not overpowering your vocal is to ensure that the
delays are EQ’d – if your delay doesn’t have any EQ,
put it on a bus and apply some EQ from there. A little
bit of top- and bottom-end cut will thin it out and
sound like reverb, but without the muddying tail.
17 Timing is everything. If your vocal lacks
energy, try applying a little pre-delay.
Or better yet, chop up your vocal and
add delay or pre-delay to certain parts to create a
tailored groove. Use a bigger amount than with
percussion. Generally 1 to 3ms will be noticeable
with drums, but with vocals you’ll need to hit about
3 to 5ms or more to notice the difference.
18 Many vocalists find it easier to hit the
right notes if they sing powerfully. If
your singer is regularly missing notes,
try asking them to sing with more force. Just
remember that this will tire out their voice much
faster, and none of the subsequent takes are likely to
match the early ones, so it is generally best saved
until towards the end of a session.
19 Sometimes a live vocal performance
can sound amazing, but once you
record it you’re stuck with it. To get a
similar effect on a studio recorded vocal, play it back
through some speakers, then record that playback
and layer it underneath your original. Since this is
almost exactly what happens with live feedback, the
result will be strikingly similar.
20 For some real bite on your vocals
you can’t beat a bit of distortion,
and almost every DAW now comes
with some kind of guitar pedal and amp simulator,
so make use of them. The trick, as ever, is to strike
the right balance between bite and intelligibility
– unless you just want a mangled vocal, in which
case, go for your life!
Your vocal is usually not just another part of your track
– it is your track. It’s best to treat your vocals like the
hook, as that is how most other people will view it

132 | BEGINNER HOME STUDIO HANDBOOK
RECORDING | MIXING: THE BASICS
This brief overview of the mixing process will help you maintain perspective, set up a conducive environment,
and foster good practices from the start
MIXING: THE BASICS

BEGINNER HOME STUDIO HANDBOOK | 133
MIXING: THE BASICS | RECORDING
It’s all well and good saying you’re
about to “do a mix”, but what does
that actually mean, and what’s the
best way to go about it? At its
simplest level, mixing involves
balancing the elements of the
music so that they’re both
individually present, and making the
best contribution to the overall track.
At its most complex stage, mixing can
involve replacing elements and sounds,
restructuring or editing the entire track,
and sculpting both individual and overall
sounds using automation and a multitude
of effects. A mix is a sonic landscape, and
your aim is to create a coherent yet
distinctive one.
Time to learn more about the essence
of a good mix, how to achieve one, and
how to keep perspective.
WHAT MAKES A MIX GOOD?MIXING IS subjective in terms of preference
but objective in terms of quality. There are
a number of common failings in a bad
mix. For example, one key element, such
as a bassline, might be overpowering the
vocals to the point where it obscures
them; or perhaps the levels of individual
elements might fluctuate so that they’re
inconsistently audible.
So, if that’s bad, then clear-sounding
musical parts that can be distinguished
from one another (when required) and
that allow you to hear what’s going on
are good. But if good isn’t good enough
and you aspire to greatness, you need
to go even further...
Each sound must not only be clear, it
must sound incredible and stand up in its
own right. The mix should encompass
sounds taken from right across the
frequency range. Bass should feel weighty
and punchy, highs exciting and smooth,
and the mid-range should be warm and
musical. There should be interesting
variation throughout, whether in energy
or arrangement.
HOW TO ACHIEVE A GOOD MIXTHERE’S NO reason why mixing a track on
a computer should be any different really
to mixing on a mixing desk. That said,
computers are so flexible now that it’s
akin to being in a technology sweet shop
at times. So don’t be afraid to push the
envelope, but beware of being gimmicky.
If you want your track to stand the test of
time, concentrate on the fundamentals
and use the latest technology to enhance
your music only.
It’s said that you can fix things in the
mix, but if something sounds rubbish at
the recording stage it will most likely still
sound rubbish when you try to mix it. A
mix is the sum of its parts, and while
some mediocre sonic cracks can be
papered over, the more cracks there are
the more people will perceive them.
So when should you mix? Some people
mix as they go, while others leave it until
last. Whenever you tackle it, have fun and
remember that mixing is a process aimed
at arriving at a specific outcome. Within
certain boundaries, that outcome is for
the most part in your hands.
Getting a good mix involves many
techniques, but maintaining an overall
perspective is hard. Yet, in many respects,
it’s the key to getting it right. The following
tips will help keep you on the straight and
narrow, and maintain focus.
SET UP YOUR MIXING ENVIRONMENTIF YOU’RE going to achieve consistent mixes
you need a predictable space. Position
your monitors properly (at ear level and
not too far apart) and try to reduce the
room ambience (having lots of furniture
in the room can help with this).
VARY YOUR MONITORING LEVELSONCE YOU get into the minutiae of your mix,
it’s easy to work for ages without even
thinking about the monitoring levels. Try
working for short spells at different levels
(say, quiet, medium and loud). Each will
offer you a different idea of the balance.
TAKE A BREAKMIXING CAN be an all-consuming activity if
you’re not careful, and time will tick by
without you noticing. Force yourself to
take a break and rest your ears, as the
more tired your hearing gets the less
productive you’ll become.
COMPARE AND CONTRASTARE YOU aiming for the sound of an existing
artist or band? Line up some examples in
your arrange window. This way you can
switch between your mix and theirs to
play a fun game of ‘spot the difference’.
With regular practice you will be able to
recognise how the various frequencies
of their production slot together.
BEWARE OF EXTREMESMUSIC SOFTWARE offers such a powerful
array of tools, it’s easy to go way too far.
As a rule of thumb, if you find yourself
applying large amounts of the same kind
of EQ to everything it’s quite possible
you’re not hearing things properly.
PHONE A FRIEND IF YOU think your mix sounds rubbish, be
brave and play it to someone else whose
opinion you trust. It’s surprising how
levelling other people’s opinions can be,
and their objectivity may bring something
glaringly obvious to your attention.
Getting a good mix involves many techniques, but
maintaining an overall perspective is hard. Yet, in many
respects, it’s the key to getting it right

134 | BEGINNER HOME STUDIO HANDBOOK
RECORDING | MIXING: THE BASICS
You’ve spent hours mixing
your brand new tune, but
no matter how much you
fiddle it still doesn’t stand
up against your favourite
releases. You’ve tried
everything – bolstered the
bass, drenched the whole thing in
effects, added more parts (and then
removed them again), and even made it
louder – but it just doesn’t sound right.
So, what can you do about it? Well, the
chances are good that somewhere along
the way you have committed one of a
handful of the common production sins
that all budding producers have fallen
prey to at some point (don’t worry –
we’ve all been there!). Making music is
often a quite long, lonely and personal
experience – you’re composing in your
bedroom, quietly (or noisily) having fun
and getting on with your dream. But this
also means that you’re too close to the
project. Part of coming up with a great
finished track is being able to step back
and listen with objective ears.
It’s also important to get feedback from
others, but getting valuable feedback is
difficult. Just as making music is personal,
so are individual listeners’ particular likes
and dislikes, and the last thing you want is
to be shot down in flames by someone
who doesn’t know what they’re talking
about or just isn’t into your style of music.
The solution is to get feedback from a
bunch of people who know what they’re
talking about! Drawing upon many years’
experience of mixing and producing
music, and importantly, listening to
demos, newly-signed artists and
commercial releases, we polled a
selection of mixing experts to identify
the top ten most common mixing
mistakes made by budding producers.
Our ten-point list (starting below)
contains everything from the obvious to
the not-so-glaring, from throwing too
much into an arrangement to making
things too loud, and even – yes, we really
do mean this – making it too perfect! So,
be sure to keep these points in mind the
next time you’re working on a mix and
your production nightmares could soon
be behind you.
10TELL-TALE SIGNS OF AN AMATEUR MIX
How to identify and avoid some of the common pitfalls of mixing and end those production nightmares
1 TOO NARROWOne of the most common problems with mixes
occurs when too much is happening in any one part
of the musical plane (or to look at it another way, not
enough is happening). Try to think of music in three
dimensions, and first, check the width. Great mixes
spread themselves like a warm audio blanket across
the entire stereo spectrum. Poor mixes, on the other
hand, throw everything down a narrow beam of audio
straight into your eardrums.
With this in mind, be sure to make good use of
your ‘humble’ panning tools. Pan certain parts to
extremes: unusual effects, percussive noises and
pads go hard left and right; backing vocals can
come further in; and main vocals and bass usually
sit best in the middle. And while there are rules
here, don’t feel as though you can’t break them. Just
make sure that the finished mix sits across the whole
width of the spectrum rather than in one part. Pan
everything to one area and your listeners will simply
think that one of their speakers or headphones is
playing up!
2 KEEP THIS FREQUENCY CLEARSo, that was width – now it’s time for you to
think about depth. There’s nothing worse than a
track that’s been mixed so the whole thing takes
your head off with all of the parts sounding like
they’re playing through a tin can. This is usually a
sign of terrible monitors being used at the mixing
stage – great monitors let you hear the whole
frequency range of your mix. A simple rule of thumb
is to keep instruments of the same frequency apart,
like naughty children, so you don’t get them clashing
and fighting with one another for attention.
A good place to hit first is the bottom end, or bass.
Most genres of music are driven by some form of
bass (with rock it’s bass guitar, for example, and with
dance it’s synth bass) so make sure your mix has
some kind of low-end element upon which to hang.
From there, spread everything upwards and across
the frequency range and don’t have too much
happening in any one area of the spectrum.
3 TOO MUCH CLUTTERComputers have put untold musical power at
our fingertips, but this doesn’t mean we need to fill
256 tracks every time we compose a new tune. In

BEGINNER HOME STUDIO HANDBOOK | 135
MIXING: THE BASICS | RECORDING
fact, many great pieces of music use very sparse
arrangements with a few well-recorded sounds and
instruments. Take the famous Phil Spector ‘wall of
sound’ production method of the 1960s – the name
might imply that everything and the kitchen sink was
thrown in there, but actually Spector’s wall of sound
was just well-recorded, distinct, big sounds.
We’ve already pointed out how important it is to
have a good spread across both the frequency range
and the stereo image, but decluttering can be done
elsewhere in your mix as well, simply by removing
parts from the arrangement. Some of the best pop
songs feature a vocal, a guitar and nothing else,
while some classic dance tracks primarily feature a
drum machine, bassline and vocal. So go ahead and
be ruthless here – you can increase your impact by
decreasing your sounds.
4 THE WRONG SOUNDSSometimes tracks don’t sound right because
the constituent parts do not make a whole. This can
be often caused by using sounds that simply don’t
fit – synth brass being used in place of a real part,
for example, or a sample with slightly incorrect
timing or pitch, for example. It can also be down to
the use of some boring-sounding presets, too many
or, indeed, incorrectly applied effects, or roughly
recorded samples. Don’t misunderstand this last
point, though, because rough, lo-fi audio can sound
fantastic in the right context. It’s all about getting
the right sounds for the track.
The mix is also extremely important here. Of
course you’ll want some sounds to stand out –
the hooks, lead vocals and so on – but it can be
jarring when other sounds that make up the
arrangement are so poorly mixed that they
end up taking over.
5 WHERE’S THE HOOK? At the risk of stating the obvious here, one of
the main problems with your average demo is that
it’s just that – average. In other words it lacks that
certain something that will grab the listener’s ear
and make the track really stand out from the crowd.
And as that crowd is getting increasingly, well,
crowded – as more and more people discover the
joys of at-home music-making – nowadays any tune
worth its salt needs some kind of hook to make it
instantly noticeable and enduringly memorable so
that people take notice quickly.
A great hook can potentially be pretty much
anything – it can consist of a cool bass sound or
part, a melody, an effect or a vocal trick. Indeed,
you will find that the best pop songs (think Kylie
Minogue’s Can’t Get You Out Of My Head, for
example) have all of these. Quite often, though,
just one will do – that one amazing effect or riff that
makes the listener want to listen again as soon as
the track is finished, and has them humming it for
the rest of the day. Get this right and you have won
half the battle.
6 THE WRONG FEELGetting the right ‘feel’ on a track is probably
the single most important consideration when
composing and mixing. Getting the groove wrong
will destroy the heart and soul of a rock track, and
even an ambient, grooveless piece of music needs to
have feel. Part of producing great tracks is capturing
the feel and enhancing the groove.
Some of this is really obvious: if you’re going for a
classic rock track, a 100-120bpm tempo and a solid
backbeat will be a good starting point. If you want
something a bit more laid-back, slow things down
and add a bit of swing. Beyond that, there are myriad
subtle techniques you can use to define your beats
and make them match the overall feel of your track.
Learn them and apply them.
Beats define your groove, but you should be
aware that they can also destroy it. Ram a rigid 4/4
beat onto a soul track, for example, and you could
end up with a real mess.
7 LAZINESSWhile time-tested sounds and tricks have their
place and can sometimes be exactly what a track
needs, many producers unthinkingly borrow the
obvious bits of a genre and just throw them in
willy-nilly. Clichés can make a track sound average,
and sometimes dated, so think on your feet.
This advice extends to how you use your Digital
Audio Workstation, too. Beware of just throwing
something into an arrangement simply because it
fits, or of automatically letting your software stretch
a part to the right tempo just because you can. And
then, of course, we have synth presets – yes, they
can sound great, but if you’re using a preset because
it sounds out of this world, you can bet that it will be
instantly recognisable to everyone else who owns
that same synth, and you can also bet that they will
shake their heads disapprovingly.
This kind of preset snobbery is so wrong in many
ways – presets are created to be used, after all – but
the more ‘out there’ and available a sound is, the
more obvious its source will be, so at least tweak it a
little to make it your own.
8 THE REAL OBVIOUS STUFFThere’s really no excuse for dodgy tuning, but
things like out-of-key vocals, clashing melodies and
unintentionally obvious pitch correction are still
common demo demons that simply make us angry.
To all of the culprits responsible for this, we say:
there are two flaps of gristle on the sides of your
head called ‘ears’ – use ’em!
Coming a close second on our list of obvious
bugbears is hiss. This was an all-too-common
problem back in the early days when analogue met
digital, but if you’re working solely inside the box
with nowt coming in, you really shouldn’t experience
it, so nor should your listeners. If you’re recording
vocals, guitars or other live instruments, take steps
– both of the preventative and the corrective type –
to eradicate extraneous noise.
And finally, the stereo master mix that clips never
fails to astound and enrage us in equal measure, with
many an otherwise astonishing track being ruined
because the producer thinks that louder equals
better. On that note…
9 TOO LOUDWe’ve already mentioned width and depth as
two of the three musical dimensions that you need
to consider when mixing, so let’s move on to look at
the third: height, or, to use the correct term, dynamic
range. This is the ratio between the quietest and
loudest sounds in the mix.
The general trend in music production over the
past decade or more has been to make master
mixes louder and louder by using compressors and
limiters to ‘squash’ the dynamic range, both of
individual parts and the entire mix. As a result, we’ve
all experienced over-compression. You know what it
feels like: you’ll be happily listening to a classic track
on your iPod in shuffle mode and then suddenly
something comes in from a couple of decades later
that blows your ears off.
While these techniques once worked to make
tracks stand out, they’ve now become so extreme
that they’re having the opposite effect. Today there’s
an ever-growing movement to reverse this trend, and
it’s one we support.
10 TOO PERFECTMany producers feel that computers have
made music too perfect, and we think they may have
a point. While we don’t want to sound like our dads
here, the slick production sheen that’s imparted by
today’s music technology can often make tracks
sound samey and uninspiring.
If pristine production is totally your thing, then by
all means that’s fine. But consider the fact that your
music might benefit if you make things a bit more
organic, a little bit earthier and a bit more raw. We
know you don’t want to sound amateurish – and our
aim is to help you sound anything but amateurish
– but sometimes it’s fine to allow or even flaunt
some slight imperfection in your mixes.

136 | BEGINNER HOME STUDIO HANDBOOK
RECORDING | MASTERING: THE BASICS
Mastering is the final stage
of the long production
process, and your last
chance to make your
tracks as good as they
can be. Done well and
mastering will polish your
mixes to perfection. Done badly and the
process can undo much of the good work
that came before it.
If you simply want to add a dash of life
to a demo, there are plenty of things you
can do with the tools you already have to
transform your song into a track worthy
of shouting about. In this feature we look
at some of the common tools you’re
likely to run into when mastering.
MONITORINGTHE POINT of mastering is to create a mix
that sounds great anywhere you hear it,
and such a feat requires decent monitors.
Assuming that you’ve got those (and a
suitable room) sorted, listen to as much
You’ve written a killer tune and mixed it to the best of your abilities. Now discover how
to give it a high gloss finish
on broader top and bottom-end
adjustments. When boosting, an EQ
that imparts some character is best;
perhaps one modelled on an analogue
unit with a touch of valve warmth. For
troubleshooting problem frequencies,
giving a bit more presence to a vocal or
carrying out similar frequency-specific
jobs, a mix of analogue emulations and
‘digital’ EQs works well.
MULTIBAND DYNAMICSTHESE ALLOW you to compress and limit
(and sometimes expand) different parts
MASTERING:THE BASICS
different material as possible until you
learn the limitations and idiosyncrasies
of your environment.
When mastering, listen to tracks on
many different systems. If your master
sounds awesome in your bedroom but
unbearable on earbuds, go back to the
drawing board. If you’re really stuck there
are plugins that claim to compensate for
flawed monitoring and poor acoustics,
such as IK Multimedia’s ARC.
EQTHIS IS one of the most critical processes
in mastering. Two main factors affect how
we hear a finished mix and one of these is
the frequency spectrum, so a good EQ is
essential. It’s also important for setting
the tone of the finished master.
When mastering, you will want a fully
parametric EQ with shelving filters for
both the top and bottom end, as well as a
high-pass filter. This allows precise work
on specific frequency ranges as well as
Two main factors affect
how we hear a finished
mix, and one of these is
the frequency spectrum,
so a good EQ is essential

BEGINNER HOME STUDIO HANDBOOK | 137
MASTERING: THE BASICS | RECORDING
of the frequency spectrum individually.
When troubleshooting bad mixes, this is a
boon as it enables a large amount of
control over each part of the mix – these
tools can be used to tame bass, bring out
vocals, reduce harsh top-end and fix a
multitude of other issues. It can also be
used more subtly to pull together parts of
a mix and add some sonic glue.
LIMITINGLIMITERS HAVE become synonymous with
the often overly loud style of modern
mastering. This processor prevents
peaks in the signal exceeding a certain
threshold, so the signal can be turned up
louder without those peaks causing any
nasty digital clipping to occur.
STEREO TOOLSSTEREO PROCESSORS have varied uses in
mastering. They are often employed to
create a sense of space in the stereo mix,
but this can have a knock-on effect on the
clarity and focus of certain parts.
The most important things to be aware
of when using stereo tools are that bass
should usually be mono, and that vocals
should normally take centre stage. It’s
also important to realise that stereo
widening often increases the perceived
level of high frequencies, so consider that
when EQing your mix.
SIGNAL ANALYSERSTHERE’S A reason why pro mastering
engineers have a visual meter on-hand
to guide and confirm their impression.
When mastering your own music, using
a meter is important because your
monitors may encounter problems
reproducing certain frequencies.
So where should you place your
metering? Stereo analysers should be
placed after any stereo field processors
in the signal chain (any decent stereo
mastering plugin should include one).
Frequency analysers should be applied at
least after your EQ, though ideally you’ll
want to be able to check what’s going on
before and after the equaliser to see the
effects, so we recommend that you place
two into the chain. Many modern EQ
plugins have built-in frequency analysis.
Dynamics processing can have an
impact on the frequency content, too, so
place an analyser at the end of your chain
to check the final product.
If you aren’t sure what a good mix
sounds like, playing professionally-
mastered material in the same genre
often helps. A top tip is to play mastered
tracks through the analyser and have a
look at how the meters behave, then
compare it to your own stuff. If there are
obvious differences between your tracks
and theirs, this will give you some
pointers on what to fix.
STEREO PROCESSORSSTEREO TOOLS are one of the newest
weapons in the mastering armoury, and
there are quite a few ways in which these
can affect the stereo field. One of the
simplest is to delay one side of the stereo
signal to create a perception of space.
Beware: because the effect is not very
natural-sounding, it should be used with
lots of caution.
Another way to create artificial stereo
is to use a type of comb filtering that
spreads the frequencies of a signal
alternately left and then right. This
technique is much more suitable for
mastering and is offered by plugins such
as Vengeance Sound’s Stereo Bundle.
If you aren’t sure what a good mix sounds like, playing
professionally mastered material in the same genre
helps – compare them to your own
As we’ve pointed out, artificial stereo
isn’t the most natural-sounding thing in
the world, and a number of dedicated
wideners such as Waves’ S1 and
Sonalksis’ Stereo Tools are available for
when you need less obvious stereo
processing – such as when mastering
acoustic guitar, for example. These
utilities essentially act just like a mid/side
processor, allowing you to adjust the
balance between the mono and the
stereo signals. This means that they can
make the track seem wider without
adding anything that wasn’t already
present in the signal.
The last stereo tool in the mastering
engineer’s toolbox is mid/side
processing, as found in EQs and
compressors. These tools allow the
mastering engineer to either equalise or
compress the stereo, or work on the
mono signals separately.
Whichever process you use, the key to
stereo processing is to not get carried
away. Turn the effect off from time to time
to evaluate the difference it makes, and
take regular breaks because it’s easy to
get seduced by width. After a few minutes
away from the studio your refreshed ears
will be able to tell if you’ve overdone it.

138 | BEGINNER HOME STUDIO HANDBOOK
RECORDING | TROUBLESHOOTING
Connection confusion? Lamentable latency? We troubleshoot your most common woes to
help you get back on track
1 MY DAW/COMPUTER DOESN’T SEE MY AUDIO OR MIDI INTERFACE
FIRST, CHECK if there’s an update for the
driver and any software for your interface.
This will likely be unnecessary if you’re
using a Mac, since its OS has built-in
support for class-compliant MIDI and
audio hardware. If there’s no driver
available, any Windows users can use
ASIO4ALL (asio4all.com), a low-latency
driver that works with many interfaces.
Another thing to consider is driver
conflicts. Sometimes one device doesn’t
want to work with another. For example, if
you try to stick too many 1-in/1-out MIDI
interfaces from the same manufacturer
on your machine, your software may not
be able to tell them apart. What about the
possibility of an IRQ conflict or a bad PCI
slot? PCI soundcards can conflict with
other PCI devices in your machine. Try
plugging your interface into a different
PCI slot if possible. If you’re using an
external interface, have you tried
connecting it with another cable?
2 MY GUITAR SOUNDS AWFUL WHEN I PLUG IT DIRECTLY INTO MY PC/MAC
GUITARS HAVE certain special requirements
in the studio. The impedance of the signal
produced by your guitar is likely not
matched to that of your computer’s line
input. You’d be best served by using an
audio interface with dedicated guitar
inputs, or a DI box to convert the guitar’s
signal to line level.
3 MY RECORDINGS ARE DISTORTEDTHE MOST obvious culprit is lousy gain
staging. How many options for increasing
the signal level do you have? Are you
using an external mic pre, guitar amp, or
mixer? Each of these devices provides an
opportunity to overload either itself or a
step further down the chain. Learning to
master the gain stages means knowing
the gear you use. Read the manuals and
experiment to figure out at which points
distortion is likely to occur, and set the
levels to optimise your gain staging.
Some equipment allows you to choose
between operating at +4dBu or -10dBV
analogue signal levels, so make sure your
levels are properly matched. Some
mixers and interfaces offer a 20dB ‘pad’
that can be switched in to lower the
incoming signal. Finally, most musical
sounds are dynamic, meaning that they
can be at turns very loud or whisper-
quiet, and it’s the loudest peaks that can
cause distortion.
Many audio interfaces can record at a
resolution of 24-bits, allowing enough
headroom to back off the signal without
the quiet sections being swallowed up by
the noise floor. If this isn’t practical, use a
hardware compressor or limiter on the
incoming signal to prevent the peaks
from clipping.
4THERE ARE WEIRD DIGITAL GLITCHES IN MY RECORDINGS
TO BEGIN with, make sure there are no
unnecessary stresses being placed on
your system during the recording. Also, if
you’re using any external gear with digital
outputs, you might need to set either the
external hardware or your interface as
the digital clock master. It is imperative
that all of your digital gear be clocked to a
master clock. FireWire buss problems
can cause glitches and dropouts, too. For
instance, you may find that you need to
put your external drive and interface on
discreet FireWire busses.
5I CAN’T HEAR MY MICROPHONE THROUGH MY INTERFACE
THIS IS usually down to one of three
issues. First, some mics – such as large
diaphragm condenser models – require
power, most often delivered via the XLR
cable connecting the mic. This is called
‘phantom power’ and is there for the
purpose of powering your condenser
mics, usually activated with a 48V switch

BEGINNER HOME STUDIO HANDBOOK | 139
TROUBLESHOOTING | RECORDING
on an interface, preamp or mixer. Some
condensers (such as AKG’s C1000) use
standard batteries instead.
The second place to look will be your
interface. It may have a switch for toggling
between mic and line level. Make sure it’s
set to mic level if plugging the mic straight
into the interface. This is the perfect time
to discuss input monitoring – applicable
to any live input, not just microphones.
Many interfaces allow you to mix between
the incoming (‘direct’) signals and those
played back by your computer. If not,
you’ll need to enable input monitoring in
your DAW. Your DAW and interface user
manuals will explain monitoring features.
6WHY IS THERE AN ECHO ON MY GUITAR/VOICE WHEN MONITORING?
DO YOU have a delay plugin strapped
across an insert? Some DAWs have
preset template tracks and many of these
tracks are pre-routed to auxiliary busses
or have effects on the inserts. Shut ’em
off! More likely, though, the echo can be
due to the inherent latency in the system/
DAW when monitoring through your
music software.
First, try lowering the buffer size of your
audio interface (check your manuals); if
it’s still not acceptable, consider using
your audio interface’s direct monitoring
(if it has this feature), which monitors
audio directly through the interface for
near-zero latency.
7I KNOW I’M PLAYING IN TIME BUT WHEN I PLAY BACK, IT SOUNDS OUT
SOME DAWS record ‘what you play’, while
others record ‘what you hear’. Taking the
latter as an example, let’s say there’s
some audible latency when monitoring
but you decide to ignore the fact that
when you hit your MIDI drum pads, the
resulting drum hits come back out of the
speakers a bit late – so long as the impact
of skin against rubber is precisely on the
beat. When you play it back it will sound
late, as that is indeed how it sounded
through the speakers during recording.
The DAW recorded what you hear.
Conversely, you might instinctively
adapt your playing to account for the
added monitoring latency by playing a
little early so that during recording, what
you hear through the speakers sounds
exactly right. However, if your DAW
records what you play, upon playback the
software will compensate for the latency
(which you already compensated for
yourself by playing ahead of the beat),
resulting in the recording sounding early.
This can affect audio and MIDI recording.
Get to know which mode of operation
your DAW uses and adapt your playing
and workflow practices to work with it.
Some DAWs offer both modes – for
example, Cubase with its optional (and on
by default) Adjust for Record Latency,
which records ‘what you hear’.
8WHEN I PLAY MY PROJECT, IT STUTTERS AND BREAKS UP
IT MIGHT be that your audio buffer size is
too low for the tasks at hand. While this
will minimise latency, it will also tax your
CPU a lot more and you can wind up with
stuttering and drop-outs. With that in
mind, it makes sense to keep buffer size
low when recording in order to avoid
latency, but to increase it once all of your
tracking is complete and you need to
maximise CPU power for mixing duties.
Another option is to choose less CPU
intensive plugins for basic processing
needs. You don’t need a bells-and-
whistles super-delay to provide a simple
echo. Find effects plugins that are equal
to the tasks at hand; ditto for synths and
samplers. There’s no need to open a
multigigabyte sample set just to play back
a cowbell. Look very closely at all of the
instruments and different effects in play
and determine where you can cut back.
With a modern multicore CPU, you will
experience break-ups as soon as one core
is maxed out. As such, experiment with
disabling plugins on different tracks in
your DAW so that you can discover where
the bottleneck is – you may find that you
only need to disable/replace a plugin or
two in order to alleviate the situation.
If you need every instrument and effect,
consider freezing or rendering tracks to
conserve CPU. This will allow you to
bypass piggish effects and instruments
and cut back the amount of processing
and RAM needed to play your project.
Also, check to see if you are overtaxing
your hard drive – lots of audio tracks and
disk-streaming samplers can make heavy
demands on your drive. If this is the case,
you might consider creating sub-mixes of
your tracks, ie, you might mix all of your
backup vocals down to a single track. You
can always keep the original multitracked
vocals saved safely in a separate project,
in case you do need to revisit them.
9 MY PLUGINS DON’T SHOW UP!YOU COULD be attempting to use 32-bit
plugins in a 64-bit DAW, or vice versa.
Logic Pro X, for instance, is a 64-bit
application that only runs 64-bit plugins.
Some DAWs come in both 32- and 64-bit
versions (for example, Ableton Live), so
you can choose which you want to be able
to run. Some include their own ‘bit bridge’
that will allow a 64-bit DAW to run 32-bit
plugins. If your DAW doesn’t have a bit
bridge, there are third-party ‘wrappers’
that offer the same functionality. 32 Lives
(soundradix.com) is such a program for
AU, while jBridge (jstuff.wordpress.com)
is what you need for VST.
Before getting sidetracked, though,
make sure your plugins are compatible
with your DAW (ie, an AU-only plugin isn’t
going to show up in a VST-only DAW) and
installed in the correct folders. Check
your DAW’s plugin management system
to see if any problems were detected on
startup. There will be a way to force the
DAW to scan again for plugins, too.
10 WHEN I LOAD A PROJECT, THE DAW CAN’T FIND THE AUDIO/SAMPLES
THAT GO WITH ITWERE THE audio or sample files moved or
renamed? You’ll find that most DAWs
don’t store samples or audio in their
project’s default file format, but rather
pointers that tell the software where to
look for the data on your drives. If you’ve
moved the samples or audio, the software
won’t be able to find it. Some DAWs offer
a ‘find’ feature, but others will need you to
manually direct the software to the new
path. Some software can store all of the
files associated with a project in a single,
monolithic file format. This can take up a
lot of space, but it’s a good way to ensure
your data is stored with the project.
When it comes to samples and audio,
it’s a good idea early on to develop good
organisational habits. It’s all too easy (and
rather unhelpful) to wind up with tons of
files scattered all over your drives.

140 | BEGINNER HOME STUDIO HANDBOOK
THE BUSINESS OF MUSIC
THE BUSINESS OF MUSIC
By now you’ll have set up a home studio, chosen the right gear, and recorded your music to be the best that it can be. So, what do you do with it now? Not everyone’s goals are the same – some of you will have been recording as a hobby,
others for close friends and family. But for those of you who are recording music to share it with the world and get noticed, this section is for you. We’ve called in a raft of industry experts to give you advice on building your local fanbase and getting your music heard. We have tips on how to grow an organic buzz around your band, how to supercharge your YouTube presence, and how to get reviews. It’s competitive out there, but with the right attitude and brilliant songs, there’s no reason why you can’t make an impact.

BEGINNER HOME STUDIO HANDBOOK | 141
GET YOUR MUSIC HEARD | THE BUSINESS OF MUSIC
You’ve recorded your music and
now you’re getting ready to
share it with others. Whether
you’re looking for reviews,
gigs at your local rock night,
or you’re using your new
recording to connect with
fans and other bands on and offline, this
expert-led feature will help you.
Over the next few pages we’ll be
dishing out advice from trusted industry
experts, advising you on how to find your
tribe and build an online platform. From
writing your own press release and
making your songs available digitally,
through to building a YouTube following
and growing your fanbase, this feature
will help you get your music heard.
GET YOUR MUSIC HEARD
How to build a fanbase, connect with your local and national music scene, and get your music out there to grow a buzz around your band

142 | BEGINNER HOME STUDIO HANDBOOK
THE BUSINESS OF MUSIC | GET YOUR MUSIC HEARD
Skip Curtis is a well-respected
face on the UK music scene.
He teaches students at
BIMM Bristol about working
in the industry, and he’s a
producer and songwriter, as
well as consulting on A&R
and artist development. Skip says that
establishing a local fan base is an
essential part of any artist’s career:
“Some artists are lucky enough to grow
up in, or close to, a dynamic city with a
strong musical heritage, while others
find themselves plying their fledgling
trade in areas with little musical
infrastructure or culture.
“As the industry has moved online,
geographical constraints have been
reduced and online communication plays
an important role in establishing a local
fanbase,” says Skip. “The most successful
artists are those who build organically and
establish a true connection with their fans
and their community.” Here, Skip gives
you advice on building a fanbase – both
online and in your home town.
SOCIAL MEDIA ESSENTIALS “THERE ARE certain social media sites that
it’s expected for you to be using as a new
artist – sites like Facebook, Twitter and
SoundCloud are pretty much essential.
Get in the habit of using these regularly
by posting relevant content. Proper use
will steadily increase your page’s likes
and followers, and you can guarantee
that any promoters looking to book you
will be looking at these numbers.”
FOLLOW AND INTERACT“POTENTIAL FANS and useful people are easy
to find – a quick Twitter search will give
you hundreds of useful and interesting
local social media accounts to connect
with. These like-minded people are the
ones you should be interacting with early
on and throughout your career. Don’t
spam and mass-follow thousands of
accounts; do your research and connect
with the ones you think would be most
interested in your music.”
ACT THE PART “THE WAY you communicate online and in
person should reflect what a dedicated
artist you are. Lots of new artists act as
though they don’t take the industry or
themselves seriously. While the novelty of
funny pictures and in-jokes might win
over a handful of people, in reality it’s
probably going to mean that local radio,
press and promoters won’t take you
seriously. Keep your communication
dynamic, but keep it on point.”
RESEARCH“UNDERSTAND YOUR local music community.
Spend time investigating the different
venues, promoters, bloggers, DJs, sites,
magazines and tastemakers operating in
your area. These will be the people to
target once you’re ready to release what
you’ve just recorded and start building
your hometown following.”
ASK FOR HELP “IT’S NOT cool so many artists don’t do it,
but you’ll be amazed at the response you
get when you simply (and politely) ask for
something. Research the best and most
relevant local new music site or magazine
and send them an email asking if they’d
be interesting in writing about you. More
often than not you’ll get a response; even
if they’re not interested, your name is out
there. When you post links and content
online, ask fans to share them. This isn’t a
desperate plea for exposure, just a simple
‘If you like this, please share it.’”
LOOK THE PART“THE WAY you market yourself online is a
massive part of the modern music
BUILD YOUR LOCAL FANBASE

BEGINNER HOME STUDIO HANDBOOK | 143
GET YOUR MUSIC HEARD | THE BUSINESS OF MUSIC
industry. Press photos and good graphic
design help build the ‘cult’ of personality
artists are striving to create and these
give audiences something to connect
with. Getting this sorted might cost a bit
of cash, but it’s a necessary expenditure.
The more professional you look, the more
seriously you will be taken and the more
fans will buy into you.”
INTERACT WITH OTHER LOCAL ARTISTS“THERE WILL always be healthy competition
between similar artists from the same
area, but that doesn’t mean they
shouldn’t get along and support one
another. Befriending and supporting
other local artists online and in person is
in everyone’s interest. Not only does it
help with gig sharing and fan crossover,
but it also helps create a musical
community and buzz in your area. Be
visible, go to other artists’ gigs, get your
face known and support them online.
Very often, certain places become
hotbeds of talent and lots of industry
eyes and ears will turn towards particular
cities or areas.”
DON’T OVERPLAY“MANY ARTISTS fail to spot this pitfall, but
overplaying in your local area can be
detrimental to your career. Although you
may want to hone your craft and keep
playing as many shows as possible to
build a fan base, in reality people will get
bored of you. Music is readily available
to consumers now, so you need to offer
them something worth seeing. If you’re
too available your performances lose
their excitement and appeal. Once that
goes you lose the punters, and once they
go you lose the promoters. Space your
local gigs out and keep your set fresh.”
VIDEOS “YOUTUBE IS the king in terms of actual
users and subscribers, so get a video
presence online early. The approach you
take depends on the kind of artist you
are. Live sessions and acoustic videos
suit certain artists with music that
sounds good stripped back, while
off-the-wall music videos will suit bands
with more abstract sounds. No one’s
expecting big budget HD video shoots
early on, but these days getting decent
footage with clear audio is definitely
achievable on a shoestring. Behind-the-
scenes footage, studio clips and gig
videos are great for drawing fans in.”
BECOME THICK SKINNED“YOUR MUSIC is never going to appeal to
everyone. Prepare to be turned down
plenty by promoters and press for purely
subjective reasons. On a similar note, get
ready for the occasional negative online
comment. Arguing with trolls online will
show you in a bad light. Don’t waste your
time on people who don’t like your music,
instead concentrate on interacting with
the ones who do like your songs.”
Session musician Jon Harper
has more than a decade of
experience with major and
independent record labels.
He knows that building your
video channel and attracting
followers will help get your
music heard worldwide. “YouTube has put
artists in control of their image, allowing
them to create their own video identity
and broadcast their talents,” he says.
“A few minutes spent establishing an
account could allow you access to the
industry and a vast audience across the
world. You don’t need a huge budget to
promote your project, it’s more about
embracing a few simple ideas, being
passionate about what you do and
showcasing your talent.
“Setting up is simply a case of
registering: choose a name and add
some design to your page. Select a name
that can run across your other online
profiles.” Here’s more of Jon’s advice for
supercharging your YouTube presence...
BUILD YOUR BRAND“MAKE SURE your YouTube page shares a
similar design with your other sites to
present a professional brand image. Use
your own website or blog as a hub to tie
everything together.”
GEAR UP“TO MAKE videos you’ll need a basic way
of recording and editing video and sound.
You don’t need pro equipment – many
smartphones let you create HD video
and upload to YouTube. There’s also
plenty of free video editing [software].”
BE CREATIVE“WITH MILLIONS of videos on YouTube you
need to stand out. You can hook viewers
with creative covers. Look at the Trending
section of YouTube. Note the content,
length and hits of these videos – you can
always ‘piggy back’ off others by creating
a similar (or better) video as a ‘video
response’ to drive traffic to your channel.”
GIVE IT A NAME“TITLES SHOULD be specific and improve
your visibility by using keywords/phrases
that people will be searching for (SEO).
Add a detailed description and choose
keywords from this for tags. Allow mobile
sharing so people can watch on their
devices and share on social media.”
KEEP IT REGULAR“REGULAR CONTENT keeps people coming
back. Make a couple of videos at a time so
you have reserves. Encourage subscribers
by using YouTube’s annotation feature, and
by referencing related videos.”
SUPERCHARGE YOUR YOUTUBE PRESENCE

144 | BEGINNER HOME STUDIO HANDBOOK
THE BUSINESS OF MUSIC | GET YOUR MUSIC HEARD
For those of you with no band
budget for a professional press
campaign, how about some tips
on writing a knockout press
release that will help get you
reviewed? Luckily we have
insider info from Jay Taylor,
Director at Prescription PR. Jay’s clients
include Polyvinyl Records, Navigator
Records and Sony Music, plus artists
such as The Beach Boys, The Kinks,
Tears For Fears, Richard Thompson and
Lenny Kravitz. Rest assured, he knows
what he’s talking about!
“Jenny Bulley [Reviews Editor, Mojo]
once told The Musician that, ‘The value
of a good press release can’t be
underestimated’. I couldn’t agree more,”
says Jay. “This extends beyond just how
well a press release is written, and takes
into account its form and functionality.”
Here are Jay’s tips for writing a great
press release and improving your
chances of getting reviewed…
BE OUTSTANDING FROM THE START“GET TO the point early on, and if you
have already had some decent early
coverage, include the best of the
media quotes you’ve garnered at the
top of your press release. It’ll be eye-
catching and instantly make you stand
out from the 500 other releases that
writer will receive that day.”
KEEP IT BRIEF“IF YOU’RE sending a physical version of
your press release, don’t exceed two
sides of A4. If you’re emailing it, ensure
you format it correctly and send as plain
text rather than as an attachment.”
REMEMBER THE BASICS“DOUBLE-, THEN triple-check the spelling
and grammar. Include all relevant contact
information and links to further
information. For example, a bio, images,
or links to more of your music.”
WRITE FOR ONLINE AS WELL AS PRINT“IF YOUR press release is more news
related, keep it short and sharp. In all
likelihood your press release may end up
on social media with the title [and often
the contents] replicated word for word.
Make sure the title fits a site like Twitter’s
character restrictions for maximum
impact and ease of sharing.”
WHAT NOT TO INCLUDE“AVOID HACKNEYED clichés about how you’re
the saviours of rock’n’roll. You never know,
you might turn out to be just that, but at
this early stage it’s not your call to make.
It’ll be more of a turn off than anything
else. Similarly, don’t mention ‘pounding
drums’, ‘pumping bass’ or ‘driving guitars’.
To the first-timer they might well indeed
represent a valid analysis of your sound,
but these phrases have been doing the
rounds forever and are somewhat of an
industry in-joke. Avoid at all costs.”
MANNERS MATTER“BEYOND THIS, when you approach
journalists with your press release, be
polite, patient. If they don’t get back to
you particularly fast, try to understand
that they are busy people. You will soon
discover that different editors have their
preferred way of working but, generally
speaking, a follow-up email is usually
expected. Just try to resist the urge to
bombard anyone too often.”
DIY PR


146 | BEGINNER HOME STUDIO HANDBOOK
JARGON BUSTER
AUDIO INTERFACEHARDWARE DEVICE with audio
inputs/outputs for sending
and receiving audio from your
computer. Connects via
FireWire or USB.
BUSSANOTHER NAME for a group
channel or send effect. See
Group Channel, Send Effect.
CHANNELGENERALLY REFERS to a mixer
channel in a sequencer.
Usually features a fader to
control the overall volume
level, EQ controls, and the
ability to add insert effects.
See EQ, Insert Effect.
CLICK TRACKAN AUDIO cue programmed to
a specific tempo and time
signature to keep musicians
in time when playing.
CLIPPINGDISTORTION THAT occurs when
an audio input is overloaded.
COMPRESSORAN EFFECT that raises the overall
volume of a channel by
making the loud parts quieter,
then boosting the entire
signal. See Effect, Dynamics.
CONDENSER MICMORE SENSITIVE than a dynamic
mic and requiring external
power. Excellent for recording
detailed sounds and capturing
high frequency detail.
CUTOFFTHE FREQUENCY at which a filter
starts filtering. See Filter.
DAWDIGITAL AUDIO Workstation. A
computer with the hardware
and software to facilitate
music productions.
DE-ESSERAN EFFECT used to reduce
unwanted ‘S’ sounds (sibilance
or hiss) in vocals. See Effect.
DELAYAN EFFECT that simulates
echoes by repeating the
sound. See Effect, Plugin.
DI BOXDEVICE USED to plug guitars and
basses into mixers or audio
interfaces, negating the need
for a separate amp.
DYNAMICSTHE VARIATION between loud
and quiet music. Limiters,
compressors and gates can
adjust dynamics. See Effects,
Compressor, Limiter, Gate.
EFFECTPLUGIN THAT alters the sound
of an audio/instrument
channel, eg, a reverb effect.
See Reverb, Filter.
EQ EQUALISATION AUDIO processing
that affects the frequency
content of a sound. EQ can be
used to either boost or reduce
the volume of a sound at
various frequencies.
FILTERAN EFFECT or part of an
instrument that removes
certain frequencies from the
sound to change its tonal
quality. See Effect, Plugin.
GATEAN EFFECT that silences audio
below a certain volume, used
to remove noise from poor
quality recordings.
GROUP CHANNELA CHANNEL that can receive
input from multiple other
channels so that they can
be processed together.
HEADROOMAMOUNT OF volume you can add
without distortion occurring.
INSERT EFFECTAN EFFECT added in series to an
audio or instrument channel,
can only be used by a single
channel. See Send Effect.
LATENCYTHE TIME it takes your audio
driver to process audio. The
gap you hear between hitting
a MIDI note or playing a real
instrument and hearing it.
LIMITERAN EFFECT that stops a track’s
volume exceeding a certain
level. See Effects, Dynamics.
MIDIMUSICAL INSTRUMENT Digital
Interface – a method of
sending information between
music hardware and software.
MIDI CONTROLLERANY DEVICE that sends out MIDI
data, eg, a controller keyboard.
MULTITRACKA PROGRAM capable of
recording multiple audio parts
on separate tracks.
OVERDUBBINGRECORDING A new performance
over the top of an existing one.
PLOSIVESTHE POPS you get when a
vocalist records a take. Can be
reduced using a pop shield.
PLUGINSSOFTWARE INSTRUMENTS/ effects
that can plugged into a host
program, usually a sequencer.
PANTHE POSITION of a sound
between the speakers.
PREAMPDEVICE FOR amplifying a mic,
guitar or record player before
it’s plugged into a mixer or
audio interface.
REVERBAN EFFECT to simulate multiple
echoes as heard in real
spaces. See Effect, Plugin.
SAMPLEANY SNIPPET of recorded
audio data.
SEND EFFECTA CHANNEL-INDEPENDENT effect
that can be used by multiple
sources at the same time. See
Insert Effect.
SOUNDCARDAN INTERNAL audio interface.
See Audio Interface.
TRACKEITHER AN entire piece of music,
or an individual ‘lane’ of audio
or MIDI data. See Audio, MIDI.
TRANSPORT CONTROLSPLAY, RECORD, Fast Forward,
Rewind, etc – controls used
for track playback in your
audio editor or sequencer.
JARGON BUSTERHere we explain some essential words and terms that you might encounter in this Handbook, or elsewhere on your forays into the world of home recording

AVAILABLE IN PRINT & DIGITALLY NOW
HOME RECORDING FOR EXPERTS

9000
9001