home irrigation installation planner diy · home irrigation system is a fully automatic hub and ......
TRANSCRIPT

Home IrrigationInstallation Planner
DIY

I N S T R U C T I O N S
House
Drive
Pergola
Pat
h
1. Measure and draw your home and garden
Draw a plan to scale on the graph paper inside this planner, including your gardens, pathways, lawns, garden shed, pergola, patios and driveways. Choose a scale and write this in the box on the graph paper. Measure your home and gardens accurately.
2. Measure your Water Supply Capacity Measure the available water from the tap that will supply the
system. Turn the tap on fully. Slide a 9 litre bucket under the tap and time how long it takes to fill. Determine your water supply capacity by using the calculation below. Write the result under ‘Water Supply Capacity’ in the ‘Calculate the Number of Lines’ table.
In the example:
Time to Fill = 14 Seconds.
Water Supply Capacity = 9 x 60 ÷ 14 = 38.6 LPM
This means the capacity of the water supply has a maximum of 38.6 LPM (litres per minute) to use at any one time when designing a system. Decrease the result by 10% for a safety margin. A 38.6 LPM supply would therefore be 34.7 LPM.
3. Mark on your plan where each Watering Method will be usedMatch the different plant groups in your yard to different Watering Methods.
• Use Micro Sprays for flower beds, garden beds, shrubs and ground cover.
• Use Drippers or Misters for pots and hanging baskets.
• Use Drippers for shrubs and ground cover.
• Use Pop-ups Sprinklers in your lawn.
In the example, Micro Sprays are written where there are garden beds, Pop-ups where there are Lawns and Drippers in the Pergola. Note the use of Drippers in the garden bed along the side of the house because the garden bed is too narrow for Micro Sprays. They would spray onto the path wasting water.

Garden–Micro Sprays
Lawn–Pop-ups
Gar
den
–Mic
ro S
pray
s Pergola–Drippers
Nar
row
Gar
den
Bed
–Dri
pper
s
Lawn–Pop-ups
Lawn–Pop-ups
Garden–Micro
Sprays
4. Select Watering Methods from the Shopping List Selecting Nozzles is a personal choice. Use the Nozzle Pattern
and Radius to make these decisions. Aim to have the least number of Nozzles possible. Use 90° nozzles in the corner of lawns and gardens. Use 180° nozzles along the edges and against fences or buildings. Place 360° nozzles in the centre of large areas.
Micro Sprays, Drippers, Spray Head Pop-ups and Gear Drive Pop-ups should not be mixed together on the same watering line.
5. Mark the position of nozzles on your planSpace nozzles apart by the same distance as their spray radius. This ensures that the water spraying from one micro spray should just reach the next micro spray. This overlapping of spray patterns achieves the most even water coverage for your garden. The spacing between nozzles is not critical, plus or minus 20% is fine.
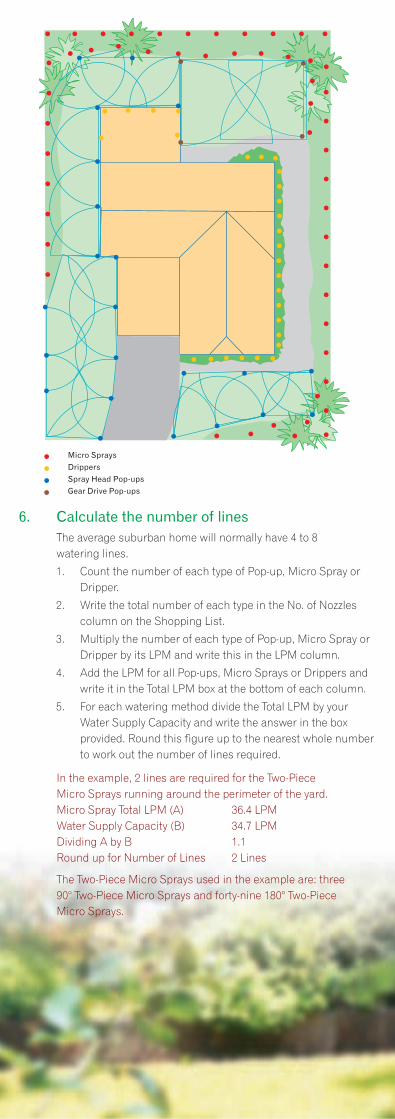
In the example over the page, Two-Piece Micro Sprays, Micro Sprinklers, Adjustable Drippers, Gear Drive Pop-ups and Spray Head Pop-ups are used.
In the garden, that runs around the perimeter of the yard, 180° Two-Piece Micro Sprays are positioned. In wider parts of the garden Two-Piece Micro Sprays are staggered to provide full coverage. Where the garden is very narrow Adjustable Micro Sprays are positioned.
Drippers are positioned at each plant in the garden bed running along the side of the house. It is too narrow for Two-Piece Micro Sprays. Drippers are also used in the Pergola.
The Lawn areas use both Spray Head and Gear Drive Pop-ups.
6. Calculate the number of linesThe average suburban home will normally have 4 to 8 watering lines.
1. Count the number of each type of Pop-up, Micro Spray or Dripper.
2. Write the total number of each type in the No. of Nozzles column on the Shopping List.
3. Multiply the number of each type of Pop-up, Micro Spray or Dripper by its LPM and write this in the LPM column.
4. Add the LPM for all Pop-ups, Micro Sprays or Drippers and write it in the Total LPM box at the bottom of each column.
5. For each watering method divide the Total LPM by your Water Supply Capacity and write the answer in the box provided. Round this figure up to the nearest whole number to work out the number of lines required.
In the example, 2 lines are required for the Two-Piece Micro Sprays running around the perimeter of the yard.
Micro Spray Total LPM (A) 36.4 LPM Water Supply Capacity (B) 34.7 LPM Dividing A by B 1.1 Round up for Number of Lines 2 Lines
The Two-Piece Micro Sprays used in the example are: three 90° Two-Piece Micro Sprays and forty-nine 180° Two-Piece Micro Sprays.
Micro SpraysDrippersSpray Head Pop-upsGear Drive Pop-ups

1 Line for Garden & Pergola
2 Lines for Gardens
3 Lines for Spray Head Pop-ups in the Lawn
1 Line for Gear Drive Pop-ups in the Back Yard Lawn
7. Preparing linesDivide the nozzles for each watering method into groups. There should be the same number of groups as lines. The total LPM of each group of nozzles should be below that of the water supply.
Mark the position of your system HUB. The HUB is the heart of your system where you control the operation of each line. It is normally located at a central garden tap. For each line select the most convenient route from the HUB to the area being watered. Mark these lines on your plan.
In the example, there is only 1 line for the pergola and garden along the side of the house using Drippers.
The Lawn needs 4 lines. The first line is an isolated area in the front yard. It deserves its own line because of the difficulty of running a line under the driveway. One line in the back yard is devoted to Gear Drive Pop-ups, because it is a large clearly defined area.
The total capacity of Spray Head Pop-ups along the side yard requires 2 lines. Experiment with a few options. It is easier to make changes now rather than later.
Hub
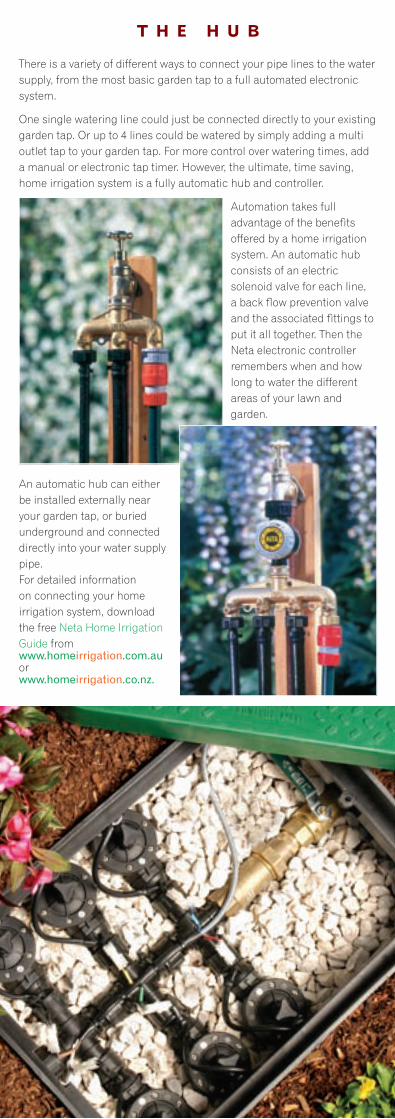
T H E H U B
There is a variety of different ways to connect your pipe lines to the water supply, from the most basic garden tap to a full automated electronic system.
One single watering line could just be connected directly to your existing garden tap. Or up to 4 lines could be watered by simply adding a multi outlet tap to your garden tap. For more control over watering times, add a manual or electronic tap timer. However, the ultimate, time saving, home irrigation system is a fully automatic hub and controller.
Automation takes full advantage of the benefits offered by a home irrigation system. An automatic hub consists of an electric solenoid valve for each line, a back flow prevention valve and the associated fittings to put it all together. Then the Neta electronic controller remembers when and how long to water the different areas of your lawn and garden.
An automatic hub can either be installed externally near your garden tap, or buried underground and connected directly into your water supply pipe.For detailed information on connecting your home irrigation system, download the free Neta Home Irrigation Guide from www.homeirrigation.com.au or www.homeirrigation.co.nz.

GARdENS
Micro Sprays & Sprinklers
Clay 30–40 mins every 6th day
30–40 mins every 5th day
30–40 mins every 3rd day
Loam 20–30 mins every 5th day
20–30 mins every 3rd day
20–30 mins every 2nd day
Sandy 10–20 mins every 3rd day
10–20 mins every 2nd day
10–20 mins every day
W A T E R I N G C H A R T
Watering only when your plants need moisture is the key to water conservation and healthy plants. The ideal situation is to apply just enough water to wet the root zone of your plants and no more. Then encourage deep root growth by allowing the soil to dry out, before watering again. How often and how long to water depends on a number of factors, including your climate, plant types, soil texture, water pressure, sprinkler type and the season.
As a general guide, flowers and vegetables will only need short, frequent watering. Whereas lawns, trees and shrubs will need a deeper soaking, but less often.
The chart below gives you a basic guide to watering times for various plant groups and watering methods, however you should vary watering times according to your observations.
lAWNS
Watering Method Soil type Cool to Warm 15–25ºC
Warm to Hot 25–35ºC
Very Hot
<35ºC
Spray Head
Pop-ups
Clay 20–30 mins every 8th day
20–30 mins every 6th day
20–30 mins every 4th day
Loam 10–20 mins every 6th day
10–20 mins every 5th day
10–20 mins every 3rd day
Sandy 5–10 mins every 4th day
5–10 mins every 2nd day
5–10 mins every day
Gear drive
Pop-ups
Clay 40–60 mins every 8th day
40–60 mins every 6th day
40–60 mins every 4th day
Loam 30–40 mins every 6th day
30–40 mins every 5th day
30–40 mins every 3rd day
Sandy 20–30 mins every 4th day
20–30 mins every 2nd day
20–30 mins every day
drippers Clay 4–6 hours every 6th day
4–6 hours every 5th day
4–6 hours every 3rd day
Loam 2–4 hours every 5th day
2–4 hours every 3rd day
2–4 hours every 2nd day
Sandy 1–2 hours every 3rd day
1–2 hours every 2nd day
1–2 hours every day
POTS ANd BASkETS
drippers & Misters Potting mix Until full every 3rd day
Until full every 2nd day
Until full every day
ClIMATE
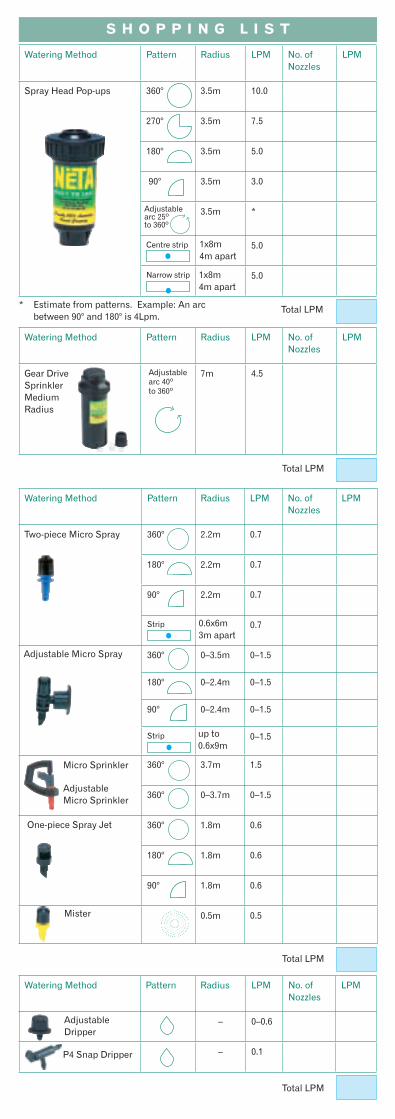
Watering Method Pattern Radius LPM No. of Nozzles
LPM
– 0–0.6
– 0.1
Adjustable Dripper
P4 Snap Dripper
Total LPM
Total LPM
Watering Method Pattern Radius LPM No. of Nozzles
LPM
Gear Drive Sprinkler Medium Radius
7m 4.5
S H O P P I N G l I S T
Total LPM
Watering Method Pattern Radius LPM No. of Nozzles
LPM
Two-piece Micro Spray 360° 2.2m 0.7
180° 2.2m 0.7
90° 2.2m 0.7
Strip 0.7
360° 0–3.5m 0–1.5
180° 0–2.4m 0–1.5
90° 0–2.4m 0–1.5
Strip 0–1.5
360° 3.7m 1.5
360° 0–3.7m 0–1.5
360° 1.8m 0.6
180° 1.8m 0.6
90° 1.8m 0.6
0.5m 0.5
Micro Sprinkler
Adjustable Micro Sprinkler
One-piece Spray Jet
Mister
Adjustable Micro Spray
Watering Method Pattern Radius LPM No. of Nozzles
LPM
Spray Head Pop-ups 360° 3.5m 10.0
270° 3.5m 7.5
180° 3.5m 5.0
90° 3.5m 3.0
3.5m *
Centre strip 5.0
Narrow strip 5.0
* Estimate from patterns. Example: An arc between 90° and 180° is 4Lpm.
Adjustable arc 25º to 360º
Adjustable arc 40º to 360º
0.6x6m 3m apart
up to 0.6x9m
Total LPM
1x8m 4m apart
1x8m 4m apart
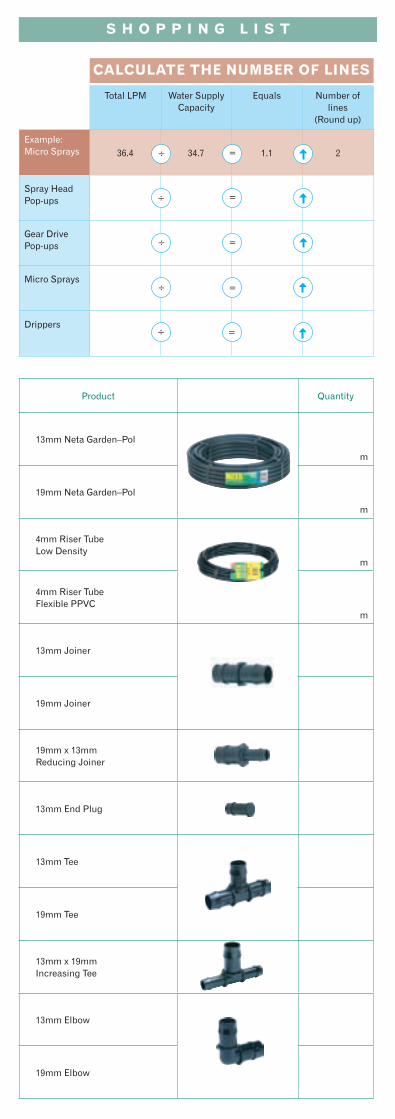
Total LPM Water Supply Capacity
Equals Number of lines
(Round up)
Example: Micro Sprays 36.4 34.7 1.1 2
Spray Head Pop-ups
Gear Drive Pop-ups
Micro Sprays
Drippers
CAlCUlATE THE NUMBER Of lINES
S H O P P I N G l I S T
Product Quantity
13mm Neta Garden–Pol
m
19mm Neta Garden–Pol
m
4mm Riser Tube Low Density
m
4mm Riser Tube Flexible PPVC
m
13mm Joiner
19mm Joiner
19mm x 13mm Reducing Joiner
13mm End Plug
13mm Tee
19mm Tee
13mm x 19mm Increasing Tee
13mm Elbow
19mm Elbow
÷
÷
÷
=
=
=
=
=
÷
÷

S H O P P I N G l I S T
Product Quantity
19mm x ½” Male Threaded Tee
19mm x ½” Male Threaded Elbow
13mm Ratchet Clip
19mm Ratchet Clip
13mm Saddle & Nail
19mm Saddle
200mm Rigid Riser with Adaptor
300mm Rigid riser with Adaptor
Rigid Riser Stake
13 mm Riser/Pipe Stake
4mm Goof Repair Plug (10 pack)
4mm Joiner
4mm Tee
4mm Elbow
4mm Cross
4mm Saddle & Nail
Punch & Spanner 1
Gear Drive Clamp
Gear Drive Multi-tool

PIPE• Use a combination of fittings and pipe to lay out your system
according to the lines on your plan.
• Use 19mm pipe for Pop-up lines and 13mm pipe for Micro Sprays and Drippers.
• To straighten pipe, unroll and place in the sun with bricks securing each end.
• The pipe will bend around a corner, but if it looks like kinking use an elbow.
• Use secateurs or a Stanley Knife to cut pipe.
PIPE FITTINGS• If it is difficult to fit elbows and tees, dip the pipe into hot water
to make it soft.
• Ratchet Clips should be used at every joint.
• Run water through all lines to remove debris before attaching nozzles.
POP-UPS• The simplest way to connect a pop-up
sprinkler is to screw it directly into a male threaded tee or elbow.
• For more flexibility, Articulated Risers offer many benefits. They can be swivelled to allow easy installation, they protect sprinklers from damage if run over and they offer quick height adjustment if soil subsides or lawn is top dressed.
• Always ensure that the top of the sprinkler is set slightly above ground level and not at the level of the grass.
MICRO SPRAYS• Micro Sprays screw into the top of Rigid
Risers. This allows pipe to be hidden under mulch and ensures the spray is above the height of plants
• Use a stake to keep Risers upright. A Riser Pipe Stake will also secure the main pipe to the ground. A Rigid Riser Stake is best when using 4mm tube to locate the spray away from the 13mm pipe.
DRIPPERS• Drippers are also available with stakes attached, for positioning
in a pot or next to a plant.
• Use the Adjustable Dripper if you believe plants or pots require different amounts of water. This is normally due to different pot sizes.
• Use a Pressure Reducer for each Dripper watering line.
• Use 4mm Riser Tube to run from 13mm pipe – it can be easily hidden to become unobtrusive.
• There are 2 types of 4mm Riser Tube: 4mm Low Density Riser Tube and 4mm Flexible Riser Tube. The Flexible Tube is easier to bend and weave through your plants.
PUNCH SPANNER• Use the Punch Spanner to pierce a
hole in the pipe for Rigid Risers or 4mm Joiners.
• Use the Punch Spanner to screw Micro Sprays or Spray Jets into Rigid Risers.
• Use the hole in the handle of the Punch Spanner to pull apart Micro Sprays for cleaning.
• If you punch a hole in the wrong place use a Goof Plug to re-seal it.
I N S T A L L A T I O N H I N T S
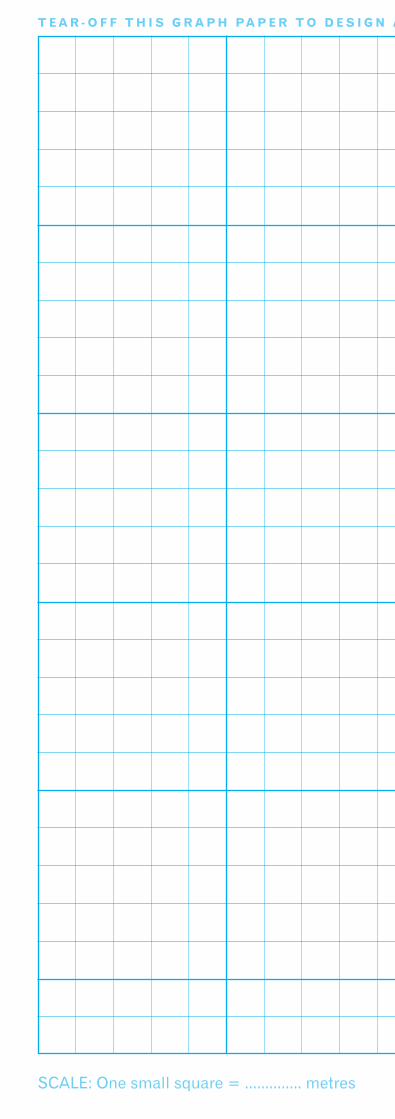
SCALE: One small square = .............. metres
T E A R - O f f T H I S G R A P H P A P E R T O d E S I G N A H O M E I R R I G AT I O N P l A N . f O R Y O U R G A R d E N T H E N f I l l O U T T H E S H O P P I N G l I S T O N T H E B A C k & TA k E I T T O Y O U R N E TA S T O C k I S T.

SCALE: One small square = .............. metres
T E A R - O f f T H I S G R A P H P A P E R T O d E S I G N A H O M E I R R I G AT I O N P l A N . f O R Y O U R G A R d E N T H E N f I l l O U T T H E S H O P P I N G l I S T O N T H E B A C k & TA k E I T T O Y O U R N E TA S T O C k I S T.
SCALE: One small square = .............. metres
T E A R - O f f T H I S G R A P H P A P E R T O d E S I G N A H O M E I R R I G AT I O N P l A N . f O R Y O U R G A R d E N T H E N f I l l O U T T H E S H O P P I N G l I S T O N T H E B A C k & TA k E I T T O Y O U R N E TA S T O C k I S T.

SCALE: One small square = .............. metres
T E A R - O f f T H I S G R A P H P A P E R T O d E S I G N A H O M E I R R I G AT I O N P l A N . f O R Y O U R G A R d E N T H E N f I l l O U T T H E S H O P P I N G l I S T O N T H E B A C k & TA k E I T T O Y O U R N E TA S T O C k I S T.

1st September 2005ZM/LT2IRRPLN
100% Australian Owned Company
A Division of PPI Corporation Pty LtdABN 79 010 656 005
Stockist:
Neta provides further information on all aspects of
designing an automatic system for the home garden at
the Neta Home Irrigation website. For more information on
using automatic watering systems wisely, please consult the
Neta Home Irrigation Guide’s section on
Water Conservation, by pressing the Blue
Droplet link. Download the Guide for FREE
from www.homeirrigation.com.au