home energy projects
TRANSCRIPT

Home Energy Projects
An Energy EfficiencyGuide for Do-It-Yourselfers
Arkansas Energy OfficeOne Capitol Mall
Little Rock, AR 72201(501) 682-1370(800) 558-2633
www.arkansasenergy.org
CreditsPrincipal Authors:Dennis CreechJeffrey S. Tiller
Graphic Design:Greg Brough
Word Processing:Lisa Dagdigian
For additional copies of this publication, or other energyinformation, please contact:
Energy OfficeOne Capitol MallLittle Rock, AR 72201(501) 682-7324
Disclaimer
This publication was prepared with the support of the Division of Energ yR e s o u r c e s / G e o rgia Environmental Facilities Authority under Grant Number DE-FG44-77CS60212. However, any opinions, findings, conclusions, or recommendations expressed herein are those of the author(s) and do notnecessarily reflect the views of the Division of Energy Resources.
Reference to any trade names, manufacturer, specific commercial products,process, or service is for information or example only and does not constitutean endorsement or recommendation for use.
The contents of this manual are offered as guidance. Neither the Divisionof Energy Resources, Southface Energy Institute, nor any of their employees,nor any of their contractors or subcontractors, nor any technical sourcesreferenced in this handbook makes any warranty or representation, expressedor implied, or assumes any legal liability or responsibility for the accuracy,completeness, or usefulness of any information, apparatus, product, or processdisclosed or represents that its use would not infringe on privately owned rights.
INTRODUCTION:HOW TO USE THIS BOOK . . . . . . . . . . . . . . . . . . . . . . . . . . . 1
CHAPTER 1:
HOME ENERGY PROJECT CHECKLIST . . . . . . . . . . . . . . . . . .2
CHAPTER 2:
THE BASICS 4
The Importance of Energy Efficiency . . . . . . . . . . . . . . . . . . . . . . . . 4
Energy Efficiency in Buildings . . . . . . . . . . . . . . . . . . . . . . . . . . . . . 5
Insulation Materials . . . . . . . . . . . . . . . . . . . . . . . . . . . . . . . . . . . . . . 6
Vapor Barriers . . . . . . . . . . . . . . . . . . . . . . . . . . . . . . . . . . . . . . . . . . . 6
Weatherstripping and Caulking . . . . . . . . . . . . . . . . . . . . . . . . . . . . . 7
Natural Cooling . . . . . . . . . . . . . . . . . . . . . . . . . . . . . . . . . . . . . . . . . 7
Domestic Water Heating . . . . . . . . . . . . . . . . . . . . . . . . . . . . . . . . . . 9
Energy-Saving Appliances . . . . . . . . . . . . . . . . . . . . . . . . . . . . . . . . 9
CHAPTER 3:
GETTING THE JOB DONE CORRECTLY . . . . . . . . . . . . . . . . .10
Should You Do It Yourself? . . . . . . . . . . . . . . . . . . . . . . . . . . . . . . .10
Hiring a Contractor . . . . . . . . . . . . . . . . . . . . . . . . . . . . . . . . . . . . . .10
Scheduling the Job . . . . . . . . . . . . . . . . . . . . . . . . . . . . . . . . . . . . . .11
Skills Required . . . . . . . . . . . . . . . . . . . . . . . . . . . . . . . . . . . . . . . . .11
Rules for Tools . . . . . . . . . . . . . . . . . . . . . . . . . . . . . . . . . . . . . . . . .11
Safety First! . . . . . . . . . . . . . . . . . . . . . . . . . . . . . . . . . . . . . . . . . . . .12
CHAPTER 4:ENERGY EFFICIENCY MEASURES . . . . . . . . . . . . . . . . . . . . . . .13
Urgent Priority ✭ ✭ ✭ ✭
1. No-Cost/Low-Cost Measures . . . . . . . . . . . . . . . . . . . . . . . . . . . .14
2. Install R-30 Insulation in Poorly Insulated Attic . . . . . . . . . . . . .17
3. Seal and Insulate Ductwork . . . . . . . . . . . . . . . . . . . . . . . . . . . . .25
4. Install Insulating Jacket on Water Heater . . . . . . . . . . . . . . . . . .27
5. Seal Holes, Cracks, and Penetrations . . . . . . . . . . . . . . . . . . . . . .29
6. Build Fireplace Covers . . . . . . . . . . . . . . . . . . . . . . . . . . . . . . . .31
7. Repair and Reglaze Windows . . . . . . . . . . . . . . . . . . . . . . . . . . .33
8. Use Low-flow Showerheads . . . . . . . . . . . . . . . . . . . . . . . . . . . .35

CHAPTER 4 –– CONTINUED:Essential Priority ✭ ✭ ✭
9. Insulate Floors . . . . . . . . . . . . . . . . . . . . . . . . . . . .............36
10. Connect Programmable Thermostat . . . . . . . . . . . . . . . . .39
11. Install Gaskets on Electrical Outlets . . . . . . . . . . . . . . . . .40
12. Caulk Window and Door Frames . . . . . . . . . . . . . . . . . . .41
13. Weatherstrip Leaky Windows and Doors . . . . . . . . . . . . . . . . .42
Important Priority ✭ ✭
14. Install Wall Insulation . . . . . . . . . . . . . . . . . . . . . . . . . . . . . . . . . . . .47
15. Install Ceiling Fans and Whole House Fans . . . . . . . . . . . . . . .50
16. Add R-19 Insulation in PartiallyInsulated Attic . . . . . . . . . . . . . . . . . . . . . . . . . . . . . . . . . . . . . .53
17. Build Exterior Solar Shade Screens . . . . . . . . . . . . . . . . . . . . . .54
18. Use Awnings and/or Interior Roller Blinds . . . . . . . . . . . . . . . . .57
19. Apply Reflective Window Film . . . . . . . . . . . . . . . . . . . . . . . . .58
20. Put Up Storm Windows . . . . . . . . . . . . . . . . . . . . . . . . . . . . . . .59
21. Increase Attic Ventilation . . . . . . . . . . . . . . . . . . . . . . . . . . . . . .62
Optional Priority ✭
22. Install R-11 Insulation in Well-Insulated Attic . . . . . . . . . . . . . . . . .66
23. Install Radiant Barrier in Attic . . . . . . . . . . . . . . . . . . . . . . . . . .67
24. Put in Storm Doors . . . . . . . . . . . . . . . . . . . . . . . . . . . . . . . . . .68
25. Install Movable Insulation . . . . . . . . . . . . . . . . . . . . . . . . . . . . .69
CHAPTER 5:ENERGY EFFICIENCY REPLACEMENT MEASURES . . . .70
Replacement Measure 1: Water Heater . . . . . . . . . . . . . . . . . . . . . . .71
Replacement Measure 2: Windows . . . . . . . . . . . . . . . . . . . . . . . . . .73
Replacement Measure 3: Doors . . . . . . . . . . . . . . . . . . . . . . . . . . . .74
Replacement Measure 4: Unvented Fuel-Fired
Space Heaters . . . . . . . . . . . . . . . . . . . . . . . . . . . . . . . . . . . . . . . . .75
Replacement Measure 5: Provide Outside Air Supply
for Central Furnace in Heated Area . . . . . . . . . . . . . . . . . . . . . . . .78
Replacement Measure 6: Central Heating System . . . . . . . . . . . . .79
Replacement Measure 7: Central Air Conditioner . . . . . . . . . . . . . .82
CONSTRUCTION TERMINOLOGY . . . . . . . . . . . . . . . . . . . . . . . .83
1
IN T R O D U C T I O N
HOW TO USETHIS BOOK
This book is divided into the following sections:
CH A P T E R 1 : Home Energy Project ChecklistA quick method for selecting energy e fficiency measures.
CH A P T E R 2: The BasicsExplains some of the theory of energyefficiency and describes basic energy e fficiency practices.
CH A P T E R 3 : Getting the Job Done CorrectlyDiscusses contracting, scheduling, tools,and safety measures for doing the job right.
CH A P T E R 4: Energy Efficiency MeasuresDescribes in detail how to implement 25 energy efficiency measures.
CH A P T E R 5: Replacement MeasuresDescribes options available for replacing windows, doors, heating and cooling systems fireplaces, etc.
Construction Te r m i n o l o g yShows the parts of a house via diagrams.
The Checklist, which begins the book, enables readers todevelop a prioritized list of efficiency measures for their homes. Those having little familiarity with today’s energy e fficiency options may want to start with Chapter 2: The Basics.
In planning the work itself, the reader should review C h a p t e r3: Getting the Job Done Corre c t l y. The reader can then review thedetailed discussions in Chapters 4 and 5 on how to prioritize themeasures.
Note: The estimated costs for materials and labor as well as theestimated energy savings are based on data collected in 2006.Actual energy savings may differ from these estimates due tovariations in weather, individual energy use habits, systemsettings, equipment installation and maintenance, utility costsand home characteristics.
HO M E EN E R G Y PR O J E C T S
CHAPTER 1HO M EEN E R G YPR O J E C TCH E C K L I S T
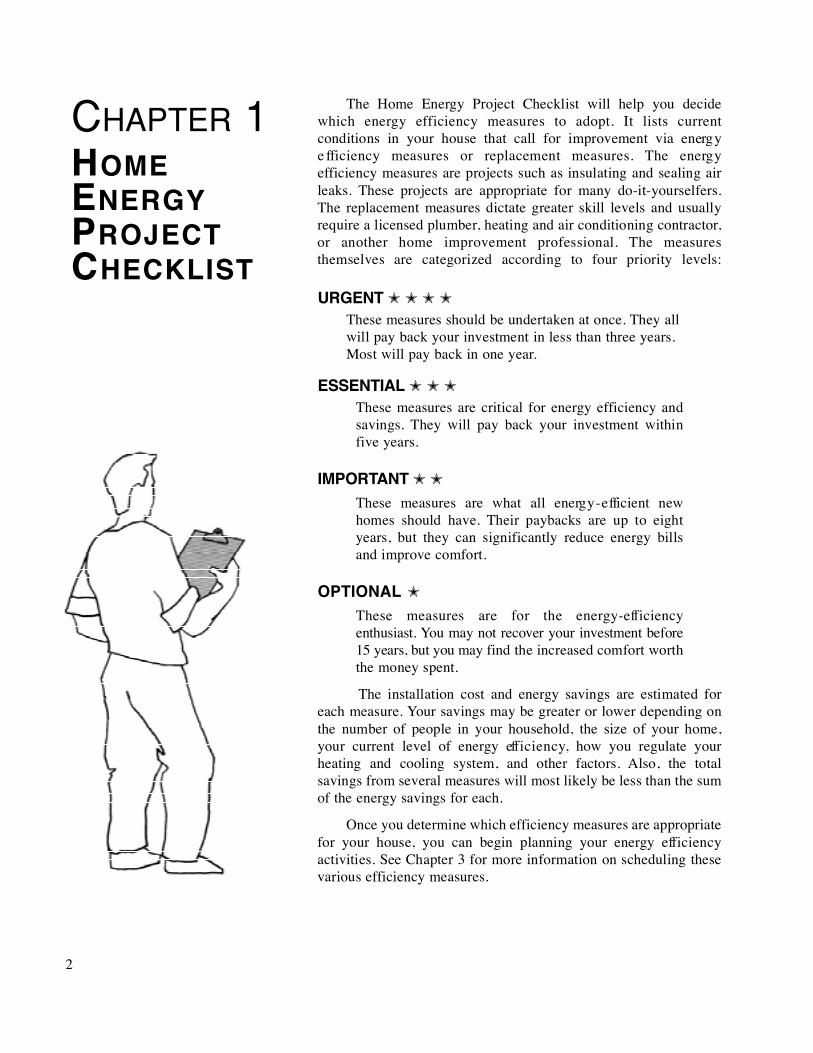
The Home Energy Project Checklist will help you decidewhich energy efficiency measures to adopt. It lists currentconditions in your house that call for improvement via energ ye fficiency measures or replacement measures. The energ ye fficiency measures are projects such as insulating and sealing airleaks. These projects are appropriate for many do-it-yourselfers.The replacement measures dictate greater skill levels and usuallyrequire a licensed plumber, heating and air conditioning contractor,or another home improvement professional. The measuresthemselves are categorized according to four priority levels:
U R G E N T ✭ ✭ ✭ ✭
These measures should be undertaken at once. They allwill pay back your investment in less than three years.Most will pay back in one year.
E S S E N T I A L ✭ ✭ ✭
These measures are critical for energy efficiency andsavings. They will pay back your investment withinfive years.
I M P O R TA N T ✭ ✭
These measures are what all energ y - e fficient newhomes should have. Their paybacks are up to eightyears, but they can significantly reduce energy billsand improve comfort.
O P T I O N A L ✭
These measures are for the energ y -e ff i c i e n c yenthusiast. You may not recover your investment before15 years, but you may find the increased comfort worththe money spent.
The installation cost and energy savings are estimated foreach measure. Your savings may be greater or lower depending onthe number of people in your household, the size of your home,your current level of energy eff i c i e n c y, how you regulate yourheating and cooling system, and other factors. Also, the totalsavings from several measures will most likely be less than the sumof the energy savings for each.
Once you determine which efficiency measures are appropriatefor your house, you can begin planning your energy eff i c i e n c yactivities. See Chapter 3 for more information on scheduling thesevarious efficiency measures.
2

3
Priority: URGENT ✭ ✭ ✭ ✭
1. Household members unfamiliar with energy-saving lifestyle actionsPage 14 - Low-cost/no-cost actions (such as reducing thermostat settings, blocking air leaks, using appliances wisely)
2. 0 to 3 inches attic insulation Page 17 - Install R-30 insulation (and provide attic ventilation)
3. Ductwork leaky and uninsulatedPage 25 - Seal and insulate ductwork
4. Water heater uninsulatedPage 27 -Insulate with water heater jacket (if in unheated space)
5. Holes, large cracks or penetra-tions for wiring, plumbing, or ductwork in ceiling, walls, or floorsPage 29 - Seal holes, cracks, and penetrations
6. Air leakage through fireplacePage 31 - Build fireplace cover
q 7. Windows broken or need reglazingPage 33 - Repair and reglaze windows
Priority: ESSENTIAL ✭ ✭ ✭
8. Showerheads have no flow controlsPage 35 -Use low-flow showerheads
9. Floors uninsulatedPage 36 - Insulate floors
10. Household members willing to vary thermostat settingPage 39 - Install program-mable thermostat
11. Air leakage through electric outletsPage 40 - Install gaskets on electric outlets
12. Substantial air leakage around door and window framesPage 41 - Caulk window and door frames
13. Substantial air flow between door or window sash and framePage 42 - Weatherstrip leaky windows and doors
Priority: IMPORTANT ✭ ✭
14. Walls uninsulatedPage 47 - Have wall insulation blown
15. Discomfort and/or excessive cooling bills in summerPage 50 - Install ceiling fans and whole-house fans
16. Attic with 3 to 5 inches of insulationPage 53 - Install R-19 insulation in partially insulated attic
17. Windows receive too much sunlightPage 54 - Build exterior solarshade screens
18. Windows receive too much sunlight (continued)Page 57 - Use awnings and/ or interior roller blinds
19. Windows receive too much sunlight (continued)Page 58 - Apply reflective window film
20. Single-paned windows with substantial heat lossPage 59 - Put up storm windows
21. Attic has inadequate ventilationPage 62 - Increase attic ventilation
Priority: OPTIONAL ✭
22. Attic has 5 or more inches of insulationPage 66 - Install R-11 in well-insulated attic
23. Attic temperature is excessive in summerPage 67 - Install radiant barrier in attic
24. Doors seem to lose excessive amounts of heat Page 68 - Put in storm doors (or a replacement insulateddoor - see Replacement Measure 3)
25. Double-paned windows have excessive heat loss in winter and heat gain in summerPage 69 - Build movable Insulation shutters
ENERGY EFFICIENCY
1. Water heater leaking or needsreplacingPage 71 - Replace water heater with high-efficiency model
2. Window unit broken, rotten,or very loose Page 73 - Repair or replace window
3. Exterior door broken,damaged, or loosePage 74 - Repair or replace door with insulated unit
4. House with unvented gas/propane space heatersPage 75 - Replace with centralfurnace, approved gas/propane space heaters, or unvented space heaters
5. Furnace within heated areaPage 78 - Provide exterior combustion air
6. Heating system needs replacing Page 79 - Install new high-efficiency system –– either gas/propane with AFUE of at least .80 or heat pump with SEER of at least 10.0
7. Air conditioner needsreplacingPage 82 - Replace air conditioner with high-efficiency unit –– SEER of at least 10.0
ENERGYEFFICIENCYCHECKLISTEnergy Conservat ion ReplacementENERGY EFFICIENCYREPLACEMENTMEASURES

CHAPTER 2THE BASICSThis chapter describes howe n e rgy is used in homes, givesan estimated breakdown ofannual energy bills, andsuggests how to achieve thegreatest energy savings. Inaddition, insulation, vaporbarriers, infiltration, caulking,weatherstripping, shading,ventilation and other energ ye fficiency practices ared i s c u s s e d .
THE IMPORTANCE OF ENERGYEFFICIENCY
For many Arkansans, the costs of heating and cooling homes,providing hot water, and operating major appliances are difficult toafford; they can exceed mortgage payments. However, energy costscan be controlled through basic energy efficiency measures.
Some of the most effective ways to conserve energy cost little ornothing. Simply cleaning the filters on your home’s furnace or airconditioner, setting back the thermostat at night, and proper schedulingof energy-consuming activities such as laundry, cooking, and dish-washing can save you energy and money.
Energy-saving improvements to your home, such as increasinginsulation in the attic and floor, sealing off unwanted drafts, andbuying energy-efficient models when replacing appliances may costseveral hundred dollars. However, they pay for themselves in energysavings within a few years. Most of the energy efficiency measuresthat save on heating bills will also keep your house cooler in summer.Efficiency will make your home more comfortable by moderatingtemperature swings and eliminating drafts. Some measures will alsoreduce maintenance needs for your home and add to its value.
The energy costs for any home depend on many factors includinglocal climate, size of the home, and lifestyle of the occupants.However, the most important factors are the design and construction ofyour home––the quantity of insulation in the ceiling, walls, and floor,the tightness of construction (how well it prevents drafts), and theefficiency of heating and cooling equipment and major appliances suchas the water heater, refrigerator, and dishwasher. The following chartshows estimated energy costs of typical Arkansas homes.
Your home’s energy bills may vary from the estimates in thechart. Often, local utilities will be able to help you determine yourspecific energy use.
In considering energy efficiency measures to reduce energy bills,think of your house as a bucket and the energy used to heat and cool itas water in the bucket. If there is a hole––no matter how small––the water will drain out
If there is a hole in the insulation, weatherstripping, or caulking ofa house, heat escapes in winter or leaks inside in summer. In an energy-efficient home, these leaks are minimized by insulating the ceiling,walls, and floor and by sealing air leaks.
Before investing in energy efficiency, think about how energy isused in a home. Heating, cooling, and hot water are primary energyneeds. Energy efficiency can help the most in these areas.
4
Seal and insulate the envelope
The energy bucket

5
CHAPTER 2
THE BASICS
ENERGY EFFICIENCY IN BUILDINGS
The energy needed for heating and cooling is determined by themovement of heat into and out of your home. Heat travels by conduction,convection, and radiation and always moves from hot to cold. The speed atwhich heat moves is determined by the difference in temperature between thehotter area and the cooler––the larger the difference in temperature, the fasterheat flows.
C o n d u c t i o n is the movement of heat through a solid object such as theceiling, walls, and floor of a home. Insulation is used to stop the flow ofheat by conduction and will reduce your heating and cooling costs.
C o n v e c t i o n is the transfer of heat caused by the movement of air. As air isheated, it becomes lighter and rises. As air cools, it becomes heavier andfalls. Convection causes air to circulate between warm areas and cool areasinside a home.
Infiltration is the convective flow of heat in and out of a home through airleaks. Weatherstripping, sealing holes, caulking cracks, and other infiltrationcontrol measures can reduce total heating and cooling bills over 30 percent.
R a d i a t i o n is the movement of heat by long waves from a warm to a coldsurface. For example, radiation heat flow occurs in the summer whensunlight strikes a roof and the roof radiates heat to the attic floor below. Yo ucan use reflective materials to block the flow of radiant heat.
In winter, your home loses heat by conduction through the buildingenvelope––the walls, windows, ceilings, and floors that form the barrierbetween heated and unheated areas; by infiltration around the baseboard orsill plate, windows, doors, and wall penetrations for plumbing and wiring;and by radiation from people and warm interior surfaces to cold outer wallsand windows.
Conduction
Convection
Infiltration
Radiation
Typical Annual Home Energy Costs in ARKANSAS
$817
$370
$634
Heating 43% Appliances, Lighting, etc. 12%
Hot Water 12%Cooling 25%
$382

CHAPTER 2
THE BASICS
Heat gain in the winter from sunlight and internal heats o u r c e s ––the heat given off by appliances, lighting, and people––helpsoffset the losses from conduction, infiltration, and radiation. In homesdesigned to capture and store sunlight, called “passive solar” homes, heatgain from sunlight can provide over 50 percent of the total heat required.
In summer, unwanted heat enters your home primarily throughconduction from the outside, through sunlight passing throughwindows, and from internal heat sources. Air leaks bring in outsidehumidity which causes moisture problems as well as higher bills.Radiation can be important in houses with little ceiling insulation.
INSULATION MATERIALSInsulation blocks the flow of heat by forming thousands of pockets
that trap air or other gases. These pockets, called dead air spaces, mustbe kept intact for the material to maintain its insulating value.
Many different insulation products are available. When choosingone, always consider the R-value, a measure of effectiveness (R meansresistance to heat flow). The higher the R-value, the better the insulator.Labels on some products may list the U-value, which is simply theinverse of the R-value (U=1/R). The U-value is on a scale from 0 to 1.0.The lower the U-value, the greater the resistance to heat flow.
Compare insulation materials by the cost per R-value. Someinsulating materials have a high R-value per inch of thickness, but aremore expensive per R-value than other products. For example, fiberg l a s sbatts have an R-value of about three per inch and cost around $.023 per R-value per square foot. Rigid foam insulation boards have a higher R-value per inch but cost about $.07 per R-value per square foot. If spaceis not a problem, such as when insulating a ceiling with an attic above,fiberglass is a better buy.
Careful installation of insulation and weatherstripping is critical. Ina study conducted by the Naval Civil Engineering Laboratory, a 5percent gap in the coverage of ceiling insulation reduced the overall R-value of the ceiling by over 40 percent. Similar findings were reportedfor gaps in the wall and floor insulation.
WATER VAPORWater vapor occurs naturally inside a home, especially in kitchens,
baths, and laundries. A vapor barrier prevents the flow of moisture from inside the house into the insulation. If insulation getsdamp, its insulating value decreases. Where severe condensationoccurs, the moisture produced may cause deterioration of materials orrotting of wood.
Most of the moisture that moves from inside the house into theinsulation is carried by air leaks rather than by diffusion through interiorfinish materials. Therefore, to control moisture, it is more important toseal openings in walls, ceilings, and floors.
6
Batt or roll insulation
Loose-fill insulation
Rigid board insulation
}VaporBarrier
Water Vapor

7
CHAPTER 2
THE BASICS
Some types of insulation have an attached vapor barrier, forexample, fiberglass batts with asphalt-impregnated kraft paper or metalfoil. Other types, such as loose-fill cellulose, fiberglass, or rock woolthat come in bags, have no built-in vapor barrier. For these products,polyethylene plastic installed on the interior side of the insulation or avapor barrier paint can be used to stop moisture flow.
The vapor barrier should be located between the insulation andinterior of the home. If you are using insulation without a built-in vaporbarrier, either install polyethylene plastic on the interior side of theinsulation, or apply a vapor barrier paint on the ceiling and walls ofrooms with high humidity, such as baths, laundry, and kitchen. Anexhaust fan to vent heat and humidity to the outside should also beincluded in these rooms. Paints that help prevent the flow of moistureare available at hardware stores.
WEATHERSTRIPPING AND CAULKINGWeatherstripping is a strip of metal, plastic, rubber, or fiber that
blocks air leaks around doors, windows, and other openings in thebuilding envelope. Caulking, which is a pliable material, or foam sealantsare used to seal gaps. They are also used to seal the seam where diff e r e n tbuildings materials meet, such as between the window jamb and siding.
When choosing weatherstripping and caulking products, considercost and longevity. The caulk should have at least a 25-year life.Acceptable options include acrylic latex caulk with silicones, siliconecaulk, and urethane caulk.
NATURAL COOLINGThe same efficiency measures that keep heat inside your home in
winter will also help keep heat outside in summer. By relying onefficiency and other natural cooling techniques, you should be able tominimize the need for air conditioning. If your home does not have airconditioning, natural cooling measures become even more important asthey can keep the house comfortable for much of the summer.
The keys to staying comfortable inexpensively in Arkansas’ hot,humid summers are to keep windows shaded from direct sun, provideadequate ventilation in the house, avoid activities that produce heat orhumidity, and use air conditioning as efficiently as possible.
Daily activities inside the home, such as cooking, washing dishes,laundry, and bathing, are a major source of heat and humidity in thesummer. By minimizing these activities and scheduling them for coolermorning and evening hours, your home will stay more comfortable.
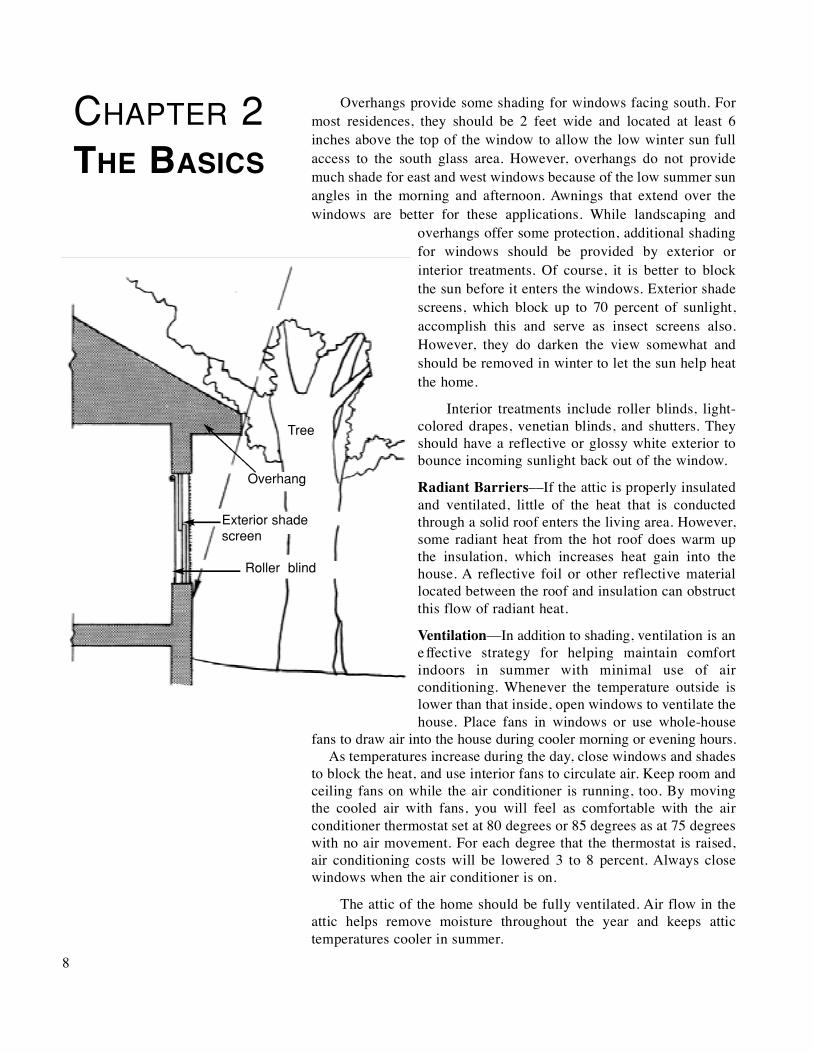
S h a d i n g––In winter, the south side of your house receives almostthree times more sunlight than the east or west sides. However, ins u m m e r, the east and west windows receive the bulk of the sun’srays––almost three times more than the south side. T h e r e f o r e ,summer shading of the east and west windows, and, to a lesserdegree, the south windows, is of paramount importance. Use trees,shrubs and trellises to shade unshaded windows where practical.
CH A P T E R 2
TH E BA S I C S
Overhangs provide some shading for windows facing south. Formost residences, they should be 2 feet wide and located at least 6inches above the top of the window to allow the low winter sun fullaccess to the south glass area. However, overhangs do not providemuch shade for east and west windows because of the low summer sunangles in the morning and afternoon. Awnings that extend over thewindows are better for these applications. While landscaping and
overhangs offer some protection, additional shadingfor windows should be provided by exterior orinterior treatments. Of course, it is better to blockthe sun before it enters the windows. Exterior shadescreens, which block up to 70 percent of sunlight,accomplish this and serve as insect screens also.H o w e v e r, they do darken the view somewhat andshould be removed in winter to let the sun help heatthe home.
Interior treatments include roller blinds, light-colored drapes, venetian blinds, and shutters. T h e yshould have a reflective or glossy white exterior tobounce incoming sunlight back out of the window.
Radiant Barriers––If the attic is properly insulatedand ventilated, little of the heat that is conductedthrough a solid roof enters the living area. However,some radiant heat from the hot roof does warm upthe insulation, which increases heat gain into thehouse. A reflective foil or other reflective materiallocated between the roof and insulation can obstructthis flow of radiant heat.
Ventilation––In addition to shading, ventilation is ane ffective strategy for helping maintain comfortindoors in summer with minimal use of airconditioning. Whenever the temperature outside islower than that inside, open windows to ventilate thehouse. Place fans in windows or use whole-house
fans to draw air into the house during cooler morning or evening hours. As temperatures increase during the day, close windows and shades
to block the heat, and use interior fans to circulate air. Keep room andceiling fans on while the air conditioner is running, too. By movingthe cooled air with fans, you will feel as comfortable with the airconditioner thermostat set at 80 degrees or 85 degrees as at 75 degreeswith no air movement. For each degree that the thermostat is raised,air conditioning costs will be lowered 3 to 8 percent. Always closewindows when the air conditioner is on.
The attic of the home should be fully ventilated. Air flow in theattic helps remove moisture throughout the year and keeps attictemperatures cooler in summer.
8
Tree
Overhang
Exterior shade
Roller blind
screen

9
CHAPTER 2
THE BASICS
DOMESTIC WATER HEATINGE n e rgy costs for heating water can be as great as those for
heating or cooling an entire house. An average family of four inArkansas will spend about $435 each year for electric water heatingor about $290 for natural gas. However, several simple energ ye fficiency measures can cut that bill by more than half.
Reducing the temperature setting on the water heater from highto low (160 degrees to 120 degrees) will save energy and stillprovide enough hot water. Electric water heaters usually have twothermostats which can be adjusted with a screwdriver. Make certainthat the flow of electricity to the heater is disconnected beforeadjusting the thermostat. Gas water heaters usually have atemperature setting dial near the burner. This dial can easily beturned to set the temperature.
If you have to buy a new water heater, make certain it is anenergy-efficient unit with foam insulation inside the metal shell. Foryour current water heater, installing an insulating tank jacket willquickly pay for itself in energy savings. In addition, insulate the first3 feet of all pipes extending from the tank. If the water heater islocated inside the living area, increasing the insulation levels willkeep your home cooler in summer.
Low-flow showerheads, which release water at the rate of twoto three gallons per minute instead of the usual five gallons, saveenergy and water. Well-designed fixtures will reduce only thequantity of water and not the force at which it is delivered. They cancut water use up to 60 percent.
Flushing sediment from the water heater helps to save energy aswell as to extend its life. Drain a gallon of water from the bottom of thetank every few months to remove any sediment that has accumulated.
ENERGY-SAVING APPLIANCESEnergy-efficient appliances can also save you money on utility
bills. Refrigerators, freezers, and dishwashers are the biggest energyusers and together can cost several hundred dollars a year to operateHigh efficiency models can save over 50 percent of these costs.
When selecting an appliance, consider purchasing a unit that isENERGY STAR-rated. This label indicates that it is at least 30percent more efficient than similar models. Also check the EnergyGuide tag. This yellow tag is required by law to be attached to mostmajor appliances and compares the energy use of a particularproduct to that for similar models. The Energy Guide also shows theestimated yearly cost of operating the appliance.
In addition to saving energy, efficient appliances give off lesswaste heat than standard models so they save on air conditioningcosts, too. Their higher cost is usually recovered within a few years.

CHAPTER 3GETTINGTHE JOBDONECORRECTLYThis chapter considers thepractical issues involved inworking on your home:
• Should you hire a contractor to do the job?
• How should you decide what efficiency measures to install with your limited time and money?
• In what order should the measures be applied?
• Do you have the skills necessary to do the work?
• What are the basic rules for using tools?
• What are effective safety guidelines?
SHOULD YOU DO IT YOURSELF?The energy efficiency measures described in this publication have a
common goal––saving money on your home energy bills. Your skillswill be perfectly suited for some tasks, while other tasks will require acontractor. Be sure to judge accurately your own capabilities beforeembarking on a project by yourself. Even when hiring a contractor, readthe instructions in this book to ensure quality work.
QUESTIONS TO ANSWER ARE:1. If I make a mistake, what would be the worst possible consequence?
How much would the repair cost? How likely is the mistake? Can I really afford the risk?
2. Do I really have the skills to do an acceptable job on this project? Do I have the necessary tools? Can I rent the tools?
3. Do I really have enough time to do the project? If the project takes two times (three times, four times, etc.) longer than I anticipate, what would be the consequences? Will the house be without heating,cooling, hot water, any water, or electricity? Can I call in a contractor quickly enough to avoid a serious inconvenience for my household?
If, after reviewing the questions, you are still confident and ready toproceed, go ahead. But first, read the sections in this chapter that describe thebasic things to consider when working on energy efficiency meaasures. I fyou realize that you need to hire a contractor, read the next section.
HIRING A CONTRACTORWeatherization and renovation contractors vary widely in cost, skill
level, knowledge, and quality. The guidelines listed below should befollowed when dealing with any contractor:
1. Always check references for contractors and look at their previous jobs. Talk at length with former clients about the quality of the work.
2. Write a bid request that describes the project fully and includesdrawings of unusual construction details.
3. Get bids from at least three contractors.
4. Write a contract with the contractor to help minimize costly misunderstandings for both parties. The contract should spell out all phases of the project in detail. For example, when hiring someone to insulate the floor, specifically write into the contract whether youwant a plastic vapor barrier installed on the floor of the crawl space,pipes insulated, or dryer vents extended.
5. A contract for insulation work should specify what R-value you want installed. Always check to make sure the proper number of bags or batts were used.
6. Never pay the contractor until the job is completed. If necessary, youcan work out a payment plan so that as parts of the job are completed, payment can be made.
7. If the contractor does not live up to the contract, make her/him correct the deficiencies. Be firm and straightforward when working with contractors.
10

11
CHAPTER 3GETTING THEJOB DONECORRECTLY
Hammer 3⁄4-inch chisel Flat head
screwdriverNail setTape ruleCombination squareUtility knifePencil
SCHEDULING THE JOBOften your bank balance will restrict you from implementing as
many measures as you would like. Schedule the jobs wisely. Start withthe highest priority (urgent priority) tasks first and work down to thosehaving less importance. For example, do not do a lower priority job,such as installing storm windows, when a high priority task, such asinsulating the attic, has yet to be done. See Chapter 1 for a list ofefficiency measures in priority order.
The detailed descriptions of the different measures in Chapters 4and 5 include cost estimates. Determine your maximum budget andidentify in priority order a set of jobs whose total costs will notexceed the budget.
SKILLS REQUIREDFor each conservation measure described in this book, the
relative skill level needed by the do-it-yourselfer is indicated. Themain categories used are:
Simple handiwork––competent using basic hand tools, such ash a m m e r, screwdriver, utility knife, tape rule, putty knife, and handsaw.
Basic carpentry––comfortable working with both hand tools and powertools, such as circular saw, electric drill, reciprocating saw, and sabers a w.
Skilled carpentry––proficient with hand tools and power tools. Ableto make difficult angled cuts and do finished carpentry.Knowledgeable about most elements of residential construction.
RULES FOR TOOLSTools are intended to make our
work easier. Too often, experienced do-it-yourselfers use the wrong tools or poorly maintained tools and makesimple jobs difficult. Some general
guidelines for tool use are:
1. Use the right tool for the job.
2 . Always keep tools in good condition––chisels and cutting blades sharp, paint brushes clean, etc.
3. Never muscle or rush your work.
4. If a job requires more than you have, there is probably a tool to makeit easier. Often, expensive tools can be rented for reasonable prices.
Accompanying the efficiency measures described in Chapter 4 of thebook are lists of the tools needed for each project. Because of theirfrequent use, the following tools are referred to throughout the text as“Carpenter’s Tool Belt.”
CHAPTER 3GETTING THEJOB DONECORRECTLY
SAFETY FIRST!Safety should be a predominant concern of the occasional carpenter.
When working sporadically, such as on weekends, you often forget topay attention to basic safety rules in your rush to finish the job. Areasonable set of common sense safety measures follows:
• Don’t wear loose clothing; tie back long hair. Wear protectivegear––earplugs, heavy shoes, hats, goggles, and gloves. Wear a dust mask when working around sawdust, insulation, etc.
• Provide plenty of light on all sides of the work. Clean up any mess around you. Clear your path before carrying lumber or other large or heavy objects. Remove all obstructions and distractions; evensomething far away can become surprisingly distracting once you have started the job.
• Before you switch on a power tool, STOP, THINK, AND CHECK! Where is everything? Are your hands clear? Are you well balanced? Is all of your body well out of the path of action? Is your support stable? Is the tool going to run into anything? Reconsider for a
` moment (this applies also to hand tool use).
• Switch ON a tool only when ready to use it immediately. Switch it OFF immediately after use––if you get accustomed to the sound youmay forget the machine is active.
• Unplug power tools when changing blades.
• You are never so skilled that you can become casual around power tools; always observe basic safety rules.
• Maintain a respect for more “passive” tools. Keep fingers back from points of chisels, screwdrivers, awls, and hand saws. They can cause surprisingly large cuts.
• Use clamps to secure the work.
• Use only clean, dry, unfrayed extension cords. Beware of water puddles. Observe proper grounding practices.
• Never place tools on a step ladder, even for a moment. When you latermove the ladder, tools can fall on your head!
• Follow common sense rules about tools (see previous section).
• When you are tired, stop. If confused, unclear, perplexed, or hungry,stop. A little time goes a long way in solving a problem––trying to rush a solution often causes mistakes.
• Provide adequate ventilation when working with paints, adhesives,and other materials with harmful fumes or vapors.
• Familiarize yourself with first aid practices. Know the location of thenearest telephone and hospital. Keep a first-aid kit nearby.
12
✔
13
CHAPTER 4ENERGYEFFICIENCYMEASURES
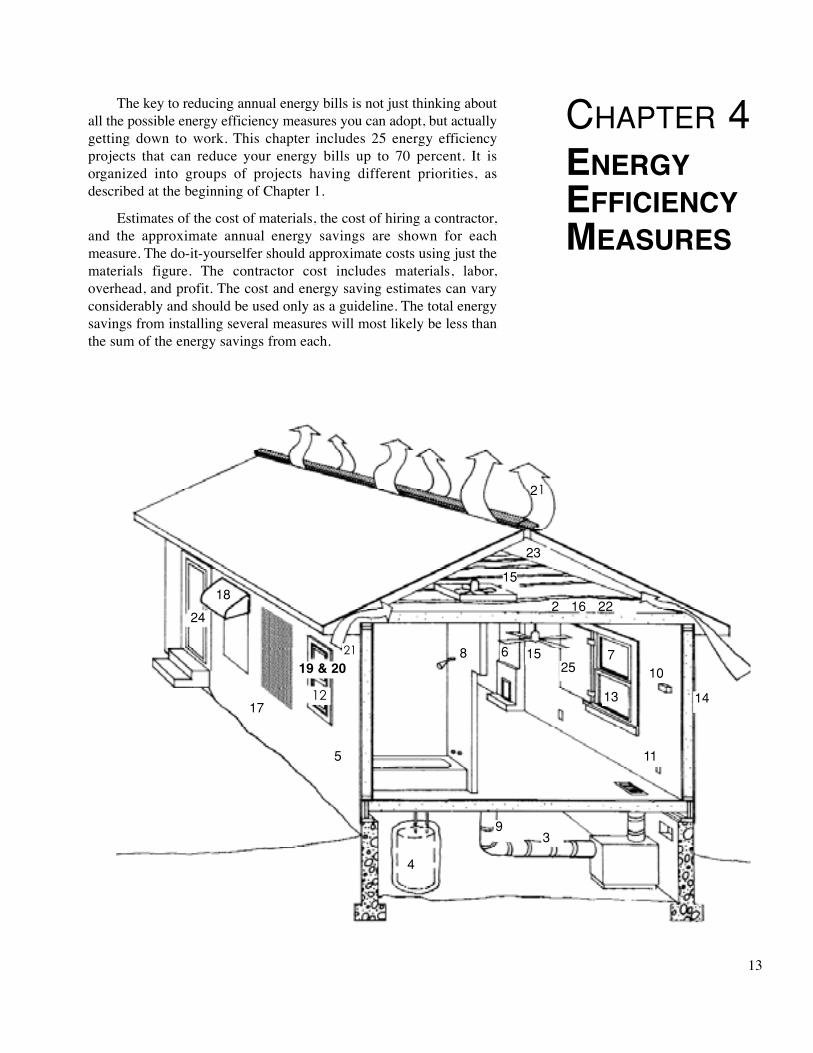
The key to reducing annual energy bills is not just thinking aboutall the possible energy efficiency measures you can adopt, but actuallygetting down to work. This chapter includes 25 energy efficiencyprojects that can reduce your energy bills up to 70 percent. It isorganized into groups of projects having different priorities, asdescribed at the beginning of Chapter 1.
Estimates of the cost of materials, the cost of hiring a contractor,and the approximate annual energy savings are shown for eachmeasure. The do-it-yourselfer should approximate costs using just thematerials figure. The contractor cost includes materials, labor,overhead, and profit. The cost and energy saving estimates can varyconsiderably and should be used only as a guideline. The total energysavings from installing several measures will most likely be less thanthe sum of the energy savings from each.
23
10
14
93
4
24
18
19 & 2021
17
5
13
11
71525
8
12
21
15
2 16 22
6

NO-COST,LOW-COSTMEASURES
Priority: URGENT✭✭✭ ✭
Initial Requirements• None
Typical Costs and SavingsMaterials:
• Minimal
Contractor (materials, labor,and overhead:
• None required
Annual energy savings:
• Up to several hundreddollars
Average Time Required• 2 to 3 days
Skills Required• Simple handiwork
Tools• Tape rule
• Utility knife or • heavy-duty shears• Scotch tape
Safety• No special measures
Materials• Plastic to cover holes
in windows• Filters
BASIC PROCEDUREMany opportunities for saving energy are available at the tip of yourfinger––switching off lights, adjusting thermostats, switching on fans,etc. However, simple, no-cost measures are often overlooked. A checklistof these measures is shown below:
SAVING ON HEATING BILLS• Set the thermostat back to 55
or 65 degrees at night. If youhave a heat pump, settingyour thermostat back may notsave you money. Check withyour local utility for recommen-dations for your home.
• Leave the thermostat at themaximum of 65 to 68 degreesduring the day, if the house isnot occupied.
• Keep the fireplace damper closed whenever fires are completely extinguished (if you do not have a damper, install a fireplacecover––Project 6).
• Use kitchen, bath, and other vent fans sparingly on cold days.
• Do not use the fireplace when the furnace is on unless the fireplacehas glass doors.
• If the heating systemis in use, never open awindow in a room thatis too hot; reduce thethermostat setting in-stead.
• Install a clean filter forthe heating systeme v e r y month or twoduring the winter.
• Wear a sweater––a light,long-sleeved sweatermakes the room feel two degrees warmer, aheavy sweater makes itfeel about four degreeswarmer, and two light-weight sweaters makeit feel five degreeswarmer.
14
65˚ 68˚ 72˚
Dress for Winter
15
PROJECT 1
NO-COST,LOW-COSTMEASURES
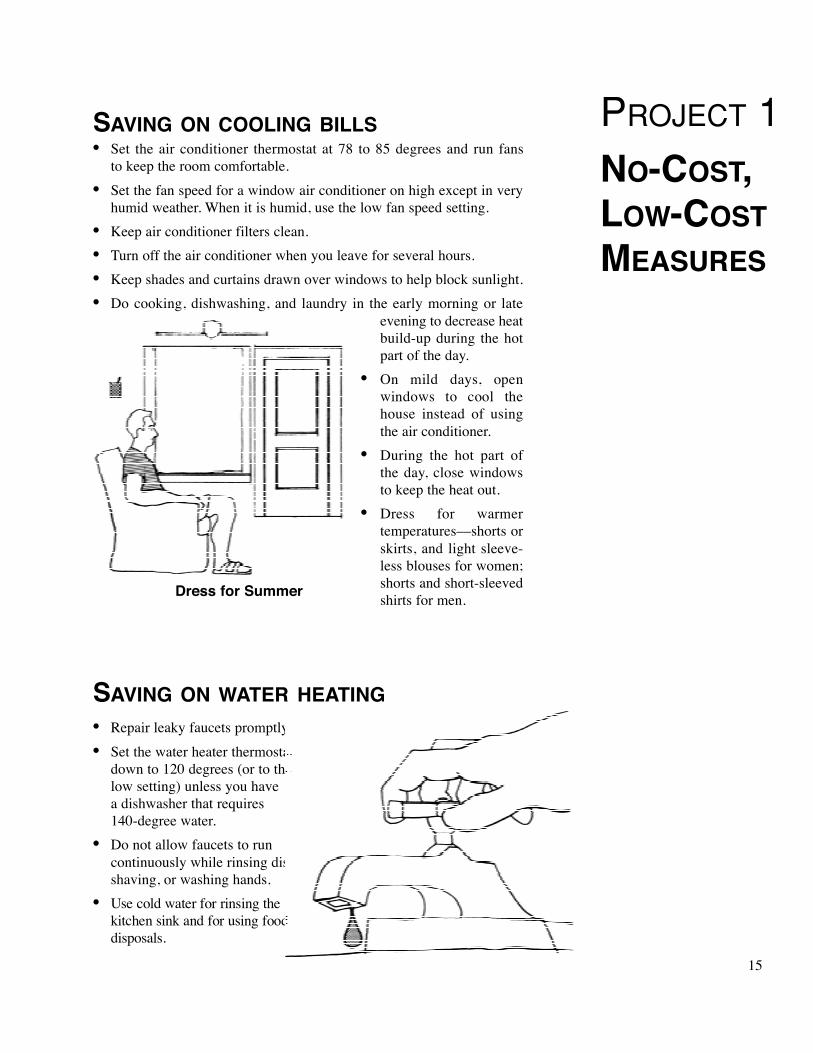
SAVING ON COOLING BILLS• Set the air conditioner thermostat at 78 to 85 degrees and run fans
to keep the room comfortable.
• Set the fan speed for a window air conditioner on high except in veryhumid weather. When it is humid, use the low fan speed setting.
• Keep air conditioner filters clean.
• Turn off the air conditioner when you leave for several hours.
• Keep shades and curtains drawn over windows to help block sunlight.
• Do cooking, dishwashing, and laundry in the early morning or lateevening to decrease heat build-up during the hotpart of the day.
• On mild days, openwindows to cool thehouse instead of usingthe air conditioner.
• During the hot part ofthe day, close windowsto keep the heat out.
• Dress for warmertemperatures––shorts orskirts, and light sleeve-less blouses for women; shorts and short-sleevedshirts for men.
SAVING ON WATER HEATING• Repair leaky faucets promptly.
• Set the water heater thermostat down to 120 degrees (or to the low setting) unless you have a dishwasher that requires 140-degree water.
• Do not allow faucets to run continuously while rinsing dishes,shaving, or washing hands.
• Use cold water for rinsing the kitchen sink and for using food d i s p o s a l s .
Dress for Summer
PROJECT 1
NO-COST,LOW-COST
MEASURES
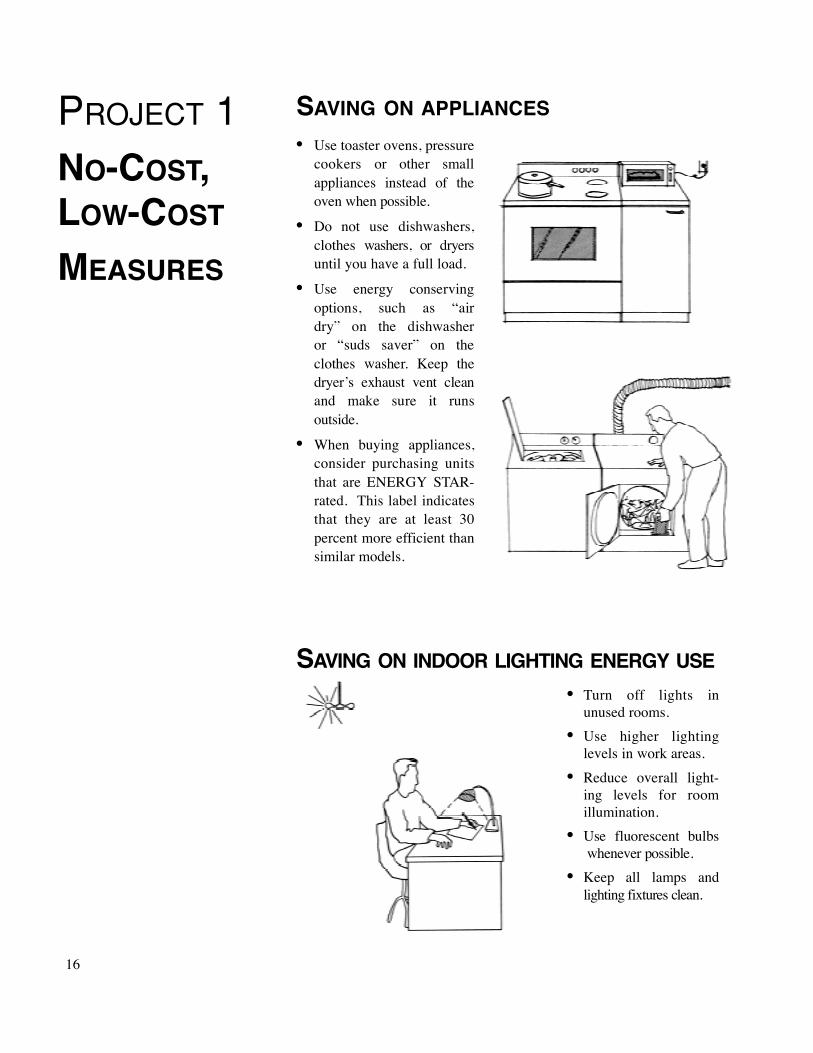
SAVING ON APPLIANCES• Use toaster ovens, pressure
cookers or other smallappliances instead of the oven when possible.
• Do not use dishwashers,clothes washers, or dryersuntil you have a full load.
• Use energy conservingoptions, such as “air dry” on the dishwasher or “suds saver” on the clothes washer. Keep thed r y e r’s exhaust vent cleanand make sure it runso u t s i d e .
• When buying appliances, consider purchasing unitsthat are ENERGY STAR-rated. This label indicatesthat they are at least 30percent more efficient thansimilar models.
SAV I N G O N I N D O O R L I G H T I N G E N E R G Y U S E• Turn off lights in
unused rooms.
• Use higher lightinglevels in work areas.
• Reduce overall light-ing levels for room illumination.
• Use fluorescent bulbswhenever possible.
• Keep all lamps andlighting fixtures clean.
16

17
PROJECT 2INSTALL R-30INSULATIONIN POORLYINSULATEDATTICPriority: URGENT ✭ ✭ ✭ ✭
CHECKLISTInitial Requirements• Attic currently has 0 to 3
inches of insulation. If the attic does not have adequate ventilation (the net free ventarea should equal 1/150 of the attic floor area), consider installing more attic ventilation––see Project 21 for details.
Typical Costs and SavingsMaterials:
• $.35 to $.55/sq ft fiber-glass/mineral wool roll
• 28 to $.35/sq ft blown cellulose
• $.28 to $.38/sq ft blown fiberglass/mineral wool
Contractor (materials, labor,and overhead):
• $.43 to $.77/sq ft fiber-glass/mineral wool roll
• $.35 to $.60/sq ft blown cellulose
• $.35 to $.60/sq ft blown fiberglass/mineral wool
Annual energy savings:
• $.15 to $.31/sq ft of attic floor
Average Time Required• 1⁄2 to 1 day/1,000 sq ft
SAFETYWhen working in the attic, be careful of what is below you––a
ceiling that probably will not support your weight––and what is aboveyou––a roof deck that likely has roofing nails pointing toward you. Walkonly on the ceiling joists, attic floor, or walkboards placed on top of thejoists. Be careful not to hit the roof above with your head; you shouldwear a construction helmet to ensure protection.
Insulating anattic is a messy job.The attic air will befull of particlesfrom the insulation,so wear a dust maskand goggles. Also,put on gloves, along-sleeved shirt,long pants, socks,and good shoes toprotect your skinfrom potentiallyirritating insulation.
MAT E R I A L SInsulation––if installing roll or batt insulation, see exhibit on How toOrder Roll or Batt Insulation. If installing loose-fill insulation, see thesection entitled Blowing Loose-Fill Attic Insulation
Foam sealant– –one to three cans used to seal around wiring,plumbing, ducts, and other penetrations between attic and heated area
Air sealing materials, such as plywood, insulation boards, andcaulking as required
Weatherstripping––for attic access doors
Sheet metal and screws––for supporting insulation blocking aroundchimney
✓
✓

PROJECT 2INSTALL R-30INSULATION INPOORLYINSULATEDATTIC
CHECKLISTSkills Required• Simple handiwork for
installing batt or roll insulation
• Blown insulation is often installed by a contractor, but a person who is handy can usually do the job
18
Tools• Utility knife
• Heavy-duty shears
• Drop light and extension cord• Tin snips
• Tape rule
• Heavy-duty stapler
and staples
✓
BASIC PROCEDURETwo approaches for installing attic insulation are addressed in this
section: 1) installing your own batt or roll insulation; and 2) blowing inloose-fill insulation. Batts and rolls are relatively easy to install, and usingthem to insulate an attic is an ideal project for the occasional do-it-yourselfer.
Loose-fill insulation should always be installed with a mechanicalinsulation blower which mixes air in with the insulation and increases theR-value. Blowing insulation is a more complicated job than installingbatts or rolls. It is appropriate for skilled do-it-yourselfers. However,sometimes the cost for a contractor to put in the insulation will be lessthan the materials cost for the insulation itself, whether it is in batt, roll,or loose-fill form. Therefore, call several contractors to get bids beforedeciding to install insulation yourself. Information on blowing your ownattic insulation is covered later in this chapter.
INSTALLING ROLL OR BATT INSULATION1. Install attic ventilation (see Project 21: Increase Attic Ventilation)
2. Check the attic and roof condition
a. Are there roof leaks? Look for water stains on the under-side of the roof decking, on the existing insulation, or on the attic floor.
b. Will the ceiling support insulation? If the interior plaster isbeginning to pull away from the lath or the drywall or sheetrockis pulling away from nails, do not insulate unless the ceiling is reinforced, or insulate by laying rolls of insulation tightlytogether crosswise over the joists.
c. Before insulating, note the location of all of the following items:
• Recessed lights
• Doorbell transformers
• Masonry chimneys
• Metal chimneys and vent pipes
• Exhaust fans
• Heat/light ventilators
• Knob and tube wiring
• Uncovered electric junction boxes
• Whole house fans
• Attic access doors
You will need to take care when insulating near these objects toreduce the danger of fire. See the exhibit on Attic Insulation BlockingGuidelines.

19
Vent exhaust fans to carrymoisture out of attic
3. Prepare the attica. Run drop cords and lights into attic. Install 2” x 6” or 2” x 8”
walkboards so nobody accidentally steps on the ceiling and ends up on the floor below.
b. Move stored items downstairs; protect what is left by covering them with plastic.
c. If possible, pull up the attic floor over any uninsulated areas.d. If the old insulation is damp and compressed, remove it. If the
vapor barrier on old insulation faces upwards, remove it or flip the insulation so the vapor barrier is against the ceiling.
4 . Seal penetrations through the attic with foam sealant or c a u l k i n gLocate all wiring, plumbing, ductwork, and other penetrationsthrough the ceiling and seal using 20-year caulk, spray foam sealant,or other suitable material. Pay special attention to large cracks orholes, such as those around lights, heating ducts, or electric boxes forceiling lights.
5. Weatherstrip and insulate the attic access doorInstall weatherstripping all around the attic access door to reduceinfiltration. See P roject 13: Weatherstrip Leaky Windows and Doorsfor more information on weatherstripping.Attach a batt of insulation to the door. If the attic access is a fold-downs t a i r w a y, build a lightweight, insulated box to go over the stairs. Sucha box can be lowered easily over the stairs as they are closed. T h e r eare also commercial products designed to insulate over attic stairs.
6. Install blockingBlock around potential danger areas with R-30 or R-19 roll or battinsulation as described in the exhibit on Attic Insulation BlockingGuidelines.
7. Install insulationWear long pants, a long-sleeved shirt, work gloves, a dust mask,safety goggles, and a hat or helmet for this work. When insulating,pay attention to these key elements:Get total coverage––insulate under all portions of the attic floor, ifpresent. Move boxes and stored items so you can insulate everywhere.
Do not block air flow from soffit or eave vents––use cardboard, foaminsulation, special foam baffles, or wood to keep insulationespecially loose-fill, from blocking this vital air flow.
Start near the eave area. Place insulation with the vapor barrier––if ithas one––facing down. If there is some insulation already on the atticfloor, use unfaced batts which do not have a vapor barrier. Do notinstall a vapor barrier sandwiched between layers of insulation. Toinstall insulation under the attic floor, use a push rod as shown on thediagram. You may have to use thinner insulation in this area––if thefloor boards are installed on top of 2” x 6” joists, use 6-inch (R-19)rolls. Of course, if the floor boards are loose or easy to pull up,remove them, install insulation and then replace them. If possible,floorboards should be elevated since compressing insulation reducesits R-value. When you encounter cross-bracing, cut and weave theinsulation around the braces as shown in the diagram.
Wiring penetrationsVent stack
Exhaust fan
ÇROSS-BRACING
Insulation
Baffle
Soffit vent
FiberglassAttic Flooring
Push rod
PROJECT 2INSTALL R-30INSULATIONIN POORLYINSULATEDATTIC
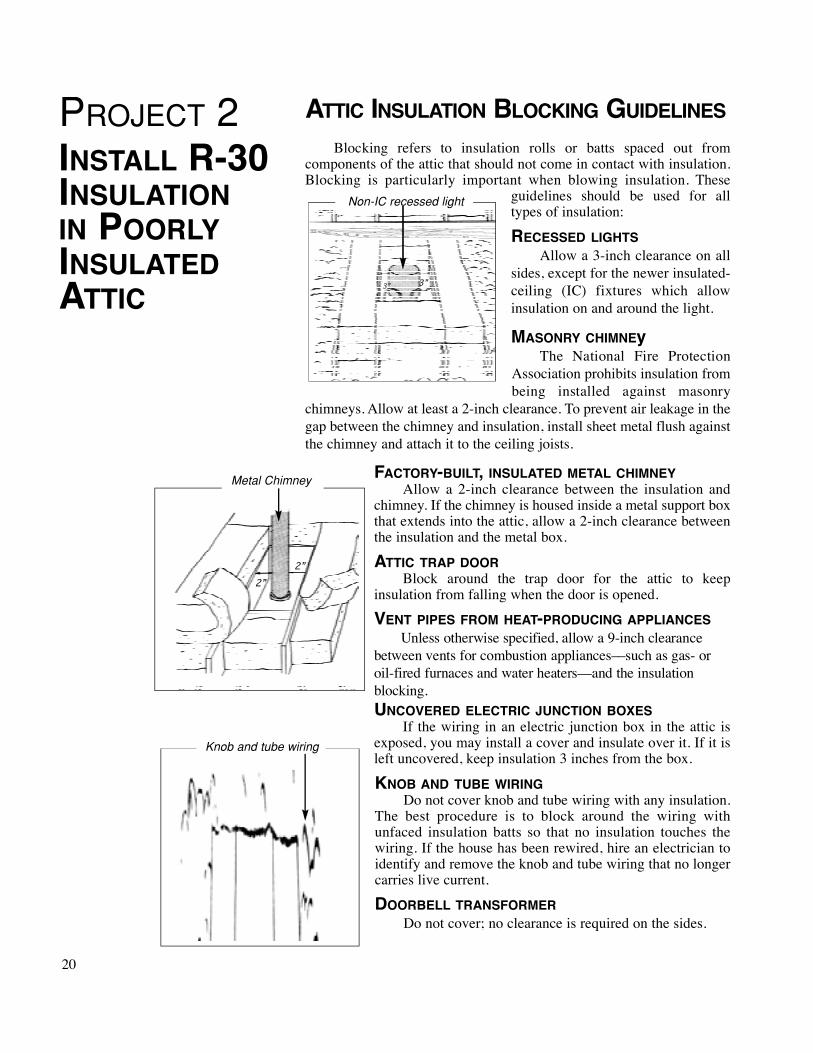
AT T I C IN S U L AT I O N BL O C K I N G GU I D E L I N E SBlocking refers to insulation rolls or batts spaced out from
components of the attic that should not come in contact with insulation.Blocking is particularly important when blowing insulation. These
guidelines should be used for alltypes of insulation:
RECESSED LIGHTSAllow a 3-inch clearance on all
sides, except for the newer insulated-ceiling (IC) fixtures which allowinsulation on and around the light.
MASONRY CHIMNEyThe National Fire Protection
Association prohibits insulation frombeing installed against masonry
chimneys. Allow at least a 2-inch clearance. To prevent air leakage in thegap between the chimney and insulation, install sheet metal flush againstthe chimney and attach it to the ceiling joists.
FACTORY-BUILT, INSULATED METAL CHIMNEYAllow a 2-inch clearance between the insulation and
chimney. If the chimney is housed inside a metal support boxthat extends into the attic, allow a 2-inch clearance betweenthe insulation and the metal box.
ATTIC TRAP DOORBlock around the trap door for the attic to keep
insulation from falling when the door is opened.
VENT PIPES FROM HEAT-PRODUCING APPLIANCESUnless otherwise specified, allow a 9-inch clearance
between vents for combustion appliances––such as gas- oroil-fired furnaces and water heaters––and the insulationb l o c k i n g .UNCOVERED ELECTRIC JUNCTION BOXES
If the wiring in an electric junction box in the attic isexposed, you may install a cover and insulate over it. If it isleft uncovered, keep insulation 3 inches from the box.
KNOB AND TUBE WIRINGDo not cover knob and tube wiring with any insulation.
The best procedure is to block around the wiring withunfaced insulation batts so that no insulation touches thewiring. If the house has been rewired, hire an electrician toidentify and remove the knob and tube wiring that no longercarries live current.
DOORBELL TRANSFORMERDo not cover; no clearance is required on the sides.
20
Non-IC recessed light
3” 3”
Knob and tube wiring
Metal Chimney
2”2”

21
EXHAUST FAN FOR KITCHEN OR BATHROOMIf the fan exhausts into the attic with no ductwork to the outside, a
minimum 3-inch clearance is needed at the mouth of the blower.Preferably, you should extend a flexible duct from the fan to outside airor to one of the attic vents. If you do not extend the duct outside, the atticvent area should be greater thanthe minimum––(1/150 of the atticfloor area with a vapor barrier or1/300 without). See P roject 21for details on attic ventilation.
HEAT/LIGHT/VENTILTORIn the case of a heat/light/
ventilator combination oftenused in a bathroom, allow a 3-inch clearance on all sides just asyou would for a recessed lightand do not insulate over the top.
WHOLE-HOUSE FANSInstall blocking up to thewhole-house fan housingand allow a 3-inchclearance between theblocking and fan moto
Heat/light/ventilator
Consider the attic area shown below:
The floor area thatneeds R-30 iscalculated below(the portion thatalready has 4 inchesneeds only R-19):25 ft x 60 ft = 1,500sq ft
Roll or batt insulation is made of fiberglass ormineral wool. To obtain R-30, you can either order R-30 rolls or batts, or buy R-19 to go between the ceilingjoists and R-11 to go crosswise on top of the joists. Toestimate how many square feet you need, multiply thefloor area of the attic by .95 to account for spaceoccupied by the joists. In the above example, you
would need: .95 x 1,500 sq ft = 1,425 sq ft ofinsulation
After estimating the square footage, call theinsulation supplier and specify the area and thespacing between the joists. He or she should be able totell you how many rolls are needed. Make sure youpurchase insulation that is sized to go between thejoists in your attic. Most often, joists are either 14.5inches or 22.5 inches apart.
If the attic currently has insulation, you shouldorder unfaced rolls of insulation. Unfaced insulationhas no asphalt-impregnated kraft paper or metal foilvapor barrier. If the attic has no insulation, order facedbatts; the ones with the asphalt-impregnated kraftpaper backing work fine. The backing, which shouldface down towards the heated space, acts as a vaporbarrier to moisture flow from the rooms below.
HOW TO ORDER ROLL OR BATT INSULATION
60 ft
0 inches
4 inches30 f t
25 ft
25 ft
PROJECT 2INSTALL R-30INSULATIONIN POORLYINSULATEDATTIC
Whole -house fan
3”

PROJECT 2
INSTALL R-30INSULATION INPOORLYINSULATEDATTIC
BL O W I N G L O O S E-F I L L AT T I C I N S U L AT I O NTo install loose-fill attic insulation, you should follow the steps
listed on the next page. Remember to get bids from several insulationcontractors to make sure you will be saving enough money to justifydoing it yourself. Note that many blowing machines are designed toblow only cellulose insulation; make sure you get the right blower andinsulation for the job.
When ordering loose-fill insulation, you will need to know the atticfloor area, the spacing between the joists, and the desired R-value. T h ebag in which the insulation comes will have a chart that shows how manybags are needed to provide specific R-values for a given floor area.
Never judge R-value by the thickness of the insulation. Themechanical blowing machine used to install loose-fill insulation blowsa mixture of air and insulation through a blower hose into the attic. Ifthe mixture has an excess of air, the insulation will be “fluffed”–– thethickness of the insulation will not reflect its true insulating value.Fluffed insulation settles over time and has a much lower R-value thanits initial thickness indicates.
To avoid problems encountered with variable mixtures of air andinsulation, never judge the insulating value of loose-fill insulation by itsthickness. Instead, use the insulation chart on the bag the insulationcomes in to determine how many bags to blow into your attic. See thesample insulation chart below.
For example, suppose your attic contains 1,500 square feet of areayou wish to insulate to R-30. Assume the joists are spaced 24 inches oncenter. Since R-30 is not shown on the sample chart, use the sizingestimates for R-32 insulation. The chart shows that 63 bags are neededfor 1,000 square feet; thus, for the 1,500 square foot insulation area:
63 bags x 1,500/1,000 = 94 bags for R-32 insulation are needed.22
TY P I C A L IN S U L AT I N G VA L U E S O F CE L L U L O S E IN S U L AT I O N
R-value at 75 F R-40 R-32 R-24 R-19
2” x 6” Joists Spaced 24 inches onCenter sq ft coverage per 25# bag 2.1 1.6 . 9 8 .67
Bags per 1,000 sq ft 77 5 6 4 3 2 4
Minimum thickness in inches 10.8 8.6 6.5 5.1
Minimum weight (lbs.) per sq ft 2.1 1.6 6.5 .67
2” x 6” Joists Spaced 24 inches onCenter sq ft coverage per 25# bag 1 3 1.8 2 3 4 1
Bags per 1,000 sq ft 8 3 6 3 4 8 27

23
PROJECT 2INSTALL R-30INSULATION INPOORLYINSULATEDATTICCautionary Note onInsulation ContractorsSome contractors have fluffedinsulation as a matter of practice.While most contractors arereputable, make sure that whoeveris installing your insulation knowsahead of time that you plan tocheck the insulation chart on thebag and make sure he or she hasinstalled the recommended numberof bags.
Therefore, order 94 bags and purchase one or two rolls of R-30batt or roll insulation to be used as blocking material. Be prepared forstoring the large number of bags you will be purchasing––they cantake up an unexpectedly large volume.
STEPS IN INSTALLING LOOSE-FILLINSULATION1. Store the loose-fill insulation near where you plan to locate the
insulation blower.
2. Follow steps 1 through 6 listed in the previous section Installing Roll or Batt Insulation.
3. Set up the blowing machine (the place where you buy theinsulation may loan or rent it to you). Unwind the hose and run it into the attic. The most convenient arrangement is often to keep the whole blowing operation out of the house by locating the blower outside on a covered porch or inside a cargo van, and then running the hose through an outside opening into the attic, such as a gable vent.
4. Organize your crew. It is best to have three people––one to be in the attic blowing insulation, another loading the blowing machine with insulation, and the third acting as a go-between. In the summerthe attic will be hot, so start early and plan for the person blowing the attic insulation to have frequent relief. Set up a signal to tell the person loading the machine to quickly turn it off in case of problems in the attic. The go-between crew member is helpful here.
5. Plug in the blowing machine. Most machines have two plugs, onefor the blower and another for an agitator that stirs up the insulation loaded in the hopper. It is best to connect the plugs to two separate circuits to prevent blowing fuses or breaker switches.
6. Turn on the agitator. The blades should turn around inside the h o p p e r. Never place hands or objects other than loose-fill insulation in the hopper when the agitator is operating. Rip a bag of insulation open and dump it into the hopper. Be careful not to let any of the torn portions of the bag fall into the hopper, as they can stop up the blower hose.
7. When the person in the attic signals that he or she is ready,whoever is loading the blower can turn it on. As the insulation level in the hopper declines, add additional bags.
8. Once again, install all of the bags of insulation purchased for the job.
9. When all of the bags have been installed, let the blower run for a few minutes to clear itself of all insulation. Then clean up.

PROJECT 2INSTALL R-30INSULATIONIN POORLYINSULATEDATTIC
OTHER CONDITIONSIn many houses, attic areas may
include heated rooms or attics may noteven exist because of cathedral ceilingsor flat roofs.
Heated rooms in the atticAttic rooms are often uncomfortable
because of improper air sealing andinsulation. Remember, you want toinsulate and seal the entire envelope of theh o u s e .
Cathedral ceilings and flat roofsThese areas present special
problems for the home insulator. Noaccess exists to the enclosed cavity soinsulation cannot be added easily. Themost common methods for addinginsulation require considerable buildingskills that typically call for a carpenter orbuilding contractor. Some options aredescribed in the following paragraphs.
Have the contractor build a dropped ceiling and insulate over it. Ifremovable panels (ceiling tiles) form the new ceiling, use roll insulation.Loose-fill insulation will drop between the tiles and make a mess everytime you look into the space above. While insulating, add attic ventilation.
If you have an exposed beam ceiling, the contractor can insulatebetween the rafters and install a new interior finish of wood or drywall.If you want to preserve the look of the exposed beams, but still insulate,thinner pieces of insulation, such as 2 to 4 inches of rigid foaminsulation board, can be installed and covered with an interior finish thatfits in between the still exposed portions of the rafters as shown in thediagram. With rigid foam insulation, the contractor should use aninterior finish with a 15-minute fire rating, such as 1/2-inch drywall.attach 2” x 4” nailers to the sides of the rafters as nailing surfaces forthe interior finish.
When the rafters for a cathedral ceiling or flat roof are enclosedwithin the interior finish, insulating becomes even more difficult. If theinterior finish needs replacing, two approaches can be followed: 1)remove the existing finish, install insulation leaving an air space abovefor ventilation, install ridge and soffit vents, put in a vapor barrier, andapply the new interior finish; or 2) attach 2 inches of rigid insulation tothe interior side of the old finish and screw the new finish into the raftersthrough the insulation and old finish.
If reroofing, your contractor can install rigid insulation board overthe existing roof, nail 1” x 4” or 2” x 4” spacers through theinsulation into the existing rafters, attach a new roof deck to thesespacers, install the new roof, and put in ridge and soffit vents forventilation.
24
RoofAir space2” x 4” nailerExposed rafterInterior finish4” rigid
New roof
4” rigidinsulation
Old roof
Rafter
Interior finish
Attic roominsulation
1” Rigid foam insulation
31⁄2” BattCaulkElectrical box
Attic Kneewall
{

25
PROJECT 3
SEAL ANDINSULATEDUCTWORKPriority: URGENT e e e e
CHECKLISTInitial Requirements• Leaky or uninsulated ductwork
in unheated area (basement, crawl space, attic, garage, etc.)
Typical Costs and Savings
Materials:
• $15 to $20/gal of duct sealing mastic
• $.50 to $1.00/foot for duct insulation
Contractor (materials, labor,and overhead):
• Cost varies according to the accessibility of the ductwork and size of the house. Average sized home with easy access may range from $500 to $750
Annual energy savings:
• 10% to 30% of central heatingand cooling bills
Average Time Required• Contractor can usually finish
in 1 to 2 days
Skills Required• You should hire a contractor
for this job
Tools and materials• Contractor will supply all tools
and materials
BASIC PROCEDUREDucts and other components of your heating and cooling
system should be airtight so that they do not waste energy or createhealth and safety problems. Poorly sealed ducts can cause 10 to 30percent of your home’s total heating and cooling costs. Duct leakscan draw air that is laden with toxic chemicals, pollen, mold,excess humidity, dust, and other contaminants into your homefrom attics, crawl spaces, and basements .
In addition to being airtight, the ducts should be wellinsulated to reduce energy losses and prevent condensation. Allsurfaces of the ductwork should be insulated, including the bootconnections to the floor or ceiling. Duct insulation does not forman airtight seal, so a contractor usually must remove it to sealducts, then reinstall the insulation.
The best material to use to seal ducts is mastic, a thick pastewhich can be applied to all types of ductwork. Avoid using ducttape. Even quality tapes do not stick well to ducts. Only use tapesto provide a temporary seal, such as over an opening for the filter,which must be changed periodically.
Return grille✓
Supply register
Boot
Round ductwork
Ductwork joint
Supply plenum
Supply takeoff
Elbow
Supply trunk
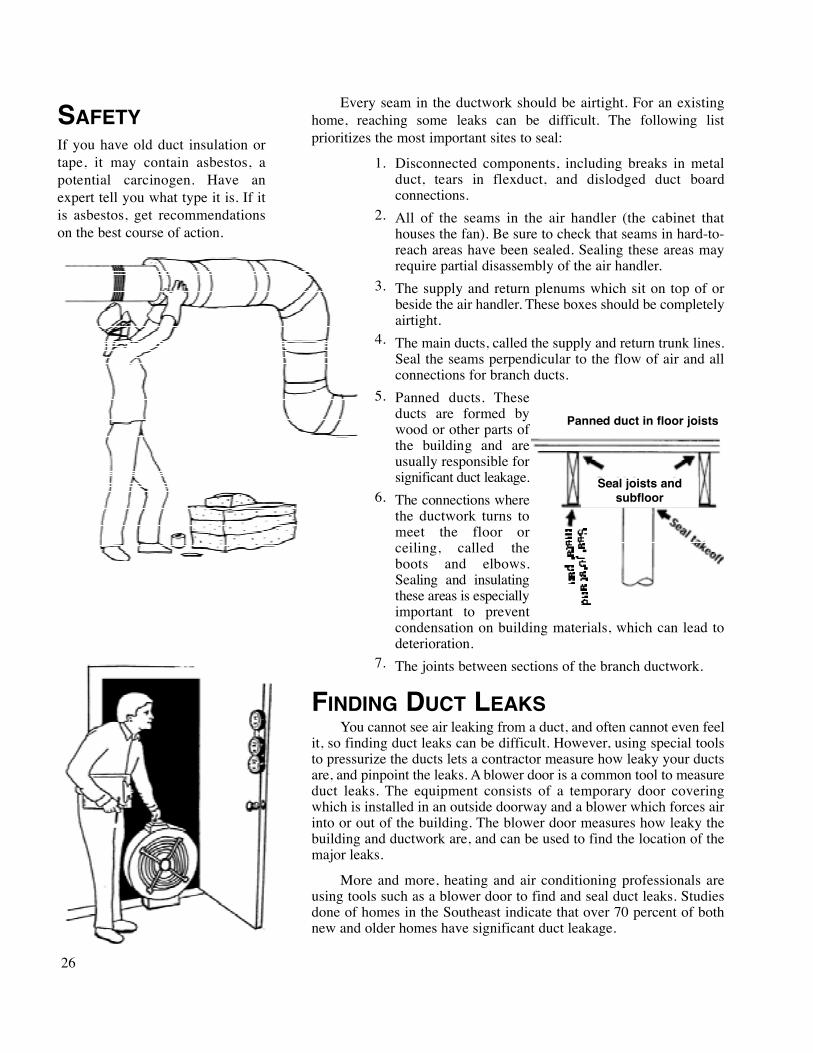
SAFETYIf you have old duct insulation ortape, it may contain asbestos, apotential carcinogen. Have anexpert tell you what type it is. If itis asbestos, get recommendationson the best course of action.
Every seam in the ductwork should be airtight. For an existinghome, reaching some leaks can be difficult. The following listprioritizes the most important sites to seal:
Disconnected components, including breaks in metalduct, tears in flexduct, and dislodged duct boardconnections.
All of the seams in the air handler (the cabinet thathouses the fan). Be sure to check that seams in hard-to-reach areas have been sealed. Sealing these areas mayrequire partial disassembly of the air handler.
The supply and return plenums which sit on top of orbeside the air handler. These boxes should be completelyairtight.
The main ducts, called the supply and return trunk lines.Seal the seams perpendicular to the flow of air and allconnections for branch ducts.
Panned ducts. T h e s educts are formed bywood or other parts ofthe building and areusually responsible forsignificant duct leakage.
The connections wherethe ductwork turns tomeet the floor orceiling, called theboots and elbows.Sealing and insulatingthese areas is especiallyimportant to preventcondensation on building materials, which can lead todeterioration.
The joints between sections of the branch ductwork.
FINDING DUCT LEAKSYou cannot see air leaking from a duct, and often cannot even feel
it, so finding duct leaks can be difficult. However, using special toolsto pressurize the ducts lets a contractor measure how leaky your ductsare, and pinpoint the leaks. A blower door is a common tool to measureduct leaks. The equipment consists of a temporary door coveringwhich is installed in an outside doorway and a blower which forces airinto or out of the building. The blower door measures how leaky thebuilding and ductwork are, and can be used to find the location of themajor leaks.
More and more, heating and air conditioning professionals areusing tools such as a blower door to find and seal duct leaks. Studiesdone of homes in the Southeast indicate that over 70 percent of bothnew and older homes have significant duct leakage.
26
1.
2.
3.
4.
5.
6.
7.
Seal joists andsubfloor
Panned duct in floor joists
27
PROJECT 4
INSTALLINSULATINGJACKET ONWATERHEATERPriority: URGENT ✭✭✭✭
CHECKLIST
Initial Requirements
• Current water heater is standard rather than high e ff i c i e n c y. Some older, cabinet-type units that are usually located in the kitchen may be inappropriate to insulate.
Typical Costs and SavingsMaterials:
• $10 to $20
Contractor (materials, labor,and overhead):
• $25 to $35
Annual energy savings:
• 4% to 9% of water- h e a t i n gcosts
Average Time Required
• 1⁄2 to 1 hour
Skills Required• Simple handiwork
Tools• Utility knife• Heavy-duty shears
SAFETYWear work gloves and a long-sleeved shirt––most water heater
jackets contain fiberglass or mineral wool insulation which can beirritating to the skin.
Read the instructions on the water heater jacket carefully; gas,propane, or fuel oil water heaters should be insulated only on thesides––not the top. Never block the cover for the pilot light andburner, or the exhaust vent at the top of a gas or propane water heater.Also, do not block the pressure-temperature relief valve (also calledthe “pop-off” valve) for any type water heater. In addition, do notcover the drain valve at the bottom of the water heater.
MATERIALS• Insulating jacket––use an insulating jacket large enough for your
water heater.
• Vinyl tape––to secure the jacket to the water heater; it often comeswith the water heater jacket.
• Pipe insulation––enough to wrap about 15 feet of pipe. Make sureit is the right size for your piping (usually 3/4-inch copper or galvanized).
✓

PROJECT 4INSTALLINSULATINGJACKETON WATERHEATER
BASIC PROCEDUREFor an electric waterheater:
Turn off electricity tow a t e r h e a t e r.
Remove the door cover-ing the thermostat and setthermostat to low setting(120 degrees). If you havea dishwasher, use thermo-stat setting recommendedfor it. Replace the doorwhen you finish. Manyelectric water heatershave two thermostats,both of which should bea d j u s t e d .
Wrap the insulating jacketaround the sides, cut tosize, and tape in place.
Cut a “window” throughthe insulation to provideaccess to the thermostat. Put the insulation you cut out back in thewindow so the water heater remains insulated.
Cut insulation for the top of the water heater. Cut holes in the toppiece to allow the pipes and the pressure-temperature relief valve toprotrude.
Install the insulated cover over the top and tape the seams.
For a gas, propane, or fuel oil water heater:Reduce the thermostat to the low setting.
Wrap the insulating jacket or insulation rolls around the sides, cut tosize, and tape in place.
Cut insulation away from the pressure-temperature relief valve, pilotlight and burner area. Make sure insulation can not possibly drop infront of these areas. These actions are critical for your safety.
Do not install insulation on the top of a gas, propane or fuel oil waterheater.
PIPE INSULATIONInstall pipe insulation on the first 3 feet of all pipes exiting the waterheater––cold and hot water lines.
28
InsulationJacketThermostatDo not cover burner area
GAS WATER HEATER
1.
2.
3.
4.
5.
6.
1.
2.
3.
4.
Do not cover top ELECTRIC WATER HEATER
Insulation
•Thermostats
29
PROJECT 5SEAL HOLES,CRACKS, ANDPENETRATIONSPriority: URGENT✭✭✭✭
CHECKLIST
Initial Requirements• Holes, cracks, or unsealed
penetrations through walls, ceilings, and floors.
Typical Costs and SavingsMaterials:
• $2 to $7/caulk tube
• $5 to $12/can of spray foam sealant
• $5 to $30 for sheet materials to seal large holes
• $2 to $5/package of backing material
Contractor (materials, labor,and overhead):
• Up to $500/house
Annual energy savings:
• $130 to $180/house
Average Time Required• Varies widely
Skills Required• Simple handiwork, perhaps
some basic carpentry
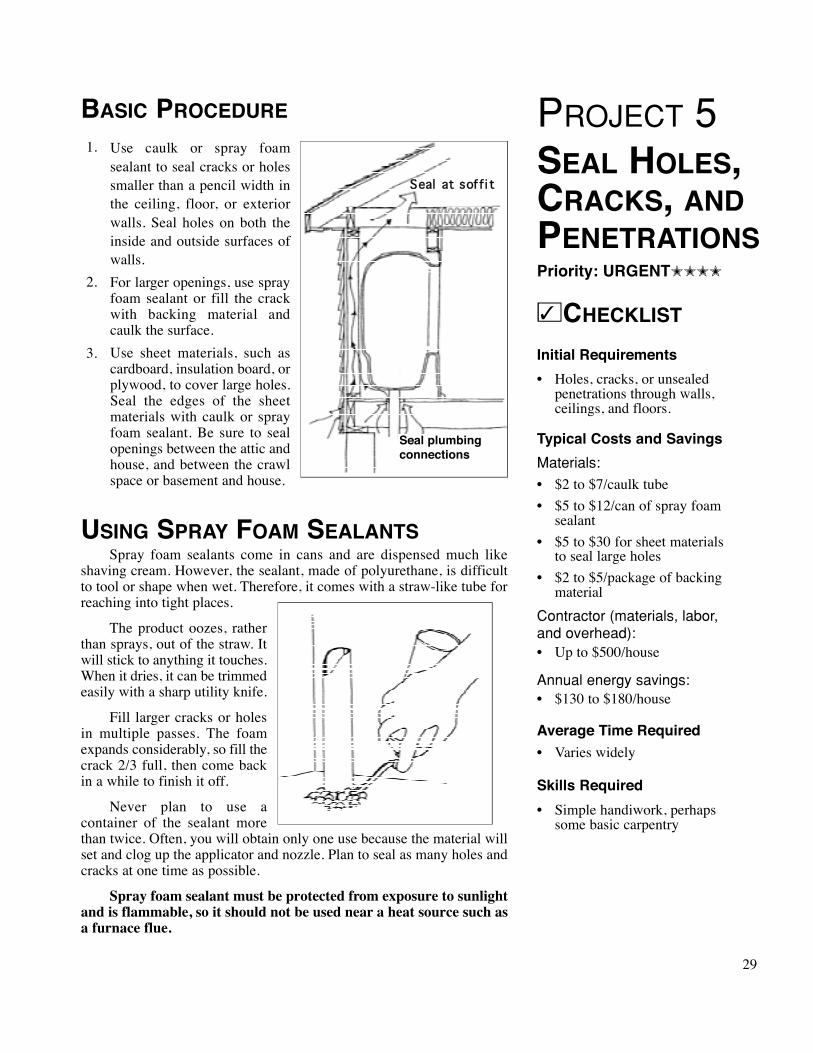
BASIC PROCEDUREUse caulk or spray foamsealant to seal cracks or holessmaller than a pencil width inthe ceiling, floor, or exteriorwalls. Seal holes on both theinside and outside surfaces ofwalls.
For larger openings, use sprayfoam sealant or fill the crackwith backing material andcaulk the surface.
Use sheet materials, such ascardboard, insulation board, orplywood, to cover large holes.Seal the edges of the sheetmaterials with caulk or sprayfoam sealant. Be sure to sealopenings between the attic andhouse, and between the crawlspace or basement and house.
USING SPRAY FOAM SEALANTSSpray foam sealants come in cans and are dispensed much like
shaving cream. However, the sealant, made of polyurethane, is difficultto tool or shape when wet. Therefore, it comes with a straw-like tube forreaching into tight places.
The product oozes, ratherthan sprays, out of the straw. Itwill stick to anything it touches.When it dries, it can be trimmedeasily with a sharp utility knife.
Fill larger cracks or holesin multiple passes. The foamexpands considerably, so fill thecrack 2/3 full, then come backin a while to finish it off.
Never plan to use acontainer of the sealant morethan twice. Often, you will obtain only one use because the material willset and clog up the applicator and nozzle. Plan to seal as many holes andcracks at one time as possible.
Spray foam sealant must be protected from exposure to sunlightand is flammable, so it should not be used near a heat source such asa furnace flue.
1.
2.
3.
Seal at soffi t
Seal plumbing connections
✓

PROJECT 5
SE A L HO L E S,CR A C K S, A N DPE N E T R AT I O N S
CHECKLISTTools• Caulk gun
• Utility knife• Optional Tools
• Carpenter’s tool belt (see Rules for Tools section in Chapter 3)
• Saw
Safety• No special measures
Materials• One-part urethane caulk,
acrylic latex caulk with silicones, paintable silicone caulk, or other caulk with at least a 20-year life
• Backing material––such asfoam backer rod
• Spray foam sealant––e.g.,Great Stuff Polycel 1® or Touch n’ F o a m®
• Sheet materials such as insulation board, plywood,or cardboard to cover l a rge holes
AIR SEAL BYPASSESAir leaks cause high heating and cooling bills and can make your
home uncomfortable. Air leaks bring in outside moisture, dust, pollen,radon, and otherp o l l u t a n t s . E v e nthough your homeis well insulated, itcan still haveexcessive air leaks.Standard loose-fill,batt, or roll insu--lation materials donot stop air leaks,and can lose theirinsulating values ifair seeps throughthem. Be sure toseal all bypassesbefore you insulate.
30
✓
Attic stair sealed with weatherstripping and insulated box
Gap sealed with sheet metal and high temperature caulk
Dropped soffit sealed withinsulation board and spray
foam
Plenum for ductworksealed with insulation
boardand spray foam
Whole house fan sealed withinsulation board and Velcro®
31
PROJECT 6BUILDFIREPLACECOVERSPriority: URGENT ✭✭✭✭
CHECKLISTInitial Requirements• If house has undampered
fireplaces that are seldom used, install fireplace covers or glass doors.
• If a fireplace that is often used has no dampers, install glass doors, a fireplace insert, or a woodstove. The fireplace cover discussed in this chapter should not be installed on a frequently used fireplace due to the danger of fire (see Safety section).
Average Time Required• 1 to 3 hours/fireplace cover
• Contractor usually can install glass doors, fireplace insert, or wood stove in a day’s time
Skills Required• Simple handiwork for fireplace
cover
Tools• Tape rule
• Fabric shears
• 4-foot straightedge (yard stick,metal bar, or thin lumber that is not warped)
Optional Tools• Circular saw
SAFETYNever install thefireplace coverbefore the fire iscompletely out. Redembers or other signsof fire should not bepresent. In otherwords, the fireshould have beenstone cold for severaldays.
MATERIALS3/4-inch rigid extruded polystyrene insulation board––Dow(Styrofoam blue board), U.S. Gypsum (Foamular), or Amoco(Amofoam)
or
3/4-inch plywood
Fabric or self-sticking wall paper to cover insulation board orplywood.
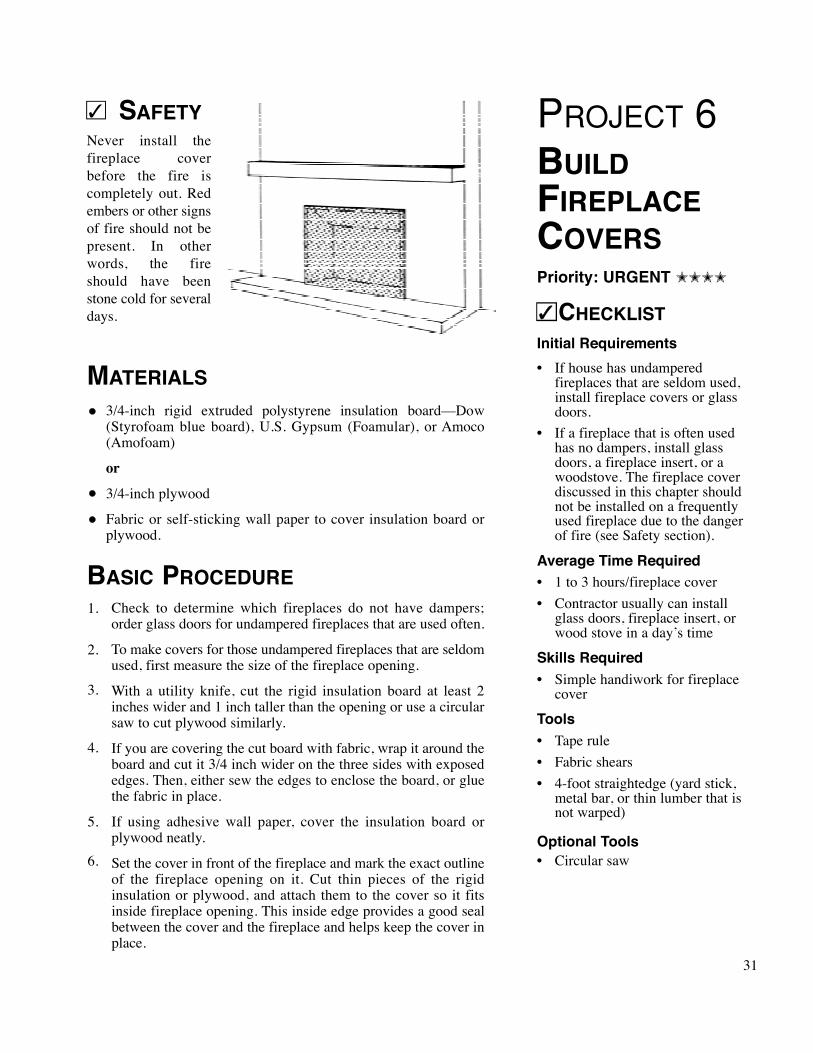
BASIC PROCEDURECheck to determine which fireplaces do not have dampers;order glass doors for undampered fireplaces that are used often.
To make covers for those undampered fireplaces that are seldomused, first measure the size of the fireplace opening.
With a utility knife, cut the rigid insulation board at least 2inches wider and 1 inch taller than the opening or use a circularsaw to cut plywood similarly.
If you are covering the cut board with fabric, wrap it around theboard and cut it 3/4 inch wider on the three sides with exposededges. Then, either sew the edges to enclose the board, or gluethe fabric in place.
If using adhesive wall paper, cover the insulation board orplywood neatly.
Set the cover in front of the fireplace and mark the exact outlineof the fireplace opening on it. Cut thin pieces of the rigidinsulation or plywood, and attach them to the cover so it fitsinside fireplace opening. This inside edge provides a good sealbetween the cover and the fireplace and helps keep the cover inplace.
✓
•
•
•
1.
2.
3.
4.
5.
6.
✓

PROJECT 6BUILDFIREPLACECOVERS
32
TYPICAL COSTS AND SAVINGS
Fireplace coverMaterials:
• $20 to $50/cover
Contractor (materials,labor, and overhead):
• $40 to $100/cover
Annual energy savings:
• $20 to $50/cover
Glass doorsMaterials:
• Vary widelya c c o r d i n g
to style
Contractor (materials, labor, and overhead):
• $100 to $300 for standard designs
Annual energy savings:
• Vary widely––up to $150
Fireplace insertsMaterials:
• $300 to $1,000 for standard designs
Contractor (materials, labor, and overhead):
• $400 to $1,500
Annual energy savings:
• Vary widely––up to $400
Wood stovesMaterials:
• $400 to $1,000 for standard designs
Contractor (materials, labor, and overhead):
• $500 to $1,500
Annual energy savings:
• Vary widely––up to $400

33
PROJECT 7
REPAIR ANDREGLAZEWINDOWSPriority: URGENT ✭✭✭✭
CHECKLISTInitial Requirements• Some windows are broken or
have cracked or missing glazing compound
Typical Costs and SavingsRepair
Materials:
• $1 to $3/sq ft
Contractor (materials, labor,and overhead):
• $5 to $10/sq ft
Annual energy savings:
• Vary widelyReglazing
Materials:
• Minimal
Contractor (materials, labor,and overhead):
• $3 to $6/sq ft
Annual energy savings:
• Vary widely
Average Time Required• Repair: 1⁄4 to 1 hour/
window pane
• Reglazing: 1⁄4 to 1 hour/window
SAFETYBe careful when working with glass to avoid cuts, particularly
when removing pieces of a broken window pane. Use work gloveswhen removing glass.
MATERIALS• Glazing compound that contains linseed oil––for sealing windows in
place; do not use caulk.
• Quick-drying primer, linseed oil, or wood sealer––if glazing compound has no linseed oil. Sealing unpainted wood will make glazingcompound last longer.
• Glazier’s points––to hold panes in place during installation
• Window panes––measure the size of the opening for broken panes andcut the glass 1/8 inch smaller along both dimensions. When buyingthe glass, take a piece of the broken window pane with you to matchthe type of glass.
• Exterior paint to match window trim
• Paint thinner––for cleanup
BASIC PROCEDUREReplacing broken window panes
(If the window does not use glazing compound, see Replacing panessealed in place with gaskets).
1. Measure opening for brokenpanes and order new panes 1/8inch smaller in height and width.
2. Remove old pane carefully––usework gloves and work from thetop down to prevent glass fromdropping on your hands. Wiggleglass back and forth (likeloosening a child’s tooth) to helppull it out. Also, remove all of theold glazing compound.
If using a glazing compound that does not contain linseed oil, sealthe unpainted wood mullions withquick-drying primer, linseed oil, orwood sealer.
After the sealant dries (readdirections on the can for an estimateof how long drying takes), use a puttyknife to spread a 1/8-inch layer ofcompound evenly around the framein which the glass will rest.
Driedglazingcompound
3.
4.
✓
Layer of glazingcompound
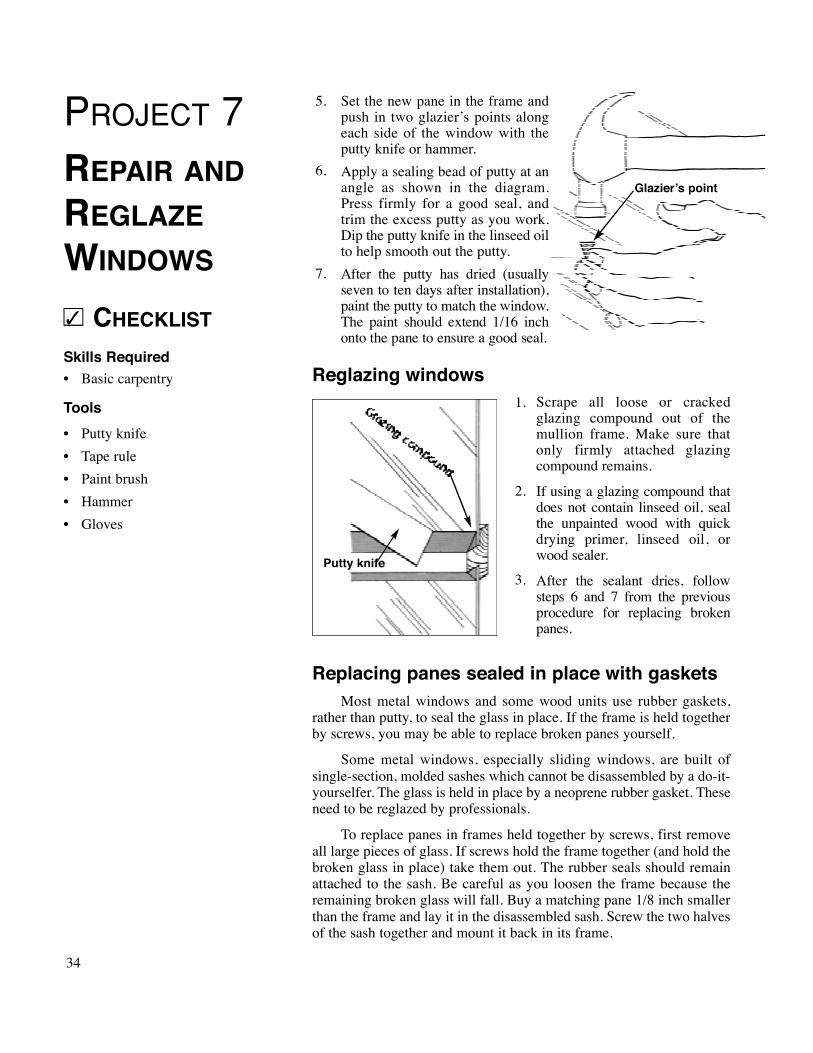
PROJECT 7
REPAIR ANDREGLAZEWINDOWS
CHECKLISTSkills Required• Basic carpentry
Tools• Putty knife
• Tape rule
• Paint brush
• Hammer
• Gloves
Set the new pane in the frame andpush in two glazier’s points alongeach side of the window with theputty knife or hammer.
Apply a sealing bead of putty at anangle as shown in the diagram.Press firmly for a good seal, andtrim the excess putty as you work.Dip the putty knife in the linseed oilto help smooth out the putty.
After the putty has dried (usuallyseven to ten days after installation),paint the putty to match the window.The paint should extend 1/16 inchonto the pane to ensure a good seal.
Reglazing windowsScrape all loose or crackedglazing compound out of themullion frame. Make sure thatonly firmly attached glazingcompound remains.
If using a glazing compound thatdoes not contain linseed oil, sealthe unpainted wood with quickdrying primer, linseed oil, orwood sealer.
After the sealant dries, followsteps 6 and 7 from the previousprocedure for replacing brokenp a n e s .
Replacing panes sealed in place with gasketsMost metal windows and some wood units use rubber gaskets,
rather than putty, to seal the glass in place. If the frame is held togetherby screws, you may be able to replace broken panes yourself.
Some metal windows, especially sliding windows, are built ofsingle-section, molded sashes which cannot be disassembled by a do-it-yourselfer. The glass is held in place by a neoprene rubber gasket. Theseneed to be reglazed by professionals.
To replace panes in frames held together by screws, first removeall large pieces of glass. If screws hold the frame together (and hold thebroken glass in place) take them out. The rubber seals should remainattached to the sash. Be careful as you loosen the frame because theremaining broken glass will fall. Buy a matching pane 1/8 inch smallerthan the frame and lay it in the disassembled sash. Screw the two halvesof the sash together and mount it back in its frame.
34
✓
5.
6.
7.
Glazier’s point
1.
2.
3.Putty knife

35
PROJECT 8USELOW-FLOWSHOWERHEADSPriority: ESSENTIAL ✭ ✭ ✭
CHECKLIST
Initial Requirements• Existing standard showerhead
can be removed.
Typical Costs and SavingsMaterials:
• $15 to $100/showerhead
Contractor (materials, labor, and
overhead):
• $25 to $125/showerhead
Annual energy savings:
• Up to 30% of hot water costs
Average Time Required• 1/4 to 1 hour/showerhead
Skills Required• Minor plumbing (using
an adjustable wrench)
Tools• Adjustable wrench
• Pipe wrench may be necessary
Safety• No special measures
MATERIALSShower flow controls for each shower––options include acompletely new energy-conserving showerhead or an insert into your existings h o w e rhead. Mostlow-flow shower-heads provide af o r c e f u l s p r a yof water, whiler e d u c i n g w a t e rconsumption fromsix gallons perminute down totwo or three. Af l o w - r e s t r i c t i n ginsert in yourexisting shower isless expensive thanan entire newshowerhead, butmay reduce theforcefulness of thes p r a y. In bothcases, it is best toremove your existing showerheads and take them to the store withyou to ensure the product you buy will fit.
Teflon tape––for wrapping the threads of the shower to preventleakage
BASIC PROCEDURERemove the existing showerhead with an adjustable wrench.
Take the showerhead to the hardware store or building supply andpurchase an appropriate shower flow control.
Wrap teflon tape around the threads of the shower pipe. Start at theend of the pipe and wrap clockwise one or two layers thick.
If using a flow control insert, follow installation instructions.Then replace the old showerhead.
If using a new energy-conserving showerhead, tighten it onto thetaped pipe threads using the adjustable wrench.
OTHER CONDITIONSIf the old showerhead is locked on because of corroded pipes, youshould reassess the job carefully before proceeding. Do not use bruteforce and damage the house’s plumbing because the job can thenbecome expensive, and may leave your household without water untilrepairs are made. Of course, if the corrosion is severe, the flow mayalready be restricted.
•
•
1.
2.
3.
4.
5.
Low-flow showerhead
✓

PROJECT 9INSULATEFLOORSPriority: ✭ ✭ ✭ ✭
CHECKLISTInitial Requirements
The floor is presentlyuninsulated. An accessiblecrawl space (at least 18 inchesof headroom) or unheatedbasement is under the floor.R-19 insulation isrecommended; however, inareas with mild winters, R-11or R-13 can be used.
Typical Costs and Savings
R-19 Floor InsulationMaterials:
• $.24 to $.38/sq ft of floor tobe insulated
Contractor (materials, labor,and overhead):
• $.37 to $.60/sq ft of floor (up to $.05/sq ft more fora low crawl space)
Annual energy savings:
• $.06 to $.10/sq ft of floor
R-11 Floor Insulation Materials:
• @ $.12 to $.18/sq ft of floor
Contractor (materials, labor,and overhead):
• $.22 to $.40/sq ft of floor (up to $.05/sq ft more for a low crawl space)
Annual energy savings:
• $.05 to .07/sq ft of floor
Average Time Required
• 1 to 2 days/1,000 sq ft
SAFETYWear hard-soled shoes, dust mask, safety glasses or goggles,
long-sleeved shirt, hat, and work gloves for full protection–you willbe working with fiberglass or mineral wool insulation.
MATERIALSStaples for heavy-duty stapler
Insulation–Order R-19 rolls of insulation with a vapor barrier onone side for the specific spacing between joists (usually 14-1/2 or221⁄2 inches). See exhibit on Floor Insulation Sizing for moreinformation.
Tiger claws or other rigid wire supports designed to hold insulationbetween the floor joists firmly against the subfloor-order for thespecific spacing between joists. You will need about 50 to 55supports per 100 square feet in floors with joists spaced 14-1/2inches apart, or 35 to 40 per 100 square feet in floors with joistsspaced 22-1/2 inches apart.
6 to 10 mil polyethylene plastic-only for houses with crawl spacesor basements over bare earth.
Pipe insulation for hot and cold water pipes
Baling wire and U-nails to hold insulation in place (see Specialconditions)
FLOOR INSULATION SIZINGFloor insulation can be sized either by determining the area of
the floor to be insulated, or by finding the total length of joist spacesin which insulation will be installed. For example, consider a floorthat has 1,600 square feet with joists spaced on 22 1/2-inch centers.Allowing 5 percent for framing, the insulation area should be 95percent of the floor area:
Insulation area = .95 x 1,600 = 1,520 sq ft
Specify 1,520 square feet of R-19 insulation that is 22 1/2 incheswide. Also order 35 to 40 tiger claws per 100 square feet of floor-about 600 total tiger claws.
You could also have measured the length of the joist spaces andcounted their number. If the above floor had 40 joist spaces 20 feetlong, you would need: 40 x 20 = 800 linear feet of 22 1/2-inch R-19insulation.
36
✓
•
•
•
•
•
•
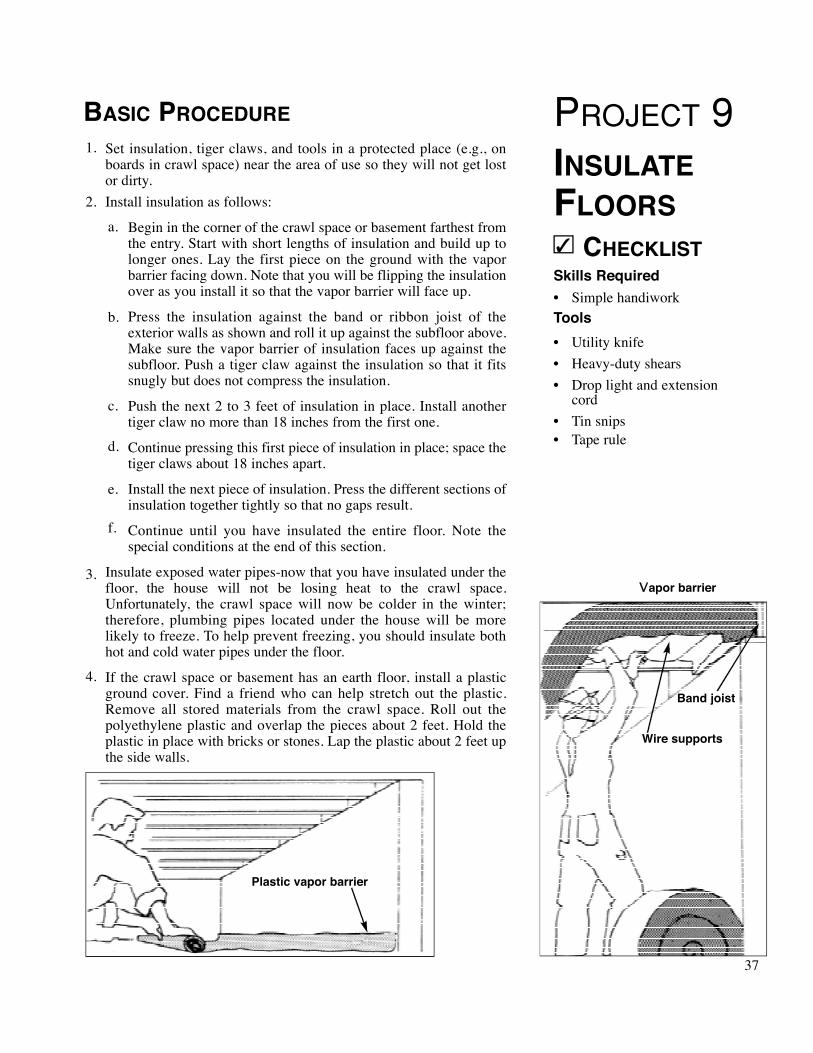
37
PROJECT 9
INSULATEFLOORS
CHECKLISTSkills Required• Simple handiworkTools• Utility knife
• Heavy-duty shears
• Drop light and extension cord
• Tin snips• Tape rule
BASIC PROCEDURESet insulation, tiger claws, and tools in a protected place (e.g., onboards in crawl space) near the area of use so they will not get lostor dirty.
Install insulation as follows:
Begin in the corner of the crawl space or basement farthest fromthe entry. Start with short lengths of insulation and build up tolonger ones. Lay the first piece on the ground with the vaporbarrier facing down. Note that you will be flipping the insulationover as you install it so that the vapor barrier will face up.
Press the insulation against the band or ribbon joist of theexterior walls as shown and roll it up against the subfloor above.Make sure the vapor barrier of insulation faces up against thesubfloor. Push a tiger claw against the insulation so that it fitssnugly but does not compress the insulation.
Push the next 2 to 3 feet of insulation in place. Install anothertiger claw no more than 18 inches from the first one.
Continue pressing this first piece of insulation in place; space thetiger claws about 18 inches apart.
Install the next piece of insulation. Press the different sections ofinsulation together tightly so that no gaps result.
Continue until you have insulated the entire floor. Note thespecial conditions at the end of this section.
Insulate exposed water pipes-now that you have insulated under thef l o o r, the house will not be losing heat to the crawl space.Unfortunately, the crawl space will now be colder in the winter;therefore, plumbing pipes located under the house will be morelikely to freeze. To help prevent freezing, you should insulate bothhot and cold water pipes under the floor.
If the crawl space or basement has an earth floor, install a plasticground cover. Find a friend who can help stretch out the plastic.Remove all stored materials from the crawl space. Roll out thepolyethylene plastic and overlap the pieces about 2 feet. Hold theplastic in place with bricks or stones. Lap the plastic about 2 feet upthe side walls.
1.
2.
3.
4.
a.
b.
c.
d.
e.
f.
Plastic vapor barrier
Band joist
Vapor barrier
✓
Wire supports
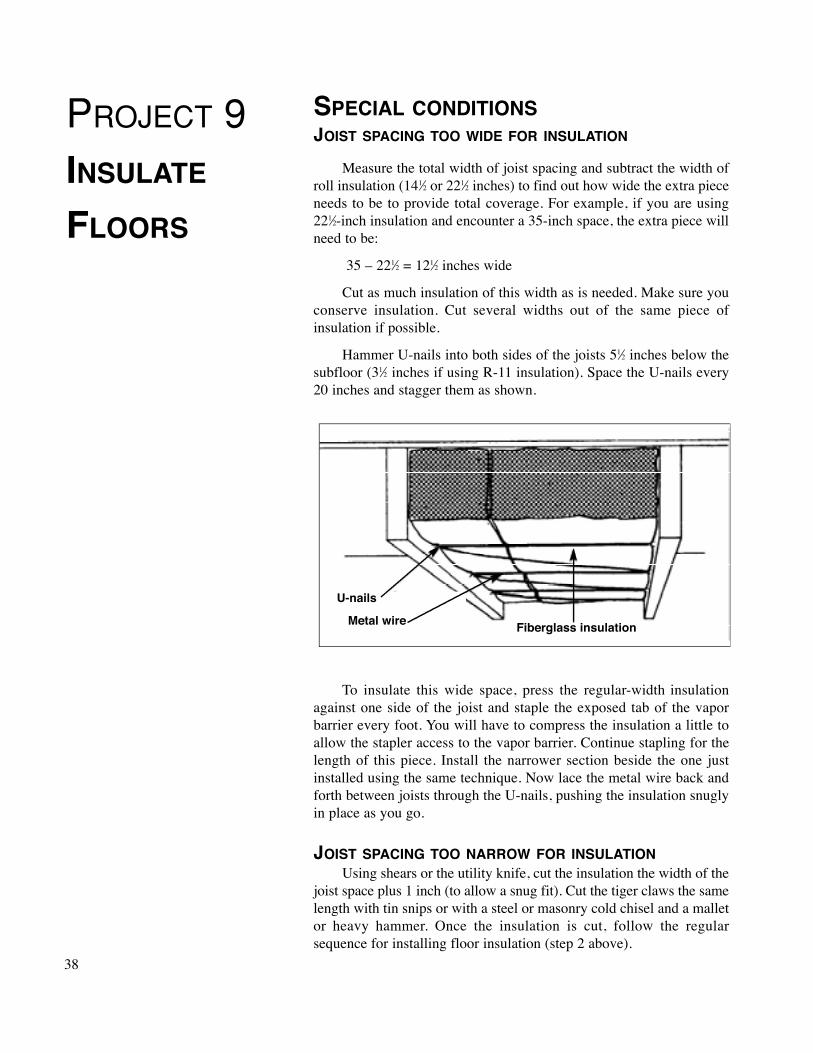
PROJECT 9
INSULATE
FLOORS
SPECIAL CONDITIONSJOIST SPACING TOO WIDE FOR INSULATION
Measure the total width of joist spacing and subtract the width ofroll insulation (141⁄2 or 221⁄2 inches) to find out how wide the extra pieceneeds to be to provide total coverage. For example, if you are using221⁄2-inch insulation and encounter a 35-inch space, the extra piece willneed to be:
35 – 221⁄2 = 121⁄2 inches wide
Cut as much insulation of this width as is needed. Make sure youconserve insulation. Cut several widths out of the same piece ofinsulation if possible.
Hammer U-nails into both sides of the joists 51⁄2 inches below thesubfloor (31⁄2 inches if using R-11 insulation). Space the U-nails every20 inches and stagger them as shown.
To insulate this wide space, press the regular-width insulationagainst one side of the joist and staple the exposed tab of the vaporbarrier every foot. You will have to compress the insulation a little toallow the stapler access to the vapor barrier. Continue stapling for thelength of this piece. Install the narrower section beside the one justinstalled using the same technique. Now lace the metal wire back andforth between joists through the U-nails, pushing the insulation snuglyin place as you go.
JOIST SPACING TOO NARROW FOR INSULATIONUsing shears or the utility knife, cut the insulation the width of the
joist space plus 1 inch (to allow a snug fit). Cut the tiger claws the samelength with tin snips or with a steel or masonry cold chisel and a malletor heavy hammer. Once the insulation is cut, follow the regularsequence for installing floor insulation (step 2 above).
38
U-nails
Metal wire Fiberglass insulation

39
PROJECT 10
CONNECTPROGRAMMABLETHERMOSTATPriority: ESSENTIAL ✭ ✭✭
CHECKLISTInitial Requirements• You are willing to let the
temperature of your house drop in winter at night and when no one is home. Also, you are willing to increase the temperature when no one is home during the summer.
Typical Costs and Savings
Materials:
• $50 to $150Contractor (materials, labor and
overhead):
• $80 to $200
Annual energy savings:
• $65 to $90
Average Time Required
• 1⁄2 hour to install
Skills Required• Simple handiwork
Tools• Screwdriver• Needle-nosed pliers
SAFETYAlthough the risk of an electric shock from low-voltage thermostatwires is minimal, always be careful around electricity. Never touchbare wire; handle it by the insulation. Always disconnect the electricalservice by removing the fuse or turning off the breaker for the heatingor cooling system.
MATERIALS• Programmable thermostat (or clock thermostat)
• Important: If your house has a central heat pump, it requires aspecial programmable thermostat that is designed for your particularbrand system. Call the local distributor or manufacturer for recommendations on the best product to buy.
BASIC PROCEDURE1. Read the directions for installation and operation of the
programmable thermostat.
2. Disconnect the fuse or turn off the breaker switch for the heatingand cooling system in the service entrance panel.
3. Remove the old thermostat by taking off the cover and unscrewingthe unit from the wall. Make sure the wires do not fall back inside the wall. Caulk the hole through which the wires extend.
4. Follow the directions that come with the thermostat to connect it tothe wiring from the heating and cooling system.
5. Attach the thermostat to the wall or other location.
6. Reconnect electrical service to the heating and cooling system; program the thermostat and monitor its performance to make sure it is working properly.
✓

PROJECT 11INSTALLGASKETS ONELECTRICALOUTLETSPriority: ESSENTIAL ✭✭✭
CHECKLISTInitial Requirements• No gaskets on electrical outlets
Typical Costs and Savings
Materials:
• $5 to $15/house (about $2 for 8 gaskets)
Contractor (labor, materials,and overhead):
• $15 to $40/house
Annual energy savings:
• 1% to 2%
Average Time Required• 1 1⁄2 to 3 hours
Skills Required• Simple handiwork
Tools• Flat head screwdriver sized forelectrical switchplate covers
SAFETYThis task can be extremely dangerous as you will be working around120-volt electricity. Always disconnect the fuse or turn off thebreaker switch to the different outlets and switch boxes as youproceed.
Be careful when removing coverplates from electrical outlets andswitches. Even when you have made every effort possible to turn offthe current to the box being worked on, there is a chance it may stillbe live. Never insert any object, especially fingers and metal tools,inside the electrical box.
MATERIALSGaskets for both switches and outlets––enough to cover theswitches and outlets for the house. Gaskets are available for doubleswitches and outlets as well. Also, get plastic safety plugs for thoseoutlets that are seldom used. Although switches and outlets onexterior walls have priority, gaskets should be installed under allcover plates. Cold air leaks from the attic, basement, and crawlspace into interior walls.
BASIC PROCEDURE1. Disconnect the fuse or turn off the breaker switch to the outlet or
switch being worked on (use a loud radio plugged into the outlet or light controlled by the switch to tell which fuse shuts off the circuit).
2. Unscrew the coverplate––do not lose the screw.
3. Install the gasket carefully––there may be live wires inside the box.For best results, caulk the gasket to the wall finish material.
4. Replace the coverplate.
5. Continue for the whole house.
40
✓
•

41
PROJECT 12CAULKWINDOW ANDDOORFRAMESPriority: ESSENTIAL ✭✭✭
CHECKLISTInitial Requirements• Missing or cracked caulk
between the window or door frame and the exterior or interior wall finish
Typical Costs and Savings
Materials:
• $2 to $7/tube of durable caulk
• $2 to $5/package of backing material
Contractor (materials, labor,
and overhead):
• $8 to $20/unit
Annual energy savings:
• Vary widely
Average Time Required• About 1/4 hour/window or
door
Skills Required• Simple handiwork
Tools• Caulk gun• Putty knife
Safety• No special measures
MATERIALS• Acrylic latex caulk with silicones, silicone caulk, 1-part urethane,
or other durable caulk
• Backing material, such as foam backer rod
BASIC PROCEDURE1. Clean old, dried caulk out of the crack between the wall and
window or door frame.
2. Apply caulk to the crack. If the crack is wider than 1⁄4”, use backing material to fill the gap, then cover with caulk.
✓
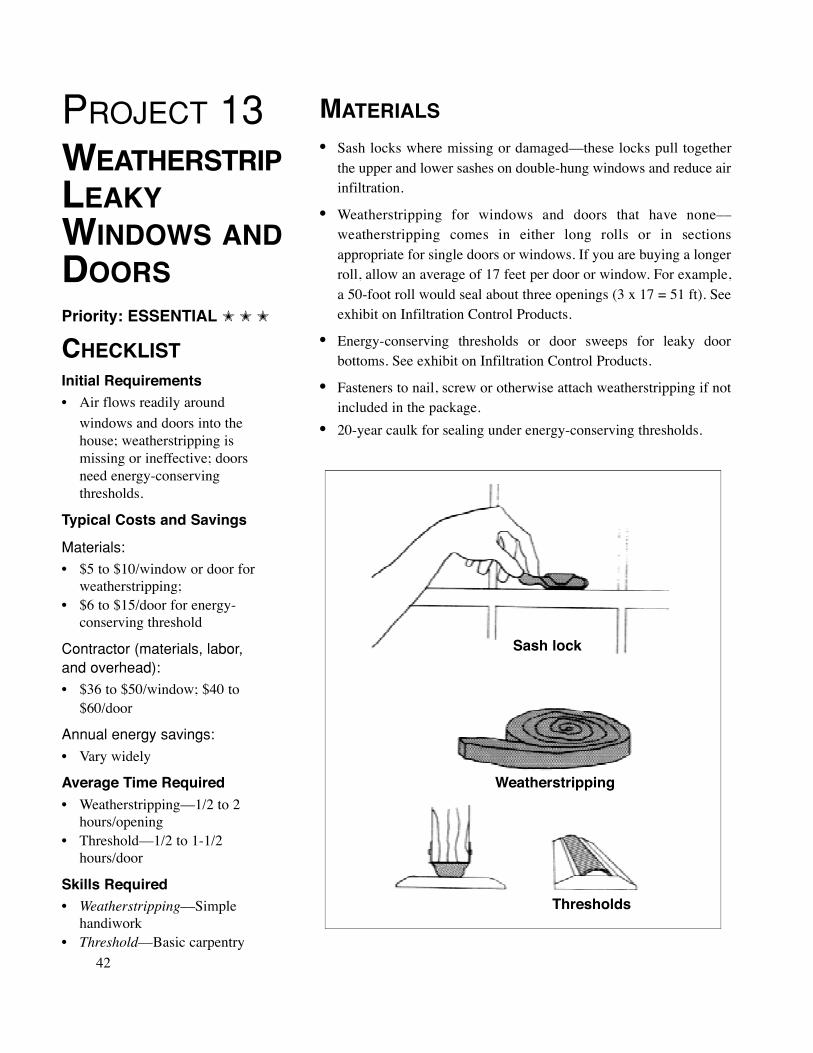
PROJECT 13WE AT H E R S T R I PLEAKYWINDOWS ANDDOORSPriority: ESSENTIAL ✭ ✭ ✭
CHECKLISTInitial Requirements• Air flows readily around
windows and doors into the house; weatherstripping is missing or ineffective; doors need energy-conserving thresholds.
Typical Costs and Savings
Materials:
• $5 to $10/window or door for weatherstripping;
• $6 to $15/door for energy-conserving threshold
Contractor (materials, labor,
and overhead):
• $36 to $50/window; $40 to $60/door
Annual energy savings:
• Vary widely
Average Time Required• Weatherstripping––1/2 to 2
hours/opening• Threshold––1/2 to 1-1/2
hours/door
Skills Required• Weatherstripping––Simple
handiwork• Threshold––Basic carpentry
MATERIALS• Sash locks where missing or damaged––these locks pull together
the upper and lower sashes on double-hung windows and reduce airinfiltration.
• Weatherstripping for windows and doors that have none––weatherstripping comes in either long rolls or in sectionsappropriate for single doors or windows. If you are buying a longer roll, allow an average of 17 feet per door or window. For example,a 50-foot roll would seal about three openings (3 x 17 = 51 ft). See exhibit on Infiltration Control Products.
• E n e rgy-conserving thresholds or door sweeps for leaky door bottoms. See exhibit on Infiltration Control Products.
• Fasteners to nail, screw or otherwise attach weatherstripping if not included in the package.
• 20-year caulk for sealing under energy-conserving thresholds.
42
Sash lock
Weatherstripping
Thresholds
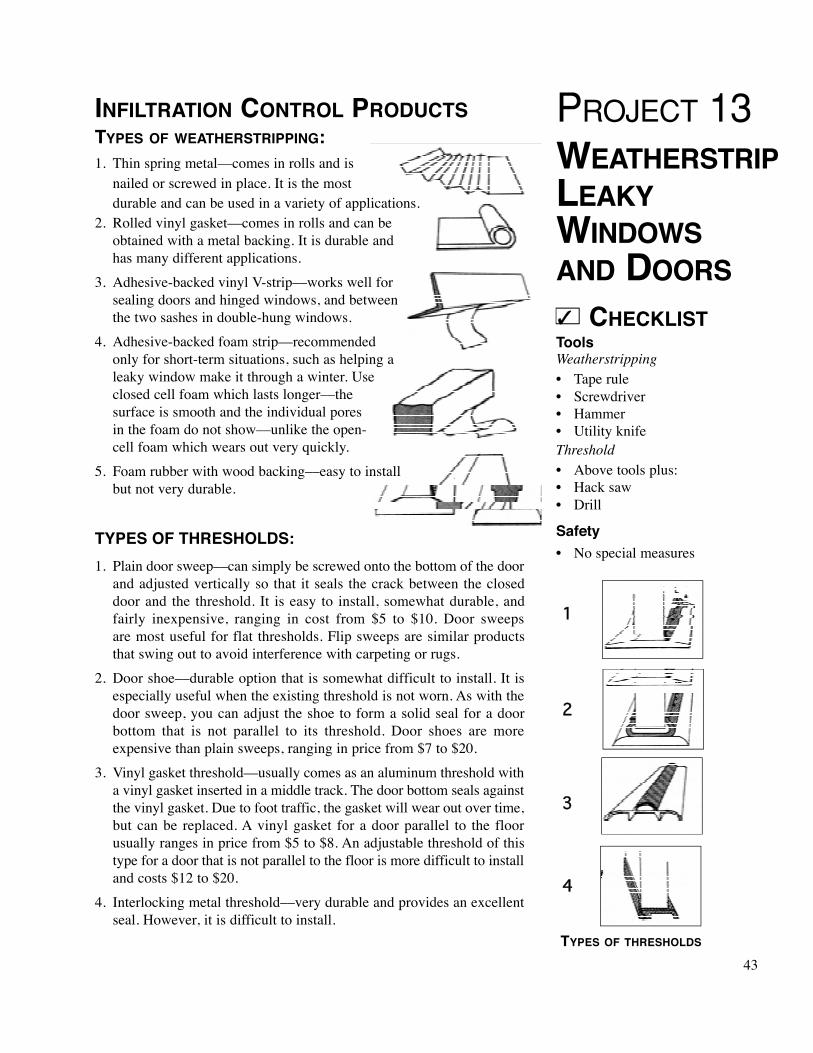
INFILTRATION CONTROL PRODUCTSTYPES OF WEATHERSTRIPPING:1. Thin spring metal––comes in rolls and is
nailed or screwed in place. It is the most durable and can be used in a variety of applications.
2. Rolled vinyl gasket––comes in rolls and can be obtained with a metal backing. It is durable and has many different applications.
3. Adhesive-backed vinyl V-strip––works well for sealing doors and hinged windows, and between the two sashes in double-hung windows.
4. Adhesive-backed foam strip––recommended only for short-term situations, such as helping a leaky window make it through a winter. Use closed cell foam which lasts longer––the surface is smooth and the individual pores in the foam do not show––unlike the open-cell foam which wears out very quickly.
5. Foam rubber with wood backing––easy to installbut not very durable.
TYPES OF THRESHOLDS:1. Plain door sweep––can simply be screwed onto the bottom of the door
and adjusted vertically so that it seals the crack between the closed door and the threshold. It is easy to install, somewhat durable, and fairly inexpensive, ranging in cost from $5 to $10. Door sweepsare most useful for flat thresholds. Flip sweeps are similar products that swing out to avoid interference with carpeting or rugs.
2. Door shoe––durable option that is somewhat difficult to install. It isespecially useful when the existing threshold is not worn. As with thedoor sweep, you can adjust the shoe to form a solid seal for a door bottom that is not parallel to its threshold. Door shoes are moreexpensive than plain sweeps, ranging in price from $7 to $20.
3. Vinyl gasket threshold––usually comes as an aluminum threshold witha vinyl gasket inserted in a middle track. The door bottom seals against the vinyl gasket. Due to foot traffic, the gasket will wear out over time, but can be replaced. A vinyl gasket for a door parallel to the floorusually ranges in price from $5 to $8. An adjustable threshold of this type for a door that is not parallel to the floor is more difficult to install and costs $12 to $20.
4. Interlocking metal threshold––very durable and provides an excellentseal. However, it is difficult to install.
43
PR O J E C T 1 3WE AT H E R S T R I PLE A K YWI N D O W SA N D DO O R S
CHECKLISTToolsWeatherstripping• Tape rule• Screwdriver• Hammer• Utility knifeThreshold• Above tools plus:• Hack saw• Drill
Safety• No special measures
✓
1
2
3
4
TY P E S O F T H R E S H O L D S
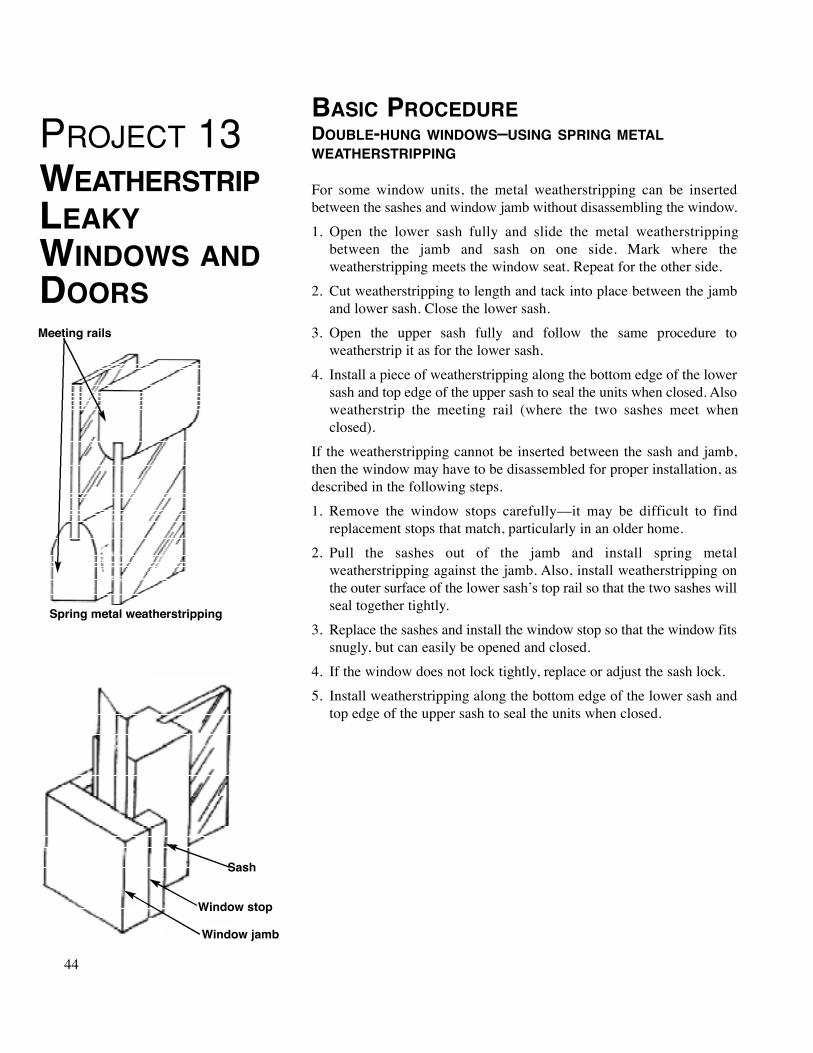
PROJECT 13WE AT H E R S T R I PLEAKYWINDOWS ANDDOORS
BASIC PROCEDUREDOUBLE-HUNG WINDOWS–USING SPRING METALWEATHERSTRIPPING
For some window units, the metal weatherstripping can be insertedbetween the sashes and window jamb without disassembling the window.
1. Open the lower sash fully and slide the metal weatherstripping between the jamb and sash on one side. Mark where the weatherstripping meets the window seat. Repeat for the other side.
2. Cut weatherstripping to length and tack into place between the jamb and lower sash. Close the lower sash.
3. Open the upper sash fully and follow the same procedure to weatherstrip it as for the lower sash.
4. Install a piece of weatherstripping along the bottom edge of the lower sash and top edge of the upper sash to seal the units when closed. Also weatherstrip the meeting rail (where the two sashes meet when closed).
If the weatherstripping cannot be inserted between the sash and jamb,then the window may have to be disassembled for proper installation, asdescribed in the following steps.
1. Remove the window stops carefully––it may be difficult to findreplacement stops that match, particularly in an older home.
2. Pull the sashes out of the jamb and install spring metalweatherstripping against the jamb. Also, install weatherstripping onthe outer surface of the lower sash’s top rail so that the two sashes will seal together tightly.
3. Replace the sashes and install the window stop so that the window fits snugly, but can easily be opened and closed.
4. If the window does not lock tightly, replace or adjust the sash lock.
5. Install weatherstripping along the bottom edge of the lower sash and top edge of the upper sash to seal the units when closed.
44
Meeting rails
Spring metal weatherstripping
Sash
Window stop
Window jamb
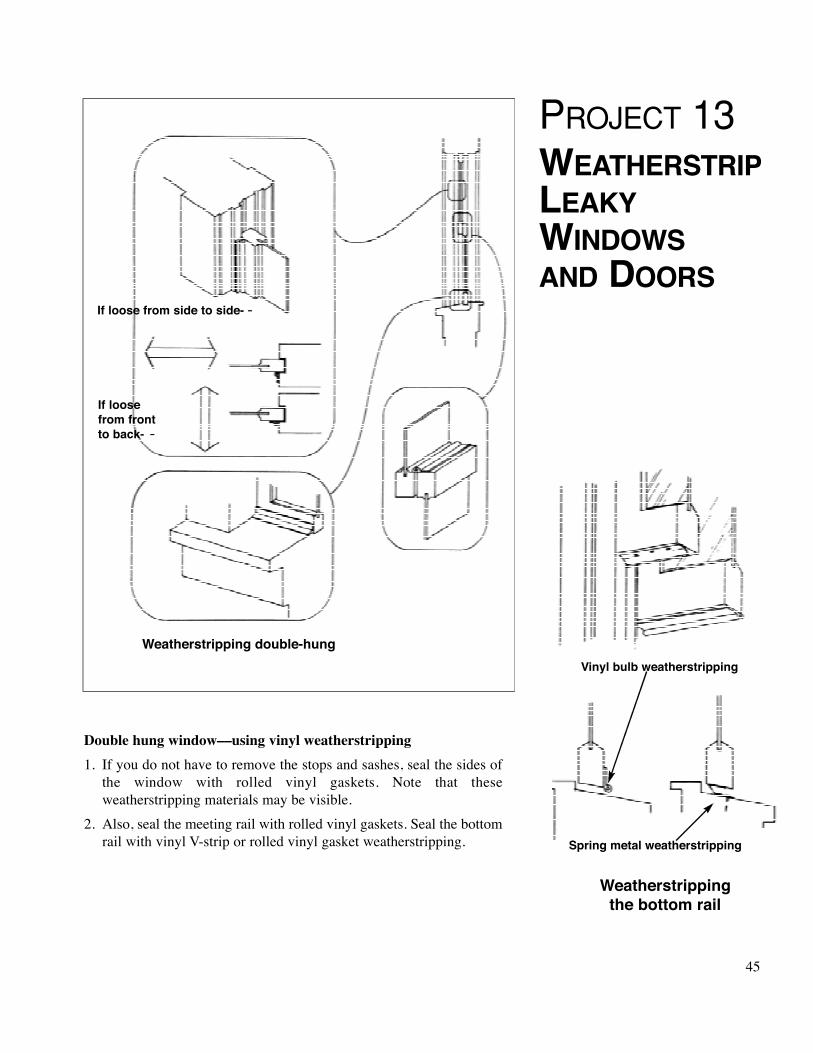
45
PR O J E C T 1 3WE AT H E R S T R I PLE A K YWI N D O W SA N D DO O R S
Double hung window––using vinyl weatherstripping
1. If you do not have to remove the stops and sashes, seal the sides ofthe window with rolled vinyl gaskets. Note that these weatherstripping materials may be visible.
2. Also, seal the meeting rail with rolled vinyl gaskets. Seal the bottom rail with vinyl V-strip or rolled vinyl gasket weatherstripping.
Weatherstripping double-hungVinyl bulb weatherstripping
Spring metal weatherstripping
Weatherstripping the bottom rail
If loose from side to side- -
If loose from front to back- -

PROJECT 13WEATHERSTRIPLEAKYWINDOWSAND DOORS
CASEMENT WINDOWSInstall spring metal or vinyl V-
strip weatherstripping around thejamb just beside the window stops.
METAL WINDOWSAlthough not recommended for
other windows, use closed-cell,adhesive-backed foam to seal thebottom rail and meeting rails ofthese windows. You may have toreplace this weatherstrippingannually, but it is inexpensive andeasy to install.
CONVENTIONAL SWINGINGDOORS
Use spring metal, vinyl V-strip,or rolled vinyl weatherstrippingaround the top and sides of thedoor frame.
SWINGING DOOR BOTTOMSIf the door bottom is not square
with the threshold, attach a doorshoe or plain sweep; adjust itvertically to provide a good seal. Ifthe door has no threshold, installan adjustable threshold with avinyl gasket instead.
If the door is square and needsa threshold, install a simple(nonadjustable) threshold with avinyl gasket. If it is square andalready has a threshold, install adoor boot or plain sweep. See theexhibit on Checking for Square inProject 24: Put In Storm Doors.
SLIDING GLASS DOORSMany units are already weather-
stripped with a replaceable brush-like “pile” weatherstripping orwith a neoprene gasket. If notweatherstripped, a skilled carpentercan screw rolled vinyl weather-stripping with a metal backing intothe frame using sheet metal screws.
46
Adjustable door shoe
Weatherstripping casementwindows
Spring metal or vinyl V-strip
weatherstripping

47
PROJECT 14INSTALL WALLINSULATION
Priority: IMPORTANT ✭ ✭
CHECKLISTInitial Requirements• Existing walls are uninsulated.
Typical Costs and SavingsMaterials:
• $.20 to $.35/sq ft of wall
Contractor (materials, labor,and overhead):
• $.55 to $1.00/sq ft of wall for blowing through interior wallor exterior wood siding
• $.80 to $1.75/sq ft of wallfor blowing through exterior brick veneer
Annual energy savings:
• $.33 to $.50/sq ft
Average Time Required• Contractor can often finish an
average size home in one full day
Skills Required• In most cases, a contractor
should be hired for this job
Tools• Insulation blowing machine
10-ft, 11⁄2” diameter flexible plastic tube
• Ladders
• Power tools, such as saws, drillsas required
• Carpenter’s tool belt (See Rules for Tools section in Chapter 3)
SAFETYExceptional care is needed to avoid damaging electrical wires and
plumbing inside the walls. The electrical circuits for the wires runningthrough the walls that are being insulated should be turned off.
Blowing wall insulation can be a delicate operation. The insulationblowing machine pressurizes the wall with its high air flow. Undercertain conditions, the interior wall finish can be strained andpotentially loosened from its support. An observer should be stationedinside the house watching the wall. If the interior wall is shaking orbillowing considerably, the observer can tell the installer to turn off theblowing machine.
MATERIALS• Loose-fill insulation––When filled with insulation, the insulating
value of most wall cavities increases by about R-13. A 25-pound bag of insulation will fill about three wall cavities––about 25 square feet of coverage per bag.
• Siding or other materials to replace damaged areas
• If holes are to be drilled, one- and two-inch wall plugs to cover holes
• 20-year paintable caulk to seal plugs in place
• Paint may be required
✓
✓

PROJECT 14
INSTALL WALLINSULATION
BASIC PROCEDUREIf the walls in your home do not have insulation, blowing in
loose-fill insulation can both insulate and air seal wall cavities.Cellulose insulation usually provides the best job of sealing air leaksand adds about R-13 to the wall.
To gain access to the stud cavities, you can either drillholes into the wall from outside or inside, or remove apiece of exterior siding. If the house does not havesheathing under the siding, you may only need to pry thesiding up a few inches in order to get the hose for theinsulation blower into the wall. If you have to drill holes,you will need to patch them. Patching holes in the plasteror sheetrock on the inside is relatively easy to do, but thepatch and wall will need to be painted. Holes drilled on theoutside have to be patched as well. Wood or plastic plugscan be used to fill these holes. The plugs must be caulkedand painted carefully to match the exterior finish.
Blowing the insulation into the wall through aflexible tube compacts the insulation, and can dramaticallyreduce air leaks. Known as dense pack wall insulation, thismethod packs about three times more insulation materialinto the wall and so seals air leaks while insulating. At thedensity typically applied without using the dense packmethod, wall insulation does not significantly reduce airleakage.
Most exterior walls have electrical wires, plumbingand other materials that can be life threatening ordamaging to the building if improperly handled. Be certainthat whoever is insulating the walls is knowledgeableabout performing this work safely and efficiently. Neverwork on walls that have live electrical current or faultywiring. Be sure to know where cutoff valves are locatedfor water lines.
THE BASIC STEPS IN DENSE PACK WALLINSULATION FOR A HOUSE WITH SIDING ARE:1. Pry the lower course of siding away from the wall
about two inches, being careful not to crack the siding,and to keep its top edge nailed to the wall so it can be easily renailed. If the house has sheathing beneath the siding, remove the siding and drill a 2-inch diameter hole in the sheathing at an upwards angle to allow the tube to be shunted to the top of the wall without a sharp bend.
48
Using aflexible tube tofill wall cavitiespacks theinsulation sothat it reducesair leaks.
Densepack insulation

49
PROJECT 14
INSTALL WALLINSULATION
2. Pry or remove siding as required for horizontal blocking in thewall, above window and door framing, and for diagonal cornerbracing.
3. Adjust the insulation blower so that it will blow insulation at asufficient pressure to compact the loose-fill cellulose to a densityof about 3 pounds per cubic foot of wall area. The insulationshould be compressed tightly such that poking it with your finger feels like poking a kitchen sponge. BE CAREFUL THAT THEPRESSURE IS NOT SO GREAT THAT THE INTERIOR WALLSURFACE BOWS OR CRACKS.
4. Blow insulation into each stud bay by shunting the tube to 1 footfrom the top of the wall. As the bay begins to fill with insulationand the insulation compacts around the end of the tube, pull the tube down in 1 foot increments allowing the insulation to become tightly packed. Dense packing the entire stud bay for an 8-foot high wall should take 3-5 minutes. If filling a stud bay is taking longer, stop and check to ensure that the insulation is not flowinginside, or into the attic or crawl space.
5. Be sure to insulate the entire exterior wall –– above windows and doors, where porch roofs or balconies attach to walls, and wherethere are uninsulated floors above garages or open areas.Dense pack cellulose insulation is also effective at sealing air leaksbetween floor joists for attic bonus rooms. Many of these areas will require insulating from above while standing on a ladder.Follow strict safety guidelines as the blower can become clogged or drills obstructed and jerk against the installer.
6. After the stud bay is insulated, close the wall by re-nailing the siding. Plug any drill holes in the wall sheathing with pieces offiberglass insulation, and then re-nail the siding. Repair and paint pieces of siding if necessary.
PROJECT 15INSTALLCEILING FANSAND WHOLEHOUSE FANSPriority: IMPORTANT ✭ ✭
CHECKLISTInitial Requirements• You need a full attic with
adequate ventilation to install a whole house fan.
Typical Costs and SavingsCeiling fan
Materials:
• $50 to $200
Contractor (materials, labor,and overhead):
• $100 to $300
Annual energy savings:
• Up to 40% on cooling costs and up to 10% on heating costs (using several fans)
Whole house fanMaterials:
• $150 to $350
Contractor (materials, labor,
and overhead):
• $300 to $500
Annual energy savings:
• Up to 2⁄3 of cooling bill
SAFETYInstalling fans requires substantial electrical work –– do not
attempt it unless you are very sure of your abilities. Assume all wiresare live until tested. Turn off the breaker switch or disconnect the fusefor the circuit on which you will be working or cut off the mainbreaker for the house. Always connect a temperature-sensitive switch,called a firestat, in the attic when installing a whole house fan.Firestats will shut off the fan in case of fire.
MATERIALSCEILING FAN• Multi-speed ceiling fan –– use a multi-speed model sized according
to the room. Make sure the post that connects the fan to the ceiling is long enough so that the fan will be located about 7 feet above the floor.
• Electric wire –– 12- or 14-gauge, 2-conductor with ground.
• Wire nuts to connect wires –– should be large enough to connect three 12- or 14-gauge wires. Buy six to ten
• Cable clamps –– these screw into the electric box and clamp the incoming wire in place. Buy six to ten.
• Electric box to which ceiling fan is connected –– the box should connect directly to the ceiling joist.
• Switch box, multi-speed switch, and switch cover-plate for fan –– if needed (many are operated by a pull switch that hangs from the fan.)
EXTRA MATERIALS FOR WHOLE HOUSE FAN• Multi-speed whole house fan –– size based on the volume of the area
you wish to cool. For example, a house with 2,000 square feet of area to cool and 8-foot ceilings would have a volume of 16,000 cubic feet The fan should deliver 1⁄2 to 1 air change per minute; that is, every1 to 2 minutes the volume of air in the house should be replaced. In the example, you need a fan that produces 8,000 to 16,000 cubic feet of air flow per minute, or 8,000 to 16,000 cfm. The cfm rating should be printed on the box.
• In addition to the wiring materials listed for a ceiling fan, you willneed the following for a whole house fan:
• Extra wire nuts and cable clamps
• Temperature-sensitive safety switch (firestat) –– to keep fan fromrunning if a fire occurs in house
• Timer switch –– keeps you from having to get out of bed in the middle of the night to turn off the fan
• 2” x 8” or 2” x 6” lumber –– for framing the opening where the fan will be mounted. The lumber should be the same size as the ceiling joists
• Nails for framing opening
• Inner tube or other rubber material (optional) –– gasket for the whole house fan
50
✓

51
PROJECT 15INSTALLCEILING FANSAND WHOLEHOUSE FANS
CHECKLISTAverage Time RequiredCeiling fan –– 1 to 3 hours
Whole house fan –– 8 to 16 hours
Skills RequiredCeiling fan –– basic electricalwiring
Whole house fan –– basic carpentryand basic electrical wiringNever do your own wiring unless youhave prior experience and totalconfidence in your abilities.
ToolsCeiling fan
• Wiring inside electric box
• Voltage meter or circuit tester
• Utility knife
• Wire stripper
• Needle-nose pliers
• Carpenter’s tool belt (see Rules for Tools sectionin Chapter 3)
• Ladder
Whole house fan• Above tools, plus:• Circular saw or reciprocating
saw
• Framing square
BASIC PROCEDUREINSTALLING CEILING FAN
1. Read installation instructions before you leave the store to makesure the fan is appropriate for your house.
2. Determine where you want the fan installed (e.g., center of theceiling, over dining table, over bed, etc.). Also, determine theposition of the switch to control the fan if necessary. Many fans arecontrolled by a pull cord just like that for a closet light.
3. Determine the path for electric wiring. If substituting the fan for anexisting overhead light, you can probably use the wiring inside theelectric box for the light. Otherwise, the wire can extend to themain service panel or it may be connected to an outlet box in aseldom used circuit.
4. If a new electric box is necessary, attach it to a joist in the attic.
5. Run wiring to the box.
6. Keep the circuit off and follow the instructions to hang the fan andconnect the wiring into the electric box.
Ceiling Fan
Seal hole
Wiring inside electric box
✓
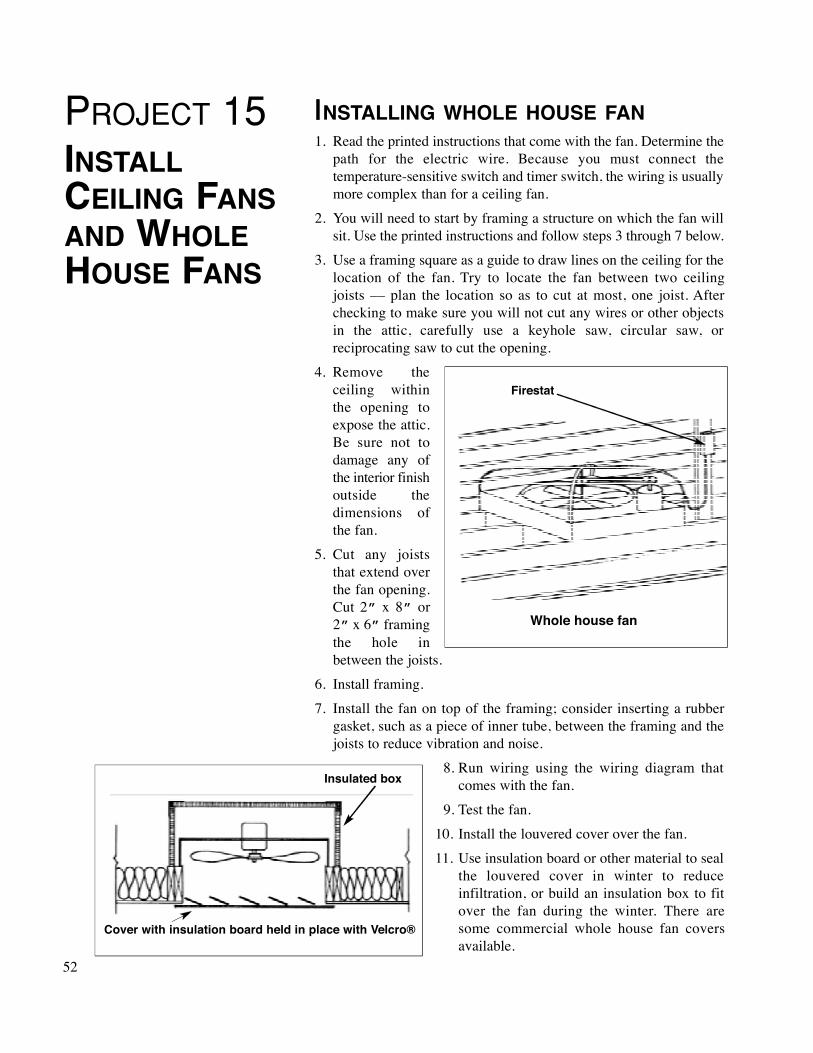
PROJECT 15INSTALLCEILING FANSAND WHOLEHOUSE FANS
INSTALLING WHOLE HOUSE FAN1. Read the printed instructions that come with the fan. Determine the
path for the electric wire. Because you must connect the temperature-sensitive switch and timer switch, the wiring is usually more complex than for a ceiling fan.
2. You will need to start by framing a structure on which the fan willsit. Use the printed instructions and follow steps 3 through 7 below.
3. Use a framing square as a guide to draw lines on the ceiling for the location of the fan. Try to locate the fan between two ceiling joists –– plan the location so as to cut at most, one joist. After checking to make sure you will not cut any wires or other objects in the attic, carefully use a keyhole saw, circular saw, or reciprocating saw to cut the opening.
4. Remove theceiling withinthe opening toexpose the attic.Be sure not todamage any ofthe interior finishoutside thedimensions of the fan.
5. Cut any joiststhat extend overthe fan opening.Cut 2” x 8” or 2” x 6” framingthe hole inbetween the joists.
6. Install framing.
7. Install the fan on top of the framing; consider inserting a rubber gasket, such as a piece of inner tube, between the framing and the joists to reduce vibration and noise.
8. Run wiring using the wiring diagram thatcomes with the fan.
9. Test the fan.
10. Install the louvered cover over the fan.
11. Use insulation board or other material to seal the louvered cover in winter to reduce infiltration, or build an insulation box to fit over the fan during the winter. There are some commercial whole house fan covers available.
52
Insulated box
Cover with insulation board held in place with Velcro®
Whole house fan
Firestat
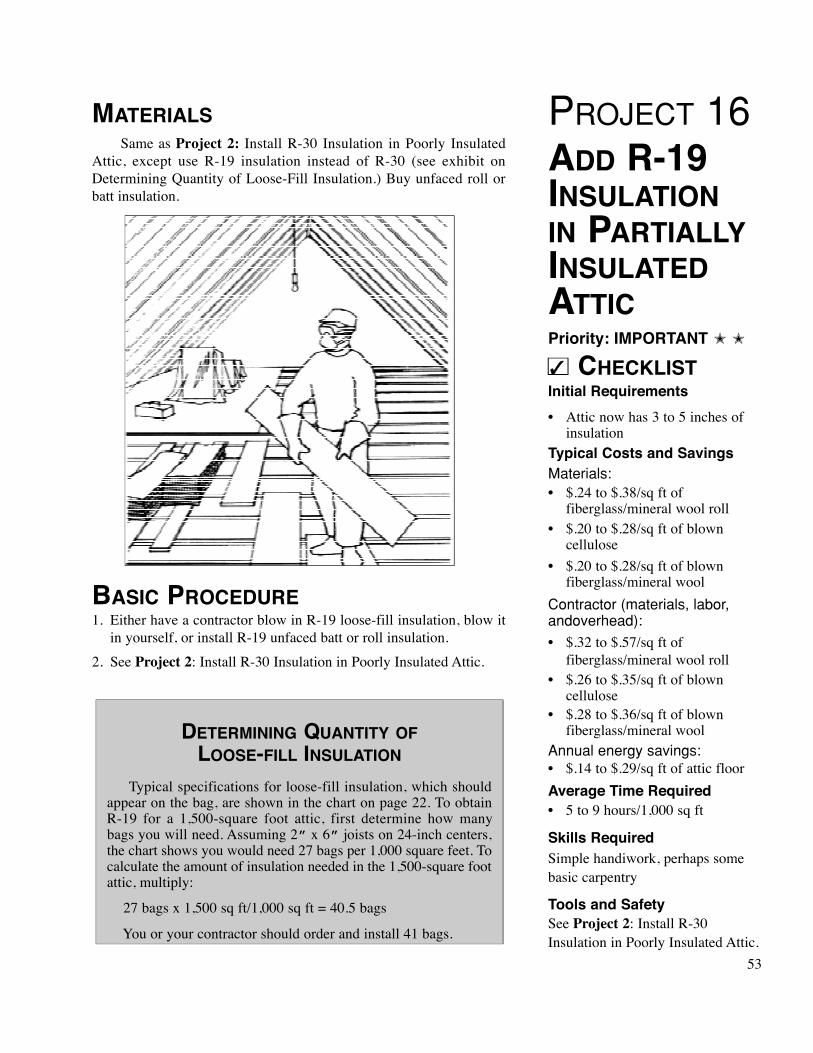
53
PROJECT 16ADD R-19INSULATIONIN PARTIALLYINSULATEDATTICPriority: IMPORTANT ✭ ✭
CHECKLISTInitial Requirements• Attic now has 3 to 5 inches of
insulationTypical Costs and SavingsMaterials:
• $.24 to $.38/sq ft of fiberglass/mineral wool roll
• $.20 to $.28/sq ft of blown cellulose
• $.20 to $.28/sq ft of blown fiberglass/mineral wool
Contractor (materials, labor,andoverhead):
• $.32 to $.57/sq ft offiberglass/mineral wool roll
• $.26 to $.35/sq ft of blown cellulose
• $.28 to $.36/sq ft of blown fiberglass/mineral wool
Annual energy savings:
• $.14 to $.29/sq ft of attic floor
Average Time Required• 5 to 9 hours/1,000 sq ft
Skills RequiredSimple handiwork, perhaps some basic carpentry
Tools and SafetySee Project 2: Install R-30 Insulation in Poorly Insulated Attic.
MATERIALSSame as Project 2: Install R-30 Insulation in Poorly Insulated
Attic, except use R-19 insulation instead of R-30 (see exhibit onDetermining Quantity of Loose-Fill Insulation.) Buy unfaced roll orbatt insulation.
BASIC PROCEDURE1. Either have a contractor blow in R-19 loose-fill insulation, blow it
in yourself, or install R-19 unfaced batt or roll insulation.
2. See Project 2: Install R-30 Insulation in Poorly Insulated Attic.
DETERMINING QUANTITY OFLOOSE-FILL INSULATION
Typical specifications for loose-fill insulation, which shouldappear on the bag, are shown in the chart on page 22. To obtain R-19 for a 1,500-square foot attic, first determine how many bags you will need. Assuming 2” x 6” joists on 24-inch centers,the chart shows you would need 27 bags per 1,000 square feet. Tocalculate the amount of insulation needed in the 1,500-square footattic, multiply:
27 bags x 1,500 sq ft/1,000 sq ft = 40.5 bags
You or your contractor should order and install 41 bags.
✓

PROJECT 17BUILDEXTERIORSO L A R SH A D ESCREENSPriority: IMPORTANT ✭✭
CHECKLISTInitial Requirements
• Unshaded windows facing east, southeast, south, southwest, or west. (See also Projects 18and 19.)
Typical Costs and Savings
Materials:
• $.80 to $3.00/sq ft
Contractor (materials,labor, and overhead):
• $3.25 to $5.00/sq ft
Annual energy savings:
• $.27 to $.44/sq ft
Average Time Required• 1/4 to 1 hour to fabricate
and install each screen
• Shade screen on metal frame
MATERIALSSHADE SCREEN ON WOOD FRAME:• Solar shade screen –– rated
to block 60 to 80 percentof sunlight and sized at least 1 to 2 inches largerthan the screen frame
• Heavy-duty 1⁄4-inch staples for staple gun to attach the screen to frame
• 3⁄4-inch or 1-inch brads toattach the screen molding to frame
• Corrugated metal fasteners –– to hold together new frame
• 1” x 2” lumber long enough for the frame
• Construction adhesive or glue
• Screen molding (if needed) to extend all around the frame
• Exterior wood primer
• Exterior paint to matchwindow trim
• Hardware to attach the screen over the window
SHADE SCREEN ON METAL FRAME:• Solar shade screen ––
rated to block 60to 80 percent of sunlight and sized at least 1 to 2inches larger thanscreen frame
• Rubber spline to holdthe screen in the metalframe
• Hardware to attach the screen over the window
54
✓
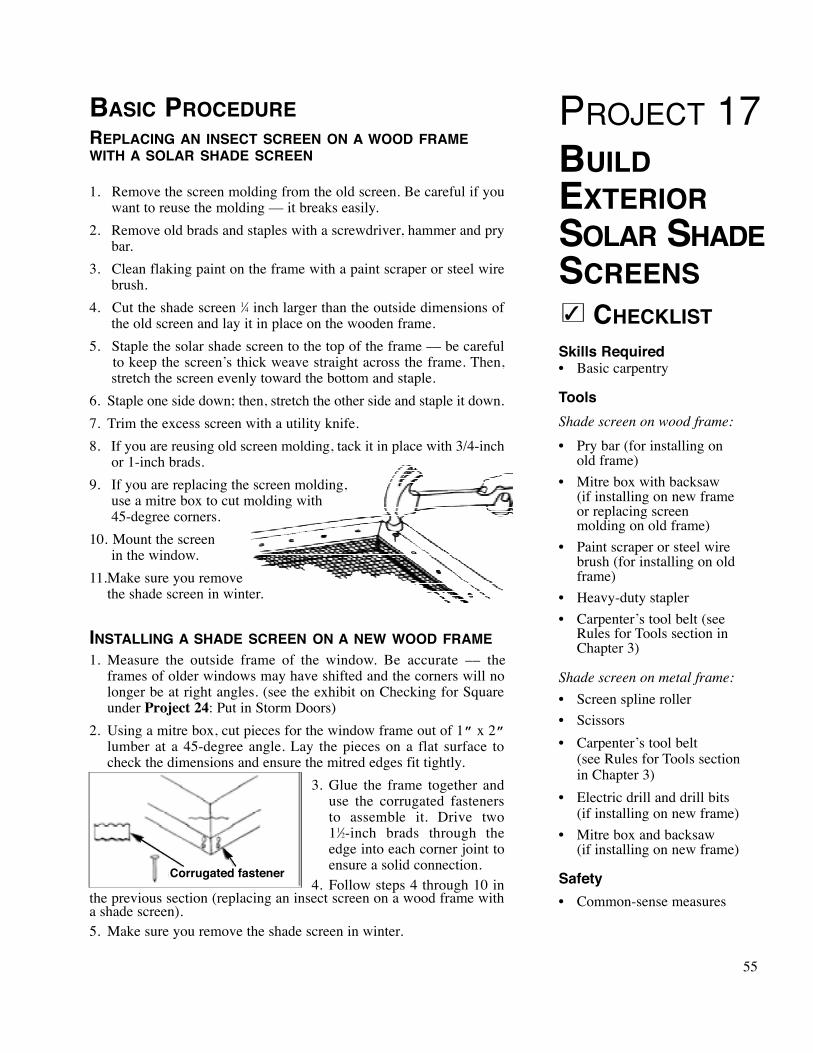
55
PROJECT 17BUILDEXTERIORSO L A R SH A D ESCREENS
CHECKLISTSkills Required• Basic carpentry
ToolsShade screen on wood frame:
• Pry bar (for installing on old frame)
• Mitre box with backsaw (if installing on new frame or replacing screen molding on old frame)
• Paint scraper or steel wire brush (for installing on oldframe)
• Heavy-duty stapler
• Carpenter’s tool belt (see Rules for Tools section inChapter 3)
Shade screen on metal frame:
• Screen spline roller• Scissors
• Carpenter’s tool belt (see Rules for Tools sectionin Chapter 3)
• Electric drill and drill bits (if installing on new frame)
• Mitre box and backsaw (if installing on new frame)
Safety• Common-sense measures
BASIC PROCEDUREREPLACING AN INSECT SCREEN ON A WOOD FRAMEWITH A SOLAR SHADE SCREEN
1. Remove the screen molding from the old screen. Be careful if you want to reuse the molding –– it breaks easily.
2. Remove old brads and staples with a screwdriver, hammer and prybar.
3. Clean flaking paint on the frame with a paint scraper or steel wire brush.
4. Cut the shade screen 1⁄4 inch larger than the outside dimensions ofthe old screen and lay it in place on the wooden frame.
5. Staple the solar shade screen to the top of the frame –– be careful to keep the screen’s thick weave straight across the frame. Then,stretch the screen evenly toward the bottom and staple.
6. Staple one side down; then, stretch the other side and staple it down.
7. Trim the excess screen with a utility knife.
8. If you are reusing old screen molding, tack it in place with 3/4-inchor 1-inch brads.
9. If you are replacing the screen molding,use a mitre box to cut molding with 45-degree corners.
10. Mount the screen in the window.
11.Make sure you remove the shade screen in winter.
INSTALLING A SHADE SCREEN ON A NEW WOOD FRAME1. Measure the outside frame of the window. Be accurate –– the
frames of older windows may have shifted and the corners will no longer be at right angles. (see the exhibit on Checking for Squareunder Project 24: Put in Storm Doors)
2. Using a mitre box, cut pieces for the window frame out of 1” x 2”lumber at a 45-degree angle. Lay the pieces on a flat surface tocheck the dimensions and ensure the mitred edges fit tightly.
3. Glue the frame together anduse the corrugated fastenersto assemble it. Drive two 11⁄2-inch brads through theedge into each corner joint to ensure a solid connection.
4. Follow steps 4 through 10 inthe previous section (replacing an insect screen on a wood frame witha shade screen).5. Make sure you remove the shade screen in winter.
Corrugated fastener
✓

PROJECT 17BUILDEXTERIORSO L A R SH A D ESCREENS
RE P L A C I N G A N I N S E C T S C R E E N O N A M E TA LF R A M E W I T H A S O L A R S H A D E S C R E E N1. Remove the old screen from the metal frame by gently pulling out
the rubber or plastic spline –– be careful if you plan to reuse the spline.
2. Cut a piece of the shade screen 1 to 2 inches larger than the outside dimensions of the old screen.
3. Place the shade screen over theframe. Starting at the top left-hand corner, lay the rubberspline on top of the screendirectly over the groove in theframe.
4. Roll the spline roller in a clockwise direction to press the spline and the screen firmly into the groove. Continue around the frame until you reach the starting point. As you proceed, keep the weave even in the frame.
5. Trim any excess screen from the spline using the utility knife.
6. Install the shade screen frame in the window.
7. Make sure you remove the shade screen in winter.
INSTALLING A SHADE SCREEN ON A NEWMETAL FRAME1. Measure the outside frame
of the window.2. Cut four pieces of aluminum
frame stock to form the top,bottom, and sides of the frame. For larger screens,you may also need a centersupport bar and clips for attaching it to the frame.
3. Slide the frame pieces onto the metal corner brackets. Set thecompleted frame into the window to check the fit. Make any needed adjustments.
4. Follow steps 2 through 6 for the previous procedure in this section (replacing an insect screen on a metal frame with a solar shade screen).
5. Make sure you remove the shade screen in winter.
56
S pline roller

57
PROJECT 18USEAWNINGSAND/ORINTERIORROLLERBLINDSPriority: IMPORTANT ✭ ✭
CHECKLISTInitial Requirements• Unshaded windows face east
southeast, south, southwest,or west; owners prefer blindsor awnings to shade screens or reflective window film (Projects 17 and 19.)
Typical Costs and SavingsWhite Roller BlindMaterials:
• $5 to $25/window
Contractor (materials, labor,and overhead):
• $10 to $30/window
Annual energy savings:
• $10% to 15% of cooling costs
Awnings
Materials:
• $45 to $300/window
Contractor (materials, labor,and overhead):
• $60 to $400/window
Annual energy savings:
• Up to 25% of cooling costsAverage Time Required
• 1⁄4 to 1⁄2 hour/roller blind• 1⁄2 to 2 hours/awning
MATERIALS• White roller blinds sizedfor the window –– the whitecolor is important to reflectincoming summer sunlight backout the window.
• Awnings –– preferablyshould be wider than thewindow, should extend over it ins u m m e r, and should beretractable to allow full sunlightin winter. Also, the awningshould have vent holes where itattaches to the house to keepfrom trapping hot air under theawning.
BASIC PROCEDUREFollow instructions that come withthe products.
Skills RequiredRoller blind –– simplehandiwork
Awnings –– basic carpentry
ToolsRoller blind:
• Screwdriver
• Hammer
• Tape rule
Awning:
• Electric drill with bits• Carpenter’s tool belt
• (See Rules for Tools sectionin Chapter 3)
• Level
Safety• Common-sense rules in
Safety First section of of Chapter 3
Roller Blind
✓
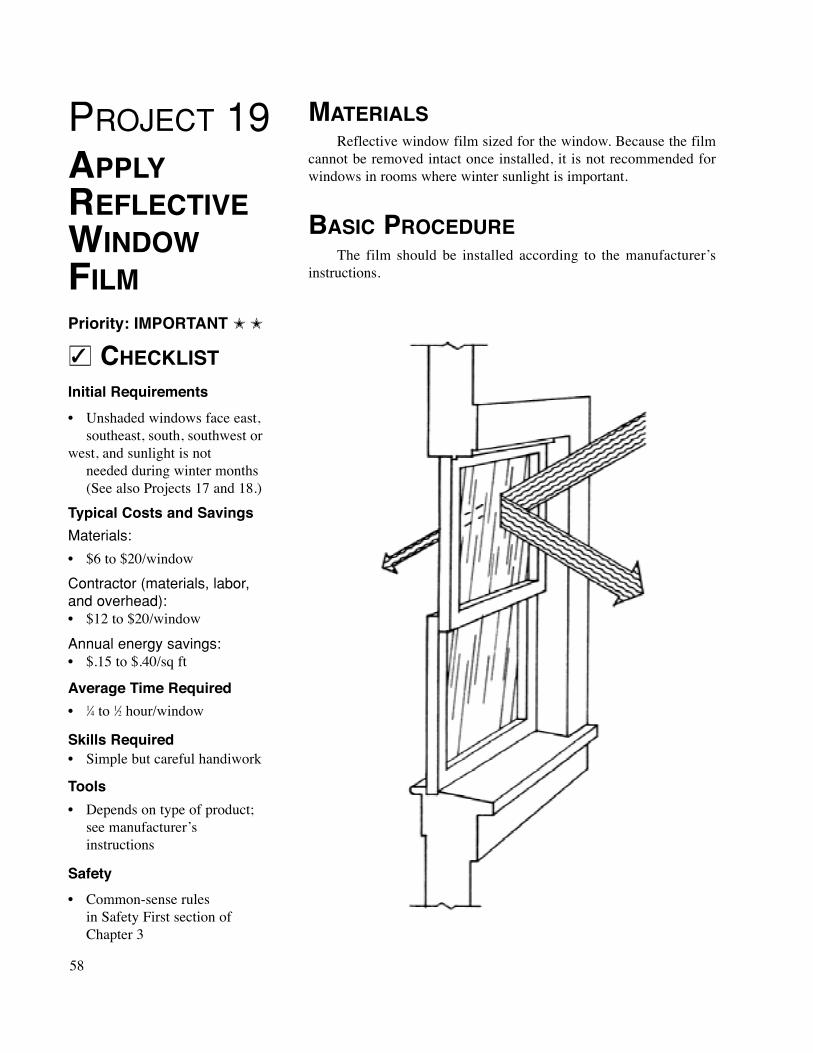
PROJECT 19APPLYREFLECTIVEWINDOWFILMPriority: IMPORTANT ✭ ✭
CHECKLISTInitial Requirements• Unshaded windows face east,
southeast, south, southwest or west, and sunlight is not
needed during winter months (See also Projects 17 and 18.)
Typical Costs and SavingsMaterials:
• $6 to $20/window
Contractor (materials, labor,
and overhead):
• $12 to $20/window
Annual energy savings:
• $.15 to $.40/sq ft
Average Time Required• 1⁄4 to 1⁄2 hour/window
Skills Required• Simple but careful handiwork
Tools• Depends on type of product;
see manufacturer’sinstructions
Safety• Common-sense rules
in Safety First section of Chapter 3
MATERIALSReflective window film sized for the window. Because the film
cannot be removed intact once installed, it is not recommended forwindows in rooms where winter sunlight is important.
BASIC PROCEDUREThe film should be installed according to the manufacturer’s
instructions.
58
✓
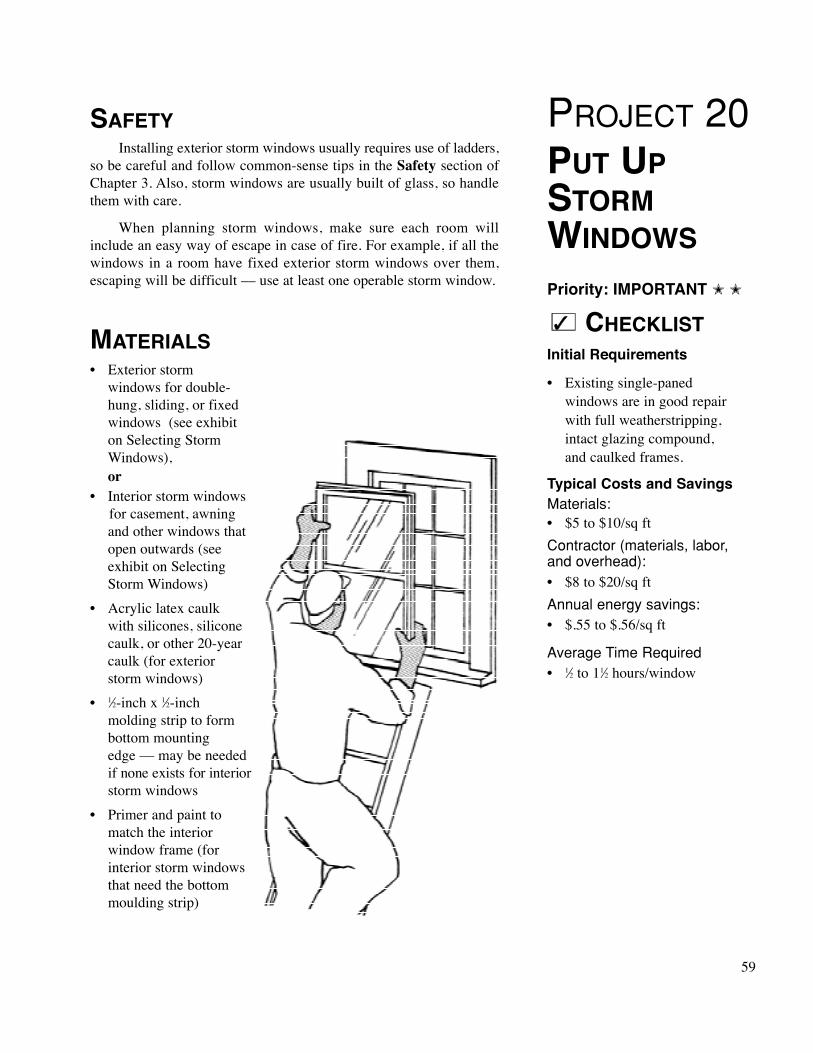
59
PROJECT 20PUT UPSTORMWINDOWSPriority: IMPORTANT ✭ ✭
CHECKLISTInitial Requirements
• Existing single-paned windows are in good repair with full weatherstripping, intact glazing compound, and caulked frames.
Typical Costs and SavingsMaterials:
• $5 to $10/sq ft
Contractor (materials, labor,and overhead):
• $8 to $20/sq ft
Annual energy savings:
• $.55 to $.56/sq ft
Average Time Required
• 1⁄2 to 11⁄2 hours/window
SAFETYInstalling exterior storm windows usually requires use of ladders,
so be careful and follow common-sense tips in the Safety section ofChapter 3. Also, storm windows are usually built of glass, so handlethem with care.
When planning storm windows, make sure each room willinclude an easy way of escape in case of fire. For example, if all thewindows in a room have fixed exterior storm windows over them,escaping will be difficult –– use at least one operable storm window.
MATERIALS• Exterior storm
windows for double-hung, sliding, or fixed windows (see exhibit on Selecting Storm Windows),or
• Interior storm windowsfor casement, awning and other windows that open outwards (see exhibit on Selecting Storm Windows)
• Acrylic latex caulk with silicones, siliconecaulk, or other 20-yearcaulk (for exterior storm windows)
• 1⁄2-inch x 1⁄2-inch molding strip to form bottom mounting edge –– may be needed if none exists for interiorstorm windows
• Primer and paint to match the interior window frame (for interior storm windowsthat need the bottom moulding strip)
✓
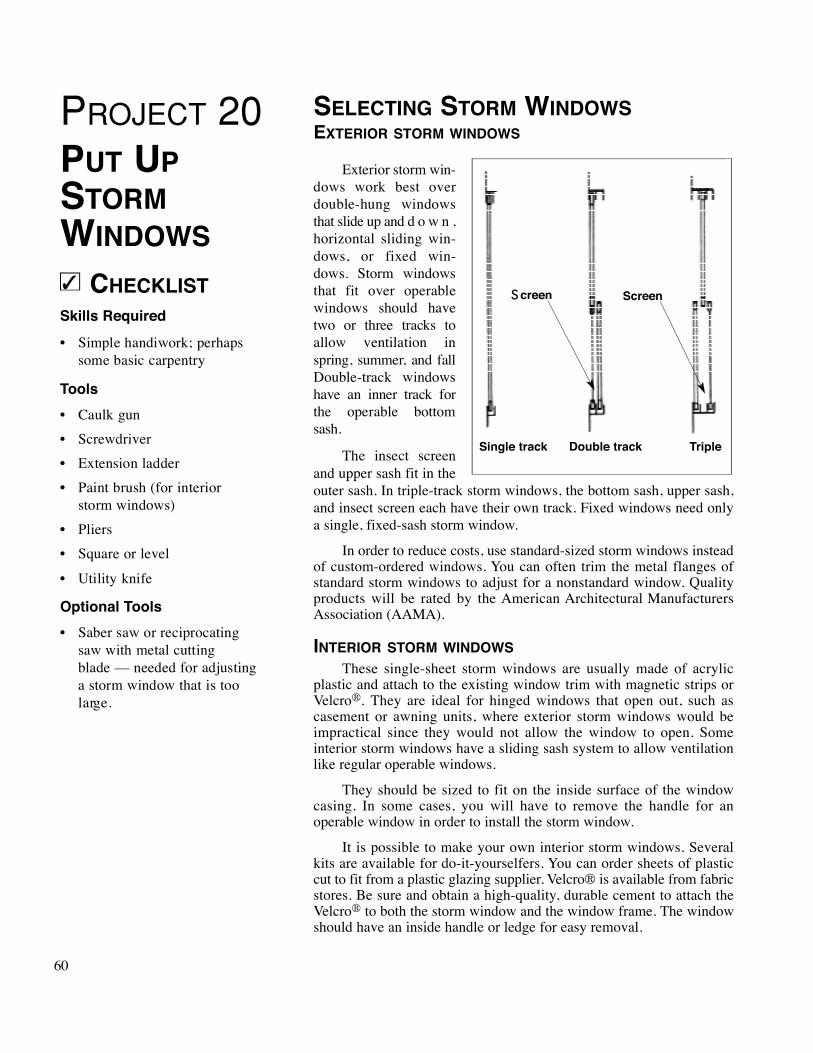
PROJECT 20PUT UPSTORMWINDOWS
CHECKLISTSkills Required• Simple handiwork; perhaps
some basic carpentry
Tools• Caulk gun
• S c r e w d r i v e r
• Extension ladder
• Paint brush (for interior storm windows)
• P l i e r s
• Square or level
• Utility knife
Optional Tools• Saber saw or reciprocating
saw with metal cutting blade –– needed for adjusting a storm window that is too l a rg e .
SELECTING STORM WINDOWSEXTERIOR STORM WINDOWS
Exterior storm win-dows work best overdouble-hung windowsthat slide up and d o w n ,horizontal sliding win-dows, or fixed win-dows. Storm windowsthat fit over operablew i n d o w s should havetwo or three tracks toallow ventilation inspring, summer, and fallDouble-track windowshave an inner track forthe operable bottoms a s h .
The insect screenand upper sash fit in theouter sash. In triple-track storm windows, the bottom sash, upper sash,and insect screen each have their own track. Fixed windows need onlya single, fixed-sash storm window.
In order to reduce costs, use standard-sized storm windows insteadof custom-ordered windows. You can often trim the metal flanges ofstandard storm windows to adjust for a nonstandard window. Qualityproducts will be rated by the American Architectural ManufacturersAssociation (AAMA).
INTERIOR STORM WINDOWSThese single-sheet storm windows are usually made of acrylic
plastic and attach to the existing window trim with magnetic strips orVelcro®. They are ideal for hinged windows that open out, such ascasement or awning units, where exterior storm windows would beimpractical since they would not allow the window to open. Someinterior storm windows have a sliding sash system to allow ventilationlike regular operable windows.
They should be sized to fit on the inside surface of the windowcasing. In some cases, you will have to remove the handle for anoperable window in order to install the storm window.
It is possible to make your own interior storm windows. Severalkits are available for do-it-yourselfers. You can order sheets of plasticcut to fit from a plastic glazing supplier. Velcro® is available from fabricstores. Be sure and obtain a high-quality, durable cement to attach theVelcro® to both the storm window and the window frame. The windowshould have an inside handle or ledge for easy removal.
60
✓
Single track Double track Triple
ScreenS creen
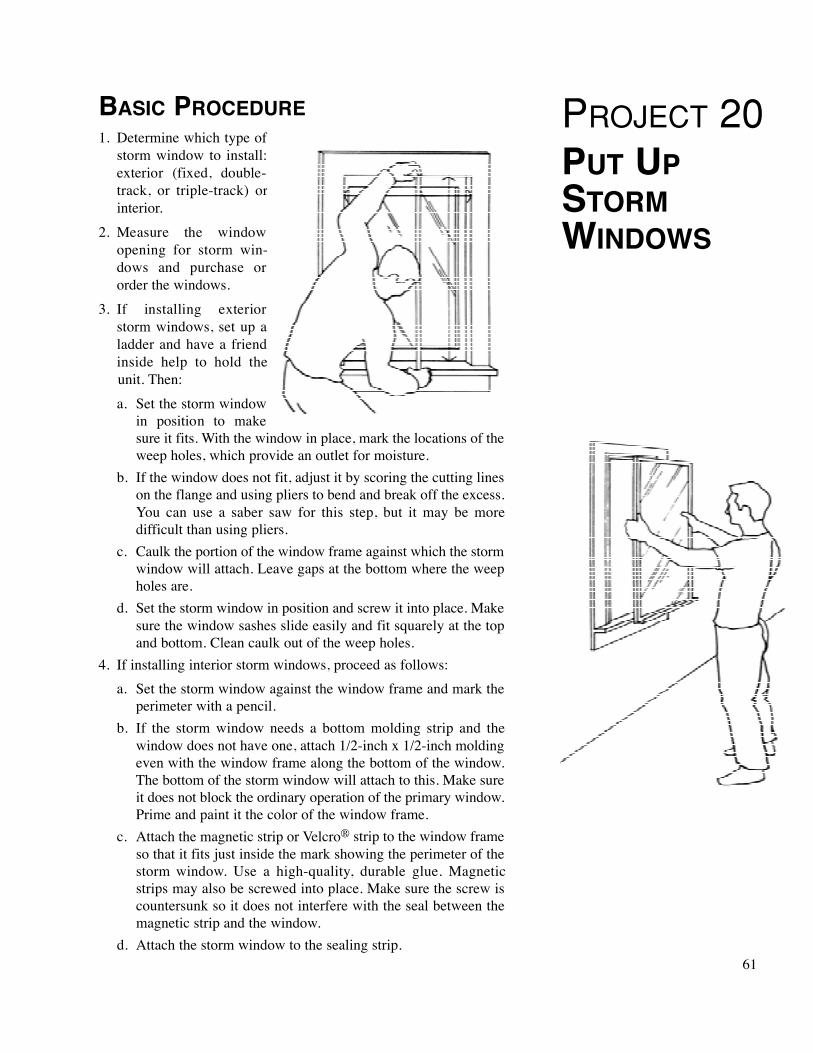
61
PROJECT 20PUT UPSTORMWINDOWS
BASIC PROCEDURE1. Determine which type of
storm window to install: exterior (fixed, double-track, or triple-track) or interior.
2. Measure the window opening for storm win- dows and purchase or order the windows.
3. If installing exterior storm windows, set up a ladder and have a friend inside help to hold the unit. Then:
a. Set the storm window in position to make sure it fits. With the window in place, mark the locations of the weep holes, which provide an outlet for moisture.
b. If the window does not fit, adjust it by scoring the cutting lineson the flange and using pliers to bend and break off the excess. You can use a saber saw for this step, but it may be more difficult than using pliers.
c. Caulk the portion of the window frame against which the storm window will attach. Leave gaps at the bottom where the weep holes are.
d. Set the storm window in position and screw it into place. Make sure the window sashes slide easily and fit squarely at the top and bottom. Clean caulk out of the weep holes.
4. If installing interior storm windows, proceed as follows:
a. Set the storm window against the window frame and mark the perimeter with a pencil.
b. If the storm window needs a bottom molding strip and the window does not have one, attach 1/2-inch x 1/2-inch molding even with the window frame along the bottom of the window.The bottom of the storm window will attach to this. Make sure it does not block the ordinary operation of the primary window.Prime and paint it the color of the window frame.
c. Attach the magnetic strip or Velcro® strip to the window frame so that it fits just inside the mark showing the perimeter of the storm window. Use a high-quality, durable glue. Magnetic strips may also be screwed into place. Make sure the screw is countersunk so it does not interfere with the seal between the magnetic strip and the window.
d. Attach the storm window to the sealing strip.

PROJECT 21INCREASEATTICVENTILATIONPriority: IMPORTANT ✭✭
CHECKLISTInitial Requirements• Attic net free vent area is less
than 1/150 of the attic area (see exhibit on Selecting and Sizing Attic Vents.)
Typical Costs and SavingsMaterials:
• Gable vents –– $20 to $70 each
• Roof louver vents –– $15 to $90 each
• Turbine vents –– $20 to $45 each
• Ridge vents –– $1 to $3/linearfoot
• S o ffit vents –– $1 to $5 each
Contractor (materials, labor, andoverhead):
• Gable vents –– $50 to $150 each
• Roof louver vents –– $80 to$125 each
• Turbine vents –– $60 to $225 each
• Ridge vents –– $5 to $12/linearfoot
• Soffit vents –– $10 to $20 each
Annual energy savings:
• Range widely, but attic ventilation is needed for reasons other than energy efficiency.It helps remove moisture from the attic throughout the year. In summer, it keeps the attic cooler and may increase the life of the roof.
SAFETYBe careful when working on the roof. Always have someone
close by in case of an accident. Work during a cool part of the day, asroof temperatures can exceed 150 degrees on hot, sunny days.
MATERIALS• Attic vents –– install as many as are required to achieve the desired
net free vent area (see exhibit entitled Selecting and Sizing Attic Vents.)
• Flashing –– choose a product that is durable and matches the other flashing materials on the roof. Some vents come with built-in flashing.
• Roofing cement –– follow the recommendations of the manufac-turer about which type of material to use to provide a waterproof seal.
• Roofing nails
62
✓
TYPES OF ROOF VENTS
Soffit
RidgeTurbine
Static

63
PROJECT 21INCREASEATTICVENTILATION
CHECKLISTAverage Time Required• 6 to 12 hours to install
several vents
Skills Required• Skilled carpentry. Be sure
you have the experience needed for this job. Improperly installed attic vents can cause roof leaks. If you are in doubt, hire a contractor.
Tools• Carpenter’s tool belt
(See Rules for Tools section in Chapter 3)
• Circular saw, reciprocating saw, or jig saw
• Electric drill with bits
• Ladder
SELECTING AND SIZING ATTIC VENTSAttic ventilation is necessary to remove condensation from the
attic. Condensation can occur when water vapor from the interior of thehouse rises through the ceiling into the attic. Given a highconcentration of water vapor and sufficiently cool temperatures, thevapor can condense into water and potentially damage the insulation,as well as the ceiling material itself.
Attic vents should be positioned both as high and as low aspossible. The best strategy is a combination of high vents spread alongthe ridge and low vents near the soffit area (on the underside of the roofoverhang.) In addition, the vents should be spread over the entire roofarea to ensure that all of the attic is properly ventilated.
Outside air enters the attic through the soffit vents and isexhausted out through the high vents. For most homes, this naturalconvective flow of heated air and moisture out of the attic is sufficientGenerally, electrically powered attic ventilators are not necessary.
The type and placement of attic vents will be determined largelyby the roof design. Continuous ridge and soffit vents usually providethe most effective ventilation.
Attic vents are sized in terms of square feet of net free vent area–– the size of the actual opening through which air flows. You mayhave a rectangular gable vent that is 2-feet tall and 3-feet wide;however, if that opening is covered by a wood louver, the actual areathrough which air flows will be substantially less than the size of theopening. The chart shows factors for determining the net free vent areafor different vent coverings.
For example, the area of the opening for the 2-foot by 3-foot gablevent is: 2 ft x 3 ft = 6 sq ft
The vent iscovered by a woodlouver. From the chart,the ratio of openingarea to net free ventarea is 2.25. The netfree vent area of thegable vent is then:
6 sq ft/2.25 = 2.7 sq ft
REDUCTION FACTOR FOR VENT COVERS
Type Reductionof cover Factor
Wire mesh orchicken wire $1.00
Insect screen 2.00
Metal louvers 1.50
Metal louvers with insect screen 2.00
Wood louvers 2.25
Wood louvers with insect screen 3.00
✓

PROJECT 21INCREASEATTICVENTILATION
BASIC PROCEDURESOFFIT VENTS1. Determine if the eave area has sufficient room for soffit vents.
Generally, the vents are installed on the underside of the eave –– calledthe soffit. If the roof does not have an eave, the vents may be placed in the fascia framing between the rafters.
2. Follow the manufacturer’s instructions for cutting holes for the vents. Holes for both continuous and rectangular soffit vents can usually be cut with a power saw. Using a power saw overhead requires considerable skill and strength. Be certain that you have the experience necessary to do this job safely.
3. After the opening is cut, position the vent and secure with weather-resistant nails or screws.
4. If the vent does not have insect screening, install it before positioning the vent in the opening.
5. Make certain that soffit vents are not blocked by insulation.
GENERAL VENT-SIZING RULES• If your ceiling insulation has a vapor barrier, the net free attic vent area
should be 1/300 of attic floor area.
• If the insulation has no vapor barrier, the net free vent area should be 1/150 of attic floor area.
• Use the Reduction Factor Chart to determine the total net free vent area that your attic should have.
• For example, assume the floor area of an attic is 1,000 square feet The attic has gable vents with 3 square feet of net free vent area. The insulation has no vapor barrier. With no vapor barrier, you need the attic vents to equal 1/150 times the attic floor area.
• Vent area needed = 1,000 sq ft x 1/150 = 6.7 sq ft of net free vent area.• You have 3.0 square feet of net free vent area; therefore, you need 3.7
square feet more net free vent area
• Most quality vents will indicate the net free vent area on the sales literature. Usually, the area is given in square inches. To convert this to square feet, divide by 144. Typical net free vent areas for different vents are shown in the accompanying chart.
TY P I C A L VE N T RE Q U I R E M E N T S I N AT T I C S WI T H O U T VA P O R BA R R I E R:
64
Type of Vent Approximate net free Number of vents for Vent area per unit 1,000 sq ft attic
with soffit without soffitHigh VentsTurbine (12” diameter) 105 sq in/vent 5 vents 9 ventsGable (25” x 120”) 60 sq in/vent 9 vents 17 ventsRoof louver static or
mushroom (81⁄2” opening) 50 sq in/lin ft 10 vents 19 ventsRidge 18 sq in/lin ft 28 lin ft 53 lin ft
No high vent With high ventSoffit vents 12 sq in/lin ft 80 lin ft 49 lin ft
Power ventilators Recommended only in attics that cannot be insulated
65
PROJECT 21INCREASEATTICVENTILATION
RIDGE VENTS1. Follow the manufacturer’s instructions in marking the placement of
the ridge vent on the roof ridge. Generally, installing the vent will require removing the cap shingles and cutting through the roof deck.
2. Remove the cap shingles in the area where the ridge vent will be installed.
3. Follow the manufacturer’s recommendations on how wide of a gapto allow along the ridge for the ridge vent. For most vents, a cut will be required 1 to 2 inches on each side of the ridge. Mark a line showing where to cut and remove any nails that may be in theway of the saw.
4. Cut through the shingles and decking using a circular saw with a carbide-tip blade.
5. Remove the loose shingles and decking material.
6. Secure the ridge vent in place according to the manufacturer’sinstructions.
7. Be careful not to damage the vent during installation or clean-up.
ROOF LOUVER OR TURBINE VENTS1. Choose a location between two roof rafters as close to the roof ridge
as possible.
2. Follow the manufacturer’s instructions for cutting a hole in the shingles and roof decking for the vent.
3. Install the vent according to the manufacturer’s instructions. Be certain to follow guidelines for flashing to prevent roof leaks.
4. Repair or replace any shingles that may have been damaged during the work. Also check to make certain that the vent was not damaged during installation.
GABLE VENTS1. Generally, gable end walls are constructed of studs. Choose a gable
vent that will fit between two studs rather than a vent that requires cutting the studs. If the vent does require cutting through the studs on the gable end, then consult with a knowledgeable professional to ensure that no structural damage occurs.
2. Most gable vents mount over the exterior wall finish and are held in place by a flange. Follow the manufacturer’s instructions for positioning the gable vent and marking the area on the exterior wall finish to be cut for the vent.
3. Use a power or hand saw to cut through the exterior wall finish. Remove the cut materials.
4. Insert the gable vent and secure according to the manufacturer’sinstructions.
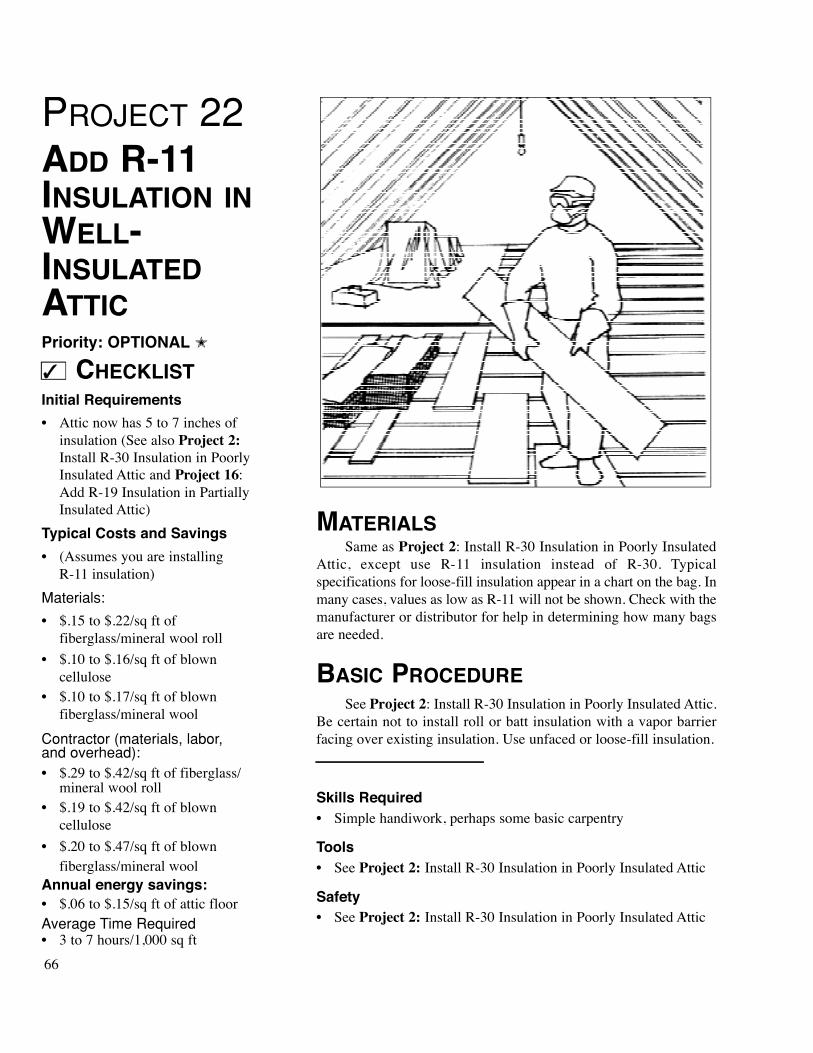
PROJECT 22ADD R-11INSULATION INWELL-INSULATEDATTICPriority: OPTIONAL ✭
CHECKLISTInitial Requirements• Attic now has 5 to 7 inches of
insulation (See also Project 2:Install R-30 Insulation in PoorlyInsulated Attic and Project 16:Add R-19 Insulation in Partially Insulated Attic)
Typical Costs and Savings• (Assumes you are installing
R-11 insulation)
Materials:
• $.15 to $.22/sq ft of fiberglass/mineral wool roll
• $.10 to $.16/sq ft of blown cellulose
• $.10 to $.17/sq ft of blown fiberglass/mineral wool
Contractor (materials, labor,and overhead):
• $.29 to $.42/sq ft of fiberglass/mineral wool roll
• $.19 to $.42/sq ft of blowncellulose
• $.20 to $.47/sq ft of blown fiberglass/mineral wool
Annual energy savings:• $.06 to $.15/sq ft of attic floorAverage Time Required• 3 to 7 hours/1,000 sq ft
MATERIALSSame as Project 2: Install R-30 Insulation in Poorly Insulated
Attic, except use R-11 insulation instead of R-30. Ty p i c a lspecifications for loose-fill insulation appear in a chart on the bag. Inmany cases, values as low as R-11 will not be shown. Check with themanufacturer or distributor for help in determining how many bagsare needed.
BASIC PROCEDURESee Project 2: Install R-30 Insulation in Poorly Insulated Attic.
Be certain not to install roll or batt insulation with a vapor barrierfacing over existing insulation. Use unfaced or loose-fill insulation.
Skills Required• Simple handiwork, perhaps some basic carpentry
Tools• See Project 2: Install R-30 Insulation in Poorly Insulated Attic
Safety• See Project 2: Install R-30 Insulation in Poorly Insulated Attic
66
✓

67
PROJECT 23INSTALLRADIANTBARRIER INATTICPriority: OPTIONAL e
CHECKLISTInitial Requirements
The roof receives direct sunlight in summer and hasa full attic underneath. The roof should have a ridge vent for ventilating hot air produced between itself and the radiant barrier. The atticshould already have at least R-19 insulation. Radiant heat barriers are never a substitute for insulation.
Typical Costs and Savings• $100 to $300/1,000 sq ft
Contractor (materials, labor,
and overhead):
• $200 to $1,000/1,000 sq ft
Annual energy savings:
• Research has shown radiantheat barriers can reduce annual cooling bills around 10 percent if the attic has less than R-30 insulation.
Average Time Required• 4 to 8 hours/1,000 sq ft
Skills Required• Simple handiwork
SAFETYAlways follow common-sense safety measures when working in
the attic. Use walkboards as walking surfaces.
MATERIALS• 1/4-inch staples for
stapler
• An aluminum foil designed to be used as a radiant barrier.Any product should resist tearing and be fire resistant. One or both surfaces should reflect at least 95 percent of incoming radiant heat. Purchase enough to fit on the underside of all of theattic rafters.
BASIC PROCEDURE1. Set up the extension cord, lights, and walkboards in the attic.
2. Most radiant barrier products come in a roll from 4 to 6 feet wide. Staple the foil either across the rafters or parallel to them, as specified by the manufacturer. The shiny side should face downward so it does not gather dust over time. As long as the surface remains shiny, it will block radiant heat whether facing upward or downward. Of course, it is best to have a reflective surface on both sides.
3. Repeat step 2 for all sections of the attic.
✓
✓
Tools• Carpenter’s tool belt (See Rules for Tools section in Chapter 3)
• Heavy-duty stapler
• Heavy-duty shears
• Drop lights and extension cords
• Tape rule

PROJECT 24PUT INSTORMDOORSPriority: OPTIONAL e
CHECKLISTInitial Requirements• Need a screen door for
summer months; current door is leaky in winter.
Typical Costs and Savings
Materials:
• $75 to $250/door
Contractor (materials, labor,
and overhead):
• $150 to $400/door
Annual energy savings:
• Up to 2% of heating and cooling costs
Average Time Required
• 4 to 12 hours depending on whether the door frame is square
Skills Required• Basic carpentry
Tools• Carpenter’s tool belt (see
Rules for Tools section in Chapter 3)
Safety• Common-sense measures
in Safety First section in Chapter 3
MATERIALS• Weatherstripped, pre-hung storm door
• 20-year caulk
BASIC PROCEDURE1. Before purchasing storm
door, make sure existing door frame is square using exhibit on Checking for Square.
2. Purchase a weatherstripped, pre-hung unit that is designed for the size of the door opening you have.
3. Place the storm door over your regular door frame and mark its position on the frame.
4. Caulk around the door frame where the storm door will be mounted.
5. Adjust the bottom of the storm door to the proper height.
6. Screw the storm door in place.
7. Install an automatic closer (if it comes with the storm door).
CHECKING FOR SQUAREWhen installing storm windows
and doors or replacement units, youwill need to determine whether theframe is square. The term “square”means the corners of the frame are allright (90 degrees) angles.
To check for square, all you needis a tape measure. Hold the tape at oneof the bottom corners and measure thedistance to the opposite top corner.Write down this distance. Then placethe tape measure in the same positionin the other bottom corner andmeasure to its opposite top corner.These distances –– alled the diagonals–– will be equal if the frame is square.Most storm doors and windows can beinstalled over a frame that is slightlyout of square.
68
✓

69
PROJECT 25INSTALLMOVABLEINSULATIONPriority: OPTIONAL e
CHECKLISTInitial Requirements• Windows already are well
sealed and homeowner is willing to operate shutters.
Typical Costs and SavingsMaterials:
• $.20 to $.57/sq ft of window
Contractor (materials, labor,
and overhead): • $6 to $10/sq ft of window
Annual energy savings:
• $.19 to $.32/sq ft of window
Average Time Required• 1 to 5 hours/window
Skills Required• Basic carpentry for pop-in
shutters
• Skilled carpentry for hinged shutters
Tools• Utility knife• Cloth shears• Carpenter’s square• Paint brush• Electric drill
• Carpenter’s tool belt (see Rules for Tools section in Chapter 3)
Optional:• Mitre saw or circular saw
Safety• Common-sense measures
MATERIALS• 11⁄2-inch rigid extruded
polystyrene insulation (you can use three 1⁄2-inch pieces)
• 2” x 2” fir lumber• Masonite
• Construction adhesive• Corrugated fasteners• Weatherstripping• Handles
• 3⁄4-inch drywall screws• Latches and hinges
(for hinged shutter)• Exterior white paint• Paint thinner for clean up
BASIC PROCEDUREPOP-IN SHUTTERS1. Measure the height and the width of the interior window frame.’
2. Cut 2” x 2” lumber for the frame as shown.3. Assemble the frame, keeping all corners at right angles and using
corrugated fasteners.
4. Cut the masonite to fit over the top and the bottom of the frame.
5. Cut the insulation to fit inside the frame.
6. Apply glue to the bottom side of the frame and nail one piece of masonite in place.
7. Set insulation in the frame and attach the top piece of masonite.
8. If you wish, apply the decorative fabric or adhesive paper to the interior surface of the shutter.
9. Paint the outside of the shutter white.
10. Install handles for easy removal.
11. Install weatherstripping all around the shutter so that it fits tightly in the window.
HINGED INSULATED SHUTTERS1. Measure the dimensions of the window
frame and cut 2” x 2” lumber for the frame as shown.
2. Follow steps 3 through 9 for pop-in shutters to assemble the shutter.
3. Attach hinges and a latch to the shutter and the window as shown.
4. Install weatherstripping all around so no air can leak around the shutter when latched.
✓
CHAPTER 5EN E R G YEF F I C I E N C YRE P L A C E M E N TME A S U R E S
Many components of your house might not be energy efficient, butit may not be cost effective to replace them unless they require repair.For example, it is not usually worthwhile to replace your current waterheater with a new energy-efficient model until the old one wears out.Put an insulating jacket on your present heater and wait a few years.
This section gives guidelines for replacing house componentsincluding windows, doors, water heaters, space heating systems, and airconditioners with energy-efficient alternatives.
In general, the replacement measures require a greater level of skillthan the efficiency measures described in Chapter 4. Usually acontractor should be hired to implement them unless you are a skilledcarpenter. In many cases, a licensed plumber or heating and airconditioning contractor will be required. Discussions in this chapterconcentrate on the available options rather than on specific installationprocedures. Information is also included on how to evaluate the jobdone by a contractor.
70

71
RE P L A C E M E N T
ME A S U R E 1WATERHEATERInitial Requirements• Current water heater is leaking
or no longer functioning. If water heater does not leak and is operating, then it is probably best to continue using it and follow the steps outlined in Project 4: Install Insulating Jacket on Water Heater. If an electric water heater is not producing hot water, the heating elements may need replacing.
WATER HEATERThe cost of heating water is based on the cost of energy and the
efficiency of the water heater. An average family in Arkansas spendsabout $290 each year to heat water with gas and about $435 forelectricity. These costs can be reduced by choosing a high efficiencymodel. A yellow EnergyGuide label which provides information on theoperating costs of a particular model is required by law to be attached toall water heaters.
Energy-efficient gas and electric water heaters have increasedinsulation levels between the outer jacket and inside tank to reduce heatloss. The average extra cost ranges from $50 to $100.
In addition, some gas models have a special design for the burner,flue, or electronic ignition that requires no pilot light. These featuresfurther increase savings; they cost an average of $75 to $300 more thanstandard models.
WATER HEATING ALTERNATIVESElectric resistance water heaters are expensive to operate. If you
have such a unit and your house does not have a supply of natural gas,an efficient alternative is a heat pump water heater, which operates attwice the efficiency of a resistance unit. The heat pump water heater hasan excellent payback on the typical $750 to $1,250 investment as annualenergy savings range from $150 to $350.
Heat pump water heaters must not be subjected to freezingconditions. They work best inpartially heated areas, such asenclosed basements or garages. Ifinstalled inside the home, they donot save as much energy becausein winter they extract some of theh o u s e ’s heat to heat water.However, they do have the addedbenefit of providing somecooling during warm weather.
A heat recovery device, alsocalled a desuperheater, heatswater with the waste heat from anair conditioner or heat pump. Thedevice captures extra heat fromthe refrigerant as it circulatesbetween the compressor andc o n d e n s e r. When used year-round on a heat pump, these unitscan cut water heating costs up toone-half and with an airconditioner up to 40 percent.
Temperature-pressure relief
valve
Incoming cut-off valve
Heat pump water heater (for electric water heaters)

REPLACEMENT
MEASURE 1
WATERHEATER
ACTIVE SOLAR WATER HEATERFor homes that use a
large amount of hot water andthat receive full sun yearround, a solar water heatermay be economical. All typesof solar water heaters work aspreheat systems assisting aconven-tional water heater.
There are many optionsfor using the sun’s energy toheat water. In active solarwater heaters, glass-coveredpanels absorb solar energy andtransfer the heat it produces towater. Pumps move the solar-heated water to an insulatedstorage tank where the heat isstored.
BATCH SOLAR WATER HEATER
Batch water heaters aremore simple but less efficientbecause the glass-coveredcollectors include the storagetank. The sun heats the waterdirectly, and the batch heatershave no pumps or controlsystems. Materials for a do-it-yourself batch water heatercost between $200 and $700and many energ y - r e l a t e dpubli-cations andorganizations have plans.
Solar water heaters installedby professional contractorscost $2,000 to $5,000. Theysave 25 percent to 70 percentof the water heating bills for atypical four-person family —from $75 to $300 each year.
72
Solar heatedwater out
Solar heatedwater out
Cold water in
Built-in storage(30-60 gallons)
Back-up waterheater
Hot water out
Pumps Hot water out
B a c k - u pw a t e rh e a t e r

73
RE P L A C E M E N T
MEASURE 2Initial Requirements• House has window frames or
sashes that are damaged and need repair, or it has leaky jalousie-style windows.
OPTION A: SASH REPLACEMENT KITSome window manufacturers offer a special replacement system in
which only the window sashes and stops, rather than the entire frame,need replacement. The kit includes airtight plastic jambs (which attach tothe old jambs), two sashes with doublepaned windows, and goodweatherstripping.
To use this system, your window frame must be in good conditionand square (all the corners must be at right angles see exhibit on Checkingfor Square in Project 24: Put in Storm Doors). If not square, the entirewindow will need to be replaced by a new unit.
The installer should follow installation instructions that come withthe replacement unit.
OPTION B : NEW WINDOW UNITNew windows vary greatly in price and quality. The key components
of a durable, energy-efficient window are:
1. Two sealed panes of glass with a 1/2- to 3/4-inch air space between panes.
2. Weatherstripping all around window sashes. A double layer of weatherstripping gives extra protection against infiltration.
3. A tight fit when closed and locked. If windows wiggle or shift when pulled, the winter wind will find a path inside.
Order replacement windows the same size or slightly larger than theold window. If the new window is smaller than the old one, new interiorand exterior wall finishes will have to be pieced in place to fill the gaps.
If the new window is larger than the old, the contractor will have totear out some of the old wall studs and reframe the wall slightly to createa large enough rough opening for the new window. It may be lessexpensive to order a custom-built window identical in size to the onebeing replaced.
Make sure the carpenter uses spray foam sealant in the gap betweenthe window unit and the rough opening.
TOP VIEW
King StudJack stud
Insulation
Old jambNew plastic jambNew insulated window

RE P L A C E M E N T
MEASURE 1
DOORSInitial Requirements• Door rotten, badly warped or
otherwise in poor condition.
REPLACE WITH INSULATED DOORQuality metal doors are filled with foam insulation and have
insulating values of about R-7 to as high as R-15 compared to R-2.2 forconventional solid wood doors. They come in a variety of styles andcan be attractive. Metal doors last longer than wood doors, do not warpeasily, and provide greater security. Often, they cost no more than solidwood exterior doors.
You may also consider a fiberglass replacement door. Theseprovide energy efficiency and durability comparable to a metal doorand have a wood grain appearance.
The major drawback of metal and fiberglass doors is theirinflexibility. They cannot be easily trimmed, so if the door frame is notsquare, it may have to be rebuilt.
Make sure the installer reads the directions that come with thedoor before beginning. Some adjustments can be made after the door isinstalled, but they will require extra time. A properly installed insulateddoor will seal tightly for years.
74
METAL DOOR SURFACE
WOOD FOR STRUCTURE AND TOREDUCE HEAT LOSS
FOAM INSULATION
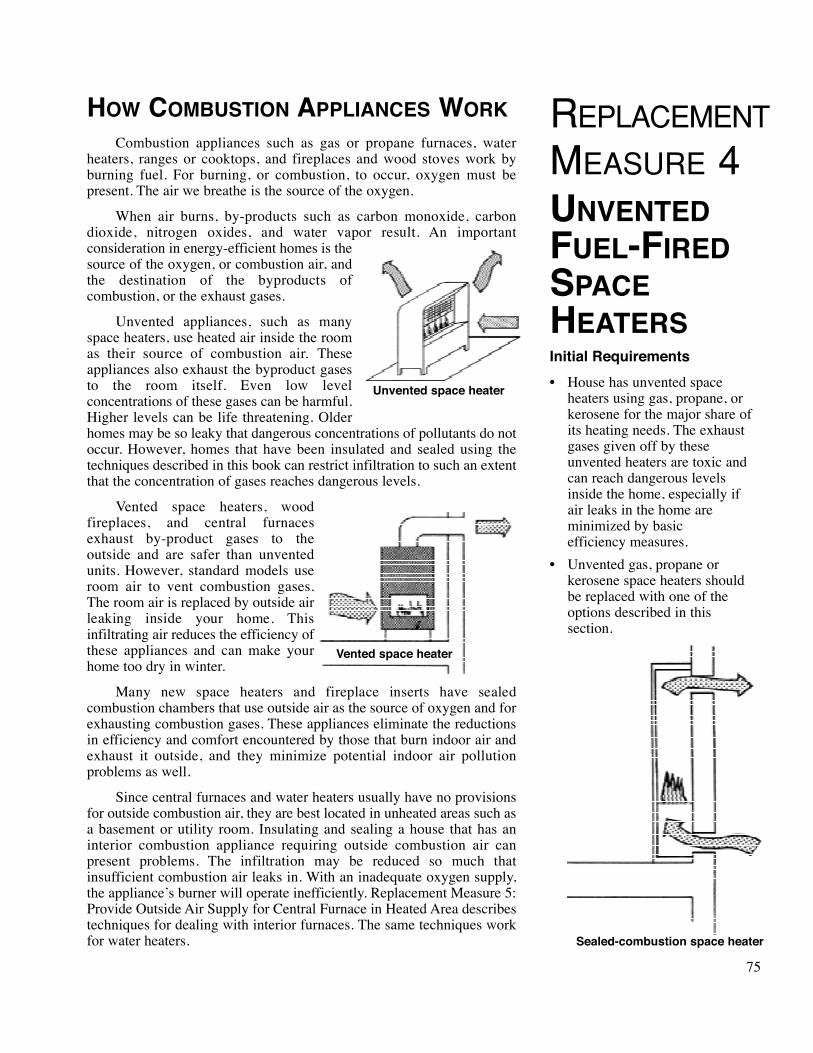
75
RE P L A C E M E N T
MEASURE 4UNVENTEDFUEL-FIREDSPACEHEATERSInitial Requirements• House has unvented space
heaters using gas, propane, or kerosene for the major share of its heating needs. The exhaust gases given off by these unvented heaters are toxic and can reach dangerous levels inside the home, especially if air leaks in the home are minimized by basic efficiency measures.
• Unvented gas, propane or kerosene space heaters should be replaced with one of the options described in this section.
HOW COMBUSTION APPLIANCES WORKCombustion appliances such as gas or propane furnaces, water
heaters, ranges or cooktops, and fireplaces and wood stoves work byburning fuel. For burning, or combustion, to occur, oxygen must bepresent. The air we breathe is the source of the oxygen.
When air burns, by-products such as carbon monoxide, carbondioxide, nitrogen oxides, and water vapor result. An importantconsideration in energy-efficient homes is thesource of the oxygen, or combustion air, andthe destination of the byproducts ofcombustion, or the exhaust gases.
Unvented appliances, such as manyspace heaters, use heated air inside the roomas their source of combustion air. Theseappliances also exhaust the byproduct gasesto the room itself. Even low levelconcentrations of these gases can be harmful.Higher levels can be life threatening. Olderhomes may be so leaky that dangerous concentrations of pollutants do notoccur. However, homes that have been insulated and sealed using thetechniques described in this book can restrict infiltration to such an extentthat the concentration of gases reaches dangerous levels.
Vented space heaters, woodfireplaces, and central furnacesexhaust by-product gases to theoutside and are safer than unventedunits. However, standard models useroom air to vent combustion gases.The room air is replaced by outside airleaking inside your home. T h i sinfiltrating air reduces the efficiency ofthese appliances and can make yourhome too dry in winter.
Many new space heaters and fireplace inserts have sealedcombustion chambers that use outside air as the source of oxygen and forexhausting combustion gases. These appliances eliminate the reductionsin efficiency and comfort encountered by those that burn indoor air andexhaust it outside, and they minimize potential indoor air pollutionproblems as well.
Since central furnaces and water heaters usually have no provisionsfor outside combustion air, they are best located in unheated areas such asa basement or utility room. Insulating and sealing a house that has aninterior combustion appliance requiring outside combustion air canpresent problems. The infiltration may be reduced so much thatinsufficient combustion air leaks in. With an inadequate oxygen supply,the appliance’s burner will operate inefficiently. Replacement Measure 5:Provide Outside Air Supply for Central Furnace in Heated Area describestechniques for dealing with interior furnaces. The same techniques workfor water heaters.
Unvented space heater
Vented space heater
Sealed-combustion space heater

RE P L A C E M E N T
MEASURE 4UNVENTEDFUEL-FIREDSPACEHEATERS
The following options help prevent degrading indoor air qualitywith unvented, fuel-fired space heaters:
• Unvented Space Heaters Using Oxygen Depletion Sensors
• Vented Fuel-Fired Space Heaters
• Air-to-Air Heat Exchangers
• Central Furnaces
UNVENTED SPACE HEATERS USING OXYGEN DEPLETIONSENSORS
New unvented fuel-fired space heaters should be equipped withoxygen depletion sensors (ODS). An ODS detects when oxygen levelsin the house have dropped—meaning levels of the by-product gasesmay be reaching dangerously high levels. When these potentiallyharmful levels occur, the ODS shuts off the flow of fuel to the burnerwhich extinguishes the flame so that no additional exhaust gases canenter the house.
Most local building codes bar the use of unvented space heaters inbedrooms and bathrooms. Always hire a licensed heating contractor toinstall new units.
VENTED FUEL-FIRED SPACE HEATERSVented, fuel-fired space heaters reduce the health risk of unvented
models and can also increase energy efficiency if the new units drawcombustion air directly from outside the home. Models that use indoorair for combustion may have net efficiencies lower than 50 percent.Higher-quality vented space heaters with sealed combustion chambersare recommended instead of those using interior air for combustion. Thehigher efficiency units are usually mounted onto an exterior wall; theydraw combustion air from outside and exhaust the by-product gasesoutside as well.
The sealed-combustion models have options such as blowers,pilotless electronic ignitions, and programmable thermostats.Unfortunately, this sophistication translates into higher prices. Simple,wall-mounted units with sealed combustion chambers cost $375 to$550. The units with more features can cost up to $750. A professionalshould always install a fuel-fired appliance.
AIR-TO-AIR HEAT EXCHANGERSAnother option for preventing contamination of indoor air by
unvented fuel-fired space heaters is to keep the existing units and bringin fresh air. Of course, opening windows when the heater is operating isan expensive way to heat a house. An alternative is to install an air-to-air heat exchanger. This device brings in fresh air and sends warm roomair outside—much like the open window. However, its design enablesthe outgoing air to transfer its heat to the incoming cold air. Differentheat exchangers have widely varying efficiencies. The exhibit on Air-to-Air Heat Exchangers describes the different types of systems.
76
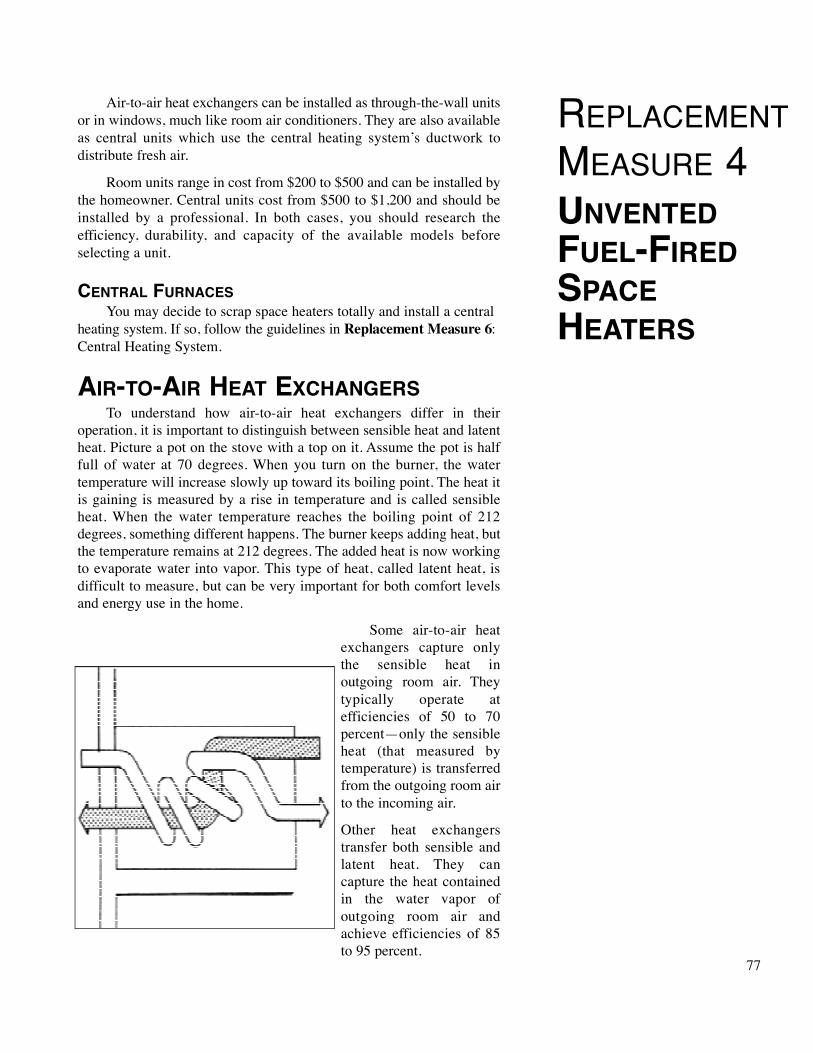
77
REPLACEMENT
MEASURE 4
UNVENTEDFUEL-FIREDSPACEHEATERS
Air-to-air heat exchangers can be installed as through-the-wall unitsor in windows, much like room air conditioners. They are also availableas central units which use the central heating system’s ductwork todistribute fresh air.
Room units range in cost from $200 to $500 and can be installed bythe homeowner. Central units cost from $500 to $1,200 and should beinstalled by a professional. In both cases, you should research theefficiency, durability, and capacity of the available models beforeselecting a unit.
CENTRAL FURNACESYou may decide to scrap space heaters totally and install a central
heating system. If so, follow the guidelines in Replacement Measure 6:Central Heating System.
AIR-TO-AIR HEAT EXCHANGERSTo understand how air-to-air heat exchangers differ in their
operation, it is important to distinguish between sensible heat and latentheat. Picture a pot on the stove with a top on it. Assume the pot is halffull of water at 70 degrees. When you turn on the burner, the watertemperature will increase slowly up toward its boiling point. The heat itis gaining is measured by a rise in temperature and is called sensibleheat. When the water temperature reaches the boiling point of 212degrees, something different happens. The burner keeps adding heat, butthe temperature remains at 212 degrees. The added heat is now workingto evaporate water into vapor. This type of heat, called latent heat, isdifficult to measure, but can be very important for both comfort levelsand energy use in the home.
Some air-to-air heatexchangers capture onlythe sensible heat inoutgoing room air. T h e ytypically operate ate fficiencies of 50 to 70percent—only the sensibleheat (that measured bytemperature) is transferredfrom the outgoing room airto the incoming air.
Other heat exchangerstransfer both sensible andlatent heat. They cancapture the heat containedin the water vapor ofoutgoing room air andachieve efficiencies of 85to 95 percent.
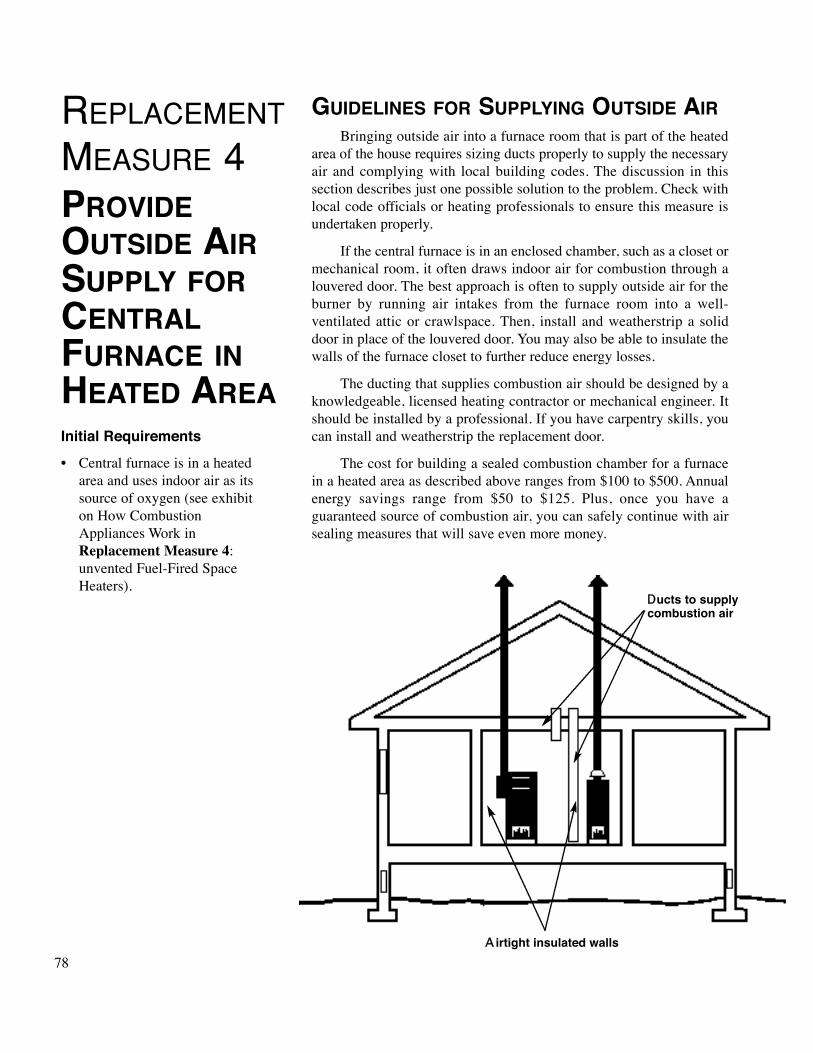
REPLACEMENT
MEASURE 4
PROVIDEOUTSIDE AIRSUPPLY FORCENTRALFURNACE INHEATED AREAInitial Requirements• Central furnace is in a heated
area and uses indoor air as its source of oxygen (see exhibit on How Combustion Appliances Work in Replacement Measure 4:unvented Fuel-Fired Space Heaters).
GUIDELINES FOR SUPPLYING OUTSIDE AIRBringing outside air into a furnace room that is part of the heated
area of the house requires sizing ducts properly to supply the necessaryair and complying with local building codes. The discussion in thissection describes just one possible solution to the problem. Check withlocal code officials or heating professionals to ensure this measure isundertaken properly.
If the central furnace is in an enclosed chamber, such as a closet ormechanical room, it often draws indoor air for combustion through alouvered door. The best approach is often to supply outside air for theburner by running air intakes from the furnace room into a well-ventilated attic or crawlspace. Then, install and weatherstrip a soliddoor in place of the louvered door. You may also be able to insulate thewalls of the furnace closet to further reduce energy losses.
The ducting that supplies combustion air should be designed by aknowledgeable, licensed heating contractor or mechanical engineer. Itshould be installed by a professional. If you have carpentry skills, youcan install and weatherstrip the replacement door.
The cost for building a sealed combustion chamber for a furnacein a heated area as described above ranges from $100 to $500. Annualenergy savings range from $50 to $125. Plus, once you have aguaranteed source of combustion air, you can safely continue with airsealing measures that will save even more money.
78A irtight insulated walls
Ducts to supplycombustion air

79
REPLACEMENT
MEASURE 6
CENTRALHEATINGSYSTEMInitial Requirements• Current heating system is
broken, is inefficient and costly to operate, does not provide sufficient heat, requires frequent maintenance, or is otherwise unsatisfactory.
GUIDELINES FOR REPLACING CENTRALHEATING SYSTEMS
1. SIZE THE SYSTEM PROPERLYHave a licensed heating contractor, mechanical engineer, or yourlocal utility estimate the heating requirements and size the unit. Anoversized system will not run efficiently and will cost more than aproperly sized unit.
2. SELECT THE APPROPRIATE TYPE OF UNITIn deciding whether to buy a fuel-fired furnace or heat pump, it isimportant to consider the relative comfort levels, lifetimes, installedcost, and annual energy costs of the different options. Talk aboutcomfort and reliability to people who have different types of units intheir homes.
If you wish to install central air conditioning at the same time you areputting in the new heating system, the installed and operating costsof a heat pump, which provide both heating and cooling, may be inthe same range as those for a gas furnace combined with a central airconditioner. Have your heating contractor or an engineer compare theinstalled cost and annual energy bills for each option before makinga decision. Be sure to get several bids.
If you do not have access to natural gas, you may choose propane,electricity, fuel oil, or other options for heating.

REPLACEMENT
MEASURE 6CENTRALHEATINGSYSTEM
3. FUEL-FIRED FURNACESA near revolution has occurred in the efficiency of heating and coolingsystems over the past decade. A standard fuel-fired furnace has anAnnual Fuel Utilization Efficiency (AFUE) of 65 to 70 percent. A mid-efficiency combustion furnace has an AFUE of 80 to 85 percent. Theseunits usually add only a few hundred dollars to the initial cost and payback the extra investment very quickly.
The high efficiency units have an AFUE from 90 to 97 percent. Thesesystems are able to extract latent heat from the water vapor in theexhaust gases. (See the exhibit on Air-to-Air Heat Exchangers inReplacement Measure 4 for a description of latent heat.) They aremore expensive and may add up to $1,200 to the cost of a standardfurnace. Many homeowners can easily justify the added cost because oflong-term energy savings.
4. HEAT PUMPSFor years, conventional electric resistance heating systems have usedresistance coils, which grow hot when electric current runs throughthem. The system’s blower distributes this heat throughout the house.Although resistance heating systems operate near 100 percentefficiency, they are costly to operate.
Heat pumps use an arrangement of compressors, condensers,expansion valves, and other components to extract heat from outsideair in winter. They also provide cooling, just like an air conditioner, byreversing the process and dumping heat from inside your home to theoutside. On the average, heat pumps cost 40 to 65 percent less tooperate than electric resistance units.
At lower outside temperatures—typically below 30 degrees—heatpumps can no longer extract sufficient heat from outside air. In thesecircumstances, a separate electric resistance unit, called a strip heater,comes on to provide backup heating. Fortunately, the time duringwhich the strip heater must operate in winter is relatively limited inArkansas because of its usually mild weather.
Heat pumps are rated in terms of their summer Seasonal EnergyEfficiency Ratio (SEER) and their winter Coefficient of Performance(COP) or Heating Season Performance Factor (HSPF). You shouldselect a unit with a SEER greater than 13, a high-temperature (47degrees) COP over 2.9, a low temperature (17 degrees) COP greaterthan 2.0, and an HSPF over 7.7.
5. ZONED HEATING AND COOLING SYSTEMSIn larger homes, entire areas may not be used during different parts ofthe day. By shutting off the flow of heated and cooled air to theserooms—a practice called zoned heating and cooling—considerableenergy savings can be realized.
Typically, independent heating and cooling systems are installed forseparate sections of the house. Multiple systems provide good comfortand closer control over the temperature in individual rooms. However,they are expensive and are usually justified only for houses having over2,500 square feet of floor area which can be divided into separate areaswith distinctive lifestyle patterns.
80
81
RE P L A C E M E N T
ME A S U R E 6CE N T R A LHE AT I N GSYSTEM
You can also zone a house by closing operable floor or wall dampers thatcontrol the air supply coming from the heating or cooling system. T h eonly problem with this measure is that the system’s blower is sized tomove a certain volume of air through all of the ductwork. If severaldampers are closed, the blower will try to push the same volume of airthrough fewer ducts and will experience increased pressure workingagainst it. By forcing the blower to work harder, you may shorten its life.
Some heating contractors can install a dampering system that eff e c t i v e l yzones a house with only one heating and cooling system and alleviatesthe increased load on the blower. These dampering systems will shut offthe flow of heated air to a given area of the house, but will allow the airto flow into the return system and minimize stress on the blower.
6. SEAL AND INSULATE DUCTWORKMake sure the heating contractor seals the joints between all ducts withmastic before installing duct insulation. Duct insulation should be usedin all unheated areas.
7. INSTALL PROGRAMMABLE THERMOSTATA programmable or clock thermostat can reduce heating energy use upto 40 percent. If you have a heat pump, make sure you buy athermostat rated for your heating system. Otherwise, the heat pumpmay use considerable electricity because a conventionalprogrammable thermostat may cause the strip heaters, not the heatpump itself, to warm the house in the early morning. For moreinformation, see Project 10: Connect Programmable Thermostat.
8. CAREFULLY EVALUATE OTHER HEATING SYSTEM CONTROLSIf considering the purchase of duty cyclers or similar energ y - m o n i t o r i n gand control devices, carefully evaluate their cost-effectiveness byconsulting with a heating contractor or your local utility.
Some energy products that control the manner in which heating orcooling systems save energy have been marketed heavily in Arkansas.For example, inflated claims have been made about savings achievedby duty cyclers. Recently, similar devices with different names havesurfaced in the marketplace. If you are considering buying this type ofdevice, check it out first with your heating contractor or local utility.
In general, never believe persons who promise a magical solution toyour energy problems. If the deal offered sounds too good to be true,it probably is. The only control device for your heating and coolingsystem that can really lower heating bills drastically is aprogrammable thermostat. The options for increasing the efficiency ofa properly installed heating and cooling system are limited.
Some electric utilities have programs to install load-managementdevices on water heaters and air conditioners. These devices do nota ffect comfort levels in your home but allow the utility to reduce thepeak load on its overall system. Often, the utility will offer you afinancial incentive for installing the device. Although the device doesnot save you any energy directly, it does lower the utility’s cost ofproviding power. In the long run, it could indirectly reduce yourelectricity cost.
RE P L A C E M E N T
ME A S U R E 7
CENTRAL AIRCONDITIONERInitial Requirements• Existing air conditioner is
broken, is costly to operate, provides insufficient cooling, needs frequent maintenance, or is otherwise unsatisfactory.
GU I D E L I N E S F O R RE P L A C I N G AI R CO N D I T I O N E R S
1. SIZE THE AIR CONDITIONER PROPERLYWhen installing a central unit, have a licensed heating and air
conditioning contractor, mechanical engineer, or your localutility estimate the cooling requirements and size the unit. Anoversized system will run inefficiently and cost more than a properlysized unit. A professional should install the system.
A room air conditioner can be sized using general guidelinesprovided by the manufacturer. Use the technical data in the salesliterature to ensure the unit is matched to your cooling needs.
2. SELECT AN ENERGY-EFFICIENT UNITThe air conditioner should have a Seasonal Energy Efficient Ratio(SEER) of at least 13.
3. FOLLOW WISE PRACTICES(Guidelines 5, 6, and 8 in Replacement Measure 6: Central HeatingSystem.)
4. USE NATURAL COOLING MEASURESUse shading and ventilation to minimize air conditioning bills andincrease comfort levels in the home. See Projects 15, 17 and 18 formore information.
5. SHADE YOUR AIR CONDITIONERKeep the outside portion of your air conditioner in the shade. Bykeeping it cooler, it will run more efficiently and save you money.However, be certain to allow easy air flow to the outside equipmentand to keep it clear of debris.
82
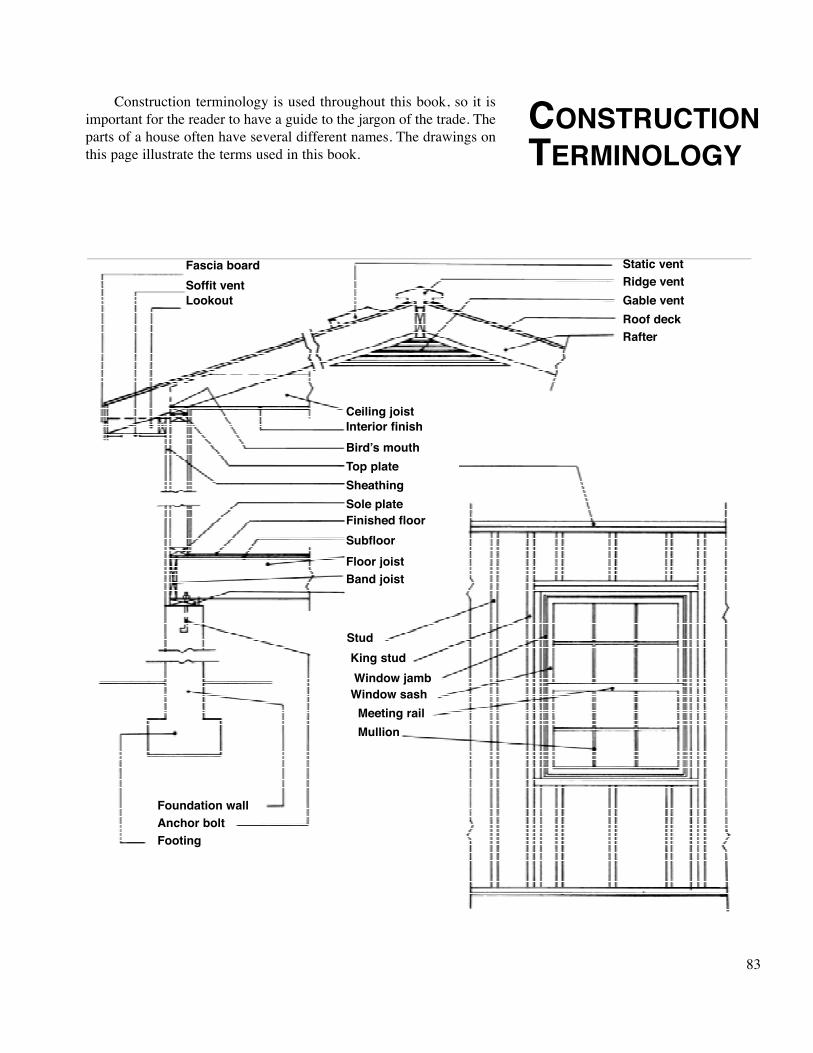
83
CONSTRUCTIONTERMINOLOGY
Construction terminology is used throughout this book, so it isimportant for the reader to have a guide to the jargon of the trade. Theparts of a house often have several different names. The drawings onthis page illustrate the terms used in this book.
Static ventRidge ventGable ventRoof deckRafter
Fascia boardSoffit ventLookout
Ceiling joistInterior finishBird’s mouthTop plateSheathingSole plateFinished floorSubfloorFloor joistBand joist
StudKing studWindow jamb
Window sashMeeting railMullion
Foundation wallAnchor boltFooting

84