home-based fruit and vegetable - afghan agriculture · the manual on home-based fruit and vegetable...
TRANSCRIPT


HOME-BASED FRUIT AND VEGETABLE PROCESSING:
A Manual for Field Workers and Trainers
BOOK 2:Practical Guidance and Recipes
Written by Susan Azam AliEdited by Charlotte Dufour
Published by arrangement with theFood and Agriculture Organization of the United Nations
by theMinistry of Agriculture, Irrigation and Livestock,
Government of Afghanistan

The designations employed and the presentation of materialin this information product do not imply the expression of anyopinion whatsoever on the part of the Food and AgricultureOrganization of the United Nations concerning the legal ordevelopment status of any country, territory, city or area or ofits authorities, or concerning the delimitation of its frontiers orboundaries. The mention of specific companies or products ofmanufacturers, whether or not these have been patented, doesnot imply that these have been endorsed or recommended bythe Food and Agriculture Organization of the United Nationsin preference to others of a similar nature that are not men-tioned. The views expressed in this publication are those of theauthor(s) and do not necessarily reflect the views of the Foodand Agriculture Organization of the United Nations.
FAO, 2008

USING THIS MANUAL
The Manual on Home-based Fruit and Vegetable Processing is composed oftwo books. This book is designed to complement Book One, "Principles ofpost-harvest handling, storage and processing of fruits and vegetables", byproviding recipes and guidance that will enable you to put into practice theprinciples described in Book One. It is advised that you start by reading BookOne before applying the recipes provided here. You can also regularly referback to Book One to better understand the purpose of each processing stepdescribed in Book Two.
Book Two is organised in seven chapters. Six chapters provide guidance andrecipes on different food processing techniques, namely:
DryingJam-makingSauces and chutneysPicklesVinegarPotato crisps
Each chapter begins by describing the processing outline for a given technique,and then providing detailed guidance on each step of the process. A colourcode and icons will enable you to follow clearly how the process unfolds.Detailed recipes for specific fruits or vegetables are then given, enabling youto put in practice the processing outline.
The last chapter, on "Measurements and Preparation of Solutions" gives guid-ance on essential tasks, such as how to calculate proportions of ingredients,chlorinate water, prepare solutions, and measure the strength of vinegar.
The definitions of words written in italic can be found in the Glossary ofBook One.
a


TABLE OF CONTENTSDRYING ...........................................................................................................................6
Processing outline for dried fruit and vegetables .............................................8Dried tomato ...........................................................................................................19Dried tomato ...........................................................................................................19Dried apricots .........................................................................................................20Dried onions ............................................................................................................21Dried apples ..........................................................................................................22
JAM-MAKING .............................................................................................................23Processing outline for Jam and Jelly ................................................................25Fruit jam or jelly – process details and quality assurance ..........................26Apricot jam ...........................................................................................................32Carrot and lemon jam ..........................................................................................33Cherry jam .................................................................................................34Mulberry jam ......................................................................................................35Apple jam ............................................................................................................36Apple jelly ............................................................................................................37
SAUCES AND CHUTNEYS ........................................................................................38Processing outline for sauce and chutney .........................................................40Sauce and chutney – process details and quality assurance .......................41Italian style tomato sauce ....................................................................................43Italian style tomato sauce ...................................................................................43Tomato paste .........................................................................................................45Tomato sauce or ketchup ....................................................................................47Tomato puree or simple concentrate .................................................................49Tomato concentrate (non-cook method) ............................................................51Coriander chutney (chatni gashnize) .................................................................54Vegetable chutney ................................................................................................55Tomato chutney (Chatni Badenjani Romi) ..........................................................57Chili chutney (Chatni Morchi Sorkh/Sabz ) ......................................................58
PICKLES ......................................................................................................................59Processing outline for lactic acid fermented pickles (atchar) .......................61Fermented pickles – process details and quality assurance .......................62Pickled cucumbers .................................................................................................64Mixed pickle ..........................................................................................................65Pumpkin pickle .......................................................................................................67
b

VINEGAR .....................................................................................................................69Process outline for fruit and vinegar .................................................................71Fruit vinegar – quality assurance and processing notes ................................72Tomato vinegar ....................................................................................................74Mulberry vinegar .................................................................................................76
POTATO CRISPS ........................................................................................................78Process outline for potato crisps ..................................................................79Potato crisps – quality assurance and processing notes ...............................80
MEASUREMENTS AND PREPARATION OF SOLUTIONS ................................82Measuring ingredients .....................................................................................83Preparation of syrup or brine solutions ............................................................84Water chlorination ..............................................................................................85Preparing a sulphite solution ..............................................................................85Preparing a sulphite solution ..............................................................................86The Pearson Square ..............................................................................................87Measuring the strength of vinegar .....................................................................89
c

DRYING
1Drying
Dryi
ng

DryingDrying is one of the most popular methods of preserving fruit and vegetables.You can dry most fruit and vegetables and, if you dry them properly and storethem well, they will keep for a long time.
Common fruits and vegetables suitable for drying:apricotsgrapes plumstomatoesonionsokra egg plantgarlicgreen vegetables such as spinach, mint, dill (“shibet”).
At the home level, there are two main options for drying:drying in the sun,solar drying with either a direct or indirect solar dryer.
Each type of dryer has its advantages and disadvantages. The informationprovided in Book 1 allows you to decide which is the best type of dryer foryour own situation.
Annex 2 of Book 1 also provides different models of dryers and guidance on howto build them
2Home-based Fruit and Vegetable Processing
Dryi
ng
Should I dry fruit and vegetables?
Yes, if you live in a hot dry climate Drying is one of the cheapest methods offood preservationIt requires very little equipment You can dry most fruit and vegetables andsave them for the off seasonDried foods have a long shelf life and canbe used in a variety of ways
No, if you live in a cold and/or humid climateYou will need to use a fuel-assisted dryerwhich is expensiveThe foods may not dry properly and willspoil during storage.
DRYING - Equipmentneeded
KnifeSulphur tent or cabinet(optional)Large pan for blanch-ing (optional)Dryer (optional)Packaging materialHeat sealer (optional)

Processing outline for dried fruit and vegetables
3Drying
Dryi
ng
Selection and preparation of the fruit(washing and cutting)
Blanching (optional)
Drying
Dried product
Conditioning and Packaging
Sulphuring or sulphiting(optional)

WashingWash the fruit and vegetables to remove dirt and bacteria that are present onthe skin.
Wash unpeeled fruits and vegetables, using chlorinated water (see the sectionon the preparation of chlorinated water for washing, page X). Take care not tobreak the skin of the fruits as this will contaminate the flesh. Wear gloves andaprons to protect your hands and clothes. Ten litres of treated water (100ppmchlorine) will be sufficient for about 20kg fruit. Change the wash water afterthis amount has been washed as it becomes contaminated by the fruit.
Chopping and slicingCut the fruit and vegetables into slices of similar thickness and size so thatthey dry at the same rate. The table below gives recommended thickness fordifferent fruit and vegetables.The following points are useful to consider:
thick pieces dry at a slower rate than thinner ones;thicker pieces may not dry fully in the centre and will not store well;very thin pieces tend to stick to the drying trays;packets of mixed thick and thin pieces do not look attractive.
It is best to use stainless steel knives to peel and chop the fruit and vegetables.If you do not have a stainless steel knife, make sure you use one with a clean,sharp blade.
Table 1: Preparation and slice thickness for fruits and vegetables
Recommended preparation and slice thickness for various fruit and vegetables
OkraWash the pods. If the pods are biggerthan 7cm long, cut them into slices (10mmthick). Pods less than 7cm long can besliced in half from top to bottom.
Spinach
Wash thoroughly to remove soil. Cut outthe hard tough stem from the centre ofolder leaves. The stem in younger leaves isnot as tough and can be used. Pat dry toremove excess water.
LeekWash and dry thoroughly. Remove theouter dark green layers which may be oldand tough. Cut into rings (10mm).
4Home-based Fruit and Vegetable Processing
Dryi
ng
Preparation of the fruit or vegetable

5Drying
Dryi
ng
Onion Remove the outer skin. Remove the top androot end. Cut into slices 3-5mm thick.
Apricot
Select firm, mature, but not over-ripe fruit.Wash well. Do not peel. You can cut theapricots in half or leave them whole (thismakes the final product softer and easierto clean). If you leave them whole,squeeze out the pit after two to threedays of drying –when apricots are stillsoft- by pressing gently on the apricot.
Apple
Select mature, firm apples. Wash well.Remove the peel and take out the centralcore. Cut in rings or slices 3-5mm thick orcut in quarters or eighths.
Grape
Wash, sort, remove stems. Leave the smallseedless grapes whole. Large grapesshould be cut in half. If drying whole, crackthe skins by dipping in boiling water for 30seconds. If halved, dip in a solution of dilut-ed lemon juice (250ml lemon juice per litreof water) for up to 10 minutes. Drain.
Tomato
Dip in boiling water to loosen the skins. Chillin cold water and peel. Cut into sections lessthan 20mm wide or cut in half, depending onthe size of the tomato.
Plums
Wash well. Leave whole if small; cut largefruit into halves or slices and remove thestone. If left whole, crack skins in boilingwater for 1 to 2 minutes. If cut in half, dip ina solution of lemon juice for 10 minutes.Remove and drain.
Cherries
Select fully ripe fruit. Wash well. Removestems and stones. Dip whole cherries inboiling water for 30 seconds to crack theskins. If cut in half, dip in a solution ofdilute lemon juice (250ml lemon juice perlitre of water) for up to 10 minutes.Remove and drain well.

Vegetables are blanched to inactivate the enzymes and reduce the number andactivity of microbes. Blanching is used for hard vegetables such as carrots, beansand peas as it helps to preserve a good colour and softens the vegetable so thatit dries more quickly later on. It is not used for soft vegetables or fruits such astomatoes, onions and peppers.
Place the cut pieces of vegetable intoboiling water or hold them in steam for upto 5 minutes.The length of time needed to blanch avegetable varies with the type of veg-etable, the size of the pieces and the num-ber of pieces blanched at any one time.The following table gives a rough guide. Ifvegetables are blanched for too long, theylose their colour and taste.
Table 2: Blanching time for selected vegetables
You need a large volume of water so that all the pieces are heated thorough-ly in as short a time as possible. Use 4.5 litres of water for each 500g of pre-pared vegetable.
Hot water blanching1. Cut the vegetables into even sized pieces. Large thick pieces take longer
to blanch than small thin pieces.2. Boil a large pot of water.
Blanching time (minutes)Vegetable Steam blanching Water blanchingEggplant (slices) 3.5 2Leafy green vegetables 2-2.5 1.5-2Green beans 2-2.5 1.5-2Carrots (sliced) 3-3.5 2Cabbage 2.5-3 1.5Okra (whole pods) 4.5-6 3-4Cauliflower florets 4.5 3
6Home-based Fruit and Vegetable Processing
Dryi
ng
Blanching
Blanching

3. Add the vegeta-bles to the boil-ing water. Donot add toomany at one timeor the tempera-ture of the waterwill drop and theprocess will takelonger. If you have a sieve, mesh basket or clean muslin cloth, place thevegetable pieces in this and dip it in the boiling water. Move the muslincloth around to ensure that the vegetables receive heat evenly.
4. Wait until the water starts to boil again (if it does not boil after 1 minute,there are too many vegetables for the amount of water). Boil for therequired time then quickly remove the vegetables from the pan of water.
5. Immediately put the vegetables into a large pan of cold (iced, if possible)water. This stops the heating process and helps to keep a good colour.
Steam blanching1. Cut the vegetables into even sized pieces. Large thick pieces take longer
to blanch than small thin pieces.2. Boil a large pot of water.3. Place the vegetable pieces in a sieve or colander. Hold the colander in
the steam above the pot of boiling water. Place a lid on the pot andleave the vegetables in the steam for the required time (steam blanchingtakes about 1! times longer than water blanching). You can use amantoo pot for this step.
4. After the set time, quickly immerse the colander of vegetables into alarge pan of cold (iced, if possible) water. This stops the heating processand helps to keep a good colour.
Sulphur dioxide is used to preserve the colour and increase the shelf life ofdried foods, especially fruits. It cannot be used to treat red fruits such as cher-ries as it bleaches the flesh. It is commonly used to preserve apricots.
There are two methods of treatingfruit with sulphur: sulphiting andsulphuring.
7Drying
Dryi
ng
Sulphuring and sulphiting
Why should I blanch vegetables before drying?
Blanching is usually only used for hard or green vegetables.It softens the hard vegetables which makes it easier for thewater to be lost from them during the drying process.It also helps to maintain a good colour, especially ingreen vegetables.Blanching kills microbes that can cause spoilage. It alsoinactivates enzymes that cause the vegetable to ripenand mature.
Why do I need to use sulphur dioxide (SO2)?Sulphur dioxide is not essential, but it helps tokeep a good colour in fruits, especially apri-cots, and helps to prevent the growth ofmould and fungus

1. Sulphiting,Pieces of fruit or vegetables aredipped in a solution that is made bydissolving sodium or potassiummetabisulphite in water. If the fruit isalso being blanched, the chemical canbe added to the blanching water.
The strength of the sulphite solution andthe dipping time depend on the type offruit and the size of the pieces.The strength of sulphur dioxide is expressed as "parts per million" (ppm). 1.5 gramsof sodium metabisulphite in one litre of water gives 1000 ppm of sulphur dioxide.
See page X on how to prepare sulphite solutions of various strengths.
Fruit halves should be dipped in the solution for up to 15 minutes. Fruit slicesshould be dipped for up to 5 minutes.2. Sulphuring
A piece of sulphur is burned in a closed chamber so that it gives off sulphurdioxide gas.
The sulphur chamber is either a cabinet or tent with a stack of perforated trays inside.(see Annex 3 of Book 1, to see how to make a simple sulphur box or tent).Food is placed on the trays, and the sulphur is placed on a metal plate, underthe lowest tray in the chamber. Allow the sulphur to burn for 2-3 hours, or untilall the fumes are absorbed by the fruits.
The amount of sulphur used and the time of exposure depend on the type of fruit, itsmoisture content, the size of the pieces and the permitted final levels in the product.
For most fruits 1.5-3g sulphur per kg food is sufficient.
8Home-based Fruit and Vegetable Processing
Dryi
ng
Warnings about sulphiting :Do not get sulphite solution on the skin as it can cause a rash.
After dipping a batch of fruit or vegetable, refill the container to the origi-nal level with fresh preservative solution of correct strength. After five lotsof produce have been dipped, the solution should be thrown awaySulphiting wets the fruit or vegetable: this makes the drying period longer
Warning about sulphuring :Take care when using sulphur or sulphite as the gas is not pleasant and can cause breath-ing problems. You need to do sulphuring in a well ventilated place, preferably outdoors.Place the burning sulphur in an enclosed chamber and DO NOT breathe in the gas.
Blanching

Warning: If too much sulphite is used it gives the fruit a bad taste. The maxi-mum permitted levels of sulphur in dried fruits are 0.005 to 0.2%. Some peo-ple do not like fruit that is treated with sulphur.
Table 3: Pre-treatments required for selected fruit and vegetables
Place the fruits and vegetables on drying trays, such as wooden frames with afitted base of netting. Mesh made of woven grass or thin branches can also beused. Metal netting must NOT be used because it discolours the product.
Make sure that the fruit and vegetable pieces are in a single layer and that thepieces are not touching. With 80 cm x 50 cm trays, the approximate load fora tray is 3 kg;
Fruit or vegetable Pre-treatment required
Apple
Wash in clean water, peel, cut into 1/8pieces. Blanching is optional. Either sul-phur using 1.5-3g/kg fresh fruit or dip insulphite (3g/litre) for 5 minutes
Cabbage Wash in clean water, shred coarsely.Blanch 3 minutes. Sulphite dip (3g/litre) for5 minutes
Carrots Wash in clean water, peel, cut into strips.Blanch for 4 minutes. Sulphite dip (3g/litre)for 5 minutes
Spinach Cut the stems near the base of the bunch,wash the leaves
thoroughly in clean water. Blanch 2 min-utes. Sulphite dip (3g/litre) for 5 minutes
Okra
Wash in clean water. Keep whole or slicelengthwise. Blanch 3 minutes using 1%NaHCO3 (Sodium bicarbonate). Sulphitedip (3g/litre) for 5 minutes
Tomato in clean water, cut in half lengthwise, removeseeds. Blanch 1-2 minutes. Do not sulphite.
9Drying
Dryi
ngDrying

Sun drying: place the trays on aframework at table height from theground to allow the air to circulatefreely around the drying materialand to keep the food away fromdirt. You can also make a bed ofrocks, lay out a thin sheet (e.g. ofcotton) on the rocks, and place theproduce on the sheet.If there is no dust, expose the drying trays to the wind to speed up drying.Dry or nearly dry products can be blown away by the wind. You canprevent this by covering the loaded tray with an empty one; this alsoprotects against insects and birds.At night the trays should be stacked in a ventilated room or coveredwith canvas.Plastic sheets should NEVER be used for covering individual trays dur-ing sun drying: they will cause condensation to form and the product willnot dry. If you need to cover the trays use a clean cotton sheet.
Products for sun drying should be prepared early in the day; this willensure that the material enjoys the full effect of the sun during the earlystages of drying.
Solar drying: Place the cut, prepared pieces of fruit and vegetableonto trays or drying racks that go inside the dryer.If you are using a cabinet dryer, you need to control the drying tem-perature so that the fruit and vegetables do not over-heat and dry tooquickly. Most fruit and vegetables are dried at about 60-70°C
Shade drying: Shade drying is carried out for products which can losetheir colour and/or turn brown in direct sunlight, such as tomatoes,herbs, green and red sweet peppers, chilies, green beans and okra.The material to be dried requires full air circulation. Therefore, shadedrying is carried out under a roof or thatch which has open sides.If using a dryer, it is better to place a screen inside the drying cabinet thanto place the whole dryer in the shade. The screen can be made from a cleansheet that is suspended above the food. A portable shelter is useful. It canbe used to cover the dryer to protect them from both the sun and the rain.
Under dry conditions when there is a good circulation of air, shade dryingtakes a little more time than is normally required for drying in full sunlight.
During the first part of the drying period, the material should be stirred andturned over at least once an hour. This will help the material dry faster and
10Home-based Fruit and Vegetable Processing
Dryi
ng
Blanching

more evenly, prevent it sticking together and improve the quality of the finishedproduct.
Dry the prepared fruit and vegetables until they reach the required finalmoisture content (10-15% for fruit and less than 10% for vegetables).
How do I know when the fruit and vegetables are dry?Dry vegetables should be hard and brittle. Take out a small handful of thedried vegetables and cool for a few minutes before testing for dryness.
Dry fruits are more leathery andflexible than dried vegetables. Totest them for dryness, take out a fewpieces of dried fruit and let themcool to room temperature. Squeezea handful of the fruit. If no moisture is left on the hand and pieces spring apartwhen you release your hand, they are dry.
It is important to let the fruit or vegetable cool before you test them as they aremore soft and bendy when they are warm.
How long should a food be dried for?
The drying time depends on several factors:the temperature inside the dryerthe flow of air through the dryer the amount of humidity in the airthe amount of water inside the foodthe size of the pieces of food.
When a new type of dryer is used, or if a different type of food is being dried,you have to do a few tests to find the rate of drying. The information can thenbe used to find the time that the food should spend in the dryer before themoisture content is low enough to prevent spoilage by micro-organisms.The rate of drying has an important effect on the quality of the dried foods.
11Drying
Dryi
ng
What is case hardening?Sometimes fruits can dry too quickly in the early stages of drying (this usually onlyhappens when artificial dryers are used) and a hard skin forms on the outside of thefruit pieces. This prevents any more water from being lost from the inside of the fruitpiece. This is known as case hardening. It can be prevented by using a lower dry-ing temperature at the start of drying and by cutting the fruit into smaller pieces sothat the water from the inside of the fruit does not have as far to travel to reach theoutside of the fruit piece.
To ensure safe storage of the fruit andvegetables, the final moisture contentshould be less than 10-15% for fruits andless than 10% for vegetables.

Figure 1. Example of a drying curve
12Home-based Fruit and Vegetable Processing
Dryi
ng
How to find the rate of drying
You need a clock and a set of scales.1. Make a graph that shows the time on the bottom and the weight of the food on
the side axis. (see figure 1) 2. Weigh the food and place it in the dryer. Record the weight on the graph.3. Leave for 5-10 minutes, take it out and re-weigh it. Record the weight.4. Replace in the dryer and leave for another 5-10 minutes.5. Continue this process, recording each weight, until the weight of food does not
change.6. In the graph, you will see two separate phases of drying - the 'constant rate'
(A-B on the graph) and the 'falling' rate periods (B-C on the graph).
In the constant rate the surface of the food remains wet which means it can be spoiledby moulds and bacteria. In the falling rate the surface is dry and the risk of spoilageis much smaller. When drying foods, the period from A to B should be as short as pos-sible to cut down on potential spoilage. The falling rate depends on the tempera-ture and efficiency of the dryer. It should be quick to prevent spoilage, but not toofast so to avoid the problem of case hardening.You should aim to get to the final weight (D on the graph) as quickly as possible toensure the best quality product.
A B
Moisturecontent
Drying time
CD

Table 4: Drying times in a cabinet dryer for fruits and vegetables
* This ratio means that dry okra is twelve times lighter than fresh okra.
Note: the drying times for tent dryers and sun drying are not providedbecause they depend on the climatic conditions.
When drying is complete, some pieces of fruit will contain more moisture thanothers due to their size and placement in the dryer during drying. Conditioningis a process that is used to distribute any remaining moisture throughout all thepieces. This reduces the chance of spoilage, especially from mould.Dried vegetables contain less moisture than fruits so do not usually need to beconditioned.
To condition the dried fruits, place them in large plastic or glass containers, abouttwo-thirds full. Cover the container and store in a warm, dry, well-ventilated placefor four to 10 days. Stir or shake the containers daily to separate the pieces. Ifbeads of moisture form inside the container, return the dried pieces to the dryer tocontinue the drying process, then repeat the conditioning step.
Pack the dried fruits or vegetables into sealed moisture-proof polyethylene bags.
Drying times in a cabinet dryer for fruit and vegetables
Okra 8-10 hours until tough and brittle. Ratio of wet to dry weights = 12:1*.Moisture content = 5%
Spinach 6-10 hours until crisp. Ratio of wet to dry weight = 12:1.* Moisturecontent = 5%
Leek 6-10 hours until very brittle (5% moisture)Onion 6-10 hours until very brittle (5% moisture)
Apricot
Arrange in single layer on trays. If cut in half, place the pit side upwith cavity popped up to expose more flesh to the air. Dry until soft,pliable, and leathery; no moist area in centre when cut (24-36 hours)If left whole, leave to dry for one to 2 days and then press the pit out.Leave to dry until soft and leathery.
Apple Arrange in single layer on trays, pit side up. Dry until soft, pliable, andleathery and there is no moist area in centre when cut (6-24 hours)
Grape Dry until pliable and leathery with no moist centre (12-24 hours)Tomato 6-24 hours until they are leathery and pliable
Plums Arrange in single layer on trays pit side up, cavity popped out. Dry untilpliable and leathery (6-10 hours for slices; 24-36 hours for halves)
Cherries Arrange in single layer on trays. Dry until tough, leathery, and slight-ly sticky (24-36 hours)
13Drying
Dryi
ng
Conditioning and packaging

Dried tomato
Select firm, ripe tomatoes. Reject any tomatoes that are over-ripe, rotten ordamaged. The under-ripe fruit can be left to ripen and used at a later date.
You can choose to leave the skin on, or remove it from the tomatoes.If you remove the skin, the fruit will dry more evenly. To do so, plunge the toma-toes in boiling water to loosen the skins. Remove from the hot water, cool in coldwater and peel the skin.
If you leave the skin on, the drying process will take longer as it is difficult forthe tomatoes to lose water through the skin. The final product will have a wrin-kled leathery skin with curled up edges (see figure 2). If the unpeeled piecesof tomato are too big, it might be difficult to remove all the moisture from thecentre of the pieces and they will not keep for very long after drying.
Cut the tomatoes. You can choose whether to leave them in half or quarters, orto cut them into slices (20mm thick). The amount of chopping depends on thesize of the tomatoes. Remember that the smaller pieces dry more quickly so youwill get a better dried product. But do not make the pieces too small (no lessthan 20mm thick) or they will shrivel and become crisp during drying.
Place the cut pieces of tomato on the drying tray. If you are using tomatohalves, place them with the cut side upwards. If you are not peeling the toma-toes, make sure the side with the peel is in contact with the tray. Place thepieces close together so you get as many as possible in the dryer. But do notlet the pieces touch or overlap.
Place the trays of fruit into the dryer, or outside in a well-ventilated area pro-tected from dust. Place the trays or dryer in the shade, as direct sunlight willcause the red colour to fade.
Dry until the pieces are soft and leathery.
14Home-based Fruit and Vegetable Processing
Dryi
ng
Preparation of the tomatoes
Drying

Conditioning is especially important to carry out if you leave the peel on thetomato and there is the risk of some moisture remaining in the dried pieces.Let the dried fruit pieces cool and then place in a large plastic or glass con-tainer. Fill the container to about two thirds full. Stand in a warm, dry, well ven-tilated place for up to 10 days. After this time, inspect the pieces of tomato. Ifthere are beads of moisture on the pieces, return them to the dryer or sun.Check them daily and retrieve them when they are dry.
Once you are sure that the pieces are all dry, pack them in moisture proofpackaging.
Figure 2 Dried tomatoes with a wrinkled skin.www.trainafoods.com
15Drying
Dryi
ng
Conditioning and packing

Dried apricots
Select firm, ripe apricots. Reject any fruit that are soft and over-ripe, rotten ordamaged. Wash the fruit in clean water.
Cut the fruit. Leave the apricots whole, or cut them apricots in half and take outthe stone. Do not peel the fruit.
Apricots are treated with sulphur dioxide to help them keep a bright orangecolour. It is not essential to treat with sulphur, but if you have some, it will alsohelp to preserve the fruit.
Place the apricot pieces (if cut, peel side downwards) onto mesh trays that fitinto the sulphur cabinet or tent. Place the pieces close together so that you canget as many as possible onto the tray. Do not let the pieces touch or overlap.
Place the sulphur (2g per kg of fruit) in a small dish inside the sulphur tent or cab-inet. Burn the sulphur for 2-3 hours to allow the gas to penetrate into the apricots.
Make sure that the sulphur gas cannot escape from the sulphuring chamber asit can cause breathing difficulties.
Place the trays of apricot into the dryer. Solar drying is better than sun drying as itgives the fruit some protection from dust and insects during drying. If you do not havea dryer, place them out in the sun, in a well ventilated area protected from dust.Dry the apricot pieces until they are soft and leathery.If you have left the apricots whole, squeeze out the pit by pressing gently, after1 or 2 days of drying (when the apricots are still soft but firm)
Remove the dried apricots from the dryer or sun. Allow them to cool to roomtemperature.
Place the dried apricot pieces in a large plastic or glass container. Fill the con-tainer to about two thirds full. Stand in a warm, dry, well ventilated place forup to 10 days. After this time, inspect the pieces of apricot. If there are beadsof moisture on the pieces, return them to the dryer or sun. Check them daily andretrieve them when they are dry.
Check that the pieces are all dry and pack in moisture proof packaging.
16Home-based Fruit and Vegetable Processing
Dryi
ng Preparation of the apricots
Sulphuring (optional)
Drying
Conditioning and packing

Dried onions
Select firm onions. Discard any that are rotten.Remove the outer skin and slice the onion into rings 3-5mm thick.
Place the onion rings onto the drying tray. Separate the smaller rings from thelarger ones. Place the pieces close together so you get as many as possible inthe dryer. But do not let the pieces touch or overlap.
Place the trays of onion into the dryer or in the sun and dry until the piecesare dry and brittle – the dried pieces should crumble in the hands when theyare crushed.
Remove the dried onions from the dryer or sun. Allow them to cool to room temper-ature. Check that the pieces are all dry and pack in moisture proof packaging.Conditioning is not necessary for onions as they are dried until they are brittleand crisp.Do not pack them while they are still warm or condensation will form on theinside of the packet, and spoil the onions.Also, do not leave dried onions in the open air: they easily attract water andbecome moist and soft again, and will need re-drying.
17Drying
Dryi
ng
Drying
Packing
Preparation of the onions

Dried apples
Select ripe apples. Wash the fruit in clean water.
Peel the fruit and remove the core. To make apple rings, slice the apple in halfand remove the core of the apples. Then slice each half into rings (3-5mm thick).Make sure all the slices are of the same thickness so they dry at the same rate.Alternatively, cut the apple into quarters and remove the core from each seg-ment. Cut the quarters in half again for drying.Apple rings are the preferred method of drying as they are the same thicknessthroughout. Apple segments are thicker on the outer edge than at the centreand will not dry as well as the flat rings.
Place the slices of apple into a bowl of water that contains 250ml lemonjuice per litre of water to prevent the apple pieces browning. Drain well andplace the slices on a tray for drying. The pieces should be close together butnot touching.
Place trays of fruit into the dryer. Solar drying is better than sun drying asit gives the fruit some protection from dust and insects during drying. If youdo not have a dryer, place them out in the sun, in a well ventilated area pro-tected from dust.Dry the apple pieces until they are soft and leathery. Depending on the sizeof the pieces and the climate, drying will take about 2 to 3 days in the sun.
Remove the dried apples from the dryer or sun. Allow them to cool to roomtemperature.
Place the dried apple pieces in a large plastic or glass container. Fill the con-tainer to about two thirds full. Stand in a warm, dry, well ventilated place forup to 10 days. After this time, inspect the pieces of fruit. If there are beadsof moisture on the pieces, return them to the dryer or sun. Check them daily andretrieve them when they are dry.
Check that the pieces are all dry and pack in moisture proof packaging.
18Home-based Fruit and Vegetable Processing
Dryi
ng Preparation of the apples
Drying
Conditioning and packing

JAM-MAKING
19Jam-Making
Jam
-Mak
ing
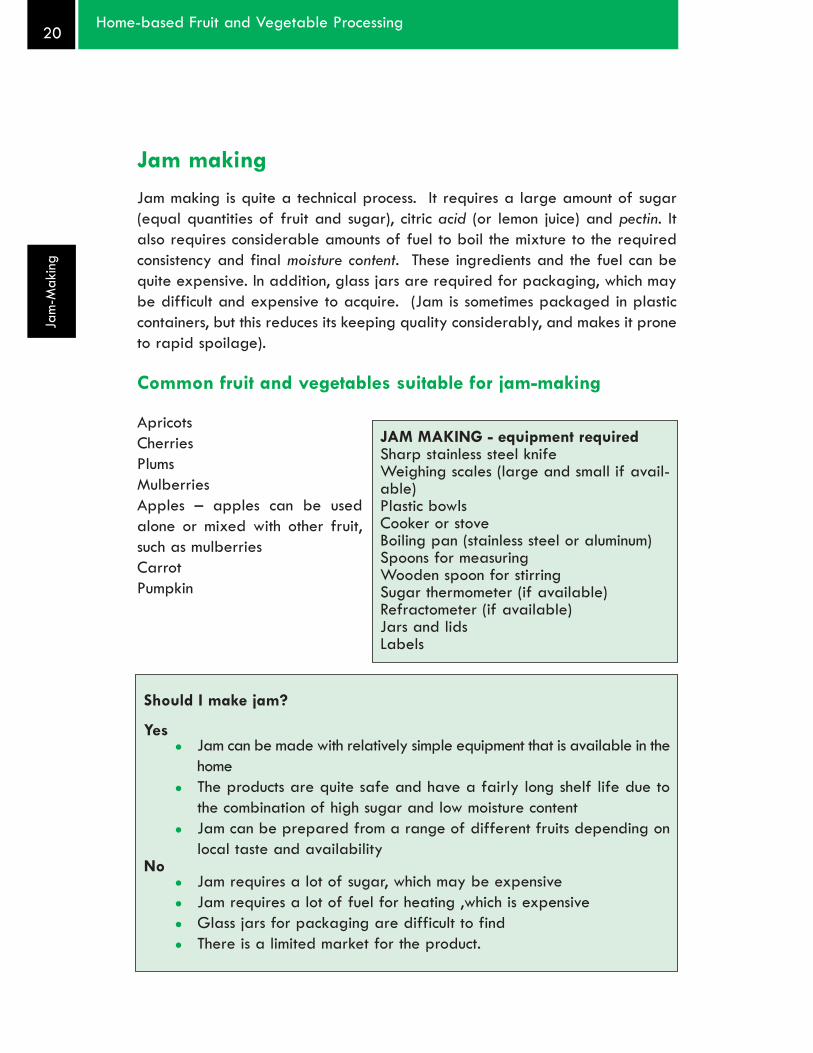
Jam makingJam making is quite a technical process. It requires a large amount of sugar(equal quantities of fruit and sugar), citric acid (or lemon juice) and pectin. Italso requires considerable amounts of fuel to boil the mixture to the requiredconsistency and final moisture content. These ingredients and the fuel can bequite expensive. In addition, glass jars are required for packaging, which maybe difficult and expensive to acquire. (Jam is sometimes packaged in plasticcontainers, but this reduces its keeping quality considerably, and makes it proneto rapid spoilage).
Common fruit and vegetables suitable for jam-making
ApricotsCherriesPlumsMulberriesApples – apples can be usedalone or mixed with other fruit,such as mulberriesCarrotPumpkin
20Home-based Fruit and Vegetable Processing
Jam
-Mak
ing
JAM MAKING - equipment requiredSharp stainless steel knifeWeighing scales (large and small if avail-able)Plastic bowlsCooker or stoveBoiling pan (stainless steel or aluminum)Spoons for measuring Wooden spoon for stirringSugar thermometer (if available)Refractometer (if available)Jars and lidsLabels
Should I make jam?
YesJam can be made with relatively simple equipment that is available in thehomeThe products are quite safe and have a fairly long shelf life due tothe combination of high sugar and low moisture contentJam can be prepared from a range of different fruits depending onlocal taste and availability
NoJam requires a lot of sugar, which may be expensiveJam requires a lot of fuel for heating ,which is expensiveGlass jars for packaging are difficult to findThere is a limited market for the product.

Processing outline for Jam and Jelly
21Jam-Making
Jam
-Mak
ing
Selection and preparation ofthe fruit (sorting, washing,
cutting)
Preparation of the jars & lids
Juice extraction (for jelly)
Filling and packaging
Storage
Heating and addition ofsugar
Jam/jelly
Added ingredients

Fruit jam or jelly – process details and quality assurance
Wash the fruit in clean water, peel it and remove stones and damaged parts.Chop large fruits into smaller pieces. The fruit should be as fresh as possibleand slightly under-ripe. Over-ripe and/or bruised fruit will not make good jamas it has low levels of Pectin and/or acid; in this case, the jam will not set.
Wash the glass jars and lids and put them into a large saucepan. Fill the saucepanwith water so that the jars and lids are covered and heat until the water boils. Letthe water boil for about 5 minutes. Remove the jars and turn upside down so thatthe water can all drain out. Do not dry them with a dirty cloth.
If you are using plastic jars they cannot be sterilised by heating like this. If thejars are new and unopened, do not open them until they are needed. If the jarsare recycled, wash them thoroughly in chlorinated water (100ppm). Standupside down and leave to drain well. Do not dry them with a dirty cloth.
Jelly makingTo make a jelly, you need to soften the fruit to turn it into a pulp, then extractthe juice from the pulp.
Place the washed fruit in a pan and heat over a low heat. This is tosoften the fruit and allow the juice to be released. Add a little waterto prevent the fruit burning or sticking to the bottom of the pan. Do notadd too much water because you need to remove it all later during theboiling stage.Transfer the softened fruit to a jelly bag: a bag made from muslin cloththat is tied and suspended above a bowl into which the fruit juice drips.Allow the juice to drip out from the cloth; this may take overnight. Makesure that the juice cannot be contaminated by insects and dust while itis dripping. Do not squeeze the bag as this makes the juice cloudy. Youcan use the fruit left in the bag as a substrate for vinegar production.Measure the volume of juice extracted. Weigh out the sugar (you shouldhave equal amounts of juice and sugar) and add it to the juice.
22Home-based Fruit and Vegetable Processing
Jam
-Mak
ing
Preparation of the fruit
Preparation of the jars and lids
Extraction of fruit juice (for making jelly)

For jam makingTo make jam, the fruit also needs to be softened (turned into pulp):
Place the washed fruit in a pan and heat over a low heat. This is tosoften the fruit and allow the juice to be released. Some fruits will needa little water to be added at this stage to prevent the fruit burning orsticking to the bottom of the pan. Do not add too much water becauseyou need to remove it all later during the boiling stage.When the fruit has all softened and there is juice in the pan, add thesugar and continue to heat gently until all the sugar has dissolved.
From now on, the process is the same for jam and jelly.
Add the pectin if you are using it. Follow the instructions on the packet. In gen-eral, it is better to mix the pectin powder with a small amount of sugar taken outof the total sugar in the recipe, rather than just adding the pectin directly to thepulp. This helps the pectin to disperse more evenly throughout the fruit pulp. If youare using a liquid pectin, this can be added directly to the juice or pulp. If youcannot buy pectin, you can use apples as these are a good source of pectin. Youcan make a mixed fruit jam by substituting some of your fruit for apples.
Return the pan with the pulp (for jam) or juice (for jelly) plus dissolved sugar andpectin to the heat. Use a large pan as this will allow the water to evaporatemore quickly and reduce the time needed for boiling. Turn up the heat and startto boil the mixture. Stir with a wooden spoon to prevent the mixture sticking tothe bottom of the pan.
The aim of boiling is to reduce the water content of the mixture and concentratethe fruit and sugar. The final Total Soluble Solids (TSS) content of a jam (alsoknown as the “Degrees Brix” or “end-point of the jam”) should be 65 to 68%.(The TSS is a measure of the amount of material that is soluble in water. It isexpressed as a percentage -a product with 100% soluble solids, has no water,one with 0% soluble solids is all water).
If the final TSS of jam is lower than 65-68% the shelf life will be reduced. Thejam will have a runny consistency and bacteria and moulds will be able to growin the product. If the TSS is higher than 68%, the jam will be very stiff and thesugar might start to form crystals in the jam.
23Jam-Making
Jam
-Mak
ing
Heat treatment (for jam and jelly)

The end-point of boiling is measured in different ways. The most accuratemethod is to use a refractometer to measure the total sugar concentration. Thismethod is not really suitable for home-use as a refractometer is expensive. It isonly when making jam for sale that you might consider using a refractometer toensure consistency between different batches of the jam.
When making jam for home consumption, you can use other methods: the droptest, the skin wrinkle test, or the use of a jam thermometer to test the tempera-ture. All these methods are described in the section below, on page X.
Remove the jam from the heat while you test for the end point otherwise it willcontinue heating and may become overcooked.
Cool the jam to about 85°C and pour into the hot sterilised jars. The jars shouldbe hot when they are filled or they may crack. If the jam is hotter than 85°C,condensation will form under the lid. This can drop down onto the surface of thejam and dilute it, which may allow mould to grow. If the jam is colder than this,it will be difficult to pour.Fill the jars to about 9/10ths of their volume. Place the clean lids onto the jars,fasten them loosely and invert the jars to sterilise the lid with the hot jam.
If you are using plastic jars, leave the jam to cool until about 80°C before youpour into the jars. If the jam is hotter than this it may cause the plastic bottleto melt and become misshapen. Do not cool too much though or the jam will bedifficult to pour.
It is preferable to use glass jars with new screw-on lids but if these are notavailable, you can use plastic jars and cover with foil lids. These are lessexpensive, but have a shorter shelf life than glass packaging.
Jams and jellies that are made according to the correct recipe will have a longshelf life. Jam stored in glass jars will have a longer storage life (up to 12 months)than those packed in plastic bottles (up to 4 months). For the optimum storagetime, jams should be stored in a cool dry place, away from direct sunlight.
24Home-based Fruit and Vegetable Processing
Jam
-Mak
ing
Filling and packaging
Storage

Determination of the end point of a jam To make sure that the jam is well preserved and will have a long shelf life, it isessential that the final sugar content (which is measured as the total solublesolids) be 65 to 68%.
When the jam is starting to thicken and will coat the back of the spoon you arestirring it with, it is time to start testing it to see if it has reached the end point.There are four main ways to test when a jam has been boiled for long enough.
a) Use a refractometerThis is the most accurate method.
Measuring the sugar content with a refractometer1. Take a small portion of jam from the pan. Let it cool to 20°C.
(Remember to take the pan off the heat)2. Place one or two drops of the jam onto the prism and carefully close the
prism. Make sure the sample spreads evenly over the surface of the prism.3. Hold the refractometer near a source of light and look through the end piece.4. The line between the dark and light fields will be seen through the view-
er. Read the corresponding number on the scale, which is the percentageof sugar in the sample.
5. Open the prism and remove the sample with a piece of tissue paper orwet cotton wool.
25Jam-Making
Jam
-Mak
ing
A small refractometer costs about US$ 100 to $150. A refractometer will notbe used in the home. It is a tool that is only necessary once you start makingjam on a larger scale and making it for sale.
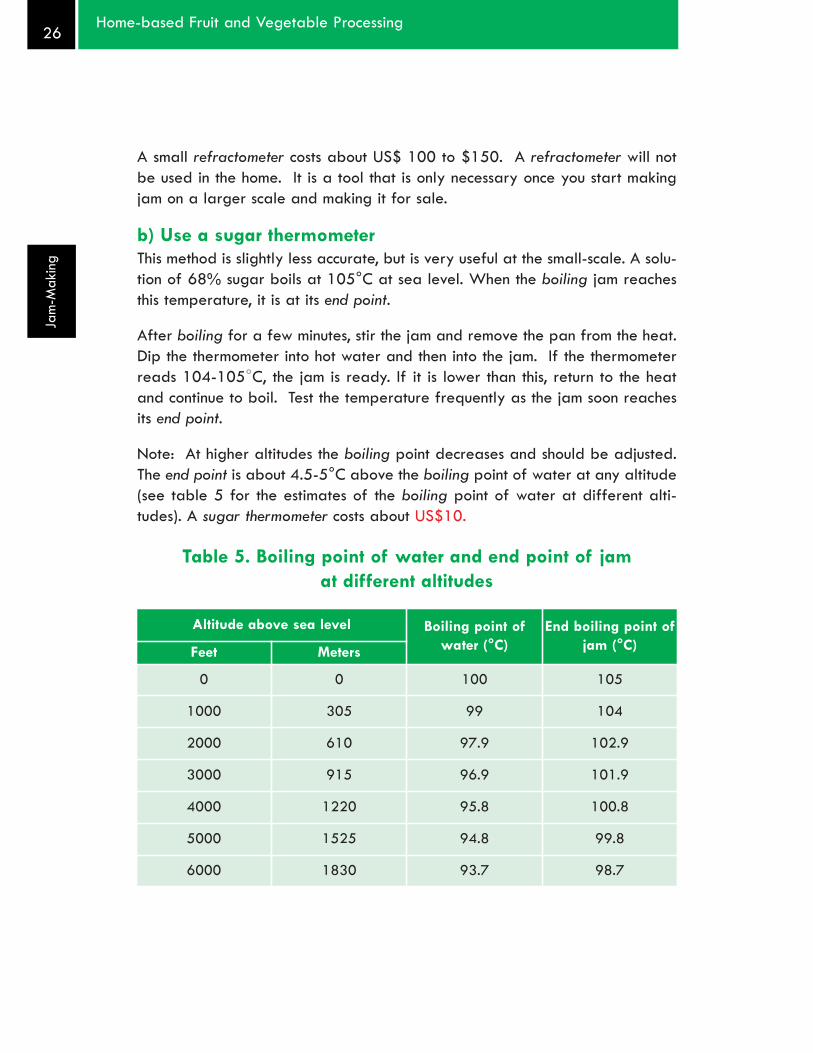
b) Use a sugar thermometerThis method is slightly less accurate, but is very useful at the small-scale. A solu-tion of 68% sugar boils at 105°C at sea level. When the boiling jam reachesthis temperature, it is at its end point.
After boiling for a few minutes, stir the jam and remove the pan from the heat.Dip the thermometer into hot water and then into the jam. If the thermometerreads 104-105°C, the jam is ready. If it is lower than this, return to the heatand continue to boil. Test the temperature frequently as the jam soon reachesits end point.
Note: At higher altitudes the boiling point decreases and should be adjusted.The end point is about 4.5-5°C above the boiling point of water at any altitude(see table 5 for the estimates of the boiling point of water at different alti-tudes). A sugar thermometer costs about US$10.
Table 5. Boiling point of water and end point of jam at different altitudes
Altitude above sea level Boiling point ofwater (°C)
End boiling point ofjam (°C)Feet Meters
0 0 100 105
1000 305 99 104
2000 610 97.9 102.9
3000 915 96.9 101.9
4000 1220 95.8 100.8
5000 1525 94.8 99.8
6000 1830 93.7 98.7
26Home-based Fruit and Vegetable Processing
Jam
-Mak
ing

c)\Use the drop testThis is the cheapest option, but is the least accurate of the methods. It is goodenough for use at the home level, for jam that will be used within a fairly shorttime. It is not recommended for jams that are meant for sale as there is noguarantee of consistency from one batch of jam to another.
After two minutes of rapid boiling, remove the pan from the heat. Dip a cleanwooden spoon into the jam and hold it over the pan for 1 to 2 seconds. If thejam runs back freely, repeat the test every two minutes until the jam looks likea heavy syrup. When a small lump of jam forms on the back of the spoon andbreaks away from the rest, the setting point has been reached.
Alternatively, you can drop the jam into a glass of cold water: Take a smalldrop of the boiled jam on a spoon. Cool it slightly and drop into a glass of coldwater. If the drop falls in a single piece until it reaches the bottom of the glassthe end point has been reached. If it disperses in the water it requires boilingfor longer.
d) Use the skin wrinkle testThis method is also cheap and about as accurate as the drop test. You need acold plate or saucer. After two minutes of rapid boiling, remove the pan fromheat. Dip a clean wooden spoon into the jam and drip a small amount of jamonto the cold plate surface. Let it cool and then push the lump of jam with yourfinger. If the surface of the lump of jam wrinkles when you push it, it is cooked.
http://www.davidlebovitz.com/archives/2005/06/norecipe_yikes.html
Remember to remove the pan of boiling jamfrom the heat source while you are doing thesetests as the jam will continue to cook and maybecome over-cooked.
27Jam-Making
Jam
-Mak
ing
Figure 3: the skin wrinkle testYou can always cook for a little longer, butyou cannot go back if you heat for too long.It is better to take the jam off the heat tooearly and then re-heat if it is too soft.Test the jam at frequent intervals so you donot miss the end point.

Calculation of jam yield from different combinations offruit and sugar.You can use the following basic recipes to make jams. As you can see, you canvary the proportion of fruit and sugar that you use in each recipe.The maximum amount of fruit that can be used to make a good quality jam is50% fruit, with 50% sugar (recipe 1).The minimum amount of fruit that can be used to make a good quality jam is40% (plus 60% sugar) (recipe 3).
You can use these formulae to work out the approximate yield of jam from thegiven recipe. From the examples you can see that by increasing the percent-age of sugar in the recipe (recipe 3) you get a higher total yield of jam for thesame amount of fruit.
Table 6: Proportions of ingredients for high quality jam
Table 7: Proportions of ingredients for medium quality jam
Recipe 1. fruit:sugar =50:50Desired Brix in final product =68% Yield = 11.115x100/68 = 16.4 kg
Ingredients Soluble Solids (SS)
10kg fruit at 10% TSS 1.000 kg
10kg sugar 10.000kg
60g pectin (grade 200) 0.060 kg
55g citric acid 0.055 kg
Total Soluble Solids 11.115 kg
Recipe 2. fruit:sugar =45:55Desired Brix in final product =68% Yield = 13.325x100/68 = 19.6 kg
Ingredients Soluble Solids (SS)
10kg fruit at 10% TSS 1.000 kg
2.5 litre water
12.2 kg sugar 12.200kg
65g pectin (grade 200) 0.065 kg
60g citric acid 0.060 kg
Total Soluble Solids 13.325 kg
28Home-based Fruit and Vegetable Processing
Jam
-Mak
ing
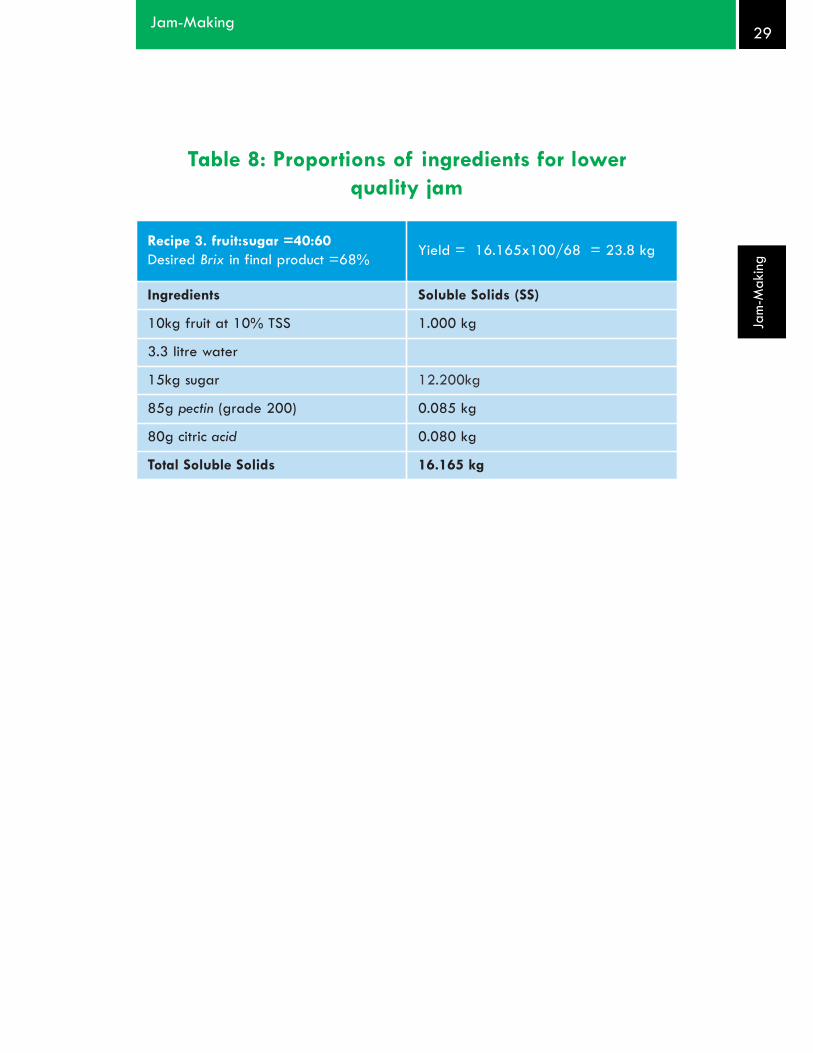
Table 8: Proportions of ingredients for lowerquality jam
29Jam-Making
Jam
-Mak
ing
Recipe 3. fruit:sugar =40:60Desired Brix in final product =68% Yield = 16.165x100/68 = 23.8 kg
Ingredients Soluble Solids (SS)
10kg fruit at 10% TSS 1.000 kg
3.3 litre water
15kg sugar 12.200kg
85g pectin (grade 200) 0.085 kg
80g citric acid 0.080 kg
Total Soluble Solids 16.165 kg

Apricot jam
Ingredients (to make 2.4kg jam):1.5kg fresh apricots1.5kg sugar300ml water
Sort the fruit and discard any unripe, over-ripe or damaged fruit.Wash in clean water and leave to drainCut the fruit in half and remove the stone. Cut the pieces in half again if preferred.Weigh the prepared fruit and place in a large cooking pan with the water.
For glass jars: Wash the glass jars and lids and put them into a largesaucepan.Fill the saucepan with water so that the jars and lids are covered and heat untilthe water boils. Let the water boil for about 5 minutes.Remove the jars and turn upside down so that the water can all drain out.DO NOT dry them with a dirty cloth.If you are using recycled plastic jars, clean them with a solution of chlorinatedwater (100ppm). Turn upside down so all the water can drain out.
Cook over a medium heat until the fruit has softened and the volume hasreduced by one third. Stir with a wooden spoon to prevent burning at the bot-tom of the pan.Add the sugar and stir until it has all dissolvedTurn up the heat and boil rapidly until the product reaches its end point (use arefractometer if available. If not use a jam thermometer, the drop test or thewrinkle test).Cool the jam to about 85°C and pour into the hot sterilised jars. The jars shouldbe hot when they are filled or they may crack.
Fill the jars to about 9/10ths of their volume. Place the clean lids onto thejars, fasten them loosely and invert the jars to sterilise the lid with the hot jam.If you are using plastic jars, let the jam cool to about 80°C before pouringinto the jars.
30Home-based Fruit and Vegetable Processing
Jam
-Mak
ing
Preparation of the fruit
Preparation of the jars and lids
Heat treatment and addition of sugar
Filling and packaging

Carrot and lemon jam
Ingredients (to make 5.7-6.4kg jam):
2-4kg carrots4-8 medium size lemons (including 35ml lemon juice)3.5kg sugarWater (about 1200ml per kg grated carrot)
Choose carrots that are all of a similar size and maturity.Peel the skin and cut off the green stalk residue.Wash the carrots with plenty of water. Use a brush to remove all the soil. Drain well.Cut lengthwise into 3-6mm strips and then cut the strips in half or into quarters;or grate using a cheese grater.Weigh the grated carrot and place in a pan.Wash the lemons and cut into thin slices. Remove the pips.Cut the lemon rind into thin strips without removing the white part. Add the stripsof rind, the pulp and the lemon juice to the carrots. Add enough water to coverthe carrots.
For glass jars: Wash the jars and lids and put them into a large saucepan.Fill the saucepan with water so that the jars and lids are covered and heat untilthe water boils. Let the water boil for about 5 minutes.Remove the jars and turn upside down so that the water can all drain out.DO NOT dry them with a dirty cloth.If you are using recycled plastic jars, clean them with a solution of chlorinatedwater (100ppm). Turn upside down so all the water can drain out.
Cook the carrots with the lemon and water over a low heat for 60-90 minutesto soften the carrots. Stir with a wooden spoon to prevent burning at the bot-tom of the pan.When the carrot pieces disintegrate and become transparent and the lemonrind strips are soft, add one third (1.2kg) of the total sugar and dissolve rap-idly. Continue cooking on a medium fire for 10 minutes.
31Jam-Making
Jam
-Mak
ing
Preparation of the fruit
Preparation of the jars and lids
Heat treatment and addition of sugar

Add the remaining sugar (2.3kg) and dissolve rapidly. Boil on a high fire untilthe mixture sets (use a refractometer if available, a jam thermometer or thedrop test). Stir with a wooden spoon to prevent burning.
Cool the jam to about 85°C and pour into the hot sterilised jars. The jarsshould be hot when they are filled or they may crack.Fill the jars to about 9/10ths of their volume. Place the clean lids onto thejars, fasten them loosely and invert the jars to sterilise the lid with the hot jam.If you are using plastic jars, let the jam cool to about 80°C before pouringinto the jars.
32Home-based Fruit and Vegetable Processing
Jam
-Mak
ing
Filling and packaging

Cherry jam
Ingredients (to make 2.3kg jam):
1.8kg stoned cherriesJuice of 3 lemons (about 135ml or 9tbsp)1.4kg sugar
Wash the cherries and drain well.Remove the stones from the centre.Either leave the cherries whole (minus the stone) or cut into half or quarters Crack a few of the cherry stones and remove the kernels (optional step).Weigh the cherries and place in a pan together with the lemon juice and kernels.
For glass jars: Wash the jars and lids and put them into a large saucepan.Fill the saucepan with water so that the jars and lids are covered and heat untilthe water boils. Let the water boil for about 5 minutes.Remove the jars and turn upside down so that the water can all drain out.DO NOT dry them with a dirty cloth.If you are using recycled plastic jars, clean them with a solution of chlorinatedwater (100ppm). Turn upside down so all the water can drain out.
Cook over a low heat for about 45 minutes until the cherries are soft. Stir witha wooden spoon to prevent burning at the bottom of the pan.Remove from the heat. Add the sugar and stir until it is dissolved.Bring to the boil. Boil rapidly for about 30 minutes until the jam is set (use arefractometer if available, a jam thermometer or the drop test). Stir with awooden spoon to prevent burning.
Cool the jam to about 85°C and pour into the hot sterilised jars. The jars shouldbe hot when they are filled or they may crack.Fill the jars to about 9/10ths of their volume. Place the clean lids onto the jars,fasten them loosely and invert the jars to sterilise the lid with the hot jam.If you are using plastic jars, let the jam cool to about 80°C before pouring intothe jars.
33Jam-Making
Jam
-Mak
ing
Preparation of the fruit
Preparation of the jars and lids
Heat treatment and addition of sugar
Filling and packaging

Mulberry jam
Ingredients (to make 0.9kg jam):1kg mulberriesJuice of 1 lemon (about 3tbs or 45ml)500g sugar
Sort the fruit. Remove under-ripe, over-ripe and rotten berries.Wash the mulberries and drain well.Weigh the mulberries and place in a pan together with the lemon juice.
For glass jars: Wash the jars and lids and put them into a large saucepan.Fill the saucepan with water so that the jars and lids are covered and heat untilthe water boils. Let the water boil for about 5 minutes.Remove the jars and turn upside down so that the water can all drain out.DO NOT dry them with a dirty cloth.If you are using recycled plastic jars, clean them with a solution of chlorinatedwater (100ppm). Turn upside down so all the water can drain out.
Cook the mulberries and lemon juice over a low heat for about 15-20 minutesuntil the mulberries are soft and the juice begins to run out. Stir with a woodenspoon to prevent burning at the bottom of the pan.Remove from the heat. Add the sugar and stir until it is dissolved.Return to the heat and boil rapidly for about 30 minutes until the jam is set (usea refractometer if available, a jam thermometer or the drop test). Stir with awooden spoon to prevent burning.
Cool the jam to about 85°C and pour into the hot sterilised jars. The jars shouldbe hot when they are filled or they may crack.Fill the jars to about 9/10ths of their volume. Place the clean lids onto the jars,fasten them loosely and invert the jars to sterilise the lid with the hot jam.If you are using plastic jars, let the jam cool to about 80°C before pouring intothe jars.
34Home-based Fruit and Vegetable Processing
Jam
-Mak
ing
Preparation of the fruit
Preparation of the jars and lids
Heat treatment and addition of sugar
Filling and packaging

Apple jam
Ingredients (to make 1kg jam):7 cups apples (peeled and cored)6 cups sugar" cup lemon juice1tsp cinnamon powder (optional) or cardamom powder according to personaltaste1-2 cups water
Sort the fruit. Remove under-ripe, over-ripe and rotten apples.Wash the apples, peel them and remove the core.Slice the apples finely and place in a large saucepan with enough water toprevent the fruit from burning on the base of the pan (do not add too muchwater as you will need to cook for longer to remove the excess).
For glass jars: Wash the jars and lids and put them into a large saucepan.Fill the saucepan with water so that the jars and lids are covered and heat untilthe water boils. Let the water boil for about 5 minutes.Remove the jars and turn upside down so that the water can all drain out.DO NOT dry them with a dirty cloth.If you are using recycled plastic jars, clean them with a solution of chlorinatedwater (100ppm). Turn upside down so all the water can drain out.
Cook the apples over a low heat for about 15-20 minutes until the apples aresoft. Add the lemon juice, sugar and cinnamon or cardamom if you are using it.Keep over a low heat until the sugar had dissolved. Turn up the heat to high sothat the mixture boils. Stir continuously to prevent the jam burning.Boil rapidly for about 30 minutes until the jam is set (use a refractometer ifavailable, a jam thermometer, or the drop test or wrinkle test). Stir with a wood-en spoon to prevent burning. If any foam rises to the surface of the jam duringboiling, scoop it off with the spoon to remove it.
Cool the jam to about 85°C and pour into the hot sterilised jars. The jars shouldbe hot when they are filled or they may crack.Fill the jars to about 9/10ths of their volume. Place the clean lids onto the jars,fasten them loosely and invert the jars to sterilise the lid with the hot jam.If you are using plastic jars, let the jam cool to about 80°C before pouring into the jars.
35Jam-Making
Jam
-Mak
ing
Preparation of the fruit
Preparation of the jars and lids
Heat treatment and addition of sugar
Filling and packaging

Apple jelly Ingredients: (to make 0.8-1.0kg jelly)1.8kg apples1200ml waterStick of cinnamon, a few cloves or cardamon (optional)500g sugar per 500ml juice obtained
Sort the fruit. Remove any rotten or bruised apples. Wash well.Cut the apples into quarters but do not remove the skin or core (most of the pectinis contained in the apple skin). Make sure you cut out any bad pieces of apple.
For glass jars: Wash the jars and lids and put them into a large saucepan.Fill the saucepan with water so that the jars and lids are covered and heat untilthe water boils. Let the water boil for about 5 minutes.Remove the jars and turn upside down so that the water can all drain out.DO NOT dry them with a dirty cloth.If you are using recycled plastic jars, clean them with a solution of chlorinatedwater (100ppm). Turn upside down so all the water can drain out.
Put the fruit in a large pan with the water. Tie the cinnamon or cloves in a pieceof muslin and add that to the pan.Cook over a low heat until the fruit is soft and pulpy. Remove the bag of spices.
Place the pulp in a jelly bag (a piece of clean muslin cloth that is suspendedover a bowl). Leave to strain overnight. Make sure that the dripping juice is ina clean place where it cannot be contaminated by flies and dust. Do notsqueeze the bag to extract the juice as this makes the juice cloudy.Measure the juice into a large pan.
36Home-based Fruit and Vegetable Processing
Jam
-Mak
ing
Selection and preparation of the fruit
Preparation of the jars and lids
Heat treatment
Juice extraction

Heat the juice gently in a pan. Add the sugar (500g per 500ml juice) and stiruntil the sugar has dissolved.Turn up the heat and boil the mixture rapidly until the jam is set (use a refrac-tometer if available, a jam thermometer, the drop test or the wrinkle test). Stirwith a wooden spoon to prevent burning. Remove any foam from the surfaceof the jam with a wooden spoon.
Cool the jam to about 85°C and pour into the hot sterilised jars. The jarsshould be hot when they are filled or they may crack.Fill the jars to about 9/10ths of their volume. Place the clean lids onto thejars, fasten them loosely and invert the jars to sterilise the lid with the hot jam.If you are using plastic jars, let the jam cool to about 80°C before pouringinto the jars.
37Jam-Making
Jam
-Mak
ing
Heat treatment and addition of sugar
Filling and packaging


SAUCES AND CHUTNEYS
39Sauce and Chutneys
Sauc
es a
ndCh
utne
ys

Sauce, ketchup, paste and chutneyA range of fruits and vegetables can be used to make sauce, ketchup and chut-ney. The base ingredients are often tomatoes, mixed with other vegetables andfruit. Tomatoes are good for making sauce as they are acidic, so preserve well.You can add any vegetables and spices that you like and which are commonlyavailable in your area. Adding chilli powder or chopped whole chillies to thesauce or chutney makes a spicy hot product. The basic principles of the preserva-tion method are the addition of sugar or salt and acid (acetic acid or vinegar) com-bined with concentration of the mixture by heating to reduce the water content.
ChutneysChutneys are thick, jam-like mixtures that are made from a variety of fruit andvegetables, with added salt, spices, vinegar and sometimes sugar. Any ediblesour fruit or vegetable can be used to make chutney.
Sauces, ketchup and pastesSauces and purees are made from a mixture of vegetables, spices, salt andsugar which are heated to remove the water and to concentrate the mixture.Sauces are thinner than chutneys and tend to be more acidic. If sauces andpurees are heated further to remove more water, they can be made into paste.
Common fruits and vegetables suitable for chutneys and sauces:TomatoesOnionsCarrots ChilliCorianderMintLemonOrange
40Home-based Fruit and Vegetable Processing
Sauc
es a
ndCh
utne
ys
Should I make sauce and chutney?
YesChutneys and sauces can be made withrelatively simple equipment that is avail-able in the home.The products are quite safe and have afairly long shelf life due to the combina-tion of high acidity, high salt and lowmoisture contenttomato based products are a stapleingredient used in every day cooking
NoThe availability of vinegar (acetic acid)may be a problem in some areasThe high levels of sugar required forsome chutney recipes may be prohibi-tively expensive.
SAUCE AND CHUTNEY -equip-ment requiredSharp stainless steel knifeWeighing scalesPlastic bowlsCooker or stoveBoiling pan (stainless steel oraluminum)Measuring jug or bottleSpoons for measuring,Wooden spoon for stirringGlass jars and lids

Processing outline for sauce and chutney
41Sauce and Chutneys
Sauc
es a
ndCh
utne
ys
Selection and preparation ofthe fruit and vegetable
(washing, chopping)
Preparation of jars and lids
Pulp/juice extraction
Filling, packaging and sealing
Cooling and storage
Heating
Heating (optional)
Sauce/chutney
Added ingredients

Sauce and chutney – process details and quality assurance
Only use ripe fruit and vegetables to make sauce. Leave under-ripe productsto ripen and use at a later date. Chutneys are often made from fruits that areslightly under-ripe. Do not use over-ripe or rotten fruits.Wash the fruit and vegetables in clean water.Some fruits, particularly tomatoes, are blanched in hot water for up to 5 min-utes to soften the skin and to destroy enzymes and microbes. After blanching,they should be cooled by plunging into cold water.Peel fruits and chop into various sized pieces according to the recipe.
For glass jars: Wash the jars and lids and put them into a large saucepan. Fillthe saucepan with water so that the jars and lids are covered and heat until thewater boils. Boil for about 5 minutes.Remove the jars and turn upside down so that the water can all drain out.DO NOT dry them with a dirty cloth.If you are using recycled plastic jars, clean them with a solution of chlorinatedwater (100ppm). Turn upside down so all the water can drain out.
Extract the fruit pulp with a manual pulper or a pulper-finisher that separates outthe seeds and skins from the pulp. Pass the seeds and skin through the pulper asecond time to obtain the maximum amount of juice and pulp from the fruit.If you do not have a pulper or mouli, heat the fruit gently with a little water to extractthe juice. Pass the fruit through a sieve or extract the juice using a muslin bag.The acidity of the pulp should be 4.0 or lower. The following recipes are alltried and tested so the pH does not need to be measured. If you are makingyour own chutney from a new recipe, you should check the acidity of the pulpwith a pH meter or pH paper. If it is above 4.0, add lemon juice to reduce it.
Spices.You can add a range of spices to chutneys and sauces to suit your taste. Anyspices you use should be clean and in good condition. If you are making prod-ucts for sale, you need to make sure that you use the same recipe formulationand add exactly the same amount of spice to each batch that you make.Always use the same measuring spoon or container
42Home-based Fruit and Vegetable Processing
Sauc
es a
ndCh
utne
ys
Selection and preparation of the fruit or vegetable
Preparation of the jars and lids
Added ingredients
Pulp/juice extraction

Chemical preservatives.Sodium benzoate is sometimes added to sauces and purees to help preserve the prod-ucts after the bottle has been opened. Some consumers do not like additives such asthis, so prefer to buy products that do not contain them. Make sure that you do not addtoo much benzoate as it gives the product a bad taste. All countries have maximumpermitted levels for preservatives. The recommended level for benzoate is 0.2%.
Heat the mixture of pulp and added ingredients in a large open pan over alow heat. An open pan is best as it allows moisture to evaporate more quickly.Stir continuously with a wooden spoon during heating to prevent burning.The bright red colour of tomato sauces can be preserved by very slow heating.
Hot-fill the sauce or chutney into hot, clean jars or bottles. If the glass jars arecold, there is the risk of breaking when the hot liquid is added.It is preferable to use glass jars with new screw-on lids but if these are notavailable, you can use plastic jars covered with foil lids. These are less expen-sive, but have a shorter shelf life than glass packaging.Alternatively, the chutney can be cooled and filled into polyethylene bags or pouches.
If using glass bottles, sauces should be pasteurised in the jar after filling.Immerse the jars or bottles in a large pan or water bath and heat.N.B. Pasteurization can only be done in glass bottles, not in plastic bottles. Forthis reason, it is preferable to use glass bottles.Both the time and temperature of pasteurisation are critical to achieve the cor-rect shelf life and to retain the colour and flavour of the juice.
Cool the bottles to room temperature by immersing them in clean cold water. Ifthe bottles are cooled too quickly they will crack and break.The high acidity of sauces and chutney gives them a long shelf life of up to 12 months,if packed in pasteurised glass bottles. The products should be stored in a cool dryplace away from direct sunlight to prevent any changes in the colour of the products.
Basic sauce and chutney recipesThe following basic recipes are guidelines for the production of sauces andchutneys. The ingredients can be varied according to local taste and availabil-ity of fruits, vegetables and spices.
43Sauce and Chutneys
Sauc
es a
ndCh
utne
ys
Heat treatment
Filling and packaging
Heating
Cooling and storage

Italian style tomato sauce
Ingredients (to make 11kg sauce)
5kg fresh tomatoes 5 medium onions (1 medium onion per kg tomato) 25 medium garlic cloves (5 medium garlic cloves per kg tomato)Salt and pepper to taste1kg of carrots (1kg carrots per 5kg tomato)50-100ml vegetable oilHerbs to taste (dried oregano, fresh basil, chilli powder) (optional)
Select ripe tomatoes. Remove any that are under-ripe, over-ripe or rotten.Wash in clean water and drain. Cut each tomato in half and discard any thatare rotting inside.Chop the onion in small cubes. Cut the garlic cloves into quarters.Peel the carrots and chop into small cubes.
For glass jars: Wash the jars and lids and put them into a large saucepan. Fillthe saucepan with water so that the jars and lids are covered and heat until thewater boils. Boil for about 5 minutes.Remove the jars and turn upside down so that the water can all drain out.DO NOT dry them with a dirty cloth.If you are using recycled plastic jars, clean them with a solution of chlorinatedwater (100ppm). Turn upside down so all the water can drain out.
Add oil to a pan and fry the garlic and onion over a low flame until the onionturns pink. Take care not to burn the onion and garlic.Place the cut tomatoes and carrots in a large pan and heat over a low flame.Add the cooked onion and garlic, salt, pepper and chilli powder if using these.Increase the heat and boil for 40 minutes, stirring constantly until it reaches atotal solid concentration of 10-12° Brix (10-12% TSS), measured with a refrac-tometer. If you do not have a refractometer, boil for 40 minutes until the veg-etables can be squashed against the side of the pan with a spoon.
44Home-based Fruit and Vegetable Processing
Sauc
es a
ndCh
utne
ys
Selection and preparation of the fruit
Preparation of the the jars and lids
Heat treatment and addition of ingredients

Add fresh basil or dried oregano according to taste. Boil for a further 5 min-utes and remove the pot from the heat.
Pass the sauce through a pulper, mouli or sieve to remove the seeds and skin.
Cook the sauce for 10-15 minutes until it starts to bubble and thickens.
Fill the hot sauce into clean sterile glass jars or bottles. Fill them to the topand immediately close with clean lids. If you do not have glass jars, let thesauce cool slightly then fill into polyethylene bags that are heat sealed, orclean plastic jars.
Place the glass containers into a water bath that is at the same temperature asthe bottles. The water must cover the jars. Sterilise in boiling water for 45 min-utes from the time that the water starts to boil.
Allow the bottles to cool a little, then place them in a bowl containing clean cool-er water. Change the cooling water as it warms up and the temperature of thebottles decreases. Do this until the bottles are cooled to room temperature. Donot use cold water straight away as this will cause the bottles to crack.
Store the bottles of sauce in a cool dry place away from direct sunlight to pre-vent the colour from fading. When prepared properly and stored in dry coolconditions, the tomato sauce should have a shelf life of about 12 months, ifpacked in pasteurised glass bottles.
45Sauce and Chutneys
Sauc
es a
ndCh
utne
ys
Pulp/juice extraction
Heating (for glass jars)
Heat treatment
Filling and packaging
Cooling and storage

Tomato paste
Ingredients:Fresh ripe tomatoes (10kg)Lemon juice (50ml per litre of tomato juice - to adjust the acidity)Salt (25g per kg tomato pulp)Sodium benzoate (0.3g per 10kg pulp)
This is a thick bright red paste. It can be stored in jars or polythene bags andhas a shelf life of several months. (Fellows, 1997)
Select ripe tomatoes. Discard any over-ripe or mouldy fruits. Save the under-ripe fruits for a later batch.Wash in plenty of clean (chlorinated) water (8 litres per kg tomatoes). Drain.Cut each tomato in half and discard any that are rotting inside.Blanch tomatoes in a water bath at 80°C for 5 minutes to soften the skins forpeeling and to destroy enzymes and micro-organisms.
For glass jars: Wash the jars and lids and put them into a large saucepan. Fillthe saucepan with water so that the jars and lids are covered and heat until thewater boils. Boil for about 5 minutes.Remove the jars and turn upside down so that the water can all drain out.DO NOT dry them with a dirty cloth.If you are using recycled plastic jars, clean them with a solution of chlorinatedwater (100ppm). Turn upside down so all the water can drain out.
Pass the tomatoes through a pulper-finisher, mouli or sieve with a 1mm mesh.This removes the skins and seeds from the fruit. Ideally you should check theacidity (pH) of the pulp at this stage. If you have a pH meter or pH indicatorpapers, make sure that the pulp has a pH value of 4.0 or lower. If the pH ishigher than this, add lemon juice or vinegar to increase the acidity. If you can-not measure the acidity of the tomato pulp, you should add lemon juice (50mlper litre of tomato juice) to make sure that the acidity is high enough.Add 0.3g sodium benzoate per 10kg pulp to preserve the product.
46Home-based Fruit and Vegetable Processing
Sauc
es a
ndCh
utne
ys
Preparation of the fruit
Preparation of the jars and lids
Pulp/juice extraction

Concentrate the pulp by removing the water. There are two ways of doing this– by heating or by draining:
Heating - Heat slowly in an open pan, stirring constantly to prevent burning. If thisis done carefully, the bright red colour can be retained. Continue heating until apaste with 30% total solids is obtained. For best results, this is measured using arefractometer. If you do not have a refractometer, you need to use another method:
When it is cooked, the paste should easily coat the back of a spoon.You can also calculate how much water has been lost by weighing thepulp before and after heating. The pulp should be reduced to one thirdof its starting weight. (Remember to substract the weight of the pan whenestimating the pulp weight!)
Draining - An improved method of concentrating is to place the pulp in a whitecotton sack that is hung up for one hour to allow the water to drain out, until thepulp loses half its original weight.Add 2.5% salt by weight of concentrate and mix thoroughly.Re-hang the sack for one hour until the pulp is one third of its original weight(until it is 30% total solids).Make sure that the sack is very clean (put it in boiling water for 5 minutes) andthat the pulp is not exposed to insects and dust.
Fill the paste into bottles or plastic pouches. Seal the containers.
Place the glass containers into a water bath that is at the same temperature asthe bottles. The water must cover the jars. Pasteurise at 90°C for 45 minutes.
Remove the water bath from the heat. Gradually add cold water to slowly coolthe water bath. Or, leave the jars to cool in the water bath until the following day.
Both glass and plastic packages of tomato paste should be stored away fromdirect sunlight to prevent the colour fading. The pasteurised paste stored inglass jars will have a longer shelf life (up to 12 months) than that in plasticpouches which cannot be pasteurised after packing (up to 3 months). Shelf lifealso depends on the correct level of acidity to prevent the growth of bacteria.Once opened, both glass and plastic bottles of tomato puree are susceptibleto spoilage by bacteria.
47Sauce and Chutneys
Sauc
es a
ndCh
utne
ys
Filling and packaging
Heating (for glass jars)
Cooling and storage
Concentration

Tomato sauce or ketchup
Ingredients (to make 5-6kg sauce)
20kg ripe tomatoes1.5kg sugar450g onions3 to 5g nutmeg (optional)9g cinnamon11.5g cumin11.5g cardamom11.5g ground black pepper5g ground white pepper 800ml vinegar330g salt
This is a thick, sweet red sauce made from fresh tomatoes. It has a shelf life ofmore than one year in glass bottles when the container is unopened. The recipecan be varied by adding different spices. For example, 2.5g chilli powder per10kg tomato pulp can be added before processing. (Fellows, 1997)
Sort the fruit and select ripe tomatoes. Discard any over-ripe or mouldy fruits.Save the under-ripe fruits for a later batch.Wash in plenty of clean water (8 litres per kg tomatoes). Drain. Cut each toma-to in half and discard any that are rotting inside.Blanch tomatoes in hot water for 3-5 minutes until the skins are loosened.Remove from the heat and plunge into cold water to cool. Remove the skin andcore of tomatoes.Peel the onions and chop into small pieces.
For glass jars: Wash the jars and lids and put them into a large saucepan. Fillthe saucepan with water so that the jars and lids are covered and heat until thewater boils. Boil for about 5 minutes.Remove the jars and turn upside down so that the water can all drain out.DO NOT dry them with a dirty cloth.If you are using recycled plastic jars, clean them with a solution of chlorinatedwater (100ppm). Turn upside down so all the water can drain out.
48Home-based Fruit and Vegetable Processing
Sauc
es a
ndCh
utne
ys
Selection and preparation of the fruit
Preparation of the jars and lids

Chop the tomato into pieces and pulp, either by hand or with a pulper-finish-ing machine.
Add 500g sugar, the onions and the spices tied loosely in a muslin bag.
Heat to below boiling point in a pan, stirring continuously until the volume hasreduced by half.Remove the spice bag. Add 1kg sugar, the salt and vinegar. Continue heatingfor 5-10 minutes until the sauce is thick enough to coat the back of the spoon.
Hot-fill into clean, sterilised jars at 80°C. Close the tops with lids. Glass jars orbottles are the best packaging material. If you do not have glass, you can useplastic bottles or pouches.
Cool to room temperature. Dry the jars, add labels and store in a cool dryplace away from light. The product should be stable for at least 12 monthswhen packed in glass bottles and stored in good conditions.
49Sauce and Chutneys
Sauc
es a
ndCh
utne
ys
Pulp/juice extraction
Added ingredients
Heat
Filling and packaging
Cooling and storage

Tomato puree or simple concentrateIngredients (to make 1kg puree or concentrate)Fresh ripe tomatoes (10kg)Salt (100g for puree; 200g for concentrate)
This recipe can be used to either make a tomato puree (10° Brix) or a simpleconcentrate (16° Brix). (FAO, 1997)
Sort the fruit and select ripe tomatoes. Discard any over-ripe or mouldy toma-toes. Save the under-ripe tomatoes for a later batch.Wash in plenty of clean water (8 litres per kg tomatoes). Drain. Cut each toma-to in half and discard any that are rotting inside.
For glass jars: Wash the jars and lids and put them into a large saucepan. Fillthe saucepan with water so that the jars and lids are covered and heat until thewater boils. Boil for about 5 minutes.Remove the jars and turn upside down so that the water can all drain out.DO NOT dry them with a dirty cloth.If you are using recycled plastic jars, clean them with a solution of chlorinatedwater (100ppm). Turn upside down so all the water can drain out.
Place the tomatoes in a large pot and cook over a medium heat, stirring witha wooden spoon occasionally. Add a little water to the pan to prevent themburning. Add salt to taste if desired.Continue heating until the tomatoes are softened (if you have a refractometeryou can measure the total solids (6.5-6.8° Brix)). Remove from the heat andallow to cool slightly.
Extract the juice by passing the sauce through a pulper, mouli or sieve. Pass the skinsand seeds through the pulper a second time to remove as much juice as possible.
To make the tomato puree:Place the sauce back on the heat and boil to concentrate it. Weigh thepan before you start heating. You need to reduce the weight by 5%. For
50Home-based Fruit and Vegetable Processing
Sauc
es a
ndCh
utne
ys
Selection and preparation of the fruit
Preparation of the jars and lids
Heating
Heat
Pulp/juice extraction

example, if you start with 10kg pulp, you need to boil until the weight is9.5kg. (Remember to subtract the weight of the pan when estimating theweight of the pulp!)Weigh at 10 minute intervals until the correct amount of water has been removed.The amount of time taken to reach the final concentration depends on severalfactors – the volume of liquid you are heating (smaller volumes will reduce morequickly than large ones) and the type of pan you use – the water will evapo-rate more quickly from a wide, open pan. Stir occasionally with a woodenspoon to prevent burning.Add 1% salt (100g for 10kg tomatoes), continue heating until it has dissolved,then remove from the heat.
To make the tomato concentrate:You need to continue heating until 10% of the moisture has been removed andthe sauce is more concentrated. e.g. for 10kg pulp, you need to heat until itweighs 9kg. (Remember to subtract the weight of the pan when estimating theweight of the pulp!)Add 2% salt, dissolve and remove from the heat.
Hot-fill into clean, sterilised jars at 80°C. Close the tops with lids.Glass jars or bottles are the best packaging material. If you do not have glass,you can use plastic bottles or pouches, but these will not have a shorter storagelife than the puree packed in glass containers.
Place the glass containers into a water bath that is at the same temperature asthe bottles. The water must cover the jars. Sterilise in boiling water for 45 min-utes from the time that the water starts to boil.
Cool to room temperature.Dry the jars, add labels and store in a cool dry place away from light. Theproduct should be stable for at least 12 months when packed in a glass con-tainer. When packed in plastic, the product will only have a storage life ofabout 4 months.
51Sauce and Chutneys
Sauc
es a
ndCh
utne
ys
Heat
Filling and packaging
Cooling and storage

Tomato concentrate (non-cook method)
This is an alternative method for making a concentrated tomato paste that doesnot involve heating the pulp. It is useful in areas where fuel costs are high. Youprepare a puree and then squeeze out the excess water by hanging the pulpin a muslin cloth so the water can drip out. Salt is added to the pulp to act asa preservative and to help separate out the water from the pulp.
Ingredients (to make 1.5kg concentrate)
Tomatoes (15kg – which yields approximately 10kg pulp)Sodium benzoate (optional) 0.3g/10kg pulpSalt (250g per 10kg pulp)
Sort the tomatoes. Remove those that are under-ripe, over-ripe and rottenor diseased.Remove the green stalks and wash the tomatoes in clean water.
The tomatoes are blanched to kill any bacteria and to split the skins so they areeasy to remove. Place the clean tomatoes into the boiling water. Make surethey are all underneath the water; place a lid on the pan. When the watertemperature returns to 80°C, keep it there for 5 minutes to blanch the tomatoes.Remove the tomatoes from the blanching pan and put them into a clean container.Cover them to prevent contamination from insects or dust.
For glass jars: Wash the jars and lids and put them into a large saucepan. Fillthe saucepan with water so that the jars and lids are covered and heat until thewater boils. Boil for about 5 minutes.Remove the jars and turn upside down so that the water can all drain out.DO NOT dry them with a dirty cloth.If you are using recycled plastic jars, clean them with a solution of chlorinatedwater (100ppm). Turn upside down so all the water can drain out.
Blend the tomatoes to make a pulp. Pass the pulp through a strainer (sieve) toseparate out the seeds and skin. The seeds and skin can be put aside and usedto make vinegar. Weigh the pulp.
52Home-based Fruit and Vegetable Processing
Sauc
es a
ndCh
utne
ys
Selection and preparation of tomatoes
Preparation of the jars and lids
Pulp extraction

If you are adding preservatives to the paste, you do it at this stage. Add sodi-um benzoate (0.3g per 10kg pulp). Mix the sodium benzoate with a smallamount of the pulp and then mix it all together.
It is important that the pulp has a pH value of less than 4.5. Most tomatoeshave a low pH, but sometimes they have a higher value. You should check thepH with a piece of pH paper.
If the pH is 4.5 or higher, you need to add citric acid (or lemon juice) to makeit lower. Take a 1 litre sample of the pulp and add the juice of a quarter of alemon to it (or 0.25g citric acid). Check the pH of this treated pulp again. If itis still high, add more lemon juice. Repeat this until you have a pH of 4.2 orlower. Then add the same amount of lemon juice or citric acid to every litre ofyour pulp.
Transfer the pulp into clean cotton sacks. The sacks must be made of non-bleached cotton and should not be painted. They should be sterilized beforeyou use them by boiling in water for 5 minutes.Try using different fabrics as they will drip at different rates. You need a fab-ric that drips quickly so that the juice is extracted from the pulp in the shortesttime possible. If the dripping takes a long time, the pulp may become contam-inated or start to ferment.Hang the cotton sacks over buckets to collect the juice that runs out. This juicecan be used to ferment to make vinegar.
Let the pulp leak out until the sack is half the original weight (this should take about1 hour for a 40litre sack, depending on the drip rate of the material you use).
Add salt to the remaining pulp in the bag. Salt is added at a rate of 2.5%.This means that for 7.5kg pulp remaining in the sack, 187.5g salt is added.Dissolve the salt in some of the extracted juice and then add it to the remain-ing pulp in the sack.
Hang the sack again and let it continue to drip over the bucket. Let it drip untilabout 5kg concentrated pulp remains in the sack (this means that it is about onethird of the original weight of tomatoes). This should take about 45 minutes to1 hour depending on the fabric you use.
53Sauce and Chutneys
Sauc
es a
ndCh
utne
ys
Add preservatives
Hanging the pulp
Add salt

If you do not want to collect the unsalted juice after the first hanging (which canbe used for making vinegar), you can add the salt to the pulp at the start ofthe hanging. This is better in terms of hygiene as the dripping process is com-pleted in a shorter time. However, if you want to use the expressed juice forvinegar making, it is better to do this without salt.
Fill the concentrated pulp into glass bottles if you have them. If you do not haveglass bottles, you can use plastic pouches (100g per pouch is a good amountto pack). Seal the pouches using a heat sealer. Make sure all the air is removedfrom the pouch when you seal it.
If you are using glass jars, you need to place the jars into cooler water andslowly bring the temperature up to boiling point to prevent cracking the glass.Boil for 45 minutes.If you are using pouches and the plastic is heat resistant (laminate of poly-eth-ylene –70 micron– and polyamide –30 to 40 micron), place the pouches into apan of water that has been heated to boiling point. Wait until the water beginsto boil again, then leave the pouches in for 45 minutes to ensure they are wellpasteurized.
Cool the pouches by adding cold water to the hot water bath. Be careful withglass bottles – you need to let the bottles cool down more gradually so they donot shatter.
The pasteurised concentrate has a shelf life of at least 12 months as long as itis stored in a cool, dry place away from direct sunlight. Without pasteurisation,the concentrate will store for about 3-4 months.
54Home-based Fruit and Vegetable Processing
Sauc
es a
ndCh
utne
ys
Filling and packaging
Heat treatment
Cooling and storage

Coriander chutney (chatni gashnize)Ingredients (for 1.5 to 2 kg chutney)
1 kg fresh coriander 200g garlic500g fresh hot pepper (green or red)250 ml vinegar Salt to taste100g walnut (optional)
This is a tasty chutney that is prepared from fresh coriander, peppers andgarlic. The chutney can be eaten as soon as it has been made or can be leftto ferment for up to 2-3 months in the jars during which time it will becomemore acidic.
Sort the coriander. Remove the unwanted parts. Wash in clean water and drainwell.Peel the garlic cloves.Cut the pepper. Remove the stems and seeds. Wash the pepper in clean water.Shell the walnuts.
Wash the blender with clean (boiled or chlorinated) water.For glass jars: Wash the jars and lids and put them into a large saucepan. Fillthe saucepan with water so that the jars and lids are covered and heat until thewater boils. Boil for about 5 minutes.Remove the jars and turn upside down so that the water can all drain out.DO NOT dry them with a dirty cloth.If you are using recycled plastic jars, clean them with a solution of chlorinatedwater (100ppm). Turn upside down so all the water can drain out.
Blend the prepared vegetables with the walnuts in the blender or pounder(“awang” or “oghor”). The vegetables should be blended until they are wellmixed and form a very smooth paste Add vinegar and salt and mix well.
55Sauce and Chutneys
Sauc
es a
ndCh
utne
ys
Selection and preparation of vegetables
Preparation of the equipment, jars a nd lids
Mix

Pour the chutney into clean jars. Do not fill the jars completely as the chutneywill ferment during storage. You need to leave some place for the gas toescape during fermentation.Place lids on the jars and seal.
After packaging in the jar, stand in the sunlight for 2-3 days to encouragethe fermentation of the chutney. Fermentation adds flavour to the chutneyand results in the formation of an acid that helps to preserve the chutney.After 2-3 days in the sun, remove to a cool place, where it can be stored forup to 3-4 months.
56Home-based Fruit and Vegetable Processing
Sauc
es a
ndCh
utne
ys
Filling and packaging
Storage

Vegetable chutney
Ingredients (makes 3kg chutney)750g carrots 9 tea cups600g cabbage 9 tea cups100g capsicum 1 tea cup450g onions 4 tea cups120g chilli powder 3-9tbs15g ginger powder 1 tbs40g salt 3 level tbs30g curry powder 6 level tsp750ml sunflower oil 3 # tea cups300ml vinegar 1 ! tea cups
If you do not have weighing scales, you can use a teacup to measure out theingredients.tbs = tablespoon (next size up from a teaspoon or equal to three teaspoons) tsp = teaspoon (5ml)
Sort the vegetables and discard any unripe, over-ripe or damaged ones.Wash in clean cold water and drain.Peel the onions and carrots. Chop the onions, cabbage and capsicum intosmall pieces about 5cm long. Do not use the core of the cabbage.It is best to use a stainless steel knife to prevent marking the flesh of thefruit and vegetables, but if you do not have one, use a knife with a cleansharp blade.Grate the carrots using the large holes on the grater.Weigh out the ingredients accurately. Use weighing scales if you have them. Ifnot, use the same measuring cup or container each time you make the productso that it is the same from one batch to the next.
For glass jars: Wash the jars and lids and put them into a large saucepan. Fillthe saucepan with water so that the jars and lids are covered and heat until thewater boils. Boil for about 5 minutes.Remove the jars and turn upside down so that the water can all drain out.DO NOT dry them with a dirty cloth.If you are using recycled plastic jars, clean them with a solution of chlorinatedwater (100ppm). Turn upside down so all the water can drain out.
57Sauce and Chutneys
Sauc
es a
ndCh
utne
ys
Selection and preparation of the vegetable
Preparation of the jars and lids

Mix the dry spices- chilli powder, ginger powder, salt and curry powder.
Heat the dry spices in some of the sunflower oil (about 50ml). Stir well to pre-vent the spices burning. Add the onions to the spicy oil and fry until they aresoft (about 5 minutes).Add the rest of the oil and the vinegar. Stir well.Add the cabbage and cook for 5 minutes. Stir to prevent burning.Add the carrots and capsicum and cook for 5 minutes until the carrot is soft.Keep stirring to make sure the chutney does not burn.
Hot-fill the chutney into clean sterile jars. Fill them to within 2cm of the top ofthe jar.Make sure that there is a layer of liquid from the chutney covering the vegeta-bles or they will spoil when the jar is opened. Clean the outside rim of the jarand put on the lid. Close the lid as tightly as possible.Slowly turn the jar upside down so that any bacteria on the lid of the jar or inthe space at the top are killed. Leave the jar upside down until it is cold. Whenthe jars are cold test each lid to make sure it has a good seal.
Store the chutney in a cool dry place away from direct sunlight. It will store forup to 6 months.
58Home-based Fruit and Vegetable Processing
Sauc
es a
ndCh
utne
ys
Mix ingredients
Heating
Filling and packaging
Storage
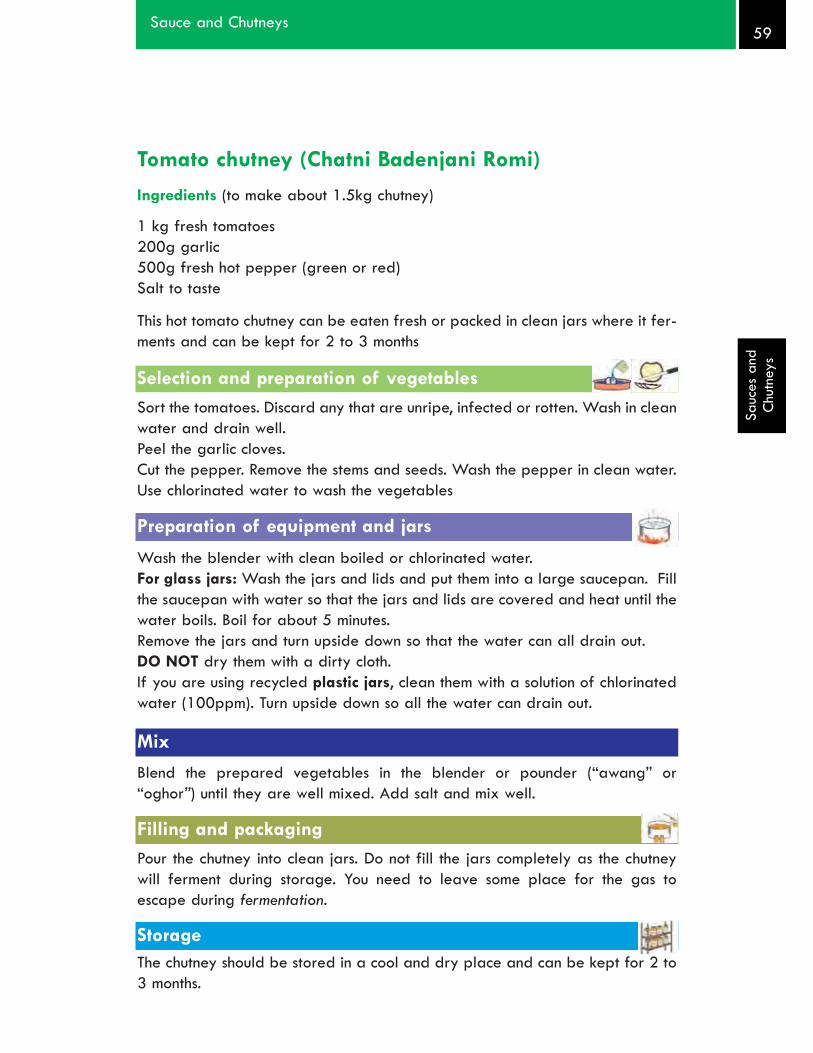
Tomato chutney (Chatni Badenjani Romi)Ingredients (to make about 1.5kg chutney)
1 kg fresh tomatoes200g garlic500g fresh hot pepper (green or red)Salt to taste
This hot tomato chutney can be eaten fresh or packed in clean jars where it fer-ments and can be kept for 2 to 3 months
Sort the tomatoes. Discard any that are unripe, infected or rotten. Wash in cleanwater and drain well.Peel the garlic cloves.Cut the pepper. Remove the stems and seeds. Wash the pepper in clean water.Use chlorinated water to wash the vegetables
Wash the blender with clean boiled or chlorinated water.For glass jars: Wash the jars and lids and put them into a large saucepan. Fillthe saucepan with water so that the jars and lids are covered and heat until thewater boils. Boil for about 5 minutes.Remove the jars and turn upside down so that the water can all drain out.DO NOT dry them with a dirty cloth.If you are using recycled plastic jars, clean them with a solution of chlorinatedwater (100ppm). Turn upside down so all the water can drain out.
Blend the prepared vegetables in the blender or pounder (“awang” or“oghor”) until they are well mixed. Add salt and mix well.
Pour the chutney into clean jars. Do not fill the jars completely as the chutneywill ferment during storage. You need to leave some place for the gas toescape during fermentation.
The chutney should be stored in a cool and dry place and can be kept for 2 to3 months.
59Sauce and Chutneys
Sauc
es a
ndCh
utne
ys
Filling and packaging
Selection and preparation of vegetables
Preparation of equipment and jars
Mix
Storage

Chili chutney (Chatni Morchi Sorkh/Sabz )Ingredients (to make 1. 5 kg chutney)1 kg fresh red/green chilli300g garlic250 ml vinegar Salt to taste100g walnut (optional)
This is a hot chutney made of red peppers and garlic. It can be consumed whenit is fresh, or stored for up to 3 months in a sealed, clean jar.
Sort the peppers and discard any that are damaged or diseased. Wash inclean water and drain well. Cut the peppers. Remove the stems and seedsPeel the garlic cloves.Use chlorinated water to wash the vegetables.
Wash the blender with clean boiled or chlorinated water.Glass jars: Wash the jars and lids and put them into a large saucepan. Fill thesaucepan with water so that the jars and lids are covered and heat until thewater boils. Boil for about 5 minutes.Remove the jars and turn upside down so that the water can all drain out.DO NOT dry them with a dirty cloth.If you are using recycled plastic jars, clean them with a solution of chlorinatedwater (100ppm). Turn upside down so all the water can drain out.
Blend the prepared pepper and garlic in the blender or pounder (awang or oghor)until they are well mixed. Add the walnuts to the blender if you are using them.Add the vinegar and salt and mix well.
Pour the chutney into clean jars. Do not fill the jars completely as the chutneywill ferment during storage. You need to leave some place for the gas toescape during fermentation.
The chutney should be store in the cool and dry place be kept for up to 3months.
60Home-based Fruit and Vegetable Processing
Sauc
es a
ndCh
utne
ys
Selection and preparation of vegetables
Preparation of equipment and jars
Mix
Filling and packaging
Storage

PICKLES
61Pickles
Pick
les

PicklesPickles include a range of savoury products that are made from a mixture ofvegetables and fruit. They are eaten as a spicy accompaniment to a meal. Themethod of preservation is a combination of increased acidity (reduced pH),added salt, reduced moisture and added spices. The most common types ofpickles in Afghanistan, known as ‘atchar’ or ‘toorchi’, are fermented through theaddition of salt or brine (lactic acid fermentation) or with vinegar (acetic acid).
Fermented pickles (atchar)Atchars are made by adding salt or vinegar to vegetables (or fruit) and leavingthem to ferment for a few days. Wild mustard seeds (awri) are sometimes addedto salt or brine pickles. During fermentation, lactic acid or acetic acid is producedwhich reduces the pH of the product and helps to preserve it by preventing thegrowth of spoilage bacteria. These pickles are usually not heated after fermenta-tion and therefore strict attention must be paid to hygiene to make sure that thecorrect type of bacteria are present to carry out the fermentation. If the ferment-ing vegetables are contaminated with other bacteria, they may become toxic andcause food poisoning. Well made pickles can be stored for several months whenthey are kept in a cool dry place, away from direct sunlight.
Common vegetables and fruits suitable for pickles (atcharor toorchi):
62Home-based Fruit and Vegetable Processing
Pick
les
Should I make pickle?Yes
Pickles can be made with rela-tively simple equipment that isavailable in the home.The products are quite safe andhave a fairly long shelf life due tothe combination of high acidity,high salt and low moisture content.Pickles can be prepared from arange of different fruit and veg-etables depending on local tasteand availability.
NoThe availability of vinegar (aceticacid) may be a problem in someareas.The conditions for fermentation(temperature, salt content and pH)should be closely monitored to geta good, safe product.
PICKLES -equipment requiredSharp stainless steel knifeWeighing scales or,
Measuring jug or bottleMeasuring cup
Spoons for measuringPlastic bowlsSieveGraterMortar and pestle or grinderBoiling pan (stainless steel or aluminum)Wooden spoon for stirringCooker or stoveGlass jars and lids
For fermented pickles: large bucket or potfor fermenting in
CucumberCabbageCarrotBonjon-e-atcharGarlicOnion
MintGreen and redchilliPumpkinCauliflowerTurnip

Processing outline for lactic acid fermented pickles (atchar)
63Pickles
Pick
les
Selection and Preparation ofthe vegetables
Fermentation
Heating (optional) Add salt or brine or vinegar
Add spices and oil
Filling and packaging /sealing
Storage
Pickle
Preparation of jars and lids

Fermented pickles – process details and quality assurance
Select good quality vegetables. Discard any that are damaged or rotten.Wash the vegetables in clean (boiled) water. Washing vegetables thoroughly isvery important, especially if the pickle is prepared without heating the produce.Peel them if required and remove the stones.Cut the vegetables into small, uniform sized pieces. Place the cut pieces intosalted water (2-3% salt solution) to prevent the pieces turning brown.
Glass jars: Wash the jars and lids and put them into a large saucepan. Fill thesaucepan with water so that the jars and lids are covered and heat until thewater boils. Boil for about 5 minutes.Remove the jars and turn upside down so that the water can all drain out.DO NOT dry them with a dirty cloth.If you are using recycled plastic jars, clean them with a solution of chlorinatedwater (100ppm). Turn upside down so all the water can drain out.
In some recipes, the vegetables are boiled to soften them prior to fermentation.
Place the pieces of vegetable in a clean container that is suitable for fermen-tation, for example a large clean earthenware pot (only used for fermentation)or plastic bucket that is made of food grade plastic and is only used for food.The container should have a lid or a cover that prevents contamination byinsects and dust. A 2 litre container is needed for each kg of vegetables.
Lactic acid fermentation (salt or brine)Add salt or brine to the vegetables.
If you are adding salt, place the salt and vegetables into the contain-er in alternating layers until the container is three quarters full. As aguide, 300g salt is needed for 10kg vegetables. Make sure the toplayer is of salt so that all the vegetable pieces are underneath the saltThe brine starts to form as water is drawn out of the vegetables anddissolves the salt to make a brine. Fermentation begins as soon asthe brine is formed.If you are using brine, prepare a 15-20% salt solution by dissolving saltin clean (boiled) water (150 to 200g salt per litre of brine; see pageX for more details on making brine). Do not use chlorinated water for thebrine as this will prevent fermentation.
64Home-based Fruit and Vegetable Processing
Pick
les
Selection and preparation of the vegetables
Sterilise the jars and lids
Fermentation: lactic acid fermentation
Heating

You need to make sure that all the vegetables are in the brine – use 2litres per kg vegetables. Remember that most vegetables will floatwhen you first put them in the brine so you must place a clean plate orsimilar heavy object on top to submerge the vegetable pieces.
To accelerate the fermentation process, you can pound wild mustard seeds(awri) and add the awri powder to the brine.
OR: Acetic acid fermentation (vinegar)Cover the vegetables in vinegar.Instead of vinegar, you can also use cover the vegetables in a 5% acetic acidsolution available in the bazaar. (If the solution is 10% acetic acid, make sureto dilute it in water to make a 5% solution).Remember that most vegetables will float when you first put them in the vine-gar or acetic acid solution so you must place a clean plate or similar heavyobject on top to submerge the vegetable pieces.
Once you have covered the vegetables with salt, or brine, or vinegar, place alid on the fermentation pot and leave it to stand in a warm place (21°C) to fer-ment. It is important to use a lid to help maintain a constant temperature andto protect the fermenting liquor from contamination.
You can speed up the fermentation by adding a starter culture to the salt orbrine mixture. The starter culture is the juice left over from a previous fermen-tation and which contains some of the lactic acid bacteria.
You can see the fermentation is taking place as small bubbles of carbon diox-ide gas appear in the brine.
Fermentation takes between one and four weeks to complete. The time takendepends on the temperature, the salt concentration and the pH (acidity of the brineor vinegar). It is complete when the bubbles of carbon dioxide gas stop appearing.
Fill the fermented pickles into clean sterile jars or containers. The pickles are notprocessed any further, therefore it is essential to make sure it does not becomecontaminated at this stage. All equipment must be clean.Pour a layer of good quality vegetable oil on top of the pickle to act as a seal.Make sure there are no air bubbles trapped in the pickle after filling the jars.Tap the bottom of the bottle lightly on the table to remove any trapped air.
The pickles should be stored in a cool place out of direct sunlight. The high levelof acidity gives them a long shelf life of up to 6 months.
65Pickles
Pick
les
Storage
Filling and packaging

Pickled cucumbersIngredients 20kg small cucumbersor 15kg large cucumbers1kg salt
Cucumbers are fermented by lactic acid bacteria to make a dark green, slight-ly transparent product. Occasionally oil is added to the fermented product.
Select ripe cucumbers that are free from bruising or disease. Wash them inclean water and drain.Cucumbers can either be pickled whole or sliced into smaller pieces. If you areslicing, cut into pieces that are 5-8mm thick. Cucumbers do not need to be peeled.
Glass jars: Wash the jars and lids and put them into a large saucepan. Fill thesaucepan with water so that the jars and lids are covered and heat until thewater boils. Boil for about 5 minutes.Remove the jars and turn upside down so that the water can all drain out.DO NOT dry them with a dirty cloth.If you are using recycled plastic jars, clean them with a solution of chlorinatedwater (100ppm). Turn upside down so all the water can drain out.
Place the cucumbers and salt (1kg salt per 15-20kg cucumber) in alternate layersin a sealed container. A brine will form to cover the cucumbers. Ensure that they aresubmerged in the brine. If this brine is not sufficient to cover the cucumbers, preparea 40% brine (see page X below) and add it to the pot to cover all the cucumbers.
As soon as the brine is formed, fermentation starts. Bubbles of carbon dioxidegas appear. Leave to ferment in a warm place for 1-4 weeks depending uponthe temperature. Fermentation is complete when no more bubbles appear.
Fill into clean pots or glass jars and seal. The pickle is not further processed,therefore it is important to ensure that the jars are clean and good hygiene ispracticed during filling. Oil can be added to the surface if desired.Cap the jars after filling.
StorageStore in a cool dry place for up to 6 months.
66Home-based Fruit and Vegetable Processing
Pick
les
Selection and preparation of the vegetable
Preparation of the jars and lids
Salting
Fermentation
Filling and packaging

Mixed pickle
Ingredients (to make approximately 5 kg of pickle)500g carrot500g baby eggplant (‘bonjon-e-atchar’)500g turnip500g cauliflower300g chilli250g garlic50g salt250g ‘awri’ (wild mustard seeds)3 litres water (enough to cover the vegetables) + water for boiling the vegetables
Select vegetables that are good quality and without bruising.Wash well with clean, chlorinated water.Peel the carrots. Remove the inedible parts. Chop into small pieces.Peel the turnip. Remove the inedible parts. Chop into small pieces the same sizeas the carrots.Chop the eggplant into pieces the same size as the carrots and turnips.Take off the cauliflower florets. Chop into smaller pieces.Peel the garlic and chop into small pieces.Grind the wild mustard seeds (awri).
Glass jars: Wash the jars and lids and put them into a large saucepan. Fill thesaucepan with water so that the jars and lids are covered and heat until thewater boils. Boil for about 5 minutes.Remove the jars and turn upside down so that the water can all drain out.DO NOT dry them with a dirty cloth.If you are using recycled plastic jars, clean them with a solution of chlorinatedwater (100ppm). Turn upside down so all the water can drain out.
Boil the carrot, turnip, eggplant, chilli and cauliflower with a little water for 10to 15 minutes until they are soft. Place them in a sieve and allow the water torun out. Cover the vegetables with a clean cloth and leave to cool down.Boil the 3 litres of water and leave to cool down.
67Pickles
Pick
les
Preparation of vegetables
Preparation of the jars and lids
Heating
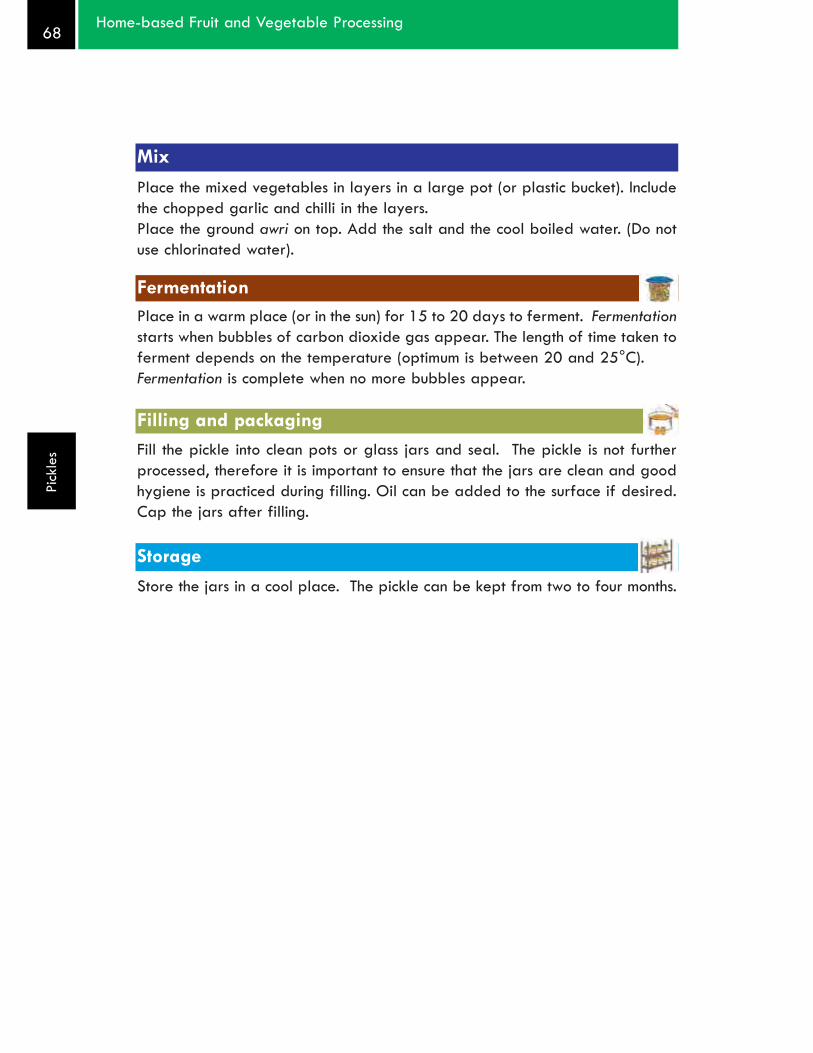
Place the mixed vegetables in layers in a large pot (or plastic bucket). Includethe chopped garlic and chilli in the layers.Place the ground awri on top. Add the salt and the cool boiled water. (Do notuse chlorinated water).
Place in a warm place (or in the sun) for 15 to 20 days to ferment. Fermentationstarts when bubbles of carbon dioxide gas appear. The length of time taken toferment depends on the temperature (optimum is between 20 and 25°C).Fermentation is complete when no more bubbles appear.
Fill the pickle into clean pots or glass jars and seal. The pickle is not furtherprocessed, therefore it is important to ensure that the jars are clean and goodhygiene is practiced during filling. Oil can be added to the surface if desired.Cap the jars after filling.
Store the jars in a cool place. The pickle can be kept from two to four months.
68Home-based Fruit and Vegetable Processing
Pick
les
Mix
Fermentation
Filling and packaging
Storage

Pumpkin pickleIngredients (to make approximately 5,5kg of pickle)2kg pumpkin250g chilli250g garlic200g awri (wild mustard seeds)50g salt3 litres water (enough to cover the vegetables) + water for boiling the vegetables100g mint leaves
Select vegetables that are good quality and without bruising. Wash well withclean chlorinated water.Chop the pumpkin into smaller pieces.Peel the garlic and chop into small pieces. Wash the mint leaves and chilli withboiled water.Grind the awri.
Glass jars: Wash the jars and lids and put them into a large saucepan. Fill thesaucepan with water so that the jars and lids are covered and heat until thewater boils. Boil for about 5 minutes.Remove the jars and turn upside down so that the water can all drain out.DO NOT dry them with a dirty cloth.If you are using recycled plastic jars, clean them with a solution of chlorinatedwater (100ppm). Turn upside down so all the water can drain out.
Boil the pumpkin in a little water for 10 to 15 minutes until it is soft soft. Placeit in a sieve and allow the water to run out. Cover the vegetables with a cleancloth and leave to cool down.Boil the 3 litres of water and leave to cool down.
Place the pumpkin in layers in a large pot (or plastic bucket). Include thechopped garlic, chilli and mint in the layers.Place the ground awri on top. Add the salt and the cool boiled water. (Do notuse chlorinated water)
69Pickles
Pick
les
Selection and preparation of vegetables
Preparation of the jars and lids
Heating
Mix and add ingredients

Place in a warm place (or in the sun) for 15 to 20 days to ferment. Fermentationstarts when bubbles of carbon dioxide gas appear. The length of time taken toferment depends on the temperature (optimum is between 20 and 25°C).Fermentation is complete when no more bubbles appear.
Fill the pickle into clean pots or glass jars and seal. The pickle is not furtherprocessed, therefore it is important to ensure that the jars are clean and goodhygiene is practiced during filling. Oil can be added to the surface if desired.Cap the jars after filling.
Store in a cool and dry place. The pickle can be stored up to 3 to 4 months.
70Home-based Fruit and Vegetable Processing
Pick
les
Fermentation
Filling and packaging
Storage

VINEGAR
71Vinegar
Vine
gar

Preparation of vinegar
Vinegar is also known as acetic acid. It is a by-product of the fermentationof fruit and vegetables and because it is acidic, it can also be used to pre-serve fruit and vegetables. It is commonly added to fruit and vegetables tomake pickles.
Common fruits and vegetables suitable for making vinegar:GrapeAppleMulberries
Vinegar can also be made byutilising fruit waste, for exampletomato peel and seeds, fruitpeelings.
72Home-based Fruit and Vegetable Processing
Vine
gar
Should I make vinegar?Yes
Vinegar can be made with relativelysimple equipment that is available in thehomeMaking vinegar is a good way to utilisefruit waste, for example peels andextracted juiceVinegar is a useful ingredient for pre-serving other fruit and vegetables.
NoManaging the two different fermenta-tions requires some skill and knowledgeof the process. You need to make sure thefermentation conditions are suitable toproduce a good productTo make a good product for sale, you doneed some proper equipment to ensureconsistency from batch to batchMake sure the fermenting vinegar is notcontaminated by other bacteria whichcause it to spoilIf you want to use the vinegar in picklemaking, you need to ensure it is strongenough to act as a preservative.
VINEGAR - equipment required
Sharp stainless steel knifeWeighing scales or,
Measuring jug or bottleMeasuring cup
Spoons for measuringPlastic bowlsBlender or liquidizer (optional)SieveMuslin filter clothGlass jars and lidsLarge fermenting vesselAir lock

Process outline for fruit and vinegar
73Vinegar
Vine
gar
Selection and preparation ofthe fruit
Fermentation Yeast fermentation
Filter Filter
Filter
Acetobacter fermentation
Vinegar
Fill/pack
Cool and store
Pasteurise (optional)
Preparation of pulp

Fruit vinegar – quality assurance and processing notes
Wash the fruit or vegetables in clean boiled (non-chlorinated) water. If you areusing fruit peels they should be from clean ripe fruit. Do not use peels from rot-ten or damaged fruit as this will produce a bad product.
Do not use peels from fruit or vegetables that have been sprayed with fungi-cide or herbicide. Do not use fruit or vegetables that have been treated withpreservative as this will prevent the growth of bacteria that are needed for fer-mentation.
Cut the fruit or fruit peel into thin strips and put into clay or plastic pots or buckets.Only use boiled water for vinegar making. Do not use chlorinated water formaking vinegar or for washing the fruits as the chlorine will prevent the fermen-tation taking place.
All the equipment you use should be clean. Steam–sterilise the bottles beforeuse to get rid of any bacteria that can contaminate the fermentation. (Do not usechlorinated water).
Do not use aluminium or iron pots for the fermentation as the acid will react withthe metal of the pots.
1. Traditional one-stage methodMash or liquidise the fruit with boiled water to make a pulp. If you do nothave a blender you can mash the fruit by hand and mix with boiled water tomake a thick pulp. Dilute the pulp by adding 2 litres of boiled water per litreof pulp. Place the diluted fruit pulp in a large pot for fermentation and addsugar (use about 120g sugar per litre of diluted pulp).Add a starter culture of acetobacter (waste fruit slurry saved from a previousfermentation) and cover the pot with a clean cotton cloth. Leave it in a warmplace (20-22°C) for about 8 days.While the fruit is fermenting, make sure the water level does not fall too low. Ifit is getting dry, add some more water.After 8 days the liquid should have the correct level of acidity (about 4% orpH3 if using a pH meter or papers). If it is not strong enough, leave to ferment
74Home-based Fruit and Vegetable Processing
Vine
gar
Selection and preparation of the fruit or fruit peels
Preparation of equipment
Fermentation

for a little longer. You might need to add some more sugar. You need a pHpaper to test the acidity. If you do not have one, you can do a simple titrationtest to find out how strong your vinegar is (See page X, below). If you need thevinegar to be stronger, leave it to ferment for a few more days. You might needto add some more sugar to the mixture.
You may need to adjust the acidity of the fermenting liquid. For apple vinegar,add 1 tsp sodium bicarbonate per 10 litres of fermenting liquid to reduce theacidity. For mulberry vinegar, add 1tsp citric acid (lemon juice) per 10 litres offermenting liquid to increase the acidity.
2. Improved two stage methodThis method involves two separate fermentations. Ethanol is made by addingyeast to the fruit mixture. The ethanol is then converted into vinegar by addingacetobacter.
Place the fruit pieces or peels in a clean blender with cool boiled waterto make a thick fruit pulp. If you do not have a blender you can mashthe fruit by hand and mix with boiled water to make a thick pulp. Dilutethe pulp with extra water (1 part pulp to 2 parts boiled water). Addsugar to the pulp (120g per litre of diluted pulp).Add the yeast to the pulp, place in a large plastic bucket and leave toferment at 25°C for two days.You may need to adjust the acidity of the fermenting liquid. For applevinegar, add 1 tsp sodium bicarbonate per 10 litres of fermenting liq-uid to reduce the acidity. For mulberry vinegar, add 1tsp citric acid(lemon juice) per 10 litres of fermenting liquid to increase the acidity.After fermenting, filter the mixture through a muslin cloth and col-lect the liquid.
Add the acetic acid bacteria to the liquid (use a starter culture thathas been saved from a precious batch of vinegar). Place in a warmplace (20-22°C), cover with a clean cotton cloth and leave to fer-ment for 11 days.
75Vinegar
Vine
gar

Drain off the liquid. Filter it through a muslin cloth. Save some of the residualfruit slurry to use as a starter culture in the next batch of vinegar.
Fill the vinegar into clean, sterilised bottles. Place on the caps and fastenloosely.
Place the bottles in a pan of water and heat to boiling for about 10 minutes topasteurise the vinegar. This will give it a longer shelf life. This stage is option-al. If you are using the vinegar straight away, for example to make pickle orchutney, you do not need to pasteurise it.
Cool the bottles to room temperature. Tighten the lids on the bottles as theycool down.Vinegar will store for up to 12 months if kept in a cool, dry place away fromdirect sunlight.
76Home-based Fruit and Vegetable Processing
Vine
gar
Filter
Filling and packaging
Heating (optional) -Pasteurization
Cooling and storage

Tomato vinegar
Ingredients (to make 15-20L vinegar)10kg tomatoes or tomato skins Or, 10L tomato juice extracted from the tomato puree10 litres of boiled water120g sugar per litre of diluted juice (approximately 2.4kg for the amount oftomato juice specified above)Yeast (for improved fermentation)Starter culture (left-over vinegar slurry from a previous fermentation)
Sort the tomatoes and remove any damaged or rotten fruits. Wash the toma-toes in clean boiled (not chlorinated) water.Cut the tomatoes into small pieces and press through a sieve to separate outthe juice from the pulp, skin and seeds.Boil the water and allow it to cool before you use it. Do not use chlorinat-ed water for making vinegar as the chlorine will prevent the fermentationtaking place.
All the equipment you use should be clean. Steam –sterilise the bottles beforeuse to get rid of any bacteria that can contaminate the fermentation.
Collect the tomato juice in a large pot for fermentation. Dilute the juice byadding 1 litre of boiled water per litre of juice. Add sugar (120g per litre ofdiluted juice).Cover the pot with a clean cotton cloth to keep out the dust and insects. Leaveto ferment until you can smell vinegar.You can speed up the fermentation by adding a starter culture (some left overjuice from a previous fermentation) to the tomato liquid. Keep the pot at 20-22°C to speed up the fermentation.After about 8 days the level of acidity in the vinegar should be high enough (thisdepends on the temperature – if it is very cold, the fermentation will take a lotlonger than this). You need a pH paper to test the acidity. If you do not have one,you can do a simple titration test to find out how strong your vinegar is (See pageX, below). If you need the vinegar to be stronger, leave it to ferment for a fewmore days. You might need to add some more sugar to the mixture.
77Vinegar
Vine
gar
Selection and preparation of the fruit
Preparation of the equipment
Traditional fermentation

Filter the liquid through a muslin cloth. Save some of the liquid or fruit slurry touse as a starter culture in the next batch of vinegar.
The improved method involves two fermentation stages. The first one is ananaerobic (without oxygen) fermentation using yeast. The fermented juice is fil-tered and then a second fermentation takes place, using acetobacter (from astarter culture of old vinegar) that produces acetic acid (vinegar).
Fermentation 1Place the tomato juice in a large pot with a small neck. Add water (1 litre perlitre of juice) and sugar (120g per litre of diluted juice) to the juiceActivate the yeast – place the yeast in a cup with some sugar, warm water anda small quantity of the fruit juice. Keep the mixture warm (30C) and after about15 – 20 minutes it should start to bubble. If the yeast does not start to producebubbles in the glass, it is dead. You need to get another supply of yeast.Add the yeast to the juice, place in a large plastic bucket and leave to fermentat 25°C for two days. You need to make sure that the first fermentation is in aclosed container, to prevent any air getting into the mixture. The bacteria thatconvert sugar into ethanol have to do it without oxygen.An airlock is usually fitted to the jar that is used for fermentation – this preventsair getting into the fermenting juice, but the gas that is given off during fermen-tation can escape through the airlock.
Filter the mixture through a muslin cloth and collect the liquid in a wide,open pot.
Fermentation 2Add the acetic acid bacteria to the liquid (use a starter culture that has beensaved from a previous batch of vinegar (use the slurry that is left over whenyou filter off the vinegar)). Place in a warm place (20-22°C), cover with a cleancotton cloth and leave to ferment for 11 days. It is essential that air gets to theliquid during the second stage as the acetobacter need oxygen to convert theethanol into vinegar.
78Home-based Fruit and Vegetable Processing
Vine
gar
Improved fermentation
Filter
Filter

Filter the liquid through a muslin cloth. Save some of the liquid or the slurryleft after filtering to use as a starter culture in the next batch of vinegar. Youcannot use pasteurised vinegar as a starter culture as pasteurisation kills thebacteria that are needed for fermentation. Make sue you save a samplebefore it is pasteurised.
Fill the vinegar into clean, sterilised bottles. Place on the caps and fastenloosely.
Place the bottles in a pan of water and heat to boiling for about 10 minutes topasteurise the vinegar. This will give it a longer shelf life. This stage is option-al. If you are using the vinegar straight away, for example to make pickle orchutney, you do not need to pasteurise it.
Cool the bottles to room temperature. Tighten the lids on the bottles as theycool down.Pasteurised vinegar will keep for up to 12 months if it is stored in a cool dryplace away from direct sunlight.Non-pasteurised vinegar should be used within one month.
79Vinegar
Vine
gar
Filter
Filling and packaging
Heating (optional)
Cooling and storage

Mulberry vinegar
Ingredients (to make 15 litres vinegar)
Single fermentation10kg mulberries10 litres of boiled water 2.4 kg sugar (120g sugar per litre of diluted juice)2tsp lemon juice (1tsp lemon juice per 10 litres diluted juice)
Two-stage fermentation10kg mulberries20 litres boiled water3.6 kg sugar (120g sugar per litre of diluted juice)3tsp lemon juice (1tsp lemon juice per 10 litres diluted juice)
Sort the mulberries and select those that are ripe. Discard any that are rottenor infected.Place in a large plastic or clay pot that is suitable for fermentation. .Boil the water and allow it to cool before you use it. Do not use chlorinated waterfor making vinegar as the chlorine will prevent the fermentation taking place.
All the equipment you use should be clean. Steam –sterilise the bottles beforeuse to get rid of any bacteria that can contaminate the fermentation.
Squash the mulberries to break the cells and extract the juice. You can liq-uidise the fruit if you have a liquidiser, otherwise do it by hand to make apulp. Add clean boiled water to the mulberries (1 litre per litre of squashedmulberries) to make diluted pulp. Add sugar (120g per litre of diluted pulp).Add lemon juice (1tsp per 10litres of diluted pulp) to increase the acidity ofthe diluted pulp.Cover the pot with a clean cotton cloth to keep out the dust and insects. Leaveto ferment until you can smell vinegar.You can speed up the fermentation by adding a starter culture (some left overjuice from a previous fermentation) to the mulberry liquid.Keep the pot at 20-22°C to speed up the fermentation.
80Home-based Fruit and Vegetable Processing
Vine
gar
Selection and preparation of the fruit
Prepare equipment
Traditional fermentation

After about 8 days the level of acidity in the vinegar should be high enough(about 4% acid, which is equivalent to a pH of 3). The time of fermentation thisdepends on the temperature – if it is very cold, the fermentation will take a lotlonger than this). You need a pH paper to test the acidity. If you do not haveone, you can do a simple titration test to find out how strong your vinegar is(See page X, below). If you need the vinegar to be stronger, leave it to fermentfor a few more days. You might need to add some more sugar to the mixture.
Drain off the liquid. Filter it through a muslin cloth. Save some of the residualfruit slurry to use as a starter culture in the next batch of vinegar.
Improved two stage fermentationThis method involves two separate fermentations. Ethanol is made by addingyeast to the fruit mixture. The ethanol is then converted into vinegar by addingacetobacter.
Fermentation 1Make the fruit pulp by mixing crushed mulberries with boiled water (1 litre perkg fruit). Dilute the pulp with extra water (1 part water to 1 part pulp). Addsugar to the diluted pulp (120g per litre diluted pulp) and lemon juice (1tsp per10 litres diluted pulp).
Activate the yeast: place the yeast in a cup with some sugar, warm waterand a small quantity of the fruit pulp. Keep the mixture warm (30°C) andafter about 15 – 20 minutes it should start to bubble, If the yeast does notstart to produce bubbles in the glass, it is dead. You need to get anothersupply of yeast.Add the yeast to the pulp, place in a large plastic bucket and leave to fermentat 25°C for two days. You need to make sure that the first fermentation is in aclosed container, to prevent any air getting into the mixture. The bacteria thatconvert sugar into ethanol have to do it without oxygen.
Filter the mixture through a muslin cloth and collect the liquid.
81Vinegar
Vine
gar
Filter
Filter

Fermentation 2Add the acetic acid bacteria (acetobacter) to the liquid (use a starter culture thathas been saved from a previous batch of vinegar). Place in a warm place (20-22°C), cover with a clean cotton cloth and leave to ferment for 11 days. It isessential that air gets to the liquid during the second stage as the acetobacterneed oxygen to convert the ethanol into vinegar.
Drain off the liquid. Filter it through a muslin cloth. Save some of the residualfruit slurry to use as a starter culture in the next batch of vinegar. You cannotuse pasteurised vinegar as a starter culture as pasteurisation kills the bacteriathat are needed for fermentation. Make sure you save a sample before it ispasteurised.
Fill the vinegar into clean, sterilised bottles. Place on the caps and fastenloosely.
Place the bottles in a pan of water and heat to boiling for about 10 minutesto pasteurise the vinegar. This will give it a longer shelf life. This stage isoptional. If you are using the vinegar straight away, for example to makepickle or chutney, you do not need to pasteurise it.
Cool the bottles to room temperature. Tighten the lids on the bottles as theycool down.Pasteurised vinegar will keep for up to 12 months if it is stored in a cool dryplace away from direct sunlight.Non-pasteurised vinegar should be used within one month.
82Home-based Fruit and Vegetable Processing
Vine
gar
Filter
Filling and packaging
Heating (optional)
Cooling and storage

POTATO CRISPS
83Potato Crisps
Pota
to
Crisp
s
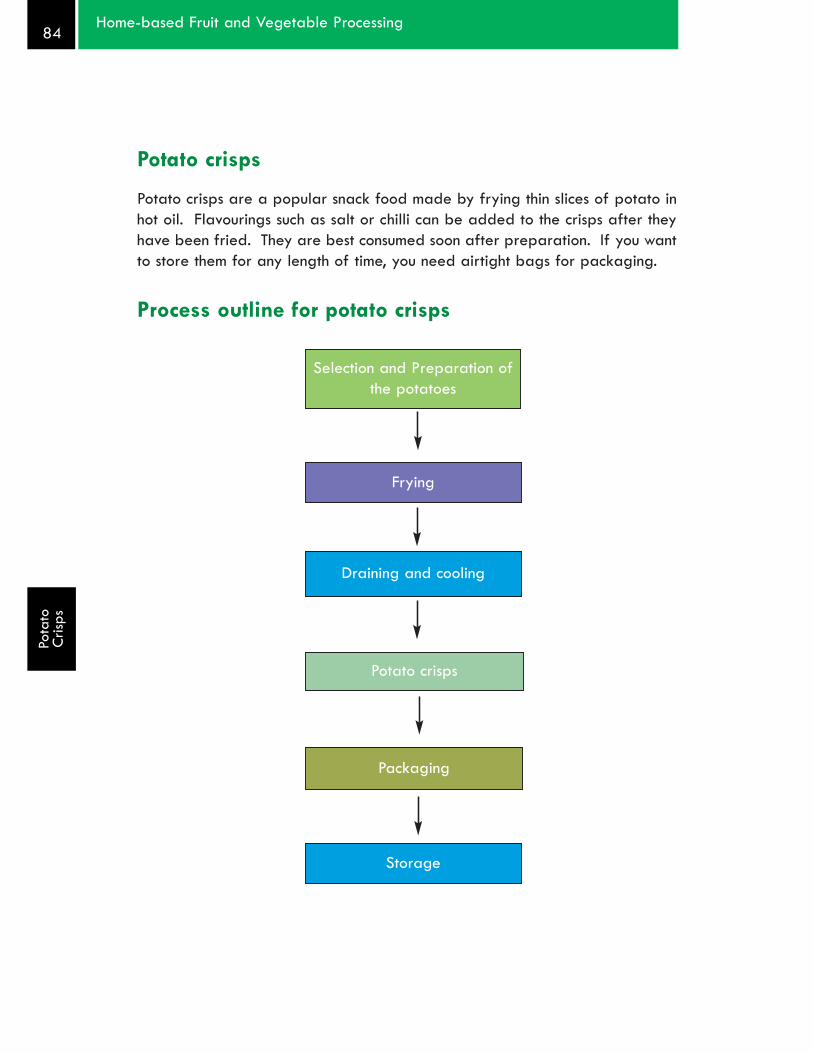
Potato crisps
Potato crisps are a popular snack food made by frying thin slices of potato inhot oil. Flavourings such as salt or chilli can be added to the crisps after theyhave been fried. They are best consumed soon after preparation. If you wantto store them for any length of time, you need airtight bags for packaging.
Process outline for potato crisps
84Home-based Fruit and Vegetable Processing
Pota
to
Crisp
s
Selection and Preparation ofthe potatoes
Packaging
Frying
Draining and cooling
Storage
Potato crisps
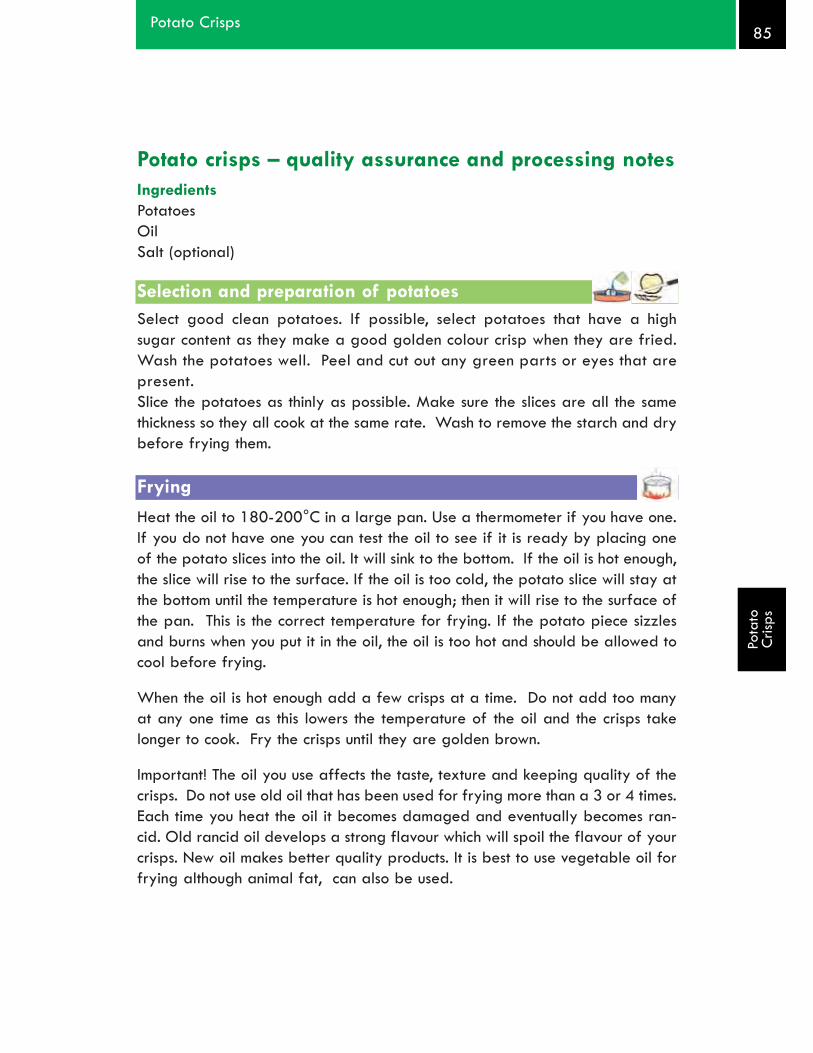
Potato crisps – quality assurance and processing notesIngredients PotatoesOilSalt (optional)
Select good clean potatoes. If possible, select potatoes that have a highsugar content as they make a good golden colour crisp when they are fried.Wash the potatoes well. Peel and cut out any green parts or eyes that arepresent.Slice the potatoes as thinly as possible. Make sure the slices are all the samethickness so they all cook at the same rate. Wash to remove the starch and drybefore frying them.
Heat the oil to 180-200°C in a large pan. Use a thermometer if you have one.If you do not have one you can test the oil to see if it is ready by placing oneof the potato slices into the oil. It will sink to the bottom. If the oil is hot enough,the slice will rise to the surface. If the oil is too cold, the potato slice will stay atthe bottom until the temperature is hot enough; then it will rise to the surface ofthe pan. This is the correct temperature for frying. If the potato piece sizzlesand burns when you put it in the oil, the oil is too hot and should be allowed tocool before frying.
When the oil is hot enough add a few crisps at a time. Do not add too manyat any one time as this lowers the temperature of the oil and the crisps takelonger to cook. Fry the crisps until they are golden brown.
Important! The oil you use affects the taste, texture and keeping quality of thecrisps. Do not use old oil that has been used for frying more than a 3 or 4 times.Each time you heat the oil it becomes damaged and eventually becomes ran-cid. Old rancid oil develops a strong flavour which will spoil the flavour of yourcrisps. New oil makes better quality products. It is best to use vegetable oil forfrying although animal fat, can also be used.
85Potato Crisps
Pota
to
Crisp
s
Selection and preparation of potatoes
Frying

Remove the crisps from the hot oil. Drain on absorbent paper to remove anyexcess oil. Add flavourings such as salt or chilli if required.It is important to drain the crisps to remove the excess oil. Poorly drained prod-ucts leave a greasy film inside the packaging which looks unattractive andaccelerates deterioration of the crisps.
Fried crisps rapidly absorb water from the surrounding air and soon becomesoft. They should be packaged as soon as they are cool. Do not seal in thepackets before they are cool or condensation will form on the inside of thepacket. The packaging must be air tight and moisture proof.
Potato crisps should be stored in a cool dry place away from direct sunlightbecause they will soften if they are in a damp place. Crisps should be storedaway from products with a strong taste or odour because they will pick up thetaste from other products if they are stored together.They should be consumed within one month of production.
86Home-based Fruit and Vegetable Processing
Pota
to
Crisp
s
Draining
Storage
Packaging

MEASUREMENTS AND PREPARATION OF SOLUTIONS
87Measurements and Preparation of Solution
Mea
sure
men
ts an
dPr
epar
atio
n of
Solut
ions

Measuring ingredientsFor accurate measurements of ingredients, weighing scales are recommended.However, if these are not available, you can use containers found in the kitchento measure out different amounts. For accuracy and consistency of the prod-uct, the same measure should be used for each batch of product that you make.
Table 9: Approximate weight of different ingredients
IMAGE 28 - pictures in the table of the different measures - cup, teaspoon,tablespoon, pepsi bottle and others that are commonly used
Table 10: Weight of volume of common containers
Approximate weight (g)
Ingredients 1 teaspoon full(1tsp)
1 tablespoon full(1tbs) 1 cup (250ml)
Salt 7.0g 21.0g 350g
Sugar 6.0g 18.0g 300g
Pectin 3.5g 10.5g
Citric acid 7.0g 21.0gSodiummetabisulpHite 6.5g 19.5g
Container Weight or volumeCup (tea cup commonly used inAfghanistan) 250ml
Teaspoon 5mg or 5mlTablespoon 15mg or 15mlLarge pepsi bottle 1.5 litres or 3 litresCoke/pepsi can 330ml
Oil plastic bottles CHECK
Ghee / oil cans CHECK
88Home-based Fruit and Vegetable Processing
Mea
sure
men
ts an
dPr
epar
atio
n of
Solut
ions
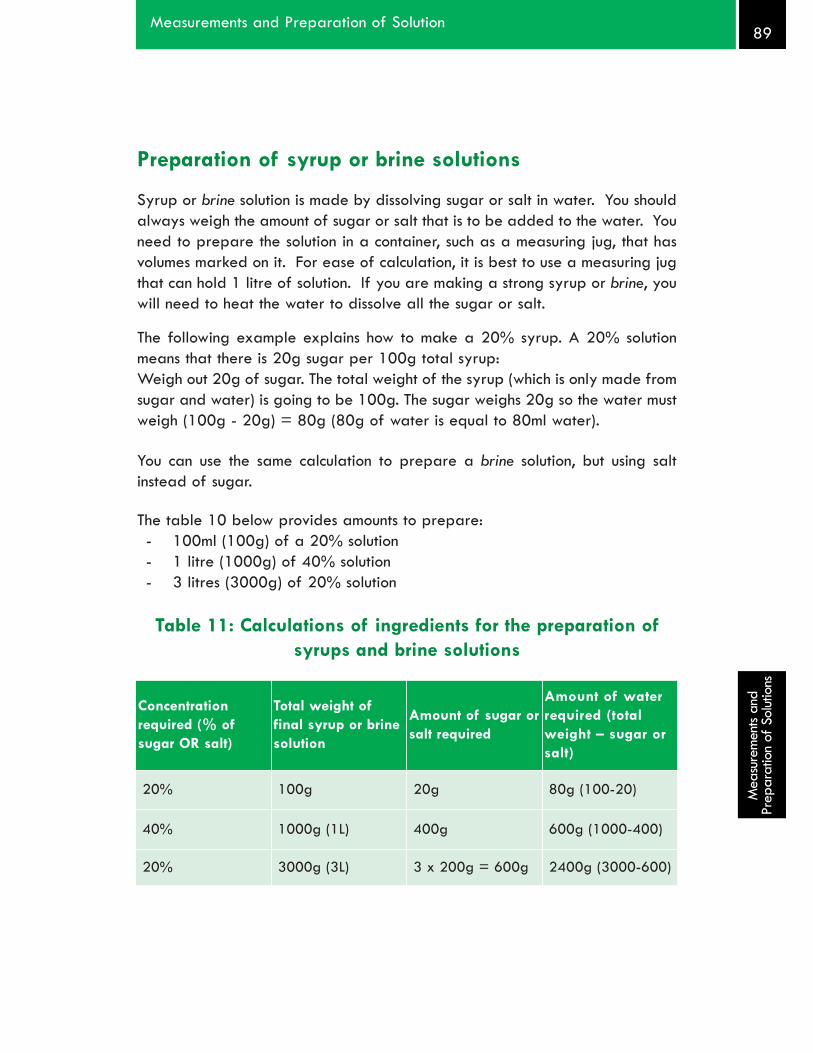
Preparation of syrup or brine solutions
Syrup or brine solution is made by dissolving sugar or salt in water. You shouldalways weigh the amount of sugar or salt that is to be added to the water. Youneed to prepare the solution in a container, such as a measuring jug, that hasvolumes marked on it. For ease of calculation, it is best to use a measuring jugthat can hold 1 litre of solution. If you are making a strong syrup or brine, youwill need to heat the water to dissolve all the sugar or salt.
The following example explains how to make a 20% syrup. A 20% solutionmeans that there is 20g sugar per 100g total syrup:Weigh out 20g of sugar. The total weight of the syrup (which is only made fromsugar and water) is going to be 100g. The sugar weighs 20g so the water mustweigh (100g - 20g) = 80g (80g of water is equal to 80ml water).
You can use the same calculation to prepare a brine solution, but using saltinstead of sugar.
The table 10 below provides amounts to prepare:- 100ml (100g) of a 20% solution- 1 litre (1000g) of 40% solution - 3 litres (3000g) of 20% solution
Table 11: Calculations of ingredients for the preparation ofsyrups and brine solutions
Concentrationrequired (% ofsugar OR salt)
Total weight offinal syrup or brinesolution
Amount of sugar orsalt required
Amount of waterrequired (totalweight – sugar orsalt)
20% 100g 20g 80g (100-20)
40% 1000g (1L) 400g 600g (1000-400)
20% 3000g (3L) 3 x 200g = 600g 2400g (3000-600)
89Measurements and Preparation of Solution
Mea
sure
men
ts an
dPr
epar
atio
n of
Solut
ions

A common mistake in calculating syrup concentrationsQuite often, when people make a syrup or a brine solution, they assume thatyou add the given amount of sugar or salt to 1 litre of water. In fact the givenamount of salt or sugar should be dissolved in a smaller amount of water andthen the total volume made up to 1 litre.
For example, you need to make 3 litres of a 20% syrup.Based on the calculations above, you need to take 3x200 g (600g) sugar anddissolve this in 3000-600 (2400g) water.
A common mistake is to take (3x200g) 600g sugar and dissolve this in 3litres(3000g) water. If you do this, you end up with a total syrup weight of 3,600gThe proportion of sugar in this is 600g out of a total of 3,600g, which is equalto 17% (600/3600 x100) instead of the 20% that you require.
90Home-based Fruit and Vegetable Processing
Mea
sure
men
ts an
dPr
epar
atio
n of
Solut
ions

Water chlorination
Clean water is an essential part of food processing. Water is needed toclean the raw materials and the equipment and also for use as an ingredi-ent in some processes.
Water can be made safe to use by boiling for 10-15 minutes. However, this iscostly in terms of the amount of fuel needed and the time taken to steriliselarge amounts of water.
An alternative method is to add chlorine to the water. Chlorine solutions of dif-ferent strengths are needed for different purposes:
For water that is used for cleaning, a concentration of 60-100ppm chlo-rine is required.For water that is to be used for drinking or as an added ingredient,0.5ppm chlorine is needed. If too much chlorine is added to drinkingwater, it can affect the flavour of the products.
Water is chlorinated by adding sodium hypochlorite, which has 50% availablechlorine. If sodium hypochlorite is not available in the market, household bleachcan be used. Household bleach contains between 3 and 6% available chlorine.But this will probably be more expensive See the boxes below for detailed instructions.
Warning!Chlorine kills most microbes, but is also a dangerous chemical. Care must be takenwhen making the solution. Wear gloves to avoid burning the skin. Do not get itin the eyes. Do not breathe in the fumes. Chlorine corrodes aluminium equipment,so use plastic buckets and spoons for mixing
91Measurements and Preparation of Solution
Preparation of water for cleaning fruits, vegetables and equipment (clean-ing solution)A chlorine solution of 100ppm should be used.
Using bleachAdd 10ml (2 tsp) of bleach to 5 litres of water
Using sodium hypochloriteAdd 200mg sodium hypochlorite to 1 litre of water
ALLOW THE CHLORINATED WATER TO STAND FOR 30 MINUTES TO ALLOWCHLORINE TO REACT WITH THE WATER
Mea
sure
men
ts an
dPr
epar
atio
n of
Solut
ions

Preparing a sulphite solution
Sulphur dioxide is used during drying to help preserve the fruit and to preventthe colour fading. The gas can be produced by burning elemental sulphur, orby dissolving sodium metabisulphite (Na2S2O5) in water to make a sulphitesolution.
The concentration of sulphur dioxide is usually expressed as ppm (parts per mil-lion). 1ppm = 1 part in 1,000,000. It is equivalent to the measurement ofmg/kg (or mg per litre).
When sodium metabisulphite is dissolved in water, only about two thirds (2/3)of the weight of sodium metabisulphite is turned into sulphur dioxide. Therefore,to achieve a known final concentration of SO2, you have to dissolve 3/2 (1.5)times more weight of Na2S2O5 than the final concentration you require.
For example, to achieve a concentration of 1000 ppm (mg/L), you have to dis-solve 1000 x 1.5 (1500mg) of sodium metabisulphite in 1 litre of water.
92Home-based Fruit and Vegetable Processing
Preparation of water to be used for drinking or in processing (as aningredient)
A 0.5ppm chlorine solution should be used.
Using bleach:Prepare the cleaning solution described in the other box, and dilute it 200times: Take 1 tsp (5ml) of the cleaning solution (100ppm chlorine) and add it to1 litre of water.
Using sodium hypochloriteAdd 5mg (1tsp) sodium hypochlorite to 5 litres of water.
Using the chlorine solution available in pharmacies (which contains 0.5%sodium hypochlorite)Add 2ml chlorine solution to 10 L of water.
ALLOW THE CHLORINATED WATER TO STAND FOR 30 MINUTES TO ALLOWCHLORINE TO REACT WITH THE WATER
Mea
sure
men
ts an
dPr
epar
atio
n of
Solut
ions

To achieve a final concentration of 800ppm SO2, you have to dissolve 800 x1.5 (1200mg) sodium metabisulphite in 1 litre of water.It is always easier to work out how much of a powder needs to be added to 1litre water (remember mg per litre give ppm) and then multiply this to get thefinal quantity you require.
For example if you need 3 litres of a 800ppm SO2 solution, you calculate thatyou need 1200mg to make 1 litre, therefore you will need 3 x 1200mg(3600mg) to make 3 litres.
The calculations for preparing a sulphur dioxide concentration are summarisedin the table below.
Table 12: Amounts of sodium metabisulphite and waterrequired to prepare different concentrations of SO2.
Concentration ofSO2 required
Amount of totalSO2 solution
required
Amount of sodiummetabisulphite
Amount ofwater
1000 ppm (mg/L) 1L (1000g) 1500mg or 1.5g(1.5 x 1000mg) 1L (1000g)
800 ppm 1L (1000g) 1200mg or 1.2 g(1.5 x 800mg) 1L (1000g)
800ppm 3L (3000g) 3600mg or 3.6 g(=1.5 x 800mg x 3L) 3L (3000g)
93Measurements and Preparation of Solution
Mea
sure
men
ts an
dPr
epar
atio
n of
Solut
ions

The Pearson Square
The Pearson square is a method that processors can use to calculate the amountsof two components that should be mixed together to give a final known con-centration.For example, it can be used to calculate the amounts of fruit pulp and sugar tomake a jam. The method can only be used for blending two components. Whenmore than two components are involved, it becomes more complex.
Example of how to use the Pearson SquareYou wish to produce a fruit jam with a final sugar content of 68%. You use apricotpuree (that contains 15% sugar), mixed with sugar (that contains 100% sugar).
1. Draw a rectangle
2. Label the two horizontal lines with the names of the two products to beblended (fruit puree and sugar)
Apricot puree
Sugar
3. Enter the sugar composition of each product in the rectangle as shown below:Apricot puree
Sugar
94Home-based Fruit and Vegetable Processing
Mea
sure
men
ts an
dPr
epar
atio
n of
Solut
ions
15
100
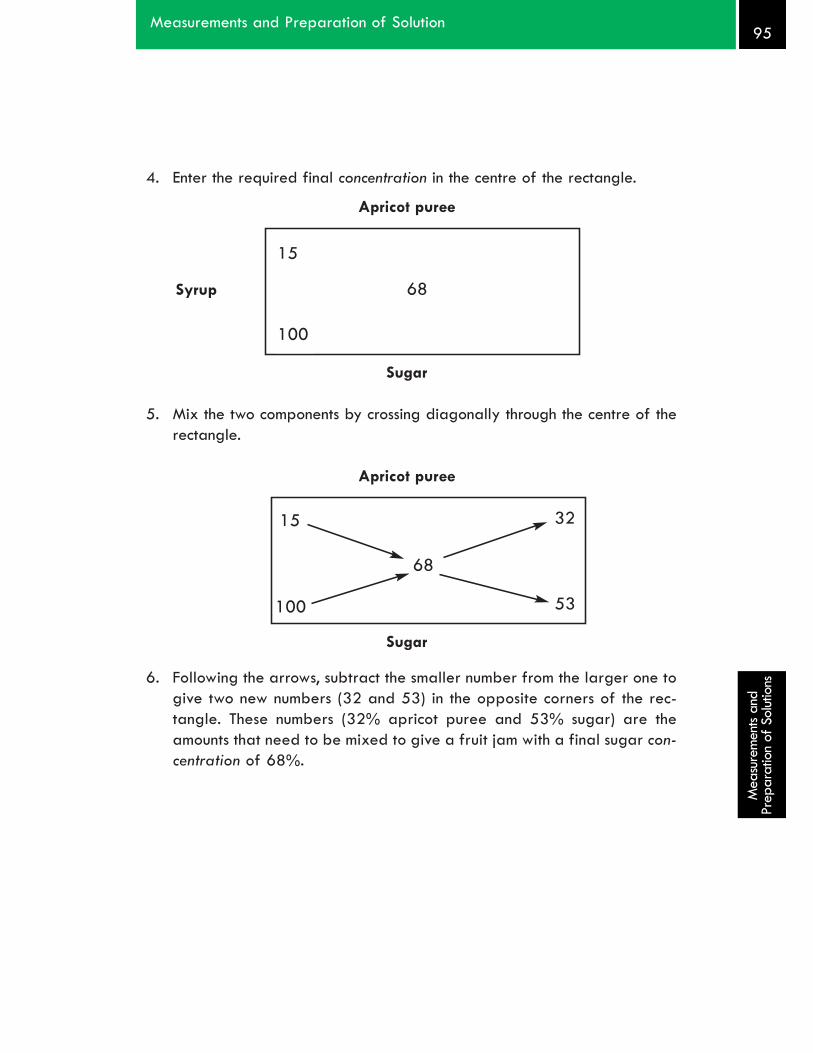
4. Enter the required final concentration in the centre of the rectangle.
Apricot puree
Syrup
Sugar
5. Mix the two components by crossing diagonally through the centre of therectangle.
Apricot puree
Sugar
6. Following the arrows, subtract the smaller number from the larger one togive two new numbers (32 and 53) in the opposite corners of the rec-tangle. These numbers (32% apricot puree and 53% sugar) are theamounts that need to be mixed to give a fruit jam with a final sugar con-centration of 68%.
95Measurements and Preparation of Solution
Mea
sure
men
ts an
dPr
epar
atio
n of
Solut
ions
15
15
68
100
32
53
100
68
Measuring the strength of vinegarYou can test the strength (acidity) of your homemade vinegar by doing a sim-ple titration. All you need is a few small glasses and jars, an eyedropper, alittle baking soda (sodium bicarbonate), a small amount of commercial vine-gar and some red cabbage or beetroot (you can also use dark coloured rosepetals or a strong cup of tea as the indicator).
In one small jar put a solution of baking soda in water. The amount doesnot matter, but it should be enough so that a little un-dissolved soda set-tles at the bottom of the jar after it has been mixed well.In the other jar, put some water that is left over from cooking beetroot orred cabbage. You want a strong purple colour: you can steam a head ofcabbage or boil a beetroot in just a small amount of water.Next put a few millimeters of water in two glasses. The amount does notmatter, but make certain you have the same amount in both glasses.Use the eyedropper to put enough drops of the purple liquid into thewater in the glasses to give the water a definite colour. Again, be carefulto put the same amount in each glass.Rinse the eyedropper in water, then in the store-bought vinegar. Then putseven drops of the store-bought vinegar into one of the glasses ofcoloured water which is your ‘control’ or standard.Rinse the eyedropper in water again, then in your homemade vinegar, and addseven drops of your homemade vinegar to the other glass – this one is your test glass.Rinse the eyedropper in water again, then in the baking soda solution. Put20 drops of the baking soda solution in the ‘control’ glass (with store-bought vinegar). Stir it with a glass rod or plastic spoon. The water willturn blue. The exact shade depends on the pH of your water.Add baking soda solution, one drop at a time (remember to count the drops asyou add them) to the test glass. Stir after adding each drop. Do this until the colourof the water in the test glass exactly matches the colour of the water in the con-trol glass. If you add a drop too much, no problem. Just don’t count that one.When the colours of the two glasses match, the acid content of your home-made vinegar is equal to the number of drops of baking soda solution youput in the test glass divided by four.
For example: if you used 28 drops of solution, the acidity is 28 divided by 4, or 7%.But you require a 5% vinegar to make pickles.How do you make it 5%?You need to water it down. To make it 5%, subtract 5 from whatever your home-made vinegar tested: in our example, 7-5=2. Multiply that by the amount ofvinegar (in ml) you are going to dilute. For instance if you have 250ml, 250 x2 = 500. Divide that by 5, and you get 100.Add 100 ml of water to 250ml of 7% vinegar to make it 5% acidity.Follow the method of the Pearson square (see page X above) to do this calculation.
96Home-based Fruit and Vegetable Processing
Mea
sure
men
ts an
dPr
epar
atio
n of
Solut
ions

The designations employed and the presentation of materialin this information product do not imply the expression of anyopinion whatsoever on the part of the Food and AgricultureOrganization of the United Nations concerning the legal ordevelopment status of any country, territory, city or area or ofits authorities, or concerning the delimitation of its frontiers orboundaries. The mention of specific companies or products ofmanufacturers, whether or not these have been patented, doesnot imply that these have been endorsed or recommended bythe Food and Agriculture Organization of the United Nationsin preference to others of a similar nature that are not men-tioned. The views expressed in this publication are those of theauthor(s) and do not necessarily reflect the views of the Foodand Agriculture Organization of the United Nations.
FAO, 2008

USING THIS MANUAL
The Manual on Home-based Fruit and Vegetable Processing is composed oftwo books. This book is designed to complement Book One, "Principles ofpost-harvest handling, storage and processing of fruits and vegetables", byproviding recipes and guidance that will enable you to put into practice theprinciples described in Book One. It is advised that you start by reading BookOne before applying the recipes provided here. You can also regularly referback to Book One to better understand the purpose of each processing stepdescribed in Book Two.
Book Two is organised in seven chapters. Six chapters provide guidance andrecipes on different food processing techniques, namely:
DryingJam-makingSauces and chutneysPicklesVinegarPotato crisps
Each chapter begins by describing the processing outline for a given technique,and then providing detailed guidance on each step of the process. A colourcode and icons will enable you to follow clearly how the process unfolds.Detailed recipes for specific fruits or vegetables are then given, enabling youto put in practice the processing outline.
The last chapter, on "Measurements and Preparation of Solutions" gives guid-ance on essential tasks, such as how to calculate proportions of ingredients,chlorinate water, prepare solutions, and measure the strength of vinegar.
The definitions of words written in italic can be found in the Glossary ofBook One.
a


TABLE OF CONTENTSDRYING ...........................................................................................................................6
Processing outline for dried fruit and vegetables .............................................8Dried tomato ...........................................................................................................19Dried tomato ...........................................................................................................19Dried apricots .........................................................................................................20Dried onions ............................................................................................................21Dried apples ..........................................................................................................22
JAM-MAKING .............................................................................................................23Processing outline for Jam and Jelly ................................................................25Fruit jam or jelly – process details and quality assurance ..........................26Apricot jam ...........................................................................................................32Carrot and lemon jam ..........................................................................................33Cherry jam .................................................................................................34Mulberry jam ......................................................................................................35Apple jam ............................................................................................................36Apple jelly ............................................................................................................37
SAUCES AND CHUTNEYS ........................................................................................38Processing outline for sauce and chutney .........................................................40Sauce and chutney – process details and quality assurance .......................41Italian style tomato sauce ....................................................................................43Italian style tomato sauce ...................................................................................43Tomato paste .........................................................................................................45Tomato sauce or ketchup ....................................................................................47Tomato puree or simple concentrate .................................................................49Tomato concentrate (non-cook method) ............................................................51Coriander chutney (chatni gashnize) .................................................................54Vegetable chutney ................................................................................................55Tomato chutney (Chatni Badenjani Romi) ..........................................................57Chili chutney (Chatni Morchi Sorkh/Sabz ) ......................................................58
PICKLES ......................................................................................................................59Processing outline for lactic acid fermented pickles (atchar) .......................61Fermented pickles – process details and quality assurance .......................62Pickled cucumbers .................................................................................................64Mixed pickle ..........................................................................................................65Pumpkin pickle .......................................................................................................67
b

VINEGAR .....................................................................................................................69Process outline for fruit and vinegar .................................................................71Fruit vinegar – quality assurance and processing notes ................................72Tomato vinegar ....................................................................................................74Mulberry vinegar .................................................................................................76
POTATO CRISPS ........................................................................................................78Process outline for potato crisps ..................................................................79Potato crisps – quality assurance and processing notes ...............................80
MEASUREMENTS AND PREPARATION OF SOLUTIONS ................................82Measuring ingredients .....................................................................................83Preparation of syrup or brine solutions ............................................................84Water chlorination ..............................................................................................85Preparing a sulphite solution ..............................................................................85Preparing a sulphite solution ..............................................................................86The Pearson Square ..............................................................................................87Measuring the strength of vinegar .....................................................................89
c

DRYING
1Drying
Dryi
ng

DryingDrying is one of the most popular methods of preserving fruit and vegetables.You can dry most fruit and vegetables and, if you dry them properly and storethem well, they will keep for a long time.
Common fruits and vegetables suitable for drying:apricotsgrapes plumstomatoesonionsokra egg plantgarlicgreen vegetables such as spinach, mint, dill (“shibet”).
At the home level, there are two main options for drying:drying in the sun,solar drying with either a direct or indirect solar dryer.
Each type of dryer has its advantages and disadvantages. The informationprovided in Book 1 allows you to decide which is the best type of dryer foryour own situation.
Annex 2 of Book 1 also provides different models of dryers and guidance on howto build them
2Home-based Fruit and Vegetable Processing
Dryi
ng
Should I dry fruit and vegetables?
Yes, if you live in a hot dry climate Drying is one of the cheapest methods offood preservationIt requires very little equipment You can dry most fruit and vegetables andsave them for the off seasonDried foods have a long shelf life and canbe used in a variety of ways
No, if you live in a cold and/or humid climateYou will need to use a fuel-assisted dryerwhich is expensiveThe foods may not dry properly and willspoil during storage.
DRYING - Equipmentneeded
KnifeSulphur tent or cabinet(optional)Large pan for blanch-ing (optional)Dryer (optional)Packaging materialHeat sealer (optional)

Processing outline for dried fruit and vegetables
3Drying
Dryi
ng
Selection and preparation of the fruit(washing and cutting)
Blanching (optional)
Drying
Dried product
Conditioning and Packaging
Sulphuring or sulphiting(optional)
WashingWash the fruit and vegetables to remove dirt and bacteria that are present onthe skin.
Wash unpeeled fruits and vegetables, using chlorinated water (see the sectionon the preparation of chlorinated water for washing, page X). Take care not tobreak the skin of the fruits as this will contaminate the flesh. Wear gloves andaprons to protect your hands and clothes. Ten litres of treated water (100ppmchlorine) will be sufficient for about 20kg fruit. Change the wash water afterthis amount has been washed as it becomes contaminated by the fruit.
Chopping and slicingCut the fruit and vegetables into slices of similar thickness and size so thatthey dry at the same rate. The table below gives recommended thickness fordifferent fruit and vegetables.The following points are useful to consider:
thick pieces dry at a slower rate than thinner ones;thicker pieces may not dry fully in the centre and will not store well;very thin pieces tend to stick to the drying trays;packets of mixed thick and thin pieces do not look attractive.
It is best to use stainless steel knives to peel and chop the fruit and vegetables.If you do not have a stainless steel knife, make sure you use one with a clean,sharp blade.
Table 1: Preparation and slice thickness for fruits and vegetables
Recommended preparation and slice thickness for various fruit and vegetables
OkraWash the pods. If the pods are biggerthan 7cm long, cut them into slices (10mmthick). Pods less than 7cm long can besliced in half from top to bottom.
Spinach
Wash thoroughly to remove soil. Cut outthe hard tough stem from the centre ofolder leaves. The stem in younger leaves isnot as tough and can be used. Pat dry toremove excess water.
LeekWash and dry thoroughly. Remove theouter dark green layers which may be oldand tough. Cut into rings (10mm).
4Home-based Fruit and Vegetable Processing
Dryi
ng
Preparation of the fruit or vegetable

5Drying
Dryi
ng
Onion Remove the outer skin. Remove the top androot end. Cut into slices 3-5mm thick.
Apricot
Select firm, mature, but not over-ripe fruit.Wash well. Do not peel. You can cut theapricots in half or leave them whole (thismakes the final product softer and easierto clean). If you leave them whole,squeeze out the pit after two to threedays of drying –when apricots are stillsoft- by pressing gently on the apricot.
Apple
Select mature, firm apples. Wash well.Remove the peel and take out the centralcore. Cut in rings or slices 3-5mm thick orcut in quarters or eighths.
Grape
Wash, sort, remove stems. Leave the smallseedless grapes whole. Large grapesshould be cut in half. If drying whole, crackthe skins by dipping in boiling water for 30seconds. If halved, dip in a solution of dilut-ed lemon juice (250ml lemon juice per litreof water) for up to 10 minutes. Drain.
Tomato
Dip in boiling water to loosen the skins. Chillin cold water and peel. Cut into sections lessthan 20mm wide or cut in half, depending onthe size of the tomato.
Plums
Wash well. Leave whole if small; cut largefruit into halves or slices and remove thestone. If left whole, crack skins in boilingwater for 1 to 2 minutes. If cut in half, dip ina solution of lemon juice for 10 minutes.Remove and drain.
Cherries
Select fully ripe fruit. Wash well. Removestems and stones. Dip whole cherries inboiling water for 30 seconds to crack theskins. If cut in half, dip in a solution ofdilute lemon juice (250ml lemon juice perlitre of water) for up to 10 minutes.Remove and drain well.

Vegetables are blanched to inactivate the enzymes and reduce the number andactivity of microbes. Blanching is used for hard vegetables such as carrots, beansand peas as it helps to preserve a good colour and softens the vegetable so thatit dries more quickly later on. It is not used for soft vegetables or fruits such astomatoes, onions and peppers.
Place the cut pieces of vegetable intoboiling water or hold them in steam for upto 5 minutes.The length of time needed to blanch avegetable varies with the type of veg-etable, the size of the pieces and the num-ber of pieces blanched at any one time.The following table gives a rough guide. Ifvegetables are blanched for too long, theylose their colour and taste.
Table 2: Blanching time for selected vegetables
You need a large volume of water so that all the pieces are heated thorough-ly in as short a time as possible. Use 4.5 litres of water for each 500g of pre-pared vegetable.
Hot water blanching1. Cut the vegetables into even sized pieces. Large thick pieces take longer
to blanch than small thin pieces.2. Boil a large pot of water.
Blanching time (minutes)Vegetable Steam blanching Water blanchingEggplant (slices) 3.5 2Leafy green vegetables 2-2.5 1.5-2Green beans 2-2.5 1.5-2Carrots (sliced) 3-3.5 2Cabbage 2.5-3 1.5Okra (whole pods) 4.5-6 3-4Cauliflower florets 4.5 3
6Home-based Fruit and Vegetable Processing
Dryi
ng
Blanching
Blanching

3. Add the vegeta-bles to the boil-ing water. Donot add toomany at one timeor the tempera-ture of the waterwill drop and theprocess will takelonger. If you have a sieve, mesh basket or clean muslin cloth, place thevegetable pieces in this and dip it in the boiling water. Move the muslincloth around to ensure that the vegetables receive heat evenly.
4. Wait until the water starts to boil again (if it does not boil after 1 minute,there are too many vegetables for the amount of water). Boil for therequired time then quickly remove the vegetables from the pan of water.
5. Immediately put the vegetables into a large pan of cold (iced, if possible)water. This stops the heating process and helps to keep a good colour.
Steam blanching1. Cut the vegetables into even sized pieces. Large thick pieces take longer
to blanch than small thin pieces.2. Boil a large pot of water.3. Place the vegetable pieces in a sieve or colander. Hold the colander in
the steam above the pot of boiling water. Place a lid on the pot andleave the vegetables in the steam for the required time (steam blanchingtakes about 1! times longer than water blanching). You can use amantoo pot for this step.
4. After the set time, quickly immerse the colander of vegetables into alarge pan of cold (iced, if possible) water. This stops the heating processand helps to keep a good colour.
Sulphur dioxide is used to preserve the colour and increase the shelf life ofdried foods, especially fruits. It cannot be used to treat red fruits such as cher-ries as it bleaches the flesh. It is commonly used to preserve apricots.
There are two methods of treatingfruit with sulphur: sulphiting andsulphuring.
7Drying
Dryi
ng
Sulphuring and sulphiting
Why should I blanch vegetables before drying?
Blanching is usually only used for hard or green vegetables.It softens the hard vegetables which makes it easier for thewater to be lost from them during the drying process.It also helps to maintain a good colour, especially ingreen vegetables.Blanching kills microbes that can cause spoilage. It alsoinactivates enzymes that cause the vegetable to ripenand mature.
Why do I need to use sulphur dioxide (SO2)?Sulphur dioxide is not essential, but it helps tokeep a good colour in fruits, especially apri-cots, and helps to prevent the growth ofmould and fungus

1. Sulphiting,Pieces of fruit or vegetables aredipped in a solution that is made bydissolving sodium or potassiummetabisulphite in water. If the fruit isalso being blanched, the chemical canbe added to the blanching water.
The strength of the sulphite solution andthe dipping time depend on the type offruit and the size of the pieces.The strength of sulphur dioxide is expressed as "parts per million" (ppm). 1.5 gramsof sodium metabisulphite in one litre of water gives 1000 ppm of sulphur dioxide.
See page X on how to prepare sulphite solutions of various strengths.
Fruit halves should be dipped in the solution for up to 15 minutes. Fruit slicesshould be dipped for up to 5 minutes.2. Sulphuring
A piece of sulphur is burned in a closed chamber so that it gives off sulphurdioxide gas.
The sulphur chamber is either a cabinet or tent with a stack of perforated trays inside.(see Annex 3 of Book 1, to see how to make a simple sulphur box or tent).Food is placed on the trays, and the sulphur is placed on a metal plate, underthe lowest tray in the chamber. Allow the sulphur to burn for 2-3 hours, or untilall the fumes are absorbed by the fruits.
The amount of sulphur used and the time of exposure depend on the type of fruit, itsmoisture content, the size of the pieces and the permitted final levels in the product.
For most fruits 1.5-3g sulphur per kg food is sufficient.
8Home-based Fruit and Vegetable Processing
Dryi
ng
Warnings about sulphiting :Do not get sulphite solution on the skin as it can cause a rash.
After dipping a batch of fruit or vegetable, refill the container to the origi-nal level with fresh preservative solution of correct strength. After five lotsof produce have been dipped, the solution should be thrown awaySulphiting wets the fruit or vegetable: this makes the drying period longer
Warning about sulphuring :Take care when using sulphur or sulphite as the gas is not pleasant and can cause breath-ing problems. You need to do sulphuring in a well ventilated place, preferably outdoors.Place the burning sulphur in an enclosed chamber and DO NOT breathe in the gas.
Blanching

Warning: If too much sulphite is used it gives the fruit a bad taste. The maxi-mum permitted levels of sulphur in dried fruits are 0.005 to 0.2%. Some peo-ple do not like fruit that is treated with sulphur.
Table 3: Pre-treatments required for selected fruit and vegetables
Place the fruits and vegetables on drying trays, such as wooden frames with afitted base of netting. Mesh made of woven grass or thin branches can also beused. Metal netting must NOT be used because it discolours the product.
Make sure that the fruit and vegetable pieces are in a single layer and that thepieces are not touching. With 80 cm x 50 cm trays, the approximate load fora tray is 3 kg;
Fruit or vegetable Pre-treatment required
Apple
Wash in clean water, peel, cut into 1/8pieces. Blanching is optional. Either sul-phur using 1.5-3g/kg fresh fruit or dip insulphite (3g/litre) for 5 minutes
Cabbage Wash in clean water, shred coarsely.Blanch 3 minutes. Sulphite dip (3g/litre) for5 minutes
Carrots Wash in clean water, peel, cut into strips.Blanch for 4 minutes. Sulphite dip (3g/litre)for 5 minutes
Spinach Cut the stems near the base of the bunch,wash the leaves
thoroughly in clean water. Blanch 2 min-utes. Sulphite dip (3g/litre) for 5 minutes
Okra
Wash in clean water. Keep whole or slicelengthwise. Blanch 3 minutes using 1%NaHCO3 (Sodium bicarbonate). Sulphitedip (3g/litre) for 5 minutes
Tomato in clean water, cut in half lengthwise, removeseeds. Blanch 1-2 minutes. Do not sulphite.
9Drying
Dryi
ngDrying

Sun drying: place the trays on aframework at table height from theground to allow the air to circulatefreely around the drying materialand to keep the food away fromdirt. You can also make a bed ofrocks, lay out a thin sheet (e.g. ofcotton) on the rocks, and place theproduce on the sheet.If there is no dust, expose the drying trays to the wind to speed up drying.Dry or nearly dry products can be blown away by the wind. You canprevent this by covering the loaded tray with an empty one; this alsoprotects against insects and birds.At night the trays should be stacked in a ventilated room or coveredwith canvas.Plastic sheets should NEVER be used for covering individual trays dur-ing sun drying: they will cause condensation to form and the product willnot dry. If you need to cover the trays use a clean cotton sheet.
Products for sun drying should be prepared early in the day; this willensure that the material enjoys the full effect of the sun during the earlystages of drying.
Solar drying: Place the cut, prepared pieces of fruit and vegetableonto trays or drying racks that go inside the dryer.If you are using a cabinet dryer, you need to control the drying tem-perature so that the fruit and vegetables do not over-heat and dry tooquickly. Most fruit and vegetables are dried at about 60-70°C
Shade drying: Shade drying is carried out for products which can losetheir colour and/or turn brown in direct sunlight, such as tomatoes,herbs, green and red sweet peppers, chilies, green beans and okra.The material to be dried requires full air circulation. Therefore, shadedrying is carried out under a roof or thatch which has open sides.If using a dryer, it is better to place a screen inside the drying cabinet thanto place the whole dryer in the shade. The screen can be made from a cleansheet that is suspended above the food. A portable shelter is useful. It canbe used to cover the dryer to protect them from both the sun and the rain.
Under dry conditions when there is a good circulation of air, shade dryingtakes a little more time than is normally required for drying in full sunlight.
During the first part of the drying period, the material should be stirred andturned over at least once an hour. This will help the material dry faster and
10Home-based Fruit and Vegetable Processing
Dryi
ng
Blanching

more evenly, prevent it sticking together and improve the quality of the finishedproduct.
Dry the prepared fruit and vegetables until they reach the required finalmoisture content (10-15% for fruit and less than 10% for vegetables).
How do I know when the fruit and vegetables are dry?Dry vegetables should be hard and brittle. Take out a small handful of thedried vegetables and cool for a few minutes before testing for dryness.
Dry fruits are more leathery andflexible than dried vegetables. Totest them for dryness, take out a fewpieces of dried fruit and let themcool to room temperature. Squeezea handful of the fruit. If no moisture is left on the hand and pieces spring apartwhen you release your hand, they are dry.
It is important to let the fruit or vegetable cool before you test them as they aremore soft and bendy when they are warm.
How long should a food be dried for?
The drying time depends on several factors:the temperature inside the dryerthe flow of air through the dryer the amount of humidity in the airthe amount of water inside the foodthe size of the pieces of food.
When a new type of dryer is used, or if a different type of food is being dried,you have to do a few tests to find the rate of drying. The information can thenbe used to find the time that the food should spend in the dryer before themoisture content is low enough to prevent spoilage by micro-organisms.The rate of drying has an important effect on the quality of the dried foods.
11Drying
Dryi
ng
What is case hardening?Sometimes fruits can dry too quickly in the early stages of drying (this usually onlyhappens when artificial dryers are used) and a hard skin forms on the outside of thefruit pieces. This prevents any more water from being lost from the inside of the fruitpiece. This is known as case hardening. It can be prevented by using a lower dry-ing temperature at the start of drying and by cutting the fruit into smaller pieces sothat the water from the inside of the fruit does not have as far to travel to reach theoutside of the fruit piece.
To ensure safe storage of the fruit andvegetables, the final moisture contentshould be less than 10-15% for fruits andless than 10% for vegetables.

Figure 1. Example of a drying curve
12Home-based Fruit and Vegetable Processing
Dryi
ng
How to find the rate of drying
You need a clock and a set of scales.1. Make a graph that shows the time on the bottom and the weight of the food on
the side axis. (see figure 1) 2. Weigh the food and place it in the dryer. Record the weight on the graph.3. Leave for 5-10 minutes, take it out and re-weigh it. Record the weight.4. Replace in the dryer and leave for another 5-10 minutes.5. Continue this process, recording each weight, until the weight of food does not
change.6. In the graph, you will see two separate phases of drying - the 'constant rate'
(A-B on the graph) and the 'falling' rate periods (B-C on the graph).
In the constant rate the surface of the food remains wet which means it can be spoiledby moulds and bacteria. In the falling rate the surface is dry and the risk of spoilageis much smaller. When drying foods, the period from A to B should be as short as pos-sible to cut down on potential spoilage. The falling rate depends on the tempera-ture and efficiency of the dryer. It should be quick to prevent spoilage, but not toofast so to avoid the problem of case hardening.You should aim to get to the final weight (D on the graph) as quickly as possible toensure the best quality product.
A B
Moisturecontent
Drying time
CD

Table 4: Drying times in a cabinet dryer for fruits and vegetables
* This ratio means that dry okra is twelve times lighter than fresh okra.
Note: the drying times for tent dryers and sun drying are not providedbecause they depend on the climatic conditions.
When drying is complete, some pieces of fruit will contain more moisture thanothers due to their size and placement in the dryer during drying. Conditioningis a process that is used to distribute any remaining moisture throughout all thepieces. This reduces the chance of spoilage, especially from mould.Dried vegetables contain less moisture than fruits so do not usually need to beconditioned.
To condition the dried fruits, place them in large plastic or glass containers, abouttwo-thirds full. Cover the container and store in a warm, dry, well-ventilated placefor four to 10 days. Stir or shake the containers daily to separate the pieces. Ifbeads of moisture form inside the container, return the dried pieces to the dryer tocontinue the drying process, then repeat the conditioning step.
Pack the dried fruits or vegetables into sealed moisture-proof polyethylene bags.
Drying times in a cabinet dryer for fruit and vegetables
Okra 8-10 hours until tough and brittle. Ratio of wet to dry weights = 12:1*.Moisture content = 5%
Spinach 6-10 hours until crisp. Ratio of wet to dry weight = 12:1.* Moisturecontent = 5%
Leek 6-10 hours until very brittle (5% moisture)Onion 6-10 hours until very brittle (5% moisture)
Apricot
Arrange in single layer on trays. If cut in half, place the pit side upwith cavity popped up to expose more flesh to the air. Dry until soft,pliable, and leathery; no moist area in centre when cut (24-36 hours)If left whole, leave to dry for one to 2 days and then press the pit out.Leave to dry until soft and leathery.
Apple Arrange in single layer on trays, pit side up. Dry until soft, pliable, andleathery and there is no moist area in centre when cut (6-24 hours)
Grape Dry until pliable and leathery with no moist centre (12-24 hours)Tomato 6-24 hours until they are leathery and pliable
Plums Arrange in single layer on trays pit side up, cavity popped out. Dry untilpliable and leathery (6-10 hours for slices; 24-36 hours for halves)
Cherries Arrange in single layer on trays. Dry until tough, leathery, and slight-ly sticky (24-36 hours)
13Drying
Dryi
ng
Conditioning and packaging
Dried tomato
Select firm, ripe tomatoes. Reject any tomatoes that are over-ripe, rotten ordamaged. The under-ripe fruit can be left to ripen and used at a later date.
You can choose to leave the skin on, or remove it from the tomatoes.If you remove the skin, the fruit will dry more evenly. To do so, plunge the toma-toes in boiling water to loosen the skins. Remove from the hot water, cool in coldwater and peel the skin.
If you leave the skin on, the drying process will take longer as it is difficult forthe tomatoes to lose water through the skin. The final product will have a wrin-kled leathery skin with curled up edges (see figure 2). If the unpeeled piecesof tomato are too big, it might be difficult to remove all the moisture from thecentre of the pieces and they will not keep for very long after drying.
Cut the tomatoes. You can choose whether to leave them in half or quarters, orto cut them into slices (20mm thick). The amount of chopping depends on thesize of the tomatoes. Remember that the smaller pieces dry more quickly so youwill get a better dried product. But do not make the pieces too small (no lessthan 20mm thick) or they will shrivel and become crisp during drying.
Place the cut pieces of tomato on the drying tray. If you are using tomatohalves, place them with the cut side upwards. If you are not peeling the toma-toes, make sure the side with the peel is in contact with the tray. Place thepieces close together so you get as many as possible in the dryer. But do notlet the pieces touch or overlap.
Place the trays of fruit into the dryer, or outside in a well-ventilated area pro-tected from dust. Place the trays or dryer in the shade, as direct sunlight willcause the red colour to fade.
Dry until the pieces are soft and leathery.
14Home-based Fruit and Vegetable Processing
Dryi
ng
Preparation of the tomatoes
Drying

Conditioning is especially important to carry out if you leave the peel on thetomato and there is the risk of some moisture remaining in the dried pieces.Let the dried fruit pieces cool and then place in a large plastic or glass con-tainer. Fill the container to about two thirds full. Stand in a warm, dry, well ven-tilated place for up to 10 days. After this time, inspect the pieces of tomato. Ifthere are beads of moisture on the pieces, return them to the dryer or sun.Check them daily and retrieve them when they are dry.
Once you are sure that the pieces are all dry, pack them in moisture proofpackaging.
Figure 2 Dried tomatoes with a wrinkled skin.www.trainafoods.com
15Drying
Dryi
ng
Conditioning and packing

Dried apricots
Select firm, ripe apricots. Reject any fruit that are soft and over-ripe, rotten ordamaged. Wash the fruit in clean water.
Cut the fruit. Leave the apricots whole, or cut them apricots in half and take outthe stone. Do not peel the fruit.
Apricots are treated with sulphur dioxide to help them keep a bright orangecolour. It is not essential to treat with sulphur, but if you have some, it will alsohelp to preserve the fruit.
Place the apricot pieces (if cut, peel side downwards) onto mesh trays that fitinto the sulphur cabinet or tent. Place the pieces close together so that you canget as many as possible onto the tray. Do not let the pieces touch or overlap.
Place the sulphur (2g per kg of fruit) in a small dish inside the sulphur tent or cab-inet. Burn the sulphur for 2-3 hours to allow the gas to penetrate into the apricots.
Make sure that the sulphur gas cannot escape from the sulphuring chamber asit can cause breathing difficulties.
Place the trays of apricot into the dryer. Solar drying is better than sun drying as itgives the fruit some protection from dust and insects during drying. If you do not havea dryer, place them out in the sun, in a well ventilated area protected from dust.Dry the apricot pieces until they are soft and leathery.If you have left the apricots whole, squeeze out the pit by pressing gently, after1 or 2 days of drying (when the apricots are still soft but firm)
Remove the dried apricots from the dryer or sun. Allow them to cool to roomtemperature.
Place the dried apricot pieces in a large plastic or glass container. Fill the con-tainer to about two thirds full. Stand in a warm, dry, well ventilated place forup to 10 days. After this time, inspect the pieces of apricot. If there are beadsof moisture on the pieces, return them to the dryer or sun. Check them daily andretrieve them when they are dry.
Check that the pieces are all dry and pack in moisture proof packaging.
16Home-based Fruit and Vegetable Processing
Dryi
ng Preparation of the apricots
Sulphuring (optional)
Drying
Conditioning and packing
Dried onions
Select firm onions. Discard any that are rotten.Remove the outer skin and slice the onion into rings 3-5mm thick.
Place the onion rings onto the drying tray. Separate the smaller rings from thelarger ones. Place the pieces close together so you get as many as possible inthe dryer. But do not let the pieces touch or overlap.
Place the trays of onion into the dryer or in the sun and dry until the piecesare dry and brittle – the dried pieces should crumble in the hands when theyare crushed.
Remove the dried onions from the dryer or sun. Allow them to cool to room temper-ature. Check that the pieces are all dry and pack in moisture proof packaging.Conditioning is not necessary for onions as they are dried until they are brittleand crisp.Do not pack them while they are still warm or condensation will form on theinside of the packet, and spoil the onions.Also, do not leave dried onions in the open air: they easily attract water andbecome moist and soft again, and will need re-drying.
17Drying
Dryi
ng
Drying
Packing
Preparation of the onions

Dried apples
Select ripe apples. Wash the fruit in clean water.
Peel the fruit and remove the core. To make apple rings, slice the apple in halfand remove the core of the apples. Then slice each half into rings (3-5mm thick).Make sure all the slices are of the same thickness so they dry at the same rate.Alternatively, cut the apple into quarters and remove the core from each seg-ment. Cut the quarters in half again for drying.Apple rings are the preferred method of drying as they are the same thicknessthroughout. Apple segments are thicker on the outer edge than at the centreand will not dry as well as the flat rings.
Place the slices of apple into a bowl of water that contains 250ml lemonjuice per litre of water to prevent the apple pieces browning. Drain well andplace the slices on a tray for drying. The pieces should be close together butnot touching.
Place trays of fruit into the dryer. Solar drying is better than sun drying asit gives the fruit some protection from dust and insects during drying. If youdo not have a dryer, place them out in the sun, in a well ventilated area pro-tected from dust.Dry the apple pieces until they are soft and leathery. Depending on the sizeof the pieces and the climate, drying will take about 2 to 3 days in the sun.
Remove the dried apples from the dryer or sun. Allow them to cool to roomtemperature.
Place the dried apple pieces in a large plastic or glass container. Fill the con-tainer to about two thirds full. Stand in a warm, dry, well ventilated place forup to 10 days. After this time, inspect the pieces of fruit. If there are beadsof moisture on the pieces, return them to the dryer or sun. Check them daily andretrieve them when they are dry.
Check that the pieces are all dry and pack in moisture proof packaging.
18Home-based Fruit and Vegetable Processing
Dryi
ng Preparation of the apples
Drying
Conditioning and packing

JAM-MAKING
19Jam-Making
Jam
-Mak
ing

Jam makingJam making is quite a technical process. It requires a large amount of sugar(equal quantities of fruit and sugar), citric acid (or lemon juice) and pectin. Italso requires considerable amounts of fuel to boil the mixture to the requiredconsistency and final moisture content. These ingredients and the fuel can bequite expensive. In addition, glass jars are required for packaging, which maybe difficult and expensive to acquire. (Jam is sometimes packaged in plasticcontainers, but this reduces its keeping quality considerably, and makes it proneto rapid spoilage).
Common fruit and vegetables suitable for jam-making
ApricotsCherriesPlumsMulberriesApples – apples can be usedalone or mixed with other fruit,such as mulberriesCarrotPumpkin
20Home-based Fruit and Vegetable Processing
Jam
-Mak
ing
JAM MAKING - equipment requiredSharp stainless steel knifeWeighing scales (large and small if avail-able)Plastic bowlsCooker or stoveBoiling pan (stainless steel or aluminum)Spoons for measuring Wooden spoon for stirringSugar thermometer (if available)Refractometer (if available)Jars and lidsLabels
Should I make jam?
YesJam can be made with relatively simple equipment that is available in thehomeThe products are quite safe and have a fairly long shelf life due tothe combination of high sugar and low moisture contentJam can be prepared from a range of different fruits depending onlocal taste and availability
NoJam requires a lot of sugar, which may be expensiveJam requires a lot of fuel for heating ,which is expensiveGlass jars for packaging are difficult to findThere is a limited market for the product.

Processing outline for Jam and Jelly
21Jam-Making
Jam
-Mak
ing
Selection and preparation ofthe fruit (sorting, washing,
cutting)
Preparation of the jars & lids
Juice extraction (for jelly)
Filling and packaging
Storage
Heating and addition ofsugar
Jam/jelly
Added ingredients

Fruit jam or jelly – process details and quality assurance
Wash the fruit in clean water, peel it and remove stones and damaged parts.Chop large fruits into smaller pieces. The fruit should be as fresh as possibleand slightly under-ripe. Over-ripe and/or bruised fruit will not make good jamas it has low levels of Pectin and/or acid; in this case, the jam will not set.
Wash the glass jars and lids and put them into a large saucepan. Fill the saucepanwith water so that the jars and lids are covered and heat until the water boils. Letthe water boil for about 5 minutes. Remove the jars and turn upside down so thatthe water can all drain out. Do not dry them with a dirty cloth.
If you are using plastic jars they cannot be sterilised by heating like this. If thejars are new and unopened, do not open them until they are needed. If the jarsare recycled, wash them thoroughly in chlorinated water (100ppm). Standupside down and leave to drain well. Do not dry them with a dirty cloth.
Jelly makingTo make a jelly, you need to soften the fruit to turn it into a pulp, then extractthe juice from the pulp.
Place the washed fruit in a pan and heat over a low heat. This is tosoften the fruit and allow the juice to be released. Add a little waterto prevent the fruit burning or sticking to the bottom of the pan. Do notadd too much water because you need to remove it all later during theboiling stage.Transfer the softened fruit to a jelly bag: a bag made from muslin cloththat is tied and suspended above a bowl into which the fruit juice drips.Allow the juice to drip out from the cloth; this may take overnight. Makesure that the juice cannot be contaminated by insects and dust while itis dripping. Do not squeeze the bag as this makes the juice cloudy. Youcan use the fruit left in the bag as a substrate for vinegar production.Measure the volume of juice extracted. Weigh out the sugar (you shouldhave equal amounts of juice and sugar) and add it to the juice.
22Home-based Fruit and Vegetable Processing
Jam
-Mak
ing
Preparation of the fruit
Preparation of the jars and lids
Extraction of fruit juice (for making jelly)

For jam makingTo make jam, the fruit also needs to be softened (turned into pulp):
Place the washed fruit in a pan and heat over a low heat. This is tosoften the fruit and allow the juice to be released. Some fruits will needa little water to be added at this stage to prevent the fruit burning orsticking to the bottom of the pan. Do not add too much water becauseyou need to remove it all later during the boiling stage.When the fruit has all softened and there is juice in the pan, add thesugar and continue to heat gently until all the sugar has dissolved.
From now on, the process is the same for jam and jelly.
Add the pectin if you are using it. Follow the instructions on the packet. In gen-eral, it is better to mix the pectin powder with a small amount of sugar taken outof the total sugar in the recipe, rather than just adding the pectin directly to thepulp. This helps the pectin to disperse more evenly throughout the fruit pulp. If youare using a liquid pectin, this can be added directly to the juice or pulp. If youcannot buy pectin, you can use apples as these are a good source of pectin. Youcan make a mixed fruit jam by substituting some of your fruit for apples.
Return the pan with the pulp (for jam) or juice (for jelly) plus dissolved sugar andpectin to the heat. Use a large pan as this will allow the water to evaporatemore quickly and reduce the time needed for boiling. Turn up the heat and startto boil the mixture. Stir with a wooden spoon to prevent the mixture sticking tothe bottom of the pan.
The aim of boiling is to reduce the water content of the mixture and concentratethe fruit and sugar. The final Total Soluble Solids (TSS) content of a jam (alsoknown as the “Degrees Brix” or “end-point of the jam”) should be 65 to 68%.(The TSS is a measure of the amount of material that is soluble in water. It isexpressed as a percentage -a product with 100% soluble solids, has no water,one with 0% soluble solids is all water).
If the final TSS of jam is lower than 65-68% the shelf life will be reduced. Thejam will have a runny consistency and bacteria and moulds will be able to growin the product. If the TSS is higher than 68%, the jam will be very stiff and thesugar might start to form crystals in the jam.
23Jam-Making
Jam
-Mak
ing
Heat treatment (for jam and jelly)

The end-point of boiling is measured in different ways. The most accuratemethod is to use a refractometer to measure the total sugar concentration. Thismethod is not really suitable for home-use as a refractometer is expensive. It isonly when making jam for sale that you might consider using a refractometer toensure consistency between different batches of the jam.
When making jam for home consumption, you can use other methods: the droptest, the skin wrinkle test, or the use of a jam thermometer to test the tempera-ture. All these methods are described in the section below, on page X.
Remove the jam from the heat while you test for the end point otherwise it willcontinue heating and may become overcooked.
Cool the jam to about 85°C and pour into the hot sterilised jars. The jars shouldbe hot when they are filled or they may crack. If the jam is hotter than 85°C,condensation will form under the lid. This can drop down onto the surface of thejam and dilute it, which may allow mould to grow. If the jam is colder than this,it will be difficult to pour.Fill the jars to about 9/10ths of their volume. Place the clean lids onto the jars,fasten them loosely and invert the jars to sterilise the lid with the hot jam.
If you are using plastic jars, leave the jam to cool until about 80°C before youpour into the jars. If the jam is hotter than this it may cause the plastic bottleto melt and become misshapen. Do not cool too much though or the jam will bedifficult to pour.
It is preferable to use glass jars with new screw-on lids but if these are notavailable, you can use plastic jars and cover with foil lids. These are lessexpensive, but have a shorter shelf life than glass packaging.
Jams and jellies that are made according to the correct recipe will have a longshelf life. Jam stored in glass jars will have a longer storage life (up to 12 months)than those packed in plastic bottles (up to 4 months). For the optimum storagetime, jams should be stored in a cool dry place, away from direct sunlight.
24Home-based Fruit and Vegetable Processing
Jam
-Mak
ing
Filling and packaging
Storage

Determination of the end point of a jam To make sure that the jam is well preserved and will have a long shelf life, it isessential that the final sugar content (which is measured as the total solublesolids) be 65 to 68%.
When the jam is starting to thicken and will coat the back of the spoon you arestirring it with, it is time to start testing it to see if it has reached the end point.There are four main ways to test when a jam has been boiled for long enough.
a) Use a refractometerThis is the most accurate method.
Measuring the sugar content with a refractometer1. Take a small portion of jam from the pan. Let it cool to 20°C.
(Remember to take the pan off the heat)2. Place one or two drops of the jam onto the prism and carefully close the
prism. Make sure the sample spreads evenly over the surface of the prism.3. Hold the refractometer near a source of light and look through the end piece.4. The line between the dark and light fields will be seen through the view-
er. Read the corresponding number on the scale, which is the percentageof sugar in the sample.
5. Open the prism and remove the sample with a piece of tissue paper orwet cotton wool.
25Jam-Making
Jam
-Mak
ing

A small refractometer costs about US$ 100 to $150. A refractometer will notbe used in the home. It is a tool that is only necessary once you start makingjam on a larger scale and making it for sale.
b) Use a sugar thermometerThis method is slightly less accurate, but is very useful at the small-scale. A solu-tion of 68% sugar boils at 105°C at sea level. When the boiling jam reachesthis temperature, it is at its end point.
After boiling for a few minutes, stir the jam and remove the pan from the heat.Dip the thermometer into hot water and then into the jam. If the thermometerreads 104-105°C, the jam is ready. If it is lower than this, return to the heatand continue to boil. Test the temperature frequently as the jam soon reachesits end point.
Note: At higher altitudes the boiling point decreases and should be adjusted.The end point is about 4.5-5°C above the boiling point of water at any altitude(see table 5 for the estimates of the boiling point of water at different alti-tudes). A sugar thermometer costs about US$10.
Table 5. Boiling point of water and end point of jam at different altitudes
Altitude above sea level Boiling point ofwater (°C)
End boiling point ofjam (°C)Feet Meters
0 0 100 105
1000 305 99 104
2000 610 97.9 102.9
3000 915 96.9 101.9
4000 1220 95.8 100.8
5000 1525 94.8 99.8
6000 1830 93.7 98.7
26Home-based Fruit and Vegetable Processing
Jam
-Mak
ing

c)\Use the drop testThis is the cheapest option, but is the least accurate of the methods. It is goodenough for use at the home level, for jam that will be used within a fairly shorttime. It is not recommended for jams that are meant for sale as there is noguarantee of consistency from one batch of jam to another.
After two minutes of rapid boiling, remove the pan from the heat. Dip a cleanwooden spoon into the jam and hold it over the pan for 1 to 2 seconds. If thejam runs back freely, repeat the test every two minutes until the jam looks likea heavy syrup. When a small lump of jam forms on the back of the spoon andbreaks away from the rest, the setting point has been reached.
Alternatively, you can drop the jam into a glass of cold water: Take a smalldrop of the boiled jam on a spoon. Cool it slightly and drop into a glass of coldwater. If the drop falls in a single piece until it reaches the bottom of the glassthe end point has been reached. If it disperses in the water it requires boilingfor longer.
d) Use the skin wrinkle testThis method is also cheap and about as accurate as the drop test. You need acold plate or saucer. After two minutes of rapid boiling, remove the pan fromheat. Dip a clean wooden spoon into the jam and drip a small amount of jamonto the cold plate surface. Let it cool and then push the lump of jam with yourfinger. If the surface of the lump of jam wrinkles when you push it, it is cooked.
http://www.davidlebovitz.com/archives/2005/06/norecipe_yikes.html
Remember to remove the pan of boiling jamfrom the heat source while you are doing thesetests as the jam will continue to cook and maybecome over-cooked.
27Jam-Making
Jam
-Mak
ing
Figure 3: the skin wrinkle testYou can always cook for a little longer, butyou cannot go back if you heat for too long.It is better to take the jam off the heat tooearly and then re-heat if it is too soft.Test the jam at frequent intervals so you donot miss the end point.

Calculation of jam yield from different combinations offruit and sugar.You can use the following basic recipes to make jams. As you can see, you canvary the proportion of fruit and sugar that you use in each recipe.The maximum amount of fruit that can be used to make a good quality jam is50% fruit, with 50% sugar (recipe 1).The minimum amount of fruit that can be used to make a good quality jam is40% (plus 60% sugar) (recipe 3).
You can use these formulae to work out the approximate yield of jam from thegiven recipe. From the examples you can see that by increasing the percent-age of sugar in the recipe (recipe 3) you get a higher total yield of jam for thesame amount of fruit.
Table 6: Proportions of ingredients for high quality jam
Table 7: Proportions of ingredients for medium quality jam
Recipe 1. fruit:sugar =50:50Desired Brix in final product =68% Yield = 11.115x100/68 = 16.4 kg
Ingredients Soluble Solids (SS)
10kg fruit at 10% TSS 1.000 kg
10kg sugar 10.000kg
60g pectin (grade 200) 0.060 kg
55g citric acid 0.055 kg
Total Soluble Solids 11.115 kg
Recipe 2. fruit:sugar =45:55Desired Brix in final product =68% Yield = 13.325x100/68 = 19.6 kg
Ingredients Soluble Solids (SS)
10kg fruit at 10% TSS 1.000 kg
2.5 litre water
12.2 kg sugar 12.200kg
65g pectin (grade 200) 0.065 kg
60g citric acid 0.060 kg
Total Soluble Solids 13.325 kg
28Home-based Fruit and Vegetable Processing
Jam
-Mak
ing

Table 8: Proportions of ingredients for lowerquality jam
29Jam-Making
Jam
-Mak
ing
Recipe 3. fruit:sugar =40:60Desired Brix in final product =68% Yield = 16.165x100/68 = 23.8 kg
Ingredients Soluble Solids (SS)
10kg fruit at 10% TSS 1.000 kg
3.3 litre water
15kg sugar 12.200kg
85g pectin (grade 200) 0.085 kg
80g citric acid 0.080 kg
Total Soluble Solids 16.165 kg

Apricot jam
Ingredients (to make 2.4kg jam):1.5kg fresh apricots1.5kg sugar300ml water
Sort the fruit and discard any unripe, over-ripe or damaged fruit.Wash in clean water and leave to drainCut the fruit in half and remove the stone. Cut the pieces in half again if preferred.Weigh the prepared fruit and place in a large cooking pan with the water.
For glass jars: Wash the glass jars and lids and put them into a largesaucepan.Fill the saucepan with water so that the jars and lids are covered and heat untilthe water boils. Let the water boil for about 5 minutes.Remove the jars and turn upside down so that the water can all drain out.DO NOT dry them with a dirty cloth.If you are using recycled plastic jars, clean them with a solution of chlorinatedwater (100ppm). Turn upside down so all the water can drain out.
Cook over a medium heat until the fruit has softened and the volume hasreduced by one third. Stir with a wooden spoon to prevent burning at the bot-tom of the pan.Add the sugar and stir until it has all dissolvedTurn up the heat and boil rapidly until the product reaches its end point (use arefractometer if available. If not use a jam thermometer, the drop test or thewrinkle test).Cool the jam to about 85°C and pour into the hot sterilised jars. The jars shouldbe hot when they are filled or they may crack.
Fill the jars to about 9/10ths of their volume. Place the clean lids onto thejars, fasten them loosely and invert the jars to sterilise the lid with the hot jam.If you are using plastic jars, let the jam cool to about 80°C before pouringinto the jars.
30Home-based Fruit and Vegetable Processing
Jam
-Mak
ing
Preparation of the fruit
Preparation of the jars and lids
Heat treatment and addition of sugar
Filling and packaging
Carrot and lemon jam
Ingredients (to make 5.7-6.4kg jam):
2-4kg carrots4-8 medium size lemons (including 35ml lemon juice)3.5kg sugarWater (about 1200ml per kg grated carrot)
Choose carrots that are all of a similar size and maturity.Peel the skin and cut off the green stalk residue.Wash the carrots with plenty of water. Use a brush to remove all the soil. Drain well.Cut lengthwise into 3-6mm strips and then cut the strips in half or into quarters;or grate using a cheese grater.Weigh the grated carrot and place in a pan.Wash the lemons and cut into thin slices. Remove the pips.Cut the lemon rind into thin strips without removing the white part. Add the stripsof rind, the pulp and the lemon juice to the carrots. Add enough water to coverthe carrots.
For glass jars: Wash the jars and lids and put them into a large saucepan.Fill the saucepan with water so that the jars and lids are covered and heat untilthe water boils. Let the water boil for about 5 minutes.Remove the jars and turn upside down so that the water can all drain out.DO NOT dry them with a dirty cloth.If you are using recycled plastic jars, clean them with a solution of chlorinatedwater (100ppm). Turn upside down so all the water can drain out.
Cook the carrots with the lemon and water over a low heat for 60-90 minutesto soften the carrots. Stir with a wooden spoon to prevent burning at the bot-tom of the pan.When the carrot pieces disintegrate and become transparent and the lemonrind strips are soft, add one third (1.2kg) of the total sugar and dissolve rap-idly. Continue cooking on a medium fire for 10 minutes.
31Jam-Making
Jam
-Mak
ing
Preparation of the fruit
Preparation of the jars and lids
Heat treatment and addition of sugar

Add the remaining sugar (2.3kg) and dissolve rapidly. Boil on a high fire untilthe mixture sets (use a refractometer if available, a jam thermometer or thedrop test). Stir with a wooden spoon to prevent burning.
Cool the jam to about 85°C and pour into the hot sterilised jars. The jarsshould be hot when they are filled or they may crack.Fill the jars to about 9/10ths of their volume. Place the clean lids onto thejars, fasten them loosely and invert the jars to sterilise the lid with the hot jam.If you are using plastic jars, let the jam cool to about 80°C before pouringinto the jars.
32Home-based Fruit and Vegetable Processing
Jam
-Mak
ing
Filling and packaging
Cherry jam
Ingredients (to make 2.3kg jam):
1.8kg stoned cherriesJuice of 3 lemons (about 135ml or 9tbsp)1.4kg sugar
Wash the cherries and drain well.Remove the stones from the centre.Either leave the cherries whole (minus the stone) or cut into half or quarters Crack a few of the cherry stones and remove the kernels (optional step).Weigh the cherries and place in a pan together with the lemon juice and kernels.
For glass jars: Wash the jars and lids and put them into a large saucepan.Fill the saucepan with water so that the jars and lids are covered and heat untilthe water boils. Let the water boil for about 5 minutes.Remove the jars and turn upside down so that the water can all drain out.DO NOT dry them with a dirty cloth.If you are using recycled plastic jars, clean them with a solution of chlorinatedwater (100ppm). Turn upside down so all the water can drain out.
Cook over a low heat for about 45 minutes until the cherries are soft. Stir witha wooden spoon to prevent burning at the bottom of the pan.Remove from the heat. Add the sugar and stir until it is dissolved.Bring to the boil. Boil rapidly for about 30 minutes until the jam is set (use arefractometer if available, a jam thermometer or the drop test). Stir with awooden spoon to prevent burning.
Cool the jam to about 85°C and pour into the hot sterilised jars. The jars shouldbe hot when they are filled or they may crack.Fill the jars to about 9/10ths of their volume. Place the clean lids onto the jars,fasten them loosely and invert the jars to sterilise the lid with the hot jam.If you are using plastic jars, let the jam cool to about 80°C before pouring intothe jars.
33Jam-Making
Jam
-Mak
ing
Preparation of the fruit
Preparation of the jars and lids
Heat treatment and addition of sugar
Filling and packaging

Mulberry jam
Ingredients (to make 0.9kg jam):1kg mulberriesJuice of 1 lemon (about 3tbs or 45ml)500g sugar
Sort the fruit. Remove under-ripe, over-ripe and rotten berries.Wash the mulberries and drain well.Weigh the mulberries and place in a pan together with the lemon juice.
For glass jars: Wash the jars and lids and put them into a large saucepan.Fill the saucepan with water so that the jars and lids are covered and heat untilthe water boils. Let the water boil for about 5 minutes.Remove the jars and turn upside down so that the water can all drain out.DO NOT dry them with a dirty cloth.If you are using recycled plastic jars, clean them with a solution of chlorinatedwater (100ppm). Turn upside down so all the water can drain out.
Cook the mulberries and lemon juice over a low heat for about 15-20 minutesuntil the mulberries are soft and the juice begins to run out. Stir with a woodenspoon to prevent burning at the bottom of the pan.Remove from the heat. Add the sugar and stir until it is dissolved.Return to the heat and boil rapidly for about 30 minutes until the jam is set (usea refractometer if available, a jam thermometer or the drop test). Stir with awooden spoon to prevent burning.
Cool the jam to about 85°C and pour into the hot sterilised jars. The jars shouldbe hot when they are filled or they may crack.Fill the jars to about 9/10ths of their volume. Place the clean lids onto the jars,fasten them loosely and invert the jars to sterilise the lid with the hot jam.If you are using plastic jars, let the jam cool to about 80°C before pouring intothe jars.
34Home-based Fruit and Vegetable Processing
Jam
-Mak
ing
Preparation of the fruit
Preparation of the jars and lids
Heat treatment and addition of sugar
Filling and packaging

Apple jam
Ingredients (to make 1kg jam):7 cups apples (peeled and cored)6 cups sugar" cup lemon juice1tsp cinnamon powder (optional) or cardamom powder according to personaltaste1-2 cups water
Sort the fruit. Remove under-ripe, over-ripe and rotten apples.Wash the apples, peel them and remove the core.Slice the apples finely and place in a large saucepan with enough water toprevent the fruit from burning on the base of the pan (do not add too muchwater as you will need to cook for longer to remove the excess).
For glass jars: Wash the jars and lids and put them into a large saucepan.Fill the saucepan with water so that the jars and lids are covered and heat untilthe water boils. Let the water boil for about 5 minutes.Remove the jars and turn upside down so that the water can all drain out.DO NOT dry them with a dirty cloth.If you are using recycled plastic jars, clean them with a solution of chlorinatedwater (100ppm). Turn upside down so all the water can drain out.
Cook the apples over a low heat for about 15-20 minutes until the apples aresoft. Add the lemon juice, sugar and cinnamon or cardamom if you are using it.Keep over a low heat until the sugar had dissolved. Turn up the heat to high sothat the mixture boils. Stir continuously to prevent the jam burning.Boil rapidly for about 30 minutes until the jam is set (use a refractometer ifavailable, a jam thermometer, or the drop test or wrinkle test). Stir with a wood-en spoon to prevent burning. If any foam rises to the surface of the jam duringboiling, scoop it off with the spoon to remove it.
Cool the jam to about 85°C and pour into the hot sterilised jars. The jars shouldbe hot when they are filled or they may crack.Fill the jars to about 9/10ths of their volume. Place the clean lids onto the jars,fasten them loosely and invert the jars to sterilise the lid with the hot jam.If you are using plastic jars, let the jam cool to about 80°C before pouring into the jars.
35Jam-Making
Jam
-Mak
ing
Preparation of the fruit
Preparation of the jars and lids
Heat treatment and addition of sugar
Filling and packaging

Apple jelly Ingredients: (to make 0.8-1.0kg jelly)1.8kg apples1200ml waterStick of cinnamon, a few cloves or cardamon (optional)500g sugar per 500ml juice obtained
Sort the fruit. Remove any rotten or bruised apples. Wash well.Cut the apples into quarters but do not remove the skin or core (most of the pectinis contained in the apple skin). Make sure you cut out any bad pieces of apple.
For glass jars: Wash the jars and lids and put them into a large saucepan.Fill the saucepan with water so that the jars and lids are covered and heat untilthe water boils. Let the water boil for about 5 minutes.Remove the jars and turn upside down so that the water can all drain out.DO NOT dry them with a dirty cloth.If you are using recycled plastic jars, clean them with a solution of chlorinatedwater (100ppm). Turn upside down so all the water can drain out.
Put the fruit in a large pan with the water. Tie the cinnamon or cloves in a pieceof muslin and add that to the pan.Cook over a low heat until the fruit is soft and pulpy. Remove the bag of spices.
Place the pulp in a jelly bag (a piece of clean muslin cloth that is suspendedover a bowl). Leave to strain overnight. Make sure that the dripping juice is ina clean place where it cannot be contaminated by flies and dust. Do notsqueeze the bag to extract the juice as this makes the juice cloudy.Measure the juice into a large pan.
36Home-based Fruit and Vegetable Processing
Jam
-Mak
ing
Selection and preparation of the fruit
Preparation of the jars and lids
Heat treatment
Juice extraction

Heat the juice gently in a pan. Add the sugar (500g per 500ml juice) and stiruntil the sugar has dissolved.Turn up the heat and boil the mixture rapidly until the jam is set (use a refrac-tometer if available, a jam thermometer, the drop test or the wrinkle test). Stirwith a wooden spoon to prevent burning. Remove any foam from the surfaceof the jam with a wooden spoon.
Cool the jam to about 85°C and pour into the hot sterilised jars. The jarsshould be hot when they are filled or they may crack.Fill the jars to about 9/10ths of their volume. Place the clean lids onto thejars, fasten them loosely and invert the jars to sterilise the lid with the hot jam.If you are using plastic jars, let the jam cool to about 80°C before pouringinto the jars.
37Jam-Making
Jam
-Mak
ing
Heat treatment and addition of sugar
Filling and packaging


SAUCES AND CHUTNEYS
39Sauce and Chutneys
Sauc
es a
ndCh
utne
ys

Sauce, ketchup, paste and chutneyA range of fruits and vegetables can be used to make sauce, ketchup and chut-ney. The base ingredients are often tomatoes, mixed with other vegetables andfruit. Tomatoes are good for making sauce as they are acidic, so preserve well.You can add any vegetables and spices that you like and which are commonlyavailable in your area. Adding chilli powder or chopped whole chillies to thesauce or chutney makes a spicy hot product. The basic principles of the preserva-tion method are the addition of sugar or salt and acid (acetic acid or vinegar) com-bined with concentration of the mixture by heating to reduce the water content.
ChutneysChutneys are thick, jam-like mixtures that are made from a variety of fruit andvegetables, with added salt, spices, vinegar and sometimes sugar. Any ediblesour fruit or vegetable can be used to make chutney.
Sauces, ketchup and pastesSauces and purees are made from a mixture of vegetables, spices, salt andsugar which are heated to remove the water and to concentrate the mixture.Sauces are thinner than chutneys and tend to be more acidic. If sauces andpurees are heated further to remove more water, they can be made into paste.
Common fruits and vegetables suitable for chutneys and sauces:TomatoesOnionsCarrots ChilliCorianderMintLemonOrange
40Home-based Fruit and Vegetable Processing
Sauc
es a
ndCh
utne
ys
Should I make sauce and chutney?
YesChutneys and sauces can be made withrelatively simple equipment that is avail-able in the home.The products are quite safe and have afairly long shelf life due to the combina-tion of high acidity, high salt and lowmoisture contenttomato based products are a stapleingredient used in every day cooking
NoThe availability of vinegar (acetic acid)may be a problem in some areasThe high levels of sugar required forsome chutney recipes may be prohibi-tively expensive.
SAUCE AND CHUTNEY -equip-ment requiredSharp stainless steel knifeWeighing scalesPlastic bowlsCooker or stoveBoiling pan (stainless steel oraluminum)Measuring jug or bottleSpoons for measuring,Wooden spoon for stirringGlass jars and lids

Processing outline for sauce and chutney
41Sauce and Chutneys
Sauc
es a
ndCh
utne
ys
Selection and preparation ofthe fruit and vegetable
(washing, chopping)
Preparation of jars and lids
Pulp/juice extraction
Filling, packaging and sealing
Cooling and storage
Heating
Heating (optional)
Sauce/chutney
Added ingredients

Sauce and chutney – process details and quality assurance
Only use ripe fruit and vegetables to make sauce. Leave under-ripe productsto ripen and use at a later date. Chutneys are often made from fruits that areslightly under-ripe. Do not use over-ripe or rotten fruits.Wash the fruit and vegetables in clean water.Some fruits, particularly tomatoes, are blanched in hot water for up to 5 min-utes to soften the skin and to destroy enzymes and microbes. After blanching,they should be cooled by plunging into cold water.Peel fruits and chop into various sized pieces according to the recipe.
For glass jars: Wash the jars and lids and put them into a large saucepan. Fillthe saucepan with water so that the jars and lids are covered and heat until thewater boils. Boil for about 5 minutes.Remove the jars and turn upside down so that the water can all drain out.DO NOT dry them with a dirty cloth.If you are using recycled plastic jars, clean them with a solution of chlorinatedwater (100ppm). Turn upside down so all the water can drain out.
Extract the fruit pulp with a manual pulper or a pulper-finisher that separates outthe seeds and skins from the pulp. Pass the seeds and skin through the pulper asecond time to obtain the maximum amount of juice and pulp from the fruit.If you do not have a pulper or mouli, heat the fruit gently with a little water to extractthe juice. Pass the fruit through a sieve or extract the juice using a muslin bag.The acidity of the pulp should be 4.0 or lower. The following recipes are alltried and tested so the pH does not need to be measured. If you are makingyour own chutney from a new recipe, you should check the acidity of the pulpwith a pH meter or pH paper. If it is above 4.0, add lemon juice to reduce it.
Spices.You can add a range of spices to chutneys and sauces to suit your taste. Anyspices you use should be clean and in good condition. If you are making prod-ucts for sale, you need to make sure that you use the same recipe formulationand add exactly the same amount of spice to each batch that you make.Always use the same measuring spoon or container
42Home-based Fruit and Vegetable Processing
Sauc
es a
ndCh
utne
ys
Selection and preparation of the fruit or vegetable
Preparation of the jars and lids
Added ingredients
Pulp/juice extraction

Chemical preservatives.Sodium benzoate is sometimes added to sauces and purees to help preserve the prod-ucts after the bottle has been opened. Some consumers do not like additives such asthis, so prefer to buy products that do not contain them. Make sure that you do not addtoo much benzoate as it gives the product a bad taste. All countries have maximumpermitted levels for preservatives. The recommended level for benzoate is 0.2%.
Heat the mixture of pulp and added ingredients in a large open pan over alow heat. An open pan is best as it allows moisture to evaporate more quickly.Stir continuously with a wooden spoon during heating to prevent burning.The bright red colour of tomato sauces can be preserved by very slow heating.
Hot-fill the sauce or chutney into hot, clean jars or bottles. If the glass jars arecold, there is the risk of breaking when the hot liquid is added.It is preferable to use glass jars with new screw-on lids but if these are notavailable, you can use plastic jars covered with foil lids. These are less expen-sive, but have a shorter shelf life than glass packaging.Alternatively, the chutney can be cooled and filled into polyethylene bags or pouches.
If using glass bottles, sauces should be pasteurised in the jar after filling.Immerse the jars or bottles in a large pan or water bath and heat.N.B. Pasteurization can only be done in glass bottles, not in plastic bottles. Forthis reason, it is preferable to use glass bottles.Both the time and temperature of pasteurisation are critical to achieve the cor-rect shelf life and to retain the colour and flavour of the juice.
Cool the bottles to room temperature by immersing them in clean cold water. Ifthe bottles are cooled too quickly they will crack and break.The high acidity of sauces and chutney gives them a long shelf life of up to 12 months,if packed in pasteurised glass bottles. The products should be stored in a cool dryplace away from direct sunlight to prevent any changes in the colour of the products.
Basic sauce and chutney recipesThe following basic recipes are guidelines for the production of sauces andchutneys. The ingredients can be varied according to local taste and availabil-ity of fruits, vegetables and spices.
43Sauce and Chutneys
Sauc
es a
ndCh
utne
ys
Heat treatment
Filling and packaging
Heating
Cooling and storage

Italian style tomato sauce
Ingredients (to make 11kg sauce)
5kg fresh tomatoes 5 medium onions (1 medium onion per kg tomato) 25 medium garlic cloves (5 medium garlic cloves per kg tomato)Salt and pepper to taste1kg of carrots (1kg carrots per 5kg tomato)50-100ml vegetable oilHerbs to taste (dried oregano, fresh basil, chilli powder) (optional)
Select ripe tomatoes. Remove any that are under-ripe, over-ripe or rotten.Wash in clean water and drain. Cut each tomato in half and discard any thatare rotting inside.Chop the onion in small cubes. Cut the garlic cloves into quarters.Peel the carrots and chop into small cubes.
For glass jars: Wash the jars and lids and put them into a large saucepan. Fillthe saucepan with water so that the jars and lids are covered and heat until thewater boils. Boil for about 5 minutes.Remove the jars and turn upside down so that the water can all drain out.DO NOT dry them with a dirty cloth.If you are using recycled plastic jars, clean them with a solution of chlorinatedwater (100ppm). Turn upside down so all the water can drain out.
Add oil to a pan and fry the garlic and onion over a low flame until the onionturns pink. Take care not to burn the onion and garlic.Place the cut tomatoes and carrots in a large pan and heat over a low flame.Add the cooked onion and garlic, salt, pepper and chilli powder if using these.Increase the heat and boil for 40 minutes, stirring constantly until it reaches atotal solid concentration of 10-12° Brix (10-12% TSS), measured with a refrac-tometer. If you do not have a refractometer, boil for 40 minutes until the veg-etables can be squashed against the side of the pan with a spoon.
44Home-based Fruit and Vegetable Processing
Sauc
es a
ndCh
utne
ys
Selection and preparation of the fruit
Preparation of the the jars and lids
Heat treatment and addition of ingredients
Add fresh basil or dried oregano according to taste. Boil for a further 5 min-utes and remove the pot from the heat.
Pass the sauce through a pulper, mouli or sieve to remove the seeds and skin.
Cook the sauce for 10-15 minutes until it starts to bubble and thickens.
Fill the hot sauce into clean sterile glass jars or bottles. Fill them to the topand immediately close with clean lids. If you do not have glass jars, let thesauce cool slightly then fill into polyethylene bags that are heat sealed, orclean plastic jars.
Place the glass containers into a water bath that is at the same temperature asthe bottles. The water must cover the jars. Sterilise in boiling water for 45 min-utes from the time that the water starts to boil.
Allow the bottles to cool a little, then place them in a bowl containing clean cool-er water. Change the cooling water as it warms up and the temperature of thebottles decreases. Do this until the bottles are cooled to room temperature. Donot use cold water straight away as this will cause the bottles to crack.
Store the bottles of sauce in a cool dry place away from direct sunlight to pre-vent the colour from fading. When prepared properly and stored in dry coolconditions, the tomato sauce should have a shelf life of about 12 months, ifpacked in pasteurised glass bottles.
45Sauce and Chutneys
Sauc
es a
ndCh
utne
ys
Pulp/juice extraction
Heating (for glass jars)
Heat treatment
Filling and packaging
Cooling and storage

Tomato paste
Ingredients:Fresh ripe tomatoes (10kg)Lemon juice (50ml per litre of tomato juice - to adjust the acidity)Salt (25g per kg tomato pulp)Sodium benzoate (0.3g per 10kg pulp)
This is a thick bright red paste. It can be stored in jars or polythene bags andhas a shelf life of several months. (Fellows, 1997)
Select ripe tomatoes. Discard any over-ripe or mouldy fruits. Save the under-ripe fruits for a later batch.Wash in plenty of clean (chlorinated) water (8 litres per kg tomatoes). Drain.Cut each tomato in half and discard any that are rotting inside.Blanch tomatoes in a water bath at 80°C for 5 minutes to soften the skins forpeeling and to destroy enzymes and micro-organisms.
For glass jars: Wash the jars and lids and put them into a large saucepan. Fillthe saucepan with water so that the jars and lids are covered and heat until thewater boils. Boil for about 5 minutes.Remove the jars and turn upside down so that the water can all drain out.DO NOT dry them with a dirty cloth.If you are using recycled plastic jars, clean them with a solution of chlorinatedwater (100ppm). Turn upside down so all the water can drain out.
Pass the tomatoes through a pulper-finisher, mouli or sieve with a 1mm mesh.This removes the skins and seeds from the fruit. Ideally you should check theacidity (pH) of the pulp at this stage. If you have a pH meter or pH indicatorpapers, make sure that the pulp has a pH value of 4.0 or lower. If the pH ishigher than this, add lemon juice or vinegar to increase the acidity. If you can-not measure the acidity of the tomato pulp, you should add lemon juice (50mlper litre of tomato juice) to make sure that the acidity is high enough.Add 0.3g sodium benzoate per 10kg pulp to preserve the product.
46Home-based Fruit and Vegetable Processing
Sauc
es a
ndCh
utne
ys
Preparation of the fruit
Preparation of the jars and lids
Pulp/juice extraction

Concentrate the pulp by removing the water. There are two ways of doing this– by heating or by draining:
Heating - Heat slowly in an open pan, stirring constantly to prevent burning. If thisis done carefully, the bright red colour can be retained. Continue heating until apaste with 30% total solids is obtained. For best results, this is measured using arefractometer. If you do not have a refractometer, you need to use another method:
When it is cooked, the paste should easily coat the back of a spoon.You can also calculate how much water has been lost by weighing thepulp before and after heating. The pulp should be reduced to one thirdof its starting weight. (Remember to substract the weight of the pan whenestimating the pulp weight!)
Draining - An improved method of concentrating is to place the pulp in a whitecotton sack that is hung up for one hour to allow the water to drain out, until thepulp loses half its original weight.Add 2.5% salt by weight of concentrate and mix thoroughly.Re-hang the sack for one hour until the pulp is one third of its original weight(until it is 30% total solids).Make sure that the sack is very clean (put it in boiling water for 5 minutes) andthat the pulp is not exposed to insects and dust.
Fill the paste into bottles or plastic pouches. Seal the containers.
Place the glass containers into a water bath that is at the same temperature asthe bottles. The water must cover the jars. Pasteurise at 90°C for 45 minutes.
Remove the water bath from the heat. Gradually add cold water to slowly coolthe water bath. Or, leave the jars to cool in the water bath until the following day.
Both glass and plastic packages of tomato paste should be stored away fromdirect sunlight to prevent the colour fading. The pasteurised paste stored inglass jars will have a longer shelf life (up to 12 months) than that in plasticpouches which cannot be pasteurised after packing (up to 3 months). Shelf lifealso depends on the correct level of acidity to prevent the growth of bacteria.Once opened, both glass and plastic bottles of tomato puree are susceptibleto spoilage by bacteria.
47Sauce and Chutneys
Sauc
es a
ndCh
utne
ys
Filling and packaging
Heating (for glass jars)
Cooling and storage
Concentration
Tomato sauce or ketchup
Ingredients (to make 5-6kg sauce)
20kg ripe tomatoes1.5kg sugar450g onions3 to 5g nutmeg (optional)9g cinnamon11.5g cumin11.5g cardamom11.5g ground black pepper5g ground white pepper 800ml vinegar330g salt
This is a thick, sweet red sauce made from fresh tomatoes. It has a shelf life ofmore than one year in glass bottles when the container is unopened. The recipecan be varied by adding different spices. For example, 2.5g chilli powder per10kg tomato pulp can be added before processing. (Fellows, 1997)
Sort the fruit and select ripe tomatoes. Discard any over-ripe or mouldy fruits.Save the under-ripe fruits for a later batch.Wash in plenty of clean water (8 litres per kg tomatoes). Drain. Cut each toma-to in half and discard any that are rotting inside.Blanch tomatoes in hot water for 3-5 minutes until the skins are loosened.Remove from the heat and plunge into cold water to cool. Remove the skin andcore of tomatoes.Peel the onions and chop into small pieces.
For glass jars: Wash the jars and lids and put them into a large saucepan. Fillthe saucepan with water so that the jars and lids are covered and heat until thewater boils. Boil for about 5 minutes.Remove the jars and turn upside down so that the water can all drain out.DO NOT dry them with a dirty cloth.If you are using recycled plastic jars, clean them with a solution of chlorinatedwater (100ppm). Turn upside down so all the water can drain out.
48Home-based Fruit and Vegetable Processing
Sauc
es a
ndCh
utne
ys
Selection and preparation of the fruit
Preparation of the jars and lids

Chop the tomato into pieces and pulp, either by hand or with a pulper-finish-ing machine.
Add 500g sugar, the onions and the spices tied loosely in a muslin bag.
Heat to below boiling point in a pan, stirring continuously until the volume hasreduced by half.Remove the spice bag. Add 1kg sugar, the salt and vinegar. Continue heatingfor 5-10 minutes until the sauce is thick enough to coat the back of the spoon.
Hot-fill into clean, sterilised jars at 80°C. Close the tops with lids. Glass jars orbottles are the best packaging material. If you do not have glass, you can useplastic bottles or pouches.
Cool to room temperature. Dry the jars, add labels and store in a cool dryplace away from light. The product should be stable for at least 12 monthswhen packed in glass bottles and stored in good conditions.
49Sauce and Chutneys
Sauc
es a
ndCh
utne
ys
Pulp/juice extraction
Added ingredients
Heat
Filling and packaging
Cooling and storage

Tomato puree or simple concentrateIngredients (to make 1kg puree or concentrate)Fresh ripe tomatoes (10kg)Salt (100g for puree; 200g for concentrate)
This recipe can be used to either make a tomato puree (10° Brix) or a simpleconcentrate (16° Brix). (FAO, 1997)
Sort the fruit and select ripe tomatoes. Discard any over-ripe or mouldy toma-toes. Save the under-ripe tomatoes for a later batch.Wash in plenty of clean water (8 litres per kg tomatoes). Drain. Cut each toma-to in half and discard any that are rotting inside.
For glass jars: Wash the jars and lids and put them into a large saucepan. Fillthe saucepan with water so that the jars and lids are covered and heat until thewater boils. Boil for about 5 minutes.Remove the jars and turn upside down so that the water can all drain out.DO NOT dry them with a dirty cloth.If you are using recycled plastic jars, clean them with a solution of chlorinatedwater (100ppm). Turn upside down so all the water can drain out.
Place the tomatoes in a large pot and cook over a medium heat, stirring witha wooden spoon occasionally. Add a little water to the pan to prevent themburning. Add salt to taste if desired.Continue heating until the tomatoes are softened (if you have a refractometeryou can measure the total solids (6.5-6.8° Brix)). Remove from the heat andallow to cool slightly.
Extract the juice by passing the sauce through a pulper, mouli or sieve. Pass the skinsand seeds through the pulper a second time to remove as much juice as possible.
To make the tomato puree:Place the sauce back on the heat and boil to concentrate it. Weigh thepan before you start heating. You need to reduce the weight by 5%. For
50Home-based Fruit and Vegetable Processing
Sauc
es a
ndCh
utne
ys
Selection and preparation of the fruit
Preparation of the jars and lids
Heating
Heat
Pulp/juice extraction

example, if you start with 10kg pulp, you need to boil until the weight is9.5kg. (Remember to subtract the weight of the pan when estimating theweight of the pulp!)Weigh at 10 minute intervals until the correct amount of water has been removed.The amount of time taken to reach the final concentration depends on severalfactors – the volume of liquid you are heating (smaller volumes will reduce morequickly than large ones) and the type of pan you use – the water will evapo-rate more quickly from a wide, open pan. Stir occasionally with a woodenspoon to prevent burning.Add 1% salt (100g for 10kg tomatoes), continue heating until it has dissolved,then remove from the heat.
To make the tomato concentrate:You need to continue heating until 10% of the moisture has been removed andthe sauce is more concentrated. e.g. for 10kg pulp, you need to heat until itweighs 9kg. (Remember to subtract the weight of the pan when estimating theweight of the pulp!)Add 2% salt, dissolve and remove from the heat.
Hot-fill into clean, sterilised jars at 80°C. Close the tops with lids.Glass jars or bottles are the best packaging material. If you do not have glass,you can use plastic bottles or pouches, but these will not have a shorter storagelife than the puree packed in glass containers.
Place the glass containers into a water bath that is at the same temperature asthe bottles. The water must cover the jars. Sterilise in boiling water for 45 min-utes from the time that the water starts to boil.
Cool to room temperature.Dry the jars, add labels and store in a cool dry place away from light. Theproduct should be stable for at least 12 months when packed in a glass con-tainer. When packed in plastic, the product will only have a storage life ofabout 4 months.
51Sauce and Chutneys
Sauc
es a
ndCh
utne
ys
Heat
Filling and packaging
Cooling and storage

Tomato concentrate (non-cook method)
This is an alternative method for making a concentrated tomato paste that doesnot involve heating the pulp. It is useful in areas where fuel costs are high. Youprepare a puree and then squeeze out the excess water by hanging the pulpin a muslin cloth so the water can drip out. Salt is added to the pulp to act asa preservative and to help separate out the water from the pulp.
Ingredients (to make 1.5kg concentrate)
Tomatoes (15kg – which yields approximately 10kg pulp)Sodium benzoate (optional) 0.3g/10kg pulpSalt (250g per 10kg pulp)
Sort the tomatoes. Remove those that are under-ripe, over-ripe and rottenor diseased.Remove the green stalks and wash the tomatoes in clean water.
The tomatoes are blanched to kill any bacteria and to split the skins so they areeasy to remove. Place the clean tomatoes into the boiling water. Make surethey are all underneath the water; place a lid on the pan. When the watertemperature returns to 80°C, keep it there for 5 minutes to blanch the tomatoes.Remove the tomatoes from the blanching pan and put them into a clean container.Cover them to prevent contamination from insects or dust.
For glass jars: Wash the jars and lids and put them into a large saucepan. Fillthe saucepan with water so that the jars and lids are covered and heat until thewater boils. Boil for about 5 minutes.Remove the jars and turn upside down so that the water can all drain out.DO NOT dry them with a dirty cloth.If you are using recycled plastic jars, clean them with a solution of chlorinatedwater (100ppm). Turn upside down so all the water can drain out.
Blend the tomatoes to make a pulp. Pass the pulp through a strainer (sieve) toseparate out the seeds and skin. The seeds and skin can be put aside and usedto make vinegar. Weigh the pulp.
52Home-based Fruit and Vegetable Processing
Sauc
es a
ndCh
utne
ys
Selection and preparation of tomatoes
Preparation of the jars and lids
Pulp extraction

If you are adding preservatives to the paste, you do it at this stage. Add sodi-um benzoate (0.3g per 10kg pulp). Mix the sodium benzoate with a smallamount of the pulp and then mix it all together.
It is important that the pulp has a pH value of less than 4.5. Most tomatoeshave a low pH, but sometimes they have a higher value. You should check thepH with a piece of pH paper.
If the pH is 4.5 or higher, you need to add citric acid (or lemon juice) to makeit lower. Take a 1 litre sample of the pulp and add the juice of a quarter of alemon to it (or 0.25g citric acid). Check the pH of this treated pulp again. If itis still high, add more lemon juice. Repeat this until you have a pH of 4.2 orlower. Then add the same amount of lemon juice or citric acid to every litre ofyour pulp.
Transfer the pulp into clean cotton sacks. The sacks must be made of non-bleached cotton and should not be painted. They should be sterilized beforeyou use them by boiling in water for 5 minutes.Try using different fabrics as they will drip at different rates. You need a fab-ric that drips quickly so that the juice is extracted from the pulp in the shortesttime possible. If the dripping takes a long time, the pulp may become contam-inated or start to ferment.Hang the cotton sacks over buckets to collect the juice that runs out. This juicecan be used to ferment to make vinegar.
Let the pulp leak out until the sack is half the original weight (this should take about1 hour for a 40litre sack, depending on the drip rate of the material you use).
Add salt to the remaining pulp in the bag. Salt is added at a rate of 2.5%.This means that for 7.5kg pulp remaining in the sack, 187.5g salt is added.Dissolve the salt in some of the extracted juice and then add it to the remain-ing pulp in the sack.
Hang the sack again and let it continue to drip over the bucket. Let it drip untilabout 5kg concentrated pulp remains in the sack (this means that it is about onethird of the original weight of tomatoes). This should take about 45 minutes to1 hour depending on the fabric you use.
53Sauce and Chutneys
Sauc
es a
ndCh
utne
ys
Add preservatives
Hanging the pulp
Add salt

If you do not want to collect the unsalted juice after the first hanging (which canbe used for making vinegar), you can add the salt to the pulp at the start ofthe hanging. This is better in terms of hygiene as the dripping process is com-pleted in a shorter time. However, if you want to use the expressed juice forvinegar making, it is better to do this without salt.
Fill the concentrated pulp into glass bottles if you have them. If you do not haveglass bottles, you can use plastic pouches (100g per pouch is a good amountto pack). Seal the pouches using a heat sealer. Make sure all the air is removedfrom the pouch when you seal it.
If you are using glass jars, you need to place the jars into cooler water andslowly bring the temperature up to boiling point to prevent cracking the glass.Boil for 45 minutes.If you are using pouches and the plastic is heat resistant (laminate of poly-eth-ylene –70 micron– and polyamide –30 to 40 micron), place the pouches into apan of water that has been heated to boiling point. Wait until the water beginsto boil again, then leave the pouches in for 45 minutes to ensure they are wellpasteurized.
Cool the pouches by adding cold water to the hot water bath. Be careful withglass bottles – you need to let the bottles cool down more gradually so they donot shatter.
The pasteurised concentrate has a shelf life of at least 12 months as long as itis stored in a cool, dry place away from direct sunlight. Without pasteurisation,the concentrate will store for about 3-4 months.
54Home-based Fruit and Vegetable Processing
Sauc
es a
ndCh
utne
ys
Filling and packaging
Heat treatment
Cooling and storage

Coriander chutney (chatni gashnize)Ingredients (for 1.5 to 2 kg chutney)
1 kg fresh coriander 200g garlic500g fresh hot pepper (green or red)250 ml vinegar Salt to taste100g walnut (optional)
This is a tasty chutney that is prepared from fresh coriander, peppers andgarlic. The chutney can be eaten as soon as it has been made or can be leftto ferment for up to 2-3 months in the jars during which time it will becomemore acidic.
Sort the coriander. Remove the unwanted parts. Wash in clean water and drainwell.Peel the garlic cloves.Cut the pepper. Remove the stems and seeds. Wash the pepper in clean water.Shell the walnuts.
Wash the blender with clean (boiled or chlorinated) water.For glass jars: Wash the jars and lids and put them into a large saucepan. Fillthe saucepan with water so that the jars and lids are covered and heat until thewater boils. Boil for about 5 minutes.Remove the jars and turn upside down so that the water can all drain out.DO NOT dry them with a dirty cloth.If you are using recycled plastic jars, clean them with a solution of chlorinatedwater (100ppm). Turn upside down so all the water can drain out.
Blend the prepared vegetables with the walnuts in the blender or pounder(“awang” or “oghor”). The vegetables should be blended until they are wellmixed and form a very smooth paste Add vinegar and salt and mix well.
55Sauce and Chutneys
Sauc
es a
ndCh
utne
ys
Selection and preparation of vegetables
Preparation of the equipment, jars a nd lids
Mix

Pour the chutney into clean jars. Do not fill the jars completely as the chutneywill ferment during storage. You need to leave some place for the gas toescape during fermentation.Place lids on the jars and seal.
After packaging in the jar, stand in the sunlight for 2-3 days to encouragethe fermentation of the chutney. Fermentation adds flavour to the chutneyand results in the formation of an acid that helps to preserve the chutney.After 2-3 days in the sun, remove to a cool place, where it can be stored forup to 3-4 months.
56Home-based Fruit and Vegetable Processing
Sauc
es a
ndCh
utne
ys
Filling and packaging
Storage

Vegetable chutney
Ingredients (makes 3kg chutney)750g carrots 9 tea cups600g cabbage 9 tea cups100g capsicum 1 tea cup450g onions 4 tea cups120g chilli powder 3-9tbs15g ginger powder 1 tbs40g salt 3 level tbs30g curry powder 6 level tsp750ml sunflower oil 3 # tea cups300ml vinegar 1 ! tea cups
If you do not have weighing scales, you can use a teacup to measure out theingredients.tbs = tablespoon (next size up from a teaspoon or equal to three teaspoons) tsp = teaspoon (5ml)
Sort the vegetables and discard any unripe, over-ripe or damaged ones.Wash in clean cold water and drain.Peel the onions and carrots. Chop the onions, cabbage and capsicum intosmall pieces about 5cm long. Do not use the core of the cabbage.It is best to use a stainless steel knife to prevent marking the flesh of thefruit and vegetables, but if you do not have one, use a knife with a cleansharp blade.Grate the carrots using the large holes on the grater.Weigh out the ingredients accurately. Use weighing scales if you have them. Ifnot, use the same measuring cup or container each time you make the productso that it is the same from one batch to the next.
For glass jars: Wash the jars and lids and put them into a large saucepan. Fillthe saucepan with water so that the jars and lids are covered and heat until thewater boils. Boil for about 5 minutes.Remove the jars and turn upside down so that the water can all drain out.DO NOT dry them with a dirty cloth.If you are using recycled plastic jars, clean them with a solution of chlorinatedwater (100ppm). Turn upside down so all the water can drain out.
57Sauce and Chutneys
Sauc
es a
ndCh
utne
ys
Selection and preparation of the vegetable
Preparation of the jars and lids

Mix the dry spices- chilli powder, ginger powder, salt and curry powder.
Heat the dry spices in some of the sunflower oil (about 50ml). Stir well to pre-vent the spices burning. Add the onions to the spicy oil and fry until they aresoft (about 5 minutes).Add the rest of the oil and the vinegar. Stir well.Add the cabbage and cook for 5 minutes. Stir to prevent burning.Add the carrots and capsicum and cook for 5 minutes until the carrot is soft.Keep stirring to make sure the chutney does not burn.
Hot-fill the chutney into clean sterile jars. Fill them to within 2cm of the top ofthe jar.Make sure that there is a layer of liquid from the chutney covering the vegeta-bles or they will spoil when the jar is opened. Clean the outside rim of the jarand put on the lid. Close the lid as tightly as possible.Slowly turn the jar upside down so that any bacteria on the lid of the jar or inthe space at the top are killed. Leave the jar upside down until it is cold. Whenthe jars are cold test each lid to make sure it has a good seal.
Store the chutney in a cool dry place away from direct sunlight. It will store forup to 6 months.
58Home-based Fruit and Vegetable Processing
Sauc
es a
ndCh
utne
ys
Mix ingredients
Heating
Filling and packaging
Storage

Tomato chutney (Chatni Badenjani Romi)Ingredients (to make about 1.5kg chutney)
1 kg fresh tomatoes200g garlic500g fresh hot pepper (green or red)Salt to taste
This hot tomato chutney can be eaten fresh or packed in clean jars where it fer-ments and can be kept for 2 to 3 months
Sort the tomatoes. Discard any that are unripe, infected or rotten. Wash in cleanwater and drain well.Peel the garlic cloves.Cut the pepper. Remove the stems and seeds. Wash the pepper in clean water.Use chlorinated water to wash the vegetables
Wash the blender with clean boiled or chlorinated water.For glass jars: Wash the jars and lids and put them into a large saucepan. Fillthe saucepan with water so that the jars and lids are covered and heat until thewater boils. Boil for about 5 minutes.Remove the jars and turn upside down so that the water can all drain out.DO NOT dry them with a dirty cloth.If you are using recycled plastic jars, clean them with a solution of chlorinatedwater (100ppm). Turn upside down so all the water can drain out.
Blend the prepared vegetables in the blender or pounder (“awang” or“oghor”) until they are well mixed. Add salt and mix well.
Pour the chutney into clean jars. Do not fill the jars completely as the chutneywill ferment during storage. You need to leave some place for the gas toescape during fermentation.
The chutney should be stored in a cool and dry place and can be kept for 2 to3 months.
59Sauce and Chutneys
Sauc
es a
ndCh
utne
ys
Filling and packaging
Selection and preparation of vegetables
Preparation of equipment and jars
Mix
Storage

Chili chutney (Chatni Morchi Sorkh/Sabz )Ingredients (to make 1. 5 kg chutney)1 kg fresh red/green chilli300g garlic250 ml vinegar Salt to taste100g walnut (optional)
This is a hot chutney made of red peppers and garlic. It can be consumed whenit is fresh, or stored for up to 3 months in a sealed, clean jar.
Sort the peppers and discard any that are damaged or diseased. Wash inclean water and drain well. Cut the peppers. Remove the stems and seedsPeel the garlic cloves.Use chlorinated water to wash the vegetables.
Wash the blender with clean boiled or chlorinated water.Glass jars: Wash the jars and lids and put them into a large saucepan. Fill thesaucepan with water so that the jars and lids are covered and heat until thewater boils. Boil for about 5 minutes.Remove the jars and turn upside down so that the water can all drain out.DO NOT dry them with a dirty cloth.If you are using recycled plastic jars, clean them with a solution of chlorinatedwater (100ppm). Turn upside down so all the water can drain out.
Blend the prepared pepper and garlic in the blender or pounder (awang or oghor)until they are well mixed. Add the walnuts to the blender if you are using them.Add the vinegar and salt and mix well.
Pour the chutney into clean jars. Do not fill the jars completely as the chutneywill ferment during storage. You need to leave some place for the gas toescape during fermentation.
The chutney should be store in the cool and dry place be kept for up to 3months.
60Home-based Fruit and Vegetable Processing
Sauc
es a
ndCh
utne
ys
Selection and preparation of vegetables
Preparation of equipment and jars
Mix
Filling and packaging
Storage

PICKLES
61Pickles
Pick
les

PicklesPickles include a range of savoury products that are made from a mixture ofvegetables and fruit. They are eaten as a spicy accompaniment to a meal. Themethod of preservation is a combination of increased acidity (reduced pH),added salt, reduced moisture and added spices. The most common types ofpickles in Afghanistan, known as ‘atchar’ or ‘toorchi’, are fermented through theaddition of salt or brine (lactic acid fermentation) or with vinegar (acetic acid).
Fermented pickles (atchar)Atchars are made by adding salt or vinegar to vegetables (or fruit) and leavingthem to ferment for a few days. Wild mustard seeds (awri) are sometimes addedto salt or brine pickles. During fermentation, lactic acid or acetic acid is producedwhich reduces the pH of the product and helps to preserve it by preventing thegrowth of spoilage bacteria. These pickles are usually not heated after fermenta-tion and therefore strict attention must be paid to hygiene to make sure that thecorrect type of bacteria are present to carry out the fermentation. If the ferment-ing vegetables are contaminated with other bacteria, they may become toxic andcause food poisoning. Well made pickles can be stored for several months whenthey are kept in a cool dry place, away from direct sunlight.
Common vegetables and fruits suitable for pickles (atcharor toorchi):
62Home-based Fruit and Vegetable Processing
Pick
les
Should I make pickle?Yes
Pickles can be made with rela-tively simple equipment that isavailable in the home.The products are quite safe andhave a fairly long shelf life due tothe combination of high acidity,high salt and low moisture content.Pickles can be prepared from arange of different fruit and veg-etables depending on local tasteand availability.
NoThe availability of vinegar (aceticacid) may be a problem in someareas.The conditions for fermentation(temperature, salt content and pH)should be closely monitored to geta good, safe product.
PICKLES -equipment requiredSharp stainless steel knifeWeighing scales or,
Measuring jug or bottleMeasuring cup
Spoons for measuringPlastic bowlsSieveGraterMortar and pestle or grinderBoiling pan (stainless steel or aluminum)Wooden spoon for stirringCooker or stoveGlass jars and lids
For fermented pickles: large bucket or potfor fermenting in
CucumberCabbageCarrotBonjon-e-atcharGarlicOnion
MintGreen and redchilliPumpkinCauliflowerTurnip
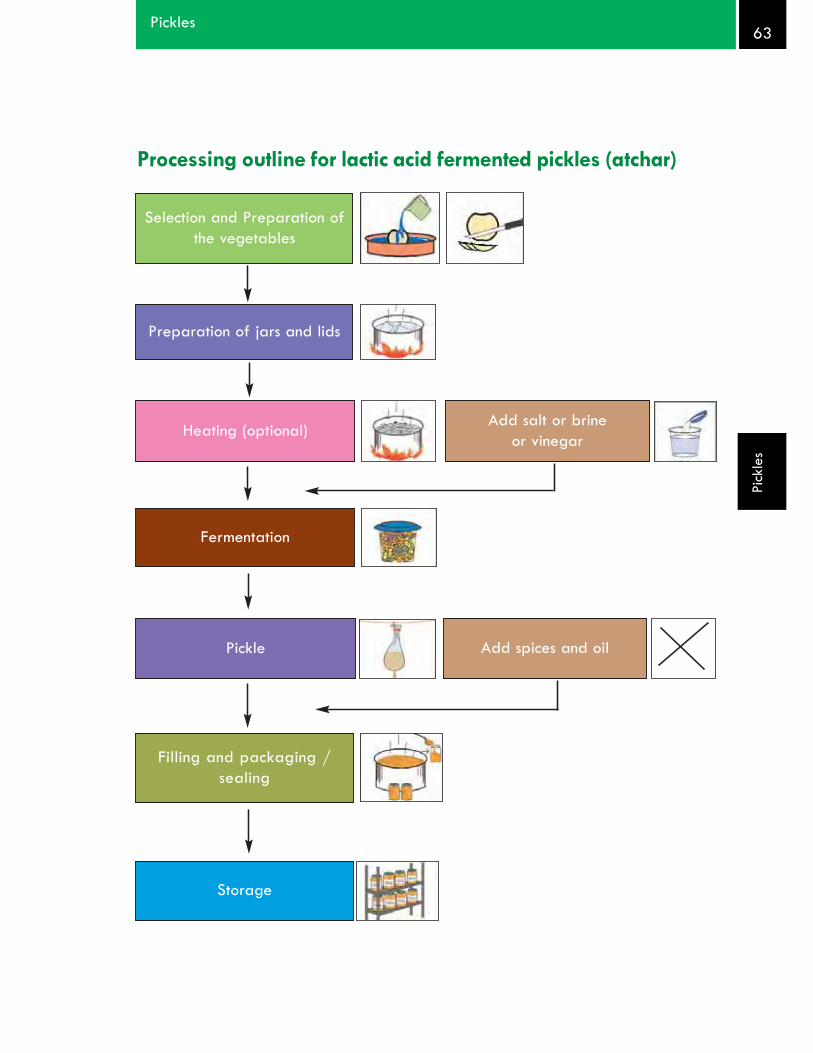
Processing outline for lactic acid fermented pickles (atchar)
63Pickles
Pick
les
Selection and Preparation ofthe vegetables
Fermentation
Heating (optional) Add salt or brine or vinegar
Add spices and oil
Filling and packaging /sealing
Storage
Pickle
Preparation of jars and lids

Fermented pickles – process details and quality assurance
Select good quality vegetables. Discard any that are damaged or rotten.Wash the vegetables in clean (boiled) water. Washing vegetables thoroughly isvery important, especially if the pickle is prepared without heating the produce.Peel them if required and remove the stones.Cut the vegetables into small, uniform sized pieces. Place the cut pieces intosalted water (2-3% salt solution) to prevent the pieces turning brown.
Glass jars: Wash the jars and lids and put them into a large saucepan. Fill thesaucepan with water so that the jars and lids are covered and heat until thewater boils. Boil for about 5 minutes.Remove the jars and turn upside down so that the water can all drain out.DO NOT dry them with a dirty cloth.If you are using recycled plastic jars, clean them with a solution of chlorinatedwater (100ppm). Turn upside down so all the water can drain out.
In some recipes, the vegetables are boiled to soften them prior to fermentation.
Place the pieces of vegetable in a clean container that is suitable for fermen-tation, for example a large clean earthenware pot (only used for fermentation)or plastic bucket that is made of food grade plastic and is only used for food.The container should have a lid or a cover that prevents contamination byinsects and dust. A 2 litre container is needed for each kg of vegetables.
Lactic acid fermentation (salt or brine)Add salt or brine to the vegetables.
If you are adding salt, place the salt and vegetables into the contain-er in alternating layers until the container is three quarters full. As aguide, 300g salt is needed for 10kg vegetables. Make sure the toplayer is of salt so that all the vegetable pieces are underneath the saltThe brine starts to form as water is drawn out of the vegetables anddissolves the salt to make a brine. Fermentation begins as soon asthe brine is formed.If you are using brine, prepare a 15-20% salt solution by dissolving saltin clean (boiled) water (150 to 200g salt per litre of brine; see pageX for more details on making brine). Do not use chlorinated water for thebrine as this will prevent fermentation.
64Home-based Fruit and Vegetable Processing
Pick
les
Selection and preparation of the vegetables
Sterilise the jars and lids
Fermentation: lactic acid fermentation
Heating

You need to make sure that all the vegetables are in the brine – use 2litres per kg vegetables. Remember that most vegetables will floatwhen you first put them in the brine so you must place a clean plate orsimilar heavy object on top to submerge the vegetable pieces.
To accelerate the fermentation process, you can pound wild mustard seeds(awri) and add the awri powder to the brine.
OR: Acetic acid fermentation (vinegar)Cover the vegetables in vinegar.Instead of vinegar, you can also use cover the vegetables in a 5% acetic acidsolution available in the bazaar. (If the solution is 10% acetic acid, make sureto dilute it in water to make a 5% solution).Remember that most vegetables will float when you first put them in the vine-gar or acetic acid solution so you must place a clean plate or similar heavyobject on top to submerge the vegetable pieces.
Once you have covered the vegetables with salt, or brine, or vinegar, place alid on the fermentation pot and leave it to stand in a warm place (21°C) to fer-ment. It is important to use a lid to help maintain a constant temperature andto protect the fermenting liquor from contamination.
You can speed up the fermentation by adding a starter culture to the salt orbrine mixture. The starter culture is the juice left over from a previous fermen-tation and which contains some of the lactic acid bacteria.
You can see the fermentation is taking place as small bubbles of carbon diox-ide gas appear in the brine.
Fermentation takes between one and four weeks to complete. The time takendepends on the temperature, the salt concentration and the pH (acidity of the brineor vinegar). It is complete when the bubbles of carbon dioxide gas stop appearing.
Fill the fermented pickles into clean sterile jars or containers. The pickles are notprocessed any further, therefore it is essential to make sure it does not becomecontaminated at this stage. All equipment must be clean.Pour a layer of good quality vegetable oil on top of the pickle to act as a seal.Make sure there are no air bubbles trapped in the pickle after filling the jars.Tap the bottom of the bottle lightly on the table to remove any trapped air.
The pickles should be stored in a cool place out of direct sunlight. The high levelof acidity gives them a long shelf life of up to 6 months.
65Pickles
Pick
les
Storage
Filling and packaging

Pickled cucumbersIngredients 20kg small cucumbersor 15kg large cucumbers1kg salt
Cucumbers are fermented by lactic acid bacteria to make a dark green, slight-ly transparent product. Occasionally oil is added to the fermented product.
Select ripe cucumbers that are free from bruising or disease. Wash them inclean water and drain.Cucumbers can either be pickled whole or sliced into smaller pieces. If you areslicing, cut into pieces that are 5-8mm thick. Cucumbers do not need to be peeled.
Glass jars: Wash the jars and lids and put them into a large saucepan. Fill thesaucepan with water so that the jars and lids are covered and heat until thewater boils. Boil for about 5 minutes.Remove the jars and turn upside down so that the water can all drain out.DO NOT dry them with a dirty cloth.If you are using recycled plastic jars, clean them with a solution of chlorinatedwater (100ppm). Turn upside down so all the water can drain out.
Place the cucumbers and salt (1kg salt per 15-20kg cucumber) in alternate layersin a sealed container. A brine will form to cover the cucumbers. Ensure that they aresubmerged in the brine. If this brine is not sufficient to cover the cucumbers, preparea 40% brine (see page X below) and add it to the pot to cover all the cucumbers.
As soon as the brine is formed, fermentation starts. Bubbles of carbon dioxidegas appear. Leave to ferment in a warm place for 1-4 weeks depending uponthe temperature. Fermentation is complete when no more bubbles appear.
Fill into clean pots or glass jars and seal. The pickle is not further processed,therefore it is important to ensure that the jars are clean and good hygiene ispracticed during filling. Oil can be added to the surface if desired.Cap the jars after filling.
StorageStore in a cool dry place for up to 6 months.
66Home-based Fruit and Vegetable Processing
Pick
les
Selection and preparation of the vegetable
Preparation of the jars and lids
Salting
Fermentation
Filling and packaging

Mixed pickle
Ingredients (to make approximately 5 kg of pickle)500g carrot500g baby eggplant (‘bonjon-e-atchar’)500g turnip500g cauliflower300g chilli250g garlic50g salt250g ‘awri’ (wild mustard seeds)3 litres water (enough to cover the vegetables) + water for boiling the vegetables
Select vegetables that are good quality and without bruising.Wash well with clean, chlorinated water.Peel the carrots. Remove the inedible parts. Chop into small pieces.Peel the turnip. Remove the inedible parts. Chop into small pieces the same sizeas the carrots.Chop the eggplant into pieces the same size as the carrots and turnips.Take off the cauliflower florets. Chop into smaller pieces.Peel the garlic and chop into small pieces.Grind the wild mustard seeds (awri).
Glass jars: Wash the jars and lids and put them into a large saucepan. Fill thesaucepan with water so that the jars and lids are covered and heat until thewater boils. Boil for about 5 minutes.Remove the jars and turn upside down so that the water can all drain out.DO NOT dry them with a dirty cloth.If you are using recycled plastic jars, clean them with a solution of chlorinatedwater (100ppm). Turn upside down so all the water can drain out.
Boil the carrot, turnip, eggplant, chilli and cauliflower with a little water for 10to 15 minutes until they are soft. Place them in a sieve and allow the water torun out. Cover the vegetables with a clean cloth and leave to cool down.Boil the 3 litres of water and leave to cool down.
67Pickles
Pick
les
Preparation of vegetables
Preparation of the jars and lids
Heating

Place the mixed vegetables in layers in a large pot (or plastic bucket). Includethe chopped garlic and chilli in the layers.Place the ground awri on top. Add the salt and the cool boiled water. (Do notuse chlorinated water).
Place in a warm place (or in the sun) for 15 to 20 days to ferment. Fermentationstarts when bubbles of carbon dioxide gas appear. The length of time taken toferment depends on the temperature (optimum is between 20 and 25°C).Fermentation is complete when no more bubbles appear.
Fill the pickle into clean pots or glass jars and seal. The pickle is not furtherprocessed, therefore it is important to ensure that the jars are clean and goodhygiene is practiced during filling. Oil can be added to the surface if desired.Cap the jars after filling.
Store the jars in a cool place. The pickle can be kept from two to four months.
68Home-based Fruit and Vegetable Processing
Pick
les
Mix
Fermentation
Filling and packaging
Storage

Pumpkin pickleIngredients (to make approximately 5,5kg of pickle)2kg pumpkin250g chilli250g garlic200g awri (wild mustard seeds)50g salt3 litres water (enough to cover the vegetables) + water for boiling the vegetables100g mint leaves
Select vegetables that are good quality and without bruising. Wash well withclean chlorinated water.Chop the pumpkin into smaller pieces.Peel the garlic and chop into small pieces. Wash the mint leaves and chilli withboiled water.Grind the awri.
Glass jars: Wash the jars and lids and put them into a large saucepan. Fill thesaucepan with water so that the jars and lids are covered and heat until thewater boils. Boil for about 5 minutes.Remove the jars and turn upside down so that the water can all drain out.DO NOT dry them with a dirty cloth.If you are using recycled plastic jars, clean them with a solution of chlorinatedwater (100ppm). Turn upside down so all the water can drain out.
Boil the pumpkin in a little water for 10 to 15 minutes until it is soft soft. Placeit in a sieve and allow the water to run out. Cover the vegetables with a cleancloth and leave to cool down.Boil the 3 litres of water and leave to cool down.
Place the pumpkin in layers in a large pot (or plastic bucket). Include thechopped garlic, chilli and mint in the layers.Place the ground awri on top. Add the salt and the cool boiled water. (Do notuse chlorinated water)
69Pickles
Pick
les
Selection and preparation of vegetables
Preparation of the jars and lids
Heating
Mix and add ingredients
Place in a warm place (or in the sun) for 15 to 20 days to ferment. Fermentationstarts when bubbles of carbon dioxide gas appear. The length of time taken toferment depends on the temperature (optimum is between 20 and 25°C).Fermentation is complete when no more bubbles appear.
Fill the pickle into clean pots or glass jars and seal. The pickle is not furtherprocessed, therefore it is important to ensure that the jars are clean and goodhygiene is practiced during filling. Oil can be added to the surface if desired.Cap the jars after filling.
Store in a cool and dry place. The pickle can be stored up to 3 to 4 months.
70Home-based Fruit and Vegetable Processing
Pick
les
Fermentation
Filling and packaging
Storage

VINEGAR
71Vinegar
Vine
gar

Preparation of vinegar
Vinegar is also known as acetic acid. It is a by-product of the fermentationof fruit and vegetables and because it is acidic, it can also be used to pre-serve fruit and vegetables. It is commonly added to fruit and vegetables tomake pickles.
Common fruits and vegetables suitable for making vinegar:GrapeAppleMulberries
Vinegar can also be made byutilising fruit waste, for exampletomato peel and seeds, fruitpeelings.
72Home-based Fruit and Vegetable Processing
Vine
gar
Should I make vinegar?Yes
Vinegar can be made with relativelysimple equipment that is available in thehomeMaking vinegar is a good way to utilisefruit waste, for example peels andextracted juiceVinegar is a useful ingredient for pre-serving other fruit and vegetables.
NoManaging the two different fermenta-tions requires some skill and knowledgeof the process. You need to make sure thefermentation conditions are suitable toproduce a good productTo make a good product for sale, you doneed some proper equipment to ensureconsistency from batch to batchMake sure the fermenting vinegar is notcontaminated by other bacteria whichcause it to spoilIf you want to use the vinegar in picklemaking, you need to ensure it is strongenough to act as a preservative.
VINEGAR - equipment required
Sharp stainless steel knifeWeighing scales or,
Measuring jug or bottleMeasuring cup
Spoons for measuringPlastic bowlsBlender or liquidizer (optional)SieveMuslin filter clothGlass jars and lidsLarge fermenting vesselAir lock

Process outline for fruit and vinegar
73Vinegar
Vine
gar
Selection and preparation ofthe fruit
Fermentation Yeast fermentation
Filter Filter
Filter
Acetobacter fermentation
Vinegar
Fill/pack
Cool and store
Pasteurise (optional)
Preparation of pulp

Fruit vinegar – quality assurance and processing notes
Wash the fruit or vegetables in clean boiled (non-chlorinated) water. If you areusing fruit peels they should be from clean ripe fruit. Do not use peels from rot-ten or damaged fruit as this will produce a bad product.
Do not use peels from fruit or vegetables that have been sprayed with fungi-cide or herbicide. Do not use fruit or vegetables that have been treated withpreservative as this will prevent the growth of bacteria that are needed for fer-mentation.
Cut the fruit or fruit peel into thin strips and put into clay or plastic pots or buckets.Only use boiled water for vinegar making. Do not use chlorinated water formaking vinegar or for washing the fruits as the chlorine will prevent the fermen-tation taking place.
All the equipment you use should be clean. Steam–sterilise the bottles beforeuse to get rid of any bacteria that can contaminate the fermentation. (Do not usechlorinated water).
Do not use aluminium or iron pots for the fermentation as the acid will react withthe metal of the pots.
1. Traditional one-stage methodMash or liquidise the fruit with boiled water to make a pulp. If you do nothave a blender you can mash the fruit by hand and mix with boiled water tomake a thick pulp. Dilute the pulp by adding 2 litres of boiled water per litreof pulp. Place the diluted fruit pulp in a large pot for fermentation and addsugar (use about 120g sugar per litre of diluted pulp).Add a starter culture of acetobacter (waste fruit slurry saved from a previousfermentation) and cover the pot with a clean cotton cloth. Leave it in a warmplace (20-22°C) for about 8 days.While the fruit is fermenting, make sure the water level does not fall too low. Ifit is getting dry, add some more water.After 8 days the liquid should have the correct level of acidity (about 4% orpH3 if using a pH meter or papers). If it is not strong enough, leave to ferment
74Home-based Fruit and Vegetable Processing
Vine
gar
Selection and preparation of the fruit or fruit peels
Preparation of equipment
Fermentation

for a little longer. You might need to add some more sugar. You need a pHpaper to test the acidity. If you do not have one, you can do a simple titrationtest to find out how strong your vinegar is (See page X, below). If you need thevinegar to be stronger, leave it to ferment for a few more days. You might needto add some more sugar to the mixture.
You may need to adjust the acidity of the fermenting liquid. For apple vinegar,add 1 tsp sodium bicarbonate per 10 litres of fermenting liquid to reduce theacidity. For mulberry vinegar, add 1tsp citric acid (lemon juice) per 10 litres offermenting liquid to increase the acidity.
2. Improved two stage methodThis method involves two separate fermentations. Ethanol is made by addingyeast to the fruit mixture. The ethanol is then converted into vinegar by addingacetobacter.
Place the fruit pieces or peels in a clean blender with cool boiled waterto make a thick fruit pulp. If you do not have a blender you can mashthe fruit by hand and mix with boiled water to make a thick pulp. Dilutethe pulp with extra water (1 part pulp to 2 parts boiled water). Addsugar to the pulp (120g per litre of diluted pulp).Add the yeast to the pulp, place in a large plastic bucket and leave toferment at 25°C for two days.You may need to adjust the acidity of the fermenting liquid. For applevinegar, add 1 tsp sodium bicarbonate per 10 litres of fermenting liq-uid to reduce the acidity. For mulberry vinegar, add 1tsp citric acid(lemon juice) per 10 litres of fermenting liquid to increase the acidity.After fermenting, filter the mixture through a muslin cloth and col-lect the liquid.
Add the acetic acid bacteria to the liquid (use a starter culture thathas been saved from a precious batch of vinegar). Place in a warmplace (20-22°C), cover with a clean cotton cloth and leave to fer-ment for 11 days.
75Vinegar
Vine
gar

Drain off the liquid. Filter it through a muslin cloth. Save some of the residualfruit slurry to use as a starter culture in the next batch of vinegar.
Fill the vinegar into clean, sterilised bottles. Place on the caps and fastenloosely.
Place the bottles in a pan of water and heat to boiling for about 10 minutes topasteurise the vinegar. This will give it a longer shelf life. This stage is option-al. If you are using the vinegar straight away, for example to make pickle orchutney, you do not need to pasteurise it.
Cool the bottles to room temperature. Tighten the lids on the bottles as theycool down.Vinegar will store for up to 12 months if kept in a cool, dry place away fromdirect sunlight.
76Home-based Fruit and Vegetable Processing
Vine
gar
Filter
Filling and packaging
Heating (optional) -Pasteurization
Cooling and storage
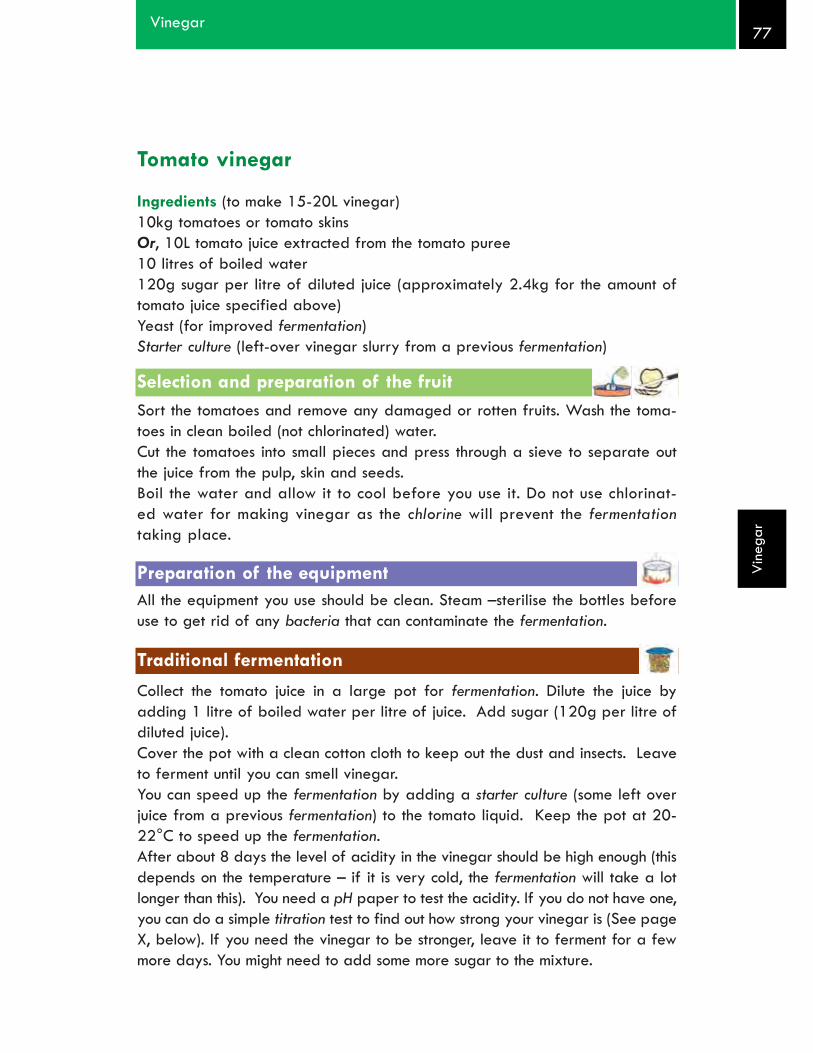
Tomato vinegar
Ingredients (to make 15-20L vinegar)10kg tomatoes or tomato skins Or, 10L tomato juice extracted from the tomato puree10 litres of boiled water120g sugar per litre of diluted juice (approximately 2.4kg for the amount oftomato juice specified above)Yeast (for improved fermentation)Starter culture (left-over vinegar slurry from a previous fermentation)
Sort the tomatoes and remove any damaged or rotten fruits. Wash the toma-toes in clean boiled (not chlorinated) water.Cut the tomatoes into small pieces and press through a sieve to separate outthe juice from the pulp, skin and seeds.Boil the water and allow it to cool before you use it. Do not use chlorinat-ed water for making vinegar as the chlorine will prevent the fermentationtaking place.
All the equipment you use should be clean. Steam –sterilise the bottles beforeuse to get rid of any bacteria that can contaminate the fermentation.
Collect the tomato juice in a large pot for fermentation. Dilute the juice byadding 1 litre of boiled water per litre of juice. Add sugar (120g per litre ofdiluted juice).Cover the pot with a clean cotton cloth to keep out the dust and insects. Leaveto ferment until you can smell vinegar.You can speed up the fermentation by adding a starter culture (some left overjuice from a previous fermentation) to the tomato liquid. Keep the pot at 20-22°C to speed up the fermentation.After about 8 days the level of acidity in the vinegar should be high enough (thisdepends on the temperature – if it is very cold, the fermentation will take a lotlonger than this). You need a pH paper to test the acidity. If you do not have one,you can do a simple titration test to find out how strong your vinegar is (See pageX, below). If you need the vinegar to be stronger, leave it to ferment for a fewmore days. You might need to add some more sugar to the mixture.
77Vinegar
Vine
gar
Selection and preparation of the fruit
Preparation of the equipment
Traditional fermentation

Filter the liquid through a muslin cloth. Save some of the liquid or fruit slurry touse as a starter culture in the next batch of vinegar.
The improved method involves two fermentation stages. The first one is ananaerobic (without oxygen) fermentation using yeast. The fermented juice is fil-tered and then a second fermentation takes place, using acetobacter (from astarter culture of old vinegar) that produces acetic acid (vinegar).
Fermentation 1Place the tomato juice in a large pot with a small neck. Add water (1 litre perlitre of juice) and sugar (120g per litre of diluted juice) to the juiceActivate the yeast – place the yeast in a cup with some sugar, warm water anda small quantity of the fruit juice. Keep the mixture warm (30C) and after about15 – 20 minutes it should start to bubble. If the yeast does not start to producebubbles in the glass, it is dead. You need to get another supply of yeast.Add the yeast to the juice, place in a large plastic bucket and leave to fermentat 25°C for two days. You need to make sure that the first fermentation is in aclosed container, to prevent any air getting into the mixture. The bacteria thatconvert sugar into ethanol have to do it without oxygen.An airlock is usually fitted to the jar that is used for fermentation – this preventsair getting into the fermenting juice, but the gas that is given off during fermen-tation can escape through the airlock.
Filter the mixture through a muslin cloth and collect the liquid in a wide,open pot.
Fermentation 2Add the acetic acid bacteria to the liquid (use a starter culture that has beensaved from a previous batch of vinegar (use the slurry that is left over whenyou filter off the vinegar)). Place in a warm place (20-22°C), cover with a cleancotton cloth and leave to ferment for 11 days. It is essential that air gets to theliquid during the second stage as the acetobacter need oxygen to convert theethanol into vinegar.
78Home-based Fruit and Vegetable Processing
Vine
gar
Improved fermentation
Filter
Filter

Filter the liquid through a muslin cloth. Save some of the liquid or the slurryleft after filtering to use as a starter culture in the next batch of vinegar. Youcannot use pasteurised vinegar as a starter culture as pasteurisation kills thebacteria that are needed for fermentation. Make sue you save a samplebefore it is pasteurised.
Fill the vinegar into clean, sterilised bottles. Place on the caps and fastenloosely.
Place the bottles in a pan of water and heat to boiling for about 10 minutes topasteurise the vinegar. This will give it a longer shelf life. This stage is option-al. If you are using the vinegar straight away, for example to make pickle orchutney, you do not need to pasteurise it.
Cool the bottles to room temperature. Tighten the lids on the bottles as theycool down.Pasteurised vinegar will keep for up to 12 months if it is stored in a cool dryplace away from direct sunlight.Non-pasteurised vinegar should be used within one month.
79Vinegar
Vine
gar
Filter
Filling and packaging
Heating (optional)
Cooling and storage

Mulberry vinegar
Ingredients (to make 15 litres vinegar)
Single fermentation10kg mulberries10 litres of boiled water 2.4 kg sugar (120g sugar per litre of diluted juice)2tsp lemon juice (1tsp lemon juice per 10 litres diluted juice)
Two-stage fermentation10kg mulberries20 litres boiled water3.6 kg sugar (120g sugar per litre of diluted juice)3tsp lemon juice (1tsp lemon juice per 10 litres diluted juice)
Sort the mulberries and select those that are ripe. Discard any that are rottenor infected.Place in a large plastic or clay pot that is suitable for fermentation. .Boil the water and allow it to cool before you use it. Do not use chlorinated waterfor making vinegar as the chlorine will prevent the fermentation taking place.
All the equipment you use should be clean. Steam –sterilise the bottles beforeuse to get rid of any bacteria that can contaminate the fermentation.
Squash the mulberries to break the cells and extract the juice. You can liq-uidise the fruit if you have a liquidiser, otherwise do it by hand to make apulp. Add clean boiled water to the mulberries (1 litre per litre of squashedmulberries) to make diluted pulp. Add sugar (120g per litre of diluted pulp).Add lemon juice (1tsp per 10litres of diluted pulp) to increase the acidity ofthe diluted pulp.Cover the pot with a clean cotton cloth to keep out the dust and insects. Leaveto ferment until you can smell vinegar.You can speed up the fermentation by adding a starter culture (some left overjuice from a previous fermentation) to the mulberry liquid.Keep the pot at 20-22°C to speed up the fermentation.
80Home-based Fruit and Vegetable Processing
Vine
gar
Selection and preparation of the fruit
Prepare equipment
Traditional fermentation

After about 8 days the level of acidity in the vinegar should be high enough(about 4% acid, which is equivalent to a pH of 3). The time of fermentation thisdepends on the temperature – if it is very cold, the fermentation will take a lotlonger than this). You need a pH paper to test the acidity. If you do not haveone, you can do a simple titration test to find out how strong your vinegar is(See page X, below). If you need the vinegar to be stronger, leave it to fermentfor a few more days. You might need to add some more sugar to the mixture.
Drain off the liquid. Filter it through a muslin cloth. Save some of the residualfruit slurry to use as a starter culture in the next batch of vinegar.
Improved two stage fermentationThis method involves two separate fermentations. Ethanol is made by addingyeast to the fruit mixture. The ethanol is then converted into vinegar by addingacetobacter.
Fermentation 1Make the fruit pulp by mixing crushed mulberries with boiled water (1 litre perkg fruit). Dilute the pulp with extra water (1 part water to 1 part pulp). Addsugar to the diluted pulp (120g per litre diluted pulp) and lemon juice (1tsp per10 litres diluted pulp).
Activate the yeast: place the yeast in a cup with some sugar, warm waterand a small quantity of the fruit pulp. Keep the mixture warm (30°C) andafter about 15 – 20 minutes it should start to bubble, If the yeast does notstart to produce bubbles in the glass, it is dead. You need to get anothersupply of yeast.Add the yeast to the pulp, place in a large plastic bucket and leave to fermentat 25°C for two days. You need to make sure that the first fermentation is in aclosed container, to prevent any air getting into the mixture. The bacteria thatconvert sugar into ethanol have to do it without oxygen.
Filter the mixture through a muslin cloth and collect the liquid.
81Vinegar
Vine
gar
Filter
Filter

Fermentation 2Add the acetic acid bacteria (acetobacter) to the liquid (use a starter culture thathas been saved from a previous batch of vinegar). Place in a warm place (20-22°C), cover with a clean cotton cloth and leave to ferment for 11 days. It isessential that air gets to the liquid during the second stage as the acetobacterneed oxygen to convert the ethanol into vinegar.
Drain off the liquid. Filter it through a muslin cloth. Save some of the residualfruit slurry to use as a starter culture in the next batch of vinegar. You cannotuse pasteurised vinegar as a starter culture as pasteurisation kills the bacteriathat are needed for fermentation. Make sure you save a sample before it ispasteurised.
Fill the vinegar into clean, sterilised bottles. Place on the caps and fastenloosely.
Place the bottles in a pan of water and heat to boiling for about 10 minutesto pasteurise the vinegar. This will give it a longer shelf life. This stage isoptional. If you are using the vinegar straight away, for example to makepickle or chutney, you do not need to pasteurise it.
Cool the bottles to room temperature. Tighten the lids on the bottles as theycool down.Pasteurised vinegar will keep for up to 12 months if it is stored in a cool dryplace away from direct sunlight.Non-pasteurised vinegar should be used within one month.
82Home-based Fruit and Vegetable Processing
Vine
gar
Filter
Filling and packaging
Heating (optional)
Cooling and storage

POTATO CRISPS
83Potato Crisps
Pota
to
Crisp
s

Potato crisps
Potato crisps are a popular snack food made by frying thin slices of potato inhot oil. Flavourings such as salt or chilli can be added to the crisps after theyhave been fried. They are best consumed soon after preparation. If you wantto store them for any length of time, you need airtight bags for packaging.
Process outline for potato crisps
84Home-based Fruit and Vegetable Processing
Pota
to
Crisp
s
Selection and Preparation ofthe potatoes
Packaging
Frying
Draining and cooling
Storage
Potato crisps

Potato crisps – quality assurance and processing notesIngredients PotatoesOilSalt (optional)
Select good clean potatoes. If possible, select potatoes that have a highsugar content as they make a good golden colour crisp when they are fried.Wash the potatoes well. Peel and cut out any green parts or eyes that arepresent.Slice the potatoes as thinly as possible. Make sure the slices are all the samethickness so they all cook at the same rate. Wash to remove the starch and drybefore frying them.
Heat the oil to 180-200°C in a large pan. Use a thermometer if you have one.If you do not have one you can test the oil to see if it is ready by placing oneof the potato slices into the oil. It will sink to the bottom. If the oil is hot enough,the slice will rise to the surface. If the oil is too cold, the potato slice will stay atthe bottom until the temperature is hot enough; then it will rise to the surface ofthe pan. This is the correct temperature for frying. If the potato piece sizzlesand burns when you put it in the oil, the oil is too hot and should be allowed tocool before frying.
When the oil is hot enough add a few crisps at a time. Do not add too manyat any one time as this lowers the temperature of the oil and the crisps takelonger to cook. Fry the crisps until they are golden brown.
Important! The oil you use affects the taste, texture and keeping quality of thecrisps. Do not use old oil that has been used for frying more than a 3 or 4 times.Each time you heat the oil it becomes damaged and eventually becomes ran-cid. Old rancid oil develops a strong flavour which will spoil the flavour of yourcrisps. New oil makes better quality products. It is best to use vegetable oil forfrying although animal fat, can also be used.
85Potato Crisps
Pota
to
Crisp
s
Selection and preparation of potatoes
Frying

Remove the crisps from the hot oil. Drain on absorbent paper to remove anyexcess oil. Add flavourings such as salt or chilli if required.It is important to drain the crisps to remove the excess oil. Poorly drained prod-ucts leave a greasy film inside the packaging which looks unattractive andaccelerates deterioration of the crisps.
Fried crisps rapidly absorb water from the surrounding air and soon becomesoft. They should be packaged as soon as they are cool. Do not seal in thepackets before they are cool or condensation will form on the inside of thepacket. The packaging must be air tight and moisture proof.
Potato crisps should be stored in a cool dry place away from direct sunlightbecause they will soften if they are in a damp place. Crisps should be storedaway from products with a strong taste or odour because they will pick up thetaste from other products if they are stored together.They should be consumed within one month of production.
86Home-based Fruit and Vegetable Processing
Pota
to
Crisp
s
Draining
Storage
Packaging

MEASUREMENTS AND PREPARATION OF SOLUTIONS
87Measurements and Preparation of Solution
Mea
sure
men
ts an
dPr
epar
atio
n of
Solut
ions
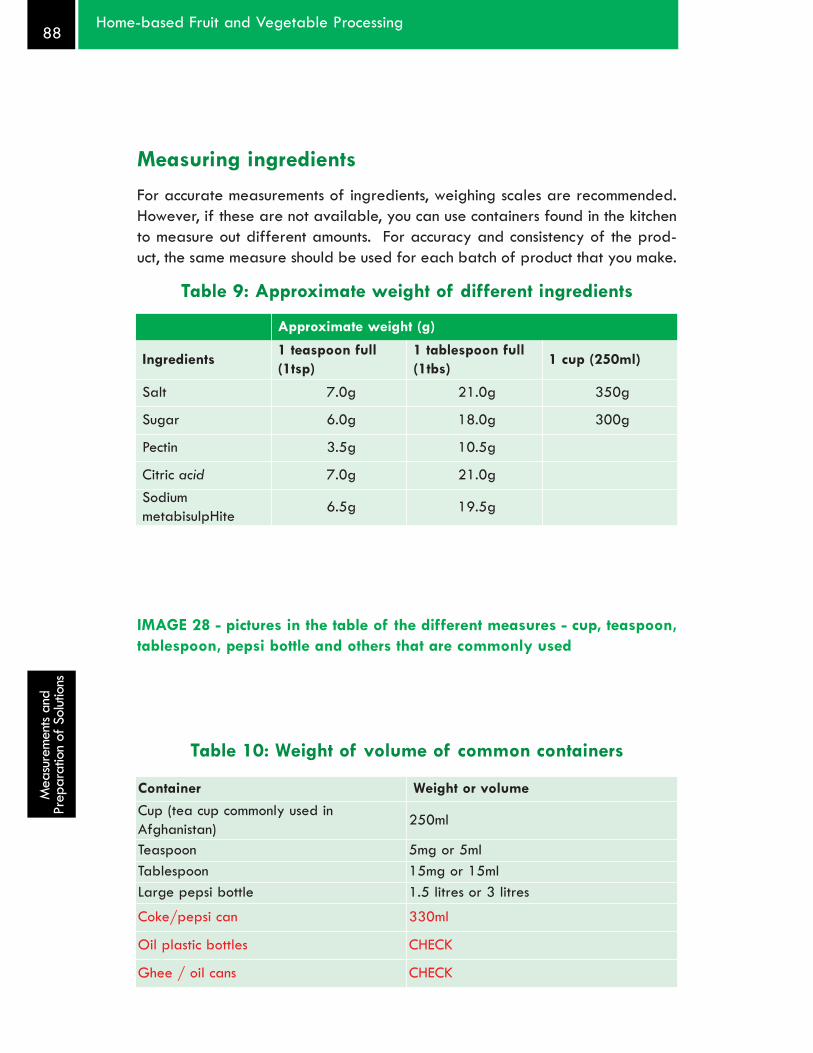
Measuring ingredientsFor accurate measurements of ingredients, weighing scales are recommended.However, if these are not available, you can use containers found in the kitchento measure out different amounts. For accuracy and consistency of the prod-uct, the same measure should be used for each batch of product that you make.
Table 9: Approximate weight of different ingredients
IMAGE 28 - pictures in the table of the different measures - cup, teaspoon,tablespoon, pepsi bottle and others that are commonly used
Table 10: Weight of volume of common containers
Approximate weight (g)
Ingredients 1 teaspoon full(1tsp)
1 tablespoon full(1tbs) 1 cup (250ml)
Salt 7.0g 21.0g 350g
Sugar 6.0g 18.0g 300g
Pectin 3.5g 10.5g
Citric acid 7.0g 21.0gSodiummetabisulpHite 6.5g 19.5g
Container Weight or volumeCup (tea cup commonly used inAfghanistan) 250ml
Teaspoon 5mg or 5mlTablespoon 15mg or 15mlLarge pepsi bottle 1.5 litres or 3 litresCoke/pepsi can 330ml
Oil plastic bottles CHECK
Ghee / oil cans CHECK
88Home-based Fruit and Vegetable Processing
Mea
sure
men
ts an
dPr
epar
atio
n of
Solut
ions

Preparation of syrup or brine solutions
Syrup or brine solution is made by dissolving sugar or salt in water. You shouldalways weigh the amount of sugar or salt that is to be added to the water. Youneed to prepare the solution in a container, such as a measuring jug, that hasvolumes marked on it. For ease of calculation, it is best to use a measuring jugthat can hold 1 litre of solution. If you are making a strong syrup or brine, youwill need to heat the water to dissolve all the sugar or salt.
The following example explains how to make a 20% syrup. A 20% solutionmeans that there is 20g sugar per 100g total syrup:Weigh out 20g of sugar. The total weight of the syrup (which is only made fromsugar and water) is going to be 100g. The sugar weighs 20g so the water mustweigh (100g - 20g) = 80g (80g of water is equal to 80ml water).
You can use the same calculation to prepare a brine solution, but using saltinstead of sugar.
The table 10 below provides amounts to prepare:- 100ml (100g) of a 20% solution- 1 litre (1000g) of 40% solution - 3 litres (3000g) of 20% solution
Table 11: Calculations of ingredients for the preparation ofsyrups and brine solutions
Concentrationrequired (% ofsugar OR salt)
Total weight offinal syrup or brinesolution
Amount of sugar orsalt required
Amount of waterrequired (totalweight – sugar orsalt)
20% 100g 20g 80g (100-20)
40% 1000g (1L) 400g 600g (1000-400)
20% 3000g (3L) 3 x 200g = 600g 2400g (3000-600)
89Measurements and Preparation of Solution
Mea
sure
men
ts an
dPr
epar
atio
n of
Solut
ions

A common mistake in calculating syrup concentrationsQuite often, when people make a syrup or a brine solution, they assume thatyou add the given amount of sugar or salt to 1 litre of water. In fact the givenamount of salt or sugar should be dissolved in a smaller amount of water andthen the total volume made up to 1 litre.
For example, you need to make 3 litres of a 20% syrup.Based on the calculations above, you need to take 3x200 g (600g) sugar anddissolve this in 3000-600 (2400g) water.
A common mistake is to take (3x200g) 600g sugar and dissolve this in 3litres(3000g) water. If you do this, you end up with a total syrup weight of 3,600gThe proportion of sugar in this is 600g out of a total of 3,600g, which is equalto 17% (600/3600 x100) instead of the 20% that you require.
90Home-based Fruit and Vegetable Processing
Mea
sure
men
ts an
dPr
epar
atio
n of
Solut
ions

Water chlorination
Clean water is an essential part of food processing. Water is needed toclean the raw materials and the equipment and also for use as an ingredi-ent in some processes.
Water can be made safe to use by boiling for 10-15 minutes. However, this iscostly in terms of the amount of fuel needed and the time taken to steriliselarge amounts of water.
An alternative method is to add chlorine to the water. Chlorine solutions of dif-ferent strengths are needed for different purposes:
For water that is used for cleaning, a concentration of 60-100ppm chlo-rine is required.For water that is to be used for drinking or as an added ingredient,0.5ppm chlorine is needed. If too much chlorine is added to drinkingwater, it can affect the flavour of the products.
Water is chlorinated by adding sodium hypochlorite, which has 50% availablechlorine. If sodium hypochlorite is not available in the market, household bleachcan be used. Household bleach contains between 3 and 6% available chlorine.But this will probably be more expensive See the boxes below for detailed instructions.
Warning!Chlorine kills most microbes, but is also a dangerous chemical. Care must be takenwhen making the solution. Wear gloves to avoid burning the skin. Do not get itin the eyes. Do not breathe in the fumes. Chlorine corrodes aluminium equipment,so use plastic buckets and spoons for mixing
91Measurements and Preparation of Solution
Preparation of water for cleaning fruits, vegetables and equipment (clean-ing solution)A chlorine solution of 100ppm should be used.
Using bleachAdd 10ml (2 tsp) of bleach to 5 litres of water
Using sodium hypochloriteAdd 200mg sodium hypochlorite to 1 litre of water
ALLOW THE CHLORINATED WATER TO STAND FOR 30 MINUTES TO ALLOWCHLORINE TO REACT WITH THE WATER
Mea
sure
men
ts an
dPr
epar
atio
n of
Solut
ions

Preparing a sulphite solution
Sulphur dioxide is used during drying to help preserve the fruit and to preventthe colour fading. The gas can be produced by burning elemental sulphur, orby dissolving sodium metabisulphite (Na2S2O5) in water to make a sulphitesolution.
The concentration of sulphur dioxide is usually expressed as ppm (parts per mil-lion). 1ppm = 1 part in 1,000,000. It is equivalent to the measurement ofmg/kg (or mg per litre).
When sodium metabisulphite is dissolved in water, only about two thirds (2/3)of the weight of sodium metabisulphite is turned into sulphur dioxide. Therefore,to achieve a known final concentration of SO2, you have to dissolve 3/2 (1.5)times more weight of Na2S2O5 than the final concentration you require.
For example, to achieve a concentration of 1000 ppm (mg/L), you have to dis-solve 1000 x 1.5 (1500mg) of sodium metabisulphite in 1 litre of water.
92Home-based Fruit and Vegetable Processing
Preparation of water to be used for drinking or in processing (as aningredient)
A 0.5ppm chlorine solution should be used.
Using bleach:Prepare the cleaning solution described in the other box, and dilute it 200times: Take 1 tsp (5ml) of the cleaning solution (100ppm chlorine) and add it to1 litre of water.
Using sodium hypochloriteAdd 5mg (1tsp) sodium hypochlorite to 5 litres of water.
Using the chlorine solution available in pharmacies (which contains 0.5%sodium hypochlorite)Add 2ml chlorine solution to 10 L of water.
ALLOW THE CHLORINATED WATER TO STAND FOR 30 MINUTES TO ALLOWCHLORINE TO REACT WITH THE WATER
Mea
sure
men
ts an
dPr
epar
atio
n of
Solut
ions

To achieve a final concentration of 800ppm SO2, you have to dissolve 800 x1.5 (1200mg) sodium metabisulphite in 1 litre of water.It is always easier to work out how much of a powder needs to be added to 1litre water (remember mg per litre give ppm) and then multiply this to get thefinal quantity you require.
For example if you need 3 litres of a 800ppm SO2 solution, you calculate thatyou need 1200mg to make 1 litre, therefore you will need 3 x 1200mg(3600mg) to make 3 litres.
The calculations for preparing a sulphur dioxide concentration are summarisedin the table below.
Table 12: Amounts of sodium metabisulphite and waterrequired to prepare different concentrations of SO2.
Concentration ofSO2 required
Amount of totalSO2 solution
required
Amount of sodiummetabisulphite
Amount ofwater
1000 ppm (mg/L) 1L (1000g) 1500mg or 1.5g(1.5 x 1000mg) 1L (1000g)
800 ppm 1L (1000g) 1200mg or 1.2 g(1.5 x 800mg) 1L (1000g)
800ppm 3L (3000g) 3600mg or 3.6 g(=1.5 x 800mg x 3L) 3L (3000g)
93Measurements and Preparation of Solution
Mea
sure
men
ts an
dPr
epar
atio
n of
Solut
ions

The Pearson Square
The Pearson square is a method that processors can use to calculate the amountsof two components that should be mixed together to give a final known con-centration.For example, it can be used to calculate the amounts of fruit pulp and sugar tomake a jam. The method can only be used for blending two components. Whenmore than two components are involved, it becomes more complex.
Example of how to use the Pearson SquareYou wish to produce a fruit jam with a final sugar content of 68%. You use apricotpuree (that contains 15% sugar), mixed with sugar (that contains 100% sugar).
1. Draw a rectangle
2. Label the two horizontal lines with the names of the two products to beblended (fruit puree and sugar)
Apricot puree
Sugar
3. Enter the sugar composition of each product in the rectangle as shown below:Apricot puree
Sugar
94Home-based Fruit and Vegetable Processing
Mea
sure
men
ts an
dPr
epar
atio
n of
Solut
ions
15
100

4. Enter the required final concentration in the centre of the rectangle.
Apricot puree
Syrup
Sugar
5. Mix the two components by crossing diagonally through the centre of therectangle.
Apricot puree
Sugar
6. Following the arrows, subtract the smaller number from the larger one togive two new numbers (32 and 53) in the opposite corners of the rec-tangle. These numbers (32% apricot puree and 53% sugar) are theamounts that need to be mixed to give a fruit jam with a final sugar con-centration of 68%.
95Measurements and Preparation of Solution
Mea
sure
men
ts an
dPr
epar
atio
n of
Solut
ions
15
15
68
100
32
53
100
68

Measuring the strength of vinegarYou can test the strength (acidity) of your homemade vinegar by doing a sim-ple titration. All you need is a few small glasses and jars, an eyedropper, alittle baking soda (sodium bicarbonate), a small amount of commercial vine-gar and some red cabbage or beetroot (you can also use dark coloured rosepetals or a strong cup of tea as the indicator).
In one small jar put a solution of baking soda in water. The amount doesnot matter, but it should be enough so that a little un-dissolved soda set-tles at the bottom of the jar after it has been mixed well.In the other jar, put some water that is left over from cooking beetroot orred cabbage. You want a strong purple colour: you can steam a head ofcabbage or boil a beetroot in just a small amount of water.Next put a few millimeters of water in two glasses. The amount does notmatter, but make certain you have the same amount in both glasses.Use the eyedropper to put enough drops of the purple liquid into thewater in the glasses to give the water a definite colour. Again, be carefulto put the same amount in each glass.Rinse the eyedropper in water, then in the store-bought vinegar. Then putseven drops of the store-bought vinegar into one of the glasses ofcoloured water which is your ‘control’ or standard.Rinse the eyedropper in water again, then in your homemade vinegar, and addseven drops of your homemade vinegar to the other glass – this one is your test glass.Rinse the eyedropper in water again, then in the baking soda solution. Put20 drops of the baking soda solution in the ‘control’ glass (with store-bought vinegar). Stir it with a glass rod or plastic spoon. The water willturn blue. The exact shade depends on the pH of your water.Add baking soda solution, one drop at a time (remember to count the drops asyou add them) to the test glass. Stir after adding each drop. Do this until the colourof the water in the test glass exactly matches the colour of the water in the con-trol glass. If you add a drop too much, no problem. Just don’t count that one.When the colours of the two glasses match, the acid content of your home-made vinegar is equal to the number of drops of baking soda solution youput in the test glass divided by four.
For example: if you used 28 drops of solution, the acidity is 28 divided by 4, or 7%.But you require a 5% vinegar to make pickles.How do you make it 5%?You need to water it down. To make it 5%, subtract 5 from whatever your home-made vinegar tested: in our example, 7-5=2. Multiply that by the amount ofvinegar (in ml) you are going to dilute. For instance if you have 250ml, 250 x2 = 500. Divide that by 5, and you get 100.Add 100 ml of water to 250ml of 7% vinegar to make it 5% acidity.Follow the method of the Pearson square (see page X above) to do this calculation.
96Home-based Fruit and Vegetable Processing
Mea
sure
men
ts an
dPr
epar
atio
n of
Solut
ions