hipaa implementation guide with claredi - oracle … work is confidential and proprietary...
TRANSCRIPT
HIPAA Implementation Guide with Claredi
Release 5.0.5 for Schema Run-time Environment (SRE)
SeeBeyond Proprietary and Confidential

The information contained in this document is subject to change and is updated periodically to reflect changes to the applicable software. Although every effort has been made to ensure the accuracy of this document, SeeBeyond Technology Corporation (SeeBeyond) assumes no responsibility for any errors that may appear herein. The software described in this document is furnished under a License Agreement and may be used or copied only in accordance with the terms of such License Agreement. Printing, copying, or reproducing this document in any fashion is prohibited except in accordance with the License Agreement. The contents of this document are designated as being confidential and proprietary; are considered to be trade secrets of SeeBeyond; and may be used only in accordance with the License Agreement, as protected and enforceable by law. SeeBeyond assumes no responsibility for the use or reliability of its software on platforms that are not supported by SeeBeyond.
SeeBeyond, e*Gate, e*Way, and e*Xchange are the registered trademarks of SeeBeyond Technology Corporation in the United States and/or select foreign countries. The SeeBeyond logo, SeeBeyond Integrated Composite Application Network Suite, eGate, eWay, eInsight, eVision, eXchange, eView, eIndex, eTL, ePortal, eBAM, and e*Insight are trademarks of SeeBeyond Technology Corporation. The absence of a trademark from this list does not constitute a waiver of SeeBeyond Technology Corporation's intellectual property rights concerning that trademark. This document may contain references to other company, brand, and product names. These company, brand, and product names are used herein for identification purposes only and may be the trademarks of their respective owners.
© 2005 SeeBeyond Technology Corporation. All Rights Reserved. This work is protected as an unpublished work under the copyright laws.
This work is confidential and proprietary information of SeeBeyond and must be maintained in strict confidence.
Version 20050406091934.
HIPAA Implementation Guide with Claredi 2 SeeBeyond Proprietary and Confidential

Contents
Contents
List of Tables 8
Chapter 1
Introduction 10Introduction to HIPAA 10
Intended Reader 11
Chapter 2
HIPAA Overview 12Introduction to HIPAA 12
What Is HIPAA? 12HIPAA Goals 13
Electronic Health Transactions Standards 13Unique Identifiers 13Security and Electronic Signatures 14Privacy and Confidentiality 14
Trading Partner Agreements 14
NCPDP 15What Is NCPDP? 15History 15What Is the NCPDP Telecommunications Standard? 16Components of an NCPDP Envelope 16
Structure of a Request Transaction 16Structure of a Response Transaction 16
Batching in NCPDP 17Acknowledgment Types 17Transaction Codes 17
Additional Information 17
Chapter 3
The SeeBeyond Solution 19Introduction 19
e*Xchange Partner Manager 19e*Gate Integrator 19
HIPAA Implementation Guide with Claredi 3 SeeBeyond Proprietary and Confidential
Contents
e*Index Global Identifier 19
e*Xchange Partner Manager 20The HIPAA ETD Library 20Complete HIPAA Transaction ETDs 21
e*Gate Integrator 21e*Gate Files for HIPAA Transactions 22
Testing the SeeBeyond Solution 22
Chapter 4
e*Xchange HIPAA Validations 24Overview 24
Validated Transaction Sets 24HIPAA Validations Summary 24
Interchange Control Receipt and Acknowledgement 25Functional Group Receipt and Acknowledgement 25HIPAA Transaction-specific Validation 25Overriding HIPAA Validations 25
Code Set Validations 26Message Tracking 27
Message Tracking Error Message Format 27
Chapter 5
Post-validation Collaboration 28Overview 28
Post-validation Processing Components 28Collaboration Rules 29Post-validation Java Methods 29
Java Method Parameters 30Post-validation Collaboration Indicator 32Message Tracking 32
Standard Validation Processing 33HIPAA Transaction Validation without Reprocessing 33HIPAA Transaction Validation with Reprocessing 33
Implementing Post-validation Collaboration Rules 34Creating Post-validation Collaboration Rules 34
Specifying Input and Output ETDs 34Specifying Post-validation Collaboration Rules for a Message Profile 37
Viewing Reprocessed Transactions in Message Tracking 38Viewing the Stripped Error Messages 39Viewing Post-validation Processing Errors 40
HIPAA Implementation Guide with Claredi 4 SeeBeyond Proprietary and Confidential
Contents
Chapter 6
Processing Large Transactions 42Overview 42
Considerations 42Methodology 43
Source System e*Way Requirements 43Translation Requirements 43Splitting the Message 43Post-Processing 43
Implementing Large Message Processing 44Trading Partner Attributes 44Message Profile Settings 45
Customizing Large Message Processing Components 46Source System e*Way 46Large Message Collaboration 46Monk Splitter Function 47
Chapter 7
e*Xchange Implementation 48Overview 48
Case Study: Sending a Health Care Claim 48
Verify the e*Gate and e*Xchange Installation 50
Installing the Sample Files 51
Create the Trading Partner Profiles 52Trading Partner Information Hierarchy 52Step 1: Create the Company 53Step 2: Create the Trading Partner 54Step 3: Set up the Inbound B2B Protocol Information 54Step 4: Create the Inbound Message Profiles 55Step 5: Set Up Outbound B2B Protocol Information 56Step 6: Create the Outbound Message Profiles 57Step 7: Configure Return Messages for Inbound 60
Clone the eXSchema 60
Configure the Internal_Order_Eater e*Way 60The e*Xchange Internal_Order_Eater e*Way 60Step 1: Create and Configure the Internal_Order_Eater e*Way 61Step 2: Create the Internal_Order_Eater Collaboration Rule Script 61Step 3: Create the Internal_Order_Eater Collaboration Rule 62Step 4: Create the Internal_Order_Eater Collaboration 63
Configure the Internal_Order_Feeder e*Way 64The e*Xchange Internal_Order_Feeder e*Way 64Step 1: Create and Configure the Internal_Order_Feeder e*Way 64Step 2: Create the Internal_Order_Feeder Collaboration Rule Script 65
HIPAA Implementation Guide with Claredi 5 SeeBeyond Proprietary and Confidential

Contents
Step 3: Create the Internal_Order_Feeder Collaboration Rule 66Step 4: Create the Internal_Order_Feeder Collaboration 66
Configure the eX_ePM e*Way 67
Configure the eX_Poll_Receive_FTP e*Way 68
Running the Scenario 69Viewing the Results in Message Tracking 70
Chapter 8
e*Gate Implementation 72Overview 72
The e*Gate XML Scenario 72
Verify the e*Gate Installation 73
Create a New Schema 74
Create the Event Types and Java ETDs 74
Create the Collaboration Rules 74Create the Java Pass Through Collaborations 75
Add the e*Ways and e*Way Connection 76Add and Configure the File e*Ways 76Add the Multi-Mode e*Way 78Configure the IQ Manager 78Add the JMS e*Way Connection 79
Add the Collaborations that Route the Data 79Add and Configure col_FileIn 80Add and Configure col_XML 80Add and Configure col_FileOut 81
Test the Scenario 81Review the Complete Schema 81Test the Schema 83
Start the Schema 83
Chapter 9
Claredi Implementation 85Introduction 85
About Validation Flow 86
Error Handling and Reporting 87
Configuring System Default Settings 88Configuring the Error Filter Table 90Generating 997 Message Acknowledgements 92
Configuring Message Profile Settings 93
HIPAA Implementation Guide with Claredi 6 SeeBeyond Proprietary and Confidential
Contents
Viewing a Message and its Errors 96
Generating Interleaved Error Reports 97
Appendix A
HIPAA Files 99e*Xchange Files for HIPAA Transactions 99
HIPAA e*Xchange Files for e*Gate 99
e*Gate Files for HIPAA Transactions 102X12 HIPAA ETDs 102NCPDP HIPAA ETDs 103
Appendix B
ASC X12 Overview 106Introduction to X12 106
What Is ASC X12? 106What Is a Message Structure? 107
Components of an X12 Envelope 107Data Elements 108Segments 108Loops 108Delimiters 108
Structure of an X12 Envelope 109Transaction Set (ST/SE) 113Functional Group (GS/GE) 114Interchange Envelope (ISA/IEA) 115Control Numbers 116
ISA13 (Interchange Control Number) 116GS06 (Functional Group Control Number) 116ST02 (Transaction Set Control Number) 116
Acknowledgment Types 117TA1, Interchange Acknowledgment 117997, Functional Acknowledgment 117Application Acknowledgments 117
Key Parts of EDI Processing Logic 118Structures 118Validations, Translations, Enveloping, Acknowledgments 118X12 Acknowledgments in e*Xchange Partner Manager 119Trading Partner Agreements 119
Additional Information 120
Index 121
HIPAA Implementation Guide with Claredi 7 SeeBeyond Proprietary and Confidential

List of Tables
List of Tables
Table 1 HIPAA External Code Sets 26
Table 2 Definitions of Java Method Parameters 30
Table 3 Post-validation Collaboration Mapping 35
Table 4 Trading Partner Attributes for Large Message Processing 44
Table 5 Message Profile Settings for Large Messages 45
Table 6 B2B Protocol Information 54
Table 7 B2B Protocol Information, General Page 55
Table 8 Inbound Message Profile, General Settings 55
Table 9 Inbound Message Profile, Interchange Control Envelope 55
Table 10 Inbound Message Profile, Functional Group Envelope 56
Table 11 Inbound Message Profile, Transaction Set Envelope 56
Table 12 Outbound Message Profile, General Settings 57
Table 13 Outbound Message Profile, Interchange Control Envelope 57
Table 14 Outbound Message Profile, Functional Group Envelope 58
Table 15 Outbound Message Profile, Transaction Set Envelope 58
Table 16 Return Message Values: Inbound 58
Table 17 Functional Acknowledgment, General Settings 59
Table 18 Functional Acknowledgment, Interchange Control Envelope 59
Table 19 Functional Acknowledgment, Functional Group Envelope 59
Table 20 Functional Acknowledgment, Transaction Set Envelope 59
Table 21 Return Message Values: Outbound 60
Table 22 Internal_Order_Eater e*Way Parameters 61
Table 23 Internal_Order_Eater Collaboration Rule Configuration - General Tab 62
Table 24 Internal_Order_Eater Collaboration configuration 63
Table 25 Internal_Order_Feeder e*Way Parameters 64
Table 26 Internal_Order_Feeder Collaboration Rule Configuration - General Tab 66
Table 27 Internal_Order_Feeder Collaboration Configuration 66
Table 28 eX_ePM e*Way Parameters 68
Table 29 eX_Poll_Receive_FTP e*Way Parameters 68
Table 30 HIPAA Components 82
Table 31 Error Handling Options 88
Table 32 System Default Settings for Faciledi Validation 88
HIPAA Implementation Guide 8 SeeBeyond Proprietary and Confidential
List of Tables
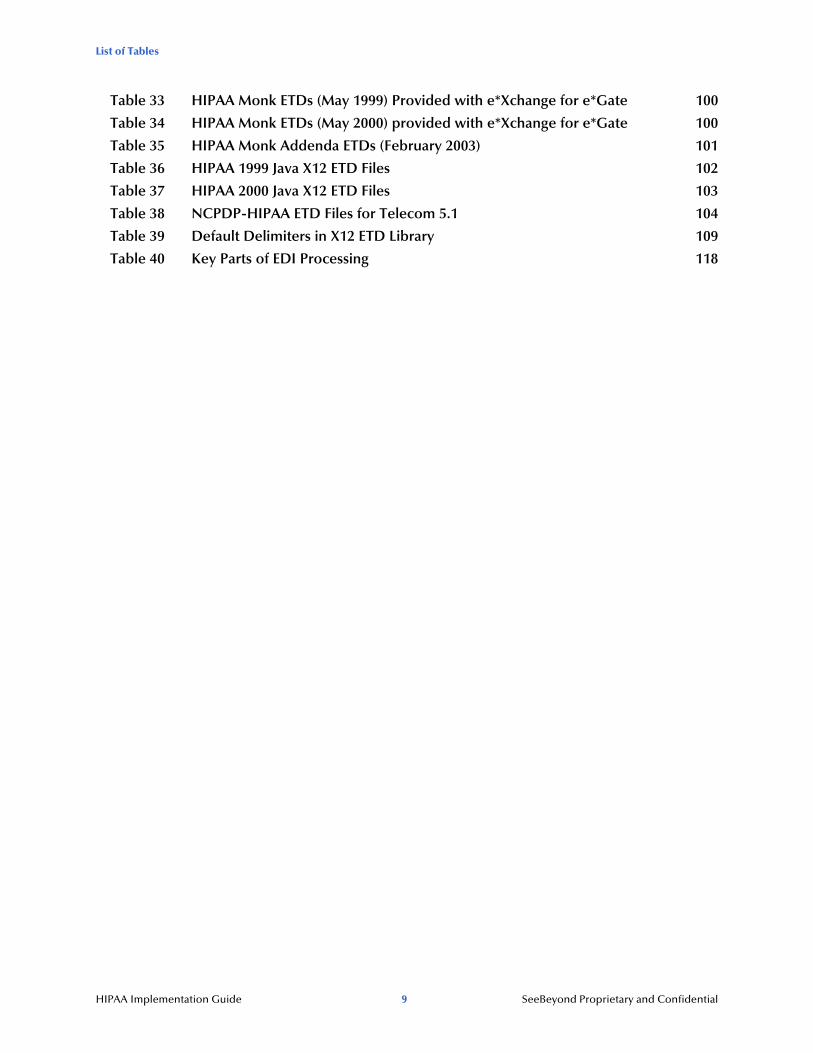
Table 33 HIPAA Monk ETDs (May 1999) Provided with e*Xchange for e*Gate 100
Table 34 HIPAA Monk ETDs (May 2000) provided with e*Xchange for e*Gate 100
Table 35 HIPAA Monk Addenda ETDs (February 2003) 101
Table 36 HIPAA 1999 Java X12 ETD Files 102
Table 37 HIPAA 2000 Java X12 ETD Files 103
Table 38 NCPDP-HIPAA ETD Files for Telecom 5.1 104
Table 39 Default Delimiters in X12 ETD Library 109
Table 40 Key Parts of EDI Processing 118
HIPAA Implementation Guide 9 SeeBeyond Proprietary and Confidential
Chapter 1
Introduction
This chapter introduces you to the HIPAA Implementation Guide.
The Health Insurance Portability & Accountability Act of 1996 (HIPAA) is a federal mandate that was developed specifically for the healthcare industry. For transactions related to healthcare, HIPAA uses a customization of X12. For pharmaceutical transactions, the HIPAA standard uses NCPDP (National Council for Prescription Drug Programs) transactions.
This book includes an overview of HIPAA, and then specific information relating to the installation and contents of SeeBeyond’s HIPAA implementations.
1.1 Introduction to HIPAAHIPAA amends the Internal Revenue Service Code of 1986. Its primary purpose is to set standards for transactions and information within the healthcare industry. HIPAA requires:
Improved efficiency in healthcare delivery by standardizing electronic data interchange
Protection of confidentiality and security of health data through setting and enforcing standards.
More specifically, HIPAA calls for:
Standardization of electronic patient health, administrative, and financial data
Unique health identifiers for individuals, employers, health plans, and healthcare providers
Security standards protecting the confidentiality and integrity of “individually identifiable health information,” past, present or future
HIPAA Implementation Guide 10 SeeBeyond Proprietary and Confidential

Chapter 1 Section 1.2Introduction Intended Reader
1.2 Intended ReaderThe reader of this guide is presumed to be a developer or system administrator with responsibility for developing components of the e*Gate™ system or the SeeBeyond™ eBusiness Integration Suite, to be thoroughly familiar with Windows operations and administration, and to be familiar with Microsoft Windows graphical user interfaces.
HIPAA Implementation Guide 11 SeeBeyond Proprietary and Confidential
Chapter 2
HIPAA Overview
This chapter provides an overview of HIPAA, including general information, a list of the specific transactions that comprise the HIPAA standard, and the structure of HIPAA envelopes, data elements, and syntax.
2.1 Introduction to HIPAAThe following sections provide an introduction to HIPAA.
2.1.1. What Is HIPAA?HIPAA is an acronym for the Health Insurance Portability and Accountability Act of 1996. This Act is designed to protect patients. Among other things, it defines specifications affecting standards of treatment and privacy rights. It provides a number of standardized transactions that can be used for such things as a healthcare eligibility inquiry or a healthcare claim. HIPAA legislates that all of the healthcare industry will be on the same implementation timetable. All institutions performing electronic healthcare insurance transactions must implement these standardized transactions by October 2002, unless an extension to October 2003 has been granted to the institution.
HIPAA has three primary goals.
Define standards for electronic transactions and code sets used for financial and clinical electronic data interchange (EDI).
Establish unique identifiers for the three participants in the provision of healthcare services: providers, payers, and employers.
Mandate security and privacy standards for the protection of individually identifiable healthcare information.
HIPAA regulations affect many organizations dealing with the medical industry, such as:
providers
health plans
employers
For provider systems, HIPAA does not mandate they perform EDI and therefore many of the standards do not apply. However, if a provider elects to perform EDI, then their
HIPAA Implementation Guide 12 SeeBeyond Proprietary and Confidential
Chapter 2 Section 2.1HIPAA Overview Introduction to HIPAA
EDI transactions are required to be in compliance with all of the HIPAA transaction requirements.
The impact of HIPAA on health plans is potentially far greater than the impact on provider systems. Where providers have the option to perform EDI, HIPAA requires health plans to support nine standard EDI transactions.
2.1.2. HIPAA Goals
Electronic Health Transactions Standards
Historically, health providers and plans used many different electronic formats. Implementing a national standard means that everyone uses one format, thereby simplifying and improving transaction efficiency. HIPAA defines standards for nine healthcare transactions, and mandates that all providers, health plans, and employers performing EDI comply with the standards. The HIPAA transactions cover the following situations:
eligibility for a health plan
claims or equivalent encounter information
payment and remittance advice
coordination of benefits
health claims status
referral certification and authorization
first report of injury
enrollment and disenrollment in a health plan
health plan premium payments
pending transaction - health claims attachments
For transactions relating to such things as healthcare claims, the HIPAA standard uses a range of customized X12 transactions as listed above. For transactions relating to prescriptions, HIPAA uses NCPDP transactions.
Health organizations must also adopt standards for the coding of information within the individual transactions. For example, coding systems that describe diseases, injuries, and other health problems, as well as their causes, symptoms, and actions taken must be uniform. HIPAA also establishes national standards for these code sets based on currently available standards (for example, ICD9, CPT4, and so on).
Unique Identifiers
As well as meeting the need for standard encoding of information within the transactions, HIPAA also establishes the requirement to uniquely identify the participants involved in the provision of and payment for healthcare services. These participants include the provider, the payer (health plan), and the employer.
HIPAA Implementation Guide 13 SeeBeyond Proprietary and Confidential

Chapter 2 Section 2.1HIPAA Overview Introduction to HIPAA
Security and Electronic Signatures
The security standards provide a level of protection for all health information that is housed or transmitted electronically and that pertains to an individual. Organizations that use electronic signatures also have to meet a standard ensuring message integrity, user authentication, and non-repudiation.
The security standard mandates safeguards for physical storage and maintenance, transmission, and access of individual health information. It applies not only to the transactions adopted under HIPAA, but to all individual health information that is maintained or transmitted.
The security standard does not require specific technologies to be used; solutions vary from business to business, depending on the needs and technologies in place.
No transactions adopted under HIPAA currently require an electronic signature.
Privacy and Confidentiality
In general, privacy is about who has the right to access personally identifiable health information. This covers all individually identifiable health information regardless of whether the information is, or has been, in electronic form.
The privacy standards:
Limit non-consensual use and release of private health information.
Give patients the right to access their medical records and to know who else has accessed them.
Restrict most disclosure of health information to the minimum needed for the intended purpose.
Establish new criminal and civil sanctions for improper use or disclosure.
Establish new requirements for access to records by researchers and others.
2.1.3. Trading Partner AgreementsAlthough the regulations mandated by HIPAA are very strict and specific, it is still important to have trading partner agreements for individual trading relationships.
Following the HIPAA standard ensures that transactions comply with the regulations mandated by the government. HIPAA requirements are completely described in the HIPAA implementation guide for each transaction, and must not be modified by a trading partner.
However, there is room for negotiation in terms of the specific processing of the transactions in each trading partner’s individual system. The specifics might vary between sites. The trading partner agreement is a useful repository for this type of site-specific information.
There are three levels of information that guide the final format of a specific transaction. These three levels are:
The HIPAA standard
HIPAA Implementation Guide 14 SeeBeyond Proprietary and Confidential
Chapter 2 Section 2.2HIPAA Overview NCPDP
HIPAA publishes a standard structure for each HIPAA transaction.
Industry-specific Implementation Guides
Specific industries, including healthcare, publish implementation guides customized for that industry. Normally, these are provided as recommendations only. However, in the case of HIPAA, it is extremely important to follow these guidelines since HIPAA regulations are law.
Trading Partner Agreements
It is normal for trading partners to have individual agreements that supplement the standard guides. The specific processing of the transactions in each trading partner’s individual system might vary between sites. Because of this, additional documentation that provides information about the differences is helpful to the site’s trading partners and simplifies implementation. For example, while a certain code might be valid in an implementation guide, a specific trading partner might not use that code in transactions. It would be important to include that information in a trading partner agreement.
2.2 NCPDPThe following section provides an introduction to NCPDP, including information about NCPDP transactions and message structures.
2.2.1. What Is NCPDP?NCPDP (National Council for Prescription Drug Programs) is an organization, accredited by ANSI, that is tasked with standards development for the pharmaceutical industry.
The mission of NCPDP is twofold:
To create and promote standards for data interchange in pharmaceutical services (including electronic data interchange)
To provide educational information and resources to members
In following the above, NCPDP hopes to enhance the quality of healthcare by creating, and encouraging the use of, a high-quality data interchange standard.
2.2.2. HistoryPharmacies started moving toward computerization in the late 1970s. By 1977, standardization of forms was seen as a need and NCPDP was formed to meet that need. The first NCPDP standardized form was released in 1978. By 1987, electronic claims were introduced. In 1988, version 1.0 of the NCPDP Telecommunications Standard was released. Since then, the standard has continued to be developed.
HIPAA Implementation Guide 15 SeeBeyond Proprietary and Confidential
Chapter 2 Section 2.2HIPAA Overview NCPDP
2.2.3. What Is the NCPDP Telecommunications Standard?The NCPDP Telecommunications Standard (Telecom) is a data transmission standard specifically designed for the communication of prescription information between pharmacies and payers. It was developed to provide a consistent standard for pharmaceutical drug claims. This standard defines the structure for prescription claim transactions between providers (for example, pharmacies or doctors) and claims adjudicators. It provides for communications in both directions.
The HIPAA standard for electronic healthcare transactions and code sets adopts the following NCPDP standards for pharmacy claims:
NCPDP Telecommunication Standard Format, Version 5.1
NCPDP Batch Standard, Version 1 Release 1 (1.1)
Note: At the request of NCPDP, DSMO (Designated Standards Maintenance Organization) has revised support from Batch Standard Version 1.0 to Batch Standard Version 1.1 for usage with Telecommunication Standard Version 5.1. For backwards compatibility, Batch 1.0 files are still provided in the NCPDP-HIPAA ETD Library.
Health plans, healthcare clearinghouses, and healthcare providers who use electronic transactions are required to use these standards after October 2002, unless they have been granted an extension to October 2003.
2.2.4. Components of an NCPDP EnvelopeNCPDP messages are all ASCII text with the exception of the delimiters, which are hexadecimal.
Structure of a Request Transaction
An NCPDP Business Request Transaction has the following main parts:
An electronic envelope, including such items as sender ID, receiver ID, message type, password, and date/time.
A prescriber section, including such items as prescriber identifier (for example, State License), prescriber name, business name, business address, and specialty code.
A pharmacy section, including such items as NCPDP provider identifying code, pharmacy name, pharmacist name, pharmacy address, and pharmacy phone number.
A patient section, including such items as patient name, date of birth, gender, address, and the pharmacy or prescriber’s internal ID code for the patient.
Structure of a Response Transaction
An NCPDP Response Transaction includes:
HIPAA Implementation Guide 16 SeeBeyond Proprietary and Confidential
Chapter 2 Section 2.3HIPAA Overview Additional Information
An electronic envelope.
A response status, which can be any one of the following:
An acknowledgment of receipt of the transaction
A “paired” response transaction (this might approve the request, deny it, or approve it with changes)
An error acknowledgment
2.2.5. Batching in NCPDPNCPDP supports batching of transactions.
An NCPDP batch file is comprised of three sections:
A transaction header (one per batch)
Data (one or many, to a maximum of 9,999,999,997), each containing a Transaction Reference Number to uniquely identify the transaction within the file
A transaction trailer (one per batch)
2.2.6. Acknowledgment TypesThe transactions defined within NCPDP are of two types: request transactions and response transactions. There are no discrete acknowledgment transactions.
However, a “captured” response (one of the several types of response transactions) can be used when information transactions are sent and require nothing more than acknowledgment of their receipt at the processor or endpoint.
2.2.7. Transaction CodesNCPDP uses transaction codes to indicate the type of transaction being performed.
2.3 Additional InformationFor more information on HIPAA, visit the following Web sites:
http://www.hcfa.gov/HIPAA/HIPAAHM.HTM
http://www.hipaa-dsmo.org
http://www.wedi.org/
http://www.claredi.com/
http://aspe.os.dhhs.gov/admnsimp/
For more information on NCPDP, visit the official NCPDP Web site at this address:
http://www.ncpdp.org/
HIPAA Implementation Guide 17 SeeBeyond Proprietary and Confidential

Chapter 2 Section 2.3HIPAA Overview Additional Information
Note: This information is correct at the time of going to press; however, SeeBeyond has no control over these sites. If you find the link is are no longer correct, use a search engine to search for HIPAA or NCPDP.
HIPAA Implementation Guide 18 SeeBeyond Proprietary and Confidential
Chapter 3
The SeeBeyond Solution
This chapter provides an overview of SeeBeyond’s solution for HIPAA implementations, which was developed in partnership with Claredi Corporation.
3.1 IntroductionThe SeeBeyond eBusiness Integration Suite supports the translations and field mapping features needed to comply with nationally mandated code sets while preserving local autonomy. It also includes the pre-built message structures for all HIPAA transactions, and the ability to map proprietary, internal messaging formats to the appropriate HIPAA transactions.
3.1.1. e*Xchange Partner Managere*Xchange Partner Manager allows organizations to use technology for business-to-business (B2B) and business-to-consumer (B2C) e-commerce. In addition to the standard e*Xchange functionality, SeeBeyond has partnered with Claredi Corporation to provide pre-built validation rules for the standard X12 transactions for HIPAA that are Claredi compliant, as well as optional HIPAA-compliant security for transmission over public networks.
3.1.2. e*Gate Integratore*Gate Integrator can be used without e*Xchange Partner Manager to transform data from other formats to the standard X12 format for HIPAA. It also provides connectivity with, and between, the diverse systems and applications that participate in the HIPAA transactions. e*Gate cannot attach to the Claredi appliance, however; you must use e*Xchange for that. To write schemas or perform post-validation collaboration, the HIPAA solution uses e*Gate add-ons available through ESRs.
3.1.3. e*Index Global Identifiere*Index Global Identifier provides the ability to maintain internal numbering for providers, health plans, employers, and patients, and cross-indexes these internal numbers to the nationally assigned identifiers for external communication. This may become useful when introducing the HIPAA requirement of unique identifiers.
HIPAA Implementation Guide 19 SeeBeyond Proprietary and Confidential
Chapter 3 Section 3.2The SeeBeyond Solution e*Xchange Partner Manager
3.2 e*Xchange Partner Managere*Xchange Partner Manager provides functionality to receive, process, and route inbound and outbound messages in batch, fast batch, and interactive transmission modes.
For HIPAA, e*Xchange works with a networked appliance from Claredi Corporation that includes pre-built validation rules for the standard transactions, as well as optional HIPAA-compliant security for transmission over public networks.
This solution does the following:
Validates messages based on the May 2000 HIPAA standards and the revised February 2003 Addenda for those standards.
Automatically generates and reconciles acknowledgments, providing the acknowledgment handling required by HIPAA.
Stores trading partner information, messages, acknowledgments, and errors in a database. HIPAA requires that seven years of patient data be stored. This is handled by the e*Xchange database; and the e*Xchange Repository Manager allows management and archiving of data.
Allows users to view messages and supports security of data access via user ID and password verification via the e*Xchange Web interface.
Provides an audit of who views the data. This is a HIPAA mandate that SeeBeyond supports via the Web interface Message Tracking audit feature.
Tracks transactions per trading partner, which is also a HIPAA mandate supported via Message Tracking.
eSecurity Manager offers the following additional functionality that may be desired by HIPAA:
Exchange content integrity.
Origin authentication via digital signatures.
Non-repudiation of transmission and receipt.
3.2.1. The HIPAA ETD LibraryThe HIPAA ETD Library e*Gate add-on provides JAVA ETD files (including Addenda files available through an ESR) for each HIPAA X12 transaction. These files work together with the e*Xchange HIPAA Collaboration Rules to validate the HIPAA rules in the X12 implementation guides. Each ETD includes Java methods to provide error message handling, indicate national identifier preferences, and set or retrieve delimiters. These ETDs cannot be modified.
The output ETD for all of the Claredi HIPAA validations is X12ValidationResult, which contains information about any data, envelope, or unmarshalling errors found while processing HIPAA transactions.
Note that the ETD library add-on is only required if you’re writing an e*Gate schema or doing post-validation collaboration.
HIPAA Implementation Guide 20 SeeBeyond Proprietary and Confidential
Chapter 3 Section 3.3The SeeBeyond Solution e*Gate Integrator
3.2.2. Complete HIPAA Transaction ETDsIn addition to the standard e*Xchange format files, installation also includes a version of HIPAA Monk ETD files that include the GS/GE and ISA/IEA enveloping. These are suitable for use outside e*Xchange when a complete Event structure is required; for example, when using e*Gate to translate from X12 to a business application’s proprietary data format. Note that these files do not provide the comprehensive HIPAA validations that are provided in the e*Xchange/Claredi solution.
There are HIPAA X12 ETD files for the May 1999 and May 2000 HIPAA implementation guide releases.
The Monk ETD file names have “_xlate” (for May 1999 files) or “_xlat” (for May 2000 files) appended to the file name to indicate that these are the translation files and that they include the interchange control and functional group header and footer. To indicate that the files match the HIPAA standard, they have “hipaa” in the file name. Java ETD files names have a “.xsc” suffix. Examples are shown below.
Monk ETD file for an X12 270, Eligibility Coverage Inquiry, May 1999 release: X12_270EligibCoverageBenefitInquiry_004010X092_hipaa_xlate.ssc
Java ETD file for an X12 270, Eligibility Coverage Inquiry, May 2000 release: X12_004010X092_00_hipaa270_EligCoveOrBeneInqu.xsc
Java Addenda ETD file for an X12 270, Eligibility Coverage Inquiry: X12_004010X092A1_00_hipaa270_EligCoveOrBeneInqu.xsc
ETD files are stored in the following locations:
C:\eGate\server\registry\repository\default\etd\templates\Hipaa_1999
C:\eGate\server\registry\repository\default\etd\templates\Hipaa_2000
C:\eGate\server\registry\repository\default\etd\templates\Hipaa_2003
For a complete list of files, see “HIPAA e*Xchange Files for e*Gate” on page 99.
Note: These files use dynamic delimiters, and can only be used in translating from X12 to a proprietary format.
The Claredi network appliance also supports Java ETDs for the Addenda to HIPAA Implementation Guides that were approved in October, 2002 and formally adopted in February, 2003. ETDs are available through software patches (ESRs). Contact your SeeBeyond support representative for details.
3.3 e*Gate IntegratorThe HIPAA ETD Library includes the pre-built Java message structures for all HIPAA transactions, and the ability to map proprietary, internal messaging formats to the appropriate HIPAA transactions. For more information on the HIPAA ETD Library, refer to the HIPAA ETD Library User’s Guide.
HIPAA Implementation Guide 21 SeeBeyond Proprietary and Confidential

Chapter 3 Section 3.4The SeeBeyond Solution Testing the SeeBeyond Solution
Note: Although you can use e*Gate to create EDI messages that conform to HIPAA standards, you also need to ensure that other HIPAA standards are also met; for example, privacy and security. e*Xchange Partner Manager provides a more complete HIPAA solution.
All the HIPAA X12 ETDs accept either standard ANSI X12 format or XML format as input. By default, output is ANSI. However, you can optionally define that the output is XML. Although the XML format does not meet the HIPAA requirements for EDI, this format is useful when displaying the data in a Web browser.
3.3.1. e*Gate Files for HIPAA TransactionsThe X12 portion of the HIPAA ETD Library provides Java Event Type Definitions (.xsc and .jar files) for all standard X12 transactions that have been adopted by HIPAA. These ETDs are stored in the following locations:
\<eGate>\server\registry\repository\default\etd\templates\Hipaa_1999
\<eGate>\server\registry\repository\default\etd\templates\Hipaa_2000
These transactions are based on the October 1997 X12 standard; that is, Version 4, Release 1, Sub-release 0 (004010) (version 4010).
For a list of files, see “e*Gate Files for HIPAA Transactions” on page 102.
The NCPDP portion of the HIPAA ETD Library provides request and response transactions for all the HIPAA-approved NCPDP transaction codes. These ETDs are stored in:
\<eGate>\server\registry\repository\default\etd\templates\NCPDP
For a list of NCPDP-HIPAA files, see “e*Gate Files for HIPAA Transactions” on page 102.
3.4 Testing the SeeBeyond SolutionClaredi Corporation and the WEDI SNIP (Workgroup for Electronic Data Interchange, Strategic National Implementation Process) task group have developed recommended types of HIPAA testing. Testing is performed in six different areas, ranging from basic integrity checking to a more detailed level of testing. The types of HIPAA tests include:
Level 1: Syntax Integrity Testing
Level 2: Implementation Guide Syntax Requirement Testing
Level 3: Balancing Testing
Level 4: Situation Testing
Level 5: External Code Set Testing
Level 6: Product Types or Lines of Service Testing
HIPAA Implementation Guide 22 SeeBeyond Proprietary and Confidential

Chapter 3 Section 3.4The SeeBeyond Solution Testing the SeeBeyond Solution
Additional (“Level 7”) testing specific to Trading Partners is also identified, and available as an additional service. Because the HIPAA validation testing supported by e*Xchange is actually performed by Claredi Corporation, you can be assured of having the highest accuracy possible in the industry.
HIPAA Implementation Guide 23 SeeBeyond Proprietary and Confidential
Chapter 4
e*Xchange HIPAA Validations
This chapter provides information about how e*Xchange supports the HIPAA validations for each type. HIPAA validation rules are described for each transaction set in the X12 implementation guides.
4.1 OverviewUnder HIPAA regulations, several validations must be performed at the segment and element levels to comply with the rules stated in the HIPAA implementation guides. SeeBeyond meets this requirement by incorporating automatic validations into the HIPAA ETD libraries and by integrating with the appliance from Claredi Corporation.
Validation as discussed in this chapter applies to the May 2000 standards and the Addenda for those standards proposed in October 2002 and formally adopted in February 2003.
4.1.1. Validated Transaction SetsValidations need to be performed at the element, segment, and loop levels against HIPAA transactions to be sure that the data contained within each transaction meet the rules put forth in the HIPAA implementation guides. Standard X12 transaction types have been adopted by HIPAA. e*Xchange supports validations for all nine transaction sets, based on the May 2000 standards and the Addenda adopted for them in 2002 that were formally approved in 2003.
4.1.2. HIPAA Validations SummaryEvery HIPAA transaction received by e*Xchange must pass three validation phases before it can be accepted as a valid message. Error messages are generated for errors that occur at each phase.
The primary phases of validation are:
Interchange Control Receipt and Acknowledgement.
Functional Group Receipt and Acknowledgement.
HIPAA Transaction-specific Validation.
HIPAA Implementation Guide 24 SeeBeyond Proprietary and Confidential

Chapter 4 Section 4.1e*Xchange HIPAA Validations Overview
Interchange Control Receipt and Acknowledgement
All messages containing HIPAA transactions must be received in ASC X12 format. When e*Xchange receives a HIPAA transaction, the first step in validation is to check the Interchange Control Envelope information to determine the sender of the document and to confirm receipt of the message with a TA1 Interchange Acknowledgement. If a message is not properly formatted and cannot be read by e*Xchange, it fails validation and no further processing occurs for the failed message. For information about the format of the error messages produced during this phase, see “getICValidation Result” in Chapter 5 of the HIPAA ETD Library User’s Guide.
Functional Group Receipt and Acknowledgement
Once a message passes the Interchange Control Receipt and Acknowledgement process, the message is validated at the Functional Group level. At the Functional Group level, messages are verified to ensure that the number of transactions in the file is correct and that the control numbers agree. If a message is not properly formatted and cannot be read by e*Xchange, it fails validation and no further processing occurs for the failed message. For information about the format of the error messages produced during this phase, see “getFGValidation Result” in Chapter 5 of the HIPAA ETD Library User’s Guide.
HIPAA Transaction-specific Validation
If a message passes validations for both of the previous phases, the whole Functional Group of which it is part is then passed to the Claredi appliance for HIPAA validation processing. All ST-SE messages in the Functional Group sent to Claredi in a set.
Any errors encountered during this phase are identified, passed back to e*Xchange, and recorded for review in the e*Xchange Message Tracking system.
Overriding HIPAA Validations
The standard HIPAA ETDs and Claredi validations adhere strictly to the rules set forth in the X12 implementation guides. To ensure that the standard components are HIPAA-compliant, the ETDs cannot be modified to provide less restrictive validations or to perform additional validations. If your implementation requires that additional validations be performed against HIPAA transactions or that HIPAA validations be less restrictive for certain transactions, you can create Collaboration Rules scripts to reprocess HIPAA transactions. For more information, see Chapter 5, “Post-validation Collaboration”.
HIPAA Implementation Guide 25 SeeBeyond Proprietary and Confidential
Chapter 4 Section 4.2e*Xchange HIPAA Validations Code Set Validations
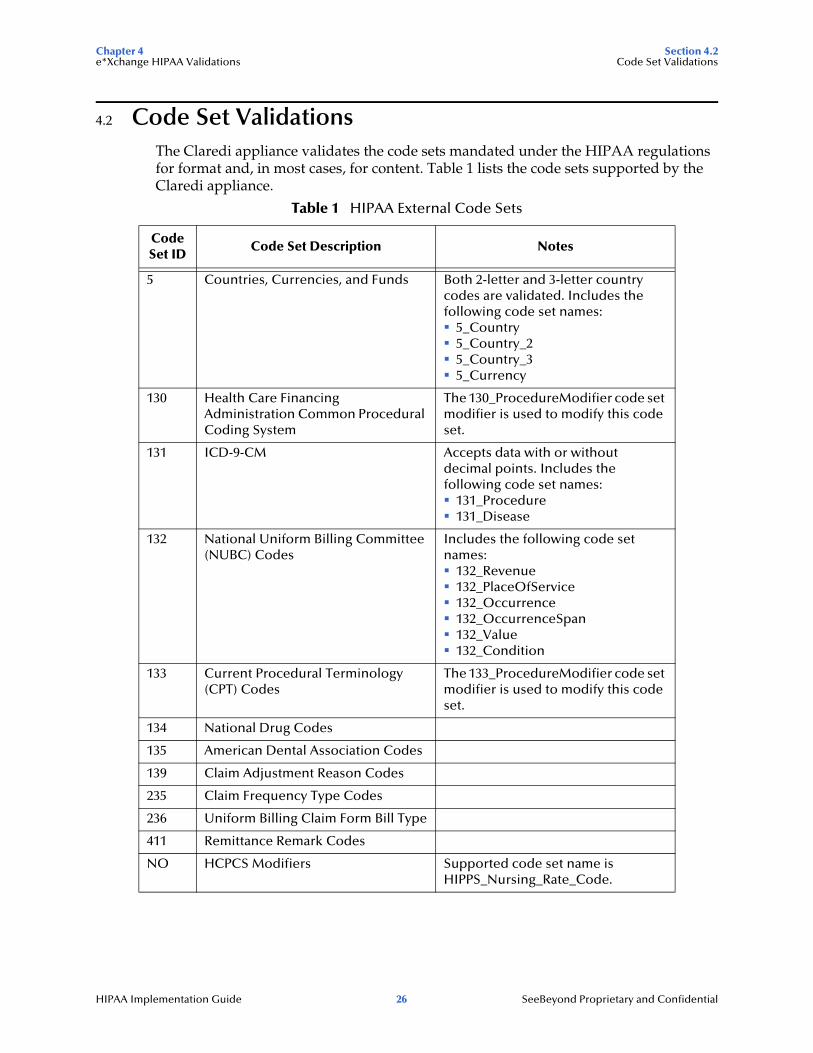
4.2 Code Set ValidationsThe Claredi appliance validates the code sets mandated under the HIPAA regulations for format and, in most cases, for content. Table 1 lists the code sets supported by the Claredi appliance.
Table 1 HIPAA External Code Sets
Code Set ID
Code Set Description Notes
5 Countries, Currencies, and Funds Both 2-letter and 3-letter country codes are validated. Includes the following code set names:
5_Country5_Country_25_Country_35_Currency
130 Health Care Financing Administration Common Procedural Coding System
The 130_ProcedureModifier code set modifier is used to modify this code set.
131 ICD-9-CM Accepts data with or without decimal points. Includes the following code set names:
131_Procedure131_Disease
132 National Uniform Billing Committee (NUBC) Codes
Includes the following code set names:
132_Revenue132_PlaceOfService132_Occurrence132_OccurrenceSpan 132_Value132_Condition
133 Current Procedural Terminology (CPT) Codes
The 133_ProcedureModifier code set modifier is used to modify this code set.
134 National Drug Codes
135 American Dental Association Codes
139 Claim Adjustment Reason Codes
235 Claim Frequency Type Codes
236 Uniform Billing Claim Form Bill Type
411 Remittance Remark Codes
NO HCPCS Modifiers Supported code set name is HIPPS_Nursing_Rate_Code.
HIPAA Implementation Guide 26 SeeBeyond Proprietary and Confidential
Chapter 4 Section 4.2e*Xchange HIPAA Validations Code Set Validations
4.2.1. Message TrackingThe e*Xchange error messages can be viewed using the Message Tracking feature of the e*Xchange Web interface. Message Tracking allows you to view any messages that have been processed by e*Xchange, including any errors that might be associated with a message. This tool helps you to pinpoint the source of an error so it can be resolved, and provides a way for you to fix and resend any messages that had errors. For more information about Message Tracking, see Chapter 10, “Web Interface: Message Tracking”, in the e*Xchange Partner Manager User’s Guide.
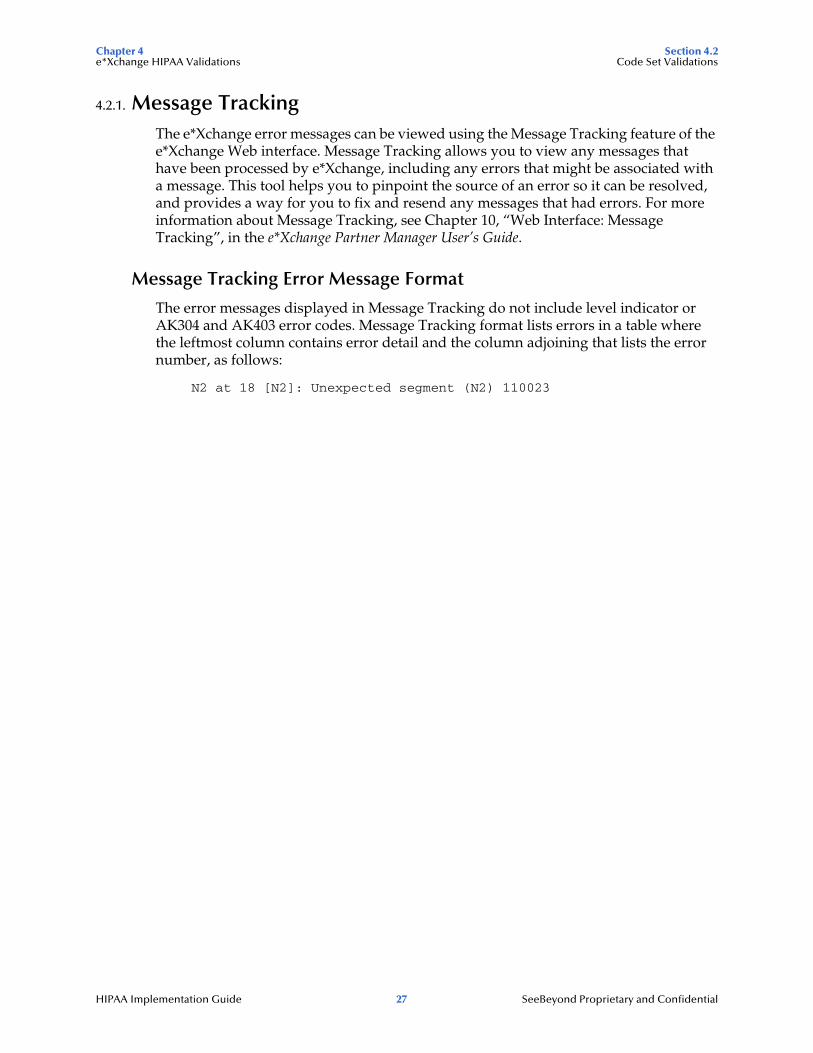
Message Tracking Error Message Format
The error messages displayed in Message Tracking do not include level indicator or AK304 and AK403 error codes. Message Tracking format lists errors in a table where the leftmost column contains error detail and the column adjoining that lists the error number, as follows:
N2 at 18 [N2]: Unexpected segment (N2) 110023
HIPAA Implementation Guide 27 SeeBeyond Proprietary and Confidential

Chapter 5 Section 5.1Post-validation Collaboration Overview
Chapter 5
Post-validation Collaboration
This chapter provides information about post-validation processing and instructions for using post-validation Collaboration Rules, including creating new post-validation Collaboration Rules, specifying the Collaboration Rules to use for each message, and viewing reprocessed transactions in Message Tracking.
5.1 Overviewe*Xchange with the Claredi appliance strictly validates HIPAA transactions against the rules set forth in the HIPAA implementation guides. For certain transactions from certain Trading Partners, you may find that additional validations are required or that the standard HIPAA validations must be relaxed in order for transactions to be processed. e*Xchange provides a method of reprocessing X12 transactions to allow all transactions to pass through (even those that do not pass the HIPAA validations) and to put transactions through additional validations that produce custom error messages.
Messages are reprocessed using post-validation Collaboration Rules scripts to strip error data, add error data, and perform custom validations, including validating against non-standard code sets. This allows a message to pass through e*Xchange even though it does not conform strictly to the HIPAA rules.
5.2 Post-validation Processing ComponentsIn order to implement post-validation processing of HIPAA transactions, you need to work with four different components of e*Xchange:
Collaboration Rules
HIPAA ETD Library Methods
Post-validation Collaboration Indicator
Message Tracking
HIPAA Implementation Guide 28 SeeBeyond Proprietary and Confidential
Chapter 5 Section 5.2Post-validation Collaboration Post-validation Processing Components
5.2.1. Collaboration RulesThe Claredi Faciledi application that validates incoming HIPAA transactions strictly adheres to the rules as outlined in the implementation guides and does not allow flexibility in determining how to process incoming information. This means if data from a specific Trading Partner is not in compliance with the HIPAA rules, transactions from that Trading Partner will continually fail. However, you can create post-validation Collaboration Rules scripts to reprocess the failed transactions while still flagging the messages as containing HIPAA errors.
In addition, some transactions may pass the HIPAA validations, but contain other errors specific to your business requirements. You can define new validations and their corresponding error messages for reprocessing messages.
5.2.2. Post-validation Java MethodsSeveral methods are provided specifically for use when creating the Collaboration Rules for post-validation processing of HIPAA transactions. These methods allow you to remove error data (for less strict validations), to add new error data (for more strict validations), and to redirect standard code set validations to validate against user-defined code sets.
The new methods are:
addDataErrorThis method uses the given parameters to create error messages to add to the error message string. Use this method to define error messages for the custom validations you define in the post-validation processing Collaboration Rules script.
Syntax
public final void addDataError(short level, String segmIDCode, int segmPosiInTransSet, String loopIDCode, short segmSyntErroCode, short elemPosiInSegm, short compDataElemPosiInComp,String dataElemRefeNumb, short dataElemSyntErroCode, String CopyOfBadDataElem)
addUserDataErrorThis method uses the given parameters to create customized error messages to add to the error message string. The error data you define should be as complete as possible. Use this method to define error messages for the custom validations you define in the post-validation processing Collaboration Rules script.
Syntax
public final void addUserDataError(int errorCode, String errorDesc, short level, String loopIDCode, String segmIDCode, int segmPosiInTransSet, short segmSyntErroCode, short elemPosiInSegm, short compDataElemPosiInComp, String dataElemRefeNumb, short dataElemSyntErroCode, String CopyOfBadDataElem)
clearDataErrorsThis method strips out all errors. PVC processing continues as though the stripped errors did not exist.
Syntax
public final void clearDataErrors()
HIPAA Implementation Guide 29 SeeBeyond Proprietary and Confidential

Chapter 5 Section 5.2Post-validation Collaboration Post-validation Processing Components
countDataErrorThis method returns a value indicating the total number of errors.
Syntax
public final int countDataErrors()
getClarediRawDataThis method retrieves the entire validation result for a given message as returned by Claredi Corporation’s Faciledi appliance.
Syntax
public final java.lang.String getClarediRawData()
removeDataErrorThis method deletes the error specified in a particular line of its associated index.
Syntax
public final void removeDataError(int index)
stripDataErrorThis method uses the given parameters as search criteria to find the error data to strip from the HIPAA error message string. You can define the search as strictly or loosely as you need to remove the appropriate errors. For example, if you only enter a loop and segment ID code, all error data for that segment in the specified loop are removed. This method allows you to loosen the restrictions of HIPAA validations.
Syntax
public void stripDataError(int ErrorCode, short level, java.lang.String loopIDCode, java.lang.String segmIDCode, int segmPosiInTransSet, short segmSyntErroCode, short elemPosiInSegm, short compDataElemPosiInComp, java.lang.String dataElemRefNumb, short dataElemSyntErroCode, java.lang.String CopyOfBadDataElem)
Any additional Java methods and functions inherited from the base class are not used for Post-Validation Collaboration.
Java Method Parameters
Many of the same parameters are common to multiple Java methods.
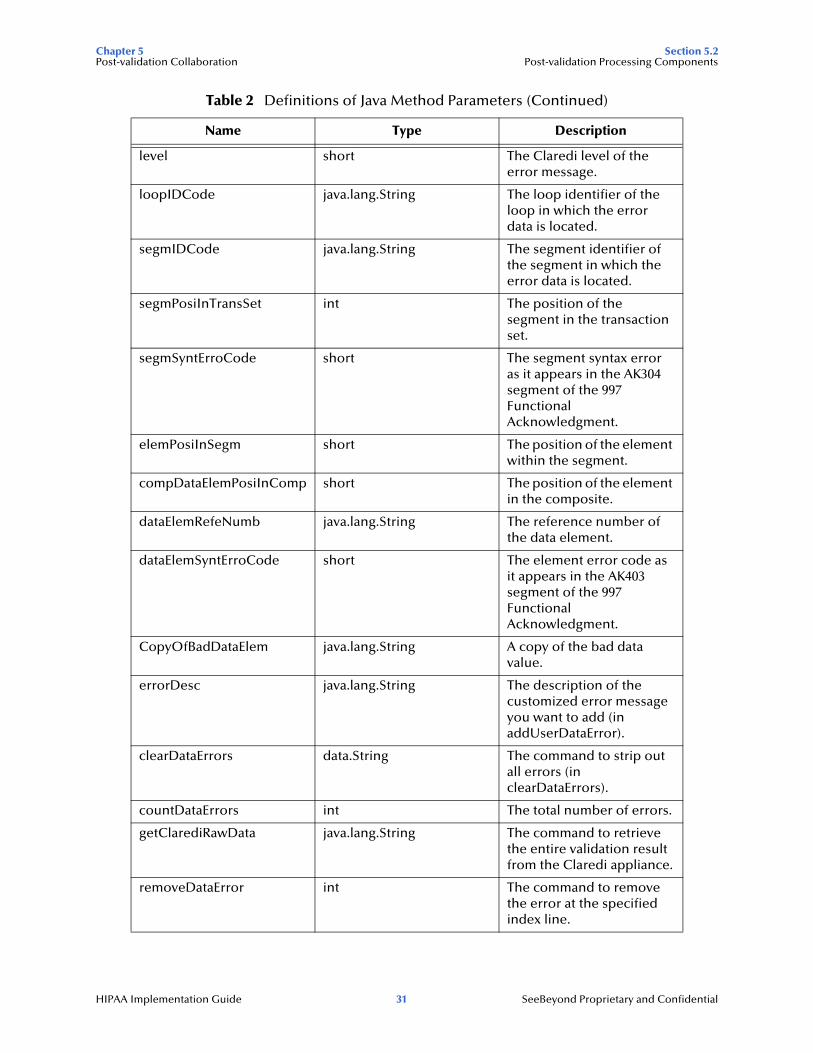
Table 2 Definitions of Java Method Parameters
Name Type Description
Parameter descriptions in this table apply to all methods but use the example of the stripDataError method unless otherwise indicated.
ErrorCode int The error code number for the error message to be stripped. Note: In previous versions, HIPAA error code numbers began at 5000; for the current version, they begin at 15000.
HIPAA Implementation Guide 30 SeeBeyond Proprietary and Confidential
Chapter 5 Section 5.2Post-validation Collaboration Post-validation Processing Components
level short The Claredi level of the error message.
loopIDCode java.lang.String The loop identifier of the loop in which the error data is located.
segmIDCode java.lang.String The segment identifier of the segment in which the error data is located.
segmPosiInTransSet int The position of the segment in the transaction set.
segmSyntErroCode short The segment syntax error as it appears in the AK304 segment of the 997 Functional Acknowledgment.
elemPosiInSegm short The position of the element within the segment.
compDataElemPosiInComp short The position of the element in the composite.
dataElemRefeNumb java.lang.String The reference number of the data element.
dataElemSyntErroCode short The element error code as it appears in the AK403 segment of the 997 Functional Acknowledgment.
CopyOfBadDataElem java.lang.String A copy of the bad data value.
errorDesc java.lang.String The description of the customized error message you want to add (in addUserDataError).
clearDataErrors data.String The command to strip out all errors (in clearDataErrors).
countDataErrors int The total number of errors.
getClarediRawData java.lang.String The command to retrieve the entire validation result from the Claredi appliance.
removeDataError int The command to remove the error at the specified index line.
Table 2 Definitions of Java Method Parameters (Continued)
Name Type Description
HIPAA Implementation Guide 31 SeeBeyond Proprietary and Confidential

Chapter 5 Section 5.2Post-validation Collaboration Post-validation Processing Components
Parameter Notes
When defining parameters, follow these guidelines.
For parameters of the data type short, you must use a cast for the parameter value. For example, if the parameter value is “3”, the parameter must be defined as “(short)3” (without the double quotes).
For parameters of the data type java.lang.String, the value of the parameter must be placed in double quotes. For example, “Element value is not valid.”
To specify that a parameter not be used in a specific call to a method:
Enter -1 for parameters of the type int.
Enter (short)-1 for parameters of the type short.
Enter null (the actual text “null” with no quotes) for parameters of the type java.lang.String.
For example, if in using the stripDataError method, you do not know the Claredi level of the message you want to strip, enter “(short)-1” (no quotes) for the level parameter for stripDataError. The method will then ignore the Claredi level when searching for errors to remove.
5.2.3. Post-validation Collaboration IndicatorThe Message Profile window in the web interface contains a field named “Post Validation Collaboration” that allows you to specify a post-validation Collaboration Rules script. If there is no value in this field, e*Xchange does not perform any reprocessing of HIPAA transactions for the displayed Trading Partner and message profile after they are processed through the standard HIPAA validations. If a post-validation Collaboration is specified, the transactions are reprocessed according to the logic defined in the specified Collaboration Rules script.
5.2.4. Message TrackingYou can view any standard errors and any custom errors for a given transaction in Message Tracking. Message Tracking also displays a list of any errors you stripped from the transaction to allow it to pass through.
Standard HIPAA validation errors are indicated in the Error Data column on the Message Details window, and any custom errors that were generated during reprocessing are appended to the end of the error list. The Error Audit column indicates whether errors were stripped from the original error string for the displayed transaction. If this column is Yes for a transaction, you can click Yes to view a list of errors that were stripped to allow the transaction to pass through the validations.
HIPAA Implementation Guide 32 SeeBeyond Proprietary and Confidential
Chapter 5 Section 5.3Post-validation Collaboration Standard Validation Processing
5.3 Standard Validation Processing Using a post-validation Collaboration Rules script slightly modifies the method by which HIPAA transactions are validated by performing extra steps to reprocess the transactions you specify.
5.3.1. HIPAA Transaction Validation without ReprocessingIf no post-validation Collaboration Rules script is specified, e*Xchange performs the following general sequence when a HIPAA transaction is received. This sequence does not reprocess transactions and adheres strictly to the X12 implementation guide rules.
1 e*Xchange receives the HIPAA transaction and uses the Claredi appliance to validate the transaction for HIPAA compliance.
2 Strict validations are performed, as outlined by the X12 implementation guide for the specified transaction type.
3 A string is returned from Claredi that contains any error messages created while processing.
4 The HIPAA validator writes the transaction to the database and sends the error message string to the error handler for processing.
5.3.2. HIPAA Transaction Validation with ReprocessingIf a post-validation Collaboration Rules script is specified, the processing sequence changes to include additional steps that allow error data to be removed or added. The new processing sequence allows you to ignore certain errors or perform additional validations with their own custom error messages. You can specify that the validations performed during reprocessing be as strict or loose as you prefer.
1 e*Xchange receives the HIPAA transaction and uses the Claredi appliance to validate the transaction for HIPAA compliance.
2 Strict validations are performed, as outlined by the X12 implementation guide pertaining to the specified transaction.
3 The Collaboration checks the Message Profile properties for an entry in the Post Validation Collaboration field specifying new Collaboration Rules for post-validation processing.
4 If there is no value in the Post Validation Collaboration field, processing continues as outlined in steps 3 and 4 under “HIPAA Transaction Validation without Reprocessing” on page 33.
5 If there is a value in the Post Validation Collaboration field, the error message from the HIPAA validation is forwarded for processing through the Collaboration Rules specified in the field.
6 The post-validation Collaboration Rules reprocess the information and alters the error message string in one or both of the following ways.
HIPAA Implementation Guide 33 SeeBeyond Proprietary and Confidential

Chapter 5 Section 5.4Post-validation Collaboration Implementing Post-validation Collaboration Rules
A Errors that were previously identified as acceptable for your business applications are removed from the error message string, making the overall validation less restrictive.
B Additional validations are performed against the transaction, and user-defined errors are added to the error message string, making the overall validation more restrictive.
7 Upon completion of the Post Validation Collaboration, processing control is returned to eX_X12_Validate and the error message string is returned as a parameter.
8 The validation continues as described in steps 3 and 4 under “HIPAA Transaction Validation without Reprocessing” on page 33.
5.4 Implementing Post-validation Collaboration RulesThere are two steps to implementing post-validation Collaboration Rules for HIPAA transactions. You need to perform these steps for each message type you want to reprocess and possibly for each Trading Partner from which the messages are processed. The implementation steps are:
1 Creating Post-validation Collaboration Rules on page 34
2 Specifying Post-validation Collaboration Rules for a Message Profile on page 37
5.4.1. Creating Post-validation Collaboration RulesYou can design the post-validation Collaboration Rules for HIPAA transactions to adhere as strictly or loosely to the requirements of the X12 implementation guides as you desire for a specific Trading Partner or Trading Partners. You must create different post-validation Collaboration Rules for each message type you want to reprocess, and you may need to define different Collaboration Rules for the same message type but for different Trading Partners. An analysis of the data in the messages from each Trading Partners and the HIPAA errors produced from these messages will help you define the structure of the post-validation Collaboration Rules.
Specifying Input and Output ETDs
To create post-validation collaboration rules, you specify input and output ETDs as follows:
1 Open the HIPAA schema in the Schema Manager.
2 In the Components Pane of the Schema Manager, highlight Collaboration Rules, and then click New Collaboration Rules.
3 Name the Collaboration Rules file, and then click OK.
4 In the Service field on the Collaboration Rules Properties window, select Java.
HIPAA Implementation Guide 34 SeeBeyond Proprietary and Confidential
Chapter 5 Section 5.4Post-validation Collaboration Implementing Post-validation Collaboration Rules
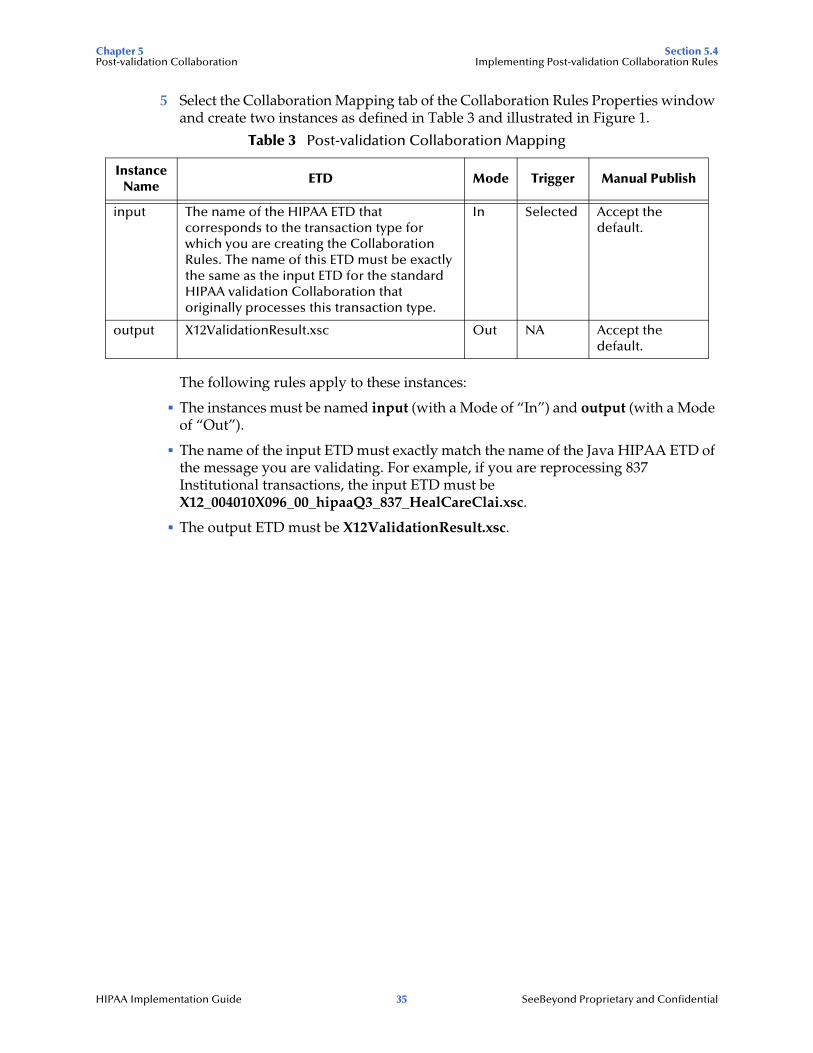
5 Select the Collaboration Mapping tab of the Collaboration Rules Properties window and create two instances as defined in Table 3 and illustrated in Figure 1.
The following rules apply to these instances:
The instances must be named input (with a Mode of “In”) and output (with a Mode of “Out”).
The name of the input ETD must exactly match the name of the Java HIPAA ETD of the message you are validating. For example, if you are reprocessing 837 Institutional transactions, the input ETD must be X12_004010X096_00_hipaaQ3_837_HealCareClai.xsc.
The output ETD must be X12ValidationResult.xsc.
Table 3 Post-validation Collaboration Mapping
Instance Name
ETD Mode Trigger Manual Publish
input The name of the HIPAA ETD that corresponds to the transaction type for which you are creating the Collaboration Rules. The name of this ETD must be exactly the same as the input ETD for the standard HIPAA validation Collaboration that originally processes this transaction type.
In Selected Accept the default.
output X12ValidationResult.xsc Out NA Accept the default.
HIPAA Implementation Guide 35 SeeBeyond Proprietary and Confidential

Chapter 5 Section 5.4Post-validation Collaboration Implementing Post-validation Collaboration Rules
Figure 1 Collaboration Mapping Instances
6 After you create the two instances above, click Apply and then select the General tab of the properties window.
7 In the Collaboration Rules box, click New. The Collaboration Rules Editor appears, and displays the input and output ETDs you specified in step 5.
HIPAA Implementation Guide 36 SeeBeyond Proprietary and Confidential
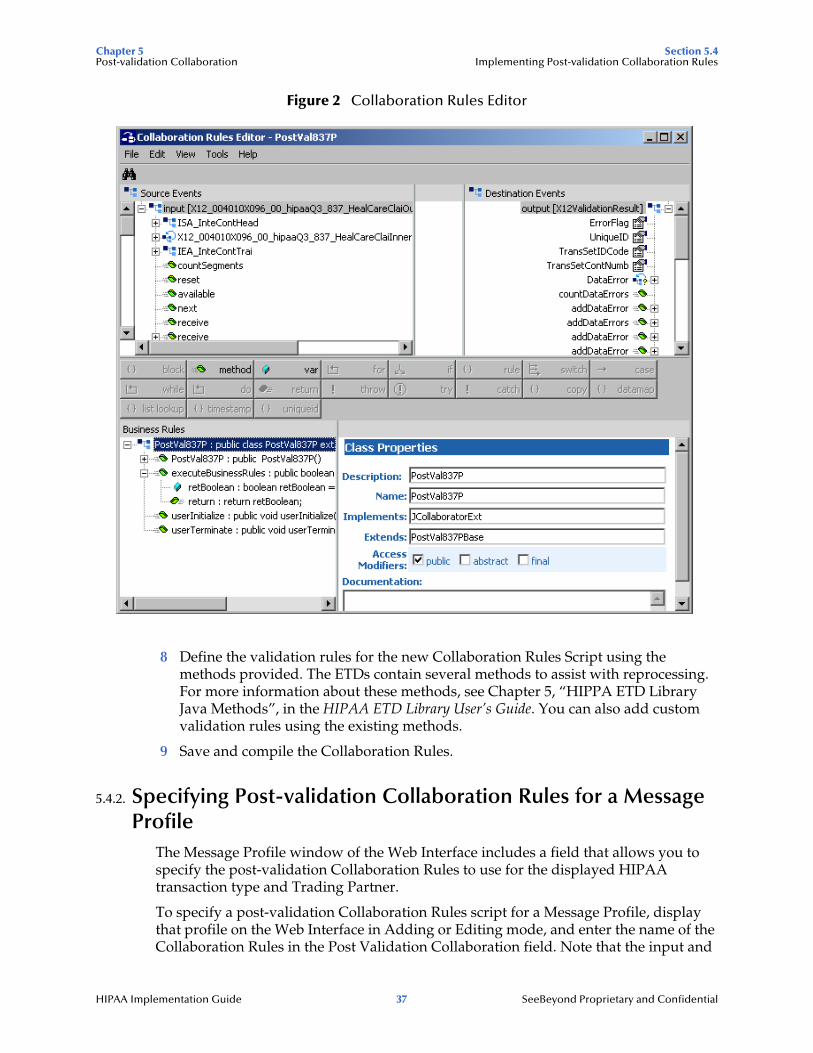
Chapter 5 Section 5.4Post-validation Collaboration Implementing Post-validation Collaboration Rules
Figure 2 Collaboration Rules Editor
8 Define the validation rules for the new Collaboration Rules Script using the methods provided. The ETDs contain several methods to assist with reprocessing. For more information about these methods, see Chapter 5, “HIPPA ETD Library Java Methods”, in the HIPAA ETD Library User’s Guide. You can also add custom validation rules using the existing methods.
9 Save and compile the Collaboration Rules.
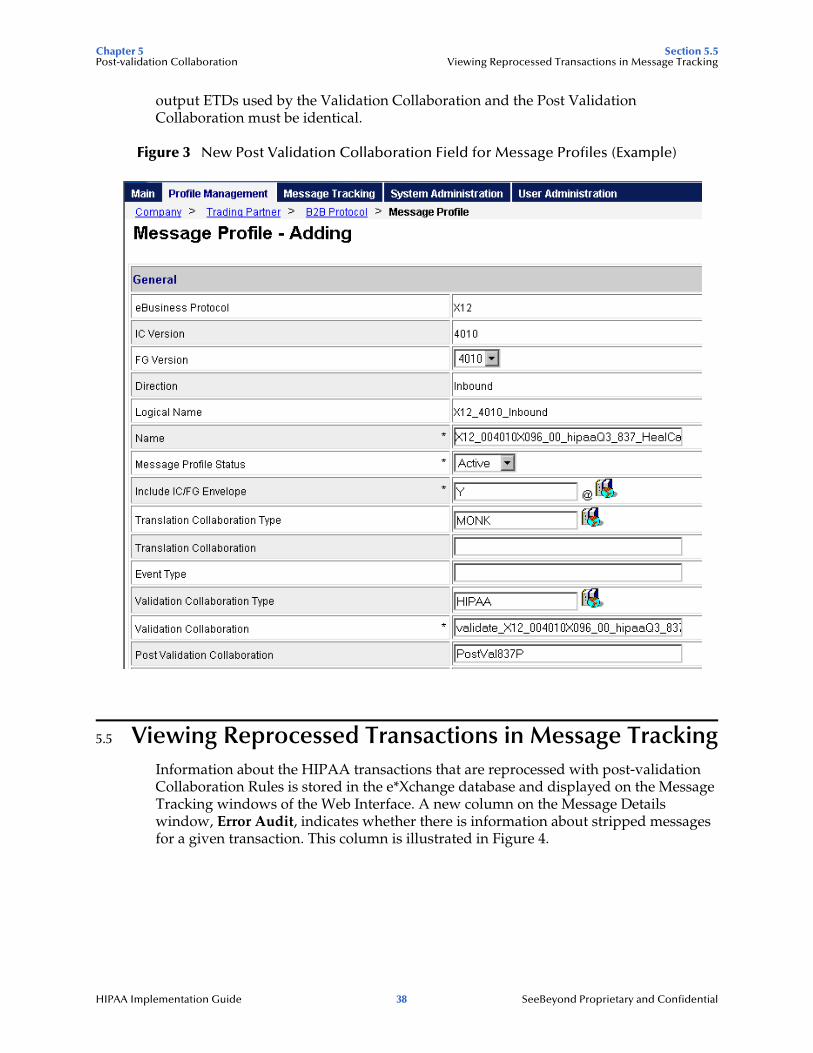
5.4.2. Specifying Post-validation Collaboration Rules for a Message Profile
The Message Profile window of the Web Interface includes a field that allows you to specify the post-validation Collaboration Rules to use for the displayed HIPAA transaction type and Trading Partner.
To specify a post-validation Collaboration Rules script for a Message Profile, display that profile on the Web Interface in Adding or Editing mode, and enter the name of the Collaboration Rules in the Post Validation Collaboration field. Note that the input and
HIPAA Implementation Guide 37 SeeBeyond Proprietary and Confidential
Chapter 5 Section 5.5Post-validation Collaboration Viewing Reprocessed Transactions in Message Tracking
output ETDs used by the Validation Collaboration and the Post Validation Collaboration must be identical.
Figure 3 New Post Validation Collaboration Field for Message Profiles (Example)
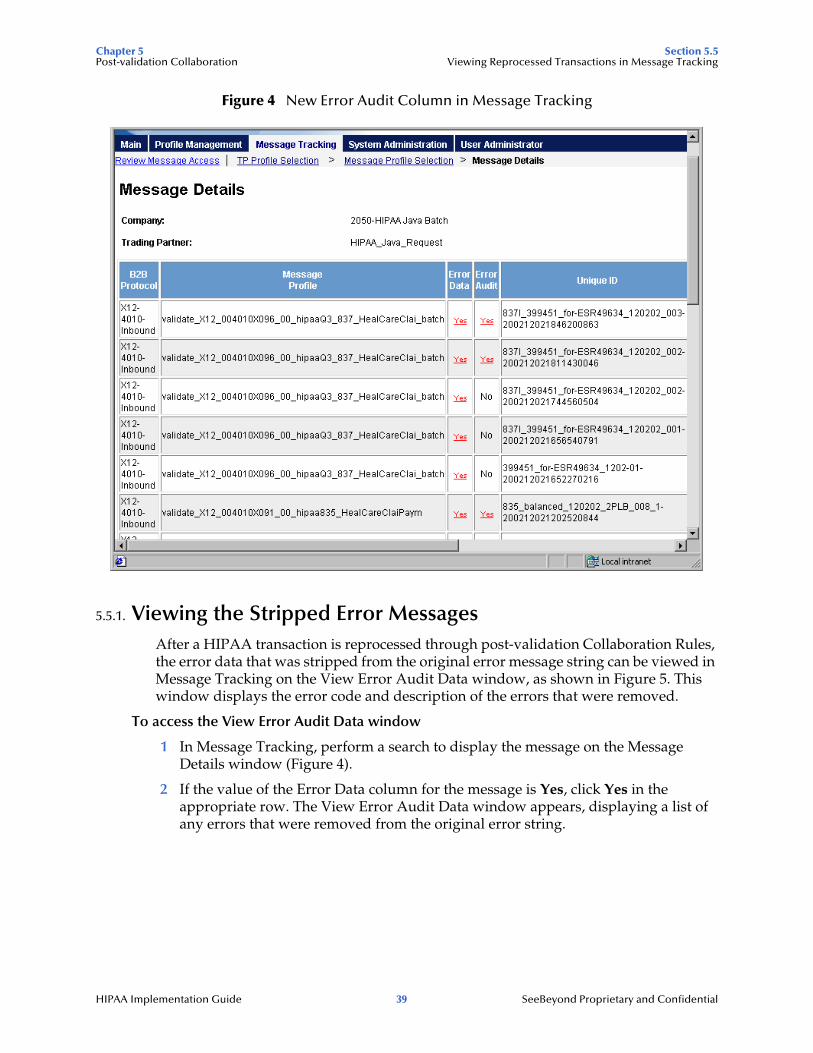
5.5 Viewing Reprocessed Transactions in Message TrackingInformation about the HIPAA transactions that are reprocessed with post-validation Collaboration Rules is stored in the e*Xchange database and displayed on the Message Tracking windows of the Web Interface. A new column on the Message Details window, Error Audit, indicates whether there is information about stripped messages for a given transaction. This column is illustrated in Figure 4.
HIPAA Implementation Guide 38 SeeBeyond Proprietary and Confidential
Chapter 5 Section 5.5Post-validation Collaboration Viewing Reprocessed Transactions in Message Tracking
Figure 4 New Error Audit Column in Message Tracking
5.5.1. Viewing the Stripped Error MessagesAfter a HIPAA transaction is reprocessed through post-validation Collaboration Rules, the error data that was stripped from the original error message string can be viewed in Message Tracking on the View Error Audit Data window, as shown in Figure 5. This window displays the error code and description of the errors that were removed.
To access the View Error Audit Data window
1 In Message Tracking, perform a search to display the message on the Message Details window (Figure 4).
2 If the value of the Error Data column for the message is Yes, click Yes in the appropriate row. The View Error Audit Data window appears, displaying a list of any errors that were removed from the original error string.
HIPAA Implementation Guide 39 SeeBeyond Proprietary and Confidential

Chapter 5 Section 5.5Post-validation Collaboration Viewing Reprocessed Transactions in Message Tracking
Figure 5 View Error Audit Data Window
5.5.2. Viewing Post-validation Processing ErrorsAfter a HIPAA transaction is reprocessed through post-validation Collaboration Rules, any custom error data that was added to the original error message string can be viewed in Message Tracking on the View Error Data window, as shown in Figure 6. The custom messages are appended to the end of the error message string, and should appear at the bottom of error list on the View Error Data window.
To view post-validation processing errors
1 In Message Tracking, perform a search to display the message on the Message Details window (Figure 4).
2 If the value of the Error Data column for the message is Yes, click Yes in the appropriate row. The View Error Data window appears.
HIPAA Implementation Guide 40 SeeBeyond Proprietary and Confidential

Chapter 5 Section 5.5Post-validation Collaboration Viewing Reprocessed Transactions in Message Tracking
3 Scroll to the bottom of the error list to see any custom error messages that were added as a result of reprocessing.
Figure 6 View Error Data Window
HIPAA Implementation Guide 41 SeeBeyond Proprietary and Confidential
Chapter 6
Processing Large Transactions
e*Xchange processes large outbound transactions by breaking them up into smaller sections before validation. This chapter describes how large messages are processed and the settings that need to be modified to use this feature.
6.1 Overviewe*Xchange provides the ability to process large HIPAA X12 835 outbound messages in an interactive manner through the eX_ePM and eX_Batch_to_External e*Ways within the e*Xchange Schema. Large messages are processed by breaking the messages up into smaller, more manageable pieces during processing. The large message processing components provided with e*Xchange are specifically designed to handle X12 835 transactions. You can extend the framework for other transaction types by using the 835 as a template.
6.1.1. ConsiderationsCertain HIPAA transactions consist of very large messages, which can cause processing errors unless the large message feature is in use. This depends on many factors in the processing environment, such as available disk size, memory, message volume, and so on. For example, you might find that there is a problem with files larger than 60 MB unless you use the large message feature. In some cases larger files might process smoothly, and in other cases smaller files might cause errors. Your processing environment will determine whether you should use large message processing, and the size at which a message should be processed as a large message. You can use large message processing for any size message, however there are a few considerations.
You cannot view large messages using the Message Tracking feature.
Large message processing uses additional disk space.
Large message processing may slow down processing speed due to the additional processing performed.
This section describes the ability of the eX_ePM and eX_Batch_to_External e*Ways to process large outbound messages in an interactive manner.
HIPAA Implementation Guide 42 SeeBeyond Proprietary and Confidential
Chapter 6 Section 6.1Processing Large Transactions Overview
6.1.2. Methodology
Source System e*Way Requirements
To enable large message processing, a message must be flagged as a large message before it reaches the eX_ePM e*Way. This logic should be written into the e*Way processing messages from the source system into e*Xchange. If the message is to be processed as a large message, the source system e*Way must send the file name (in the format FILE:<file_name>) instead of the message body to e*Xchange.
The file name must include the full path to the file, be base64-encoded, and be populated in the Payload section of the e*Xchange Standard Event. The file must be stored in a directory location that is accessible by the e*Xchange e*Way components. If the file is already in an X12 format, the enveloping can be in ST/SE or ISA/IEA formats.
Translation Requirements
If an X12 translation must be performed once a large message file name reaches the eX_ePM e*Way, the translation Collaboration must be able to accept a file name as input. The output of the translation Collaboration must be the file name of the translated message in the format of FILE:<file_name>. Each translation must create an output file that contains a single transaction, which is in X12 835 format with ST/SE or ISA/IEA enveloping.
Note: Performing translations creates a second file of approximately the same size as the original file in the data directory. This can cause the size of the directory to grow quickly, so frequent archival or removal of the data files is recommended.
Splitting the Message
e*Xchange provides a custom large message Collaboration for the 835 transaction, HIPAA_2K_835_Outb_validation, that breaks up the large message into well-formed, manageable pieces that are then validated. After any translations have been performed, the name of the new file created by the translation is sent to the large message Collaboration, and the file is divided into smaller files, each containing the specified number of CLP files and each including header information and SE/ST enveloping.
Each file is sent to the Claredi appliance. Once validation is completed successfully, a new file is created that contains a copy of the message, including the correct enveloping and delimiters as defined in the Trading Partner Profile settings. This file is named by appending a 12-digit unique number to the end of the original file name. The end result of the validation is as if the message were processed as a single entity.
Post-Processing
After validation processing is complete and the final copy of the original message is created, the eX_ePM e*Way sends the file name to the eX_Batch_to_External e*Way to be sent to the appropriate trading partner using FTP. When the file transfer to the trading partner is complete, two copies (three if translations were performed) of the
HIPAA Implementation Guide 43 SeeBeyond Proprietary and Confidential
Chapter 6 Section 6.2Processing Large Transactions Implementing Large Message Processing
message are stored in the specified data directory. These files should be archived or deleted as needed to maintain disk space on the e*Xchange server.
6.2 Implementing Large Message ProcessingLarge message settings are specified at the Message Profile level and within Trading Partner Attribute pairs that you add to the e*Xchange Standard Event. These settings apply whether you are using the 835 message processing functionality provided or you are using custom Collaborations and Monk scripts to split large messages of a different transaction type.
Trading Partner Attributes
Two Trading Partner Attribute name and value pairs must be added to the structure defined in eX_StandardEvent.xsc; two optional attribute pairs can be added for additional control. These attributes can be added using the addNameValuePair method (see the e*Xchange Implementation Guide for more information about this method). Table 4 lists each Trading Partner Attribute used for large message processing, along with the value and description for each.
Table 4 Trading Partner Attributes for Large Message Processing
TPAttribute NameOptional/Required
TPAttribute Value Description
LARGE_MSG Required Y This is an indicator that the message should be processed using large message processing.
MSG_ALT_ID Required Must exactly match the value set in the Message Alt ID field of the Message Profile of the applicable outbound Trading Partner Profile.
This is used to identify the message profile level of the Trading Partner Profile.
LARGE_MSG_SIZE Optional Numeric valueDefault: 1000
This value determines the number of CLP segments to include in each portion of the file that is sent for validation.
LARGE_MSG_INDX Required only for files with multiple large transactions
Numeric valueDefault: 1
This value identifies the transactions to be processed as a large message in a file where multiple transactions require large message processing.
HIPAA Implementation Guide 44 SeeBeyond Proprietary and Confidential

Chapter 6 Section 6.2Processing Large Transactions Implementing Large Message Processing
LARGE_MSG_SIZE
The “LARGE_MSG_SIZE” attribute determines the number of CLP loops that are pulled out of the large message file for each partial validation that is performed, controlling both the size and the number of the message portions that are sent to validation for each large message. Use this attribute if you determine that a value other than the default of “1000” would optimize performance for your system.
LARGE_MSG_INDX
The “LARGE_MSG_INDX” attribute is not required if the message file sent to e*Xchange by the source system e*Way has a single transaction set. The default value, 1, specifies that the first large transaction in a file will be processed using large message processing. If the message file contains many large transaction sets, this attribute is required to identify which of the transaction sets should be processed as large messages.
e*Xchange processes a single transaction for each subscription to an eX_eBPM queue Event. Therefore, if a message file has 20 transactions and four of them are to be processed as large transactions, the source system e*Way must publish the e*Xchange Standard Event four times. Each time the Event is published, the same file name is populated in the Payload segment, but a different index value is included to identify the transaction to be processed.
Message Profile Settings
Certain settings in the General section of the Message Profile for the outbound message must be configured for processing large messages. You can configure these settings in the e*Xchange Web interface. Table 5 lists the required settings for large message processing.
The validation Collaboration used for processing large messages, HIPAA_2K_Outb_validation, checks whether the input string is a message or a file name. If the input string is a file name, the Collaboration calls a function,
Table 5 Message Profile Settings for Large Messages
Attribute NameOptional/Required
Possible Values Description
Message Alt ID Required Must exactly match the value set in the MSG_ALT_ID attribute in the eX_StandardEvent structure
This value is used to identify the message profile level of the Trading Partner Profile.
Validation Collaboration Type
Required Must be set to JAVA. This value indicates that the validation Collaboration file called by the splitter function is written in Java.
Validation Collaboration
Required Must be set to HIPAA_2K_Outb_validation (or the name of your custom Collaboration)
This value indicates that a Collaboration that processes large messages will be used.
HIPAA Implementation Guide 45 SeeBeyond Proprietary and Confidential
Chapter 6 Section 6.3Processing Large Transactions Customizing Large Message Processing Components
HIPAA_835_Outb_splitter, to break up the message into smaller, well-formed messages that are passed to the standard validation. If the input string is a message, the message is sent to the standard 835 validation Collaboration. If you are configuring the Message Profile for a custom configuration of large message processing, enter the name of the validation Collaboration you created for processing messages of the specified type in this field.
A Note on Transfer Modes
For large messages, the X12 Outbound processing ignores the settings of the transfer mode in the Trading Partner Profile and processes the message in an interactive manner.
6.3 Customizing Large Message Processing ComponentsYou can use the logic provided in the files HIPAA_2K_835_Outb_validation.tsc and HIPAA_835_Outb_splitter.monk to create a custom Collaboration and splitter to process additional types of large X12 transactions by breaking them up into smaller pieces that are validated one piece at a time. To enable this process for alternate transaction types, you must create or customize three e*Gate components:
The e*Way for the source system
The large message Collaboration
The Monk splitter function
Note: When using customized components for processing large transactions, make sure to modify the Trading Partner Attributes and Message Profile settings described earlier in this chapter accordingly.
Source System e*Way
When processing large messages, the e*Way that processes data from the source system must be configured to be able to determine whether a message should be processed as a large message or a standard message. This is based on a file size that you determine to be the cut-off size for processing standard messages. Any messages at or above the cut-off value you specify will be processed as large messages. When a message is to be processed as a large message, the source system e*Way must save the message in a file and send the file name (in the format FILE:<file name>) to e*Xchange. Make sure the file name includes the full path of the file to be processed, and the message contained in the file is in a standard X12 messaging format with the appropriate enveloping in place.
Large Message Collaboration
You can base your large message Collaboration on the existing 835 Collaboration, HIPAA_2K_835_Outb_validation.tsc. The purpose of this Collaboration is primarily to direct the flow of data once it determines whether it is processing a large message or a standard message. The Collaboration specifies the name of the splitter function and of
HIPAA Implementation Guide 46 SeeBeyond Proprietary and Confidential
Chapter 6 Section 6.3Processing Large Transactions Customizing Large Message Processing Components
the Java validation Collaboration or Monk validation Collaboration to be used for data validation.
The logic in the large message Collaboration is as follows. If the Collaboration determines that a standard message is being processed, the message is sent directly to the HIPAA validation Collaboration. If the large message Collaboration determines that a large message is being processed, it calls the Monk splitter function to break the message up into smaller pieces. Once the message has been broken up and smaller files are created, the splitter function sends each file to the appropriate Collaboration for validation or processing. On completion, the large message Collaboration joins the message back together, including the appropriate header information, and saves the message in a file to be picked up by the FTP e*Way. This file is named by appending a 12-digit unique number to the end of the original file name.
When you customize the large message Collaboration, make sure you specify the appropriate names for the splitter function and the validation Collaborations.
Monk Splitter Function
The Monk splitter function defines how each large message will be divided into smaller, more manageable messages. Each message split from the large message must be a well-formed X12 message, including SE/ST enveloping. In the default splitter, several functions are defined that are used to retrieve information from the large message and to parse the message into smaller pieces. You can customize these functions to define the loops or segments that exist in the transaction type you are processing.
The splitter reads the Trading Partner settings to determine how many CLP segments to include in each message and which transaction in the file to process (in cases where the file contains multiple transactions). By default, the size of the parsed messages is based on the number of CLP segments. You can modify the splitter so the size of each parsed message is based on a more appropriate segment for the transaction type you are processing.
After reading the Trading Partner settings, the splitter parses the large message and sends each piece of the message to the appropriate validation Collaboration (as defined in the large message processing Collaboration).
There are several issues to consider when determining how to break up a large message, including the following:
Any “balance” fields that need to be verified in the parsed messages.
Segment repetition. You can base the size of each parsed message on the number of repetitions of a particular segment. In the case of 835 large message processing, the size of each partial message is based on the CLP segments since many 835 transactions contain a very large number of CLP segments.
The best method of parsing the message, and the appropriate structure for the parsed messages.
Any header or trailer information that needs to be appended to the file.
Required enveloping formats.
HIPAA Implementation Guide 47 SeeBeyond Proprietary and Confidential
Chapter 7
e*Xchange Implementation
This chapter discusses the steps involved to create an e*Xchange implementation that transfers HIPAA X12 data.
7.1 OverviewAn e*Xchange implementation makes use of the features designed to add and remove the EDI enveloping information for messages exchanged between trading partners.
In an e*Xchange implementation, use the e*Xchange Web Interface to set up trading partner information, and the e*Gate Schema Designer GUI to add user-defined e*Gate components to provide connectivity to the business application or trading partner. Once this is done, the pre-configured e*Xchange e*Gate Schema components handle enveloping and de-enveloping Events as they travel through the e*Xchange system.
The major steps for an e*Xchange implementation are as follows:
1 Verify the e*Gate and e*Xchange installation.
2 Create the trading partner profiles.
3 Configure the user-defined e*Ways that will connect the business application to e*Xchange and exchange messages with the trading partner.
4 Configure the e*Xchange e*Way.
5 Run and test the scenario.
SeeBeyond supplies the sample files needed to run the e*Xchange HIPAA scenario. If you would prefer to use the files that are already set up for you, skip steps 2 through 4, and install the sample schema files, as described under “Installing the Sample Files” on page 51.
7.1.1. Case Study: Sending a Health Care ClaimThe case study discussed in this chapter illustrates one possible implementation of sending a health care claim to a trading partner.
In this example, a Health Care Claim (837) is sent to an external trading partner, the insurance provider. The enveloping is automatically added to the message by e*Xchange based on trading partner information retrieved from the e*Xchange database, and then the message is sent to the external system. An acknowledgment
HIPAA Implementation Guide 48 SeeBeyond Proprietary and Confidential
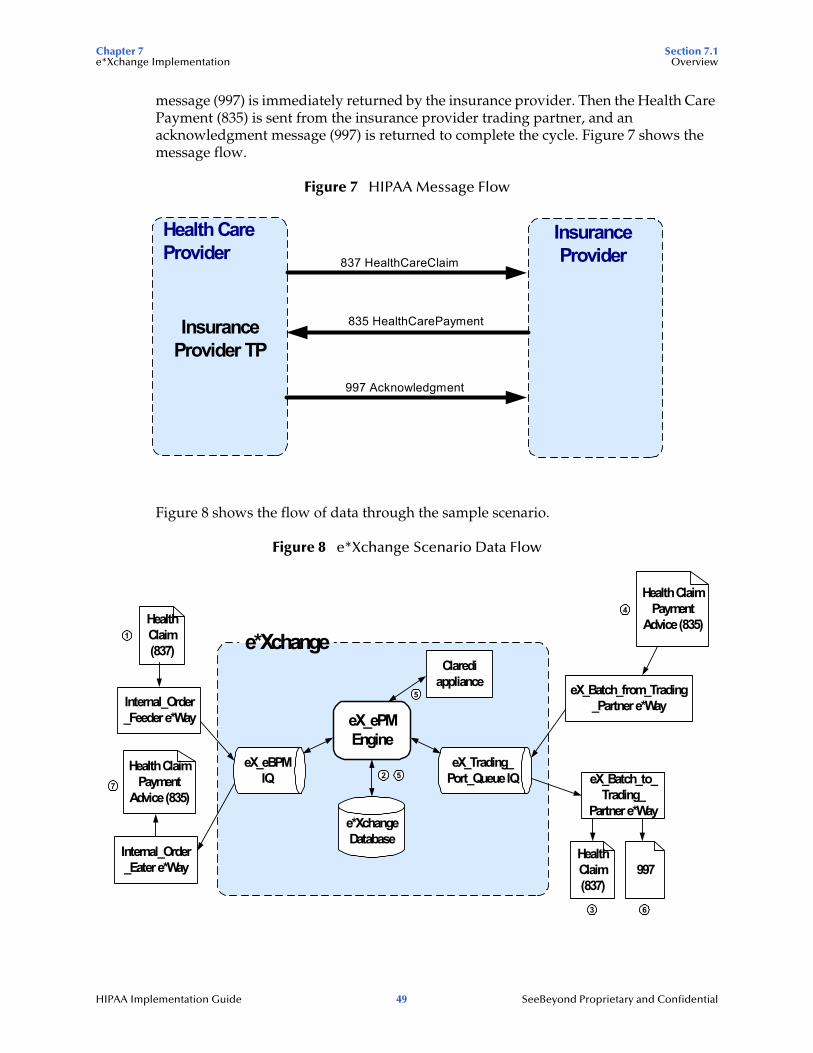
Chapter 7 Section 7.1e*Xchange Implementation Overview
message (997) is immediately returned by the insurance provider. Then the Health Care Payment (835) is sent from the insurance provider trading partner, and an acknowledgment message (997) is returned to complete the cycle. Figure 7 shows the message flow.
Figure 7 HIPAA Message Flow
Figure 8 shows the flow of data through the sample scenario.
Figure 8 e*Xchange Scenario Data Flow
InsuranceProvider TP
837 HealthCareClaim
835 HealthCarePayment
997 Acknowledgment
InsuranceProvider
Health CareProvider
3
1
HealthClaim(837)
e*XchangeDatabase
Internal_Order_Feeder e*Way eX_ePM
Engine
Health ClaimPayment
Advice (835)
eX_eBPMIQ
eX_Trading_Port_Queue IQ
eX_Batch_from_Trading_Partner e*Way
eX_Batch_to_Trading_
Partner e*Way
997
2
e*Xchange
Health ClaimPayment
Advice (835)
Internal_Order_Eater e*Way
HealthClaim(837)
4
57
6
Clarediappliance
5
HIPAA Implementation Guide 49 SeeBeyond Proprietary and Confidential
Chapter 7 Section 7.2e*Xchange Implementation Verify the e*Gate and e*Xchange Installation
Figure 8 data flow description
1 The Internal_Order_Feeder e*Way picks up the health care claim message (837) and publishes it to the eX_eBPM IQ.
2 The e*Xchange engine picks it up from the IQ, validates it, saves it to the database, and publishes the message to the eX_Trading_Port_Queue IQ.
3 The eX_Batch_to_Trading_Partner e*Way picks up the message from the IQ and sends it out to the trading partner. The trading partner (customer) then sends a response in the form of an 835 message.
4 The eX_Batch_from_Trading_Partner e*Way sends the healthcare payment advice message (835) to the eX_Trading_Port_Queue IQ.
5 The e*Xchange engine picks the message up from the IQ, passes it to the Claredi appliance for validation, saves it to the database, and publishes two messages:
an acknowledgment (997) to the eX_Trading_Port_Queue IQ.
the health claim payment advice (835) to the eX_eBPM IQ.
6 The eX_Batch_to_Trading_Partner e*Way picks up the 997 acknowledgment and sends it to the trading partner.
7 The Internal_Order_Eater e*Way picks up the health claim payment advice (835) from the eX_eBPM IQ and sends it to the internal system.
7.2 Verify the e*Gate and e*Xchange InstallationThis end-to-end scenario requires e*Xchange and e*Gate to be installed on your system. For e*Xchange, you must have the Web interface and e*Xchange sample Schema installed. You also need a working e*Xchange database with the correct database connections set up. For e*Gate, install the Java HIPAA ETD Library add-on, the Database e*Way appropriate to the database platform of the e*Xchange database, and the Java Generic e*Way Extension Kit.
Refer to the e*Xchange Partner Manager Installation Guide for system requirements and instructions to install the e*Xchange components. The e*Gate Integrator Installation Guide describes e*Gate system requirements and provides instructions to install the e*Gate components.
HIPAA Implementation Guide 50 SeeBeyond Proprietary and Confidential
Chapter 7 Section 7.3e*Xchange Implementation Installing the Sample Files
7.3 Installing the Sample FilesThe components for this implementation are provided on your installation CD, and are located in \setup\ex\sample\HIPAA_SAMPLE_IMPLEMENTATION.zip. You can either install the sample files and import them into the e*Gate and e*Xchange environments, or you can go through the steps of creating and configuring the required components. Either way, you need the data files located in the “data” subdirectory of the .zip file to be copied to the e*Gate environment. Follow these steps to install the components:
1 Unzip the file to a local directory.
2 Copy the folder named “data”, along with all of its subfolders and files, to the e*Gate home directory.
Note: The default registry port number is 23001.
3 Install the e*Gate Schema using one of the following commands. The instructions refer to the schema name HealthClaim, however, this is user-defined.
A For UNIX, type the following command:
sh install_hipaa_sample.sh <egate_registry_host_name> <schema_name> <user_name> <password> <egate_registry_port_num>
B For Windows, type the following command:
install_hipaa_sample.bat <egate_registry_host_name> <schema_name> <user_name> <password> <egate_registry_port_num>
4 Use the e*Xchange Import function in e*Xchange Repository Manager to import HIPAA.exp into e*Xchange Partner Manager.
5 If your e*Gate home directory is named something other than “eGate”, modify the file names specified for the inbound and outbound B2B protocols accordingly. See step 7 in both “Step 3: Set up the Inbound B2B Protocol Information” on page 54 and “Step 5: Set Up Outbound B2B Protocol Information” on page 56 for more information.
6 If your e*Gate home directory is named something other than “eGate”, modify the OutputDirectory setting for the Internal_Order_Eater e*Way (for more information, see “Step 1: Create and Configure the Internal_Order_Eater e*Way” on page 61).
7 If your e*Gate home directory is named something other than “eGate”, modify the PollDirectory setting for the Internal_Order_Feeder e*Way (for more information, see “Step 1: Create and Configure the Internal_Order_Feeder e*Way” on page 64
8 Configure the return message for the inbound message. See “Step 7: Configure Return Messages for Inbound” on page 60 for detailed instructions.
9 Modify the database configuration settings in the eX_ePM and eX_Poll_Receive_FTP e*Ways by entering your e*Xchange database name, login ID, and password (for more information see “Configure the eX_ePM e*Way” on page 67 and “Configure the eX_Poll_Receive_FTP e*Way” on page 68).
HIPAA Implementation Guide 51 SeeBeyond Proprietary and Confidential
Chapter 7 Section 7.4e*Xchange Implementation Create the Trading Partner Profiles
The steps on the following pages describe how to create each component for this implementation. You can perform these steps instead of installing the sample files as described above. See “Running the Scenario” on page 69 for instructions to run the implementation.
7.4 Create the Trading Partner ProfilesTrading partner profiles in e*Xchange act as repositories for the information necessary to send EDI messages back and forth between entities. They contain all of the information needed to properly envelope an Event and forward it to its correct destination.
Refer to the e*Xchange Partner Manager User’s Guide for detailed assistance with the process of creating trading partner profiles.
Trading Partner Information Hierarchy
e*Xchange stores trading partner information at various levels. The process of creating a trading partner profile proceeds from the most general inclusive level, that of a company with which you do business, to the most specific information regarding a message that you wish to send (the message profile).
Figure 9 shows an overview of the components that you need to create for this example, including:
Company
Trading Partner
B2B Protocol Information
Message Profiles
HIPAA Implementation Guide 52 SeeBeyond Proprietary and Confidential

Chapter 7 Section 7.4e*Xchange Implementation Create the Trading Partner Profiles
Figure 9 Insurance Overview
To configure the Insurance trading partner profile you must follow the steps listed below:
Step 1: Create the Company on page 53
Step 2: Create the Trading Partner on page 54
Step 3: Set up the Inbound B2B Protocol Information on page 54
Step 4: Create the Inbound Message Profiles on page 55
Step 5: Set Up Outbound B2B Protocol Information on page 56
Step 6: Create the Outbound Message Profiles on page 57
Step 7: Configure Return Messages for Inbound on page 60
Step 1: Create the Company
To create the company
1 Log in to the e*Xchange Web interface.
2 From the Main page, click Profile Management.
3 From the Company page, click New.
4 In the Company - adding page, enter the Company name, “Insurance”.
5 Click Next.
This saves your changes and returns to the Company page.
e*Xchange
Insurance TP
B2B Protocol InformationInbound (Receive from Insurance)
Message ProfilesHealth Care Claim Payment Advice
Outbound (Send to Insurance)
Message ProfilesHealth Care ClaimAcknowledgment
B2B Protocol Information
Insurance Company
HIPAA Implementation Guide 53 SeeBeyond Proprietary and Confidential

Chapter 7 Section 7.4e*Xchange Implementation Create the Trading Partner Profiles
Note: The security information is automatically configured for the current user.
Step 2: Create the Trading Partner
To create the trading partner
1 From the Company page, ensure that the “Insurance” trading partner is selected, and then click Continue: Trading Partner.
2 From the Trading Partner page, click New to access the Trading Partner - adding page.
3 Enter the Trading Partner Name, “Insurance”.
4 Click Next.
This saves your changes and returns to the Trading Partner page.
Note: The required security information defaults from the company level.
Step 3: Set up the Inbound B2B Protocol Information
To set up the inbound B2B protocol information
1 From the Trading Partner page, ensure that “Insurance” is selected, and then click Continue: B2B Protocol.
2 From the B2B Protocol page, click New to access the B2B Protocol - adding page.
3 Enter the information listed in Table 6.
In an actual implementation, your local administrator can provide you with the B2B Protocol information.
HIPAA message validations performed by the Faciledi appliance from Claredi Corporation working in conjunction with e*Xchange Partner Manager support the following for X12:
Transmission-level duplicate checking
Unique ID assignment through internal or validation processes
Journal file Error copying to the Error Queue
For an explanation of the B2B Protocol parameters, see the e*Xchange Partner Manager User’s Guide.
4 Click Next to save your changes and access the General section.
5 Enter the information listed in Table 7.
Table 6 B2B Protocol Information
Parameter Value
eBusiness Protocol X12
Version 4010
Direction Inbound
HIPAA Implementation Guide 54 SeeBeyond Proprietary and Confidential

Chapter 7 Section 7.4e*Xchange Implementation Create the Trading Partner Profiles
6 Click Next to save your changes and access the Transport Component section.
7 In the File Name window, enter <egate>\data\hipaa\TP\input\*.dat.
8 Click Next to access the Message Security section.
9 No changes are required. Click Finish to save the information and return to the B2B Protocol page.
Step 4: Create the Inbound Message Profiles
For the purposes of this scenario, you must set up the following inbound message profile:
Health Claim Payment Advice (X12_004010X091_00_hipaa835_HealCareClaiPaym)
To set up the X12_004010X091_00_hipaa835_HealCareClaiPaym order inbound message profile
1 From the B2B Protocol page, click Continue: Message Profile.
2 From the Message Profile page, click the New button to access the Message Profile - adding page.
3 Enter the information listed in Table 8.
Note: This table only lists the attributes required to make this scenario work.
Table 8 Inbound Message Profile, General Settings
4 Click Next to access the Interchange Control Envelope section. Enter the information listed in Table 9.
Table 9 Inbound Message Profile, Interchange Control Envelope
Table 7 B2B Protocol Information, General Page
Parameter Value
Logical Name Insurance
Status Active
Communication Protocol FTP(BATCH)
Name Value
Name X12_004010X091_00_hipaa835_HealCareClaiPaym
Validation Collaboration Type FACILEDI
Validation Collaboration FACILEDI
Transfer Mode Interactive
Name Value
ISA05 Interchange Sender Identification Qualifier 01
ISA06 Interchange Sender Identifier 6264712000
ISA07 Interchange Receiver Identification Qualifier 01
HIPAA Implementation Guide 55 SeeBeyond Proprietary and Confidential
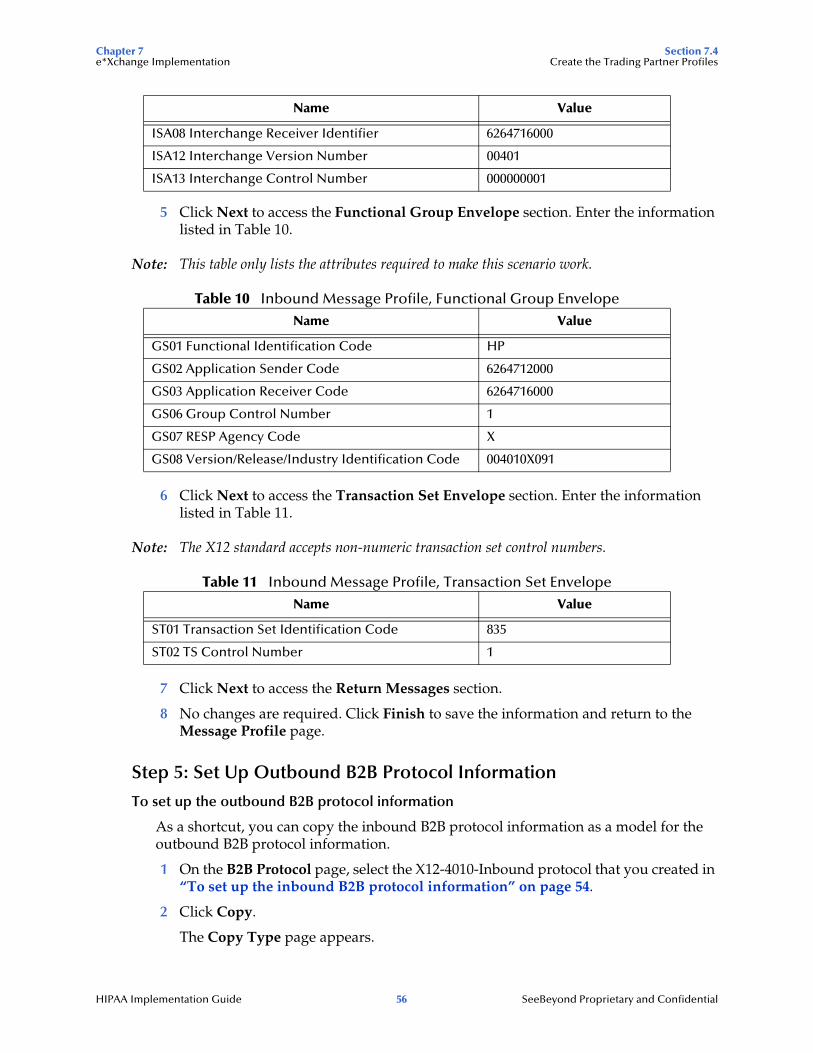
Chapter 7 Section 7.4e*Xchange Implementation Create the Trading Partner Profiles
5 Click Next to access the Functional Group Envelope section. Enter the information listed in Table 10.
Note: This table only lists the attributes required to make this scenario work.
Table 10 Inbound Message Profile, Functional Group Envelope
6 Click Next to access the Transaction Set Envelope section. Enter the information listed in Table 11.
Note: The X12 standard accepts non-numeric transaction set control numbers.
Table 11 Inbound Message Profile, Transaction Set Envelope
7 Click Next to access the Return Messages section.
8 No changes are required. Click Finish to save the information and return to the Message Profile page.
Step 5: Set Up Outbound B2B Protocol Information
To set up the outbound B2B protocol information
As a shortcut, you can copy the inbound B2B protocol information as a model for the outbound B2B protocol information.
1 On the B2B Protocol page, select the X12-4010-Inbound protocol that you created in “To set up the inbound B2B protocol information” on page 54.
2 Click Copy.
The Copy Type page appears.
ISA08 Interchange Receiver Identifier 6264716000
ISA12 Interchange Version Number 00401
ISA13 Interchange Control Number 000000001
Name Value
GS01 Functional Identification Code HP
GS02 Application Sender Code 6264712000
GS03 Application Receiver Code 6264716000
GS06 Group Control Number 1
GS07 RESP Agency Code X
GS08 Version/Release/Industry Identification Code 004010X091
Name Value
ST01 Transaction Set Identification Code 835
ST02 TS Control Number 1
Name Value
HIPAA Implementation Guide 56 SeeBeyond Proprietary and Confidential

Chapter 7 Section 7.4e*Xchange Implementation Create the Trading Partner Profiles
3 Clear the Include Sub-components check box and then click OK.
The B2B Protocol - copying page appears.
4 In the Direction field, ensure that Outbound is selected.
5 Click Next.
The B2B Protocol - copying, General page appears.
6 No changes are needed: click Next to accept the values and access the Transport Component page.
7 In the File Name window, enter <egate>\data\hipaa\TP\output\output%#.dat.
8 Click Next to accept the values and access the Message Security page.
9 No changes are required. Click Finish to save the information and return to the B2B Protocol page.
Step 6: Create the Outbound Message Profiles
For the purposes of this scenario, you must set up the following outbound message profiles:
Health Care Claim Message (X12_004010X098_00_hipaaQ1_837_HealCareClai)
Acknowledgment (X12-4010-997)
To set up the X12_004010X098_00_hipaaQ1_837_HealCareClai order outbound message profile
1 From the B2B Protocol page, click Continue: Message Profile.
2 From the Message Profile page, click the New button to access the Message Profile - adding page.
3 Enter the information listed in Table 12.
Note: This table only lists the attributes required to make this scenario work.
Table 12 Outbound Message Profile, General Settings
4 Click Next to access the Interchange Control Envelope section. Enter the information listed in Table 13.
Table 13 Outbound Message Profile, Interchange Control Envelope
Name Value
Name X12_004010X098_00_hipaaQ1_837_HealCareClai
Validation Collaboration Type FACILEDI
Validation Collaboration FACILEDI
Transfer Mode Interactive
Name Value
ISA06 Interchange Sender Identifier 6264716000
ISA08 Interchange Receiver Identifier 6264712000
HIPAA Implementation Guide 57 SeeBeyond Proprietary and Confidential
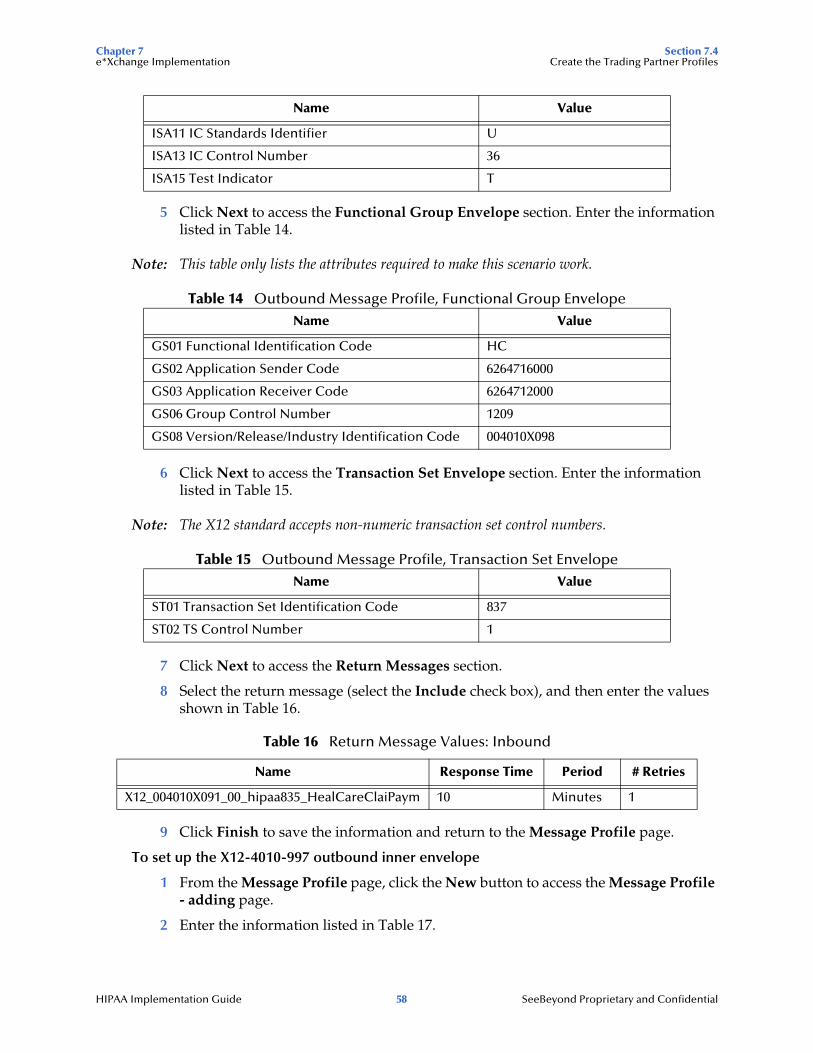
Chapter 7 Section 7.4e*Xchange Implementation Create the Trading Partner Profiles
5 Click Next to access the Functional Group Envelope section. Enter the information listed in Table 14.
Note: This table only lists the attributes required to make this scenario work.
Table 14 Outbound Message Profile, Functional Group Envelope
6 Click Next to access the Transaction Set Envelope section. Enter the information listed in Table 15.
Note: The X12 standard accepts non-numeric transaction set control numbers.
Table 15 Outbound Message Profile, Transaction Set Envelope
7 Click Next to access the Return Messages section.
8 Select the return message (select the Include check box), and then enter the values shown in Table 16.
9 Click Finish to save the information and return to the Message Profile page.
To set up the X12-4010-997 outbound inner envelope
1 From the Message Profile page, click the New button to access the Message Profile - adding page.
2 Enter the information listed in Table 17.
ISA11 IC Standards Identifier U
ISA13 IC Control Number 36
ISA15 Test Indicator T
Name Value
GS01 Functional Identification Code HC
GS02 Application Sender Code 6264716000
GS03 Application Receiver Code 6264712000
GS06 Group Control Number 1209
GS08 Version/Release/Industry Identification Code 004010X098
Name Value
ST01 Transaction Set Identification Code 837
ST02 TS Control Number 1
Table 16 Return Message Values: Inbound
Name Response Time Period # Retries
X12_004010X091_00_hipaa835_HealCareClaiPaym 10 Minutes 1
Name Value
HIPAA Implementation Guide 58 SeeBeyond Proprietary and Confidential
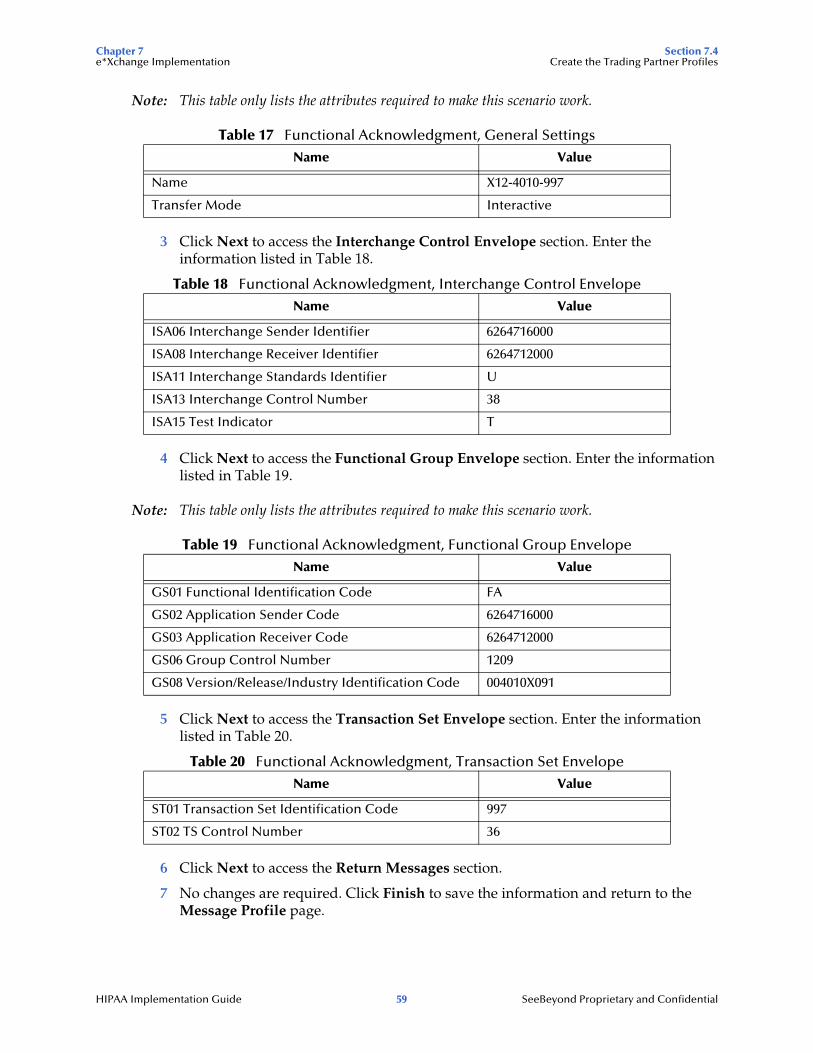
Chapter 7 Section 7.4e*Xchange Implementation Create the Trading Partner Profiles
Note: This table only lists the attributes required to make this scenario work.
Table 17 Functional Acknowledgment, General Settings
3 Click Next to access the Interchange Control Envelope section. Enter the information listed in Table 18.
Table 18 Functional Acknowledgment, Interchange Control Envelope
4 Click Next to access the Functional Group Envelope section. Enter the information listed in Table 19.
Note: This table only lists the attributes required to make this scenario work.
Table 19 Functional Acknowledgment, Functional Group Envelope
5 Click Next to access the Transaction Set Envelope section. Enter the information listed in Table 20.
Table 20 Functional Acknowledgment, Transaction Set Envelope
6 Click Next to access the Return Messages section.
7 No changes are required. Click Finish to save the information and return to the Message Profile page.
Name Value
Name X12-4010-997
Transfer Mode Interactive
Name Value
ISA06 Interchange Sender Identifier 6264716000
ISA08 Interchange Receiver Identifier 6264712000
ISA11 Interchange Standards Identifier U
ISA13 Interchange Control Number 38
ISA15 Test Indicator T
Name Value
GS01 Functional Identification Code FA
GS02 Application Sender Code 6264716000
GS03 Application Receiver Code 6264712000
GS06 Group Control Number 1209
GS08 Version/Release/Industry Identification Code 004010X091
Name Value
ST01 Transaction Set Identification Code 997
ST02 TS Control Number 36
HIPAA Implementation Guide 59 SeeBeyond Proprietary and Confidential

Chapter 7 Section 7.5e*Xchange Implementation Clone the eXSchema
Step 7: Configure Return Messages for Inbound
To set up the return message profile values for inbound
Once you have set up inbound and outbound message profiles, you can specify return messages.
1 From the B2B Protocol page, select X12-4010-Inbound.
2 Click Continue: Message Profile.
3 From the Message Profile page, select X12_004010X091_00_hipaa835_HealCareClaiPaym from the drop-down list.
4 Click the Return Messages link to access the Return Messages section.
5 Click Edit.
6 Select the return messages (select the check boxes), and the enter the values shown in Table 21.
7 Click Apply to save the information and return to the Message Profile page.
8 Click OK.
7.5 Clone the eXSchemaThe supplied Schema named eXSchema contains the components required to run e*Xchange. Make a copy of this Schema and then configure the copy for this implementation.
To make a copy of eXSchema
1 Open eXSchema in the e*Gate Schema Designer GUI.
2 Export eXSchema.
3 Create a new Schema named HealthClaim using the exported file.
7.6 Configure the Internal_Order_Eater e*WayThis component sends the message to the internal system.
The e*Xchange Internal_Order_Eater e*Way
The e*Xchange example simulates the publication of the message to the internal system.
Table 21 Return Message Values: Outbound
Name Response Time Period # Retries
X12-4010-997 3 Minutes 1
HIPAA Implementation Guide 60 SeeBeyond Proprietary and Confidential

Chapter 7 Section 7.6e*Xchange Implementation Configure the Internal_Order_Eater e*Way
Follow these steps to configure the Internal_Order_Eater e*Way.
Step 1: Create and Configure the Internal_Order_Eater e*Way on page 61
Step 2: Create the Internal_Order_Eater Collaboration Rule Script on page 61
Step 3: Create the Internal_Order_Eater Collaboration Rule on page 62
Step 4: Create the Inbound Message Profiles on page 55
Step 1: Create and Configure the Internal_Order_Eater e*Way
To create and configure the Internal_Order_Eater e*Way
1 Create an e*Way called Internal_Order_Eater.
2 Open the e*Way Properties dialog box and, in the Executable file area of the General tab, browse for stcewfile.exe.
3 In the e*Way Properties dialog box, in the Configuration file area of the General tab, click New.
4 Configure the Internal_Order_Eater e*Way parameters using the values specified in Table 22.
5 When finished editing the e*Way configuration file, save your work and close the e*Way Editor.
6 Click OK to close the e*Way Properties dialog box.
Step 2: Create the Internal_Order_Eater Collaboration Rule Script
The Internal_Order_Eater.tsc Collaboration Rule script helps prepare the data leaving the e*Xchange system by converting the message to raw data, and then copying it from the Payload node of the TP_EVENT section of the e*Xchange standard Event to the output ETD.
To create and configure the Internal_Order_Eater Collaboration Rule Script
1 Open the Collaboration Editor.
Table 22 Internal_Order_Eater e*Way Parameters
Screen Parameter Setting
General Settings AllowIncoming NO
AllowOutgoing YES
Outbound (send) settings OutputDirectory <eGate>\data\hipaa\internal\output
OutputFileName output_order%d.dat
(All others) (Default)
Poller (inbound) settings (All) (Default)
Performance Testing (All) (Default)
HIPAA Implementation Guide 61 SeeBeyond Proprietary and Confidential

Chapter 7 Section 7.6e*Xchange Implementation Configure the Internal_Order_Eater e*Way
2 Create a new Collaboration Rules script named Internal_Order_Eater.tsc. The Source Event Type Definition is eX_Standard_Event.ssc. The Destination Event Type Definition is root.ssc.
3 Add the rule shown at the bottom of Figure 10.
Figure 10 Internal_Order_Eater.tsc
4 Save the Collaboration Rules script and close the Collaboration Rules Editor.
Step 3: Create the Internal_Order_Eater Collaboration Rule
Once the Collaboration Rule script has been created, you must set up the Collaboration Rules properties for the Internal_Order_Eater component in the Schema Designer GUI.
To create and configure the Internal_Order_Eater Collaboration Rule
1 Create a new Collaboration Rule named Internal_Order_Eater.
2 Open the Internal_Order_Eater Collaboration Rule Properties dialog box, and then select the General tab. Configure as shown in Table 23.
Table 23 Internal_Order_Eater Collaboration Rule Configuration - General Tab
Important: To use the Monk function base64->raw, you must make sure the file containing this function has been loaded.
3 Select the Subscriptions tab. Select eX_to_eBPM and move to the right pane.
4 Select the Publications tab. Select eX_External_Evt and move to the right pane.
5 Click OK to save the properties information and close the dialog.
Section Value
Service Monk
Collaboration Rule monk_scripts\common\Internal_Order_Eater.tsc
Initialization File monk_scripts\common\load_ext
HIPAA Implementation Guide 62 SeeBeyond Proprietary and Confidential
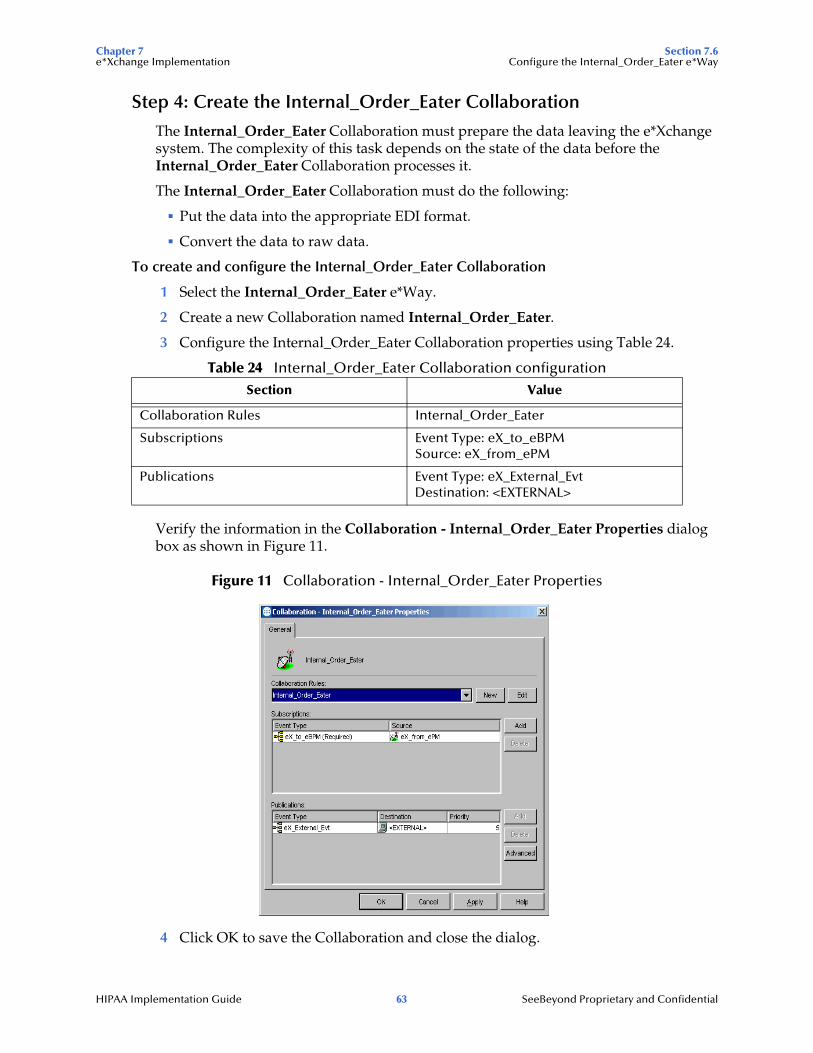
Chapter 7 Section 7.6e*Xchange Implementation Configure the Internal_Order_Eater e*Way
Step 4: Create the Internal_Order_Eater Collaboration
The Internal_Order_Eater Collaboration must prepare the data leaving the e*Xchange system. The complexity of this task depends on the state of the data before the Internal_Order_Eater Collaboration processes it.
The Internal_Order_Eater Collaboration must do the following:
Put the data into the appropriate EDI format.
Convert the data to raw data.
To create and configure the Internal_Order_Eater Collaboration
1 Select the Internal_Order_Eater e*Way.
2 Create a new Collaboration named Internal_Order_Eater.
3 Configure the Internal_Order_Eater Collaboration properties using Table 24.
Table 24 Internal_Order_Eater Collaboration configuration
Verify the information in the Collaboration - Internal_Order_Eater Properties dialog box as shown in Figure 11.
Figure 11 Collaboration - Internal_Order_Eater Properties
4 Click OK to save the Collaboration and close the dialog.
Section Value
Collaboration Rules Internal_Order_Eater
Subscriptions Event Type: eX_to_eBPMSource: eX_from_ePM
Publications Event Type: eX_External_EvtDestination: <EXTERNAL>
HIPAA Implementation Guide 63 SeeBeyond Proprietary and Confidential
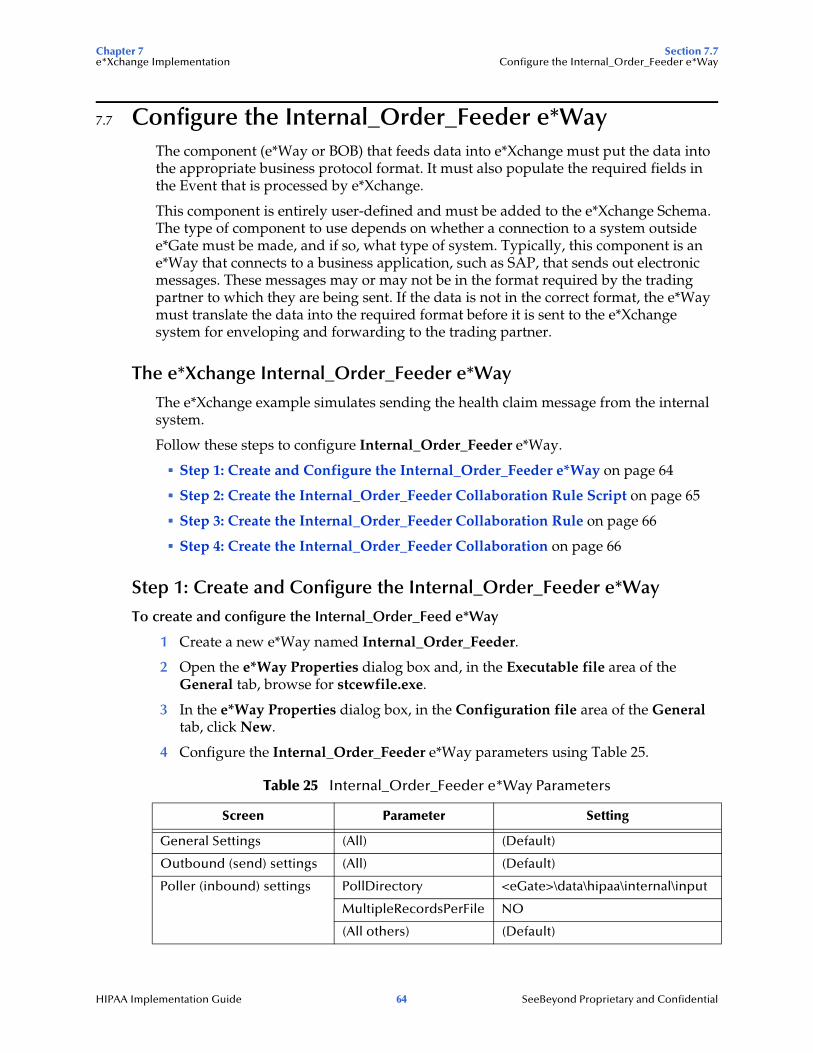
Chapter 7 Section 7.7e*Xchange Implementation Configure the Internal_Order_Feeder e*Way
7.7 Configure the Internal_Order_Feeder e*WayThe component (e*Way or BOB) that feeds data into e*Xchange must put the data into the appropriate business protocol format. It must also populate the required fields in the Event that is processed by e*Xchange.
This component is entirely user-defined and must be added to the e*Xchange Schema. The type of component to use depends on whether a connection to a system outside e*Gate must be made, and if so, what type of system. Typically, this component is an e*Way that connects to a business application, such as SAP, that sends out electronic messages. These messages may or may not be in the format required by the trading partner to which they are being sent. If the data is not in the correct format, the e*Way must translate the data into the required format before it is sent to the e*Xchange system for enveloping and forwarding to the trading partner.
The e*Xchange Internal_Order_Feeder e*Way
The e*Xchange example simulates sending the health claim message from the internal system.
Follow these steps to configure Internal_Order_Feeder e*Way.
Step 1: Create and Configure the Internal_Order_Feeder e*Way on page 64
Step 2: Create the Internal_Order_Feeder Collaboration Rule Script on page 65
Step 3: Create the Internal_Order_Feeder Collaboration Rule on page 66
Step 4: Create the Internal_Order_Feeder Collaboration on page 66
Step 1: Create and Configure the Internal_Order_Feeder e*Way
To create and configure the Internal_Order_Feed e*Way
1 Create a new e*Way named Internal_Order_Feeder.
2 Open the e*Way Properties dialog box and, in the Executable file area of the General tab, browse for stcewfile.exe.
3 In the e*Way Properties dialog box, in the Configuration file area of the General tab, click New.
4 Configure the Internal_Order_Feeder e*Way parameters using Table 25.
Table 25 Internal_Order_Feeder e*Way Parameters
Screen Parameter Setting
General Settings (All) (Default)
Outbound (send) settings (All) (Default)
Poller (inbound) settings PollDirectory <eGate>\data\hipaa\internal\input
MultipleRecordsPerFile NO
(All others) (Default)
HIPAA Implementation Guide 64 SeeBeyond Proprietary and Confidential
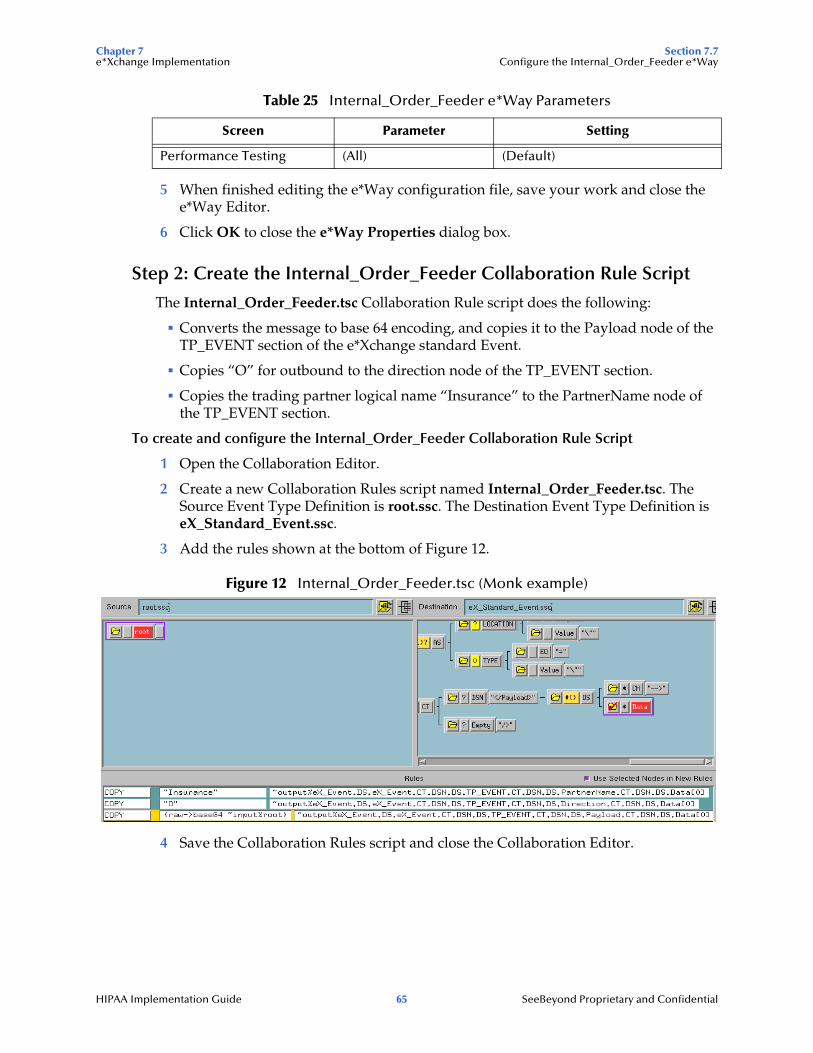
Chapter 7 Section 7.7e*Xchange Implementation Configure the Internal_Order_Feeder e*Way
5 When finished editing the e*Way configuration file, save your work and close the e*Way Editor.
6 Click OK to close the e*Way Properties dialog box.
Step 2: Create the Internal_Order_Feeder Collaboration Rule Script
The Internal_Order_Feeder.tsc Collaboration Rule script does the following:
Converts the message to base 64 encoding, and copies it to the Payload node of the TP_EVENT section of the e*Xchange standard Event.
Copies “O” for outbound to the direction node of the TP_EVENT section.
Copies the trading partner logical name “Insurance” to the PartnerName node of the TP_EVENT section.
To create and configure the Internal_Order_Feeder Collaboration Rule Script
1 Open the Collaboration Editor.
2 Create a new Collaboration Rules script named Internal_Order_Feeder.tsc. The Source Event Type Definition is root.ssc. The Destination Event Type Definition is eX_Standard_Event.ssc.
3 Add the rules shown at the bottom of Figure 12.
Figure 12 Internal_Order_Feeder.tsc (Monk example)
4 Save the Collaboration Rules script and close the Collaboration Editor.
Performance Testing (All) (Default)
Table 25 Internal_Order_Feeder e*Way Parameters
Screen Parameter Setting
HIPAA Implementation Guide 65 SeeBeyond Proprietary and Confidential

Chapter 7 Section 7.7e*Xchange Implementation Configure the Internal_Order_Feeder e*Way
Step 3: Create the Internal_Order_Feeder Collaboration Rule
Once the Collaboration Rule script has been created, you must set up the Collaboration and Collaboration Rules properties for the Internal_Order_Feeder component in the Schema Designer GUI.
To create and configure the Internal_Order_Feeder Collaboration Rule
1 Create a new Collaboration Rule named Internal_Order_Feeder.
2 Open the Internal_Order_Feeder Collaboration Rule Properties dialog box, and then select the General tab. Configure as shown in Table 26.
Table 26 Internal_Order_Feeder Collaboration Rule Configuration - General Tab
Important: To use the Monk function raw->base64, you must make sure the file containing this function has been loaded.
3 Select the Subscriptions tab. Select eX_External_Evt and move it to the right pane.
4 Select the Publications tab. Select eX_to_ePM and move it to the right pane.
5 Click OK to save the Collaboration Rule and close the properties dialog.
Step 4: Create the Internal_Order_Feeder Collaboration
The Internal_Order_Feeder Collaboration must prepare the data coming into the e*Xchange system. The complexity of this task depends on the state of the data before the Internal_Order_Feeder Collaboration processes it.
The Internal_Order_Feeder Collaboration must do the following:
Put the data into the appropriate EDI format.
Convert the data to base 64 encoding.
Populate the required nodes in the Event sent to e*Xchange for processing.
To create and configure the Internal_Order_Feeder Collaboration
1 Select the Internal_Order_Feeder e*Way.
2 Create a new Collaboration named Internal_Order_Feeder.
3 Open the Internal_Order_Feeder Collaboration Properties dialog box, and then configure the properties using the values specified in Table 27.
Table 27 Internal_Order_Feeder Collaboration Configuration
Section Value
Service Monk
Collaboration Rules monk_scripts\common\Internal_Order_Feeder.tsc
Initialization File monk_scripts\common\load_ext
Section Value
Collaboration Rules Internal_Order_Feeder
HIPAA Implementation Guide 66 SeeBeyond Proprietary and Confidential
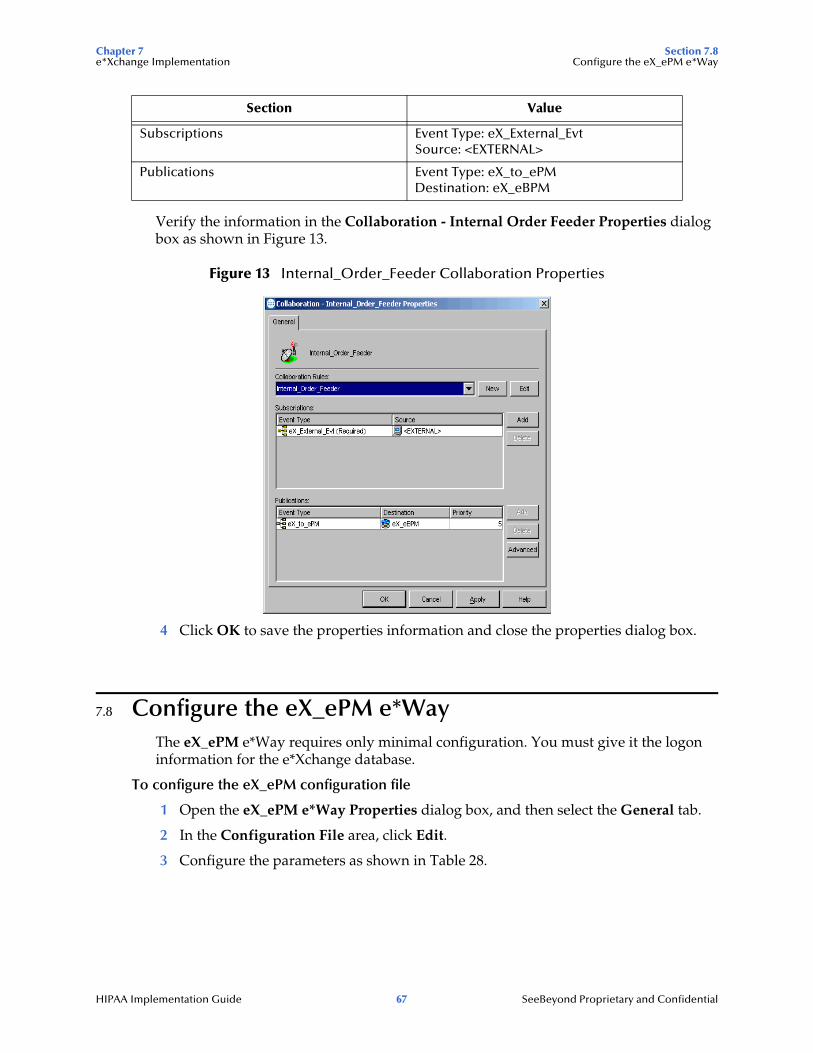
Chapter 7 Section 7.8e*Xchange Implementation Configure the eX_ePM e*Way
Verify the information in the Collaboration - Internal Order Feeder Properties dialog box as shown in Figure 13.
Figure 13 Internal_Order_Feeder Collaboration Properties
4 Click OK to save the properties information and close the properties dialog box.
7.8 Configure the eX_ePM e*WayThe eX_ePM e*Way requires only minimal configuration. You must give it the logon information for the e*Xchange database.
To configure the eX_ePM configuration file
1 Open the eX_ePM e*Way Properties dialog box, and then select the General tab.
2 In the Configuration File area, click Edit.
3 Configure the parameters as shown in Table 28.
Subscriptions Event Type: eX_External_EvtSource: <EXTERNAL>
Publications Event Type: eX_to_ePMDestination: eX_eBPM
Section Value
HIPAA Implementation Guide 67 SeeBeyond Proprietary and Confidential

Chapter 7 Section 7.9e*Xchange Implementation Configure the eX_Poll_Receive_FTP e*Way
4 Save the configuration settings and close the Edit Settings dialog box.
7.9 Configure the eX_Poll_Receive_FTP e*WayAlthough the eX_Poll_Receive_FTP e*Way does not appear in Figure 8, it is used to send information to the eX_Batch_from_Trading_Partner e*Way.
The eX_Poll_Receive_FTP e*Way requires only minimal configuration. You must give it the logon information for the e*Xchange database.
To configure the eX_Poll_Receive_FTP configuration file
1 Open the eX_Poll_Receive_FTP e*Way Properties dialog box, and then select the General tab.
2 In the Configuration File area, click Edit.
3 Configure the parameters as shown in Table 29..
Table 28 eX_ePM e*Way Parameters
Screen Parameter Setting
General Settings (All) (Default)
Communication Setup (All) (Default)
Monk Configuration (All) (Default)
Database Setup Database Name (service name of the e*Xchange database)
User name (administrator user login ID)
Password (administrator user password)
(All others) (Default)
Table 29 eX_Poll_Receive_FTP e*Way Parameters
Screen Parameter Setting
General Settings (All) (Default)
Communication Setup (All) (Default)
Monk Configuration (All) (Default)
Database Setup Database Name (service name of the e*Xchange database)
User name (administrator user login ID)
Password (administrator user password)
(All others) (Default)
HIPAA Implementation Guide 68 SeeBeyond Proprietary and Confidential

Chapter 7 Section 7.10e*Xchange Implementation Running the Scenario
4 Save the configuration settings and close the Edit Settings dialog box.
7.10 Running the ScenarioRunning the scenario performs two functions:
1 Sends the health claim to the trading partner.
2 Processes the health claim payment sent from the trading partner.
Before you run the scenario, make sure you have performed steps 1 through 3 under “Installing the Sample Files” on page 51. This ensures your data files are in the correct locations.
To process the Health Claim message
1 Start the Control Broker. At the command line, enter:
stccb.exe -rh localhost -rs HealthClaim -ln localhost_cb -un Administrator -up STC
2 Open the Schema Manager. Select the HealthClaim Schema.
3 Start the ewHipaaValidation e*Way.
4 Start the Internal_Order_Feeder e*Way.
This e*Way retrieves the health care claim message and sends it to e*Xchange.
5 Start the eX_ePM e*Way.
6 Rename <eGate>\data\hipaa\internal\input\hipaa-837.~in to hipaa-837.fin.
The file is renamed hipaa-837.~in as it is picked up.
7 Start the eX_Batch_to_Trading_Partner e*Way.
This e*Way sends the message to the trading partner.
8 Look in the <egate>\data\hipaa\TP\output folder. The file output0.dat appears.
9 Start the eX_Poll_Receive_FTP e*Way.
This e*Way sends configuration information to the eX_Batch_from_Trading_Partner e*Way.
10 Start the eX_Batch_from_Trading_Partner e*Way.
This e*Way retrieves messages from the trading partner.
11 Start the Internal_Order_Eater e*Way.
This e*Way sends the message to the internal system.
12 Rename <egate>\data\hipaa\TP\input\hipaa-835.dat.backup to hipaa-835.dat.
This sends the health claim payment advice message from the trading partner. The file is renamed hipaa-835.dat.backup as it is picked up.
13 Look in the <egate>\data\hipaa\internal\output folder. The file output_order1.dat appears.
HIPAA Implementation Guide 69 SeeBeyond Proprietary and Confidential
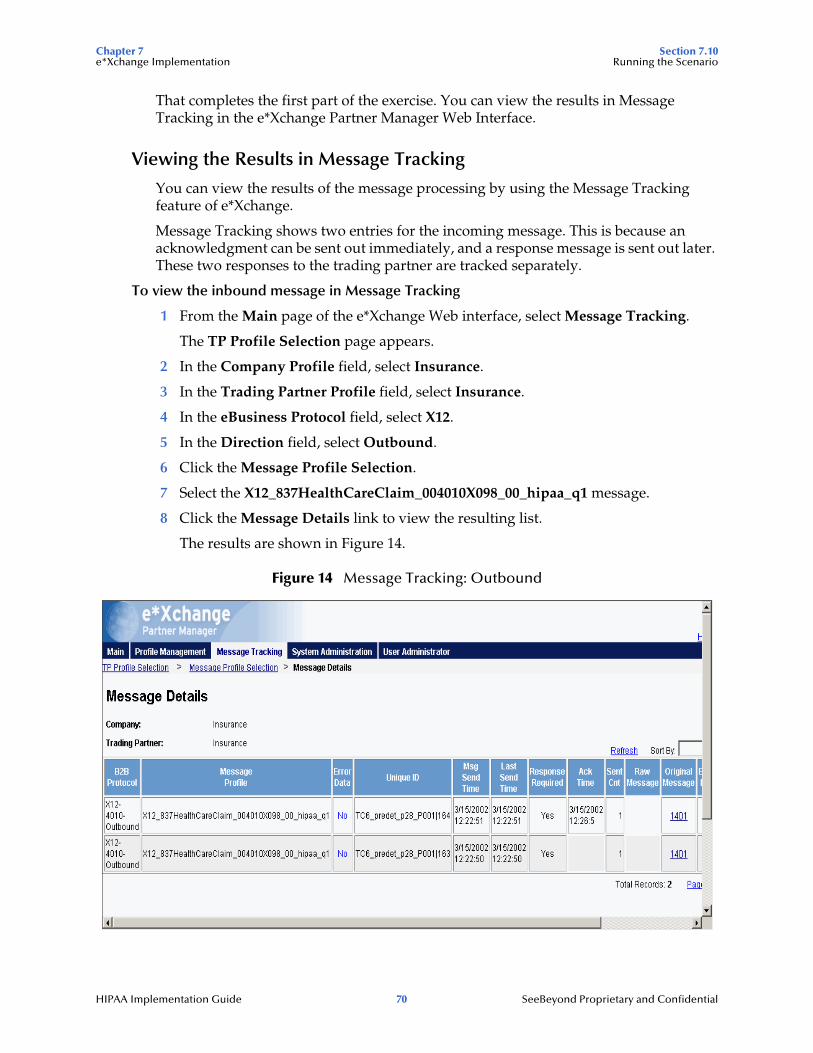
Chapter 7 Section 7.10e*Xchange Implementation Running the Scenario
That completes the first part of the exercise. You can view the results in Message Tracking in the e*Xchange Partner Manager Web Interface.
Viewing the Results in Message Tracking
You can view the results of the message processing by using the Message Tracking feature of e*Xchange.
Message Tracking shows two entries for the incoming message. This is because an acknowledgment can be sent out immediately, and a response message is sent out later. These two responses to the trading partner are tracked separately.
To view the inbound message in Message Tracking
1 From the Main page of the e*Xchange Web interface, select Message Tracking.
The TP Profile Selection page appears.
2 In the Company Profile field, select Insurance.
3 In the Trading Partner Profile field, select Insurance.
4 In the eBusiness Protocol field, select X12.
5 In the Direction field, select Outbound.
6 Click the Message Profile Selection.
7 Select the X12_837HealthCareClaim_004010X098_00_hipaa_q1 message.
8 Click the Message Details link to view the resulting list.
The results are shown in Figure 14.
Figure 14 Message Tracking: Outbound
HIPAA Implementation Guide 70 SeeBeyond Proprietary and Confidential

Chapter 7 Section 7.10e*Xchange Implementation Running the Scenario
As shown in Figure 14, e*Xchange records two entries for the message. The top entry is for the original message, for which a response message will be sent. The second entry is for the acknowledgment message.
For one entry, the Ack Message column has a link to the message information. Click it to view the acknowledgment message.
HIPAA Implementation Guide 71 SeeBeyond Proprietary and Confidential
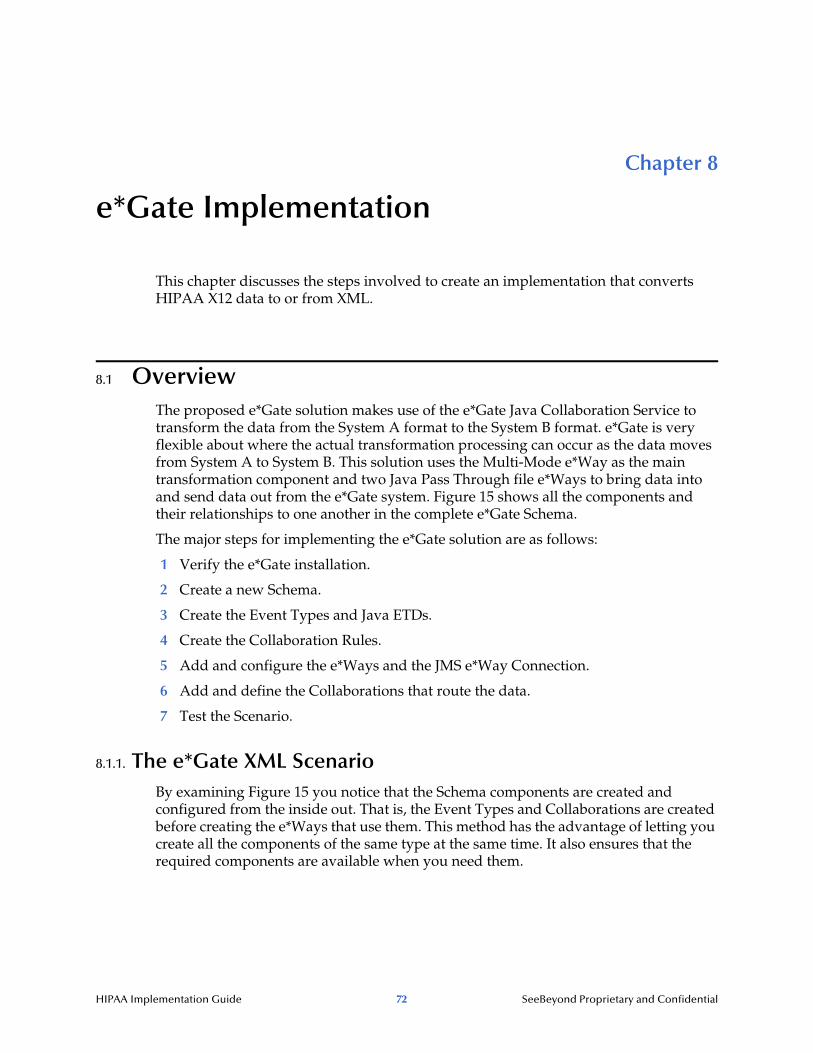
Chapter 8
e*Gate Implementation
This chapter discusses the steps involved to create an implementation that converts HIPAA X12 data to or from XML.
8.1 OverviewThe proposed e*Gate solution makes use of the e*Gate Java Collaboration Service to transform the data from the System A format to the System B format. e*Gate is very flexible about where the actual transformation processing can occur as the data moves from System A to System B. This solution uses the Multi-Mode e*Way as the main transformation component and two Java Pass Through file e*Ways to bring data into and send data out from the e*Gate system. Figure 15 shows all the components and their relationships to one another in the complete e*Gate Schema.
The major steps for implementing the e*Gate solution are as follows:
1 Verify the e*Gate installation.
2 Create a new Schema.
3 Create the Event Types and Java ETDs.
4 Create the Collaboration Rules.
5 Add and configure the e*Ways and the JMS e*Way Connection.
6 Add and define the Collaborations that route the data.
7 Test the Scenario.
8.1.1. The e*Gate XML Scenario By examining Figure 15 you notice that the Schema components are created and configured from the inside out. That is, the Event Types and Collaborations are created before creating the e*Ways that use them. This method has the advantage of letting you create all the components of the same type at the same time. It also ensures that the required components are available when you need them.
HIPAA Implementation Guide 72 SeeBeyond Proprietary and Confidential
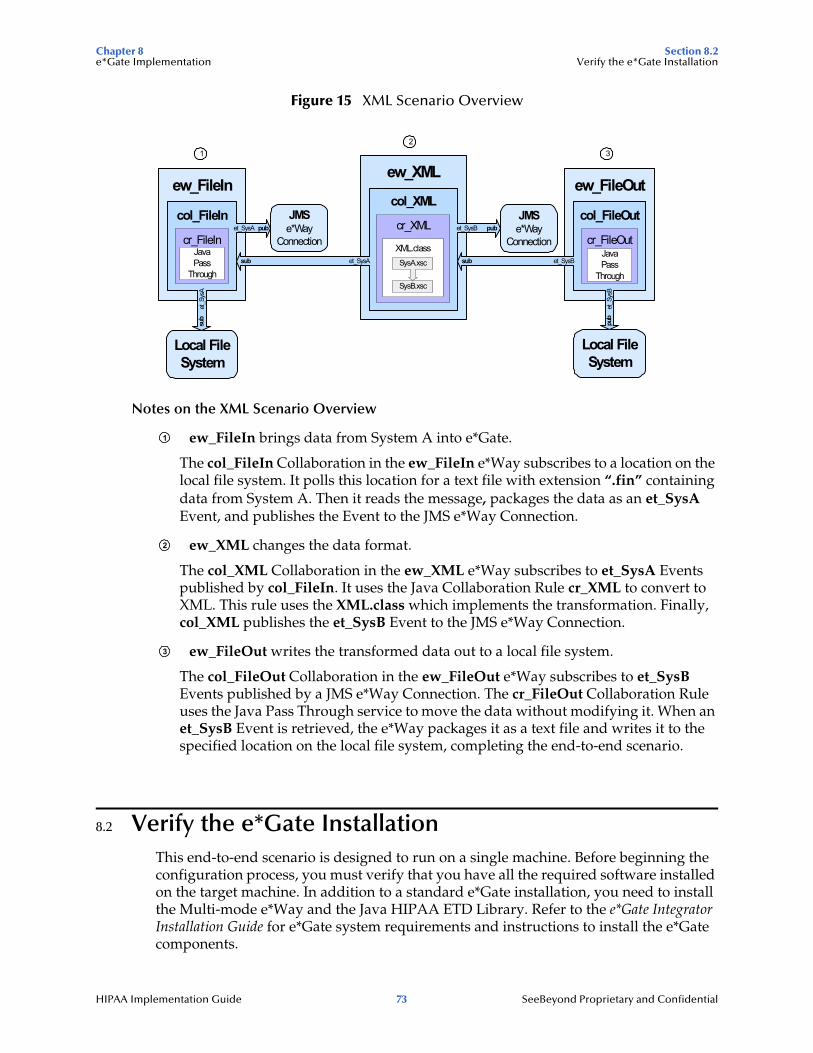
Chapter 8 Section 8.2e*Gate Implementation Verify the e*Gate Installation
Figure 15 XML Scenario Overview
Notes on the XML Scenario Overview
ew_FileIn brings data from System A into e*Gate.
The col_FileIn Collaboration in the ew_FileIn e*Way subscribes to a location on the local file system. It polls this location for a text file with extension “.fin” containing data from System A. Then it reads the message, packages the data as an et_SysA Event, and publishes the Event to the JMS e*Way Connection.
ew_XML changes the data format.
The col_XML Collaboration in the ew_XML e*Way subscribes to et_SysA Events published by col_FileIn. It uses the Java Collaboration Rule cr_XML to convert to XML. This rule uses the XML.class which implements the transformation. Finally, col_XML publishes the et_SysB Event to the JMS e*Way Connection.
ew_FileOut writes the transformed data out to a local file system.
The col_FileOut Collaboration in the ew_FileOut e*Way subscribes to et_SysB Events published by a JMS e*Way Connection. The cr_FileOut Collaboration Rule uses the Java Pass Through service to move the data without modifying it. When an et_SysB Event is retrieved, the e*Way packages it as a text file and writes it to the specified location on the local file system, completing the end-to-end scenario.
8.2 Verify the e*Gate InstallationThis end-to-end scenario is designed to run on a single machine. Before beginning the configuration process, you must verify that you have all the required software installed on the target machine. In addition to a standard e*Gate installation, you need to install the Multi-mode e*Way and the Java HIPAA ETD Library. Refer to the e*Gate Integrator Installation Guide for e*Gate system requirements and instructions to install the e*Gate components.
ew_FileIn ew_FileOut
Local FileSystem
Local FileSystem
col_FileIn col_FileOutsu
b
pub
sub
pub
sub
pub
JavaPass
Through
cr_FileIn cr_FileOutet_SysA
et_SysA
et_S
ysA
et_SysB
et_S
ysB
et_SysB
ew_XML
XML.classSysA.xsc
SysB.xsc
col_XML
cr_XML
1 32
JavaPass
Through
JMSe*Way
Connection
JMSe*Way
Connection
1
2
3
HIPAA Implementation Guide 73 SeeBeyond Proprietary and Confidential
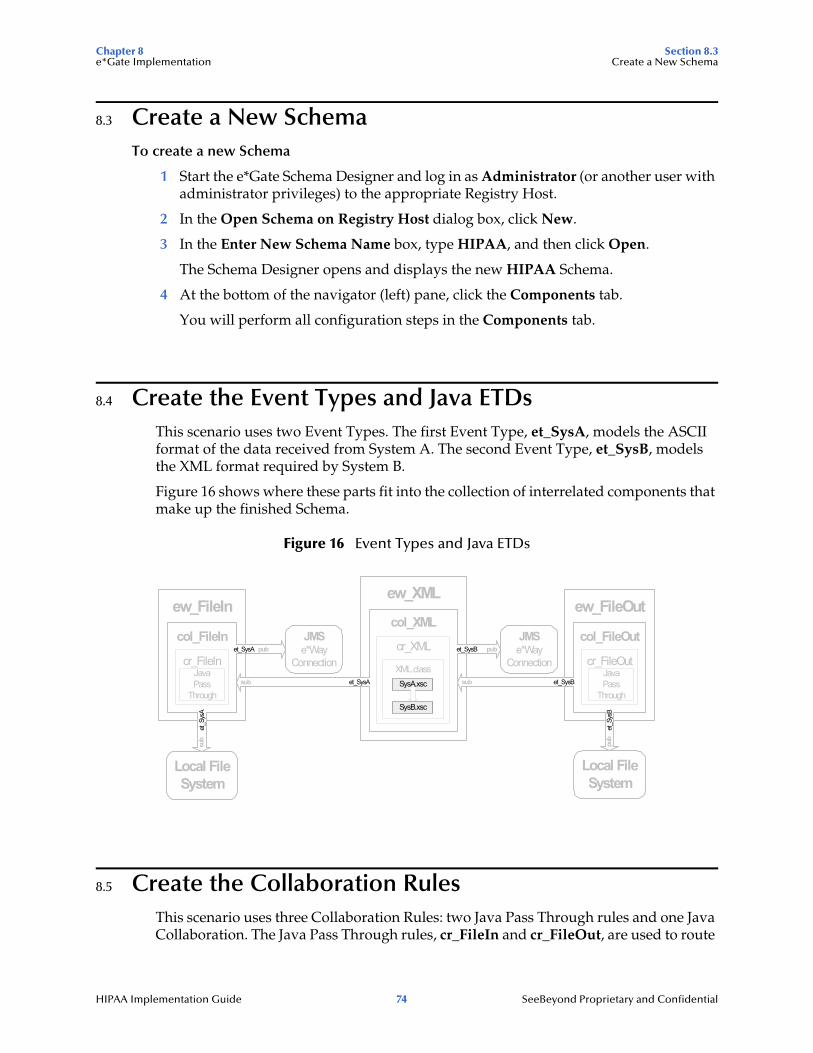
Chapter 8 Section 8.3e*Gate Implementation Create a New Schema
8.3 Create a New SchemaTo create a new Schema
1 Start the e*Gate Schema Designer and log in as Administrator (or another user with administrator privileges) to the appropriate Registry Host.
2 In the Open Schema on Registry Host dialog box, click New.
3 In the Enter New Schema Name box, type HIPAA, and then click Open.
The Schema Designer opens and displays the new HIPAA Schema.
4 At the bottom of the navigator (left) pane, click the Components tab.
You will perform all configuration steps in the Components tab.
8.4 Create the Event Types and Java ETDsThis scenario uses two Event Types. The first Event Type, et_SysA, models the ASCII format of the data received from System A. The second Event Type, et_SysB, models the XML format required by System B.
Figure 16 shows where these parts fit into the collection of interrelated components that make up the finished Schema.
Figure 16 Event Types and Java ETDs
8.5 Create the Collaboration RulesThis scenario uses three Collaboration Rules: two Java Pass Through rules and one Java Collaboration. The Java Pass Through rules, cr_FileIn and cr_FileOut, are used to route
ew_FileIn ew_FileOut
Local FileSystem
Local FileSystem
col_FileIn col_FileOut
sub
pub
sub
pub
sub
pub
cr_FileIn cr_FileOutet_SysA
et_SysA
et_S
ysA
et_SysB
et_S
ysB
et_SysB
ew_XML
XML.classSysA.xsc
SysB.xsc
col_XML
cr_XMLJMSe*Way
Connection
JMSe*Way
ConnectionJavaPass
Through
JavaPass
Through
HIPAA Implementation Guide 74 SeeBeyond Proprietary and Confidential
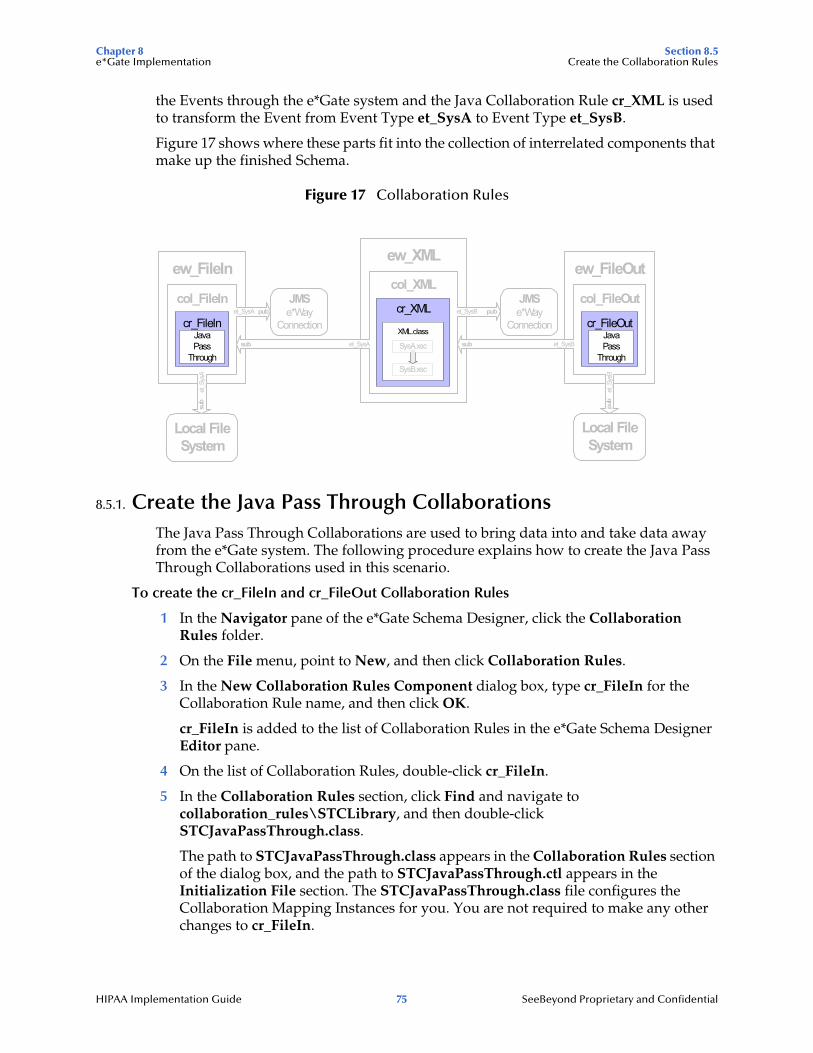
Chapter 8 Section 8.5e*Gate Implementation Create the Collaboration Rules
the Events through the e*Gate system and the Java Collaboration Rule cr_XML is used to transform the Event from Event Type et_SysA to Event Type et_SysB.
Figure 17 shows where these parts fit into the collection of interrelated components that make up the finished Schema.
Figure 17 Collaboration Rules
8.5.1. Create the Java Pass Through CollaborationsThe Java Pass Through Collaborations are used to bring data into and take data away from the e*Gate system. The following procedure explains how to create the Java Pass Through Collaborations used in this scenario.
To create the cr_FileIn and cr_FileOut Collaboration Rules
1 In the Navigator pane of the e*Gate Schema Designer, click the Collaboration Rules folder.
2 On the File menu, point to New, and then click Collaboration Rules.
3 In the New Collaboration Rules Component dialog box, type cr_FileIn for the Collaboration Rule name, and then click OK.
cr_FileIn is added to the list of Collaboration Rules in the e*Gate Schema Designer Editor pane.
4 On the list of Collaboration Rules, double-click cr_FileIn.
5 In the Collaboration Rules section, click Find and navigate to collaboration_rules\STCLibrary, and then double-click STCJavaPassThrough.class.
The path to STCJavaPassThrough.class appears in the Collaboration Rules section of the dialog box, and the path to STCJavaPassThrough.ctl appears in the Initialization File section. The STCJavaPassThrough.class file configures the Collaboration Mapping Instances for you. You are not required to make any other changes to cr_FileIn.
ew_FileIn ew_FileOut
Local FileSystem
Local FileSystem
col_FileIn col_FileOut
sub
pub
sub
pub
sub
pub
cr_FileIn cr_FileOutet_SysA
et_SysA
et_S
ysA
et_SysB
et_S
ysB
et_SysB
ew_XML
XML.class
SysA.xsc
SysB.xsc
col_XML
cr_XMLJMSe*Way
Connection
JMSe*Way
ConnectionJavaPass
Through
JavaPass
Through
HIPAA Implementation Guide 75 SeeBeyond Proprietary and Confidential
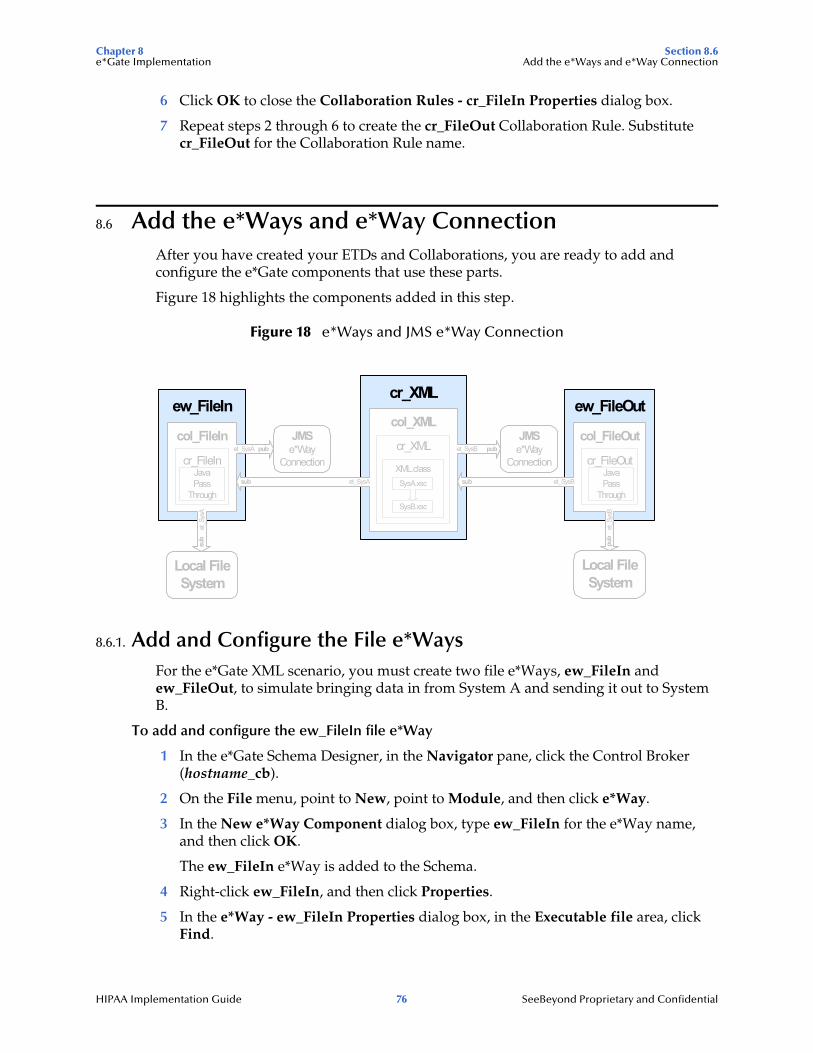
Chapter 8 Section 8.6e*Gate Implementation Add the e*Ways and e*Way Connection
6 Click OK to close the Collaboration Rules - cr_FileIn Properties dialog box.
7 Repeat steps 2 through 6 to create the cr_FileOut Collaboration Rule. Substitute cr_FileOut for the Collaboration Rule name.
8.6 Add the e*Ways and e*Way ConnectionAfter you have created your ETDs and Collaborations, you are ready to add and configure the e*Gate components that use these parts.
Figure 18 highlights the components added in this step.
Figure 18 e*Ways and JMS e*Way Connection
8.6.1. Add and Configure the File e*WaysFor the e*Gate XML scenario, you must create two file e*Ways, ew_FileIn and ew_FileOut, to simulate bringing data in from System A and sending it out to System B.
To add and configure the ew_FileIn file e*Way
1 In the e*Gate Schema Designer, in the Navigator pane, click the Control Broker (hostname_cb).
2 On the File menu, point to New, point to Module, and then click e*Way.
3 In the New e*Way Component dialog box, type ew_FileIn for the e*Way name, and then click OK.
The ew_FileIn e*Way is added to the Schema.
4 Right-click ew_FileIn, and then click Properties.
5 In the e*Way - ew_FileIn Properties dialog box, in the Executable file area, click Find.
ew_FileIn ew_FileOut
Local FileSystem
Local FileSystem
col_FileIn col_FileOut
sub
pub
sub
pub
sub
pub
cr_FileIn cr_FileOutet_SysA
et_SysA
et_S
ysA
et_SysB
et_S
ysB
et_SysB
cr_XML
XML.classSysA.xsc
SysB.xsc
col_XML
cr_XMLJMSe*Way
Connection
JMSe*Way
ConnectionJavaPass
Through
JavaPass
Through
HIPAA Implementation Guide 76 SeeBeyond Proprietary and Confidential
Chapter 8 Section 8.6e*Gate Implementation Add the e*Ways and e*Way Connection
6 In the File Selection dialog box, browse for and double-click the file stcewfile.exe.
The bin\stcewfile.exe file is added as the executable file, causing the component to become a file e*Way.
7 In the Configuration file area, click New.
The e*Way Configuration File Editor opens with a default file e*Way configuration file ready for editing.
8 In the Goto Section list, click Poller (inbound) settings.
9 In the PollDirectory box, type C:\eGate\Client\Data\HIPAA and then press ENTER.
C:\eGate\Client\Data\HIPAA is added as the directory to be polled to the PollDirectory list. No other changes are necessary to the ew_FileIn e*Way’s configuration file.
10 On the File menu, click Save.
11 In the Save As dialog box, click Save to accept the default filename (ew_FileIn.cfg) and save the file.
12 On the File menu, click Close to quit the e*Way Configuration File Editor.
The configs\stcewfile\ew_FileIn.cfg file is added to the Configuration file area in the e*Way - ew_FileIn Properties dialog box.
13 Click the Start Up tab, and then select the Start automatically check box.
14 Click OK to close the e*Way - ew_FileIn Properties dialog box.
To add and configure the ew_FileOut file e*Way
Adding the ew_FileOut e*Way follows the same general procedure as that outlined for adding the ew_FileIn e*Way above.
1 Use steps 1 through 7 from “To add and configure the ew_FileIn file e*Way” on page 76 to add another file e*Way named ew_FileOut and open its configuration file for editing.
2 In the e*Way Configuration File Editor, in General Settings, click NO for AllowIncoming, and YES for AllowOutgoing.
3 In the Goto Section list, click Outbound (send) settings.
4 Add C:\eGate\Client\Data\HIPAA as the default OutputDirectory.
5 Add HIPAAoutput%d.dat as the default OutputFileName.
No other changes are necessary to the ew_FileOut e*Way’s configuration file.
6 On the File menu, click Save.
7 In the Save As dialog box, click Save to accept the default file name (ew_FileOut.cfg) and save the file.
8 On the File menu, click Close to quit the e*Way Configuration File Editor.
9 Click the Start Up tab, and then select the Start automatically check box.
10 Click OK to close the e*Way - ew_FileOut Properties dialog box.
HIPAA Implementation Guide 77 SeeBeyond Proprietary and Confidential
Chapter 8 Section 8.6e*Gate Implementation Add the e*Ways and e*Way Connection
8.6.2. Add the Multi-Mode e*WayTo add the multi-mode e*Way
1 In the e*Gate Schema Designer, in the Navigator pane, click the Control Broker (hostname_cb).
2 On the File menu, point to New, point to Module, and then click e*Way.
3 In the New e*Way Component dialog box, type ew_XML for the e*Way name, and then click OK.
The ew_XML e*Way is added to the Schema.
4 Right-click the ew_XML e*Way in the Editor pane, and then click Properties.
5 In the Configuration file area, click New.
The e*Way Configuration File Editor opens with a default Multi-Mode e*Way configuration file.
6 Scroll to the bottom of the JVM Settings parameters and click Remote debugging port number.
7 In the Remote debugging port number box, type 8000, and then press ENTER.
8000 is listed as the Remote debugging port number. No other changes are necessary to the ew_XML e*Way’s configuration file.
Important: In-schema debugging must be enabled on the Participating Host for this to work. See the e*Gate Integrator Installation Guide for more information.
8 On the File menu, click Save.
9 In the Save As dialog box, click Save to accept the default filename (ew_XML.cfg) and save the file.
10 On the File menu, click Close to quit the e*Way Configuration File Editor.
11 Click the Start Up tab, and then select the Start automatically check box.
12 Click OK to close the e*Way - ew_XML Properties dialog box.
8.6.3. Configure the IQ ManagerTo configure the IQ Manager
1 In the e*Gate Schema Designer, in the Navigator pane, double-click the IQ manager (hostname_iqmgr).
2 In the Configuration File area, click New.
3 On the File menu, click Save, and then click Save again to accept the default name.
4 On the File menu, click Close to quite the editor.
5 Click the Start Up tab, select the Start automatically check box, and then click OK.
HIPAA Implementation Guide 78 SeeBeyond Proprietary and Confidential

Chapter 8 Section 8.7e*Gate Implementation Add the Collaborations that Route the Data
8.6.4. Add the JMS e*Way ConnectionTo add the JMS e*Way Connection
1 In the Navigator pane of the e*Gate Schema Designer, click the e*Way Connections folder.
2 In the Editor pane, right-click, and then click New e*Way Connection.
3 In the New e*Way Connection Component dialog box, type JMS for the e*Way Connection name, and then click OK.
JMS is added to the list of e*Way Connections.
4 In the editor pane, double-click JMS.
The e*Way Connection - JMS Properties dialog box displays.
5 From the e*Way Connection Type drop-down list, select SeeBeyond JMS.
6 In the Configuration File area, click New.
7 From the JMS IQ Manager drop-down list, select your IQ Manager.
8 Click OK to save your configuration file.
9 Click OK to close the e*Way Connection - JMS Properties dialog box.
8.7 Add the Collaborations that Route the DataThe e*Ways in this example use Collaborations to route data through the e*Gate system. Typically, the Collaborations are configured in upstream to downstream order. Figure 19 shows the relationships of the Collaborations to the remaining components that make up the complete Schema.
Figure 19 Collaborations Showing Publish and Subscribe Relationships
ew_FileIn ew_FileOut
Local FileSystem
Local FileSystem
col_FileIn col_FileOut
sub
pub
sub
pub
sub
pub
cr_FileInJavaPass
Through
cr_FileOutet_SysA
et_SysA
et_S
ysA
et_SysB
et_S
ysB
et_SysB
ew_XML
XML.class
SysA.xsc
SysB.xsc
col_XML
cr_XMLJMSe*Way
Connection
JMSe*Way
ConnectionJavaPass
Through
HIPAA Implementation Guide 79 SeeBeyond Proprietary and Confidential
Chapter 8 Section 8.7e*Gate Implementation Add the Collaborations that Route the Data
8.7.1. Add and Configure col_FileInThe col_FileIn Collaboration brings the data into the e*Gate system from the specified data file.
To add and configure col_FileIn
1 In the e*Gate Schema Designer, in the Navigator pane, click the ew_FileIn e*Way.
2 On the File menu, point to New, and then click Collaboration.
3 In the New Collaboration Component dialog box, type col_FileIn for the Collaboration name, and then click OK.
4 In the editor pane, double-click col_FileIn.
The Collaboration - col_FileIn Properties dialog box displays.
5 In the Collaboration Rules list, click cr_FileIn.
6 In the Subscriptions area, click Add.
A row is added to the Subscriptions box.
7 In the Instance Name column, select JavaPassThroughIn. In the Event Type column, click et_SysA on the list, and then in the Source column, select <EXTERNAL> from the list.
8 In the Publications area, click Add.
A row is added to the Publications box.
9 In the Instance Name column, select JavaPassThroughOut. In the Event Type column, click et_SysA on the list, and then in the Destination column, select JMS from the list.
10 Click OK to close the Collaboration - col_FileIn Properties dialog box.
8.7.2. Add and Configure col_XMLThe col_XML Collaboration changes the data from the et_SysA Event Type to the et_SysB Event Type.
To add and configure col_XML
1 Use steps 1 through 4 from “Add and Configure col_FileIn” on page 80 to add a Collaboration to the ew_XML e*Way named col_XML and open its properties dialog box.
2 In the Collaboration Rules list, click cr_XML.
3 In the Subscriptions area, click Add.
A row is added to the Subscriptions box.
4 Double-click in the Instance Name column and click In on the list.
5 Double-click in the Event Type column and click et_SysA on the list.
6 Double-click in the Source column and click JMS on the list.
7 In the Publications area, click Add.
HIPAA Implementation Guide 80 SeeBeyond Proprietary and Confidential

Chapter 8 Section 8.8e*Gate Implementation Test the Scenario
A row is added to the Publications area.
8 Double-click in the Instance Name column, and then click Out on the list.
9 Double-click in the Event Type column, and then click et_SysB on the list.
10 Double-click in the Destination column, and then click JMS on the list.
11 Click OK to close the Collaboration - col_XML Properties dialog box.
8.7.3. Add and Configure col_FileOutThe col_FileOut Collaboration sends the transformed data out of the e*Gate system. Use the following procedure to add and configure col_FileOut.
To add and configure col_FileOut
1 Use steps 1 through 4 from “Add and Configure col_FileIn” on page 80 to add a Collaboration to the ew_FileOut e*Way named col_FileOut and open its properties dialog box.
2 In the Collaboration Rules list, click cr_FileOut.
3 In the Subscriptions area, click Add.
4 A row is added to the Subscriptions box.
5 In the Instance Name column, select JavaPassThroughIn. In the Event Type column, click et_SysB on the list, and then in the Source column, select JMS from the list.
6 In the Publications area, click Add.
A row is added to the Publications area.
7 In the Instance Name column, select JavaPassThroughOut. In the Event Type column, click et_SysB on the list, and in the Destination column, select <EXTERNAL> from the list.
8 Click OK to close the Collaboration - col_FileOut Properties dialog box.
8.8 Test the ScenarioTesting the scenario includes the following steps:
1 Review the complete Schema.
2 Test the Schema.
3 Troubleshoot any problems.
8.8.1. Review the Complete SchemaTable 30 lists all the components for the Schema. Check all the settings. Substitute the name of the machine running the Schema for hostname where applicable.
HIPAA Implementation Guide 81 SeeBeyond Proprietary and Confidential

Chapter 8 Section 8.8e*Gate Implementation Test the Scenario
Table 30 HIPAA Components
Component Logical Name Settings
Schema HIPAA
Control Broker hostname_cb
IQ Manager hostname_iqmgr Service = SeeBeyond JMSConfig file = hostname_iqmgr.cfgStart Up = Auto
Event Type et_SysA SysA.xsc
et_SysB SysB.xsc
Java ETD SysA.xsc Package Name = SysApackage
SysB.xsc Package Name = SysBpackage
Collaboration Rule cr_FileIn Service = JavaJavaPassThroughIn GenericInEvent.xsc TriggerJavaPassThroughOut GenericOutEvent.xsc
cr_XML Service = JavaIn SysA.xsc In TriggerOut SysB.xsc Out
cr_FileOut Service = JavaJavaPassThroughIn GenericInEvent.xsc TriggerJavaPassThroughOut GenericOutEvent.xsc
Java Collaboration Rule
cr_XML.class Source = InDestination = Out
Inbound e*Way ew_FileIn Executable = stcewfile.exeConfig file = ew_FileIn.cfgStart Up = AutoCollaboration = col_FileIn
Outbound e*Way ew_FileOut Executable = stcewfile.exeConfig file = ew_FileOut.cfgStart Up = AutoCollaboration = col_FileOut
Multi-Mode e*Way ew_XML Executable = stceway.exeConfig file = ew_XML.cfgStart Up = AutoCollaboration = col_XML
JMS e*Way Connection
JMS Service = SeeBeyond JMSConfig file = jmshostname_iqmgr.cfg
HIPAA Implementation Guide 82 SeeBeyond Proprietary and Confidential
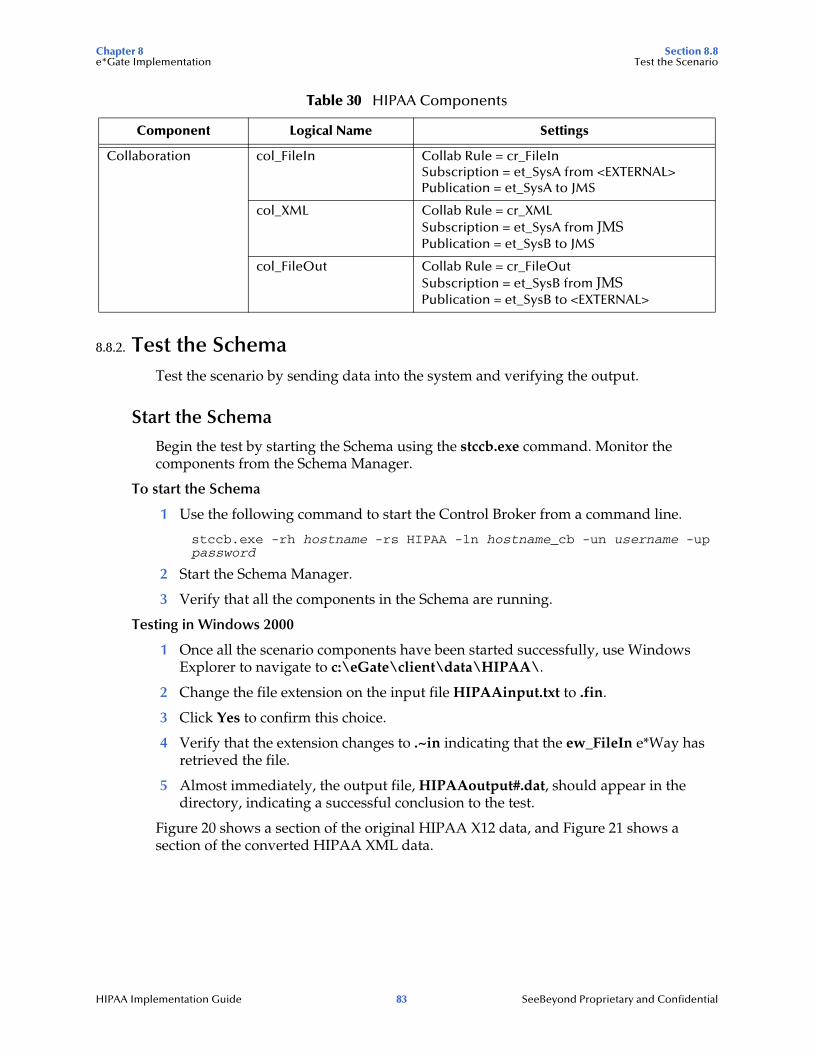
Chapter 8 Section 8.8e*Gate Implementation Test the Scenario
8.8.2. Test the SchemaTest the scenario by sending data into the system and verifying the output.
Start the Schema
Begin the test by starting the Schema using the stccb.exe command. Monitor the components from the Schema Manager.
To start the Schema
1 Use the following command to start the Control Broker from a command line.
stccb.exe -rh hostname -rs HIPAA -ln hostname_cb -un username -up password
2 Start the Schema Manager.
3 Verify that all the components in the Schema are running.
Testing in Windows 2000
1 Once all the scenario components have been started successfully, use Windows Explorer to navigate to c:\eGate\client\data\HIPAA\.
2 Change the file extension on the input file HIPAAinput.txt to .fin.
3 Click Yes to confirm this choice.
4 Verify that the extension changes to .~in indicating that the ew_FileIn e*Way has retrieved the file.
5 Almost immediately, the output file, HIPAAoutput#.dat, should appear in the directory, indicating a successful conclusion to the test.
Figure 20 shows a section of the original HIPAA X12 data, and Figure 21 shows a section of the converted HIPAA XML data.
Collaboration col_FileIn Collab Rule = cr_FileInSubscription = et_SysA from <EXTERNAL>Publication = et_SysA to JMS
col_XML Collab Rule = cr_XMLSubscription = et_SysA from JMSPublication = et_SysB to JMS
col_FileOut Collab Rule = cr_FileOutSubscription = et_SysB from JMSPublication = et_SysB to <EXTERNAL>
Table 30 HIPAA Components
Component Logical Name Settings
HIPAA Implementation Guide 83 SeeBeyond Proprietary and Confidential

Chapter 8 Section 8.8e*Gate Implementation Test the Scenario
Figure 20 Original data
Figure 21 Converted data
HIPAA Implementation Guide 84 SeeBeyond Proprietary and Confidential
Chapter 9
Claredi Implementation
This chapter provides an overview of the HIPAA validation process enabled by the partnership between e*Xchange and a validation engine called Faciledi from Claredi Corporation.
9.1 IntroductionThe partnership between SeeBeyond Technology Corporation and Claredi Corporation enables HIPAA validation using an external appliance provided by Claredi rather than proprietary Monk- or Java-based validations written by SeeBeyond.
The Claredi configuration uses a separate Linux server installed as a network appliance to perform HIPAA validations. The networked “Faciledi” appliance is a server that communicates with e*Xchange. Faciledi tests inbound and outbound HIPAA transactions for compliance against Claredi’s interpretation of the HIPAA Implementation Guides. Faciledi can also test against Rational Business edits (to verify whether a transaction makes sense in addition to being HIPAA-compliant), against published Companion Guides that have been incorporated into Faciledi, against regionally prevalent business edits, and against Medicare adjudication tables. For more information about Faciledi, see www.claredi.com.
Claredi-based HIPAA validations conform to standards endorsed by WEDI/SNIP (see “Testing the SeeBeyond Solution” on page 22 or www.wedi.org/snip/ for information about the WEDI organization or its SNIP forum). You can store messages and compliance test results from the Faciledi appliance for debugging purposes.
Following installation of the Faciledi appliance on your network, you enable the Claredi implementation by applying an ESR to e*Xchange and then modifying the following e*Xchange settings:
System defaults
Trading Partner profiles
Installation of the appropriate ESR, which is available from your account manager and from SeeBeyond Customer Support, enables the following:
Claredi (Faciledi) HIPAA validations
Improved error handling, including conformance to the X12 standard of accepting non-numeric transaction set control numbers.
HIPAA Implementation Guide 85 SeeBeyond Proprietary and Confidential
Chapter 9 Section 9.2Claredi Implementation About Validation Flow
The rest of this chapter explains each of these points in detail.
9.2 About Validation FlowIn older versions of e*Xchange, the trading partner profile specified only a proprietary Monk or Java validation type and Collaboration to call for HIPAA message processing.
When the Faciledi appliance has been installed on your network and system default settings and message profile properties have been configured to support it, e*Xchange does the following with an incoming X12 transmission for a Trading Partner:
1 Strip out a functional group from the message envelope
2 Repackage the functional group, including multiple ST-SEs, into its own Interchange envelope
3 Send the repackaged X12 transaction to the Faciledi appliance.
The Faciledi appliance then returns an appropriate error string to e*Xchange.
e*Xchange stores the result and typically generates a positive or negative 997 acknowledgement for each processed group (for more on 997, see “997, Functional Acknowledgment” on page 117).
Note: The 997 transaction type is used for all errors. Errors in levels H2 to H6 (that is, errors in levels other than H1) can optionally generate a generic 824 application acknowledgement as described in “Application Acknowledgments” on page 117.
The Faciledi-based HIPAA validation process is shown in Figure 22.
HIPAA Implementation Guide 86 SeeBeyond Proprietary and Confidential
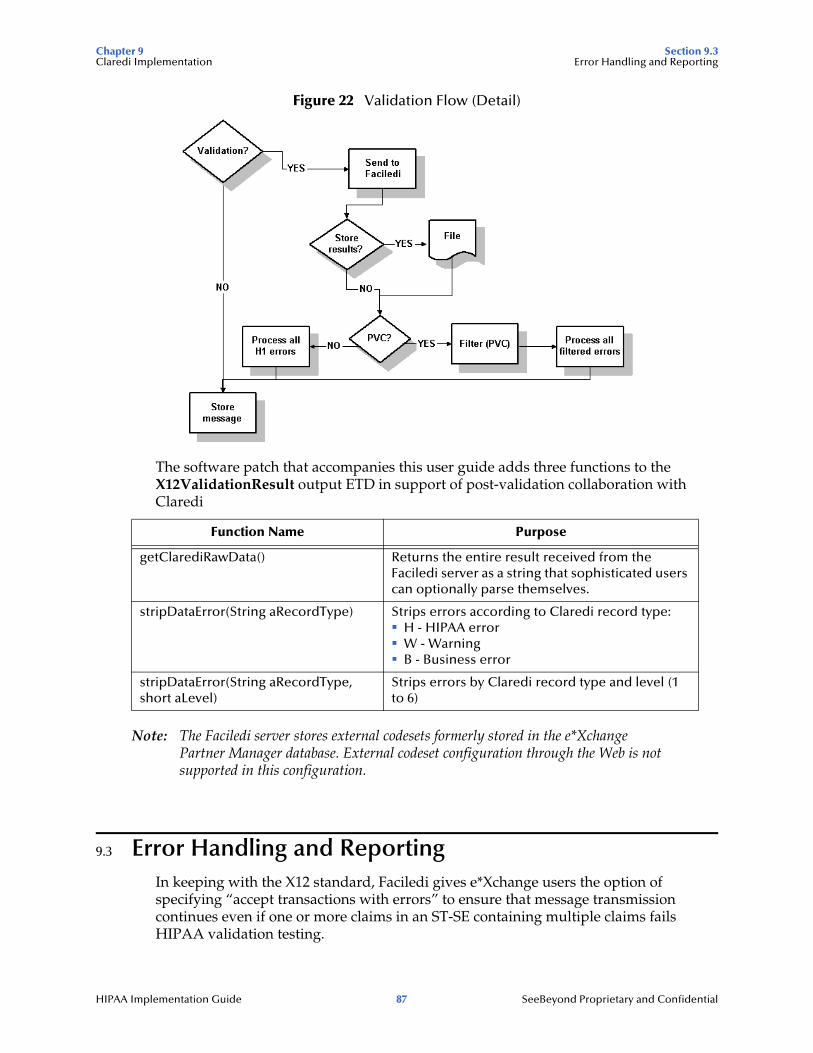
Chapter 9 Section 9.3Claredi Implementation Error Handling and Reporting
Figure 22 Validation Flow (Detail)
The software patch that accompanies this user guide adds three functions to the X12ValidationResult output ETD in support of post-validation collaboration with Claredi
Note: The Faciledi server stores external codesets formerly stored in the e*Xchange Partner Manager database. External codeset configuration through the Web is not supported in this configuration.
9.3 Error Handling and ReportingIn keeping with the X12 standard, Faciledi gives e*Xchange users the option of specifying “accept transactions with errors” to ensure that message transmission continues even if one or more claims in an ST-SE containing multiple claims fails HIPAA validation testing.
Function Name Purpose
getClarediRawData() Returns the entire result received from the Faciledi server as a string that sophisticated users can optionally parse themselves.
stripDataError(String aRecordType) Strips errors according to Claredi record type:H - HIPAA errorW - WarningB - Business error
stripDataError(String aRecordType, short aLevel)
Strips errors by Claredi record type and level (1 to 6)
HIPAA Implementation Guide 87 SeeBeyond Proprietary and Confidential
Chapter 9 Section 9.4Claredi Implementation Configuring System Default Settings
When “accept transactions with errors” is selected, for example, one or more errors in an inbound transaction do not keep that transaction from being transmitted into e*Gate. Each inbound error is flagged with a 997 acknowledgment.
To enable transaction processing with errors (setting E in Table 31), do the following:
1 From the main page of the Web interface, select System Administration.
2 In the System Administration window, select System Defaults.
3 In the System Defaults - Viewing window, select Edit.
4 In the “Accept Transactions With Errors” field of the System Defaults - Editing window, enter Y.
5 Click OK.
The default setting (N) for the field in step 4 above rejects transactions containing errors.
In HIPAA terms, the error handling settings in this section apply to the AK5 transaction set response trailer.,
9.4 Configuring System Default SettingsTo enable HIPAA validation testing through the Faciledi appliance after it has been installed on your network, ensure that system defaults accessed through the System Administration tab of e*Xchange Partner Manager are set as follows:
Table 31 Error Handling Options
Setting Meaning
A Accepted
R Rejected
E Accepted But Errors Were Noted
Table 32 System Default Settings for Faciledi Validation
Field Setting
Place Journal Errors in Error Queue Enter either Y or N. The Y option supports users who want to track errors but do not have access to the server where the flat-file Journal is stored. Placing all errors in a queue ensures that they can be picked up by error handlers built during installation. Entering Y may also create duplicate instances of certain errors in the Dead Letter (Error) Queue.
HIPAA Implementation Guide 88 SeeBeyond Proprietary and Confidential
Chapter 9 Section 9.4Claredi Implementation Configuring System Default Settings
FACILEDI - Path to Store Retrieved Records in File
Enter the path in which to store records. Data entered here is written to the sb_defaults table, and used for handling large messages. An entry in this field is required.
FACILEDI - Path to Store Interleaved Records as File
Enter the path and file where Interleaved Report records will be stored. No records are stored if you leave this field blank.
FACILEDI - Retrieve Faciledi Records Enter the type(s) of records to be retrieved from Faciledi. You can specify one or more of several possible types by entering the appropriate letter:
A- Aggregate HIPAAmetrics data about all claims in the fileB - Business errors or messages as defined by WEDI/SNIP C - Certification messages produced for many of the elements in the X12 messageE - Unsupported file format or other system-level error that prevents parsingH - HIPAA errorsK- Complex records useful when evaluating HIPAAmetricsL - Records that provide scoping information but are ignored in calculating errors, metrics, or business units in a given fileM - (HIPAA) Metric records associated with a business unitP- Errors that result from Payer Specific EditsT - ST and SE records generated at the end of each transactionU - Records that mark the end of a “business unit” and contain information about the segments in that unitV- Version information about the server producing the outputW - Warning messages as defined by WEDI/SNIPZ - The last record in a response composed of multiple messages. If no Z record is received, then a file processing error occurred
Note that older versions of Faciledi only generate records of types H, T, and Z.
Accept Transactions With Errors Enter either Y or N
Table 32 System Default Settings for Faciledi Validation (Continued)
Field Setting
HIPAA Implementation Guide 89 SeeBeyond Proprietary and Confidential
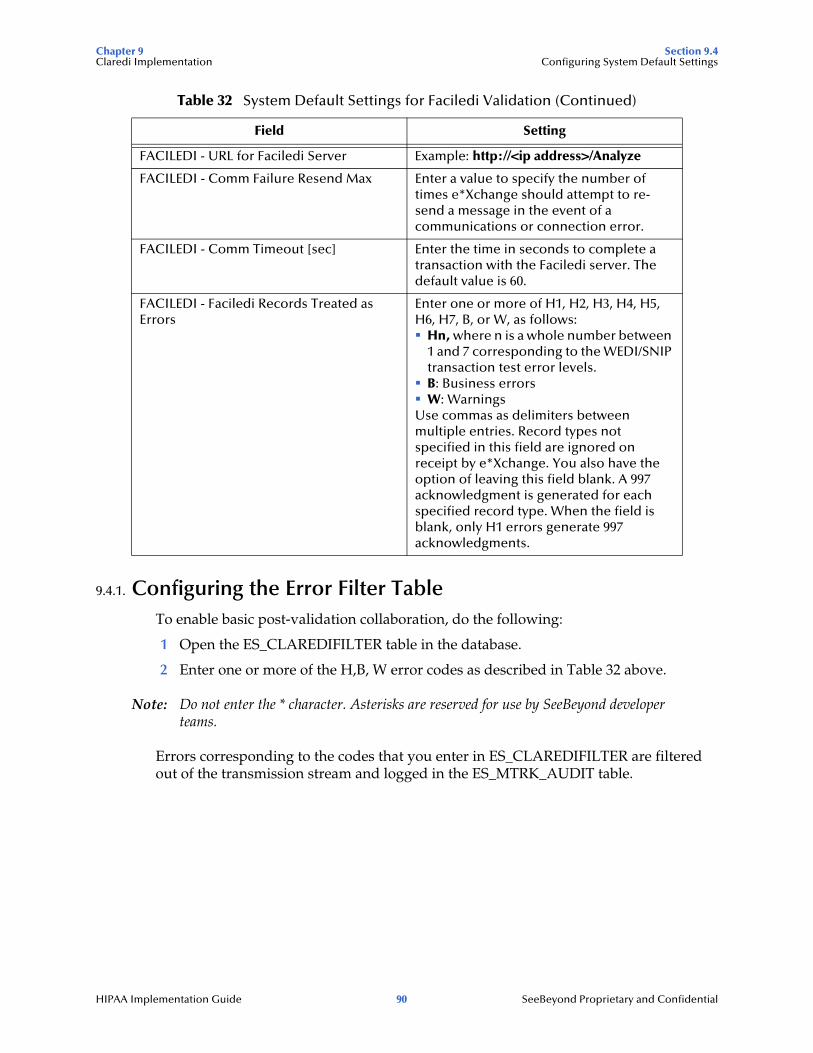
Chapter 9 Section 9.4Claredi Implementation Configuring System Default Settings
9.4.1. Configuring the Error Filter TableTo enable basic post-validation collaboration, do the following:
1 Open the ES_CLAREDIFILTER table in the database.
2 Enter one or more of the H,B, W error codes as described in Table 32 above.
Note: Do not enter the * character. Asterisks are reserved for use by SeeBeyond developer teams.
Errors corresponding to the codes that you enter in ES_CLAREDIFILTER are filtered out of the transmission stream and logged in the ES_MTRK_AUDIT table.
FACILEDI - URL for Faciledi Server Example: http://<ip address>/Analyze
FACILEDI - Comm Failure Resend Max Enter a value to specify the number of times e*Xchange should attempt to re-send a message in the event of a communications or connection error.
FACILEDI - Comm Timeout [sec] Enter the time in seconds to complete a transaction with the Faciledi server. The default value is 60.
FACILEDI - Faciledi Records Treated as Errors
Enter one or more of H1, H2, H3, H4, H5, H6, H7, B, or W, as follows:
Hn, where n is a whole number between 1 and 7 corresponding to the WEDI/SNIP transaction test error levels.B: Business errorsW: Warnings
Use commas as delimiters between multiple entries. Record types not specified in this field are ignored on receipt by e*Xchange. You also have the option of leaving this field blank. A 997 acknowledgment is generated for each specified record type. When the field is blank, only H1 errors generate 997 acknowledgments.
Table 32 System Default Settings for Faciledi Validation (Continued)
Field Setting
HIPAA Implementation Guide 90 SeeBeyond Proprietary and Confidential
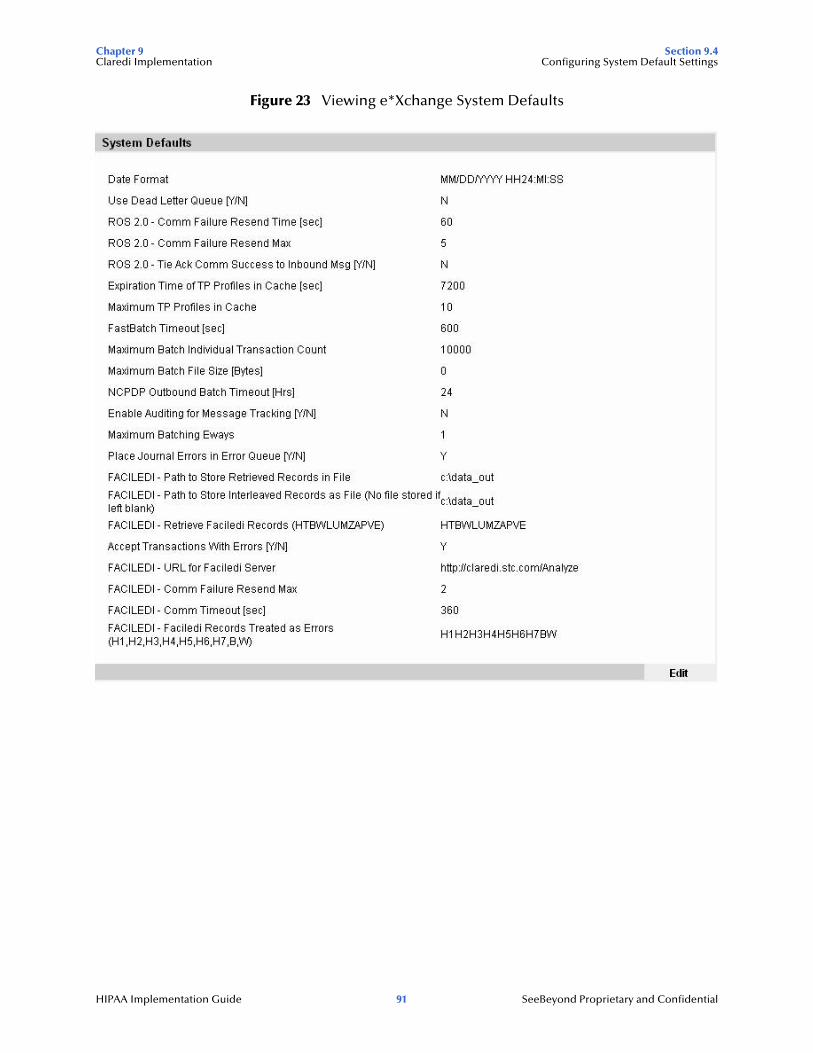
Chapter 9 Section 9.4Claredi Implementation Configuring System Default Settings
Figure 23 Viewing e*Xchange System Defaults
HIPAA Implementation Guide 91 SeeBeyond Proprietary and Confidential
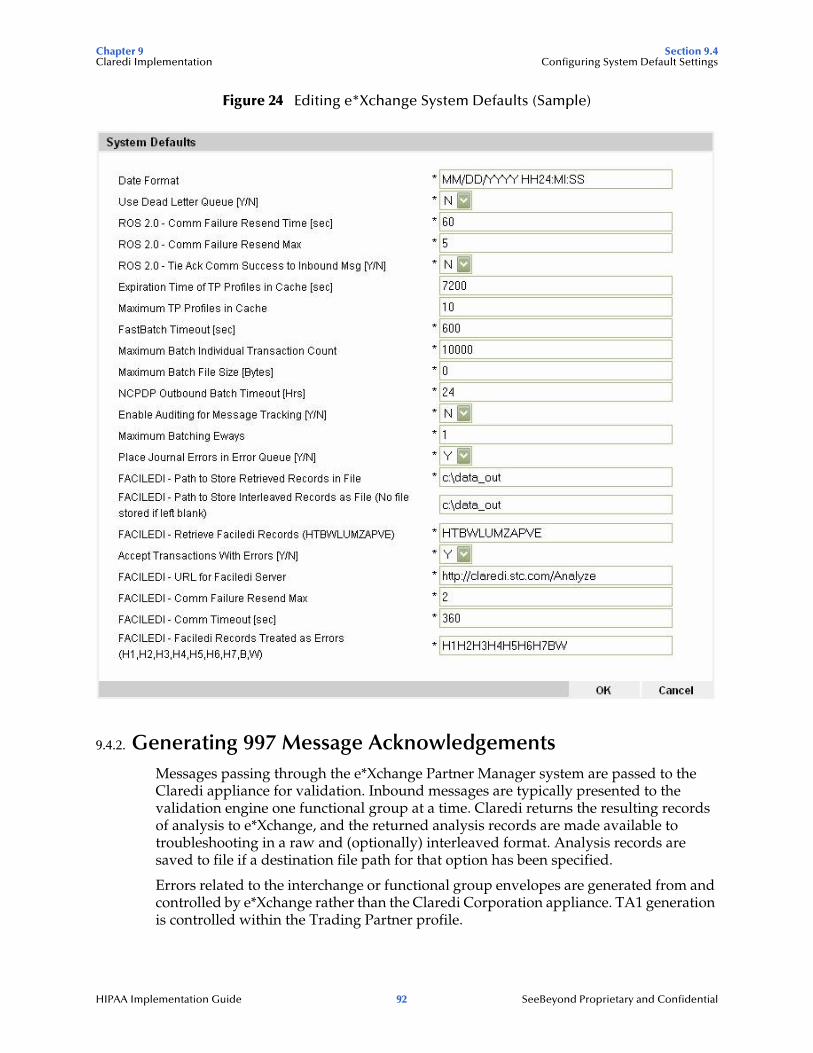
Chapter 9 Section 9.4Claredi Implementation Configuring System Default Settings
Figure 24 Editing e*Xchange System Defaults (Sample)
9.4.2. Generating 997 Message AcknowledgementsMessages passing through the e*Xchange Partner Manager system are passed to the Claredi appliance for validation. Inbound messages are typically presented to the validation engine one functional group at a time. Claredi returns the resulting records of analysis to e*Xchange, and the returned analysis records are made available to troubleshooting in a raw and (optionally) interleaved format. Analysis records are saved to file if a destination file path for that option has been specified.
Errors related to the interchange or functional group envelopes are generated from and controlled by e*Xchange rather than the Claredi Corporation appliance. TA1 generation is controlled within the Trading Partner profile.
HIPAA Implementation Guide 92 SeeBeyond Proprietary and Confidential

Chapter 9 Section 9.5Claredi Implementation Configuring Message Profile Settings
For each H record generated during the analysis of a transaction set, e*Xchange attempts to generate one of the following:
An AK 3/4 pair
An AK3 alone
Segment-level errors typically generate only an AK3. Data element-level errors typically generate an AK 3/4 pair. What happens is driven both by the content of the returned analysis record and by the code table in the e*Xchange database, ES_CLAREDI_ERRCODE, that matches the H error number to AK3/4 codes.
An AK4 is not generated if either of the following conditions applies:
The Claredi analysis record does not point to specific data element
The error code table does not show an error code for the AK4
The validation engine can generate several different error messages against the same segment or data element to reflect different errors. For example, in a BHT04 segment, if both the month and day fields have errors, the Claredi appliance generates two H records with two different error codes. When these error codes are mapped to the 997, they generate two AK3/4 segments that look identical but report two different errors within the BHT04. Because, in this example, no data element data is returned to e*Xchange, the AK404 segment is not populated.
If an expected AK4 segment is not received, it may be because a 0 character in the Element Position identifies the error as originating from segment level rather than element level, and consequently returning an AK3 alone.
9.5 Configuring Message Profile SettingsTo validate HIPAA compliance through the Faciledi appliance after it has been installed on your network, ensure that message profile properties accessed through the Profile Management tab of the e*Xchange Partner Manager are set as follows
Field Setting
Transmission Key Enter a Monk function name that defines the variable, “transmission_key”. This B2B Protocol-level value is used to support optional Transmission-level duplicate checking, in contrast to the default Transaction-level duplicate checking. If this variable is used, duplicate transmissions return a TA1 with a TA105 value of 25 (duplicate control ID), while unique transmissions process normally. You can use “sample_transmission.tsc” in the Monk_Scripts/common directory, or modify that sample.
HIPAA Implementation Guide 93 SeeBeyond Proprietary and Confidential
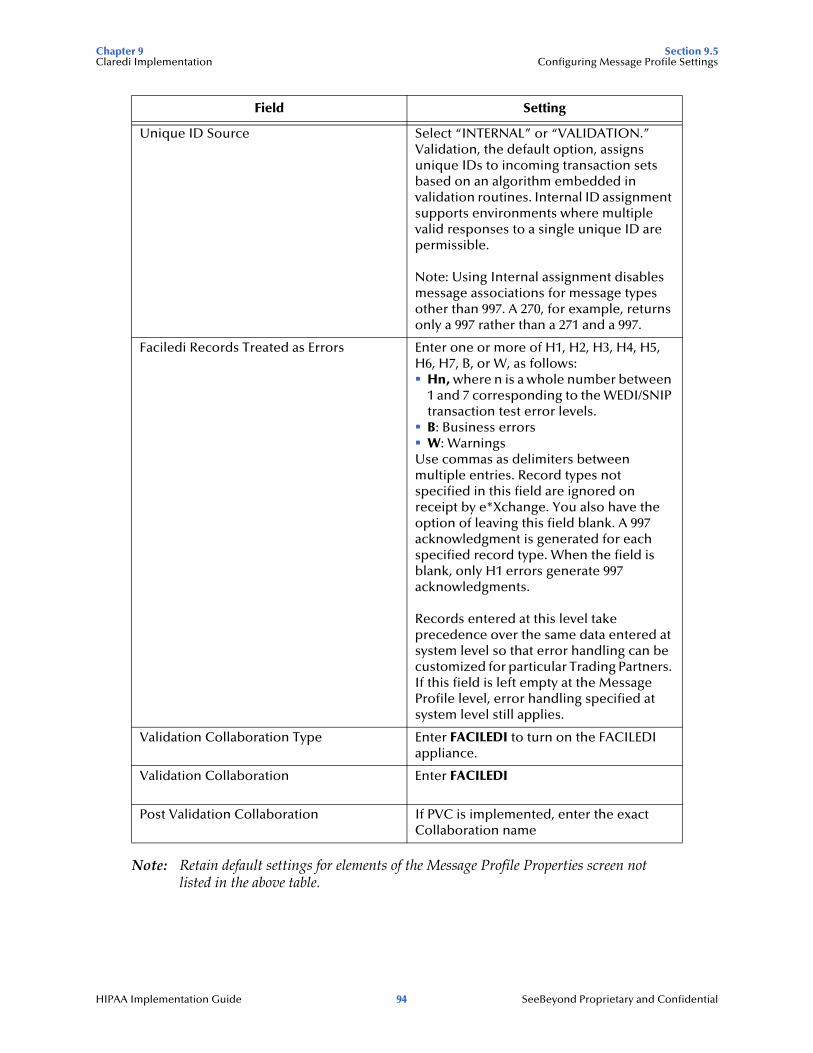
Chapter 9 Section 9.5Claredi Implementation Configuring Message Profile Settings
Note: Retain default settings for elements of the Message Profile Properties screen not listed in the above table.
Unique ID Source Select “INTERNAL” or “VALIDATION.” Validation, the default option, assigns unique IDs to incoming transaction sets based on an algorithm embedded in validation routines. Internal ID assignment supports environments where multiple valid responses to a single unique ID are permissible.
Note: Using Internal assignment disables message associations for message types other than 997. A 270, for example, returns only a 997 rather than a 271 and a 997.
Faciledi Records Treated as Errors Enter one or more of H1, H2, H3, H4, H5, H6, H7, B, or W, as follows:
Hn, where n is a whole number between 1 and 7 corresponding to the WEDI/SNIP transaction test error levels.B: Business errorsW: Warnings
Use commas as delimiters between multiple entries. Record types not specified in this field are ignored on receipt by e*Xchange. You also have the option of leaving this field blank. A 997 acknowledgment is generated for each specified record type. When the field is blank, only H1 errors generate 997 acknowledgments.
Records entered at this level take precedence over the same data entered at system level so that error handling can be customized for particular Trading Partners. If this field is left empty at the Message Profile level, error handling specified at system level still applies.
Validation Collaboration Type Enter FACILEDI to turn on the FACILEDI appliance.
Validation Collaboration Enter FACILEDI
Post Validation Collaboration If PVC is implemented, enter the exact Collaboration name
Field Setting
HIPAA Implementation Guide 94 SeeBeyond Proprietary and Confidential

Chapter 9 Section 9.5Claredi Implementation Configuring Message Profile Settings
Figure 25 Message Profile Settings (Faciledi Configuration)
HIPAA Implementation Guide 95 SeeBeyond Proprietary and Confidential

Chapter 9 Section 9.6Claredi Implementation Viewing a Message and its Errors
9.6 Viewing a Message and its ErrorsTo view a message and any errors associated with that message, open the Message Tracking tab of e*Xchange Partner Manager.
1 In the TP Profile Selection dialog box, specify the following:
Company Profile
Trading Partner Profile
eBusiness Protocol
B2B Protocol/Message Profile
Direction
2 In addition to the required information in step 1, you may optionally specify the following:
B2B Protocol Version
Transfer Mode
Message Profile Version
Message Profile Status
3 Select the desired B2B Profile.
HIPAA Implementation Guide 96 SeeBeyond Proprietary and Confidential

Chapter 9 Section 9.7Claredi Implementation Generating Interleaved Error Reports
Figure 26 View Error Data Screen (Sample)
9.7 Generating Interleaved Error ReportsMessages returned by the Faciledi appliance optionally generate HTML files called Interleaved Error Reports that embed any error messages generated by validation testing within the original message content. By displaying errors together with the data that triggered them, Interleaved Error Reports simplify the debugging process.
To generate Interleaved Error Reports, do the following:
1 Open the System Administration Tab of e*Xchange Partner Manager
2 Enter a path in which to store Interleaved records as a file in the FACILEDI-Path to Store Interleaved Records as File field.
3 Enter Y as the value in the Accept Transactions With Errors field.
Figure 23 shows system defaults set to enable Interleaved Error Reports.
Figure 27 and Figure 28 show parts of sample Interleaved Error Reports.
The Interleaved Error Report includes every error received from the Faciledi server, not just those specified in the “Faciledi Records Treated as Errors” field of the System Defaults screen. Interleaved Error Reports are not generated in cases where the Faciledi server generates more than a million characters in a functional group.
HIPAA Implementation Guide 97 SeeBeyond Proprietary and Confidential
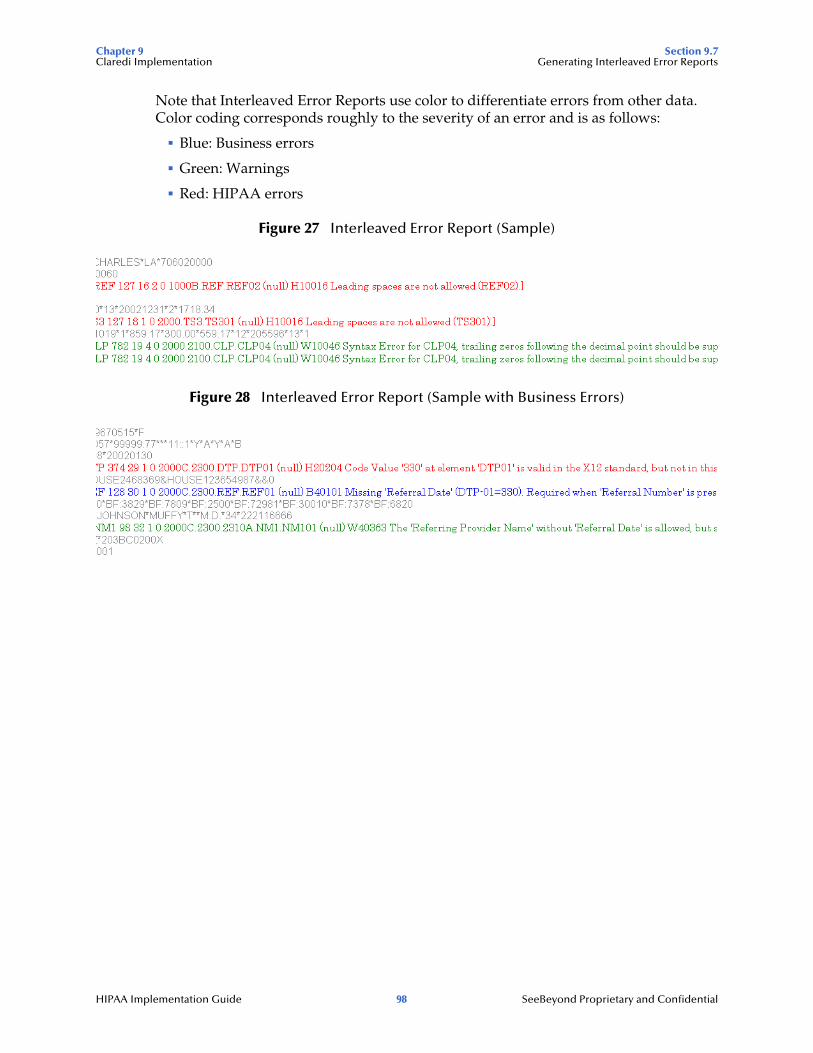
Chapter 9 Section 9.7Claredi Implementation Generating Interleaved Error Reports
Note that Interleaved Error Reports use color to differentiate errors from other data. Color coding corresponds roughly to the severity of an error and is as follows:
Blue: Business errors
Green: Warnings
Red: HIPAA errors
Figure 27 Interleaved Error Report (Sample)
Figure 28 Interleaved Error Report (Sample with Business Errors)
HIPAA Implementation Guide 98 SeeBeyond Proprietary and Confidential

Appendix A
HIPAA Files
This appendix provides information on the HIPAA files provided with e*Gate and e*Xchange. For more information on the SeeBeyond HIPAA solution, refer to Chapter 3, “The SeeBeyond Solution” on page 19.
A.1 e*Xchange Files for HIPAA TransactionsJava ETDs for HIPAA transactions are provided in the e*Gate HIPAA ETD Library for both X12 and NCPDP transactions.
The Faciledi server stores external code sets formerly stored in the e*Xchange Partner Manager database.
Note: The HIPAA solution also requires the X12 4010 ETD Library to work properly.
A.1.1. HIPAA e*Xchange Files for e*GateThe following Monk ETDs are available through SeeBeyond. They include the GS/GE and ISA/IEA enveloping and are suitable for use outside e*Xchange when a complete Event structure is required. For example, they are appropriate when using e*Gate to translate from X12 to a business application’s proprietary data format.
These files are stored in the following location:
\<eGate>\server\registry\repository\default\monk_scripts\eXchange\HIPAA
The file names have “_xlate” (for May 1999 files) or “_xlat” (for May 2000 files) appended to the file name to indicate that these are the translation files and include the interchange control and functional group header and footer. The May 2000 files have “00” in their file names to further distinguish them from the May 1999 files.
May 1999 Files
The May 1999 HIPAA Monk ETDs that are in Table 33.
HIPAA Implementation Guide 99 SeeBeyond Proprietary and Confidential
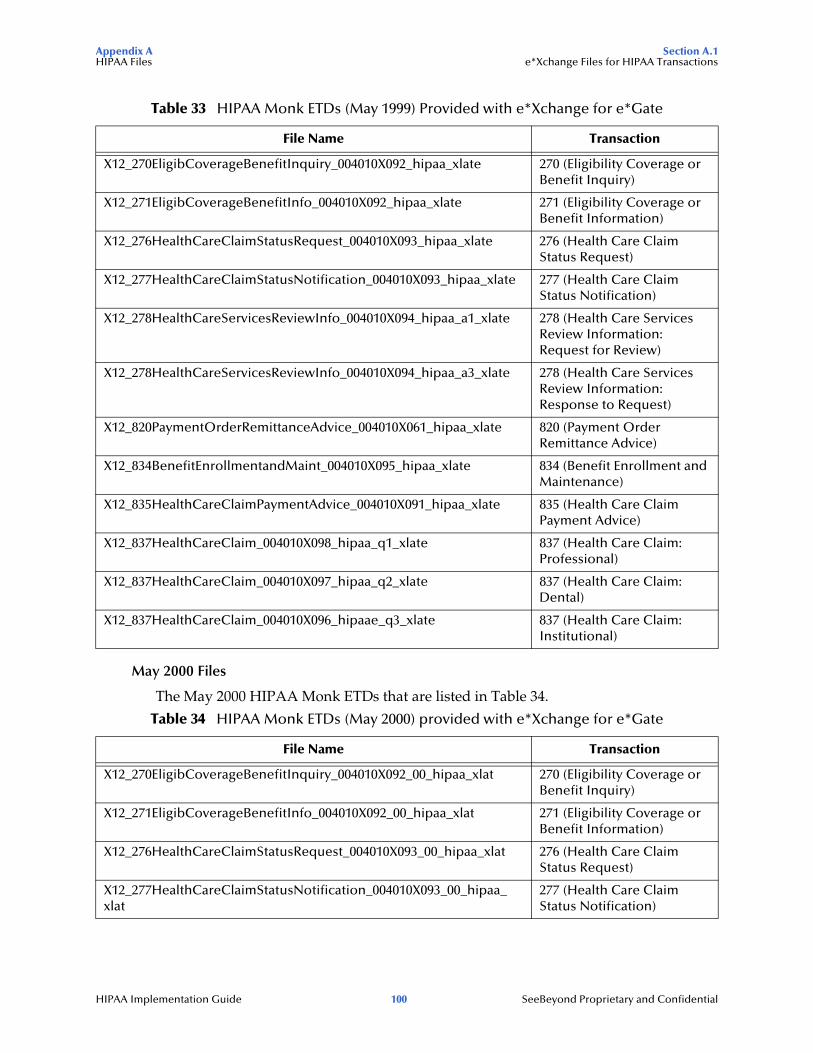
Appendix A Section A.1HIPAA Files e*Xchange Files for HIPAA Transactions
May 2000 Files
The May 2000 HIPAA Monk ETDs that are listed in Table 34.
Table 33 HIPAA Monk ETDs (May 1999) Provided with e*Xchange for e*Gate
File Name Transaction
X12_270EligibCoverageBenefitInquiry_004010X092_hipaa_xlate 270 (Eligibility Coverage or Benefit Inquiry)
X12_271EligibCoverageBenefitInfo_004010X092_hipaa_xlate 271 (Eligibility Coverage or Benefit Information)
X12_276HealthCareClaimStatusRequest_004010X093_hipaa_xlate 276 (Health Care Claim Status Request)
X12_277HealthCareClaimStatusNotification_004010X093_hipaa_xlate 277 (Health Care Claim Status Notification)
X12_278HealthCareServicesReviewInfo_004010X094_hipaa_a1_xlate 278 (Health Care Services Review Information: Request for Review)
X12_278HealthCareServicesReviewInfo_004010X094_hipaa_a3_xlate 278 (Health Care Services Review Information: Response to Request)
X12_820PaymentOrderRemittanceAdvice_004010X061_hipaa_xlate 820 (Payment Order Remittance Advice)
X12_834BenefitEnrollmentandMaint_004010X095_hipaa_xlate 834 (Benefit Enrollment and Maintenance)
X12_835HealthCareClaimPaymentAdvice_004010X091_hipaa_xlate 835 (Health Care Claim Payment Advice)
X12_837HealthCareClaim_004010X098_hipaa_q1_xlate 837 (Health Care Claim: Professional)
X12_837HealthCareClaim_004010X097_hipaa_q2_xlate 837 (Health Care Claim: Dental)
X12_837HealthCareClaim_004010X096_hipaae_q3_xlate 837 (Health Care Claim: Institutional)
Table 34 HIPAA Monk ETDs (May 2000) provided with e*Xchange for e*Gate
File Name Transaction
X12_270EligibCoverageBenefitInquiry_004010X092_00_hipaa_xlat 270 (Eligibility Coverage or Benefit Inquiry)
X12_271EligibCoverageBenefitInfo_004010X092_00_hipaa_xlat 271 (Eligibility Coverage or Benefit Information)
X12_276HealthCareClaimStatusRequest_004010X093_00_hipaa_xlat 276 (Health Care Claim Status Request)
X12_277HealthCareClaimStatusNotification_004010X093_00_hipaa_ xlat
277 (Health Care Claim Status Notification)
HIPAA Implementation Guide 100 SeeBeyond Proprietary and Confidential

Appendix A Section A.1HIPAA Files e*Xchange Files for HIPAA Transactions
February 2003 Files
The February 2003 HIPAA Monk Addenda ETDs are listed in Table 35.
X12_278HealthCareServicesReviewInfo_004010X094_00_hipaa_a1_xlat 278 (Health Care Services Review Information: Request for Review)
X12_278HealthCareServicesReviewInfo_004010X094_00_hipaa_a3_xlat 278 (Health Care Services Review Information: Response to Request)
X12_820PaymentOrderRemittanceAdvice_004010X061_00_hipaa_xlat 820 (Payment Order Remittance Advice)
X12_834BenefitEnrollmentandMaint_004010X095_00_hipaa_xlat 834 (Benefit Enrollment and Maintenance)
X12_835HealthCareClaimPaymentAdvice_004010X091_00_hipaa_xlat 835 (Health Care Claim Payment Advice)
X12_837HealthCareClaim_004010X096_00_hipaa_q3_xlat 837 (Health Care Claim: Professional)
X12_837HealthCareClaim_004010X097_00_hipaa_q2_xlat 837 (Health Care Claim: Dental)
X12_837HealthCareClaim_004010X098_00_hipaa_q1_xlat 837 (Health Care Claim: Institutional)
Table 35 HIPAA Monk Addenda ETDs (February 2003)
File Name Transaction
X12_270_EligCoveOrBeneInqu_004010X092A1_00_hipaa.ssc 270 (Eligibility Coverage or Benefit Inquiry)
X12_271_EligCoveOrBeneInfo_004010X092A1_00_hipaa.ssc 271 (Eligibility Coverage or Benefit Information)
X12_276_HealCareClaiStatRequ_004010X093A1_00_hipaa.ssc 276 (Health Care Claim Status Request)
X12_277_HealCareClaiStatNoti_004010X093A1_00_hipaa.ssc 277 (Health Care Claim Status Notification)
X12_278_HealCareServReviInfo_004010X094A1_00_hipaaA1.ssc 278 (Health Care Services Review Information: Request for Review)
X12_278_HealCareServReviInfo_004010X094A1_00_hipaaA3.ssc 278 (Health Care Services Review Information: Response to Request)
X12_820_PaymOrdeRemiAdvi_004010X061A1_00_hipaa.ssc 820 (Payment Order Remittance Advice)
X12_834_BeneEnroAndMain_004010X095A1_00_hipaa.ssc 834 (Benefit Enrollment and Maintenance)
Table 34 HIPAA Monk ETDs (May 2000) provided with e*Xchange for e*Gate (Continued)
File Name Transaction
HIPAA Implementation Guide 101 SeeBeyond Proprietary and Confidential
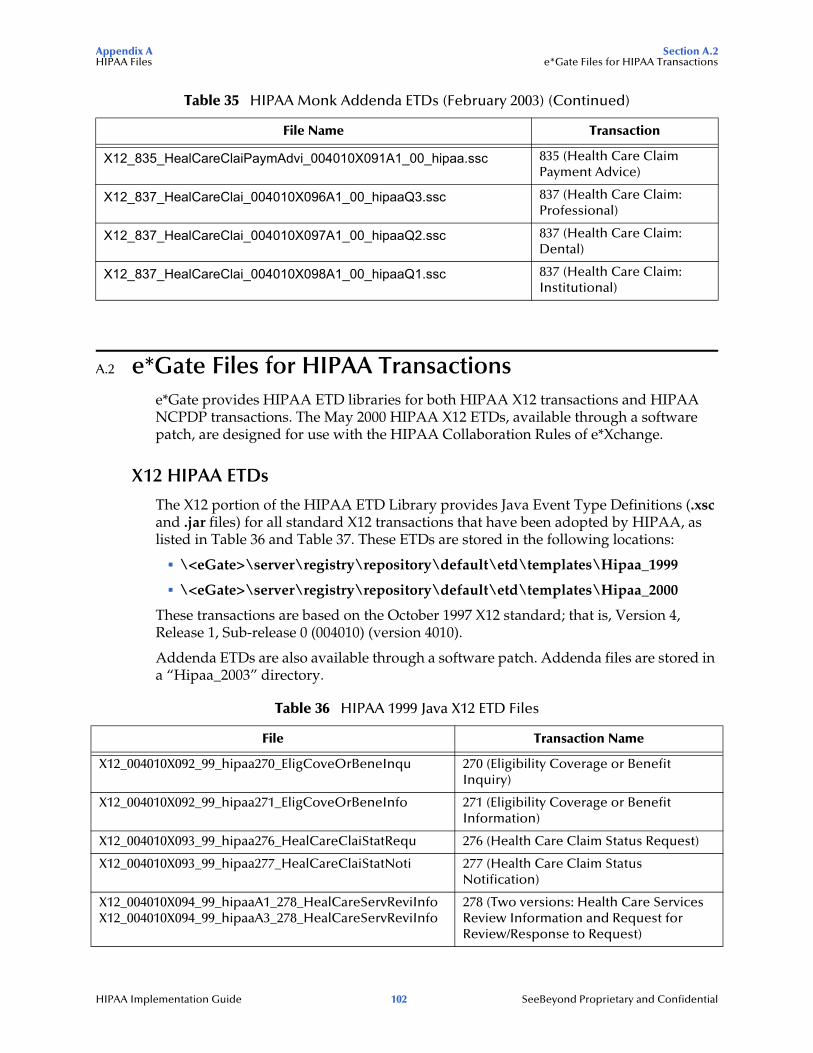
Appendix A Section A.2HIPAA Files e*Gate Files for HIPAA Transactions
A.2 e*Gate Files for HIPAA Transactionse*Gate provides HIPAA ETD libraries for both HIPAA X12 transactions and HIPAA NCPDP transactions. The May 2000 HIPAA X12 ETDs, available through a software patch, are designed for use with the HIPAA Collaboration Rules of e*Xchange.
X12 HIPAA ETDs
The X12 portion of the HIPAA ETD Library provides Java Event Type Definitions (.xsc and .jar files) for all standard X12 transactions that have been adopted by HIPAA, as listed in Table 36 and Table 37. These ETDs are stored in the following locations:
\<eGate>\server\registry\repository\default\etd\templates\Hipaa_1999
\<eGate>\server\registry\repository\default\etd\templates\Hipaa_2000
These transactions are based on the October 1997 X12 standard; that is, Version 4, Release 1, Sub-release 0 (004010) (version 4010).
Addenda ETDs are also available through a software patch. Addenda files are stored in a “Hipaa_2003” directory.
X12_835_HealCareClaiPaymAdvi_004010X091A1_00_hipaa.ssc 835 (Health Care Claim Payment Advice)
X12_837_HealCareClai_004010X096A1_00_hipaaQ3.ssc 837 (Health Care Claim: Professional)
X12_837_HealCareClai_004010X097A1_00_hipaaQ2.ssc 837 (Health Care Claim: Dental)
X12_837_HealCareClai_004010X098A1_00_hipaaQ1.ssc 837 (Health Care Claim: Institutional)
Table 36 HIPAA 1999 Java X12 ETD Files
File Transaction Name
X12_004010X092_99_hipaa270_EligCoveOrBeneInqu 270 (Eligibility Coverage or Benefit Inquiry)
X12_004010X092_99_hipaa271_EligCoveOrBeneInfo 271 (Eligibility Coverage or Benefit Information)
X12_004010X093_99_hipaa276_HealCareClaiStatRequ 276 (Health Care Claim Status Request)
X12_004010X093_99_hipaa277_HealCareClaiStatNoti 277 (Health Care Claim Status Notification)
X12_004010X094_99_hipaaA1_278_HealCareServReviInfoX12_004010X094_99_hipaaA3_278_HealCareServReviInfo
278 (Two versions: Health Care Services Review Information and Request for Review/Response to Request)
Table 35 HIPAA Monk Addenda ETDs (February 2003) (Continued)
File Name Transaction
HIPAA Implementation Guide 102 SeeBeyond Proprietary and Confidential
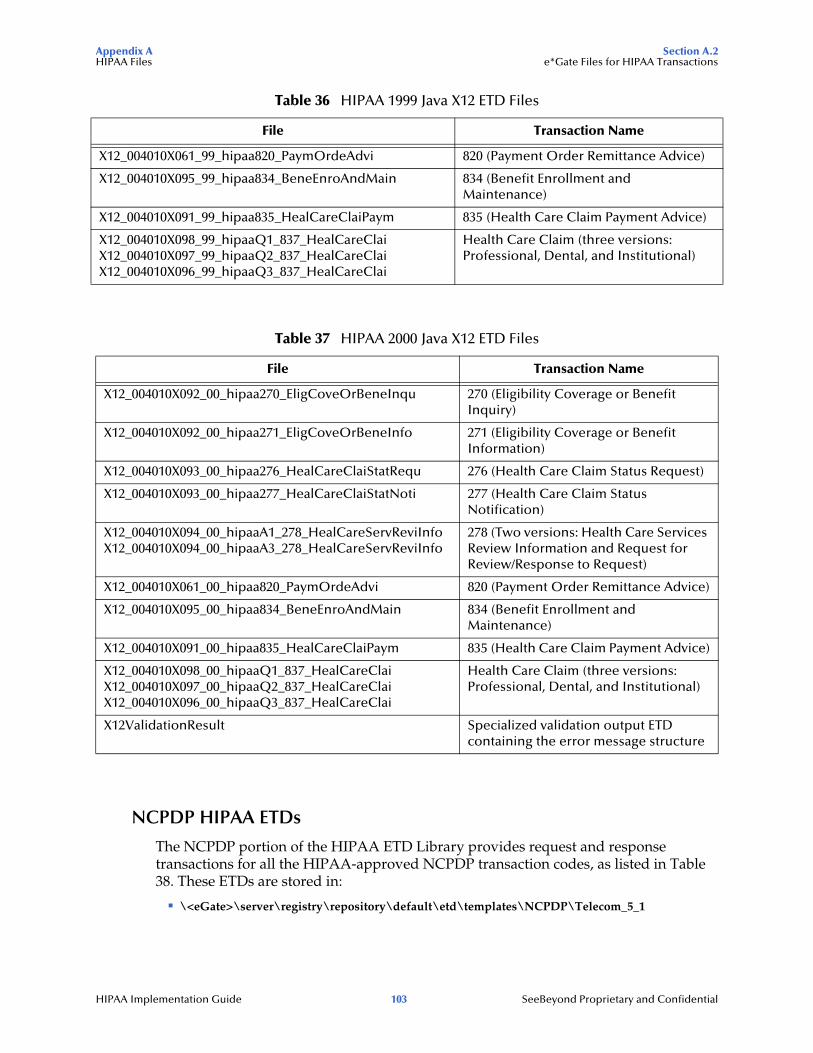
Appendix A Section A.2HIPAA Files e*Gate Files for HIPAA Transactions
NCPDP HIPAA ETDs
The NCPDP portion of the HIPAA ETD Library provides request and response transactions for all the HIPAA-approved NCPDP transaction codes, as listed in Table 38. These ETDs are stored in:
\<eGate>\server\registry\repository\default\etd\templates\NCPDP\Telecom_5_1
X12_004010X061_99_hipaa820_PaymOrdeAdvi 820 (Payment Order Remittance Advice)
X12_004010X095_99_hipaa834_BeneEnroAndMain 834 (Benefit Enrollment and Maintenance)
X12_004010X091_99_hipaa835_HealCareClaiPaym 835 (Health Care Claim Payment Advice)
X12_004010X098_99_hipaaQ1_837_HealCareClaiX12_004010X097_99_hipaaQ2_837_HealCareClaiX12_004010X096_99_hipaaQ3_837_HealCareClai
Health Care Claim (three versions: Professional, Dental, and Institutional)
Table 37 HIPAA 2000 Java X12 ETD Files
File Transaction Name
X12_004010X092_00_hipaa270_EligCoveOrBeneInqu 270 (Eligibility Coverage or Benefit Inquiry)
X12_004010X092_00_hipaa271_EligCoveOrBeneInfo 271 (Eligibility Coverage or Benefit Information)
X12_004010X093_00_hipaa276_HealCareClaiStatRequ 276 (Health Care Claim Status Request)
X12_004010X093_00_hipaa277_HealCareClaiStatNoti 277 (Health Care Claim Status Notification)
X12_004010X094_00_hipaaA1_278_HealCareServReviInfoX12_004010X094_00_hipaaA3_278_HealCareServReviInfo
278 (Two versions: Health Care Services Review Information and Request for Review/Response to Request)
X12_004010X061_00_hipaa820_PaymOrdeAdvi 820 (Payment Order Remittance Advice)
X12_004010X095_00_hipaa834_BeneEnroAndMain 834 (Benefit Enrollment and Maintenance)
X12_004010X091_00_hipaa835_HealCareClaiPaym 835 (Health Care Claim Payment Advice)
X12_004010X098_00_hipaaQ1_837_HealCareClaiX12_004010X097_00_hipaaQ2_837_HealCareClaiX12_004010X096_00_hipaaQ3_837_HealCareClai
Health Care Claim (three versions: Professional, Dental, and Institutional)
X12ValidationResult Specialized validation output ETD containing the error message structure
Table 36 HIPAA 1999 Java X12 ETD Files
File Transaction Name
HIPAA Implementation Guide 103 SeeBeyond Proprietary and Confidential

Appendix A Section A.2HIPAA Files e*Gate Files for HIPAA Transactions
Note: Because of a limitation in NCPDP, the E1 (Eligibility Verification) Request and Response messages are not associated in Message Tracking (unless you perform customization to circumvent this problem). Because of this limitation, you might see timeout errors on outbound Request messages when the responses have already been received.
NCPDP Batch 1.1 files for HIPAA are stored in:
\<eGate>\server\registry\repository\default\etd\templates\NCPDP\Batch_1_1
The Batch files are named NCPDP_Batch11, and include a Monk ETD (.ssc), a Java ETD (.xsc), and an executable .jar file.
Table 38 NCPDP-HIPAA ETD Files for Telecom 5.1
Code Transaction Name
NCPDP_T51_E1_REQ_EligVeriRequNCPDP_T51_E1_RESP_EligResp
E1 (Eligibility Verification)
NCPDP_T51_B1_REQ_BillRequNCPDP_T51_B1_RESP_BillResp
B1 (Billing)
NCPDP_T51_B2_REQ_ReveRequNCPDP_T51_B2_RESP_ReveResp
B2 (Reversal)
NCPDP_T51_B3_REQ_RebiRequNCPDP_T51_B3_RESP_RebiResp
B3 (Rebill)
NCPDP_T51_P1_REQ_PrioAuthRequAndBillRequNCPDP_T51_P1_RESP_PrioAuthReqeAndBillResp
P1 (Prior Authorization Request and Billing)
NCPDP_T51_P2_REQ_PrioAuthReveRequNCPDP_T51_P2_RESP_PrioAuthReveResp
P2 (Prior Authorization Reversal)
NCPDP_T51_P3_REQ_PrioAuthInquRequNCPDP_T51_P3_RESP_PrioAuthInquResp
P3 (Prior Authorization Inquiry)
NCPDP_T51_P4_REQ_PrioAuthRequOnlyRequNCPDP_T51_P4_RESP_PrioAuthRequOnlyResp
P4 (Prior Authorization Request Only)
NCPDP_T51_N1_REQ_InfoRepoRequNCPDP_T51_N1_RESP_InfoRepoResp
N1 (Information Reporting)
NCPDP_T51_N2_REQ_InfoRepoReveRequNCPDP_T51_N2_RESP_InfoRepoReveResp
N2 (Information Reporting Reversal)
NCPDP_T51_N3_REQ_InfoRepoRebiRequNCPDP_T51_N3_RESP_InfoRepoRebiResp
N3 (Information Reporting Rebill)
NCPDP_T51_C1_REQ_ContSubsRepoRequNCPDP_T51_C1_RESP_ContSubsRepoResp
C1 (Controlled Substance Reporting)
NCPDP_T51_C2_REQ_ContSubsRepoReveRequNCPDP_T51_C2_RESP_ContSubsRepoReveResp
C2 (Controlled Substance Reporting Reversal)
NCPDP_T51_C3_REQ_ContSubsRepoRebiRequNCPDP_T51_C3_RESP_ContSubsRepoRebiResp
C3 (Controlled Substance Reporting Rebill)
HIPAA Implementation Guide 104 SeeBeyond Proprietary and Confidential
Appendix A Section A.2HIPAA Files e*Gate Files for HIPAA Transactions
NCPDP Batch 1.0 files for HIPAA are supplied only for backwards compatibility. Batch 1.1 is now the mandated standard for HIPAA transactions. The Batch 1.0 files are stored in:
\<eGate>\server\registry\repository\default\etd\templates\NCPDP\Batch_1_0
The Batch files are named NCPDP_Batch_1_0, and include a Monk ETD (.ssc), a Java ETD (.xsc), and an executable .jar file.
HIPAA Implementation Guide 105 SeeBeyond Proprietary and Confidential

Appendix B
ASC X12 Overview
This appendix provides an overview of the X12 standard, including:
An overview of ASC X12, including the structure of an X12 envelope, data elements, and syntax.
An explanation of how to use the generic message structures provided as an add-on to e*Gate to help you quickly create the structures you need for various X12 transactions.
For specific information on HIPAA, refer to Chapter 2, “HIPAA Overview” on page 12.
B.1 Introduction to X12The following sections provide an introduction to X12.
B.1.1. What Is ASC X12?ASC X12 is an EDI (electronic data interchange) standard, developed for the electronic exchange of machine-readable information between businesses.
The Accredited Standards Committee (ASC) X12 was chartered by the American National Standards Institute (ANSI) in 1979 to develop uniform standards for interindustry electronic interchange of business transactions—electronic data interchange (EDI). The result was the X12 standard.
The ASC X12 body develops, maintains, interprets, and promotes the proper use of the ASC X12 standard. Data Interchange Standards Association (DISA) publishes the ASC X12 standard and the UN/EDIFACT standard. The ASC X12 body comes together three times a year to develop and maintain EDI standards. Its main objective is to develop standards to facilitate electronic interchange relating to business transactions such as order placement and processing, shipping and receiving information, invoicing, and payment information.
The ASC X12 EDI standard is used for EDI within the United States. UN/EDIFACT is broadly used in Europe and other parts of the world.
X12 was originally intended to handle large batches of transactions. However, it has been extended to encompass real-time processing (transactions sent individually as
HIPAA Implementation Guide 106 SeeBeyond Proprietary and Confidential
Appendix B Section B.2ASC X12 Overview Components of an X12 Envelope
they are ready to send, rather than held for batching) for some healthcare transactions to accommodate the healthcare industry.
B.1.2. What Is a Message Structure?The term message structure (also called a transaction set structure) refers to the way in which data elements are organized and related to each other for a particular EDI transaction.
In e*Gate, a message structure is called an Event Type Definition (ETD). Each message structure (ETD) consists of the following:
Physical hierarchy
The predefined way in which envelopes, segments, and data elements are organized to describe a particular X12 EDI transaction.
Delimiters
The specific predefined characters that are used to mark the beginning and end of envelopes, segments, and data elements.
Properties
The characteristics of a data element, such as the length of each element, default values, and indicators that specify attributes of a data element—for example, whether it is required, optional, or repeating.
The transaction set structure of a claim that is sent from a payer to a provider defines the header, trailer, segments, and data elements required by claim transactions. Installation of X12 templates for a specific version includes transaction set structures for each of the transactions available in that version.
e*Xchange Partner Manager uses e*Gate Event Type Definitions, which are based on the X12 message structures, to verify that the data in the messages coming in or going out is in the correct format. There is a message structure for each X12 transaction.
The list of transactions provided is different for each version of X12, and for each customized implementation. This book addresses the transactions covered by the May 1999 and May 2000 implementations of the HIPAA standard.
B.2 Components of an X12 EnvelopeX12 messages are all ASCII text, with the exception of the BIN segment which is binary.
Each X12 message is made up of a combination of the following elements:
Data elements
Segments
Loops
Elements are separated by delimiters.
HIPAA Implementation Guide 107 SeeBeyond Proprietary and Confidential
Appendix B Section B.2ASC X12 Overview Components of an X12 Envelope
More information on each of these is provided below.
B.2.1. Data ElementsThe data element is the smallest named unit of information in the ASC X12 standard. Data elements can be broken down into two types. The distinction between the two is strictly a matter of how they are used. The two types are:
Simple
If a data element occurs in a segment outside the defined boundaries of a composite data structure it is called a simple data element.
Composite
If a data element occurs as an ordinally positioned member of a composite data structure it is called a composite data element.
Each data element has a unique reference number; it also has a name, description, data type, and minimum and maximum length.
B.2.2. SegmentsA segment is a logical grouping of data elements. In X12, the same segment can be used for different purposes. This means that an element’s meaning can change based on the segment. For example:
The NM1 segment is for any name (patient, provider, organization, doctor)
The DTP segment is for any date (date of birth, discharge date, coverage period)
For more information on the X12 enveloping segments, refer to “Structure of an X12 Envelope” on page 109.
B.2.3. LoopsLoops are sets of repeating ordered segments. In X12 you can locate elements by specifying:
The transaction set (for example, 270)
The loop (for example, “loop 1000” or “info. receiver loop”)
The occurrence of the loop
The segment (for example, BGN)
The element number (for example, 01)
The occurrence of the segment (if it is a repeating segment)
B.2.4. DelimitersIn an X12 message, the various delimiters act as syntax, dividing up the different elements of a message. The delimiters used in the message are defined in the
HIPAA Implementation Guide 108 SeeBeyond Proprietary and Confidential
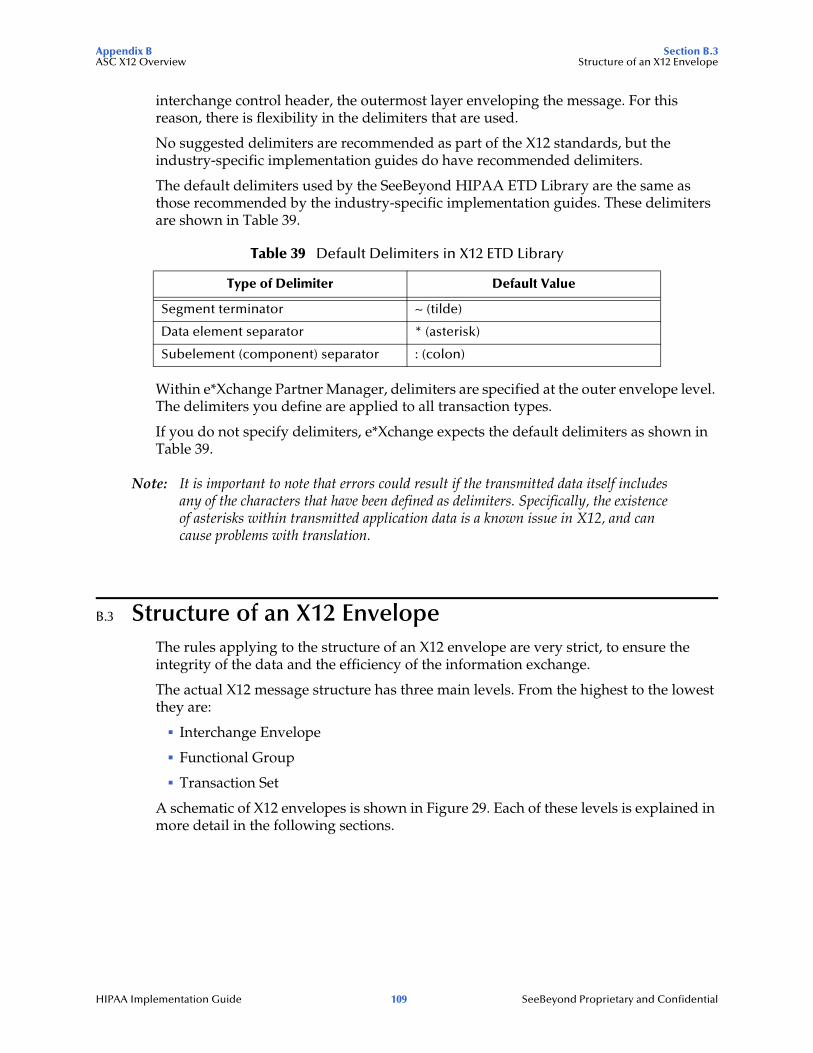
Appendix B Section B.3ASC X12 Overview Structure of an X12 Envelope
interchange control header, the outermost layer enveloping the message. For this reason, there is flexibility in the delimiters that are used.
No suggested delimiters are recommended as part of the X12 standards, but the industry-specific implementation guides do have recommended delimiters.
The default delimiters used by the SeeBeyond HIPAA ETD Library are the same as those recommended by the industry-specific implementation guides. These delimiters are shown in Table 39.
Within e*Xchange Partner Manager, delimiters are specified at the outer envelope level. The delimiters you define are applied to all transaction types.
If you do not specify delimiters, e*Xchange expects the default delimiters as shown in Table 39.
Note: It is important to note that errors could result if the transmitted data itself includes any of the characters that have been defined as delimiters. Specifically, the existence of asterisks within transmitted application data is a known issue in X12, and can cause problems with translation.
B.3 Structure of an X12 EnvelopeThe rules applying to the structure of an X12 envelope are very strict, to ensure the integrity of the data and the efficiency of the information exchange.
The actual X12 message structure has three main levels. From the highest to the lowest they are:
Interchange Envelope
Functional Group
Transaction Set
A schematic of X12 envelopes is shown in Figure 29. Each of these levels is explained in more detail in the following sections.
Table 39 Default Delimiters in X12 ETD Library
Type of Delimiter Default Value
Segment terminator ~ (tilde)
Data element separator * (asterisk)
Subelement (component) separator : (colon)
HIPAA Implementation Guide 109 SeeBeyond Proprietary and Confidential
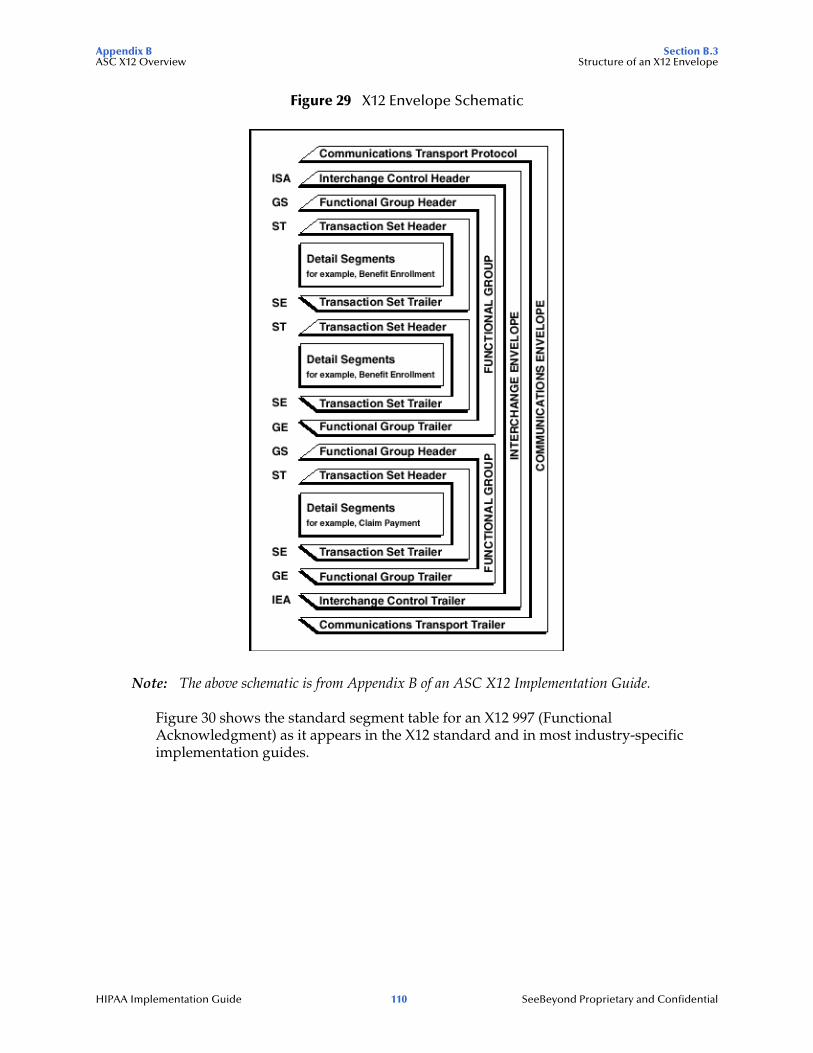
Appendix B Section B.3ASC X12 Overview Structure of an X12 Envelope
Figure 29 X12 Envelope Schematic
Note: The above schematic is from Appendix B of an ASC X12 Implementation Guide.
Figure 30 shows the standard segment table for an X12 997 (Functional Acknowledgment) as it appears in the X12 standard and in most industry-specific implementation guides.
HIPAA Implementation Guide 110 SeeBeyond Proprietary and Confidential
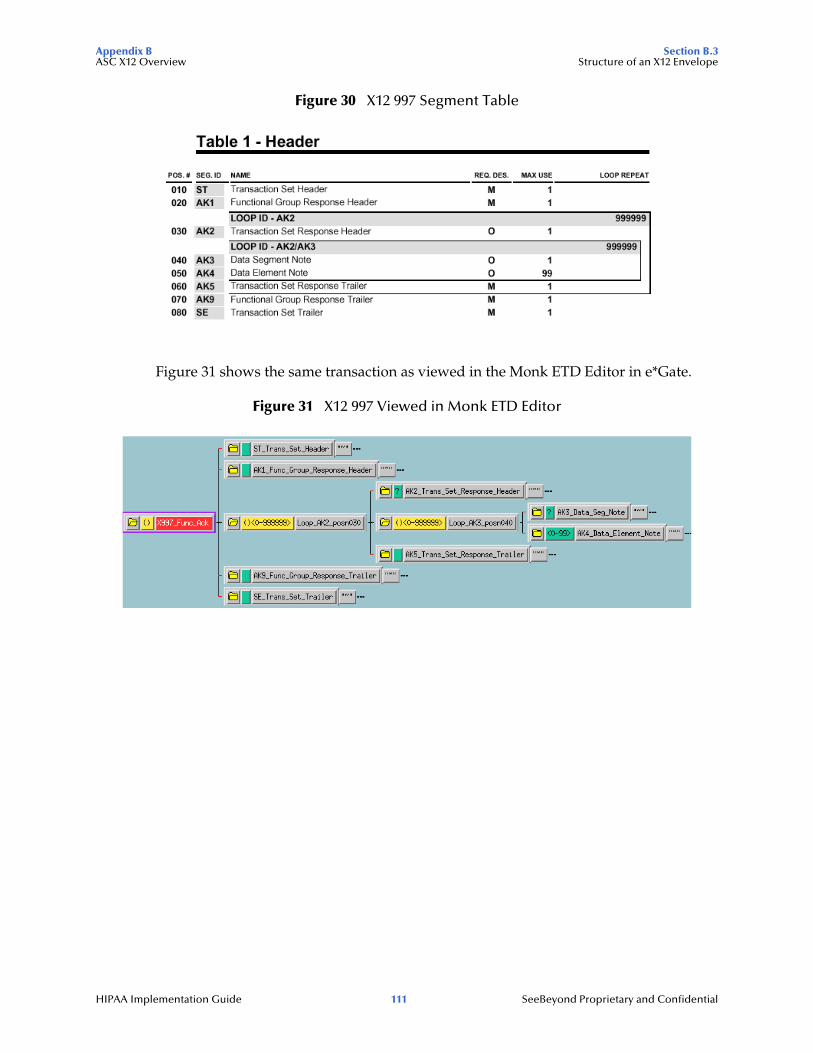
Appendix B Section B.3ASC X12 Overview Structure of an X12 Envelope
Figure 30 X12 997 Segment Table
Figure 31 shows the same transaction as viewed in the Monk ETD Editor in e*Gate.
Figure 31 X12 997 Viewed in Monk ETD Editor
HIPAA Implementation Guide 111 SeeBeyond Proprietary and Confidential

Appendix B Section B.3ASC X12 Overview Structure of an X12 Envelope
Figure 32 shows the same transaction as viewed in the Java ETD Editor.
Figure 32 X12 997 Viewed in Java ETD Editor
Figure 33 shows an example of a positive 997 acknowledgment, as viewed in the Message Tracking window in the e*Xchange Partner Manager.
Note: The message shown in Figure 33 was part of a batch and therefore includes only the ST/SE (transaction set) envelope layer.
Figure 33 Positive 997 (Functional Acknowledgment) Viewed in Message Tracking
Figure 34 shows an example of a negative 997 acknowledgment, as viewed in the Message Tracking window in the e*Xchange Partner Manager.
Note: The message shown in Figure 34 is an interactive message and therefore includes all enveloping layers.
A indicates acceptance
HIPAA Implementation Guide 112 SeeBeyond Proprietary and Confidential

Appendix B Section B.3ASC X12 Overview Structure of an X12 Envelope
Figure 34 Negative 997 (Functional Acknowledgment) Viewed in Message Tracking
B.3.1. Transaction Set (ST/SE)Each transaction set (also called a transaction) contains three things:
A transaction set header
A transaction set trailer
A single message, enveloped within the header and footer
The transaction has a three-digit code, a text title, and a two-letter code; for example, 997, Functional Acknowledgment (FA).
The transaction is comprised of logically related pieces of information, grouped into units called segments. For example, one segment used in the transaction set might convey the address: city, state, ZIP code, and other geographical information. A transaction set can contain multiple segments. For example, the address segment could be used repeatedly to convey multiple sets of address information.
The X12 standard defines the sequence of segments in the transaction set and also the sequence of elements within each segment. The relationship between segments and elements could be compared to the relationship between records and fields in a database environment.
Figure 35 Example of a Transaction Set Header (ST)
Figure 36 Example of a Transaction Set Trailer (SE)
R indicates rejection
ST*270*0159~
Transaction Set Identifier Code
Transaction Set Control Number
SE*41*0159~
Number of Included Segments
Transaction Set Control Number
HIPAA Implementation Guide 113 SeeBeyond Proprietary and Confidential
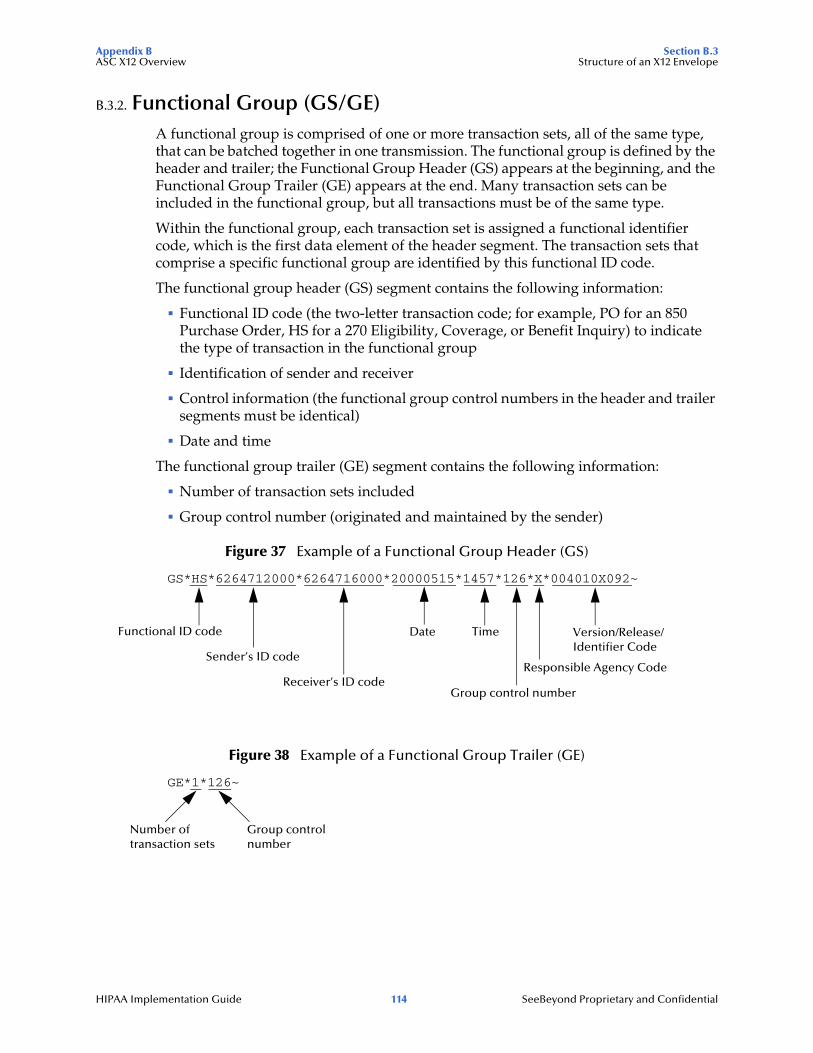
Appendix B Section B.3ASC X12 Overview Structure of an X12 Envelope
B.3.2. Functional Group (GS/GE)A functional group is comprised of one or more transaction sets, all of the same type, that can be batched together in one transmission. The functional group is defined by the header and trailer; the Functional Group Header (GS) appears at the beginning, and the Functional Group Trailer (GE) appears at the end. Many transaction sets can be included in the functional group, but all transactions must be of the same type.
Within the functional group, each transaction set is assigned a functional identifier code, which is the first data element of the header segment. The transaction sets that comprise a specific functional group are identified by this functional ID code.
The functional group header (GS) segment contains the following information:
Functional ID code (the two-letter transaction code; for example, PO for an 850 Purchase Order, HS for a 270 Eligibility, Coverage, or Benefit Inquiry) to indicate the type of transaction in the functional group
Identification of sender and receiver
Control information (the functional group control numbers in the header and trailer segments must be identical)
Date and time
The functional group trailer (GE) segment contains the following information:
Number of transaction sets included
Group control number (originated and maintained by the sender)
Figure 37 Example of a Functional Group Header (GS)
Figure 38 Example of a Functional Group Trailer (GE)
GS*HS*6264712000*6264716000*20000515*1457*126*X*004010X092~
Functional ID code
Group control number
Sender’s ID code
Receiver’s ID code
Date Time Version/Release/Identifier Code
Responsible Agency Code
GE*1*126~
Number of transaction sets
Group control number
HIPAA Implementation Guide 114 SeeBeyond Proprietary and Confidential
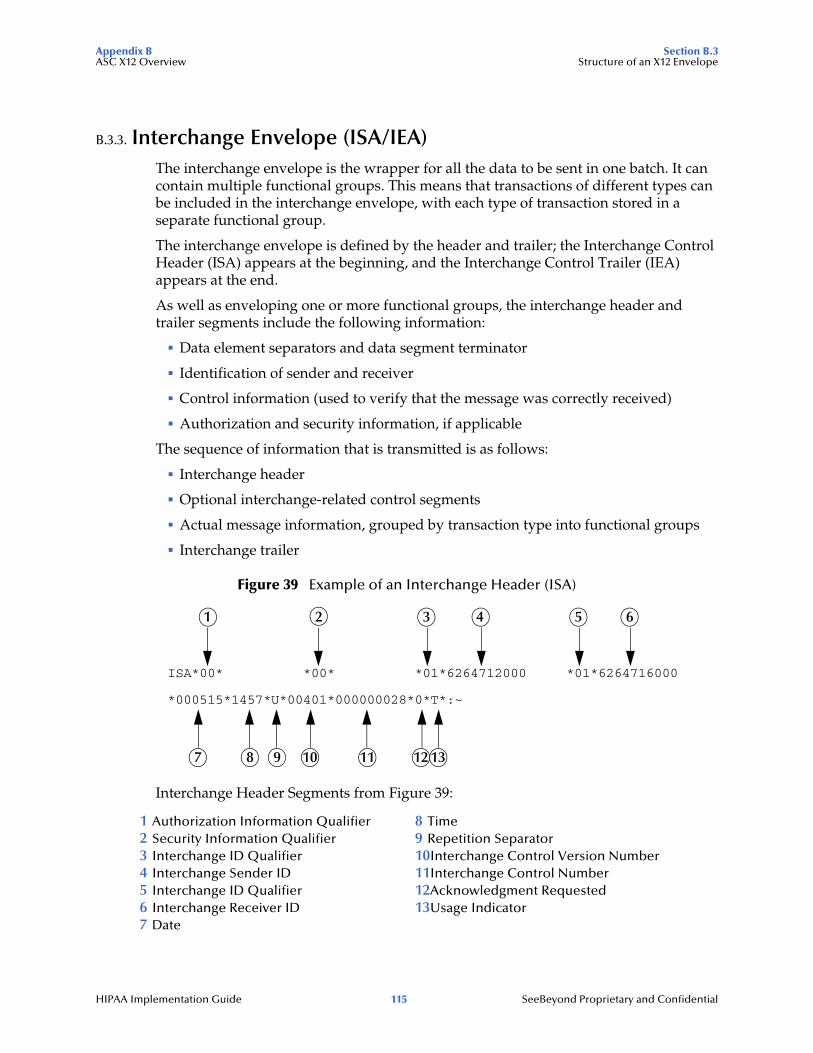
Appendix B Section B.3ASC X12 Overview Structure of an X12 Envelope
B.3.3. Interchange Envelope (ISA/IEA)The interchange envelope is the wrapper for all the data to be sent in one batch. It can contain multiple functional groups. This means that transactions of different types can be included in the interchange envelope, with each type of transaction stored in a separate functional group.
The interchange envelope is defined by the header and trailer; the Interchange Control Header (ISA) appears at the beginning, and the Interchange Control Trailer (IEA) appears at the end.
As well as enveloping one or more functional groups, the interchange header and trailer segments include the following information:
Data element separators and data segment terminator
Identification of sender and receiver
Control information (used to verify that the message was correctly received)
Authorization and security information, if applicable
The sequence of information that is transmitted is as follows:
Interchange header
Optional interchange-related control segments
Actual message information, grouped by transaction type into functional groups
Interchange trailer
Figure 39 Example of an Interchange Header (ISA)
Interchange Header Segments from Figure 39:
1 Authorization Information Qualifier2 Security Information Qualifier3 Interchange ID Qualifier4 Interchange Sender ID5 Interchange ID Qualifier6 Interchange Receiver ID7 Date
8 Time9 Repetition Separator10Interchange Control Version Number11Interchange Control Number12Acknowledgment Requested13Usage Indicator
ISA*00* *00* *01*6264712000 *01*6264716000
*000515*1457*U*00401*000000028*0*T*:~
10 11987 12 13
1 2 3 4 5 6
HIPAA Implementation Guide 115 SeeBeyond Proprietary and Confidential

Appendix B Section B.3ASC X12 Overview Structure of an X12 Envelope
Figure 40 Example of an Interchange Trailer (IEA)
B.3.4. Control NumbersThe X12 standard includes a control number for each enveloping layer:
ISA13—Interchange Control Number
GS06—Functional Group Control Number
ST02—Transaction Set Control Number
The control numbers act as identifiers, useful in message identification and tracking. The e*Xchange Partner Manager includes a flag for each control number, so you can choose not to assign control numbers to outgoing messages and not to store control numbers on incoming messages.
ISA13 (Interchange Control Number)
The ISA13 is assigned by the message sender. It must be unique for each interchange. This is the primary means used by e*Xchange Partner Manager to identify an individual interchange.
GS06 (Functional Group Control Number)
The GS06 is assigned by the sender. It must be unique within the Functional Group assigned by the originator for a transaction set.
Note: The Functional Group control number GS06 in the header must be identical to the same data element in the associated Functional Group trailer, GE02.
ST02 (Transaction Set Control Number)
The ST02 is assigned by the sender, and is stored in the transaction set header. It must be unique within the Functional Group.
Note: The control number in ST02 must be identical with the SE02 element in the transaction set trailer, and must be unique within a Functional Group (GS-GE). Once you have defined a value for ST02, e*Xchange Partner Manager uses the same value for SE02.
IEA*1*000000028~
Number of included functional groups
Interchange control number
HIPAA Implementation Guide 116 SeeBeyond Proprietary and Confidential

Appendix B Section B.4ASC X12 Overview Acknowledgment Types
B.4 Acknowledgment TypesX12 includes two types of acknowledgment, the TA1 Interchange Acknowledgment and the 997 Functional Acknowledgment.
B.4.1. TA1, Interchange AcknowledgmentThe TA1 acknowledgment verifies the interchange envelopes only. The TA1 is a single segment and is unique in the sense that this single segment is transmitted without the GS/GE envelope structures. A TA1 acknowledgment can be included in an interchange with other functional groups and transactions.
B.4.2. 997, Functional AcknowledgmentThe 997 includes much more information than the TA1. The 997 was designed to allow trading partners to establish a comprehensive control function as part of the business exchange process.
There is a one-to-one correspondence between a 997 and a functional group. Segments within the 997 identify whether the functional group was accepted or rejected. Data elements that are incorrect can also be identified.
Many EDI implementations have incorporated the acknowledgment process into all of their electronic communications. Typically, the 997 is used as a functional acknowledgment to a functional group that was transmitted previously.
The 997 is the acknowledgment transaction recommended by ASC X12.
The acknowledgment of the receipt of a payment order is an important issue. Most corporate originators want to receive at least a Functional Acknowledgment (997) from the beneficiary of the payment. The 997 is created using the data about the identity and address of the originator found in the ISA and/or GS segments.
Some users argue that the 997 should be used only as a point-to-point acknowledgment and that another transaction set, such as the Application Advice (824) should be used as the end-to-end acknowledgment.
B.4.3. Application AcknowledgmentsApplication acknowledgments are responses sent from the destination system back to the originating system, acknowledging that the transaction has been successfully or unsuccessfully completed.
Application advice (824) is a generic application acknowledgment that can be used in response to any X12 transaction. However, it has to be set up as a response transaction. Collaborations have to be written outside of e*Xchange to populate the appropriate segments in 824-based or business rules; only TA1 and 997 transactions are sent out automatically by e*Xchange.
Other types of responses from the destination system to the originating system, which may also be considered application acknowledgments, are responses to query
HIPAA Implementation Guide 117 SeeBeyond Proprietary and Confidential
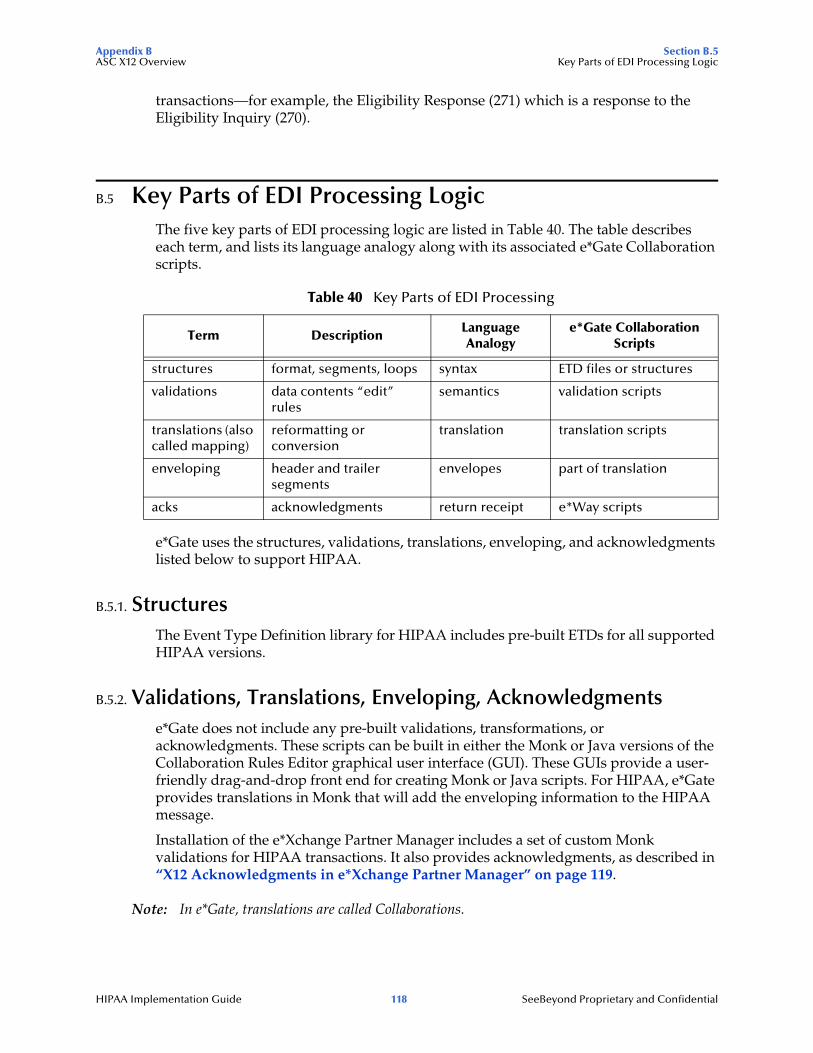
Appendix B Section B.5ASC X12 Overview Key Parts of EDI Processing Logic
transactions—for example, the Eligibility Response (271) which is a response to the Eligibility Inquiry (270).
B.5 Key Parts of EDI Processing LogicThe five key parts of EDI processing logic are listed in Table 40. The table describes each term, and lists its language analogy along with its associated e*Gate Collaboration scripts.
e*Gate uses the structures, validations, translations, enveloping, and acknowledgments listed below to support HIPAA.
B.5.1. StructuresThe Event Type Definition library for HIPAA includes pre-built ETDs for all supported HIPAA versions.
B.5.2. Validations, Translations, Enveloping, Acknowledgmentse*Gate does not include any pre-built validations, transformations, or acknowledgments. These scripts can be built in either the Monk or Java versions of the Collaboration Rules Editor graphical user interface (GUI). These GUIs provide a user-friendly drag-and-drop front end for creating Monk or Java scripts. For HIPAA, e*Gate provides translations in Monk that will add the enveloping information to the HIPAA message.
Installation of the e*Xchange Partner Manager includes a set of custom Monk validations for HIPAA transactions. It also provides acknowledgments, as described in “X12 Acknowledgments in e*Xchange Partner Manager” on page 119.
Note: In e*Gate, translations are called Collaborations.
Table 40 Key Parts of EDI Processing
Term DescriptionLanguage Analogy
e*Gate Collaboration Scripts
structures format, segments, loops syntax ETD files or structures
validations data contents “edit” rules
semantics validation scripts
translations (also called mapping)
reformatting or conversion
translation translation scripts
enveloping header and trailer segments
envelopes part of translation
acks acknowledgments return receipt e*Way scripts
HIPAA Implementation Guide 118 SeeBeyond Proprietary and Confidential

Appendix B Section B.5ASC X12 Overview Key Parts of EDI Processing Logic
B.5.3. X12 Acknowledgments in e*Xchange Partner ManagerAll X12 acknowledgments are automatically handled in e*Xchange Partner Manager. This allows you to configure the transaction set, if any, that is expected as the acknowledgment. e*Xchange Partner Manager can automatically create TA1 and 997 acknowledgments of X12. 824 and proprietary advice messages must be written as part of the implementation.
For more information on X12 acknowledgment types, refer to “Acknowledgment Types” on page 117.
HIPAA message validations performed by the Faciledi appliance from Claredi Corporation working in conjunction with e*Xchange Partner Manager support the following for X12:
Transmission-level duplicate checking
Unique ID assignment through internal or validation processes
Journal file Error copying to the Error Queue
For more information, see “Configuring System Default Settings” on page 88
B.5.4. Trading Partner AgreementsThere are three levels of information that guide the final format of a specific transaction. These three levels are:
The ASC X12 standard
ASC X12 publishes a standard structure for each X12 transaction.
Industry-specific Implementation Guides
Specific industries publish Implementation Guides customized for that industry. Normally, these are provided as recommendations only. However, in certain cases, it is extremely important to follow these guidelines. Specifically, since HIPAA regulations are law, it is important to follow the guidelines for these transactions closely.
Trading Partner Agreements
It is normal for trading partners to have individual agreements that supplement the standard guides. The specific processing of the transactions in each trading partner’s individual system might vary between sites. Because of this, additional documentation that provides information about the differences is helpful to the site’s trading partners and simplifies implementation. For example, while a certain code might be valid in an implementation guide, a specific trading partner might not use that code in transactions. It would be important to include that information in a trading partner agreement.
HIPAA Implementation Guide 119 SeeBeyond Proprietary and Confidential

Appendix B Section B.6ASC X12 Overview Additional Information
B.6 Additional InformationFor more information on X12, visit the following Web sites:
For X12 standard:
http://www.disa.org
For Implementation Guides: Washington Publishing Company at
http://www.wpc-edi.com
Note: This information is correct at the time of going to press; however, SeeBeyond has no control over these sites. If you find the links are no longer correct, use a search engine to search for X12.
HIPAA Implementation Guide 120 SeeBeyond Proprietary and Confidential
Index
Index
Numerics997 message acknowledgements 92
Aacknowledgments 17, 117, 118
functional acknowledgment (997) 117interchange acknowledgment (TA1) 117NCPDP 17receipt of payment order 117
acknowledgments, handling of 119addDataError 29addUserDataError 29audit feature 20
BB2B Profile, creating 54batch standard 16book 24, 42, 85bypassing HIPAA validations 25
CClaredi 17, 22, 85clearDataErrors 29code sets
descriptions 26standard sets 26
CollaborationJava 73Java pass through 75validation 55, 57
Collaboration Rulesfor reprocessing 28, 29post-validation processing 29
company, creating 53confidentiality mandates 14configuring
Trading Partner profiles 52control numbers 116
functional group control number (GS06) 116interchange control number (ISA13) 116transaction set control number (ST02) 116
countDataError 30
Ddata element separator 109data elements 108delimiters 108
data element separator 109segment terminator 109subelement (component) separator 109
Ee*Gate transaction ETDs 21e*Way
HIPAA validation 69JMS connection 72, 73, 79multi-mode 72, 78
EDI standards 13enveloping 118Error Audit column 32, 38error data
adding 29stripping 29
Error Data column 32, 40error filter table 90ES_CLAREDIFILTER 90event type
Java 74, 102java 21NCPDP 103
eX_X12_Validate 34
FFaciledi appliance 85functional acknowledgments (997) 117functional group 114
validation phase 25functional group control number (GS06) 116
GgetClarediRawData 30GS06 (functional group control number) 116
HHIPAA 12
additional information (Web sites) 17HIPAA ETD Library 21, 102HIPAA reprocessing validation sequence 33HIPAA testing 22
HIPAA Implementation Guide 121 SeeBeyond Proprietary and Confidential
Index
HIPAA transaction files 99HIPAA transactions 20HIPAA validations
overriding 25sequence 33
HIPAA X12sending a health care claim (case study) 48
Iimplementation
acknowledgments 118enveloping 118structures 118translations 118validations 118
indexbook 24, 42, 85
inner envelopecreating 55
intended reader 11interchange acknowledgment (TA1) 117interchange control number (ISA13) 116interchange envelope 115
validation phase 25Interleaved Error Reports 97ISA13 (interchange control number) 116
JJava
Collaboration rule 74pass through 72, 73, 75
JMS Connection 73
Llarge messages
and Message Tracking 42and processing capacity 42message profile settings for 45trading partner attributes for 44
loops 108
MMessage Profile, creating 55, 57Message Profile, validation settings 93Message Tracking 70
Error Audit column 32Error Data column 32for reprocessed messages 32post-validation errors 40
reprocessed messages 38Monk ETDs 21
NNCPDP
acknowledgment types 17batch standard 16envelope structure 16history 15request transaction 16what is it? 15
NCPDP-HIPAA ETDs 103NCPDP-HIPAA transaction codes 104
Ooverview
of X12 99, 106
Pparameters, Java method 30poller 77Post Validation Collaboration field 32, 33privacy mandates 14PVC Collaboration indicator 32PVC, Input and Output ETDs for, 34
RremoveDataError 30reprocessing transactions 25
Collaboration Rules 29response transactions 117
Ssecurity mandates 14segment terminator 109segments 108service
Java Collaboration 72ST02 (transaction set control number) 116stripDataError 30structure of an X12 envelope 109structures 118subelement (component) separator 109syntax
control numbers 116delimiters 108
system settingsClaredi/Faciledi-driven 88
HIPAA Implementation Guide 122 SeeBeyond Proprietary and Confidential

Index
TTA1 (interchange acknowledgment) 117telecommunications standard
NCPDP telecommunications standard 16Trading Partner agreements 14, 119Trading Partner profiles, configuring 52Trading Partner, creating 54transaction codes 104transaction set 113transaction set control number (ST02) 116translations 118
Uunique identifiers 13user audit 20
Vvalidation Collaboration 55, 57validation e*Way 69validation flow 86validations 118
overriding 25through Faciledi appliance 85
View Error Audit Data window 39View Error Data window 40viewing errors 96
WWEDI SNIP 22
XX12
acknowledgment types 117additional information (Web sites) 120data elements 108envelope structure 109functional group 114interchange envelope 115loops 108message structure 107segments 108transaction set 113what is it? 106
X12 acknowledgments, handling of 119
HIPAA Implementation Guide 123 SeeBeyond Proprietary and Confidential