hinweise zum gebrauch instructions for use manuel d ... · »note: do not dispose of old batteries...
TRANSCRIPT

1
○ ○ ○ ○ ○ ○ ○ ○ ○ ○ ○ ○ ○ ○ ○ ○ ○ ○ ○ ○ ○ ○ ○ ○ ○ ○ ○ ○ ○ ○ ○ ○ ○ ○ ○ ○ ○ ○ ○ ○ ○ ○ ○ ○ ○ ○
D GB F
Hinweise zum GebrauchInstructions for use
Manuel d'utilisation

2
○ ○ ○ ○ ○ ○ ○ ○ ○ ○ ○ ○ ○ ○ ○ ○ ○ ○ ○ ○ ○ ○ ○ ○ ○ ○ ○ ○ ○ ○ ○ ○ ○ ○ ○ ○ ○ ○ ○ ○ ○ ○ ○ ○ ○ ○
D GB F
Contents
Please read these instructions carefully
before using the camera.
Parts and functions » 4
LCD-Monitor
and Viewfinder display » 10
Using the camera
Attaching the strap » 12
Loading batteries » 12
Testing batteries » 13
Adjusting the eyepiece » 14
MODE button » 14
DRIVE button » 14
Loading film » 15
Setting the film speed » 16
Holding the camera » 17
Focusing » 17
Procedure » 18
Framing the picture » 19
Focus lock » 20
Manual focusing » 21
Removing the film » 22
Sommaire
Veuillez lire attentivement le mode
d’emploi avant d’utiliser l’appareil
Pièces et fonctions » 4
Ecran ACL et affichages
dans le viseur » 10
Maniement et emploi
Fixation de la bandoulière » 12
Mise en place des piles » 12
Contrôle des piles » 13
Réglage dioptrique » 14
Touche de fonction MODE » 14
Touche de fonction DRIVE » 14
Mise en place du film » 15
Réglage sur la sensibilité du film » 16
Tenue de l’appareil » 17
Mise au point » 17
Choix du sujet » 18
Cadrage » 19
Mémorisation de la mise au point
(focus-lock) » 20
Mise au point manuelle » 21
Retrait du film » 22
Inhalt
Bitte die Anleitung vor Benutzung der
Kamera aufmerksam durchlesen!
Einzelteile und Funktion » 4
LCD-Monitor und Sucher » 10
Handhabung und Gebrauch
Tragriemen anbringen » 12
Batterien einsetzen » 12
Batteriespannung prüfen » 13
Dioptrieneinstellung » 14
Funktionstaste MODE » 14
Funktionstaste DRIVE » 14
Film einlegen » 15
Filmempfindlichkeit einstellen » 16
Kamerahaltung » 17
Fokussieren » 17
Motiv anwählen » 18
Bildausschnitt bestimmen » 19
Schärfenspeicher (Fokus-Lock) » 20
Manuelle Fokussierung » 21
Film entnehmen » 22

3
○ ○ ○ ○ ○ ○ ○ ○ ○ ○ ○ ○ ○ ○ ○ ○ ○ ○ ○ ○ ○ ○ ○ ○ ○ ○ ○ ○ ○ ○ ○ ○ ○ ○ ○ ○ ○ ○ ○ ○ ○ ○ ○ ○ ○ ○
D GB F
Belichtungsarten wählen » 23
Programm-/ Zeitautomatik » 23
Blendenautomatik » 24
Manueller Betrieb » 24
Langzeitbelichtung BULB » 25
Blitzaufnahmen » 25
Belichtungskorrektur » 26
ABC-Bracketing » 27
Selbstauslöser » 28
Fernauslöser » 29
Serienaufnahmen » 30
Mehrfachbelichtungen » 31
Datenspeicher » 32
Dateneinbelichtung » 33
Datum- u. Zeit-Korrektur » 34
Batteriewechsel Datenrückwand » 35
Blitzbetrieb » 36
Leitzahltabelle » 40
Abhilfe bei Bedienungsfehlern » 41
Pflege der Kamera » 43
Technische Daten » 45
Choosing an exposure mode » 23
Aperture-priority AE » 23
Shutter-priority AE » 24
Manual exposure control » 24
Time exposure BULB » 25
Flash photography » 25
Exposure compensation » 26
Automatic exposure
bracketing (ABC) » 27
Self-timer photography » 28
Remote control » 29
Continuous film advance » 30
Multiple exposure » 31
Data memory » 32
Imprinting the date » 33
Correcting the date and hour » 34
Changing battery of the
data back » 35
Using flash » 36
Guide-number table » 40
Troubleshooting » 41
Camera care » 43
Specifications » 45
Sélection du type d’exposition » 23
Vitesse automatique » 23
Diaphragme automatique » 24
Fonctionnement manuel » 24
Pose longue BULB » 25
Prise au flash » 25
Correction de l’exposition » 26
Bracketing A,B,C » 27
Retardateur » 28
Déclencheur à distance » 29
Prises en rafale » 30
Surimpressions » 31
Mémoire de données » 32
Insolation de la date » 33
Correction de la date et de l’heure » 34
Changement de la pile
du dos dateur » 35
Fonctionnement avec le flash » 36
Table des nombres-guides » 40
Remèdes aux erreurs de
maniement » 41
Entretien de l’appareil » 43
Données techniques » 45

○ ○ ○ ○ ○ ○ ○ ○ ○ ○ ○ ○ ○ ○ ○ ○ ○ ○ ○ ○ ○ ○ ○ ○ ○ ○ ○ ○ ○ ○ ○ ○ ○ ○ ○ ○ ○ ○ ○ ○ ○ ○ ○ ○ ○ ○
4

5
○ ○ ○ ○ ○ ○ ○ ○ ○ ○ ○ ○ ○ ○ ○ ○ ○ ○ ○ ○ ○ ○ ○ ○ ○ ○ ○ ○ ○ ○ ○ ○ ○ ○ ○ ○ ○ ○ ○ ○ ○ ○ ○ ○ ○ ○
D GB F
Parts and functionsEinzelteile und Funktionen Pièces et fonctions
! Auslöser
" Einstellrad für Verschlußzeiten (ver-senkbar)
§ A,B,C-Taste
$ LCD-Monitor
% Einstellrad für Entfernungs-einstellung (versenkbar)
& Tragriemenhalter, links
/ Sucherfenster
( LED für Selbstauslöser
) IR-Fenster
= Blendeneinstellring
Q Objektiv
W Tragriemenhalter, rechts
M Objektivschutzdeckel,gleichzeitig IR-Fernauslöser
; Sensor für Belichtungsmessung
: Fenster für Entfernungsmessung
_ IR-Empfänger
! Shutter release
" Shutter-speed dial (retractable)
§ ABC button
$ LCD monitor
% Focusing dial (retractable)
& Left-hand strap lug
/ Eyepiece window
( Self-timer LED
) Remote-control sensor
= Aperture ring
Q Lens
W Right-hand strap lug
M Lens cap, doubling as IR remotelelease
! Déclencheur
" Molette des vitesses (escamotable)
§ Touche A,B,C
$ Ecran ACL
% Molette de mise au point(escamotable)
& Attache gauche de bandoulière
/ Fenêtre du viseur
( DEL pour retardateur
) Récepteur pour déclenchementpar IR
= Bague de réglage du diaphragme
Q Objectif
W Attache droite de bandoulière
M Bouchon d’objectif ettélédéclencheur IR

○ ○ ○ ○ ○ ○ ○ ○ ○ ○ ○ ○ ○ ○ ○ ○ ○ ○ ○ ○ ○ ○ ○ ○ ○ ○ ○ ○ ○ ○ ○ ○ ○ ○ ○ ○ ○ ○ ○ ○ ○ ○ ○ ○ ○ ○
6

7
○ ○ ○ ○ ○ ○ ○ ○ ○ ○ ○ ○ ○ ○ ○ ○ ○ ○ ○ ○ ○ ○ ○ ○ ○ ○ ○ ○ ○ ○ ○ ○ ○ ○ ○ ○ ○ ○ ○ ○ ○ ○ ○ ○ ○ ○
D GB F
E Anschlußbuchse für Blitzgerät
R Rückwandriegel
T Gewindeanschluß für Blitzgerät
Z Taste ON/OFF
U Dioptrieneinstellung
I Sucherokular
O Taste MODE
P Taste DRIVE
A Wipp-Taste für Zoomobjektiv
S Kamerarückwand
D Display für Dateneinbelichtung
F Tasten für Dateneinbelichtung
G Filmfenster
H Knopf für Filmrückspulung
J Stativgewinde 1/4"
K Batteriefachdeckel
E Flash terminal
R Back lock
T Threaded flash socket
Z ON/OFF button
U Eyesight adjustment
I Viewfinder eyepiece
O MODE button
P DRIVE button
A Zoom rocker
S Camera back
D Date display
F Date buttons
G Film-type window
H Rewind button
J 1/4" tripod socket
K Battery-chamber cover
E Prise pour flash
R Verrouillage dos
T Raccord fileté pour flash
Z Touche ON/OFF
U Réglage dioptrique
I Oculaire
O Touche MODE
P Touche DRIVE
A Touche à bascule pour objectifZoom
S Dos de l’appareil
D Ecran pour composition de la date
F Touches pour insolation de la date
G Fenêtre du film
H Bouton de rembobinage
J Filetage pour pied 1/4"
K Couvercle du logement des piles

○ ○ ○ ○ ○ ○ ○ ○ ○ ○ ○ ○ ○ ○ ○ ○ ○ ○ ○ ○ ○ ○ ○ ○ ○ ○ ○ ○ ○ ○ ○ ○ ○ ○ ○ ○ ○ ○ ○ ○ ○ ○ ○ ○ ○ ○
8

9
○ ○ ○ ○ ○ ○ ○ ○ ○ ○ ○ ○ ○ ○ ○ ○ ○ ○ ○ ○ ○ ○ ○ ○ ○ ○ ○ ○ ○ ○ ○ ○ ○ ○ ○ ○ ○ ○ ○ ○ ○ ○ ○ ○ ○ ○
D GB F
L Filmpatronenfach
Ö DX-Kontakte
Y Film-Gleitbühne
X Schlitzverschluß
C Filmeinlege-Markierung
V * Filmandruckplatte
B * Batteriefach für Dateneinrichtung
N * Fenster für Dateneinbelichtung
L Cartridge chamber
Ö DX contacts
Y Film guides
X Focal-plane shutter
C Film-start marker
V * Film pressure plate
B * Date-imprinting battery chamber
N * Date-imprinting window
L Logement de la cartouche de film
Ö Contacts DX
Y Fenêtre-glissière
X Obturateur focal
C Marque de mise en place du film
V * Presseur de film
B * Logement de la pile pourdispositif de datage
N * Fenêtre pour insolation de la date
* Teile 34 – 36in den Einzelabbildungen
* For parts 34 – 36 ,see detail pictures
* Pièces 34 – 36 dans les illustrations de détail

10
○ ○ ○ ○ ○ ○ ○ ○ ○ ○ ○ ○ ○ ○ ○ ○ ○ ○ ○ ○ ○ ○ ○ ○ ○ ○ ○ ○ ○ ○ ○ ○ ○ ○ ○ ○ ○ ○ ○ ○ ○ ○ ○ ○ ○ ○
D GB F
888 88 EXPmmFNO
ISOSPEED
ABC 0 • 1 2•
8.888.8
D GB F
LCD-MonitorLCD-MonitorEcran ACL
Viewfinder display
AF area
Minimum focusing distance 1.2 m
Autofocus frame
Shutter speed
Distance
Over/underexposure
Aperture
Flash
Focus indicator
Sucheranzeigen
AF-Meßfeld
Nahbereichsgrenze von 0,7 – 1,2 m
Fokussierrahmen
Verschlußzeit
Entfernung
Über-/Unterbelichtung
Blende
Blitzbetrieb
Fokussierinformation
Affichages dans le viseur
Champ de mesure AF
Mise au point minimum de 1,2 m
Cadre de mise au point
Vitesse
Distance
Sous-/surexposition
Diaphragme
Fonctionnement avec flash
Information de mise au point

11
○ ○ ○ ○ ○ ○ ○ ○ ○ ○ ○ ○ ○ ○ ○ ○ ○ ○ ○ ○ ○ ○ ○ ○ ○ ○ ○ ○ ○ ○ ○ ○ ○ ○ ○ ○ ○ ○ ○ ○ ○ ○ ○ ○ ○ ○
D GB F
88 EXPmmFNO
888ISOSPEED
cap
ABC 0 • 1
Objektivdeckel
Verschlußzeit/ISO
Entfernung/Brennweite/Blende/Bildzähler
Fernauslöser
Selbstauslöser
Serienaufnahmen
Mehrfachbelichtungen
Filmpatronenanzeige
offene Rückwand
Filmrückspulung
Filmlaufanzeige
Film fehlerhaft eingelegt
Batteriezustand
Bracketing (A-B-C)
Information
Lens cap
Shutter speed/ISO
Distance/focal length/frame counter
Remote release
Self-timer
Continuous film advance
Multiple exposure
Film-cartridge symbol
Open camera back
Film rewind
Film advance
Battery status
Bracketing (ABC)
Information
Capuchon d’objectif
Vitesse/ISO
Distance/focale/compteur de vues
Télédéclencheur
Retardateur
Prises en rafale
Surimpressions
Affichage cartouche
Dos ouvert
Rembobinage
Affichage d’avance du film
Etat des piles
Bracketing (A-B-C)
Information

12
○ ○ ○ ○ ○ ○ ○ ○ ○ ○ ○ ○ ○ ○ ○ ○ ○ ○ ○ ○ ○ ○ ○ ○ ○ ○ ○ ○ ○ ○ ○ ○ ○ ○ ○ ○ ○ ○ ○ ○ ○ ○ ○ ○ ○ ○
D GB F
Tragriemen anbringenTragriemen gemäß Abbildung an Halter& und W befestigen.
Batterien einsetzenBatteriefachdeckel K mit Münze links-drehend öffnen und 2 Lithiumbatterien(Typ CR2) mit den Plus-Polen nach un-ten einlegen. Batteriefachdeckel schlie-ßen.
Attaching the strapAttach the strap to the lugs & and Was illustrated.
Loading batteriesOpen battery-chamber cover K, turn-ing it counterclockwise with a coin,and insert two type CR2 lithium batter-ies with their positive poles (+) facingdown. Replace battery-chamber cover.
Fixation de la bandoulièreFixer la bandoulière aux attaches & etW comme indiqué sur l’illustration.
Mise en place des pilesOuvrir le couvercle K du logementavec une pièce de monnaie en tour-nant vers la gauche. Y installer 2 pilesau lithium (type CR2), les pôles plus di-rigés vers le bas. Refermer le couver-cle.
&W &
K

13
○ ○ ○ ○ ○ ○ ○ ○ ○ ○ ○ ○ ○ ○ ○ ○ ○ ○ ○ ○ ○ ○ ○ ○ ○ ○ ○ ○ ○ ○ ○ ○ ○ ○ ○ ○ ○ ○ ○ ○ ○ ○ ○ ○ ○ ○
D GB F
Batteriespannung prüfenDie Batterieleistung wird beim Ein-schalten der Kamera automatisch wiefolgt geprüft:» Batteriesymbol im LCD-Monitor
– ausreichende Kapazität» Batteriesymbol halb gefüllt
– einige Aufnahmen noch möglich,Batterien erneuern
» Batteriesymbol halb gefüllt und blin-kend– Batterien erneuern
» Hinweis: Alte Batterien gehörennicht in den Hausmüll, sondern sindentsprechend zu entsorgen.
Testing batteriesBattery voltage is tested automaticallywhen the camera is switched on:» Battery symbol in LCD
– Sufficient battery power» Battery symbol half filled
– Keep spare batteries ready» Battery symbol half filled
and blinking– Replace batteries
» Note: Do not dispose of oldbatteries together with your house-hold waste!
Contrôle des pilesLors de la mise en circuit, la capacitédes piles est contrôléeautomatiquement comme suit :» Le pictogramme de pile apparaît
sur l’écran ACL– Suffisamment de capacité.
» Pictogramme à moitié constitué– Quelques vues encore possiblesmais piles à changer
» Pictogramme à moitié constitué etclignotant– Changer les piles
» Remarque: Ne pas jeter les pilesusées avec les ordures ménagèresmais les déposer aux rebutsspéciaux.

14
○ ○ ○ ○ ○ ○ ○ ○ ○ ○ ○ ○ ○ ○ ○ ○ ○ ○ ○ ○ ○ ○ ○ ○ ○ ○ ○ ○ ○ ○ ○ ○ ○ ○ ○ ○ ○ ○ ○ ○ ○ ○ ○ ○ ○ ○
D GB F
DioptrieneinstellungMit der Dioptrieneinstellung U kanndas Sucherbild der Sehstärke ange-paßt werden.(Einstellbereich: -3 bis +1 Dioptrien).
Funktionstaste MODE OMit dieser Taste können folgendeKamerafunktionen gewählt werden:
» Selbstauslöser
» Fernauslöser
» Serienaufnahmen
» MehrfachbelichtungenFunktionstaste DRIVE PMit dieser Taste können folgende Kor-rekturen vorgenommen werden:
» Belichtungskorrektur
» Filmempfindlichkeit
» Informationen
Adjusting the eyepieceThe eyesight adjustment U serves toadjust the eyepiece to match yourneeds. The available range is from -3to +1 diopters.
MODE button OUse this button to choose one of thefollowing modes:
» Self-timer
» Remote control
» Continuous film advance
» Multiple exposureDRIVE button PThis button controls the followingfunctions:
» Exposure compensation
» Film-speed setting
» Information
U
EXPmmFNO
O P
ISOISO ISO ISO
888 EXPmmFNO
ISOSPEED
ABC 0 • 1 2•888 EXP
mmFNO
ISOSPEED
ABC 0 • 1 2•
Réglage dioptriqueLe réglage dioptrique U permetd’adapter l’image du viseur à l’acuitévisuelle. (Latitude de réglage : -3 à +1dioptries).
Touche de fonctions MODE OCette touche permet de choisir lesdifférentes fonctions :
» Retardateur
» Déclenchement à distance
» Prises en rafale
» SurimpressionsTouche de fonctions DRIVE PCette touche permet d’effectuer lescorrections suivantes:
» Correction d’exposition
» Sensibilité du film
» Informations

15
○ ○ ○ ○ ○ ○ ○ ○ ○ ○ ○ ○ ○ ○ ○ ○ ○ ○ ○ ○ ○ ○ ○ ○ ○ ○ ○ ○ ○ ○ ○ ○ ○ ○ ○ ○ ○ ○ ○ ○ ○ ○ ○ ○ ○ ○
D GB F
Film einlegenKamerarückwand S durch Betätigendes Riegels R öffnen und aufklappen.Filmpatrone in Filmfach L einlegen,festdrücken und Film soweit herauszie-hen, bis der Filmanfang die orangefar-bene Vorspannmarkierung C erreicht.Den Film leicht andrücken, damit er aufder Filmgleitbahn aufliegt. Kamera-rückwand schließen und einrasten las-sen. Der Kameramotor transportiertden Film automatisch auf Bild 1. Beikorrekt eingelegtem Film erscheint imLCD-Monitor die Transportkontroll-anzeige mit der Bildzahl 1. Ist der Filmnicht richtig eingelegt, erscheint imMonitor die Anzeige E. Dann die Rück-wand öffnen und Einlegevorgang wie-derholen.
» Hinweis: Der Kameraverschluß istein Präzisionsteil und darf nicht mitdem Finger oder dem Filmvorspannin Berührung kommen.
Loading filmOpen camera back S by pressing lockR. Insert film cartridge in chamber L,hold it down and pull film leader outuntil it reaches the orange start marker.Make sure the film is in perfect contactwith the film guides. Close the backuntil it snaps into place. The camerawill automatically advance the film tothe first frame. If the film has been cor-rectly loaded, the film-advance displayand the frame number 1 appear in theLCD. Should the film have been loadedincorrectly, the LCD will read E. In thiscase, open the camera back oncemore and repeat the process.» Note: Be sure never to touch the
focal-plane shutter with your fingersor with the film leader!
Mise en place du filmOuvrir le dos S en manœuvrant leverrouillage R. Glisser la cartouchedans son logement L, appuyezfermement et tirer le film jusqu’à ceque l’amorce atteigne la marque oran-ge C. Appuyer légèrement sur lapellicule pour qu’elle repose sur laglissière et bien refermer le dos del’appareil jusqu’à encliquetage. Lemoteur transporte alors automatique-ment le film jusqu’à la vue no 1. Si lefilm a été correctement mis en place,l’affichage de contrôle de transport dufilm apparaît sur l’écran ACL ainsi quele nombre 1. Si le film n’a pas été miscorrectement, E apparaît sur l’écranACL. Ouvrir alors le dos et renouvelerl’opération.
» Remarque: L’obturateur est unepièce de précision et ne doit jamaisentrer en contact avec un doigt ouavec l’amorce du film.
R
CL

16
○ ○ ○ ○ ○ ○ ○ ○ ○ ○ ○ ○ ○ ○ ○ ○ ○ ○ ○ ○ ○ ○ ○ ○ ○ ○ ○ ○ ○ ○ ○ ○ ○ ○ ○ ○ ○ ○ ○ ○ ○ ○ ○ ○ ○ ○
D GB F
Filmempfindlichkeit einstellenBei DX-codierten Filmen erfolgt die Ein-stellung automatisch zwischen ISO 25und 5000. Bei nicht DX-codierten Fil-men wird automatisch ISO 100/21°verrechnet. Wird eine andere Film-empfindlichkeit gewünscht, so kanndiese auch bei DX-codiertem Film wiefolgt verändert werden:
Taste P DRIVE solange betätigen, bisdas Symbol ISO im LCD-Monitor er-scheint. Durch Betätigung der Wipp-Taste A läßt sich der ISO-Wert verän-dern und durch Drücken des KnopfesABC speichern.
� WIDE TELE �DX 6-8-10 5000-6400
Die Korrektur erfolgt in 1/3-Stufen undumfaßt den Bereich von ISO 6–6400.
» Hinweis: Bei Filmwechsel ist daraufzu achten, daß der eingestellte ISO-Wert wieder korrigiert werden muß.
Setting the film speedWith DX-coded film, the camera will setthe film speed automatically betweenISO 25/15° and ISO 5000/38°.With non-DX-coded film, the cameradefaults to ISO 100/21°. To overridethe DX setting or set the film speedmanually with non-DX-coded film,proceed as follows:
Hold down DRIVE button P until ISOappears in the LCD. Then press zoomrocker A to change the ISO settingand press ABC button for memory.
� WIDE TELE �DX 6-8-10 5000-6400
Settings are possible in increments of1/3 EV over a range of ISO 6 to 6400.
» Note: Be sure to change the film-speed setting and, if necessary,reset to DX when loading a new film!
Réglage sur la sensibilité du filmAvec les films codés DX, le réglage sefait automatiquement entre ISO 25 et5000. Avec les films non codés DX, leréglage se fait automatiquement à lavaleur ISO 100/21°. Si l’on désire unréglage sur une autre sensibilité,comme d’ailleurs avec un film codéDX, procéder comme suit :
Appuyer sur la touche P DRIVEjusqu’à ce que le symbole ISOapparaisse sur l’écran ACL. Pourmodifier la valeur ISO, il faut appuyersur la touche à bascule A; appuyerensuite sur la touche ABC pourmémoriser la nouvelle valeur.
� WIDE TELE �DX 6-8-10 5000-6400
La correction s’effectue par 1/3 devaleur entre 6 et 6400 ISO.
» Remarque: Lors d’un changementde film, penser à réviser le réglagede la valeur ISO.

17
○ ○ ○ ○ ○ ○ ○ ○ ○ ○ ○ ○ ○ ○ ○ ○ ○ ○ ○ ○ ○ ○ ○ ○ ○ ○ ○ ○ ○ ○ ○ ○ ○ ○ ○ ○ ○ ○ ○ ○ ○ ○ ○ ○ ○ ○
D GB F
KamerahaltungUm Verwackelungen zu vermeiden dieKamera stets ruhig halten. Das gilt be-sonders für Aufnahmen mit Tele-Ein-stellung. Ferner ist darauf zu achten,daß Objektiv, Belichtungssensor undAutofokusfenster nicht durch Finger,Haare oder Kameratasche verdecktwerden.Taste ON/OFF Z drücken, Objektivfährt heraus und die Kamera ist be-triebsbereit.Im LCD-Monitor und im Sucher-Dis-play blinkt die Information CAP als Hin-weis auf evtl. aufgesetzten Objektiv-schutzdeckel M. Sie erlischt beiBetätigung einer beliebigen Funktions-taste.
FokussierenDie Kamera verfügt sowohl über eineautomatische als auch eine manuelleScharfeinstellung. Wird das Einstellrad% aus der A-Position herausgedreht,wird die Schärfe manuell zwischen0,7 m und ∞ bestimmt. Dazu ist dasEinstellrad durch Antippen zu ent-rasten. Für die automatische Fokussie-rung ist das Einstellrad % wieder in dieA-Position zu bringen und abzusenken.
Holding the cameraHold the camera as steady as possibleand press the shutter release verygently to avoid camera shake. This isespecially important when using a longfocal length. Also, avoid blocking thelens, the exposure sensor or theautofocus windows with your fingers,your hair or the camera case.
Press ON/OFF button Z — the lensmoves out, the camera is ready to fire.Should the lens cap still be attached,CAP will blink both in the LCD and theviewfinder as a warning. It willdisappear as any button is pressed.
FocusingFocusing is possible both automaticallyand manually. With the dial % turnedaway from A, the distance can be setmanually between 0.7 m and ∞ (infinity)after disengaging the dial by slightpressure. For autofocusing, turn dial %back to A and push it down.
Tenue de l’appareilPour éviter un flou de bougé veiller àtenir l’appareil immobile, tout parti-culièrement en réglage télé. Eviter enoutre toute obstruction de l’objectif,des fenêtres du capteur d’expositionou de l’autofocus avec un doigt, lescheveux ou le sac de l’appareil.Appuyer sur la touche Z ON/OFF,l’objectif sort et l’appareil est prêt àfonctionner.L’information CAP clignote sur l’écranACL et sur la plage d’affichage du viseurpour signaler que le capuchon de l’ob-jectif M n’est éventuellement pas ôté.Pour faire cesser le clignotement, il fautappuyer sur n’importe quelle touche.
Mise au pointL’appareil laisse le choix entre la miseau point automatique ou la mise aupoint manuelle. Si la bague de réglage% est dégagée de la position A, lamise au point se détermine manu-ellement entre 0,7 m et ∞. Pour ce fai-re, une simple tape du doigt suffit à fai-re sauter le cran d’arrêt. Pour reveniren mise au point automatique, il fautramener la bague % en position A etl’enfoncer dans son cran.

18
○ ○ ○ ○ ○ ○ ○ ○ ○ ○ ○ ○ ○ ○ ○ ○ ○ ○ ○ ○ ○ ○ ○ ○ ○ ○ ○ ○ ○ ○ ○ ○ ○ ○ ○ ○ ○ ○ ○ ○ ○ ○ ○ ○ ○ ○
D GB F
Motiv anwählenZum Fokussieren das Fokusfeld aufdas Objekt richten und den Auslöser! leicht niederdrücken. Die Fokussie-rung erfolgt so automatisch. Im Suchererscheint das Fokussiersymbol. Fürdie Aufnahme den Auslöser ganzdurchdrücken, der Film wird nach derBelichtung automatisch um 1 Bildweitertransportiert. Ist das Aufnahme-objekt zu dunkel oder fast ohne Kon-trastunterschied, projeziert ein AF-Blitzder Kamera ein Muster auf das Objektund erhöht damit die Meßfähigkeit. BeiObjekten unter 0,7 m kann nicht mehrfokussiert werden. Der Auslöser wirdautomatisch blockiert.
ProcedureTo focus, place the AF area over yoursubject and lightly press the shutterrelease !. The camera will focus onthe detail within the AF area. The focusindicator appears in the viewfinder. Totake your picture, depress the shutterrelease fully — the film is wound on tothe next frame. If your subject is verydark or lacks contrast, an AF flash willproject a focusing pattern onto thesubject, thus increasing focusingaccuracy. The minimum focusingdistance is 0.7 m. At shorter distancesthe shutter will lock.
Choix du sujetPour mettre au point, diriger le champdu viseur sur le sujet et appuyer à mi-course sur le déclencheur !. La miseau point se fait automatiquement. Lepictogramme de mise au pointapparaît dans le viseur. Appuyer àfond sur le déclencheur pour la prisede vue. Le film est ensuite transportéautomatiquement à la vue suivante. Sile sujet est trop sombre ou neprésente presque aucun contraste,l’éclair AF de l’appareil assurel’efficacité de la mesure. Si la distancedu sujet est inférieure à 0,7 m, la miseau point n’est plus possible et ledéclencheur reste bloqué.

19
○ ○ ○ ○ ○ ○ ○ ○ ○ ○ ○ ○ ○ ○ ○ ○ ○ ○ ○ ○ ○ ○ ○ ○ ○ ○ ○ ○ ○ ○ ○ ○ ○ ○ ○ ○ ○ ○ ○ ○ ○ ○ ○ ○ ○ ○
D GB F
Bildausschnitt bestimmenMotiv über Sucher anvisieren unddurch Betätigen der Wipp-Taste Aden Bildausschnitt bestimmen. ImLCD-Monitor wird die gewählte Brenn-weite angezeigt.
mmSPEED
mmSPEED
Framing the pictureSight your subject through the view-finder and frame it pressing the zoomrocker A. The LCD displays the focallength selected.
CadrageViser le sujet dans le viseur et cadreren appuyant sur la touche à basculeA. La focale choisie est affichée surl’écran ACL.

20
○ ○ ○ ○ ○ ○ ○ ○ ○ ○ ○ ○ ○ ○ ○ ○ ○ ○ ○ ○ ○ ○ ○ ○ ○ ○ ○ ○ ○ ○ ○ ○ ○ ○ ○ ○ ○ ○ ○ ○ ○ ○ ○ ○ ○ ○
D GB F
Schärfenspeicher (Fokus-Lock)Liegt das Objekt für eine exakte Fokus-sierung nicht genau in der Bildmitte,kann der Schärfenspeicher wie folgtbenutzt werden:Sucher mit AF-Meßfeld auf das Auf-nahme-Objekt ausrichten, Auslöser !zum Speichern der gemessenen Ent-fernung leicht niederdrücken und ge-drückt halten. Mit dem nun fixiertenFokus den endgültigen Bildausschnittfestlegen und auslösen. Der automati-sche Schärfenspeicher hebt sich auf,sobald der Auslöser wieder losgelas-sen wird.
Focus lockIf you wish to arrange your subjectoutside the center of the frame, youcan still use the autofocusing feature:Place the AF area over the detail onwhich the camera should focus. Thenlightly press shutter release ! andhold it in this position. The camera nowlocks the focus setting, and you mayrecompose the picture to suit yourintentions. Focus lock is canceled assoon as you remove your finger fromthe shutter release.
Mémorisation de la mise au point(focus-lock)Dans le cas d’un cadrage avec unsujet excentré amenant des problèmesde mise au point net, procéder commesuit pour mémoriser la mise au pointexacte sur le sujet :Diriger le champ de mesure AF duviseur sur le sujet, appuyer ledéclencheur ! à mi-course et lemaintenir pour mémoriser la distancemesurée. Dans cette position, choisirle cadrage désiré et déclencher. Lamise en mémoire automatique estsupprimée dès que l’on relâche ledéclencheur.

21
○ ○ ○ ○ ○ ○ ○ ○ ○ ○ ○ ○ ○ ○ ○ ○ ○ ○ ○ ○ ○ ○ ○ ○ ○ ○ ○ ○ ○ ○ ○ ○ ○ ○ ○ ○ ○ ○ ○ ○ ○ ○ ○ ○ ○ ○
D GB F
Manuelle FokussierungFokussierrad % im manuellen Einstell-bereich 0,7 m – ∞ drehen, das Fokus-feld auf das gewünschte Objekt richtenund dabei die Sucheranzeige beach-ten:
� FerneinstellungDer gewünschte Bildausschnittist nicht scharf eingestellt. DerGegenstand hinter dem ge-wünschten Bildausschnitt wirdscharf eingestellt.
● Scharf eingestelltDer gewünschte Bildausschnittist scharf eingestellt.
� NaheinstellungDer gewünschte Bildausschnittist nicht scharf eingestellt. DerGegenstand vor dem ge-wünschten Bildausschnitt wirdscharf eingestellt.
� � Entfernungsmessung nichtmöglichEntfernungsmessung nicht mög-lich und daher die Scharfeinstel-lung nicht möglich.Aufnahmebereich: ∞ – 0,7 m
Manual focusingSet focusing dial % to the desireddistance (from 0.7 m to ∞), place theAF area over your subject and checkthe viewfinder display:
� Far focusThe desired detail is out of focus.The plane of sharp focus isbehind your subject.
● In focusThe desired detail is in focus.
� Near focusThe desired detail is out of focus.The plane of sharp focus is infront of your subject.
� � Ranging impossibleRanging — and thus focusing —is impossible.Focusing range: ∞ – 0.7 m
Mise au point manuelleDiriger le champ du viseur sur le sujetet tourner la molette de mise au point% dans le secteur de réglage manuel0,7 m – ∞ en observant l’affichagedans le viseur :
� Réglage loinLe sujet visé n’est pas réglé netLe réglage net est effectué surl’arrière-plan du sujet
● Réglage netLe réglage net est effectué sur lesujet
� Réglage prèsLe sujet visé n’est pas réglé netLe réglage net est effectué surl’avant-plan du sujet
� � Mesure impossibleMesure de distance impossibleet impossibilité donc d’effectuerun réglage netLatitude de prise de vue :∞ – 0,7 m

22
○ ○ ○ ○ ○ ○ ○ ○ ○ ○ ○ ○ ○ ○ ○ ○ ○ ○ ○ ○ ○ ○ ○ ○ ○ ○ ○ ○ ○ ○ ○ ○ ○ ○ ○ ○ ○ ○ ○ ○ ○ ○ ○ ○ ○ ○
D GB F
Film entnehmenNach der letzten Aufnahme wird derFilm automatisch zurückgespult. DerRücktransport stoppt, sobald sich derFilm wieder in der Partone befindet. ImLCD-Monitor $ erscheint die Bildzahl0 und das Patronensymbol signalisiertdurch Blinken die erforderliche Film-entnahme. Soll ein teilbelichteter Filmzurückgespult werden, mit abgerunde-tem Stift (Kugelschreiber) den Rück-spulknopf H drücken. Der Film wirdautomatisch zurückgespult. Wird beimRückspulvorgang die ON/OFF-Tastegedrückt, so wird das Rückspulen un-terbrochen.
Stoppt der Rücktransport bevor aufdem Display die Bildzahl 0 angezeigtwird, neue Batterien einsetzen undTransport zuende führen.
Removing the filmThe film is automatically rewound afterthe last frame has been exposed.Rewinding stops as soon the entirelength of the film is back in the filmcartridge. The LCD monitor $ reads 0and the cartidge symbol blinks toindicate that the film should beremoved. Partially exposed films maybe rewound by pressing the rewindbutton H. Rewinding stops if the ON/OFF button is pressed while it is inprogress.
Should rewinding stop before thedisplay reads 0, replace the batteriesand continue rewinding.
Retrait du filmLe film est automatiquementrembobiné après la dernière prise devue. Lorsque le film est rentré dans sacartouche, le compteur de vuesindique 0 sur l’écran ACL $ et leclignotement du pictogramme decartouche signale la nécessité dechanger de film. Si un film partiellementexposé doit être rembobiné, appuyersur le bouton de rembobinage H avecune pointe arrondie (crayon-bille). Lefilm est alors automatiquementrembobiné. Si l’on presse sur la toucheON/OFF en cours de rembobinage, cedernier est interrompu.
Si le rembobinage s’interrompt avantque le chiffre 0 n’apparaisse sur l’écranACL, changer les piles et terminer lerembobinage.

23
○ ○ ○ ○ ○ ○ ○ ○ ○ ○ ○ ○ ○ ○ ○ ○ ○ ○ ○ ○ ○ ○ ○ ○ ○ ○ ○ ○ ○ ○ ○ ○ ○ ○ ○ ○ ○ ○ ○ ○ ○ ○ ○ ○ ○ ○
D GB F
Belichtungsarten wählenJe nach Verwendungszweck undMotivsituation können folgendeBelichtungsarten gewählt werden:
Programmautomatik: Blendenring =und Verschlußzeitenrad " auf A stel-len. Die Automatik wählt dann vonselbst eine zu den Lichtverhältnissenpassende Zeit-/ Blenden-kombination.
Zeitautomatik: Hierzu Verschluß-zeitenrad " auf A stellen. Am Blen-denstellring = die gewünschte Blendeeinstellen. Die Verschlußzeit stellt sichdann automatisch ein. Im Sucher-display werden die Verschlußzeit undBlende angezeigt.
» Hinweis: Blende so wählen, daßdie Verschlußzeit zwischen 1/60und 1/8000 s liegt. Bei längerenVerschlußzeiten Stativ benutzen.Bei Überbelichtung blinkt zusätzlichdas Symbol , bei Unterbelichtungblinkt das Symbol , Blendenwertändern bis das Symbol erlischt.
Choosing an exposure modeThe following exposure modes areavailable to suit shooting conditionsand types of subject:
Programmed AE: Set aperture ring =and shutter-speed dial " to A. Thecamera will then automatically select asuitable shutter-speed/aperturecombination.
Aperture-priority AE: Set shutter-speed dial " to A, the aperture ring =to the desired aperture. The camerawill automatically choose a suitableshutter speed. The latter, and theaperture, are displayed in theviewfinder when the shutter release ispressed lightly.
» Note: Choose an aperture that willgive a shutter speed within therange of 1/60 s to 1/8000 s. Forslower shutter speeds, use a tripod.A blinking warns againstoverexposure, a blinking againstunderexposure. Vary the aperturesetting until the arrow disappears.
Choix du mode d’expositionSelon l’intention du photographe et lasituation du sujet, les modes d’expositionsuivants peuvent être sélectionnés :
Programme automatique : Positionnerla bague des diaphragmes = et lamolette des vitesses " sur A.L’automatisme détermine alors de lui-même la combinaison vitesse/dia-phragme convenant aux conditionsd’éclairage.
Vitesse automatique : Placer la molettedes vitesses " sur A. Régler la baguedes diaphragmes = sur la valeur voulue.La vitesse se règle alors automatique-ment. La vitesse réglée et le diaphragmeapparaissent sur la plage d’affichagedu viseur.» Remarque: Sélectionner une valeur
de diaphragme qui autorise unevitesse entre 1/60 et 1/8000 s. Avecune pose plus longue, utiliser un pied.En cas de surexposition lepictogramme clignote dans leviseur ou bien le pictogramme encas de sous-exposition. Changeralors la valeur de diaphragme jusqu’àce que le pictogramme disparaisse.

24
○ ○ ○ ○ ○ ○ ○ ○ ○ ○ ○ ○ ○ ○ ○ ○ ○ ○ ○ ○ ○ ○ ○ ○ ○ ○ ○ ○ ○ ○ ○ ○ ○ ○ ○ ○ ○ ○ ○ ○ ○ ○ ○ ○ ○ ○
D GB F
Blendenautomatik: Blendeneinstell-ring = auf A stellen und am Zeitenrad" die gewünschte Verschlußzeit ein-stellen. Der entsprechende Blenden-wert ermittelt sich automatisch. ImSucherdisplay wird der Blenden- undZeitwert angezeigt. Bei Über- bzw. Un-terbelichtung erscheinen wieder die zu-vor beschriebenen Symbole. (s. S. 23)
Manueller Betrieb: Hier können belie-bige Zeit-/ Blenden-Kombinationen ein-gestellt werden. Der Belichtungsab-gleich erfolgt wahlweise über die Zeitoder die Blende. Im Sucherdisplay er-scheinen der eingestellte Verschlußwertund die eingestellte Blende. Bei Über-bzw. Unterbelichtung erscheinen wie-der die entsprechenden Symbole.
Shutter-priority AE: Set aperture ring= to A and shutter-speed dial " tothe desired speed. The camera willautomatically choose an appropriateaperture. The latter, and the shutterspeed, ares displayed in the viewfinderwhen the shutter release is pressedlightly. The aforementioned arrowsappear to warn against over or under-exposure.
Manual exposure control: Anydesired shutter-speed/aperture com-bination can be set manually. Either theshutter speed or the aperture may beused to obtain correct exposure. Withthe shutter release pressed lightly, boththe shutter speed and the aperture setappear in the viewfinder display. Arrowswarn against incorrect exposure.
Diaphragme automatique: Position-ner la bague des diaphragmes = sur Aet régler la molette des vitesses " à lavaleur voulue. La valeur de diaphragmecorrespondante sera automatiquementdéterminée. Le diaphragme et la vi-tesse d’obturation apparaissent sur laplage d’affichage du viseur. En cas desous- ou de surexposition, les picto-grammes décrits précédemment réap-paraissent.Réglage manuel : Dans ce mode, lescombinaisons vitesse/diaphragme sontréglées librement. L’équilibrage de l’ex-position s’effectue par la vitesse ou parle diaphragme. La vitesse d’obturation etle diaphragme réglés apparaissent sur laplage d’affichage du viseur. Une sous-ou surexposition est également signaléepar le pictogramme correspondant.
="

25
○ ○ ○ ○ ○ ○ ○ ○ ○ ○ ○ ○ ○ ○ ○ ○ ○ ○ ○ ○ ○ ○ ○ ○ ○ ○ ○ ○ ○ ○ ○ ○ ○ ○ ○ ○ ○ ○ ○ ○ ○ ○ ○ ○ ○ ○
D GB F
Hinweis: Abhängig von der einge-stellten Brennweite ergibt sich bei denBlendenwerten 2,8 und 4 eine Diffe-renz zwischen der manuel eingestell-ten und der von der Kamera realisier-ten Blende, siehe Tabelle.
Differenz zwischen der manuell am Ob-jektiv eingestellten Blende und der vonder Kamera realisierten Blende (Anzei-ge im Display)
QZ 35 T 38 40 45 50 55 60 63 68 70 75 80 85 902,8 2,8 3,5 3,5 3,5 4 4 4 4,5 4,5 4,5 5,6 5,6 5,64 4 4 4 4 4 4 4 4,5 4,5 4,5 5,6 5,6 5,6
QZ 35 W 28 30 35 37 40 43 45 47 50 53 55 57 602,8 2,8 3,5 3,5 3,5 4 4 4 4,5 4,5 4,5 4,5 5,6 5,64 4 4 4 4 4 4 4 4,5 4,5 4,5 4,5 5,6 5,6

26
○ ○ ○ ○ ○ ○ ○ ○ ○ ○ ○ ○ ○ ○ ○ ○ ○ ○ ○ ○ ○ ○ ○ ○ ○ ○ ○ ○ ○ ○ ○ ○ ○ ○ ○ ○ ○ ○ ○ ○ ○ ○ ○ ○ ○ ○
D GB F
Langzeitbelichtung, B-Funktion(BULB)Durch Einrasten des Zeitenrades " aufB erscheint auf dem LCD-Monitor bu.Der Verschluß bleibt bei gedrücktemAuslöser so lange geöffnet, bis derAuslöser wieder freigegeben wird. Umein Verwackeln zu vermeiden, ist dieStativverwendung notwendig.
BlitzaufnahmenDazu Zeitenrad " auf X einrasten. ImLCD-Monitor und im Sucherdisplay er-scheint die Synchronzeit 1/180(s. Seite 36 Blitzbetrieb).
Time exposure (BULB)When the shutter-speed dial " is setto B, bu will appear in the LCD. In thissetting, the shutter remains open aslong as the shutter release is helddown. Be sure to use a tripod to avoidcamera shake.
Flash photographySet shutter-speed dial " to X. FLappears in the LCD (see page 36under Using flash.)
Pose longue, fonction B (BULB)Après avoir cranté la molette desvitesses " sur B, bu apparaît surl’écran ACL. Quand le déclencheur estenfoncé, l’obturateur demeure ouverttant qu’on ne relâche pas ledéclencheur. L’utilisation d’un pied estindispensable pour éviter un flou debougé.
Prise au flashCranter la molette des vitesses " surX. La vitesse synchrone 1/180 apparaîtsur l’écran ACL(v. p. 36, Fonctionnement avec leflash).
" "

27
○ ○ ○ ○ ○ ○ ○ ○ ○ ○ ○ ○ ○ ○ ○ ○ ○ ○ ○ ○ ○ ○ ○ ○ ○ ○ ○ ○ ○ ○ ○ ○ ○ ○ ○ ○ ○ ○ ○ ○ ○ ○ ○ ○ ○ ○
D GB F
BelichtungskorrekturBesteht zwischen Objekt und Hinter-grund ein extremer Kontrastunter-schied oder handelt es sich um eineGegenlichtaufnahme, so ist dieseFunktion zu wählen. Dazu TasteDRIVE P drücken, und die Belich-tungskorrektur-Funktion wählen.Durch Betätigen der WIDE/ TELE-Wipptaste den Korrekturwert einstellenund durch Drücken des Knopfes ABCabspeichern. Das Symbol stelltÜberbelichtungen und das Symbol Unterbelichtungen dar. Die Korrekturenwerden über den Cursor im Bereichvon -2EV bis +2EV in 1/2 Stufen vor-genommen.
Eine Aufhebung der Korrektur erfolgtdurch ein erneutes Korrigieren des EV-Wertes auf 0 EV.
Exposure compensationUse this function when there is highcontrast between your subject and thebackground or when shooting againstthe light. Press DRIVE button P toactivate the function. Then hold theABC button down and set the desiredcompensation by pressing the WIDE/TELE rocker switch. The blinkingsymbol stands for overexposure, thesymbol for underexposure. Thecursor indicates the compensationvalue set; this can be entered inincrements of 0.5s EV over a range of -2 EV to +2 EV. Confirm your setting bybriefly pressing the ABC button.
Remember to reset the compensationto 0 EV before continuing with normalphotography requiring no compen-sation.
Correction d’expositionCette fonction s’avère nécessaire si lecontraste entre le sujet et l’arrière-planest trop accentué on bien si l’oneffectue une prise de vue en contre-jour. Tout d’abord appuyer sur latouche DRIVE P et sélectionner lafonction de correction d’exposition.Maintenir appuyé le bouton de réglageA-B-C et choisir la valeur corrective enappuyant sur la touche à bascule (21).Le pictogramme signale une surex-position et le pictogramme unesous-exposition. Le curseur permetde faire varier la correction par 1/2 va-leur dans une latitude de -2 IL à +2 IL.
La suppression de correction s’opèreen ramenant la valeur IL corrigée à IL0.

28
○ ○ ○ ○ ○ ○ ○ ○ ○ ○ ○ ○ ○ ○ ○ ○ ○ ○ ○ ○ ○ ○ ○ ○ ○ ○ ○ ○ ○ ○ ○ ○ ○ ○ ○ ○ ○ ○ ○ ○ ○ ○ ○ ○ ○ ○
D GB F
Automatic-Bracketing-Control(A-B-C)In dieser Funktion werden drei Aufnah-men hintereinander mit unterschiedli-chen Verschlußzeiten belichtet. DazuA-B-C-Taste § gedrückt halten. ImLCD-Monitor blinkt ABC, und dasSymbol mit dem Cursor er-scheint. Bei gedrückter A-B-C-Tastekann nun über die WIDE/ TELE-Wipp-taste die Über-/Unterbelichtung von0,5 EV bis 1EV eingestellt werden.
Die Aufnahmen werden dann in derReihenfolge Unterbelichtung – Kor-rekte Belichtung – Überbelichtungdurchgeführt.Nach einer durchgeführten Bracketing-Belichtung erlischt die Programmie-rung und muß erneut vorgenommenwerden. A-B-C ist nicht möglich imBlitzbetrieb.
Automatic exposure bracketing(ABC)This function results in three consecu-tive pictures taken with different expo-sure settings. First press ABC button§; ABC blinks in the LCD, and thesymbol appears together with thecursor . Hold down the ABC buttonand set the desired variation of expo-sure from +1 to -1 EV. WIDE = minuscompensation; TELE = plus compen-sation.
The photos will be taken in the follow-ing order: Underexposure – correctexposure – overexposure. This, ofcourse, is possible only in an automaticexposure mode. After bracketing, thecamera reverts to normal operation.Should you wish to take anotherbracketing series, activate the functionagain.Flash cannot be combined with auto-matic exposure bracketing.
Contrôle bracketing automatiqueA-B-CCette fonction déclenche la priseautomatique de trois vues successivesselon un dégradé des valeursd’exposition. Pour ce faire appuyer surla touche § A-B-C. ABC clignote surl’écran ACL et le pictogramme apparaît avec le curseur . Enmaintenant la touche A-B-C appuyéeet en manipulant la touche à bascule, ilest possible de déterminer l’ampleurdu dégradé dans une latitude de +1 à -1 IL en notant que WIDE = moins etTELE = plus.
La série de vues se fait alors dansl’ordre sous – exposition –exposition correcte –surexposition. Ceci ne peut se fairequ’en automatisme. Après exécutiond’une exposition en bracketing, laprogrammation est annulée et leprocessus doit être renouvelé pour unerépétition. La fonction A-B-C ne peutpas être sélectionnée simultanémentavec le flash.

29
○ ○ ○ ○ ○ ○ ○ ○ ○ ○ ○ ○ ○ ○ ○ ○ ○ ○ ○ ○ ○ ○ ○ ○ ○ ○ ○ ○ ○ ○ ○ ○ ○ ○ ○ ○ ○ ○ ○ ○ ○ ○ ○ ○ ○ ○
D GB F
SelbstauslöserDurch Drücken der Taste MODE Okann unter dem Symbol die Selbst-auslöserfunktion gewählt werden. DerSelbstauslöser wird durch Druck desAuslösers aktiviert. Nach 10 sec. Vor-laufzeit erfolgt die Belichtung. Währenddes Ablaufs der Vorlaufzeit leuchtet zurKontrolle der rote LED (. Die letzten 3sec. werden druch Blinken angezeigt.Nach der Belichtung oder durch Betä-tigen der OFF-Taste ist diese Funktionwieder aufgehoben. Selbstauslöser-Aufnahmen im B-Betrieb sind nichtmöglich.
Self-timer photographyPress the MODE button O and selectthe self-timer function marked by thesymbol . To start the self-timer,press the shutter release. The picturewill be taken ten seconds later. The redLED ( lights during self-timer count-down, the last three seconds beingidentified by blinking. The function isautomatically canceled after the expo-sure. It may also be aborted by press-ing the OFF button. The bulb settingand self-timer cannot be combined.
RetardateurEn appuyant sur la touche MODE O, ilest possible de sélectionner la fonctionretardateur représentée par le picto-gramme . Le retardateur est activéen appuyant sur le déclencheur. Ledéclenchement s’effectue après undélai de 10 secondes. Une DEL rouge( s’allume durant le retardement. Les3 dernières secondes sont signaléespar un clignotement de la DEL. Cettefonction est annulée après l’expositionou bien après avoir ramenél’interrupteur sur OFF. Les prises devue à retardement ne sont paspossibles en fonctionnement sur B.

30
○ ○ ○ ○ ○ ○ ○ ○ ○ ○ ○ ○ ○ ○ ○ ○ ○ ○ ○ ○ ○ ○ ○ ○ ○ ○ ○ ○ ○ ○ ○ ○ ○ ○ ○ ○ ○ ○ ○ ○ ○ ○ ○ ○ ○ ○
D GB F
FernauslöserMit Taste MODE die Funktion Fern-auslöser wählen, Bildausschnitt be-
stimmen, IR-Auslöser M auf den Emp-
fänger ) richten und den Auslöse-knopf des IR-Fernauslösers drücken.Nach ca. 2 sec. blinkt die rote LED (und die Aufnahme wird durchgeführt.
BatteriewechselBeide Befestigungsschrauben mitKreuzschlitzschraubendreher lösenund neue Batterie entsprechend Pol-schema einlegen.
Remote releaseSelect the remote-control function by pressing the MODE button. Com-pose your picture, aim IR release atsensor ) and press the release buttonof the IR remote control. The red LED( will start blinking after about stwoseconds, and the shutter will be re-leased.
Déclenchement à distanceAvec la touche MODE, sélectionner lafonction télédéclencheur , effectuerle cadrage, diriger le télédéclencheurIR vers le récepteur ) et appuyer surle bouton du télédéclencheur IR. LaDEL rouge ( clignote et la prise devue est exécutée au bout d’env. 2secondes.
M
)(

31
○ ○ ○ ○ ○ ○ ○ ○ ○ ○ ○ ○ ○ ○ ○ ○ ○ ○ ○ ○ ○ ○ ○ ○ ○ ○ ○ ○ ○ ○ ○ ○ ○ ○ ○ ○ ○ ○ ○ ○ ○ ○ ○ ○ ○ ○
D GB F
Serienaufnahmen
Mit Taste MODE das Symbol fürSerienaufnahmen von bewegten Moti-ven anwählen. Auslöser drücken undfesthalten. Die Autofokusfunktion führtbei der ersten Aufnahme eine Scharf-einstellung durch. Die Kamera belichtetund transportiert jetzt so lange, bis derAuslöser wieder freigegeben wird.
Continuous film advancePress the MODE button to select thesymbol for continuous shooting ofmoving subjects. The camera will nowexpose one picture after another, aslong as the shutter release is helddown, automatically focusing the lensfor each and every one of the pictures.If continuous film advance is combinedwith flash, the recycling time of the lat-ter will determine the framing rate.
Prises en rafaleSélectionner avec la touche MODE lepictogramme pour prises en rafalede sujets en mouvement. Déclencheren maintenant le déclencheur enfoncé.L’appareil expose et transporte le filmaussi longtemps que vous appuyez. Lafonction autofocus se charge de lanetteté de chaque vue pendant ceprocessus. Lors de prises en rafaleavec le flash, c’est le temps derecharge du flash qui déterminel’intervalle de temps entre deux vues.

32
○ ○ ○ ○ ○ ○ ○ ○ ○ ○ ○ ○ ○ ○ ○ ○ ○ ○ ○ ○ ○ ○ ○ ○ ○ ○ ○ ○ ○ ○ ○ ○ ○ ○ ○ ○ ○ ○ ○ ○ ○ ○ ○ ○ ○ ○
D GB F
MehrfachbelichtungenÜber die Taste MODE das Symbol anwählen, Motiv anvisieren und Auslö-ser drücken. Der Film wird belichtetaber nicht weitertransportiert. Im LCD-Monitor wird die Funktion blinkend an-gezeigt. Nächste Aufnahme wie ge-wünscht neu anvisieren und einzweites Mal auslösen. Darauf wird derFilm automatisch transportiert und dieEinzelbildfunktion ist wieder eingestellt.Sollen mehr als zwei Aufnahmen aufein Bild belichtet werden, so ist vor derzweiten bzw. vor den weiteren Belich-tungen stets die Funktion Mehrfach-belichtung erneut zu wählen.
Multiple exposurePress the MODE button to select thesymbol , compose your picture andpress the shutter release. After expo-sure, the film will not be advanced, andanother exposure can be superim-posed on the first one by pressing theshutter release once more. After thesecond exposure, the camera auto-matically advances the film and revertsto the single-frame mode. Should youwish to combine more than two expo-sures in one frame, reset the ME func-tion before the second (or each follow-ing) exposure.
SurimpressionsSélectionner avec la touche MODE lepictogramme , viser le sujet etdéclencher. Le film est exposé maisn’est pas transporté. La fonction estsignalée par un clignotement surl’écran ACL. Choisir son cadrage pourla deuxième vue et déclencher denouveau. Le film est alors transportésur la vue suivante et l’avanceautomatique après chaque vue estrétablie. Si vous désirez davantage devues en surimpression, il vous suffit deresélectionner la fonctionsurimpressions avant la deuxième ouchaque exposition ultérieure.

33
○ ○ ○ ○ ○ ○ ○ ○ ○ ○ ○ ○ ○ ○ ○ ○ ○ ○ ○ ○ ○ ○ ○ ○ ○ ○ ○ ○ ○ ○ ○ ○ ○ ○ ○ ○ ○ ○ ○ ○ ○ ○ ○ ○ ○ ○
D GB F
Datenspeicher (Information)Blende, Zeit und Bildnummer fürinsges. 3 Filme à 36 Aufnahmen aufruf-bar. Taste DRIVE drücken bis Symbol
erscheint. Durch Drücken der TasteTELE/WIDE A werden für jedes Bilddie Belichtungsdaten (Blende/Zeit undBelichtungskorrektur) im LCD Monitorangezeigt.Bei gedrückter ABC-Taste kann durchBetätigen der Taste TELE/WIDE derentsprechende Film mit seinenBelichtungsdaten aufgerufen werden.
» Hinweis: Beim Abrufen der Spei-cherdaten kann die Kamera nichtausgelöst werden.
Data memoryAperture, shutter speed and framenumber for up to three films of 36exposures can retrieved from memory.Press DRIVE button until Symbol appears. Then press TELE/WIDE Abutton to display the exposure data(aperture/shutter speed) in the LCDmonitor. Hold ABC button down andpress TELE/WIDE button to call upthe desired film and its exposure data.
» Note: The shutter cannot bereleased during data retrieval.
Mémoire de donnéesLe diaphragme, la vitesse d’obturationet le numéro de vue pour 3 films de 36vues peuvent ètre appelés. Appuyersur la touche DRIVE jusqu’à ce que lepictogramme apparaisse. En ap-puyant sur la touche à bascule A, lesdonnées d’exposition de chaque vue(diaphragme, vitesse d’obturation) ap-paraissent sur l’écran ACL.La touche ABC étant enfoncée, onpeut, en appuyant sur la touche à bas-cule A, appeler le film correspondant,avec les données d’exposition.
» Remarque: L’appareil ne peut pasêtre déclenché pendant l’appel dedonnées mémorisées.
888FNO
ISOSPEED
ABC 0FNO
SPEEDABC 0

34
○ ○ ○ ○ ○ ○ ○ ○ ○ ○ ○ ○ ○ ○ ○ ○ ○ ○ ○ ○ ○ ○ ○ ○ ○ ○ ○ ○ ○ ○ ○ ○ ○ ○ ○ ○ ○ ○ ○ ○ ○ ○ ○ ○ ○ ○
D GB F
DateneinbelichtungMit Hilfe der Tasten MODE, SELECT,SET an der Kamerarückwand kann dieDateneinbelichtung in oben gezeigterReihenfolge eingegeben werden. Dieerfolgte Einbelichtung wird im LCD-Display D durch Blinken des Balkensüber der Jahreszahl angezeigt. Bei derAufnahme erfolgt die Belichtung amunteren Bildrand. Eine Einbelichtungauf hellem oder unruhigem Hintergrundist zu vermeiden.
Die korrekte Dateneinbelichtung ist beiTemperaturen von -10° C bis +50° Cgegeben.
Imprinting the dateThe buttons MODE, SELECT, SET onthe camera back serve to set the datein that order. The setting is confirmedin the display D by a line blinkingabove the year. The date is imprintedat the bottom of the picture. Try toavoid bright or fussy background in thearea where the date will be imprinted.
Date imprinting is possible at tempera-tures from -10° C to +50° C.
Insolation de la dateIl est possible de programmer uneinsolation de la date avec les touchesMODE, SELECT et SET sur le dos del'apparail, utilisées dans cet ordre.L'insolation effectuée est signalée surl’écran ACL D par le clignotement dela barre au-dessus du nombre del'année. L’insolation a lieu sur le bordinférieur de la vue. Il est doncpréférable d’éviter un arrière-plan tropclair ou trop fouillé dans cette zone.
Une insolation correcte de la date estobtenue à des températures entre-10° C et + 50 °C.
Tag · Stunde · Min.Day · hour · minutejour · heure · minute
Jahr · Monat · TagYear · Month · Dayannée · mois · jour
Monat · Tag · JahrMonth · day · yearmois · jour · année
Tag · Monat · JahrDay · month · yearjour · mois · année
Keine AnzeigeNo displaypas d’affichage
-- -- --
21 12 20
97 10 21
21 10 97
10 21 97

35
○ ○ ○ ○ ○ ○ ○ ○ ○ ○ ○ ○ ○ ○ ○ ○ ○ ○ ○ ○ ○ ○ ○ ○ ○ ○ ○ ○ ○ ○ ○ ○ ○ ○ ○ ○ ○ ○ ○ ○ ○ ○ ○ ○ ○ ○
D GB F
Korrektur der Datums- und Zeitan-gabeMit der Taste MODE die zu korrigie-rende Anzeigenart anwählen. Über dieTaste SELECT den zu veränderndenAnzeigeteil anwählen (wird durch Blin-ken angezeigt). Datum bzw. Zeit durchBetätigen der Taste SET neu festle-gen. Wird die Taste SET gedrückt ge-halten, laufen die Ziffern schnell durch.Die Korrektur wird beendet, sobald dieTaste MODE gedrückt wird.
Correcting the date and hourSelect the display to be corrected bypressing the MODE button. Next,press the SELECT button to choosethe display segment to be changed.The latter will blink. Set the date andhour by pressing the SET button.Holding down the SET button willcause the figures to cycle rapidly. Toterminate the setting, press the MODEbutton.
Correction de la date et de l’heureSélectionner avec la touche MODEl'affichage à corriger. Se placer avec latouche SELECT sur la partie devantêtre modifiée. Le positionnement estsignalé par un clignotement. Corriger ladate ou l’heure en appuyant sur latouche SET. En maintenant la toucheSET appuyée, les chiffres défilentrapidement. La correction est achevéeen appuyant de nouveau sur la toucheMODE.
mode select set97 10 21
mode select set97 10 21
mode select set97 10 21

36
○ ○ ○ ○ ○ ○ ○ ○ ○ ○ ○ ○ ○ ○ ○ ○ ○ ○ ○ ○ ○ ○ ○ ○ ○ ○ ○ ○ ○ ○ ○ ○ ○ ○ ○ ○ ○ ○ ○ ○ ○ ○ ○ ○ ○ ○
D GB F
Changing the battery of the databackThe data back is powered by a typeR2025 3-volt lithium battery. Open thecamera back and remove the battery-chamber cover with the aid of a Philipsscrewdriver. Remove the old batteryand insert a fresh one with its positivepole facing up. Reset the date andhour. The battery has a life of aboutthree years.
» Note: Do not dispose of oldbatteries together with your house-hold waste!
Changement de la pile du dosdateurLa pile requise est une pile au lithium 3V (R2025). Ouvrir le dos de l’appareil etle couvercle du logement de la pileavec un tournevis cruciforme. Changezde pile en veillant à placer la nouvellepile avec le pôle plus dirigé vers lehaut. Remettre le presseur de film enplace dans l’ordre inverse.Reprogrammer la date et l’heure. Lalongévité de cette pile est d’environ 3ans.
» Remarque: Ne pas jeter les pilesusées avec les ordures ménagèresmais les déposer aux rebutsspéciaux.
Batteriewechsel der Daten-rückwandErforderlich ist eine 3-V-Lithium-Batte-rie (CR2025). Kamerarückwand öffnen,Filmandruckplatte wie in der Abb. ge-zeigt entriegeln, abheben und Batterie-fachdeckel mit Kreuzschlitzschrauben-dreher öffnen. Alte Batterie entnehmenund neue Batterie (Pluspol nach oben)einlegen. Filmandruckplatte in umge-kehrter Reihenfolge wieder ansetzen.Datum- und Zeitangabe neu program-mieren. Die Lebensdauer dieser Batte-rie beträgt ca. 3 Jahre.
» Hinweis: Alte Batterien gehörennicht in den Hausmüll, sondern sindentsprechend zu entsorgen!

37
○ ○ ○ ○ ○ ○ ○ ○ ○ ○ ○ ○ ○ ○ ○ ○ ○ ○ ○ ○ ○ ○ ○ ○ ○ ○ ○ ○ ○ ○ ○ ○ ○ ○ ○ ○ ○ ○ ○ ○ ○ ○ ○ ○ ○ ○
D GB F
BlitzbetriebBodenkappe abschrauben, Batterie-fachdeckel linksdrehend mit einerMünze öffnen und die 3 V Lithium-Bat-terien (CR 123A) gemäß Pol-Schemaeinlegen. Dazu sollte der Hauptschalterauf OFF stehen. Batteriefach wiederschließen.
Blitzgerät testen: Schalter auf MA-NUAL stellen und warten bis dieBereitschaftslampe aufleuchtet. TEST-Knopf betätigen, wenn der Blitz ausge-löst wird ist das Gerät funktionsbereit.
Blitzgerät anschließen: Blitzgerät wiegezeigt ansetzen und mit der Rändel-schraube rechtsdrehend an der Kame-ra befestigen. Blitzkabel mit der Steck-Buchse an der Kamera verbinden.
Flash photographyMake sure the master switch is set toOFF. Open the battery-chambercover, turning it counterclockwise witha coin, and insert the 3V lithium cells(type CR 123A)with their negative andpositive poles as indicated. Close thecover.
Testing the flash unit: Set switch toMANUAL and wait for the ready lampto light. Then press the TEST button.The unit is operating properly if a flashis fired.
Connecting the flash to the cam-era: Attach flash as illustrated and se-cure, turning knurled clamp screwclockwise. The flash reflector can berotated left/right through ±60°; in addi-
Fonctionnement avec le flashOuvrir le couvercle du logement de lapile en tournant vers la gauche avecune pièce de monnaie et introduire lapile 3 V au lithium (CR 123A) en res-pectant la concordance de pôle indi-quée. Lors de cette opération, l’inter-rupteur principal devrait être placé surOFF. Refermer le logement.
Contrôle du flash : Placer le commu-tateur sur MANUAL et attendre que lalampe de disponibilité s’allume. Ap-puyez sur le bouton TEST. L’appareilest en état de marche si l’éclair est dé-clenché.
Raccordement du flash : Monter leflash comme indiqué et fixez-le à l’ap-pareil en tournant la molette vers la

38
○ ○ ○ ○ ○ ○ ○ ○ ○ ○ ○ ○ ○ ○ ○ ○ ○ ○ ○ ○ ○ ○ ○ ○ ○ ○ ○ ○ ○ ○ ○ ○ ○ ○ ○ ○ ○ ○ ○ ○ ○ ○ ○ ○ ○ ○
D GB F
Das Blitzgerät verfügt über zwei Win-kel-Verstellbereiche: rechts/links amReflektorknopf und zwar im Bereichvon ± 60° und das ganze Gerät kannim Bereich von ± 45° geneigt werden,um indirekt zu blitzen.Die Rollei QZ 35 W und QZ 35 T arbei-ten mit dem Blitzgerät systemkonform,d.h. die Steuerung des Blitzlichtes er-folgt automatisch über die Kamera.Es stehen 3 verschiedene Blitz-möglichkeiten zur Verfügung:Programmautomatik, Blendenautoma-tik und manueller Blitzbetrieb.
tion, the unit can be tilted through ±45º.The unit is a dedicated flash for theRollei QZ 35 W and QZ 35 T. In otherwords, the camera will control the flashautomatically in one of four modes:Programmed AE, aperture-priority AE,shutter-priority AE and manual.
Programmed AESet shutter-speed dial and aperturering of camera to A, the switch of theflash unit to AUTO. The flash is readyto fire as soon as the ready lampcomes on. Flash output and apertureare controlled automatically as a func-tion of subject distance.
Aperture-priority AESet aperture ring to desired aperture(� guide-number table). The LEDlights up when the flash is ready to fire.The camera is automatically set to itssync speed of 1/180 s. Flash outputvaries with subject distance.
Over or underexposure will result if theaperture set does not match the sub-ject distances given above.
droite. Relier le câble du flash à la prisede l’appareil. Le réflecteur pivote surdeux angles : droite/gauche dans unelatitude de ± 45° et l'ensemble du flashpeut être incliné sur ± 45° pour avoirun éclairage indirect. Les Rollei QZ 35W et QZ 35 T fonctionnent avec leflash en conformité avec le systéme,c’est-à-dire que le contrôle de l’éclairse fait à partir de l’appareil qui disposede 4 possibilités de flash : en pro-gramme automatique, en vitesse auto-matique, en diaphragme automatiqueet en réglage manuel.
Programme automatiquePositionner la bague des diaphragmes,la molette des vitesses sur A et lecommutateur du flash sur AUTO. Dé-clencher après apparition de la DEL

39
○ ○ ○ ○ ○ ○ ○ ○ ○ ○ ○ ○ ○ ○ ○ ○ ○ ○ ○ ○ ○ ○ ○ ○ ○ ○ ○ ○ ○ ○ ○ ○ ○ ○ ○ ○ ○ ○ ○ ○ ○ ○ ○ ○ ○ ○
D GB F
Shutter-priority AESet shutter-speed dial to X, aperturering to A. Camera and flash are readyto fire when the ready lamp comes on.Flash output is controlled to suit thesubject distance.
If your subject is outside the flashrange for the aperture chosen, over orunderexposure is unavoidable. Seeguide-number table.
verte de disponibilité du flash. La puis-sance de l’éclair et l’ouverture dediaphragme s’établissent automatique-ment selon la distance du sujet.
Vitesse automatiqueRégler la bague des diaphragmes surl’ouverture voulue (�table de nom-bres-guides). Déclenchement aprèsapparition de la DEL verte indiquant ladisponibilité du flash. La vitesse estautomatiquement de 1/180 s. La puis-sance de l’éclair s’établit selon la dis-tance du sujet.
Si une vue est prise avec une valeur dediaphragme inadéquate en fonction dela distance, elle est surexposée ousous-exposée. Consulter la table desnombres-guides.
Diaphragme automatiqueRégler la molette des vitesses sur X etla bague des diaphragmes sur A.Déclenchement après apparition de laDEL verte indiquant la disponibilité duflash. La puissance de l’éclair s’établitselon la distance du sujet.
ProgrammautomatikVerschlußzeitenrad und Blendenringder Kamera auf A stellen und denSchalter am Blitzgerät auf AUTO. Beileuchten der Blitzbereitschafts-LEDkann ausgelöst werden. Die Leucht-stärke des Blitzes sowie die Öffnungder Blende steuern sich automatisch jenach Entfernung des Objektes.
Blendenautomatik:Zeiteneinstellrad auf X und Blendenringauf A stellen. Nach Anzeige der Blitz-bereitschaft kann ausgelöst werdenund die Leuchtstärke des Blitzes rich-tet sich nach der Objektentfernung.

40
○ ○ ○ ○ ○ ○ ○ ○ ○ ○ ○ ○ ○ ○ ○ ○ ○ ○ ○ ○ ○ ○ ○ ○ ○ ○ ○ ○ ○ ○ ○ ○ ○ ○ ○ ○ ○ ○ ○ ○ ○ ○ ○ ○ ○ ○
D GB F
Manueller BlitzbetriebAm Blitzgerät Schalter auf MANUALstellen, Blitzbereitschaft über LED ab-warten und auslösen. Bei dieser Be-triebsart wird die Blitzintensität nichtvon der Kamera gesteuert und der Blitzerfolgt stets mit voller Leistung, so daßes bei kürzeren Entfernungen zu Über-belichtungen kommen kann.Zeiteneinstellrad auf X stellen undBlende entsprechend der Tabelle ein-stellen.
Indivirektes Blitzen im manuellenBlitzbetriebBlitzgerät gegen geeignete Reflex-fläche ( z.B. Decke oder Wand)schwenken. Zeiteneinstellrad auf Xstellen und die manuell vorgewählteBlende, siehe Tabelle, um 2 Blenden-stufen (Richtwert) vergrößern.
Manual modeSet flash switch to MANUAL, wait forLED to light and fire. In this mode, flashoutput is not controlled by the camera.The flash will always fire with full outputso that overexposure is possible atshort range.Turn shutter-speed dial to X and set asuitable aperture according to theguide-number table on page 37.
Fill flash with manually controlledflashTurn the shutter-speed dial and set thedesired speed (outside the range of1/8000 – 1/250 s); choose an apertureto suit background brightness.
Réglage manuelPlacer le commutateur du flash surMANUAL, attendre le signal de dispo-nibilité du flash et déclencher. Dans cemode, l’intensité de l’éclair n’est pascontrôlée par l’appareil. Il est toujoursdéclenché en pleine puissance, entraî-nant donc un risque de surexposition àcourte distance.Régler la vitesse d’obturation sur X etsélectionner une valeur de diaphragmeadéquate conformément à la table desnombres-guides (p. 37).
Fill-in en réglage manuelRégler avec la molette des vitesses à lavitesse voulue (sauf entre 1/8000 et1/ 250 s) et adapter la valeur dudiaphragme dans la zone de réglagemanuel en fonction de l’exposition.
41
○ ○ ○ ○ ○ ○ ○ ○ ○ ○ ○ ○ ○ ○ ○ ○ ○ ○ ○ ○ ○ ○ ○ ○ ○ ○ ○ ○ ○ ○ ○ ○ ○ ○ ○ ○ ○ ○ ○ ○ ○ ○ ○ ○ ○ ○
D GB F
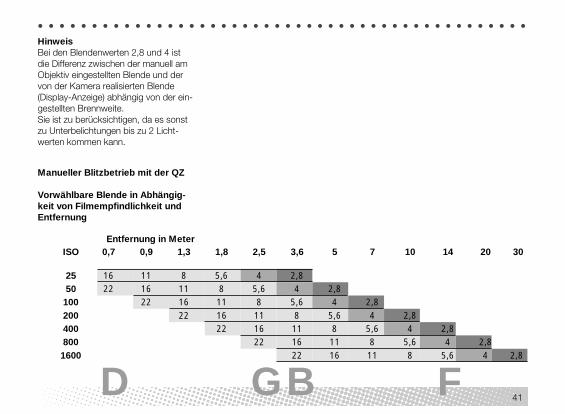
Manueller Blitzbetrieb mit der QZ
Vorwählbare Blende in Abhängig-keit von Filmempfindlichkeit undEntfernung
HinweisBei den Blendenwerten 2,8 und 4 istdie Differenz zwischen der manuell amObjektiv eingestellten Blende und dervon der Kamera realisierten Blende(Display-Anzeige) abhängig von der ein-gestellten Brennweite.Sie ist zu berücksichtigen, da es sonstzu Unterbelichtungen bis zu 2 Licht-werten kommen kann.
ISO 0,7 0,9 1,3 1,8 2,5 3,6 5 7 10 14 20 30
25 16 11 8 5,6 4 2,850 22 16 11 8 5,6 4 2,8
100 22 16 11 8 5,6 4 2,8200 22 16 11 8 5,6 4 2,8400 22 16 11 8 5,6 4 2,8800 22 16 11 8 5,6 4 2,81600 22 16 11 8 5,6 4 2,8
Entfernung in Meter

42
○ ○ ○ ○ ○ ○ ○ ○ ○ ○ ○ ○ ○ ○ ○ ○ ○ ○ ○ ○ ○ ○ ○ ○ ○ ○ ○ ○ ○ ○ ○ ○ ○ ○ ○ ○ ○ ○ ○ ○ ○ ○ ○ ○ ○ ○
D GB F
Abhilfe bei Bedienfehlern
» Störung: Der Verschluß löstnicht aus.
» UrsacheEin/Aus-Schalter nicht auf ON.
» AbhilfeDen Ein/Aus-Schalter auf ON stellen.
» UrsacheBatterie nicht richtig eingelegt.
» AbhilfeDie Batterie unter Beachtung desSymbols des Batteriefachdeckelsnochmals einlegen.
» UrsacheBatterie verbraucht.
» AbhilfeBatterie erneuern.
» UrsacheFilmpatronensymbol blinkt.
» AbhilfeKamerarückwand öffnen und Filmentnehmen. Neue Filmpatrone einle-gen bzw. Filmwechsel wiederholen.
Troubleshooting
» Problem: Shutter is locked.
» CauseCamera switched OFF.
» RemedySet ON/OFF switch to ON.
» CauseBatteries improperly loaded.
» RemedyReinsert batteries, observing symbolin battery-chamber cover.
» CauseBatteries exhausted.
» RemedyReplace.
» CauseFilm-cartridge symbol blinking.
» RemedyOpen camera back and removefilm. Load new film cartridge orrepeat film-loading procedure.
Remèdes aux erreurs de maniement
» Incident: Le déclenchement nepeut s’effectuer
» CauseL’interrupteur n’a pas été mis surON
» RemèdeMettre l'interrupteur sur ON
» CausePiles placées incorrectement
» RemèdeReplacer les piles en veillant àrespecter les indications portées surle couvercle du logement
» CausePiles usées
» RemèdeChanger les piles
» CausePictogramme de cartouche clignote
» RemèdeOuvrir le dos de l’appareil, en retirerla cartouche et mettre un nouveaufilm ou bien rechanger le film

43
○ ○ ○ ○ ○ ○ ○ ○ ○ ○ ○ ○ ○ ○ ○ ○ ○ ○ ○ ○ ○ ○ ○ ○ ○ ○ ○ ○ ○ ○ ○ ○ ○ ○ ○ ○ ○ ○ ○ ○ ○ ○ ○ ○ ○ ○
D GB F
» Si des fonctions sont perturbéeslors de l’utilisation de l’appareil,retirer les piles de leur logementet les replacer de nouveau.
» Sollten beim Gebrauch der Ka-mera Fehlfunktionen auftreten,Batterien aus dem Batteriefachentnehmen und wieder einlegen.
» Should the camera malfunction,remove batteries and reinsertthem.
» Störung: Die Aufnahme ist un-scharf.
» UrsacheFokusfeld auf den Aufnahmegegen-stand nicht genau gerichtet undscharf eingestellt.
» AbhilfeSeiten für die Aufnahmemethodeund Scharfeinstellung noch einmaldurchlesen.
» UrsacheAutomatischer Entfernungsmeßbe-reich durch die Hand oder Haareverdeckt.
» AbhilfeKamerahaltung korrigieren.
» UrsacheFehler beim manuellen Fokussieren.
» AbhilfeEinstellhilfen im Sucher beachten.
» Incident: Sujet flou
» CauseLa visée a été effectuée sans tenircompte du champ de mise au point
» RemèdeRelire la méthode de prise de vue etde réglage net
» CauseLa zone de mesure automatique aété masquée par la main ou lescheveux.
» RemèdeVeiller à bien tenir l’appareil
» CauseErreur de mise au point manuelle
» RemèdeTenir compte des aides de mise aupoint dans le viseur.
» Problem: Subject out of focus.
» CauseAF area did not coincide withsubject during focusing.
» RemedyRead pages explaining focusingprocedure.
» CauseAF windows covered by hand orhairs.
» RemedyHold camera properly.
» CauseFaulty manual focusing.
» RemedyWatch focusing aids in viewfinder.

44
○ ○ ○ ○ ○ ○ ○ ○ ○ ○ ○ ○ ○ ○ ○ ○ ○ ○ ○ ○ ○ ○ ○ ○ ○ ○ ○ ○ ○ ○ ○ ○ ○ ○ ○ ○ ○ ○ ○ ○ ○ ○ ○ ○ ○ ○
D GB F
Pflege der Kamera» Kamera vor hartem Stoß und Fall
bewahren. Zur Vorsicht den Trage-riemen an der Kamera lassen undKamera stets umgehängt benutzen.
» Kamera vor Nässe, Seesand unddauernder Sonnenbestrahlungschützen. Das gilt besonders für diegeöffnete Kamera beim Film-wechsel.
» Der Kameraverschluß besteht ausdünmen Stahllamellen und ist einabsolutes Präzisionsteil.Deshalb: Verschlußfenster nicht mitden Fingern berühren oder abwi-schen. Beim Filmwechsel daraufachten, daß der Filmvorspann denVerschluß nicht berührt. Bei Benut-zung von Druckluft nicht zu stark aufden Verschluß einwirken, da sichsonst die Verschlußlamellen verfor-men können.
» Filmandruckplatte sauberhalten undgelegentlich mit einem Ledertuchsäubern. Das Innere des Gehäuseswird mit einem Pinsel gereinigt. Einweicher Haarpinsel ist auc für das
Camera care» Do not drop the camera, and
protect it from impact. Always leavethe strap attached and carry thecamera on your shoulder or aroundyour neck.
» Keep the camera away from water,sand and prolonged exposure tosunlight. This applies, above all,during film loading.
» The shutter is a highly precisecomponent made of thin steelblades. NEVER touch the shutterblades with your fingers or wipethem! When changing films, makesure that the film leader does nottouch the shutter blades. Do notuse compressed air directly on theshutter, or the shutter blades maybe deformed.
» Keep the pressure plate clean andoccasionally clean it with leather.Use a brush to clean the interior ofthe camera body. A soft hair brushis ideal for cleaning the lens.Remove fingerprints with lens-cleaning tissue. Should the lens fog
Entretien de l’appareil» Eviter à l’appareil les chocs violents
et les chutes. Par précaution,toujours laisser la bandoulière fixéeà l’appareil et la garder autour ducou.
» Protéger l’appareil de l’humidité, dusable des plages et de l’expositionprolongée au soleil. Ceci estparticulièrement important lorsquel’appareil est ouvert pour unchangement de film.
» L’obturateur est composé delamelles métalliques très fines etconstitue la pièce de précision parexcellence. Il ne faut jamais toucherles lamelles ni les essuyer. Lors d’unchangement de film veillez à ce quel’amorce du film ne vienne pas encontact avec l’obturateur.En casd'utilisation d'air comprimé, veiller àce que la pression ne s’effectue pastrop fortement sur l’obturateur carles lamelles pourraient se déformer.
» Tenir propre le presseur de film et lenettoyer de temps à autre avec unepeau de chamois. L’intérieur du

45
○ ○ ○ ○ ○ ○ ○ ○ ○ ○ ○ ○ ○ ○ ○ ○ ○ ○ ○ ○ ○ ○ ○ ○ ○ ○ ○ ○ ○ ○ ○ ○ ○ ○ ○ ○ ○ ○ ○ ○ ○ ○ ○ ○ ○ ○
D GB F
Objektiv das beste Reinigungsmittel.Fingerspuren sind mit Linsenputz-papier zu entfernen. Wenn die aus-gekühlten Linsen im Winter beiÜbergang ins Warme beschlagen,einige Minuten warten, bis dieFeuchtigkeit von selbst verdunstetist.
when returning to a heated roomafter exposure to the winter cold,wait for a few minutes until thecondensation has evaporated.
boîtier se dépoussière avec unpinceau fin qui convient égalementparfaitement pour l’objectif. Eliminerles empreintes de doigts avec unpapier spécialement imprégné pourles lentilles. Si, en hiver, de la buéevenait à se former sur les lentillesfroides lors d’un passage au chaud,il suffit d’attendre pendant quelquesminutes que l’humidité s’évapored’elle-même.

46
○ ○ ○ ○ ○ ○ ○ ○ ○ ○ ○ ○ ○ ○ ○ ○ ○ ○ ○ ○ ○ ○ ○ ○ ○ ○ ○ ○ ○ ○ ○ ○ ○ ○ ○ ○ ○ ○ ○ ○ ○ ○ ○ ○ ○ ○
D GB F
Specifications
Type» Fully automatic 35mm motor-zoom
camera with motorized film advanceand automatic rewinding, in atitanium body.
Film type» DX-coded 35mm film (negative size:
24 mm x 36 mm).
Lens» Rollei QZ 35 W: Rollei Vario-Apogon
28-60 mm f/2.8/5.6-22 HFT» Rollei QZ 35 T: Rollei Vario-Apogon
38-90 mm f/2.8/5.6-22 HFT» 10 elements in eight components.
Shutter» Electronically controlled, vertical-run
metal focal-plane shutter with» speeds from 16 s to 1/8000 s; sync
speed 1/180 s.
Fiche technique
Type d’appareil» Appareil 24 x 36 avec zoom
motorisé et transport de filmégalement motorisé avecrembobinage automatique. Boîtieren titane
Type de film» Film 35 mm codé DX (format de
prise de vue 24 x 36 mm)
Objectif» Avec le Rollei QZ 35 W : zoom
Rollei VarioApogon 28 - 60 mm HFTde f/2,8 -5,6 à f/22
» Avec le Rollei QZ 35 T : zoomRollei VarioApogon 38 - 90 mm HFTde f/2,8 - 5,6 à f/22
» 10 lentilles en 8 groupes
Obturateur» Obturateur focal électronique en
métal, à course verticale.» Vitesses d’obturation :
16 – 1/8000 s, synchro flash 1/180s
Technische Daten
Typ» Vollautomatische Motorzoom-Klein-
bildkamera mit motorischem Film-transport und automatischer Rück-spulung, sowie hochwertigemTitangehäuse.
Filmtyp» 35 mm Kleinbildfilm mit DX-Codie-
rung (Aufnahmeformat: 24 x 36 mm)
Objektiv» Bei Rollei QZ 35 W: Rollei
VarioApogon f2.8/ 5.6 - 22/ 28 - 60mm HFT
» Bei Rollei QZ 35 T: RolleiVarioApogon f2.8/ 5.6 - 22/ 38 - 90mm HFT
» 10 Linsen, 8 Gruppen
Verschluß» Elektronisch gesteuerter Metall-
Schlitzverschluß, vertikal ablaufend.» Verschlußzeiten: 16 – 1/8 000 s,
Blitzsynchronzeit 1/180 s

47
○ ○ ○ ○ ○ ○ ○ ○ ○ ○ ○ ○ ○ ○ ○ ○ ○ ○ ○ ○ ○ ○ ○ ○ ○ ○ ○ ○ ○ ○ ○ ○ ○ ○ ○ ○ ○ ○ ○ ○ ○ ○ ○ ○ ○ ○
D GB F
Entfernungseinstellung» Passives Autofokus-System, Aus-
sendung eines Meßblitzes bei gerin-gem Kontrast, manuelle Scharfein-stellung mit Fokushilfe im Sucher.
Belichtungssteuerung» Wahlweise Programmautomatik,
Zeit- und Blendenautomatik, manuel-ler Belichtungsabgleich, Belichtungs-korrektur von +2 bis -2 EV in 1/2Stufen. Meßbereich von EV 1 bis EV20 bei ISO 100.
Einstellung Filmempfindlichkeit» Automatisch bei DX-Codierten Fil-
men von ISO 25 bis 5 000.» Manuelle Einstellung von ISO 6 bis 6
400
Belichtungsmessung» Mehrzonenmeß-System über Silizi-
um-Fotodioden. Zoomsynchron.
Sucher» Heller „Real-Image-Sucher“. Vergrö-
ßerung: 0.4 – 0.9 x über 85 % desFilmbildes. Sucherdisplay mit allenaufnahmerelevanten Daten, beleuch-tet. Dioptrienausgleich von -3 bis +1.
Focusing» Passive autofocus system; metering
flash in low-contrast situations;manual focusing with viewfinderfocusing aid.
Exposure control» Programmed AE, aperture-priority
and shutter-priority AE, manualcontrol; exposure compensation of+2 to -2 EV in 1/2 increments.Operating range from EV 1 to EV 20at ISO 100/21°.
Film-speed setting» Automatic with DX-coded film from
ISO 25/15° to 5000/38°.» Manual setting from ISO 6/9° to
6400/39°.
Exposure metering» Multi-pattern system using silicon
photodiodes; pegged to focal length.
Viewfinder» Bright real-image viewfinder.
Magnification 0.4 – 0.9x. Viewfinderarea 85% of frame. Illuminateddisplay of all relevant data. Eyesightadjustment from -3 to +1 diopter.
Mise au point :» Système autofocus passif, éclair
autofocus si nécessaire, réglagemanuel avec aides de mise au pointdans le viseur
Contrôle de l’exposition :» Programme automatique,
diaphragme automatique, vitesseautomatique et équilibrage manuel,correction de l’exposition par 1/2valeur de +2 à -2 IL. Domaine demesure de IL 1 à IL 20 (avec ISO 100)
Réglages sur sensibilité du film» Automatique avec film codé DX de
ISO 25 à 5000» Réglage manuel de ISO 6 à 6400
Mesure de l’exposition» Système de mesure multizone par
photodiodes au silicium. Synchroni-sation zoom.
Viseur» Viseur „real-image“. Grossissement:
0.4 – 0.9 fois sur 85 % de l’image dunégatif. Affichage éclairé de toutesles données importantes.Compensation dioptrique de -3 à +1.

48
○ ○ ○ ○ ○ ○ ○ ○ ○ ○ ○ ○ ○ ○ ○ ○ ○ ○ ○ ○ ○ ○ ○ ○ ○ ○ ○ ○ ○ ○ ○ ○ ○ ○ ○ ○ ○ ○ ○ ○ ○ ○ ○ ○ ○ ○
D GB F
Filmtransport» Automatische Filmeinfädelung zum
ersten Bild nach Schließen derRückwand.
» Automatischer Filmvor- und Film-rücktransport.
» Rückspulung auch von teil-belichteten Filmen.
Aufnahmefunktion» Selbstauslöser, Fernauslöser über
mitgelieferte IR-Fernbedienung,Serienaufnahmen bis zu 1,5 Bilder/sek., Mehrfachbelichtungen und A-B-C-Bracketing.
Display» LCD-Monitor für alle Kamera-
funktionen wie Bildzählwerk,Verschlußzeit, Blende, manuelle Fo-kussierung, Filmempfindlichkeit,Belichtungskorrektur, Zoom-brennweite, Selbstauslöser, Fern-auslöser, Serienaufnahmen,Mehrfachbelichtungen, Batterie-Kontrolle.
Datenrückwand» Automatischer Kalender und Quarz-
Uhr, sowie Dateneinbelichtung.
Film advance» Automatic film threading and
advance to first frame after closingof camera back.
» Automatic film advance and rewind.» Rewinding of partially exposed films
is possible.
Operating modes» Self-timer, remote release via
standard IR remote control,continuous film advance with up to1.5 fps, multiple exposure.
Display» LCD monitor showing all important
shooting data, such as framecounter, shutter speed, aperture,manual focusing, film speed,exposure compensation, focallength in use, self-timer, remotecontrol, continuous film advance,multiple exposure, battery status.
Data back» Automatic calender and quartz
clock, plus data imprinting.
Fonctions de transport» Prise et avance automatiques de
l’amorce jusqu’à la première vueaprès fermeture du dos. Avance etrembobinage automatiques du film.
» Rembobinage d'un filmpartiellement exposé
Fonction de prise de vue» Retardateur, déclenchement à
distance avec télécommande IR desérie, prises en rafale jusqu’à 1.5 i/s, surimpressions.
Affichage» Ecran ACL pour toutes les fonctions
de l’appareil : compteur de vues,obturateur, diaphragme, mise aupoint manuelle, sensibilité du film,correction de l’exposition, distancefocale du zoom, retardateur,déclenchement à distance, prisesen rafale, surimpressions, contrôledes piles.
Dos dateur» Calendrier automatique, horloge à
quartz et insolation de la date.

49
○ ○ ○ ○ ○ ○ ○ ○ ○ ○ ○ ○ ○ ○ ○ ○ ○ ○ ○ ○ ○ ○ ○ ○ ○ ○ ○ ○ ○ ○ ○ ○ ○ ○ ○ ○ ○ ○ ○ ○ ○ ○ ○ ○ ○ ○
D GB F
Energieversorgung» Kamera:
6 V ( 2 x 3 V Lithium-Batterien CR2)» Datenrückwand / IR-Fernbedie-
nung:3 V Lithiumknopfzelle (CR 2025)
Blitz» Von der Kamera gesteuertes Blitz-
system, abnehmbar NG 20» 2 Lithium Batterien 3 V (CR 123A)
Maße» 145 x 78 x 59 mm
Gewicht» ca. 670 g
Power supply» Camera:
6 V (2 x 3V CR2 lithium batteries)» Data back: 3 V (CR 2025 lithium
button cell)
Flash» Dedicated flash, mountable, NG 20» 2 lithium batteries 3 V (CR 123A)
Dimensions (mm)» 145 x 78 x 59
Weight» Approx. 670 g
Alimentation en énergie» Appareil :
2 piles au lithium 3 V (CR 2)» Dos dateur : pile bouton au lithium
3 V (CR 2025)
Flash» Flash dédié connectable, NG 20,
cranté pour éclairage indirect.» 2 piles au lithium 3 V (CR 123A)
Dimensions :» 145 x 78 x 59 mm
Poids :» Env. 670 g

○ ○ ○ ○ ○ ○ ○ ○ ○ ○ ○ ○ ○ ○ ○ ○ ○ ○ ○ ○ ○ ○ ○ ○ ○ ○ ○ ○ ○ ○ ○ ○ ○ ○ ○ ○ ○ ○ ○ ○ ○ ○ ○ ○ ○ ○
50
Vario-Apogon2,8/5,6 – 22 / 28 – 60 mm
Vario-Apogon2,8/5,6 – 22 / 38 – 90 mm

51
○ ○ ○ ○ ○ ○ ○ ○ ○ ○ ○ ○ ○ ○ ○ ○ ○ ○ ○ ○ ○ ○ ○ ○ ○ ○ ○ ○ ○ ○ ○ ○ ○ ○ ○ ○ ○ ○ ○ ○ ○ ○ ○ ○ ○ ○
D GB F
E.V.
7
6
5
4
3
2
1
Fno
45
32
22
16
11
8
5.6
4
2.8
8 9 10 11 12 13 14 15 16 17 18 19 20 21
16 8 4 2 1 1/2 4 8 15 30 60 125 250 500 1000 2000 4000 8000
38 mm 90 mm
Programmautomatik Programmed AE Programme automatique

○ ○ ○ ○ ○ ○ ○ ○ ○ ○ ○ ○ ○ ○ ○ ○ ○ ○ ○ ○ ○ ○ ○ ○ ○ ○ ○ ○ ○ ○ ○ ○ ○ ○ ○ ○ ○ ○ ○ ○ ○ ○ ○ ○ ○ ○
52
Rollei Fototechnic GmbHP.O. Box 3245 · D-38022 Braunschweig
Germany
D, G
B, F
97

53
○ ○ ○ ○ ○ ○ ○ ○ ○ ○ ○ ○ ○ ○ ○ ○ ○ ○ ○ ○ ○ ○ ○ ○ ○ ○ ○ ○ ○ ○ ○ ○ ○ ○ ○ ○ ○ ○ ○ ○ ○ ○ ○ ○ ○ ○
D GB F
Hinweise zum GebrauchInstructions for use
Manuel d'utilisation