hilton supply management level i “simple shopping” …
TRANSCRIPT

HILTON SUPPLY MANAGEMENT
LEVEL I
“SIMPLE SHOPPING”
www.hsm-online.com Copyright© 2003 Birch Street Systems, Inc. All Rights Reserved. Any distribution of this software by any entity other than Birch Street Systems is strictly prohibited.

Introduction Hilton Hotels Corporation has partnered with Birch Street Systems, Inc. to develop its next generation of e-Procurement software. The Birch Street application is designed to connect buyers and suppliers in a private marketplace. The system has been developed by hoteliers, for hoteliers and is simply an enabling tool, which provides Hilton with a common platform to connect buyers to the suppliers we conduct business with today. The system is also designed to capture and leverage our “collective” spend across the organization. The e-Procurement system does not change the relationship between the buyer and supplier.
Key System Benefits: Facilitates electronic purchasing activities through contracted and approved suppliers Provides order guide templates, robust catalog search engine, multiple buying methods
(Catalog Content, Non-Catalog Content, Supplier on Demand) Enables the connectivity of multiple locations to leverage the purchasing power of our
organization Simplifies the purchasing process through a consistent platform Supports multi data transmission methods (cXML, EDI, Facsimile, Internet) Direct Supplier User Interface - Catalog Maintenance and PO Acceptance Classifies spend Captures maverick spend No cost to hotels or suppliers
Level II Training
Hotel Administrative Process (Add/Remove/Edit User Information) Workflow and Approval Process Receiving and Reconciliation Process Basic Reports
Level III Training
Declining Checkbook / Budget Management Request For Quote (RFQ) Change Order Process Advanced Reports
(cont’d.)
© 2004 Birch Street Systems, Inc. March 2004 Page 2 of 62

STOP – PLEASE READ
• The Level I Reference Guide is designed to be used by Team Members who have completed the
one hour on-line training. The material covered during the on-line training is reflected in the enclosed guide.
• Each Team Member who went through the on-line training received either a “Class Reminder”
and/or a “Thank You” e-mail, which included a hyperlink to access the Level I Reference Guide. • The Level I Reference Guide has been formatted for printing. Please print a copy of this guide
and place it in a 3-ring binder. Additional guides should be added to your binder as your hotel completes the Level II and Level III training segments.
• The Level I Reference Guide will soon be available through the Hilton.net site, under:
Departments - Hilton Supply Management - Resources Library - Level I Reference Guide
Application Note
SCREEN LOADING RATES WILL VARY DEPENDING ON A HOST OF CRITERIA. SCREENS THAT HANDLE A LARGE AMOUNT OF DATA AND/OR PROCESSING WILL LOAD SLOWER IF IT IS THE FIRST TIME THE SCREEN HAS BEEN LOADED SINCE A REBOOT. THE SAME SCREEN WILL LOAD MUCH FASTER AFTER THE INITIAL SCREEN LOAD
© 2004 Birch Street Systems, Inc. March 2004 Page 3 of 62
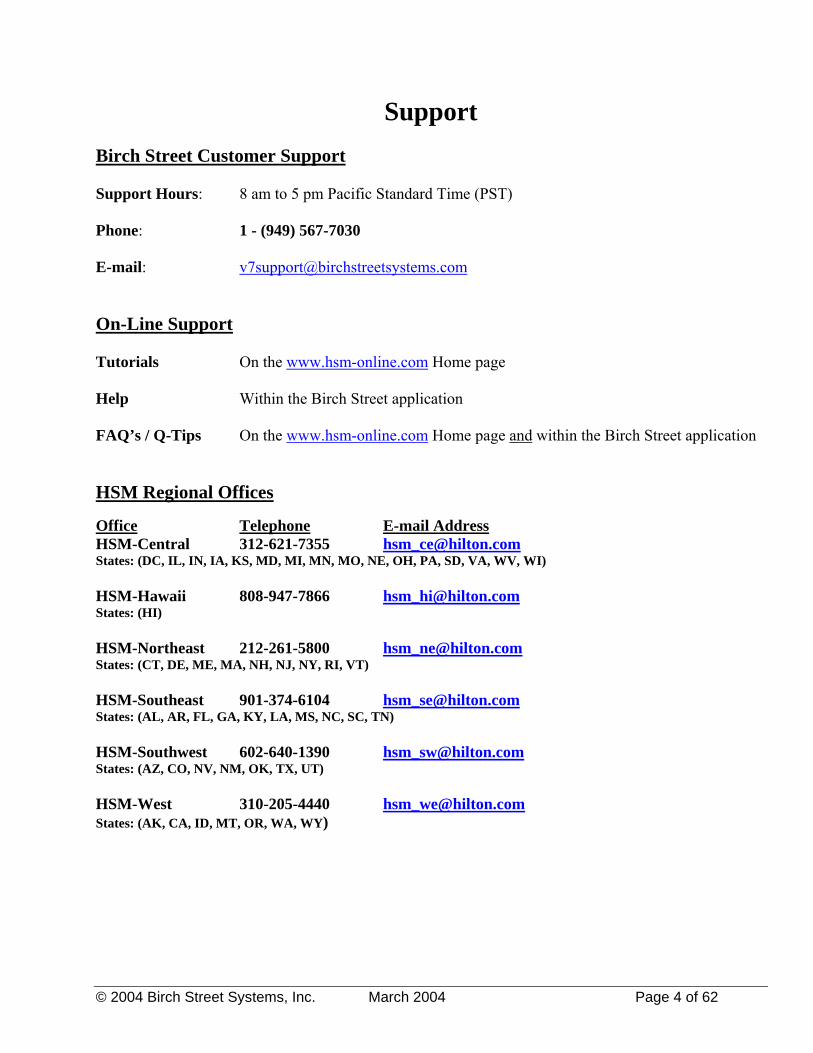
Support Birch Street Customer Support Support Hours: 8 am to 5 pm Pacific Standard Time (PST) Phone: 1 - (949) 567-7030 E-mail: [email protected] On-Line Support Tutorials On the www.hsm-online.com Home page Help Within the Birch Street application FAQ’s / Q-Tips On the www.hsm-online.com Home page and within the Birch Street application HSM Regional Offices Office Telephone E-mail AddressHSM-Central 312-621-7355 [email protected] States: (DC, IL, IN, IA, KS, MD, MI, MN, MO, NE, OH, PA, SD, VA, WV, WI) HSM-Hawaii 808-947-7866 [email protected] States: (HI) HSM-Northeast 212-261-5800 [email protected] States: (CT, DE, ME, MA, NH, NJ, NY, RI, VT) HSM-Southeast 901-374-6104 [email protected] States: (AL, AR, FL, GA, KY, LA, MS, NC, SC, TN) HSM-Southwest 602-640-1390 [email protected] States: (AZ, CO, NV, NM, OK, TX, UT) HSM-West 310-205-4440 [email protected] States: (AK, CA, ID, MT, OR, WA, WY)
© 2004 Birch Street Systems, Inc. March 2004 Page 4 of 62

Table of Contents Introduction............................................................................................................................................... 2
Support....................................................................................................................................................... 4
Chapter 1 - Getting Started ..................................................................................................................... 7
1. First Time Login ........................................................................................................................ 7
2. Updating Your Personal Information - “My Settings” ............................................................... 9
3. Creating the e-SYSCO Link ..................................................................................................... 10
Chapter 2 - System Navigation .............................................................................................................. 12
1. The Front Page.......................................................................................................................... 12
2. Main Menu........................................................................................................................ 12
3. Summary / Search Panel ................................................................................................... 13
4. Logo Panel ........................................................................................................................ 13
5. Front Page Tabs ........................................................................................................................ 14
Chapter 3 - Searching Catalogs ............................................................................................................. 15
1. Product Search .......................................................................................................................... 15
2. Category Search ........................................................................................................................ 16
3. Supplier Search ......................................................................................................................... 18
4. Supplier Classifications ............................................................................................................ 19
5. View Products................................................................................................................... 20
6. View Categories................................................................................................................ 21
Chapter 4 - Order Guides ...................................................................................................................... 22
1. Create an Order Guide .............................................................................................................. 22
2. Add Catalog Content to an Order Guide................................................................................... 23
3. Add Non-Catalog Content to an Order Guide .......................................................................... 24
4. Edit Non-Catalog Content in an Order Guide........................................................................... 26
5. Sort Order Guide....................................................................................................................... 27
6. Adding Par Values .................................................................................................................... 28
7. Print / View............................................................................................................................... 29
© 2004 Birch Street Systems, Inc. March 2004 Page 5 of 62

Chapter 5 – Purchase Orders ................................................................................................................ 31
1. Create a Purchase Order – From an Order Guide..................................................................... 31
2. Create a Purchase Order – From a Catalog Search................................................................... 33
3. Create a Purchase Order – From a Copied PO ......................................................................... 35
4. Create a Purchase Order – From a Spot Buy ............................................................................ 39
5. Create a Purchase Order – From a Supplier-On-The-Fly (S-O-T-F)........................................ 42
Chapter 6 - Submitting Purchase Orders to Suppliers ....................................................................... 46
1. Purchase Order Status Definitions ............................................................................................ 46
2. Purchase Order Filter / Views................................................................................................... 47
3. Proxy Suppliers......................................................................................................................... 49
4. Submitting the Purchase Order ................................................................................................. 50
Chapter 7 - Add New Suppliers............................................................................................................. 51
1. Add New Supplier..................................................................................................................... 51
Chapter 8 – Glossary .............................................................................................................................. 53
1. Symbols (Icons) and Definitions .............................................................................................. 53
2. Glossary of Terms..................................................................................................................... 54
© 2004 Birch Street Systems, Inc. March 2004 Page 6 of 62

Chapter 1 - Getting Started 1. First Time Login - Go to www.hsm-online.com
Step 1: Click on V7 Procurement Login. Step 2: Enter your Birch Street Login ID and Password provided.
(Please obtain your Birch Street Login ID/Password from your hotel GM, if not already provided).
Step 3: Go through the First Time Login process - click Continue
© 2004 Birch Street Systems, Inc. March 2004 Page 7 of 62

Chapter 1 - Getting Started 1. First Time Login - Go to www.hsm-online.com
Step 4: Click “Accept” Terms of Use Step 5: Enter your original password/
Change (Create) your new password – known only to you. Retype new password. Click “Change”.
You will automatically be redirected to your “My Settings” screen.
You have successfully logged into the Birch Street application for the first time. This is the only time you will need to satisfy these steps. All future system access will take you directly from the Login screen to your Home Page.
© 2004 Birch Street Systems, Inc. March 2004 Page 8 of 62
Chapter 1 - Getting Started
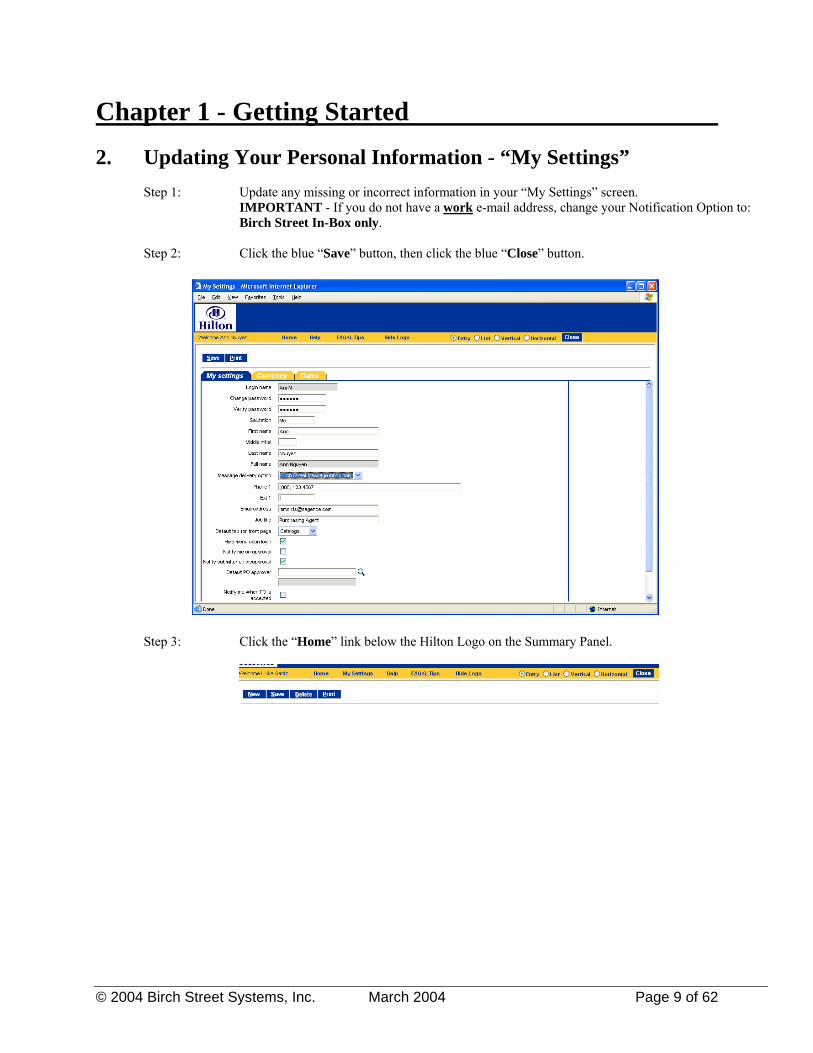
2. Updating Your Personal Information - “My Settings” Step 1: Update any missing or incorrect information in your “My Settings” screen.
IMPORTANT - If you do not have a work e-mail address, change your Notification Option to: Birch Street In-Box only.
Step 2: Click the blue “Save” button, then click the blue “Close” button.
Step 3: Click the “Home” link below the Hilton Logo on the Summary Panel.
© 2004 Birch Street Systems, Inc. March 2004 Page 9 of 62

Chapter 1 - Getting Started 3. Creating the e-SYSCO Link
IMPORTANT - Please skip this section if you do not currently buy from SYSCO or have a SYSCO account. The Hilton e-Procurement system provides Buyers with the ability to connect with a select group of suppliers via a Punch-out, directly into the supplier’s web site. At the conclusion of your ‘buying’ session, the products purchased will be reflected in your Birch Street account in the form of a Purchase Order (PO). Step 1: Click the “Hide Menu” check box below the Hilton Logo on the Summary Panel.
Step 2: From the Main Menu, select v7 Procurement, then select SYSCO Punchout Profile option.
Step 3: Enter the following information in the 2 white background fields: You’re existing SYSCO Login
ID and your existing SYSCO Account Number.
© 2004 Birch Street Systems, Inc. March 2004 Page 10 of 62

Chapter 1 - Getting Started 3. Creating the e-SYSCO Link
Step 4: Click on the magnifying glass icon to display all of the SYSCO Distributors or Operating
Companies (OpCo) – Let the screen load the data before you continue.
Step 5: Select the SYSCO OpCo that currently services your hotel.
Step 6: Click the blue “Save” button, then click the blue “Close” button.
Step 7: Click the “Home” link below the Hilton Logo on the Summary Panel.
The SYSCO punchout link should now be displayed on your Catalog Tab.
Please contact your HSM Regional Office if you do not know your SYSCO Login ID or SYSCO account number.
© 2004 Birch Street Systems, Inc. March 2004 Page 11 of 62

Chapter 2 - System Navigation 1. The Front Page
When you log in to the Birch Street application you are taken to the “Front” page. The “Front” page is designed to manage all the activities a buyer typically requires throughout the transaction cycle. Buyers can ‘toggle’ between the Front Page tabs to select a variety of features.
2. Main Menu Accessing the main menu is achieved by un-checking the Hide Menu checkbox on the Logo Panel. The Main Menu’ is used to navigate and access additional features that are not typically required to manage the purchasing cycle. You will need to access the Main Menu to create your Sysco Punchout Profile account and Edit Supplier-On-The-Fly (S-O-T-F) records. 1. My Menu – Provides alternate access to the My Settings screen. 2. SYSCO Punchout Profile 3. Edit A Supplier On The Fly (S-O-T-F) 4. V7 Procurement – Provides various access to other Maintenance Screens, Reports and alternate access to
screens also accessible via the Front Page Tabs
© 2004 Birch Street Systems, Inc. March 2004 Page 12 of 62

Chapter 2 - System Navigation
3. Summary / Search Panel The Summary/Search Panel provides high level summary information from the application as well as catalog search functionality. The Summary Panel contains the Search All Catalogs screen, In Box and Shopping Cart Summary. Selecting the ‘Hide Summary’ check box will hide the Search All Catalogs screen, In Box and Shopping Cart Summary. Un-checking the box will re-display the Summary/Search Panel.
Search All Catalogs – This functionality provides catalog searches based upon 3 criteria: • Product Searches allow the user to search by any descriptive criteria including product number. • Category Searches allow the user to search by product category name. • Supplier Searches allow the user to search by Supplier Name. In Box – This summary information provides the number of new messages (NOT new PO’s) and total message count in the Birch Street In Box. The In Box is accessible via the Front Page Tabs. Shopping Cart – This summary information provides the number of items (Lines) and the total dollar value (Total) in the Cart. The Cart is accessible via the Front Page Tabs.
4. Logo Panel The Logo Panel provides access to program maintenance, configuration and Help functionality. Clicking on the ‘Hide Logo’ link hides the blue ‘Logo’ section. Re-clicking this link will display the Logo Panel. Hiding the Logo panel will create additional screen space to display other information. Display items and links available from the Logo panel are as follows:
• Hide Menu Checkbox - Checking this box hides the main menu. Un-checking it displays the Main Menu.
• Hide Summary Checkbox - Checking this box hides the Summary/Search panel.
• Hide Logo - This link hides the Logo section of the Logo Panel.
• Home - This link refreshes the Front Page Tabs to display the Home Catalog tab.
• My Settings – This link displays the My Settings screen for adjustment of personal contact information and individual application settings.
• Help – This link displays application ‘Help’ resources.
• FAQ/Q-Tips - This link displays Frequently Asked Questions and Quick-Tips. • Logout – This link logs the user out of the application and returns them to the hsm-online Login Page.
© 2004 Birch Street Systems, Inc. March 2004 Page 13 of 62

Chapter 2 - System Navigation
5. Front Page Tabs
The Front Page Tabs provide for convenient application navigation organized by specific program functionality. Catalogs - The Catalog Tab provides for access to the following functionality: • Adding Non-Catalog Content to existing or current PO’s. • Accessing Catalogs directly through the Category Structure. • Displays the Results from any Catalog Searches initiated through the Search All Catalog
functionality. Order Guide - The Order Guide Tab allows for the creation, maintenance and use of Order Guides in the PO process. Cart - The Cart is a temporary staging area for the creation of PO’s that allows for comparisons of products from any number of suppliers. PO – The PO tab lists existing PO’s and all relevant actions taken against PO’s can be initiated from this tab (New, Submitted, Viewed, Accepted, Rejected, PO Header information…more.) In Box – The In Box tab maintains a list of all system generated notifications delivered to the user. The user will receive notifications within this In Box only if the Message Delivery setting on the My Settings Screen includes delivery to the “Birch Street In Box”.
© 2004 Birch Street Systems, Inc. March 2004 Page 14 of 62

Chapter 3 - Searching Catalogs
1. Product Search
Step 1: On the Front Page, in the Search All Catalogs section of the Summary Panel, select “Product” from
the drop down list. Step 2: In the field immediately to the Right of the Products drop down list, type the product name or item
number of the product you wish to find. In this example, we searched for the product: Shampoo. Step 3: Click on the “Go” button. - The search results are displayed in the below Result Grid.
From the above screen, a Buyer can do any of the following: • Click on the “Computer Monitor Icon” to view the product image. • Click on the “More Product Info” link to view additional product information. • Click on the “Select” box (far right column) to tag the item – Add to Order Guide. • Enter an Order Quantity (second column from right) – Create a PO.
© 2004 Birch Street Systems, Inc. March 2004 Page 15 of 62

Chapter 3 - Searching Catalogs
2. Category Search
Step 1: On the Front Page, in the Search All Catalog section of the Summary Panel, select “Categories” from the drop down list.
Step 2: In the field immediately to the Right of the Categories drop down list, type in the “Category” you
wish to find. In this example, we searched for Category: beds.
Step 3: Click on the “Go” button. - The result is displayed in the Result Grid.
Notice that we are now “drilling down” within the category structure, further refining our catalog search. At the top left of the tab the Catalog, Category and Sub Category information is now displayed along with a blue “Up” button, that if clicked will move you back “up” the category structure. Also displayed on the top right of the tab is an additional Search this Catalog feature that provides for searches within the sub-category. Clicking on any of the Categories will either display any existing Sub-Categories or the product(s) within the Category.
Step 4: The next level down displays sub-categories.
© 2004 Birch Street Systems, Inc. March 2004 Page 16 of 62

Chapter 3 - Searching Catalogs
3. Category Search Step 5: Click on any of the sub-categories to display the products contained within the sub-category.
© 2004 Birch Street Systems, Inc. March 2004 Page 17 of 62

Chapter 3 - Searching Catalogs
3. Supplier Search
Step 1: On the Front Page, in the Search All Catalog section of the Summary Panel, select Suppliers from the drop down list.
Step 2: In the field immediately to the Right of the Suppliers drop down list, type in the Supplier Name
you wish to find.
Step 3: Click on the “Go” button.
All Suppliers with the same text you entered are returned.
© 2004 Birch Street Systems, Inc. March 2004 Page 18 of 62

Chapter 3 - Searching Catalogs
4. Supplier Classifications National – The classification for any Supplier who has a ‘National’ contract with Hilton Hotels Corporation and has the ability to service multiple geographic markets and/or hotel brands.
Or Regional – A Regional Supplier is managed by a HSM Regional Office and only services a specific geographic market.
And Proxy - A ‘Proxy Supplier’ is a Supplier who does not sell directly to hotels. Hilton Supply Management (HSM) takes “Title” to the transaction when you create a Purchase Order for the Proxy Supplier. The Birch Street system will automatically transfer the PO to HSM.
Or Direct - Opposite of a Proxy Supplier. A ‘Direct Supplier’ sells products directly to a hotel. The submitted PO goes directly to the supplier. In addition… On The Fly - The term ‘Supplier-On-The-Fly’ (S-O-T-F) denotes when a new Supplier account is created by the Buyer. The (S-O-T-F) Supplier has not been adopted into the Private Marketplace. All PO’s created for the S-O-T-F Supplier will contain non-catalog content and the orders will be sent to the Supplier via the Birch Street fax server. Supplier-On-The-Fly (S-O-T-F) Suppliers do not have catalog content.
© 2004 Birch Street Systems, Inc. March 2004 Page 19 of 62

Chapter 3 - Searching Catalogs
5. View Products
Click on the View Products link. The system will display all products associated to that Supplier, if the Supplier has less than 1,000 products. The products displayed will look similar to the Product search result.
Or A Search Text box is displayed for Suppliers with greater than 1,000 products in their catalog. An additional search feature is provided to narrow the result set for the search.
© 2004 Birch Street Systems, Inc. March 2004 Page 20 of 62

Chapter 3 - Searching Catalogs
6. View Categories
Click on the View Categories link.
The system will display all of the categories that contain the Supplier’s products. The Categories displayed will look similar to the Category search result.
Clicking on any of the Categories will either display any existing Sub-Categories or the product(s) within the Category.
© 2004 Birch Street Systems, Inc. March 2004 Page 21 of 62
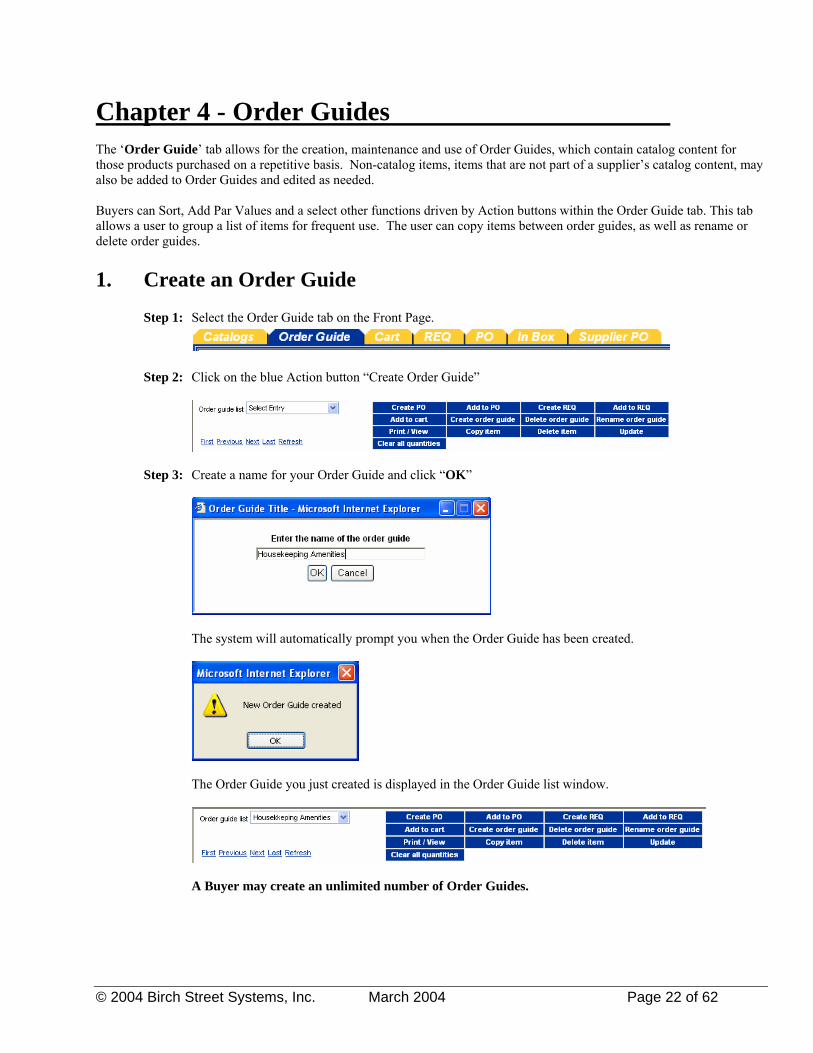
Chapter 4 - Order Guides The ‘Order Guide’ tab allows for the creation, maintenance and use of Order Guides, which contain catalog content for those products purchased on a repetitive basis. Non-catalog items, items that are not part of a supplier’s catalog content, may also be added to Order Guides and edited as needed. Buyers can Sort, Add Par Values and a select other functions driven by Action buttons within the Order Guide tab. This tab allows a user to group a list of items for frequent use. The user can copy items between order guides, as well as rename or delete order guides. 1. Create an Order Guide
Step 1: Select the Order Guide tab on the Front Page.
Step 2: Click on the blue Action button “Create Order Guide”
Step 3: Create a name for your Order Guide and click “OK”
The system will automatically prompt you when the Order Guide has been created.
The Order Guide you just created is displayed in the Order Guide list window.
A Buyer may create an unlimited number of Order Guides.
© 2004 Birch Street Systems, Inc. March 2004 Page 22 of 62
Chapter 4 - Order Guides
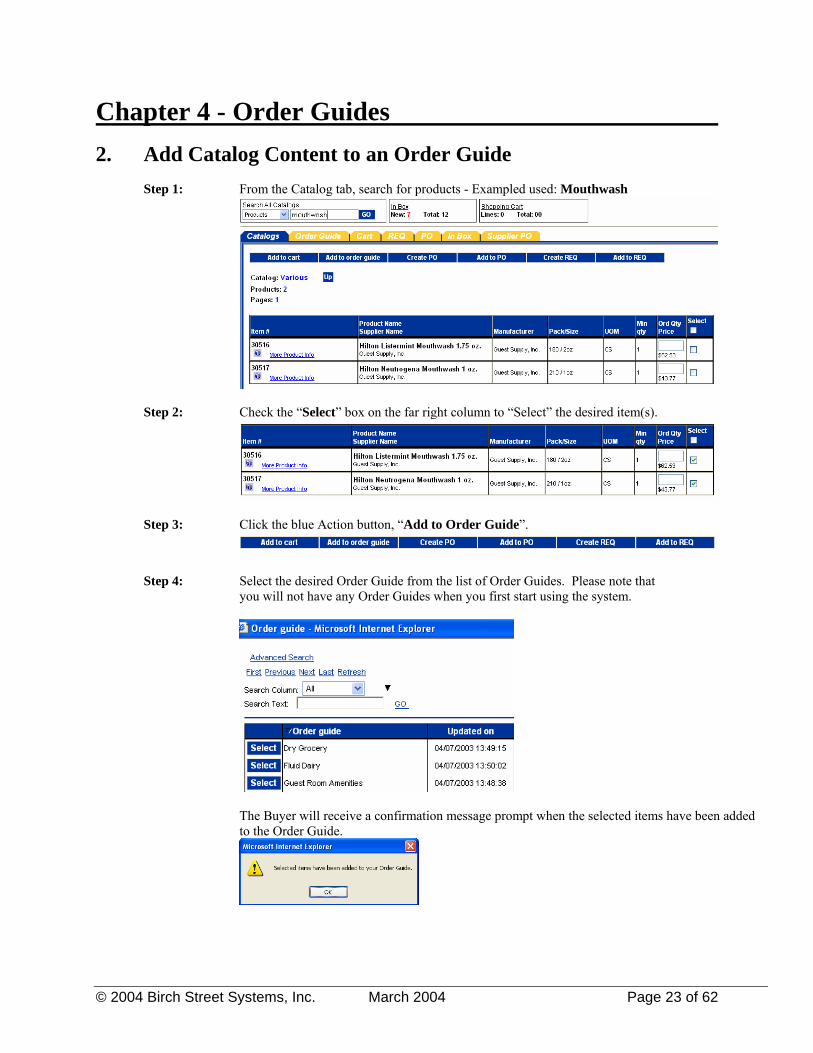
2. Add Catalog Content to an Order Guide
Step 1: From the Catalog tab, search for products - Exampled used: Mouthwash
Step 2: Check the “Select” box on the far right column to “Select” the desired item(s).
Step 3: Click the blue Action button, “Add to Order Guide”.
Step 4: Select the desired Order Guide from the list of Order Guides. Please note that
you will not have any Order Guides when you first start using the system.
The Buyer will receive a confirmation message prompt when the selected items have been added to the Order Guide.
© 2004 Birch Street Systems, Inc. March 2004 Page 23 of 62

Chapter 4 - Order Guides
3. Add Non-Catalog Content to an Order Guide
Step 1: Click on the “Home” link in the Logo Panel to display the Catalog Tab.
Step 2: Click on the “Create non-catalog items” button.
Step 3: Click on the “Select Supplier” button.
Step 4: Enter the supplier’s name in the Supplier Search field and click on “Go.”
Step 5: Click on the “Select” button next to the correct supplier.
Step 6: Enter non-catalog line item information in the Non-Catalog Item Grid. Make sure that all fields are completed. The “Ord Qty” field must have at least a 0.
Step 7: Click on the “Add to Order Guide” button.
© 2004 Birch Street Systems, Inc. March 2004 Page 24 of 62

Chapter 4 - Order Guides
3. Add Non-Catalog Content to an Order Guide
Step 8: Click on the “Select” button next to the appropriate Order Guide.
Items will be displayed on the Order Guide Tab in “Purple” to denote them as non-catalog items. When the Order Guide is printed, all items will have an asterisk (*) next to each item number to denote them non-catalog items. All non-catalog items added to your order guide will only contain the pricing information provided at the time the items were created. Suppliers do not have the ability to update non-catalog items.
© 2004 Birch Street Systems, Inc. March 2004 Page 25 of 62

Chapter 4 - Order Guides 4. Edit Non-Catalog Content in an Order Guide
Step 1: Select an Order Guide from the Order Guide list window. Use the down arrow to display all
Order Guides in your account.
Step 2: Tag the row or product you wish to edit. Step 3: Click on the “Edit item” action button.
Step 4: Make the desired changes and click on the “Save” button.
© 2004 Birch Street Systems, Inc. March 2004 Page 26 of 62
Chapter 4 - Order Guides 5. Sort Order Guide
Step 1: Select an Order Guide from the Order Guide list window. Use the down arrow to display all
Order Guides in your account.
Step 2: Click within the “Sort” check box, directly below the blue “Clear all Quantities” Action button.
The ‘Sort’ check box is available within all Order Guides and is used to rearrange the sequence of product rows. Selecting the ‘Sort’ check box will launch a ‘Sort’ column (second column from left) on the Order Guide screen.
Step 3: Enter a numeric value in each row, based on the sequence desired and then clicks ‘Update’. The
Order Guide will be ‘sorted’ accordingly. A Buyer may also elect to use decimals to sub sort within whole number sequences.
© 2004 Birch Street Systems, Inc. March 2004 Page 27 of 62

Chapter 4 - Order Guides 6. Adding Par Values
Step 1: Select an Order Guide from the Order Guide list window. Use the down arrow to display all Order Guides in your account.
Step 2: Click within the “Par Values” check box, directly below the blue “Clear all Quantities” Action button.
A Buyer can elect to add a Minimum (Min) and/or Maximum (Max)’Par Value’ for each item contained in their Order Guides. When a Buyer checks the ‘Par Values’ check box, the system launches 2 new columns within the Order Guide grid (Min Qty) and (Max Qty).
Step 3: The Buyer populates the fields with the desired Min and Max Par quantities. Please note that the
(Min) Par Qty must equal to or greater than the supplier’s minimum order quantity. Conversely, the (Max) Par Qty must also be equal to or greater than the supplier’s minimum order qty.
Step 4: Upon completion, the Buyer must click the ‘Update’ button to save their Par values.
© 2004 Birch Street Systems, Inc. March 2004 Page 28 of 62

Chapter 4 - Order Guides 7. Print / View
Step 1: The “Print/View” Action button is also located within Order Guide tab and performs differently than the PO Print/View process. Select an Order Guide from the Order Guide list window. Use the down arrow to display all Order Guides in your account.
Step 2: Click the “Print/View” Action button. Step 3: If the below File Download message appears, click “Open”.
© 2004 Birch Street Systems, Inc. March 2004 Page 29 of 62

Chapter 4 - Order Guides 7. Print / View
Step 4: When a Buyer selects an existing Order Guide and clicks on the “Print/View” button, the system
creates a copy of the Order Guide in Microsoft Excel. The Excel Order Guide can then be “saved” to the Buyer’s computer.
The Order Guide (now an Excel Spreadsheet) has a row titled, “Forecast Count”. The Buyer may elect to populate these fields with forecast information (House Count, Occupancy Rate, etc.) in which formulas can be used to determine optimum ordering quantities. There is also a date field that can be used to denote the date or day of the week. The system also creates seven (7) Inventory / Order (Inv/Ord) columns for the purpose tracking existing quantities on hand.
IMPORTANT ORDER GUIDE INFORMATION – THINGS YOU SHOULD KNOW: • When a supplier updates pricing for a product, your Birch Street Order Guide will automatically be updated as
well. • When you select “Print/View” and create an Excel Spreadsheet version of the Order Guide, the Spreadsheet is
now divorced for the Birch Street application. All future supplier updates will NOT be reflected in the Spreadsheet version of the order Guide.
• Product Names displayed in Red text in existing Birch Street Order Guide indicate that the Supplier has
discontinued selling the item. The discontinued item(s) can NOT be selected to create a future PO. The discontinued products will remain in the Order Guide until the Buyer deletes them.
© 2004 Birch Street Systems, Inc. March 2004 Page 30 of 62

Chapter 5 – Purchase Orders Creating Purchase Orders can be achieved from multiple places within the application. PO’s can be created from the results of Catalog Searches, from Order Guides, even from existing PO’s.
1. Create a Purchase Order – From an Order Guide
Step 1: From the Front Page, click on the Order Guide tab.
Step 2: Select an Order Guide from the Order Guide list.
Step 3: Enter the desired order quantity for each desired item(s).
Remember to Tab off of each field. Notice that by changing the quantity the line has been automatically selected for action (i.e. the checkbox is checked). Notice also that the select checkbox for Order Guide Items is on the far left while the catalog tab has the select checkbox on the far right. Select Check boxes and/or Radio buttons will always be on either end of the grid, depending on which Front Page Tab you are working from.
Step 4: Click on the blue “Create PO” Action button.
The Create Document window opens for entering the purchase order header information for this PO.
© 2004 Birch Street Systems, Inc. March 2004 Page 31 of 62

Chapter 5 – Purchase Orders
1. Create a Purchase Order – From an Order Guide
Step 5: Create the PO Header by entering data into the following fields: • Subject: Give the PO a subject for reference • Req’d Del. Date: Enter date product is needed hotel • Approver: Leave on the default approver or select an approver from the drop down menu. • Note to Supplier: Enter a Note to the Supplier, if desired • Cost Center: Enter your Department Name • Source Doc: Leave this field blank • Use Tax %: Accept the Default • Tax: Accept the Default
Step 6: Click OK to create the PO. A popup message box displays the number of the PO created.
Ste 7: Click OK again. The application will take you directly to the PO Tab and load PO that was just
created, displaying the PO for further action.
© 2004 Birch Street Systems, Inc. March 2004 Page 32 of 62

Chapter 5 – Purchase Orders
2. Create a Purchase Order – From a Catalog Search
Step 1: On the Front Page, in the Search All Catalog section of the Summary Panel, select All Suppliers from the drop down list.
Step 2: In the field immediately to the Right of the Suppliers drop down list, type in the Supplier Name you wish to find.
Step 3: Click on the “Go” button.
Step 4: Click on the View Products link.
The system will display all products associated to that Supplier, if the Supplier has less than 1,000 products. The products displayed will look similar to the Product search result.
Step 5: Enter the desired quantities for each item in the Ord Qty column. Use the “Tab” key once you have entered a quantity and the row will be selected and the “Select” box will be tagged accordingly.
Step 6: Click on the blue “Create PO” Action button. The Create Document window opens for entering the purchase order header information for this PO.
Step 5: Create the PO Header by entering data into the following fields:
• Subject: Give the PO a subject for reference • Req’d Del. Date: Enter date product is needed hotel • Approver: Leave on the default approver or select an approver from the drop down menu. • Note to Supplier: Enter a Note to the Supplier • Cost Center: Enter your Department Name • Source Doc: Leave this field blank • Use Tax %: Accept the Default • Tax: Accept the Default See next page for screen shot of PO Header fields.
© 2004 Birch Street Systems, Inc. March 2004 Page 33 of 62

Chapter 5 – Purchase Orders
2. Create a Purchase Order – From a Catalog Search
Step 6: Click OK to create the PO. A popup message box displays the number of the PO created.
Ste 7: Click OK again. The application will take you directly to the PO Tab and load PO that was just
created, displaying the PO for further action.
© 2004 Birch Street Systems, Inc. March 2004 Page 34 of 62

Chapter 5 – Purchase Orders
3. Create a Purchase Order – From a Copied PO In the below example, we create a new Purchase Order from a PO that was submitted and then Rejected by the Supplier.
Step 1: From the Front Page, click on the PO tab.
Step 2: Select any existing PO, regardless of its PO status by clicking the Round Radio button on
the far left column. Click the blue “Edit” Action button to the right of the Radio button.
Step 3: Select the blue “Copy PO” Action button to create a copy of the PO.
Step 4: The screen will automatically refresh itself and prompt you when the processing is done. Click “OK” to continue.
© 2004 Birch Street Systems, Inc. March 2004 Page 35 of 62

Chapter 5 – Purchase Orders
3. Create a Purchase Order – From a Copied PO
Step 5: The below screen illustrates the copied PO. Please note that when you copy an existing PO to create a new PO, the following changes occur: The new PO is given a new PO Number The Status of the newly created PO is “New” The Unit Price and Extension is updated for all Catalog items All other information is exactly the same as on the original PO:
• Subject • Required Delivery Date • Supplier Name • Supplier Address • PO Line Items • Order Quantities
Step 6: Modify or change the data on the PO Header of the newly created PO.
© 2004 Birch Street Systems, Inc. March 2004 Page 36 of 62

Chapter 5 – Purchase Orders
3. Create a Purchase Order – From a Copied PO
The Buyer can click on any of the tabs but can only change information on the PO Header, Ship To and Line Items tabs.
Step 7: Changes to the Attention and Ship Via can be made on the Ship To tab. The Ship Via is
the method in which you want your order to ship.
Step 8: The Line Items tab has its own “Edit” button, which when selected launches the screen
that contains all of the information about the PO line item. Changes to the line item information can be made here.
© 2004 Birch Street Systems, Inc. March 2004 Page 37 of 62

Chapter 5 – Purchase Orders
3. Create a Purchase Order – From a Copied PO Step 9: Once the Buyer has completed all of the desired changes, click the blue “Save” Action
button to save the changes. Click the blue “Close” Action button in the far upper right corner of your screen.
© 2004 Birch Street Systems, Inc. March 2004 Page 38 of 62

Chapter 5 – Purchase Orders
4. Create a Purchase Order – From a Spot Buy
Step 1: From the Front Page, click on Home link on the Logo Panel at the top of the Front Page screen. This takes the user to the Main Catalog Tab.
Step 2: Click on the blue “Create Non-Catalog Items” Action button. This action will launch a
blank product grid, where the Buyer can free-form product information.
Step 3: The blank product grid is designed to provide structure for free-form or “Spot Buy”
product data. The Buyer must manually “Select” each row in the far left check box, prior to completing the other product attribute fields. At this point, we have indicated WHAT we want to purchase.
Step 4: Now we need to identify WHO we want to purchase these items from. Click on the blue
“Select Supplier” Action button.
© 2004 Birch Street Systems, Inc. March 2004 Page 39 of 62

Chapter 5 – Purchase Orders
4. Create a Purchase Order – From a Spot Buy Step 5: When you click on the “Select Supplier” Action button, the system launches a Supplier
Name search window.
Type the name of the Supplier into the “Supplier Search” window. IMPORTANT INFORAMTION – A Buyer can search for Hilton Supply Management using the following conventions: Hilton Supply Management HSM Hilton Hotels Corporation HEC Hilton
All of the above examples will return a positive match.
Step 6: Click on the blue “Select” Action button to the left of the Supplier Name. We have now
identified WHO we want to purchase the “Spot Buy” products from.
© 2004 Birch Street Systems, Inc. March 2004 Page 40 of 62

Chapter 5 – Purchase Orders
4. Create a Purchase Order – From a Spot Buy Step 7: Select the blue “Create PO” Action button to initiate the PO creation process. A Buyer
may also elect to add the content to an existing PO. At this point, the PO creation process is exactly the same as if we had selected content
from a Catalog search or created the PO from an Order Guide.
© 2004 Birch Street Systems, Inc. March 2004 Page 41 of 62
Chapter 5 – Purchase Orders
5. Create a Purchase Order – From a Supplier-On-The-Fly (S-O-T-F)
Step 1: From the Front Page, click on Home link on the Logo Panel at the top of the Front Page
screen. This takes the user to the Main Catalog Tab.
Step 2: Click on the blue “Create Non-Catalog Items” Action button. This action will launch a blank product grid, where the Buyer can free-form product information.
Step 3: The blank product grid is designed to provide structure for free-form or “Spot Buy”
product data. The Buyer must manually “Select” each row in the far left check box, prior to completing the other product attribute fields. At this point, we have indicated WHAT we want to purchase.
Step 4: Now we need to identify WHO we want to purchase these items from. Click on the blue
“Select Supplier” Action button.
© 2004 Birch Street Systems, Inc. March 2004 Page 42 of 62

Chapter 5 – Purchase Orders
5. Create a Purchase Order – From a Supplier-On-The-Fly (S-O-T-F) Step 5: When you click on the “Select Supplier” Action button, the system launches a Supplier
Name search window. Type the name of the Supplier into the “Supplier Search” window.
Step 6: The below screen is displayed when no Supplier Name match was found. Click on the
blue “Add New Supplier” Action button to proceed to the next step. As step one in the Supplier validation process, Birch Street first searches for the Supplier by name. When no match is found…
Step 7: Birch Street searches for the Supplier via their Fax number. The fax number search is important because all PO’s will be sent to the Supplier via the Birch Street fax server. Please note that the Supplier does not have a Birch Street account in which to retrieve electronic Purchase Orders. Enter the Supplier’s Fax Number in the field below.
Step 8: Birch Street performs the second validation process by search for Fax Number match.
No two suppliers can ever have the same Fax Number. If no Fax Number match was found, the system will launch the following screen:
© 2004 Birch Street Systems, Inc. March 2004 Page 43 of 62

Chapter 5 – Purchase Orders
5. Create a Purchase Order – From a Supplier-On-The-Fly (S-O-T-F)
Step 9: Enter the new Supplier (S-O-T-F) information in the appropriate fields.
Fields with a blue box and white triangle are “required” fields and must be completed before the Buyer can complete the process of creating a new Supplier account.
© 2004 Birch Street Systems, Inc. March 2004 Page 44 of 62

Chapter 5 – Purchase Orders
5. Create a Purchase Order – From a Supplier-On-The-Fly (S-O-T-F)
Step 10: Click the blue “Save” Action button to complete the process.
© 2004 Birch Street Systems, Inc. March 2004 Page 45 of 62
Chapter 6 - Submitting Purchase Orders to Suppliers
1. Purchase Order Status Definitions
The Birch Street application tracks the Purchase Order from the moment it is created through the final step of the transaction cycle. As the Purchase Order moves through the purchasing cycle, its “Status” will change when each milestone is passed. A few Purchase Order ‘Status’ examples are as follows:
New PO has been created. The PO may also go through several “edits” but is still
considered a new PO. The PO has NOT been submitted to the Supplier.
Submitted The PO has been submitted but NOT Viewed OR Accepted by he Supplier.
Fax in Line to be Sent A PO with this status is in a Queue or electronic waiting line and will soon be dispatch to the supplier by the Birch Street fax server.
Viewed Supplier has received and opened or viewed the PO only. The Supplier has
NOT accepted the PO.
Accepted The Supplier has agreed to the terms of the PO and HAS accepted the order.
Fax/E-mail Accepted The PO was sent to the Supplier via the Birch Street fax server. All Supplier-On-The-Fly (S-O-T-F) PO’s and PO’s to Fax Enabled Suppliers (see Glossary of Terms for definition) are considered AUTOMATICCALLY ACCEPTED, once the fax has been transmitted successfully.
Fax/E-mail Failed The PO was sent to the Supplier via the Birch Street fax server, BUT – either
the fax number provided on the PO Header was invalid or the Supplier’s fax machine may have been out of order. The PO was NOT transmitted to the Supplier and has NOT been automatically accepted. The Birch Street System will make up to 5 attempts to send the order via their fax server before giving the PO a Fax/E-mail Failed status. Once the PO has Fax Failed status, the transaction is considered void. At that point, the Buyer must Copy the PO to a new PO and obtain a valid Supplier fax number and resubmit the new PO the supplier.
Rejected The Supplier has declined the order and has rejected the PO with a Note which
explains the reason for the rejection. IMPORTANT – ONLY PO’S THAT HAVE BEEN EITHER ‘ACCEPTED’ OR ‘FAX/E-MAIL ACCEPTED’ ARE CONSIDERED VALID TRANSACTIONS AND WILL BE SHIPPED BY THE SUPPLIER.
© 2004 Birch Street Systems, Inc. March 2004 Page 46 of 62

Chapter 6 - Submitting Purchase Orders to Suppliers
2. Purchase Order Filter / Views Over time, Buyers will create hundred, if not thousands of Purchase Orders in their Birch Street account. To assist in managing such a large volume of data, Birch Street provides “Filters” on the PO Tab.
Each Buyer can elect to view all Purchase Orders by “PO Status”. Changing the Search Column from “All” to “PO Status” will allow the Buyer to define which PO Status code they would like displayed in the below PO grid.
© 2004 Birch Street Systems, Inc. March 2004 Page 47 of 62

Chapter 6 - Submitting Purchase Orders to Suppliers
2. Purchase Order Filter / Views In the below example, we changed the PO Filter to all PO’s that have only been “Viewed” by the Supplier. REMEMBER – PO’s in Viewed status have NOT been “Accepted” by the Supplier.
All Purchase Orders in Supplier Viewed Status – These Orders have not been “Accepted”
All Purchase Orders in Supplier Rejected Status – These Orders have been voided by the Supplier when they were “Rejected”.
IMPORTANT INFORMATION – ALL BUYERS SHOULD CHECK THEIR PO STATUSES DAILY TO ENSURE THAT THE SUPPLIERS HAVE RECEIVED, VIEWED AND ACCEPTED THE ORDER(S).
© 2004 Birch Street Systems, Inc. March 2004 Page 48 of 62

Chapter 6 - Submitting Purchase Orders to Suppliers
3. Proxy Suppliers
Please note that directly to the right of the Supplier’s Name on the below PO Header is displayed the word “Proxy”. Directly below the Supplier’s Name Cardinal Glassware is “Hilton Supply Management”. The Buyer searched for Cardinal Glassware (Supplier search), clicked on viewed products, selected the products, and created a PO. AT NO TIME WAS HILTON SUPPLY MANAGEMENT SELECTED AS THE SUPPLIER. There is a special feature in Birch Street which recognizes when Hilton Supply Management takes “Title” to the transaction through a “Proxy” Supplier.
The only time Hilton Supply Management should be “Selected” as the Supplier is when a non-catalog content PO “Spot Buy” is created AND the Buyer knows that Hilton Supply management should receive the order.
© 2004 Birch Street Systems, Inc. March 2004 Page 49 of 62
Chapter 6 - Submitting Purchase Orders to Suppliers
4. Submitting the Purchase Order Step 1: Select the ‘PO Tab” from the Front Page.
Step 2: Select a “New” Status PO that is ready to be submitted to the Supplier.
Step 3: Click on the blue “Submit” Action button.
THE EXACT SAME PROCESS IS REPEATED FOR ALL TYPES OF PURCHASE ORDERS. From Order Guides
From Catalog From Spot Buy From S-O-T-F
© 2004 Birch Street Systems, Inc. March 2004 Page 50 of 62

Chapter 7 - Add / Edit New Suppliers
1. Add New Supplier
Step 1: Click on the “Home” link on the Logo Panel Step 2: Click on the “Create non-catalog items” button.
Step 3: Click on the “Select Supplier” button.
Step 4: Type the name of the supplier you need to add under the “Supplier Search” box.
Step 5: Since the supplier doesn’t exist in Birch Street, you will see “No Supplier Found.” Click on the “Add New Supplier” button.
© 2004 Birch Street Systems, Inc. March 2004 Page 51 of 62

Chapter 7 - Add New Suppliers
1. Add a New Supplier
Step 6: Enter the supplier’s fax number, without dashes “-“or parentheses “()”, and click on the “Search” button. Note: The fax number you enter here is the number where Birch Street POs will be faxed.
Step 6: Enter the supplier’s contact information.
Step 7: Click on the “Save” button.
© 2004 Birch Street Systems, Inc. March 2004 Page 52 of 62

Chapter 8 – Glossary
1. Symbols (Icons) and Definitions
Active Radio Buttons = Entry List Vertical Horizontal
First Previous Next Last New Refresh Active Text “clickable” Links =
Attachments (Paperclip) =
Calendar =
Check Box =
Dropdown Menu = Chg passw ord
Expandable Field =
Magnifying Glass =
Non-Catalog Content = *
Notes =
Product Image Available for View =
Required Field =
Flashlight =
© 2004 Birch Street Systems, Inc. March 2004 Page 53 of 62

Chapter 8 – Glossary
2. Glossary of Terms Action Buttons ‘Action’ buttons can be found behind each of the Front Page tabs. The below Action buttons are
specific to the Order Guide tab. Other tabs, Catalog, Cart, In Box and PO have their own ‘unique’ Action buttons.
Active Text Link First Previous Next Last New Refresh
Text that is displayed with an underline typical indicates that it is an ‘Active Text Link’ and can be selected by using your left mouse button.
Attachments A Buyer can add an ‘Attachment’ to a Purchase Order. The attachment process works the same way as attaching a file to an e-mail.
Attributes ‘Attributes’ are fields that contain information about the product. The Birch Street application
only displays a specific amount of product information during your initial product view. Additional product ‘Attributes’ or information is available under the link, ‘More Product Info’. Below are examples of product attributes.
Item # 610042-050 Product Name Bed Set, queen, 60"x80", Suite Dreams II
Supplier Serta, Inc. Hilton Supply Management
Lead Time (Days) 15 UOM EA Case Pack Will Break Case 0 FOB Delivered Dimension Min Order Qty 1 Manufacturer Serta Mattress Co. Mfg Part Number 610042-050 Brand Name Serta Model Size 60" x 80" x 20" Portion Size Commodity Quantity Break Description Mattress & Box Spring Queen 2 pc set, 6 sets or more no freight charge
© 2004 Birch Street Systems, Inc. March 2004 Page 54 of 62

Chapter 8 – Glossary
2. Glossary of Terms Bill To The ‘Bill To’ tab is displayed when you select the ‘Edit’ button on the PO list grid within the PO
tab. The ‘Bill To’ screen displays the hotel information in ‘grayed-out’ fields. The ‘Bill To’ information is also displayed on the PO. These fields are NOT editable by the Buyer or Supplier.
Brand Name One of the available product attributes a Supplier can populate with relevant data. Heinz is an
example of a ‘Brand Name’. Calendar The ‘Calendar’ icon provides the Buyer with the ability to select a date (present and
future), which will be displayed in the PO Required Delivery Date field. Calendar icons are available for all fields that require ‘date’ information. Additional short-cuts for creating ‘date’ information can be found under Q-Tips on the Summary Panel of the Front Page.
Cart (Shopping) The ‘Cart’ provides summary information of the number of items (Lines) and the total dollar
value (Total) in the Cart. The Cart is accessible via the Front Page Tabs. Products may be added to your ‘Cart’ from the ‘Catalog’ tab. You can create a PO from items placed in your Cart, and you can also add ‘Cart’ items to an existing Order Guide.
Catalogs The ‘Catalog Tab’ provides access to the following functionality:
• Accessing Catalogs directly through the Category Structure • Adding Non-Catalog Content to PO’s • Displays the Results from any Catalog Searches initiated through the Search All Catalogs functionality. ALL OF YOUR AVAILABLE SUPPLIERS AND THEIR PRODUCTS ARE FOUND ON THE CATALOG TAB. MOST SUPPLIERS AND THEIR PRODUCTS CAN BE FOUND IN A SINGLE CATALOG CALLED “HSM MASTER”.
Categories All suppliers’ products are assigned to a ‘Category’ before they are loaded into Birch Street. The
same product may also be found under multiple categories. Hilton Supply Management manages the category creation process at all times.
Check Box A ‘Check Box’ is another form of action button. Selecting or de-selecting a check box will provide different results, depending on the check box placement within the application or screens. Check boxes are used throughout the application as a means to reduce the amount instructions required, which helps make the software easier to use.
Clear All Quantities ‘Clear All Quantities’ is an Action button on the Order Guide tab, that when selected will change
or ‘clear’ all of the existing order ‘Quantities’. This feature is used to create a new order or PO. Description One of the available attributes a Supplier is required to populate with relevant data about their
product. The ‘Description’ field is different than the ‘Product Name’ field. The ‘Description’ field can contain up to 3,000 characters of text. Suppliers use this long description field to provide additional information about their product.
Dimension One of the available product attributes a Supplier can populate with relevant data Direct Supplier Opposite of a Proxy Supplier. A ‘Direct Supplier’ sells products directly to a hotel. The
submitted PO goes direct to the Supplier.
© 2004 Birch Street Systems, Inc. March 2004 Page 55 of 62

Chapter 8 – Glossary
2. Glossary of Terms
Drop Down Menu All
A Drop-Down Menu contains additional options for that field. Drop-down menus are used throughout the application.
Edit Within the application, ‘Edit’ is always an ‘Action’ button. Selecting ‘Edit’ opens hidden
screens, which allows a Buyer to access additional information that can be changed or edited. FAQ/Q-Tips This link displays ‘Frequently Asked Questions’ and ‘Quick-Tips’. ALL BUYERS ARE
STRONGLY ENCOURAGED TO PERIODICALLY REVIEW THIS INFORMATION, AS IT IS UPDATED ON A CONTINUOUS BASIS. FAQ’s and Q-TIPS are located on the Summary Panel on the Front Page.
Fax Enabled ‘Fax Enabled’ is a classification given to a Supplier who elects to receive ALL electronic
Purchase Orders created by Buyers via Birch Street’s fax server. The Supplier maintains an electronic Birch Street account solely for the purpose of managing catalog content.
Flashlight The ‘Flashlight’ icon denotes when there is additional information available. Clicking on
the Flashlight icon will launch a separate screen. FOB ‘FOB’ is an acronym, which stands for ‘Free on Board’. FOB information is controlled by the
Supplier, and indicated where freight costs are incurred by the hotel. Examples are as follows: • FOB: Manufacturer’s Facility - Hotels are responsible for any freight costs once the product
leaves the Manufacturer’s Facility. • FOB: Distribution Center - Hotels are responsible for any freight costs once the product
leaves the Distribution center. The Manufacturer has paid the freight cost between their Facility and the Distribution Center. The hotel may be responsible for any freight cost between the Distribution Center and the hotel.
• FOB: Delivered - The Manufacturer or Distributor has paid the freight cost to ship the product to the hotel. The hotel is not responsible for any freight cost.
Front Page Tabs The ‘Front Page Tabs’ provide for convenient navigation between the major System components.
The Front Page Tabs are as follows: • Catalogs • Order Guides • Cart (Shopping cart) • PO (Purchase Orders) • In Box
Help The ‘Help’ link displays application Help resources. ALL BUYERS ARE STRONGLY
ENCOURAGED TO PERIODICALLY REVIEW THIS INFORMATION, AS IT IS UPDATED ON A CONTINUOUS BASIS. The ‘Help’ link is located on the Summary Panel on the Front Page.
Hide Logo Clicking on this link hides the ‘Logo’ section of the Logo Panel. Re-clicking this link will
display the Logo Panel. Hiding the Logo panel will create additional screen space to display other information.
Hide Menu Checking this box hides the ‘Main Menu’. Un-checking it displays the Main Menu. Hiding the
Main Menu will create additional screen space to display other information.
© 2004 Birch Street Systems, Inc. March 2004 Page 56 of 62

Chapter 8 – Glossary
2. Glossary of Terms Hide Summary Checking this box hides the ‘Summary/Search’ panel. Un-checking the box displays the
Summary/Search Panel. Checking the Hide Summary panel will create additional screen space to display other information.
History ‘History’ is an ‘Action’ button which contains a date and time stamp for all activity since the PO
was created. The ‘History’ button displays who accessed the PO, when the PO was changed and any status changes that have been made (New - Submitted - Viewed - Accepted).
Home The ‘Home’ link refreshes the Front Page Tabs and takes the Buyer to their
Catalog tab. You may select Home link at anytime within the application, which will always take you back to the Catalog tab.
Images The computer monitor icon, within the Item Number column, is used to denote products that have an ‘Image’ available for view. The icon is displayed when product search results are returned on the Catalog tab and is also displayed next to products within Order Guides.
In Box This summary information provides the number of new messages (NOT new PO’s) and total
message count in the Birch Street ‘In Box’. The In Box is accessible via the Front Page tabs. The In Box tab maintains a list of all system generated notifications delivered to Buyers and Suppliers. The Buyer will receive notifications within their In Box only if the Message Delivery setting on the My Settings Screen includes delivery to the “Birch Street In Box only” or “Birch St Msg inbox and e-mail”.
Item Number One of the available product attributes a Supplier is required to populate with relevant data. The
‘Item Number’ is the product number the Supplier uses to reference their product number to the general public.
Lead Time (Days) ‘Lead Time’ is one of the available product attributes a Supplier is required to populate with
relevant data. The Supplier controls the Lead-Time data for each product they sell. A Buyer may create a PO with a Required Delivery Date Lead Time that is SHORTER THAN THE PRODUCT LEAD TIME indicates, but will be prompted with an alert message accordingly. Creating a PO with a Required Delivery Date that is shorter than the product’s Lead Time does NOT prevent the Buyer from completing the PO and submitting the PO to the Supplier. Please note that the Supplier may elect to reject your if they are unable to deliver the product in time to meet the Hotel’s Required Delivery Date deadline.
Line Items The term ‘Line Items’ is used to describe each product row on a Purchase Order or Order Guide. Logo Panel The ‘Logo Panel’ provides access to program maintenance, configuration and Help functionality.
Display items and links available from the Logo panel are as follows: • Hide Menu Box ● My Settings • Hide Summary Box ● Help • Hide Logo ● FAQ/Q-Tips • Home ● Logout
© 2004 Birch Street Systems, Inc. March 2004 Page 57 of 62

Chapter 8 – Glossary
2. Glossary of Terms Logout The ‘Logout’ link logs the Buyer out of the application and returns the Buyer to the www.hsm-
online.com Home Page. DO NOT CLICK ON THE RED ‘X’ IN THE UPPER RIGHT SCREEN CORNER TO EXIT THE BIRCH STREET APPLICATION. ALWAYS USE THE LOGOUT LINK WHEN YOU ARE READY TO EXIT THE SYSTEM.
Magnifying Glass The ‘Magnifying Glass’ icon is used to denote when you are able to LOOK-UP information. Clicking on the icon will launch a new screen with additional data to select.
Main Menu Accessing the ‘Main Menu’ is achieved by un-checking the Hide Menu checkbox on the Logo
Panel. The Main Menu’ is used to navigate and access additional features that are not typically required to manage the purchasing cycle. You will need to access the Main Menu to create your Sysco Punchout Profile account and edit Supplier-On-The-Fly (S-O-T-F) records.
Manufacturer One of the available product attributes a Supplier can populate with relevant data. A Distributor
may elect to provide the ‘Manufacturer’s Name’ for that product. Mfg Part Number One of the available product attributes a Supplier can populate with relevant data. The ‘Mfg Part
Number’ may often be different from a Distributor’s Item Number. The Mfg Part # represents the Manufacturer’s number for the product. The Item # may represent the Distributor’s product number for the same item.
Min. Qty. One of the available product attributes a Supplier is required to populate with relevant data. The
‘Minimum Quantity’ data is controlled by the Supplier and indicates the minimum order quantity required to purchase the product. A Buyer may elect to purchase LESS THAN THE MINIMUM QTY., but will be prompted with an alert message accordingly. Creating a PO with a quantity less than the minimum order quantity does NOT prevent the Buyer from completing the PO and submitting the PO to the Supplier. Please note that the Supplier may elect to reject your PO if they are unable to ship less than the minimum quantity displayed.
Model One of the available product attributes a Supplier can populate with relevant data. More Product Info ‘More Product Info’ is an active text link that, when clicked, will launch a separate screen to
display additional product attributes (see Attributes for a list of fields contained within the More Product Info link.)
My Settings This link displays the ‘My Settings’ screen for adjustment of personal contact information and
your individual application settings. Non-Catalog Item * This symbol is displayed on the Print/View screen for both Purchase Orders and Order Guides
when a line item is created from ‘Non-Catalog’ content. National Supplier The classification for any Supplier who has a ‘National’ contract with Hilton Hotels Corporation
and has the ability to service multiple geographic markets.
© 2004 Birch Street Systems, Inc. March 2004 Page 58 of 62
Chapter 8 – Glossary
2. Glossary of Terms Notes The ‘Notes’ icon indicates to both Buyers and Suppliers that the PO contains Note(s).
There is also a ‘Notes’ Action button that can be selected when creating a PO. Selecting the Notes button allows a Buyer to create a note, which is visible to the Supplier. Additionally, every Supplier has the ability to add a ‘Note’ to the submitted PO if the Supplier elects to reject the order. Notes created by a Supplier are visible to the Buyer once the PO has been rejected.
Notifications ‘Notifications’ are received and stored in the Buyer’s or Supplier’s Birch Street In Box only. A
Buyer or Supplier can configure their personal Birch Street account to receive notifications when: A PO Has Been Accepted A PO Has Been Rejected
Use the My Settings screen to manage your Notification options. Order Guides (O/G) The ‘Order Guide’ tab allows for the creation, maintenance and use of Order Guides, which
contain catalog content for those products purchased on a repetitive basis. Buyers can also Sort, Add Par Values and a select other functions driven by Action buttons within the Order Guide tab.
Ord Qty The ‘Ord Qty’ field is displayed on all product views (Catalog, Cart and Order Guides). This is
the field the Buyer enters the desired order quantity. Pack/Size One of the available product attributes a Supplier is required to populate with relevant data.
24/12oz. is an example of ‘Pack/Size’.
Par Values Par Values - A Buyer can elect to add a Minimum (Min) and/or Maximum (Max)’Par Value’ for each item contained in their Order Guides. When a Buyer checks the ‘Par Values’ check box, the system launches 2 new columns within the Order Guide grid (Min Qty) and (Max Qty). The Buyer can then populate the fields with the desired Par quantities. Upon completion, the Buyer must click on the ‘Update’ button to save their Par values.
Portion Size One of the available product attributes a Supplier can populate with relevant data. PO Date The ‘PO Date’ is the date that the PO was created and is displayed on the PO Print/View screen
accordingly. The PO Date is NOT the PO Required Delivery Date. PO Header The ‘PO Header’ is the term used to describe the PO fields that contain the following
information: • PO Subject • Required Delivery Date • Note to Supplier • Tax • Freight • …More The PO Header screen is launched when a Buyer selects the Create PO Action button.
© 2004 Birch Street Systems, Inc. March 2004 Page 59 of 62

Chapter 8 – Glossary
2. Glossary of Terms PO Status The ‘PO Status’ indicates where the PO is within the transaction cycle.
A few ‘Status’ examples are as follows: New PO has NOT been submitted to the Supplier. Submitted PO has been submitted but NOT Viewed OR Accepted by he Supplier. Viewed Supplier has received and opened or viewed the PO only. The Supplier
has NOT accepted the PO. Accepted The Supplier has agreed to the terms of the PO and HAS accepted the
order. Fax/E-mail Accepted The PO was sent to the Supplier via the Birch Street fax server. All
Supplier-On-The-Fly (S-O-T-F) PO’s and PO’s to Fax Enabled Suppliers are considered AUTOMATICCALLY ACCEPTED once the fax is transmitted successfully.
Fax/E-mail Failed The fax number provided on PO Header was either invalid or the
Supplier’s fax machine may have been out of order. The PO was NOT transmitted to the Supplier and has NOT been automatically accepted.
Rejected The Supplier has declined the order and has rejected the PO with a
Note which explains the reason for the rejection. IMPORTANT – ONLY PO’S THAT HAVE BEEN EITHER ‘ACCEPTED’ OR ‘FAX/E-MAIL ACCEPTED’ ARE CONSIDERED VALID TRANSACTIONS AND WILL BE SHIPPED BY THE SUPPLIER.
PO Tab The ‘PO Tab’ lists every PO created. A variety of options can be initiated against PO’s from this
tab (Submit to Supplier, Update PO Header Information, View PO History…more). Print/View Print/View (PO tab) - The “Print/View” Action button is located within the PO tab. Buyers and
Suppliers can click the Print/View button anytime they wish to review or print a Purchase Order, regardless of the PO status (New, Submitted, View, Accepted or Rejected).
Print/View Print/View (Order Guide tab) – The “Print/View” Action button is also located within the
Order Guide tab and performs differently than the PO Print/View process. When a Buyer selects an existing Order Guide and clicks on the Print/View button, the system creates a copy of the Order Guide in Microsoft Excel. The Excel Order Guide can then be “saved” to the Buyer’s computer.
Product Name The ‘Product Name’ is the short description for the product and is displayed on all product
information screens (Catalog, Order Guide, PO’s…more) Proxy Supplier A ‘Proxy Supplier’ is a Supplier that does not sell directly to hotels. Hilton Supply Management
(HSM) takes “Title” to the transaction when you create a Purchase Order for the Proxy Supplier. The Birch Street system will automatically transfer the PO to HSM.
Punch-out Catalog
© 2004 Birch Street Systems, Inc. March 2004 Page 60 of 62

Chapter 8 – Glossary
2. Glossary of Terms Punch-out Supplier The term ‘Punch-out Supplier’ applies to a select group of Suppliers that have a HSM approved
direct link between Birch Street and their Internet site. Quantity Break A Supplier may elect to offer volume discounts, based on the quantity purchased. The ‘Quantity
Break’ field can be viewed under the ‘More Product Info’ link. The quantity ‘brackets’ are displayed as numbers within this field and are also displayed on the initial product view. Although the discounted price is not visible in the ‘Quantity Break’ field, when products are tagged or selected to create a PO, the cost is recalculated, based on the quantity ordered for that product when the PO has been created.
Red Text Product Product Names displayed in Red text in existing Order Guide indicate that the Supplier has
discontinued selling the item. The discontinued item(s) can NOT be selected to create a future PO. The discontinued products will remain in the Order Guide until the Buyer deletes them.
Refresh Refresh - Use the ‘Refresh’ link to update various screens. Regional Supplier A ‘Regional Supplier’ is managed by a HSM Regional Office and only provides product or
services for a specific geographic market. Required Delivery Date The Date that the hotel requires delivery. The ‘Required Delivery Date’ is entered on the PO
Header, which is displayed after the Buyer selects Create PO. Required Field The ‘Required Field’ icon indicates that data must be entered before a Buyer can go to the
next step or screen. Save The ‘Save’ function is different from the ‘Update’ function. The ‘Save’ button saves your work
within your screen. When you select ‘Update’ the Birch Street system (database) receives the updated information and the Buyer’s screen(s) change accordingly. The ‘Save’ button ONLY saves your work within your screen.
Search The ‘Search’ panel provides high level summary information from the application as well as
catalog search functionality. The search panel provides different information depending on the Tab the users is in at the time: • Catalog Tab – Search options for Products, Categories and Suppliers. • Order Guide Tab – Search options for Order Guides and Product information. • Cart Tab – Search options for Products placed in the Shopping Cart. • PO Tab – Search options for New PO’s, Submitted PO’s, Accepted PO’s, PO Number, PO
Subject…more. • In Box Tab - Search options for Messages and Notifications.
Search (Catalogs) Search (All Catalogs) functionality provides catalog searches based upon 3 criteria:
• Product - Searches allow the user to search by any descriptive criteria including product number and Mfg. product number.
• Category - Searches allow the user to search by product category name. • Supplier - Searches allow the user to search by Supplier Name.
© 2004 Birch Street Systems, Inc. March 2004 Page 61 of 62

Chapter 8 – Glossary
2. Glossary of Terms
Ship To The ‘Ship To’ tab is displayed when you select the ‘Edit button on the PO list grid within the PO tab. The ‘Ship To’ screen displays the hotel information in “grayed-out’ fields. The ‘Ship To’ information is also displayed on the PO. These fields are NOT editable by the Buyer or Supplier.
Show Field Help Many fields within the application have a hidden ‘Help’ feature. Place your mouse within a field
and ‘right click’ to display the ‘Show Field Help’. The Field Help provides a brief explanation of the field.
Sort Sort – The ‘Sort’ check box is available within all Order Guides and is used to rearrange the sequence of product rows. Selecting the ‘Sort’ check box will launch a ‘Sort’ column on the left edge of the Order Guide screen. A Buyer then enters a numeric value in each row, based on the sequence desired and then clicks ‘Update’. The Order Guide will be ‘resorted’ accordingly.
Spot Buy The term ‘Spot Buy’ denotes when a PO is created from non-catalog content. The Supplier
selected HAS been adopted in the Hilton Private Marketplace. Select ‘Select’ is always an Action button and is used to pick information within a list of options. Subject ‘Subject’ is a field available on the PO Header, which a Buyer can type any combination of
characters to give the PO a ‘Subject’. The ‘Subject’ field is displayed on the Buyer and Supplier copy of the PO.
Supplier-On-The-Fly The term ‘Supplier-On-The-Fly’ denotes when a new Supplier account is created by the (S-O-T-F) buyer. The (S-O-T-F) Supplier has NOT been adopted into the Private Marketplace. All PO’s
created for the S-O-T-F Supplier will contain non-catalog content and the orders will be sent to the Supplier via the Birch Street fax server.
Symbols (Icons) See Symbols (Icons) and Definitions Tutorials Buyer and Supplier ‘Tutorials’ are available on the hsm-online.com Home page. The Tutorials
are self-paced on-line learning tools, which provide the ‘student’ with an overview of each core component or process of the software. ALL BUYERS ARE STRONGLY ENCOURAGED TO REVIEW THIS INFORMATION.
Up The ‘Up’ Action button is displayed when searching by Category on the Catalog tab. Selecting
‘Up’ will take the Buyer back “Up’ one level within the category hierarchal structure. UOM Unit of Measure (UOM) is one of the available attributes a supplier is required to populate with
relevant data. Examples of UOM are: Case, Box, Each, etc. Many Suppliers sell their products by multiple UOM’s.
Update The ‘Update’ function is different from the ‘Save’ function. When you select ‘Update’ the Birch
Street system (database) receives the updated information and the Buyer’s screen(s) change accordingly. The ‘Save’ button only saves your work within your screen.
Will Break Case One of the available product attributes a supplier can populate with relevant data. The ‘Will
Break Case’ is a field within the ‘More Product Info’ screen. When populated with ‘Yes’, it indicates that a supplier is willing to sell the item in fraction quantities. A Buyer may enter (.5) in the Ord Qty field to indicate a half case.
© 2004 Birch Street Systems, Inc. March 2004 Page 62 of 62