high-idle governors - apex tool company, inc · high-idle governors. installation instructions ......
TRANSCRIPT

HIGH-IDLE GOVERNORS
Installation Instructions and Trouble-shooting Guide
Models Covered:
Apex Tool Company Inc. 10957 E State Road 7 Columbus, IN 47203 1-800-365-2233 Tel: (812)579-5478 Fax: (812) 579-6818 [email protected] www.apexinds.com
Printed in USA
709321 300 30/01/06- COPYRIGHT APEX TOOL COMPANY USA 2013
for 12 Volt systems TR1001 for Power Take Off use TR2001 for Fast Idle use for 24 Volt systems TR1241 for Power Take Off use TR2241 for Fast Idle use Each governor comes complete with an installation kit which contains all necessary components for installation on all Cummins NH-NT Small Cam engines and NT Big Cam engines. Other engines may require substitutions and/or modification of the mounting bracket.

Content Description
Warnin
1
Warning

1. The governor senses engine speed indirectly with
fuel pressure from the gear pump, inside the fuel pump. Fuel pressure increases proportionately with engine speed. This pressure exerts a force on the outer end of the plunger, closing the fuel metering port. The governor spring forces the plunger in the opposite direction which opens the fuel metering port. In operation, the pressure and spring forces balance positioning the plunger so that there is only enough fuel flow to maintain the required engine speed.
The governor compensates for load changes in this manner:
a) load demand increases; example: PTO switched on. b) engine speed drops slightly.
To Injectors *
c) gear pump fuel pressure decreases. d) spring forces plunger to left, increasing metering
port opening. e) governor sends more fuel to engine injectors. f) engine power output increases until it matches
the load. 2. The governor is equipped with a shut off valve. This is
a solenoid type valve which operates electrically. It has two positions: open, allowing free flow of fuel, or closed. The valve does not meter flow.
3. As a safety precaution, inlet fuel to the High-Idle Governor is taken after the Cummins automotive governor. The automotive governor limits the maximum engine speed regardless of misadjustment or failure of the High-Idle Governor.
Shut-down 1 Valve
Injector Supply
HIGH IDLE GOVERNOR
Drain
Gear Pump Pressure
Automotive Governor
Figure 1: Fuel System Schematic Gear Pump
Filter Fuel Tank
2 3

0
Cleanliness is essential for the proper function of the fuel system. It is important to thoroughly clean the engine and fuel pump before proceeding.
1. The mounting bracket has been designed so that the governor can be attached in four different positions. See figure 2.
2. Install the governor on the engine behind the fuel pump. The exact location is to be determined by the existing equipment and brackets.
3. Normal installation has the governor horizontal, but tilting the unit will not affect performance.
Figure 2: Mounting Bracket Mounting bracket normal position
_ Alternative positions
4 5
1. INSTALLATION

Fuel Pump
3
1
2
3
1 2 3
1
2 2 (OPTIONAL)
6 7

1. Disconnect the drain hose from the fuel return ra i l (located near the rear of the engine).
2. Install the #8 male/female adapter fitting on the fuel return rail then attach the drain hose to the adapter.
3. Install a straight fitting in the adapter cross hole nearest to the governor. Plug the other hole.
Figure 6:Installing fittings on hose
1. Check that inner hose is round,
correct if necessary. 2. Place socket in vise. 3. Thread hose counterclockwise until
hose bottoms. 4. Back off 1/2 turn.
NOTE: Installing socket will compress inner hose lining making installation of nipple difficult. If this occurs use a lubricated tapered mandrel to increase the inner hose diameter.
8
1. Figure 6 shows the correct method for installing reusable fittings. Examine each hose for obstructions by looking down the centre. Exercise caution to avoid pinching the inner lining.
2. Figure 7 shows how the governor is to be connected to the fuel system. Measure and make up four hoses to make these connections.
3. Flush hoses with diesel fuel. Compressed air will not adequately clean hoses and malfunction may occur.
4. Install hoses as per figure 7. CAUTION: failure to connect the hoses to the correct ports may result in engine RPM run away and subsequent damage to the engine or personal injury. If RPM run away occurs, switch off the governor immediately.
5. Lubricate nipple threads and inside of hose with heavy oil.
CAUTION: Do not oil hose cover.
6. Thread nipple clockwise into socket until nipple hex shoulders against socket.
9
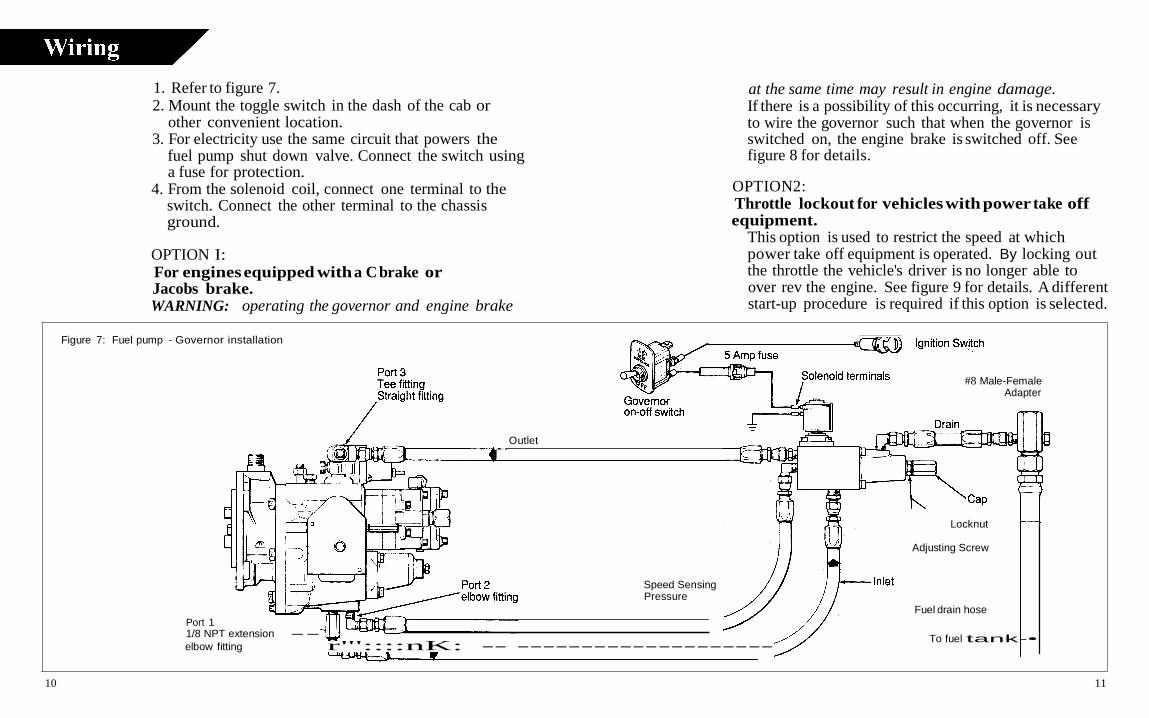
1. Refer to figure 7. 2. Mount the toggle switch in the dash of the cab or
other convenient location. 3. For electricity use the same circuit that powers the
fuel pump shut down valve. Connect the switch using a fuse for protection.
4. From the solenoid coil, connect one terminal to the switch. Connect the other terminal to the chassis ground.
OPTION I: For engines equipped with a C brake or Jacobs brake. WARNING: operating the governor and engine brake
Figure 7: Fuel pump - Governor installation
at the same time may result in engine damage. If there is a possibility of this occurring, it is necessary to wire the governor such that when the governor is switched on, the engine brake is switched off. See figure 8 for details.
OPTION2: Throttle lockout for vehicles with power take off equipment.
This option is used to restrict the speed at which power take off equipment is operated. By locking out the throttle the vehicle's driver is no longer able to over rev the engine. See figure 9 for details. A different start-up procedure is required if this option is selected.
#8 Male-Female Adapter
Outlet
Locknut
Adjusting Screw
Port 1 1/8 NPT extension --
Speed Sensing Pressure
Fuel drain hose
elbow fitting r"'::::nK: -- -------------------- To fuel tank-•
10 11

Figure 8: Wiring schematic for engines equipped with a C brake or Jacobs brake
Figure 9: Wiring schematic for throttle lockout on PTO equipped vehicles
PTO sw itc h
Alternate method using automotive relay (Switch not required)
Vehicle Ignition Switch
Governor On-Off switch SPOT 2 position ON-ON Cutler Hammer Part No. 7504K4
Normally closed Common
Normally :open I I I I
Vehicle Ignition Switch
Governor on-off switch
Install a Rapid Restart Kit Cummins Part No. AR05592
12 13

1. On the governor, remove the protective cap and loosen the lock nut on the adjusting screw. Back the adjusting screw almost completely out.
2. Start the engine and let it run for several minutes. 3. Switch the governor on. 4. Screw in the adjusting screw until desired RPM
is reached. 5. Tighten lock nut and replace cap. 6. Inspect the hoses and fittings for fuel leaks and
repair as required. 7. Use the supplied nylon tie wraps on the hoses and
wiring to prevent interference and abrasion.
OPTION FOR ENGINES WIRED FOR THROTTLE LOCKOUT
1. On the governor, remove the protective cap and
loosen the locknut on the adjusting screw. Back the adjusting screw almost completely out.
2. Turn the manual override screw clockwise on the shut down valve.
3. Start the engine and let it run for several minutes. 4. Switch the governor on. 5. Screw in the adjusting screw until the desired RPM
is reached. 6. Tighten the locknut and replace the cap. 7. Inspect the hoses and fittings for fuel leaks and
repair as required. 8. Turn the manual override screw counter-clockwise
to the off position. 9. Use the supplied nylon tie wraps on the hoses and
wiring to prevent interference and abrasion.
14
Surging or erratic operation. RPM not steady. see section
Plunger sticking in barrel ....................................3-1 Upgrade to new style plunger ............................ 3-2 Buffer screw not properly adjusted (TR 1001 only) .................................................... 3-3 Contaminated filter screens ................................ 3-4 Hoses obstructed ................................................ 3-5 Hoses to long ...................................................... 3-6
No power. RPM drops with load, or RPM builds slowly when governor switched on.
Buffer screw not properly adjusted (TR 1001only) .................................................... 3-3 Plunger sticking in barrel .................................... 3-1 Contaminated filter screens ................................ 3-4 Hoses obstructed ................................................ 3-5 Hoses connected to wrong ports ........................ 3-7 Wrong model governor installed ........................ 3-8
Engine runs at maximum speed.
Buffer screw not properly adjusted (TR 1001only) .................................................... 3-3 Spring assembly sleeve not set correctly (TR 2001 only) .................................................. 3-10 Plunger sticking in bore ...................................... 3-1 Contaminated filter screens ................................ 3-4 Hoses obstructed ................................................ 3-5 Hoses connected to wrong ports ........................ 3-7 Drain obstructed ................................................. 3-9
15
2. TROUBLESHOOTING
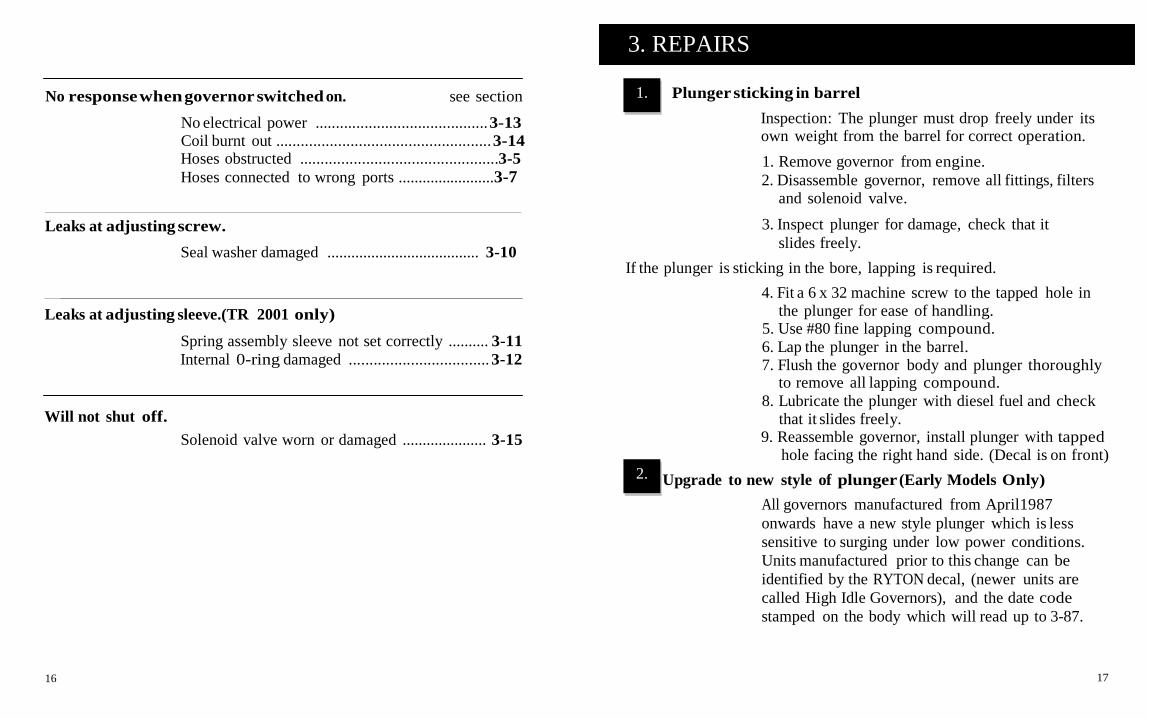
No response when governor switched on. see section
No electrical power .......................................... 3-13 Coil burnt out .................................................... 3-14 Hoses obstructed ................................................3-5 Hoses connected to wrong ports ........................3-7
Leaks at adjusting screw.
Seal washer damaged ...................................... 3-10
Leaks at adjusting sleeve.(TR 2001 only)
Spring assembly sleeve not set correctly .......... 3-11 Internal 0-ring damaged .................................. 3-12
Will not shut off.
Solenoid valve worn or damaged ..................... 3-15
16
Plunger sticking in barrel Inspection: The plunger must drop freely under its own weight from the barrel for correct operation.
1. Remove governor from engine. 2. Disassemble governor, remove all fittings, filters
and solenoid valve.
3. Inspect plunger for damage, check that it slides freely.
If the plunger is sticking in the bore, lapping is required.
4. Fit a 6 x 32 machine screw to the tapped hole in the plunger for ease of handling.
5. Use #80 fine lapping compound. 6. Lap the plunger in the barrel. 7. Flush the governor body and plunger thoroughly
to remove all lapping compound. 8. Lubricate the plunger with diesel fuel and check
that it slides freely. 9. Reassemble governor, install plunger with tapped
hole facing the right hand side. (Decal is on front) Upgrade to new style of plunger (Early Models Only)
All governors manufactured from April1987 onwards have a new style plunger which is less sensitive to surging under low power conditions. Units manufactured prior to this change can be identified by the RYTON decal, (newer units are called High Idle Governors), and the date code stamped on the body which will read up to 3-87.
17
3. REPAIRS
1.
2.
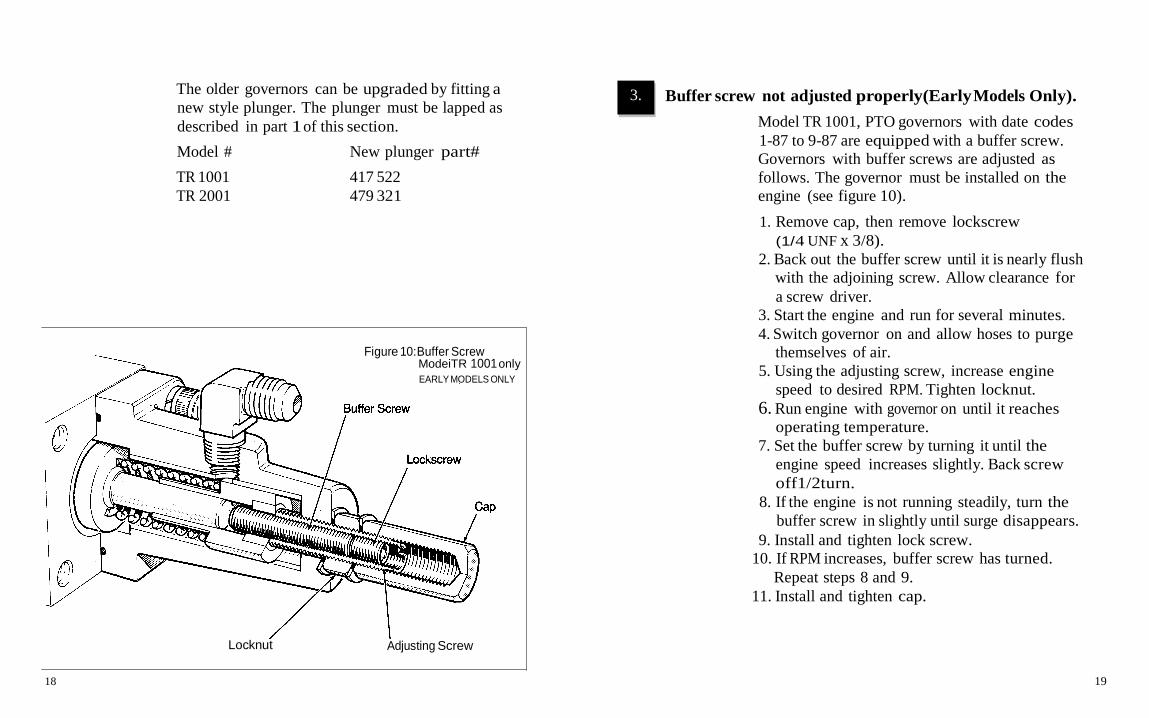
The older governors can be upgraded by fitting a new style plunger. The plunger must be lapped as described in part 1 of this section. Model # New plunger part# TR 1001 417 522 TR 2001 479 321
Figure 10:Buffer Screw ModeiTR 1001 only EARLY MODELS ONLY
Locknut Adjusting Screw
Buffer screw not adjusted properly(Early Models Only).
Model TR 1001, PTO governors with date codes 1-87 to 9-87 are equipped with a buffer screw. Governors with buffer screws are adjusted as follows. The governor must be installed on the engine (see figure 10).
1. Remove cap, then remove lockscrew (1/4 UNF x 3/8).
2. Back out the buffer screw until it is nearly flush with the adjoining screw. Allow clearance for a screw driver.
3. Start the engine and run for several minutes. 4. Switch governor on and allow hoses to purge
themselves of air. 5. Using the adjusting screw, increase engine
speed to desired RPM. Tighten locknut. 6. Run engine with governor on until it reaches
operating temperature. 7. Set the buffer screw by turning it until the
engine speed increases slightly. Back screw off1/2turn.
8. If the engine is not running steadily, turn the buffer screw in slightly until surge disappears.
9. Install and tighten lock screw. 10. If RPM increases, buffer screw has turned.
Repeat steps 8 and 9. 11. Install and tighten cap.
18 19
3.

Contaminated filter screens
There are (2) screens in the main body of the governor (see figure 11).
Inlet screen (located behind fitting on bottom of govenor).
1. Remove 1/4 NPT fitting at the bottom of the governor.
2. Remove the retaining clip. 3. Extract retaining clip. 4. Install new filter screen. 5. Install new spring. 6. Replace fitting.
Figure 11: Filter screen locations
Pressure sensing filter (located behind the elbow on left side).
1. Remove straight fitting on upper left side of governor.
2. Remove elbow fitting on left side. 3. Remove the vinyl spacer then the filter. 4. It may be necessary to push the filter out from
the opposite side. 5. To reassemble, first install the brass
dampening washer. 6. Install a new filter with the round edge leading. 7. Insert vinyl spacer then the elbow.
Hose obstructed. This problem generally occurs when installing the fittings on the hose. Remove the hoses and visually examine each for blockage. If the liner has been pinched, shorten the hose and reinstall the fitting. If the length becomes tG> short, replace the hose.
Hoses connected to wrong ports
Review instructions to ensure the correct fuel pump ports are being used. If your fuel pump is not shown in the instructions, follow these guidelines.
PT Fuel Pump Port Apex Governor Connect
Connect
Gear pump pressure to Pressure sensing (left side, lower port)
Unrestricted railpressure to Inlet (bottom port).
nletScreen
Connect Injector/ rail pressure (at shutdown valve)
to Outlet (left side, upper port).
Connect
20
Return line to fuel tank to Drain (top, right port).
21
4.
5.
6.

II
Wrong model governor installed
The model TR 2001 is not recommended for Power-Take-Off. For applications which require more than 30 HP, use the model TR 1001governor.
Drain obstructed. Inspect the following areas for obstruction. • Drain port on governor. • Drain hose. • Adapter fitting in return line to fuel tank.
Seal washers damaged Inspect seal washers; if rubber seal is damaged, replace. Be sure to tighten the locknut and protective cap.
Spring assembly sleeve not set correctly (Early Models Only).
Model TR 2001 governors with date code prior to 4-88 are equipped with an adjustable spring assembly sleeve. There is an internal 0-ring in the body of the TR 2001 governor. The spring assembly must be screwed in until it engages the 0-ring. Do not screw in further as it will interfere with governor function (see figure 12).
1. Remove adjusting screw. 2. Loosen large locknut (1-1/4 hex). 3. Back off the spring assembly sleeve
(7/8 UNEF thread). 4. Slowly screw in the spring assembly sleeve until
you feel resistance from the 0-ring.
5. Screw the sleeve in 2 more turns. 6. Check distance from spring assembly sleeve to
body, measurement should be 1.16 to 1.22 inches. 7. Tighten locknut. 8. Start the engine and reset the governor speed
with the adjusting screw. Internal 0-ring damaged (model TR 2001only)
If correctly seating the spring assembly does not stop leakage, it will be necessary to replace the internal 0-ring. This is a standard hydraulic 0-ring #116- N70. After replacing the 0-ring, install the spring assembly sleeve as detailed in part 10 of this section.
Figure 12: Spring assembly EARLY MODELS ONLY
Adjusting Screw
Spring Assembly Sleeve
22 23
11.
7.
8.
9.
10.

II
No electrical power. Ensure that the solenoid coil is receiving electrical power and also that the coil is grounded.
Check: • Fuse • Wire • Ground
. Coil burn out.
Models: PTO Governor, Part No. TR1001 PTO Governor, Part No. TR1241 High Idle Governor, Part No. TR2001 High Idle Governor, Part No. TR2241
To test the condition of the coil, measure its electrical resistance. If it exceeds the listed values, replace the coil.
Part# 285829 285725 706220
Qty 2 3 1
Description Straight fitting, 1/8 NPT - #4 SAE 90° Elbow, 1/8 NPT- #4 SAE Street 'Tee' 1/8 NPT
Coil 12VDC 24VDC
Solenoid valve worn out.
· Resistance 9-13ohms 55-79ohms
419725 419621 700327 700421 700524
1 Adapter #8 male-female 1 Adapter 1/8 NPT male-female 7' Hydraulic hose, SAE 100R5, #5 8 Hose fitting 1 Mounting bracket
1, Remove solenoid valve from governor body. 2. Examine the rubber tip of the plunger for wear. 3.(model TR 1001 only). Examine the diaphragm
for damage perforations. The diaphragm has two holes in it; one in the centre and one small hole (0.050 diameter) on the side.
Apex recommends replacing the entire solenoid valve if these parts are no longer servicable.
24
700628 700721 700825 700929 706821 701122 708620 701320 701423 705123 701527 701621 701724 TP1060 TP1061
2 2 1 1 1 10' 10' 2 2 2 1 1 6 1 1
5/16" NC mounting screw 5/16" Lockwasher 9/16" NF cap screw 9/16" Lockwasher Toggle switch c/w name plate Wire, 16 gauge Wire loom Solderless connector; female disconnect Solderless connector; ring for #10 stud Solderless connector; ring for #6 stud Inline fuse holder 5 amp fuse Nylon cable tie Adapter -3 ORB to 1/8 NPT Adapter PT- Pacer -5 ORB
25
14.
13.
12.
4. PARTS LIST
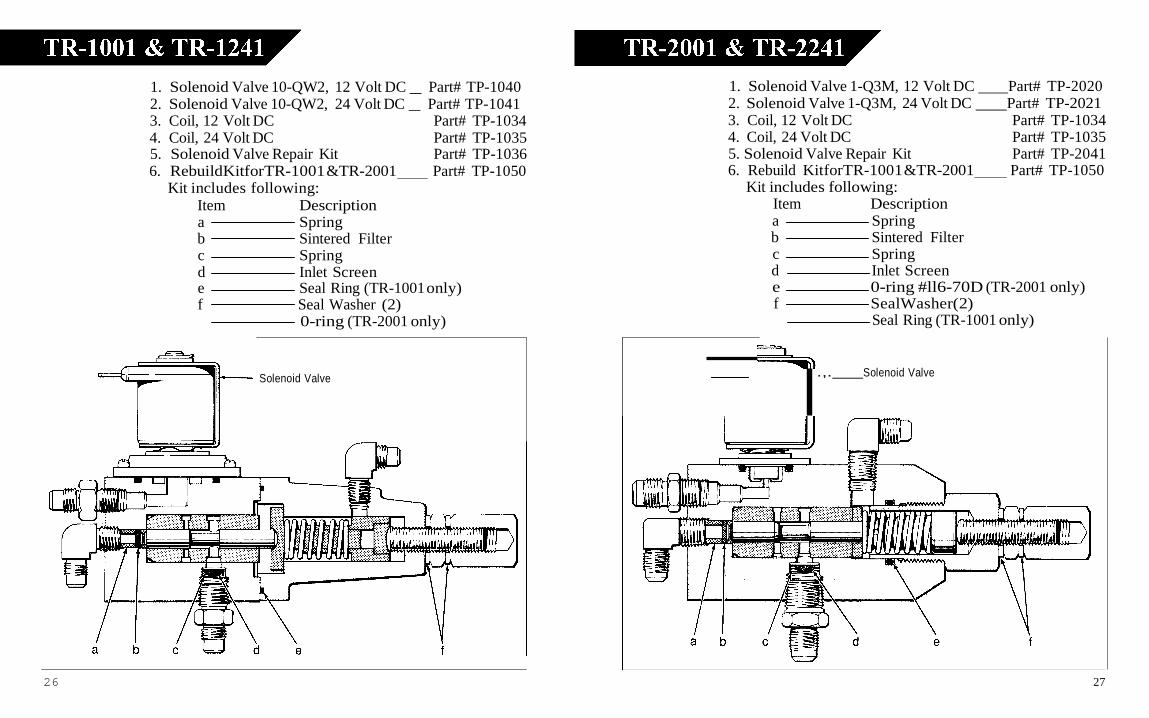
1. Solenoid Valve 10-QW2, 12 Volt DC _ Part# TP-1040 2. Solenoid Valve 10-QW2, 24 Volt DC _ Part# TP-1041 3. Coil, 12 Volt DC Part# TP-1034 4. Coil, 24 Volt DC Part# TP-1035 5. Solenoid Valve Repair Kit Part# TP-1036
1. Solenoid Valve 1-Q3M, 12 Volt DC Part# TP-2020 2. Solenoid Valve 1-Q3M, 24 Volt DC Part# TP-2021 3. Coil, 12 Volt DC Part# TP-1034 4. Coil, 24 Volt DC Part# TP-1035 5. Solenoid Valve Repair Kit Part# TP-2041
6. RebuildKitforTR-1001 &TR-2001 Kit includes following:
Item Description a Spring b Sintered Filter c Spring d Inlet Screen
Part# TP-1050 6. Rebuild KitforTR-1001 &TR-2001 Kit includes following:
Item Description a Spring b Sintered Filter c Spring d Inlet Screen
Part# TP-1050
e Seal Ring (TR-1001 only) f Seal Washer (2)
0-ring (TR-2001 only)
Solenoid Valve
e 0-ring #ll6-70D (TR-2001 only) f SealWasher(2)
Seal Ring (TR-1001 only)
.,. Solenoid Valve
26 27

Apex warrants to the original retail purchaser that the High Idle Governor furnished hereunder will conform to Apex specifications and to be free from defects in materials and workmanship. This warranty applies to normal recommended use and service and will be effective for a period of one (1) year from the date of original retail purchase. This waranty will be void if the product is modified in any way or not used in accordance with the instructions. The foregoing warranty is exclusive and in leiu of all other warranties, guarantees, or representations, whether oral, written or implied, including any warranty of merchantability or fitness for use or purpose. Purchaser by accepting delivery of the product, thereby waives reliance on any other such warranties. Apex’s sole obligation under the foregoing warranty and otherwise will be to replace any defective Governor returned to Apex with our approval, freight prepaid, within one year from the date of purchase by the end user, which shall be the Purchaser's exclusive remedy. In no event shall Apex be liable to the Purchaser for any incidental, special or consequential damages.
Apex will allow labor charges up to a maximum of one (1) hour for removal and replacement of the defective unit. No claim will be accepted for readjustment of a governor. Any Apex High Idle Governor replaced under this warranty shall be warranted for the unexpired portion of the original warranty period.
1. Should a problem occur with an Apex High Idle Governor that is within the warranty period, Apex recommends immediate replacement of the unit.
2. Contact Customer Service at 1-800-365-2233 for authorization and Claim No.
28