hi -...
TRANSCRIPT
1
Hi
Before we dive in, there are 3 points you need to be aware of:
1. This guide is worth reading even if you haven’t got WP Indexer.
There's some great info here on the indexing process, and it WILL help
get your site indexed better and faster.
2. I'm assuming you've read through the features of WPI on the sales
page first, as I'll be referring to many of them here.
3. If you’ve got any questions about this guide or WPI, please shoot me an
email: [email protected]
Let’s get into the details then...

2
How to get indexed
Before we get into the details of the plugin, I’ll explain some details about the
crawling and indexing process. Whatever type of blog you’re running; this will
improve your chances of getting into Google’s main index...
Here’s a surprising thing WP Indexer DOESN’T do...
Google's been getting better and better at indexing stuff quickly. A few years
ago they updated their algorithm to improve indexing speed. They were trying
to find breaking news topics and show relevant results in the SERPS quickly.
Indexing used to take days, but if you've got a reasonable blog and a good ping
list Google will send a spider out to check out your blog ASAP (usually in
minutes).
In fact, as posts usually get indexed quick by Google, WP
Indexer doesn't even ping the main post URL - it leaves
that completely to WordPress and your chosen ping list.
That's one part of WP & SEO that isn't broken, so we're
not trying to fix it.
However WP leaves many indexing opportunities on the table. There are a
bunch of different strategies it doesn’t do automatically, which is where WPI
comes in.
3
Main vs Supplemental Indexes
So there are 2 types of indexes in Google (that I’m aware of). The main and
supplemental index. The latter is usually what people mean (although they
don't realize it) when they talk about a sandbox. It's really the supplemental
index.
The difference between the 2 indexes is in the "quantity" of PageRank and the
other names Google gives to its similar page traversal and scoring algorithms.
So basically it boils down to links. You need a certain
amount and quality of links to get in the main index (hence
the perceived sandbox, as new sites simply don’t have
enough PageRank to make it into the main index).
The good news is that (as you probably already know) every page can give
PageRank, even ones on your own site. So you can control your own link
reputation and ranking to a certain extent by interlinking on your own blog.
This point is very important, and I’ll go into more details when taking about the
tagging feature of WPI.
Crawl Cycle
Another key to this is the crawl cycle. When you view the Google cache for a
particular page it shows you the "last checked at" time. If you keep an eye on
the periods of time between this date updating for a particular page you get the
crawl cycle. It could be hours, or for many blogs it's 2-6 weeks.
When this crawl cycle increases across your blog, Google's taking more notice
of you. This is great news (and WPI helps a lot with this point) because a higher
crawl rate leads to more traffic in the long run.

4
Now we’re ready to go into details about how WPI works, and what it can do for
your blog...
Dashboard
First Steps
The first thing you’ll probably notice when you activate the plugin on your blog,
is this:
WPI will show any errors here (and also on the settings page) so you can see
what to do.
The first one is simple – just go to the settings page and turn the plugin on,
then click save.
To fix the second one you’ll need to log in to your server via FTP and “chmod”
WPI’s log file to 777. You’ll only have to do this once, and it allows WPI to
record everything it does in that txt file.
5
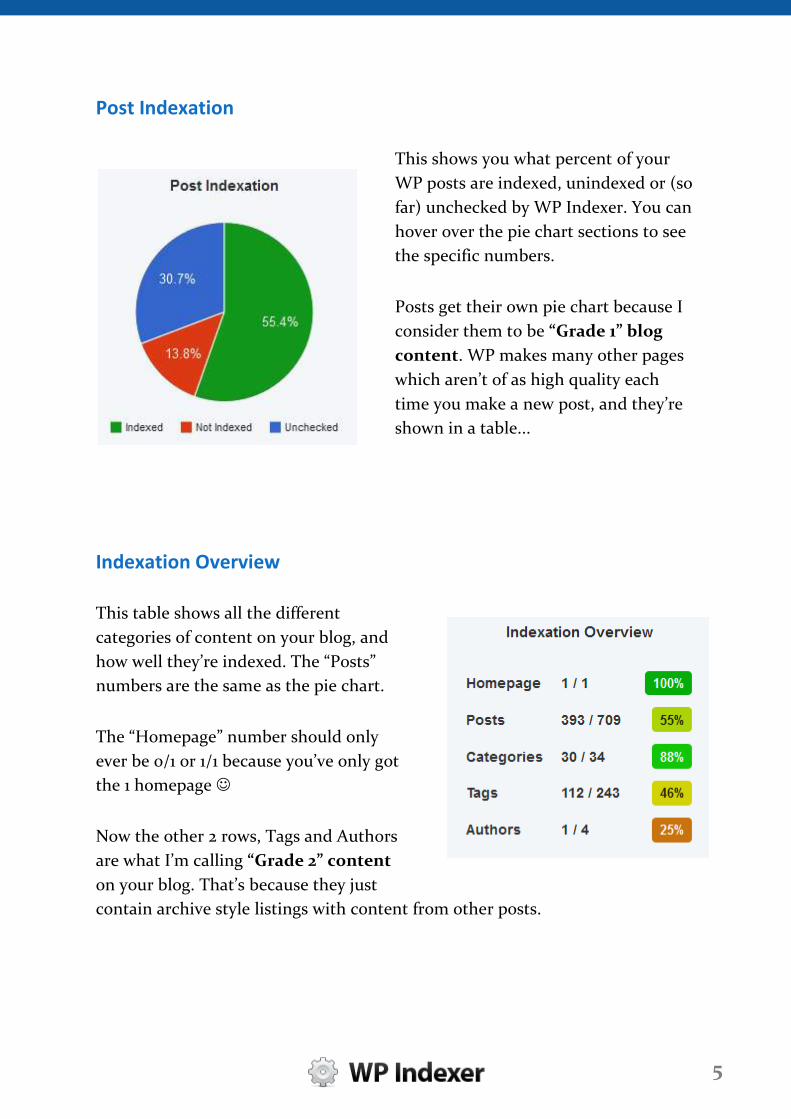
Post Indexation
This shows you what percent of your
WP posts are indexed, unindexed or (so
far) unchecked by WP Indexer. You can
hover over the pie chart sections to see
the specific numbers.
Posts get their own pie chart because I
consider them to be “Grade 1” blog
content. WP makes many other pages
which aren’t of as high quality each
time you make a new post, and they’re
shown in a table...
Indexation Overview
This table shows all the different
categories of content on your blog, and
how well they’re indexed. The “Posts”
numbers are the same as the pie chart.
The “Homepage” number should only
ever be 0/1 or 1/1 because you’ve only got
the 1 homepage
Now the other 2 rows, Tags and Authors
are what I’m calling “Grade 2” content
on your blog. That’s because they just
contain archive style listings with content from other posts.

6
To make sure you’re not harming your main post content,
only show excerpts (not full post content) on tag,
author, category and archive pages in WP.
This makes both the post pages and the other “archive
style” pages more unique overall, and helps indexation.
Some people use an SEO plugin to “noindex” these pages, but that’s a huge
mistake. Unless you’ve got 30k+ tags on your blog, you’ll be fine. Worry about
duplicate post content on archive pages when you’ve got a problem, not while
you can still benefit from the extra pages.
And the benefit of having these pages is that they each pass some PageRank
to the rest of your site, and help attract more indexing, ranking & traffic as well.
Key Activity Today
These 3 dials show you what’s happened today on your blog in a few key areas.
They only count actions done by WP Indexer, so they won’t necessarily show
the total for these stats over your whole blog.

7
The number of pings will naturally be higher than links gained or tags because
of how WPI operates, so don’t be alarmed if that figure is high. It’s normal, and
completely safe because of the way WPI pings. (More on that in a second...)
Next Index Times
At the bottom of the WPI dashboard, you’ll see something similar to this:
When you first install the plugin, this section will be a bit sparse. That’s
because you won’t have chosen how many posts to check every 15 minutes yet
on the settings page.
I read this paragraph regularly (especially after saving different settings) to
confirm when things will happen.
There’s more detailed information about WPI’s post checking under the
settings section...
Settings
This is where all the interesting stuff happens. You’ll usually only be setting this
once then forgetting about this page, unless you’re doing testing and tinkering
to find what works best for your blog.
Let’s dive into explanations for each option, along with recommended settings...
8
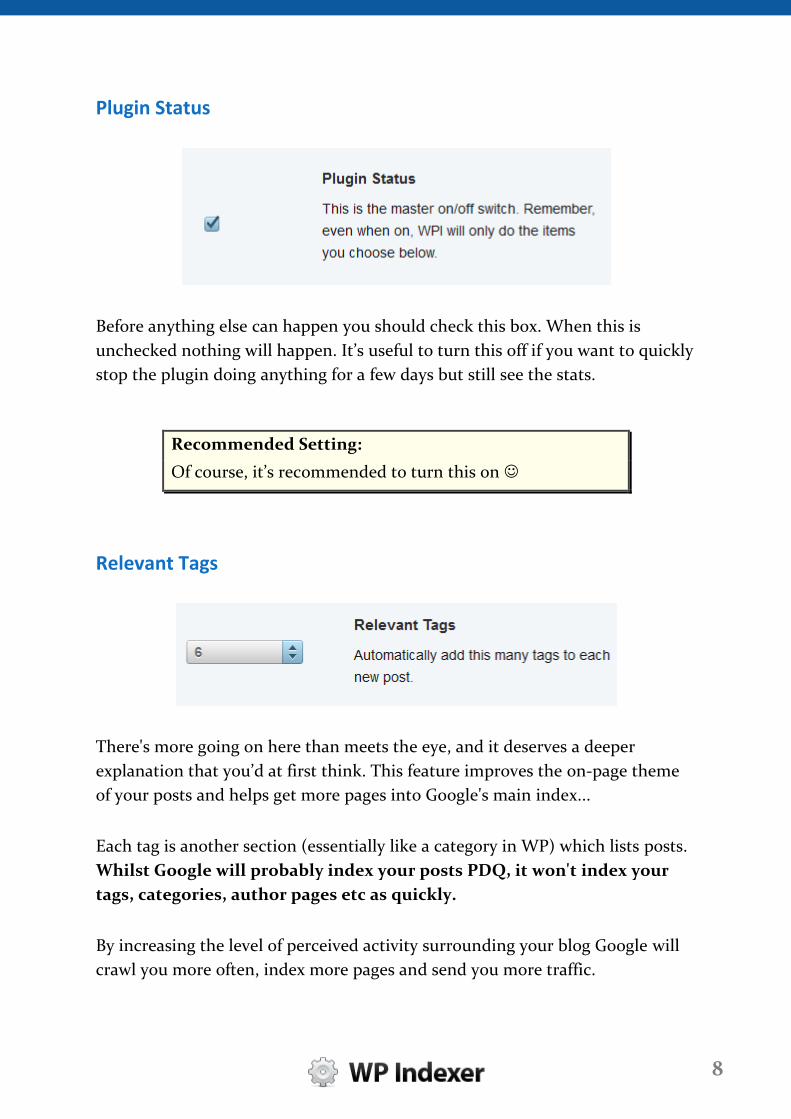
Plugin Status
Before anything else can happen you should check this box. When this is
unchecked nothing will happen. It’s useful to turn this off if you want to quickly
stop the plugin doing anything for a few days but still see the stats.
Recommended Setting:
Of course, it’s recommended to turn this on
Relevant Tags
There's more going on here than meets the eye, and it deserves a deeper
explanation that you’d at first think. This feature improves the on-page theme
of your posts and helps get more pages into Google's main index...
Each tag is another section (essentially like a category in WP) which lists posts.
Whilst Google will probably index your posts PDQ, it won't index your
tags, categories, author pages etc as quickly.
By increasing the level of perceived activity surrounding your blog Google will
crawl you more often, index more pages and send you more traffic.

9
So WPI helps here by creating high quality tags for each post you make.
Firstly this gives you more pages which can each pass PageRank to the rest
of your site and consequently get more content into the main Google index.
Secondly it creates keyword links from each post to the tag pages. Part of the
on-page analysis Google does is in the outgoing link anchors. Related
keywords as link anchors on a particular page will increase the page's
relevance for its core key phrase.
So by using really high quality, thematically related tags you're doing a better
job of informing Google about the core concept your post is about, leading to
(eventually) more targeted traffic.
WPI will try and get the number of tags you choose, but if it can’t find
enough quality tags from the content, you may get less. Reasons for this
could be that the content is too short to pull good keywords from, or it’s simply
not a keyword dense piece of text.
Recommended Setting:
On my blogs I’m tending to set this to 6 or 7. The bottom
line is that more tags are better because you get more pages
& more PageRank.
Homepage Links
So what’s a “stat” link?

10
You know sites like Alexa, or QuantCast where you can enter your URL and see
a page of stats generated about your domain on-the-fly?
Well, that’s what WPI does here. These pages all contain a link back to your
site, which we help Google to find by pinging the link after confirming it’s really
there.
Recommended Setting:
I keep this on all the time. However try turning this on for a
few days, and check the log to see if you’re happy with the
quality of links. Remember, these links are to help get
you indexed, not ranked.
Authority Pingbacks
Some people (I hope not too many anymore) are afraid of linking out to
relevant sites because it might "leak" PageRank.
There's only so much PR you can lose like this, and linking out helps to improve
a page's theme relevance (as mentioned above) but with the Auth Links in
WPI you get pingbacks too.
So there's a source of automated links right here. (WPI will only link out to
relevant BLOGS, so there's a great chance of pingbacks for each post.)
Plus Google's end game is user experience. (Well arguably it's just profit via user
experience, but we'll call it U.E. for the sake of conversation).

11
Linking out sensibly to related blogs really does help your blog readers,
and whatever algorithms Google uses today or tomorrow - that's what they're
working towards rewarding.
Recommended Setting:
WPI may not be able to insert the full 9 links if you choose
that, but I prefer to use 2-3. Much more than that and
things start to look a little artificial.
However you’ll get more links by using a higher number. So
you’re balancing results with how natural the content
looks.
RSS Pinging
This is a key feature of WPI that attracts a great deal of spider activity.
How WP normally works (if you’ve got pinging enabled) is that when you make
a new post, WP will run through each ping service in your list and let them
know a new post has been made.
You’re only meant to ping when a URL has changed content, and that’s exactly
what WPI does here. There are a selection of other URLs that also change
content when you make a new post...
The post category
12
Post tag pages
Archive page for this month
Author page of post
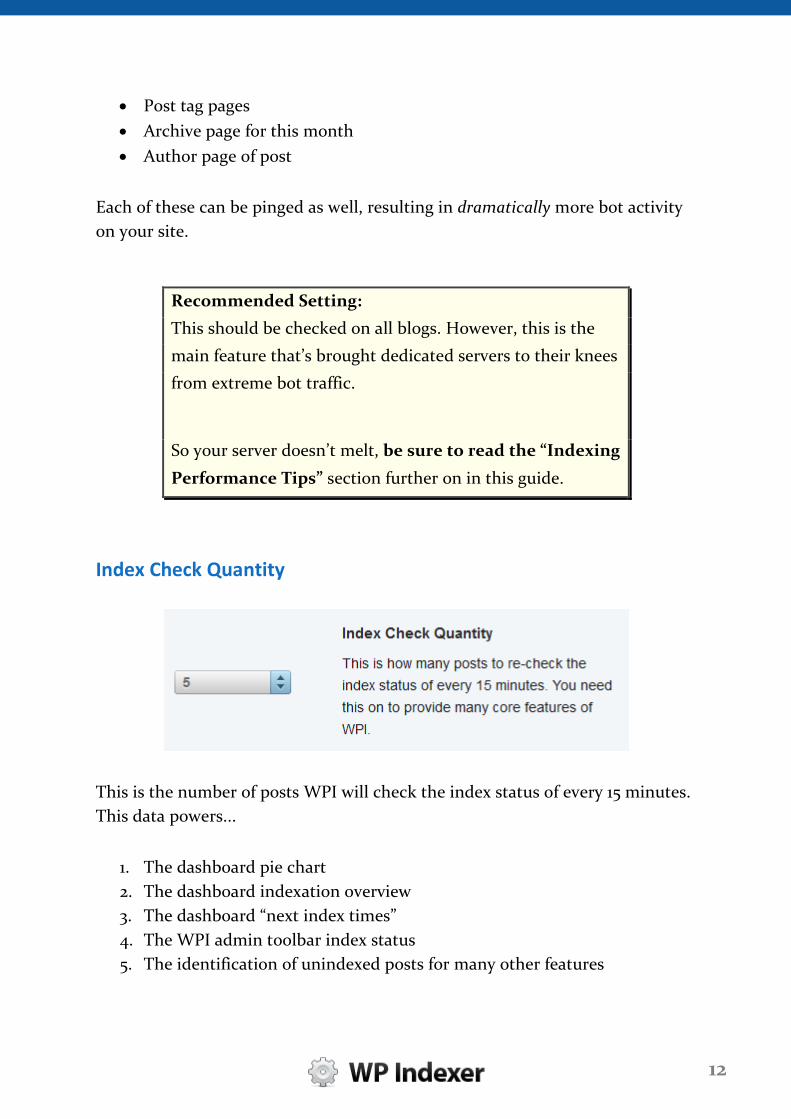
Each of these can be pinged as well, resulting in dramatically more bot activity
on your site.
Recommended Setting:
This should be checked on all blogs. However, this is the
main feature that’s brought dedicated servers to their knees
from extreme bot traffic.
So your server doesn’t melt, be sure to read the “Indexing
Performance Tips” section further on in this guide.
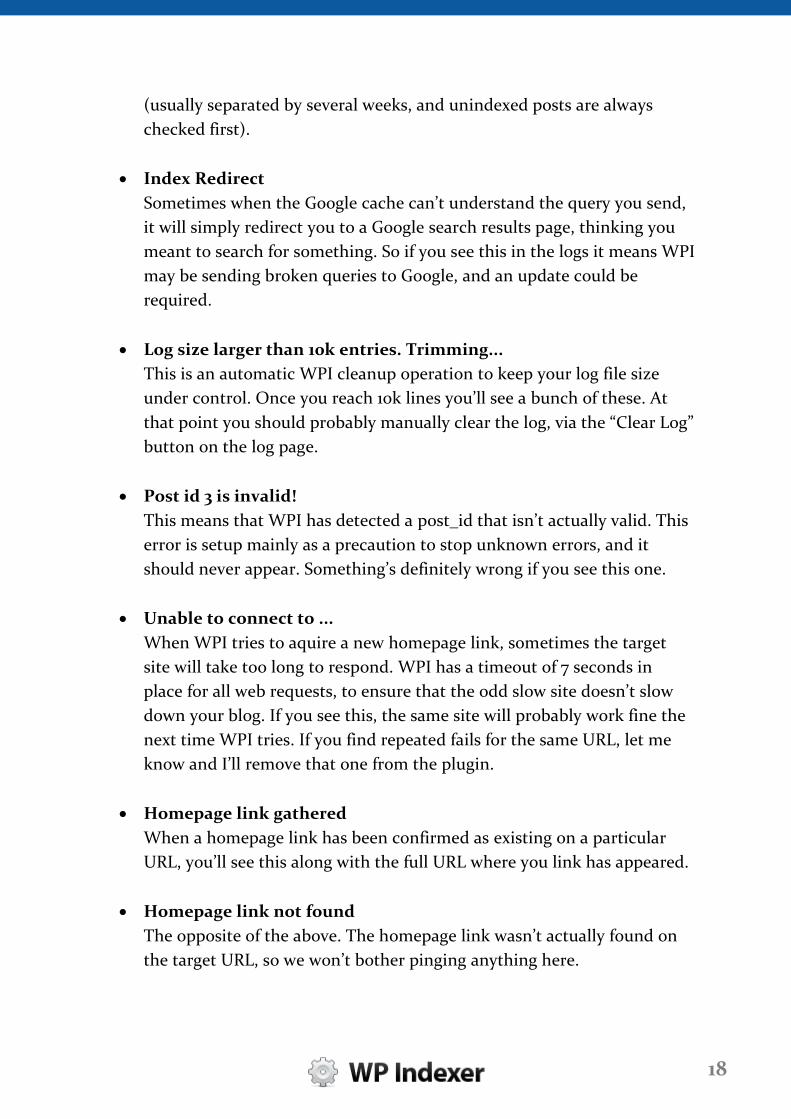
Index Check Quantity
This is the number of posts WPI will check the index status of every 15 minutes.
This data powers...
1. The dashboard pie chart
2. The dashboard indexation overview
3. The dashboard “next index times”
4. The WPI admin toolbar index status
5. The identification of unindexed posts for many other features

13
So you can see it’s a core feature of WPI.
Recommended Setting:
The perfect setting here will depend on how many posts
your blog’s got. So try a few different settings, then check
the WPI dashboard and see how long it will take for a
complete re-index of your blog.
You’re looking for a complete blog re-check at most
every 7 days.
Smart Pinging
We let WP handle the pinging of the main post. But URLS (and feeds) for the
post category, tags, author etc all don't get touched, and take much longer for
Google to take notice of. We don't want to neglect these pages as they can all
pass PageRank and also help to shape and improve your overall Site Theme.
So by pinging these URLs you're getting a real benefit in the form of increased
Googlebot activity, which leads to all the benefits mentioned in this guide.
But there's 2 catches when bulk pining...

14
One is speed. It's dog slow to ping 100's URLs one-at-a-time. So WPI will do
pings asynchronously for maximum speed. This also means that it works fine on
shared hosting because script execution time is very short.
The second gotcha is rate limiting and IP banning. If we ping the same
service too much they tend to get annoyed, and worst case they blacklist your
URL or IP. Which we don't want.
So WPI divides its internal ping list between all the URLs that need pining each
time it runs. It only gives a few pings to each URL to ensure that pings are
spread over different services. Plus WPI will outright block any mass-ping
activity more often than once every 30 mins for added safety.
Recommended Setting:
I keep this on, as it allows the pining functionality of
several other WPI features. Pinging is a core promotional
method in this plugin, so you’ll want this box checked.
Unindexed Related Posts
Below each post we link to related unindexed posts with this feature. It helps
with...
1. Discoverability for old content that might not have been seen yet
2. Fast indexing of new content
3. Providing highly relevant (but usually hidden) content for your visitors

15
Recommended Setting:
This is a great feature to have on and you’ll very likely get
more relevant results with it than WP plugins like
YARPP (Yet Another Related Posts Plugin).
However make sure you’re using a caching plugin with
this feature so WPI doesn’t have to find these posts for
every page load.
Log
The WPI log is a plain text file in this location:
wp-content/plugins/wp-indexer/txt/log.txt
Every notable action that WPI does, it logs to this text file. When you visit the
Log page inside the plugin’s admin area, it’s this text file you’re seeing.
Random web visitors can’t see this text file on your
server because it’s blocked with htaccess for security. It
only loads inside the WPI plugin.
This log file is periodically trimmed if it grows larger than 10k lines. This is
simply to stop it growing to hundreds of MB in size, requiring “log file rotation”.
So only the last 10k entries are kept (which is more than you’ll ever need to look
at).
Explanations for possible log messages
There’s no explanation for the first 3 because I’m sure you can work out when
they’ll appear

16
However, for any log messages to appear you must have first chmod’d the log
file to 777.
Plugin activated!
Plugin settings updated!
Plugin deactivated.
Index Unparsable
The Google cache HTML or Google SERP HTML wasn’t recognised, so
WPI couldn’t update the index status. This probably means Google
changed something and WPI needs updating.
WPI starting to process post_id=
This appears simply to help you identify where each post begins to be
checked in the log file, for easy scanning.
Can't ... because 2 errors were found!
Errors detected - can't run plugin
These are the same errors that may appear on the dashboard and settings
page. They’re all related to plugin settings, or the wp/php/server
environment. This message indicates that nothing can be done in the
plugin until you resolve these errors.
No point checking post index status because the homepage isn't
indexed yet
To stop wasting server resources, if your blog’s homepage isn’t indexed
yet WPI won’t check the index status of posts. The thinking is that is the
homepage isn’t indexed, there’s close to zero chance of the posts being in
Google. If you’re seeing this and you know your homepage is indexed,
you can speed up the re-checking of your homepage index status by
deactivating then reactivating the plugin. The status of everything will
then be re-checked in 2-3 minutes.
Couldn't load class WPI_Curly!
This is the PHP class that handles bulk web requests, and is used for the

17
speedy pinging functionality. Without it, WPI can’t execute many of it’s
functions. If you get this, the first step should be to re-install the plugin
as a file may have gone missing.
Couldn't load class WPI_SIP!
Couldn't load stop words - can't detect tags!
The first error is essentially the same as the WPI_Curly one above, but
this file handles extracting keywords from post content for tags. The
second error means that a txt file required for the SIP class to work
couldn’t be found. It should be located here:
wp-indexer/txt/stopwords.txt
cURL functions not installed on server!
WPI requires cURL on your server to make web requests. This is a very
standard and comes by default with almost every hosting package I’ve
seen or heard about.
Index Timeout
When checking the index status of a page on your blog, the Google cache
request timeout out. Usually nothing to worry about, as it will work the
next time WPI tries. Google is normally very speedy, so this should be a
rare error.
Not Yet Indexed
If a post isn’t indexed yet, this is the message in the log. It might be
indexed next time we check.
Index Refused
Google returned a HTTP status code that wasn’t 400 (not found) or 200
(ok). This means that something went wrong and Google couldn’t deliver
the request to WPI. A few of these here and there and there’s nothing to
worry about. But if you see lots of these it may mean Google’s rate
limiting requests from your IP and you should lower the number of posts
you check every 1 minutes.
Indexed on ...
When WPI checks the index status of a post and it’s indexed OK, this
appears in the log. The could appear multiple times for the same page
18
(usually separated by several weeks, and unindexed posts are always
checked first).
Index Redirect
Sometimes when the Google cache can’t understand the query you send,
it will simply redirect you to a Google search results page, thinking you
meant to search for something. So if you see this in the logs it means WPI
may be sending broken queries to Google, and an update could be
required.
Log size larger than 10k entries. Trimming...
This is an automatic WPI cleanup operation to keep your log file size
under control. Once you reach 10k lines you’ll see a bunch of these. At
that point you should probably manually clear the log, via the “Clear Log”
button on the log page.
Post id 3 is invalid!
This means that WPI has detected a post_id that isn’t actually valid. This
error is setup mainly as a precaution to stop unknown errors, and it
should never appear. Something’s definitely wrong if you see this one.
Unable to connect to ...
When WPI tries to aquire a new homepage link, sometimes the target
site will take too long to respond. WPI has a timeout of 7 seconds in
place for all web requests, to ensure that the odd slow site doesn’t slow
down your blog. If you see this, the same site will probably work fine the
next time WPI tries. If you find repeated fails for the same URL, let me
know and I’ll remove that one from the plugin.
Homepage link gathered
When a homepage link has been confirmed as existing on a particular
URL, you’ll see this along with the full URL where you link has appeared.
Homepage link not found
The opposite of the above. The homepage link wasn’t actually found on
the target URL, so we won’t bother pinging anything here.

19
Added 2 auth links for post_id=
When authority pingback links are added to your post content, you see
this confirmation line.
Ping Blocked: We won't ping now as we did so in the last 30 mins
This is a safety feature of WPI to stop your IP or domain getting flagged
as pinging too often. WPI will resume pining (for new posts, not
retroactively) once it’s 30mins later than the last session of bulk pinging.
Ping Timeout
Similar to the “Index Timeout” message, this one appears when a ping
service didn’t respond within 7 seconds. It’s usual for a few of these to
appear, just because ping services are generally under heavy load at most
times. Unless your log is filled with these, everything’s normal.
Ping HTTP Error
If a ping service didn’t return a status code of 200 (meaning everything
went ok) then you see the message.
Ping Failed
The ping service in question returned malformed XML, so WPI couldn’t
tell what they were saying. With this error might be the actual message
the ping service returned, if any.
Ping Rejected
An error was returned with the ping service’s message. The error will be
shown, and is usually something like “temporary failure” or “you’ve
already pinged this blog”.
Ping OK: 97 pings executed successfully
An aggregated confirmation message showing the number of successful
pings. Pings that went OK don’t appear on their own line because it
would bloat your log out to unmanageable levels.
Added these tags to post_id=3 ...
When tags are added for a new post, WPI show this line along with a list
of the keyword tags it added.

20
Indexing Performance Tips
Caching Plugin Importance
I’ll be blunt here. You have to install a caching plugin. If
you want to use WP Indexer, there’s no option.
Here’s why:
First, WP is an inefficient beast and really benefits from not having to run a
load of PHP with every page view.
But the main reason is because of the bots you’ll get visiting. If you’re planning
on making the most of WP Indexer, you’ll probably be installing it on multiple
blog (or a WPMS/WPMU install).
When you do this, the increase in bot visits puts serious load on your server.
I’ve had a client’s beefy dedicated server brought to its knees from bot
traffic a few days after installing. So this is a big deal.
With no caching plugin, each time you load any WP page your blogs CPU has
to work much harder to parse all the code, work out what goes where and
output the html.
With a caching plugin, this is done one per page, only every 30 minutes (or
whatever you set it to). In between the caching plugin saves the html output
and just output that directly to your browser, without having to run all the PHP
code again.

21
Now, the obvious drawback with this is that you blog will only get refreshed
every 30 mins. But for most blogs the payoff is well, well worth this sacrifice
as you can handle 10-50 times more traffic on the same server.
So, which caching plugin should you use?
The good news is that all the best ones are free as far as I know. Here are the 2
main players:
1. WP Super Cache
2. W3 Total Cache
They both cache pages and more importantly for WPI’s use case, they cache
RSS feeds. WPI pings the RSS feeds of all pages that change when a post is
made (if you’ve got that options checked) so having feeds cached makes a huge
difference to your server load.
I suggest installing them both and picking the one you get on with best, as they
can both do the job. It’s largely a matter of preference.
Run wp_cron with actual cronjob
By default, WP runs it’s scheduled tasks via it’s built in wp_cron feature. While
this is very useful for plugin developers to run things regularly, there are 2
problems with it:
1. It runs EVERY time anyone loads a page on your blog. This puts extra
strain on your servers, and is unnecessary.
2. It’s not guaranteed to run on time (or anywhere near the time you set
it to). For example, WPI’s post index status checking is set to run every 15
minutes. But WP’s cron feature is really a “fake” cron, because it can only
run when someone visit your blog. So if you get no visitors for several
hours, the cron can’t run.

22
There’s a simple fix you can do to boost the performance of your whole blog, in
just 2 steps...
1. Edit your wp-config.php file and add this line of code:
define('DISABLE_WP_CRON', true);
What this will do is stop WP from running it’s wp_cron feature at all.
This will speed up your site.
2. Add a cronjob in cPanel (or via the command line if you’re comfortable
with it). The file you’re running is the wp-cron.php file in your blog’s
root folder. You’ll need to enter the full path to this file, which might
look something like this (change for your actual path of course):
/home/username/public_html/wp-cron.php
Set it to run every 10 minutes, so vP can still run scheduled features of
plugins and do it’s cleanup operations.
Total number of plugins
This is a big issue that many people are unaware of. Every plugin you have
installed on your blog means that...
1. Your pages takes longer to load
2. Your server uses more CPU for each page view
3. Each page view uses more RAM
4. There’s more security vulnerabilities and chance of bugs
I’ve seen some WP blogs with upwards of 50 plugins installed, which is
insane. It slows your blog to a crawl and makes even browsing the admin area a
time drain.
I’ll probably get some hate mail for saying this, but I believe you
shouldn’t have more than 15 plugins MAX on your WP blog.
Unfortunately, WP is simply not built for installing tons of plugins.

23
So a very simple way to speed up your blog right now, is by deactivating some
plugins. (Remember to also DELETE these plugins from your blog, as WP will
still load some of their files even when not “on”).
Bot Rate Limiting
If you start using WPI with multiple blog on the same server, soon the server
will come under increased load from the bot traffic.
It’s a problem of success, and with a particular (free) WP plugin it’s a fun
problem to solve.
Install WordFence on your blogs. It’s a WP security plugin that has many
useful features with its free version. However the one in particular we’re
interested in is the bot rate limiting.
It has comprehensive options to limit the access of bots to your site, and tells
them “come back later – you’re not browsing anymore right now”.
This plugin will be a lifesaver, and could stop your server from melting.
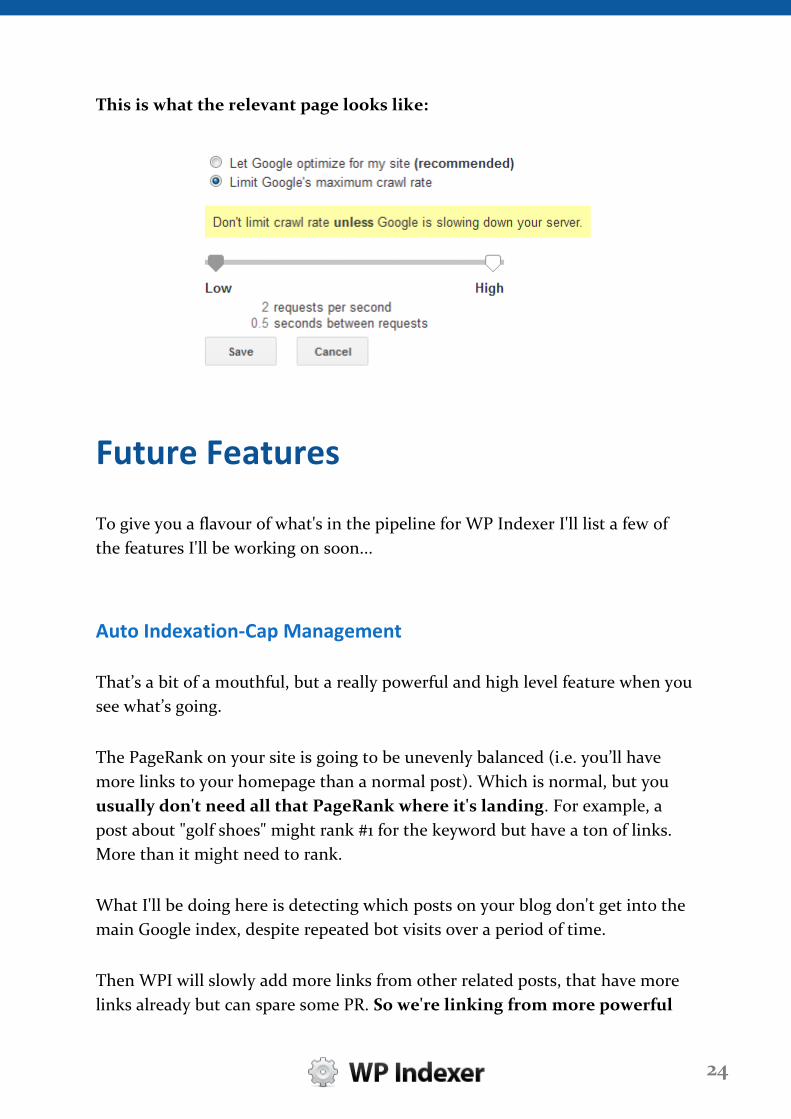
Google webmaster tools crawl rate limiting
If you’ve setup your blog with Google’s Webmaster Tools, then you’ll have
this option in the settings.
If you do this it will limit the speed at which GoogleBot and only GoogleBot)
can crawl your blog. So you have this option, but only use it if you can confirm
from your server logs that GoogleBot is causing significant load on your blog.
You probably won’t need to do this, but I’m listing it here because I’ve had to do
this for a large blog in the past, so you may find it useful.
24
This is what the relevant page looks like:
Future Features
To give you a flavour of what's in the pipeline for WP Indexer I'll list a few of
the features I'll be working on soon...
Auto Indexation-Cap Management
That’s a bit of a mouthful, but a really powerful and high level feature when you
see what’s going.
The PageRank on your site is going to be unevenly balanced (i.e. you’ll have
more links to your homepage than a normal post). Which is normal, but you
usually don't need all that PageRank where it's landing. For example, a
post about "golf shoes" might rank #1 for the keyword but have a ton of links.
More than it might need to rank.
What I'll be doing here is detecting which posts on your blog don't get into the
main Google index, despite repeated bot visits over a period of time.
Then WPI will slowly add more links from other related posts, that have more
links already but can spare some PR. So we're linking from more powerful
25
posts to lesser, unindexed ones automatically to help push more of your
site into the main index.
Unindexed Sitemap Generation
I'm not sure if this will be just 1 main sitemap, or multiple (1 for images, videos,
tags, posts etc). But the concept is to generate a sitemap with a higher index
priority for the posts/pages/tags that are the most important for your blog but
still not in the main index.
Then auto submit these sitemaps on a regular basis and ping them
Day-by-day charts for links, bot-hits and indexed pages
We've got pie charts to give the indexation overview, but there's some pretty
interesting chart data coming along. When we start tracking incoming links
and bot hits on a per-page basis, we can do some cool things. The charts will
allow us to setup specific rule sets to say things like:
(The brackets indicate drop-down boxes)
If [post] indexation goes [lower] than [600] email me
If [bothits] goes [higher] than [2000] in [3 hours] email me
This will give you early warning of any possible indexation problems, and a
chance to correct thing before they get worse. Kind of like an email from
GoogleBot saying “You’ll be in trouble if you don’t fix this now...”.
A real lifesaver.
Plus there's another use for this data that I won't mention yet. I've got more
testing to do but it could be a huge bonus for new blogs.

26
RSS Link Bouncing
Apart from the new types of RSS feed I'm planning, there are a few ideas I'm
playing around with for link building by bouncing links from your sites and RSS
feeds. I'll explain more about this when I've nailed down the code, but the
concept is looking interesting...
What Now?
If you’ve already got your copy of WP Indexer, you’re good to go. Follow the
instructions above and you’ll see drastic increases in your indexation rate in just
a few days.
If you’re skimming this guide because you wanted some quick indexing tips, or
were curious about what WPI can do, I really hope this helped you.
You can read more about WP Indexer here, or email me with any follow up
questions at [email protected].