heroquest revised edition quest books -...
TRANSCRIPT

HeroQuest Revised Edition
Quest Books
.
HeroQuest Revised Edition
Quest Books
.

The Maze “This will be your final test before you set forth. Be sure to use all the skills that you have
been taught. You must attempt to find the way out of the Maze. Several monsters have been lured into the Maze. They will try to stop you so take care. Whoever finds their way
out first will be rewarded with a purse of 100 gold crowns. This may be used to buy equipment for the adventures to come.”
NOTES The players start the game on the spaces indicated
Wandering Monster: Orc Introductory Quest: The Maze
Note that this does not constitute a quest for the purposes of becoming a champion. This Quest has been included to help teach new players the basics of the game.
Introductory Quest

Quest Book I: The Gathering Storm
Chapter One
The Gathering Storm
The fire burns warmly, but casts little light into Mentor’s study. The flickering shadows only hint at the vast number of books and scrolls that fill the many shelves. Slowly Mentor walks over to the fire. ”Well, my friends, your training is complete. You are not yet Heroes, you have yet to prove yourselves. But first, let me tell you of Morcar.
“Many centuries ago, Morcar was my apprentice. He worked hard and learned quickly. But impatience devoured him, and he wanted to learn more powerful magic. I told him of the dangers, and that he should be patient, for in time he would become a great wizard. But Morcar would not wait: each night he broke into my study and read my spell books. The secrets that where held within them where great indeed. Once he had learnt these secrets, Morcar fled.
When I caught up with him, I found him greatly changed. He had pledged his allegiance to the Great Powers of Chaos. Fool! He saw magic only as a short-cut to power and paid no heed to the terrible price he would have to pay. I tried to reason with him, but to no avail. He laughed in my face then unleashed a powerful spell which I was hard-pressed to counter. For many days we battled, but Morcar had allies stronger than even I, and I could not defeat him. In the end, as we both weakened, he fled and sought refuge in the Northern Chaos Wastes. There he licked his wounds and honed his skills, conjuring ancient powers with which to overthrow the Empire. But he knows not what he has done. They will serve him only while it suits their own dark purposes, but in time they will destroy him.
“I must watch Morcar and measure the strength of his magic. This I may do with the help of Loretome. The powers Morcar has called upon will destroy us all if I relax from this vigil. Morcar’s legions have threatened us once before. Then it was Rogar who aided me and defeated them. Now they are on the march again: already they have assailed the Borderlands. The Empire must again look for Heroes and to this end have I trained you.
Each of you must complete Fourteen tasks. If you do this, you will be named Champions of the Realm, and dubbed Imperial Knights. Then you will truly be on the road to becoming a Hero. I shall speak with you again on your return – if you return…….”
Quest Book I - Page 1 .

The Trial
“You have learnt well, my friends. Now has come the time of your first trial. You are to travel east and enter the catacombs of Verag, a foul gargoyle. The
catacombs guard the tomb of Fellmarg. The trial is not easy and some of you may not return. Those who do survive will continue their training. This is the first
step on the road to becoming heroes… tread carefully, my friends.”
NOTES A The weapons on the Weapons Rack are rusty and chipped. There is nothing a
Hero would want. B The treasure chest is empty. C This Mummy is the guardian of Fellmarg’s tomb and was once a mighty warrior. It
rolls an extra Combat Die in Defence. D The Treasure Chest contains 84 Gold Crowns. E The treasure chests contain 120 Gold Crowns.
Wandering Monster: Orc
Quest Book I - Page 2
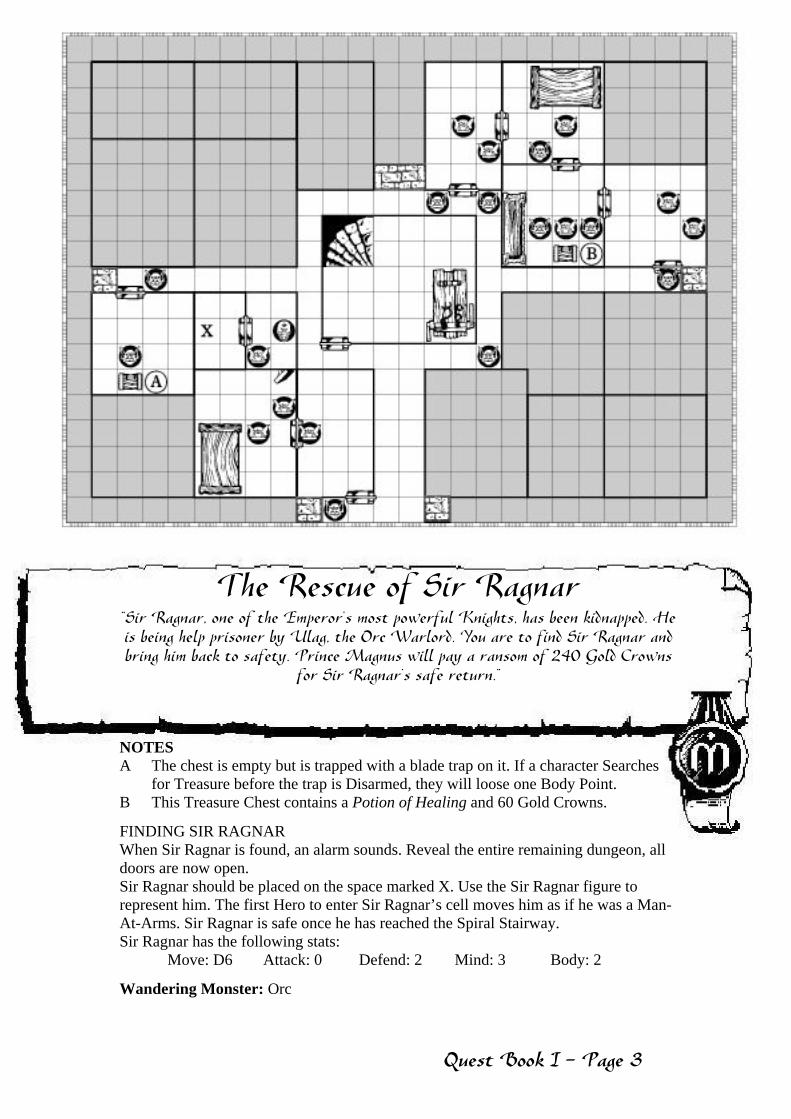
The Rescue of Sir Ragnar
“Sir Ragnar, one of the Emperor’s most powerful Knights, has been kidnapped. He is being help prisoner by Ulag, the Orc Warlord. You are to find Sir Ragnar and bring him back to safety. Prince Magnus will pay a ransom of 240 Gold Crowns
for Sir Ragnar’s safe return.” NOTES A The chest is empty but is trapped with a blade trap on it. If a character Searches
for Treasure before the trap is Disarmed, they will loose one Body Point. B This Treasure Chest contains a Potion of Healing and 60 Gold Crowns.
FINDING SIR RAGNAR When Sir Ragnar is found, an alarm sounds. Reveal the entire remaining dungeon, all doors are now open. Sir Ragnar should be placed on the space marked X. Use the Sir Ragnar figure to represent him. The first Hero to enter Sir Ragnar’s cell moves him as if he was a Man-At-Arms. Sir Ragnar is safe once he has reached the Spiral Stairway. Sir Ragnar has the following stats:
Move: D6 Attack: 0 Defend: 2 Mind: 3 Body: 2
Wandering Monster: Orc
Quest Book I - Page 3 .

Lair of the Orc Warlord
“Prince Magnus has ordered that the Orc Warlord Ulag, who was responsible for the kidnapping of Sir Ragnar, should be sought out and killed. A bounty of 180
Gold Crowns has been placed on Ulag’s head. Any treasure found in his stronghold is also yours to keep.”
NOTES A This is the Orc Armoury. The Equipment Rack holds a Spear. B This Cupboard conceals 24 Gold Crowns and a Potion of Healing. C The Treasure Chest contains 96 Gold Crowns but is trapped with a blade trap. If
a character Searches for Treasure before the trap is Disarmed, they will loose one Body Point.
D The Orc in this room is Ulag. Use the Orc Champion figure to represent him. He has the following stats:
Move: 10 Attack: 4 Defend: 5 Mind: 3 Body: 2
Wandering Monster: Orc
Quest Book I - Page 4
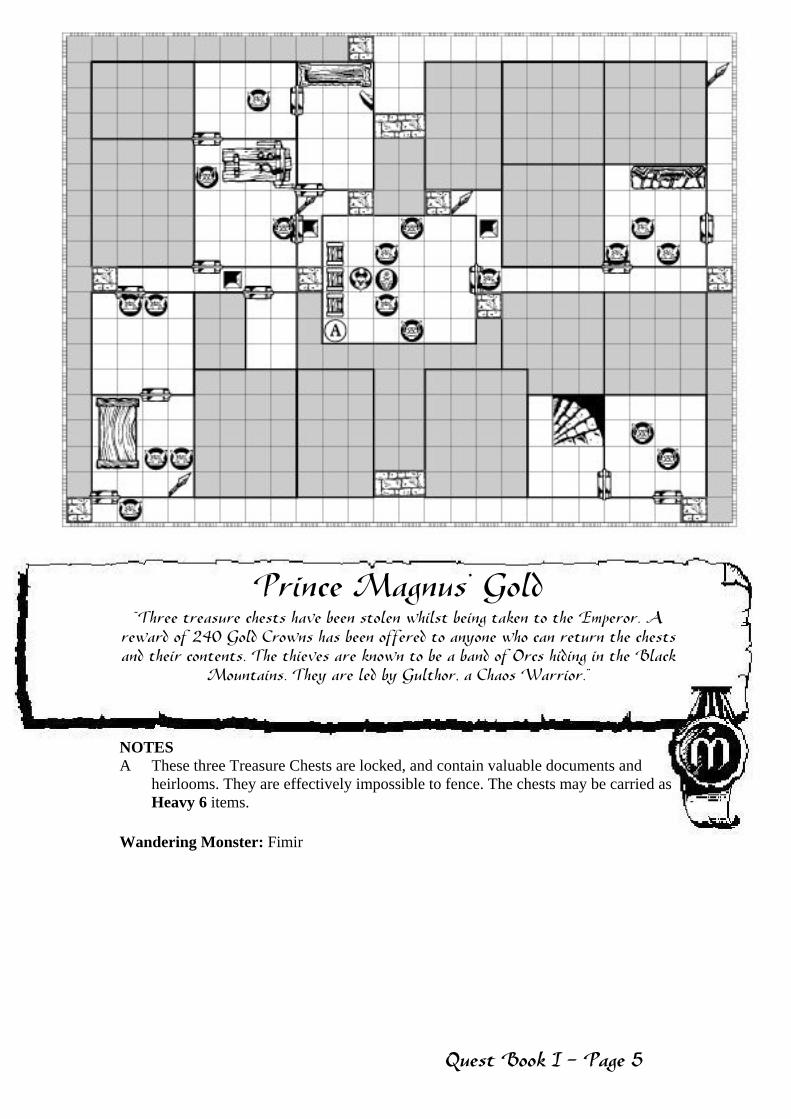
Prince Magnus’ Gold
“Three treasure chests have been stolen whilst being taken to the Emperor. A reward of 240 Gold Crowns has been offered to anyone who can return the chests and their contents. The thieves are known to be a band of Orcs hiding in the Black
Mountains. They are led by Gulthor, a Chaos Warrior.” NOTES A These three Treasure Chests are locked, and contain valuable documents and
heirlooms. They are effectively impossible to fence. The chests may be carried as Heavy 6 items.
Wandering Monster: Fimir
Quest Book I - Page 5 .

Melar’s Maze
“Long ago, a powerful sorcerer by the name of Melar created a Talisman which would enhance the wearer’s understanding of Magic. He kept the Talisman with him at all times, fearing that it might be stolen and used by the allies of Morcar. It is said that he left the Talisman in his laboratory at the heart of his Maze. Melar’s Maze is guarded by many traps and magical
guardians. It is also rumoured to be haunted by those who have sought the Talisman and perished in the attempt…”
NOTES A The Alchemist’s Bench conceals a Rejuvenation Salve. B This chamber contains a Gargoyle which appears to be a statue and cannot take
Actions or be harmed. The door to the adjoining chamber is trapped. Unless the trap is Disarmed, the Gargoyle will come to life when the door is opened, and is ten treated normally.
C The chest contains 144 Gold Crowns but is trapped with a poison gas trap. If a player Searches for Treasure before Disarming the trap they will loose two Body Points to Poison Damage.
D The Bookcases conceal the Talisman of Lore Artefact. E If a player searches for Secret Doors in this room, they will find nothing. If they
Search for Treasure, they will find Melar’s Key. On touching the key, the throne will slide aside, revealing the Secret Door, and the key will disappear.
Wandering Monster: Zombie
Quest Book I - Page 6

Legacy of the Orc Warlord “Ulag’s foul offspring, Grak, has sworn revenge on those who killed his father. Although it
has taken him several months, he has finally tracked you down and captured you in an ambush. Now you are held prisoner in his dungeons while he racks his brains to devise a
terrible punishment for you. While the guard sleeps, however, you manage to pick the lock of your cell with an old rat bone. You must find your equipment and escape.”
NOTES A The Heroes begin the quest here. They have no Treasure, Equipment or Spells,
and may only roll their basic dice. They count as unarmed. B The Orc next to the stairs is Grak, use the Orc Champion figure to represent him.
He has the following stats: Move: 8 Attack: 4 Defend: 4 Mind: 3 Body: 3 Grak carries a Spear, which he may use instead of attacking normally.
Grak is a sorcerer and knows the following Chaos Spells: Fear, Torpor, Vortex. If Grak is killed, the players may claim his Spear, and his cloak. The cloak is the Wizard’s Cloak Artefact.
C All of the Heroes’ equipment is here. When the room is Searched for Treasure, place the four Hero Equipment tokens in this room.
Wandering Monster: Fimir
Quest Book I - Page 7 .

The Stone Mage “The Emperor’s personal Wizard, Karlen has disappeared. The Emperor fears that either he
has been murdered or has succumbed to the lures of Chaos magic. You are to find out what has happened to Karlen and, if he is alive, bring him to safety. You will be paid 50 Gold
Crowns each upon returning.”
NOTES A All the Chaos Warriors in this adventure are animated stone statues, and roll an extra
Combat Die in Defence. B The Equipment Rack conceals the Borin’s Armour Artefact. C The Treasure Chest contains an unidentifiable Purple Potion but is trapped with a poisoned
needle. If a player Searches for Treasure before this trap is disarmed, they will loose two Body Points to Poison Damage.
If a Player does Search for Treasure, give them the Purple Potion token. If the Potion is imbibed before being identified, it is the Elixir of Stone Artefact.
D Karlen’s Treasure Chest contains 144 Gold Crowns. The Zombie in this room is dressed in Wizard’s robes. Papers on the Alchemists Bench prove that Karlen was consumed by Chaos Magic he was experimenting with and turned into a mindless Zombie. They also explain what effect the Purple Potion will have if imbibed, allowing the token to be exchanged for the Elixir of Stone Artefact.
Wandering Monster: Mummy
Quest Book I - Page 8

The Fire Mage “The Orcs of the Black Mountains have been using Fire magic in their raids. Balur, the Fire Mage, is thought to be responsible for helping them. No fire can harm him, and the
Emperor’s Wizards are unable to counter his spells. You have therefore been chosen to enter his lair, deep beneath Black Fire Crag. The Emperor will reward you with 100 Gold Crowns
each for Balur’s destruction.” NOTES A The Treasure Chest contains 120 Gold Crowns and the Wand of Recall Artefact. B The Chaos Sorcerer is Balur, who knows the following Chaos Spells:
Conflagration, Escape, Fear, Firestorm, Summon Orcs, Vortex. The Escape Spell will place Balur on the space marked XX. If this room has yet to be revealed, do not place him there until the Heroes open the door to said room. Balur is immune to all Fire Spells.
Wandering Monster: Fimir
Quest Book I - Page 9 .

Race from the Dark “A guide has led you down into a dungeon that is rumoured to hold a great secret. He has led
you down many dark corridors and finally you find yourselves in a room with three doors. Suddenly the guide puts out his torch and in the darkness you hear him laugh. ‘Farewell my Heroes!’ he sneers as he makes his escape. You realise to your horror that it is a trap! As
the ceiling begins to lower on you, you must escape or perish in this dark forgotten hole.” NOTES A The players start in this room and must find their way to the Spiral Stairway to
escape. As the Quest begins, the ceiling is slowly lowering on them. Once they have all left via the Secret Door, the ceiling collapses – place a Fallen Block tile on every space in this room during your turn. Any figures in this room are killed.
B These Treasure Chests contain 60 Gold Crowns each. C The Treasure Chest contains an Elixir of Life Potion but is trapped with a poison
gas trap. If a player Searches for Treasure before this trap is Disarmed, they will loose three Body Points to Poison Damage.
Wandering Monster: Fimir
Quest Book I - Page 10

Castle of Mystery “Long ago an insane wizard, Ollar, discovered the entrance to a gold mine. Using his great powers, he built a magical castle above the mine to protect it. The castle had many magic
portals and was guarded by a host of monsters who where trapped in time. Can you find the entrance to the mine? Others have tried, but the castle has thwarted them every time.”
NOTES As soon as a Hero passes through a Portal, they must stop immediately and roll 2D6. That hero is immediately teleported to the square with the same number as the dice total. If a Hero would be teleported to their starting space, they roll again. If the destination square is already occupied, the other figure loses one Body Point and, if still alive, if thrown through the portal and rolls 2D6 to see where they are teleported to. A figure may only pass through one portal per Movement Action. A If both these chaos warriors are defeated, the first Hero to Search for Treasure will find the
Ring of Return Artefact. B This is the entrance to the mine. Any player may take a sack of 5000 Gold Crowns. This
counts as a Heavy 6 item. If the sack is dropped, it teleports back to the mine. Once all the monsters are killed, the Heroes may leave the Dungeon at will. After the game all gold from the mine turns out to be fool’s gold. Any other treasure found is real.
Wandering Monster: The ghost of Ollar appears chuckles madly, and disappears.
Quest Book I - Page 11 .
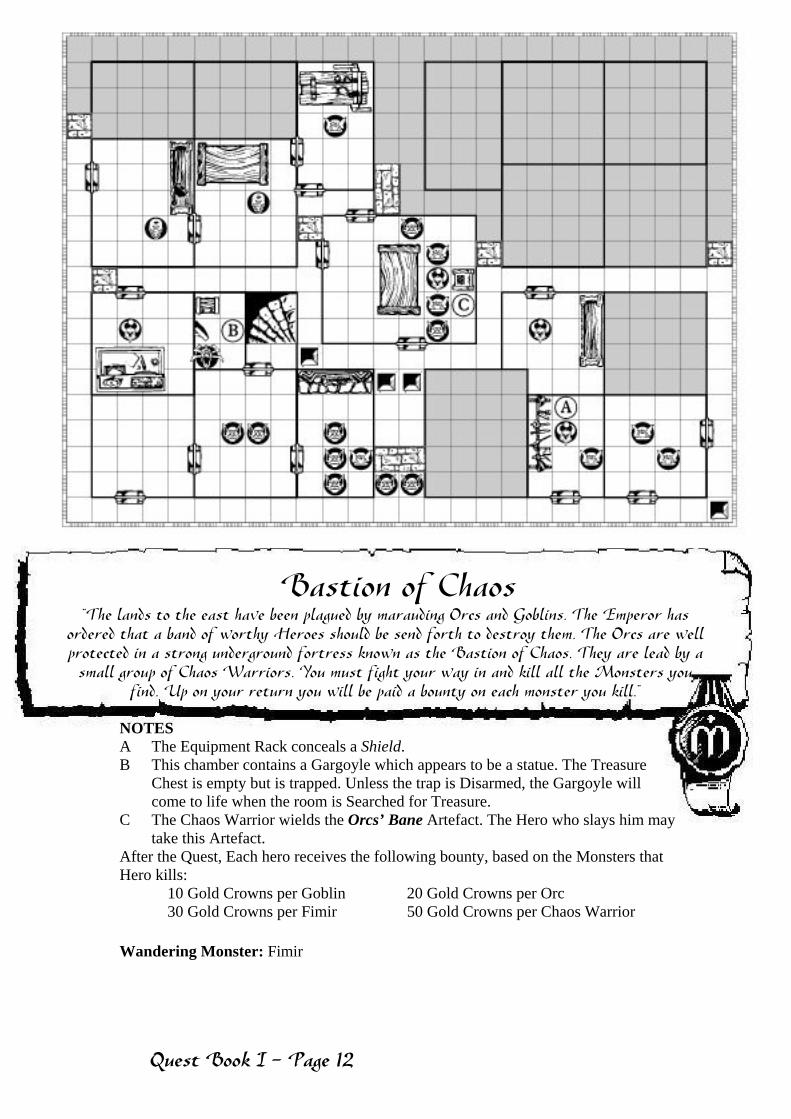
Bastion of Chaos “The lands to the east have been plagued by marauding Orcs and Goblins. The Emperor has
ordered that a band of worthy Heroes should be send forth to destroy them. The Orcs are well protected in a strong underground fortress known as the Bastion of Chaos. They are lead by a
small group of Chaos Warriors. You must fight your way in and kill all the Monsters you find. Up on your return you will be paid a bounty on each monster you kill.”
NOTES A The Equipment Rack conceals a Shield. B This chamber contains a Gargoyle which appears to be a statue. The Treasure
Chest is empty but is trapped. Unless the trap is Disarmed, the Gargoyle will come to life when the room is Searched for Treasure.
C The Chaos Warrior wields the Orcs’ Bane Artefact. The Hero who slays him may take this Artefact.
After the Quest, Each hero receives the following bounty, based on the Monsters that Hero kills:
10 Gold Crowns per Goblin 20 Gold Crowns per Orc 30 Gold Crowns per Fimir 50 Gold Crowns per Chaos Warrior
Wandering Monster: Fimir
Quest Book I - Page 12
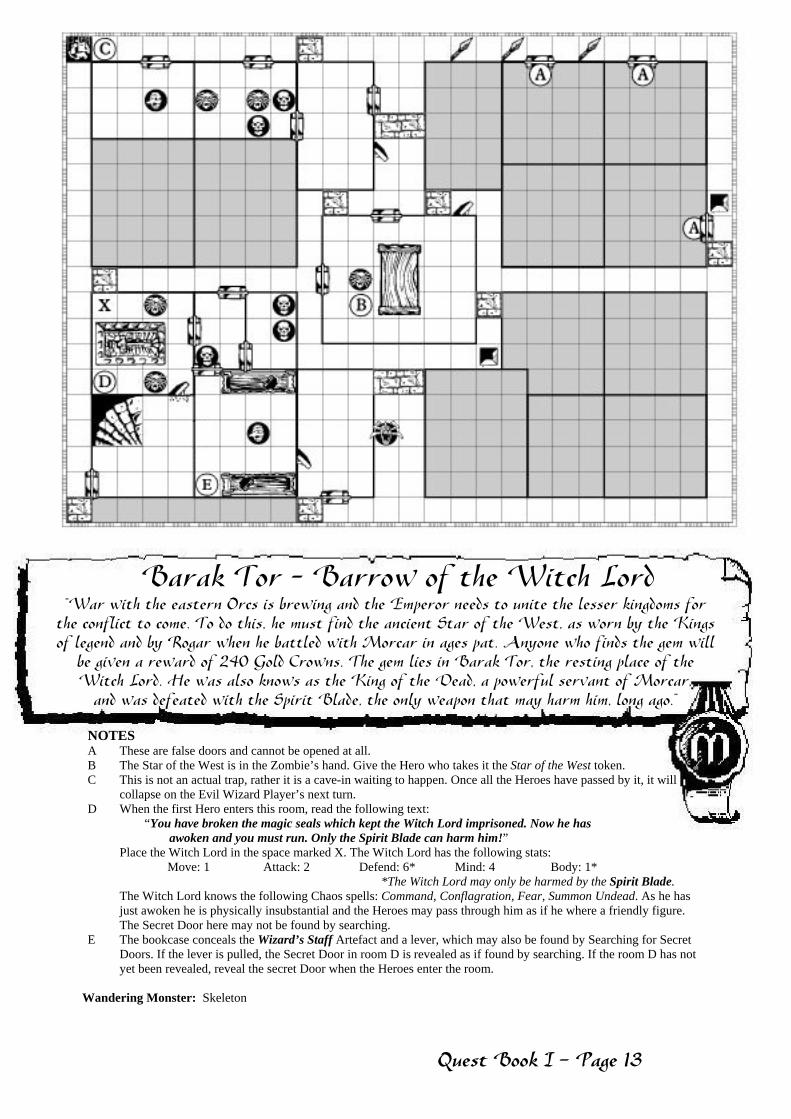
Barak Tor – Barrow of the Witch Lord “War with the eastern Orcs is brewing and the Emperor needs to unite the lesser kingdoms for
the conflict to come. To do this, he must find the ancient Star of the West, as worn by the Kings of legend and by Rogar when he battled with Morcar in ages pat. Anyone who finds the gem will
be given a reward of 240 Gold Crowns. The gem lies in Barak Tor, the resting place of the Witch Lord. He was also knows as the King of the Dead, a powerful servant of Morcar,
and was defeated with the Spirit Blade, the only weapon that may harm him, long ago.”
NOTES A These are false doors and cannot be opened at all. B The Star of the West is in the Zombie’s hand. Give the Hero who takes it the Star of the West token. C This is not an actual trap, rather it is a cave-in waiting to happen. Once all the Heroes have passed by it, it will
collapse on the Evil Wizard Player’s next turn. D When the first Hero enters this room, read the following text:
“You have broken the magic seals which kept the Witch Lord imprisoned. Now he has awoken and you must run. Only the Spirit Blade can harm him!”
Place the Witch Lord in the space marked X. The Witch Lord has the following stats: Move: 1 Attack: 2 Defend: 6* Mind: 4 Body: 1* *The Witch Lord may only be harmed by the Spirit Blade.
The Witch Lord knows the following Chaos spells: Command, Conflagration, Fear, Summon Undead. As he has just awoken he is physically insubstantial and the Heroes may pass through him as if he where a friendly figure.
The Secret Door here may not be found by searching. E The bookcase conceals the Wizard’s Staff Artefact and a lever, which may also be found by Searching for Secret
Doors. If the lever is pulled, the Secret Door in room D is revealed as if found by searching. If the room D has not yet been revealed, reveal the secret Door when the Heroes enter the room.
Wandering Monster: Skeleton
Quest Book I - Page 13 .

Quest for the Spirit Blade “You have awoken the Witch Lord. He will pose a most serious threat to the Emperor in the coming war. The Witch Lord must be destroyed before he can bring his army of the Undead to attack the Emperor’s forces. You must first find the Spirit Blade, for only this ancient weapon can harm him. The Spirit Blade was forged by the Dwarves of the World’s Edge Mountains and cooled in the Elven fountain of Lebin. The sword now lies in an ancient,
ruined temple and you must recover it.”
NOTES The falling blocks in this quest are not traps, but loose ceilings. Any Hero moving through such a space rolls a D6. On a 5 or 6, the Hero looses one Body Point. If the Hero is wearing a Helmet, they only loose a Body Point on the roll of a 6. A The Spirit Blade Artefact hangs here in mid-air, bathed in a cool blue light. No
Monsters may enter this room. B This Treasure Chest contains 180 Gold Crowns. Wandering Monster: Chaos Warrior
Quest Book I - Page 14

Return to Barak Tor “Now that you have the Spirit Blade, you must return to Barak To and defeat the Witch Lord. The Emperor has ridden forth to meet the Eastern Orcs at Black Fire Pass. If you
fail, the Witch Lord will lead his army of Undead and attack the Emperor’s forces from the rear. Then nothing will remain to prevent the Forces of Chaos overrunning the land…”
NOTES A The tomb is now empty b THE WITCH LORD
The witch lord starts in the space marked X. The Witch Lord has the following stats: Move: 10 Attack: 5 Defend: 6* Mind: 6 Body: 4* *The Witch Lord may only be harmed by the Spirit Blade. The Witch Lord knows the following Chaos Spells: Command, Conflagration,
Fear (which he may cast twice), Summon Undead, Vortex.
If the Witch Lord is killed, he vanishes in a puff of foul smoke, accompanied by the tinkle of metal skittering along the floor. The Heroes will find the Spell Ring Artefact. Wandering Monster: Mummy
Quest Book I - Page 15 .
Epilogue “You have done well. Yet seems your task has hardly begun. Dark clouds gather at the Empire’s boarders…
The Emperor road with his army towards Black Fire Pass, that perilous mountain route linking the Empire and the Boarderlands. No such army has ever been raised in living memory. Greater even than Rogar’s host it was. They drew up in their battle lines at the foot of the mountain road and waited. ‘Ere nightfall, the sky darkened and a great wind arose. Spine-chilling shrieks and howls echoed from the mountain tops, terrifying the horses and filling man and elf alike with fear.
“Then came the first assault. Pouring down the mountainside as though it where a gentle slope rather than an almost vertical cliff, the hordes of Morcar fell upon the Empire’s defenders. Like a black wave they came, but the lines held and it seemed we should win the day.
“But I had not reckoned with Morcar’s magic. He stood high on a ridge overlooking the battlefield and unleashed his terrible magic. Lightning flashed from his fingertips and great gouts of flame exploded among the defenders. Our lines where breached in a dozen places at once and the enemy howled in delight.
“Then came the Doomguard – Morcar’s force of elite Chaos Knights. Our army broke and ran. Only the Emperor’s personal guard held their ground and many sacrificed themselves to ensure his safe retreat.
“The remnants of the army are now holed up in Karak Varn – the ancient Dwarven stronghold. They do not have provisions for a long siege, however, so we must act swiftly if we are to save the Emperor and his army.
“The Empire has great need of you. I myself cannot act against these dangers, for I must move against Morcar and strive to weaken his power.
“Rest for now and recover your strength. I will summon you when I have consulted Loretome, and formulated a plan for the Emperor’s rescue.”
Quest Book I - Page 16

Quest Book II: Kellar’s Keep
Chapter Two
Kellar’s Keep
“Friends, as you know, the Emperor is besieged in Kellar’s Keep, the inner bastion of Karak Varn, the great Dwarven stronghold that lies deep in the World’s Edge Mountains. The fortress is well defended but I fear that time is against us. The Emperor’s army weakens with starvation, while the enemy grows stronger every day.
“It is up to you brave Heroes to rescue the Emperor. The great book Loretome has revealed much useful information to me.
“The World’s Edge Mountains stretch along the eastern edge of the Empire. Many thousands of years ago the Dwarves made these mountains their home. With their great engineering skills they built vast cities that cut deep into the rock. The cities where connected by tunnels that stretched for miles beneath the mountains. On the eastern side of the mountains the Dwarves constructed huge fortresses to guard against the Dark Lands. The greatest if these was Karak Varn.
“The dwarves lived for many years in peace, for the Orcs and Goblins did not trouble them after their terrible defeat at Keloth’s Tor. But during this time of peace, the Dwarves let their fortresses decline. The garrisons became smaller and less vigilant. Then came Morcar. He had been patient and had spent years raising a new army of Orcs and Goblins. When the attack came there was no warning. The dwarves fought with great valour but their enemies where too many. One by one the cities fell. Only Karak Varn held.
“Most of the hidden tunnels near Karak Varn have been long forgotten. However, Loretome has revealed to me a secret passage known as Grin’s Crag, named after the Dwarf who fist discovered it.
“Grin was a loner, his life devoted to the search for a rich vein of gold. He never found one. Yet, whilst searching, he found a narrow footpath running along the edge of an abyss. He explored beyond and found himself in the lower caverns of Kellar’s Keep. . Grin carved a map into a stone tablet so that he might find the path again. This he gave to his lord, Belorn. Belorn broke the tablet into four pieces and hid them amongst his chambers.
“It will be your task to find Grin’s Crag and bring the Emperor to safety. First you will need to journey through the Halls of Belorn, ancient passages that lie deep beneath the World’s Edge Mountains. The Halls are now ruined, stripped of the riches that once adorned their many passages and chambers. Only Orcs and Goblins dwell there now. You must make them pay dearly for their trespass.
“Even Loretome cannot show me exactly where the secret passage lies. You must find the pieces of Grin’s Map that are scattered through Belorn’s lost kingdom if you are to locate the passage to Kellar’s Keep. You must not fail, for if you do our cause will be lost. I shall lead you to the Great Gate, but from there you will be on your own. Prepare yourself, for we leave in the morning.”
Quest Book II - Page 1 .

The Great Gate “This is as far as I may go with you: once beyond these gates you will be on your own. This gateway will lead you into the Halls of Belorn. I shall watch over your progress and aid you, if I can. Carry these crystals with you at all times. If the crystal you are carrying
glows red look deep into it. This is how I shall contact you when you are in need.”
NOTES Until the end of the Grin’s Crag Quest, these quests are played as a series. A The Treasure Chest is empty. B These Secret Doors cannot be found by Searching. You may place all three of
these doors on the board at the beginning of any one of your turns. When you do so, set up these three rooms. The Monsters may move immediately.
C This chamber contains a Gargoyle which appears to be a statue. The Chest contains 200 Gold Crowns but is trapped. Unless the trap is disarmed, the Gargoyle will come to life when the room is Searched for Treasure.
Wandering Monster: Orc
Quest Book II - Page 2

The Warrior Halls Another door lies before you. The crystal Mentor gave you glows red. You look into it and see him:
“Beyond lay the Warrior Halls, ancient chambers wherein all the great Dwarven warriors are honoured. Each has his deeds carved into the walls, so that none may forget their valour.
Tread carefully, for these halls where made to test the bravest and most cunning of the Dwarven warriors. The halls are full of traps and magical opponents.”
NOTES Save for the Chaos Warriors, all the Monsters here are illusions created by powerful Dwarven magic. The Heroes, however, will have to fight them as if they where real . A These four Chaos Warriors are actually mechanically animated suits of armour.
They fight as real Chaos Warriors but have the Diagonal ability. B This is the secret armoury of the Dwarves. The Equipment Rack conceals two
Magical Throwing Dagger Magic Items. Wandering Monster: Fimir
Quest Book II - Page 3 .

The Spiral Passage “The great Citadel lies beneath the mountains. The series of staircases that lead to the
Citadel is known as the Spiral Passage. It seems, to those who pass through them, that they are forever going down and around into the very heart of the mountain. The journey down into the main living quarters is a long one. Beware for the Orcs may have laid traps to
guard against attack.”
NOTES A When the last Hero has passed the square marked A, a large boulder will fall from
the ceiling. Place the Giant Boulder token in the square marked A. It moves as described in the main rules.
B The taps in the passage are so well hidden that any Hero who Searches For Traps will only find the next trap down the passage.
C Tell the Hero that they are through the Spiral Passage. Wandering Monster: Orc
Quest Book II - Page 4

The Dwarven Forge “The greatest of the Dwarven crafts, metalwork. Few can match the Dwarves for their skill and understanding of the metals they work. The weapons they forged at the dawn of
time have become legendary: the beauty of their jewels sought by King and thief alike. It is said, that though the Orcs have long since dwelt in the halls of Belorn, they have yet to find
the Dwarven Forge. A part of Grin’s stone map lies here.”
NOTES A When this Orc is attacked he screams out. The door he is guarding opens and the contents of the
room must be placed out. B The Fimir in this room knows the Chaos Spell Rust, and may cast it three times. The Table
conceals a Dwarven Fire Opal worth 100 Gold Crowns. C The Treasure Chest contains two Fire Ring Magic Items. D This is the Dwarven Forge as described in the main rules. E The chest contains a part of Grin’s Stone Map but is trapped with a poison dart trap. If a player searches
for treasure before this trap is disarmed, they will loose two Body Points to Poison Damage. F The Treasure Chest contains 300 Gold Crowns. Wandering Monster: Fimir
Quest Book II - Page 5 .
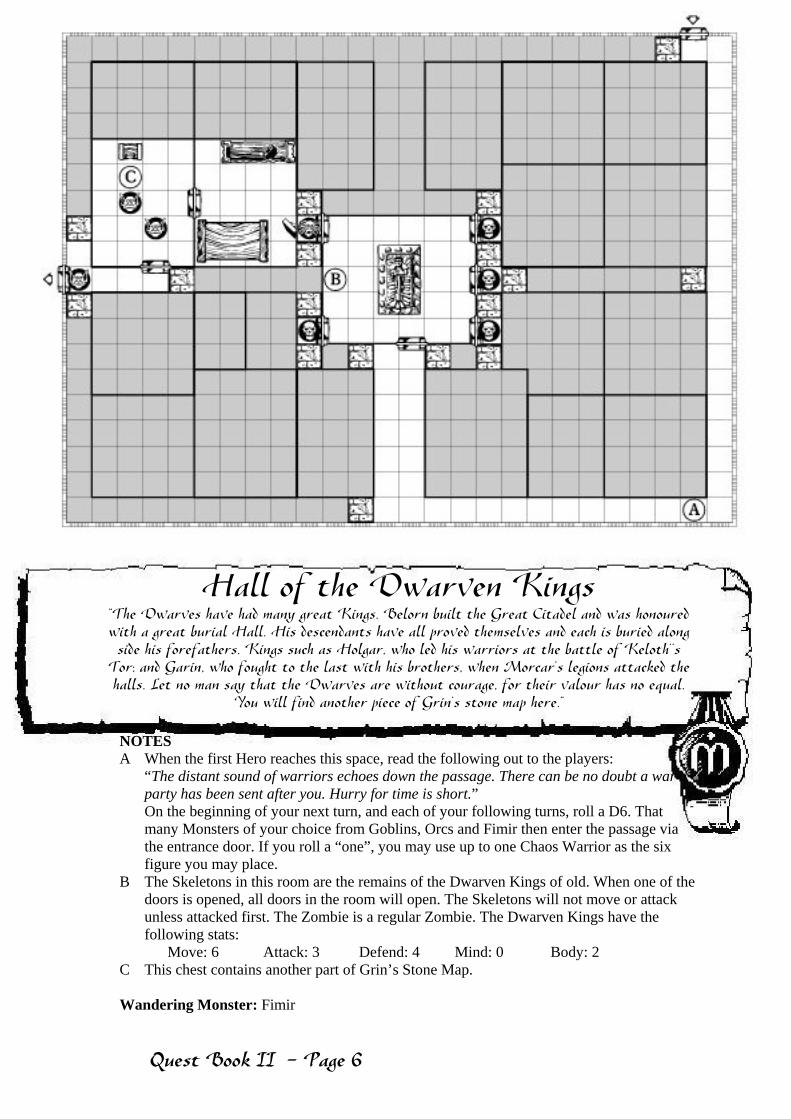
Hall of the Dwarven Kings “The Dwarves have had many great Kings. Belorn built the Great Citadel and was honoured with a great burial Hall. His descendants have all proved themselves and each is buried along side his forefathers. Kings such as Holgar, who led his warriors at the battle of Keloth’’s
Tor; and Garin, who fought to the last with his brothers, when Morcar’s legions attacked the halls. Let no man say that the Dwarves are without courage, for their valour has no equal.
You will find another piece of Grin’s stone map here.”
NOTES A When the first Hero reaches this space, read the following out to the players:
“The distant sound of warriors echoes down the passage. There can be no doubt a war party has been sent after you. Hurry for time is short.” On the beginning of your next turn, and each of your following turns, roll a D6. That many Monsters of your choice from Goblins, Orcs and Fimir then enter the passage via the entrance door. If you roll a “one”, you may use up to one Chaos Warrior as the six figure you may place.
B The Skeletons in this room are the remains of the Dwarven Kings of old. When one of the doors is opened, all doors in the room will open. The Skeletons will not move or attack unless attacked first. The Zombie is a regular Zombie. The Dwarven Kings have the following stats:
Move: 6 Attack: 3 Defend: 4 Mind: 0 Body: 2 C This chest contains another part of Grin’s Stone Map. Wandering Monster: Fimir
Quest Book II - Page 6
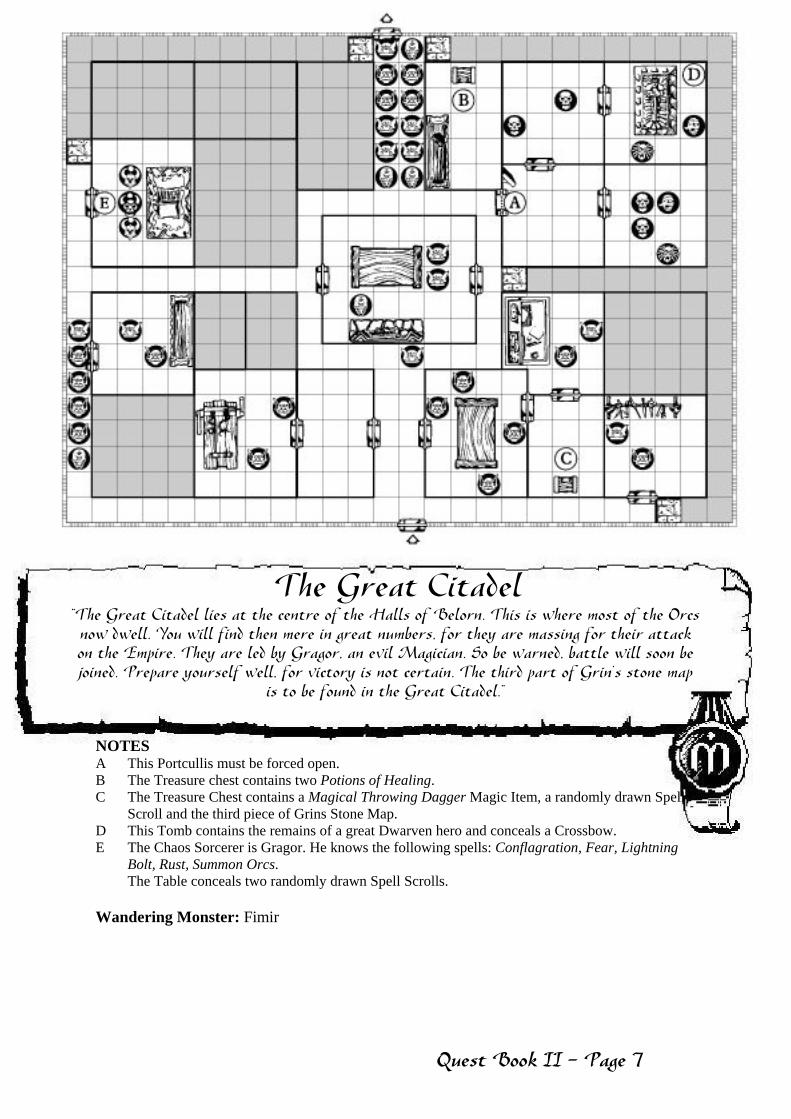
The Great Citadel “The Great Citadel lies at the centre of the Halls of Belorn. This is where most of the Orcs now dwell. You will find then mere in great numbers, for they are massing for their attack on the Empire. They are led by Gragor, an evil Magician. So be warned, battle will soon be joined. Prepare yourself well, for victory is not certain. The third part of Grin’s stone map
is to be found in the Great Citadel.”
NOTES A This Portcullis must be forced open. B The Treasure chest contains two Potions of Healing. C The Treasure Chest contains a Magical Throwing Dagger Magic Item, a randomly drawn Spell
Scroll and the third piece of Grins Stone Map. D This Tomb contains the remains of a great Dwarven hero and conceals a Crossbow. E The Chaos Sorcerer is Gragor. He knows the following spells: Conflagration, Fear, Lightning
Bolt, Rust, Summon Orcs. The Table conceals two randomly drawn Spell Scrolls. Wandering Monster: Fimir
Quest Book II - Page 7 .

The Eastern Passage “The East Gate marks the end of the Halls of Belorn. To reach it you must first navigate the eastern passage. The passage is guarded: take care. The foe will be many, so you must
fight your way through to the East Gate. The last part of Grin’s stone map is to be found here.”
NOTES A The leader of the Orcs is Ograk, an infamous Orc Captain who has, for many
years, led his evil marauders into the boarder provinces of the Empire. Use the Orc Champion figure to represent him on the space marked X. He has the same stats as a Chaos Warrior and has the Sentry ability. Ograk may reveal and move through the Secret Door in this room at any time.
B The Treasure Chest conceals the last part of Grin’s Stone Map. C The Table conceals an Elixir of Life Potion. D This Gargoyle is a statue, and cannot be harmed in any way. There are two ways for the Heroes to leave the board. If the go via door 1, they move on to The East Gate. If the go via door 2, they move on to Belorn’s Mine. Note that door number two is marked with Dwarven runes. If the Dwarf reads them, they will clearly tell that this way forward is very dangerous. Wandering Monster: Chaos Warrior
Quest Book II - Page 8

Belorn’s Mine “The Dwarves are expert miners, able to mine through even the toughest rock to reach the rich veins of gold and iron they seek. The Dwarven kingdoms of old where built upon these valuable metals. Within the Halls lies Belorn’s Mine, an ancient mine that was once the richest of all. Yet take care, for the mine has long sine been abandoned and the tunnels are likely to collapse. Orcs often search the mines, hoping to find the gold that legend tells was
hidden here in the last days before the Halls fell.”
NOTES A The Gargoyle in this room is alive and ready for combat. These chests each contain 200 Gold Crowns, but each is trapped with a poison gas
trap. Unless all three are separately disarmed Searching for Treasure will set off the remaining traps. Every figure in the room looses one Body Point to Poison Damage for each of the three traps which was not disarmed.
B An Orc looting party looking for the gold. C Both these Trapdoors are linked by a treacherous tunnel as described in the main
rules. D Dwarven symbols on this door indicate it leads to the East Gate! Wandering Monster: Gargoyle
Quest Book II - Page 9 .

The East Gate “You have journeyed far to reach this point. The East Gate must now be passed if you are to reach Grin’s Crag and rescue the Emperor. The East Gate will undoubtedly be guarded, for
you are now closer to the Dark Lands than you have ever been before.”
NOTES A This monster is a Shape-Shifter, which is currently in the form of a Fimir. When
its current form is killed, shuffle the Monster Cards together and draw one at random to determine its new form. Only if the new form matches the old will it be permanently destroyed.
B The Chaos Sorcerer is Petrokk. He may make an extra Cast Action in each of his turns. This Cast Action is a Ranged 2 attack causing Mind Damage, the target defends with Combat Dice equal to their current Mind Points.
C The Treasure Chest is empty. D The East Gate is locked by magical Dwarven runes. To unlock the door, a Hero
must roll under his current Mind Points on two D6 (one D6 for the Dwarf). If the Hero fails the roll, their turn ends.
Wandering Monster: Fimir
Quest Book II - Page 10

Grin’s Crag “Now you have Grin’s map you may find your way to Grin’s Crag. Remember your task. Do not stray from it, for the enemy are too numerous. The hour of victory is close at hand. Once
you have passed Grin’s Crag you will be able to lead the Emperor’s Army to safety. The crag is narrow. You must tread carefully or fall into the abyss.”
NOTES A This is the Cloud of Chaos, as described in the main rules. B The Treasure Chest contains 250 Gold Crowns but is trapped with an exploding
trap. If a player searches for treasure before this trap is disarmed, they will loose three Body Points.
C Once a player reaches this space, the Guardian of Grin’s Crag will become active. Place the Gargoyle at the far end of Grin’s Crag. This Gargoyle is immune to all Spells and has an extra Body Point.
This is the Cliff Corridor as described in the main rules. D The door is locked while the Gargoyle lives. Wandering Monster: Fimir
Quest Book II - Page 11 .

Epilogue The door opened into the darkness of Kellar’s keep. From above came
the thunder of battle. The forces of Morcar were making their final, remorseless, assault. This time there could be no holding them. The Emperor assembled his captains, determined to organise one last line of defence. Then came the news: a group of Champions had found a way through from the Halls of Belorn.
Without hesitation the Emperor ordered his captains to fall back towards Grin’s Crag. The Guardian Knights would take the rear and fight their way back to the passage, thus giving time for the rest of the army to carry the wounded to safety.
Morcar’s forces could not be permitted to follow. The Guardian Knights fought with such strength and courage that the Orcs and Goblins of Morcar’s army fell back, not daring to close with such a fearsome foe. Morcar looked to his left, then pointed menacingly towards the Empire’s line. The Doomguard stirred from their silence, and moved forward.
The Guardian Knights slowly fell back before them until the gate was reached. Then it fell to one man to hold the enemy while the passage behind him was destroyed so that none could pass. Kenaron, Captain of the Guardian Knights, stood in the gate. Time and again the heavily clad warriors of the Doomguard surged forward to be felled by Kenaron’s sword. Morcar watched for a while, and smiled wryly at Kenaron’s courage and skill-at-arms. A moment later his patience was spent. Kenaron fell before the storm of flame that burst against the gate. But it was too late. Morcar’s warriors howled in anger, for the passage was destroyed. The Emperor and the last of his army had escaped.
* * *
“You have done well. The Emperor has asked me to express his gratitude. Each of you will receive 500 Gold Crowns for your efforts. But do not let this victory deceive you. A dark cloud still hangs over the Empire. The army is in need of rest. Yet still the forces of Chaos advance from the East, nothing stands before them. We are in need of time. I shall look to how we might delay Morcar’s advance. Rest well my friends.
Once I have consulted Loretome I shall summon you.”
Quest Book II - Page 12

Quest Book III: Return of the Witch Lord
Chapter Three:
Return of the Witch-Lord
Mentor’s head hung low as he entered the room. There was a sadness in his voice when he spoke.
“Worthy companions, the Witch Lord is not dead. He had powers I had not foreseen and escaped death at the Spirit Blade’s edge though he has been severely weakened. . We must act quickly, for his power grows with each passing day. It will not be long until he has recovered from his defeat. Once his power has fully awoken he will raise again the legions of the dead. These warriors are a fearsome foe. Only men of great courage, or those with powerful magic, can stand against them. They know no fear and will fight relentlessly until destroyed.
“Loretome has shown me that the Witch lord has retreated from Barak Tor to the fallen city of Kalos. Long ago the city was destroyed by Morcar and given to the Witch Lord to rule. Beneath the ruins the Witch Lord built himself a great stronghold, for the light of day was too pure for him to endure. When he was defeated, the stronghold’s gates where shut and no one ventured in or out. Now he has returned.
“As he sits upon the High Throne of Kalos, the Witch Lord may look upon the Planes of Death around the city and see any who approach. None can escape his gaze. The High Throne is one of three thrones that wait for those who would rule over the Court of the Dead. If the Witch Lord is not stopped soon, the other thrones will be taken: one by Skulmar, the Captain of the Dead Host; the other by Kessandria the Witch Queen. When these two sit alongside the Witch Lord it is said that the bones of all fallen warriors will be summoned together under the Black Banner.”
* * *
“Many days of travel have brought you across the Planes of Death. This journey has been hard, for the land here is barren, scorched by the relentless sun. Throughout your journey you have felt an uneasy presence, Ever since you entered the Planes, the Witch Lord has watched your progress, awaiting your arrival. Finally, you have reached the great ruins. The skeletal remains of a once great city that rose from rich and fertile land now lies parched and dust-clogged.
Quest Book III - Page 1 .

The Gate of Doom The entrance to the stronghold is not hard to find, for no attempt has been made to disguise
it. The outer gate lies open and you see evidence that many creatures have passed this way in the last few days.
“You must work your way through the fearful tunnels to find the Gate of Doom: you destiny lies beyond. Tread carefully, my friends, for the enemy have had many days to prepare your
welcome.”
NOTES Until the end of the Court of the Witch Lord Quest, these quests are played as a series. A This door is false and cannot be opened. B The Treasure Chest contains 200 Gold Crowns. C These four rooms comprise an ambush. When the first door is opened, reveal all
four rooms, opening all the doors between them. D The Fireplace conceals two Dust of Disappearance Magic Items. Wandering Monster: Chaos Warrior
Quest Book III - Page 2

The Cold Halls “These icy passages are the resting place of the dread Spirit Riders who once lead the Witch
Lord’s Skeletal cavalry into battle. They now lie dreaming of past glories, waiting to be summoned to the Black Banner once more.”
NOTES A This is the Revolving Room, as described in the main rules, it uses the following
results 1-2: Door 1 3: Door 2 4-5: Door 3 6: Door 4 B The Cupboard conceals Holy Water Magic Item. C The Treasure Chest contains 300 Gold Crowns but is trapped with a poison needle
trap. If a player searches for treasure before this trap is disarmed, they will loose three Body Points to Poison Damage.
D This Tomb contains two Spell Scrolls drawn randomly from the Scroll Deck. However it is the resting place of Morghur, the Captain of the Spirit Riders. If the chamber is Searched for Treasure he will awaken here as if he where a Wandering Monster. He fights as a Spirit Rider but rolls an extra Combat Die in attack. Use the Chaos Sorcerer to represent him.
E The Skeletons in these rooms are Spirit Riders. They have the following stats: Move: 8 Attack: 4 Defend: 4 Mind: 3 Body: 3
Wandering Monster: Zombie
Quest Book III - Page 3 .

The Silent Passages “These passages have been silent for over a thousand years. The last voices that echoed these hallowed halls where those of King Agrain and his people as they rushed to defend the city against Morcar. It is said that an ancient and terrible magic is at work here. Tread warily
my friends.”
NOTES
A The shaded corridor is haunted by the Death Mist, as described in the main rules, except that it may not leave the shaded corridor.
B The Treasure Chest contains two Magical Throwing Dagger Magic Items but is trapped with a dart trap. If a player searches for treasure before this trap is disarmed, they will loose one Body Point.
C This Treasure Chest contains 100 Gold Crowns and a Potion of Healing. D If the Spirit Blade Artefact has been lost in a previous Quest, it will be found in this
tomb. If a Hero already carries the Spirit Blade, a Longsword will be found instead. Wandering Monster: Skeleton
Quest Book III - Page 4
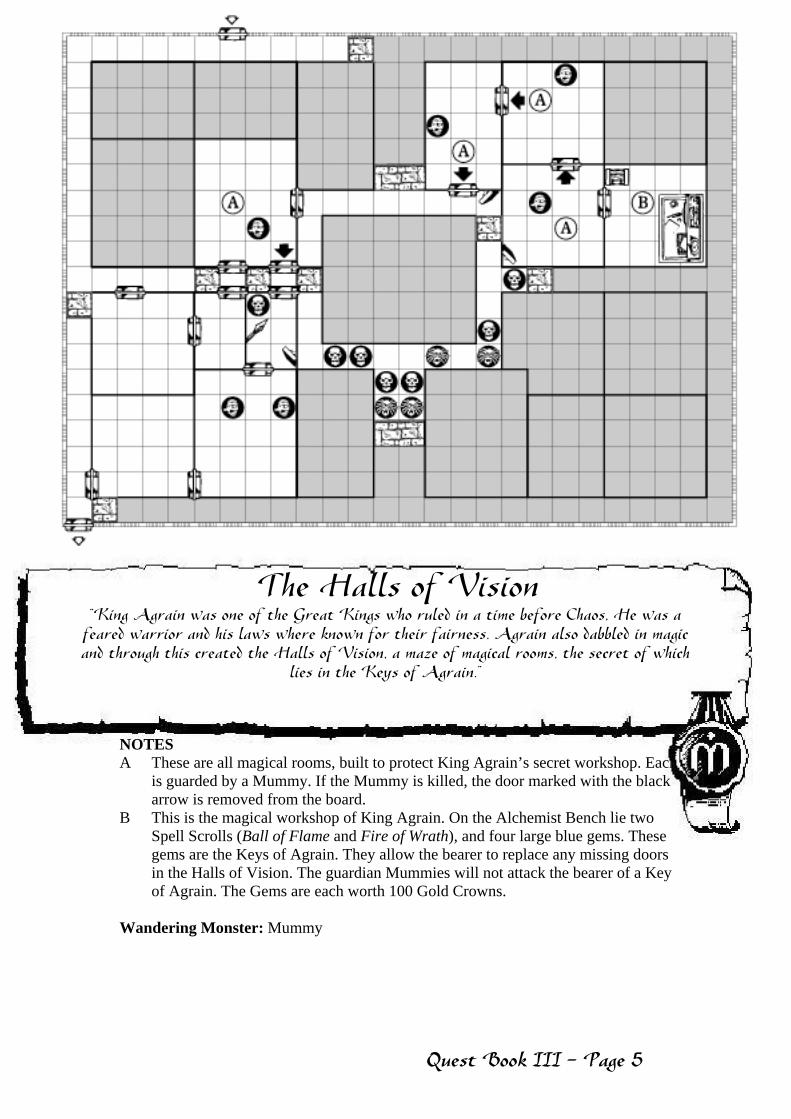
The Halls of Vision “King Agrain was one of the Great Kings who ruled in a time before Chaos, He was a
feared warrior and his laws where known for their fairness. Agrain also dabbled in magic and through this created the Halls of Vision, a maze of magical rooms, the secret of which
lies in the Keys of Agrain.”
NOTES A These are all magical rooms, built to protect King Agrain’s secret workshop. Each
is guarded by a Mummy. If the Mummy is killed, the door marked with the black arrow is removed from the board.
B This is the magical workshop of King Agrain. On the Alchemist Bench lie two Spell Scrolls (Ball of Flame and Fire of Wrath), and four large blue gems. These gems are the Keys of Agrain. They allow the bearer to replace any missing doors in the Halls of Vision. The guardian Mummies will not attack the bearer of a Key of Agrain. The Gems are each worth 100 Gold Crowns.
Wandering Monster: Mummy
Quest Book III - Page 5 .
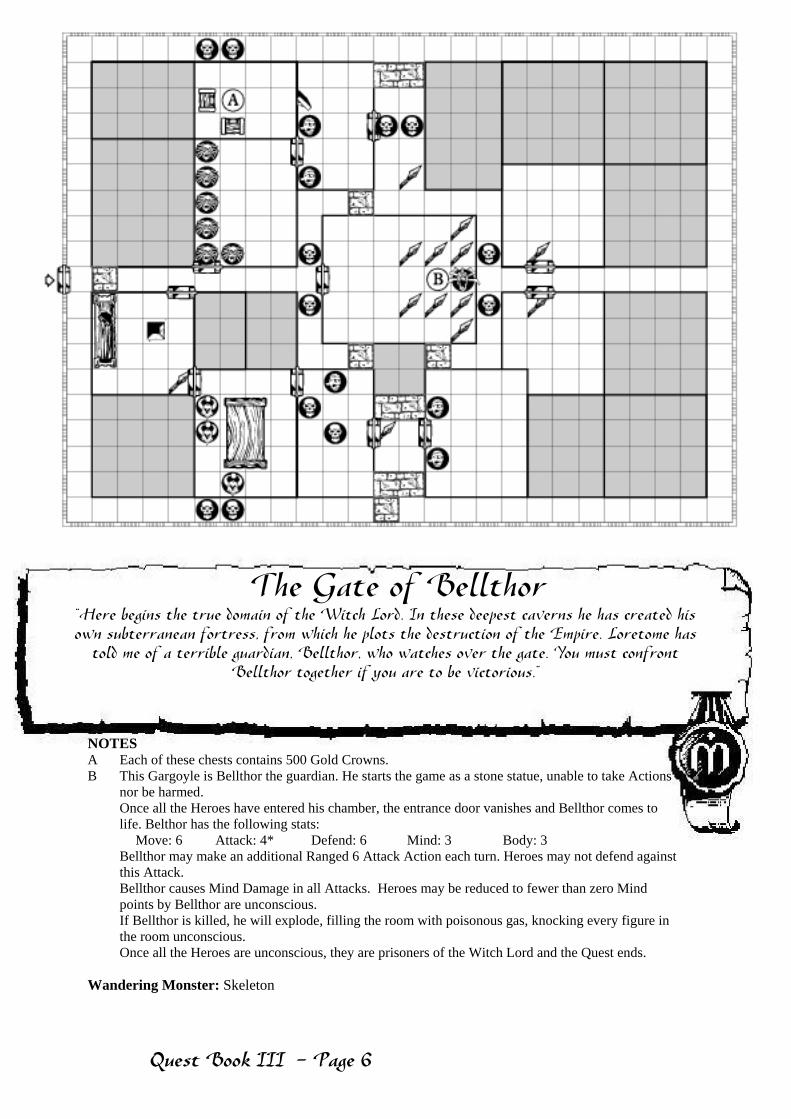
The Gate of Bellthor “Here begins the true domain of the Witch Lord. In these deepest caverns he has created his own subterranean fortress, from which he plots the destruction of the Empire. Loretome has
told me of a terrible guardian, Bellthor, who watches over the gate. You must confront Bellthor together if you are to be victorious.”
NOTES A Each of these chests contains 500 Gold Crowns. B This Gargoyle is Bellthor the guardian. He starts the game as a stone statue, unable to take Actions
nor be harmed. Once all the Heroes have entered his chamber, the entrance door vanishes and Bellthor comes to life. Belthor has the following stats:
Move: 6 Attack: 4* Defend: 6 Mind: 3 Body: 3 Bellthor may make an additional Ranged 6 Attack Action each turn. Heroes may not defend against this Attack. Bellthor causes Mind Damage in all Attacks. Heroes may be reduced to fewer than zero Mind points by Bellthor are unconscious. If Bellthor is killed, he will explode, filling the room with poisonous gas, knocking every figure in the room unconscious. Once all the Heroes are unconscious, they are prisoners of the Witch Lord and the Quest ends.
Wandering Monster: Skeleton
Quest Book III - Page 6

The Halls of the Dead “A terrible fate has befallen you, and you have become prisoners of the Witch Lord.
Already the Elf and Barbarian have been taken to the hall where he plans to feed them to his pets. I have worked a powerful spell to aid you, but now you must aid yourselves. Good
luck. You must free your friends and escape."
NOTES A The Dwarf and Wizard start here. Only they start the Quest on the board. The door to their
cell is open thanks to Mentor’s spell. Their do not have any equipment, Treasure, Spells, Artefacts, etc.
B This is the hall of the Witch Lord, use the Chaos Sorcerer to represent him as he stands in the space marked X. Do not lay this room out until the Dwarf or Wizard reveal it. The Elf and Barbarian then start here. They do not have any equipment, Treasure, Spells, Artefacts, etc. When the Dwarf or Wizard enter the Witch lord curses them and vanishes in a puff of smoke, they are then free to move normally.
C All the Elf and Barbarian’s belongings are in this Treasure Chest, save for all their Gold, Gems and other valuables.
D Do not place the Spiral Stairway on the board until the room is revealed. This is the way out. E All the Dwarf and Wizard’s belongings are in this Treasure Chest, save for all their Gold,
Gems and other valuables.
Wandering Monster: Skeleton
Quest Book III - Page 7 .

The Forgotten Legion “You have escaped the Witch Lord, but it will not be long before he follows you. The halls through which you now pass hold the Forgotten Legion, the elite of the Witch Lord’s army.
They are lead by Skulmar. In combat they are to be feared, for they bear the scars of a thousand battles, each one a victory for Chaos.”
NOTES A Here stand the Forgotten Legion, encased in magical ice which cannot be
destroyed by normal means. B When this door is opened, the magical ice will shatter and the Forgotten Legion
will be active. C Skulmar, Captain of the Dead Host, stands in the space marked X. He has the
following stats: Move: 8 Attack: 5 Defend: 6 Mind: 4 Body: 3 Skulmar will, if injured, attempt to flee top the Spiral Stairway. If he reaches the
Stairway, remove him from the board – he will return to plague the Heroes later. If Skulmar is killed, the Heroes will find on his body a Scroll of Pass Through
Rock and the Rabbit Boots Artefact. Wandering Monster: Chaos Warrior
Quest Book III - Page 8

The Forbidden City “No man has ever entered the Forbidden City before. Even Loretome can tell little of what
lies before you. It is said that the passages are filled with the walking dead, the mindless servants of Morcar who are doomed to walk the passages of the Forbidden City forever. You
must also be wary of the city itself for it is crumbling and ready to collapse at any time.”
NOTES At the beginning of each of your turns, you may take any one figure from the available Skeletons and Zombies and place them on any of the spaces marked with an X which have already been revealed by the Heroes. A The Treasure Chest contains 360 Gold Crowns and two Anti Poison Quill Magic
Items. B The Treasure Chest is empty. C The Sorcerer’s Table conceals a Scroll of Heal Body and a Scroll of Courage. D The Treasure Chest contains two Shortswords and two Longswords but is trapped
with a poison needle trap. If a player searches for treasure before this trap is disarmed, they will loose three Body Points to Poison Damage.
Wandering Monster: Chaos Warrior
Quest Book III - Page 9 .
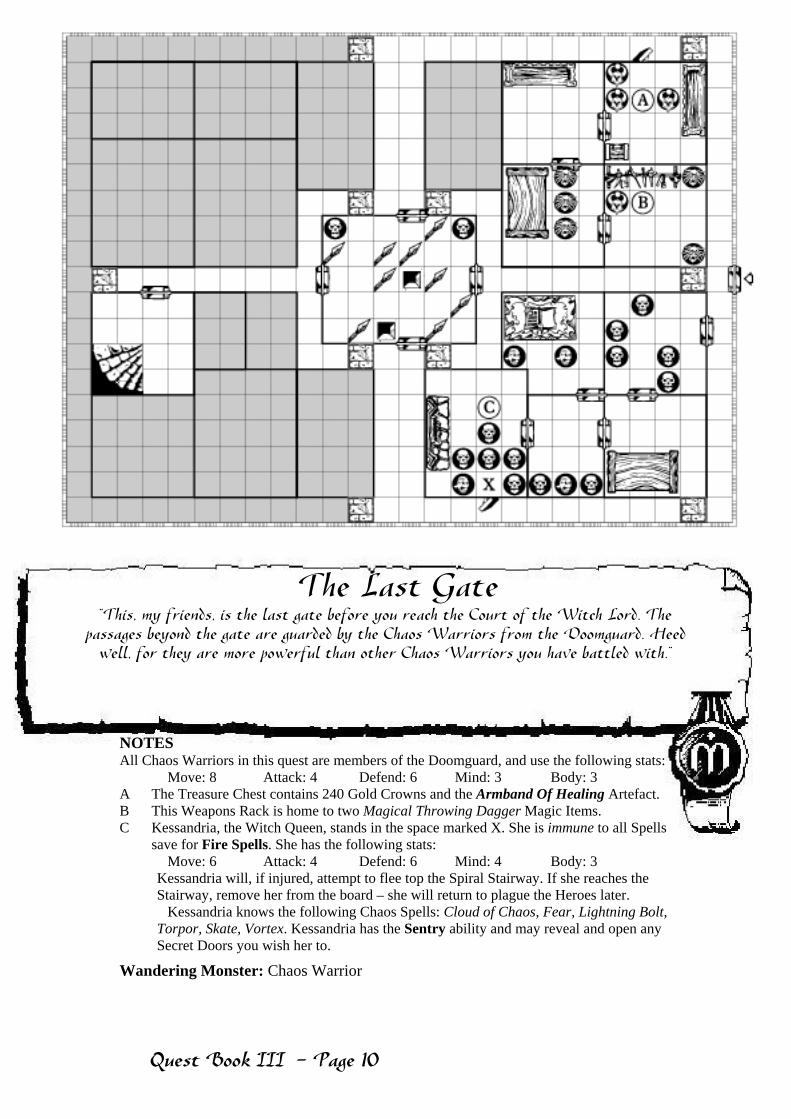
The Last Gate “This, my friends, is the last gate before you reach the Court of the Witch Lord. The
passages beyond the gate are guarded by the Chaos Warriors from the Doomguard. Heed well, for they are more powerful than other Chaos Warriors you have battled with.”
NOTES All Chaos Warriors in this quest are members of the Doomguard, and use the following stats: Move: 8 Attack: 4 Defend: 6 Mind: 3 Body: 3 A The Treasure Chest contains 240 Gold Crowns and the Armband Of Healing Artefact. B This Weapons Rack is home to two Magical Throwing Dagger Magic Items. C Kessandria, the Witch Queen, stands in the space marked X. She is immune to all Spells
save for Fire Spells. She has the following stats: Move: 6 Attack: 4 Defend: 6 Mind: 4 Body: 3 Kessandria will, if injured, attempt to flee top the Spiral Stairway. If she reaches the
Stairway, remove her from the board – she will return to plague the Heroes later. Kessandria knows the following Chaos Spells: Cloud of Chaos, Fear, Lightning Bolt, Torpor, Skate, Vortex. Kessandria has the Sentry ability and may reveal and open any Secret Doors you wish her to.
Wandering Monster: Chaos Warrior
Quest Book III - Page 10

The Court of the Witch Lord “The Witch Lord has watched your progress. He has tried to destroy you but you have
thwarted him every time. Now he has fled to the throne room, there you must do battle with him. This time there must be no escape for him.”
NOTES All Chaos Warriors in this quest are members of the Doomguard, and use the following stats: Move: 8 Attack: 4 Defend: 6 Mind: 3 Body: 3 A These Orcs are actually statues. They count as blocked squares save that they can be
destroyed. They have two Body points, roll five Combat Dice in Defence, and are immune to all Spells.
B This Treasure Chest contains two Potions of Healing. C Witch Lord stands in the space marked X. He has the following stats: Move: 10 Attack: 5 Defend: 6* Mind: 6 Body: 4* *The Witch Lord may only be harmed by the Spirit Blade. The Witch Lord knows the following Chaos Spells: Command, Fear, Firestorm,
Lightning Bolt, Summon Undead, Vortex. There is a cache of 500 Gold Crowns hidden under the Witch Lord’s Throne. D This stairway leads to the surface and freedom.
Wandering Monster: Mummy
Quest Book III - Page 11 .

Epilogue “The Witch Lord has been defeated and his army of the dead
remains asleep under the World. The magic that animated them has been weakened. Yet this victory could be our downfall if we relax our struggle.
“Now is the time for our efforts to be renewed. Now that the foe is weaker, our blow must be all the stronger. The minions of the Witch Lord who escaped are still active and will surely strive to have their revenge on those who defeated their master.
“Indeed, Loretome has shown me that Skulmar, who we believed to be slain, has escaped the ruins of Kalos with many of the Witch Lord’s most powerful spell books.
“Kessandria the Witch Queen is similarly at large, Her powers approach those of the Witch Lord himself, and she could prove a most dangerous opponent.
“I fear it will not be long before you will have to confront Skulmar and Kessandria and attempt to end their twin threats forever.
“But for the present you have earned yourselves a rest. So come, my friends, the Emperor awaits you in the Grand Palace. Tonight you are to be honoured for your incredible feats of heroism, in the presence of the nobility of the whole Empire.”
Quest Book III - Page 12

Quest Book IV: Against The Ogre Horde
Chapter Four
Against the Ogre Horde
Mentor enters his study, a grave look on his ancient face.. “My friends, you have no doubt heard of Ogres. They see the
world as one long series of meals. Enemies mean lunch or breakfast, depending on the time of day. More often than not, Ogre dues are vast eating competitions – although violent brawls make a good substitute.
“As enemies, Ogres are ruthless foes who show no ,mercy once their appetite has been whetted. Anyone brave enough to do battle with an Ogre must be sure of their own fighting prowess. Otherwise they might not just end up dead… they’ll end up as someone’s dinner!
“Ogres are not evil as such. Just permanently hungry and frighteningly violent. Often they just wander about alone. At other times, they group together into clans lead by an Ogre Lord – whoever is the meanest, nastiest, and hungriest at that particular time.
“It is possible for both the Empire and the Forces of Chaos to hire Ogres as mercenaries, so long as they are guaranteed a good time – a brawl and plenty to eat (usually as a result of the fighting), But their habits make them unpredictable and dangerous.
“Morcar has dispatched his sorcerer servant, Festrel, to corrupt the Dirgrusht Ogre Clan. They now raid the Empires farms at the behest of their master, fuelled with the corrupting power of Chaos, and their success draws ever more Ogres to them. Soon they will be an unstoppable horde.
“You must journey south the hold of the Dirgruhst and fight your way through their lair. You must destroy Festrel, and the source of his Chaos Magic, before the Ogres form an unstoppable horde.”
Quest Book IV - Page 1 .

Search for the Ogre Fortress “You, my friends, must find your way to the Ogre Fortress which is hidden deep within the coils of a vast cavern complex. But tread warily for the denizens of that Fortress will
surely have placed guardians and traps to protect their domain.”
NOTES Until the end of the Flight to the Surface Quest, these quests are played as a series. At the start of the quest, Mentor gifts each Hero with five Potions of Healing. The Heroes start on the ‘Surface’ tile. A The Weapons Rack contains a Longsword. B This swinging Blade trap is only triggered if the chest is opened without it first
being disarmed. The chest contains 60 Gold Crowns. C All the Orcs in this room are armed with crude javelins and may attack diagonally
if they wish. These weapons are so poor that the Heroes cannot make any use of them.
D This Orc is actually a magical statue. It cannot make Movement or Attack Actions. It has two Body points and rolls five Combat Dice in Defence, and is immune to all Spells. It may cast the Chaos Spell Conflagration every turn until destroyed.
Wandering Monster: 4 Goblins
Quest Book IV - Page 2

The Outer Caves “You have found the entrance to the Ogre Fortress. You must now strike at their raiding
parties and destroy their subterranean headquarters from where they plan their raids with the ain of Chaos Warrior overseers.~
NOTES A The Treasure Chest contains emeralds worth 300 Gold Crowns. B These Orcs have Shortbows which they may use in stead of attacking normally. C A secret drawer in the Table hides 600 Gold Crowns, a Revitalisation Potion, and
two Spell Scrolls drawn at random from the Scroll Deck. D The secret door to this room cannot be found Searching. Once a Hero has passed
the space marked X, the Orcs may open the door on your turn and act as normal. Wandering Monster: 2 Chaos Warriors
Quest Book IV - Page 3 .
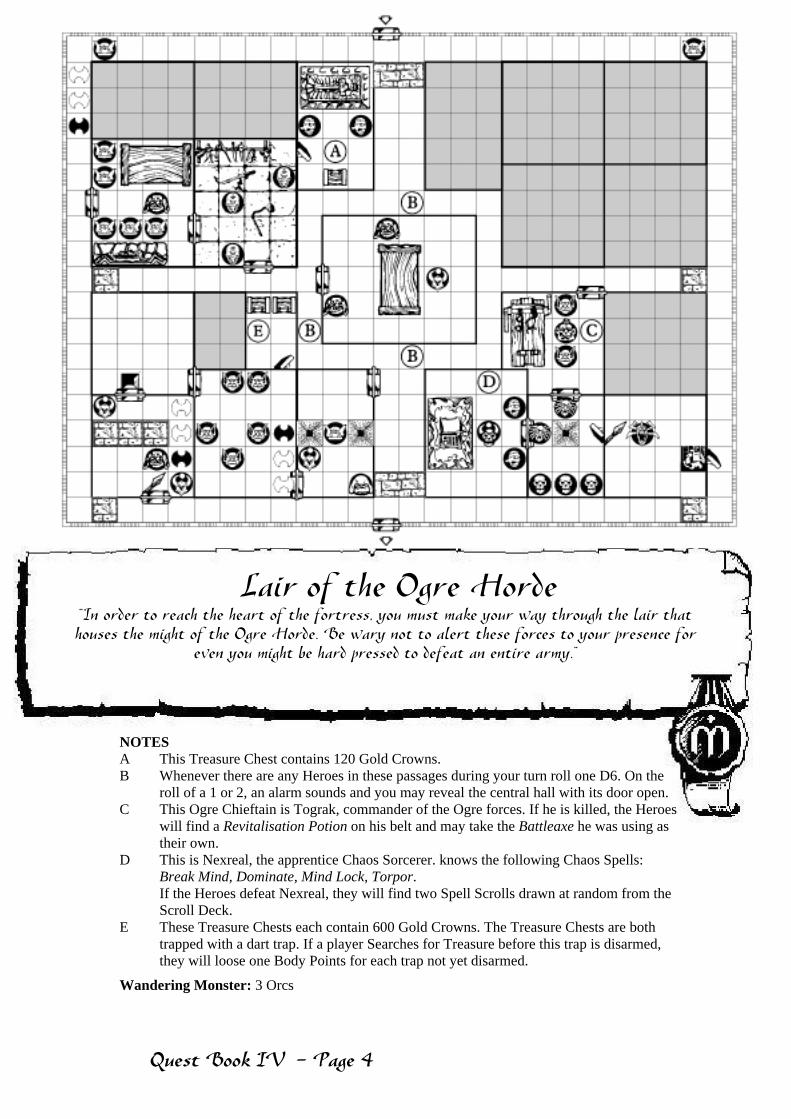
Lair of the Ogre Horde “In order to reach the heart of the fortress, you must make your way through the lair that houses the might of the Ogre Horde. Be wary not to alert these forces to your presence for
even you might be hard pressed to defeat an entire army.”
NOTES A This Treasure Chest contains 120 Gold Crowns. B Whenever there are any Heroes in these passages during your turn roll one D6. On the
roll of a 1 or 2, an alarm sounds and you may reveal the central hall with its door open. C This Ogre Chieftain is Tograk, commander of the Ogre forces. If he is killed, the Heroes
will find a Revitalisation Potion on his belt and may take the Battleaxe he was using as their own.
D This is Nexreal, the apprentice Chaos Sorcerer. knows the following Chaos Spells: Break Mind, Dominate, Mind Lock, Torpor.
If the Heroes defeat Nexreal, they will find two Spell Scrolls drawn at random from the Scroll Deck.
E These Treasure Chests each contain 600 Gold Crowns. The Treasure Chests are both trapped with a dart trap. If a player Searches for Treasure before this trap is disarmed, they will loose one Body Points for each trap not yet disarmed.
Wandering Monster: 3 Orcs
Quest Book IV - Page 4
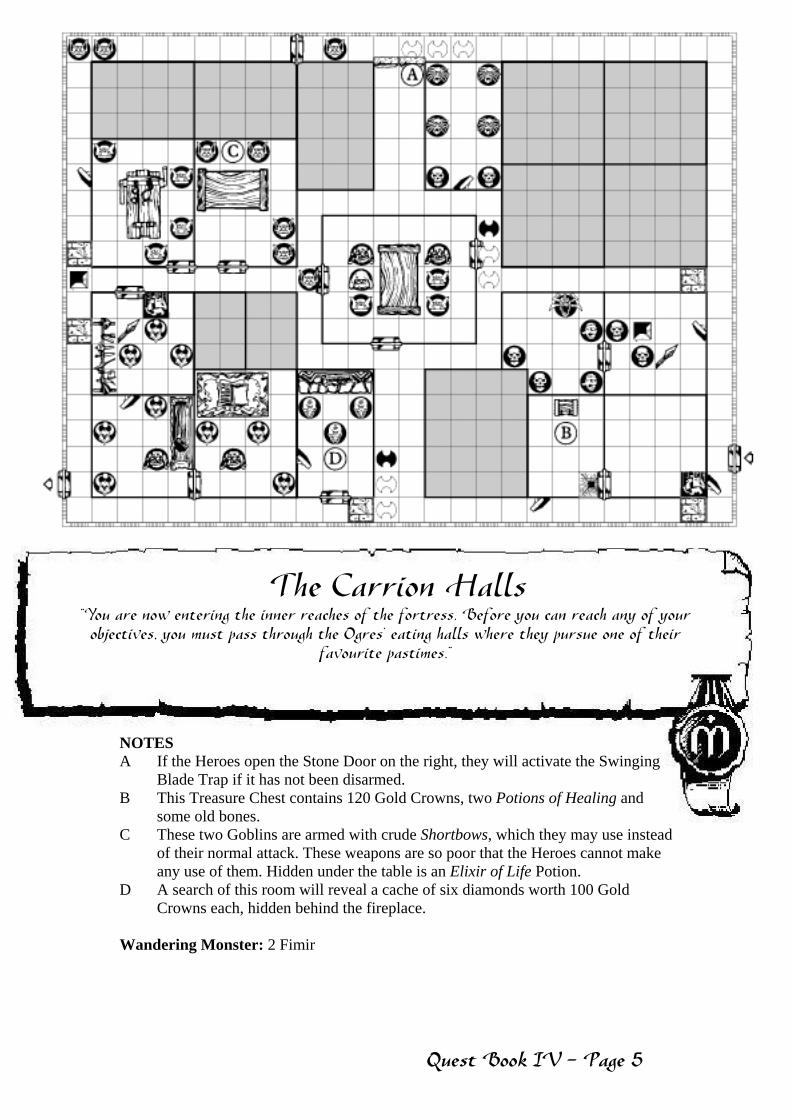
The Carrion Halls “You are now entering the inner reaches of the fortress. Before you can reach any of your objectives, you must pass through the Ogres’ eating halls where they pursue one of their
favourite pastimes.”
NOTES A If the Heroes open the Stone Door on the right, they will activate the Swinging
Blade Trap if it has not been disarmed. B This Treasure Chest contains 120 Gold Crowns, two Potions of Healing and
some old bones. C These two Goblins are armed with crude Shortbows, which they may use instead
of their normal attack. These weapons are so poor that the Heroes cannot make any use of them. Hidden under the table is an Elixir of Life Potion.
D A search of this room will reveal a cache of six diamonds worth 100 Gold Crowns each, hidden behind the fireplace.
Wandering Monster: 2 Fimir
Quest Book IV - Page 5 .
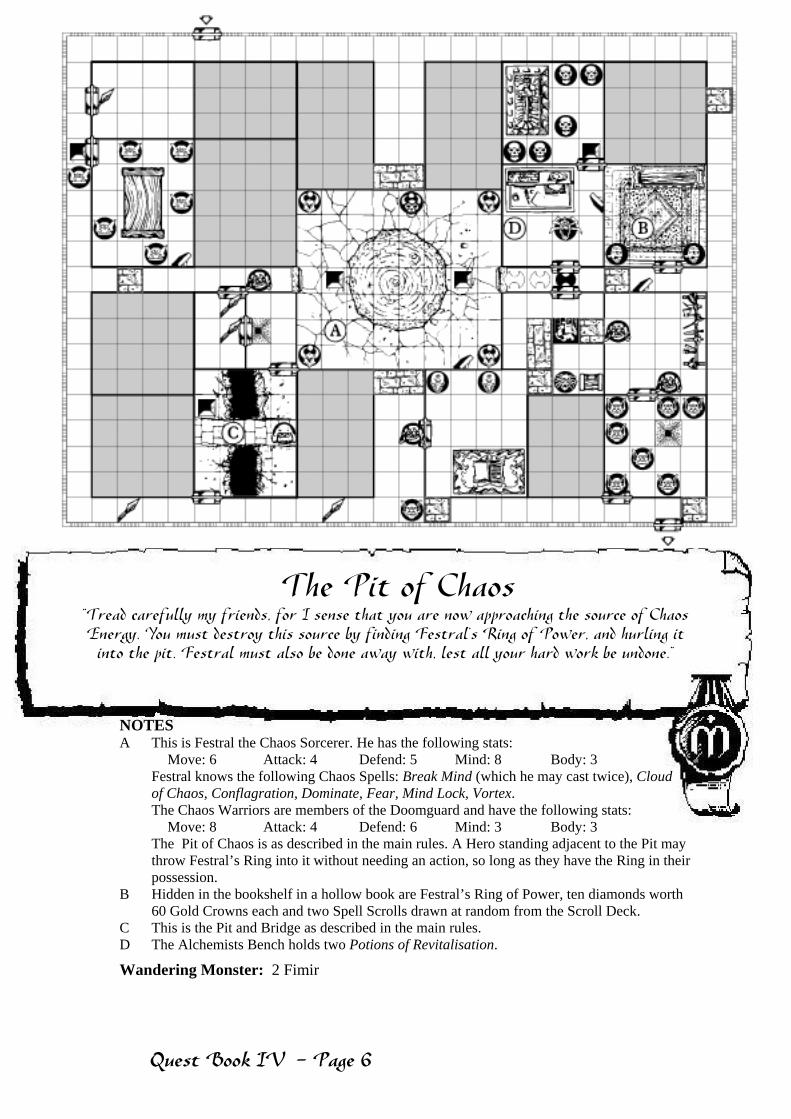
The Pit of Chaos “Tread carefully my friends, for I sense that you are now approaching the source of Chaos Energy. You must destroy this source by finding Festral’s Ring of Power, and hurling it
into the pit. Festral must also be done away with, lest all your hard work be undone.”
NOTES A This is Festral the Chaos Sorcerer. He has the following stats: Move: 6 Attack: 4 Defend: 5 Mind: 8 Body: 3
Festral knows the following Chaos Spells: Break Mind (which he may cast twice), Cloud of Chaos, Conflagration, Dominate, Fear, Mind Lock, Vortex.
The Chaos Warriors are members of the Doomguard and have the following stats: Move: 8 Attack: 4 Defend: 6 Mind: 3 Body: 3
The Pit of Chaos is as described in the main rules. A Hero standing adjacent to the Pit may throw Festral’s Ring into it without needing an action, so long as they have the Ring in their possession.
B Hidden in the bookshelf in a hollow book are Festral’s Ring of Power, ten diamonds worth 60 Gold Crowns each and two Spell Scrolls drawn at random from the Scroll Deck.
C This is the Pit and Bridge as described in the main rules. D The Alchemists Bench holds two Potions of Revitalisation.
Wandering Monster: 2 Fimir
Quest Book IV - Page 6

Fortress of the Ogre Lord “At last you have reached the heart of the Ogre fortress, where the Lord of the Ogres presides over his clan. If you can kill the Ogre Lord, the Clan will descend to infighting,
breaking its unity, and saving the Empire from destruction.”
NOTES A Both these Orcs are armed with Shortbows which they may use instead of their normal attack. B This is Xenloth, the Chaos Mage, Festrel’s assistant. Xenloth knows the following Chaos
Spells: Break Mind, Dominate, Mind Lock, Torpor. He may cast each of these spells twice. If Xenloth is defeated, the Heroes will find two random Spell Scrolls drawn from the Scroll
Deck. C These chests each contain 100 Gold Crowns and a Potion of Revitalisation. The chests are all
trapped with a dart trap. If a player Searches for Treasure before this trap is Disarmed, they will loose one Body Points for each trap not yet Disarmed.
D If the Ogre Lord is killed, the Heroes will find his jewel-encrusted crown, worth 300 Gold Crowns.
THE OGRE LORD Move: 4 Attack: 8 Defend: 6 Mind: 3 Body: 10 Special: Giant
Wandering Monster: Ogre Warrior
Quest Book IV - Page 7 .

Flight to the Surface “A thousand praises my friends! You have destroyed the might of the Ogre Horde. But
beware for we cannot rejoice yet! You are still deep within the Ogre fortress and the alarm has been raised. You must escape and if you can reach the surface you will be able to lead the
Emperor’s forces against the remnants of the Ogre Horde.”
NOTES On each of your turns you may open one or two closed doors that have not yet been revealed, revealing the contents of any room beyond. Roll one D6. On the roll of a 6, open two doors, otherwise, open one door. You may choose to reveal and open a Secret Door instead of opening two doors. A The Heroes begin the Quest on the Spiral Stairs.
On each of your turn you may place up to three Orcs or Goblins on the stair tile and them move them normally
B The first Hero to open this door will trigger a Falling Block Trap on the space marked X, unless it is first disarmed. The chest is empty.
C No monsters may enter the ‘Surface’ tile. Once a Hero reaches this tile they are safe.
Wandering Monster: You may open an additional door
Quest Book IV - Page 8
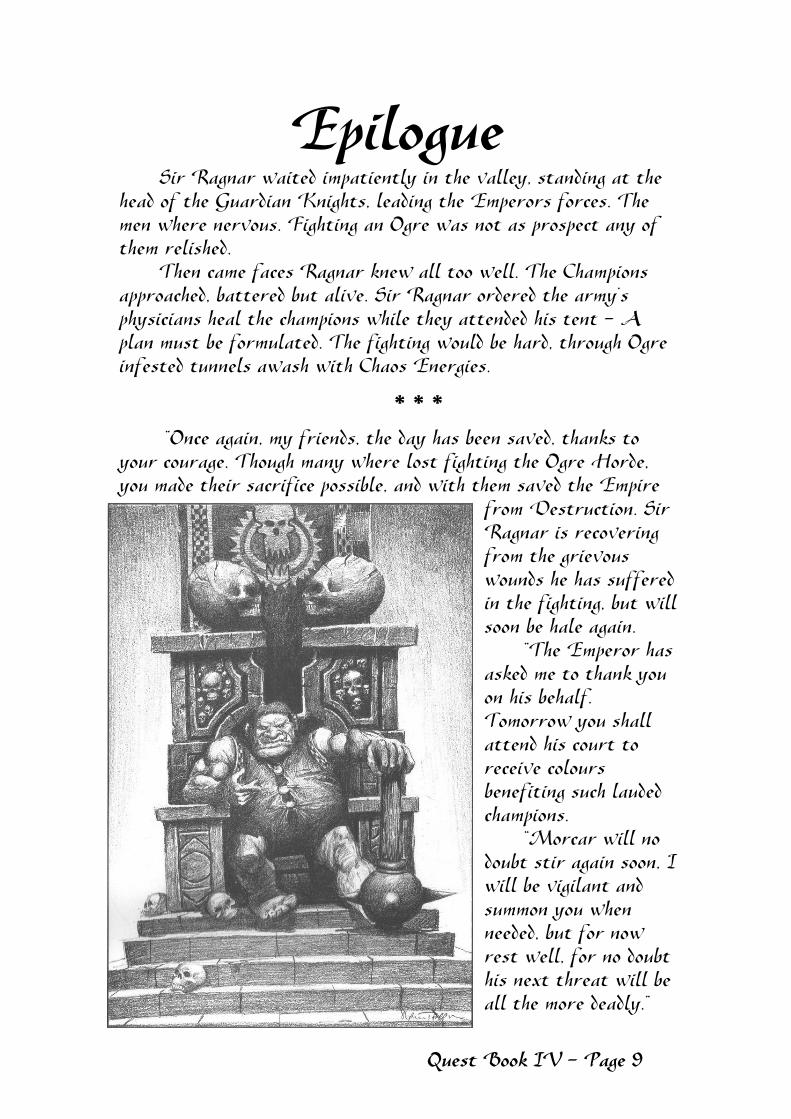
Epilogue Sir Ragnar waited impatiently in the valley, standing at the
head of the Guardian Knights, leading the Emperors forces. The men where nervous. Fighting an Ogre was not as prospect any of them relished.
Then came faces Ragnar knew all too well. The Champions approached, battered but alive. Sir Ragnar ordered the army’s physicians heal the champions while they attended his tent - A plan must be formulated. The fighting would be hard, through Ogre infested tunnels awash with Chaos Energies.
* * *
“Once again, my friends, the day has been saved, thanks to your courage. Though many where lost fighting the Ogre Horde, you made their sacrifice possible, and with them saved the Empire
from Destruction. Sir Ragnar is recovering from the grievous wounds he has suffered in the fighting, but wsoon be hale again.
ill
“The Emperor has asked me to thank you on his behalf. Tomorrow you shall attend his court to receive colours benefiting such lauded champions.
“Morcar will no doubt stir again soon, I will be vigilant and summon you when needed, but for now rest well, for no doubt his next threat will be all the more deadly.”
Quest Book IV - Page 9 .

Quest Book V: The Wizards of Morcar
Chapter Five
The Wizards of Morcar
“My Friends, Morcar has devised a most cunning plan to destroy the Empire. He has decided that to see everything we hold dear fall, he must complete one task alone: the death of the four of you.
“To this end, he has brought forth four lieutenants, sorcerers of great power, and given them the task of your demise. Even now they scry for your whereabouts. I am thankful that thus far, I have been able to hide you from them, but I cannot protect you from their gaze overlong.
“There is only one course of action we may take to save you. You must take the battle to your would-be assassins. You must journey far, to the terrifying strongholds of these servants of Chaos, and destroy them. Your very lives depend on it.”
Quest Book V - Page 1 .

Tower of the High Mage “The first of Morcar’s Scorcerous Lieutenants you must defeat is Zarnath, High Mage of Sarako. He lives in a magical tower high in the Tarak Mountains, where he is defended by
Morcar’s elite Doomguard Chaos Warriors. Prepare yourselves, my friends, for a fearsome battle against steel and magic.”
NOTES All Chaos Warriors in this quest are members of the Doomguard, and use the following stats: Move: 8 Attack: 4 Defend: 6 Mind: 3 Body: 3 A This Treasure Chest is empty B The left hand Treasure Chest contains 300 Gold Crowns and a Rejuvenation
Salve. The other Treasure Chest contains a Magical Throwing Dagger Magic Item.
C This is Zarnath, the High Mage, see PAGE 7 for his stats. Anyone searching for treasure here will find a secret drawer in the table. This contains 300 Gold Crowns and a Scroll drawn at random from the Scroll Deck.
Wandering Monster: 2 Chaos Warriors
Quest Book V - Page 2
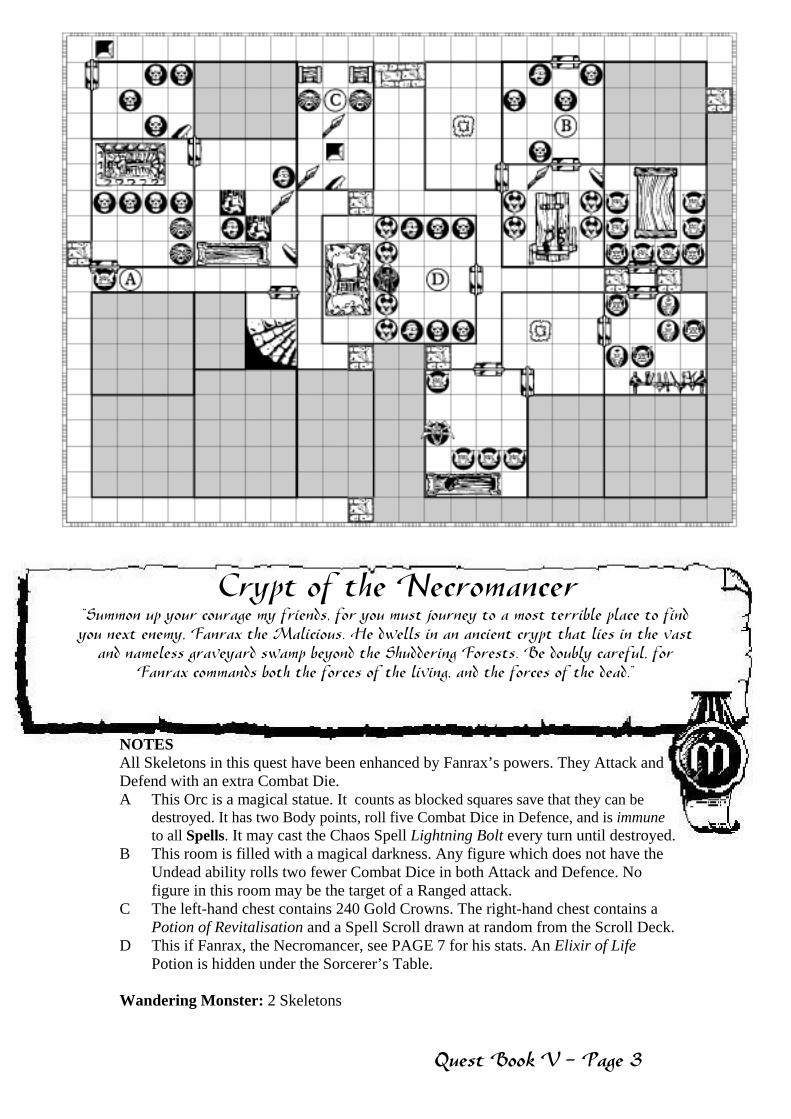
Crypt of the Necromancer “Summon up your courage my friends, for you must journey to a most terrible place to find you next enemy, Fanrax the Malicious. He dwells in an ancient crypt that lies in the vast
and nameless graveyard swamp beyond the Shuddering Forests. Be doubly careful, for Fanrax commands both the forces of the living, and the forces of the dead.”
NOTES All Skeletons in this quest have been enhanced by Fanrax’s powers. They Attack and Defend with an extra Combat Die. A This Orc is a magical statue. It counts as blocked squares save that they can be
destroyed. It has two Body points, roll five Combat Dice in Defence, and is immune to all Spells. It may cast the Chaos Spell Lightning Bolt every turn until destroyed.
B This room is filled with a magical darkness. Any figure which does not have the Undead ability rolls two fewer Combat Dice in both Attack and Defence. No figure in this room may be the target of a Ranged attack.
C The left-hand chest contains 240 Gold Crowns. The right-hand chest contains a Potion of Revitalisation and a Spell Scroll drawn at random from the Scroll Deck.
D This if Fanrax, the Necromancer, see PAGE 7 for his stats. An Elixir of Life Potion is hidden under the Sorcerer’s Table.
Wandering Monster: 2 Skeletons
Quest Book V - Page 3 .

Eyrie of the Storm Master “High atop the loftiest peak in the dark mountains lies the eyrie of Boroush, the Storm
Master. He is the next Lieutenant of Morcar you must defeat. You will have to scale the sheer heights of the mountains to reach the eyrie. Once there, you must move quickly, for Boroush commands great elemental forces with which he can easily overcome intruders.”
NOTES A This Treasure Chest contains 240 Gold Crowns. B This is Boroush, the Storm Master, see PAGE 59 for his stats. Heroes searching for treasure here will find 240 Gold Crowns, a Spell Scroll drawn at random from the Scroll Deck and three huge gems each worth 100 Gold Crowns. Wandering Monster: 2 Fimir
Quest Book V - Page 4
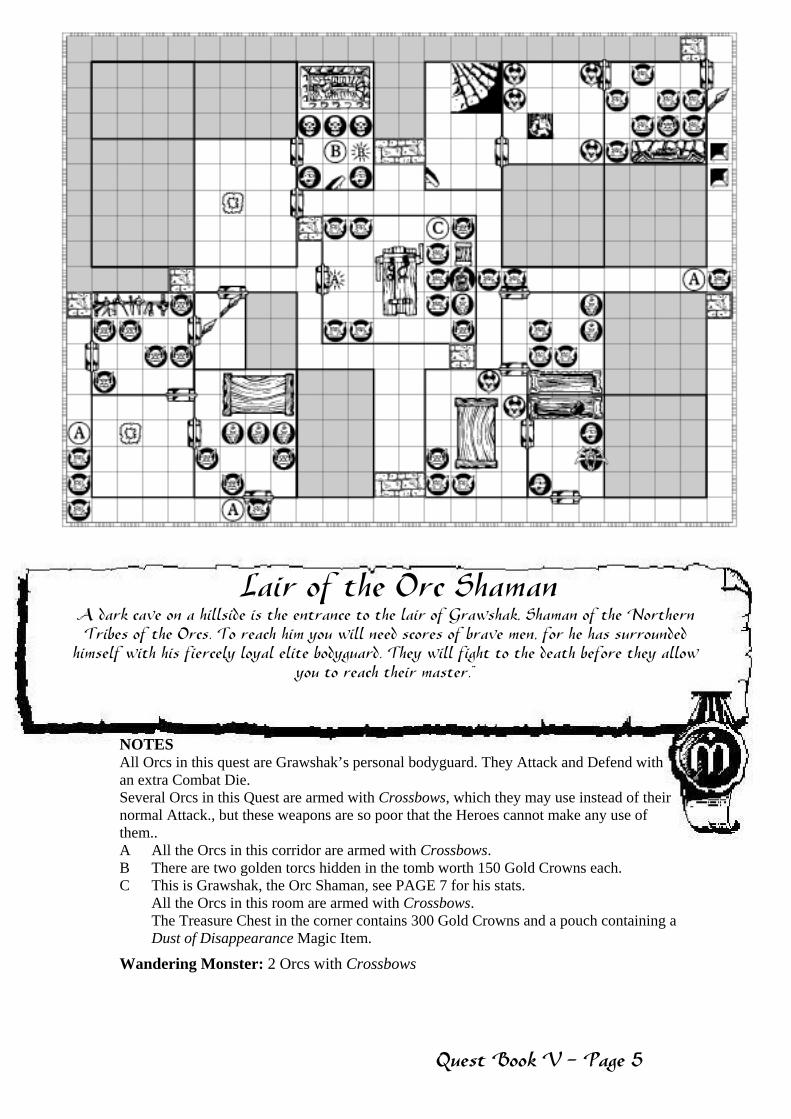
Lair of the Orc Shaman A dark cave on a hillside is the entrance to the lair of Grawshak, Shaman of the Northern Tribes of the Orcs. To reach him you will need scores of brave men, for he has surrounded
himself with his fiercely loyal elite bodyguard. They will fight to the death before they allow you to reach their master.”
NOTES All Orcs in this quest are Grawshak’s personal bodyguard. They Attack and Defend with an extra Combat Die. Several Orcs in this Quest are armed with Crossbows, which they may use instead of their normal Attack., but these weapons are so poor that the Heroes cannot make any use of them.. A All the Orcs in this corridor are armed with Crossbows. B There are two golden torcs hidden in the tomb worth 150 Gold Crowns each. C This is Grawshak, the Orc Shaman, see PAGE 7 for his stats. All the Orcs in this room are armed with Crossbows. The Treasure Chest in the corner contains 300 Gold Crowns and a pouch containing a
Dust of Disappearance Magic Item.
Wandering Monster: 2 Orcs with Crossbows
Quest Book V - Page 5 .

The Final Conflict “Alas! Morcar has deceived us and saved his four lieutenants from the jaws of death by foul sorceries. He has now brought them together in the Citadel of Twilight. However the effort
has cost him much. You must take advantage of this moment of weakness to assault his citadel and finally vanquish his evil lieutenants once and for all.”
NOTES On your first turn, reveal the contents of the central chamber. These four figures gain the Sentry ability for the duration of this Quest, and may reveal and open Secret Doors if you wish. The sorcerers’ stats are listed on PAGE 7. A The Treasure Chests each contain two Potions of Revitalisation. Wandering Monster: Choose one of the Sorcerers anywhere on the board. They may
immediately take a full turn as a bonus turn outside of the normal turn order. This does not affect their normal turns. If all the Sorcerers have been defeated, then the Hero sets-off a Fireburst Trap in the room they are standing in.
Quest Book V - Page 6

Zarnath
High Mage of Sarako
Move Attack Defend
5 5 5 Body Mind
5 8
Chaos Spells Drain Magic, Madness, Restore Chaos, Rust, Strands of Binding, Teleport, Wall of Flame
Boroush
The Storm Master
Move Attack Defend 7 6 5 Body Mind
5 6
Chaos Spells Blinding Sleet, Earthquake, Hurricane, Ice Storm, Lightning Bolt, Thieving Wind, Wall of Ice
Fanrax the Malicious
.
Move Attack Defend 6 4 6 Body Mind
5 7
Chaos Spells Call Skeleton, Deathbolt, Raise the Dead, Skulls of Doom, Summon Mummy, Summon Undead, Terror
Grawshak
Shaman of the Northern Tribes.
Move Attack Defend 7 5 5 Body Mind
5 7
Chaos Spells Orc Bezerker, Sharpen Blades, Shield of Protection, Spirit of Vengeance, Summon Goblins, Summon Orcs, Teleport Orcs
Quest Book V - Page 7 .
Epilogue “Once again, my friends, you have proven
yourselves worthy. Morcar’s plans to dispatch you are at an end. But now you must leave me a while, for the Empire’s allies are under threat. Should our comrades fail, there would be none to turn back the tide that threatens to sweep us all to sea. We must aid our friends in their time of need, or face destruction ourselves.
“Barbarian, the elders of your tribe have called for you, for an ancient and powerful evil awakens in your homeland.
“Elf, your people stand divided by treachery, and civil war is imminent if none can mend the wounds in your people.
“Dwarf, your people stand at war in their very homes, invaded from below by some vile corruption which must be cut out of the world.
“Wizard, your teachers of old require your assistance, as an evil from before the dawn of creation stirs in your old place of learning. It must be stopped or the world itself will be re-shaped by Chaos.
“Morcar has been busy, and so must you be. Go forth and put right Morcar’s evil. Then, return, that we might turn from matters without and look to the protection of the Empire.”
Page 8 - Quest Book V

Quest Book VI - Page 1 .
Quest Book VI: The Frozen Horror
Chapter Six
The Frozen Horror
“Welcome, Barbarian, to the land of your youth! It must seem like only yesterday that your tribal elders gave you leave to explore the warm and exotic lands of the south. You return now as a renowned warrior: a Champion of the Empire.
“Glad though your homecoming is, bitter tidings greet you as the tribal elders tell you why you have been summoned. Your people need aid in this, the time of their most dire need.
“The Legends tell that long ago, a creature known as the Frozen Horror came to Ice Mountain, the highest peak in the Xyberian Range. This fiend was a powerful ally of Morcar, and set about remaking the world into one of perpetual, frozen winter.
“It was by the actions of Kelvinos, a mighty Champion, that the Horror was slain. Some say that Kelvinos carried the Amulet of the North, an artefact of tremendous power, and that it was lost in the depths of Ice Mountain. None can say for sure, for Kelvinos never returned from Ice Mountain.
Now though, the Frozen Horror has returned, arisen from it’s icy tomb where it has dwelt these last centuries. At Morcar’s call, it has returned to its seat of power high on Ice Mountain. It had regained the Sceptre of Glacial Majesty, a Chaos artefact of great power. As we speak, the Horror and it’s minions are planning to cover the Northlands and the Empire in a shroud of deadly ice.
“Your people once more need a Champion. Your friends and followers must be trained to survive the frozen north. While they do so, you have been set three perilous tasks to further our cause.
“Then, you will lead your companions to Ice Mountain. There you must locate and destroy the Sceptre of Glacial Majesty before its master can reawaken its full power. Then you must face the Frozen Horror and destroy it forever.
“You must call upon all your courage and skill. The greatest perils you have yet faced awaits within Ice Mountain. You must not waver nor fail: the lives of both the Barbarian Tribes and of the Empire, rest on your shoulders.”

Solo Quest I – Xanon Pass “Good fortune to you Barbarian, on this, the first of your three tasks. The
Servants of the Frozen Horror have overrun the fortress that guards the Xanon Pass, the only route through the Xyberian range, which you must cross to reach
Ice Mountain. You must clear the fortress of the Horror’s minions and find your way through to the pass itself.”
NOTES Until the end of “The Rescue”, these Quests are played as a series. In this series the Barbarian plays alone. Any hired Men-at-Arms do not require upkeep, but neither may they partake in the Quest. If playing with an experienced Barbarian, play these three Quests as one long Quest in which the Barbarian does not recover lost Mind Points, Body Points or Spells between Quests. A The Treasure Chest contains 75 Gold Crowns B This evil Crossbowman will not move, but will shoot at the Barbarian. If the
Barbarian moves adjacent to the Crossbowman, he surrenders, giving the Barbarian the Crossbow in exchange for his life.
C A Shield is hidden in the Tomb. D The Equipment Rack contains a Longsword. Wandering Monster: 2 Skeletons
Quest Book VI - Page 2

Solo Quest II – Trial by Ice “At the head of the Xanon Pass lies an underground outpost on the slopes of the Xyberian Range. This outpost is a bass of operations for the minions of the Frozen Horror. Several
local villages are threatened by these fiends. You must enter the outpost and slay the Frozen Horror’s Lieutenant, the Chaos Warrior named Kraag.”
NOTES A This Chaos Warrior is Kraag, he has the following stats: Move: 7 Attack: 5 Defend: 5 Mind: 3 Body: 4 B The Treasure Chest is empty. C An Essence of Warmth is to be found on the Sorcerer’s Table. D The Treasure Chest contains 120 Gold Crowns. E These two Ice Tunnels are linked as per the main rules. Wandering Monster: 2 Goblins
Quest Book VI - Page 3 .

Solo Quest III – The Rescue The minions of the Frozen Horror have captured Gothar, your tribe’s Great
Elder. He has been taken to a Chaos Stronghold close to Ice Mountain. Gothar has great wisdom, but he is old and frail. He cannot long survive the cruel hands of
the creatures of Chaos. Your final task is to enter the stronghold and repair Gothar safely to the tribe.”
NOTES A The Equipment Rack holds a Battleaxe. B The Treasure Chest contains 70 Gold Crowns and a Dagger. C The Treasure Chest contains a Helmet. D The Treasure Chest contains 120 Gold Crowns but is trapped with a dart trap. If a
player Searches for Treasure before this trap is Disarmed, they will loose one Body Point.
E These two Chaos Warriors have Gothar tied to the rack. If the Chaos Warriors are defeated, Gothar is freed, use any spare Hero model to represent him. The Barbarian may move him as if he where a Man-at-Arms. If the Barbarian is killed, Gothar is automatically captured. Monsters will not attack Gothar. Gothar has the following stats:
Move: 6 Attack: 1 Defend: 2 Mind: 4 Body: 2
Wandering Monster: 2 Orcs
Quest Book VI - Page 4

The Glacial Gate “You have done well, Barbarian! The Tribal elders have appointed you their champion to oppose the Frozen Horror and its minions. Now you and your
companions are ready to assault Ice Mountain. First you must pass through the outer bastion known as the Glacial Gate, which guards the deeper reaches of the
mountain’s fastness.”
NOTES Until the end of the Heart of Ice Quest, these quests are played as a series. Before this
Quest begins, Mentor gifts each Hero with a Revitalisation Potion. A The Tomb conceals the Snowshoes of Speed Artefact. B The cage in the centre of the room is locked, and the bars block any attack made
through them. The Ice Gremlin claims to be a prisoner of the Frozen Horror left to die and begs the Heroes for clemency. A Hero may open the cage while in the room. If they do so, the Ice Gremlin will steal one piece of equipment from that Hero (Not any armour or weapon in use though), then disappear down a hole in the floor.
C A random Spell Scroll is hidden in the Bookcase D The Treasure Chest contains 600 Gold Crowns and a Revitalisation Potion, but is
trapped an explosive device. If a player Searches for Treasure before this trap is Disarmed, all figures in the room will loose two Body Points. This damage counts as a Fire Spell.
Wandering Monster: 2 Fimir
Quest Book VI - Page 5 .

The Deadly Depths “Throughout Ice Mountain, your presence causes alarms to be sounded, awakening the servants of the Frozen Horror from their icy slumber. Your journey through the stronghold will become harder after this. This region of the fortress is guarded
by Vilor, the Chaos Sorcerer, who has been ordered to halt your progress.” NOTES A This is Vilor, the Chaos Sorcerer. He knows the following Chaos Spells:
Chill, Ice Storm, Lightning Bolt, Soothe, Torpor, Vortex. B As soon as all the Heroes (and their Men-at-Arms, if any) have passed into or
through this room, the doors marked B will disappear, and are removed from the game-board.
C This door will not appear until the doors marked B have disappeared. The Monsters in the adjoining Frozen Crypt room are frozen in ice and are inactive until this door is opened, at which point the ice shatters and the Monsters move as normal.s
D The Treasure Chest contains 520 Gold Crowns and two Potions of Air Walk. E The Tomb conceals the Ring of Warmth Artefact. F The Treasure Chest contains Four Potions of Healing.
Wandering Monster: 2 Mummies
Quest Book VI - Page 6

The Frosted Path “These hallways have lain undisturbed for centuries. Now they are inhabited once again by the foul creatures of Chaos. The Frozen Horror’s minions are gathering to halt your progress. You must fight your way through towards the chambers of
the Frozen Horror.”
NOTES A This pile of debris conceals 120 Gold Crowns, a Longsword and a random Spell
Scroll. Also present are any items stolen by Ice Gremlins this Quest along with two Potions of Healing.
B The Equipment Rack holds a suit of Platemail. C This Treasure Chest contains 240 Gold Crowns and two Potions of Healing. D The Tomb conceals a Crossbow, a gem worth 120 Gold Crowns and a Potion of
Healing. E The Sorcerer’s Table conceals two random Spell Scrolls. F This room is an Ice Vault as per the main rules. The Treasure Chest contains a
Brew of Icy Might but is trapped with a poison gas trap. If a player Searches for Treasure before this trap is Disarmed, all figures in the room will loose two Body Points to Poison Damage.
Wandering Monster: Chaos Warrior
Quest Book VI - Page 7 .

The Halls of Kelvinos “Many centuries ago, Kelvinos was a famed and mighty Hero from the barbarian tribes. It was he that defeated the Frozen Horror and drove his minions from Ice
Mountain. Sadly, Kelvinos never returned from Ice Mountain. Some say he walks again, as an Undead pawn of the Chaos powers.”
NOTES A This room is an Ice Vault. The Treasure Chest contains three Potions of Warmth. B The Treasure Chest contains two Potions of Healing. C The Treasure Chest contains 480 Gold Crowns. D The ancient barbarian hero Kelvinos, now an undead slave to the Frozen Horror.
Use a spare character to represent him, he has the following stats: Move: 5 Attack: 4 Defend: 4 Mind: 0 Body: 4 Kelvinos has the Undead ability and is immune to Control Spells. If Kelvinos is defeated, the Heroes will find the Amulet of the North Artefact
around his neck. This is the Living Fog room, as per the main rules. Wandering Monster: Yeti
Quest Book VI - Page 8

Search for the Sceptre You have come far my friends, but there is still far to go. Within these chamber lies the Sceptre of Glacial Majesty, the source of the Frozen Horror’s power. You must find and destroy it. If the Sceptre should fall into the clutches of the
Horror once more, all would be lost. Be careful, for the chambers of the Frozen Horror lie close to here.”
NOTES A The Bookcase conceals an Elixir of Life Potion. B The Treasure Chest contains 180 Gold Crowns and two Potions of Healing
but is trapped with a poison needle trap. If a player Searches for Treasure before this trap is Disarmed, they will loose two Body Points to Poison Damage.
C The Sceptre is frozen into the wall and cannot be moved. It has one Body Point and rolls no Defence Dice. When destroyed, all figures in the room loose one Body Point in the ensuing explosion which counts as an Earth Spell.
D This pair of Ice Tunnels are linked as per the main rules. E This pair of Ice Tunnels are linked as per the main rules. F This pair of Ice Tunnels are linked as per the main rules. Wandering Monster: Ice Gremlin
Quest Book VI - Page 9 .

The Heart of Ice “Now that you have destroyed the Sceptre of Glacial Majesty, the Frozen
Horror awaits you. Beneath his chambers lies the Frozen Catacombs, wherein lies the means to break the protective wards that keep you from him, the Crystal Key. Once you have found this key, you may face the Horror in it’s very seat of
power. Take care, for the Horror is a most formidable foe.”
NOTES This is a double-sized quest, and the Heroes will move between the two maps as the quest continues. Mind and Body Points are not restored when moving between these quests. Once on Hero passes from one quest to another, they may take no more actions until the other Heroes join them. Monsters killed do not re-appear if a Quest is left and re-entered. If you have two game-boards, the Heroes may move freely between the quests. A This Spiral Stairway leads to room G on the other map. B This is an Ice Vault room as per the main rules. The Treasure Chest contains 240 Gold Crowns
and a Potion of Healing AND AN Ale of Frost Skin but is trapped with an exploding latch. If a player Searches for Treasure before this trap is Disarmed, they will loose one Body Point. This damage counts as a Fire Spell.
C The Alchemist Bench conceals a Potion of Healing, a Potion of Rage and a random Spell Scroll.
D This door is locked, and can only be opened by the Crystal Key. Until this door is unlocked, not effect will allow a Hero to walk through the walls of this room. The Frozen Horror’s stats are listed on the next page. The stairway through the Secret Door leads out to freedom.
Wandering Monster: Polar Warbear
Quest Book VI - Page 10

NOTES E This Treasure Chest contains two Potions of Healing. F This pair of Ice Tunnels are linked as per the main rules. G This Spiral Stairway leads to room A on the other map H The Treasure Chest contains the Crystal Key and two Potions of Healing but is
trapped with a poison needle trap. If a player Searches for Treasure before this trap is Disarmed, they will loose one Body Point to Poison Damage.
I The Detritus in this room conceals anything stolen by Ice Gremlins during this double quest plus a Potion of Air Walk.
J This pair of Ice Tunnels are linked as per the main rules. K This pair of Ice Tunnels are linked as per the main rules. L This pair of Ice Tunnels are linked as per the main rules. M The Bookcase conceals two Potions of Healing and a random Spell Scroll.
The Frozen Horror
Quest Book VI - Page 11 .
ce Move: 8 Attack: 5 Defend: 5 Mind: 4 Body: 10 The Frozen Horror knows the following Chaos Spells: Chill, Ice Storm, IWall, Mind Freeze, Skate, Soothe.
The Evil Wizard Player should also choose a further six Chaos Spells, from those available, for the Frozen Horror, other than Escape and/or Teleport. Wandering Monster: Polar Warbear

Epilogue “Congratulations! The Frozen Horror has been defeated.
The hordes of the Barbarian Tribes have been able to clear the lower passes of his remaining minions. Those few that remain are to be hunted down. Morcar’s conquest of the North have been quashed, and the Empire is safe from an ice-shrouded doom.
“The Frozen Horror returned from death once before. It is possible it may do so again. For now though the danger is passed. The barbarian Tribes may need to find new champions to defend them centuries from now. May they find champions as worthy as you.
“Tales are already being told in the barbarian camps of your cunning, bravery and skill. The tribes will sing your praises forever. In appreciation of your deeds, the Tribal Elders have granted each of you a purse of one thousand Gold Crowns. Morcar’s plans elsewhere continue unabated. We are sorely pressed on many fronts. Soon your valour will be needed again, in many dangerous tasks that yet await you.
But tonight you are to be honoured guests at a great feast. Tales of valour will be told amongst much rejoicing. Rest well this night my friends.”
Quest Book VI - Page 12

Quest Book VII - Page 1 .
Quest Book VII: The Mage of the Mirrors
Chapter Eight
The Mage of the Mirrors
“At last you have returned from the Nothlands. I bear ill tidings, Our time together must be brief for your skills are sorely needed.
“The Elven kingdom of Athelorn is in turmoil. Queen Terrellia’s young daughter, Millandriell, has been kidnapped. The Queen has in secret dispatched a courier to me. It seems the kidnapper is none other than her sister, the Archmage Sinestra.
“Sinestra has always been vain, paying more attention to her mirrors than to sage council of the wise. It would seem that this vanity has allowed her to become corrupted by Morcar and his allies. She now demands the Elven throne for herself, else the child’s life is forfeit.
“As you know, none other the Elves may freely enter the Elven kingdom. The Elf will be sent ahead to begin preparations for the assault on Sinestra’s Fortress. Meanwile, the rest of you will be lead by Elven guides through the kingdom blindfolded.
“You must rescue Millandriell, or else the Elven race will be doomed to conflict and civil war, or else become the pawns of Morcar. The turning of such a powerful force of good to the cause of Chaos would undoubtedly end our cause with alarming swiftness. You must not fail in this.”

Solo Quest I - The Avenger Returns “As your first task, Queen Terrellia needs you to recover a family heirloom
stolen by agents of Sinestra. A symbol of royal power, her possessing this item would be of detriment to our cause. No ordinary heirloom, this is the legendary sword of the royal house, known as the Avenger. The sword, for the time being, rests in a small fortress on the southern boarder of the Empire. You must secure
the sword and return it to Queen Terrellia.”
NOTES Until the end of the ‘Terrellia’s Maze’ Quest, these Quests are played as a series. In this series the Elf plays alone. Any hired Men-at-Arms do not require upkeep, but neither may they partake in the Quest. If playing with an experienced Elf, play these three Quests as one long Quest in which the Elf does not recover lost Mind Points, Body Points or Spells between Quests. A Both these Trapdoors are linked as per the main rules. B The Bookcase conceals a Potion of Healing. C The monsters here are statues. They count as blocked squares save that they can be destroyed. They
have two Body points, roll five Combat Dice in Defence, and are immune to all Spells. D The Treasure Chest contains a Shortbow but is trapped with a magical trap. If a player searches for
treasure before this trap is disarmed, the Monsters in room C will spring to life. The Tomb conceals the Avenger Sword, and the Elf may take the Avenger Sword tile. The Elf may use the Avenger until the end of the “Terrellia’s Maze Quest when it must be returned to the Queen. It counts as a Longsword, but allows you to re-roll one Combat Die when you make an attack Action with it.
Wandering Monster: Mummy
Quest Book VII - Page 2

Solo Quest II – On Sacred Ground “Two of Princess Millandriell’s handmaids survived the kidnapping, and are being
held prisoner in a remote shrine housed in a cavern to the south. They may also have valuable information on where Sinestra has absconded the princess
to. You must rescue the servants and return them to the Elven court,”
NOTES A The Chest contains 30 Gold Crowns along with several Elven dresses and some
(worthless) jewellery. B The fireplace conceals a Helmet C The Bookcase conceals a Potion of Healing. D The two attendants are to be found in this room, use two spare character figure to
represent them. They count as Men-at-Arms for the Elf and have the following stats:
Move: 2D6 Attack: 0 Defend: 1 Mind: 4 Body: 2 On returning the attendants, the Elf is rewarded with a bounty of 50 Gold Crowns for each surviving attendant. Wandering Monster: 2 Orcs
Quest Book VII - Page 3 .
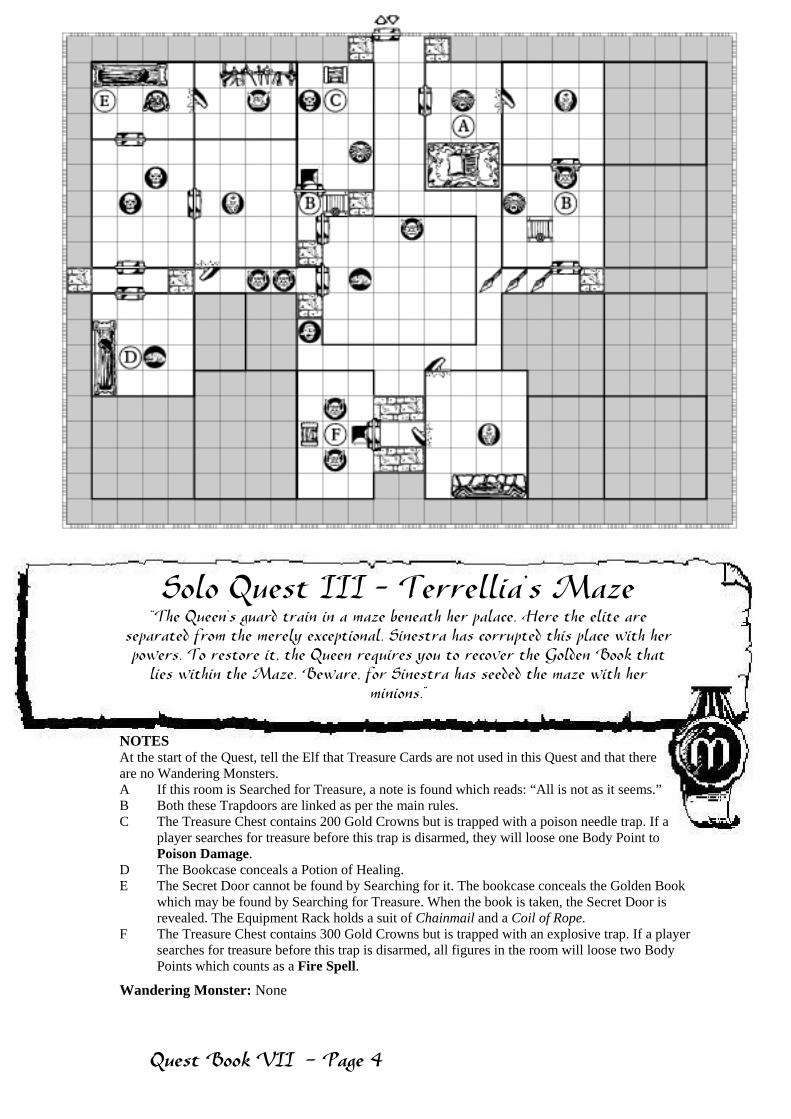
Solo Quest III – Terrellia’s Maze “The Queen’s guard train in a maze beneath her palace. Here the elite are
separated from the merely exceptional. Sinestra has corrupted this place with her powers. To restore it, the Queen requires you to recover the Golden Book that
lies within the Maze. Beware, for Sinestra has seeded the maze with her minions.”
NOTES At the start of the Quest, tell the Elf that Treasure Cards are not used in this Quest and that there are no Wandering Monsters. A If this room is Searched for Treasure, a note is found which reads: “All is not as it seems.” B Both these Trapdoors are linked as per the main rules. C The Treasure Chest contains 200 Gold Crowns but is trapped with a poison needle trap. If a
player searches for treasure before this trap is disarmed, they will loose one Body Point to Poison Damage.
D The Bookcase conceals a Potion of Healing. E The Secret Door cannot be found by Searching for it. The bookcase conceals the Golden Book
which may be found by Searching for Treasure. When the book is taken, the Secret Door is revealed. The Equipment Rack holds a suit of Chainmail and a Coil of Rope.
F The Treasure Chest contains 300 Gold Crowns but is trapped with an explosive trap. If a player searches for treasure before this trap is disarmed, all figures in the room will loose two Body Points which counts as a Fire Spell.
Wandering Monster: None
Quest Book VII - Page 4
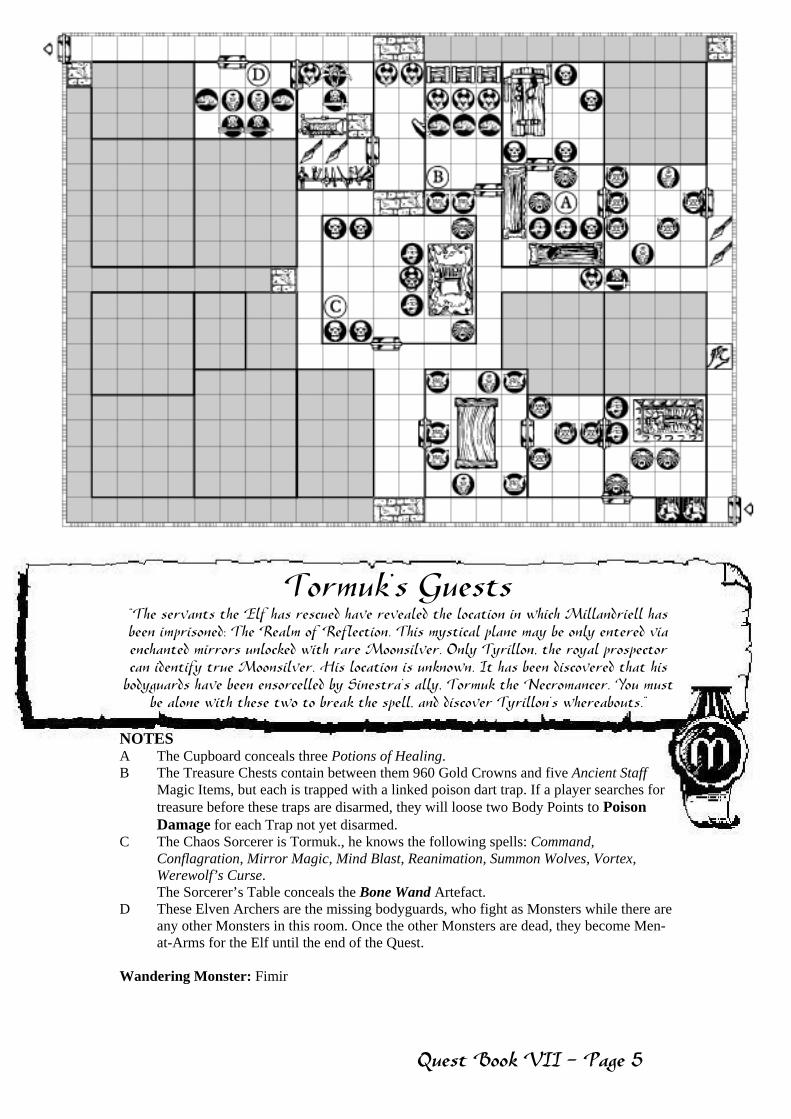
Tormuk’s Guests “The servants the Elf has rescued have revealed the location in which Millandriell has been imprisoned: The Realm of Reflection. This mystical plane may be only entered via enchanted mirrors unlocked with rare Moonsilver. Only Tyrillon, the royal prospector can identify true Moonsilver. His location is unknown. It has been discovered that his
bodyguards have been ensorcelled by Sinestra’s ally, Tormuk the Necromancer. You must be alone with these two to break the spell, and discover Tyrillon’s whereabouts.”
NOTES A The Cupboard conceals three Potions of Healing. B The Treasure Chests contain between them 960 Gold Crowns and five Ancient Staff
Magic Items, but each is trapped with a linked poison dart trap. If a player searches for treasure before these traps are disarmed, they will loose two Body Points to Poison Damage for each Trap not yet disarmed.
C The Chaos Sorcerer is Tormuk., he knows the following spells: Command, Conflagration, Mirror Magic, Mind Blast, Reanimation, Summon Wolves, Vortex, Werewolf’s Curse.
The Sorcerer’s Table conceals the Bone Wand Artefact. D These Elven Archers are the missing bodyguards, who fight as Monsters while there are
any other Monsters in this room. Once the other Monsters are dead, they become Men-at-Arms for the Elf until the end of the Quest.
Wandering Monster: Fimir
Quest Book VII - Page 5 .
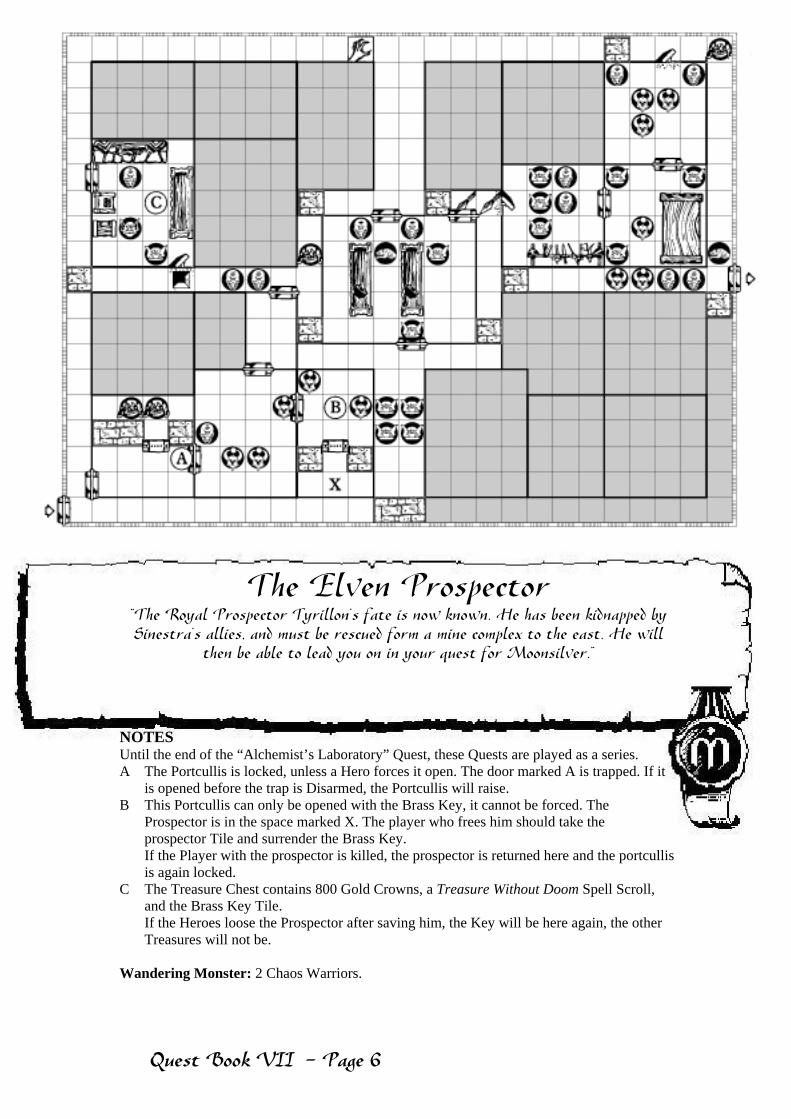
The Elven Prospector “The Royal Prospector Tyrillon’s fate is now known. He has been kidnapped by Sinestra’s allies, and must be rescued form a mine complex to the east. He will
then be able to lead you on in your quest for Moonsilver.”
NOTES Until the end of the “Alchemist’s Laboratory” Quest, these Quests are played as a series. A The Portcullis is locked, unless a Hero forces it open. The door marked A is trapped. If it
is opened before the trap is Disarmed, the Portcullis will raise. B This Portcullis can only be opened with the Brass Key, it cannot be forced. The
Prospector is in the space marked X. The player who frees him should take the prospector Tile and surrender the Brass Key.
If the Player with the prospector is killed, the prospector is returned here and the portcullis is again locked.
C The Treasure Chest contains 800 Gold Crowns, a Treasure Without Doom Spell Scroll, and the Brass Key Tile.
If the Heroes loose the Prospector after saving him, the Key will be here again, the other Treasures will not be.
Wandering Monster: 2 Chaos Warriors.
Quest Book VII - Page 6

The Alchemist’s Laboratory “The Chaos Sorcerer known as the High Alchemist controls the only known source of Moonsilver. He currently dwells in a stronghold which guards the passage to Sinestra’s lands. You must find vials of true Moonsilver, with
Tyrillon’s aid, and venture on towards Sinestra’s stronghold at Gilness Fen.”
NOTES If the Hero with the Prospector is killed, the prospector will be captured. See note D for details. A This is the laboratory of the Chaos Sorcerer known as the High Alchemist. The High
Alchemist knows the following Chaos Spells: Conflagration, Cloud of Chaos, Mind Blast, Restore Chaos, Summon Wolves, Werewolf’s Curse (which he may cast twice), and has an additional Body Point
The Laboratory contains thousands of silver bottles. If the Hero with the Prospector Searches for Treasure, they will be able to find twenty flasks of Moonsilver, and may take the corresponding Tiles. The first search, with or without the Prospector, will also find a Tonic of Renewal.
B The Treasure Chest contains a Brass Key and the Elven Boots Artefact but is trapped with a poison dart trap. If a player searches for treasure before this trap is disarmed, they will loose two Body Points to Poison Damage.
C The Treasure Chest contains a Potion of Healing, a Philtre of Recall and 720 Gold Crowns D If the Prospector is captured, he will appear hear. The Portcullis can only be opened with a
Brass Key. If the Prospector is lost again, there will be two new Chaos Warriors guarding him.
Wandering Monster: 3 Zombies
Quest Book VII - Page 7 .

Gliness Fen “The time has come to assault Sinestra’s stronghold deep beneath the marshes of Gilness Fen. The gateways to the Realm of Reflection are said to lie in the deepest catacombs
of the stronghold. You must fight your way down to these gateways to save Millandriell.”
NOTES Until the end of the “Hidden Realms” Quest, these quests are played as a series. A The Heroes begin on this stairway. B The Treasure Chest contains 120 Gold Crowns and an Elixir of Life, but is trapped
with a poison gas trap. If a player searches for treasure before this trap is disarmed, every figure in the room will loose one Body Point to Poison Damage.
C The equipment Rack contains a Tool Kit and a Brass Key. D This Portcullis can only be opened with the Brass Key. The Treasure Chest contains a
Potion of Healing and a Tonic of Swiftness. E The Alchemist’s Bench conceals a Wolfsbane Extract and three Rejuvenation Salves. F Both these Trapdoors are linked as per the main rules. G The Sorcerer’s Table conceals four Sky Orb Magic Items. The Spiral Stairway winds
downwards, and allows the Heroes to leave the Quest. Wandering Monster: Giant Wolf
Quest Book VII - Page 8
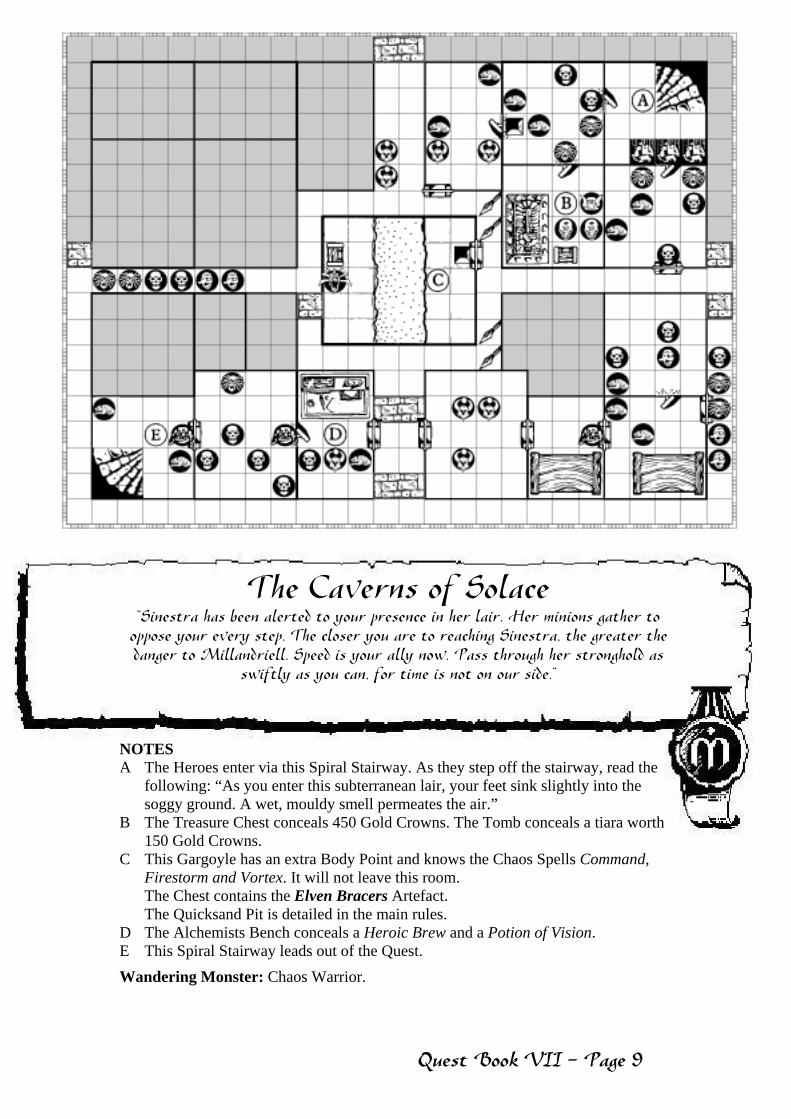
The Caverns of Solace “Sinestra has been alerted to your presence in her lair. Her minions gather to
oppose your every step. The closer you are to reaching Sinestra, the greater the danger to Millandriell. Speed is your ally now. Pass through her stronghold as
swiftly as you can, for time is not on our side.”
NOTES A The Heroes enter via this Spiral Stairway. As they step off the stairway, read the
following: “As you enter this subterranean lair, your feet sink slightly into the soggy ground. A wet, mouldy smell permeates the air.”
B The Treasure Chest conceals 450 Gold Crowns. The Tomb conceals a tiara worth 150 Gold Crowns.
C This Gargoyle has an extra Body Point and knows the Chaos Spells Command, Firestorm and Vortex. It will not leave this room. The Chest contains the Elven Bracers Artefact.
The Quicksand Pit is detailed in the main rules. D The Alchemists Bench conceals a Heroic Brew and a Potion of Vision. E This Spiral Stairway leads out of the Quest.
Wandering Monster: Chaos Warrior.
Quest Book VII - Page 9 .

Hidden Realms “You have reached the depths of Sinestra’s fortress. Here lies the mirror doorway
to the Realm of Reflection. You can use your supplies of Moonsilver to pass through the gates between realities.. Enter the Realm of reflection then, and find
Millandriell. It is believed that hidden here is the ancient Elven Bow of Vindication, an item as revered as the sword known as the Avenger. You must also return the bow, though it may help you in defeating Sinestra and her plans.”
NOTES This is a double-sized quest, and the Heroes will move between the two maps as the quest continues. Mind and Body Points are not restored when moving between these quests. A The Weapons Rack conceals a Brass Key. B Place the Mirror with the Picture of Millandriell’s picture in the space marked X, with her
picture facing the room. A Hero or Man-at-Arms may discard a flask of Moonsilver to move through the Mirror as if it where a one-way door to room G on the other map.
C The Alchemist Bench conceals two Potions of Healing. D The Bookcase conceals four Potions of Healing. E This Place an empty Mirror here. A Hero or Man-at-Arms may discard a flask of Moonsilver to
move through the Mirror as if it where a one-way door to room K on the other map. F The door to this room can only be opened by a Hero carrying the Princess. Until it is opened,
no effect will allow any figure to cross the walls of this room. The Elven Mage Sinestra stands on the space marked X, see the opposite page for her stats. The wall behind Sinestra holds a Mirror. A Hero or Man-at-Arms may discard a flask of Moonsilver to move through the Mirror as if it where a one-way door to safety.
Wandering Monster: Elven Warrior OR Elven Archer
Quest Book VII - Page 10

NOTES G Princess Millandriell is in this cell. Give her tile to the first Hero to enter the cell. The Brass
Key will open the Portcullis which may also be forced. H The heart of the Gargoyle is a giant ruby worth 500 Gold Crowns, which may be claimed by
the Hero who kills it. The Treasure Chest contains three Potions of Healing but is trapped with a poison needle trap. If a player searches for treasure before this trap is disarmed, they will loose three Body Points to Poison Damage.
I The chest contains four Revitalisation Potions. J Place the Mirror with the picture of a bow in the space marked X. A Hero who stands adjacent
to the mirror may, as an action, discard a flask of Moonsilver to take the Elven Bow of Vindication Artefact and four Arrow of Vindication Magic Items. The Heroes will have to hand over the bow to the Queen at the end of the Quest as it is a treasure of the Elven Kingdom.
K This Place an empty Mirror here. A Hero or Man-at-Arms may discard a flask of Moonsilver to move through the Mirror as if it where a one-way door to room E on the other map.
Sinestra Move: 10 Attack: 4 Defend: 3 Mind: 4 Body: 5 Sinestra knows the following Chaos Spells: Firestorm, Mind Blast, Lightning Bolt, Mirror
Magic, Nullify, Restore Chaos, Summon Wolves, Werewolf’s Curse.
Sinestra does not have to discard Spell Cards when casting any of these nine Spells. Effects that cause these Spells to be discarded still work and will prevent her from casting the spell any longer. In addition, pick a further six Chaos Spells for Sinestra, not including Teleport or Escape. These six Spells are discarded as normal when cast.
Wandering Monster: Elven Warrior OR Elven Archer
Quest Book VII - Page 11 .


Epilogue “My friends, a great celebration is about to be held in your honour. Queen Terrellia wishes to thank you personally for the rescue of Millandriell, princess of the Elven kingdoms, form a most horrible fate.
“Through your valiant efforts, peace and harmony have been restored to the Elven kingdoms. You have ended the treat to the Elves, and secured a great victory against Morcar and his plans.
“As a reward for returning the Elven Bow of Vindication, defeating Sinestra, and rescuing Millandriell, the Queen has ordered you each given a purse of some 500 Gold Crowns. But greater accolades await you.
You are all to be entered into the pages of the Elven Book of Heroes, you names and deeds recorded to the end of the World. You will be amongst the most famous champions to have walked in the Elven lands. Your names will become synonymous with Heroism, valour and justice.
“Go now and enjoy the celebration, for soon other deeds will call for your talents.”
Quest Book XII - Page 1 .