heroku workbook
DESCRIPTION
Heroku workbook to getting started with heroku and salesforceTRANSCRIPT
Workbook
Last updated: August 30, 2011 | © Copyright 2000-2011 salesforce.com, inc. All rights reserved. Salesforce.com is a registered trademark of salesforce.com, inc., as are other names
and marks. Other marks appearing herein may be trademarks of their respective owners.
http://devcenter.heroku.com
6496837814279
ISBN 978-1-4276-4968-350020
Table of Contents............................................................................................................About the Heroku Postgres Workbook! 2
.......................................................................................Tutorial #1: Provisioning and Accessing a Database! 3
.............................................................................................................................................Prerequisites! 3
....................................................................................................................Step 1: Provision a Database! 3
...................................................................................................Step 2: Import Data into Your Database! 3
....................................................................................................Step 3: Query and Access the Database! 4
.............................................................................................................Tutorial #2: Managing Your Database! 6
...........................................................................................................Step 1: Monitor Database Activity! 6
............................................................................................Step 2: Create a Snapshot of Your Database! 7
..................................................................................................................................................Summary! 7
............................................................................................Tutorial #3: Using pgAdmin with Your Database! 8
.............................................................................................................................................Prerequisites! 8
............................................................................................Step 1: Connect pgAdmin to Your Database! 8
......................................................................................................................Step 2: Explore the Schema! 9
..................................................................................................Step 3: Query Data from Your Database! 9
..........................................................................................................Step 4: Export Data to a CSV File! 10
................................................................................................................................................Summary! 10
............................................................................Tutorial #5: Using Web Applications with Your Database! 11
...........................................................................................................................................Prerequisites! 11
.....................................................................Step 1: Create and configure a Ruby on Rails application! 11
..........................................................................................Step 2: Create a model, view, and controller! 12
................................................................................................................................................Summary! 12
...............................................................................Tutorial #6: Using Microsoft Excel with Your Database! 13
...........................................................................................................................................Prerequisites! 13
...........................................................................Step 1: Install and Set Up the Postgres ODBC Driver! 13
................................................................................................Step 2: Connect Your Database to Excel! 13
..................................................................................................Step 3: Query Data to Microsoft Excel! 13
................................................................................................................................................Summary! 14
......................................................................................................................................................Next Steps! 15

About the Heroku Postgres Workbook
Heroku Postgres provides a managed SQL database as a service for storing and retrieving business and application data. This service provides you with the power of a relational database without the management burden of monitoring and maintaining it. The service is based on PostgreSQL " a powerful, stable, and well-tested open source database project. This workbook provides an introduction to working with the database service provided by Heroku.
The goal is to get you set up with Heroku Postgres so you can provision, manage, and work with the database service. Upon successful completion of this workbook, you will have provisioned a database and will know how to interact with the data using psql, pgAdmin, a local client application, and Microsoft Excel.
2
Tutorial #1: Provisioning and Accessing a DatabaseIn this tutorial, you will create and verify an account with Heroku Postgres and then learn how to provision a database on the Heroku platform. After the database is created, instructions are provided for locating the information you will need to access or connect to the database.
Please note that provisioning a database with Heroku Postgres will incur fees because it is a paid service (though not if you are trying the workbook in the Dreamforce lab). Although the database plan prices are quoted in monthly terms, you are only billed for the time during which the database is provisioned. For example, if you create a database for this workbook and throw it away shortly thereafter, you will only be charged for the time the database is running.
PrerequisitesWorking on a lab computer:
If you’re using a Dreamforce lab machine, please use the following credentials in order to skip account creation and avoid incurring charges. Username: ! [email protected] Password: ! cl0ud
Working on your own computer:Heroku user accounts are used to access both Heroku Postgres (http://postgres.heroku.com) and the Heroku runtime platform (http://www.heroku.com). If you already have a verified account with Heroku, then you can skip straight to Step 1.
1. Open your browser, and then go to the Heroku Postgres Signup page (http://postgres.heroku.com/signup).
2. On the Sign Up screen, select the Create a Heroku Account tab.3. Type your email address, create a password, complete the remainder of the form, and then click
Register.4. Enter your billing information to verify your account.
Step 1: Provision a DatabaseThe Heroku Postgres database plans differ based upon the size of their hot data set. Queries made from hot data are 100-1000x faster than from the full data set. Ideally, high performance applications such as web apps should have 99% or more of their queries be served from hot data. The Heroku Postgres databases are self-optimizing—they automatically place frequently accessed data in the hot data set.
1. Open your browser, log in to http://postgres.heroku.com if you’re not already logged in, and then click on “Your DBs”.
2. Click on the “+” in the Your Databases header.3. Select the Ronin plan, and then click Create Database. 4. When prompted, click OK to confirm. After the new database is created, it is listed in Your DBs.
You now have an active database that is ready for data.
Step 2: Import Data into Your DatabaseYou can now restore existing data to your database. For this tutorial, and others in this workbook, we will import a sample dataset using the standard pg_restore utility that is installed with PostgreSQL.
1. If you’re using a lab machine, the example schema is already downloaded and available in ~/employees.dump. If you’re on your home machine, use the terminal or command line to download it:
3
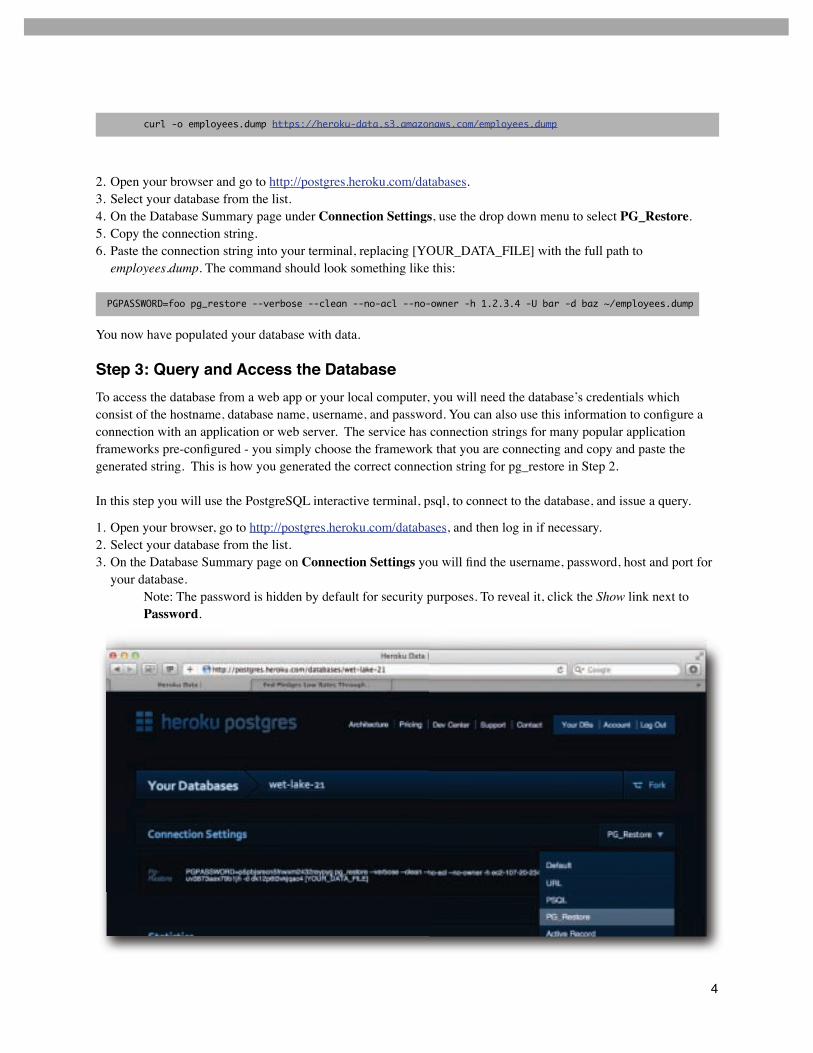
curl -o employees.dump https://heroku-data.s3.amazonaws.com/employees.dump
2. Open your browser and go to http://postgres.heroku.com/databases.3. Select your database from the list.4. On the Database Summary page under Connection Settings, use the drop down menu to select PG_Restore.5. Copy the connection string.6. Paste the connection string into your terminal, replacing [YOUR_DATA_FILE] with the full path to
employees.dump. The command should look something like this:
PGPASSWORD=foo pg_restore --verbose --clean --no-acl --no-owner -h 1.2.3.4 -U bar -d baz ~/employees.dump
You now have populated your database with data.
Step 3: Query and Access the DatabaseTo access the database from a web app or your local computer, you will need the database’s credentials which consist of the hostname, database name, username, and password. You can also use this information to configure a connection with an application or web server. The service has connection strings for many popular application frameworks pre-configured - you simply choose the framework that you are connecting and copy and paste the generated string. This is how you generated the correct connection string for pg_restore in Step 2.
In this step you will use the PostgreSQL interactive terminal, psql, to connect to the database, and issue a query.
1. Open your browser, go to http://postgres.heroku.com/databases, and then log in if necessary.2. Select your database from the list.3. On the Database Summary page on Connection Settings you will find the username, password, host and port for
your database. Note: The password is hidden by default for security purposes. To reveal it, click the Show link next to Password.
4
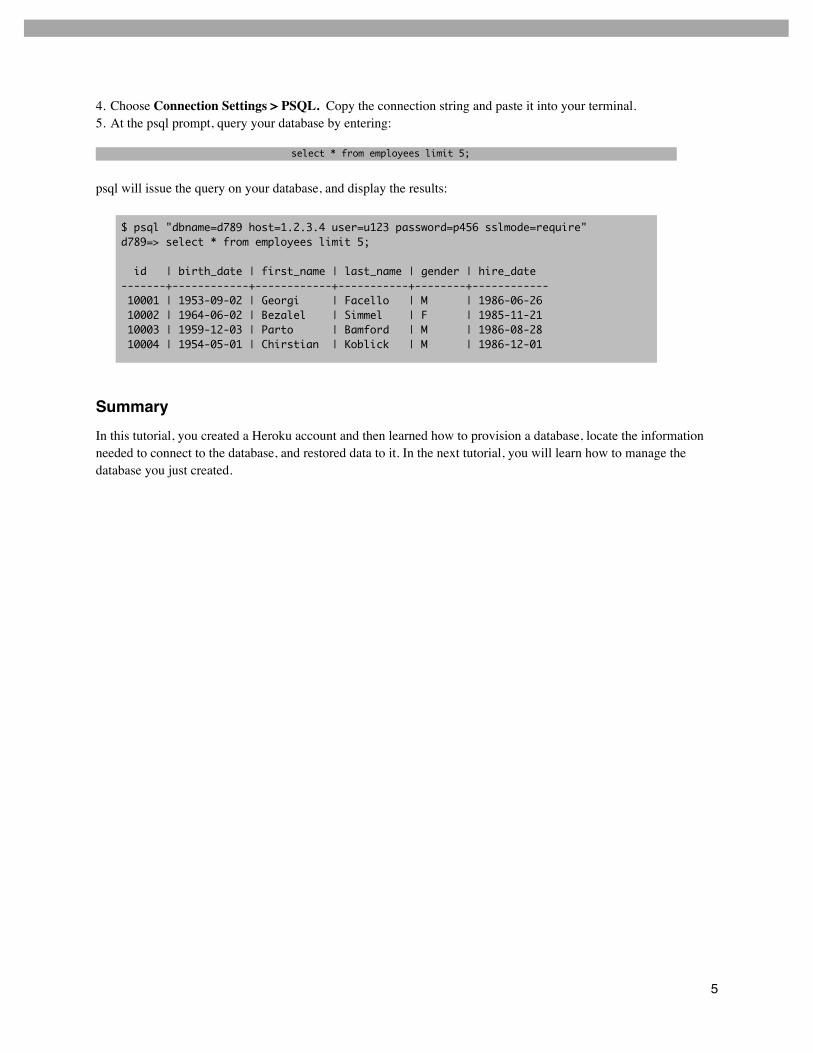
4. Choose Connection Settings > PSQL. Copy the connection string and paste it into your terminal. 5. At the psql prompt, query your database by entering:
select * from employees limit 5;
psql will issue the query on your database, and display the results:
SummaryIn this tutorial, you created a Heroku account and then learned how to provision a database, locate the information needed to connect to the database, and restored data to it. In the next tutorial, you will learn how to manage the database you just created.
5
$ psql "dbname=d789 host=1.2.3.4 user=u123 password=p456 sslmode=require"d789=> select * from employees limit 5;
id | birth_date | first_name | last_name | gender | hire_date -------+------------+------------+-----------+--------+------------ 10001 | 1953-09-02 | Georgi | Facello | M | 1986-06-26 10002 | 1964-06-02 | Bezalel | Simmel | F | 1985-11-21 10003 | 1959-12-03 | Parto | Bamford | M | 1986-08-28 10004 | 1954-05-01 | Chirstian | Koblick | M | 1986-12-01
Tutorial #2: Managing Your DatabaseIn this tutorial, you will learn about the different ways you can interact with and manage your database on the Database Summary page.
Step 1: Monitor Database ActivityYou can monitor whether your database is available and also identify query activity that needs to be further optimized.
1. Open your browser, go to http://postgres.heroku.com/databases, and then log in if necessary.2. Select your database.3. Do any of the following:
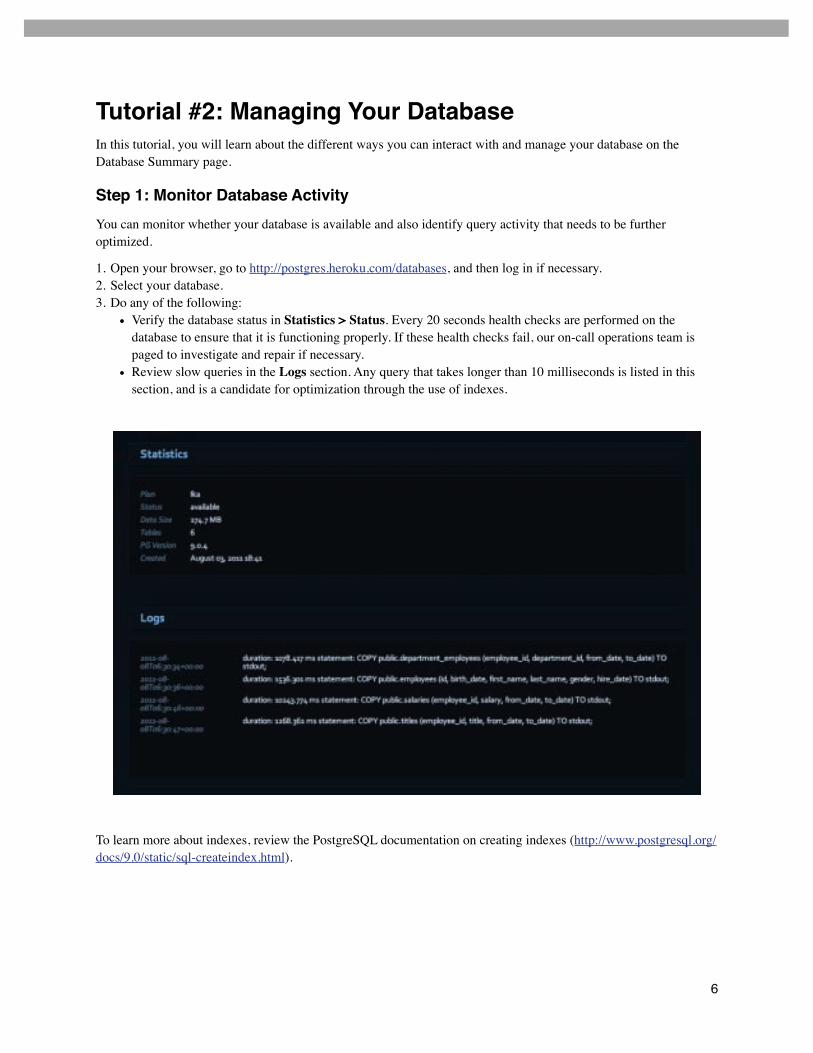
• Verify the database status in Statistics > Status. Every 20 seconds health checks are performed on the database to ensure that it is functioning properly. If these health checks fail, our on-call operations team is paged to investigate and repair if necessary.
• Review slow queries in the Logs section. Any query that takes longer than 10 milliseconds is listed in this section, and is a candidate for optimization through the use of indexes.
To learn more about indexes, review the PostgreSQL documentation on creating indexes (http://www.postgresql.org/docs/9.0/static/sql-createindex.html).
6
Step 2: Create a Snapshot of Your DatabaseA snapshot is a copy of your database at a specific point in time. Snapshots can be used to export your data to a server or your local computer, or to archive data for compliance and record keeping purposes. By default, a daily snapshot is automatically created for your database and stored for one month. You can capture additional snapshots on demand.
1. Open your browser, go to http://postgres.heroku.com/databases, and then log in if necessary.2. Select your database.3. On the Database Summary page next to Snapshots, click the plus button (+) to capture a backup.4. When prompted, click OK to confirm.5. After the backup is complete, click the Download link next to the database you want to transfer to your local
computer.
If you ever want to restore the backup you downloaded to a local database, execute the following command (substitute “myuser”, “mydb”, “snapshot_file” with your local username, database name, and snapshot file name):
pg_restore --verbose --clean --no-acl --no-owner -U <myuser> -d <mydb> <snapshot_file>.dump
SummaryIn this tutorial, you learned about the different ways you can manage and interact with your database on the Database Summary page, as well as how to create snapshots of your database. In the next tutorial, you will learn how to work with your database using pgAdmin.
7
Tutorial #3: Using pgAdmin with Your DatabasepgAdmin is a powerful desktop application that enables you to work with your PostgreSQL database. With pgAdmin, you can interactively query the database, browse the schema, insert data, and easily export data in a variety of formats. It is free, open source software that is available on Windows, Mac, and Posix platforms.
PrerequisitesWorking on your own computer:
You must install pgAdmin (http://www.pgadmin.org/download/).Working on a lab computer:
pgAdmin is already installed. You can access it from the dock.
Step 1: Connect pgAdmin to Your Database
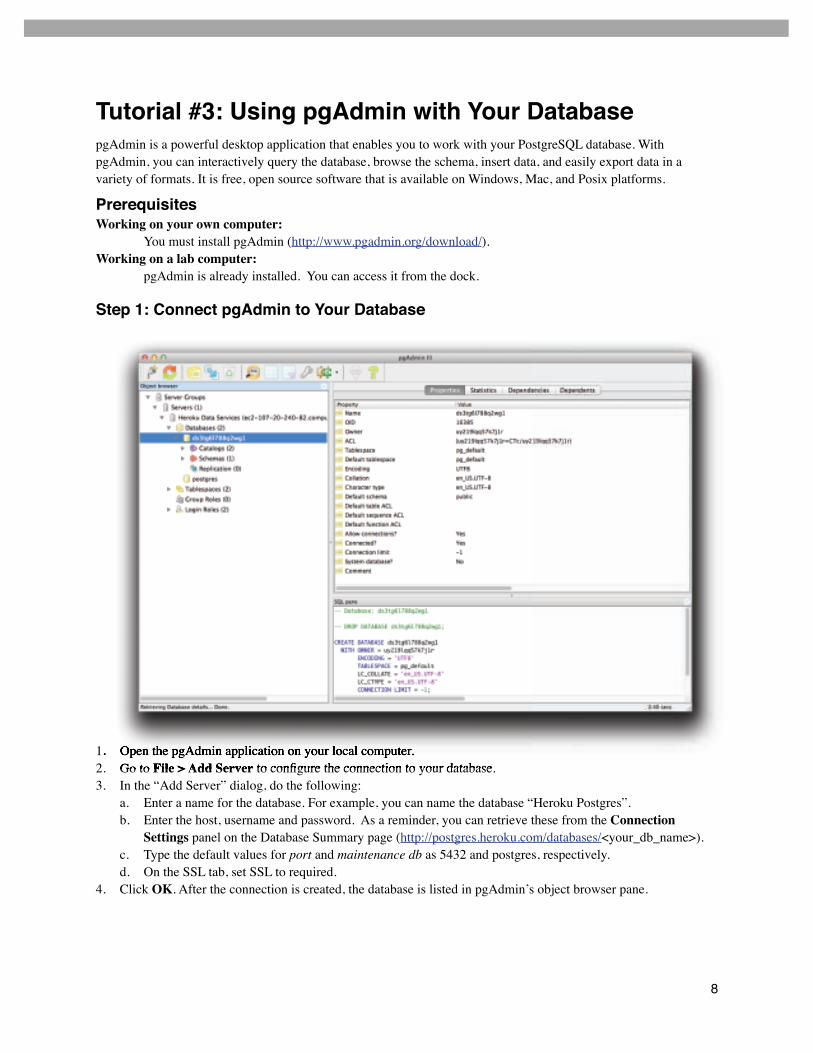
1. Open the pgAdmin application on your local computer.2. Go to File > Add Server to configure the connection to your database. 3. In the “Add Server” dialog, do the following:
a. Enter a name for the database. For example, you can name the database “Heroku Postgres”.b. Enter the host, username and password. As a reminder, you can retrieve these from the Connection
Settings panel on the Database Summary page (http://postgres.heroku.com/databases/<your_db_name>). c. Type the default values for port and maintenance db as 5432 and postgres, respectively.d. On the SSL tab, set SSL to required.
4. Click OK. After the connection is created, the database is listed in pgAdmin’s object browser pane.
. Open the pgAdmin application on your local computer.Go to File > Add Server to configure the connection to your database Open the pgAdmin application on your local computer
8
Step 2: Explore the Schema1. In the pgAdmin object browser pane, navigate to Server Groups > Servers > Heroku Postgres > Databases >
[YOUR_DATABASE_NAME] > Schemas > Public > Tables > Employees, and then do any of the following:• View the SQL definition for the employees datable the the SQL pane.• Right-click on Employees > View Data > View Top 100 Rows to view a sampling of the data.• Explore other pieces of the schema.
Step 3: Query Data from Your Database1. In the pgAdmin Object Browser pane, select Server Groups > Servers > Heroku Postgres > Databases >
[YOUR_DATABASE_NAME].2. Click the SQL button in the toolbar to launch the query window.3. Enter a query into the SQL Editor. For example to view the all of the department managers ordered by their
tenure:
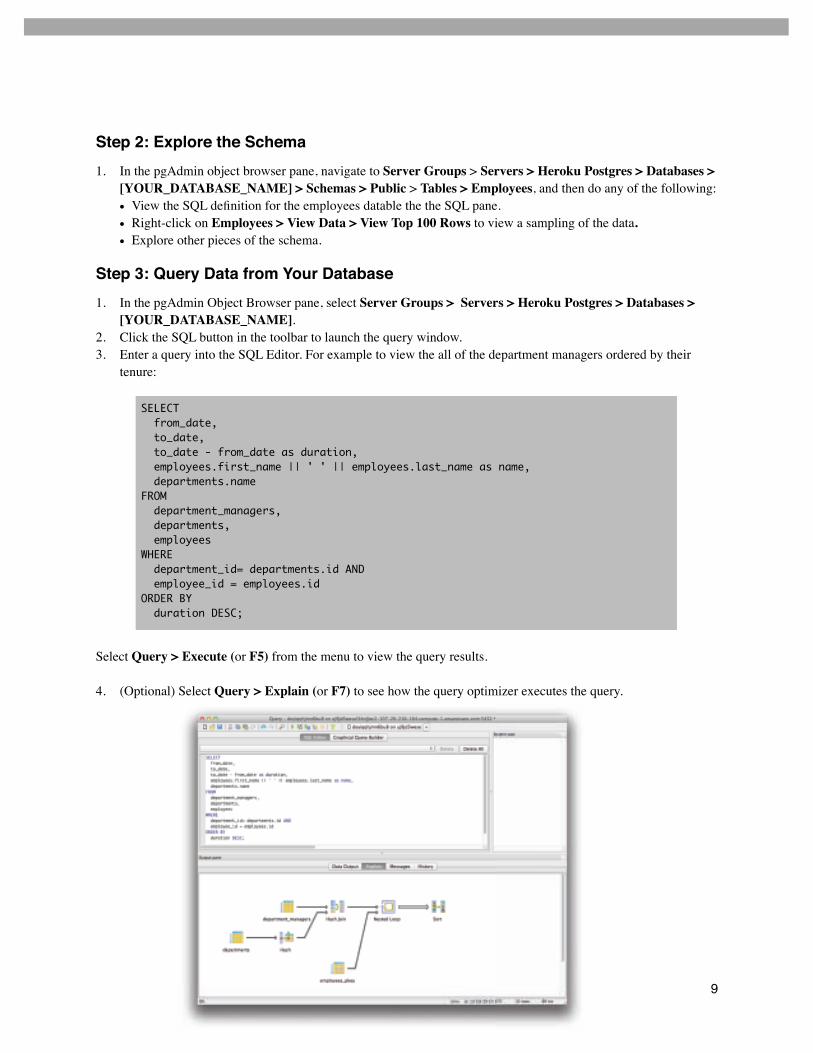
Select Query > Execute (or F5) from the menu to view the query results.
4. (Optional) Select Query > Explain (or F7) to see how the query optimizer executes the query.
SELECT from_date, to_date, to_date - from_date as duration, employees.first_name || ' ' || employees.last_name as name, departments.nameFROM department_managers, departments, employeesWHERE department_id= departments.id AND employee_id = employees.idORDER BY duration DESC;
9
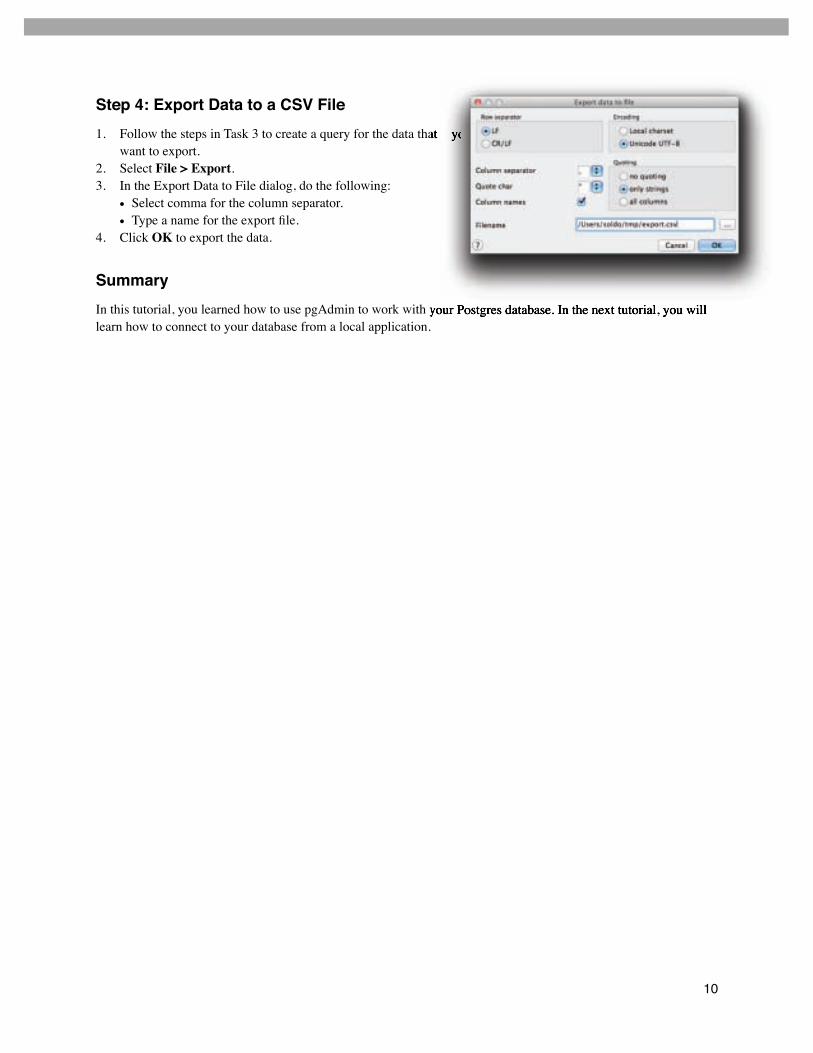
Step 4: Export Data to a CSV File1. Follow the steps in Task 3 to create a query for the data that you
want to export.2. Select File > Export.3. In the Export Data to File dialog, do the following:
• Select comma for the column separator.• Type a name for the export file.
4. Click OK to export the data.
SummaryIn this tutorial, you learned how to use pgAdmin to work with your Postgres database. In the next tutorial, you will learn how to connect to your database from a local application.
10
at y
your Postgres database. In the next tutorial, you will
you
Tutorial #5: Using Web Applications with Your DatabaseIn this tutorial, you will learn how to build a web application running on your local machine to access your Heroku Postgres database. We use Ruby on Rails here, though the same principles apply no matter which local language and platform you use.
PrerequisitesWorking on your own computer:
You must install Ruby, RubyGems, and Ruby on Rails. See http://rubyonrails.org/download for download and installation instructions.
Working on a lab computer: ! Ruby and Rails and all of its dependencies are already installed.
Step 1: Create and configure a Ruby on Rails application1. Using the terminal or command line, create a new rails application:
! rails new employees -d postgresql !! ! !
2. Open the rails project in your preferred text editor. To use TextMate for example:
! mate employees!! ! ! ! ! !
3. Retrieve the database connection string by opening a browser to http://postgres.heroku.com/databases, select your database, and clicking Connection Settings > Active Record. Copy the connection string.
4. Open the config/databases.yml file in your text editor.5. Under the development section, paste the connection string. It should look like the following:
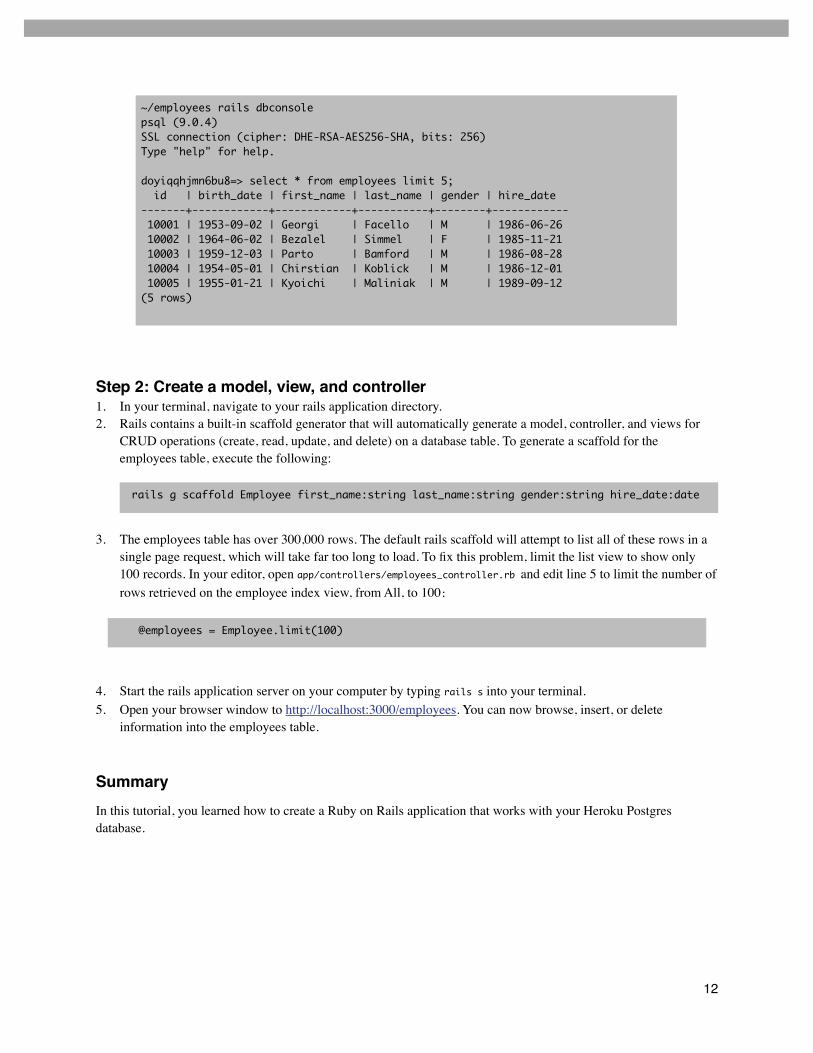
6. To test that the configuration is correct, have rails open a database connection. From your terminal, change directory to your rails application and use the rails dbconsole command:
development: adapter: postgresql encoding: unicode pool: 5 database: d123 username: u456 password: p789 host: 1.2.3.4 port: 5432
11
Step 2: Create a model, view, and controller1. In your terminal, navigate to your rails application directory.2. Rails contains a built-in scaffold generator that will automatically generate a model, controller, and views for
CRUD operations (create, read, update, and delete) on a database table. To generate a scaffold for the employees table, execute the following:
3. The employees table has over 300,000 rows. The default rails scaffold will attempt to list all of these rows in a single page request, which will take far too long to load. To fix this problem, limit the list view to show only 100 records. In your editor, open app/controllers/employees_controller.rb and edit line 5 to limit the number of rows retrieved on the employee index view, from All, to 100:
4. Start the rails application server on your computer by typing rails s into your terminal.5. Open your browser window to http://localhost:3000/employees. You can now browse, insert, or delete
information into the employees table.
SummaryIn this tutorial, you learned how to create a Ruby on Rails application that works with your Heroku Postgres database.
~/employees rails dbconsolepsql (9.0.4)SSL connection (cipher: DHE-RSA-AES256-SHA, bits: 256)Type "help" for help.
doyiqqhjmn6bu8=> select * from employees limit 5; id | birth_date | first_name | last_name | gender | hire_date -------+------------+------------+-----------+--------+------------ 10001 | 1953-09-02 | Georgi | Facello | M | 1986-06-26 10002 | 1964-06-02 | Bezalel | Simmel | F | 1985-11-21 10003 | 1959-12-03 | Parto | Bamford | M | 1986-08-28 10004 | 1954-05-01 | Chirstian | Koblick | M | 1986-12-01 10005 | 1955-01-21 | Kyoichi | Maliniak | M | 1989-09-12(5 rows)
rails g scaffold Employee first_name:string last_name:string gender:string hire_date:date
@employees = Employee.limit(100)
12
Tutorial #6: Using Microsoft Excel with Your DatabaseIn this tutorial, you will learn how to connect your database to Microsoft Excel and then query data directly to a workbook. In Excel, you can quickly and easily create reports that stay up-to-date with the live data in your database.
PrerequisitesWorking on your own computer:
This tutorial will only work with Microsoft Windows. Instructions are provided for Microsoft Excel 2010; however, older versions of Excel may still work but the interface will be slightly different.
Working on a lab computer:! The machines don’t have Microsoft Windows installed - so you won’t be able to do this tutorial. Sorry!
Step 1: Install and Set Up the Postgres ODBC Driver1. Download the latest version of the MSI Postgres ODBC driver (http://www.postgresql.org/ftp/odbc/versions/
msi/). Depending on your version of Windows, select either the 32-bit or 64-bit version of the driver (if in doubt, choose the 32-bit version).
2. Run the psqlodbc installer program from your download location.
Step 2: Connect Your Database to Excel3. Open Microsoft Excel and create a new workbook.4. Select Data Tab > From Other Sources > From Microsoft Query.5. Choose New Data Source and then click OK.6. Type a name for your data source (for example, “Heroku Postgres”) and then choose PostgreSQL Unicode as
the driver.7. Click Connect.8. When prompted, type the database credentials. As a reminder, the Hostname, Username, and Password is
located under Connection Settings on the Database Summary page (http://postgres.heroku.com/databases/<your_db_name>).
9. Click OK.
Step 3: Query Data to Microsoft Excel1. Select Data Tab > From Other Sources > From Microsoft Query.2. Choose the data source you created and then click OK.
Note: You may be prompted to re-enter your username and password.3. Click the SQL button in the toolbar and enter the following query:
13
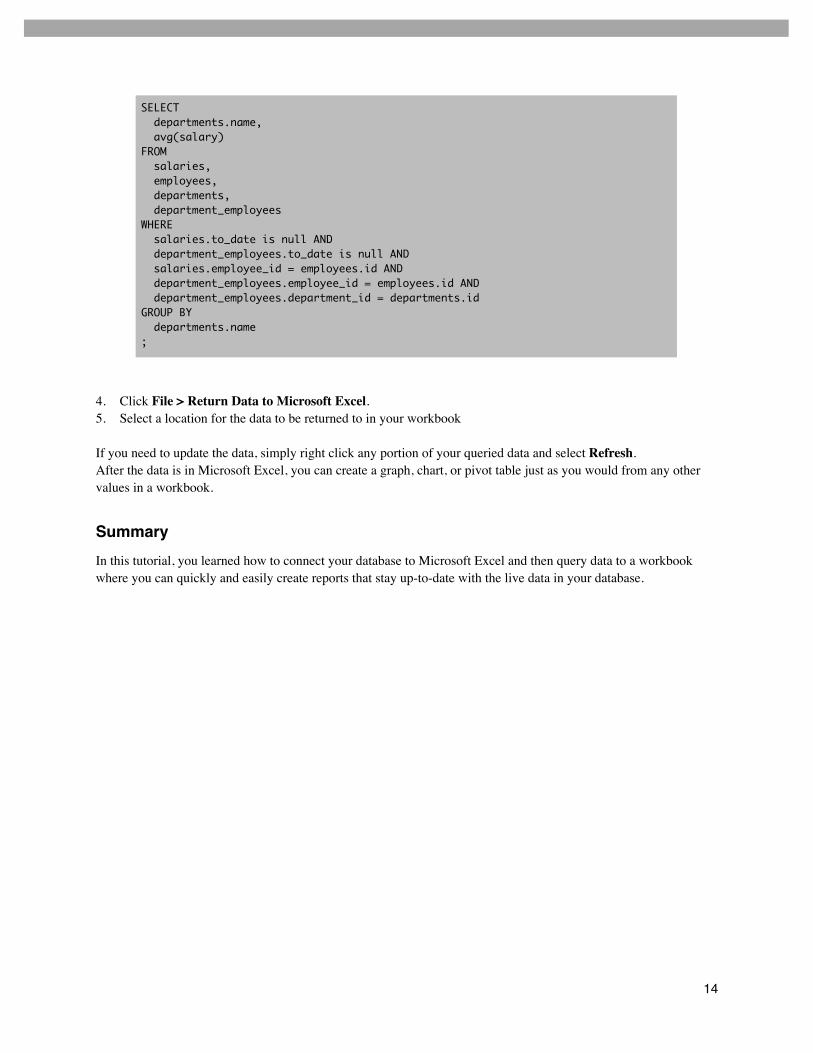
4. Click File > Return Data to Microsoft Excel.5. Select a location for the data to be returned to in your workbook
If you need to update the data, simply right click any portion of your queried data and select Refresh. After the data is in Microsoft Excel, you can create a graph, chart, or pivot table just as you would from any other values in a workbook.
SummaryIn this tutorial, you learned how to connect your database to Microsoft Excel and then query data to a workbook where you can quickly and easily create reports that stay up-to-date with the live data in your database.
SELECT departments.name, avg(salary)FROM salaries, employees, departments, department_employeesWHERE salaries.to_date is null AND department_employees.to_date is null AND salaries.employee_id = employees.id AND department_employees.employee_id = employees.id AND department_employees.department_id = departments.idGROUP BY departments.name;
14
Next StepsCongratulations on completing the workbook! You are now familiar with managing and working with a database that you provisioned from Heroku Postgres. Not only can you interact with your database using pgAdmin, but you also learned how to connect to it from Microsoft Excel and web application frameworks like Ruby on Rails.
To continue exploring:• Visit http://www.postgresql.org/docs/9.0/static/index.html to learn about the fantastic features and capabilities of
PostgreSQL. • Visit http://www.heroku.com to learn about how you can run a full application stack in the cloud.
15