heidemann 01 b
TRANSCRIPT

8/7/2019 Heidemann 01 b
http://slidepdf.com/reader/full/heidemann-01-b 1/3
ne of the best things about digital photography
is the instant feedback. Snap a picture and
you’ve got a 1x2-inch p review of the image you
just took, and m inutes later you can view that
image on a monitor or make a pr int. Comp are
this turnarou nd to the hours or days required to get
prints or slides from film. This rapid feedback is terrific
for learning how to take great pictures in unu sual
conditions. For instance, infrared and night p hotog-
raphy each require some practice.
The downside to night ph otography w ith digital
cameras is dark current noise. In ad dition to higher grain,
long exposures tu rn certain CCD elements on , giving
your picture of the night sky a few extra stars! Fortunately,
with a little care, this problem can be greatly redu ced.
Below you see the original noisy image on the left and
30 • PEI • JANUARY 2001
Eliminating DarkCurrent Noise inLong-ExposureDigital Images
Left: The original image (16 second manual exposure, f/2.8, 100 ISO equivalent) shows dark current noise.
Right: the final image after adjustment.

8/7/2019 Heidemann 01 b
http://slidepdf.com/reader/full/heidemann-01-b 2/3
the same image after correction on the right.
Dark curren t noise is a kind of noise in long-
exposure images taken on CCDs. Camera imagers
consist of an ar ray of CCD elements. Normally these
elements are triggered by light entering th e camera, but
they can also be triggered spontan eously by stray
electrons. Since electrons from noise are as good as
electrons generated from light, this noise show s up as
bright p ixels in the image where they should n’t be.
How much of this spontaneous current occurs depends
on the exposure duration (longer exposures get more
noise) and the camera temperature. At room temp erature,
today’s d igital cameras begin to exhibit noticeable d ark
current noise for exposu res longer than a few seconds.
Astronomers typically avoid d ark current n oise by
cooling the CCD. The noise is typ ically halved for
every 5 degree Celsius drop in temperatu re, so
cooling it to -30 to -40 degrees Celsius (-20 to -40
degrees Fahrenheit) avoids mu ch of the problem.
Unfortunately, few ph otographers carry arou nd liquid
nitrogen, and fewer still would want to app ly it to
their cameras (something the camera makers p robably
appreciate!). Fortunately, we can remov e most d ark
current noise by post-processing the image.
Averaging Away the ProblemThe simplest way to eliminate n oise is to blur th e
image slightly.
Since noisy p ixels
are randomly
distributed aroun d
the image, rather
than clustered
togeth er, Filter>
Blur>Gaussian Blur
will quickly blend
them into the back-
ground. Blurring
will also redu ce the
grain in the image,
not a bad thing for
long-exposure,
high-grain images.
Of course, the
dow nside of
blurring is that it gets rid of the high-contrast ed ges in
the image in ad dition to the n oise. For examp le, the
details in the refinery ligh ts are gon e. You can
partially correct for this by resharp ening the imag e
(Filter>Sharpen>Unsharp Mask), but we’d really like
to change just the noise, not the wh ole image.
What’s the Difference?Fortun ately, the
sensitivity of CCD
elements to dar k
current n oise is
relatively stable.
The same pixels
that are noisy in
one p icture w ill be
noisy in the n ext
picture, if it’s taken
soon and at about
the same tempera-
ture and conditions.
Because of th is level
of stability, you can measu re the n oise and remove it.
To record w hat d ark curren t noise is infecting y our
image, take another image (the “d ark” image) imm edi-
ately after taking your “light” image, using the sam e
settings, but with the lens cap on. At the same temperature
and exposure, this dark image will record which pixels are
generating noise. We’ll call this image the DCN correction.
PEI • JANUARY 2001 • 31
Noisy pixels are eliminated in thisimage, blurred with Radius=1.5, but
the high-contrast edges are also lost.
A portion of an image taken soonafter the original, under very similarconditions but with the lens cap on,
reveals dark current noise.
More info? PEInfo No. 39
8/7/2019 Heidemann 01 b
http://slidepdf.com/reader/full/heidemann-01-b 3/3
CCD elements fail by becoming oversaturated. A
natu ral way to fix this is to simp ly subtract these pixels.
Take the base image, hold d own the shift key and drag
the DCN correction image on to it to create a new layer,
and select the Difference mod e in the Layers p alette.
Now the noise in the dark sky an d trees is gone.
But there’s a dow nside to d ifferencing. Subtracting
the noise works w ell for astronomers looking at stars at
night. Unfortunately for photographers, subtraction
creates the opposite problem of lit-up pixels: dark sp ots
now show u p in bright p arts of the image (look at the
refinery lights). Dark current noise occur red even in
these bright areas of the image. Although we d on’t
wan t noise in the d ark areas of the picture, we need to
keep it in the bright p arts!
Adding Things UpWhat w e really want to d o is not subtract off the
noise, but to rep lace noisey pixels with the better ones.
This leads to ou r
final approach,
combining these
two m ethods. We
use blurring to
generate good d ata
for the replacement
pixels, and the
noise-only image to
control which pixels
to replace.
First we need to
get good replace-
ment p ixels. Take
the base image,
du plicate it into anoth er layer, and heavily blur th at
layer. (The exact blur rad ius depend s on image
resolution, but don’t be shy. I used Radius=5.0.) No
more noise here. Nam e this layer “DCN rep lacement.”
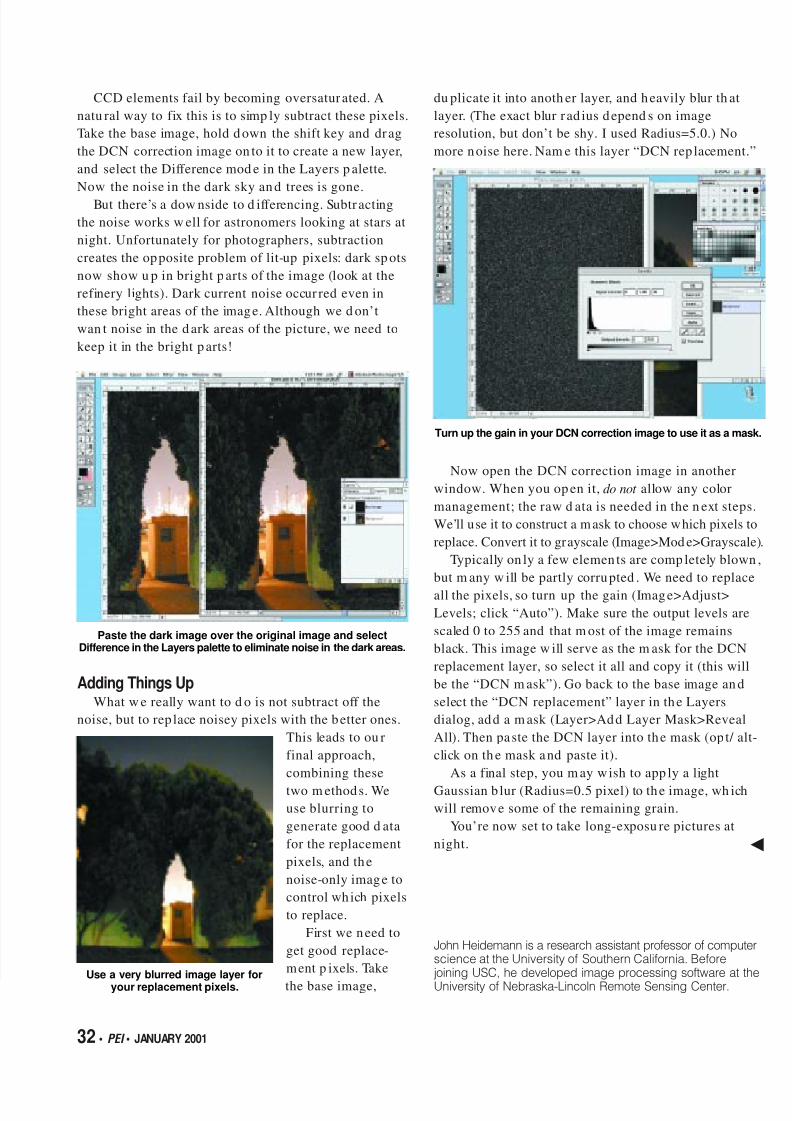
Now open the DCN correction image in another
window. When you op en it, do not allow any color
management; the raw d ata is needed in the n ext steps.
We’ll use it to construct a mask to choose which pixels to
replace. Convert it to grayscale (Image>Mod e>Grayscale).
Typically on ly a few elements are comp letely blown ,
but m any w ill be partly corrupted . We need to replace
all the pixels, so turn up the gain (Image>Adjust>
Levels; click “Auto”). Make sure the output levels are
scaled 0 to 255 and that m ost of the image remains
black. This image w ill serve as the m ask for the DCN
replacement layer, so select it all and copy it (this will
be the “DCN m ask”). Go back to the base image an d
select the “DCN replacement” layer in the Layers
dialog, add a m ask (Layer>Add Layer Mask>Reveal
All). Then paste the DCN layer into the mask (op t/ alt-
click on th e mask and paste it).
As a final step, you m ay wish to app ly a light
Gaussian b lur (Radius=0.5 pixel) to the image, wh ich
will remove some of the remaining grain.
You’re now set to take long-exposu re pictures at
night.
John Heidemann is a research assistant professor of computerscience at the University of Southern California. Beforejoining USC, he developed image processing software at theUniversity of Nebraska-Lincoln Remote Sensing Center.
32 • PEI • JANUARY 2001
Paste the dark image over the original image and selectDifference in the Layers palette to eliminate noise in the dark areas.
Turn up the gain in your DCN correction image to use it as a mask.
Use a very blurred image layer foryour replacement pixels.