headmouse extreme user guide - origin instruments extreme user guide ... alternately, mouse clicks...
TRANSCRIPT

www.orin.com
HeadMouse® Extreme User Guide
Wireless Head-controlled Mouse
HeadMouse Extreme User Guide
Origin Instruments Corporation Page 2
Table of Contents
Table of Contents ......................................................................... 2
Legal Notices ................................................................................ 3
FCC / CE Notice ........................................................................... 3
Application Disclaimer .................................................................. 4
Introduction ................................................................................... 5
User Registration .......................................................................... 5
Hardware Description ................................................................... 6
Setup and Installation ................................................................. 10
Mounting ................................................................................. 10
Notebook Mounting Bracket .................................................... 12
Custom Brackets ..................................................................... 13
Connection ................................................................................. 14
Using HeadMouse Extreme ........................................................ 15
Tracking Status ................................................................... 15
General Use ........................................................................ 16
Pointer Position ................................................................... 16
Pointer Control .................................................................... 17
Mode Switch Settings ................................................................. 18
Dual and Multiple Switches ........................................................ 19
Technical Specifications ............................................................. 20
General Care and Maintenance .................................................. 20
Customer Support ...................................................................... 20
Warranty Information .................................................................. 21
Replacement Targets ................................................................. 23
HeadMouse Extreme User Guide
Origin Instruments Corporation Page 3
Legal Notices Information in this User Guide is provided “as is” by Origin Instruments, is subject to change without notice, does not represent a commitment on the part of Origin Instruments, and is provided without warranty of any kind, either expressed or implied, including any implied warranties of merchantability or fitness for a particular purpose. No part of this document may be reproduced or transmitted in any form or by any means, electronic or mechanical, including photocopying, recording or information storage and retrieval systems, for any purpose other than the purchaser’s personal use, without the express written permission of Origin Instruments. Origin Instruments is not responsible for any problems caused by unauthorized modification of the HeadMouse Extreme and will not be responsible for direct or consequential damages associated with any use of the HeadMouse Extreme product.
FCC / CE Notice
Products bearing the CE marking have been tested and are declared by Origin Instruments Corporation of 854 Greenview Drive, Grand Prairie, Texas 75050, USA to be in conformity with the following standards or other normative documents and following the provisions of the Electromagnetic Compatibility Directive, 89/336/EEC:
EN 55022 Class B Emissions (Radiated Emission)
EN 61000-4-2, Electrostatic Discharge Immunity
EN 61000-4-3, Radiated Immunity
Origin Instruments Corporation has tested the HeadMouse Extreme and found that it complies with the limits for a Class B
digital device, pursuant to Part 15 of the FCC Rules. These limits are designed to provide reasonable protection against harmful interference in a residential installation.
HeadMouse Extreme User Guide
Origin Instruments Corporation Page 4
Operation is subject to the following two conditions: (1) this device may not cause harmful interference, and (2) this device must accept any interference received, including interference that may cause undesired operation.
If this product is suspected of causing interference to a radio or television receiver, remove and apply power to the equipment and determine whether it is the cause of the disturbance. If a problem exists, the user is encouraged to try and correct the problem by one of the following measures:
1. Reorient or relocate the receiving antenna. 2. Increase the separation between the equipment and the receiver. 3. Reorient the equipment cables. 4. Consult the dealer or Origin Instruments for additional suggestions. Information in this document is subject to change without notice and does not represent a commitment on the part of Origin Instruments Corporation.
Application Disclaimer HeadMouse Extreme is designed for use by people who have limited or no motor capability enabling USB mouse operations. However, it should not be used in an application where personal injury or property loss could occur if the HeadMouse Extreme failed for some reason. Origin Instruments products are not authorized for use as surgical aids or as part of a system intended to support or sustain life. The user assumes full responsibility for determining the suitability of the HeadMouse Extreme for the intended application.
HeadMouse Extreme User Guide
Origin Instruments Corporation Page 5
Introduction Thank you for being a HeadMouse Extreme customer! This manual is a guide to the operation and use of this head-controlled computer access system. Additional documentation may be shipped with your HeadMouse Extreme.
HeadMouse Extreme Key Features
Fast and responsive cursor control
Low power consumption
USB mouse interface
Bus powered: No power cable needed
Pocket sized
Automatically adapts to any mounting angle
Standard 3.5mm input for one or two wired switches
Built-in receiver for wireless switches
Mounting for laptops, desktops, and augmentative
communication devices
Two-year warranty
Origin Instruments' quality, reliability and support
User Registration Please complete and return the enclosed user registration form. This will ensure that you receive applicable updates following your HeadMouse purchase. In addition you will be on the list to receive follow-on product information and new product announcements.
HeadMouse Extreme User Guide
Origin Instruments Corporation Page 6
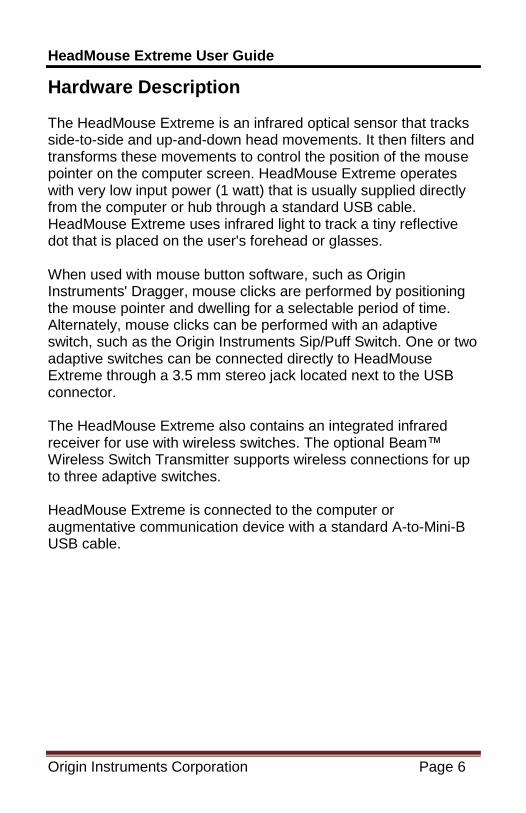
Hardware Description The HeadMouse Extreme is an infrared optical sensor that tracks side-to-side and up-and-down head movements. It then filters and transforms these movements to control the position of the mouse pointer on the computer screen. HeadMouse Extreme operates with very low input power (1 watt) that is usually supplied directly from the computer or hub through a standard USB cable. HeadMouse Extreme uses infrared light to track a tiny reflective dot that is placed on the user's forehead or glasses. When used with mouse button software, such as Origin Instruments' Dragger, mouse clicks are performed by positioning the mouse pointer and dwelling for a selectable period of time. Alternately, mouse clicks can be performed with an adaptive switch, such as the Origin Instruments Sip/Puff Switch. One or two adaptive switches can be connected directly to HeadMouse Extreme through a 3.5 mm stereo jack located next to the USB connector. The HeadMouse Extreme also contains an integrated infrared receiver for use with wireless switches. The optional Beam™ Wireless Switch Transmitter supports wireless connections for up to three adaptive switches. HeadMouse Extreme is connected to the computer or augmentative communication device with a standard A-to-Mini-B USB cable.
HeadMouse Extreme User Guide
Origin Instruments Corporation Page 7
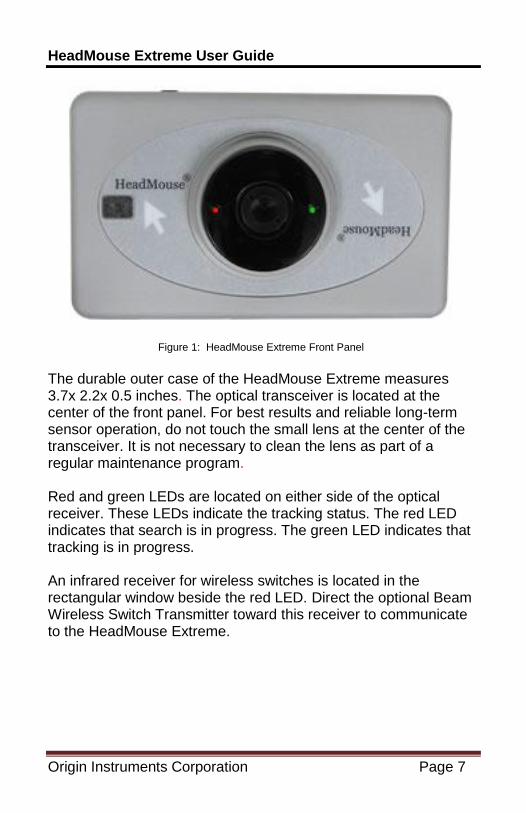
Figure 1: HeadMouse Extreme Front Panel
The durable outer case of the HeadMouse Extreme measures 3.7x 2.2x 0.5 inches. The optical transceiver is located at the center of the front panel. For best results and reliable long-term sensor operation, do not touch the small lens at the center of the transceiver. It is not necessary to clean the lens as part of a regular maintenance program. Red and green LEDs are located on either side of the optical receiver. These LEDs indicate the tracking status. The red LED indicates that search is in progress. The green LED indicates that tracking is in progress. An infrared receiver for wireless switches is located in the rectangular window beside the red LED. Direct the optional Beam Wireless Switch Transmitter toward this receiver to communicate to the HeadMouse Extreme.
HeadMouse Extreme User Guide
Origin Instruments Corporation Page 8
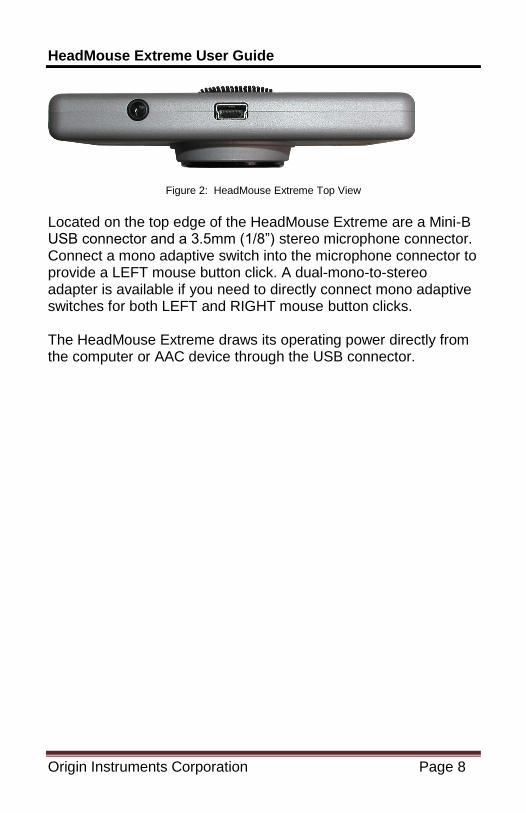
Figure 2: HeadMouse Extreme Top View Located on the top edge of the HeadMouse Extreme are a Mini-B USB connector and a 3.5mm (1/8”) stereo microphone connector. Connect a mono adaptive switch into the microphone connector to provide a LEFT mouse button click. A dual-mono-to-stereo adapter is available if you need to directly connect mono adaptive switches for both LEFT and RIGHT mouse button clicks. The HeadMouse Extreme draws its operating power directly from the computer or AAC device through the USB connector.
HeadMouse Extreme User Guide
Origin Instruments Corporation Page 9
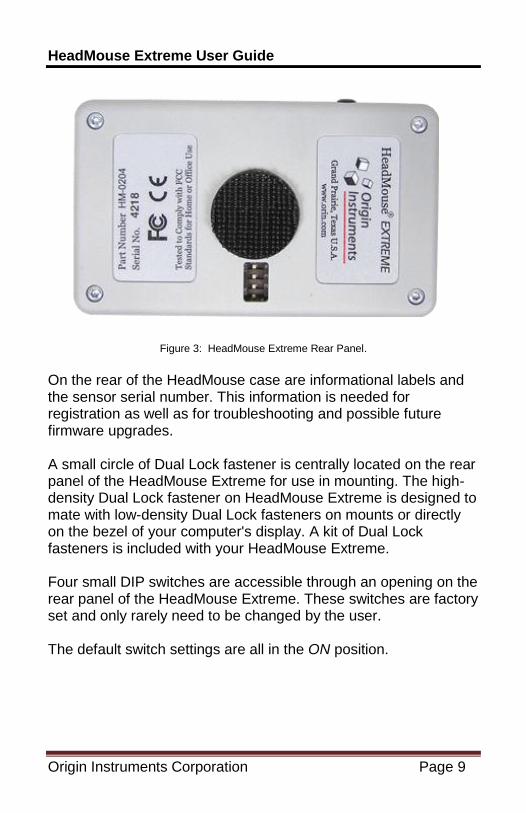
Figure 3: HeadMouse Extreme Rear Panel.
On the rear of the HeadMouse case are informational labels and the sensor serial number. This information is needed for registration as well as for troubleshooting and possible future firmware upgrades. A small circle of Dual Lock fastener is centrally located on the rear panel of the HeadMouse Extreme for use in mounting. The high-density Dual Lock fastener on HeadMouse Extreme is designed to mate with low-density Dual Lock fasteners on mounts or directly on the bezel of your computer's display. A kit of Dual Lock fasteners is included with your HeadMouse Extreme. Four small DIP switches are accessible through an opening on the rear panel of the HeadMouse Extreme. These switches are factory set and only rarely need to be changed by the user. The default switch settings are all in the ON position.
HeadMouse Extreme User Guide
Origin Instruments Corporation Page 10
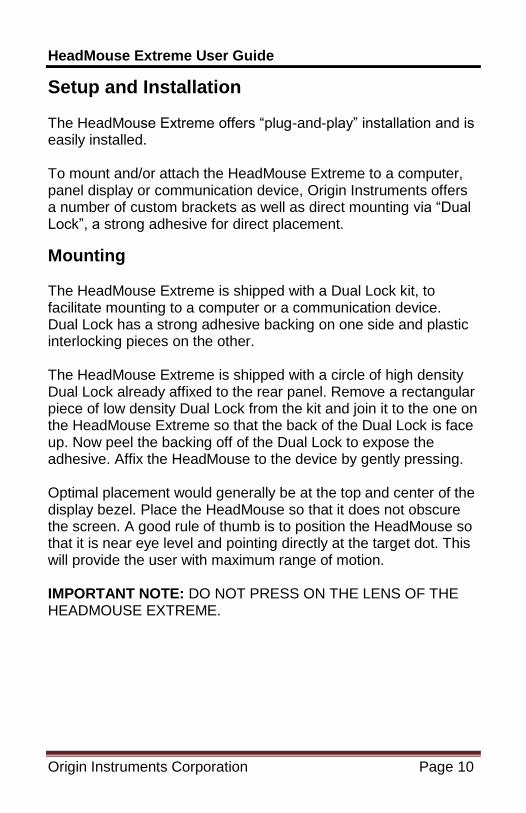
Setup and Installation The HeadMouse Extreme offers “plug-and-play” installation and is easily installed. To mount and/or attach the HeadMouse Extreme to a computer, panel display or communication device, Origin Instruments offers a number of custom brackets as well as direct mounting via “Dual Lock”, a strong adhesive for direct placement.
Mounting The HeadMouse Extreme is shipped with a Dual Lock kit, to facilitate mounting to a computer or a communication device. Dual Lock has a strong adhesive backing on one side and plastic interlocking pieces on the other. The HeadMouse Extreme is shipped with a circle of high density Dual Lock already affixed to the rear panel. Remove a rectangular piece of low density Dual Lock from the kit and join it to the one on the HeadMouse Extreme so that the back of the Dual Lock is face up. Now peel the backing off of the Dual Lock to expose the adhesive. Affix the HeadMouse to the device by gently pressing. Optimal placement would generally be at the top and center of the display bezel. Place the HeadMouse so that it does not obscure the screen. A good rule of thumb is to position the HeadMouse so that it is near eye level and pointing directly at the target dot. This will provide the user with maximum range of motion. IMPORTANT NOTE: DO NOT PRESS ON THE LENS OF THE HEADMOUSE EXTREME.
HeadMouse Extreme User Guide
Origin Instruments Corporation Page 11
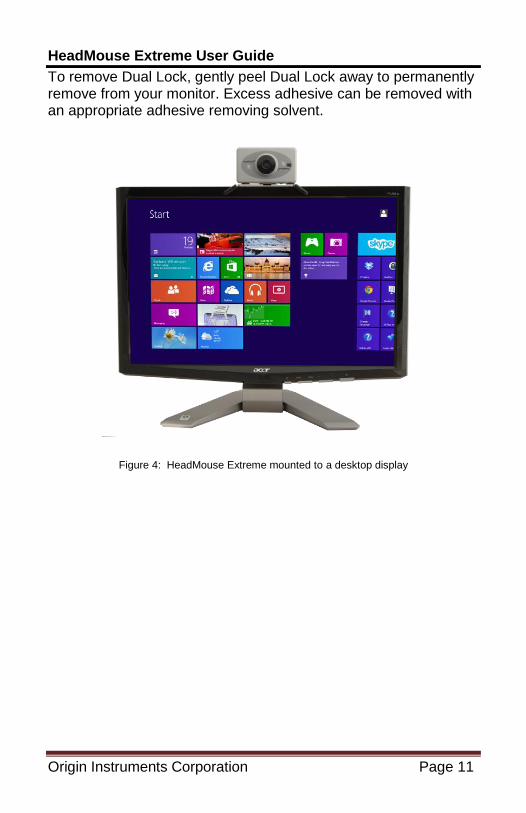
To remove Dual Lock, gently peel Dual Lock away to permanently remove from your monitor. Excess adhesive can be removed with an appropriate adhesive removing solvent.
Figure 4: HeadMouse Extreme mounted to a desktop display
HeadMouse Extreme User Guide
Origin Instruments Corporation Page 12
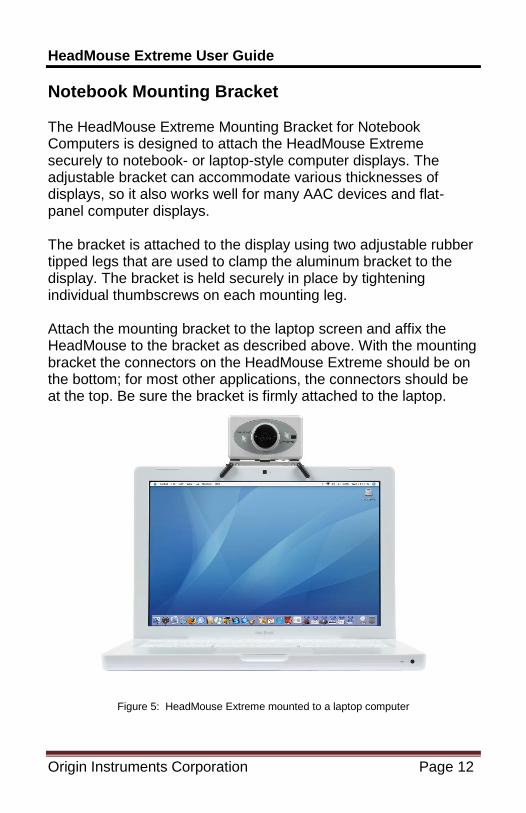
Notebook Mounting Bracket The HeadMouse Extreme Mounting Bracket for Notebook Computers is designed to attach the HeadMouse Extreme securely to notebook- or laptop-style computer displays. The adjustable bracket can accommodate various thicknesses of displays, so it also works well for many AAC devices and flat-panel computer displays. The bracket is attached to the display using two adjustable rubber tipped legs that are used to clamp the aluminum bracket to the display. The bracket is held securely in place by tightening individual thumbscrews on each mounting leg. Attach the mounting bracket to the laptop screen and affix the HeadMouse to the bracket as described above. With the mounting bracket the connectors on the HeadMouse Extreme should be on the bottom; for most other applications, the connectors should be at the top. Be sure the bracket is firmly attached to the laptop.
Figure 5: HeadMouse Extreme mounted to a laptop computer

HeadMouse Extreme User Guide
Origin Instruments Corporation Page 13
Figure 6: HeadMouse Extreme in Notebook Mounting Bracket
Figure 7: HeadMouse Extreme in Notebook Mounting Bracket (side view)
Custom Brackets Custom brackets are available for several AAC devices. These brackets are made to match the contours and dimensions of each device. Please refer to our website for a complete list of mounting options: http://www.orin.com/access/hme_mounts/
HeadMouse Extreme User Guide
Origin Instruments Corporation Page 14
Connection Choose the USB cable for the appropriate mounting configuration:
Laptop Computer with the HeadMouse connectors pointed
down, use the 3-foot (90-centimeter) straight cable. (This
orientation is typically used with our Notebook Bracket.)
Desktop Display with the HeadMouse connectors pointed
up, use the 6-foot (1.8-meter) right-angle cable.
Augmentative and Alternative Communication Device with
the HeadMouse connectors pointed up, use the 2-foot (60-
centimeter) right angle cable.
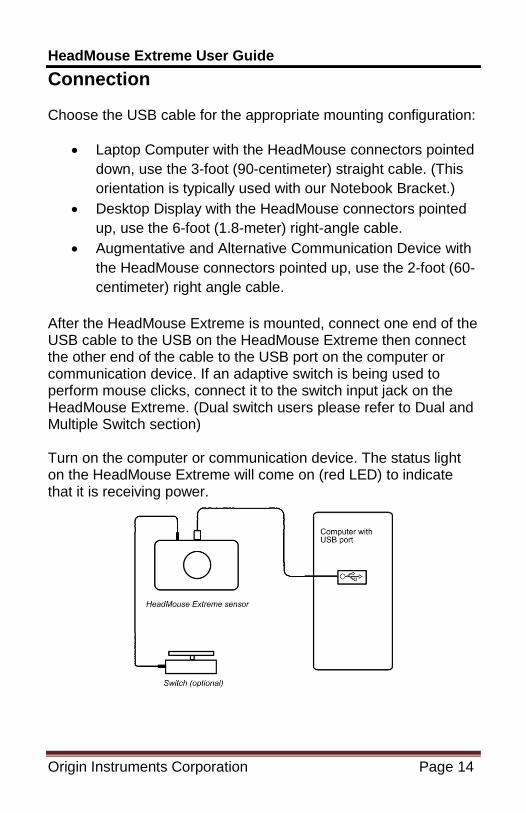
After the HeadMouse Extreme is mounted, connect one end of the USB cable to the USB on the HeadMouse Extreme then connect the other end of the cable to the USB port on the computer or communication device. If an adaptive switch is being used to perform mouse clicks, connect it to the switch input jack on the HeadMouse Extreme. (Dual switch users please refer to Dual and Multiple Switch section) Turn on the computer or communication device. The status light on the HeadMouse Extreme will come on (red LED) to indicate that it is receiving power.
HeadMouse Extreme User Guide
Origin Instruments Corporation Page 15
NOTES:
1. Some computers can take more than 60 seconds to
recognize HeadMouse Extreme when it is first plugged-in
to a USB port.
2. You may need to click in a dialog box to indicate that no
special device driver is provided or needed.
3. When connecting to the computer through a USB hub,
please use a powered hub. With some computers, a non-
powered hub may be acceptable for temporary use but
connection through a non-powered hub is not
recommended because it can impact the operation and/or
performance of the HeadMouse Extreme.
4. For best results use the USB cables that were delivered
with your HeadMouse Extreme and do not use USB
extender cables.
Using HeadMouse Extreme
Tracking Status The red and green LEDs on the front panel of the HeadMouse Extreme indicate the tracking status. When the red LED is on, it indicates that the HeadMouse is searching for a target dot. If a bright object or a reflective object moves into its field of view, the green light may come on momentarily but will resume its search if the object is not a target dot. When the HeadMouse has located a target dot, the green LED comes on. After the HeadMouse has located a target dot it will lock on to the dot and will not be affected by another dot until something obstructs its view. NOTE: If both LEDs are off, the HeadMouse is not receiving power or USB enumeration has not yet occurred.
HeadMouse Extreme User Guide
Origin Instruments Corporation Page 16
General Use Place a target dot on the user’s forehead or glasses. The HeadMouse Extreme will immediately locate the dot and the pointer will move with the user’s head movements. The HeadMouse Extreme offers very precise pointer placement. Optimally the user should be 18- to 24-inches (45- to 60-centimeters) from the HeadMouse Extreme, but can be as far as 5-feet (1.5-meters). The greater the distance from the HeadMouse, the more head movement is required to move the pointer from one edge of the screen to the other. Clicking functions can be made by using an adaptive switch, or dwell software. Please see Dual and Multiple Switch section for details regarding using multiple switches. Origin Instruments offers a variety of adaptive switches, on-screen keyboards with built-in dwell, and dwell selection software for both Windows and Mac OS X.
Pointer Position It is best to take a few minutes to practice pointing. Just like the desktop mouse will at times need to be repositioned to maintain comfort, the pointer on the screen will also need to be repositioned periodically when using the HeadMouse Extreme. This is often referred to as centering the pointer, or re-calibrating. When the pointer is in the center of the user’s work area, the user is most comfortable. The pointer will need to be re-centered as the location of the work area changes. Keep in mind that you are not necessarily centering the pointer in the center of the computer screen but in the center of your work area. This is done by “pushing” the pointer against the screen edge opposite the side of your desired work area. It is best understood by walking through an example.
HeadMouse Extreme User Guide
Origin Instruments Corporation Page 17
Exercise Example: Sit in a comfortable position and take note of where the pointer is on the screen. As an example, say the pointer is at the bottom of the screen. To move the pointer to the top of the screen attempt to move it past the bottom edge of the screen, or “push” it against the bottom edge. Then move your head back to the original comfortable position. The pointer will have moved closer to the top of the screen. This same technique can be used to reposition the pointer in the horizontal axis as well. This centering technique becomes second nature within a few minutes.
Pointer Control The mouse speed in the Control Panel/Preferences of the computer or AAC device determines the amount of sensitivity the pointer has to movement. If the mouse speed is set too fast or high, the pointer will move a greater distance with less physical movement from the user. When the mouse speed is set to slow or low, the pointer will move a smaller distance requiring more physical movement from the user. The user is the best judge of what is most comfortable for his particular abilities. Begin with the mouse speed settings at about ¾ of the way to fast. Adjust from that point in small increments until the user is comfortable with the settings. If the mouse speed is still too slow for the user, additional adjustment can be made via the Mode Switch settings on the HeadMouse Extreme. NOTE FOR MAC USERS: For those using the HeadMouse Extreme to access a Macintosh, it is best to begin with the mouse speed in the fast setting as the mouse drivers in the Macintosh operate at a slower speed than standard Windows drivers so increased speed is often required.
HeadMouse Extreme User Guide
Origin Instruments Corporation Page 18
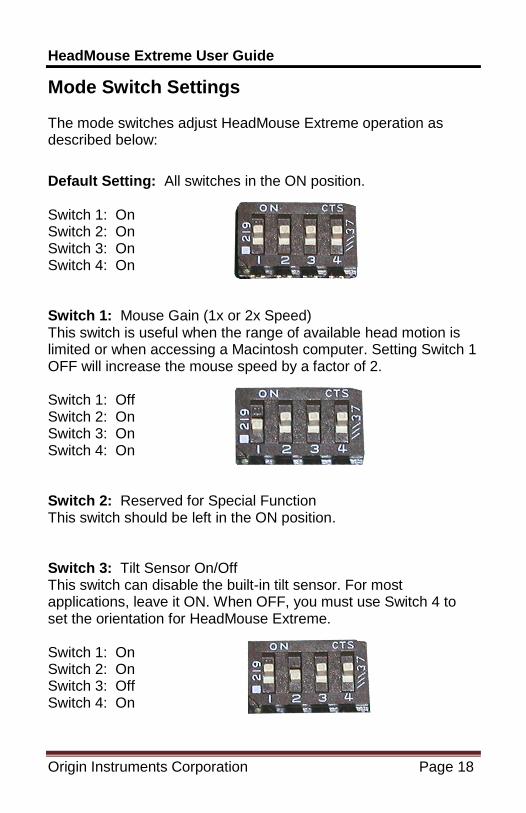
Mode Switch Settings The mode switches adjust HeadMouse Extreme operation as described below:
Default Setting: All switches in the ON position. Switch 1: On Switch 2: On Switch 3: On Switch 4: On Switch 1: Mouse Gain (1x or 2x Speed) This switch is useful when the range of available head motion is limited or when accessing a Macintosh computer. Setting Switch 1 OFF will increase the mouse speed by a factor of 2. Switch 1: Off Switch 2: On Switch 3: On Switch 4: On Switch 2: Reserved for Special Function This switch should be left in the ON position. Switch 3: Tilt Sensor On/Off This switch can disable the built-in tilt sensor. For most applications, leave it ON. When OFF, you must use Switch 4 to set the orientation for HeadMouse Extreme. Switch 1: On Switch 2: On Switch 3: Off Switch 4: On
HeadMouse Extreme User Guide
Origin Instruments Corporation Page 19
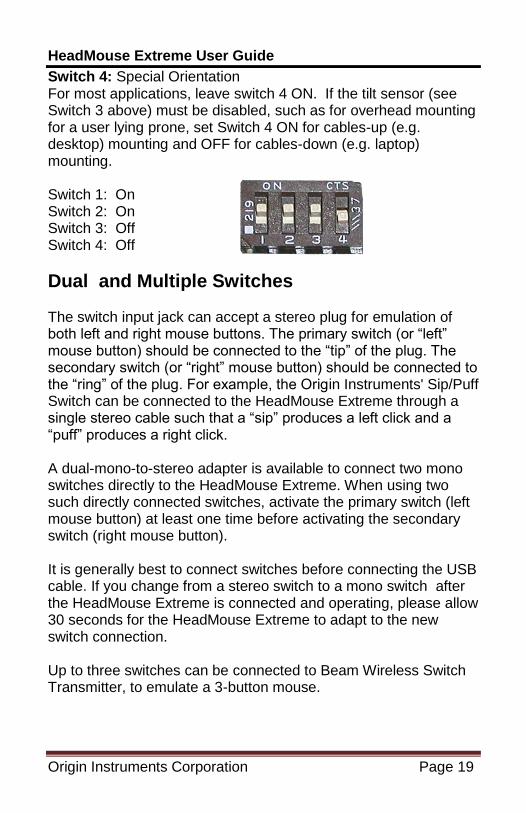
Switch 4: Special Orientation For most applications, leave switch 4 ON. If the tilt sensor (see Switch 3 above) must be disabled, such as for overhead mounting for a user lying prone, set Switch 4 ON for cables-up (e.g. desktop) mounting and OFF for cables-down (e.g. laptop) mounting. Switch 1: On Switch 2: On Switch 3: Off Switch 4: Off
Dual and Multiple Switches The switch input jack can accept a stereo plug for emulation of both left and right mouse buttons. The primary switch (or “left” mouse button) should be connected to the “tip” of the plug. The secondary switch (or “right” mouse button) should be connected to the “ring” of the plug. For example, the Origin Instruments' Sip/Puff Switch can be connected to the HeadMouse Extreme through a single stereo cable such that a “sip” produces a left click and a “puff” produces a right click. A dual-mono-to-stereo adapter is available to connect two mono switches directly to the HeadMouse Extreme. When using two such directly connected switches, activate the primary switch (left mouse button) at least one time before activating the secondary switch (right mouse button). It is generally best to connect switches before connecting the USB cable. If you change from a stereo switch to a mono switch after the HeadMouse Extreme is connected and operating, please allow 30 seconds for the HeadMouse Extreme to adapt to the new switch connection. Up to three switches can be connected to Beam Wireless Switch Transmitter, to emulate a 3-button mouse.

HeadMouse Extreme User Guide
Origin Instruments Corporation Page 20
Technical Specifications
Operating Wave Band: Near Infrared
Power Consumption: 2/3-Watt (typical)
Size: 3.7 by 2.2 by 0.5 inches (94mm by 56mm by 13mm)
Weight: Less than 3.5 ounces (96 grams)
Field of View: 45-degrees
by 60-degrees
Standard Target: Paper Thin, 0.25 inch (6.5mm) Diameter,
with Adhesive Backing
Measurement Rate: 80 Hz Nominal
USB Interface: Full Speed
General Care and Maintenance HeadMouse Extreme may be cleaned with a damp cloth, but it should never be soaked with any water or cleaning solution. Do not allow any kind of liquid in our around the connector panel.
Customer Support Customer support is provided by Origin Instruments during the hours of 8:30 a.m. to 5:30 p.m. Central Time (CT), Monday through Friday. Please email [email protected] or call 972.606.8740.

HeadMouse Extreme User Guide
Origin Instruments Corporation Page 21
Warranty Information Origin Instruments warrants that HeadMouse Extreme will be free from defects in materials and workmanship for a period of two (2) years from the date of shipment. If the product proves defective during this warranty period, Origin Instruments will, at its option, repair or replace the defective product. In order to obtain service under the foregoing warranties, the Customer must notify Origin Instruments of the defect prior to the expiration of the warranty period. The foregoing warranties will not apply to any defect, failure, or damage caused by improper use, or improper or inadequate maintenance and care. Origin Instruments will not be obligated to furnish service under these warranties (a) to repair damage resulting from attempts by unauthorized personnel to install, repair, or service the product; (b) to repair damage resulting from improper use or connection to incompatible equipment; or (c) to service a product that has been modified or integrated with other products when the effect of such modification or integration increases the time or difficulty of servicing the product. The foregoing warranties are given by Origin Instruments with respect to company products in lieu of any other warranties, expressed or implied. Origin Instruments disclaims any implied warranties of merchantability or fitness for a particular purpose. Origin Instruments’ responsibility to repair or replace defective products is the sole and exclusive remedy provided to the customer for breach of any of these warranties. Origin Instruments will not be liable for any indirect, special, incidental or consequential damages irrespective of whether Origin Instruments has advance notice of the possibility of such damage. Products no longer covered by warranty may be suitable for repair. Contact Origin Instruments for an estimated repair fee.

HeadMouse Extreme User Guide
Origin Instruments Corporation Page 22
Before returning a product for repair, please send an email to: [email protected] or call 972.606.8740 to request a Return Materials Authorization (RMA) Number. Once a RMA number is assigned, product must be returned postage pre-paid with all components to:
Origin Instruments Corporation ATTN: Customer Service – RMA (insert your number) 854 Greenview Drive Grand Prairie, TX 75050-2438 USA
For repairs during the warranty period, Origin Instruments will pay for the return of the product to the Customer if the shipment is to a location within the United States. For non-warranty repairs and for warranty repairs outside of the United States, the Customer will be responsible for paying all shipping charges, duties, taxes, and any other charges associated with the return of the product.

HeadMouse Extreme User Guide
Origin Instruments Corporation Page 23
Replacement Targets Replacement reflective targets for use with the HeadMouse Extreme are available for purchase through Origin Instruments Authorized Channel Partners and directly from Origin Instruments.

Origin Instruments Corporation 854 Greenview Dr. Grand Prairie, TX 75050 USA Voice: 972-606-8740 Fax: 972-606-8741 Email: [email protected]
Web: www.orin.com
Shop: http://shop.orin.com
©2013 Copyright by Origin Instruments Corporation. All rights reserved. HeadMouse is a registered trademark of Origin Instruments Corporation. Swifty, Beam, SofType and Dragger are trademarks of Origin Instruments Corporation. All other designated trademarks and brands are the property of their respective owners. 12192013