head porting for the do-it- yourselfer - pirate4x4.com porting diy by standard...head porting for...
TRANSCRIPT
- 1 -
Copyright 1998 Standard Abrasives - All rights reserved - Any unauthorized copying or distribution forbidden by law.
Head Porting for the
Do-It-Yourselfer
by the technical staff of
Standard AbrasivesMotor Sports Division
Here’s an interesting headporting fact: In many cases, thegreatest performance gain per dollarspent comes upon application of basicporting procedures to a productioncylinder head.
These basics can be done byany do-it-yourselfer even those with noporting experience–using the DeluxePorting Kit and the Gasket Removal Kit(part nos. 260001 and 260005) fromthe Standard Abrasives Motor SportsDivision, along with a die grinder andsome common hand tools.
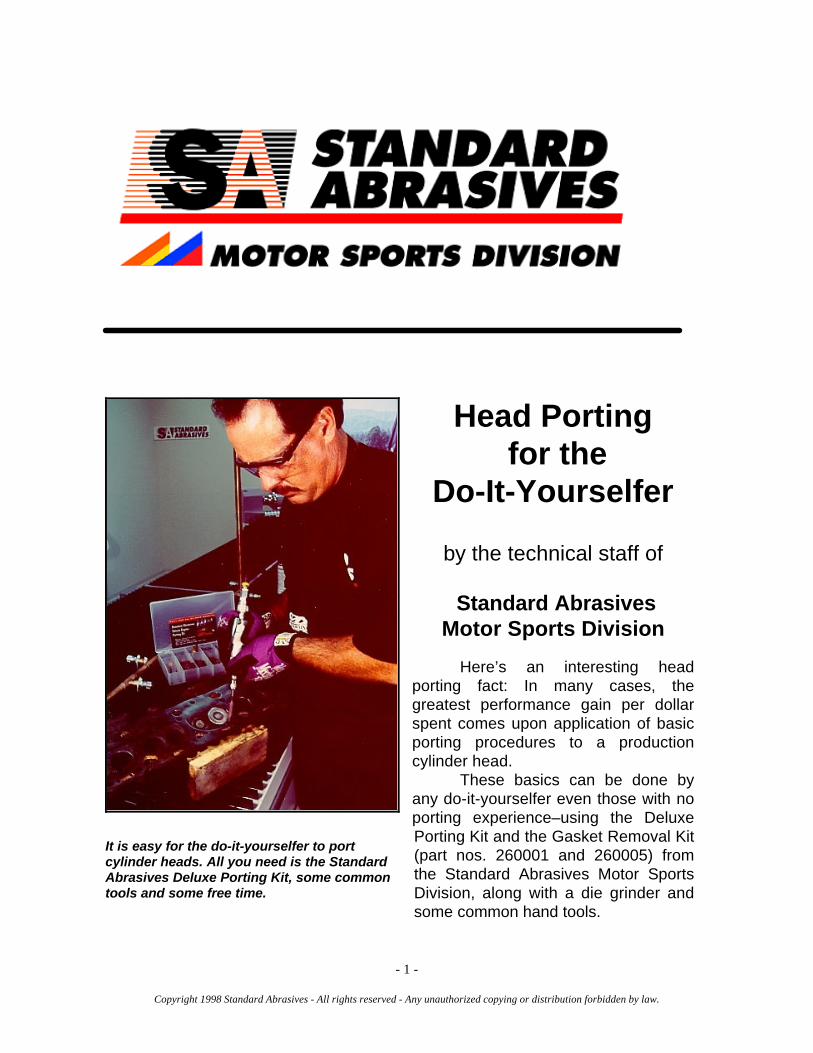
It is easy for the do-it-yourselfer to portcylinder heads. All you need is the StandardAbrasives Deluxe Porting Kit, some commontools and some free time.
Standard Abrasives Motor Sports Division • WWW.SA-MOTORSPORTS.COM • (800)383-6001Head Porting Do-It-Yourself Guide
- 2 -
Copyright 1998 Standard Abrasives - All rights reserved - Any unauthorized copying or distribution forbidden by law.
There is a significantdifference between basic headporting for a street-high-performance or weekend racerapplication and the very complexcylinder head work you see in aPro Stock drag race motor or aNASCAR Winston Cup raceengine. Doing full-on race headsrequires the services of anexperienced cylinder headprofessional, so Pro Stock,Winston Cup and similar heads arebest left to experts. Basic headporting, however, is easy…so easythat even beginning hot rodderscan do it well.
Basic cylinder head portingwill improve the performance ofany production cylinder head by removing flaws that come through massproduction. Basic porting does not attempt to correct any design or engineeringdeficiencies. Once your porting project turns to that, you’re beyond the scope ofbasic porting techniques.
Why is basic port work important to your engine’s performance? Itreduces the restriction in the engine’s intake and exhaust tracts. Reduce thatrestriction and you let more air into the cylinders. If you have more air, you canadd more fuel. The result is increased horsepower.
Most of the work in a basicporting project is focused on reducingthose restrictions which are caused by:1) “steps” that may obstruct intake airflow as it transitions from the intakemanifold to a smaller intake port entry inthe head; 2) casting bumps, ridges orother marks, such as those you mayfind on port floors or roofs; 3) sharpedges, such as those you will findaround the valve guide bosses at the
top of the valve pockets; and 4) thepoint where the intake port floor curvesdown to the valve seat.
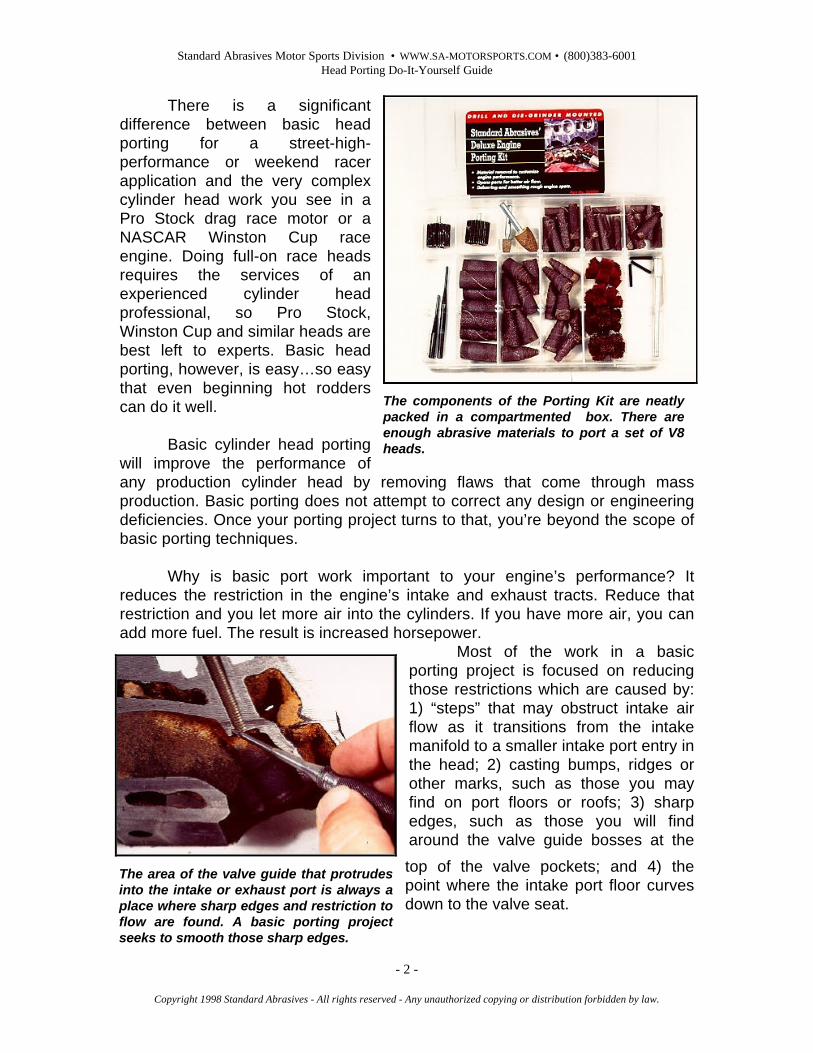
The components of the Porting Kit are neatlypacked in a compartmented box. There areenough abrasive materials to port a set of V8heads.
The area of the valve guide that protrudesinto the intake or exhaust port is always aplace where sharp edges and restriction toflow are found. A basic porting projectseeks to smooth those sharp edges.
Standard Abrasives Motor Sports Division • WWW.SA-MOTORSPORTS.COM • (800)383-6001Head Porting Do-It-Yourself Guide
- 3 -
Copyright 1998 Standard Abrasives - All rights reserved - Any unauthorized copying or distribution forbidden by law.
Basic porting, while somewhattime consuming, is not hard work. Ittakes about 10-12 hours to do a setof average V8 heads. Some weeknights and a weekend invested inyour heads and your basic portingproject will be complete.
Time is money, so we are notgoing to tell you doing your ownheads will save a lot; however, mostprofessional cylinder head portingbusinesses will charge $400-$600 forwhat is sometimes known in the tradeas a “street/strip” port/polish job. Yourbasic porting project, done with theStandard Abrasives Porting Kit, will
allow you to spend that $400-$600 on some other performance enhancementyou want.
The project is made up of six sub-tasks:
1) Intake port entry enlargement, surface finishing and port matching.2) Smooth the intake short side radii, valve guides and valve pockets.3) Smooth the exhaust short side radii, valve guides and bowls.4) Exhaust port and bowl polishing.5) Combustion chamber polishing.6) Intake manifold port matching.
Five of these six tasks reduce restriction in the intake and exhaust tracts.The remaining step, polishing the combustion chambers, inhibits carbon build-up, decreasing an engine’s tendency to detonate or “knock” under heavy load.
After we touch on materials, tools and safety precautions, we are going towalk you through the specifics of a basic port job. As an example, we’ll port astandard cast iron head as used on a 5.0-liter Chevrolet Small-Block V8;however, all basic porting techniques can be applied to the head or heads onany engine, regardless of its manufacturer, configuration or number of cylinders.
To illustrate the improvement that comes with basic porting work, at theend of this guide, we’ll post flow test results, both before and after porting.
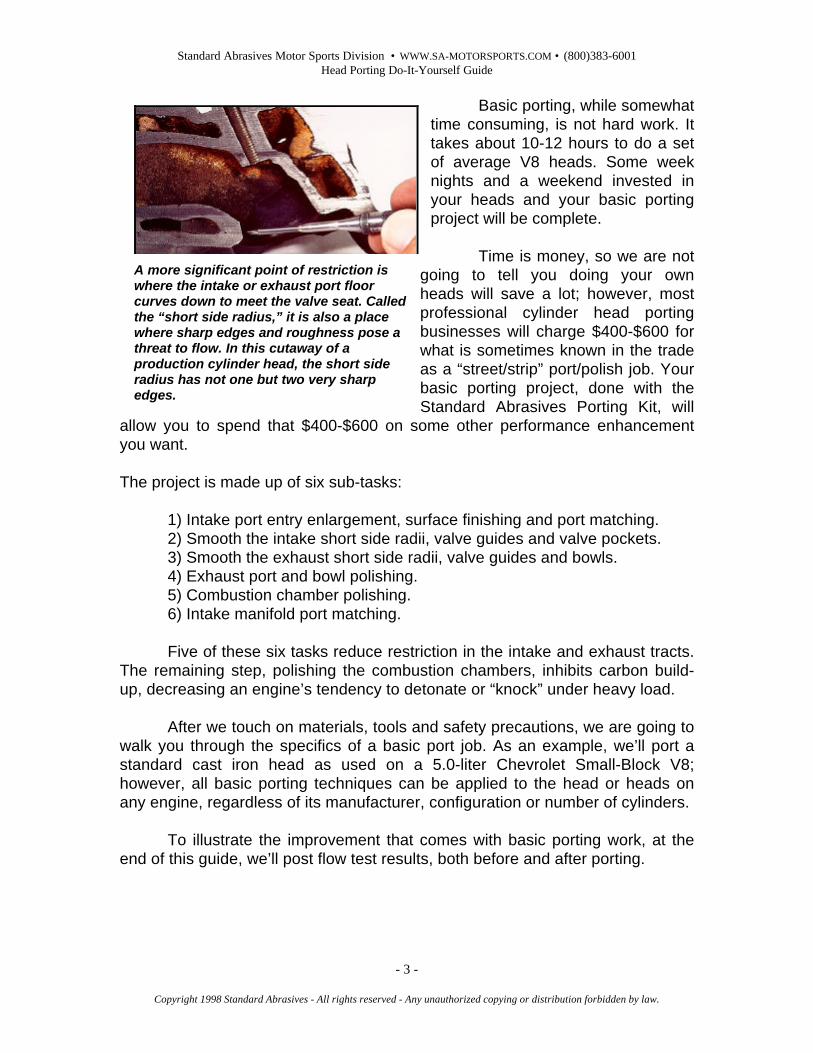
A more significant point of restriction iswhere the intake or exhaust port floorcurves down to meet the valve seat. Calledthe “short side radius,” it is also a placewhere sharp edges and roughness pose athreat to flow. In this cutaway of aproduction cylinder head, the short sideradius has not one but two very sharpedges.
Standard Abrasives Motor Sports Division • WWW.SA-MOTORSPORTS.COM • (800)383-6001Head Porting Do-It-Yourself Guide
- 4 -
Copyright 1998 Standard Abrasives - All rights reserved - Any unauthorized copying or distribution forbidden by law.
Materials, Tools and Safety
The first items you need are our Standard Abrasives Deluxe Porting Kitand our Standard Abrasives 3-inch Gasket Removal Kit. These contain all theabrasive products required to perform a basic porting job on a pair of cast iron oraluminum cylinder heads.
The components in thesekits are designed for mounting ina die grinder having a maximumspeed of 18,000-20,000 rpm anda 1/4-inch diameter collet or“chuck". Do not use an 1/8-inchcollet grinder of the type used inhobby or arts and crafts work.
An air-powered die grinderis desirable because of itsrelatively low cost and variablespeed. An air grinder will requirea compressed air source. Mostcompressors powered by motorsrated at 2.5 horsepower or morewill work well. The air system should be equipped with an adjustable pressureregulator. The abrasive products’ maximum safe speed is 18,000-20,000 rpm. Ifan air grinder’s maximum rpm exceeds that, you must reduce the air pressurewith the regulator so that speed is not exceeded.
While the never-exceed speed is 18,000-20,000 rpm, best durability ofthe abrasive products is achieved when the grinder runs at 10,000-12,000 rpm.Obviously, measuring the die grinder’s speed is difficult; however, most toolmanufacturers cite the maximum speed either in the unit’s instructions or on aspecification plate attached to the tool. Suppose maximum speed of your unit is20,000 rpm, but you want to run it at 10,000. Operate the grinder at half throttleand listen to the noise it makes. Then, run it at full throttle and adjust thepressure regulator such that the noise is about the same as before. That willapproximate 10,000 rpm.
The pressure regulator is important for another reason. You hold a diegrinder in both hands, one on the rear of the tool and the other on the front ofthe unit. The front hand controls the grinder and operates the throttle. It is easierto manipulate a die grinder with the throttle wide open than it is to both controlthe grinder and modulate the throttle at the same time.
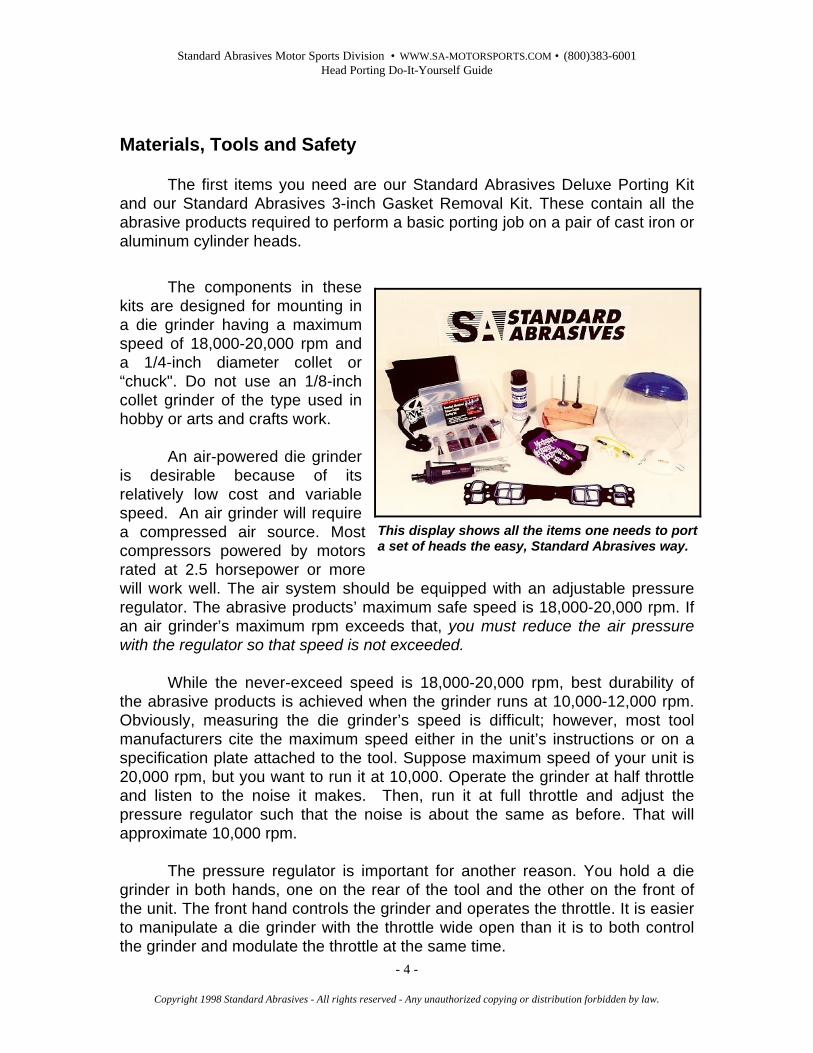
This display shows all the items one needs to porta set of heads the easy, Standard Abrasives way.

Standard Abrasives Motor Sports Division • WWW.SA-MOTORSPORTS.COM • (800)383-6001Head Porting Do-It-Yourself Guide
- 5 -
Copyright 1998 Standard Abrasives - All rights reserved - Any unauthorized copying or distribution forbidden by law.
You may be using an electric die grinder.That is acceptable as long as its maximum rpm isbelow the 18,000-20,000 rpm limit. Becauseelectric grinders are often capable of exceedingthat by a significant margin, an electrical deviceallowing the user to reduce the tool’s speed isnecessary. Additionally, speed regulation of anelectric grinder will be necessary if you want touse the abrasives at 10,000-12,000 rpm.
Additional tools and materials required are: A 5/64-in. hex key (Allenwrench), the die grinder’s chuck wrenches, a set of the intake manifold gasketsyou will use when you assemble the engine, a set of intake manifold bolts, ascribe, machinist’s bluing (either brush-on or spray-on), a pair of four-inch long2x4 wood blocks, and junk intake and exhaust valves that fit your heads.
None of the techniques used in a basic porting project are dangerouswhen proper safety procedures are followed; however, misuse of the tools orfailure to observe safety procedures may result in injury.
Porting work throws lots of metal chips around, so the first thing you needto protect are your eyes. The minimum protection is shatterproof eye weardesigned for industrial use. Better is a set of goggles with a shatterproof lens.Best is a face shield made of shatterproof material.
Next, you need snug-fitting work gloves. We recommend the MechanixWear brand since they allow a good sense of touch while still offering protection.An alternative is a generic leather work glove of medium thickness. Avoid thinleather gloves or the very thick units intended for welding. Do not use rubbergloves.
The last two pieces of safety equipment are optional but suggested.People sensitive to airborne dust may want a respirator mask such as the typeused by paint and body shops. These inexpensive, white cloth masks are held toyour face with an elastic string.
This particular air compressor has a built-inpressure regulator. The pressure control on thepanel selects the regulated pressure. The gauge onthe panel reads regulated pressure not the tankpressure. If you use an air grinder, whatevercompressed air source you use should have anadjustable regulator.
Standard Abrasives Motor Sports Division • WWW.SA-MOTORSPORTS.COM • (800)383-6001Head Porting Do-It-Yourself Guide
- 6 -
Copyright 1998 Standard Abrasives - All rights reserved - Any unauthorized copying or distribution forbidden by law.
The noise some air grinders make is quite loud. If the loud power toolsare a discomfort, do your port work wearing ear protection. Best are the muffsairport workers wear around jet engines. Acceptable are a set of ear plugsintended for industrial use.
Mechanix gloves can be found anywhere racers buy parts and supplies.You should be able to find the rest of this safety equipment at a hardware store.Dedicated safety vendors, such as Lab Safety Supply, are also good sources.
You need a waist high work bench with about a three-foot by five-footarea of clear space. Consider the lighting of your work area, too. Gauging thequality of your porting depends on you being able to easily see the work. If yourgarage or other work area is dimly lit, consider investing in some fluorescentshop lights or at least some temporary, auxiliary lighting.
As this project will probably extend over several days, you will want toclean up the work area from time to time. Know that under certain conditions,aluminum dust is a fire hazard. Dispose of aluminum particles and dust in acovered container.
If you have never used a die grinder to deburr, port or polish engine parts,we suggest you obtain a junk head and try a bit of grinding with some of theabrasive products in the Standard Abrasives Porting Kit before you start on theheads from your engine. What you want for your practice session is a head thatis damaged or otherwise unserviceable. Sources for this are wrecking yards andautomotive machine shops. Best bet is to get a head similar to the one on whichyou are going to do your basic port work.
The point of this exercise is to get a feel for the die grinder fitted withdifferent tools. Prior to starting your practice, use the wood blocks to support thehead in a manner that makes the head deck and intake and exhaust portsurfaces easy to reach. Lift up the head and place a block between your workbench and a head bolt boss or other surface of the head that will sit on the block.
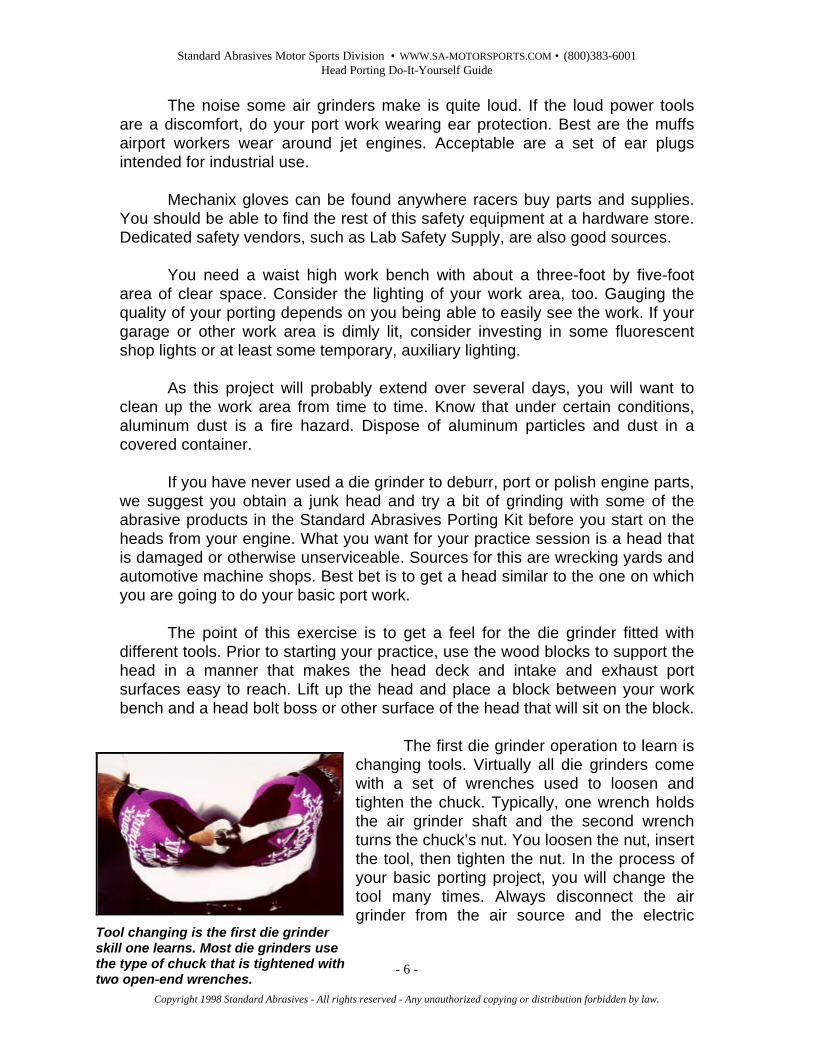
The first die grinder operation to learn ischanging tools. Virtually all die grinders comewith a set of wrenches used to loosen andtighten the chuck. Typically, one wrench holdsthe air grinder shaft and the second wrenchturns the chuck’s nut. You loosen the nut, insertthe tool, then tighten the nut. In the process ofyour basic porting project, you will change thetool many times. Always disconnect the airgrinder from the air source and the electric
Tool changing is the first die grinderskill one learns. Most die grinders usethe type of chuck that is tightened withtwo open-end wrenches.
Standard Abrasives Motor Sports Division • WWW.SA-MOTORSPORTS.COM • (800)383-6001Head Porting Do-It-Yourself Guide
- 7 -
Copyright 1998 Standard Abrasives - All rights reserved - Any unauthorized copying or distribution forbidden by law.
grinder from the power source when changing tools.
During your practice work, learn to control the grinder such that you moveit smoothly. Grinding in one place will result in removal of too much material anduneven surfaces. Also, this is the time to set the speed of the grinder. Youneither want to exceed 20,000 rpm nor do you want the grinder to chatter.Remember, best speed is 10,000-12,000 rpm. Review the previous discussionabout grinder speed if you need to change it.
If you are working with aluminum heads or intake manifolds, regardless ofthe type of abrasive, use a more gentle touch than you would if you wereworking cast iron. Because aluminum is softer than iron, it abrades faster. If youuse the same grinder pressure you would with iron, before you know it, you willhave shaved off too much material. Additionally, under most conditions, theabrasive tool will “load-up” with caked on aluminum as you work. Spraying thetool frequently with a light lubricant, such as WD-40, reduces this problem.
Throughout this job, your quality control device will be your finger. Duringyour practice work, find a reasonably flat spot on the exterior of the head. Usethe 40-grit then 80-grit cartridge rolls to smooth a square-inch or so of this area.Use the exterior of the head because you want your finished work to be easilyvisible. Strive for an even finish with the 80-grit. Then, take off your gloves anduse your finger tips to feel the area you have just prepared. Think carefully aboutwhat you are feeling. Hold that thought.
After you feel confident you have had enough practice on the junk head,lay out the “good” heads you will port on the bench. They need to be completelydisassembled before any port work is attempted. Consult a factory servicemanual if you are going to take them apart yourself or have an automotivemachine shop do it for you.
After disassembly, if the heads came off an engine that had been inservice a while, they will need to be cleaned. We suggest you have iron headshot-tanked. If your heads are aluminum, make sure whatever cleaning methodyou choose is safe for aluminum.
Used heads should be carefully examined for cracks, especially aroundthe exhaust valve seats. Additionally, used heads should be pressure checkedto make sure they have no coolant leaks. If leaks or cracks are found, have themrepaired before doing any port work.
Standard Abrasives Motor Sports Division • WWW.SA-MOTORSPORTS.COM • (800)383-6001Head Porting Do-It-Yourself Guide
- 8 -
Copyright 1998 Standard Abrasives - All rights reserved - Any unauthorized copying or distribution forbidden by law.
Step 1: Removing Old Gaskets and Marking the Intake Ports
Even though the heads have been cleaned,the gasket and deck surfaces should be
conditioned to remove all traces of old gaskets, paint, gasket sealer, corrosionand dirt. The use of a putty knife or scrapper for this purpose is not acceptablebecause neither will clean those surfaces completely. If your heads arealuminum, a putty knife or scraper may even damage those surfaces.
The Standard Abrasives' 3-inch Gasket Removal Kit is theproper way to condition the gasketsurfaces without damaging them. Itcontains surface conditioning discsfor use on cast iron and aluminumalong with a holder pad thatattaches to your die grinder.
Disconnect the grinder, installthe Standard Abrasives' surfaceconditioning disc holder into thechuck and tighten the nut. Theconditioning discs use StandardAbrasives’ unique Soc-Att™ locking system, so installation is as simple as atwist of your wrist. Reconnect the grinder, put on your eye protection and gloves,then start removing the gaskets the easy, Standard Abrasives way. Once thegasket surfaces are down to bare metal, disconnect the grinder and remove theconditioning disc set-up.
In most cases, your port workwill start with enlarging the “portentry” area to the size of the openingsin the intake manifold gaskets. Later,you will reshape the ports in theintake manifold to this same size.
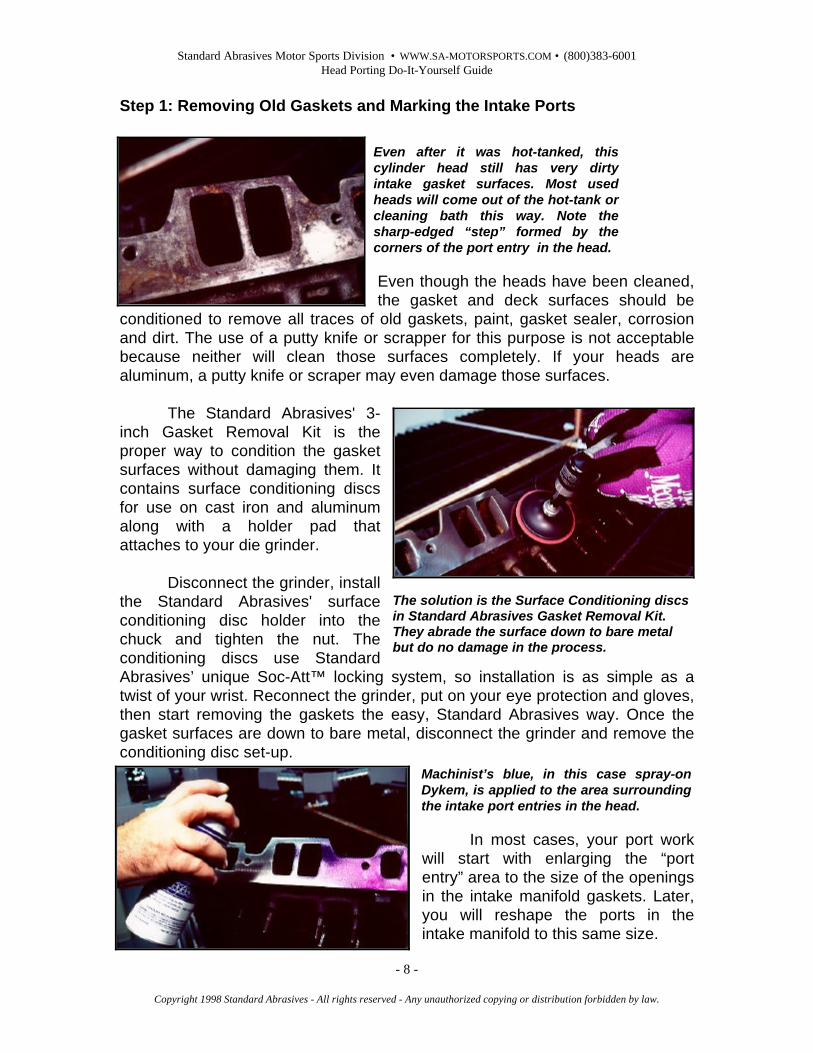
Even after it was hot-tanked, thiscylinder head still has very dirtyintake gasket surfaces. Most usedheads will come out of the hot-tank orcleaning bath this way. Note thesharp-edged “step” formed by thecorners of the port entry in the head.
The solution is the Surface Conditioning discsin Standard Abrasives Gasket Removal Kit.They abrade the surface down to bare metalbut do no damage in the process.
Machinist’s blue, in this case spray-onDykem, is applied to the area surroundingthe intake port entries in the head.

Standard Abrasives Motor Sports Division • WWW.SA-MOTORSPORTS.COM • (800)383-6001Head Porting Do-It-Yourself Guide
- 9 -
Copyright 1998 Standard Abrasives - All rights reserved - Any unauthorized copying or distribution forbidden by law.
To ensure the head port entry and the intake manifold port end up thesame size, you scribe an outline of the intake gasket openings on the head andthe manifold. Machinist’s bluing is used for this. Apply it to the intake gasketsurface around the intake ports and allow it to dry. Place the new intake gasketin its normal position and hold it with manifold bolts. Scribe the inside perimeterof each intake port onto the gasket surface of the head, then remove the gasket.
Pay close attention to the position of the gasket on the head. If it is upsidedown or backwards, your scribe marks will be in the wrong locations. That willcause a serious problem with your port work.
Step 2: Preparing the Intake Port Entry
Install the large, conical, rotarygrinding stone (part no. 263901) fromthe Porting Kit into the grinder’s chuck.Tighten the chuck then reconnect theair hose or electric cord. Remember toput your eye protection back on if youremove it during the change.
Now you are ready to do yourfirst porting work. You will enlarge theport openings in the intake gasketsurface by removing material inside ofthe scribe marks you made. Then,
The areas inside of the scribe lines are the placeswhere material will be removed.
The intake manifold gaskets, in this case a set ofFel-Pro Performance Gaskets, are installed onthe head. Intake bolts hold them in place and anoutline of the inside of the gasket’s intake port isscribed on the head.
The first porting operations are usuallydone with the rotary stone.
Standard Abrasives Motor Sports Division • WWW.SA-MOTORSPORTS.COM • (800)383-6001Head Porting Do-It-Yourself Guide
- 10 -
Copyright 1998 Standard Abrasives - All rights reserved - Any unauthorized copying or distribution forbidden by law.
you’ll blend or “feather” the now larger port opening into the remaining port byremoving progressively less material as you move down into the intake port. Inmost cases, you want to grind from the port entry to about 1-1.5 inches into theport.
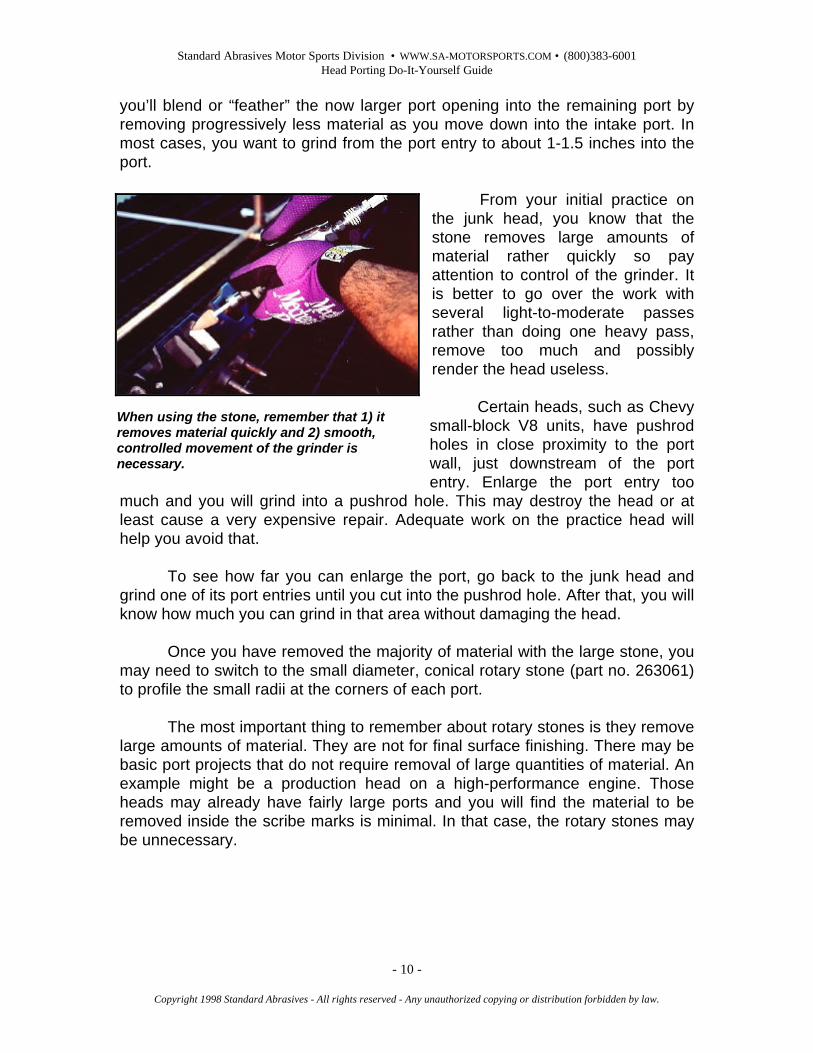
From your initial practice onthe junk head, you know that thestone removes large amounts ofmaterial rather quickly so payattention to control of the grinder. Itis better to go over the work withseveral light-to-moderate passesrather than doing one heavy pass,remove too much and possiblyrender the head useless.
Certain heads, such as Chevysmall-block V8 units, have pushrodholes in close proximity to the portwall, just downstream of the portentry. Enlarge the port entry too
much and you will grind into a pushrod hole. This may destroy the head or atleast cause a very expensive repair. Adequate work on the practice head willhelp you avoid that.
To see how far you can enlarge the port, go back to the junk head andgrind one of its port entries until you cut into the pushrod hole. After that, you willknow how much you can grind in that area without damaging the head.
Once you have removed the majority of material with the large stone, youmay need to switch to the small diameter, conical rotary stone (part no. 263061)to profile the small radii at the corners of each port.
The most important thing to remember about rotary stones is they removelarge amounts of material. They are not for final surface finishing. There may bebasic port projects that do not require removal of large quantities of material. Anexample might be a production head on a high-performance engine. Thoseheads may already have fairly large ports and you will find the material to beremoved inside the scribe marks is minimal. In that case, the rotary stones maybe unnecessary.
When using the stone, remember that 1) itremoves material quickly and 2) smooth,controlled movement of the grinder isnecessary.
Standard Abrasives Motor Sports Division • WWW.SA-MOTORSPORTS.COM • (800)383-6001Head Porting Do-It-Yourself Guide
- 11 -
Copyright 1998 Standard Abrasives - All rights reserved - Any unauthorized copying or distribution forbidden by law.
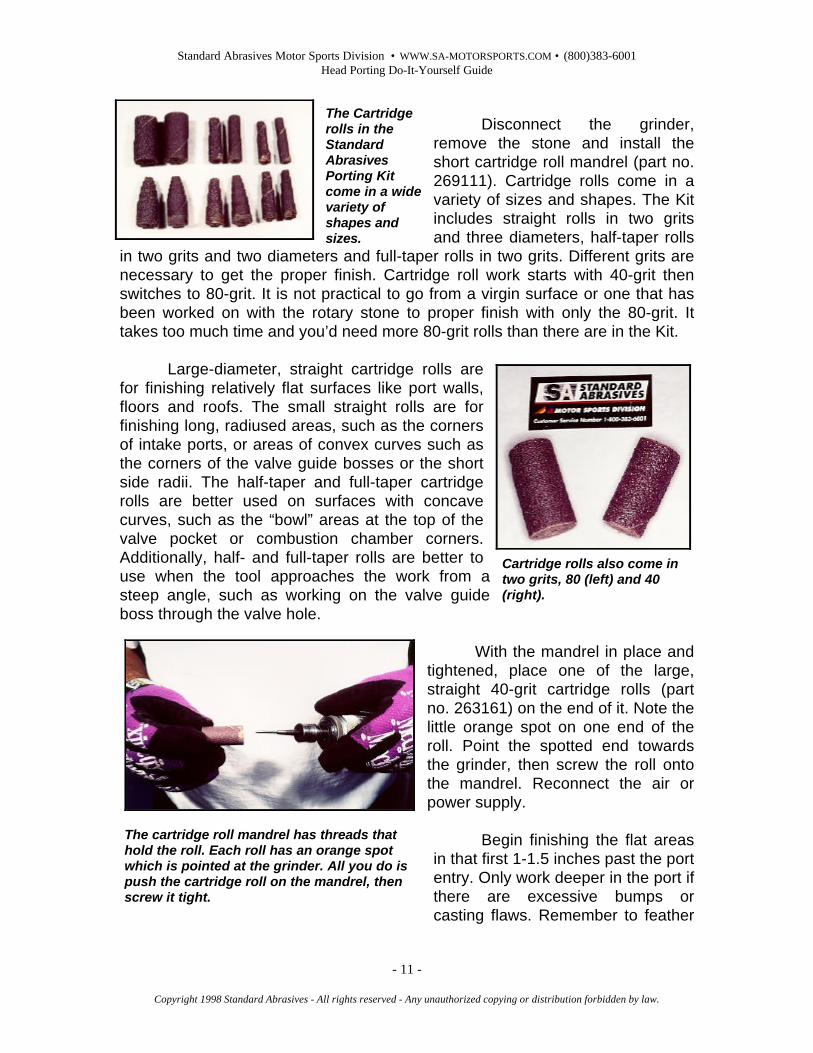
Disconnect the grinder,remove the stone and install theshort cartridge roll mandrel (part no.269111). Cartridge rolls come in avariety of sizes and shapes. The Kitincludes straight rolls in two gritsand three diameters, half-taper rolls
in two grits and two diameters and full-taper rolls in two grits. Different grits arenecessary to get the proper finish. Cartridge roll work starts with 40-grit thenswitches to 80-grit. It is not practical to go from a virgin surface or one that hasbeen worked on with the rotary stone to proper finish with only the 80-grit. Ittakes too much time and you’d need more 80-grit rolls than there are in the Kit.
Large-diameter, straight cartridge rolls arefor finishing relatively flat surfaces like port walls,floors and roofs. The small straight rolls are forfinishing long, radiused areas, such as the cornersof intake ports, or areas of convex curves such asthe corners of the valve guide bosses or the shortside radii. The half-taper and full-taper cartridgerolls are better used on surfaces with concavecurves, such as the “bowl” areas at the top of thevalve pocket or combustion chamber corners.Additionally, half- and full-taper rolls are better touse when the tool approaches the work from asteep angle, such as working on the valve guideboss through the valve hole.
With the mandrel in place andtightened, place one of the large,straight 40-grit cartridge rolls (partno. 263161) on the end of it. Note thelittle orange spot on one end of theroll. Point the spotted end towardsthe grinder, then screw the roll ontothe mandrel. Reconnect the air orpower supply.
Begin finishing the flat areasin that first 1-1.5 inches past the portentry. Only work deeper in the port ifthere are excessive bumps orcasting flaws. Remember to feather
The Cartridgerolls in theStandardAbrasivesPorting Kitcome in a widevariety ofshapes andsizes.
Cartridge rolls also come intwo grits, 80 (left) and 40(right).
The cartridge roll mandrel has threads thathold the roll. Each roll has an orange spotwhich is pointed at the grinder. All you do ispush the cartridge roll on the mandrel, thenscrew it tight.

Standard Abrasives Motor Sports Division • WWW.SA-MOTORSPORTS.COM • (800)383-6001Head Porting Do-It-Yourself Guide
- 12 -
Copyright 1998 Standard Abrasives - All rights reserved - Any unauthorized copying or distribution forbidden by law.
the smooth area into the surrounding virgin metal at the end of that 1-1.5-inchesdown the port entry.
Once you have worked the port entry with 40-grit, switch to the large,straight 80-grit cartridge roll (part no. 263163). The 80-grit gives you the smooth,but not polished, surface that is correct for intake ports. Once you finish the 80-grit step, stop, remove your gloves and feel the surface. When your tactile “QCchecker” senses the right finish on all the port walls, you’re done.
At left is a finished intake port entry.Note the slightly rough finish. At right isa partially finished port. The floor is
untouched and a large casting mark is evident. Also. note the difference in portheights. This is because the left port has been matched to the gasket whereasthe matching of the right port has not been completed.
Best way to gauge the finish on the port walls iswith your finger. For intakes, you want thesurface slightly rough to the touch but withoutwaves, gouges or low spots.
You start with 40-grit rolls andprogress to 80-grit. In many intakeports, the small-diameter rolls willbe needed to finish the radii at thecorners of the port. Typically youpolish only 1-1.5 inches down theport.
With this cutaway, we polished the wholeport to better illustrate the rough-to-touchfinish. Note the smoothed valve guides andshort side radius.
Standard Abrasives Motor Sports Division • WWW.SA-MOTORSPORTS.COM • (800)383-6001Head Porting Do-It-Yourself Guide
- 13 -
Copyright 1998 Standard Abrasives - All rights reserved - Any unauthorized copying or distribution forbidden by law.
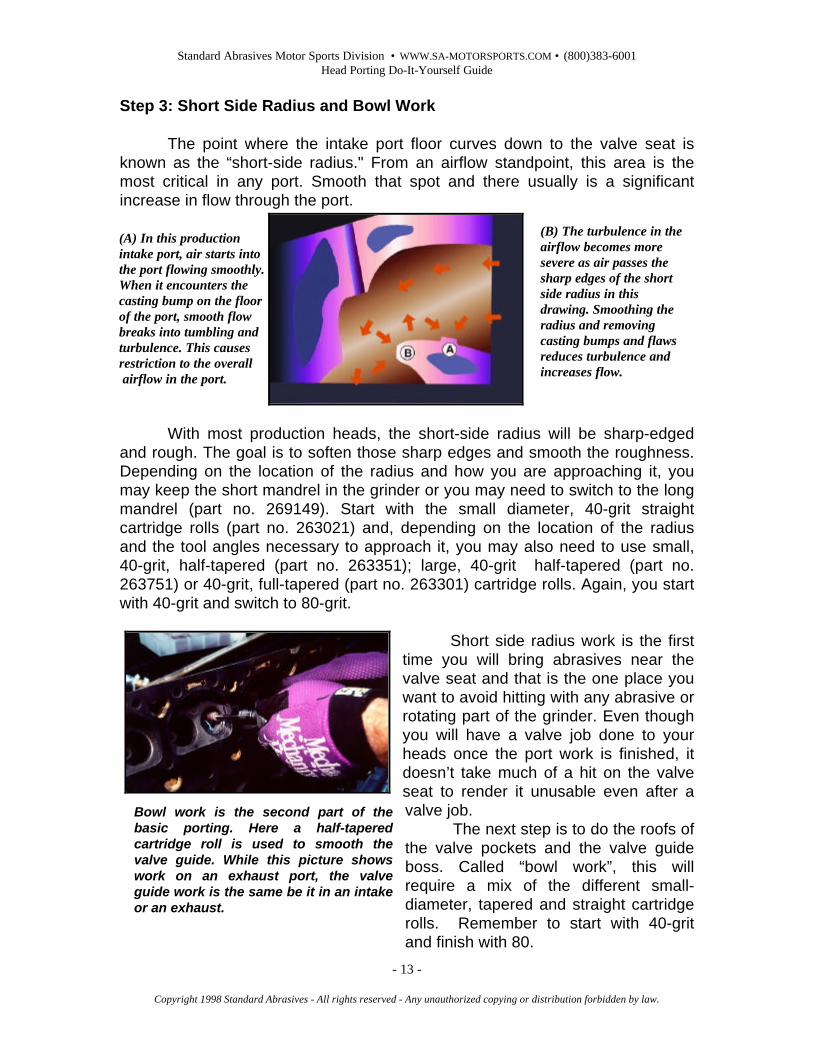
Step 3: Short Side Radius and Bowl Work
The point where the intake port floor curves down to the valve seat isknown as the “short-side radius." From an airflow standpoint, this area is themost critical in any port. Smooth that spot and there usually is a significantincrease in flow through the port.
With most production heads, the short-side radius will be sharp-edgedand rough. The goal is to soften those sharp edges and smooth the roughness.Depending on the location of the radius and how you are approaching it, youmay keep the short mandrel in the grinder or you may need to switch to the longmandrel (part no. 269149). Start with the small diameter, 40-grit straightcartridge rolls (part no. 263021) and, depending on the location of the radiusand the tool angles necessary to approach it, you may also need to use small,40-grit, half-tapered (part no. 263351); large, 40-grit half-tapered (part no.263751) or 40-grit, full-tapered (part no. 263301) cartridge rolls. Again, you startwith 40-grit and switch to 80-grit.
Short side radius work is the firsttime you will bring abrasives near thevalve seat and that is the one place youwant to avoid hitting with any abrasive orrotating part of the grinder. Even thoughyou will have a valve job done to yourheads once the port work is finished, itdoesn’t take much of a hit on the valveseat to render it unusable even after avalve job.
The next step is to do the roofs ofthe valve pockets and the valve guideboss. Called “bowl work”, this willrequire a mix of the different small-diameter, tapered and straight cartridgerolls. Remember to start with 40-gritand finish with 80.
(A) In this productionintake port, air starts intothe port flowing smoothly.When it encounters thecasting bump on the floorof the port, smooth flowbreaks into tumbling andturbulence. This causesrestriction to the overall airflow in the port.
(B) The turbulence in theairflow becomes moresevere as air passes thesharp edges of the shortside radius in thisdrawing. Smoothing theradius and removingcasting bumps and flawsreduces turbulence andincreases flow.
Bowl work is the second part of thebasic porting. Here a half-taperedcartridge roll is used to smooth thevalve guide. While this picture showswork on an exhaust port, the valveguide work is the same be it in an intakeor an exhaust.
Standard Abrasives Motor Sports Division • WWW.SA-MOTORSPORTS.COM • (800)383-6001Head Porting Do-It-Yourself Guide
- 14 -
Copyright 1998 Standard Abrasives - All rights reserved - Any unauthorized copying or distribution forbidden by law.
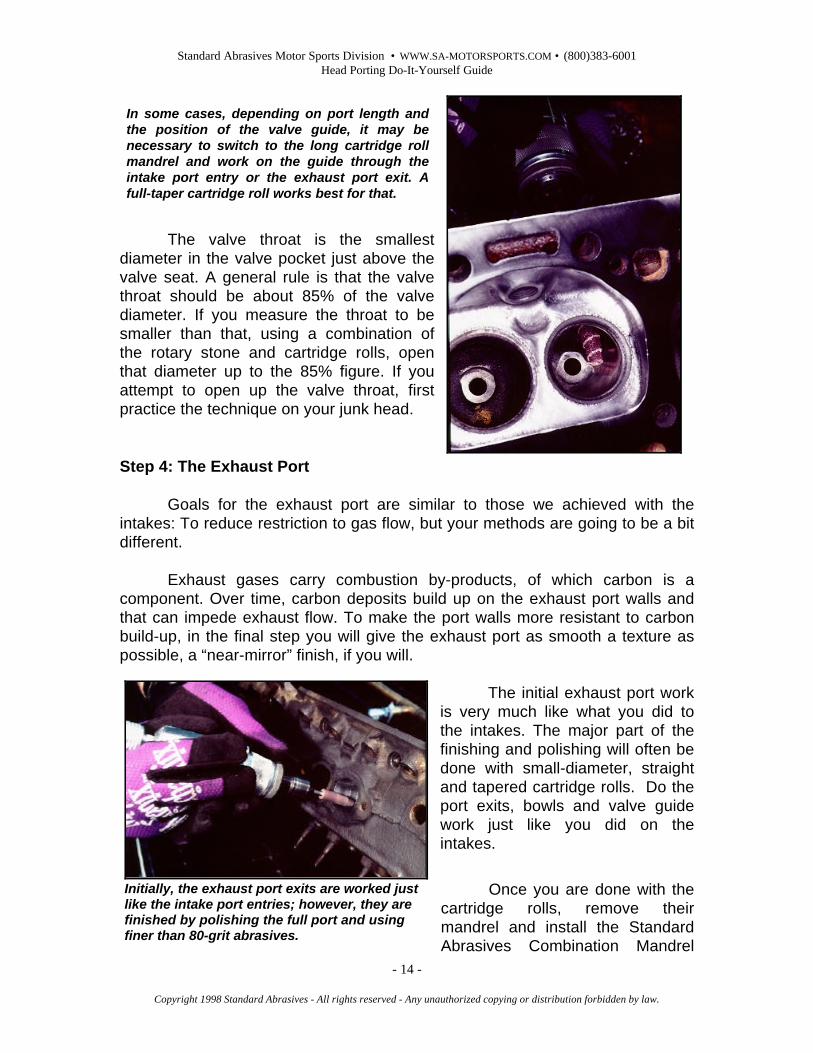
The valve throat is the smallestdiameter in the valve pocket just above thevalve seat. A general rule is that the valvethroat should be about 85% of the valvediameter. If you measure the throat to besmaller than that, using a combination ofthe rotary stone and cartridge rolls, openthat diameter up to the 85% figure. If youattempt to open up the valve throat, firstpractice the technique on your junk head.
Step 4: The Exhaust Port
Goals for the exhaust port are similar to those we achieved with theintakes: To reduce restriction to gas flow, but your methods are going to be a bitdifferent.
Exhaust gases carry combustion by-products, of which carbon is acomponent. Over time, carbon deposits build up on the exhaust port walls andthat can impede exhaust flow. To make the port walls more resistant to carbonbuild-up, in the final step you will give the exhaust port as smooth a texture aspossible, a “near-mirror” finish, if you will.
The initial exhaust port workis very much like what you did tothe intakes. The major part of thefinishing and polishing will often bedone with small-diameter, straightand tapered cartridge rolls. Do theport exits, bowls and valve guidework just like you did on theintakes.
Once you are done with thecartridge rolls, remove theirmandrel and install the StandardAbrasives Combination Mandrel
In some cases, depending on port length andthe position of the valve guide, it may benecessary to switch to the long cartridge rollmandrel and work on the guide through theintake port entry or the exhaust port exit. Afull-taper cartridge roll works best for that.
Initially, the exhaust port exits are worked justlike the intake port entries; however, they arefinished by polishing the full port and usingfiner than 80-grit abrasives.

Standard Abrasives Motor Sports Division • WWW.SA-MOTORSPORTS.COM • (800)383-6001Head Porting Do-It-Yourself Guide
- 15 -
Copyright 1998 Standard Abrasives - All rights reserved - Any unauthorized copying or distribution forbidden by law.
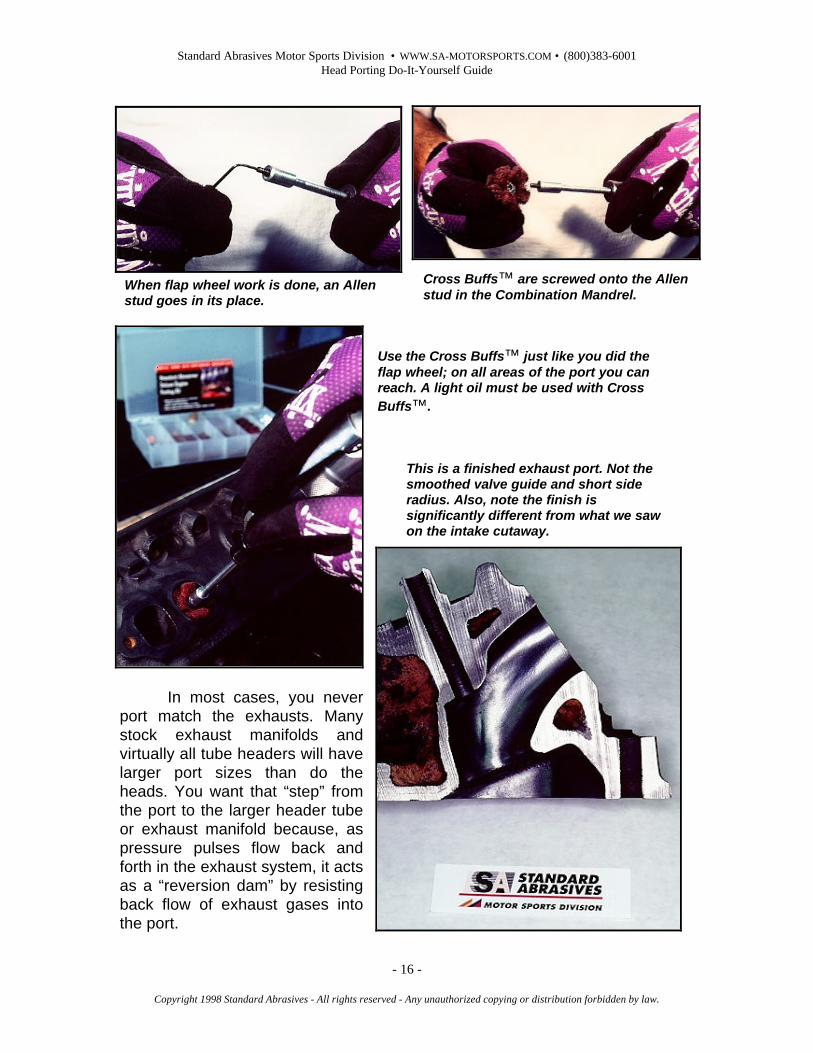
(part no. 269201) and screw the 120-grit flap wheel (part no. 262618) onto it.The flap wheel is used to take the finishone step past what you put on theintakes. Use the flap wheel on everypart of the exhaust port you can reach.
Once your flap wheel work isdone, remove it and install one of thesmall, hex-socketed set screws into theCombination Mandrel. Tighten it, thenscrew one of the maroon-colored, 3-ply,1 1/2-inch, medium-grade, CrossBuffs™ (part no. 265054) onto the setscrew. Standard Abrasives CrossBuffs™ are the most unique product inthe Deluxe Porting Kit. They weredesigned exclusively for automotive use.Of all abrasives in the Porting Kit, CrossBuffs™ are most sensitive to grinderspeed and should be run at 10,000 rpmfor best results. Also, Cross Buffs™need to be used with a light lubricant,such as WD-40.
Begin working the exhaust portwith the medium Cross Buff™. Once youhave hit as much of the port as you canwith the medium, make a final pass withthe red, 3-ply, 1 1/2-in. very-fine-grade,Cross Buff™ (part no. 265056). Whenyou are done, the exhaust port walls willhave that near-mirror finish that will resistcarbon deposits.
After cartridge roll work is complete,you switch to the Combination Mandreland attach the flap wheel.
You want to flap wheel all accessibleareas of the exhaust port.
The Cross Buffs™ in the StandardAbrasives Porting Kit come in twogrits; medium and fine.
Standard Abrasives Motor Sports Division • WWW.SA-MOTORSPORTS.COM • (800)383-6001Head Porting Do-It-Yourself Guide
- 16 -
Copyright 1998 Standard Abrasives - All rights reserved - Any unauthorized copying or distribution forbidden by law.
In most cases, you neverport match the exhausts. Manystock exhaust manifolds andvirtually all tube headers will havelarger port sizes than do theheads. You want that “step” fromthe port to the larger header tubeor exhaust manifold because, aspressure pulses flow back andforth in the exhaust system, it actsas a “reversion dam” by resistingback flow of exhaust gases intothe port.
When flap wheel work is done, an Allenstud goes in its place.
Cross Buffs™ are screwed onto the Allenstud in the Combination Mandrel.
Use the Cross Buffs™ just like you did theflap wheel; on all areas of the port you canreach. A light oil must be used with CrossBuffs™.
This is a finished exhaust port. Not thesmoothed valve guide and short sideradius. Also, note the finish issignificantly different from what we sawon the intake cutaway.
Standard Abrasives Motor Sports Division • WWW.SA-MOTORSPORTS.COM • (800)383-6001Head Porting Do-It-Yourself Guide
- 17 -
Copyright 1998 Standard Abrasives - All rights reserved - Any unauthorized copying or distribution forbidden by law.
If you end up with the rare situation where the stock exhaust manifold hasports smaller than those in the head, you will need to port match. Use the sametechnique used to match the intakes.
Step 5: Polishing the Chambers
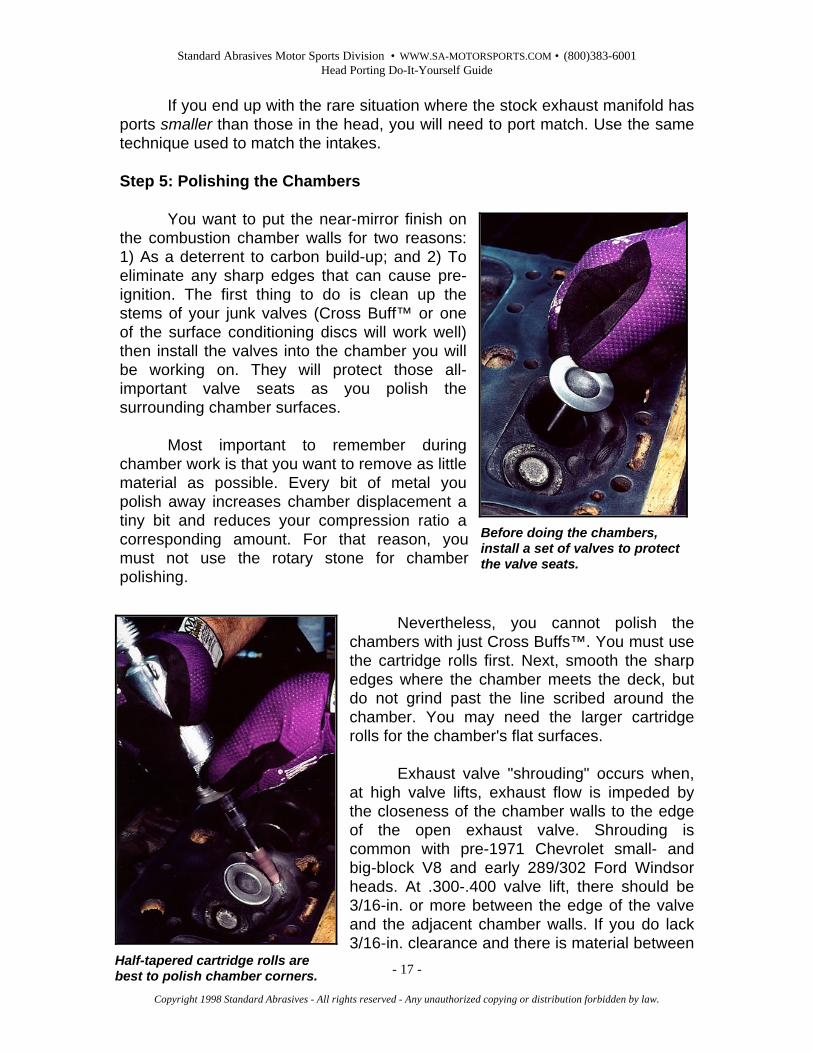
You want to put the near-mirror finish onthe combustion chamber walls for two reasons:1) As a deterrent to carbon build-up; and 2) Toeliminate any sharp edges that can cause pre-ignition. The first thing to do is clean up thestems of your junk valves (Cross Buff™ or oneof the surface conditioning discs will work well)then install the valves into the chamber you willbe working on. They will protect those all-important valve seats as you polish thesurrounding chamber surfaces.
Most important to remember duringchamber work is that you want to remove as littlematerial as possible. Every bit of metal youpolish away increases chamber displacement atiny bit and reduces your compression ratio acorresponding amount. For that reason, youmust not use the rotary stone for chamberpolishing.
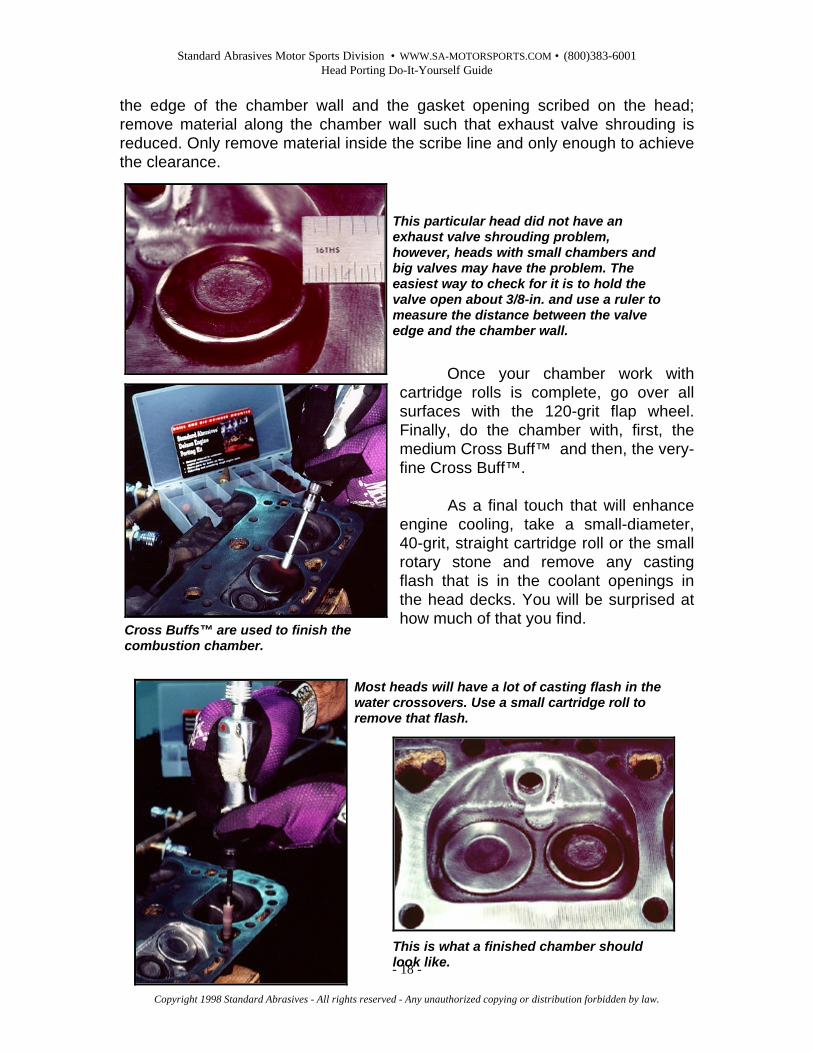
Nevertheless, you cannot polish thechambers with just Cross Buffs™. You must usethe cartridge rolls first. Next, smooth the sharpedges where the chamber meets the deck, butdo not grind past the line scribed around thechamber. You may need the larger cartridgerolls for the chamber's flat surfaces.
Exhaust valve "shrouding" occurs when,at high valve lifts, exhaust flow is impeded bythe closeness of the chamber walls to the edgeof the open exhaust valve. Shrouding iscommon with pre-1971 Chevrolet small- andbig-block V8 and early 289/302 Ford Windsorheads. At .300-.400 valve lift, there should be3/16-in. or more between the edge of the valveand the adjacent chamber walls. If you do lack3/16-in. clearance and there is material between
Before doing the chambers,install a set of valves to protectthe valve seats.
Half-tapered cartridge rolls arebest to polish chamber corners.
Standard Abrasives Motor Sports Division • WWW.SA-MOTORSPORTS.COM • (800)383-6001Head Porting Do-It-Yourself Guide
- 18 -
Copyright 1998 Standard Abrasives - All rights reserved - Any unauthorized copying or distribution forbidden by law.
the edge of the chamber wall and the gasket opening scribed on the head;remove material along the chamber wall such that exhaust valve shrouding isreduced. Only remove material inside the scribe line and only enough to achievethe clearance.
Once your chamber work withcartridge rolls is complete, go over allsurfaces with the 120-grit flap wheel.Finally, do the chamber with, first, themedium Cross Buff™ and then, the very-fine Cross Buff™.
As a final touch that will enhanceengine cooling, take a small-diameter,40-grit, straight cartridge roll or the smallrotary stone and remove any castingflash that is in the coolant openings inthe head decks. You will be surprised athow much of that you find.
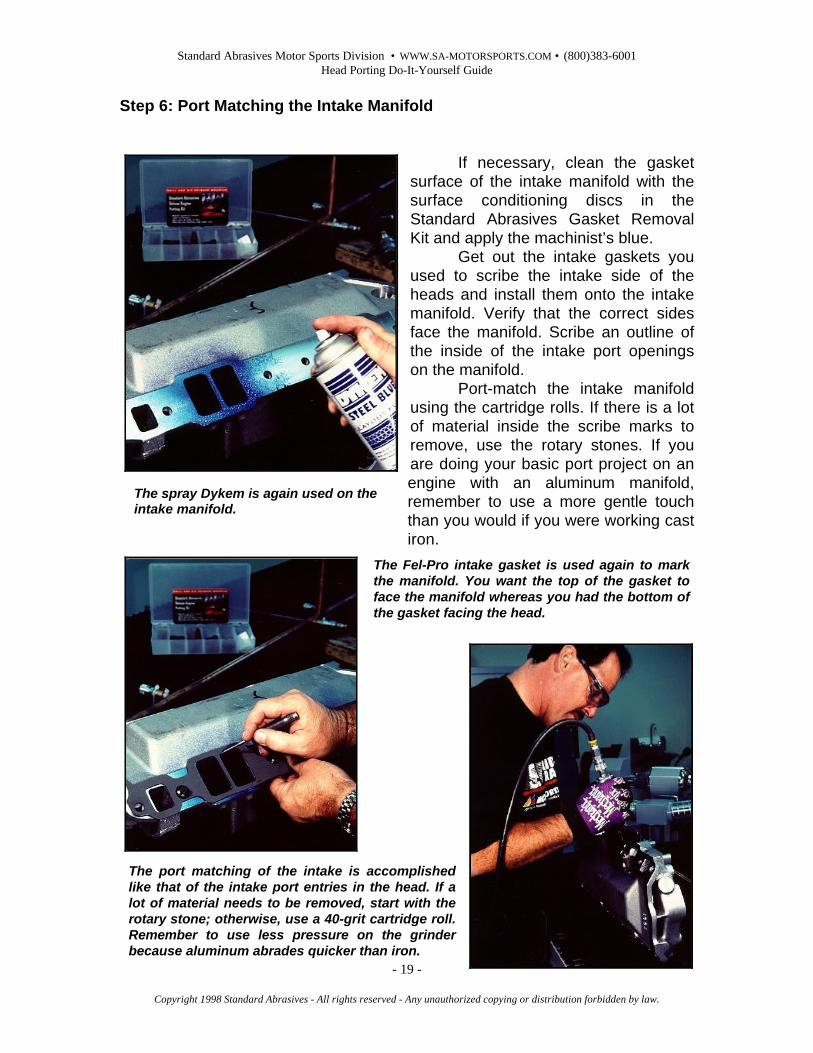
This particular head did not have anexhaust valve shrouding problem,however, heads with small chambers andbig valves may have the problem. Theeasiest way to check for it is to hold thevalve open about 3/8-in. and use a ruler tomeasure the distance between the valveedge and the chamber wall.
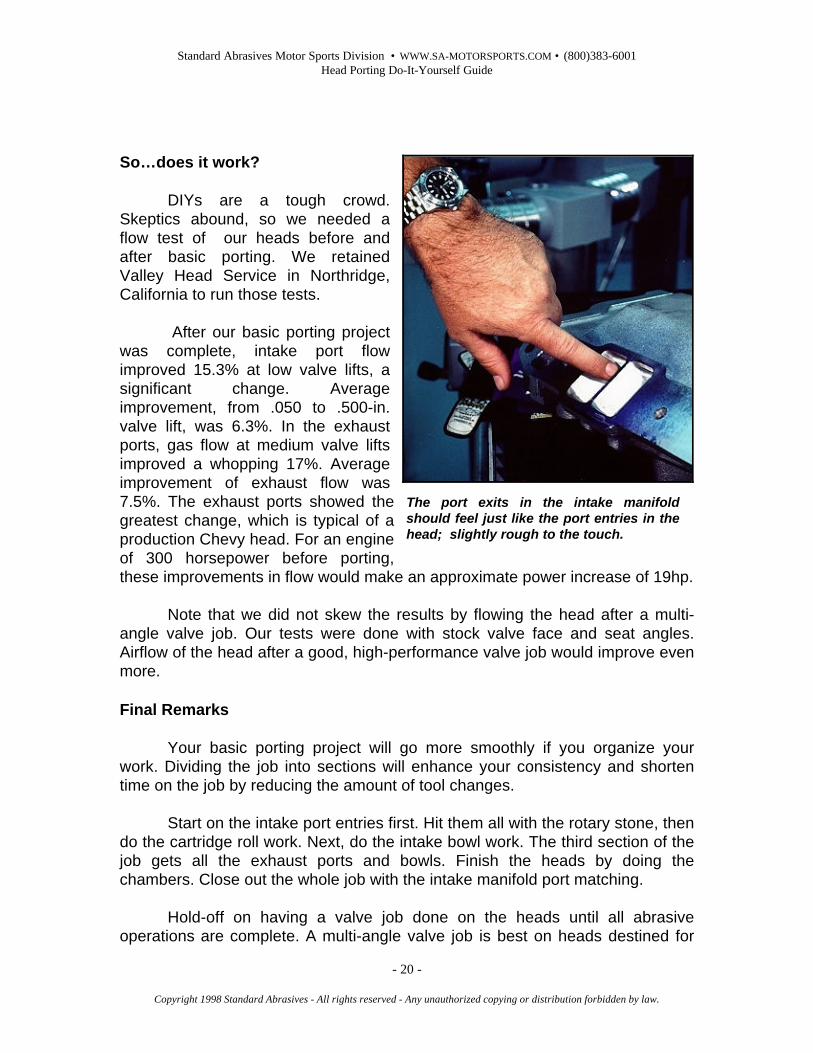
Cross Buffs™ are used to finish thecombustion chamber.
Most heads will have a lot of casting flash in thewater crossovers. Use a small cartridge roll toremove that flash.
This is what a finished chamber shouldlook like.
Standard Abrasives Motor Sports Division • WWW.SA-MOTORSPORTS.COM • (800)383-6001Head Porting Do-It-Yourself Guide
- 19 -
Copyright 1998 Standard Abrasives - All rights reserved - Any unauthorized copying or distribution forbidden by law.
Step 6: Port Matching the Intake Manifold
If necessary, clean the gasketsurface of the intake manifold with thesurface conditioning discs in theStandard Abrasives Gasket RemovalKit and apply the machinist’s blue.
Get out the intake gaskets youused to scribe the intake side of theheads and install them onto the intakemanifold. Verify that the correct sidesface the manifold. Scribe an outline ofthe inside of the intake port openingson the manifold.
Port-match the intake manifoldusing the cartridge rolls. If there is a lotof material inside the scribe marks toremove, use the rotary stones. If youare doing your basic port project on anengine with an aluminum manifold,remember to use a more gentle touchthan you would if you were working castiron.
The spray Dykem is again used on theintake manifold.
The Fel-Pro intake gasket is used again to markthe manifold. You want the top of the gasket toface the manifold whereas you had the bottom ofthe gasket facing the head.
The port matching of the intake is accomplishedlike that of the intake port entries in the head. If alot of material needs to be removed, start with therotary stone; otherwise, use a 40-grit cartridge roll.Remember to use less pressure on the grinderbecause aluminum abrades quicker than iron.
Standard Abrasives Motor Sports Division • WWW.SA-MOTORSPORTS.COM • (800)383-6001Head Porting Do-It-Yourself Guide
- 20 -
Copyright 1998 Standard Abrasives - All rights reserved - Any unauthorized copying or distribution forbidden by law.
So…does it work?
DIYs are a tough crowd.Skeptics abound, so we needed aflow test of our heads before andafter basic porting. We retainedValley Head Service in Northridge,California to run those tests.
After our basic porting projectwas complete, intake port flowimproved 15.3% at low valve lifts, asignificant change. Averageimprovement, from .050 to .500-in.valve lift, was 6.3%. In the exhaustports, gas flow at medium valve liftsimproved a whopping 17%. Averageimprovement of exhaust flow was7.5%. The exhaust ports showed thegreatest change, which is typical of aproduction Chevy head. For an engineof 300 horsepower before porting,these improvements in flow would make an approximate power increase of 19hp.
Note that we did not skew the results by flowing the head after a multi-angle valve job. Our tests were done with stock valve face and seat angles.Airflow of the head after a good, high-performance valve job would improve evenmore.
Final Remarks
Your basic porting project will go more smoothly if you organize yourwork. Dividing the job into sections will enhance your consistency and shortentime on the job by reducing the amount of tool changes.
Start on the intake port entries first. Hit them all with the rotary stone, thendo the cartridge roll work. Next, do the intake bowl work. The third section of thejob gets all the exhaust ports and bowls. Finish the heads by doing thechambers. Close out the whole job with the intake manifold port matching.
Hold-off on having a valve job done on the heads until all abrasiveoperations are complete. A multi-angle valve job is best on heads destined for
The port exits in the intake manifoldshould feel just like the port entries in thehead; slightly rough to the touch.
Standard Abrasives Motor Sports Division • WWW.SA-MOTORSPORTS.COM • (800)383-6001Head Porting Do-It-Yourself Guide
- 21 -
Copyright 1998 Standard Abrasives - All rights reserved - Any unauthorized copying or distribution forbidden by law.
any high-performance application because it offers additional improvement inlow-valve-lift air flow.
For more information on the high-performance abrasive productsavailable to the DIY automotive enthusiast see our Standard Abrasives MotorSports Division Web Page; WWW.SA-MOTORSPORTS.COM.
You also can call us at 800-383-6001 or you can write us at StandardAbrasives Motor Sports Division, 4201 Guardian St., Simi Valley CA 93063.