he va multi seeder spare parts
DESCRIPTION
He Va Multi Seeder Spare PartsTRANSCRIPT

Declaration of Conformity
Operating Instructions
Mounting Instructions
Spare Part List
UK
HE-VA MULTI-SEEDER - Pneumatic Fine Seeder


HE-VA MULTI-SEEDER Pneumatic Fine Seeder 12.03.04
1
Contents
Declaration of Conformity ........................................................................................... 2
1. Delivery Check .............................................................................................................. 3
2. Operating Instructions 2.1 Basic adjustment before filling in the seeds .................................................. 3 2.2 Changing of the dosing-roll ............................................................................. 3 2.3 Switching on and switching off the agitator................................................... 4 2.4 Test turning ...................................................................................................... 4 2.5 Sowing in the field ............................................................................................ 4 2.6 Emptying of the fine seed hopper ................................................................... 4 2.7 Maintenance...................................................................................................... 4 2.8 Additional Equipment...................................................................................... 5 2.8.1 Retaining seed plate for the dosing-roll.......................................................... 5 2.8.2 Hectare counter ............................................................................................... 5 2.8.3 Seed-Controller
Operating Instructions..................................................... 5 2.8.3.1 Signification of the stated Numbers and Letters in the display................... 6 2.8.3.2 Function of the Keys ........................................................................................ 6 2.8.3.3 Input of required values (wheel circumference, working width) ................ 7 2.8.3.4 Electrical adjustment of the seed rate (additional equipment).................... 8 2.8.3.5 Maintenance / Power supply........................................................................... 8 2.8.3.6 Connection Diagram
Junction Box ............................................................. 9
3. Mounting Instructions.................................................................................................. 10 3.1 Mounting of the Pneumatic Fine Seeder ........................................................ 10 3.2 Distribution plates ............................................................................................ 10 3.3 Driving wheel .................................................................................................... 10
4. Spare Part List
Pneumatic Fine Seeder................................................................... 11 4.1 Fine Seeder........................................................................................................ 11 4.1.1 Fine seed hopper............................................................................................... 15 4.1.2 Mechanical Fan................................................................................................. 17
4.1.3 Hydraulic Fan.................................................................................................... 19
5. Test turning scale .......................................................................................................... 21 5.1 Test turning....................................................................................................... 21 5.2 Changing of the dosing-roll ............................................................................. 21 5.3 Maintenance...................................................................................................... 21
6. Adjusting scale .............................................................................................................. 22
7. Notes............................................................................................................................... 23
HE-VA MULTI-SEEDER Pneumatic Fine Seeder 12.03.04
2
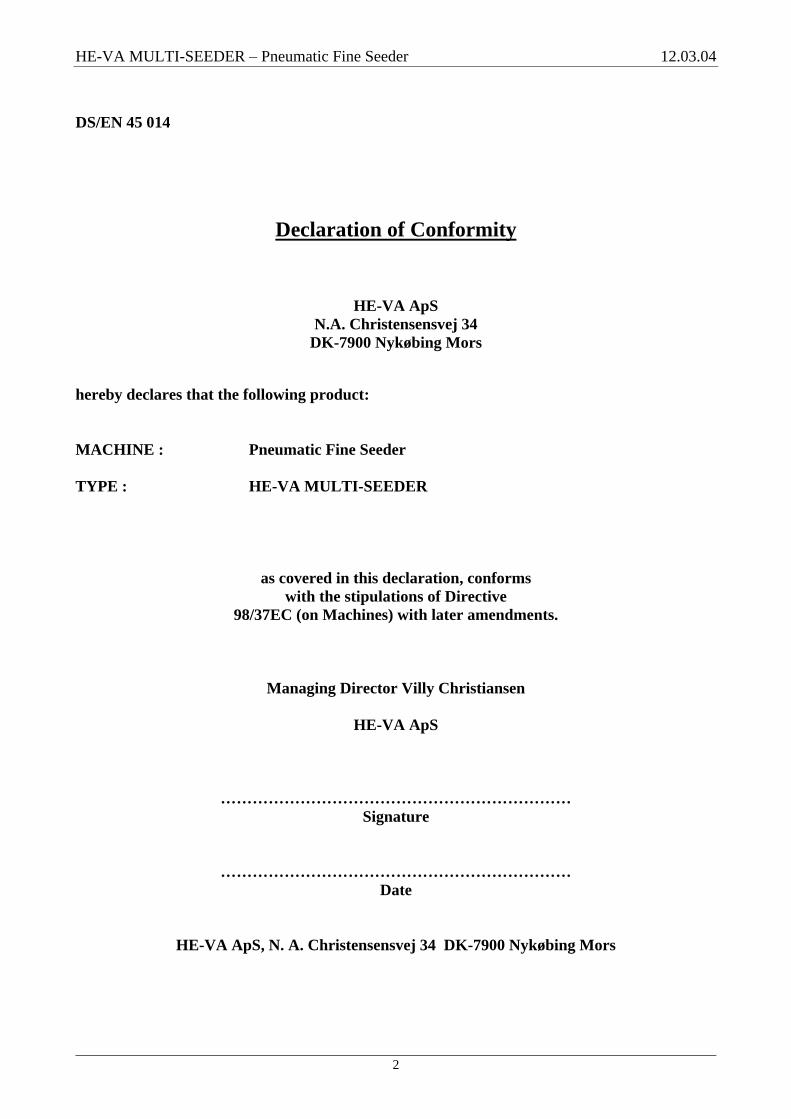
DS/EN 45 014
Declaration of Conformity
HE-VA ApS N.A. Christensensvej 34
DK-7900 Nykøbing Mors
hereby declares that the following product:
MACHINE : Pneumatic Fine Seeder
TYPE : HE-VA MULTI-SEEDER
as covered in this declaration, conforms with the stipulations of Directive
98/37EC (on Machines) with later amendments.
Managing Director Villy Christiansen
HE-VA ApS
Signature
Date
HE-VA ApS, N. A. Christensensvej 34 DK-7900 Nykøbing Mors

HE-VA MULTI-SEEDER Pneumatic Fine Seeder 12.03.04
3
1. Delivery check
Please check the Fine Seeder for any damages. Check the wires, air hoses and the hydraulic hoses, if any, for cut or pressure damages. Moreover, you have to ensure that all parts are delivered with the Fine Seeder.
2. Operating Instructions
2.1 Basic adjustment before filling in the seeds
Before filling in the seeds, you have to check if there is the correct dosing-roll in the machine and that the stroker above the dosing-roll is adjusted to the right grain size.
The dosing-roll with the black dosing units The dosing-roll with the red dosing units is suitable for: is suitable for:
Grass mixtures, rye barley wheat, sun-flower, Clover, rape, phacelia, granular seeds, vetch-/oats-mixture with peas etc. snail grains etc. (in general big volumes/quantities). (in general small volumes/quantities).
Beside these two serial dosing-rolls, we can offer you further rolls for other seed types or rows.
The stroker above can be adjusted exactly by the lever.
The stroker distance to the dosing-roll can be read on the scale by the lever:
1st slot 0 mm 2nd slot 1 mm 3rd slot 2 mm 4th slot 3 mm 5th slot 4 mm etc.
The basic rule:
The distance between the stroker and the dosing-roll is to be half of the seed s large grain size, for instance:
Rape -1 mm Rye 2 3 mm Grass-mixtures 2 3 mm Vetch-/oats-mixtures with peas 3 4 mm
2.2 Changing of the dosing-roll
Remove the bearing plate for the dosing-roll by loosening the two finger screws. Then remove the cover plate by pulling up the spring-loaded pressure screw. While pulling out the dosing-roll turn it a little bit to the left hand side. Attention: Please do not handle to strong.
HE-VA MULTI-SEEDER Pneumatic Fine Seeder 12.03.04
4
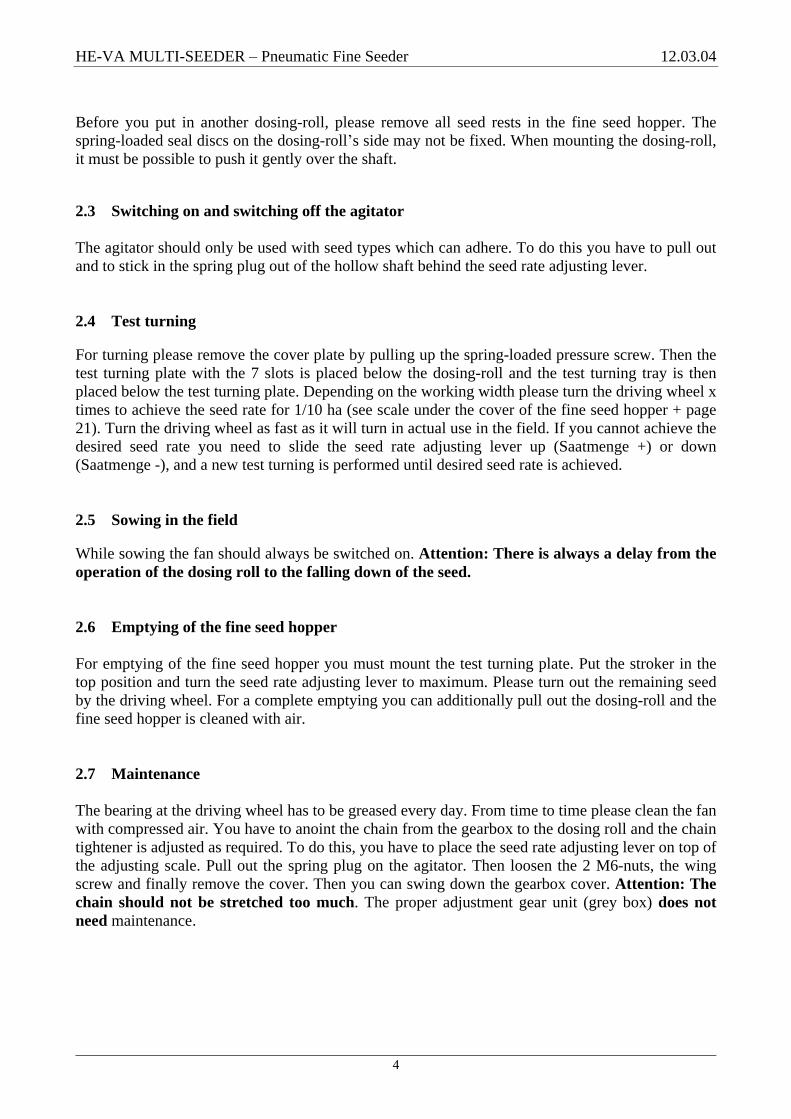
Before you put in another dosing-roll, please remove all seed rests in the fine seed hopper. The spring-loaded seal discs on the dosing-roll s side may not be fixed. When mounting the dosing-roll, it must be possible to push it gently over the shaft.
2.3 Switching on and switching off the agitator
The agitator should only be used with seed types which can adhere. To do this you have to pull out and to stick in the spring plug out of the hollow shaft behind the seed rate adjusting lever.
2.4 Test turning
For turning please remove the cover plate by pulling up the spring-loaded pressure screw. Then the test turning plate with the 7 slots is placed below the dosing-roll and the test turning tray is then placed below the test turning plate. Depending on the working width please turn the driving wheel x times to achieve the seed rate for 1/10 ha (see scale under the cover of the fine seed hopper + page 21). Turn the driving wheel as fast as it will turn in actual use in the field. If you cannot achieve the desired seed rate you need to slide the seed rate adjusting lever up (Saatmenge +) or down (Saatmenge -), and a new test turning is performed until desired seed rate is achieved.
2.5 Sowing in the field
While sowing the fan should always be switched on. Attention: There is always a delay from the operation of the dosing roll to the falling down of the seed.
2.6 Emptying of the fine seed hopper
For emptying of the fine seed hopper you must mount the test turning plate. Put the stroker in the top position and turn the seed rate adjusting lever to maximum. Please turn out the remaining seed by the driving wheel. For a complete emptying you can additionally pull out the dosing-roll and the fine seed hopper is cleaned with air.
2.7 Maintenance
The bearing at the driving wheel has to be greased every day. From time to time please clean the fan with compressed air. You have to anoint the chain from the gearbox to the dosing roll and the chain tightener is adjusted as required. To do this, you have to place the seed rate adjusting lever on top of the adjusting scale. Pull out the spring plug on the agitator. Then loosen the 2 M6-nuts, the wing screw and finally remove the cover. Then you can swing down the gearbox cover. Attention: The chain should not be stretched too much. The proper adjustment gear unit (grey box) does not need maintenance.

HE-VA MULTI-SEEDER Pneumatic Fine Seeder 12.03.04
5
2.8 Additional Equipment
2.8.1 Retaining seed plate for the dosing-roll
There is a retaining seed plate available for the fine seed hopper which prevents special seed types from adhering. The result of the retaining seed plate is that only so many seeds or granulates fall into the dosing-roll as the dosing roll brings out (e.g. phacelia, fertilizer, granulates). For all other seeds the retaining seed plate has to be dismantled or placed in the top position.
2.8.2 Hectare counter
Please mount the hectare counter on the three designated boreholes. First fill in the long shaft into the big borehole and then push the throw-out lever on the shaft. Then you have to put the shaft in a designated borehole. Adjust the throw-out lever so that a secured counting is guaranteed.
To calculate the area you have to divide the number on the hectare counter by the proportional number from the test turning scale (see scale under the cover of the fine seed hopper + page 21). Then you have the area in ha.
For example: On the hectare counter you find the number 720. Working width of the machine is 3 m. According to the scale under 3 m you find the number 220.
So you have to divide 720 : 220 = 3,273 x 1/10 ha = 0,33 ha
2.8.3 Seed-Controller
Operating Instructions
Arrow key up Input key
Arrow key down Zero key
Turning knob for seed rate adjusting
E
0

HE-VA MULTI-SEEDER Pneumatic Fine Seeder 12.03.04
6
2.8.3.1 Signification of the Numbers and Letters in the display
Display
Indication of Functions
E Partial ha (deletable), max. 999.9 ha
t Total ha (not deletable), max. 9999 ha
L Working width in m, max. 25.5 m
r Wheel circumference in m, max. 2.55 m
Stop A Shaft for dosing-roll stopped (chain broken, seed rate adjusting lever set to zero) Alarm not deletable. Area is no longer counted.
Stop G The fan is not running (seed hoses clogged, light control sensor heavily fouled). The alarm may be reset by pressing the key 0. However, the display will still show STOP and the area will still be counted if you continue driving.
Alarm for level in the fine seed hopper
A flashing line will be visible together with an alarm when the seed level in the fine seed hopper falls, below the sensor level. The tone may be reset on the Zero key. The flashing will continue until the seed is refilled.
Full Stop Indication
The full stop will be visible in connection with area measurement. Before the full stop, the ha is displayed. In connection with input of wheel circumference or working width, the metres are displayed before the full stop.
2.8.3.2 Function of the Keys
Arrow key up
The functional displays may be modified by activating the Arrow key. In connection with input of wheel circumference or working width, the value stated may be increased (see input of required values).
1
2
3
1
2 3
HE-VA MULTI-SEEDER Pneumatic Fine Seeder 12.03.04
7
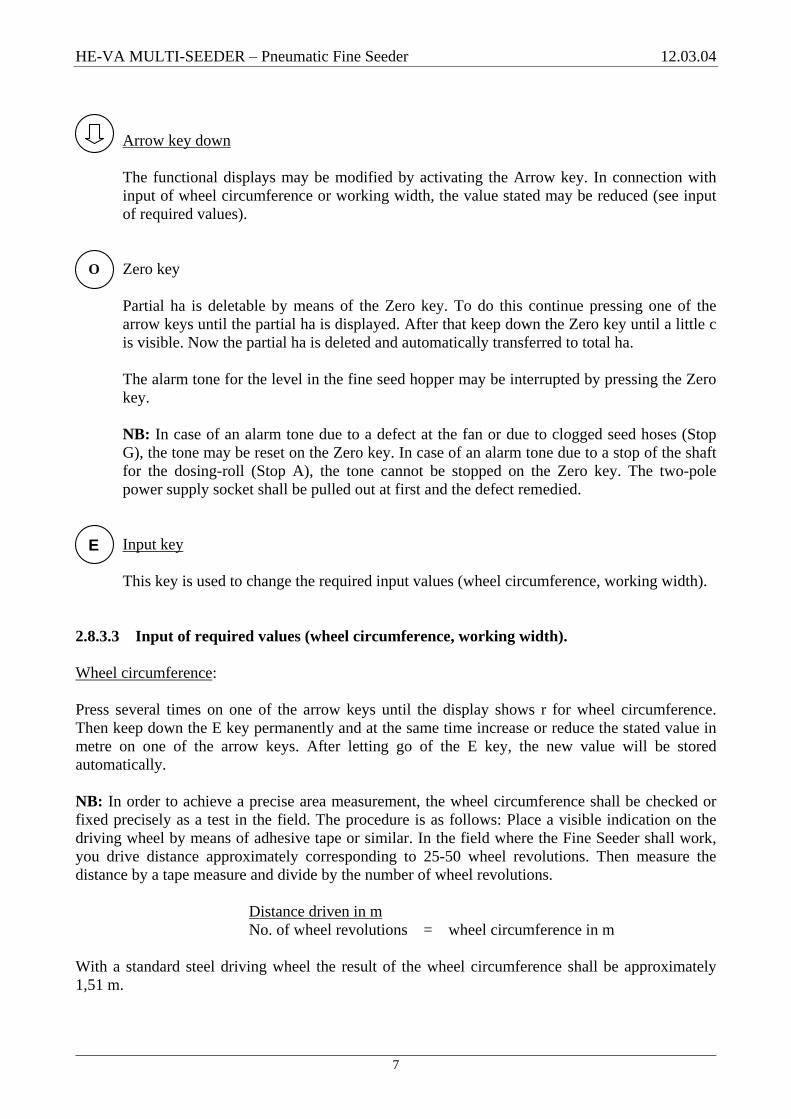
Arrow key down
The functional displays may be modified by activating the Arrow key. In connection with input of wheel circumference or working width, the value stated may be reduced (see input of required values).
Zero key
Partial ha is deletable by means of the Zero key. To do this continue pressing one of the arrow keys until the partial ha is displayed. After that keep down the Zero key until a little c is visible. Now the partial ha is deleted and automatically transferred to total ha.
The alarm tone for the level in the fine seed hopper may be interrupted by pressing the Zero key.
NB: In case of an alarm tone due to a defect at the fan or due to clogged seed hoses (Stop G), the tone may be reset on the Zero key. In case of an alarm tone due to a stop of the shaft for the dosing-roll (Stop A), the tone cannot be stopped on the Zero key. The two-pole power supply socket shall be pulled out at first and the defect remedied.
Input key
This key is used to change the required input values (wheel circumference, working width).
2.8.3.3 Input of required values (wheel circumference, working width).
Wheel circumference:
Press several times on one of the arrow keys until the display shows r for wheel circumference. Then keep down the E key permanently and at the same time increase or reduce the stated value in metre on one of the arrow keys. After letting go of the E key, the new value will be stored automatically.
NB: In order to achieve a precise area measurement, the wheel circumference shall be checked or fixed precisely as a test in the field. The procedure is as follows: Place a visible indication on the driving wheel by means of adhesive tape or similar. In the field where the Fine Seeder shall work, you drive distance approximately corresponding to 25-50 wheel revolutions. Then measure the distance by a tape measure and divide by the number of wheel revolutions.
Distance driven in m
No. of wheel revolutions = wheel circumference in m
With a standard steel driving wheel the result of the wheel circumference shall be approximately 1,51 m.
O
E

HE-VA MULTI-SEEDER Pneumatic Fine Seeder 12.03.04
8
Working width:
Press several times on one of the arrow keys until the display shows L for working width. Then keep down the E key permanently and at the same time increase or reduce the stated value in metre on one of the arrow keys. After letting go of the E key, the new value will be stored automatically.
2.8.3.4 Electrical adjusting of the seed rate (additional equipment)
The seed rate can be adjusted by means of the turning knob for the seed rate. The adjusting scale of the seed controller shall be in accordance with the scale of the Fine Seeder, i.e. when the value 20 is set on the turning knob, the seed rate adjusting lever on the Fine Seeder shall also be in position 20.
In order to achieve as high repetition accuracy as possible, it is recommended always to start the required position from zero.
The seed rate adjusting lever on the Fine Seeder shall only function for monitoring. If the seed controller is switched off, the seed rate adjusting lever on the Fine Seeder may also be set manually. For this purpose the spring loaded button on the adjusting motor shall be pressed and then the seed rate adjusting lever may be set in the required position NB: Do not use force.
This manual adjusting possibility may be used in case of problems with the seed controller or in case of power supply failure.
2.8.3.5 Maintenance / Power supply
The Seed-Controller shall be protected against moisture, dust, cold, heat, impacts and vibrations.
The Seed-Controller shall be connected to a 12 V supply. Observe the correct polarity.
Sensor adjusting - Pole
Optimum air gap: 0.5 mm - max. 1 mm + Pole

HE-VA MULTI-SEEDER Pneumatic Fine Seeder 12.03.04
9
2.8.3.6 Connection Diagram
Junction Box
Electronic components
1 2
3 4 5
6 7 8
9 10 11 12
13 14 15
16 17
18
+ 16 V Adjusting motor (red)
Control signal adjusting motor (white, No. 3)
+ 12 V Seed shaft sensor (brown) + 12 V Flex. driv. cable sensor, Fan, light cont. sens.-transmit.(brown)
Level light control sensor (brown)
Fan light control sensor-transmitter (brown)
Free
Free
Fan light control sensor (brown)
Seed shaft sensor (black)
Flexible driving cable sensor (black)
Free
Level light control sensor (white)
Negative free
Negative adjusting motor (black)
Negative fan light control sensor (white) / 2 pcs. Negative flex. driv.cable sens.-and seed shaft sens.(blue)/2 pcs.
Negative level light control sensor (green)
Flexible driving cable sensor
brown = No. 4 black = No. 11 blue = No. 17
Seed shaft sensor
brown = No. 3 black = No. 10 blue = No. 17
Light control sensor - blower
Sensor with perpendicular cable connect. (transmitter) brown = No. 4 white = No. 16
Sensor with parallel cable connection (receiver) brown = No. 9 white = No. 16
Light contr. sens. fine seed hopper level
brown = No. 5 white = No. 13 green = No. 18
Electrical seed rate adjusting
Motor cable
black = No. 15 red = No. 1 white = No. 2 white = No. 5
not required (is to be isolated)
HE-VA MULTI-SEEDER Pneumatic Fine Seeder 12.03.04
10
3. Mounting Instructions
Procedure:
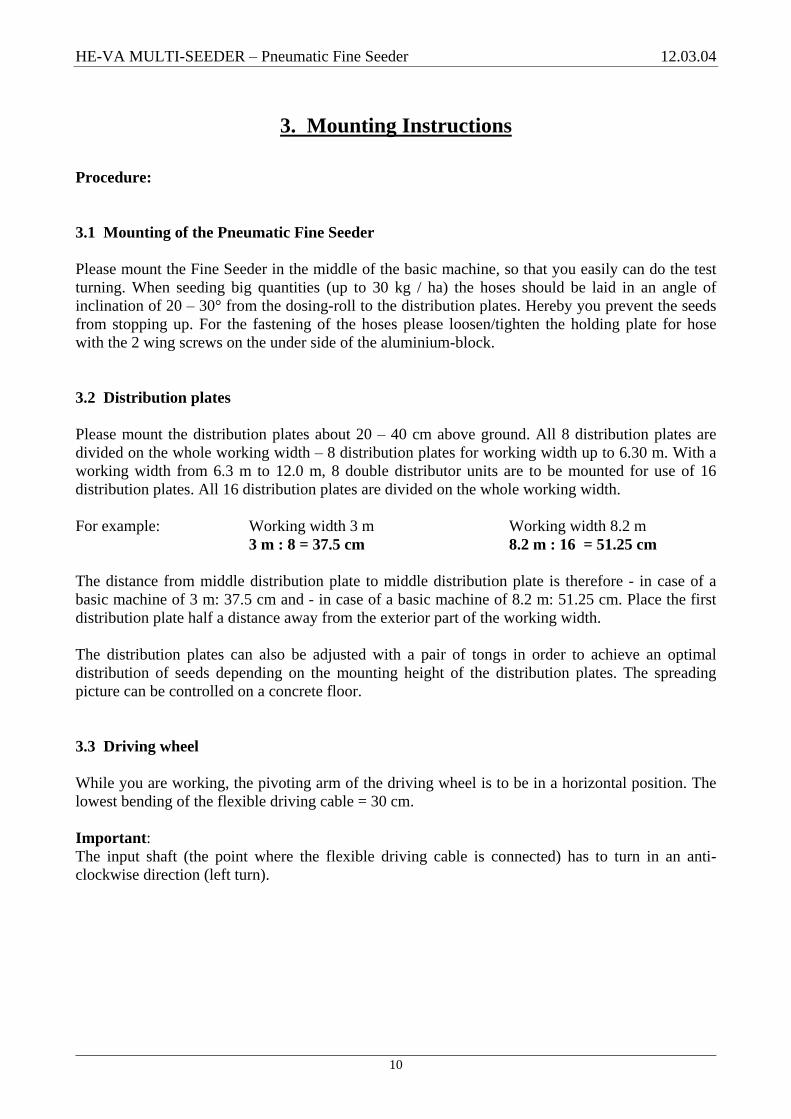
3.1 Mounting of the Pneumatic Fine Seeder
Please mount the Fine Seeder in the middle of the basic machine, so that you easily can do the test turning. When seeding big quantities (up to 30 kg / ha) the hoses should be laid in an angle of inclination of 20
30° from the dosing-roll to the distribution plates. Hereby you prevent the seeds from stopping up. For the fastening of the hoses please loosen/tighten the holding plate for hose with the 2 wing screws on the under side of the aluminium-block.
3.2 Distribution plates
Please mount the distribution plates about 20
40 cm above ground. All 8 distribution plates are divided on the whole working width
8 distribution plates for working width up to 6.30 m. With a working width from 6.3 m to 12.0 m, 8 double distributor units are to be mounted for use of 16 distribution plates. All 16 distribution plates are divided on the whole working width.
For example: Working width 3 m Working width 8.2 m 3 m : 8 = 37.5 cm 8.2 m : 16 = 51.25 cm
The distance from middle distribution plate to middle distribution plate is therefore - in case of a basic machine of 3 m: 37.5 cm and - in case of a basic machine of 8.2 m: 51.25 cm. Place the first distribution plate half a distance away from the exterior part of the working width.
The distribution plates can also be adjusted with a pair of tongs in order to achieve an optimal distribution of seeds depending on the mounting height of the distribution plates. The spreading picture can be controlled on a concrete floor.
3.3 Driving wheel
While you are working, the pivoting arm of the driving wheel is to be in a horizontal position. The lowest bending of the flexible driving cable = 30 cm.
Important: The input shaft (the point where the flexible driving cable is connected) has to turn in an anti-clockwise direction (left turn).

HE-VA MULTI-SEEDER Pneumatic Fine Seeder 12.03.04
11
4.1. Fine Seeder
Sheet 1
4. Spare Part List Fine Seeder

HE-VA MULTI-SEEDER Pneumatic Fine Seeder 12.03.04
12
Pos. Item number Designation 1 0539000 Main frame 2 0539001 Gearbox 3 0539002 Chain wheel 4 0539003 Absorber 5 0539004 Safety quard for gearbox 6 0539005 Adjusting scale 7 0539006 Seed rate adjusting lever 8 0539007 Cover for safety guard 9 0539008 Chain
10 0539009 Chain locking device 11 0539010 Chain assembler 12 0539011 Shaft for dosing-roll 13 0530012 Bearing complete 14 0539013 Chain wheel 15 0539014 Pulley 16 0539015 O-ring 17 0539016 Spacer 18 0539017 Agitator 19 0539018 Pulley 20 0539019 Flexible driving cable complete 21 0539020 Plug female 22 0539021 Alu-blok with 8 outlets 23 0539022 Holding plate for hose 24 0539023 Adapter for 1 fan 25 0539024 Adapter for 2 fans 26 0539025 Attachment for stroker 27 0539026 Shaft for stroker 28 0539027 Adapter mechanical/hydraulic fan 29 0539028 Stroker 30 0539029 Test turning plate 31 0539030 Cover plate 32 0539031 Cover plate, complete 33 0539032 Finger screw 34 0539033 Bearing plate for dosing-roll 35 0539034 Bearing bush 36 0539035 Lever for stroker 37 0539036 Adjusting scale 38 0539037 Hectare counter 39 0539038 Dosing-roll (hole)
40 0539039 Dosing-roll (fine) 41 0539040 Dosing-roll (mean) 42 0539041 Dosing-roll (rough) 43 0539042 Electrical fan 44 0539043 Holding plate for fan 60 0539044 Clutch for flexible driving cable 61 0539045 Dosing-roll (rough blue)
Sheet 1

HE-VA MULTI-SEEDER Pneumatic Fine Seeder 12.03.04
13
Sheet 2

HE-VA MULTI-SEEDER Pneumatic Fine Seeder 12.03.04
14
Pos. Item number Designation 45 0539046 Cover for fan 46 0539047 Cover for fine seed hopper 47 0539048 Sealing band 48 0539049 Test turning scale 49 0539050 Driving wheel, complete 50 0539051 Bracket for driving wheel 51 0539052 Suspension chain for driving wheel 52 0539053 Pivoting arm for driving wheel 53 0539054 Steel driving wheel
Rubber wheel 54 0539055 Hose 55 0539056 Distribution plate 56 0539057 Holding device for hose 57 0530058 Bearing bush 58 0539059 Retaining seed plate for dosing-roll 59 0539060
0539061 0539062 0539063 0539064 0539065
Flexible driving cable 1.5 m Flexible driving cable 1.8 m Flexible driving cable 2.1 m Flexible driving cable 2.5 m Flexible driving cable 2,75 m Flexible driving cable 3.0 m
62 0539097 Double distributor unit
Sheet 2

HE-VA MULTI-SEEDER Pneumatic Fine Seeder 12.03.04
15
4.1.1 Fine Seed Hopper

HE-VA MULTI-SEEDER Pneumatic Fine Seeder 12.03.04
16
Pos. Item number Designation 1 0539094 Fine seed hopper, 190 L 1 0539098 Fine seed hopper, 330 L 2 0539095 Test turning tray 3 0539047 Cover for fine seed hopper 4 0539096 Hinge
HE-VA MULTI-SEEDER Pneumatic Fine Seeder 12.03.04
17
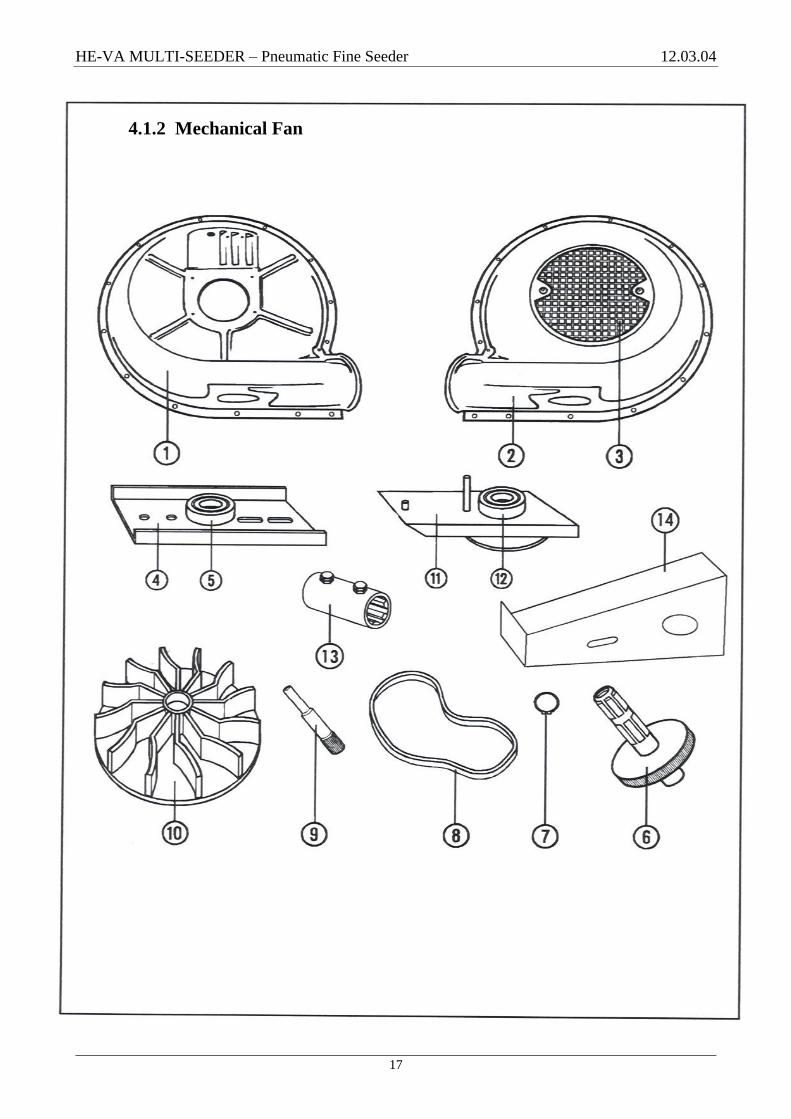
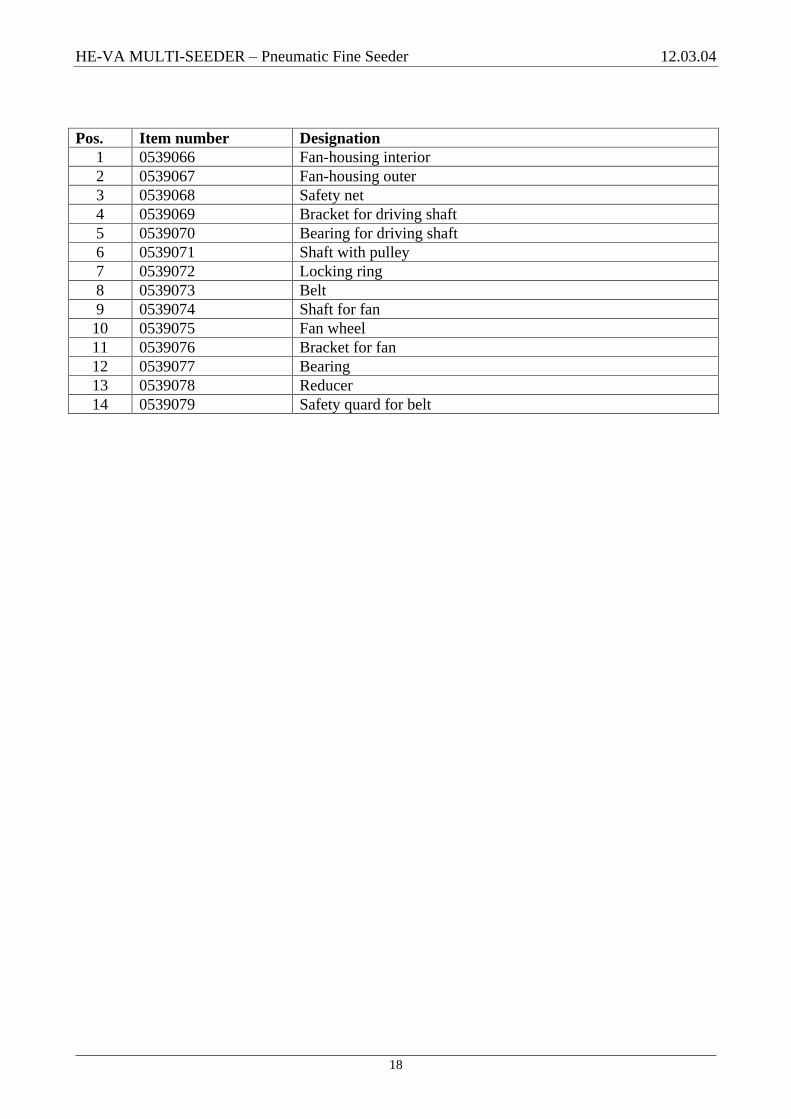
4.1.2 Mechanical Fan
HE-VA MULTI-SEEDER Pneumatic Fine Seeder 12.03.04
18
Pos. Item number Designation 1 0539066 Fan-housing interior 2 0539067 Fan-housing outer 3 0539068 Safety net 4 0539069 Bracket for driving shaft 5 0539070 Bearing for driving shaft 6 0539071 Shaft with pulley 7 0539072 Locking ring 8 0539073 Belt 9 0539074 Shaft for fan
10 0539075 Fan wheel 11 0539076 Bracket for fan 12 0539077 Bearing 13 0539078 Reducer 14 0539079 Safety quard for belt

HE-VA MULTI-SEEDER Pneumatic Fine Seeder 12.03.04
19
Reservedelsliste mekanisk blæser
Reservedelsliste hydraulisk. blæser
1. Blæsehus indvendig 0539066 1. Blæsehus indvendig
0539080 2. Blæsehus udvendig 0539067 2. Blæsehus udvendig
0539081 3. Beskyttelsesgitter 0539068 3. Beskyttelsesgitter
0539082 4. Beslag for trækaksel 0539069 4. Hydraulikslange (tryk) 0539083 5. Leje for trækaksel 0539070 4b.Hydraulikslange (retur) 0539084 6. Aksel med remskive 0539071 5. Lynkobling 0539085 7. Låsering 0539072 6. Hydr. Motor 0539086 8. Rem 0539073 7. Ventilblok 0539087 9. Aksel for blæser 0539074 8. Mængderegulering
0539088 10. Blæsehjul 0539075 9. Aksel for blæser 0539089
11. Beslag for blæser 0539076 10. Blæsehjul 0539090 12. Leje 0539077 11. Beslag for blæser
0539091 13. Overgangsstykke 0539078 12. Leje
0539092 14. Beskyttelsesskærm for rem 0539079 13. Tætningsring 0539093
4.1.3 Hydraulic Fan

HE-VA MULTI-SEEDER Pneumatic Fine Seeder 12.03.04
20
Pos. Item no. Designation 1 0539080 Fan-housing interior 2 0539081 Fan-housing outer 3 0539082 Safety net 4 0539083 Hydraulic hose (pressure)
4b 0539084 Hydraulic hose (return) 5 0539085 Quick coupling male 6 0539086 Hydraulic motor 7 0539087 Valve block 8 0539088 Valve for oil control 9 0539089 Shaft for fan 10 0539090 Fan wheel 11 0539091 Bracket for fan 12 0539092 Bearing 13 0539093 Sealing ring
HE-VA MULTI-SEEDER Pneumatic Fine Seeder 12.03.04
21
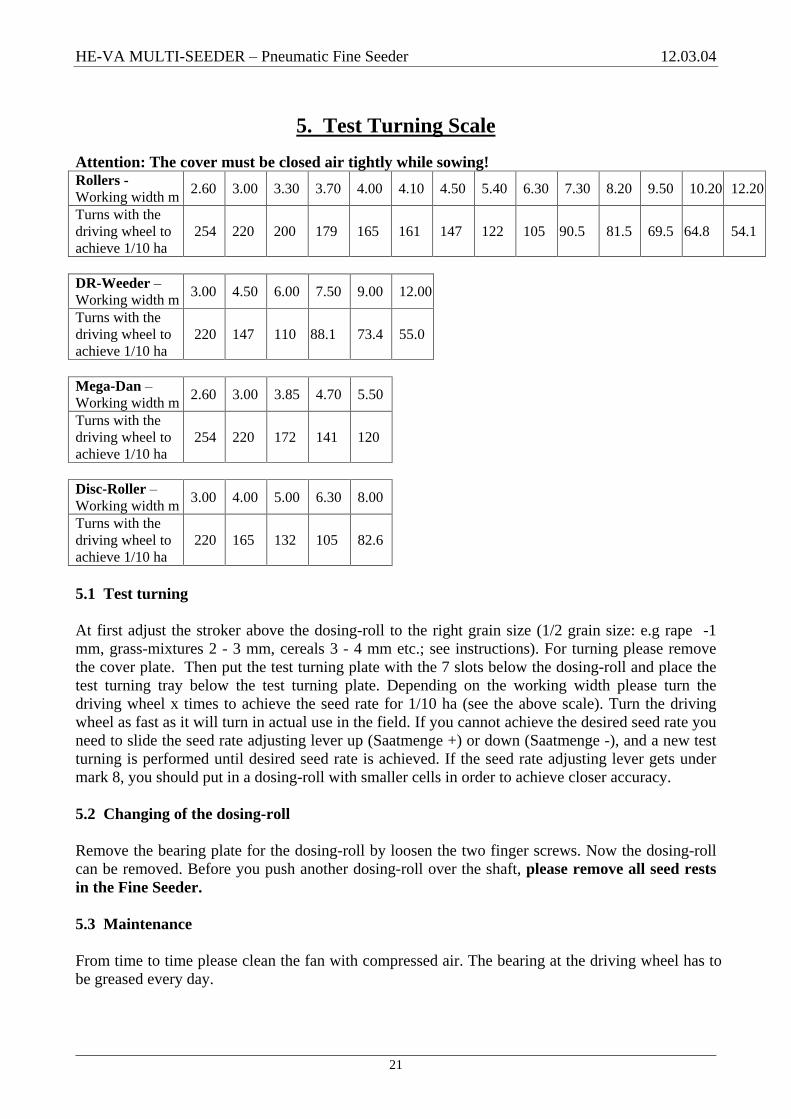
5. Test Turning Scale
Attention: The cover must be closed air tightly while sowing! Rollers - Working width m
2.60 3.00 3.30 3.70 4.00 4.10 4.50 5.40 6.30 7.30 8.20 9.50 10.20
12.20
Turns with the driving wheel to achieve 1/10 ha
254 220 200 179 165 161 147 122 105 90.5 81.5 69.5 64.8 54.1
DR-Weeder
Working width m
3.00 4.50 6.00 7.50 9.00 12.00
Turns with the driving wheel to achieve 1/10 ha
220 147 110 88.1 73.4 55.0
Mega-Dan
Working width m
2.60 3.00 3.85 4.70 5.50
Turns with the driving wheel to achieve 1/10 ha
254 220 172 141 120
Disc-Roller
Working width m
3.00 4.00 5.00 6.30 8.00
Turns with the driving wheel to achieve 1/10 ha
220 165 132 105 82.6
5.1 Test turning
At first adjust the stroker above the dosing-roll to the right grain size (1/2 grain size: e.g rape -1 mm, grass-mixtures 2 - 3 mm, cereals 3 - 4 mm etc.; see instructions). For turning please remove the cover plate. Then put the test turning plate with the 7 slots below the dosing-roll and place the test turning tray below the test turning plate. Depending on the working width please turn the driving wheel x times to achieve the seed rate for 1/10 ha (see the above scale). Turn the driving wheel as fast as it will turn in actual use in the field. If you cannot achieve the desired seed rate you need to slide the seed rate adjusting lever up (Saatmenge +) or down (Saatmenge -), and a new test turning is performed until desired seed rate is achieved. If the seed rate adjusting lever gets under mark 8, you should put in a dosing-roll with smaller cells in order to achieve closer accuracy.
5.2 Changing of the dosing-roll
Remove the bearing plate for the dosing-roll by loosen the two finger screws. Now the dosing-roll can be removed. Before you push another dosing-roll over the shaft, please remove all seed rests in the Fine Seeder.
5.3 Maintenance
From time to time please clean the fan with compressed air. The bearing at the driving wheel has to be greased every day.

HE-VA MULTI-SEEDER Pneumatic Fine Seeder 12.03.04
22
6. Adjusting Scale
Seed Stroker -
position mm Dosing-roll type
Seed rate adjusting lever - Position
Seed rate kg / ha

HE-VA MULTI-SEEDER Pneumatic Fine Seeder 12.03.04
23
7. Notes

HE-VA MULTI-SEEDER Pneumatic Fine Seeder 12.03.04
24

HE-VA MULTI-SEEDER Pneumatic Fine Seeder 12.03.04
25

Subject to design modifications without prior notice.