he folloin paes inclue tasks ou can assin to a nonpilot ...€¦ · telling the pilot how much fuel...
TRANSCRIPT

Flying CompanionA Pilot-Friendly® Manual
From passenger to helpful crew member— 50 tasks a non-pilot can complete
The following pages include 8 tasks you can assign to a non-pilot companion to help you get ready before a flight.
Excerpted from:
Details on the full manual are available at PilotWorkshops.com

TIP
Some airport diagrams show the location of transient parking or FBOs. If you know the runway your pilot is landing on, you can offer help getting to the FBO. Sometimes it helps just knowing if the FBO is a left or right turn off the runway.
that the pump is working. Fuel prices vary widely, so some research can save quite a bit of money.
If you’re planning on staying overnight—or longer—call to check on the availability (and cost) of tie-downs or hangar space. Also check on ground transportation options: Do taxis or rideshare compa-nies service the airport? Is there a rental car facility nearby? Some FBOs have loaner cars you can borrow for a quick drive into town.
Research Your Destination
One quick way to spoil a trip is arriving at yourdestination only to find everything is closed,
there’s nowhere to park for the night, or that the only food involves a five-mile walk to a Quik-mart. Imag-ine a fuel stop where it turns out there’s no self-serve gas—or the person with the key has left for the day.
Pilots are trained to research a destination air-port, but their planning can be thin on what happens after landing. You can be a huge help here.
Get the names of each airport where your pilot plans to land. There may be more than one option, and your research might help in deciding which one to use. Larger airports may have multiple FBOs (see below) to choose between on the same airport. It pays to research these options ahead of time.
FBOs vary from bare-bones, family-owned busi-nesses to huge national chains. Customer service is not every FBO’s forte. Read reviews to get the scoop.
Some FBOs charge “ramp fees” for use of the fa-cilities and line services. Some charge parking fees. Sometimes fees are waived if you only stay an hour or two, or buy a certain amount of fuel. Higher fuel prices often cover additional services and amenities that you may not even use. These prices can vary at the same airport.
Fuel isn’t always available 24 hours a day. If the fuel stop is critical (as in, you won’t be able to depart if anything prevents refueling), verify there is fuel and
Fixed-base operators (FBOs) are businesses on an airport that provide fuel, parking, maintenance, aircraft rentals, f light instruction, and so forth. The term “ fixed-base operations” came into use after the
passage of the Air Commerce Act in 1926—which forced transient barnstormers, mechanics, and in-structors to stop f lying from town to town and set up shop in one place.

RESEARCH TOOLS FOR DESTINATION PLANNING
You can do much of the research for a flight right from your web browser. Dedicated flight planning websites and avia-tion apps are usually your best starting point for information about an airport. You can also use the airport’s name or iden-tifier to find the airport’s website, but it’s usually best to start by checking a planning resource like the ones below.
SkyVector.com (right) features an easy-to-use map. Right-click and select the air-port to see airport operation-al statistics, and a listing of FBOs, fuel providers, and oth-er businesses.
AirNav.com (below) is similar to SkyVector but without the map inter-face. AirNav.com is one of the most popular websites for pilots quickly looking for informa-tion about airports, fuel, and hotels.
ForeFlight (right) is a subscription-based avi-ation app featuring destination information on an iPad or iPhone. Along with general airport infor-mation, you’ll find contact info, amenities, services, fuel prices, and comments/reviews for each FBO. You’ll also see lists of nearby restaurants, car rent-al companies, lodging, taxis, and other businesses. ForeFlight doesn’t require an internet connection to access airport listings, so you can do research while you’re flying, if you didn’t get to it on the ground.
FltPlan.com and Fltplan Go (left) are a website and app, respectively. Both are free and include air-port information. Fltplan Go works on both iOS and Android tablets and phones. You must download the information before flight, but it’s a great research tool for the cockpit in case plans change in the air.

Pilots must know the distances required for eachtakeoff, climb, descent, and landing. They must
also know how much fuel they need for the trip, plus extra for unforeseen events.
Many times pilots rely on experience, knowing the available runway or terrain around the airport far exceeds what’s required. Other times, pilots make de-tailed calculations. With practice, you can determine these numbers too—because they mean a lot as far as where and when you can use the airplane. You’ll need at least the following information:
• Aircraft weight. The heavier the aircraft, thelonger it takes to get airborne, the slower itclimbs, and the more runway it needs to land.
• Wind direction and speed. Headwinds reducethe required distances, while tailwinds greatlyincrease them. Tailwinds increase the aircraft’sspeed over the ground, so you arrive sooner.
• Airport elevation (altitude). Higher altitudesincrease takeoff and landing distances, and formany aircraft reduce engine power.
• Cruise altitude. Airplanes fly faster at higheraltitude, but more importantly they experiencedifferent winds depending on altitude.
• Temperature. Higher temperatures degradetakeoff and climb performance. If your pilotlikes early morning departures on summer days,this is probably why.
The first few times you do these calculations, have your pilot walk you through the app they like to use or the technique for your specific airplane’s charts.
TakeoffUsing the airport’s elevation, wind direction, weight of the airplane, and temperature, you should end up with two numbers: The ground roll for the takeoff, which is how much runway the airplane will use, and the total distance over a 50-foot obstacle, which is a combination of both the runway used and the dis-tance the airplane will travel to get 50 feet into the air. Check that you’re using the chart for normal takeoffs, as opposed to “short field” takeoffs, which may use a different procedure.
You can compare the predicted runway required to the lengths of the runways available. Generally, pi-lots like 50 percent more runway available than the
Run the Numbers
Charts like this take practice to read, and it helps to have a straight-edge. Most contain an example problem illustrating how it works.

chart says is required. If the wind is relatively light, your pilot may choose a runway not aligned with the winds to take advantage of more pavement to work with on takeoff.
CruiseCruise charts or apps typically offer a choice of power settings between 55- and 75-percent power. High power saves time; lower power saves fuel. Ask your pilot what setting he or she will use that day. You should then be able to see how much fuel will be burned at a certain altitude and power setting. Know-ing this information helps make sense of how much fuel the pilot plans to put in the tanks before depar-ture—and reveals whether or not you need to make a fuel stop enroute. The regulations require a minimum
amount of fuel on landing, but many pilots like extra. An hour of fuel remaining is common.
LandingThe charts for landing generally work the same way as takeoff, with both a total distance to clear some 50-foot tall trees plus runway to land and stop, as well as just the runway used. Again, a buffer of 50 percent over what’s required is nice to have for safety.
PERFORMANCE APPS MAKE IT MUCH EASIER
There may be an app or PC-based calculator you can use for your aircraft, such as CirrusProFlight (right). This makes it much easier. However, you should verify the predictions of these apps against both the book values and your pilot’s experience with the airplane.
Other apps, such as ForeFlight (left), can do fuel calculations for the entire flight. Most pilots will want to review these calculations themselves, but you can offer them as a mem-ber of the cockpit team. Even better, if the pilot must change destination in flight, you can run these numbers to check the required fuel to get to the new airport, as well as the landing and subsequent takeoff distances required.
100-27731N/P63-5
ngiseDsurriC5noitceS22RSataD ecnamrofreP
Figure 5-20
Landing DistanceWEIGHT = 3400 LBSpeed over 50 Ft Obstacle = 77 KIASFlaps - 100% · Idle · Dry, Level Paved Surface
Headwind: Subtract 10% per each 13 knots headwind.Tailwind: Add 10% for each 2 knots tailwind up to 10 knots.Runway Slope: Ref. Factors.Dry Grass: Add 20% to Ground RollWet Grass: Add 60% to Ground Roll
PRESSALTFT
DISTANCE
FT
TEMPERATURE ~ °C
0 10 20 30 40 ISA
SL Grnd Roll 1082 1121 1161 1200 1240 1141
50 ft 2244 2298 2352 2408 2464 2325
1000 Grnd Roll 1122 1163 1204 1245 1286 1175
50 ft 2298 2355 2412 2470 2529 2372
2000 Grnd Roll 1163 1206 1248 1291 1334 1210
50 ft 2356 2415 2476 2537 2598 2422
3000 Grnd Roll 1207 1251 1295 1339 1384 1247
50 ft 2417 2479 2543 2607 2672 2473
4000 Grnd Roll 1252 1298 1344 1390 1436 1285
50 ft 2481 2547 2614 2681 2749 2528
5000 Grnd Roll 1300 1348 1395 1443 1490 1324
50 ft 2550 2619 2689 2759 2831 2585
6000 Grnd Roll 1350 1399 1449 1498 1547 1365
50 ft 2622 2694 2768 2842 2917 2644
7000 Grnd Roll 1402 1453 1504 1556 1607 1408
50 ft 2698 2775 2852 2930 3008 2707
8000 Grnd Roll 1456 1509 1563 1616 1669 1452
50 ft 2779 2860 2941 3022 3105 2773
9000 Grnd Roll 1513 1569 1624 1679 1735 1497
50 ft 2865 2949 3035 3121 3207 2841
10000 Grnd Roll 1573 1630 1688 1746 1803 1545
50 ft 2956 3045 3134 3225 3316 2914
Revision A7
Tabular charts are simpler, but may require extrapolation between num-bers—or simply rounding up to the next highest number on the chart.

One of the first things most pilots check when theywalk up to a GA airplane—or should check—is
how much fuel is onboard. Fuel for the engine or en-gines means time in the air to reach your destination, or an alternate landing spot, without undue stress or hazard.
Checking the fuel can be a bit more complex than just looking at a fuel gauge, as happens in a car. Many airplanes have two or more fuel tanks, usually in the wings. Both the total fuel on board and where the fuel is located matters. Many planes have limita-tions for a maximum imbalance between the weight of fuel in each wing or auxiliary tank. So your goal for telling the pilot how much fuel is onboard isn’t: “We have 12.5 gallons.” It’s: “We have 10 gallons in the left tank and about 2.5 gallons in the right tank.”
Pilots often complain that aircraft fuel gaug-es are inaccurate. That’s not exactly fair. Fuel gauges must be accurate for every calibration mark on the gauge. However, the flat, wide nature of most aircraft fuel tanks mean a large change in fuel quantity results in a small change in the height of the fuel in the tank, which is what the gauge really measures. The height is commonly measured by a float in the tank, which can get stuck or saturated with fuel over time. Add a bit of turbulence sloshing the fuel around and you see why pilots treat fuel gauges with a certain amount of suspicion.
Luckily for you, there’s no sloshing while the air-craft is still on the ground, so the reading from the fuel gauges should be fairly accurate. However, for most light aircraft it’s still best to open each tank and confirm visually that the amount inside appears to match what’s shown on the gauge. Some aircraft have a calibrated stick you can dip into the tank for a pre-cise measure, or when the fuel is too low to see.
Some gauges read in pounds or kilos, as well as gallons or liters. Be sure you report the correct num-ber and unit. An Air Canada flight once ordered fuel in kilos, but got fueled by pounds. Later the captain got to practice his skill at flying a 200-seat glider to an abandoned airfield (successfully).
Check the Fuel
The aircraft fuel gauges could be mechanical nee-dles, or could be part of a digital dis-play. Either way, you’ ll usually need the master power for the airplane on to read the levels shown on the gauges. Check with your pilot before turning on or off the master.
A calibrated stick is a great way to check the fuel in each tank. This could simply be a piece of wood with marks on it. To use a dip tube like the one shown here, put the tube straight down into the tank with your thumb off the end. Then put your thumb tightly over the end and lift it out. Read the fuel level quickly off the scale, and then lift your thumb to drop the fuel back into the tank.

Clear liquid mixed in with the blue is a bad sign: water in the fuel. Water may also show up as a large bubble at the bottom of the cup (water is heavier than fuel) or in smaller bubbles sus-pended in the fuel. You’ll need to empty the water-contaminated fuel, dry out the cup to remove any droplets, and sump again—re-peating until you no longer see water in the samples
If your airplane was parked outside during a rain storm, quite a bit of water may find its way into the tanks. You might sump a lot of fuel to clear it all out.
Dirt and other foreign objects can clog the fuel screens in the system. So look for debris in the cup as well. Again, drain fuel until the sample runs clear of particles—there should be none.
The common 100LL avgas is a leaded fuel. While it’s still legal to burn, dumping it on the ramp is dumping a toxic substance, as well as wasting a valu-able resource. The airport may have a receptacle for hazardous liquids, but many don’t.
Some sump tools, such as the one shown here, let you pour the fuel back into the tanks. They even strain out any water from the sampled fuel as you pour. Check with your pilot about pouring sumped fuel back into the tanks.
Drain the Fuel Sumps
The fuel used in the airplane must be clean andfree from water, so some fuel is drained from
each tank and checked prior to flying. You’ll use a fuel testing tool. Pilots normally carry one on board at all times (it’s that important) or keep it handy in the hangar.
Take fuel samples before your first flight of the day (especially if the airplane sat outside in the rain, or you’re in a humid environment) and after fueling. You’ll always check to see if there’s water in the fuel and that the fuel is the correct type.
Locate the sumps on the airplane, using the pre-flight section of the POH as a guide, and check with the pilot to ensure you’ve found them all. Some high-wing Cessnas have 13 sumps. There’s often a fuel drain at the lowest point in the system, on the belly. Sometimes a drain is actuated by pulling a knob in the engine compartment, or even inside the cabin.
Drain enough fuel so that you have a good vi-sual—a few ounces or so, like a full shot glass. Look at the sample in the cup. If your aircraft uses 100LL avgas, it should look light blue.
TIP
Wait 15 minutes after fuel is added (page 16) before sump-ing the fuel tanks. It can take that long for water to settle.
Fuel drains are spring-loaded. Pushing up releas-es the fuel into a collection jar. Drains with a hole in the center require pushing up with a metal pin (top left). Drains with a T-shape are pushed with a notched cylinder (bottom left). Water will settle in the bottom of the collection jar (below).

EYEBALL TIRES BY THE SIDEWALLS
Even when inflated to their full pressure, aircraft tires can look low compared to car tires, especial-ly on a cold day.
This tire is at its full pressure of 30 psi. One clue that it’s fine is gleaned from the side of the tire coming up from the ground to the metal wheel, called the sidewall. If the angle between the low-est part of the sidewall and the ground is at least 45 degrees, the tire is probably fine.
As the air leaks out, the belly of the tire gets bigger and the sidewall droops lower. This tire is down to about 25 psi. It wouldn’t be unsafe, but it’s not good for the tire. Tell your pilot.
When the sidewall of the tire is close to—or touching—the ground, the tire almost certainly needs air. Tell your pilot right away.
Check Tire Pressures
You don’t need to check tire pressure before ev-ery flight. However, if you suspect the pressure is
low, checking tire pressure for airplane tires is rough-ly the same as with cars. Look up the tire pressure required in the POH or service manual. There may be a different pressure required on the nose or tailwheel tire compared to the tires on the main landing gear. The number is given in pounds per square inch, or psi, and you’ll look for the same number on the tire pres-sure gauge.
Go to the tire, and unscrew the cap on the tire valve stem. If the airplane has wheel covers (com-monly called “wheel pants”), you may need to roll the airplane forward or backward to uncover the valve stem. If the cap is missing, let the pilot know.
Slide the tire pressure gauge over the stem and press down to release air from the tire into the gauge. An instant readout appears on a dial, display, or along the side of a scale that extends.
The reading you get at first is the highest pres-sure that you’ll see from that tire. Remove the gauge in a quick motion so as little air escapes as practical.
If you need to add air to the tires, the FBO can bring out their portable tank or compressor on a fuel or maintenance truck. Alternately, you may have a portable tank or compressor in your hangar that you can use. Have the pilot show you how to fill a tire, bringing it slowly up to the right pressure.
If you overfill the tire, you can release the extra air pressure by pushing in the pin in the tire valve stem. It hisses as air is released.
Changes in the weather can affect your tires. If there has been a significant change in barometric air pressure, that can cause some change in tire pressure. So you should consider checking the tire pressure be-fore flight in this case.
TIP
Periodically look for worn spots. To do this with wheel pants, have someone roll the airplane forward and back to see each tire’s full circumfer-ence.

You can also use plain water—just not Windex or other scouring cleansers. To clean dried-on bugs, let the water or cleaner soak them for a while—and prevent them from drying on in the future by clean-ing the windows after the flight.
When the windshield dries, use a soft, dry cloth or T-shirt to rub off any streaks.
At every fuel stop, it pays to make another pass at the windshield, especially in the summer months. Bugs bake on after several hours in the air, but they’re even tougher to get off days later.
You can also clean other surfaces. Many aircraft owners use Pledge, or a similar gentle polish, on alu-minum-covered wings, cowlings, and control surfac-es. The polish not only removes caked-on bugs well, but also leaves a slick finish that tends to shed future grime with greater ease.
Before and after each flight, ensure a clear view bycleaning the windshield and other windows in-
side (where dust gathers) and out. You’ll use different products than you would
on your car to make sure you don’t scratch the deli-cate Plexiglass. Find a new microfiber cloth (one you only use on the airplane’s windows) and a specialized cleaner such as Plexus or Prist.
Clean the Windshield
Wipe up and down, right and left. Avoid wiping in a circular motion as it’s more likely to leave smears that catch sunlight.
KNOW YOUR LIMITATIONS: FIND THEM IN THE POH
The Pilot’s Operating Handbook, or POH, is the final word on the operation and care of the airplane. That’s where you’ll find how much oil it holds or the correct tire pressure, usually in Section 8. Ask your pilot to show you where it’s kept in the airplane.

Referring back to the weight and balance chart(page 8), you should know the exact weights
and locations (stations) where you’ll load baggage into the airplane. It’s important the bags go where you planned because there are maximum weights for each cargo or seating area. Placards or signs in the airplane’s interior state these limits. If it turns out something you planned for a specific station in the airplane doesn’t fit and must be stowed elsewhere, you must recheck how shifting that baggage effects the weight and balance.
Make sure heavier items are near the bottom of the baggage area, otherwise they may topple onto passengers, or fall out of the baggage door when you open it after the flight. It’s also good practice to put the biggest, heaviest items in first and toward the for-ward part of the baggage area. Pack the smaller stuff around them.
Smaller, soft-sided bags, such as duffels or backpacks, are easier to load and arrange than larg-er hard-sided luggage. A soft-sided duffel made of a comfortable fabric and filled with clothing can also double as a pillow in the back seat. However, anything fragile should be in a lightweight, hard-sided case. If you pack a bunch of smaller bags, you can arrange them so that you can access the items you need along the way, or for earlier parts of the trip. You’ll also be able to adjust loading to fit cargo in tighter spots in the baggage area.
Bags can really jump in turbulence or maneu-vering flight such as takeoff and landing. Not to crit-icize your pilot’s skills in this regard—unless you’re keeping score (page 54). Bungee cords or webbed cargo straps that hook onto tie-down points in the baggage areas are a good idea.
This is particularly important for anything up high, such as on a shelf, that could fly forward with sudden deceleration. If you don’t have a cargo net on these areas, get something from a sporting goods or outdoor store.
Load the Baggage
Aircraft baggage doors are smaller than your av-erage car trunk. This is another reason to pack in multiple, soft-sided bags
KNOW YOUR LIMITATIONS: WEIGHT & BALANCE
The weight and balance section in the POH (normally Section 6) carries much of the info you need to safely load the airplane, but you also need to pay attention to the placards and any markings in the cargo areas and other sections of the airplane.
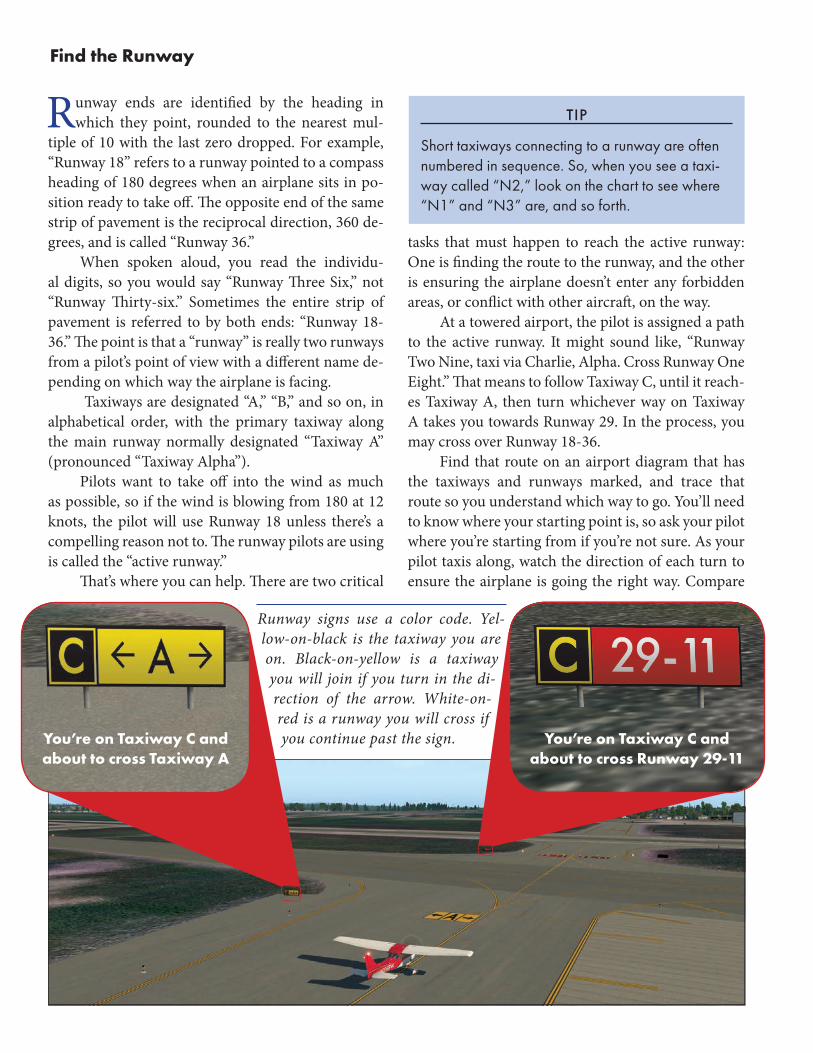
tasks that must happen to reach the active runway: One is finding the route to the runway, and the other is ensuring the airplane doesn’t enter any forbidden areas, or conflict with other aircraft, on the way.
At a towered airport, the pilot is assigned a path to the active runway. It might sound like, “Runway Two Nine, taxi via Charlie, Alpha. Cross Runway One Eight.” That means to follow Taxiway C, until it reach-es Taxiway A, then turn whichever way on Taxiway A takes you towards Runway 29. In the process, you may cross over Runway 18-36.
Find that route on an airport diagram that has the taxiways and runways marked, and trace that route so you understand which way to go. You’ll need to know where your starting point is, so ask your pilot where you’re starting from if you’re not sure. As your pilot taxis along, watch the direction of each turn to ensure the airplane is going the right way. Compare
Find the Runway
Runway ends are identified by the heading inwhich they point, rounded to the nearest mul-
tiple of 10 with the last zero dropped. For example, “Runway 18” refers to a runway pointed to a compass heading of 180 degrees when an airplane sits in po-sition ready to take off. The opposite end of the same strip of pavement is the reciprocal direction, 360 de-grees, and is called “Runway 36.”
When spoken aloud, you read the individu-al digits, so you would say “Runway Three Six,” not “Runway Thirty-six.” Sometimes the entire strip of pavement is referred to by both ends: “Runway 18-36.” The point is that a “runway” is really two runways from a pilot’s point of view with a different name de-pending on which way the airplane is facing.
Taxiways are designated “A,” “B,” and so on, in alphabetical order, with the primary taxiway along the main runway normally designated “Taxiway A” (pronounced “Taxiway Alpha”).
Pilots want to take off into the wind as much as possible, so if the wind is blowing from 180 at 12 knots, the pilot will use Runway 18 unless there’s a compelling reason not to. The runway pilots are using is called the “active runway.”
That’s where you can help. There are two critical
TIP
Short taxiways connecting to a runway are often numbered in sequence. So, when you see a taxi-way called “N2,” look on the chart to see where “N1” and “N3” are, and so forth.
Runway signs use a color code. Yel-low-on-black is the taxiway you are on. Black-on-yellow is a taxiway you will join if you turn in the di-rection of the arrow. White-on-red is a runway you will cross if you continue past the sign. You’re on Taxiway C and
about to cross Taxiway AYou’re on Taxiway C and
about to cross Runway 29-11

the taxiway and runway signs you see out the window to the ones on the chart.
A critical element is if the airplane was told to “hold short” of a specific runway or taxiway. The pi-lot must stop at this point even if it appears no one is there to create a conflict. Tower should never is-sue instructions to cross more than one runway at a time, so if your route will cross two runways, expect a hold short. If your pilot appears to be going too far, you can remind them about the hold short. Often the
tower will remove the “hold short” before the airplane actually stops, so listen for that on the radio as well.
TIP
At night, blue lights mark taxiway edges and (at some airports) green lights mark the center of taxiways. Runway side lights are white or orange. Some airports have alternating red and white lights where a taxiway crosses a runway.
Paint on the pavement has its code, but these two are probably the most important at towered air-ports. The pilot may not cross from a solid-line side to a dashed-line side without permission. The sin-gle lines mean you’re entering a taxiway or similar
movement area. The double lines mean you’re enter-ing a runway. Pilots may cross from the dashed side to the solid side without permission. At a non-tow-ered airport, pilots must use their own judgment to ensure it’s safe to cross these lines.
FOLLOW THE TAXI ON THE APP
Cockpit displays with moving maps and apps such as Fore-Flight and Garmin Pilot make a huge difference when taxi-ing around unfamiliar airports. Not only does the pilot—and you—have airport charts for almost any airport, the location of the taxiing airplane is shown progressing across the map. Sometimes the most helpful aspect is just seeing exactly where you are on the chart to start the taxi.
If you and your pilot coordinate, you can give progres-sive directions, “The next left is Alpha and we’re still expected to hold short of Runway Three Six,” while the pilot focuses out the window during the taxi.
Another advantage to these apps is you can usually draw marks on the chart itself. When tower gives your pilot instruc-tions, you can annotate the map with that route or holding point, and then erase the marks later.
PilotWorkshops is dedicated to proficiency training for general aviation pilots. Details and samples of our many products, including the Flying Companion Manual from which this document is excerpted, are available at www.PilotWorkshop.com.
When you visit, be sure to sign up for the free Pilot’s Tip of the Week (if you don’t already subscribe). These are short, focused, and practical tips you can take directly to the cockpit. Developed by our team of nationally recognized instructors, the tips are enjoyed by over 185,000 fellow pilots.