hdcvi configuration 1.lan configuration 6.mobile...
TRANSCRIPT

HDCVI CONFIGURATION
1.LAN CONFIGURATION
2.ROUTER CONFIGURATION
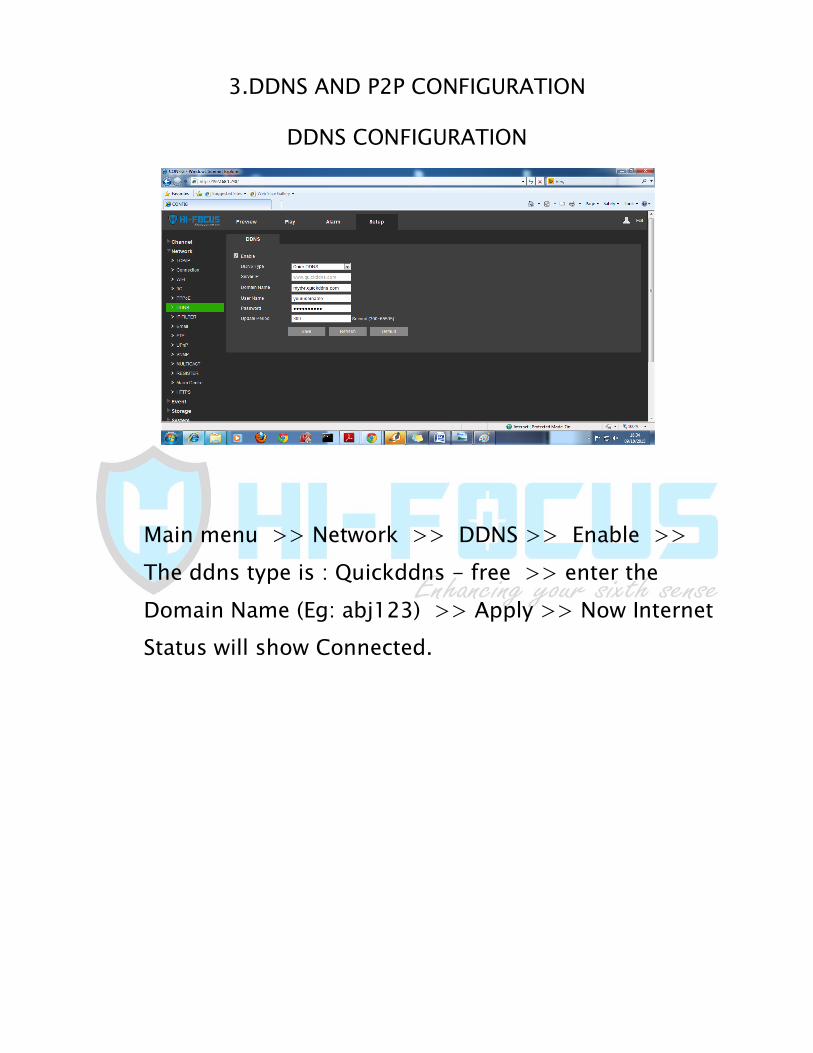
3.DDNS AND P2P CONFIGURATION
4.SMART PSS CONFIGULARATION
5.3GSETUP.
6.MOBILE CONFIGURATION
7.SYSTEM UPGRADE
8.DATE AND TIME SETTINGS
9.DISPLAY SETTING
10.TOUR SETTINGS
11.RECORD SETTING
12.ADD IP CAMERA
13.ABNORMALITY
14.PLAYBACK AND BACKUP
15.PASSWORD RESET
16.E-MAIL SETUP
DOWNLOAD LINKS:-
SMART PSS - CLICK HERE
G DMSS ANDROID - CLICK HERE

1.LAN CONFIGURATION
Connect the DVR / NVR to Router/switch through a lan
cable.
On your PC >> Start >> Run >> cmd >> ipconfig
According to the default gateway IP, assign your
device an IP in the same range.
Eg: If the default gateway is 192.168.0.1. Then device
IP will be 192.168.0.2 to 255
Dvr default ip Address is 192.168.1.108.
Desktop software is VMS.
Dvr default User Name : admin , Password : admin.

2.MODEM CONFIGURATION
Open the router page in browser as on your default
gateway
(Eg : 192.168.1.1)
Login the router page.

Goto advanced setup >> Disable the Firewall and spi.
(Single Dvr Config) Advanced setup >> Enable the
DMZ >> Enter the Dvr ip address >> ( Eg:
192.168.1.108 ) >> SAVE.

(Multi Dvr Config) Goto Virtual Server >>Enter the
rule, Start port, End port, Ip address >> Save. Do the
same settings for all the Dvr’s tcp ports and http
ports ( change it in Dvr )
NOTE : Change the IP address, TCP port and HTTP
port for all other Dvr.

Enter ping.eu in ie brower
Goto port check enter the router wan ip and port no (
37777 & 80 ) .
Click GO. Now the ports will show open.
Now goto the Dvr ddns page.
3.DDNS AND P2P CONFIGURATION
DDNS CONFIGURATION
Main menu >> Network >> DDNS >> Enable >>
The ddns type is : Quickddns - free >> enter the
Domain Name (Eg: abj123) >> Apply >> Now Internet
Status will show Connected.

P2P CONFIGURATION
FOR P2P no need to configure in modem
Menu >> Network >> Tcp/Ip >> Disable DHCP
Assign local IP to the device
Enable P2P >> now p2p status is Online.
4.VMS CONFIGURATION

Open the VMS >> Devices >> Refresh >> Select the ip
then add >>
After adding, the status will be online.

Now click the device list >> click the camera for live view
in VMS
Devices >> Manual add >> Enter the dvr device name
,register mode (ip/domain) port, user name, password.

Devices >> Manual add >> Enter the dvr device name
,register mode(Domain), user name, password
5. 3G SETUP
Main menu >> Network >> 3g >>
Network type : Auto
Authentification : No auth
Apn : (depend on Network)
Dial No : (depend on Network )

After dial up you will get the dynamic ip address >> then
go to p2p >> status will be online >> then follow the p2p
mobile settings.
6.MOBILE CONFIGURATION
Android : Hifocuslive
Iphone : Imms/Hifocuslive.
Install the Application play store/app store.

7.DDNS CONFIGURATION
Name : Any Name
Register Mode : Ip Domain
Address: (Ex: hifocus123.Quickddns .com)
Port : 37777.
User name : admin
Password : admin
8.P2P CONFIGURATION
Name: Anything
Register Mode : p2p
Address: (Ex:1c02a39papiv6ke)
User name : admin
Password : admin
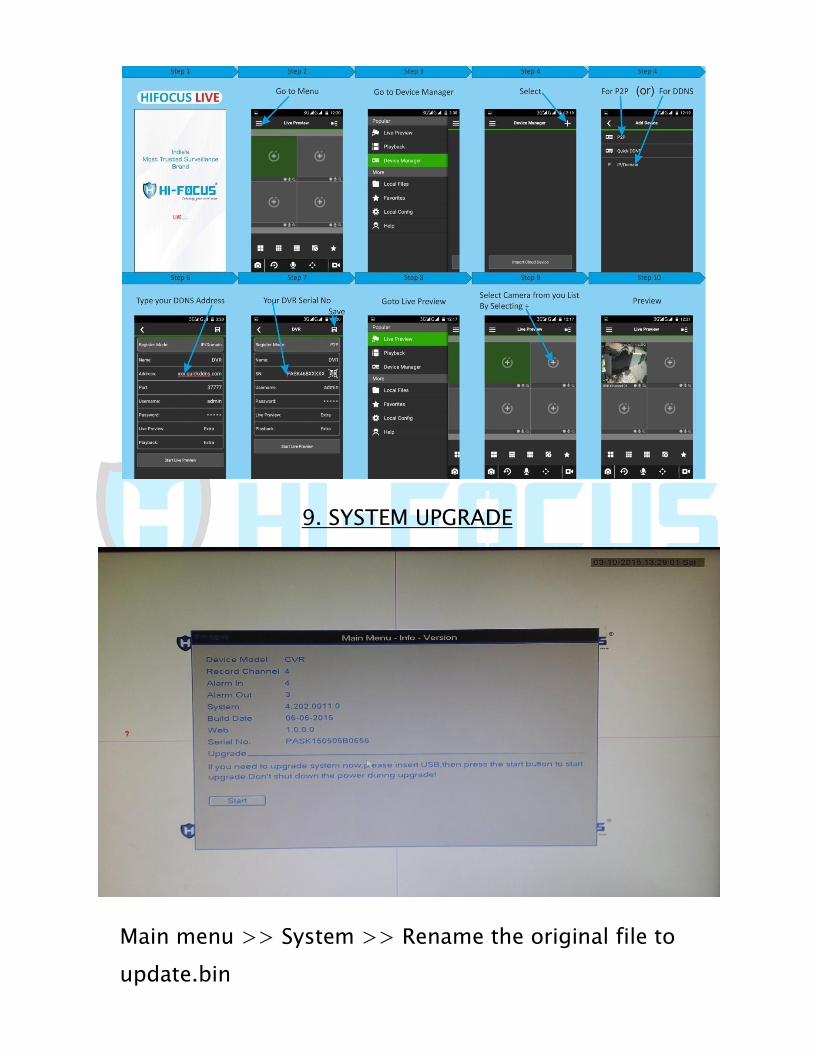
9. SYSTEM UPGRADE
Main menu >> System >> Rename the original file to
update.bin

Then start update…….
After rebooting the Dvr will be updated successfully.
10.DATE & TIME SETTING
Main menu >> System >> General >> Change the
current date and time save and apply.
11.DISPLAY SETTING
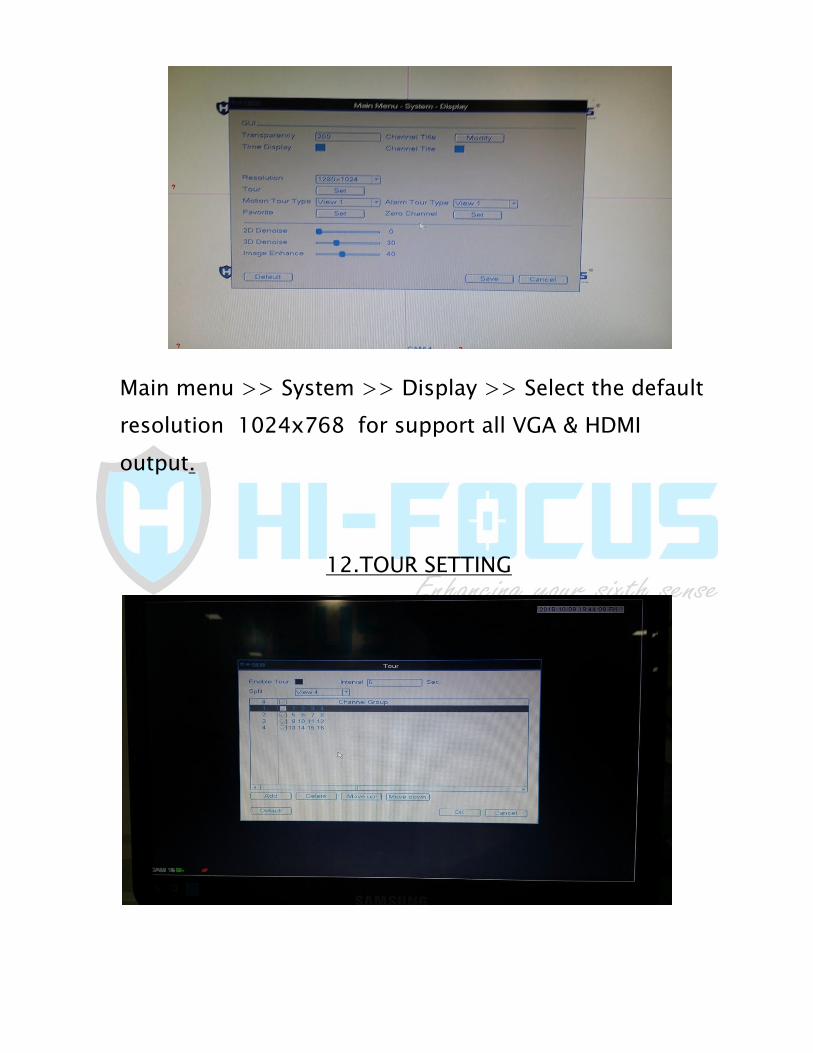
Main menu >> System >> Display >> Select the default
resolution 1024x768 for support all VGA & HDMI
output.
12.TOUR SETTING

Main menu >> System >> Display >> Tour setup >>
Enable the tour and select the tour type and channels
13.RECORD SETTING
Main menu >> Storage >> Schedule >> Enable the regular
and select all channels for continuous recording.
14.MOTION RECORDING

Above image will be showing after enabling motion
detection.
15. ADD IP CAMERA

Main menu >> Advance >> Digital >> Coaxial support
for both analog & hdcvi camera. For ip camera select ip
chennal mode. 4ch CVR supports 2 IP camera’s, 8ch
supports 4 IP camera’s, 16ch supports 4 IP camera’s
16.ABNORMALITY
Main menu >> Event >> Abnormality >> Disable Buzzer
to stop the beep sound if the Dvr is running without
Harddisk or if there is any Hdd error.
17.PLAYBACK & BACKUP

Main menu >> Search >> Select the Date and Channel
No. Search and click the file which you required. Then
the playback of the particular date and time will be
played.

Main menu >> Back up >> Now select the channel then
start date ,time and end date, time now click Add. After
the files are shown below, select the file and click start
back up. now files will be copied to your pen drive.
18. PASSWORD RESET

Main menu >> System >> Account >> User >> Modify
(admin user ) >> Enable the Modify password >> Old
password (enter the 6 digit reset code ) >> New
password ( Enter the new password ) >> Confirm
password (Enter the new password ) >> Save .

19.E-mail Setup
Setup >> Network >> Email >> Enable >> smtp
server for gmail ( smtp.gmail.com ) port [465],username:
( your mail id ), password : ( your email password ),
sender mail : ( your email id ), encrypt type ( ssl ) receiver
mail ( maximum 5 - Any email address ) , save and click
email test.