hd writer we 2
TRANSCRIPT

Operating InstructionsHigh-definition video Management/Easy Editing Software
HD Writer WE 2.0
Thank you for using HD Writer WE.Before use, please read these instructions completely.
© Panasonic Corporation 2014

2HD Writer WE
ContentsIntroduction
Read before starting operation ........................... 5General precautions ............................................. 7Operating environments ...................................... 8SD cards supported for recording .................... 11
PreparationConnect the unit to your computer ................... 12
Disconnecting the unit from the computer............................ 13
Using the Smart WizardFeature overview ................................................ 14Copying video to a computer ............................ 15
Copying by automatically selecting only the video not already copied ...................................................................... 15Copying by selecting the video yourself ............................... 16Selecting a copy destination ................................................ 18
Advanced FeaturesFeature overview ................................................ 19
Opening the main window ........................... 20Exiting the software .............................................................. 20
Updating software automatically ................ 21Checking for update information automatically .................... 21Changing the update information setting ............................. 21
Copying videos to a computer [Copy to PC] ... 22About the main window ..................................... 25Switching between window display styles ...... 27
Displaying videos in a folder in list view (Folder display) ..... 27Displaying videos with the same recording date (Calendar display) ................................................................ 28Adding registered folders ..................................................... 29
Copying/moving videos ..................................... 30Deleting videos ................................................... 31Protecting videos ............................................... 32Setting as Favorites ........................................... 33
[Play back from here (Add to favorites)] ............................... 34
Displaying the Playback window ...................... 35About the Playback window ................................................. 36
Playing back slide shows .................................. 38Playing media ..................................................... 41Displaying detailed video information .............. 42

3HD Writer WE
ContentsEditing videos on your computer ..................... 43
Editing motion pictures (Basic operations) ........................................ 44Creating a new motion picture editing project ...................... 44Saving an edited project [File output] ................................... 47Saving the edit process [Save project] ................................. 49Opening saved edit process [Open project] ......................... 49Deleting saved edit process [Delete project] ........................ 50About the edit video window ................................................ 51
Editing motion pictures (Editing from the storyboard area) ............. 53Dividing scenes [Divide] ....................................................... 54Trimming one selected portion in the scene [Trimming] ....... 55Adding still pictures or color clips with a set playback time between scenes [Still pic.] .................................................... 56Assigning titles [Title] ........................................................... 57Adding special effects to scenes [Effect] .............................. 58Adding decorative effects to scenes [Decorations] .............. 59Adjusting the balance between the sound of the motion picture and the BGM [Volume] ............................................. 60Adding scene transitions [Transition] ................................... 61Merging scenes .................................................................... 62Setting the BGM for the entire project .................................. 62
Editing motion pictures (Editing in the timeline area) ....................... 64Adding a scene .................................................................... 65Adding a title ........................................................................ 66Dividing a scene ................................................................... 67Setting the BGM for a certain scene .................................... 68
Editing motion pictures [Delete partially] ........................................... 69Deleting selected portions of a motion picture ..................... 69
Editing still pictures (Retouching still pictures) ........................... 72
Editing still pictures (Rotating still pictures) ................................ 74
Record on storage media .................................. 75 Recording ...................................................... 75Recording formats ................................................................ 75Additional recording on media with existing content ............ 75
Recording motion pictures .......................... 76 Recording still pictures ............................... 80
Copying videos to a DVD using the PC-compatibility function .................................. 81Using convenient features................................. 84
Creating still pictures from motion pictures ......................................................... 84
Creating short movie stories ....................... 86Editing BGM ......................................................................... 90Editing the order of motion pictures and still pictures in the scenario and other settings ............................................ 91Loading a saved story .......................................................... 92Deleting stories .................................................................... 93Advanced settings for short movie stories ........................... 94
Retouching motion pictures ........................ 96Adding animation effects to objects ................................... 102Loading a saved video retouch project .............................. 103Deleting video retouch projects .......................................... 104Advanced “Video retouch” settings .................................... 105
Uploading & Email ...................................... 106Sending email with the URL of an uploaded video/ Online sharing .................................................................... 106
4HD Writer WE
Converting data format (MP4 1920x1080/30p or 1920x1080/25p conversion) ................................................. 114
Printing still pictures .................................. 116
OtherSetting motion picture functions .................... 117Changing the settings for copying videos to computer ........................................................... 119Performing preview of thumbnail motion pictures.............................................................. 120Setting the operation when a still picture file with the same name already exists................. 121Right-click menu list ........................................ 122Troubleshooting ............................................... 124Trademark and License Information ............... 132
Contents

5HD Writer WE
Introduction
About the contents of these instructions ●In this manual, the Panasonic wearable camera that this software is bundled with is referred to as “the unit”. ●The description of Windows® in these operating instructions is based on the Windows® 7 screen. ●Please note that the operation screens shown in these operating instructions may not match those actually displayed on your PC due to differences in the operating environment or other cause. ●For instructions on using your computer, Windows®, various kinds of disc drives, or this unit, please refer to their respective Operating Instructions. ●The usable operation items on the menu and right-click menu depend on the operation status of this software or status of the selection of the videos. The unusable items are displayed in gray. ●Pages to be referred to are shown as (→00). ●The contents of these operating instructions may be subjected to changes without prior notice. ●Reproduction of these operating instructions in part or in full without permission is prohibited.
Steps to protect important video data ●Make a backup copy of your important data, in case any problems occur. ●When deleting original video data, confirm that the data has been correctly copied to your computer or an SD card etc. before deleting the data. ●Do not modify or delete files or folders ([DCIM], or others) used by this software.
Important ●MP4 SD cards that have been created using this software can only be played back on this unit. On other equipment, the cards may not be played back correctly, or may not be playable at all, even if the equipment is MP4-compatible. Do not insert these media into incompatible equipment. Not only will playback be unsupported, it may not be possible to eject the media. Additionally, valuable content may accidentally be deleted after a message is displayed requesting you to format the media. ●The recorded and/or edited content is for personal use only and may not be reproduced or exported without permission from the copyright holder.
Disclaimer ● Information recorded using this software may be altered or erased due to erroneous operation, static electricity, accident, malfunction, or repair, etc. Please note in advance that Panasonic is not liable in any way for any direct or indirect damage or loss resulting from the alteration or vanishing of information including personal information.
Read before starting operation

6HD Writer WE
Introduction
Read before starting operation
About supported videos ●Videos recorded using this unit. ●Videos recorded with other equipment cannot be copied. ●Not compatible with videos that were created or edited with other software.
TermsMP4 motion pictureThis is a motion picture in MP4 format (MPEG-4 AVC standard)*.* In this manual, MP4 3840x2160 motion pictures are referred to as
“4K motion pictures”.
SceneFor this software, one “scene” refers to the motion picture recorded when the recording is started to when it is stopped on this unit.ProjectThe term “project” is used to refer to a video production edited by combining scenes and still pictures using the motion picture editing functions of this software.
SD cardsIn these instructions, microSD memory cards, microSDHC memory cards, SD memory cards, SDHC memory cards and SDXC memory cards are all referred to as SD cards.

7HD Writer WE
Introduction
General information about using the software ●Do not execute the following operations while the software is running. Doing so may cause defects (damage to media, etc.). - Turn off this unit or your computer, or restart your computer. - Switch the user or log off. - Change the screen settings. - Use other software (especially software for writing to disc, or recording/encoding software with high CPU utilization and large memory requirements).
- Use the shared drive of another PC connected to the network. ●While this software is running, screen saver and power saving functions (computer hibernation or standby when there is no operation for a certain period of time) do not operate.
Playback and use of produced media ●SD cards created using this software can only be played back on equipment that is compatible with the format used (standard). Discs created using this software are recorded as computer data and can only be used on computers.
SD cards ●Use of SDHC memory cards requires SDHC-compatible equipment. ●Use of SDXC memory cards requires SDXC-compatible equipment. ●When using an SDXC card in a Windows® operating system, the computer may display a message asking whether to format the card. Be careful because if you format the card, you will delete all your precious videos. Be sure to check the following page before using an SDXC card. http://panasonic.net/avc/sdcard/information/sdxc.html ●Formatting SD cards or deleting card data only modifies file management information. Data on SD cards is not completely deleted. We recommend physically destroying SD cards or thoroughly deleting all data on SD cards when disposing of SD cards or transferring ownership. Use discretion in managing data on SD cards.
General precautions

8HD Writer WE
Introduction
System requirements
PC Intel® Pentium® 4 2.8 GHz or higher CPU (including compatible CPU)When using the playback function, Intel® Core™ 2 Duo 2.16 GHz or higher, or AMD Athlon™ 64 X2 Dual-Core 5200+ or higher is recommended.When editing content, an Intel® Core™ 2 Quad 2.6 GHz processor or higher is recommended.When using playback or editing function for 1080/60p or 1080/50p, Intel® Core™ i7 2.8 GHz or higher is recommended.When using playback or editing function for 4K motion pictures, Intel® Core™ i7 3.5 GHz or higher is recommended.
OS Microsoft® Windows® 8 / Microsoft® Windows® 8.1 (32 bit / 64 bit) Microsoft® Windows® 8 / Microsoft® Windows® 8.1 (32 bit / 64 bit) ProMicrosoft® Windows® 7 (32 bit) Starter or Service Pack 1Microsoft® Windows® 7 (32 bit / 64 bit) Home Basic or Service Pack 1Microsoft® Windows® 7 (32 bit / 64 bit) Home Premium or Service Pack 1Microsoft® Windows® 7 (32 bit / 64 bit) Professional or Service Pack 1Microsoft® Windows® 7 (32 bit / 64 bit) Ultimate or Service Pack 1Microsoft® Windows Vista® (32 bit) Home Basic Service Pack 2Microsoft® Windows Vista® (32 bit) Home Premium Service Pack 2Microsoft® Windows Vista® (32 bit) Business Service Pack 2Microsoft® Windows Vista® (32 bit) Ultimate Service Pack 2
●When using 4K motion pictures, a 64 bit version of Windows® 7 / Windows® 8 / Windows® 8.1 is required.
RAM Windows® 7 / Windows® 8 / Windows® 8.1: 2 GB or more (64 bit)Windows® 7 / Windows® 8 / Windows® 8.1: 1 GB or more (32 bit)Windows Vista®: 1 GB or moreWhen using playback or editing function for 4K motion pictures: 8 GB or more is recommended.
Operating environments

9HD Writer WE
Introduction
Operating environments
Display High Color (16 bit) or more (32 bit or more recommended)Desktop resolution of 1024 x 768 pixels or more (1920 x 1080 pixels or more recommended)Graphics card complying with DirectX® 9.0c (DirectX® 10 recommended)DirectDraw® overlay supportPCI Express™ x 16 is recommendedVideo memory of 256 MB or more recommended
●In order to play back 4K motion pictures, a video card that supports hardware decoding of 4K motion pictures is required.(For example)Intel HD Graphics 4000 or higherNVIDIA GeForce 600 series or higher ● In order to play back or edit 4K motion pictures, at least 2 GB of video memory is required. ● In order to play back motion pictures with a resolution of 4K, a monitor and a video card that support 4K are required.
Direct3D Acceleration: Enabled** To check the Direct3D® acceleration settings, enter “dxdiag” in the text field in the [Start] menu. The [DirectX
Diagnostic Tool] window appears. Select the [Display] tab and check [Direct3D Acceleration] under [DirectX Features].
Hard disk Ultra DMA-100 or higher450 MB or more free space for installing software
● If the Compression setting is enabled, errors will occur during recording. Clear the check box for [Compress this drive to save disk space] in [Properties] for the hard disk drive.
Sound DirectSound® support
Drive When writing to DVDs, a compatible drive and media are necessary.
Interface USB port (Hi-Speed USB (USB2.0))
Unit connected via USB Panasonic’s wearable camera
Content Videos recorded using this unit
Other requirements Mouse or equivalent pointing device, an environment with Internet access

10HD Writer WE
Introduction
Operating environments
●Even if the system requirements mentioned in these operating instructions are fulfilled, some personal computers cannot be used. ●For 4K motion pictures, editing may take a long time or smooth playback may not be possible, even if the recommended system requirements are fulfilled. ●This software is only for Windows®. ●This software is not compatible with Microsoft® Windows® 3.1, Windows® 95, Windows® 98, Windows® 98 SE, Windows® Me, Windows NT®, Windows® 2000 and Windows® XP. ●Windows Operation is not guaranteed on Microsoft® Windows Vista® Enterprise, Windows® 7 Enterprise, Windows® 8 Enterprise, Windows® 8.1 Enterprise and Windows® RT. ●For Windows® 8 / Windows® 8.1, this software is available only as a desktop app. ●When 2 or more USB devices are connected to a PC, or when devices are connected through USB hubs or by using USB extension cables, proper operation is not guaranteed. ●Operation on an upgraded OS is not guaranteed. ●This software does not support the multi-boot environments. ●Available only to administrator account or standard account users in Windows Vista®, Windows® 7, Windows® 8 and Windows® 8.1. (Installation and uninstallation of the software requires an administrator account.) ●Log on with an administrator account or standard user account before using this software. You cannot use this software with a guest account.
●This software does not support the multi-monitor environments. ●For fonts and screen settings, use the standard Windows® settings. Characters may not display properly depending on the settings. ●Operation is not guaranteed under Windows Vista® Ultimate, Windows® 7 Ultimate, Windows® 8 and Windows® 8.1 with the user interface set to other languages using the Multi-language User Interface (MUI) function. ●This software cannot be used simultaneously with other motion picture editing software or video capture products. Note that other software running background processes, timer recording in particular, may cause this software to malfunction. ●Non-compatible files are not displayed. ●When the size of the video file is very large or the video is in a special format, it may not be displayed. ●Before playing back high-definition motion pictures with high resolution, check your video card for the following points. Otherwise, the video may not be played back or displayed correctly. Frames in the motion picture may skip, or the motion picture may not be played back smoothly. - Make sure that the driver software is the latest version. - Make sure that the OS and standard graphic modules, such as DirectX®, are updated to the video card's recommended versions.

11HD Writer WE
Introduction
SD cards supported for recording ●Explanation of the icons
MP4 : MP4 motion picture
SD cardsSD memory card
SDHC memory cardSDXC memory card
Recording format used with this unit MP4 MP4
OthersAdditional recording
Formatting RequiredStill pictures JPEG(DCF)
●Only microSD memory cards and microSDHC memory cards can be used in this unit. ●When using SD cards, see “SD card connection” (→13). ●Motion pictures shorter than 2 seconds cannot be recorded on SD cards. ●Do not insert or remove SD cards when copying data from SD cards or recording data on discs. Removing SD cards during this process may cause data corruption or SD card damage. ●SD cards must have a capacity of at least 32 MB for motion picture recording. Additionally, operation is not guaranteed when recording motion picture to 64 MB – 256 MB SD cards. SD cards of 8 MB – 256 MB can be used to store still pictures. ●Recording requires twice the amount of free space for the work area as that being used on the media. To change the work area (→117).

12HD Writer WE
By connecting this unit to your computer using the USB cable supplied with the unit, you can copy videos from the SD card in the unit to your computer.
ImportantBe sure to fully charge the batteries of your laptop computer or this unit beforehand to avoid depleting the batteries.
1 Start the computer.
2 Turn on the unit.
3 Connect the unit to a computer.Insert the USB cable supplied with the unit firmly into the respective USB ports of the unit and computer.
4 Perform the unit settings for connection to the computer.See the Operating Instructions for the unit for details.
5 Confirm that the unit is recognized by the computer.The unit is correctly recognized by the computer if the unit is added as a drive in [Computer].
If a window like this is displayed, close it.
●When using an SD card reader/writer, select the copy function item without closing this window. In this example, select [Copy to PC].
(Example of display window)
Preparation
Connect the unit to your computer
Note that when “Always do this for pictures” is selected, the Smart Wizard starts up each time a SD card with pictures recorded on it is inserted thereafter.

13HD Writer WE
Preparation
Connect the unit to your computer
Tips ●For further details, also refer to the Operating Instructions of the unit. ●To record to SD cards, use an SD card reader/writer. ●When using an SDXC card in a Windows operating system, the computer may display a message asking whether to format the card. Be careful because if you format the card, you will delete all your precious videos. Be sure to check the following page before using an SDXC card. http://panasonic.net/avc/sdcard/information/sdxc.html ●Do not operate the unit or disconnect the USB cable during the transfer of data in the unit. The software may malfunction, and data may be lost. ●When connecting the unit to the computer for the first time, processing may take some time as the OS installs the driver. ● If the unit is not recognized after it is connected, try connecting it to a different USB connector, such as the USB connector on the rear of the computer.
SD card connectionWhen using an SD card reader/writer, connect the device before starting this software. (For connection instructions, refer to the Operating Instructions of the computer or SD card.)
1 Confirm that the unit is not recording or being accessed in any way.
2 Click or in the task tray.
Example of the task tray icon
3 Safely remove the unit by selecting it from the menu.If multiple USB devices are displayed, determine which one is the unit, for example by selecting the drive letter assigned to the unit.
4 Disconnect the USB cable from the computer.
5 Turn off the unit.
Disconnecting the unit from the computer

14HD Writer WE
By simply following the instructions in the Smart Wizard window, you can easily copy captured videos to your computer.The Smart Wizard is displayed automatically when you connect the unit to your computer.
●If the data is recorded on an SD card, insert that SD card into the unit.
You can copy motion pictures and still pictures recorded using this unit to your computer.(Video captured using other devices cannot be copied.)
Important ●The Smart Wizard is not displayed if the software is already running. Close the software before connecting the unit to the computer. ●Do not disconnect the unit from the computer while the Smart Wizard is running.
Using the Smart Wizard
Feature overview
Tips ●When a 4 GB or larger motion picture is continuously recorded using this unit, it is divided into 4 GB increments and stored as multiple scenes. After copying to PC, the video data is treated as multiple scenes. ●When the file system of the hard disk in the copy destination computer is FAT32, motion picture data that is larger than 4 GB cannot be copied. ●Recording to an SD card cannot be performed with the Smart Wizard.
Preparation: ●Connect this unit to the computer. If the data is recorded on an SD card, insert that SD card into the unit.
1 Click [Copy to PC].
2 Decide how to select the video to copy. To automatically select only the video that has not already been copied to the computerClick [Simple copy] (→15).
To select the video yourselfClick [Copy selected files] (→16).
15HD Writer WE
Using the Smart Wizard
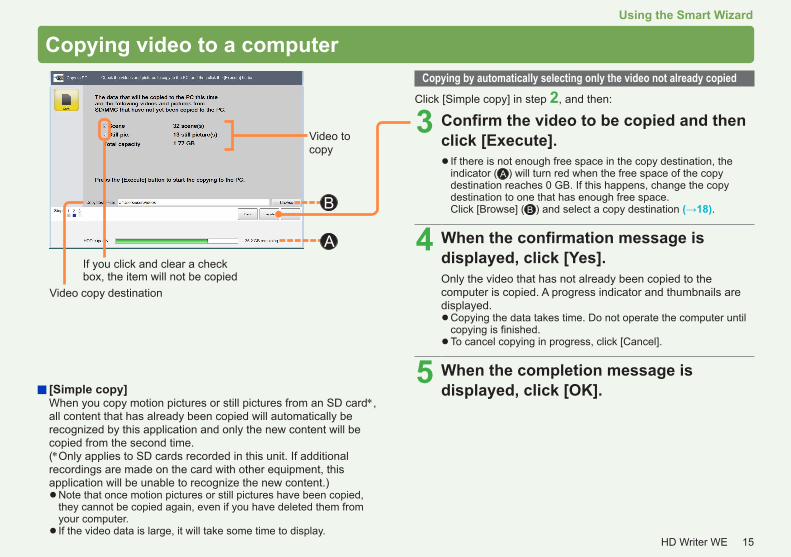
Copying video to a computerCopying by automatically selecting only the video not already copied
Click [Simple copy] in step 2, and then:
3 Confirm the video to be copied and then click [Execute].
● If there is not enough free space in the copy destination, the indicator ( A ) will turn red when the free space of the copy destination reaches 0 GB. If this happens, change the copy destination to one that has enough free space. Click [Browse] ( B ) and select a copy destination (→18).
4 When the confirmation message is displayed, click [Yes].Only the video that has not already been copied to the computer is copied. A progress indicator and thumbnails are displayed.
●Copying the data takes time. Do not operate the computer until copying is finished. ●To cancel copying in progress, click [Cancel].
5 When the completion message is displayed, click [OK]. [Simple copy]
When you copy motion pictures or still pictures from an SD card*, all content that has already been copied will automatically be recognized by this application and only the new content will be copied from the second time.(*Only applies to SD cards recorded in this unit. If additional recordings are made on the card with other equipment, this application will be unable to recognize the new content.)
●Note that once motion pictures or still pictures have been copied, they cannot be copied again, even if you have deleted them from your computer. ● If the video data is large, it will take some time to display.
Video copy destination
Video to copy
B
If you click and clear a check box, the item will not be copied
A

16HD Writer WE
Copying video to a computerUsing the Smart Wizard
Copying by selecting the video yourselfClick [Copy selected files] in step 2, and then:
3 Select the items to copy. ●Each time you click a thumbnail, items are selected or cleared. ●You can set the operation to perform if a still picture file with the same name already exists in the Copy destination folder (→121). ●To select all, click ( A ). ● If there is not enough free space in the copy destination, the indicator ( B ) will turn red when the free space of the copy destination reaches 0 GB. If this happens, change the copy destination to one that has enough free space. Click [Browse] ( C ) and select a copy destination (→18).
For videos recorded using this unit ●Videos that have not already been copied to the computer are selected as default. ●Video already copied is labeled with .
Display By scene or By date
Resize thumbnail
C
B
A
Tips ● If the video data is large, it will take some time to display. ● If a video is not compatible (→6), “?” is displayed in the thumbnail and the video cannot be copied. ●When a 4 GB or larger motion picture is continuously recorded using this unit, it is divided into 4 GB increments and stored as multiple scenes. Therefore, multiple thumbnails are displayed. After copying to PC, the video data is treated as multiple scenes.
Select the type of video to display([All], [MP4], [Still pic.])

17HD Writer WE
Copying video to a computerUsing the Smart Wizard
Tips ●About saving folders (→24) ●Copying to a computer can also be performed from [Copy to PC] in the main window.
4 Click [Execute].
5 When the confirmation message is displayed, click [Yes].The selected video(s) is copied to the computer. A progress indicator and thumbnails are displayed.
●Copying is not available unless you have selected at least one motion picture or still picture. ●Copying the data takes time. Do not operate the computer until copying is finished. ●To cancel copying in progress, click [Cancel].
6 When the completion message is displayed, click [OK].
Thumbnail check marks
Do not copy Copy

18HD Writer WE
Copying video to a computerUsing the Smart Wizard
Selecting a copy destinationIf you click [Browse] in the window for confirming or selecting the videos to copy, you can select the copy destination folder and subfolder in the following window.
1 Select the copy destination folder. To save in a folder that is not displayed
1 Click [Browse...].2 Select a folder and click [OK].
●To copy to a new folder, click [Make New Folder], enter the name of the new folder, and click [OK].
2 Select the subfolder into which to sort the videos.The sorting methods below are available.You can understand information such as the shooting date from the folder name.Select your preferred sorting method.You can set the sorting method in advance. (→119)[Date of acquisition] : Save in a folder for the date of
importing. (Example: 2014-06-20)[Recording month] : Save in a folder for the month of
recording. (Example: 2014-06)[Recording date] : Save in a folder for the date of
recording. (Example: 2014-06-18)
3 Click [OK].

19HD Writer WE
Copy video to your computer (→22)
Edit video on your computer (→43)
This section describes more advanced software operations. The following operations are possible.
To play back (→35)
To delete (→31)
Editing motion pictures• Adding effects to scenes• Adding titles to scenes• Dividing scenes or deleting selected
portions of a scene• Setting the BGM Editing still pictures• Retouching still pictures• Rotating still pictures
Use convenient features (→84)
• Creating still pictures from motion pictures• Retouching motion pictures• Creating short movie stories• Uploading & Email• Printing still pictures
Advanced Features
Feature overview
To protect (→32)
To set as a favorite (→33)
Record on storage media (→75)
To play back slide shows (→38)

20HD Writer WE
Advanced Features
Important ●Before starting, close any other software or resident programs. ●Before using the software for the first time, be sure to select [Start] → [All Programs] → [Panasonic] → [HD Writer WE 2.0] → [Read this before starting] and read the supplementary explanation and the latest information.
1 Double-click on the desktop to start the program.You can also start the program by selecting [Start] → [All Programs] → [Panasonic] → [HD Writer WE 2.0] → [HD Writer WE 2.0].
Tips ●An update notification may appear when the software is started. ● In an environment without an Internet connection, this software may take some time to start up. ●The first time the software is started, it may take some time until the window appears, because the software analyzes the videos saved on the computer.
Exiting the software
1 Click on the window.You can also exit by selecting [File] → [Exit] from the menu.
2 When the confirmation message is displayed, click [OK].
Feature overview Opening the main window

21HD Writer WE
Advanced Features
Feature overview
Checking for update information automaticallyThe software update information is checked every time the software is started.
●You can also check for update information by selecting [Help] → [Check for application updates] from the menu.
Tips ●By default, the update information is checked every time the software is started. ●Software update notifications are not performed while the Smart Wizard is running.
Changing the update information setting
1 Select [Tools] → [Settings] from the menu.
2 Click [Support] – [Update application].
3 Change the update information setting.When the check box is selected, the software update information is checked every time the software is started.
4 When [OK] is clicked, the settings are applied and the window is closed.
Updating software automatically

22HD Writer WE
Advanced Features
You can copy videos (MP4 motion pictures and still pictures) from an SD card inserted in this unit, or an SD card in an SD card slot or a device such as SD card reader/writer to your computer. This video can also be edited after it is copied to your computer.
Preparation: ●Prepare the medium to copy from (by connecting the unit to your computer, etc.). When using SD cards, see “SD card connection” (→13).
Tips ● If a video is not compatible (→6), “?” is displayed in the thumbnail and the video cannot be copied. ●When a 4 GB or larger motion picture is continuously recorded using this unit, it is divided into 4 GB increments and stored as multiple scenes. Therefore, multiple thumbnails are displayed. After copying to PC, the video data is treated as multiple scenes. ●When the file system of the hard disk in the copy destination computer is FAT32, motion picture data that is larger than 4 GB cannot be copied. ●Videos captured using other devices cannot be copied. ●To automatically select only the videos that have not already been copied to the computer, use the Smart Wizard to perform the copying.
Important ●Do not operate the unit or disconnect the USB cable while data is being transferred. ●Only motion pictures or still pictures can be copied to your computer using this software. Other data cannot be copied. ●Copying requires 1.3 times more free space than the size of the video. ●Do not use Windows Explorer or a similar method to delete, modify, or move content (folders or files) copied to the computer using this software. This prevents the content from being managed by this software.
1 Click [Copy to PC].The [Copy to PC] window is displayed.
●You can also display the window by selecting [File] → [Copy to PC] from the menu.
Copying videos to a computer [Copy to PC]

23HD Writer WE
Advanced Features
Copying videos to a computer [Copy to PC]
2 If the selection window for the location to copy from is displayed, select the drive and click [Next].
● If the connected drive or SD card is not displayed, click [Refresh].
3 Select the videos to copy to the PC.Video with thumbnails with check boxes selected are copied to the computer.
●Click a thumbnail to select or deselect it. ●Click [Select all] to select all the thumbnails. ●Click [Deselect all] to deselect all the thumbnails.
4 Click [Next].

24HD Writer WE
Copying videos to a computer [Copy to PC]Advanced Features
5 Select the copy destination folder. To save in a folder that is not displayed
1 Click [Browse...].2 Select a folder and click [OK].
●To copy the files to a new folder, click [Make New Folder], enter the name of the new folder, and click [OK].
6 Select the subfolder into which to sort the videos.You can understand information such as the shooting date from the folder name.Select your preferred sorting method.You can set the sorting method in advance. (→119)
7 Click [Execute].
8 When the confirmation message is displayed, click [Yes].The videos are sorted and copied into the set folders.
9 When the completion window is displayed after copying, click [OK].
About saving foldersThe following copy destinations are set by default. When Windows is installed on drive C, the folder locations are as follows.For Windows Vista / Windows 7 / Windows 8 / Windows 8.1Pictures C:\Users\(User Name)\PicturesVideos C:\Users\(User Name)\Videos

25HD Writer WE
Advanced Features
Menu barDifferent functions are arranged by item.
Tool barButtons are provided for frequently used functions.A menu is displayed when some of these buttons are clicked.
Folder display areaCalendar display area
The folders or calendar items are displayed in a list. The thumbnails of videos in the folder or recording date that is selected here are displayed in the display area on the right.The number of videos is displayed on the right of the folder or date.
Category search areaYou can search for videos that have been set as favorites.
You can select or deselect all the displayed thumbnails.
You can change the order of the thumbnail list in the display area and specify the data format for the thumbnails to display. You can select and display videos recorded in each format.
You can enlarge or reduce the thumbnails in the display area.
Preview on thumbnailsWhen you hold the mouse pointer over the thumbnail of a motion picture, the playback marker is displayed. You can check the content of the motion picture by moving the mouse.
About the main windowUse the main window for general operations such as copying, playback, and editing.
Information areaDisplays data such as information on the thumbnail selected in the display area and the status of the currently executed function.

26HD Writer WE
About the main windowAdvanced Features
Tips ●For motion pictures edited with this software, is displayed in the thumbnail icon. Example:
Display areaThe thumbnails of the videos specified with the folder or calendar item on the left are displayed in a list.
●Files that are not compatible are not displayed.
● Icon description : MP4 3840×2160/30p or 3840×2160/25p motion pictures : MP4 1920×1080/60p or 1920×1080/50p motion pictures : MP4 1920×1080/30p or 1920×1080/25p motion pictures : MP4 1280×720/60p or 1280×720/50p motion pictures : MP4 1280×720/30p or 1280×720/25p motion pictures : MP4 848×480/30p or 848×480/25p motion pictures : MP4 Slow 1920×1080/60p or 1920×1080/50p motion pictures : MP4 Slow 1280×720/120p or 1280×720/100p motion pictures : MP4 Slow 848×480/240p or 848×480/200p motion pictures : Still pictures : Protected videos (read-only) : Videos set to [Favorite]/[Play back from here (Add to favorites)] ●In the illustration, picture thumbnail icons for the NTSC region are
shown as an example.

27HD Writer WE
Advanced Features
Displaying videos in a folder in list view (Folder display)Only videos in a registered folder can be displayed.
Tips ●Preview is performed when the mouse pointer is placed on a motion picture thumbnail. ● In some thumbnail display sizes, there may be black lines on the right side of the picture during preview. The display can be corrected by enlarging or reducing the thumbnail size (→25). ●To select settings for operations such as adding or registering registered folders (→29).
1 Click [Folder].The window display style is switched.
●You can also switch by selecting [View] → [Display mode] → [Folder display] from the menu.
2 Click the folder that you want to view.The thumbnails of the videos in the folder are displayed in a list.
●Click or double-click the folder name to expand or hide the subfolders. ●Double-click a thumbnail to display the Playback window.
Changing the video order1 Select an item by which to sort the data ( A ).
[Name]: Displays in name order.[Date of recording]: Displays in recording date order.[File size]: Displays in file size order.
●Click again to switch from ascending (▲) to descending (▼) order. ●You can also change the order by selecting [View] → [Sorting pictures] from the menu.
Switching between window display styles
Registered folder
A

28HD Writer WE
Advanced Features
Switching between window display styles
Displaying videos with the same recording date (Calendar display)
1 Click [Calendar].The window display style is switched.
●You can also switch by selecting [View] → [Display mode] → [Calendar display] from the menu.
2 Click on the displayed year, month, and day.The Calendar display switches to the selected year, month and day.
●Years, months and days on which videos are not recorded are not displayed. ●Click or double-click a year or month to expand or hide the months or days. ●Year Calendar display
Double-click a month that displays a thumbnail to switch to the month Calendar display.
●Month Calendar displayDouble-click a day that displays a thumbnail to switch to the recording date Calendar display.
●Recording date Calendar displayDouble-click a thumbnail to display the Playback window.
Tips ●The update date and time is displayed for videos that do not have recording date and time information. ● In the year Calendar display or month Calendar display, place the mouse pointer on a month or day for which a thumbnail is displayed to display the videos in order that were recorded on that month or day. ●To select settings for operations such as adding or registering registered folders (→29).

29HD Writer WE
Advanced Features
Switching between window display styles
1 Select [Tools] → [Settings] from the menu.2 Click [General] — [Registered folder].
A : Currently registered folders3 Click [Add].4 Select the folder to register and click [OK].
5 When [OK] is clicked, the settings are applied and the window is closed.
●Select the folder and click [Delete] ( B ) to delete a registered folder.
Displaying the video files of subfoldersThe default setting will display all the files.
● If you do not wish to display all subfolder videos, remove the check mark from [Display all picture files from inside the folder] ( C ).
Tips ●Even if you delete the registration folder, the folders that are saved on the PC and the videos inside the folders are not deleted. ●A maximum of 30 registration folders can be added.
Adding registered foldersAdding or registering display folders.
A
B
C

30HD Writer WE
Advanced Features
Tips ●Videos can be selected, but they cannot be copied or moved in the Calendar display. ●Folders can be moved by dragging and dropping subfolders into a different folder. (To copy, hold [Ctrl] while dragging and dropping.) ●You can also copy videos by selecting a video and using the right-click menu. ●Videos on SD cards cannot be copied with this operation. Use [Copy to PC]. ●When copying to an SD card, use [Copy to media]. ●Select [View] → [Refresh] from the menu to update the display if the operation result is not reflected.
1 Click [Folder].
2 Select the video that you want to copy or move.
●You can select multiple thumbnails.
3 To move, drag and drop the video to the destination folder.
●To copy, drag and drop while holding down the [Ctrl] key.
4 When the confirmation message is displayed, click [Yes].
Copying/moving videos

31HD Writer WE
Advanced Features
Deleting videos
Tips ●To delete videos recorded on microSD memory cards or microSDHC memory cards, delete them using this unit. (See the Operating Instructions of this unit for details.) As for the other SD cards, delete them using the compatible equipments. ●Do not use Windows Explorer or a similar method to delete any file or folder that have been copied to the PC. It will make it impossible to play back or edit. ●When all still pictures and motion pictures are displayed, choose a folder and select [Delete folder] from the right-click menu to delete the selected folder and all videos contained therein. Use Windows Explorer to delete folders containing contents that cannot be deleted with this software, such as non-compatible files.
1 Select the video that you want to delete. ●You can select multiple thumbnail.
2 Select [File] → [Delete] from the menu. ●You can also delete by pressing the [Delete] key. ●Video can also be deleted by right-clicking thumbnails and selecting [Delete] in the menu displayed.
3 When the confirmation message is displayed, click [Yes].The video is deleted.
You can delete videos that are saved on your PC.
●Scenes that have been protected cannot be deleted. First, clear the protection (→32). ●Deletion may take a long time, depending on the video.

32HD Writer WE
Advanced Features
Protecting videosYou can protect against accidental deletion. When protection is set, videos are read-only and cannot be edited or deleted.
1 Select the video that you want to protect.
2 Select [File] → [Protect] → [ON] from the menu.
●When [Protect] → [OFF] is selected, the video protection is canceled. ●Protection can also be set by right-clicking thumbnails and selecting [Protect] → [ON] or [Protect] → [OFF] in the menu displayed.
3 When the confirmation message is displayed, click [Yes].The video is protected.
Tips ● is displayed for protected videos and they cannot be deleted or overwritten with edited data. To delete or overwrite a video, first change the [Protect] setting to [OFF] to remove the protection setting. ●Videos for which protection has been set using this unit will be copied with [Protect] [ON] when copied to a computer.
Protected video

33HD Writer WE
Advanced Features
Setting as FavoritesIf you set a video as a favorite, will be displayed on the thumbnail.
1 Select the video you want to set as a favorite.
2 Select [File] → [Favorite] → [ON] from the menu.
●Select [OFF] to remove the favorites setting. ●You can also set it by selecting [Favorite] → [ON] or [Favorite] → [OFF] from the menu displayed by right-clicking on the thumbnail. ● If [Favorite] — [ON] is selected for a motion picture, the start position is added to favorites. ● If [Favorite] — [OFF] is selected for a motion picture, all favorite registrations set for that motion picture will be canceled.
3 When the confirmation message is displayed, click [Yes].The video will be set as a favorite.
●You can easily search for your favorite videos by setting them as favorites.1 Click A : [Filtering pictures].2 Click [Favorites] on the [Category] tab.
You can display all videos that have been set as favorites.
A video for which Favorite ON is setA

34HD Writer WE
Setting as FavoritesAdvanced Features
[Play back from here (Add to favorites)]You can select your favorite spot in a scene and add to favorites. You can select multiple spots and add to favorites. This lets you easily find your favorite spots later.
1 Select the motion picture containing a spot you want to add to favorites, and then right-click on it.
2 Click [Play back from here (Add to favorites)].The Playback window will appear.
3 Click to start playback, and then pause playback at the position you want to register as a favorite.
4 Click to add a mark at the position you want to register as a favorite.Click to remove a checkmark.
5 Click to close the Playback window.
will appear on the thumbnail.
Spots added to favorites
Tips ● [Play back from here (Add to favorites)] can only be set for motion pictures. They cannot be set in still pictures. ●Favorites settings can only be made for videos copied with this software to a PC hard disk. Favorites settings cannot be made for videos stored on media.

35HD Writer WE
Advanced Features
You can play back videos that are saved on the PC.
1 Click the folder that contains the video that you want to view.Displays the thumbnails of videos in a folder.Video shown as thumbnails can be played.
●When using the Calendar display, set the recording date Calendar display.
2 Select a video.Holding your mouse over a thumbnail of a motion picture displays the playback marker. You can easily check the content of the motion picture over the thumbnail by moving the mouse.
3 Click [Playback].The Playback window is displayed. (For details about the window →36)How to open the Playback window (aside from Step 3)
●By selecting a thumbnail and double-clicking it ●By selecting a thumbnail, right-clicking it and selecting [Play back from the beginning] ●By selecting [Playback] → [Playback] from the menu bar
●By selecting [Play back from here (Add to favorites)], you can play back the video from the current playback position indicated on the thumbnail. ●Playback is not performed from the year or month Calendar display. Switch to the recording date Calendar display or the Folder display.
Displaying the Playback window

36HD Writer WE
Advanced Features
Displaying the Playback window
About the Playback window During motion picture playback
/ : Skips from the current playback position to the previous/next playback position that has been set as a favorite. If there are no favorite playback positions set before/after the current position, the playback will skip to the beginning of the current scene/the next scene.
: Pauses.: Plays back.: Stops.: During pause, performs reverse playback by frame.: During pause, performs forward playback by frame.: Saves the paused window as a still picture.: Sets a point as a favorite. Removes a point from favorites with .
You can select multiple spots and add to favorites. When you set a motion picture as a favorite, will appear on the thumbnail.
: Audio is muted (click to output audio).: Audio is being output (click to mute).
: Adjusts the volume.: Displays the full-screen view.: Closes the Playback window.
Slider: Displays the playback position of the motion picture. Drag to the left or right to move the playback position.
Display area thumbnails: Motion pictures that are displayed in the display area of the main window. Click to switch the display.
Operation panel
About the full-screen displayDouble-click the playback window or click to display the full-screen display. The following icons are displayed during full-screen view. However, depending on the resolution of your monitor, they may not appear.
: Displays in the original size.: Displays to fit the window size.
●To return to the original size, double-click the window again, or click .
●When the mouse pointer is removed from the operation panel during the full-screen display and no operation is made for about 3 seconds, the operation panel disappears. Move the mouse to display it again.
Display area thumbnails Spots added to favorites

37HD Writer WE
Advanced Features
Displaying the Playback window
During still picture display
: Displays the previous still picture.: Displays the next still picture.: Rotates 90 degrees counter-clockwise.: Rotates 90 degrees clockwise.: Changes favorites settings. Removes a point from favorites with . When you set a still picture as a favorite, will appear on the thumbnail.
: Enlarges the picture.: Reduces the picture.: Displays in the original size.: Displays to fit the window size.: Displays the full-screen view.: Closes the Playback window.
Display area thumbnails: Thumbnails that are displayed in the display area of the main window. Click to switch the display.
Display area thumbnails Operation panel
Tips ●Depending on graphics features (such as [Windows Aero] in Windows Vista and Windows 7), your computer environment, and the video being played, frames may be dropped and color loss may occur during playback, and playback may not be smooth. These problems are more likely to occur in full-screen mode. Additionally, in sections where the resolution or audio format changes, noise may be produced, and playback may not be smooth. ●Even in an environment that is fully capable of playing back high-quality, high-definition motion pictures, if [Windows Aero] is set in Windows Vista or Windows 7, high-definition motion pictures may not be played back smoothly. To cancel [Windows Aero]: - In Windows 7: From the Start menu, click [Control Panel] → [Change the theme], and then select a theme from [Basic and High Contrast Themes]. - In Windows Vista: From the Start menu, click [Control Panel] → [Customize colors] → [Open classic appearance properties for more color options], and in [Appearance Settings] → [Color scheme], select an option other than [Windows Aero].

38HD Writer WE
Advanced Features
You can easily play back a slide show that follows a prepared theme simply by clicking the Slide show button. You can also change the slide show theme and BGM. Only still pictures can be played back as slide shows. To play back a frame of a motion picture as a still picture in slideshow, create a still picture of that frame from the motion picture. (→84)
1 Click [Slide show].The slide show playback window appears in the full-screen display, and at the same time the setup and operation panel is displayed in the playback window. The still pictures displayed in the display area of the main window are played back in order.
Setup and operation panelThis lets you pause the slide show, skip to the previous or next still picture, change the theme or BGM, and redo edits.
● : Skip to previous still picture ● / : Pause/Playback During pause, this functions as the play button ● : Skip to next still picture ● : Change theme (→40) ● : Change BGM (→40) ● : Volume seek barAdjusts the volume ● : End slide show
Tips ●The slide show function cannot be used in a remote desktop environment. ● If you click [Slide show], the display will be switched to the desktop and then the slide show will begin. However, depending on the operating environment of your computer, it may take some time for the slide show to start. ●When the mouse pointer is removed from the setup and operation panel during the full-screen display and no operation is made for about 3 seconds, the setup and operation panel disappears. Move the mouse to display the setup and operation panel again. ●When still pictures with an aspect ratio of 16:9 are played back in a slide show on the 4:3 screen, the images are displayed with right and left sides cut off.
Playing back slide shows

39HD Writer WE
Playing back slide showsAdvanced Features
Tips ●When the mouse pointer is removed from the film roll panel during the full-screen display and no operation is made for about 3 seconds, the film roll panel disappears. Move the mouse to display the film roll panel again.
Move the mouse pointer to the bottom of the window.
2 The film roll panel appears. The still pictures displayed in the display area of the main window are displayed in order from the left. Click the mouse pointer on the desired scene to play back the slide show from that scene.
When changing the theme or BGM
3 Display the setup and operation panel again.
You can change the theme and BGM of the slide show being played back.
●To change the theme, click . ●To change the BGM, click .A pop-up window appears. (→40)

40HD Writer WE
Playing back slide showsAdvanced Features
[Theme]
[BGM]
A
B
C
1 Select the slide show theme.A : Sets the still picture display time.
To cancel, click [Cancel]. The display returns to the slide show window.
2 Click [Playback].The slide show is played back with the selected theme.
1 Select the BGM.You can use WAV (LPCM), WMA and MP3 format files on your computer.B : Adds BGM. C : Removes BGM.
To cancel, click [Cancel]. The display returns to the slide show window.
2 Click [Playback].The slide show is played back.

41HD Writer WE
Advanced Features
Tips ●Thumbnails are displayed only for compatible motion pictures. Thumbnails of unsupported motion pictures are labeled with “?”.
Preparation: ●Load the recording medium (insert it in the unit and connect the unit to the computer, etc.). If you are using an SD card, see “SD card connection” (→13).
1 Click [Media playback].The [Media playback] window is displayed.
●You can also display it by selecting [Playback] → [Media playback] from the menu.
2 Select the drive.
3 Click [Next].
4 Select the video that you want to view and click [Playback].
●The video in media can be copied to the computer on this window. Click [Copy to PC] to display the [Copy to PC] window.
The Playback window is displayed. ●You can also display the Playback window by selecting a thumbnail and double-clicking it. ●You can also display the Playback window by right-clicking on a thumbnail by selecting [Play back from the beginning].
You can play videos from media.
Playing media

42HD Writer WE
Advanced Features
For motion pictures
For still pictures
Displaying detailed video information
Tips ●Camera information for videos recorded using other equipment, or videos that have been processed in some way, may not be correctly displayed. ●You can only add a comment to videos that have been copied to your PC. It is impossible to add a comment to videos on an SD card, etc.
1 Select the video whose detailed information you want to view.
2 Select [File] → [Properties] from the menu.The video information window is displayed.
3 Check the information. ● [-] is displayed for items with no information. ●The displayed items vary depending on the format of the video file.
For motion picturesItem Description
File information
The file name, file size, file type, file location, etc.
For still picturesItem Description
File information
The file name, file size, file type, file location, etc.
Camera information
Manufacturer and model name of the unit used, recording date, etc.
To enter a commentYou can enter any text that you want and save it with the video. (Up to 128 (single-byte) characters)1 Click [Comment].2 Enter the text and click [Apply].
43HD Writer WE
Advanced Features
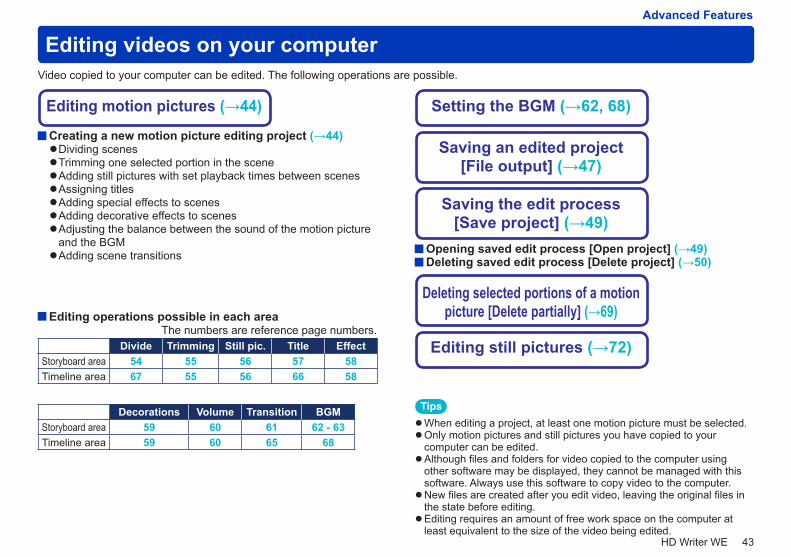
Editing videos on your computerVideo copied to your computer can be edited. The following operations are possible.
Tips ●When editing a project, at least one motion picture must be selected. ●Only motion pictures and still pictures you have copied to your computer can be edited. ●Although files and folders for video copied to the computer using other software may be displayed, they cannot be managed with this software. Always use this software to copy video to the computer. ●New files are created after you edit video, leaving the original files in the state before editing. ●Editing requires an amount of free work space on the computer at least equivalent to the size of the video being edited.
Editing motion pictures (→44)
Saving the edit process [Save project] (→49)
Creating a new motion picture editing project (→44) ●Dividing scenes ●Trimming one selected portion in the scene ●Adding still pictures with set playback times between scenes ●Assigning titles ●Adding special effects to scenes ●Adding decorative effects to scenes ●Adjusting the balance between the sound of the motion picture and the BGM ●Adding scene transitions
Setting the BGM (→62, 68)
Saving an edited project [File output] (→47)
Opening saved edit process [Open project] (→49) Deleting saved edit process [Delete project] (→50)
Deleting selected portions of a motion picture [Delete partially] (→69)
Editing still pictures (→72)
Editing operations possible in each areaThe numbers are reference page numbers.
Divide Trimming Still pic. Title EffectStoryboard area 54 55 56 57 58Timeline area 67 55 56 66 58
Decorations Volume Transition BGMStoryboard area 59 60 61 62 - 63Timeline area 59 60 65 68
44HD Writer WE
Advanced Features
Editing videos on your computer
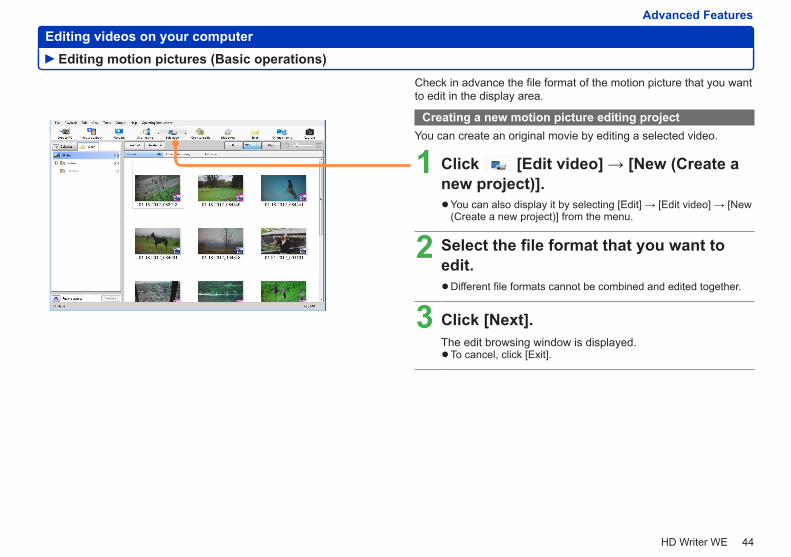
Check in advance the file format of the motion picture that you want to edit in the display area.
Creating a new motion picture editing projectYou can create an original movie by editing a selected video.
1 Click [Edit video] → [New (Create a new project)].
●You can also display it by selecting [Edit] → [Edit video] → [New (Create a new project)] from the menu.
2 Select the file format that you want to edit.
●Different file formats cannot be combined and edited together.
3 Click [Next].The edit browsing window is displayed.
●To cancel, click [Exit].
Editing motion pictures (Basic operations)

45HD Writer WE
Advanced Features
Editing videos on your computer
4 Select the video you want to edit by applying a check mark.
●To add a video from another folder, switch to that folder and select the video. ●To cancel, click [Exit].
5 Click [OK].The edit video window is displayed.
●You can switch to the timeline area by clicking [Timeline]. (→51) ●Drag and drop scenes to change their order. ●Click [Close] or to close edit video window. ●Note that displaying the edit video window may take a few minutes depending on the number of video files.
6 If there is a video you want to add, click [Add].The edit browsing window is displayed.
●By clicking [▼], you can select and add a [Scene] or a [Color clip]. (→53)
If there is no video you want to add, go to Step 9 (→46) and edit the selected scene.
Edit browsing window
Edit video window (→51)
Editing motion pictures (Basic operations)

46HD Writer WE
Advanced Features
Editing videos on your computer
7 Select the video you want to add by applying a check mark.
●To cancel, click [Close]. ●To cancel an edit, click [Undo] or [Redo] in the storyboard area or the timeline area to return to the previous step in the editing process or to redo the editing process. ●Repeat this step to line up the scenes in the order you want.
8 Click [OK].Returns to the edit video window.
9 Select one scene you want to edit, and then click it.A yellow frame is added to the selected scene, indicating that it can be edited. (→53 - 68)
Settings area
Editing motion pictures (Basic operations)

47HD Writer WE
Advanced Features
Editing videos on your computer
Saving an edited project [File output]You can merge all the scenes in a project you have edited, and save them as a single file.
1 Click [File output] in edit video window.
2 Select the save destination folder. ●There must be more free space available than the size of the motion picture being saved. The size of the motion picture file may increase after editing.
To save in a folder that is not displayed1 Click [Browse save destination folders].2 Select a folder and click [OK].
●To create a new folder to save to, click [Make New Folder], enter a folder name, and click [OK].
Tips ●You can merge the scenes by editing them and performing a file output. ●Select [View] → [Refresh] from the menu to update the display if the operation result is not reflected.
Editing motion pictures (Basic operations)

48HD Writer WE
Advanced Features
Editing videos on your computer
Tips ●Depending on the machine environment and the content of the edit, it may take a long time to complete the file output. ●Recording date information will correspond to information of the opening scene. ●Up to approximately 12 hours of a motion picture can be saved. ● If you move, copy, or rename a file using this software, Windows Explorer or other software, that file can no longer be handled by this software. ●Conversion of some motion pictures may result in out-of-sync or dropped frames, or conversion may fail. ●When you convert still pictures to motion pictures by performing the file output, the pictures may be distorted in rare cases. ●When performing [Save project] or [File output] at least one motion picture must be selected.
3 Enter a file name. Hardware accelerationWhen you click [Settings], a window appears in which output settings for the edited motion picture can be made.By checking the box for [Use the assist function of video cards (CUDA-compatible video cards only)], you may be able to improve the output performance. (For details →117)
4 Click [OK].You cannot add edits to individual scenes after a motion picture is saved using [File output]. Before performing [File output], the save edit process using [Save project] (→49) is convenient, if there is a chance you might want to add or change motion picture edits.
●Click [OK] when the completion message is displayed.
Editing motion pictures (Basic operations)

49HD Writer WE
Advanced Features
Editing videos on your computer
Saving the edit process [Save project]You can interrupt editing work in the middle of an edit or save your work at that point.
1 Click [Save project].
2 Enter a project name. ●The default name is “New Project”.
3 Click [OK].When the confirmation message appears, follow the instructions on the screen.The project will be saved under the project name entered.
Opening saved edit process [Open project]You can reload a saved project while editing and restart your work.
1 Click [Edit video] → [Open project].A window listing the projects will appear.You can also display it by selecting [Edit] → [Edit video] → [Open project] from the menu.
2 Select a file and click [OK].Tips ●Saved projects only contain the file names of each scene and the edited content that has been set. Never delete a scene file or change the name of a file or folder in a program other than this software. Doing so may prevent you from opening a project. ●When performing [Save project] or [File output] at least one motion picture must be selected.
Editing motion pictures (Basic operations)

50HD Writer WE
Advanced Features
Editing videos on your computer
Deleting saved edit process [Delete project]Deleting saved projects.
1 Click [Edit video] → [Delete project].A window listing the projects will appear.You can also display it by selecting [Edit] → [Edit video] → [Delete project] from the menu.
2 Place a check mark on the file of the project you want to delete.
●You can also select and delete several thumbnails at once.
3 Click [Delete].Click [Yes] when the confirmation message appears.The project will be deleted.
●Once a project has been deleted, it cannot be restored to original status.
4 Click [Close].Return to the main window.
Editing motion pictures (Basic operations)

51HD Writer WE
Advanced Features
Editing videos on your computer
About the edit video windowThere are 2 different screens: the storyboard area and the timeline area. When you select a scene (→46), the screen returns to the storyboard area.In the storyboard area, you can select motion pictures and still pictures and perform various kinds of editing.When you click [Timeline], the screen switches to the timeline area, where you can make various detailed settings for each scene (→ below).For example,1 after lining up the scenes in the storyboard area and setting the transition effects,2 you can set a title and BGM for each scene in the timeline area.
●Confirm the edited contents in the preview window. (→52)
Setting areaHere, you can edit the selected scene.
Menu areaButtons for saving, loading and deleting projects, and operating instructions are displayed here.
Preview areaHere, you can play back the result of your edits.(→52)
Storyboard area (→53)
Timeline area (→64)
Features in the timeline areaYou can edit according to the time flow of the motion picture.You can make settings for the insertion of titles, BGM, etc. visually, while keeping an eye on the whole scene.Example: A 5-minute project is set that contains 3 motion pictures,
2 titles and 2 BGM tracks
5 minutes
Title 1 Title 2
In the timeline area, the following kinds of edits are possible.(For details → 64 to 68)
●Adding scenes ●Adding titles to scenes ●Dividing scenes ●Adding BGM to scenes
Timeline area/storyboard area toggle button
Editing motion pictures (Basic operations)

52HD Writer WE
Advanced Features
Editing videos on your computer
Preview areaHere you can play back (preview) the edited content for confirmation.
1
23
4 5 6 7
8
1 Preview window2 Slider
Indicates the playback position in the motion picture. You can change the playback position by dragging the slider left or right.
3 Playback position/total playing timeThe current playback position and total playing time are displayed. Display format: hours, minutes, seconds.
4 Set the BGM for the whole project (→62)5 Stop button6 Play/pause button
During playback, the button changes to a Pause button.7 Sound output/mute button8 Volume level
Tips ●The preview window is used to easily confirm edited content, and the picture quality in the preview window is lower than the actual picture quality of the motion picture. ●Depending on your computer environment or the content you have edited with this software, the audio and video may be out of sync in the preview window. This is especially likely to occur in the following cases. - When multiple editing effects, titles, transitional effects etc. have been set for a single scene.
Editing motion pictures (Basic operations)

53HD Writer WE
Advanced Features
Editing videos on your computer
Storyboard areaThe images you want to edit are displayed. The selected scenes have a yellow frame. Icons are displayed for scenes with effects or titles added. You can drag and drop the scenes to change the order.
[Undo]Returns to one step earlier in the edit process.
[Redo]Starts the edit process over again.
[Add]Opens the edit browsing window and lets you add up to 300 scenes to be edited.By clicking [▼] you can switch between [Scene] and [Color clip].[Scene]: Allows you to add scenes
from the edit browsing window.
[Color clip]: Lets you add still pictures in a single color.
[Delete]Deletes registration of the selected scene.Multiple scenes can also be selected.Even if [Delete] is selected here, the selection is only deleted from the edit video window. The actual original data is not deleted.
[Transition]Edited transition effects are displayed by icons. An unset status icon is also inserted between scenes where a transition effect is not yet set.
Playback scene designation iconWhen the mouse pointer is placed on this position, the icon is displayed. Click this icon to perform playback from the start of that scene.
Playback position barDisplays the current playback position with a bar.This bar cannot be moved by dragging.
[Random]Automatically sets the transition effects ([Transition] or [Effect] → [Operation]) between scenes. Each time you click this button, a new combination of transition effects is used.
You can enlarge the storyboard area, and return it to the original size.
You can toggle to the timeline area.
The selected scenes have a yellow frame.
Editing motion pictures (Editing from the storyboard area)

54HD Writer WE
Advanced Features
Editing videos on your computer
Edit the scene in the storyboard area by selecting a tab in the Setting area.To cancel an edit, click [Undo] or [Redo] in the storyboard area to return to the previous step in the editing process or to redo the editing process.
Preparation: ●Follow the steps in “Creating a new motion picture editing project (Creating a new project)” (→44), and select a scene.
Dividing scenes [Divide]Scenes can be divided at desired positions. Adding to or removing from favorites cannot be performed on this window. Only playback positions registered beforehand with the playback device can be used.
[Divide]
1 Select [Divide].The [Divide] tab is displayed, and the selected scene is displayed in the storyboard area.
2 Click to play the content. ●During playback, the Play button changes to the Pause button.
3 Click to pause playback at the desired [Divide] position.
●Click or to skip spots where [Play back from here (Add to favorites)] has been set. (For details about [Play back from here (Add to favorites)] →34) ●You can also adjust the position by using the playback knob.
4 Click [Divide].The results of editing are applied to the edit video window.Playback knob
Drag the knob to the right or left to change the playback position.
Previous/ next frame buttons
Spots added to favorites
[Current point]Displays the position of the Playback knob.(Example of displayed time) 0:00:03.45
Hours:Minutes:Seconds (up to two digits after the decimal point)
Editing motion pictures (Editing from the storyboard area)

55HD Writer WE
Advanced Features
Editing videos on your computer
Trimming one selected portion in the scene [Trimming]You can trim selected portions of scenes. Add to favorites and remove from favorites cannot be performed on this window. Only playback positions registered beforehand by the playback device are used.
[Trimming]
1 Select [Trimming].The [Trimming] tab is displayed, and the selected scene is displayed in the storyboard area.
2 Click to play the content. ●During playback, the Play button changes to the Pause button.
A : [Current point]: Displays the position of the Playback knob.[P/B time]: Indicates the motion picture length. (Example of displayed time) 0:00:03.45
Hours:Minutes:Seconds (up to two digits after the decimal point)
3 Pause playback, and then select the [Trimming] range.
●Click or to skip spots where [Play back from here (Add to favorites)] has been set. (For details about [Play back from here (Add to favorites)] →34)
B : [Set start point]: Click to set the starting point.C : [Set end point]: Click to set the ending point.You can also select the trimming range by adjusting the starting and ending point knobs. The portion between the starting and ending point knobs is the portion of the scene that will be trimmed.
4 Click [Apply].The results of editing are applied to the edit video window.
Playback knobDrag the knob to the right or left to change the playback position.
Previous/next frame buttons
B CStarting and ending point knobsDrag the knobs to the right or left to change the starting and ending point positions.
Spots added to favorites
AThe [Delete partially] window is displayed. (→69)
Editing motion pictures (Editing from the storyboard area)

56HD Writer WE
Advanced Features
Editing videos on your computer
Adding still pictures or color clips with a set playback time between scenes [Still pic.]You can edit still pictures and color clips together with motion pictures by setting the playback times for the still pictures and color clips.
[Still pic.]
1 Select the still picture or color clip you want to edit.The [Still pic.] tab is displayed.
2 Set [Playback time]. ●You can set the time in 0.1 second increments from 0.1 second (min.) to 10 minutes (max.). (Example of displayed time) 0:00:03.40 Hours:Minutes:Seconds (up to two digits after the decimal point) To change the color of a color clip
1 Click [Color].The color setting window is displayed.
2 Select the new color that you want to use instead of the basic color, and then click [OK].
To change the basic color1 Select the basic color and click [Define Custom
Colors].2 Move the slider to adjust the brightness.3 Click [Add to Custom Colors].
The newly created color is added.4 Click [OK].
3 Click [Apply].The results of editing are applied to the edit window.
Tips ● In the edit video window, still pictures and color clips are set as motion pictures with an initial playback time setting of 5 seconds. ●You cannot use a collection of only still picture scenes or color clip scenes to perform motion picture editing. ●The set playback time may be slightly longer or shorter depending on the motion picture.
Editing motion pictures (Editing from the storyboard area)

57HD Writer WE
Advanced Features
Editing videos on your computer
Assigning titles [Title]You can add a title to each scene selected.
[Title] 1 Select [Title].The [Title] tab is displayed.
2 Enter the title and set the effects.A : Select the title motion and background.B : Select the title font type and background color.C : Set the starting time and display duration.
(Example of displayed time) 0:00:03.40
: If several titles have been added to a single scene in the timeline area (→66), you can skip to the previous or next title.
D : Select the title placement.
3 Click [Apply].The results of editing are applied to the edit video window.
●The title icon E will be displayed in the thumbnail. ●When motion is set for the title with A , click the Play button of the Preview window and check the title motion.
A
B
C
D
Tips ● If the free space in the video memory of the video card is low, the number of title characters that can be entered may be reduced. If this happens, change the font size or reduce the number of characters. ●When editing a title from the timeline area, C is not displayed.
E
Editing motion pictures (Editing from the storyboard area)

58HD Writer WE
Advanced Features
Editing videos on your computer
Adding special effects to scenes [Effect]
[Effect]
1 Select [Effect].The [Effect] tab is displayed.
2 Click to select a special effect. ● [Operation] can only be set when a still picture is selected.
If you click [Random] in the storyboard area, the [Operation] is changed automatically.
Effect Menu Operation Menu
3 Click [Apply].The icon corresponding to the selected effect is displayed.The results of editing are applied to the edit video window.
Indicates the motion picture length. (Example of Displayed Time)0:00:03.45 Hours:Minutes:Seconds (up to two digits after the decimal point)
Tips ●Some effects in the [Effect] menu cannot be used for still pictures. ●You cannot set any special effects for color clips.
Icon corresponding to the selected special effect
Editing motion pictures (Editing from the storyboard area)

59HD Writer WE
Advanced Features
Editing videos on your computer
Adding decorative effects to scenes [Decorations]You can set various decorative effects for the scenes.
[Decorations]
1 Select [Decorations].The [Decorations] tab appears.
2 Click the tab to set the decorative effect.
3 Click [Apply].The icon for the selected effect appears, and the result of the edit is reflected on the edit video window.
●The decorative effect will be visible for about 4 seconds.
Tips ●You can also add decorative effects to still pictures and color clips.
Editing motion pictures (Editing from the storyboard area)

60HD Writer WE
Advanced Features
Editing videos on your computer
Adjusting the balance between the sound of the motion picture and the BGM [Volume]
[Volume]
1 Select [Volume].The [Volume] tab appears.
2 Set the relative volume for the BGM (BGM) and the original sound of the motion picture.
Click the mark on the slider, and move the mouse left or right.
● If you set the relative volume to 0 here, no sound will be output even if you adjust the volume in the preview area (→52, 8 ). ●You can also make fade-in and fade-out settings.
3 Click [Apply].The result of the edit is reflected on the edit video window.
●The relative BGM volume is only applied to sections where the scenes and BGM overlap.
Editing motion pictures (Editing from the storyboard area)

61HD Writer WE
Advanced Features
Editing videos on your computer
Adding scene transitions [Transition]You can add transition effects between scenes. You can also automatically set the transition effects by clicking [Random] in the storyboard area. (→53)
[Transition] 1 Click the icon between the two scenes where the transition effect is to be inserted.** The Icon for the transition effect is displayed on the thumbnails
in the editing area in the short movie story editing window.
The [Transition] tab is displayed.
2 Set the transition effect.A : Select the transition effect type.B : Set the transition effect duration.
(Example of displayed time) 0:00:03.40 Hours:Minutes:Seconds (up to two digits after the decimal point)
● If you set an effect, check it on the preview window. Depending on the type of effect, transition effects end instantaneously if the [Display time] setting is short. You may not be able to check the effect during playback on the preview window or when playing the file after performing [File output]. ●You can also automatically switch between transition effects at random by clicking [Random] in the storyboard area.
3 Click [Apply].The edited transition effect is indicated by an icon.
●You can easily change the transition effect setting by clicking the icon.
The results of editing are applied to the edit video window.
B
A
Tips ●Transition effects are set between two consecutive scenes. Therefore, scenes before and after transition effects will become shorter after application.Example: When a transition with a display time of 4 seconds is set
between a 3 minute scene and a 2 minute scene, the transition overlaps 4 seconds of each scene. (This produces a sequence of a 2 minute 56 seconds scene, transition of 4 seconds, and a following scene of 1 minute 56 seconds.)
●The display time of the transition is between a minimum 0.10 seconds and a maximum 5 seconds. However, if either scene before or after the transition is less than 0.1 seconds, the transition effect cannot be set. Also, if either scene before or after the transition is 5 seconds or less, the maximum time that can be set for the transition is the playback time of the shorter scene. Example: When the transition is set between a 4 second scene and
a 5 second scene, the display time of the transition will be 4 seconds or less.
Editing motion pictures (Editing from the storyboard area)

62HD Writer WE
Advanced Features
Editing videos on your computer
Merging scenesYou can merge the scenes by editing them and performing a file output. (→47)
Setting the BGM for the entire projectYou can set the BGM for all scenes arranged in the storyboard area.
1 Click on the Preview window.A BGM registration dialog box is displayed.
2 Click [Register].The music files on your computer are opened. You can use WAV (LPCM), WMA and MP3 format files on your computer.
3 Select music and click [Open].
Editing motion pictures (Editing from the storyboard area)

63HD Writer WE
Advanced Features
Editing videos on your computer
4 Set the music.You can register multiple BGMs. The registered BGM are played in order.A : The BGM file name is displayed.B : Click to change the order of the BGM files.C : Click to cancel the registration of the displayed BGM.D : [Mixing level]: Drag the knob to the right or left to change the
volume balance between the source sound and the BGM.E : Set fade-in, fade-out and repeat playback to ON or OFF.
● If you set [Repeat playback] to ON and switch to the timeline area, the BGM track is automatically added for the duration of the motion picture. For example, if the playback time of the motion picture is 40 seconds and you set a 10 second BGM track to repeated playback, the BGM clip will automatically be added 4 times.
F : (Volume knob): Drag the knob to the right or left to change the volume.
G : (Play button): During playback, this changes to the Stop button.
H : (Playback knob): Drag the knob to the right or left to change the playback position.
I : (Starting and ending point knobs): Drag the knobs to the right or left to change the starting and ending point positions. You can use these knobs to select the BGM range to be used.
J : Playback position: Displays the position of the Playback knob. Playback time: Represents the range selected using the
Starting Point and Ending Point knobs. Display format: “Minutes:Seconds”
5 Click [OK].The results of editing are applied to the edit video window.
C
B
D
FG H
J I
Tips ●You cannot change the volume level when outputting files. ● If you set the BGM in the Timeline area (→68), and there is a gap between two BGM tracks, the indication [Mute interval] will be displayed when you switch to the storyboard area.
A
E
Editing motion pictures (Editing from the storyboard area)
64HD Writer WE
Advanced Features
Editing videos on your computer
Timeline areaPerform steps 1 to 9 in “Creating a new motion picture editing project (Creating a new project)” (→44), and then click [Timeline] so that the video you want to edit appears as a scene clip (a rectangular box). The length of each block corresponds to the playback time of the clip.A selected scene clip will have a yellow frame.You can set the BGM individually for each scene clip. When an effect is added to a scene clip, an icon appears.
Scene trackClick [Add] to add a scene clip. Up to 300 scenes can be added.
Title trackClick [Add] to add a title clip (blue).
BGM trackClick [Add] to add a BGM clip (green).
Timescale sliderMove the slider left or right to change the displayed portion of the timescale.
When there are gaps between scenes, black color clips appear when you toggle to the storyboard area.
TimescaleIndicates the timescale of the motion picture. When you adjust the timescale slider, the timescale is automatically updated.
Use this button to switch to the storyboard area.
TransitionThis icon appears when two scene clips overlap. When you click the icon, the [Transition] tab appears. Here you can make settings for the transition.
When the positions of the clips are perfectly aligned without any overlap, a black line appears. This indicates a transition that has not yet been set.To set it, (→61).
SlidersWhen you click a clip, a slider appears at the beginning and the end of the clip.Click the slider and move it left or right to adjust the playback time and display time of the clip.Note, however, that the playback time of scene clips cannot be made longer than their original length.
Playback position barIndicates the current playback position. You can change the playback position by moving this bar.
Display interval sliderMove the slider left or right to change the display interval of the timescale.
When you select a scene clip, a yellow frame is added to it and a slider appears at each end.
Editing motion pictures (Editing in the timeline area)

65HD Writer WE
Advanced Features
Editing videos on your computer
Adding a scene
Preparation: ●Perform steps 1 to 9 in “Creating a new motion picture editing project (Creating a new project)” (→44), so that the timeline area appears.
1 Click the time on the timescale where you want to add the scene.The playback position bar moves to that position.
●You can also set the time where you want to add the scene by clicking the playback position bar and moving it left or right with the mouse.
2 Click [Add].The edit browsing window is displayed.
3 Add a check mark to the scene you want to add.(For details →46, step 7)
4 Click [OK].(For details →46, step 8)The screen returns to the edit video window, and the added scene is entered in the scene track.
To change the position of the added scene1 Click the scene clip and move it left or right with the
mouse. ● If two scenes overlap, a transition appears. Click the transition to set the transition effect. (→61)
To change the start position or end position of the added scene1 Click the scene clip.
A yellow frame and two sliders appear.2 Click one of the sliders and move it left or right with the
mouse. ●The playback time of the added scene cannot be longer than its original length.Transition
Scene clipSlider Slider
Editing motion pictures (Editing in the timeline area)

66HD Writer WE
Advanced Features
Editing videos on your computer
Adding a title
Preparation: ●Perform steps 1 to 9 in “Creating a new motion picture editing project (Creating a new project)” (→44), so that the timeline area appears.
Tips ●You can also add titles to still pictures and color clips.
1 Click the time on the timescale where you want the title to appear.The playback position bar moves to that position.
●You can also set the time where you want the title to appear by clicking the playback position bar and moving it left or right with the mouse.
2 Click [Add].The title clip appears.
3 Click the title clip.A yellow frame and two sliders appear around the title clip, and the [Title] tab appears in the setting area.
4 Enter the title, set the effect, and click [Apply].(For details →57)
●The start time and the display time of the title must be set in the timeline area.
To change the position of the title1 Click the title clip and move it left or right with the mouse.
To change the start position or end position of the title1 Click the title clip.
A yellow frame and two sliders appear.2 Click one of the sliders and move it left or right with the
mouse.
Title clip
Slider Slider
Editing motion pictures (Editing in the timeline area)

67HD Writer WE
Advanced Features
Editing videos on your computer
Dividing a scene
Preparation: ●Perform steps 1 to 9 in “Creating a new motion picture editing project (Creating a new project)” (→44), so that the timeline area appears.
Tips ●You can also divide still pictures and color clips.
1 Click the time on the timescale where you want to divide the scene.The playback position bar moves to that position.
●You can also set the time where you want to divide the scene by clicking the playback position bar and moving it left or right with the mouse.
2 Place the mouse pointer over the scene clip.
appears.
3 Click .The scene is divided into 2 clips at the position of the playback position bar.
Editing motion pictures (Editing in the timeline area)

68HD Writer WE
Advanced Features
Editing videos on your computer
Setting the BGM for a certain scene
Preparation: ●Perform steps 1 to 9 in “Creating a new motion picture editing project (Creating a new project)” (→44), so that the timeline area appears.
Tips ●You can also set BGM for still pictures and color clips.
1 Click the time on the timescale where you want the BGM to start.The playback position bar moves to that position.
●You can also set the time where you want the BGM to start by clicking the playback position bar and moving it left or right with the mouse.
2 Click [Add].A window opens that displays the music files on your computer.You can use any music files in WAV, WMA and MP3 formats.
3 Select the music file you want to use as the BGM and click [Open].A BGM clip appears and the BGM is set.The playback time of the BGM is the same as the playback time of the music file.
● If the whole BGM clip is not visible on the timescale, use the timescale slider to adjust it.
To change the position of the BGM1 Click the BGM clip and move it left or right with the mouse.
To change the start position or end position of the BGM1 Click the BGM clip.
A yellow frame and two sliders appear.2 Click one of the sliders and move it left or right with the
mouse. ●You cannot make the BGM clip longer than the playback time of the music file set as the BGM.
BGM clip
Slider Slider
Editing motion pictures (Editing in the timeline area)

69HD Writer WE
Advanced Features
Deleting selected portions of a motion pictureDelete unnecessary parts of motion pictures or parts with shooting errors.
●Motion pictures must be at least 2 seconds long for partial deletion.
Selected portion
1 Click [Edit video] → [Delete partially].You can also display it by selecting [Edit] → [Edit video] → [Delete partially] from the menu.
2 Select a single scene and click [Execute].The [Delete partially] window is displayed.
3 Click to play and click to pause at the starting position for deletion.Click to fine-tune the position.
4 Click [Set start point] to identify the starting point. Otherwise, you can drag [▼] ( A ) to identify the starting point.
Editing videos on your computer
A
Editing motion pictures [Delete partially]

70HD Writer WE
Advanced Features
Editing videos on your computer
5 Click again to resume playback and click to pause at the ending position for deletion.Click to fine-tune the position.
6 Click [Set end point] to identify the ending point. Otherwise, you can drag [▲] ( A ) to identify the ending point.
7 Click [Select] to confirm this selection. ●The deletion range is displayed in gray. ●Thumbnails of the starting and ending points are displayed. ●To select multiple portions, repeat steps 3 to 6. ●To clear the selection, click the corresponding thumbnail and click [Release].
8 Play the video content to check the portion that will remain after deletion.
9 Click [Partially delete].Video data on which [Delete partially] has been performed will be newly created.The actual original data is not deleted by [Delete partially].
● [Partially delete] may take time for data processing.
Cancel editingFor details about this window (→71)
A
Editing motion pictures [Delete partially]
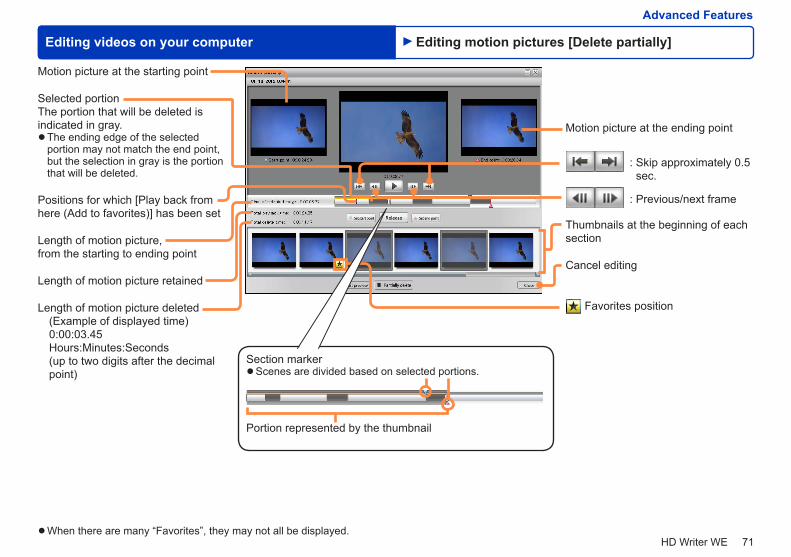
71HD Writer WE
Advanced Features
Editing videos on your computer
Motion picture at the starting point
Selected portionThe portion that will be deleted is indicated in gray.
●The ending edge of the selected portion may not match the end point, but the selection in gray is the portion that will be deleted.
Positions for which [Play back from here (Add to favorites)] has been set
Length of motion picture, from the starting to ending point
Length of motion picture retained
Length of motion picture deleted(Example of displayed time)0:00:03.45Hours:Minutes:Seconds (up to two digits after the decimal point)
Motion picture at the ending point
: Skip approximately 0.5 sec.
: Previous/next frame
Thumbnails at the beginning of each section
Cancel editing
Favorites position
Section marker ●Scenes are divided based on selected portions.
Portion represented by the thumbnail
●When there are many “Favorites”, they may not all be displayed.
Editing motion pictures [Delete partially]

72HD Writer WE
Advanced Features
A
B
C D E F
Editing videos on your computer
1 Select [Edit] → [Edit still picture] → [Retouch] from the menu.The pictures selection window is displayed.
2 Select still pictures and click [Execute].The [Retouch] screen is displayed.
●This window is also displayed by clicking [Retouch] on the short movie story [Edit] – [Effect] – [Picture] tab during still picture selection. (→88)
A : Retouch buttons on the [Edit] tabB : Display window for the selected still pictureC : Undo/Redo buttons
: Cancels the retouch operation.: Reapplies the canceled retouch operation.
D : Thumbnails for selected still picturesE : Buttons to switch the display mode and enlarge the still
picture in the display window : Zooms in. : Zooms out. : Displays the picture in full size. : Adjusts the picture to fit the display area.
F : Return to the pictures selection window
3 Click thumbnail ( D ) to select the picture you want to retouch, and button ( A ) to select the retouch function you want to use.Retouch the still picture.
Tips ●Up to 20 still pictures can be selected simultaneously in the picture selection window. ●Only the still picture displayed in the display window will be retouched. The retouch operation will not affect other still pictures in the picture selection area.
When you select [Retouch] from the short movie story editing screen (→88)
●The [Save] tab is not displayed. The retouched still picture will be saved as part of the short movie story scenario.
* Click F to save the edited contents and return to the short movie story window.
*
[Edit] / [Save] / [Operation] tabs
Retouch screen
Editing still pictures (Retouching still pictures)
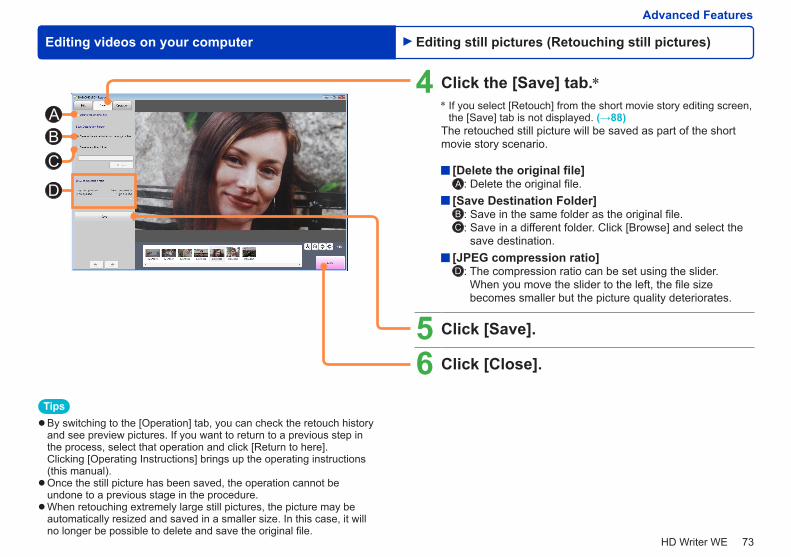
73HD Writer WE
Advanced Features
Editing videos on your computer
Tips ●By switching to the [Operation] tab, you can check the retouch history and see preview pictures. If you want to return to a previous step in the process, select that operation and click [Return to here]. Clicking [Operating Instructions] brings up the operating instructions (this manual). ●Once the still picture has been saved, the operation cannot be undone to a previous stage in the procedure. ●When retouching extremely large still pictures, the picture may be automatically resized and saved in a smaller size. In this case, it will no longer be possible to delete and save the original file.
4 Click the [Save] tab.** If you select [Retouch] from the short movie story editing screen,
the [Save] tab is not displayed. (→88)The retouched still picture will be saved as part of the short movie story scenario.
[Delete the original file]A : Delete the original file.
[Save Destination Folder]B : Save in the same folder as the original file.C : Save in a different folder. Click [Browse] and select the
save destination. [JPEG compression ratio]D : The compression ratio can be set using the slider.
When you move the slider to the left, the file size becomes smaller but the picture quality deteriorates.
5 Click [Save].
6 Click [Close].
BC
A
D
Editing still pictures (Retouching still pictures)

74HD Writer WE
Advanced Features
Editing videos on your computer
1 Select the still picture to rotate.
2 Select [Edit] → [Edit still picture] → [Counter-clockwise Rotation] or [Clockwise Rotation] from the menu.
3 When the confirmation message is displayed, click [Yes].The still picture rotates 90 degrees clockwise or counter clockwise.
When a still picture without Exif information is rotatedWhen a still picture without Exif information is rotated, a still picture in JPEG format that has Exif information is newly created.1 When the confirmation message is displayed, click
[OK].
Tips ●For still pictures in JPEG format that have Exif information, rotation is performed by correcting the Exif information only. With some software, the still picture may not seem to be rotated. ●When you rotate many still pictures at one time, it may take time to finish the process.
Editing still pictures (Rotating still pictures)

75HD Writer WE
Advanced Features
Videos stored on a computer can be recorded on SD cards and discs. ●Also refer to “General precautions” (→7).
RecordingRecording formats
Available Media Recording Format Characteristics Playback Equipment
SD cards
MP4 format ●Format for recording MP4 motion pictures as they are.
This unit (microSD memory card or microSDHC memory card only) or other compatible devices
DCF format (Still picture)
●Format designed for recording still pictures on SD cards.
Playback or printing is possible with DCF-compatible equipment (digital cameras, TVs, and printers. etc.)
DVD ― ●The data is recorded as computer data. It can only be played back on a computer.
Additional recording on media with existing content
Media Supporting Additional Recording Format
SD cards MP4DCF format still pictures
When recording additional content, you can add content to media recorded with this software by using the same recording format as the existing content.When you load media with existing content, a confirmation message about additional recording is displayed. Select [Yes] if you will add content. (If you select [No], content cannot be added.)
Record on storage media
Tips ●Additional content can also be recorded to SD cards when still pictures have been recorded to the cards. ●When a 4 GB or larger MP4 motion picture is copied to an SD card, the video data is split into 4 GB increments and copied as multiple scenes.

76HD Writer WE
Advanced Features
Record on storage media
Preparation:To record on an SD card, use an SD card reader/writer or a built-in SD card slot in your computer that supports that type of SD card.
●Copy the motion picture to the computer (→22). ●Exit all other software. - Be sure to exit other software that may access the optical drive, such as Windows Explorer.
●Load the media for recording. - When using SD cards, see “SD card connection” (→13). - Motion pictures shorter than 2 seconds cannot be recorded on SD cards. - Do not insert or remove SD cards when copying data from SD cards or recording data on discs. Removing SD cards during this process may cause data corruption or SD card damage. - SD cards must have a capacity of at least 32 MB for motion picture recording. Additionally, operation is not guaranteed when recording motion picture to 64 MB – 256 MB SD cards. SD cards of 8 MB – 256 MB can be used to store still pictures. - Recording requires twice the amount of free space for the work area as that being used on the media. To change the work area (→117).
ImportantDo not do the following during recording. These operations may prevent successful recording and damage discs or equipment.
- Connect/disconnect cables and cords to your computer or peripheral equipment, or turn equipment on or off - Log off Windows (by switching users, for example) - Force this software to close - Install or remove an SD card
Time required for recording ●Recording will take some time. The amount of time required for recording varies depending on disc specifications and optical drive performance. For details, refer to the Operating Instructions of the disc and drive.
Motion pictures and scenes can be selected from a variety of folders of motion pictures saved on the computer with this software to be recorded in any order on optical discs and SD cards.
●Use a microSD memory card or microSDHC memory card to play back on the unit.
Recording motion pictures

77HD Writer WE
Record on storage media
Advanced Features
1 Click [Copy to media] → [SD card recording].The [Copy to media] window is displayed.
2 Select a copy destination.
3 Click [Next].
4 Select a recording format.SD card [MP4 mode videos]
[DCF format still pictures] (→80)
Recording motion pictures

78HD Writer WE
Record on storage media
Advanced Features
Tips ●When this software is using an optical drive, the drive cannot be used by other software. ●Motion picture editing is not possible while the copy work area is displayed. Complete any required editing (such as dividing scenes) in advance.
Copy work area
5 Drag and drop motion pictures to the copy work area.
●To record still pictures (→80) ●Repeat this process to choose the motion picture. To select multiple items, hold the [Ctrl] key while clicking the thumbnails. ●To add motion pictures from another folder, select the folder and then perform step 5. ●The motion pictures will be recorded in the order that you drag them to the copy work area. ●To cancel the copying to media, click [Exit].
Removing motion pictures from the copy work area1 Click a motion picture to remove.
●To select multiple items, hold the [Ctrl] key while clicking the thumbnails.
2 Click [Remove from list].
12
●Motion pictures are only removed from the copy work area. The data itself is not deleted. ●Click [Deselect all] to remove all the motion pictures.
Recording motion pictures

79HD Writer WE
Record on storage media
Advanced Features
Changing the order of motion pictures1 Drag and drop motion pictures to the desired position.
6 Check the space available at the copy destination.A : Space taken up on the SD cardB : Total size of the motion pictures dragged and dropped to
the copy work area
7 Click [Execute].
8 When the confirmation message is displayed, click [Yes].Recording now begins, and the status is shown with the progress indicator and thumbnails.
●Recording will take some time. Do not operate the computer until recording is finished. ●Recording can be canceled by clicking [Cancel].
9 Click [OK] when a message is displayed indicating that recording is complete.
B A
Recording motion pictures
Tips ●Click [Settings] to perform advanced settings, such as for the recording speed.

80HD Writer WE
Advanced Features
Record on storage media
Still pictures on your computer can be recorded on SD cards. These still pictures are recorded in a format that can be viewed on digital cameras and similar devices (DCF format).
●For details on SD cards (→7)
Preparation: ● Insert the SD card. (See “SD card connection” →13)
1 Perform steps 1 – 3 in “Recording motion pictures” (→77).
2 Click [DCF format still pictures].
3 Select still pictures. ●Content exceeding the available space on the SD card is indicated in red. In this case, remove some of the still pictures to be recorded.
4 Click [Execute].
5 When the confirmation message is displayed, click [Yes].Recording now begins, and the status is shown with the progress indicator and thumbnails.
●Do not operate the computer until recording is finished.
6 Click [OK] when a message is displayed indicating that recording is complete.
Tips ●DCF: Design rule for Camera File system. This recording format conforms to file system specifications of the Japan Electronics and Information Technology Industries Association (JEITA). ●Refer to the Operating Instructions of the unit for the save folder and the file name structure.
Recording still pictures

81HD Writer WE
Advanced Features
Copying videos to a DVD using the PC-compatibility function
Preparation:Check the writing drive settings.
1 Open [Properties] for the drive.2 Select the [Recording] tab.3 Select the correct writing drive.
1 Click [Copy to media] → [DVD recording using the PC-compatibility function].The [Copy to media] screen is displayed.
2 Insert the disc that you want to write to into the drive.
● If the media is not displayed, click [Refresh].
3 Select the writing drive.
4 Click [Next].The video selection window is displayed.
If your PC has an internal or external drive that can write to DVD discs, you can copy still pictures and MP4 motion pictures to DVD-R/RW discs.

82HD Writer WE
Copying videos to a DVD using the PC-compatibility functionAdvanced Features
5 Select a video by putting a check mark in its check box.Check the total size of the selected videos and the free space available on the disc.
6 Click [Next].The Windows standard writing wizard starts.
7 Enter the disc title. ●The writing speed can also be set.
8 Click [Next].Writing to the disc starts.
9 Click [Finish].The display returns to the [Copy to media] screen.
●You can also follow the instructions in the wizard to write the same videos to another disc.

83HD Writer WE
Copying videos to a DVD using the PC-compatibility functionAdvanced Features
10 Click [Exit].
Tips ● If there are files that are ready for writing to disc in Explorer etc., a confirmation message is displayed. If copying to DVD is executed, these files that are ready for writing are canceled.

84HD Writer WE
Advanced Features
Using convenient features
You can extract a frame from a playing motion picture and save it as a still picture in JPEG format with Exif information.
1 Select the motion picture, and then click [Capture].
The playback window will appear. ●You can also display it by selecting [Tools] → [Movie] → [Still picture capture] from the menu.
2 Click to pause the playback at the point where you want to extract a still picture.
3 Click .
4 Select the save destination folder. To save in a folder that is not displayed
1 Click [Browse...].2 Select the folder that you want or create a new folder,
and then click [OK].
Creating still pictures from motion pictures

85HD Writer WE
Advanced Features
Using convenient features Creating still pictures from motion pictures
5 Enter the file name.
6 Select the option. Perform distortion correctionOne frame recorded with the unit’s angle of view set to “WIDE” mode is saved as a still picture with minimal distortion.After correction, the still picture’s display width will be narrower.
7 Click [OK].A still picture generated from the motion picture is saved.
Tips ●When a still picture is created from a motion picture containing fast moving subjects, the still picture may show some motion blur.

86HD Writer WE
Advanced Features
A
C
B
D
Using convenient features
You can create a video that lasts several minutes by selecting still pictures or motion pictures that you like from among those you have imported to your PC.When editing a short movie story, at least one motion picture must be selected. You cannot edit a short movie story that only consists of still pictures.
New story creation window
Tips ●To remove the selected motion picture or still picture from the scenario, select the motion picture or still picture that you want to remove and click [Deselect] ( A ). ●To enlarge the scene selection area, click ( B ). To enlarge the template selection/BGM editing area, click ( B ). ●To change the display area, drag the frame. ( C ) ● If you want to save the current contents of your work while creating a scenario, click [Save story] ( D ).
1 Click [Short movie] and then select[Create a new story].The window for creating a new short movie story is displayed.
●You can also display the creation window by selecting [Tools] → [Movie] → [Short movie] → [Create a new story] from the menu.
2 Click [Select].A window is displayed for selecting candidate motion pictures or still pictures for insertion in the scenario*. Select a motion picture or still picture, and then click [OK]. The candidate pictures are displayed in the scene selection area.* A scenario is the outline of a series of motion pictures and/or still
pictures according to a template.
Scene selection area Template selection/BGM editing area
●Depending on the selected picture, the motion may be too fast or the effect may be otherwise unsuitable. In that case, adjust the effect manually. (→131)
Creating short movie stories

87HD Writer WE
Using convenient features
Advanced Features
Tips ●The length of time of the short movie story is determined by the length of the BGM. ●To check the BGM, click ( C ). ●To register music other than the template tune as BGM, select [User specified] ( D ). (→90)When you select the [BGM-priority] template, a scenario is created according to the rise and fall of the registered BGM. ●To perform advanced settings such as for picture material sorting, BGM overlapping or output format, click [Settings] ( E ). (→94, 95)You can also set BGM overlap by clicking ( F ). (→94) ● If a message regarding insufficient PC specifications is displayed after clicking [Next], your PC may not have the necessary processing power. Please refer to “Troubleshooting”. (→131) ●When the scenario is created, the processing may take some time.
Motion picture or still picture that you want to prioritize for display
3 Select a template.To play back the image and BGM of a template, place the mouse pointer on the template and click the that appears.
4 Click [Next].
5 When the confirmation message is displayed, click [Yes].
●You cannot use all selected motion pictures and still pictures as content for the short movie story. There is a limit to the number of pictures that can be used for each template. From the motion pictures and still pictures that you selected, you can specify those that you definitely want to display in the scenario, or those that you decide you do not want to display by adding a mark to them. (Left: Current number of pictures marked with . Right: Upper limit for number of pictures marked with .) ( A ) - When you select a motion picture or still picture that you want to display and click ( B ), a mark is added to that motion picture or still picture. - When you select a motion picture or still picture that you do not want to display and click ( B ), a / mark is added to that motion picture or still picture. - To remove the mark, select the motion picture or still picture and click ( B ).
E
BA
C
DF
Creating short movie stories
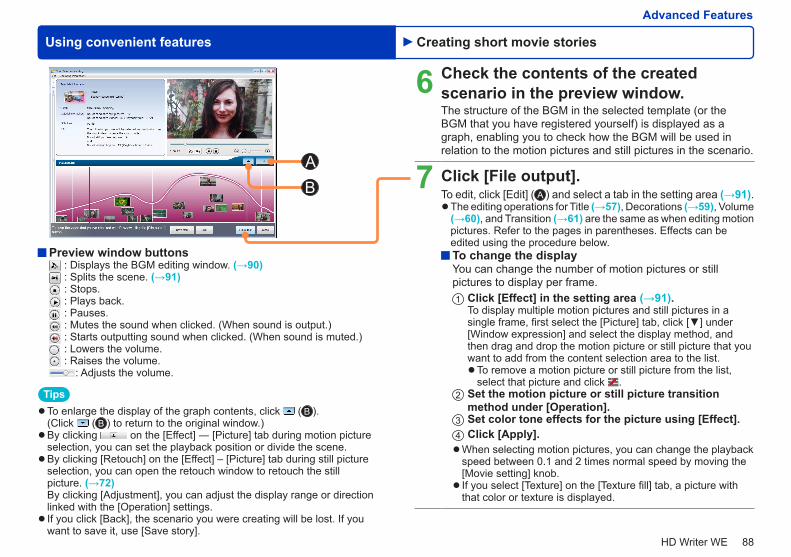
88HD Writer WE
Using convenient features
Advanced Features
6 Check the contents of the created scenario in the preview window.The structure of the BGM in the selected template (or the BGM that you have registered yourself) is displayed as a graph, enabling you to check how the BGM will be used in relation to the motion pictures and still pictures in the scenario.
7 Click [File output].To edit, click [Edit] ( A ) and select a tab in the setting area (→91).
●The editing operations for Title (→57), Decorations (→59), Volume (→60), and Transition (→61) are the same as when editing motion pictures. Refer to the pages in parentheses. Effects can be edited using the procedure below. To change the displayYou can change the number of motion pictures or still pictures to display per frame.1 Click [Effect] in the setting area (→91).
To display multiple motion pictures and still pictures in a single frame, first select the [Picture] tab, click [▼] under [Window expression] and select the display method, and then drag and drop the motion picture or still picture that you want to add from the content selection area to the list.
●To remove a motion picture or still picture from the list, select that picture and click .
2 Set the motion picture or still picture transition method under [Operation].
3 Set color tone effects for the picture using [Effect].4 Click [Apply]. ●When selecting motion pictures, you can change the playback speed between 0.1 and 2 times normal speed by moving the [Movie setting] knob. ● If you select [Texture] on the [Texture fill] tab, a picture with that color or texture is displayed.
BA
Tips ●To enlarge the display of the graph contents, click ( B ).(Click ( B ) to return to the original window.) ●By clicking on the [Effect] ― [Picture] tab during motion picture selection, you can set the playback position or divide the scene. ●By clicking [Retouch] on the [Effect] – [Picture] tab during still picture selection, you can open the retouch window to retouch the still picture. (→72) By clicking [Adjustment], you can adjust the display range or direction linked with the [Operation] settings. ● If you click [Back], the scenario you were creating will be lost. If you want to save it, use [Save story].
Preview window buttons : Displays the BGM editing window. (→90) : Splits the scene. (→91) : Stops. : Plays back. : Pauses. : Mutes the sound when clicked. (When sound is output.) : Starts outputting sound when clicked. (When sound is muted.) : Lowers the volume. : Raises the volume.
: Adjusts the volume.
Creating short movie stories

89HD Writer WE
Using convenient features
Advanced Features
Tips ●Processing while outputting a file may take some time. ●Output files cannot be re-edited. We recommend that you save your story. ●You can copy the output file to a medium for playback.
8 Check the output format and click [OK]. ●To change the output format, click [Change]. (→95)
9 Select the save destination folder. To save in a folder that is not displayed
1 Click [Browse].2 Select the desired folder, or create a new folder and
click [OK].
10 Enter a file name.
11 Click [OK].
Creating short movie stories

90HD Writer WE
Using convenient features
Advanced Features
B A B
C
DE
Editing BGMYou can register an arbitrary music file as BGM in place of the BGM that is set in the template.
Tips ●You can also edit the BGM by clicking on the operation panel below the preview window. (→88) To change song switching positions after creating a scenario, open the BGM editing window and click at the playback position that you want to switch to the next song. That position will segue into the starting position of the next song.
1 In the new story creation window, add a mark to [User specified] and click [Select].A window for selecting a music file is displayed.
2 Select a music file and click [Open].The selected music file is added to the BGM list.
●By dragging the slider in the song playback gauge to an arbitrary position, you can confirm the playback from that position. ( A ) ●To specify the starting and ending positions of the song that you want to use as BGM, drag the bottom slider. ( B ) ●To deselect a song from the BGM list, select the song and click
( C ).
To register multiple music files as BGMs 1 Click [Select].2 Select the music files you want to add, and then click
[Open].
●To change the song order, click ( D ) and move the selected song. ●To insert a pause of no sound in the BGM, select the preceding song and click [Mute] ( E ). A minute of no sound is added to the BGM after that song.
Creating short movie stories

91HD Writer WE
Using convenient features
Advanced Features
D
A B
C
Editing the order of motion pictures and still pictures in the scenario and other settingsYou can sort, change, merge, and divide motion pictures and still pictures in the scenario.
Short movie story screen
Tips
●You can also display the content selection window by clicking ( D ).(Click ( D ) to return to the original window.)
To sort the motion pictures or still picturesDrag and drop the motion pictures or still pictures into the editing area.
●To undo or redo editing operations, click [Undo] ( A ) or [Redo] ( A ). ● If you select a motion picture or still picture in the editing area and click [Delete] ( A ), that picture is removed from the scenario.
To replace a motion picture or still pictureYou can replace the content by clicking [Replace] ( A ) and dragging and dropping motion pictures and still pictures from the content selection area that is displayed on the left side of the window into the editing area.
To merge and split motion picturesWhen you select a motion picture or still picture that you want to play back seamlessly in the scenario and click [Merge] ( B ), the selected motion picture or still picture is merged with the subsequent motion picture or still picture. If you pause playback of a motion picture or still picture in the preview window ( C ) and click at the position where you want to split the motion picture or still picture, the motion picture or still picture is split at that position.
Editing area
Content selection area
Setting area
Creating short movie stories

92HD Writer WE
Using convenient features
Advanced Features
Loading a saved storyYou can restart work by loading a story that was saved before it was finished.
1 Click [Short movie] and then select[Open story].The story list screen is displayed.
●You can also display this screen by selecting [Tools] → [Movie] → [Short movie] → [Open story] from the menu.
2 Select a story file, confirm its content, and click [OK].The saved story is reloaded to enable the previously saved work to be restarted.
Tips ●You can change the display mode of the story file list by clicking
.
Creating short movie stories

93HD Writer WE
Using convenient features
Advanced Features
Deleting storiesYou can delete saved stories.
1 Click [Short movie] and then select[Delete story].The story list screen is displayed.
●You can also display this screen by selecting [Tools] → [Movie] → [Short movie] → [Delete story] from the menu.
2 Select a story file that you want to delete, confirm its content, and add a check mark to the story file.
3 Click [Delete].
4 When the confirmation message is displayed, click [Yes].The story is deleted.
5 Click [Close].
Tips ●You can change the display mode of the story file list by clicking
.
Creating short movie stories

94HD Writer WE
Using convenient features
Advanced Features
Advanced settings for short movie storiesYou can make advanced settings for the sorting order for motion pictures and still pictures, BGM overlap, output format, etc.
1 In the new story creation window, click [Settings] ( E ). (→87)The settings window is displayed.
2 Set the sorting order of the motion pictures and still pictures.
[Order][Follow the template settings]:
Plays back according to the settings of the template that is prepared in advance.
[Sort by recording date]: Plays back in the recording date order.
[Sort randomly]: The selected motion pictures and still pictures are played in random order.
3 Set the overlapping time between BGM tracks.
[Audio]Sets the ratio of mixing between BGM and motion picture audio. [Overlap between BGM]Sets the overlapping time between BGM tracks. (0 to 3 seconds)
Creating short movie stories

95HD Writer WE
Using convenient features
Advanced Features
4 Set the motion picture output format. [Output]You can select the output motion picture file format.
[Hardware acceleration]By selecting [Use the assist function of video cards (CUDA compatible video cards only)], you may be able to improve the output performance of motion pictures in MP4 format. (This function cannot be used for video cards that do not support CUDA.)By clicking [Measurement], you can check which has the highest processing speed in your PC environment, the CUDA or the CPU.
5 If the application runs slowly when you are operating, cancel the settings for each function by deselecting the check marks.
6 Click [Apply]. ●Click [OK] to apply the settings and close the window.
Creating short movie stories

96HD Writer WE
Advanced Features
Using convenient features
You can add objects (figures, text, etc.) to motion pictures and short movie stories. (“Video retouch”)You can also perform settings that make the added objects appear to move around, etc. (Animation)
Tips ●Motion pictures shorter than 5 seconds cannot be retouched. ●To retouch a motion picture file from an already output short movie story, select that motion picture from [Video].
1 Select [Tools] → [Movie] → [Video retouch] → [New] from the menu.A window appears in which the motion picture that you want to use as the basis for the retouching can be selected.
2 Select the type of picture you want to retouch.[Video]: Retouch a motion picture.[Video editing project]: Retouch a saved motion picture editing
project.[Short movie story]: Retouch a saved short movie story.
3 Click [Next].
4 Select a motion picture (story), and click [Execute] ([OK]).The [Video retouch] screen is displayed.
Retouching motion pictures

97HD Writer WE
Using convenient features
Advanced Features
InformationOperation hints and other information are displayed here. ( : Display history)
●To display the information bar, select [Information] from the [View] menu. To hide the bar, click .
Preview settings[Display magnification]: Changes the magnification of the
picture.[Display grid]: Shows a grid for easier positioning of the
object. ●The actual motion picture is not affected. Click to display the setting screen, and then use [Grid width] ([Grid height]) to adjust the spacing between the vertical and horizontal lines, and [Line color] to adjust the color of the lines in the grid. ●To display the options bar, select [Preview settings] from the [View] menu. To hide the bar, click .
About the “Video retouch” screenMenu bar Preview window
●The X and Y axis values (the number of pixels from the left edge and the upper edge of the motion picture, respectively) are shown at the lower right.
Edit/create object buttons
Object setting area
[Save] buttonSaves the contents of your work.
[Output] buttonSaves a motion picture file.
[Exit] buttonExits the “Video retouch” screen.
Playback operation area: Reduces the playback speed. (No sound is
output.): Returns to the display end/start point of
the previous object, or to the playback start position of the motion picture.
: Moves backwards frame-by-frame.: Plays back./ : Pauses.: Moves forwards frame-by-frame.: Skips to the display start/end point of the next
object, or to the playback end position of the motion picture.
: Mute./ : Sound is output.: Adjusts the volume.
Undo/Redo buttons
Playback position bar
Track selection area/ : Show/hide object.
: Move track up/down.
Tracks, Object display period
Playback position ●Click to enter a value.
Playback timescale ●You can change the timescale by dragging ► (Playback start point) and ◄ (Playback end point).
Scale gradation sliderDrag the slider to widen/narrow the width of the tracks.
Timeline area
Retouching motion pictures

98HD Writer WE
Using convenient features
Advanced Features
5 Click a Create object button.If you have already decided when to start displaying the object, you can drag the playback position bar to that position.
6 Make settings for the objects.The settings can also be made after creating the object.
●About the setting items for each object (→99, 100).
7 Create an object on the screen.The display period of the created object is indicated by the position of the playback position bar over the track area.
8 Adjust the size, position, etc. ●When you click the object in the preview window or in the track with the button selected, you can edit the settings. ●About animation settings (→102).
9 Set the display time of the object.Drag the object in the track to move the display period.To lengthen/shorten the display time, drag the left end to adjust the start time position, or the right end to adjust the end time position. You can also adjust the positions by selecting [Time settings] in the right-click menu.
Tips ●To save your work in progress as a “project”, click [Save]. Note that even if you save a retouched short movie story as a project, retouching will not be reflected in the original short movie story. However, if you later edit the original short movie story, the edited contents will be reflected in the project as well.
Retouching motion pictures

99HD Writer WE
Using convenient features
Advanced Features
Text1 Click .2 Create a bounding box by dragging with the mouse
pointer in the preview window, and then click inside the outline and enter the text.
3 Make text settings using the [Basic] tab.[Font]: Sets the font type.[Font size]: Sets the character size.[Bold]: Makes the text bold.[Italic]: Makes the text italics.
: Sets the alignment after line breaks.[Color]: Sets the color.[Opacity]: Sets the transparency.
4 Using the [Border] tab, set the color and width of the external border using [External border], and the internal border line using [Internal border].
5 To add shadows to the characters, enable [Add shadows] using the [Shadows] tab, set the color of the shadows using [Shadow color], and adjust the blurriness using [Shadow blur], the direction using [Shadow direction] and the distance from the character using [Shadow distance].
6 To add a background to the text (a rectangle behind the text), enable [Add background] using the [Background] tab, and use [Color] and [Width] to adjust the color and width of the background border, and [Texture fill] to select the background color.
●You can round the four corners of the background by selecting [Rounded corners].
7 Adjust the position of the text, etc. ●You can rotate the text by dragging the pink circles in the four corners of the bounding box.
Ellipses and rectangles1 Click or .2 Draw a figure in the preview window by dragging with the
mouse pointer.[Color]: Sets the border color.[Texture fill]: Sets the color for filled areas.[Width]: Sets the width of the border.[Rounded corners]: Rounds the four corners. (Rectangles only)[Opacity]: Sets the transparency. (Shared by all objects)<Single color setting> (Shared by all objects and grids)
A
C
BA : Color palette displayB : RGB value
specificationC : Transparency setting
●Click the color you want to use on the color palette. By clicking [Recently used colors], you can select a color from your usage history. You can also specify an RGB value.<Gradation settings> (Shared by all objects)
A B
C
A : Edge color settingsB : Gradation directionC : Intermediate color
setting ●Click ( A ) to select the edge colors. You can create color crossover points ( C ) by clicking the gradation bar. You can drag the points ( A and C ), and delete them by right-clicking them.
3 Adjust the size and position of the figure. ●Drag the light blue square inside the bounding box to make the object larger/smaller, and drag the pink circles in the four corners to rotate the object. If you hold down the [Shift] key while dragging to adjust the size, the object that you are drawing becomes a circle or a square. If the drawing is already finished, its aspect ratio is maintained.
Retouching motion pictures

100HD Writer WE
Using convenient features
Advanced Features
Still picture1 Click .2 Click [Register] on the [Image list], and select the still
picture you want to paste. ●The selected still picture is registered on the list as a candidate. ●To remove a still picture from the list, select that still picture and click [Deselect].
3 Select a still picture from the list and drag it to the preview window to paste it there.[Rounded corners]: Rounds the four corners.[Opacity]: Sets the transparency.
4 To add a frame around the still picture, enable [Add frame] using the [Frame] tab, and set the color of the frame using [Frame color] and the width using [Frame width].
5 To add shadows to the still picture, enable [Add shadows] using the [Shadows] tab and set the color of the shadows using [Shadow color], and adjust the blurriness using [Shadow blur], the direction using [Shadow direction] and the distance from the still picture using [Shadow distance].
6 Paste more still pictures or switch to and adjust the size and position, etc. of the still picture.
●Drag the light blue square inside the bounding box to make the still picture larger/smaller, and drag the pink circles in the four corners to rotate the still picture. If you hold down the [Shift] key while dragging to adjust the size, the still picture’s aspect ratio is preserved.
Stamp1 Click .2 Select a stamp, and click in the preview window to add it
there.[Magnification]: Enlarges/reduces the size.[Angle]: Sets the angle.[Animation interval]: For moving stamps, sets the speed of
movement.[Opacity]: Sets the transparency.
●About [Countdown playback] (→102) ●You cannot change the color of the stamps.
3 Add more stamps or switch to and adjust the position, etc. of the stamp.
Pen1 Click .2 Draw a line by dragging with the mouse pointer in the
preview window.[Color]: Sets the main color of the line.[Border color]: Sets the border color of the line.[Width]: Sets the width of the line.[Border width]: Sets the width of the border.[Opacity]: Sets the transparency.
●About [Countdown playback] (→102)3 Draw more lines or switch to and adjust the position,
etc. of the line.
Tips ●To remove an object, right-click it and select [Delete]. To copy it and paste additional copies, select [Duplicate]. ●By right-clicking an object in the preview window and selecting [Position], you can place the object in one of the standard positions (from the top of the menu: Left edge of window, Center horizontally, Right edge, Upper edge, Center vertically, Lower edge).
Retouching motion pictures
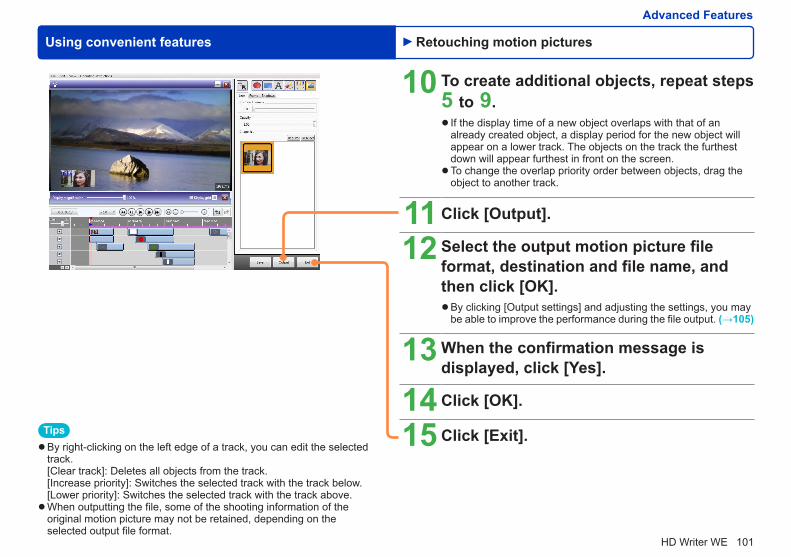
101HD Writer WE
Using convenient features
Advanced Features
Tips ●By right-clicking on the left edge of a track, you can edit the selected track.[Clear track]: Deletes all objects from the track.[Increase priority]: Switches the selected track with the track below.[Lower priority]: Switches the selected track with the track above. ●When outputting the file, some of the shooting information of the original motion picture may not be retained, depending on the selected output file format.
10 To create additional objects, repeat steps 5 to 9.
● If the display time of a new object overlaps with that of an already created object, a display period for the new object will appear on a lower track. The objects on the track the furthest down will appear furthest in front on the screen. ●To change the overlap priority order between objects, drag the object to another track.
11 Click [Output].
12 Select the output motion picture file format, destination and file name, and then click [OK].
●By clicking [Output settings] and adjusting the settings, you may be able to improve the performance during the file output. (→105)
13 When the confirmation message is displayed, click [Yes].
14 Click [OK].
15 Click [Exit].
Retouching motion pictures
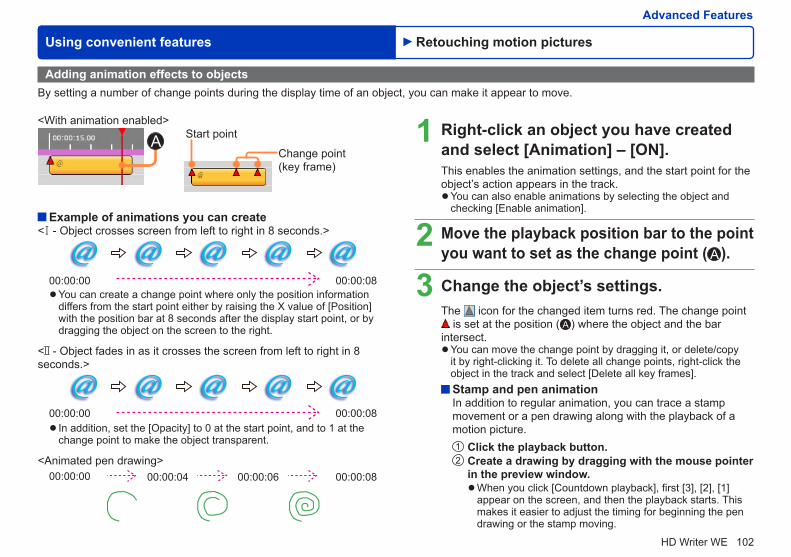
102HD Writer WE
Using convenient features
Advanced Features
Adding animation effects to objectsBy setting a number of change points during the display time of an object, you can make it appear to move.
1 Right-click an object you have created and select [Animation] – [ON].This enables the animation settings, and the start point for the object’s action appears in the track.
●You can also enable animations by selecting the object and checking [Enable animation].
2 Move the playback position bar to the point you want to set as the change point ( A ).
3 Change the object’s settings.The icon for the changed item turns red. The change point
is set at the position ( A ) where the object and the bar intersect.
●You can move the change point by dragging it, or delete/copy it by right-clicking it. To delete all change points, right-click the object in the track and select [Delete all key frames]. Stamp and pen animationIn addition to regular animation, you can trace a stamp movement or a pen drawing along with the playback of a motion picture.1 Click the playback button.2 Create a drawing by dragging with the mouse pointer
in the preview window. ●When you click [Countdown playback], first [3], [2], [1] appear on the screen, and then the playback starts. This makes it easier to adjust the timing for beginning the pen drawing or the stamp moving.
<With animation enabled>
A Start point
Change point (key frame)
Example of animations you can create< - Object crosses screen from left to right in 8 seconds.>
00:00:00 00:00:08 ●You can create a change point where only the position information differs from the start point either by raising the X value of [Position] with the position bar at 8 seconds after the display start point, or by dragging the object on the screen to the right.
< - Object fades in as it crosses the screen from left to right in 8 seconds.>
00:00:00 00:00:08 ● In addition, set the [Opacity] to 0 at the start point, and to 1 at the change point to make the object transparent.
<Animated pen drawing>00:00:00 00:00:04 00:00:06 00:00:08
Retouching motion pictures

103HD Writer WE
Using convenient features
Advanced Features
Loading a saved video retouch projectYou can restart work by loading a video retouch project that was saved before it was finished.
1 Select [Tools] → [Movie] → [Video retouch] → [Open project] from the menu.A list of saved video retouch projects is displayed.
2 Select a project, confirm its contents, and click [OK].The saved project is reloaded to enable the previously saved work to be restarted.
Tips ●You can change the display mode of the project list by clicking
. ● If you move or delete the original motion picture, or delete the saved motion picture editing project, video retouch project or short movie story that the project is based on, the project can no longer be loaded.
Retouching motion pictures

104HD Writer WE
Using convenient features
Advanced Features
Deleting video retouch projectsYou can delete saved video retouch projects.
1 Select [Tools] → [Movie] → [Video retouch] → [Delete project] from the menu.The project list screen is displayed.
2 Select the project that you want to delete, confirm the contents, and add a check mark.
3 Click [Delete].
4 When the confirmation message is displayed, click [Yes].The project is deleted.
5 Click [Close].
Tips ●You can change the display mode of the project list by clicking
.
Retouching motion pictures

105HD Writer WE
Using convenient features
Advanced Features
C
D
EFGH
A
B
Advanced “Video retouch” settings
1 Select [Settings] from the [File] menu on the video retouch screen.The setting window is displayed.
2 Make motion picture output settings.A : Set whether to save memory during the output process.B : For details about [Hardware acceleration] (→117).
3 Make preview settings.C : Set the preview image resolution.D : Set whether to return the playback position bar to the
playback start point after preview.
4 Make optional settings.E : Set the hard disk of your PC to use as a work space.F : Set whether to automatically save the contents of
your work. If the “Video retouch” process is suddenly interrupted, the next time you start the software a confirmation screen will appear, asking whether you want to resume work from the automatically saved state.
G : Set the default value for the display time of newly created objects.
H : Set whether to align the position with other objects when the display period of an object is moved.
5 Click [Apply]. ●Click [OK] to apply the settings and close the window.
Retouching motion pictures

106HD Writer WE
Advanced Features
You can upload motion pictures recorded using this unit to YouTube*1 or Facebook*2, or upload still pictures to Facebook, and then send the address (URL) of the uploaded videos by email. To upload, you need an Internet connection and you also need to register a YouTube or Facebook account beforehand.
*1 YouTube is a website for sharing motion pictures on the Internet.*2 Facebook is an Internet SNS (Social Networking Service) site.
●Because YouTube and Facebook services and specifications are subject to change, operation of online services cannot be guaranteed in the future. Available services and screens are subject to change without notice. (This service is available as of March 31, 2014.) ●Unless you are the copyright holder or you have obtained permission from the copyright holder, do not upload motion pictures protected under copyright.
Sending email with the URL of an uploaded video/Online sharing
Using convenient features
1 Click [Email] or [Online sharing].
●You can also display it by selecting [Output] → [Email] or [Online sharing] from the menu. ●Click [Settings] to perform advanced settings. (For details →107)
2 Select the motion picture(s) or still picture(s) you want to upload and click [Next].** The maximum number of motion pictures that can be selected
is 10, and the maximum number of still pictures that can be selected is 40.
The upload site selection window is displayed.If you select a video that has already been uploaded (→113).
Uploading & Email

107HD Writer WE
Using convenient features
Advanced Features
3 Select an upload site. ● If you do not already have a YouTube or Facebook account, follow the instructions on the screen to register a new account. ●Click [Settings] to perform advanced settings.
[Proxy settings]Set whether or not to upload via a proxy server.
[YouTube : Account settings]When uploading to YouTube, set the user name and password.
Tips ●To upload motion pictures to YouTube or Facebook, each motion picture can be no more than 30 minutes* long.* The total file size of the motion pictures to upload to Facebook can
be no more than 1 GB large.
Uploading & Email

108HD Writer WE
Using convenient features
Advanced Features
4 Sign in to YouTube or Facebook.Enter the necessary information on the YouTube or Facebook login screen below.
YouTube sign-in window Facebook sign-in window
●The first time you log in to Facebook, a confirmation screen is displayed. When this happens, follow the instructions on the screen.
The [Email] window or [Online sharing] window is displayed.A : You can confirm the upload information of [YouTube] and
[Facebook]. The numbers indicated in parentheses for each tab are the number of videos to be uploaded to each site.
●Description on buttons: Use this button to exclude a video from uploading.: Use this button to change the title and description of a
video. (For details about the setting window, see →109): Use this button to copy the address (URL) of a video to
the clipboard. (This is enabled only after the upload has finished.)
5 Click [Upload]. ●The [Close] button changes to a [Cancel] button during uploading. To cancel the upload, click [Cancel]. ●Click [Settings] to perform advanced settings. (For details →107)
Tips ● If you haven’t created a YouTube channel, you cannot log in, even if you have a YouTube account. (→130) ●YouTube will remember your user name from the second time you sign in. When the check box for [Remember password] is selected, your password is remembered from the next time you sign in. Once your password or user name is remembered, you will be signed in automatically, and the sign-in window will not be displayed. ●Facebook will not remember your password, so you need to re-enter it each time you sign in. ● If you sign in to Facebook using software other than this software, you are disconnected from this software and need to sign in again. ●The [Upload] and [Settings] buttons are only available before the upload is started. ●The [Attach to e-mail] and [Bulk copy to clipboard] buttons only become available after the upload is finished. ●For the [Online sharing] window, [Attach to e-mail] is not displayed.
A
Uploading & Email

109HD Writer WE
Using convenient features
Advanced Features
Changing the video settings YouTube
ABCDE
F
A : Enter a title.B : Enter a description of the contents of the motion picture.
(The title is displayed by default.)C : Specify the category.D : Enter keywords.
(The title is displayed by default.)E : To share the motion picture with other users, select [Public]*.
* Even if you select [Unlisted] or [Private] here, you can change the setting to [Public] later on YouTube. Refer to the YouTube specification for the detailed settings.
F : If you add a check mark to this option, the same settings will be copied to other content.
Tips ●When uploading to YouTube, you cannot select [Private] for [Email].
Uploading & Email

110HD Writer WE
Using convenient features
Advanced Features
A : Enter a title.B : Enter a description of the contents of the motion picture or still
picture. (The title is displayed with the default settings.)C : To share motion pictures or still pictures with other people,
select a setting other than [Only Me]. ([Everyone], [Friends Only], [Friends of friends], [Specific People], [Only Me]*)The Friend List is displayed when [Friends Only], [Friends of friends] or [Specific People] is selected as the public posting setting. * Even if you select [Only Me] here, you can change the setting
later in Facebook. Refer to the Facebook specification for the detailed settings.
D : The Friend List is displayed.E : If you add a check mark to this option, the same settings will be
copied to other content.F : Select the album to which you want to add the still picture.
When you click an album name in the list, information about that album is displayed below. You can create a new album by clicking [Create Album]. After the new album has been created, its name is added to the album list.
<Selecting still pictures> <Album creation window>
Facebook<Selecting motion pictures>
C
D
Tips ●When uploading to Facebook, you cannot select [Only Me] for [Email]. (Motion pictures only)
Uploading & Email
E
E
AB
C
D
B
F

111HD Writer WE
Using convenient features
Advanced Features
A
6 If a confirmation message is displayed, check the contents and click [OK].
●When uploading to YouTube, mark the check box [I own the copyright to all the files to be uploaded.] on the confirmation screen, and then click [OK].
7 The video is uploaded. ●Each motion picture may be up to 30 minutes long, and may be automatically divided, according to the limit time of upload site. When uploaded to YouTube, a playlist is created.* To delete the playlist, delete the playlist and all the motion pictures in the playlist from the YouTube website. * If [Unlisted] is selected, a playlist is not created. ● A : An upload progress indicator is displayed along with elapsed
time and remaining time. ●To cancel this process, click [Cancel].
8 Click [OK]. ● If you clicked [Online sharing] in Step 1 (→106), proceed to Step 10.
Tips ●Uploading may take some time depending on the file size or your communication environment.
Uploading & Email

112HD Writer WE
Using convenient features
Advanced Features
9 After uploading is finished, click [Attach to e-mail].The email window is displayed.
●The e-mail application* automatically launches with the URL of the uploaded video already attached as a file (in HTML format). * Only when using a MAPI (Messaging Application Programming
Interface) compatible e-mail application as the default ● If you click [Bulk copy to clipboard], you can copy all the URLs of the uploaded motion pictures. When using Webmail, you can copy and attach the URL into the main text and send it by e-mail.
10 Click [Close], and then click [Yes] on the confirmation screen.The main window is displayed.
Tips ● If you click the URL of an uploaded motion picture, you can go to the corresponding website and play back the motion picture on your web browser. Note that it may take some time after uploading a motion picture before you can play it back on the website. You may not be able to check it immediately.
Uploading & Email

113HD Writer WE
Using convenient features
Advanced Features
1 Click [Email] or [Online sharing].
●You can also display it by selecting [Output] → [Email] or [Online sharing] from the menu. ●Videos that have been uploaded are shown by an icon displayed in the bottom left corner of their thumbnails.* YouTube: Facebook: * These icons are only displayed for videos that were uploaded
after being copied to a PC.
2 Select the video(s) that you want to upload.
3 Click [Next].
4 Select the site to which you want to upload the video(s) and sign in.
● If some of the selected motion pictures have already been uploaded, the following confirmation window appears. Click [OK] and go to step 5 (→108). ● If only videos that have already been uploaded are selected to be sent using [Email], go to step 9 (→112).
When uploaded videos already exist
To check uploaded videosClick [YouTube] or [Facebook].A list of the uploaded videos is displayed.If you delete a video from the upload site, the corresponding thumbnail disappears.
● If an upload to YouTube or Facebook is taking a long time or is not reflected on the site, and you click [Refresh] while a video is not yet fully uploaded, that video may disappear from the upload list. ● If you double-click the thumbnail of an uploaded video, the browser jumps to the website where the file was uploaded and the video is played back in your web browser. ●By right-clicking an uploaded video and selecting Properties, you can see the storage location of the original file and other upload information.
Uploading & Email

114HD Writer WE
Advanced Features
Converting data format (MP4 1920x1080/30p or 1920x1080/25p conversion)Using convenient features
1 Select [Tools] → [Movie] → [MP4 1920x1080/30p conversion] from the menu.MP4 1920x1080/30p or 1920x1080/25p conversion window is displayed.
2 Select a motion picture by selecting its check box and click [Next].
3 Select the save settings. [Save Destination Folder]
A : Save in the same folder as the original motion picture.B : Save in a different folder. Click [Browse] and select the
save destination.
You can convert the motion picture format.
AB

115HD Writer WE
Using convenient features
Advanced Features Converting data format (MP4 1920x1080/30p or 1920x1080/25p conversion)
4 Click [Execute].
5 When the confirmation message is displayed, click [Yes].
●The motion picture data format is changed.
6 When the completion message is displayed, click [OK].
Tips ●Motion picture conversion may take a long time.

116HD Writer WE
Advanced Features
Using convenient features
You can print still pictures that are saved on a computer.
1 Select [Output] → [Print] from the menu.A window is displayed for selecting still pictures to print.
2 Select a still picture by selecting its check box and click [Next].A window for selecting printer settings is displayed.
3 Select printer settings.
4 Click [Execute].
5 When the confirmation message is displayed, click [Yes].
6 When the completion message is displayed, click [OK].
ABCD
E
F
[Printer Settings]A : Select a printer. B : Select a paper size.C : Select printing quality.D : Display the printer property window.
[Layout]E : Select a layout.
[Date setting]F : Adds a date stamp. You can select the layout such as the
character font, color and position.
Printing still pictures

117HD Writer WE
Other
Setting motion picture functions
1 Select [Tools] → [Settings] from the menu.
2 Select [Movie] and change the settings. [Work area setting]The work area is an area on the PC’s hard disk that is used temporarily when working.
●When the file system of the hard disk that is set as the work area is FAT32 - Files larger than 4 GB cannot be saved during motion picture editing.
●The following may occur depending on the remaining free space. - 5 GB or less: Some areas may not operate properly. - 300 MB or less: Some editing is not possible.
[Hardware acceleration]If you check the box [Use the assist function of video cards (CUDA-compatible video cards only)], the output performance for MP4 motion pictures may improve. (This function cannot be used for video cards that are not CUDA-compatible.)You can check which has the faster processing speed of the CUDA and the CPU by clicking [Measurement].
You can select settings related to the functions for motion picture playback and recording.

118HD Writer WE
Other
Setting motion picture functions
[Playback method][File unit]: Play back the displayed motion picture to the
end and then stop.[Repeat playback]: Play back one motion picture
repeatedly.[Continuous playback]: Continuous playback of all the
motion pictures displayed as folders.
[MP4 playback settings][Hardware acceleration]If the check box is selected, high-definition motion pictures may be played back more smoothly. Depending on your computer environment, playback may momentarily freeze before or after scene transitions.
3 When [OK] is clicked, the settings are applied and the window is closed.
Tips ●The [Hardware acceleration] function is valid only with Windows Vista and Windows 7 / Windows 8 / Windows 8.1. Note, however, that this function may not be available even with Windows Vista and Windows 7 / Windows 8 / Windows 8.1, depending on the performance of your PC.

119HD Writer WE
Other
Changing the settings for copying videos to computer
1 Select [Tools] → [Settings] from the menu.
2 Click [General] — [Basic].
3 Change the settings. [Sorting for copying to PC]
A : Save in a subfolder for the copying date (today).B : Save in a subfolder for the recording month.C : Save in a subfolder for the recording date.
[File name when copied to PC]D : Save under a file name laid out in year-month-date order.
(Example: 2014-06-20)E : Save under a file name laid out in month-date-year order.
(Example: 06-20-2014)F : Save under a file name laid out in date-month-year order.
(Example: 20-06-2014) [Automatic start] GWhen this check box is selected, this software starts automatically when the unit is connected to the computer.By default, the check box is selected.
●The automatic start can also be enabled or disabled from the menu that is displayed by right-clicking the icon in the task tray.
[Reset the confirmation message display] HDisabled confirmation screen will be re-enabled.
4 When [OK] is clicked, the settings are applied and the window is closed.
You can change the settings for copying images from an SD card to a computer.
ABC
GH
DEF

120HD Writer WE
Other
Performing preview of thumbnail motion picturesYou can set a function to preview a motion picture when the mouse pointer is placed on a motion picture thumbnail.
1 Select [Tools] → [Settings] from the menu.The settings window is displayed.
2 Click [General] ― [Thumbnail].
3 Set whether or not to preview.When this check box is selected, preview is performed simply by placing the mouse pointer on a motion picture thumbnail.
4 When [OK] is clicked, the settings are applied and the window is closed.
Tips ●Audio is not played during thumbnail preview. ●When [Preview] is set and multiple thumbnail videos are collectively displayed, such as the recording month or recording date in the Calendar display, frame-by-frame playback is performed for the collective thumbnails. ●When Preview is enabled, the videos may not be displayed smoothly depending on the performance of your PC.

121HD Writer WE
Other
Setting the operation when a still picture file with the same name already existsYou can set the operation that is performed if there is a still picture file of the same name already in the copy destination folder (and also the subfolder) when copying to a PC.
1 Select [Tools] → [Settings] from the menu.The settings window is displayed.
2 Click [Still pic.] — [Copy to PC].
3 Set the operation when there are files with the same name.[Auto]: Modification date, time and size of file are compared.
And if a same file is identified, then it is judged as an identical file and thus still pictures from it are not acquired. If one of them is different from the other, then still pictures are acquired by adding a numerical character in the brackets at the end of the file name.
[Manual]: Perform the specified process. [Add number to the end of the file name]: Save with a different name. [Skip]: Do not save. [Overwrite]: Overwrites if the file is the same (same update
date, size). If the file is not the same, it does not overwrite and save but instead adds a number in parentheses at the end of the file name.
4 When [OK] is clicked, the settings are applied and the window is closed.
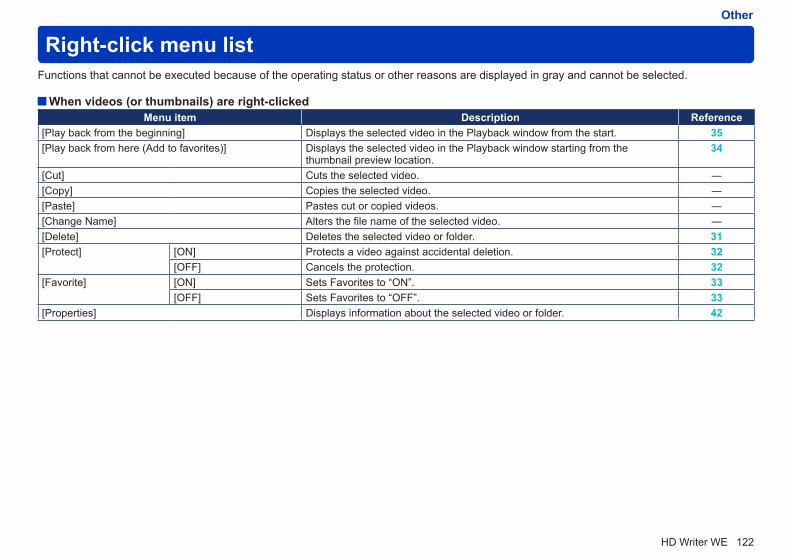
122HD Writer WE
Other
Right-click menu listFunctions that cannot be executed because of the operating status or other reasons are displayed in gray and cannot be selected.
When videos (or thumbnails) are right-clickedMenu item Description Reference
[Play back from the beginning] Displays the selected video in the Playback window from the start. 35[Play back from here (Add to favorites)] Displays the selected video in the Playback window starting from the
thumbnail preview location.34
[Cut] Cuts the selected video. ―[Copy] Copies the selected video. ―[Paste] Pastes cut or copied videos. ―[Change Name] Alters the file name of the selected video. ―[Delete] Deletes the selected video or folder. 31[Protect] [ON] Protects a video against accidental deletion. 32
[OFF] Cancels the protection. 32[Favorite] [ON] Sets Favorites to “ON”. 33
[OFF] Sets Favorites to “OFF”. 33[Properties] Displays information about the selected video or folder. 42

123HD Writer WE
Right-click menu listOther
When folders are right-clickedMenu item Description Reference
[Create folder] Creates a new folder. ―[Change folder name] Changes the folder name. ―[Delete folder] Deletes the folder. ―[Refresh folders] Updates the display of the selected folder. ―[Cut] Cuts the selected folder. ―[Copy] Copies the selected folder. ―[Paste] Pastes the cut or copied folder. ―[Open in Explorer] Displays the contents of the folder with Explorer. ―

124HD Writer WE
Other
TroubleshootingStartup
Symptom Corrective Action
The software does not start.
Windows Vista® / Windows® 7 / Windows® 8 / Windows® 8.1:Log on with an administrator account or a standard user account before using this software. The software will not function with a Guest account. ●Multiple users cannot start the software at the same time. Make sure another user has not started the software. ●It takes time for the software to start, or the software may not start, if there are any damaged or corrupted videos. ●Installation of the necessary modules may not be completed, so please restart the PC. ●Check the display resolution setting, and use a display setting that is 1024x768 or higher. Also, if the text font size is set to a value higher than the default 100%, the font size must be reduced or the display setting must be changed to an even higher resolution.
Application startup is slow. Startup may be slow on PCs that are not connected to the Internet.Check whether the PC can connect to the Internet.
The screen saver or the power-saving functions do not operate.
While this software is started, the screen saver or the power-saving functions (function to make the PC enter the standby or sleep modes after a certain time has elapsed without any operation on the PC) are disabled.

125HD Writer WE
Other
Troubleshooting
Display/playbackSymptom Corrective Action
Motion picture cannot be displayed.
●You can only display motion pictures recorded using this unit or motion pictures recorded using this software. ●Motion pictures that have been edited using other equipment or software cannot be processed, even if they were originally recorded using this unit.
Can be displayed in Thumbnail mode but cannot be displayed in the Playback window.
The supported maximum size is exceeded.If still pictures have thumbnail pictures as Exif data, only their folders can be displayed.
There are 2 files with the same name.When 2 files are linked (associated files), they have the same name except for the extension.If the association between the files is broken, for example because one of the file names has been changed, playback may be impossible on this unit.
[Error] is displayed for the thumbnail.
If the [Error] thumbnail remains even after selecting [View] → [Refresh] on the menu, the cause could be one of the following:
●The video file does not exist. The file may have been moved or deleted by a different software program. If you click a thumbnail for which [Error] is displayed, an update confirmation message is displayed for the folder in which the selected video is saved. ●The registration folder does not exist. Check whether the folder exists, such as by using Windows® Explorer.If a removable device such as an external HDD has been set as a registration folder, check that the device is connected properly, and then select [View] → [Refresh] from the menu.

126HD Writer WE
Other
Troubleshooting
Symptom Corrective Action
Videos do not play back properly.
●Close any other software that is running. ●Update the device driver for the sound card or video card. ●Videos played may have frame drops, color-dulling or a jerky effect depending on the [Windows Aero] functions of Windows Vista® or Windows® 7, the environment of the PC in use or the videos themselves. Also, there may be noise in the sound or videos may not be played back smoothly at the point where the resolution of the image and the sound are switched. ●Even in an environment that is fully capable of playing back high-quality, high-definition motion pictures, if [Windows Aero] is set in Windows Vista® or Windows® 7, high-definition motion pictures may not be played back smoothly. To cancel [Windows Aero]: - In Windows® 7: From the start menu, click [Control Panel] → [Change the theme], and then select a theme from [Basic and High Contrast Themes]. - In Windows Vista®: From the start menu, click [Control Panel] → [Customize colors] → [Open classic appearance properties for more color options], and in [Appearance Settings] → [Color scheme], select an option other than [Windows Aero].
●The frame rate may drop for playback if the processing performance of the computer is inadequate, preventing smooth playback.
4K motion pictures are not played back smoothly.
●In order to play back 4K motion pictures smoothly, a video card that supports hardware decoding of 4K motion pictures is required.(For example)Intel HD Graphics 4000 or higherNVIDIA GeForce 600 series or higher ●In order to play back 4K motion pictures, at least 2 GB of video memory is required. (In order to play back motion pictures with a resolution of 4K, a monitor and a video card that support 4K are required.)
When the check box for [Hardware acceleration] (→118) is selected, videos are not played back properly.
Try updating the video card device driver. (For instructions on how to update the device driver, consult your PC or video card manufacturer.)

127HD Writer WE
Other
Troubleshooting
Symptom Corrective Action
The check box for [Hardware acceleration] (→118) cannot be selected because the function is disabled.
Your computer is not compatible with DXVA2.0. It might become compatible if you update the video card device driver.(For details on DXVA2.0 compatibility and instructions on how to update the device driver, consult your PC or video card manufacturer.)
Voice is not audible.
●Windows Vista® / Windows® 7: From the start menu, select [Control Panel] → [Hardware and Sound] → [Sound] → [Speakers], and then click [Properties]. Confirm that [Use this device (enable)] is selected in [Device usage] on the [General] tab, or that [Speakers] and [Line input] are not muted on the [Levels] tab. ●Voice will not play back while the image is paused.
A disc you have created cannot be played in other equipment.
Discs created using this software are recorded as computer data and can only be used on computers.
Connection/Copy to PCSymptom Corrective Action
If other software is already running, this software does not start up automatically when the unit is connected.
Other programs may prevent this software’s automatic start-up function from operating correctly when the unit is connected to the computer. Please change the settings of the other software or uninstall it completely.
The unit is connected but is not displayed in the window, or recording is not possible.
Click [Refresh]. The unit may be displayed by refreshing the drive information.

128HD Writer WE
Other
Troubleshooting
Symptom Corrective Action
When a microSDHC memory card is inserted, the card is not displayed. microSDHC memory cards are only displayed when using a compatible reader/writer.
Thumbnails are not correctly displayed on the copying window.
●Thumbnails cannot be displayed for videos created using other equipment or software by manufacturers other than Panasonic. ●Motion pictures recorded with devices not compatible, or motion pictures created with other software cannot be displayed as a thumbnail, or “?” is displayed in the thumbnail and they cannot be played back.
Thumbnails are not displayed in the [Copy to PC] screen.
If TMP is set to a drive other than the hard disk in the environment variable setting of the OS, specify a folder in the hard disk that the OS is installed on.
EditingSymptom Corrective Action
Videos cannot be edited. Only video (motion pictures or still pictures) stored on the computer can be edited or copied to media. Copy video stored on other media to your computer before use.
Cannot perform motion picture editing correctly.
●Check the operating environment (→8, 9). If your PC environment doesn’t meet the recommended specification, this software may not operate correctly. ●Try updating the video card device driver. (For instructions on how to update the device driver, consult your PC or video card manufacturer.)
RecordingSymptom Corrective Action
An error message is displayed when I select the drive to record to.
●Close any other software using the drive. ●An error message may be displayed when media is replaced. Reselect the drive. ●Other recording software may be interfering with the operation. In this case, uninstall the other recording software.
The video is distorted during copying and is not copied properly. Close this software and restart the PC.

129HD Writer WE
Other
Troubleshooting
Symptom Corrective Action
Error occurs while data are being recorded.
Consider the following as factors for this problem: ●The media is not supported. (For a list of supported media: →11) ●When recording on SD cards, the cards must be formatted with a file system compatible with this software.
Format the microSD memory card and microSDHC memory card in this unit. To format other types of SD cards, use compatible devices. (The recorded data is deleted.)
●There may be a compatibility problem between the drive and disc. Use discs recommended for the drive. (With some discs, playback may not be possible even if recording is completed normally. Check playback after recording.)
●Recording may be affected by the state of the hard disk drive where the operating system is installed or the drive used for working space.
Optimize the hard disk if necessary. From the start menu, select [Computer], right-click the hard disk icon and select [Properties] → [Tools] → [Defragment now...] → [Defragment disk]. However, do not optimize the hard disk while this software is running.
●Other software may be running. Exit other applications. Using other software at the same time may cause recording to fail, or it may damage discs. (In particular, do not use disc recording software or other recording or encoding software that requires a large amount of memory.)
●Other disc writing software, packet writing software, or similar software that uses the optical drive may be installed, or an ASPI driver may be installed.
Uninstall the other software and drivers and then reinstall this software. ●Other software with features for reading UDF discs may be installed.
In this case, temporarily stop the software or uninstall it.

130HD Writer WE
Other
Troubleshooting
Symptom Corrective Action
Error occurs while data are being recorded. (Continued)
●Multiple peripherals may be connected to the computer. Disconnect SD card readers/writers and other USB devices and confirm that they function properly (particularly if you are using an external drive for recording). However, do not connect or disconnect these devices during recording.
●The unit, optical drives, hard disk drives, or SD card adapters may be connected via USB. Use a different USB port (for example, a USB port on the back of the computer).
●Operation may be affected by the firmware (a control program stored on the equipment) of your optical drive.
Update the firmware of your computer or optical drive. (Firmware updates may be available on the manufacturer’s website.)
●Operation may be affected by disc recording functions provided by the operating system as a standard feature.
Disable these functions. ●Because some models cannot play back motion pictures from SD cards, an error message is displayed if you attempt to use this software to record on SD cards formatted by using these models.
Recording (SD card)Symptom Corrective Action
Cannot format an SD card.It is not possible to format an SD card using this software. Format microSD memory cards or microSDHC memory cards in this unit. To format other types of SD cards, use computers or compatible devices.
OtherSymptom Corrective Action
Cannot log in to YouTube. If you haven’t created a YouTube channel, you cannot log in, even if you have a YouTube account. Create a YouTube channel on the YouTube home page.

131HD Writer WE
TroubleshootingOther
Symptom Corrective Action
Cannot upload to YouTube/Facebook.
Check whether the login information (user name or password, etc.) is correct.Check whether the computer is connected to the Internet.Check whether resident software such as an antivirus or firewall is blocking access to YouTube/Facebook.Also check the corrective actions on the YouTube/Facebook website.
Cannot play a playlist that has been uploaded to YouTube. Confirm that the motion pictures included in the playlist are marked as [Public].
Cannot access the optical drive using Windows® Explorer or other software.
Other software cannot access an optical drive currently in use by this software. Exit this software before accessing the optical drive.
If recording is started on a different date than when it is finished, which date is identified in “Recording date”?
“Recording date” indicates the date a recording is started.
A message appears indicating insufficient memory.
An error message indicating insufficient memory may appear when handling large volumes of motion pictures or still pictures. Please increase the amount of available memory. (In some cases, this problem may also be solved by increasing the amount of virtual memory.) For instructions on how to increase the amount of memory or virtual memory, please consult your PC’s manufacturer.
When working with a short movie story, an error message about inadequate specifications (capacity) is displayed.
In order to be able to use the short movie story functions, your computer must have adequate specifications. Even if your computer was deemed to have adequate specifications for playback at the time of installation, those specifications may be inadequate for using the short movie story functions.
You want to change the motion of a short movie story effect (picture scrolling). (Make it slower or faster.)
Depending on the selected picture, the created short movie story may scroll too fast or too slow.The scrolling speed can be adjusted in the short movie story [Edit] mode.
1. In [Edit] mode, select a fast-moving picture.2. Select [Effect], then [Picture], and then click the [Adjustment] button to open the [Move
settings] dialog box.3. Shorten the length of the start point and the end point to make the motion slower.
* You can preview the picture using the playback button ( ) in the [Move settings] dialog box.

132HD Writer WE
Other
Trademark and License Information ●Microsoft®, Windows®, Windows Vista®, Windows Media®, DirectX®, DirectDraw® and DirectSound® are either registered trademarks or trademarks of Microsoft Corporation in the United States and/or other countries. ●IBM® and PC/AT are registered trademarks of International Business Machines Corporation of the U.S. ●Intel®, Pentium®, Celeron® and Intel® Core™ are trademarks of Intel Corporation in the U.S. and/or other countries. ●SD Logo is a trademark of SD-3C, LLC. ●SDHC Logo is a trademark of SD-3C, LLC. ●SDXC Logo is a trademark of SD-3C, LLC. ●Microsoft product screen shot(s) reprinted with permission from Microsoft Corporation. ●LEADTOOLS Copyright© 1991-2005 LEAD Technologies, Inc. ●YouTube is a trademark of Google Inc. ●Facebook® is a registered trademark of Facebook, Inc. ●Other names of systems and products mentioned in these instructions are usually the registered trademarks or trademarks of the manufacturers who developed the system or product concerned. ●This product is licensed under the AVC patent portfolio license for the personal and non-commercial use of a consumer to (i) encode video in compliance with the AVC Standard (“AVC Video”) and/or (ii) decode AVC Video that was encoded by a consumer engaged in a personal and non-commercial activity and/or was obtained from a video provider licensed to provide AVC Video. No license is granted or shall be implied for any other use. Additional information may be obtained from MPEG LA, LLC. See http://www.mpegla.com/.
SQW0012MSC0298DL_E_ZA P0414KZ0