hd wi-fi indoor security camera - lorex security cameras ... ls/fxc… · flir cloud account. 3....
TRANSCRIPT

Add Camera
Scan the QR code using your mobile device
Center the QR code inside the frame
Make sure that your camera is turned onand has a working internet connection
Se rial: 12345 6789 012
fxc003484156
fxc003
484156
fxc003484156
Step One: Initial Setup1. Plug in your camera. Camera turns on automatically when the power adapter is connected.
Setup Instructions
HD Wi-Fi Indoor Security Camera
For FAQs, setup guides, and support videos visitlorextechnology.com
2. Remove the protective film on the lens.
4. Tap SIGN UP and enter your email address and password to create a new FLIR Cloud account.
3. Download the Lorex Secure app to your mobile device, then launch the app.
Step Two: Setting Up Your Camera
Wi-Fi Setup (Android Users Only)
If Bluetooth (BLE) is not available on your mobile device, follow these setup instructions:
1. Tap ADD DEVICE, then tap HD WiFi Camera. If this is not the first device on your account, tap and then tap HD WiFi Camera.2. Scan the QR code as shown below.
NOTE: If you already have an existing FLIR Cloud account, enter your email address and password and tap LOG IN.
NOTE: If Bluetooth (BLE) is not supported on your mobile device, follow the setup instructions in the “Wi-Fi Setup (Android Users Only)” section.
NOTE: Refer to your mobile device’s user guide for instructions on turning on Bluetooth.
1. Make sure your mobile device’s Bluetooth is turned on.
Lorex Secure
Tap ADD DEVICE
Tap HD WiFi Camera
Installing Power Adapter Plugs (European Users Only)
1. Tuck in the power pins as illustrated in the image below.
2. As shown in the image below, push the power adapter plug in the power adapter body until you hear a click.Power
adapter
Power pins
Power adapter plug
If you are a European user, you received a set of power adapter plugs relevant to your country. To install the power adapter plugs:
USB port facing down
NOTE: See the “Installing Power Adapter Plugs (European Users Only)” section for instructions on installing European power adapter plugs.
2. Tap ADD DEVICE, then tap HD WiFi Camera. If this is not the first device on your account, tap and then tap HD WiFi Camera.
3. Follow the on-screen instructions to complete setup.
3. Follow the on-screen instructions to complete setup.
NOTES: • If you cannot scan the camera’s QR code, tap to enter the camera’s Device ID manually. See the “Camera Overview” section for Device ID location.• If your mobile device has Bluetooth turned on but your camera’s device ID does not show up on the screen, tap “CAN’T FIND YOUR DEVICE?”. Scan the QR code and follow the on-screen instructions to complete setup.
2
5
3
4
1
10
11
12
6
7
8
10
9
fxc003484156
12
11
13
HD Wi-Fi Indoor Security CameraQuick Start Guide
English / Español
What’s Included
© 2017 FLIR Systems, Inc.FXCX2_LS_QSG_EN_FR_R2
lorextechnology.com
1. Status LED Steady Red: Camera is starting up or resetting. Slow-Flashing Red: The router or network that the camera is connected to is down. Check your router settings. Steady Blue: Camera is connected to FLIR Cloud services. Fast-Flashing Blue: Firmware upgrade in progress. DO NOT UNPLUG YOUR CAMERA. Fast-Flashing Blue and Red: Firmware is downloading and update will begin shortly. DO NOT UNPLUG YOUR CAMERA. Slow-Flashing Blue: Camera setup in progress. Slow-Flashing Blue and Red: Camera is ready for setup. LED Off: Camera is in privacy / covert mode, or is turned off.
6. Micro USB Power Port
7. Reset Button
8. microSD Card Memory Slot
9. Micro USB Power Cable Holder: Secure the USB power cable with this clip.
10. Camera Base
10. Camera Base
11. QR Code
12. Device ID
13. Mounting Plate
Camera Overview
1 HD Wi-Fi SecurityCamera
1 Micro USB Cable
1 microSD Card (Pre-installed)
1 Power Adapter
1 Mounting Plate (Pre-attached)
Quick Start Guide & Safety Information
2 Mounting Screws
2 Drywall Anchors
3 Cable Clips
NOTE: Camera configuration, memory card size, power adapter plug, and the number of accessories may vary by model. Please refer to your package for specific details. Your accessories might appear different from the ones depicted in this guide.
2. Camera Lens 4. Microphone
3. Speaker 5. Night Vision LED
Premiére Étape : Configuration initiale1. Brancher la caméra. La caméra s’allume automatiquement lorsque l’adaptateur d’alimentation est branché.
Instructions d’installation
Caméra de surveillance sans fil HD
Pour la FAQ, les guides d’installation et le soutien vidéo, visitez le site internet,
lorextechnology.com
2. Retirer le film protecteur de la lentille de la caméra.
4. Pour créer un nouveau compte FLIR Cloud, appuyez sur SIGN UP puis entrez votre adresse courriel et votre mot de passe.
3. Téléchargez l’application Lorex Secure sur votre appareil mobile et ouvrez là.
Deuxième Étape : Réglage de la caméra
Installation du Wi-Fi (Pour utilisateurs Android seulement)
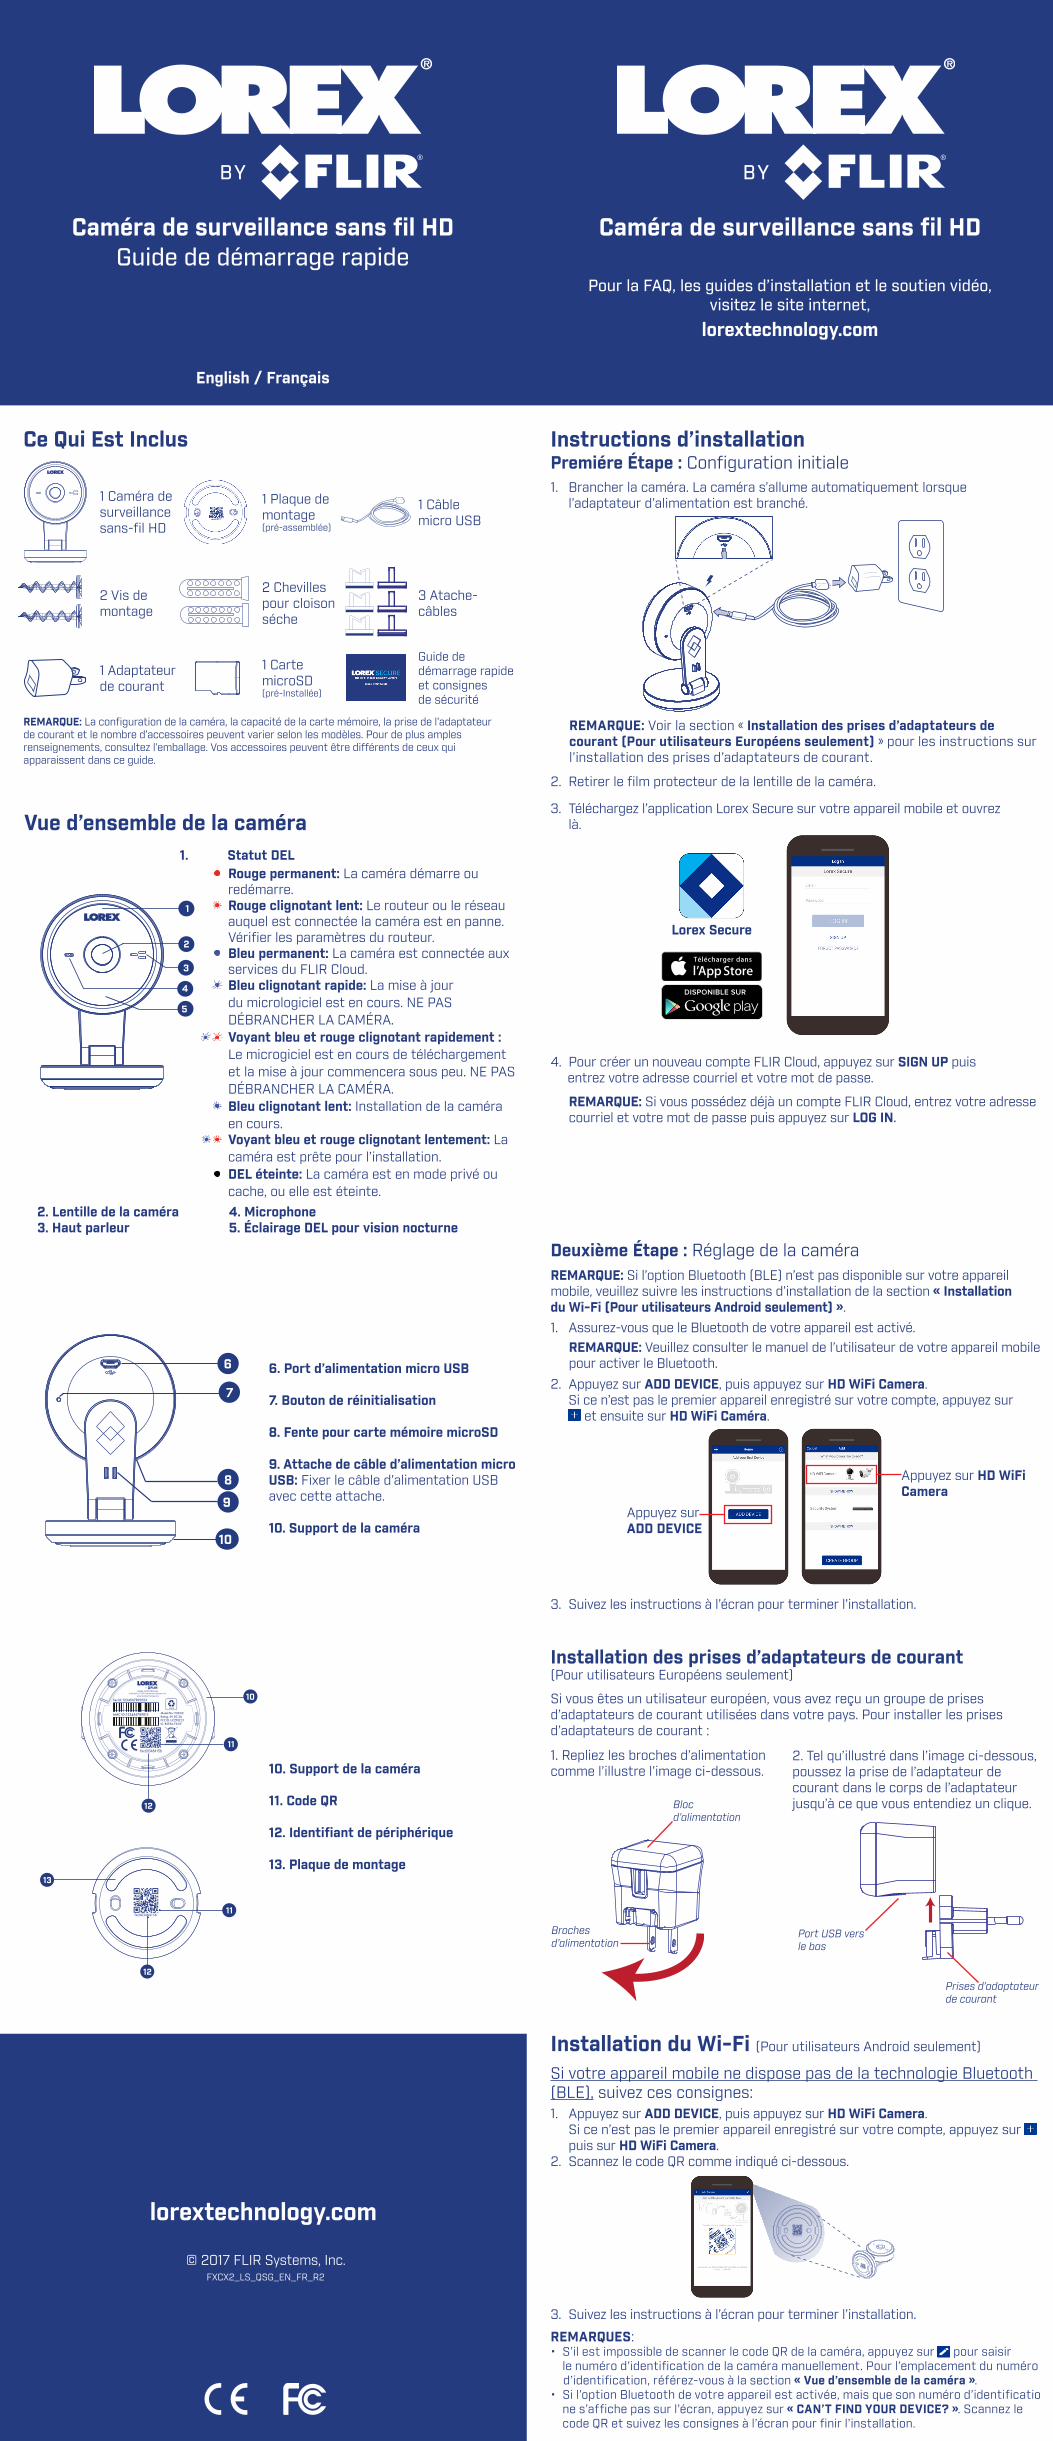
Si votre appareil mobile ne dispose pas de la technologie Bluetooth (BLE), suivez ces consignes:1. Appuyez sur ADD DEVICE, puis appuyez sur HD WiFi Camera. Si ce n’est pas le premier appareil enregistré sur votre compte, appuyez sur puis sur HD WiFi Camera.2. Scannez le code QR comme indiqué ci-dessous.
REMARQUE: Si vous possédez déjà un compte FLIR Cloud, entrez votre adresse courriel et votre mot de passe puis appuyez sur LOG IN.
REMARQUE: Si l’option Bluetooth (BLE) n’est pas disponible sur votre appareil mobile, veuillez suivre les instructions d’installation de la section « Installation du Wi-Fi (Pour utilisateurs Android seulement) ».
REMARQUE: Veuillez consulter le manuel de l’utilisateur de votre appareil mobile pour activer le Bluetooth.
1. Assurez-vous que le Bluetooth de votre appareil est activé.
Lorex Secure
Appuyez sur ADD DEVICE
Appuyez sur HD WiFi Camera
Installation des prises d’adaptateurs de courant (Pour utilisateurs Européens seulement)
1. Repliez les broches d’alimentation comme l’illustre l’image ci-dessous.
2. Tel qu’illustré dans l’image ci-dessous, poussez la prise de l’adaptateur de courant dans le corps de l’adaptateur jusqu’à ce que vous entendiez un clique.Bloc
d’alimentation
Broches d’alimentation
Prises d’adaptateur de courant
Si vous êtes un utilisateur européen, vous avez reçu un groupe de prises d’adaptateurs de courant utilisées dans votre pays. Pour installer les prises d’adaptateurs de courant :
Port USB vers le bas
REMARQUE: Voir la section « Installation des prises d’adaptateurs de courant (Pour utilisateurs Européens seulement) » pour les instructions sur l’installation des prises d’adaptateurs de courant.
2. Appuyez sur ADD DEVICE, puis appuyez sur HD WiFi Camera. Si ce n’est pas le premier appareil enregistré sur votre compte, appuyez sur et ensuite sur HD WiFi Caméra.
3. Suivez les instructions à l’écran pour terminer l’installation.
3. Suivez les instructions à l’écran pour terminer l’installation.
REMARQUES: • S’il est impossible de scanner le code QR de la caméra, appuyez sur pour saisir le numéro d’identification de la caméra manuellement. Pour l’emplacement du numéro d’identification, référez-vous à la section « Vue d’ensemble de la caméra ».• Si l’option Bluetooth de votre appareil est activée, mais que son numéro d’identificatio ne s’affiche pas sur l’écran, appuyez sur « CAN’T FIND YOUR DEVICE? ». Scannez le code QR et suivez les consignes à l’écran pour finir l’installation.
6
7
8
10
9
fxc003484156
12
11
13
Caméra de surveillance sans fil HDGuide de démarrage rapide
English / Français
Ce Qui Est Inclus
© 2017 FLIR Systems, Inc.FXCX2_LS_QSG_EN_FR_R2
lorextechnology.com
6. Port d’alimentation micro USB
7. Bouton de réinitialisation
8. Fente pour carte mémoire microSD
9. Attache de câble d’alimentation micro USB: Fixer le câble d’alimentation USB avec cette attache.
10. Support de la caméra
10. Support de la caméra
11. Code QR
12. Identifiant de périphérique
13. Plaque de montage
Vue d’ensemble de la caméra
1 Caméra de surveillancesans-fil HD
1 Câble micro USB
1 Carte microSD (pré-Installée)
1 Adaptateur de courant
1 Plaque de montage(pré-assemblée)
Guide de démarrage rapide et consignes de sécurité
2 Vis de montage
2 Chevilles pour cloison séche
3 Atache-câbles
REMARQUE: La configuration de la caméra, la capacité de la carte mémoire, la prise de l’adaptateur de courant et le nombre d’accessoires peuvent varier selon les modèles. Pour de plus amples renseignements, consultez l’emballage. Vos accessoires peuvent être différents de ceux qui apparaissent dans ce guide.
2. Lentille de la caméra 4. Microphone 3. Haut parleur 5. Éclairage DEL pour vision nocturne
1. Statut DELRouge permanent: La caméra démarre ou redémarre.Rouge clignotant lent: Le routeur ou le réseau auquel est connectée la caméra est en panne. Vérifier les paramètres du routeur. Bleu permanent: La caméra est connectée aux services du FLIR Cloud.Bleu clignotant rapide: La mise à jour du micrologiciel est en cours. NE PAS DÉBRANCHER LA CAMÉRA. Voyant bleu et rouge clignotant rapidement : Le microgiciel est en cours de téléchargement et la mise à jour commencera sous peu. NE PAS DÉBRANCHER LA CAMÉRA.Bleu clignotant lent: Installation de la caméra en cours.Voyant bleu et rouge clignotant lentement: La caméra est prête pour l’installation.DEL éteinte: La caméra est en mode privé ou cache, ou elle est éteinte.
2
5
3
4
1
10
11
12
Add Camera
Scan the QR code using your mobile device
Center the QR code inside the frame
Make sure that your camera is turned onand has a working internet connection
Se rial: 12345 6789 012
fxc003484156
fxc003
484156
fxc003484156