hcplc.org...solar system mobile balloon rocket experiment bubble science extra credit adventures...
TRANSCRIPT

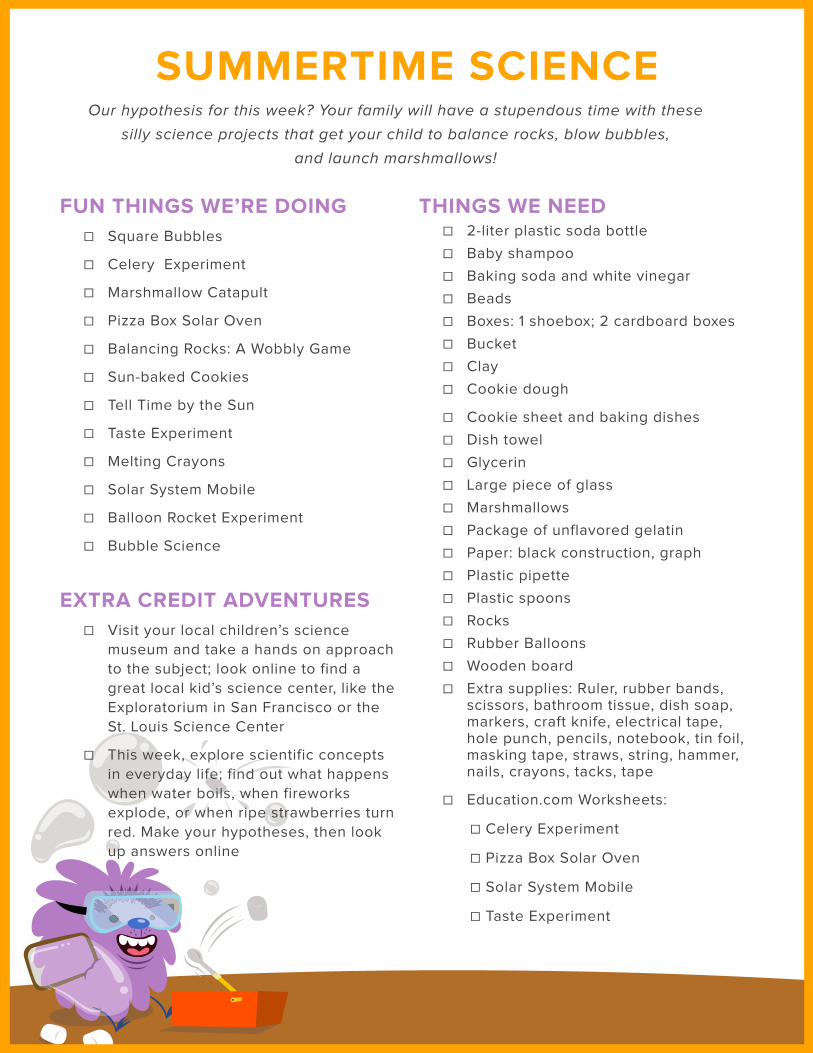
Summertime Science
Our hypothesis for this week? That your family will have a stupendous time with these silly science projectsthat get your child to balance rocks, blow bubbles, and launch marshmallows!

Table of ContentsSummertime Science
Summertime Science ChecklistPotato Cannon
Is it Possible to Blow a Square Bubble?Celery Experiment
Ready, Aim, Marshmallows!Pizza Box Solar Oven
Balancing Rocks: A Wobbly GameCan You Cook Using Only Sunlight?
How to Tell Time by the SunTaste ExperimentMelting Crayons
Solar System MobileBalloon Rocket Experiment
Bubble Science

Summertime Science
Our hypothesis for this week? That your family will have a stupendous time with these sillyscience projects that get your child to balance rocks, blow bubbles, and launchmarshmallows!
Return to Summer Learning Adventures.
SUMMERTIME SCIENCEOur hypothesis for this week? Your family will have a stupendous time with these
silly science projects that get your child to balance rocks, blow bubbles,
and launch marshmallows!
FUN THINGS WE’RE DOING☐ Square Bubbles
☐ Celery Experiment
☐ Marshmallow Catapult
☐ Pizza Box Solar Oven
☐ Balancing Rocks: A Wobbly Game
☐ Sun-baked Cookies
☐ Tell Time by the Sun
☐ Taste Experiment
☐ Melting Crayons
☐ Solar System Mobile
☐ Balloon Rocket Experiment
☐ Bubble Science
EXTRA CREDIT ADVENTURES ☐ Visit your local children’s science
museum and take a hands on approach
to the subject; look online to find a
great local kid’s science center, like the
Exploratorium in San Francisco or the
St. Louis Science Center
☐ This week, explore scientific concepts
in everyday life; find out what happens
when water boils, when fireworks
explode, or when ripe strawberries turn
red. Make your hypotheses, then look
up answers online
THINGS WE NEED☐ 2-liter plastic soda bottle
☐ Baby shampoo
☐ Baking soda and white vinegar
☐ Beads
☐ Boxes: 1 shoebox; 2 cardboard boxes
☐ Bucket
☐ Clay
☐ Cookie dough
☐ Cookie sheet and baking dishes
☐ Dish towel
☐ Glycerin
☐ Large piece of glass
☐ Marshmallows
☐ Package of unflavored gelatin
☐ Paper: black construction, graph
☐ Plastic pipette
☐ Plastic spoons
☐ Rocks
☐ Rubber Balloons
☐ Wooden board
☐ Extra supplies: Ruler, rubber bands, scissors, bathroom tissue, dish soap, markers, craft knife, electrical tape, hole punch, pencils, notebook, tin foil, masking tape, straws, string, hammer, nails, crayons, tacks, tape
☐ Education.com Worksheets:
☐ Celery Experiment
☐ Pizza Box Solar Oven
☐ Solar System Mobile
☐ Taste Experiment

Potato Cannon
Your child will love playing with his food to make a working potato cannon. This explosiveexperiment demonstrates the basic principles of Boyle's Law, which states, "Underconstant temperature, the volume of gas is inversely proportional to the total amount ofpressure applied." In the case of the popping potato, the air in the pipe is the gas, lodgedbetween two potato plugs. By shoving a broomstick into the pipe of the potato cannon,one plug pushes towards the other reducing the volume of gas, while increasing pressure.The pressure in the potato cannon is what sends the potato plug flying into the yard!
What You Need:
Safety goggles for everyone involved2 potatoesPVC pipe, 2–3 feet long with a 1-inch diameterDowel or similar object, diameter narrower than the pipeClear outdoor space
What You Do:
1. Have your child lodge a potato into both ends of the pipe to plug it. She can set apotato on the ground and push the pipe down on it. Repeat for the opposite side.
2. Tell everyone to put on their goggles!3. Have her hold the pipe in one hand and point it away from people, or anything
fragile.4. Help her to position the broomstick at the end of the pipe closest to her, barely touching the potato plug.5. With your help, have her push the broomstick slowly through the pipe, pushing the first potato towards the second. Have her stop about a
third of the way down and pull the broomstick out of the pipe.6. Get ready to shoot! Have her quickly ram the broomstick into the pipe. The potato at the end of the pipe will shoot out and should travel a
great distance.
Helpful Tip: It's safer to perform this experiment outside in a wide, open space.

Is it Possible to Blow a Square Bubble?
You can huff and puff, but no matter how many times you blow a bubble, it always endsup round. This is because the molecules in the bubble mixture pull on each other, like agroup of friends holding hands in a circle. The pulling means that you end up with a shapethat has the smallest amount of surface area—a sphere.
Is there a way you can trick the natural forces that make bubbles round into making abubble that's square? Let's find out!
Problem
Is it possible to blow a square bubble?
Materials
1/4 cup liquid dish soap2 tablespoons glycerin4 cups waterBucket6 drinking strawsClayPlastic pipette
Procedure
1. Before you start, think about the liquid bubbles you always blow: What shapes are they? Think about the stick you dip into bubble solution toblow the bubbles. What shape is it? Write down any notes in your notebook.
2. Using your notes, guess if your attempts to blow a square-shaped bubble will work. Write this guess—called a hypothesis—in yournotebook.
3. Fill the bucket with the liquid dish soap, glycerin and water, mixing the solution around gently with your hand.4. Cut all of your straws in half. You should now have 12 mini-straws.5. Assemble 4 pieces of straw into a square shape. Use a pinch of clay to keep the straws in place.6. Repeat this with 4 additional pieces of straw so that you have two squares.7. Use the 4 remaining pieces of straw and clay to join the two squares together; now you have a cube!8. Cut the bulb end off the plastic pipette; this will be your bubble blower. If you don't have a pipette, use another plastic straw instead.9. Head outside to start your bubble testing!
10. Carefully dip the straw cube into the container of bubble solution. Be sure the straw cube is completely covered with the bubble solution.11. Gently lift the straw cube out of the bubble solution. Each part of the cube should now have a film of bubble solution inside of it.12. Dip the pipette into the bubble solution.13. Blow into the small end of the pipette to make a bubble come out of the larger end.14. Gently place the bubble into the middle of your cube. This bubble will end up in the center of the cube.15. Write or draw your observations (the things you see) in your notebook.
Results
The bubble you blew and placed into the cube should have centered itself. The "side" bubbles in the straw cube should push against this "center"bubble, forcing it into a square shape. If you pop the side bubbles, the bubble in the middle will become round again.
Why
Bubbles are round because a sphere is the shape that is the most stable for them—a sphere is more stable than a square or a triangle or any othershape. But when a bubble is surrounded by other bubbles, these "side" bubbles push against the "center" bubble, squishing and squashing until ithas corners and sides—like a cube! That's what happened to your bubble.
Now that you've made a cube-shaped bubble, keep the science going by trying your hand at different shapes. If you make a pyramid out of straws,can you end up with a triangular bubble in the middle? Can you make two or more bubble shapes by connecting straw cubes? How about if youdon't cut the straws in half, and use whole straws to make a really huge straw cube? Do you end up with a really huge square bubble, or just a bigmess? Guessing and testing is a big part of the scientific method, so write down what you think will happen and head back outside for moreexperiments.

This is your bleed line.
More worksheets at www.education.com/worksheetsCopyright © 2010-2011 by Education.com2012-2013
The water has been absorbed into the celery stalk, tinting the stem and leaves red.
Celery Stick ScienceObservation Sheet
Write your thoughts and make a drawing about this experiment.
Conclusion
Draw a picture and describe what you see.
Before
What’s Happening?
Draw a picture and describe what you see.
After
Please go to: http://www.education.com/activity/article/celery_stick_science_first/ and download the activity first.
?
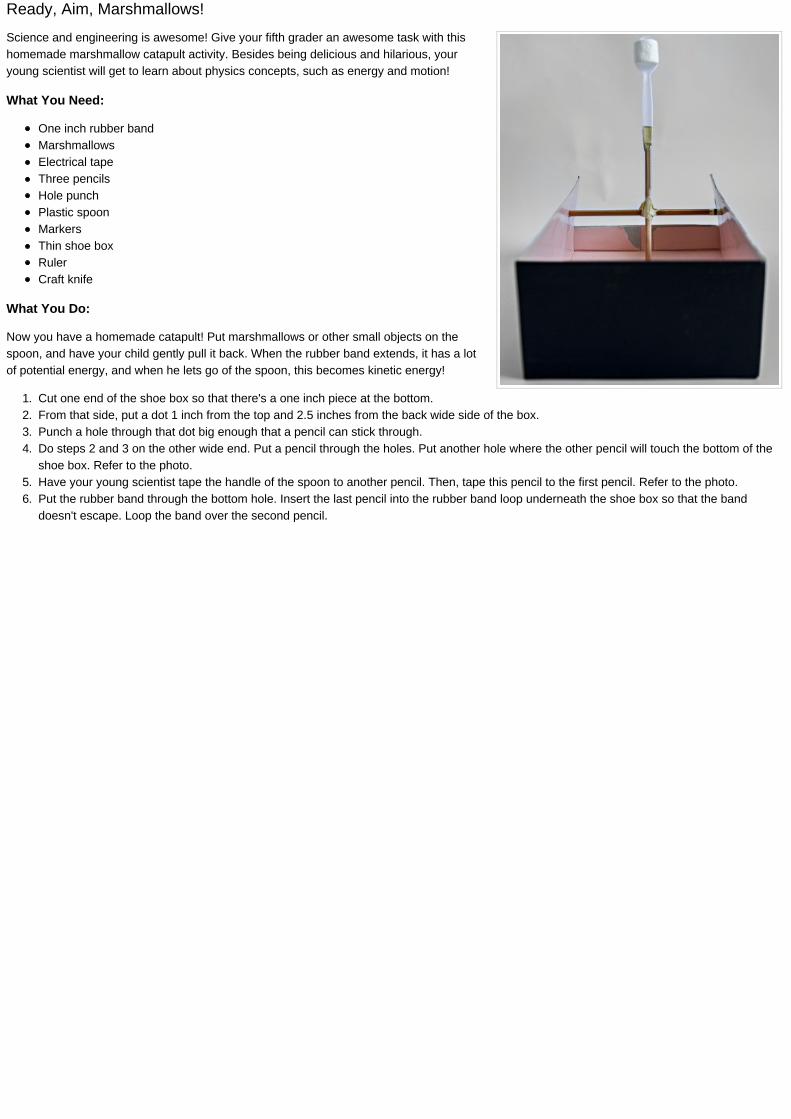
Ready, Aim, Marshmallows!
Science and engineering is awesome! Give your fifth grader an awesome task with thishomemade marshmallow catapult activity. Besides being delicious and hilarious, youryoung scientist will get to learn about physics concepts, such as energy and motion!
What You Need:
One inch rubber bandMarshmallowsElectrical tapeThree pencilsHole punchPlastic spoonMarkersThin shoe boxRulerCraft knife
What You Do:
Now you have a homemade catapult! Put marshmallows or other small objects on thespoon, and have your child gently pull it back. When the rubber band extends, it has a lotof potential energy, and when he lets go of the spoon, this becomes kinetic energy!
1. Cut one end of the shoe box so that there's a one inch piece at the bottom.2. From that side, put a dot 1 inch from the top and 2.5 inches from the back wide side of the box.3. Punch a hole through that dot big enough that a pencil can stick through.4. Do steps 2 and 3 on the other wide end. Put a pencil through the holes. Put another hole where the other pencil will touch the bottom of the
shoe box. Refer to the photo.5. Have your young scientist tape the handle of the spoon to another pencil. Then, tape this pencil to the first pencil. Refer to the photo.6. Put the rubber band through the bottom hole. Insert the last pencil into the rubber band loop underneath the shoe box so that the band
doesn't escape. Loop the band over the second pencil.

4
In this fun project, you will harness the power and heat of the sun to cook a cheese quesadilla!
MAKE A SOLAR OVEN
To complete this project, you will need the following materials, as well as an adult to assist you:
EMPTY PIZZA BOX MARKER RULER SCISSORS
GLUE STICK BLACK CONSTRUCTION
PAPER
ALUMINUM FOIL
CRAFT KNIFEto be used by an adult
BAMBOO SKEWER, STICK OR DOWEL
CLEAR PLASTIC WRAP
FLOUR TORTILLA
CHEESE

4
follow these instructions to create your oven and cook your quesadilla.
1
2
3
4
5
6
7
8
9
10
11
12
13
14
Using your ruler and a pencil, measure a window with a 1 inch margin on each side of the top of the box.
Have an adult cut three sides with a craft knife, leaving one edge connected.
Carefully pry open the flap. This will become your sun window. Fold the window upalong the uncut line.
Glue the aluminum foil to the inside of your window, smoothing out as many wrinkles as possible.
Line the rest of the box with foil, inside and out.
Tape the black piece of construction paper on the inside bottom of the box, on top of the foil.
Glue the plastic wrap to the underside of the lid. Try to make the seal as airtight as possible.
Put the prepared tortilla (with foil underneath) into your oven and place outside in the sun.
Close the box.
Cook! Check your food every 10 minutes. This could take anywhere from 20 minutes to 2 hours depending on how sunny it is outside.
When the cheese is melted, fold the tortilla in half and enjoy!
Place a flour tortilla on a piece of aluminum foil and cover half of the torilla with cheese.
Use a bamboo skewer, stick or dowel to prop the flap open.
Choose an angle that reflects the most light into the solar oven.

Balancing Rocks: A Wobbly Game
Did you know you can make a game out of a science experiment? Play with balance andsimple engineering as you hurry to create a sturdy rock tower. It's you versus gravity (anda small fake earthquake or two), and only your skills with balancing rocks can deliver thewin. What do you say -- are you game?
Problem:
What makes a balanced rock tower?
Materials:
Rocks (roughly the same size)NotebookPencilSmall tableBubble level
Procedure:
1. Scout out the perfect work station. You want to find a flat, open space -- preferably abackyard or a patio.
2. Make sure the ground is flat by placing the bubble level on the ground. Are thebubbles in the middle of each liquid window? If so, then you're all set to go! If not,keep looking. This project requires a flat surface.
3. Set up your table on the ground.4. Place your rocks on the table.5. Think about the kinds of towers you want to try out. Do you want a narrow tower or one that is wide and squat? Can you think of a special
building or a skyscraper that you would want your rock tower to look like?6. What do you think will make the most balanced rock tower? Write your guess, sometimes called a hypothesis, in your notebook.7. Build your first tower. Try experimenting with seeing how sturdy and how high you can make a tower that simply stacks one rock on top of the
one beneath it.8. Once you find a combination of rocks that seem to work, it's time for the earthquake! Set your timer and gently start shaking the table. How
long does it take before the tower tumbles?9. Record the time in your notebook.
10. Build your next tower. This time try forming a bigger foundation, or the lowest level of your tower. Group three or four rocks together and stopbuilding from there.
11. Time your fake shaking of the table again and record the results in your notebook.12. Make at least three more towers. Keep creating your fake earthquakes and make sure your write down all the times. Which towers did the
best?
Results:
Rock towers that had sturdy foundations should have stayed up longer than towers balanced on only one rock. Generally, the bigger yourfoundation, the better your rock tower should have been.
Why?
The reason some of your towers did better than others probably had a lot to do with points of contact, or the areas on an object that touch anotherobject. You can use your hands to understand points of contact. Press your palms together. What areas on each hand are touching? Probablysome of the first points of contact you identified were your fingers. Now relate this to your rocks: the towers with bigger foundations had more pointsof contact. Lots of points help buildings become sturdier, and sturdy buildings don't fall (unless you shook your table really hard).
What other wobbly games can you experiment with? Try making a rock bridge or a rock house that can ride out a fake earthquake. Can you findother things that affect balancing besides points of contact? What about the size of the rocks or the number of rocks you use? Keep guessing,testing and balancing rocks! Real scientists don't just do one experiment and stop -- they keep experimenting and learning every day.

Can You Cook Using Only Sunlight?
Grade Level: 7th to 11th; Type: Meteorology, Physics
Objective:
Bake cookies with an oven that collects sunlight and traps heat.
Research Questions:
How can I cook using just sunlight?
Make an oven that collects sunlight and traps the shorter wavelengths (heat!) inside the same way greenhouse gasesin our atmosphere trap them, and bake some cookies!
Materials:
Two cardboard boxes: one must fit completely inside the other with about an inch or two to spare, and the outer one must have flaps (or youcan create and attach some)Roll of aluminum foilMasking tapeFour 12-inch pieces of stringEight beads or pieces of macaroniPencilPiece of black construction paperScissorsScrunched-up shredded paperPiece of glass, large enough to completely cover the smaller box but small enough to fit inside the larger oneCooking thermometerSmall cookie sheet or pie tin (must fit inside smaller box; make your own with some of the foil if necessary)Prepared cookie dough (commercial or homemade) that bakes at 350° or under warm, sunny day
Experimental Procedure:
1. Cover the insides of the flaps of the larger box with aluminum foil, with the shiny side facing out; tape the foil in place. Use the pencil to pokesmall holes in the edges of the flaps.
2. Tie a bead to one end of one of the pieces of string, string it through one of the holes in one of the flaps so that the bead ends up on theoutside of the flap, string it through the hole in the next flap over from the inner side to the outer, and tie another bead to this end of the string.Repeat so that all four flaps are connected together with the strings.
3. Line the entire inside of the smaller box with foil, shiny side out, taping it in place.4. Cut the piece of construction paper so that it fits neatly inside the smaller box; tape it inside the bottom of the box.5. Put enough shredded paper inside the larger box so that when you rest the smaller box on it, the opening is just barely below the opening of
the big box.6. Center the little box and pack the space between the walls of the big box and the walls of the little box with more shredded paper.7. Put the cooking thermometer and some of the cookies on the baking sheet (you may need to grease it first: check the instructions/recipe) and
set it inside the inner box; cover the inner box with the pane of glass. Your solar oven is ready to go!8. Take the oven outside and set it in a bright, sunny spot where it won’t be disturbed. Turn it so that the sun shines directly into it; if the sun
isn’t pretty close to directly overhead, you might want to put something under one side of the box to tip it to face the sun. Use the strings toadjust the flaps so that as much sunlight as possible is reflected into the inside of the oven.
9. Now you wait. I hope you brought a good book! Depending on the time of day and how warm it is outside, you may need to turn the oven oreven move it to a new spot so that it gets as much sunlight in it as possible.
10. Keep an eye on the cooking thermometer. You’ll notice that it gets much hotter inside the oven than it is outside. That’s partly because thealuminum foil is focusing the solar radiation, and partly because the glass is acting like a layer of greenhouse gases: like them, it’s clear, butsome of the shorter wavelengths will bounce off of it and tend to stay inside the oven, making things hotter and hotter inside. It may get as hotas 350° Fahrenheit in there!
11. When the cookies look like they’re about done (they’ll probably be browning around the edges and won’t be shiny anymore), or when thethermometer reads a temperature higher than they’re supposed to cook at, whichever comes first, take the glass off and let the inside of theoven cool for a few minutes. When the cookie sheet isn’t too hot to touch anymore, lift it out and try a cookie!
Terms/Concepts: solar radiation, greenhouse gases

How to Tell Time by the Sun
Have you ever noticed how the Sun moves across the sky during the day? It rises in theEast and reaches its highest point in the sky around lunchtime. Then, it descends, settingin the West. Although it is hard to believe, it is actually we on Earth who are travelling—not the Sun!
The Sun sits in the middle of our solar system. Our Earth revolves, or orbits, around thesun. That means the Earth orbits around the Sun. It takes one full year for the Earth to goaround the Sun once. The Earth also rotates, or spins around. It takes one full day for theEarth to rotate around once. The parts of the Earth facing the sun experience day, and theparts of the Earth facing away from the Sun experience night. It’s because of this rotationthat the Sun appears to travel across the sky.
People didn’t always have watches or (or cell phones) to tell what time it was. Thousandsof years ago, early civilizations invented sundials, devices which use the apparentmovement of the Sun to determine how much time has passed. In this activity, you willconstruct a sundial and revisit it throughout the year to see how the revolution of the Earthaffects what time the sundial shows.
Problem: Why does a sundial’s position change throughout the year?
Materials
A long sunny, summer day to start your project on (a day in late August would stillwork)Wooden board, at least 12 inches squareHammerNailScissorsPlastic strawWatchRulerTacksPencilPermanent marker
Procedure
1. Hammer a nail ¼ inch into the center of the board. Why do you think it’s a good idea to make a sundial out of wood and nails rather than apaper plate?
2. Cut the straw to a length of six inches.3. Place your straw over the nail.4. In the morning, find a bright, level space outside and set the board on the ground at the top of the hour. Make sure no other shadows (from
things like trees) will cover your sundial later in the day. 5. Observe the end of the nail’s shadow. Use the pencil to mark the shadow’s end, and gently push a tack into this part of the board to mark this
location.6. Write the hour next to the mark indicating the end of the shadow.7. Make sure the sundial will not be disturbed the rest of the day. If it gets moved, your measurements will become inaccurate!8. Visit the sundial again at the top of the next hour, again placing a tack and noting the hour with a pencil.9. Continue visiting the sundial every hour until sundown, placing a tack and marking.
10. If your sundial was not disturbed and you are happy with your marks, replace the pencil numbers with numbers written in permanent marker.11. Get to know your sundial the next couple days. In what conditions can’t you use it?12. Use your sundial on several days throughout the year (make sure your sundial faces the same direction each time you use it! For best
results, never move your sun dial). This table includes some suggestions, rather than specific dates, since you can only use your sundial onsunny days. In the observations column, note how the shadows and hours varied from the previous readings.
Date Observations
Early October
Mid December
Early February

Late March
Mid May
Results
Your results will vary depending on where you live, and particularly on your location’s latitude (if you live in the Southern hemisphere, your resultsover the months will be the opposite what we describe next)! The shadow of the nail will move in a semi-circular pattern throughout the course ofthe day. The height of the nail’s shadow will be longest in the early and late part of the day, and shortest in the middle of the day. As you observethe sundial over the course of the school year, the nail’s shadow will get longer until December, and the sun might set before you can completesome readings! If your state observes Daylight Saving Time, your sundial will be an hour off during the winter. As spring approaches, the shadowson your sundial will shorten, and your results should begin to resemble your observations in August.
Why?
You made your sundial out of wood and a nail to ensure that the wind wouldn’t blow it over and make your readings inaccurate. You can only use asundial if the sun is shining.
Your sundial works as a clock because the Earth rotates. As the Earth spins, the Sun seems to move across the sky. When the sun appears overthe horizon at dawn, its light strikes the nail from the side, making a long shadow. As your part of the Earth continues to rotate, the Sun gets higherin the sky. The Sun’s light strikes the nail from above, making shorter shadows from 11 to 1. As the part of the Earth where you live rotates awayfrom the Sun, it seems to sink in the sky, and the nail shadows again get longer.
When you looked at the sundial in December, the nail shadows were longer and the day was shorter because the Earth had reached a certainposition in its path around the Sun. In this position, the Northern hemisphere is tilted away from the sun, making its light less direct. Because youturned the clocks back at the end of Daylight Saving Time in late October, your sundial was ahead by an hour for the winter: You created thesundial using a clock on daylight savings in August. In spring, when clocks are returned to daylight savings, your sundial will again match yourwatch. By May, the day will be longer and the nail’s shadow shorter, because the Earth continued to revolve around the Sun, and the Northernhemisphere returns to a position where the Sun’s light is more direct.
Going Further
Research what ancient sundials looked like. You might also investigate how different civilizations determined how to tell time by the sun. TheMayan pyramid at Chichen Itza is particularly interesting.
Copyright © 2012-2013 by Education.com More worksheets at www.education.com/worksheetsCreated by:
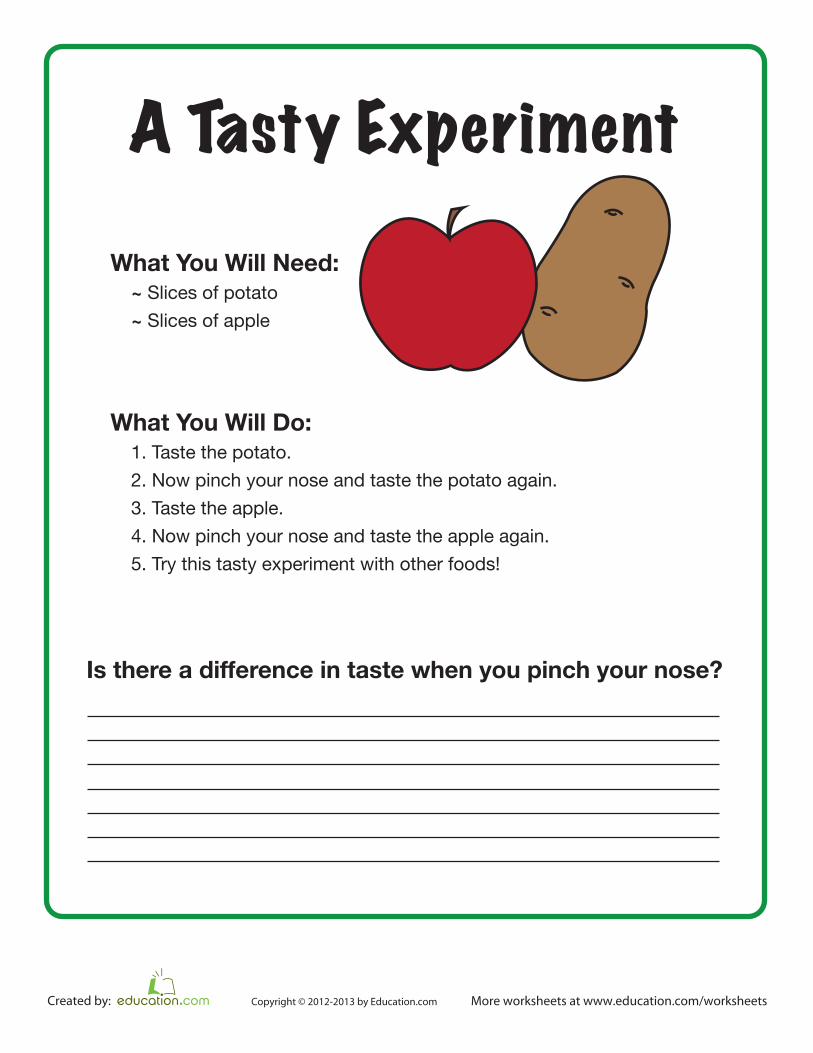
A Tasty ExperimentWhat You Will Need: ~ Slices of potato ~ Slices of apple
What You Will Do: 1. Taste the potato. 2. Now pinch your nose and taste the potato again. 3. Taste the apple. 4. Now pinch your nose and taste the apple again. 5. Try this tasty experiment with other foods!
Is there a difference in taste when you pinch your nose?

Melting Crayons
If you think you've outgrown crayons, you're probably wrong. The beloved art tools aren'tjust good for creating colorful masterpieces -- they're also great for science. Using anoven and some old crayons, you can actually test how color affects melting times. It's asimple and creative project that also ends with a waxy, splattered piece of art!
Problem:
What will melt faster, a black crayon or a yellow crayon?
Materials:
Black crayonsYellow crayonsCookie sheetWax paperTimerPencilNotebookAdultOvenOven mitt
Procedure:
1. Have an adult help you preheat the oven to 230 degrees.2. Lay a wax paper over the cookie sheet.3. Dump your crayons on the cookie sheet. You should have at least three black crayons and three yellow crayons.4. Separate the colors so that none of the black crayons are touching the yellow crayons.5. When then oven is ready, place the cookie sheet on the center rack.6. Start your timer.7. While you wait, think about the question of this project: do you think the black or the yellow crayon will melt the fastest? Or, do you think both
colors will start melting at the same time?8. Write down your best guess, or hypothesis, in your notebook.9. Keep checking the crayons to see which crayons are melting the fastest.
10. Record in your notebook the time at which each color began to melt.11. When every color group has melted, have an adult help you use an oven mitt to remove the cookie sheet from the oven. (Don't be too quick
to throw away the wax paper and crayon puddles! Once the crayon wax hardens, you can display it as nifty-looking evidence of your project.)12. Review your notes. Did all the colors melt at the same time? Was your hypothesis correct?
Results:
The black crayons should have melted much sooner than the yellow crayons.
Why?
Color makes a big difference. The pigments, which give each crayon its color, don't react the same way to heat. Black crayons melted the fasterbecause of it has dark pigments while yellow crayons melt slowly because of the light pigments.
Do you think you can only see these pigments at work with black and yellow crayons? Try this same experiment with the other colors in yourcrayon box! Can you predict the order that the colors of the rainbow -- red, orange, yellow, green, blue, indigo and violet -- will melt in?

More worksheets at www.education.com/worksheetsCopyright © 2010-2011 by Education.com
Make a Solar System Mobile
Draw a cross down the center of a round piece of cardboard.Then, using a compass, draw 8 circles, each bigger than the last. These will be the orbits of your planets.
With a hole punch or a large nail, make holes in the middle of the cardboard for the sun. Then punch a hole on each orbit, spacing them out. Attach the sun in the middle, and each planet on its orbit in this order, from closest to the sun to farthest: Mercury, Venus, Earth, Mars, Jupiter, Saturn, Uranus and Neptune.
To hang your solar system mobile, make four holes on the edge of the cardboard circle and tie on four pieces of string, then tie them together.
Print out the sun and 8 planets on the following pages. Cut out each planet. (If you want, print out two of each planet and glue them together so that each planet has two sides.) Attach a piece of string to each with a piece of tape.
1.
2.
3.
4.
You will need:• Stringoryarn• Tapeorglue• Scissors• Holepunchorlargenail• Cardboard circle (one from
a pizza works great)
© 2007 - 2018 Education.comFind worksheets, games, lessons & more at education.com/resources
© 2007 - 2020 Education.comFind worksheets, games, lessons & more at education.com/resources

More worksheets at www.education.com/worksheetsCopyright © 2010-2011 by Education.com
The SunThe sun is much too big to show in accurate proportion to the planets,
so we will just make it the biggest. Without the warmth and light of the sun, nothing could survive on our planet.
✁
Make a Solar System Mobile
© 2007 - 2018 Education.comFind worksheets, games, lessons & more at education.com/resources
© 2007 - 2020 Education.comFind worksheets, games, lessons & more at education.com/resources

More worksheets at www.education.com/worksheetsCopyright © 2010-2011 by Education.com
MercuryMercury is the closest planet to the
sun. The surface of this barren planet is covered with craters. These craters
have been created by thousands of years of being hit with asteroids and comets.
There is no atmosphere on Mercury.
VenusVenus is second closest to the sun. It is the hottest planet in the solar system. It is the brightest of all the planets,
and is also known as the evening star and the morning star.
✁
✁
Make a Solar System Mobile
© 2007 - 2018 Education.comFind worksheets, games, lessons & more at education.com/resources
© 2007 - 2020 Education.comFind worksheets, games, lessons & more at education.com/resources

More worksheets at www.education.com/worksheetsCopyright © 2010-2011 by Education.com
MarsMars has three moons, and has the nickname “The Red Planet.” Mars is
the only planet whose surface can be seen in detail from the Earth. Mars is the fourth closest planet to the sun.
EarthThe Earth is the third planet from the sun,andthefifthlargestoftheeight
planets in our solar system. It was formed 4.5 billion years ago, and life
appeared on its surface within 1 billion years. Earth is home to millions
of species, including humans — and that means you!
✁
✁
Make a Solar System Mobile
© 2007 - 2018 Education.comFind worksheets, games, lessons & more at education.com/resources
© 2007 - 2020 Education.comFind worksheets, games, lessons & more at education.com/resources

More worksheets at www.education.com/worksheetsCopyright © 2010-2011 by Education.com
JupiterJupiteristhelargestplanetinthesolarsystem,andthefifthclosest
planet to our sun. If you weigh 100 pounds on Earth, you would weigh 264 pounds on Jupiter. Jupiter rotates faster than any other planet.
It rotates so quickly that the days are only 10 hours long. The great red spot on Jupiter is a storm that has been going on for over 300 years.
✁
Make a Solar System Mobile
© 2007 - 2018 Education.comFind worksheets, games, lessons & more at education.com/resources
© 2007 - 2020 Education.comFind worksheets, games, lessons & more at education.com/resources

More worksheets at www.education.com/worksheetsCopyright © 2010-2011 by Education.com
TOP
Make a Solar System MobileSaturn
Saturn is the sixth planet from the sun and the second largest in the solar system, Saturn has over 60 moons, and is surrounded
by a beautiful system of rings.
© 2007 - 2018 Education.comFind worksheets, games, lessons & more at education.com/resources
© 2007 - 2020 Education.comFind worksheets, games, lessons & more at education.com/resources

More worksheets at www.education.com/worksheetsCopyright © 2010-2011 by Education.com
UranusUranus is the seventh planet from the sun. Because of the strange way it
spins, nights on some parts of Uranus can last for more than 40 years.Uranus is a very cold planet. It is made up of rock and ice and has a large
rocky core. It has the nickname “Ice Giant.” It is possible there are diamonds on the surface of this planet.
✁
Make a Solar System Mobile
© 2007 - 2018 Education.comFind worksheets, games, lessons & more at education.com/resources
© 2007 - 2020 Education.comFind worksheets, games, lessons & more at education.com/resources

More worksheets at www.education.com/worksheetsCopyright © 2010-2011 by Education.com
NeptuneNeptune is the eighth planet. It is the farthest planet from the sun.
It is the fourth largest planet. The interior of Neptune, like that of Uranus, is made mostly of ice and rock. A gas called methane causes Neptune to look blue.
✁
Make a Solar System Mobile
© 2007 - 2018 Education.comFind worksheets, games, lessons & more at education.com/resources
© 2007 - 2020 Education.comFind worksheets, games, lessons & more at education.com/resources

Balloon Rocket Experiment
You need to send a message to home from your tree house, but it’s too windy to send apaper airplane! Fortunately, you have a taut clothesline and a supply of balloons from lastweek’s birthday party. How can you make a balloon rocket, and how can you make ittravel as far as possible?
Problem:
How does the volume of air in a balloon affect the distance it travels?
Materials:
Rubber BalloonsBinder clipString or Thin RopeStrawsTapeCloth Tape MeasureTwo Posts (At least three feet tall and fifteen feet apart)PaperPencilGraph paperHelper
Procedure:
1. Tie the string or rope to one of the posts at the height of at least three feet. Leave the other end loose.2. Cut some straws into lengths that will fit on your balloon. One third of a straw is usually a good length.3. Inflate a balloon and seal the air inside by folding the neck over once and clamping it shut with a binder clip.4. Measure and record your balloon’s circumference by wrapping your tape measure around the balloon’s widest point. You might need your
helper to lend a hand:
4. Keeping the balloon’s opening shut, tape a straw to your inflated balloon. Make sure the straw and the nozzle of the balloon are parallel toeach other.
5. Thread the loose end of your string through the straw so that the neck of the balloon is facing towards you.6. Pull your string taut and line it up with your second post. Measure a point off the ground that’s the same height as the knot holding the other
end of the string to the first post. Be sure to hold the string at this height whenever you’re conducting a balloon launching trial. Why do youthink holding your end of the string at the same height is important?

7. Count down to zero, and let the rocket fly! Have your helper use the tape measure to measure and record the point on the string at which theballoon stopped.
8. Repeat steps 5-8 with two more balloons inflated to the same circumference as your first balloon.9. Average the distance traveled for all three trials.
10. Repeat steps 5-10 with three balloons inflated to a circumference 5cm greater than your first balloons were.11. Keep conducting trials using balloons inflated to progressively bigger circumferences. You can use a table like this as a guide:
20cm 25cm 30cm 35cm 40cm 45cm
Trial 1
Trial 2
Trial 3
Average
13. Using a sheet of graph paper, plot your trials on a line graph. The x axis should be circumference in centimeters. The y axis should bedistance travelled in feet.
14. Look at your graph. What is it telling you?
Results:
If you had a large enough difference between your smallest and largest circumferences, you should see the average distance traveled go up veryquickly as the balloon’s circumference increases.
Why?
All rockets work by shoving gas out of their nozzles really rapidly. This pushes the rest of the rocket in the other direction, as predicted by Newton’sThird Law: “For every action there is an equal and opposite reaction.” What this means is when you push on something, it pushes back on you justas hard. You might then think “Why don’t I fly all over the place when I push on something or throw a ball?” The main reason you don’t go flying likeyour ball is because you weigh more than it does. Even if the ball pushes back on you with the same amount of force that you apply to it, you’re awhole lot harder to move!
The bigger balloons move farther because they can push more air. While all of your balloons pushed air out at roughly the same speed, the biggerballoons had more “fuel,” allowing them to exert force for a longer period of time.
It’s not too hard to calculate the amount of air in each of your balloons. This equation will help:
Another cool thing is that the direction of the push matters quite a bit. Try taping your balloon so that its nozzle points to the side a little instead ofstraight along the straw. What happens? Can you match a bigger balloon and a smaller balloon together so that they don’t go anywhere when youlet them loose? Space stations use this principle to turn end over end, spin, or even move sideways. It’s the only way they can change whatdirection they’re pointing, because they don’t have anything else to push off of.


Bubble Science
There’s a fantastic place way up in Vancouver, Canada called Science World. And weheard a rumor that they had the thickest, bounciest bubbles around. So we asked themhow they did it. Here are their recipes for bubbles that not only blow up nice and big, butdo tricks and experiments! How do they do it? It’s not a secret, it’s science!
What You Need:
WaterBaby shampooPackage of unflavored gelatin (ex. Knox brand)Glycerin (you can get this at most pharmacies, all you need is a small bottle)Shallow baking dishesBubble-blowing materials, such as drinking straws, funnels, wire hangers etc.Food coloring (optional)Printable scenes for doing colored bubble art
What You Do:
1. Mix your bubble solution! You can just try out one at a time, or make them all atonce and compare the different solutions!
To make All Purpose Bubble Solution, gently mix one part water to one partbaby shampoo, and let the solution stand for a few hours. This solution isgreat for most bubble tricks, activities and experimentsTo make Bouncy Bubble Solution, Dissolve one package unflavored gelatin into one cup of hot water (just boiled). Then add 1.5 - 2ounces (50-70 ml) glycerin, and 8.5 ounces (250 ml) baby shampoo. Stir gently. The solution will gel as it cools. Reheat it carefully inthe microwave (about two minutes). Bubbles made with this solution will bounce off your clothes!To make Thick Bubble Solution, mix 3 partsbaby shampoo to 1 part water. When you make a bubble with this solution, try puffing at itto make a bubble inside a bubble.To make Colorful Bubble Solution, mix your choice of food coloring with the All Purpose Bubble Solution.
2. Once your solution is all mixed, put it in shallow baking dishes and get ready to experiment! Put a bunch of materials out so your child can trya variety of different tools, and make predictions about which will blow the best bubbles. Funnels, drinking straws, wire hangers bent intoloops, pipe cleaners, all of these things work well. For a humongous bubble blower, thread a piece of string through two drinking straws andtie the ends together. Challenge your child to come up with his own ideas, too.
3. To make an art project out of this experiment, cut out a large shape (flower, animal, etc.) out of a piece of white poster board, blow thecolored bubbles, and then “catch” them on the paper to make a neat picture. If you don't have time to cut up poster board, print out ourBubble Art Printables and use them to create your colored bubble art!
Once everyone's experimented with all the materials, have everyone grab his or her favorite blowing tool and see who can blow the weirdestbubble!