hat’s new in destiny 11 - follett...
TRANSCRIPT
W hat’s New in Destiny 11.0

© Copyright 2013 Follett Software Company. All Rights Reserved.
What’s New in Destiny 11.0
© Copyright 2013 Follett Software Company.
Contents
Destiny (All Products) ���������������������������������������������������������������������������������������� 3Push Access Levels ������������������������������������������������������������������������������������������������ 5Follett Destiny Mobile Application ���������������������������������������������������������������������������� 7Chrome Sounds/Focus Fix ������������������������������������������������������������������������������������ 11
Destiny Library Manager ���������������������������������������������������������������������������������� 13RDA Compatibility ������������������������������������������������������������������������������������������������� 15Dashboard ������������������������������������������������������������������������������������������������������������ 27Increased Visibility of Homeroom Information ������������������������������������������������������ 31Holds Enhancements ������������������������������������������������������������������������������������������� 35Added Label for Series ����������������������������������������������������������������������������������������� 41Material Type Enhancements ������������������������������������������������������������������������������� 43Missouri Report Update ���������������������������������������������������������������������������������������� 47New Icons for FollettShelf EBooks ����������������������������������������������������������������������� 51Option to Turn Off Direct Access to FollettShelf ��������������������������������������������������� 53FollettShelf EBook Search Limiter ������������������������������������������������������������������������� 55FollettShelf eBooks Hidden in FollettShelf are Hidden in Destiny ������������������������� 59Destiny Quest Mobile v1�6 ������������������������������������������������������������������������������������ 61
Digital Content Subscriptions ��������������������������������������������������������������������������� 65Push One Search Configuration to Other Sites ����������������������������������������������������� 67Multiple Sources and Formats in WebPath Express ��������������������������������������������� 69Reading Program Service Frequency Update Option ������������������������������������������� 71Cataloging Update for Fountas and Pinnell Guided Reading ������������������������������� 73
Destiny Textbook Manager ������������������������������������������������������������������������������ 75Price for Fine Calculations ������������������������������������������������������������������������������������ 77Increase Visibility of Homerooms �������������������������������������������������������������������������� 81
© Copyright 2013 Follett Software Company.
Destiny Asset Manager ������������������������������������������������������������������������������������ 83Documentation Enhancements ���������������������������������������������������������������������������� 85Historical Notes Searchable/Visible ��������������������������������������������������������������������� 89Option to Include Checked Out Items in Inventory ���������������������������������������������� 93Patron Statistics—Historical Report Enhancements ������������������������������������������� 95Price for Fine Calculations ���������������������������������������������������������������������������������� 97Update Assets—Individual, Batch, and Global Updates �������������������������������������� 99Update Patrons—Excuse / Delete Fines ����������������������������������������������������������� 105
What’s New in Destiny 11.0 1
© Copyright 2013 Follett Software Company.
Destiny 11�0 FeaturesWelcome to Destiny® 11.0. This new version incorporates many of your suggestions, and we’re confident you’ll find that the enhanced features and functions of Destiny 11.0 meet all your database needs. This document introduces you to the Destiny 11.0 features available in Destiny® Library Manager™, Destiny® Textbook Manager™, and Destiny® Asset Manager™. We know you’ll want to start using these enhancements right away.
All Destiny ProductsPush Access Levels: The Destiny Administrator can push all Access Levels to all or a selected group of sites.
Follett Destiny Mobile Application: The Follett Destiny Mobile app, version 1.5, provides more patron search capabilities, more patron information, and access to title details through all the library functions.
Chrome Sounds/Focus Fix: An issue with circulation sounds for Windows Chrome users is resolved.
Library ManagerRDA Compatibility: Library Manager is compatible with RDA (Resource Description and Access), the new cataloging standard.
Dashboard: The new Dashboard tab provides administrators with a graphical view of Library Manager reports.
Increased Visibility of Homeroom Information: Homeroom information has been added in several places, allowing a quick view of a student’s homeroom supervisor.
Holds Enhancements: Not just one but several enhancements improve the management and use of holds.
Added Label for Series: The new series label helps patrons quickly identify materials that are part of a series.
Missouri Report Update: The Missouri Report has been updated to meet the state of Missouri’s new reporting requirements.
New Icons for FollettShelf EBooks: A new Material Type icon identifies FollettShelf eBooks.
Option to Turn Off Direct Access to FollettShelf: A new permission allows you to disable direct access to FollettShelf for Access Levels you select.
FollettShelf EBook Search Limiter: The new search limiter allows you to narrow your search to FollettShelf eBooks.
FollettShelf EBooks Hidden in FollettShelf are Hidden in Destiny: EBooks that are hidden on your FollettShelf will be hidden in Destiny as well.
Destiny Quest Mobile: Enhancements to eBook, holds, and RDA functionality allow users access to even more features from their mobile phones.
2
© Copyright 2013 Follett Software Company.
Digital Content Subscriptions Push One Search Configuration to Other Sites: The Destiny Administrator can now push the configuration of One Search to other sites.
Multiple Sources and Formats in WebPath Express: The WebPath Express search results display selected limiters including format types and source types.
Reading Program Service Update Frequency Option: You can now choose how often Destiny automatically updates Reading Program Service information.
Cataloging Update for Fountas and Pinnell Guided Reading: Library searches limited to Fountas and Pinnell levels now include title records cataloged with the term “Guided Reading” in 521 subfield b.
Textbook ManagerPrice for Fine Calculations: You can now use either the Replacement Price from the title record or the Purchase Price from the copy record to calculate fines. Destiny can also factor in the condition of the textbook when calculating fines if you set up automatic conditioning in Textbook Policies.
Increased Visibility of Homerooms: You can now configure circulation receipts to contain homeroom information.
Asset ManagerDocumentation Enhancements: You can now determine whether any documents are associated with an asset description record or an asset item record, and you can limit who can view, add and edit, and delete the documents.
Historical Notes Searchable/Visible: In addition to the Asset History report and the Deleted Asset (detailed version) report, a historical notes search limiter is now available when performing an asset search, when editing an asset item, and when running an asset items report in Report Builder.
Option to Include Checked Out Items in Inventory: You can choose to include checked-out items in an inventory as well as items checked in after the inventory is started.
Patron Statistics—Historical Report Enhancements: You can examine the circulation totals of your patrons with the Patron Statistics-Historical Report.
Price for Fine Calculations: You can now use either the Replacement Price from the title record or the Purchase Price from the copy record to calculate fines, and you can also choose to factor in the depreciated value of the asset.
Update Assets—Individual, Batch, and Global Updates: The enhanced Update Assets features let you perform individual, batch, and global updates at the district and site level on item record fields without opening individual item records.
Update Patrons—Excuse/Delete Fines: You can globally excuse/delete fines and refunds assessed for lost or damaged assets.
This document provides a brief description, along with step-by-step instructions if applicable, of the new and updated features and functions in Destiny 11.0. It also notes the permissions and access levels required to access the updated functionalities.
What’s New in Destiny 11.0 3
© Copyright 2013 Follett Software Company.
Destiny (All Products)

4
© Copyright 2013 Follett Software Company.
What’s New in Destiny 11.0 5
© Copyright 2013 Follett Software Company.
Destiny (All Products)
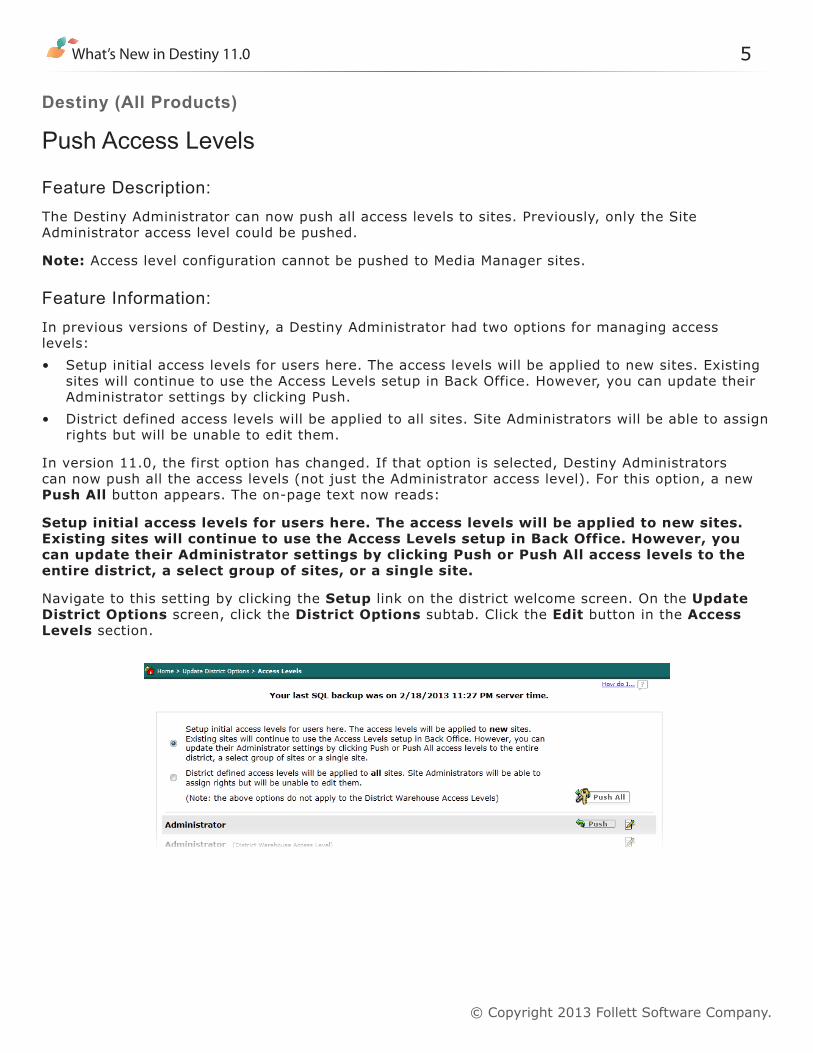
Push Access Levels
Feature Description:The Destiny Administrator can now push all access levels to sites. Previously, only the Site Administrator access level could be pushed.
Note: Access level configuration cannot be pushed to Media Manager sites.
Feature Information:In previous versions of Destiny, a Destiny Administrator had two options for managing access levels:• Setup initial access levels for users here. The access levels will be applied to new sites. Existing
sites will continue to use the Access Levels setup in Back Office. However, you can update their Administrator settings by clicking Push.
• District defined access levels will be applied to all sites. Site Administrators will be able to assign rights but will be unable to edit them.
In version 11.0, the first option has changed. If that option is selected, Destiny Administrators can now push all the access levels (not just the Administrator access level). For this option, a new Push All button appears. The on-page text now reads:
Setup initial access levels for users here. The access levels will be applied to new sites. Existing sites will continue to use the Access Levels setup in Back Office. However, you can update their Administrator settings by clicking Push or Push All access levels to the entire district, a select group of sites, or a single site.
Navigate to this setting by clicking the Setup link on the district welcome screen. On the Update District Options screen, click the District Options subtab. Click the Edit button in the Access Levels section.
6
© Copyright 2013 Follett Software Company.
Access Level:Destiny Administrator
Importance: The District Administrator now has the ability to allow sites to manage their own access levels, but are still able to push district-defined access levels down to all or a selected group of sites. Previously, Destiny allowed either site control with no district interaction (except for pushing the Administrator access level) or district control, which did not allow the sites to add, edit, or delete Access Levels.
What’s New in Destiny 11.0 7
© Copyright 2013 Follett Software Company.
Destiny (All Products)
Follett Destiny Mobile Application
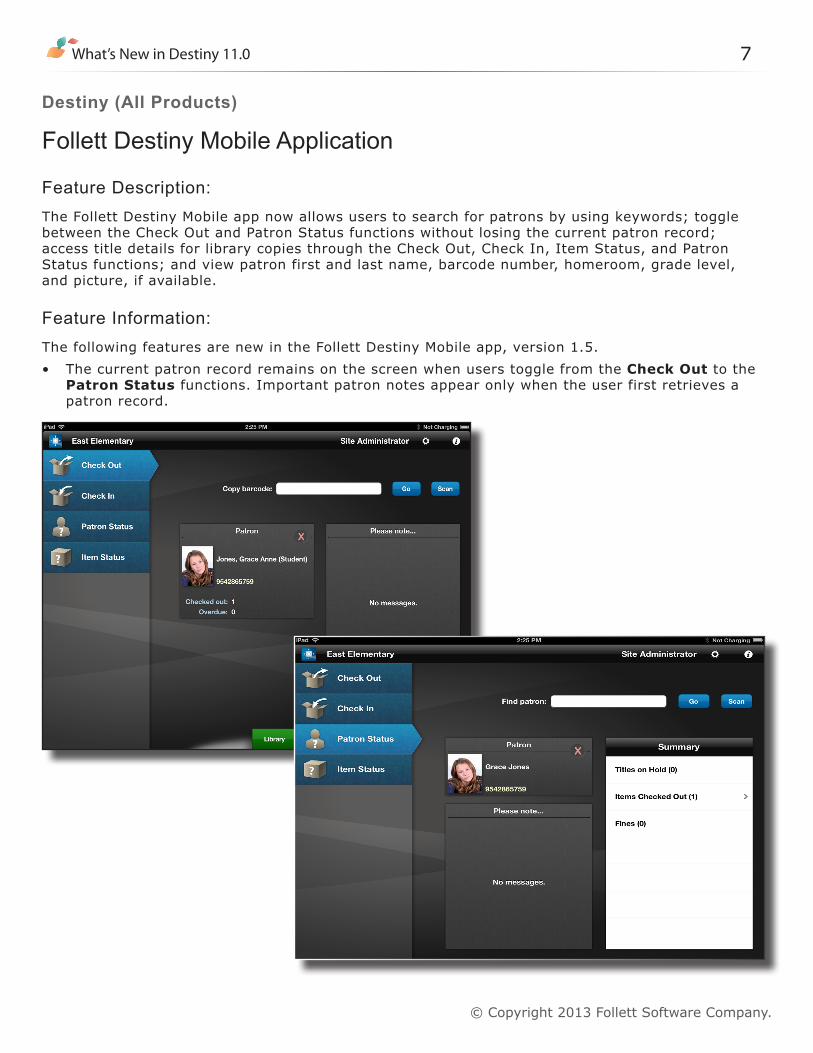
Feature Description:The Follett Destiny Mobile app now allows users to search for patrons by using keywords; toggle between the Check Out and Patron Status functions without losing the current patron record; access title details for library copies through the Check Out, Check In, Item Status, and Patron Status functions; and view patron first and last name, barcode number, homeroom, grade level, and picture, if available.
Feature Information:The following features are new in the Follett Destiny Mobile app, version 1.5.• The current patron record remains on the screen when users toggle from the Check Out to the
Patron Status functions. Important patron notes appear only when the user first retrieves a patron record.
8
© Copyright 2013 Follett Software Company.
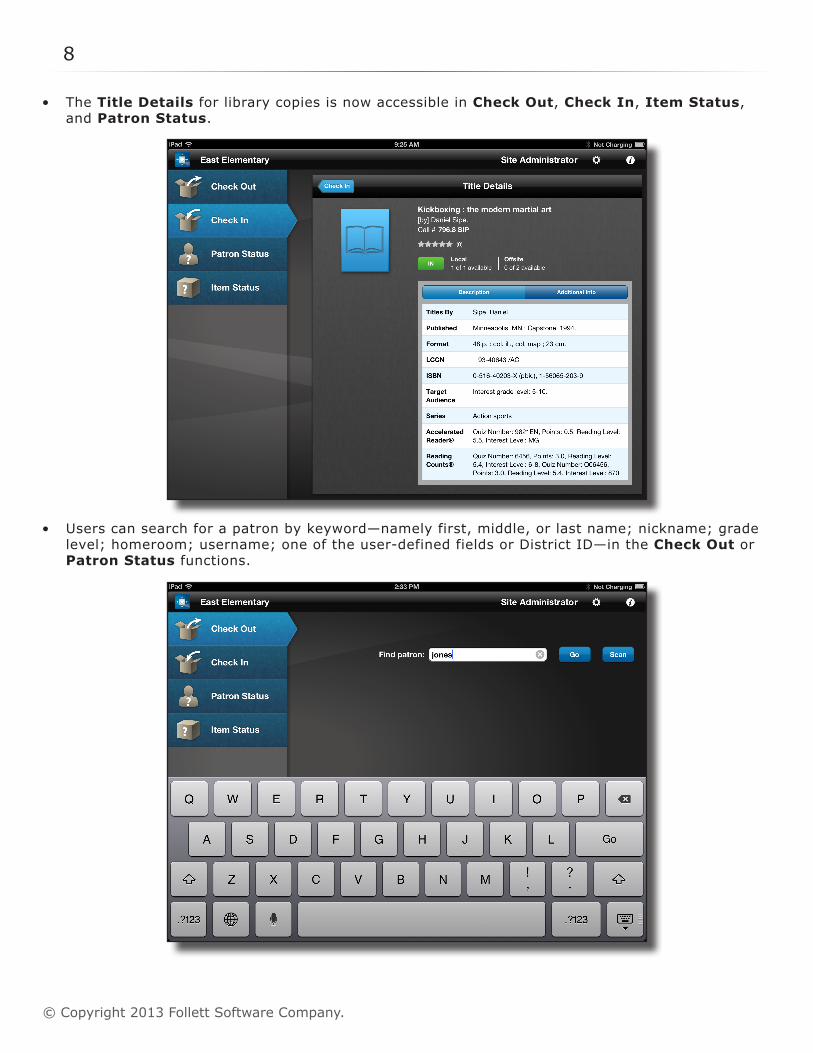
• The Title Details for library copies is now accessible in Check Out, Check In, Item Status, and Patron Status.
• Users can search for a patron by keyword—namely first, middle, or last name; nickname; grade level; homeroom; username; one of the user-defined fields or District ID—in the Check Out or Patron Status functions.
What’s New in Destiny 11.0 9
© Copyright 2013 Follett Software Company.
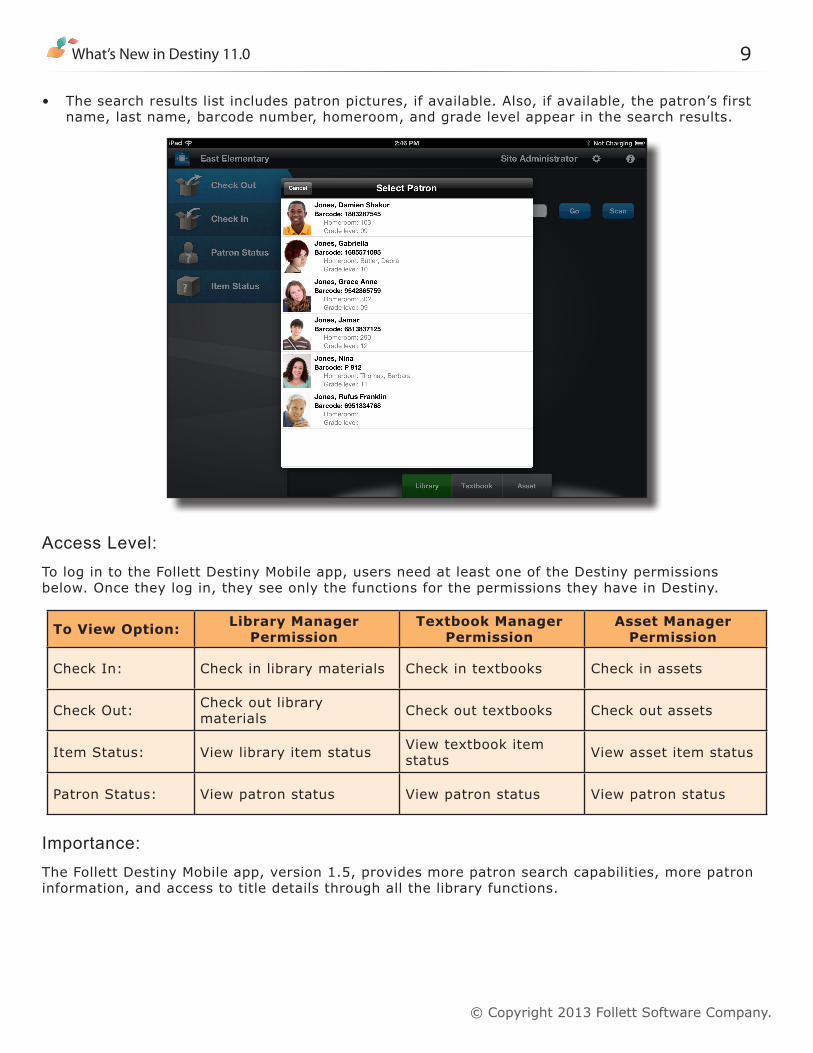
• The search results list includes patron pictures, if available. Also, if available, the patron’s first name, last name, barcode number, homeroom, and grade level appear in the search results.
Access Level:To log in to the Follett Destiny Mobile app, users need at least one of the Destiny permissions below. Once they log in, they see only the functions for the permissions they have in Destiny.
To View Option: Library Manager Permission
Textbook Manager Permission
Asset Manager Permission
Check In: Check in library materials Check in textbooks Check in assets
Check Out: Check out library materials Check out textbooks Check out assets
Item Status: View library item status View textbook item status View asset item status
Patron Status: View patron status View patron status View patron status
Importance: The Follett Destiny Mobile app, version 1.5, provides more patron search capabilities, more patron information, and access to title details through all the library functions.

10
© Copyright 2013 Follett Software Company.
What’s New in Destiny 11.0 11
© Copyright 2013 Follett Software Company.
Destiny (All Products)
Chrome Sounds/Focus Fix
Feature Description:Customers using Google Chrome for Windows in previous Destiny releases experienced a problem with the cursor not staying in the barcode field for proper scanning in circulation functions. Destiny products use the Chrome QuickTime plug-in to play circulation sounds, and a defect in Chrome’s support for QuickTime sounds caused the issue.
With Destiny 11.0, Chrome support under Windows uses a different plug-in (VLC Media Player), which does not expose the Chrome defect and ensures that the cursor stays in the barcode field for proper scanning in circulation transactions.
Feature Information:If you use Chrome for Windows, you will want to install this plug-in to ensure that circulation sounds play properly.
To check if it’s already installed, type chrome://plugins into the address bar in Chrome, find VLC Web Plugin, and make sure it’s enabled.
If it is not installed, you can download it from: http://www.videolan.org/vlc/index.html
When you install VLC, it asks you to choose which components to install. If you want to use VLC solely as a Chrome plug-in, deselect everything except Media Player, Mozilla Plugin, and ActiveX plugin.
Access Level:All Users
Importance:This fix corrects the circulation sound issue experienced with previous versions of Destiny and Chrome.

12
© Copyright 2013 Follett Software Company.
What’s New in Destiny 11.0 13
© Copyright 2013 Follett Software Company.
Destiny Library Manager

14
© Copyright 2013 Follett Software Company.
What’s New in Destiny 11.0 15
© Copyright 2013 Follett Software Company.
Library Manager
RDA Compatibility
Feature Description:RDA (Resource Description and Access) expands the patrons’ ability to find, identify, select, and obtain resources. MARC records in RDA format contain more information as to the content type (Ex. performed music, still image), media type (Ex. audio, video), and carrier type (Ex. videodisc, flipchart). In Destiny Library Manager, you can convert MARC records that follow AACR2 cataloging rules to follow the new RDA cataloging rules.
Note: You must convert MARC records one at a time.
Feature Information:Several updates to Destiny Library Manager meet the new cataloging standards. All districts that upgrade to Destiny v11.0 will see certain cataloging updates in support of RDA. Districts have the option to choose the RDA cataloging form for additional functionality.
All districts upgrading to Destiny v11.0 will see the following updates:• Seven additional fields are available in the bibliographic MARC Editor. They appear in the Add
Tag list.
▪ 264 - Production, Publication, Distribution, Manufacture and Copyright Notice (R) (used instead of a 260 in RDA)
▪ 344 - Sound Characteristics (R)
▪ 345 - Projection Characteristics of Moving Images (R)
▪ 346 - Video Characteristics (R)
▪ 347 - Digital File Characteristics (R)
▪ 377 - Associated Language (R)
▪ 883 - Machine-generated Metadata Provenance (R)• The 336, 337, and 338 fields are added to the bibliographic MARC Editor. The default subfields
of _a and _2 contain the correct information for each material type.• The 368, 378, and 883 tags are added to the Authority MARC Editor. They appear in the Add
Tag list.
▪ 368 Other Attributes of Person or Corporate Body (R)
▪ 378 Fuller Form of Personal Name (NR)
▪ 883 Machine-generated Metadata Provenance (R)• If it is in a title record, the content in the 336, 337, and 338 tags appears in the Publication
Info section of the Title Details screen. (Prior to Destiny v11.0, it displayed in the Additional Info section of Title Details screen.) In Destiny Quest and Destiny Quest Mobile, it appears on the Additional Info subtab.
• The Import Titles logic changed, affecting the merge function.• The Import Authority logic changed.
16
© Copyright 2013 Follett Software Company.
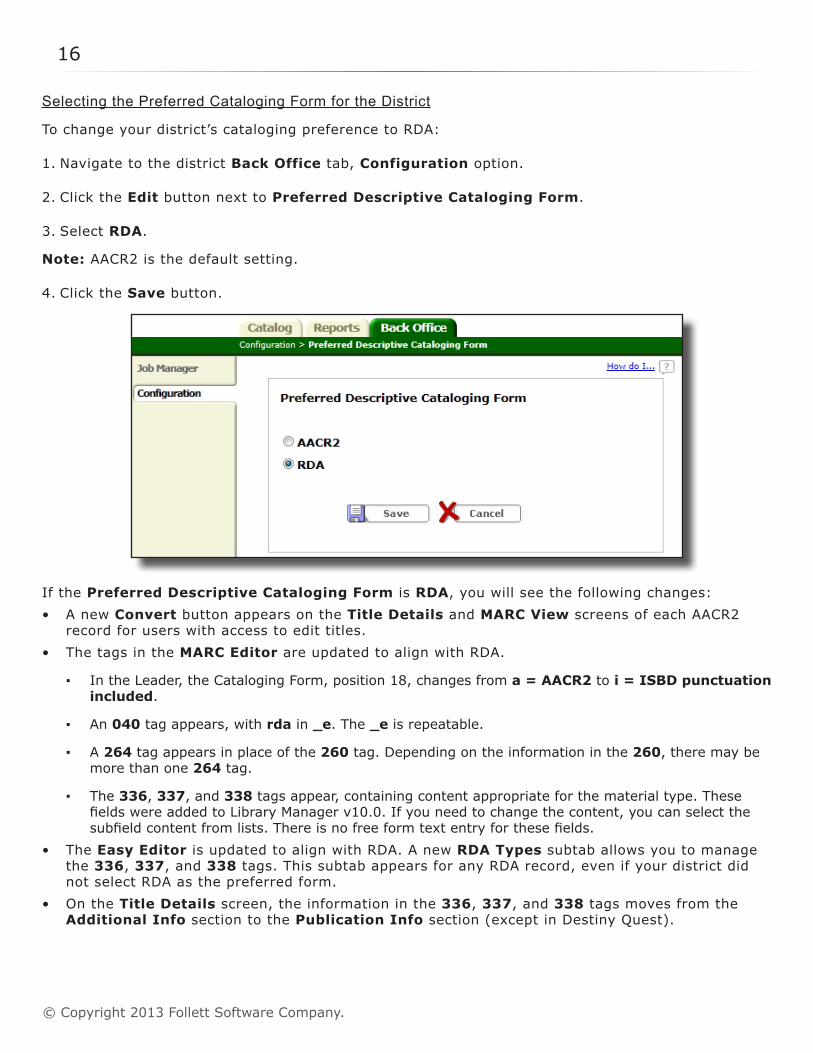
Selecting the Preferred Cataloging Form for the District
To change your district’s cataloging preference to RDA:
1. Navigate to the district Back Office tab, Configuration option.
2. Click the Edit button next to Preferred Descriptive Cataloging Form.
3. Select RDA.
Note: AACR2 is the default setting.
4. Click the Save button.
If the Preferred Descriptive Cataloging Form is RDA, you will see the following changes:• A new Convert button appears on the Title Details and MARC View screens of each AACR2
record for users with access to edit titles.• The tags in the MARC Editor are updated to align with RDA.
▪ In the Leader, the Cataloging Form, position 18, changes from a = AACR2 to i = ISBD punctuation included.
▪ An 040 tag appears, with rda in _e. The _e is repeatable.
▪ A 264 tag appears in place of the 260 tag. Depending on the information in the 260, there may be more than one 264 tag.
▪ The 336, 337, and 338 tags appear, containing content appropriate for the material type. These fieldswereaddedtoLibraryManagerv10.0.Ifyouneedtochangethecontent,youcanselectthesubfieldcontentfromlists.Thereisnofreeformtextentryforthesefields.
• The Easy Editor is updated to align with RDA. A new RDA Types subtab allows you to manage the 336, 337, and 338 tags. This subtab appears for any RDA record, even if your district did not select RDA as the preferred form.
• On the Title Details screen, the information in the 336, 337, and 338 tags moves from the Additional Info section to the Publication Info section (except in Destiny Quest).
What’s New in Destiny 11.0 17
© Copyright 2013 Follett Software Company.
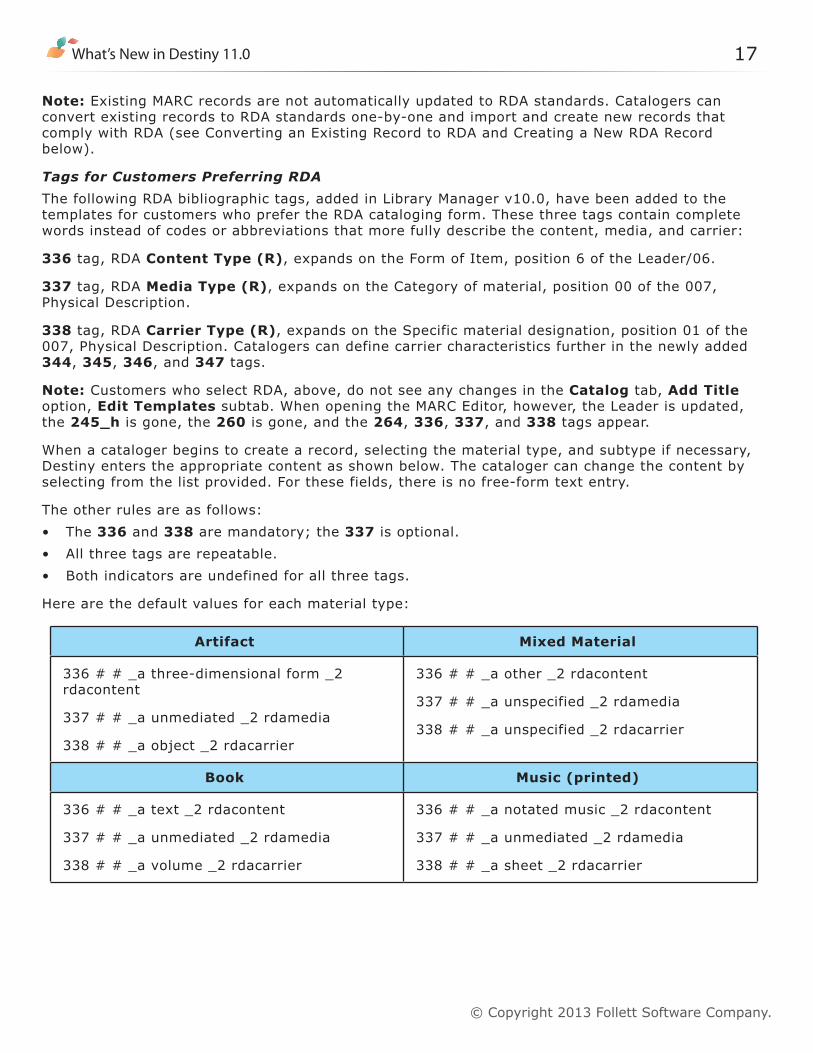
Note: Existing MARC records are not automatically updated to RDA standards. Catalogers can convert existing records to RDA standards one-by-one and import and create new records that comply with RDA (see Converting an Existing Record to RDA and Creating a New RDA Record below).
Tags for Customers Preferring RDAThe following RDA bibliographic tags, added in Library Manager v10.0, have been added to the templates for customers who prefer the RDA cataloging form. These three tags contain complete words instead of codes or abbreviations that more fully describe the content, media, and carrier:
336 tag, RDA Content Type (R), expands on the Form of Item, position 6 of the Leader/06.
337 tag, RDA Media Type (R), expands on the Category of material, position 00 of the 007, Physical Description.
338 tag, RDA Carrier Type (R), expands on the Specific material designation, position 01 of the 007, Physical Description. Catalogers can define carrier characteristics further in the newly added 344, 345, 346, and 347 tags.
Note: Customers who select RDA, above, do not see any changes in the Catalog tab, Add Title option, Edit Templates subtab. When opening the MARC Editor, however, the Leader is updated, the 245_h is gone, the 260 is gone, and the 264, 336, 337, and 338 tags appear.
When a cataloger begins to create a record, selecting the material type, and subtype if necessary, Destiny enters the appropriate content as shown below. The cataloger can change the content by selecting from the list provided. For these fields, there is no free-form text entry.
The other rules are as follows:• The 336 and 338 are mandatory; the 337 is optional.• All three tags are repeatable. • Both indicators are undefined for all three tags.
Here are the default values for each material type:
Artifact Mixed Material
336 # # _a three-dimensional form _2 rdacontent
337 # # _a unmediated _2 rdamedia
338 # # _a object _2 rdacarrier
336 # # _a other _2 rdacontent
337 # # _a unspecified _2 rdamedia
338 # # _a unspecified _2 rdacarrier
Book Music (printed)
336 # # _a text _2 rdacontent
337 # # _a unmediated _2 rdamedia
338 # # _a volume _2 rdacarrier
336 # # _a notated music _2 rdacontent
337 # # _a unmediated _2 rdamedia
338 # # _a sheet _2 rdacarrier
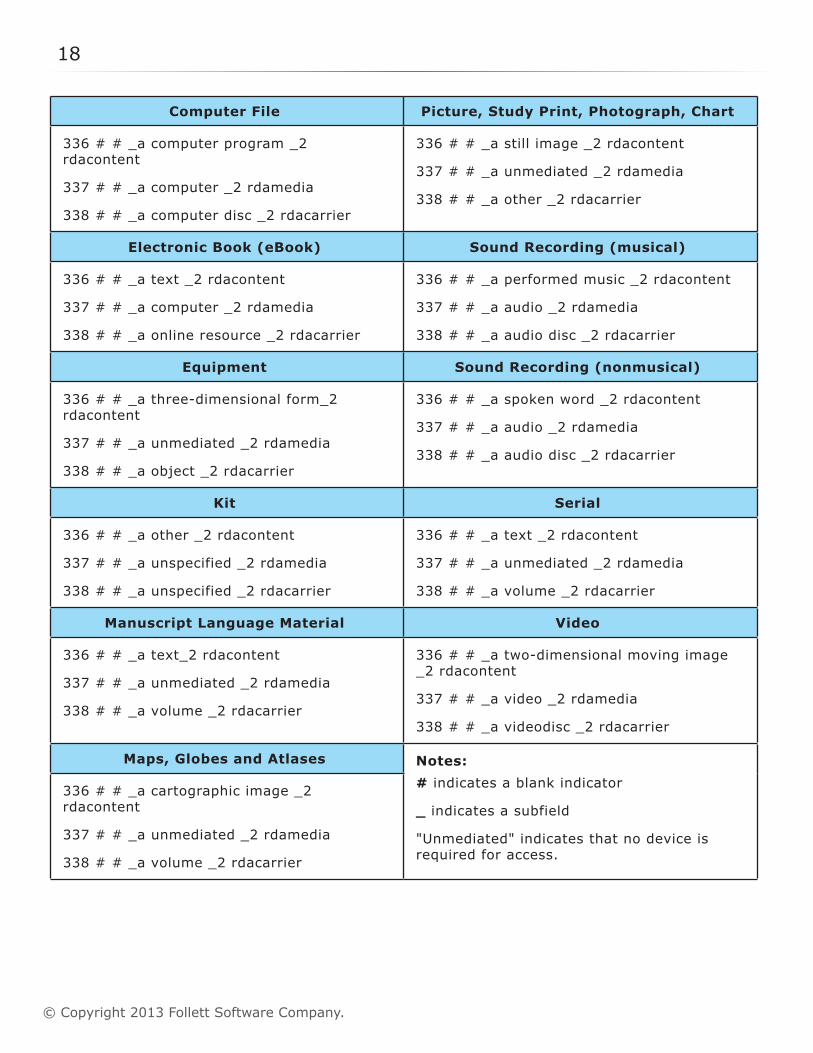
18
© Copyright 2013 Follett Software Company.
Computer File Picture, Study Print, Photograph, Chart
336 # # _a computer program _2 rdacontent
337 # # _a computer _2 rdamedia
338 # # _a computer disc _2 rdacarrier
336 # # _a still image _2 rdacontent
337 # # _a unmediated _2 rdamedia
338 # # _a other _2 rdacarrier
Electronic Book (eBook) Sound Recording (musical)
336 # # _a text _2 rdacontent
337 # # _a computer _2 rdamedia
338 # # _a online resource _2 rdacarrier
336 # # _a performed music _2 rdacontent
337 # # _a audio _2 rdamedia
338 # # _a audio disc _2 rdacarrier
Equipment Sound Recording (nonmusical)
336 # # _a three-dimensional form_2 rdacontent
337 # # _a unmediated _2 rdamedia
338 # # _a object _2 rdacarrier
336 # # _a spoken word _2 rdacontent
337 # # _a audio _2 rdamedia
338 # # _a audio disc _2 rdacarrier
Kit Serial
336 # # _a other _2 rdacontent
337 # # _a unspecified _2 rdamedia
338 # # _a unspecified _2 rdacarrier
336 # # _a text _2 rdacontent
337 # # _a unmediated _2 rdamedia
338 # # _a volume _2 rdacarrier
Manuscript Language Material Video
336 # # _a text_2 rdacontent
337 # # _a unmediated _2 rdamedia
338 # # _a volume _2 rdacarrier
336 # # _a two-dimensional moving image _2 rdacontent
337 # # _a video _2 rdamedia
338 # # _a videodisc _2 rdacarrier
Maps, Globes and Atlases Notes:# indicates a blank indicator
_ indicates a subfield
"Unmediated" indicates that no device is required for access.
336 # # _a cartographic image _2 rdacontent
337 # # _a unmediated _2 rdamedia
338 # # _a volume _2 rdacarrier
What’s New in Destiny 11.0 19
© Copyright 2013 Follett Software Company.
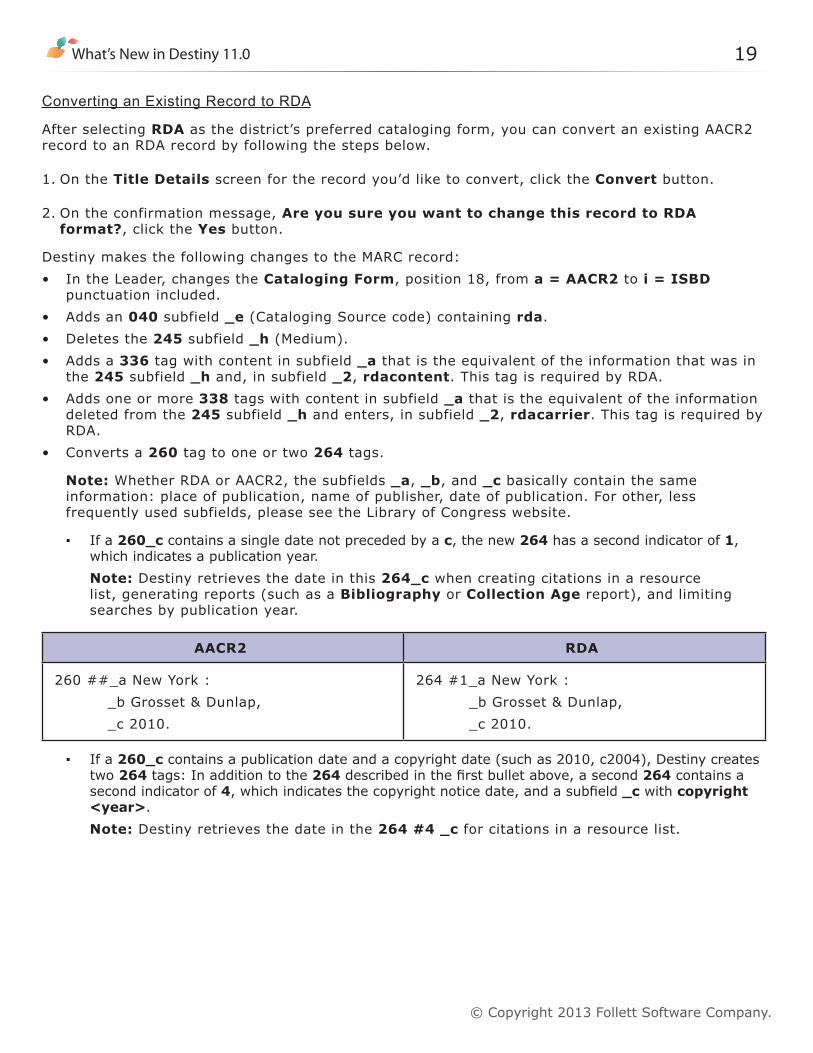
Converting an Existing Record to RDA
After selecting RDA as the district’s preferred cataloging form, you can convert an existing AACR2 record to an RDA record by following the steps below.
1. On the Title Details screen for the record you’d like to convert, click the Convert button.
2. On the confirmation message, Are you sure you want to change this record to RDA format?, click the Yes button.
Destiny makes the following changes to the MARC record:• In the Leader, changes the Cataloging Form, position 18, from a = AACR2 to i = ISBD
punctuation included.• Adds an 040 subfield _e (Cataloging Source code) containing rda.• Deletes the 245 subfield _h (Medium).• Adds a 336 tag with content in subfield _a that is the equivalent of the information that was in
the 245 subfield _h and, in subfield _2, rdacontent. This tag is required by RDA.• Adds one or more 338 tags with content in subfield _a that is the equivalent of the information
deleted from the 245 subfield _h and enters, in subfield _2, rdacarrier. This tag is required by RDA.
• Converts a 260 tag to one or two 264 tags.
Note: Whether RDA or AACR2, the subfields _a, _b, and _c basically contain the same information: place of publication, name of publisher, date of publication. For other, less frequently used subfields, please see the Library of Congress website.
▪ If a 260_c contains a single date not preceded by a c, the new 264 has a second indicator of 1, which indicates a publication year. Note: Destiny retrieves the date in this 264_c when creating citations in a resource list, generating reports (such as a Bibliography or Collection Age report), and limiting searches by publication year.
AACR2 RDA
260 ##_a New York : _b Grosset & Dunlap, _c 2010.
264 #1_a New York : _b Grosset & Dunlap, _c 2010.
▪ If a 260_c contains a publication date and a copyright date (such as 2010, c2004), Destiny creates two 264 tags: In addition to the 264describedinthefirstbulletabove,asecond264 contains a second indicator of 4,whichindicatesthecopyrightnoticedate,andasubfield_c with copyright <year>.Note: Destiny retrieves the date in the 264 #4 _c for citations in a resource list.
20
© Copyright 2013 Follett Software Company.
AACR2 RDA
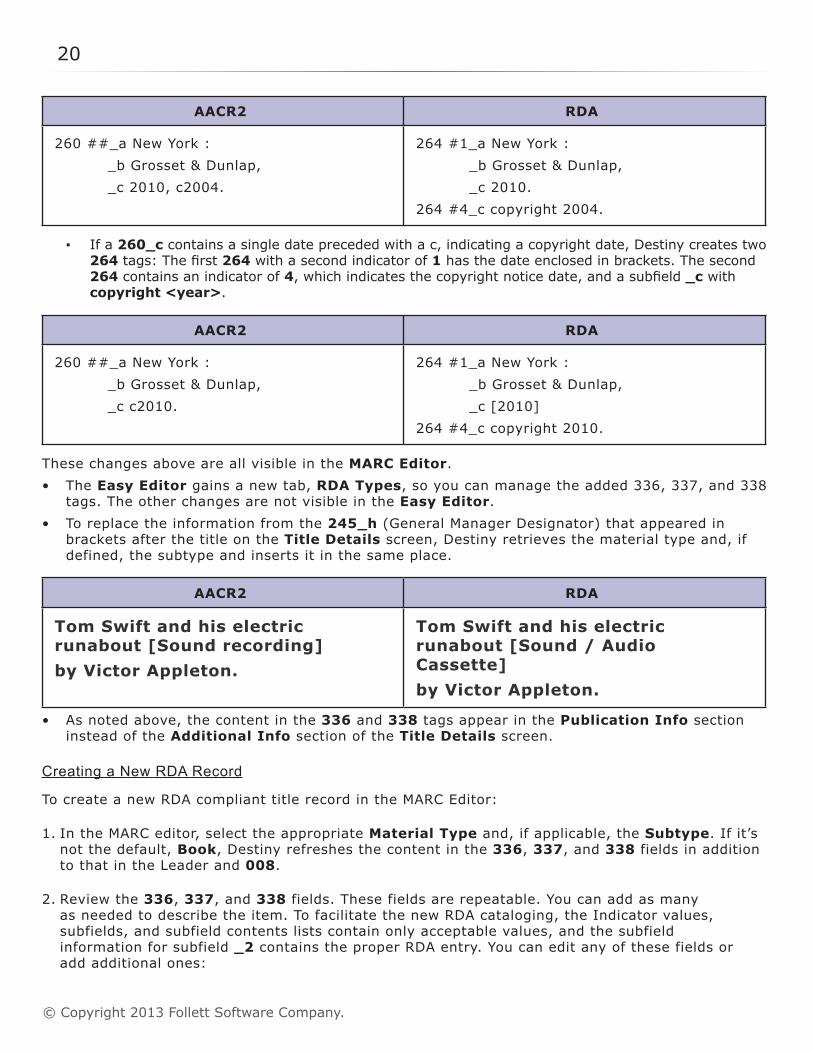
260 ##_a New York : _b Grosset & Dunlap, _c 2010, c2004.
264 #1_a New York : _b Grosset & Dunlap, _c 2010.264 #4_c copyright 2004.
▪ If a 260_c contains a single date preceded with a c, indicating a copyright date, Destiny creates two 264tags:Thefirst264 with a second indicator of 1 has the date enclosed in brackets. The second 264 contains an indicator of 4,whichindicatesthecopyrightnoticedate,andasubfield_c with copyright <year>.
AACR2 RDA
260 ##_a New York : _b Grosset & Dunlap, _c c2010.
264 #1_a New York : _b Grosset & Dunlap, _c [2010]264 #4_c copyright 2010.
These changes above are all visible in the MARC Editor.• The Easy Editor gains a new tab, RDA Types, so you can manage the added 336, 337, and 338
tags. The other changes are not visible in the Easy Editor.• To replace the information from the 245_h (General Manager Designator) that appeared in
brackets after the title on the Title Details screen, Destiny retrieves the material type and, if defined, the subtype and inserts it in the same place.
AACR2 RDA
Tom Swift and his electric runabout [Sound recording]by Victor Appleton.
Tom Swift and his electric runabout [Sound / Audio Cassette]by Victor Appleton.
• As noted above, the content in the 336 and 338 tags appear in the Publication Info section instead of the Additional Info section of the Title Details screen.
Creating a New RDA Record
To create a new RDA compliant title record in the MARC Editor:
1. In the MARC editor, select the appropriate Material Type and, if applicable, the Subtype. If it’s not the default, Book, Destiny refreshes the content in the 336, 337, and 338 fields in addition to that in the Leader and 008.
2. Review the 336, 337, and 338 fields. These fields are repeatable. You can add as many as needed to describe the item. To facilitate the new RDA cataloging, the Indicator values, subfields, and subfield contents lists contain only acceptable values, and the subfield information for subfield _2 contains the proper RDA entry. You can edit any of these fields or add additional ones:
What’s New in Destiny 11.0 21
© Copyright 2013 Follett Software Company.
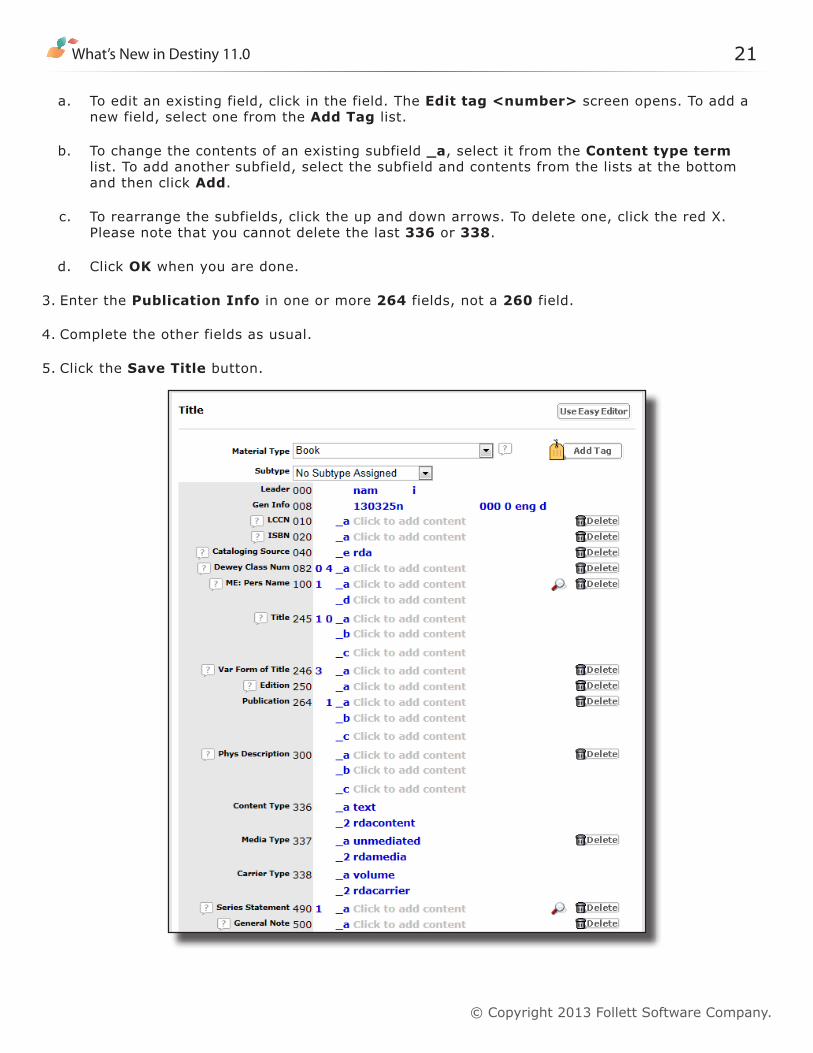
a. To edit an existing field, click in the field. The Edit tag <number> screen opens. To add a new field, select one from the Add Tag list.
b. To change the contents of an existing subfield _a, select it from the Content type term list. To add another subfield, select the subfield and contents from the lists at the bottom and then click Add.
c. To rearrange the subfields, click the up and down arrows. To delete one, click the red X. Please note that you cannot delete the last 336 or 338.
d. Click OK when you are done.
3. Enter the Publication Info in one or more 264 fields, not a 260 field.
4. Complete the other fields as usual.
5. Click the Save Title button.
22
© Copyright 2013 Follett Software Company.
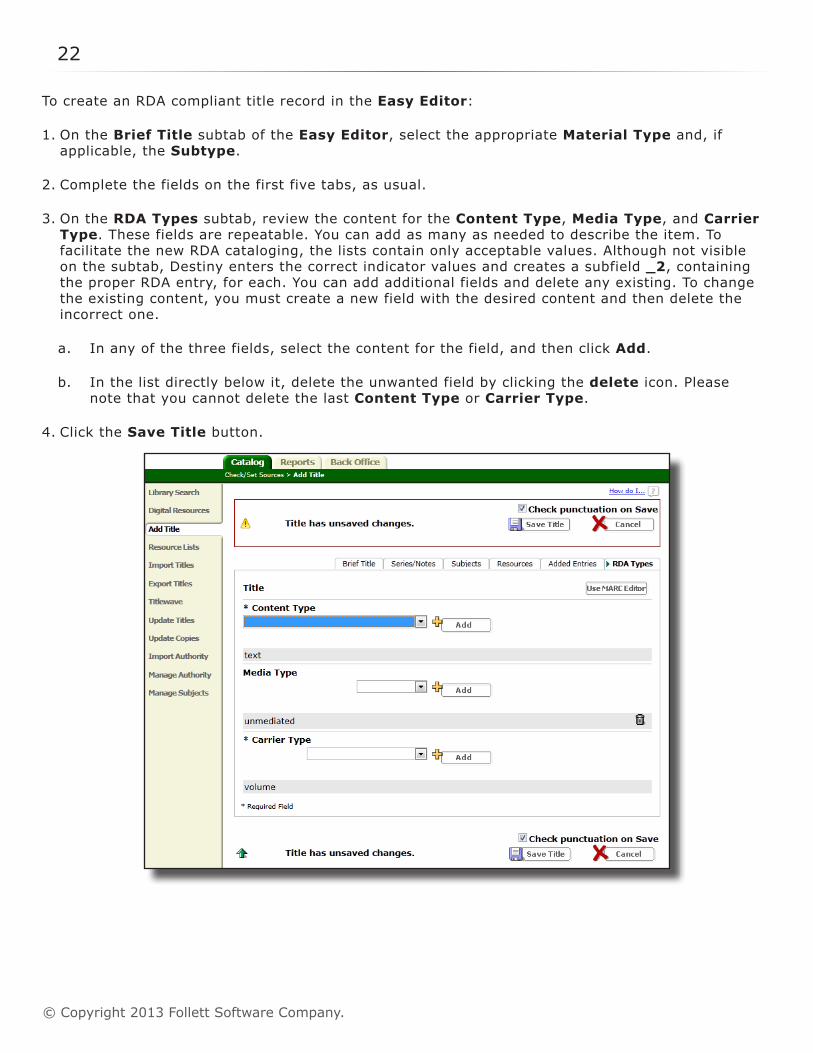
To create an RDA compliant title record in the Easy Editor:
1. On the Brief Title subtab of the Easy Editor, select the appropriate Material Type and, if applicable, the Subtype.
2. Complete the fields on the first five tabs, as usual.
3. On the RDA Types subtab, review the content for the Content Type, Media Type, and Carrier Type. These fields are repeatable. You can add as many as needed to describe the item. To facilitate the new RDA cataloging, the lists contain only acceptable values. Although not visible on the subtab, Destiny enters the correct indicator values and creates a subfield _2, containing the proper RDA entry, for each. You can add additional fields and delete any existing. To change the existing content, you must create a new field with the desired content and then delete the incorrect one.
a. In any of the three fields, select the content for the field, and then click Add.
b. In the list directly below it, delete the unwanted field by clicking the delete icon. Please note that you cannot delete the last Content Type or Carrier Type.
4. Click the Save Title button.
What’s New in Destiny 11.0 23
© Copyright 2013 Follett Software Company.
Editing an Authority Record
To add a new tag to an authority record:
1. Navigate to the Catalog tab, Manage Authority option.
2. Search for the authority record you wish to edit.
3. Select the MARC View subtab.
4. Click the Add Tag button.
5. Enter 368, 378, or 883 in the Insert box and click the OK button.
6. On the Add tag <number> screen, select the desired subfield and contents from the lists.
7. Click the Add button.
8. Continue adding subfields as needed. To rearrange the subfields, click the up and down arrows. To delete one, click the red X.
9. Click the Save button.
Importing Titles
The only change to the importing titles process is if you are merging records where the incoming record matches an existing record and the best title is not in your preferred MARC cataloging form. • If the incoming record is not deemed the better record, the existing record remains as is. • If the incoming record is deemed the better record and the incoming record is in your preferred
MARC cataloging form, the incoming record is merged with the existing record as usual.• If the incoming record is deemed the better record, but the incoming record is not in your
preferred MARC cataloging format, the incoming record is converted to the preferred MARC cataloging form and merged with the existing record.
▪ If your preferred form is RDA and the incoming record is AACR2, the changes to the record are those described in the Converting an Existing Record to RDA section above.
▪ If your preferred form is AACR2 and the incoming record is RDA, the changes to the record are as follows:
– Position 18 of the Leader, Cataloging Form, position 18, changes from i = ISBD punctuation included to a = AACR2.
– Any 040_e rdasubfieldsareremoved.
– If it is in the existing record, a 245_h tag is moved to the incoming record.
– A 260 tag is added to the incoming record, containing information from the 264.
– The 264, 336, 337 (if existing), and 338 tags remain.
24
© Copyright 2013 Follett Software Company.
– Any other tags, such as subjects and added entries, are merged in as usual.
– Any copies are moved to the incoming record, as usual.
– The unchosen record is then deleted, as usual.
If the incoming record is not a match, it is added to the database as is, regardless of the preferred cataloging form.
Merging Duplicate Titles through a Resource List
The only change to the process of merging duplicate titles through a resource list is when the best title is not in your preferred MARC cataloging form.• If the preferred form is RDA and the best title is AACR2, the changes to the title record are those
listed in the Converting an Existing Record to RDA section above.• If the preferred form is AACR2 and the best title is RDA, the changes to the title record are as
follows:
▪ Position 18 of the Leader, Cataloging Form, position 18, changes from i = ISBD punctuation included to a=AACR2.
▪ Any 040_e rdasubfieldsareremoved.
▪ If it is the unchosen record, a 245_h tag is moved to the best title record.
▪ A 260 tag is added to the best title record, containing information from the 264.
▪ The 264, 336, 337 (if existing), and 338 tags remain.
▪ Any other tags, such as local subjects and added entries, are merged in as usual.
▪ Any copies are moved to the best title record, as usual.
▪ The unchosen title records are then deleted, as usual.
Performing an Alliance Plus Online Recon
There is no change to your procedure. The changes are in the matching of records.• Alliance Plus tries to match the preferred cataloging form.• If Alliance Plus has a matching record in the customer’s preferred MARC cataloging form, the
existing record is replaced as usual.
▪ AACR2: If your preferred form is AACR2, the incoming record will be AACR2.
▪ RDA: If your preferred form is RDA and the incoming record is AACR2, the changes to the record are those listed above in the Converting an Existing Record to RDA section.
The definition of a brief record—for a recon only—changes for RDA records. Because a brief record converted to RDA gains two or three 33X tags, the existing definition cannot be applied to RDA records. This updated definition appears with the options on the Recon page:
▪ Only brief library records
– AACR2 records without tags from 305 to 899
– RDA records without tags from 305 to 321 and from 340 to 899
▪ All library records
What’s New in Destiny 11.0 25
© Copyright 2013 Follett Software Company.
Adding a Title From Alliance Plus Online
There is no change to your procedure. The changes are in the retrieval and updating of records.• Along with the search term, Destiny sends Alliance Plus the district’s preferred cataloging form.• Alliance Plus tries to return only matching records that are in your preferred cataloging form.
▪ AACR2: Alliance Plus has AACRD versions of all its records and sends those to customers who prefer AACR2.
▪ RDA: If Alliance Plus does not have one or more RDA records that match the search term, it sends AACR2. If the returned record is not RDA, you can manually convert the record after saving it.
Access Level:Selecting the Preferred Cataloging Form for the DistrictDistrict Library Administrator
Permissions: Manage Library Materials for the District
Converting an Existing Record to RDADistrict Library Administrator, Site Administrator, Library Administrator
Permissions:Manage Titles, Edit or Manage Library Materials for the District
Creating a New RDA RecordDistrict Library Administrator, Site Administrator, Library Administrator
Permissions:Manage Titles, Edit or Manage Library Materials for the District
Editing an Authority RecordDistrict Library Administrator, Site Administrator, Library Administrator
Permissions:Manage Authority
Importing TitlesDistrict Library Administrator, Site Administrator, Library Administrator
Permissions:Import titles/copies

26
© Copyright 2013 Follett Software Company.
Merging Duplicates through Resource ListsDistrict Library Administrator, Site Administrator, Library Administrator
Permissions:Merge copies from duplicated library titles
Performing an Alliance Plus Online ReconDistrict Library Administrator, Site Administrator, Library Administrator
Permission:Enhance records with Alliance Recon
Adding a Title From Alliance Plus OnlineDistrict Library Administrator, Site Administrator, Library Administrator
Permission:Add Title
Importance: On March 31, 2013, the Library of Congress will no longer create MARC records according to AACR2 rules; they will comply with RDA. Destiny Library Manager has been updated for compatibility with the new standards.
What’s New in Destiny 11.0 27
© Copyright 2013 Follett Software Company.
Library Manager
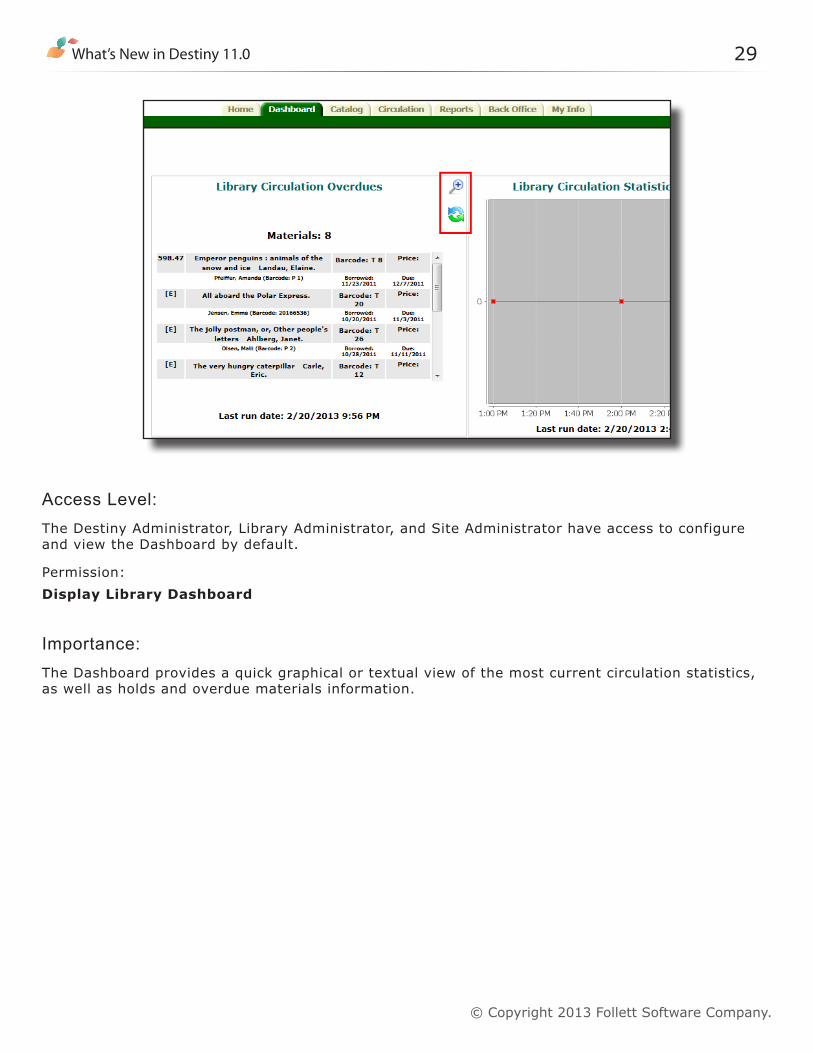
Dashboard
Feature Description:The Dashboard tab allows users with appropriate access level permission to view five reports at a glance: Library Circulation Statistics by Day, Library Circulation Statistics by Month, Library Circulation Statistics by Year, Library Holds, and Library Circulation Overdues.
After you configure the Dashboard to display the reports you select, full-color graphical representations or text versions of the reports appear immediately upon login. Additionally, you can integrate Destiny Library Manager’s Dashboard with Destiny Textbook Manager and/or Destiny Asset Manager, if you have those products.
Feature Information:The Dashboard reports display the following information:• Library Circulation Statistics by Day: a line graph that displays total checkouts for each hour
of the current day.• Library Circulation Statistics by Month: a line graph that displays total checkouts for each
day of the current calendar month.• Library Circulation Statistics by Year: a line graph that displays total checkouts for each
month of the current statistical year.• Library Holds: a textual display of the number of local requests for pending and ready holds
and reserves and ILL requests to other libraries. Below the numbers is a link, Click here to view requests, to view and process the local hold, reserve, and ILL requests.
• Library Circulation Overdues: a textual display of the number of overdue materials. Below the number is a window that displays the Overdue Materials report.
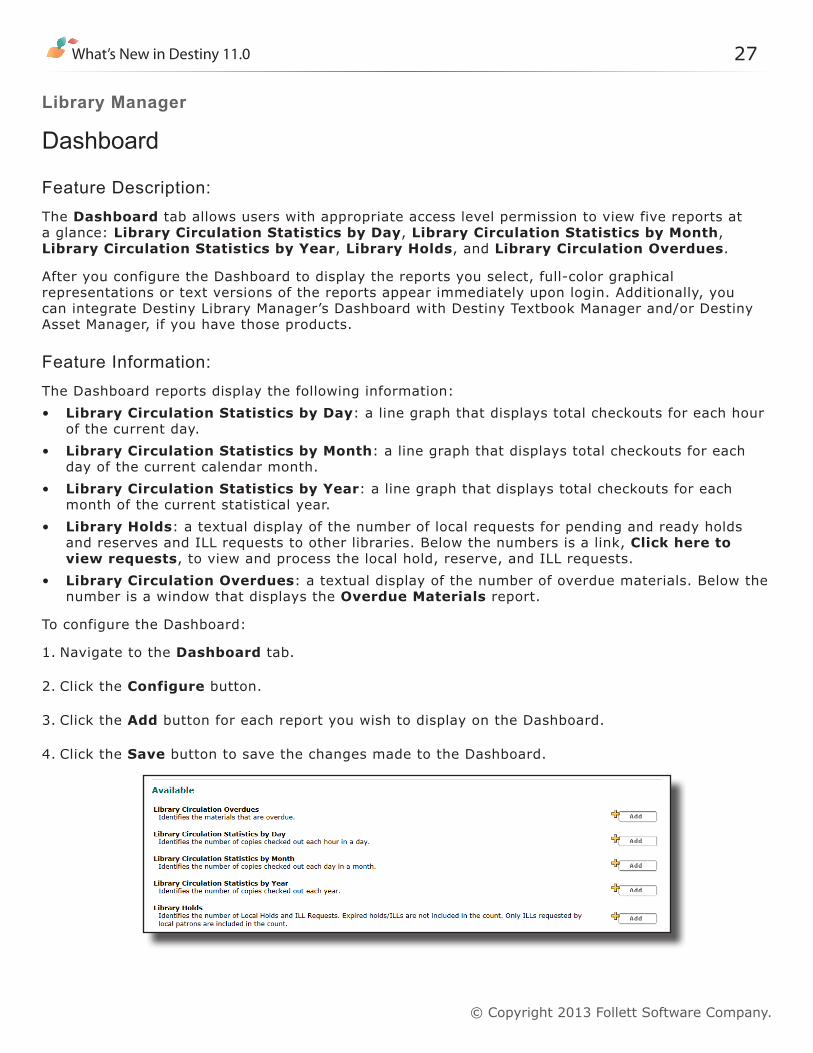
To configure the Dashboard:
1. Navigate to the Dashboard tab.
2. Click the Configure button.
3. Click the Add button for each report you wish to display on the Dashboard.
4. Click the Save button to save the changes made to the Dashboard.

28
© Copyright 2013 Follett Software Company.
To arrange the order of reports on the Dashboard:
1. Navigate to the Dashboard tab.
2. Click the Configure button.
3. Click the Move icons accompanying each report to arrange its position in the Dashboard display. Clicking the up blue arrow moves a report up one position in the list, while clicking the down blue arrow moves the report down one position in the list. The Item Position legend shows the arrangement of the reports on the Dashboard.
4. Click the red X remove icon to remove a report from the Dashboard.
5. Click the Save button to save the Dashboard changes.
To magnify the graphics or to refresh the Dashboard report data:
1. Navigate to the Dashboard tab.
2. Click the Magnify icon next to the graphic you wish to enlarge. The magnified version displays in a new window.
3. To update a report’s data, click the report’s Refresh data icon. Under the data display, the date and time of the last update appears.
What’s New in Destiny 11.0 29
© Copyright 2013 Follett Software Company.
Access Level:The Destiny Administrator, Library Administrator, and Site Administrator have access to configure and view the Dashboard by default.
Permission:Display Library Dashboard
Importance: The Dashboard provides a quick graphical or textual view of the most current circulation statistics, as well as holds and overdue materials information.

30
© Copyright 2013 Follett Software Company.
What’s New in Destiny 11.0 31
© Copyright 2013 Follett Software Company.
Library Manager
Increased Visibility of Homeroom Information
Feature Description:Homeroom information was added in several places. You can now configure circulation receipts to contain homeroom information, add homeroom information to hold notices, view homeroom information in Check In alert messages, and email students’ ready hold notices to homeroom supervisors.
Feature Information:Circulation Receipts
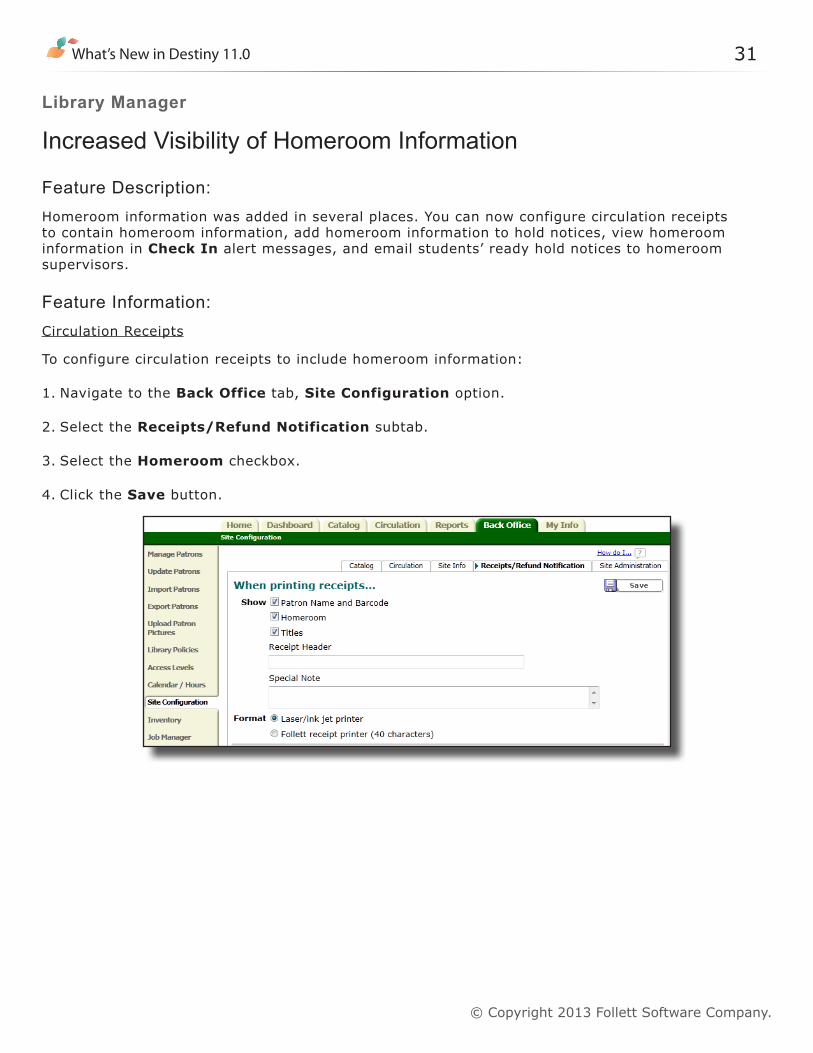
To configure circulation receipts to include homeroom information:
1. Navigate to the Back Office tab, Site Configuration option.
2. Select the Receipts/Refund Notification subtab.
3. Select the Homeroom checkbox.
4. Click the Save button.
32
© Copyright 2013 Follett Software Company.
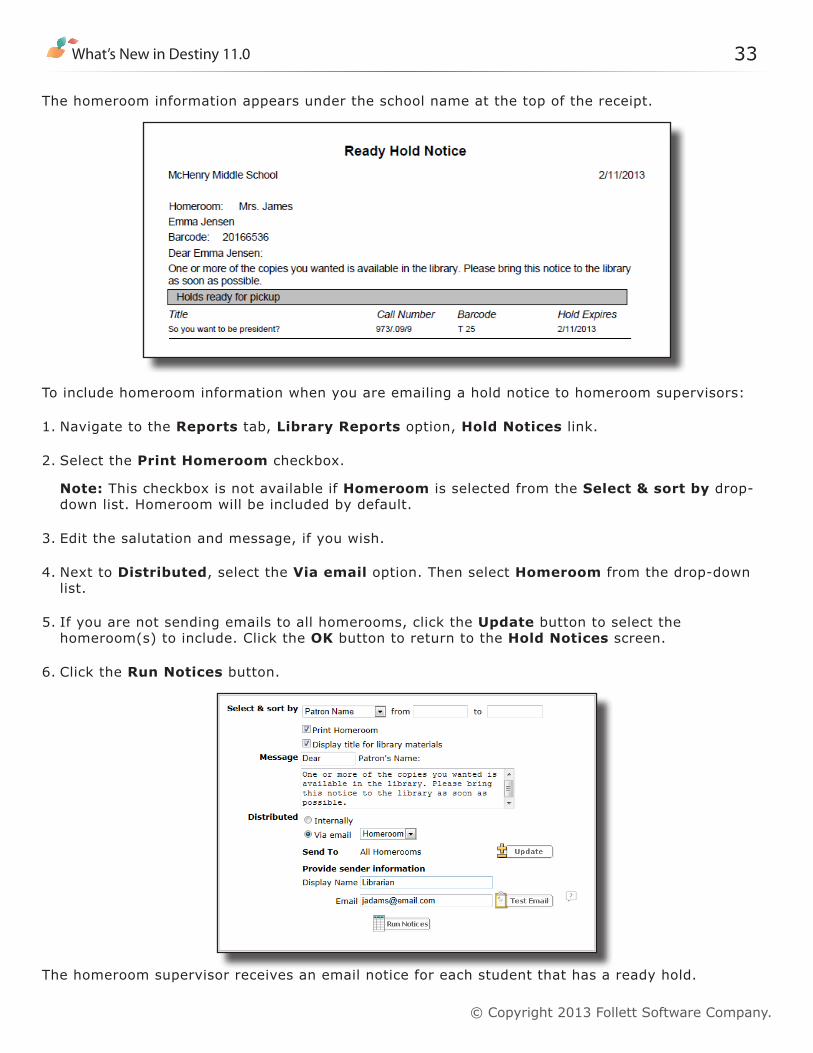
The homeroom information appears under the school name at the top of the receipt.
Hold Notices
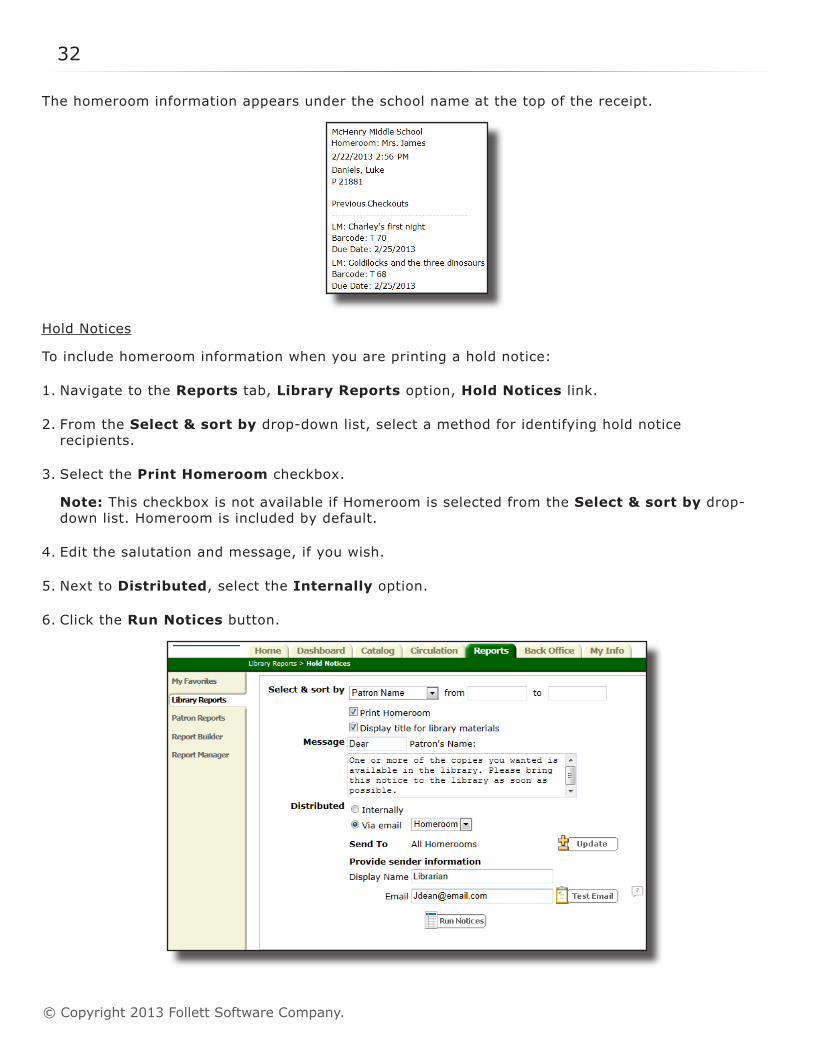
To include homeroom information when you are printing a hold notice:
1. Navigate to the Reports tab, Library Reports option, Hold Notices link.
2. From the Select & sort by drop-down list, select a method for identifying hold notice recipients.
3. Select the Print Homeroom checkbox.
Note: This checkbox is not available if Homeroom is selected from the Select & sort by drop-down list. Homeroom is included by default.
4. Edit the salutation and message, if you wish.
5. Next to Distributed, select the Internally option.
6. Click the Run Notices button.
What’s New in Destiny 11.0 33
© Copyright 2013 Follett Software Company.
The homeroom information appears under the school name at the top of the receipt.
To include homeroom information when you are emailing a hold notice to homeroom supervisors:
1. Navigate to the Reports tab, Library Reports option, Hold Notices link.
2. Select the Print Homeroom checkbox.
Note: This checkbox is not available if Homeroom is selected from the Select & sort by drop-down list. Homeroom will be included by default.
3. Edit the salutation and message, if you wish.
4. Next to Distributed, select the Via email option. Then select Homeroom from the drop-down list.
5. If you are not sending emails to all homerooms, click the Update button to select the homeroom(s) to include. Click the OK button to return to the Hold Notices screen.
6. Click the Run Notices button.
The homeroom supervisor receives an email notice for each student that has a ready hold.
34
© Copyright 2013 Follett Software Company.
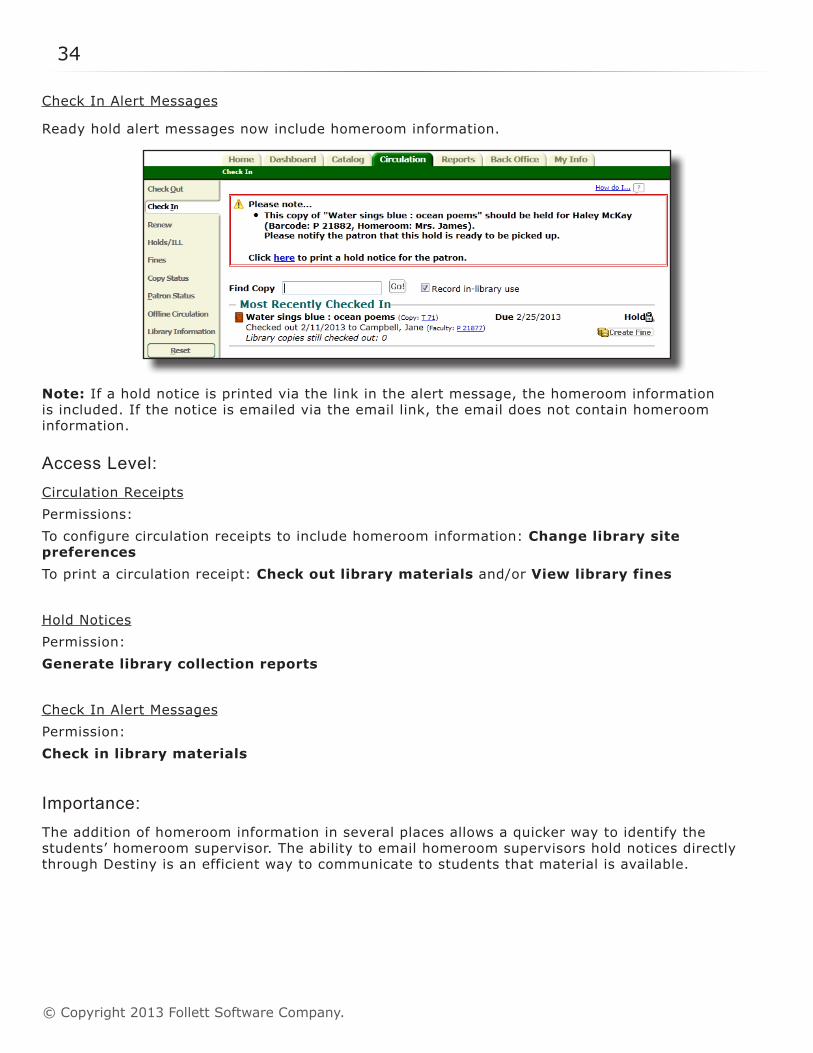
Check In Alert Messages
Ready hold alert messages now include homeroom information.
Note: If a hold notice is printed via the link in the alert message, the homeroom information is included. If the notice is emailed via the email link, the email does not contain homeroom information.
Access Level:Circulation ReceiptsPermissions: To configure circulation receipts to include homeroom information: Change library site preferencesTo print a circulation receipt: Check out library materials and/or View library fines
Hold NoticesPermission:Generate library collection reports
Check In Alert MessagesPermission:Check in library materials
Importance: The addition of homeroom information in several places allows a quicker way to identify the students’ homeroom supervisor. The ability to email homeroom supervisors hold notices directly through Destiny is an efficient way to communicate to students that material is available.
What’s New in Destiny 11.0 35
© Copyright 2013 Follett Software Company.
Library Manager
Holds Enhancements
Feature Description:Library Manager v11.0 introduces several enhancements to improve the management and use of holds.• Patrons can place a hold on multiple copies of the same title if the new access level permission is
enabled.• Patrons cannot place a hold on hidden copies unless they have the appropriate permission.
Hidden copies no longer appear in the Specific Copy list on the Hold Request screen in Circulation.
• Patrons cannot place a hold on available copies unless they have the appropriate permission. • Patrons cannot place a hold on a lost copy, or a title, if all the copies are marked lost. • Patrons cannot place a hold on off-site copies unless they have the appropriate permission.• Library staff can relate, or group, title records so any copy of a title in a group can fulfill a hold
placed on another title in the group.
Feature Information:Placing Holds on Multiple Copies of the Same Title in the Catalog
With the appropriate access level permission, patrons can place holds on multiple copies of the same title.
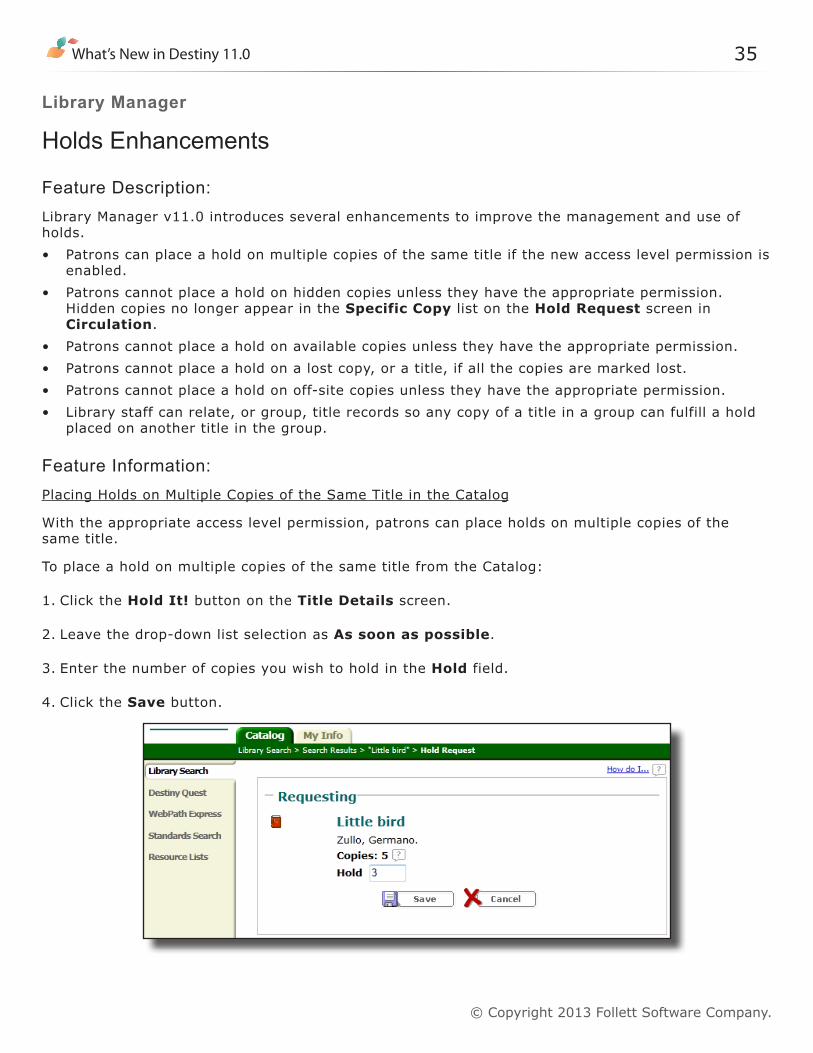
To place a hold on multiple copies of the same title from the Catalog:
1. Click the Hold It! button on the Title Details screen.
2. Leave the drop-down list selection as As soon as possible.
3. Enter the number of copies you wish to hold in the Hold field.
4. Click the Save button.

36
© Copyright 2013 Follett Software Company.
To place a hold on multiple copies of the same title in Destiny Quest:
1. Click the Hold It! button from the Title Details window.
2. Enter the number of copies you wish to hold in the Hold field.
3. Click the Save button.
Note:• The Copies count does not include lost copies. • The Copies count does not include hidden copies unless the patron has permission to see hidden
copies.• The Copies count does not appear at all if all copies of a title are lost. The patron can only place
a hold on the title.• If all copies of the title are lost, the following message appears: Your hold request could not
be placed. All copies of this title are lost. Please contact your librarian to place a hold on this title.
Placing Holds on Multiple Copies of the Same Title in Circulation
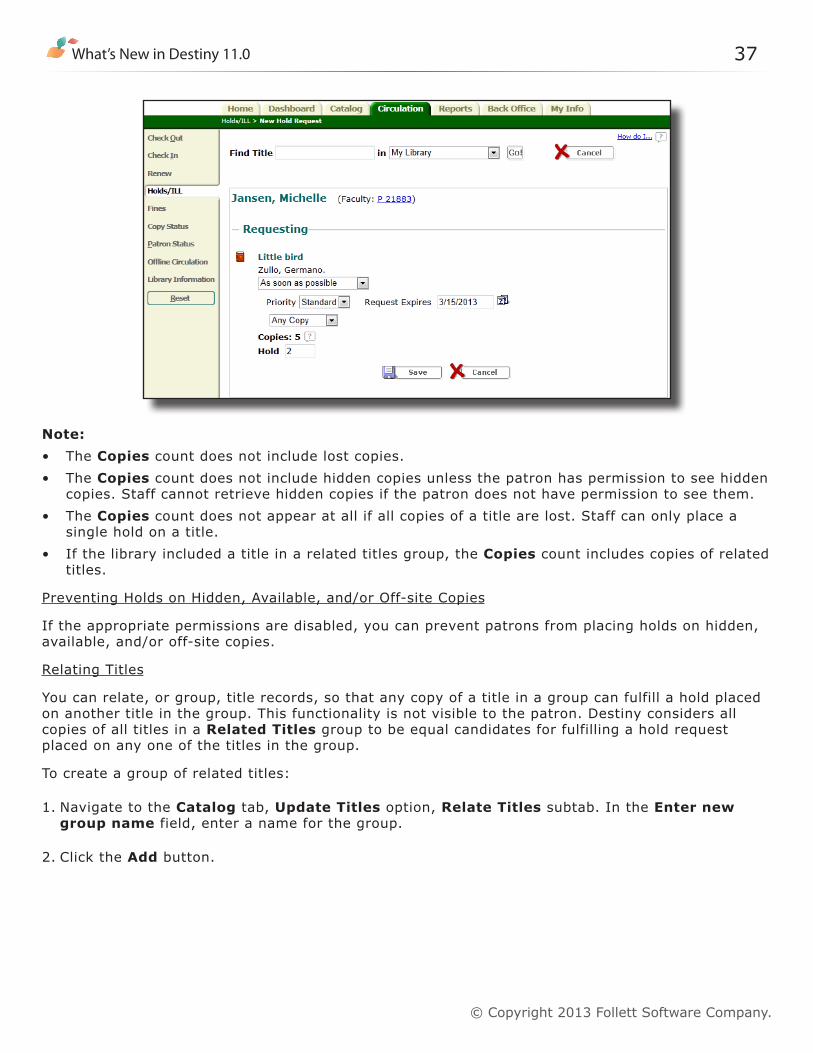
To place a hold on multiple copies from Circulation:
1. From the Holds/ILL screen, select the Add Hold button.
2. Retrieve the title requested by the patron.Note: If all copies of a title are lost, library staff cannot retrieve the title, and the following message appears: “<Title>” not found. You may want to repeat your search at “All Participating Libraries.”
3. In the Requesting section, leave the drop-down list selection as As soon as possible.
4. Adjust the Priority drop-down list and Request Expires field, if desired.
5. Leave the next drop-down list as Any Copy.
6. Enter the number of copies you wish to hold in the Hold field.
7. Click the Save button.
What’s New in Destiny 11.0 37
© Copyright 2013 Follett Software Company.
Note:• The Copies count does not include lost copies. • The Copies count does not include hidden copies unless the patron has permission to see hidden
copies. Staff cannot retrieve hidden copies if the patron does not have permission to see them.• The Copies count does not appear at all if all copies of a title are lost. Staff can only place a
single hold on a title.• If the library included a title in a related titles group, the Copies count includes copies of related
titles.
Preventing Holds on Hidden, Available, and/or Off-site Copies
If the appropriate permissions are disabled, you can prevent patrons from placing holds on hidden, available, and/or off-site copies.
Relating Titles
You can relate, or group, title records, so that any copy of a title in a group can fulfill a hold placed on another title in the group. This functionality is not visible to the patron. Destiny considers all copies of all titles in a Related Titles group to be equal candidates for fulfilling a hold request placed on any one of the titles in the group.
To create a group of related titles:
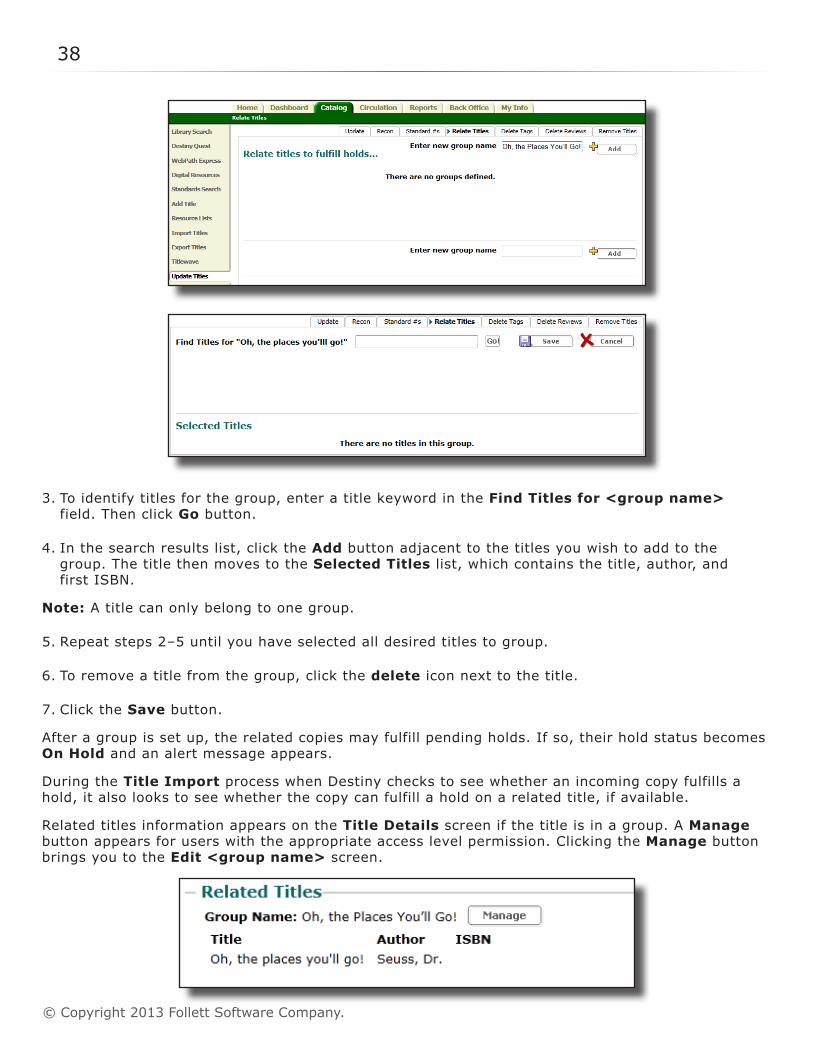
1. Navigate to the Catalog tab, Update Titles option, Relate Titles subtab. In the Enter new group name field, enter a name for the group.
2. Click the Add button.
38
© Copyright 2013 Follett Software Company.
3. To identify titles for the group, enter a title keyword in the Find Titles for <group name> field. Then click Go button.
4. In the search results list, click the Add button adjacent to the titles you wish to add to the group. The title then moves to the Selected Titles list, which contains the title, author, and first ISBN.
Note: A title can only belong to one group.
5. Repeat steps 2–5 until you have selected all desired titles to group.
6. To remove a title from the group, click the delete icon next to the title.
7. Click the Save button.
After a group is set up, the related copies may fulfill pending holds. If so, their hold status becomes On Hold and an alert message appears.
During the Title Import process when Destiny checks to see whether an incoming copy fulfills a hold, it also looks to see whether the copy can fulfill a hold on a related title, if available.
Related titles information appears on the Title Details screen if the title is in a group. A Manage button appears for users with the appropriate access level permission. Clicking the Manage button brings you to the Edit <group name> screen.
What’s New in Destiny 11.0 39
© Copyright 2013 Follett Software Company.
Access Level:Placing Holds on Multiple Copies of the Same Title in the Catalog
The ability to hold multiple copies of a title in the Catalog is enabled by default for the Site Administrator, Library Administrator, and Teacher access levels.
Note: The Site Administrator may need to adjust the Max Holds setting for those patron types allowed to hold multiple copies. The default setting for Max Holds is five copies.
Permissions:Place hold for self from CatalogPlace multiple holds for self
Placing Holds on Multiple Copies of the Same Title in Circulation
The ability to hold multiple copies of a title in Circulation is enabled by default for the Site Administrator, Library Administrator, and Teacher access levels.
Permissions:Place multiple holds for patronsAdd/edit/delete holds for patrons
Preventing Holds on Hidden, Available, and/or Off-site Copies
The ability to place holds on available items is enabled by default for the Destiny Administrator, Site Administrator, Library Administrator, Staff, Teacher, and Patron access levels. The permission must be disabled to prevent holds on Available copies.
The permission that allows ILL requests is enabled by default for the Destiny Administrator, Site Administrator, Library Administrator, Staff, Teacher, and Patron access levels. The permission must be disabled to prevent holds on off-site copies.
Permissions:Place holds on available itemsPlace ILL for self from CatalogSee local hidden materials
Relating Titles
The ability to relate titles is enabled by default for the Destiny Administrator and Site Administrator access levels.
Permission:Relate library titles
40
© Copyright 2013 Follett Software Company.
Importance: The enhancements to holds functionality allow you to further customize holds options to meet your patron and library needs. The ability to place holds on multiple copies allows patrons such as teachers to hold multiple copies to meet their lesson plan needs. The ability to prevent holds on available copies saves library staff time, because they do not have to pull copies from the shelves. Preventing holds on lost copies prevents issues with patrons in case the copy is not replaced. Similarly, disabling availability of hidden copies for holds prevents issues with patrons placing holds on materials that are not available for checkout. Lastly, the ability to group title records (such as those with the same title and author but different ISBNs) allows more holds to be fulfilled.
What’s New in Destiny 11.0 41
© Copyright 2013 Follett Software Company.
Library Manager
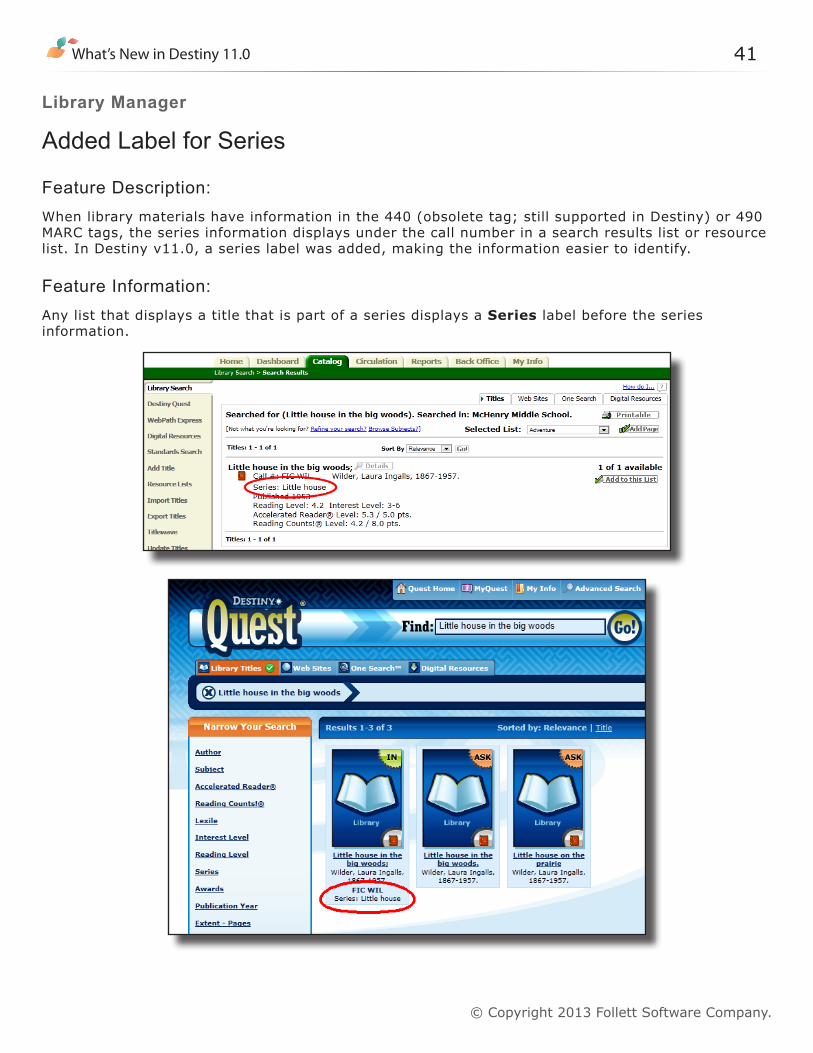
Added Label for Series
Feature Description:When library materials have information in the 440 (obsolete tag; still supported in Destiny) or 490 MARC tags, the series information displays under the call number in a search results list or resource list. In Destiny v11.0, a series label was added, making the information easier to identify.
Feature Information:Any list that displays a title that is part of a series displays a Series label before the series information.
42
© Copyright 2013 Follett Software Company.
Access Level:All users
Importance: The new label makes it easier to recognize materials that are part of a series in search results and resource lists.
What’s New in Destiny 11.0 43
© Copyright 2013 Follett Software Company.
Library Manager
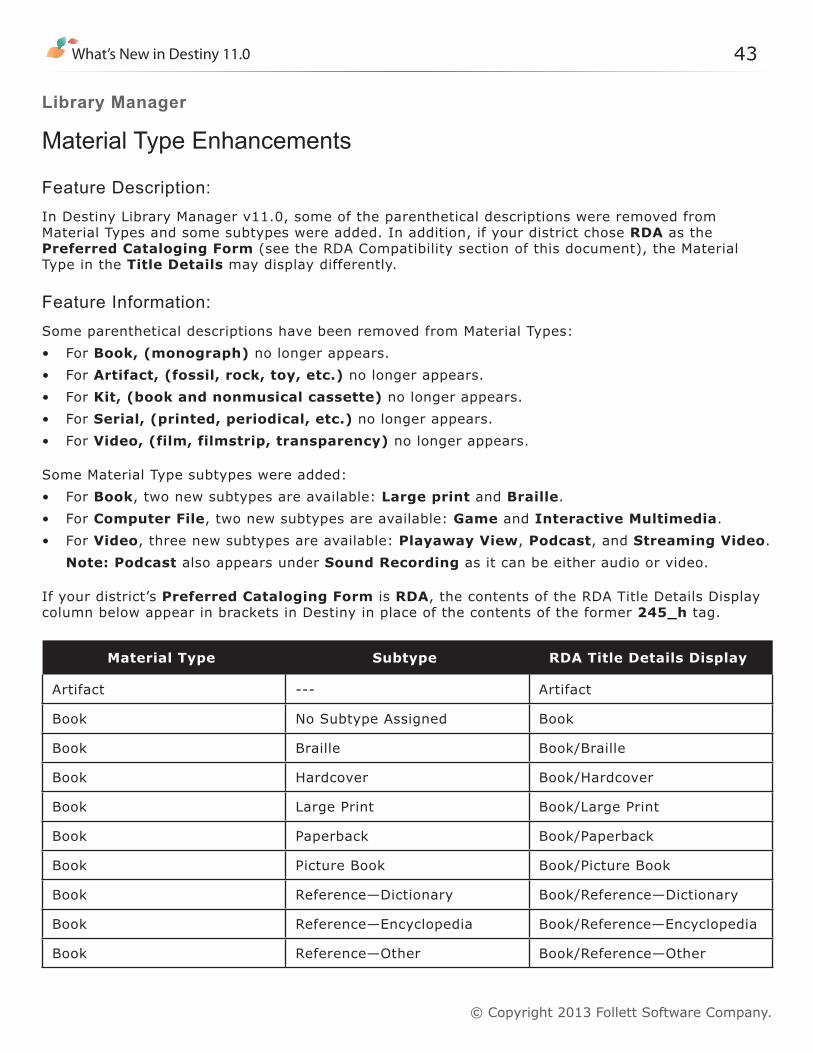
Material Type Enhancements
Feature Description:In Destiny Library Manager v11.0, some of the parenthetical descriptions were removed from Material Types and some subtypes were added. In addition, if your district chose RDA as the Preferred Cataloging Form (see the RDA Compatibility section of this document), the Material Type in the Title Details may display differently.
Feature Information:Some parenthetical descriptions have been removed from Material Types:• For Book, (monograph) no longer appears.• For Artifact, (fossil, rock, toy, etc.) no longer appears.• For Kit, (book and nonmusical cassette) no longer appears.• For Serial, (printed, periodical, etc.) no longer appears.• For Video, (film, filmstrip, transparency) no longer appears.
Some Material Type subtypes were added:• For Book, two new subtypes are available: Large print and Braille.• For Computer File, two new subtypes are available: Game and Interactive Multimedia.• For Video, three new subtypes are available: Playaway View, Podcast, and Streaming Video.
Note: Podcast also appears under Sound Recording as it can be either audio or video.
If your district’s Preferred Cataloging Form is RDA, the contents of the RDA Title Details Display column below appear in brackets in Destiny in place of the contents of the former 245_h tag.
Material Type Subtype RDA Title Details Display
Artifact --- Artifact
Book No Subtype Assigned Book
Book Braille Book/Braille
Book Hardcover Book/Hardcover
Book Large Print Book/Large Print
Book Paperback Book/Paperback
Book Picture Book Book/Picture Book
Book Reference—Dictionary Book/Reference—Dictionary
Book Reference—Encyclopedia Book/Reference—Encyclopedia
Book Reference—Other Book/Reference—Other

44
© Copyright 2013 Follett Software Company.
Material Type Subtype RDA Title Details Display
Book Other Book/Other
Computer File No Subtype Assigned Computer
Computer File Archive Computer/Archive
Computer File Document Computer/Document
Computer File Executable Computer/Executable
Computer File Game Computer/Game
Computer File Interactive Multimedia Computer/Interactive Multimedia
Computer File Media File Computer/Media File
Computer File Other Computer File/Other
Electronic Book (eBook) --- eBook
Equipment --- Equipment
Kit --- Kit
Manuscript Language Material --- Language
Maps, Globes and Atlases No Subtype Assigned Map
Maps, Globes and Atlases Atlases Map/Atlases
Maps, Globes and Atlases Globes Map/Globes
Maps, Globes and Atlases Maps Map/Maps
Maps, Globes and Atlases Other Map/Other
Mixed Material --- Mixed
Music (printed) --- Music
Picture, Study Print, Photograph, Chart
--- Graphic
Serial No Subtype Assigned Serial
Serial Journal Serial/Journal
Serial Magazine Serial/Magazine
Serial Newspaper Serial/Newspaper
Serial Other Serial/Other
Sound Recording (musical) No Subtype Assigned Recording
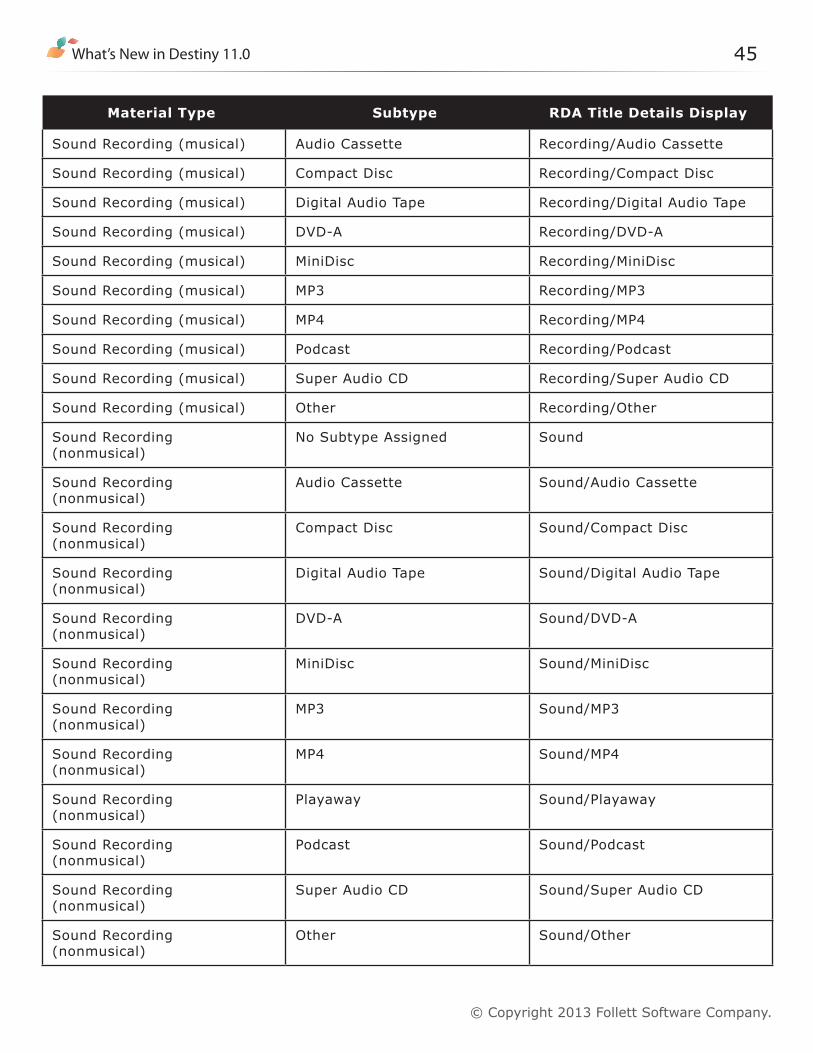
What’s New in Destiny 11.0 45
© Copyright 2013 Follett Software Company.
Material Type Subtype RDA Title Details Display
Sound Recording (musical) Audio Cassette Recording/Audio Cassette
Sound Recording (musical) Compact Disc Recording/Compact Disc
Sound Recording (musical) Digital Audio Tape Recording/Digital Audio Tape
Sound Recording (musical) DVD-A Recording/DVD-A
Sound Recording (musical) MiniDisc Recording/MiniDisc
Sound Recording (musical) MP3 Recording/MP3
Sound Recording (musical) MP4 Recording/MP4
Sound Recording (musical) Podcast Recording/Podcast
Sound Recording (musical) Super Audio CD Recording/Super Audio CD
Sound Recording (musical) Other Recording/Other
Sound Recording (nonmusical)
No Subtype Assigned Sound
Sound Recording (nonmusical)
Audio Cassette Sound/Audio Cassette
Sound Recording (nonmusical)
Compact Disc Sound/Compact Disc
Sound Recording (nonmusical)
Digital Audio Tape Sound/Digital Audio Tape
Sound Recording (nonmusical)
DVD-A Sound/DVD-A
Sound Recording (nonmusical)
MiniDisc Sound/MiniDisc
Sound Recording (nonmusical)
MP3 Sound/MP3
Sound Recording (nonmusical)
MP4 Sound/MP4
Sound Recording (nonmusical)
Playaway Sound/Playaway
Sound Recording (nonmusical)
Podcast Sound/Podcast
Sound Recording (nonmusical)
Super Audio CD Sound/Super Audio CD
Sound Recording (nonmusical)
Other Sound/Other
46
© Copyright 2013 Follett Software Company.
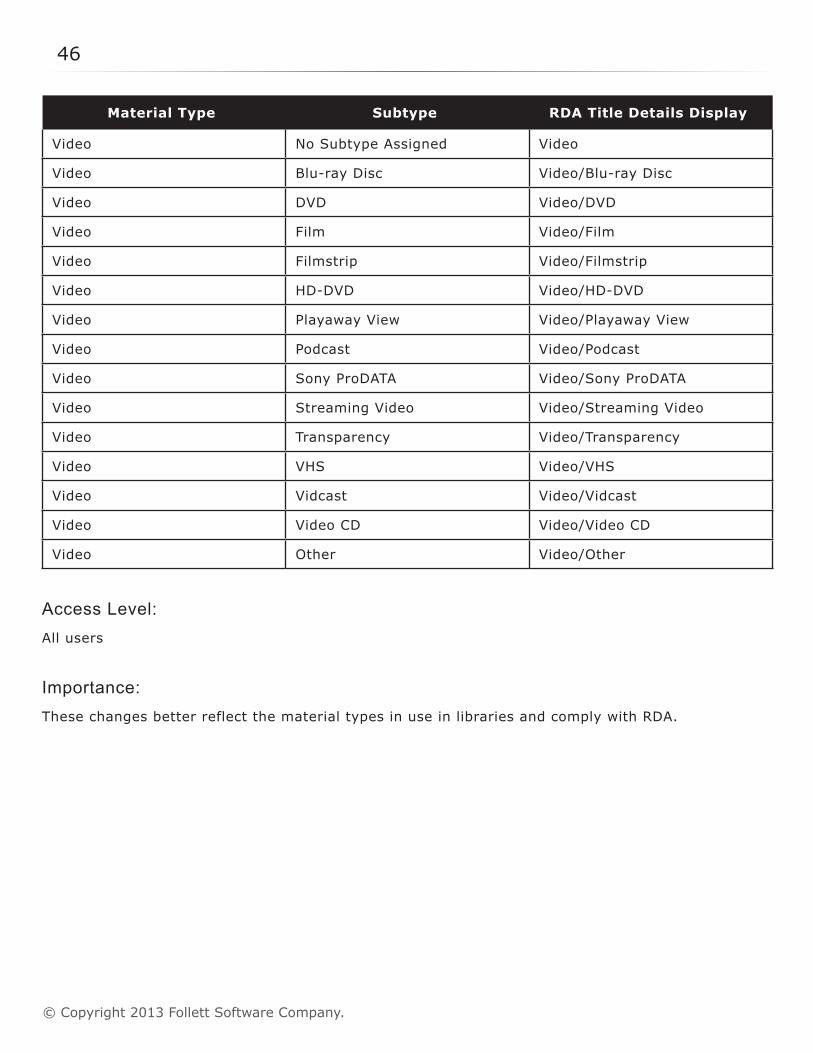
Material Type Subtype RDA Title Details Display
Video No Subtype Assigned Video
Video Blu-ray Disc Video/Blu-ray Disc
Video DVD Video/DVD
Video Film Video/Film
Video Filmstrip Video/Filmstrip
Video HD-DVD Video/HD-DVD
Video Playaway View Video/Playaway View
Video Podcast Video/Podcast
Video Sony ProDATA Video/Sony ProDATA
Video Streaming Video Video/Streaming Video
Video Transparency Video/Transparency
Video VHS Video/VHS
Video Vidcast Video/Vidcast
Video Video CD Video/Video CD
Video Other Video/Other
Access Level:All users
Importance: These changes better reflect the material types in use in libraries and comply with RDA.
What’s New in Destiny 11.0 47
© Copyright 2013 Follett Software Company.
Library Manager
Missouri Report Update
Feature Description:The state of Missouri changed the reporting requirements for its libraries. A new Missouri Report is available in Destiny Library Manager to meet the new reporting requirements. You now need to run only one report. The existing Missouri Report was renamed the Missouri Time Sensitive Dewey Reports.
Feature Information:To configure and generate a Missouri Report:
1. Navigate to the Reports tab, Library Reports option.
2. If you are a district library materials manager, select a library Site from the drop-down list.
3. Select the Configure subtab.
4. Select the correct collection for each call number prefix.Note: EBooks can be counted as either Fiction or Visual.
5. If you are a district library materials manager, you can push this setup to one or all library sites in the district. To do so, make your selection from the Apply these settings at drop-down list and click the Push button.
6. Click the Save Setup button.
7. Return to the Reports tab.
8. Click the Run Report button.
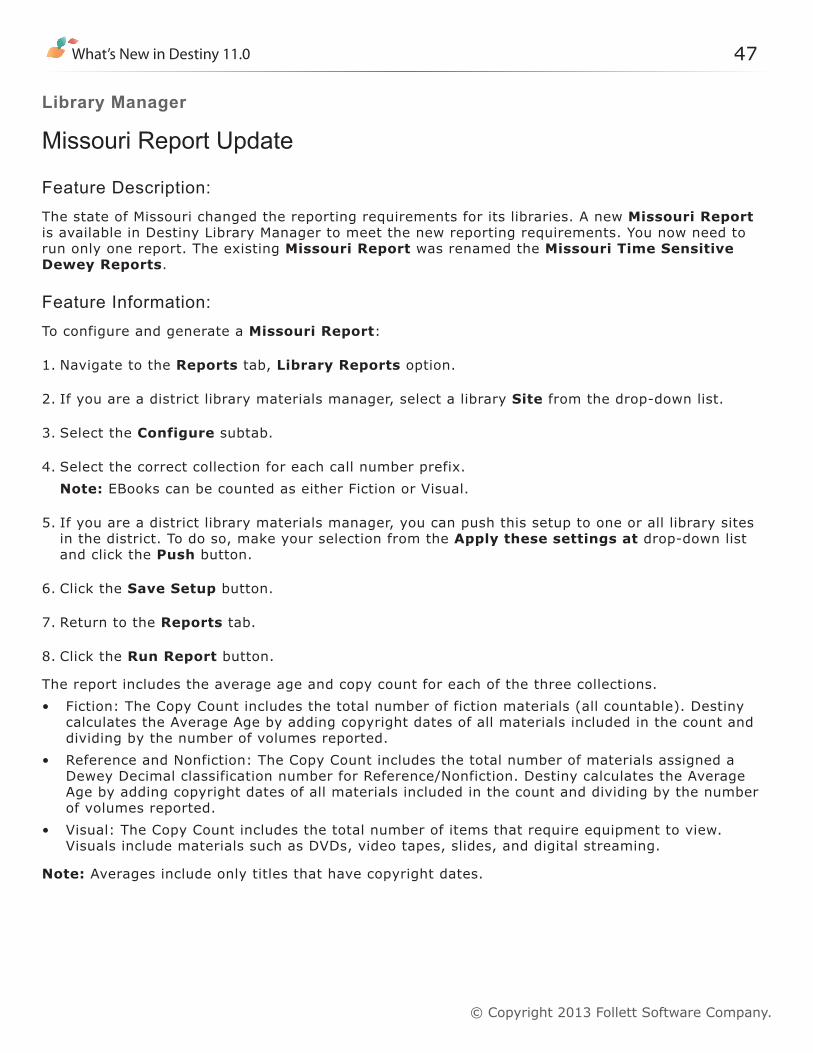
The report includes the average age and copy count for each of the three collections.• Fiction: The Copy Count includes the total number of fiction materials (all countable). Destiny
calculates the Average Age by adding copyright dates of all materials included in the count and dividing by the number of volumes reported.
• Reference and Nonfiction: The Copy Count includes the total number of materials assigned a Dewey Decimal classification number for Reference/Nonfiction. Destiny calculates the Average Age by adding copyright dates of all materials included in the count and dividing by the number of volumes reported.
• Visual: The Copy Count includes the total number of items that require equipment to view. Visuals include materials such as DVDs, video tapes, slides, and digital streaming.
Note: Averages include only titles that have copyright dates.
48
© Copyright 2013 Follett Software Company.
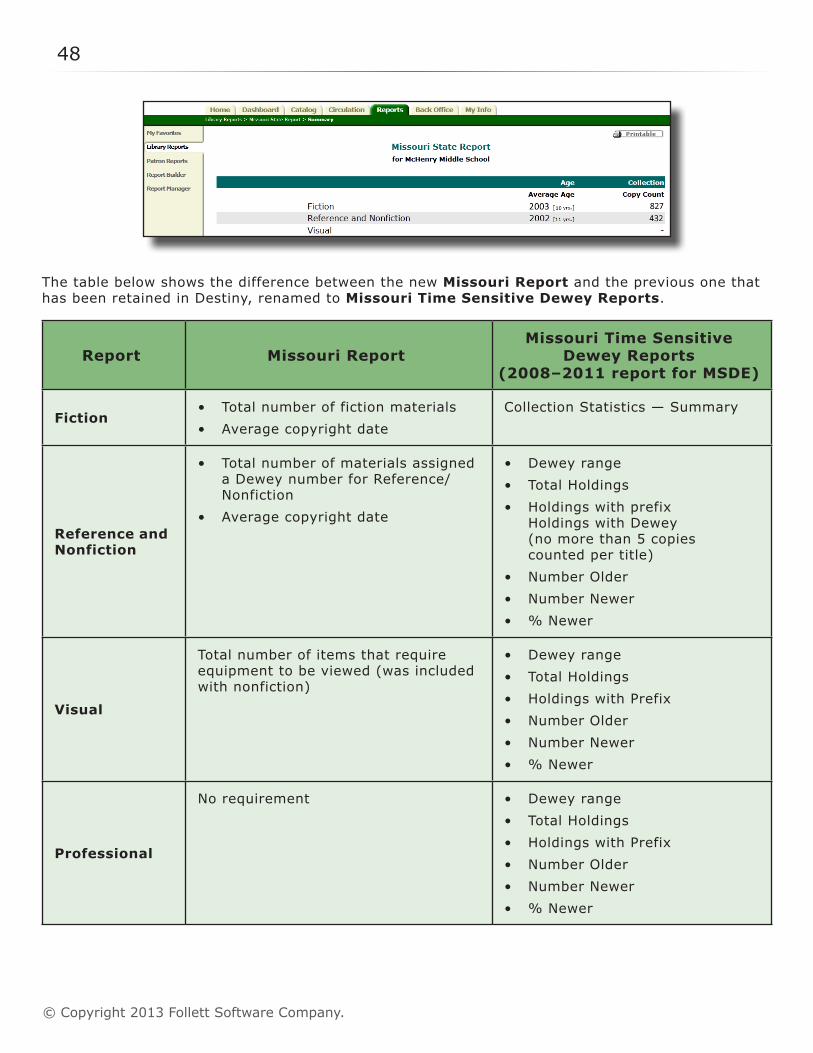
The table below shows the difference between the new Missouri Report and the previous one that has been retained in Destiny, renamed to Missouri Time Sensitive Dewey Reports.
Report Missouri ReportMissouri Time Sensitive
Dewey Reports (2008–2011 report for MSDE)
Fiction• Total number of fiction materials• Average copyright date
Collection Statistics — Summary
Reference and Nonfiction
• Total number of materials assigned a Dewey number for Reference/Nonfiction
• Average copyright date
• Dewey range• Total Holdings• Holdings with prefix
Holdings with Dewey(no more than 5 copies counted per title)
• Number Older• Number Newer• % Newer
Visual
Total number of items that require equipment to be viewed (was included with nonfiction)
• Dewey range• Total Holdings• Holdings with Prefix• Number Older• Number Newer• % Newer
Professional
No requirement • Dewey range• Total Holdings• Holdings with Prefix• Number Older• Number Newer• % Newer
What’s New in Destiny 11.0 49
© Copyright 2013 Follett Software Company.
Access Level:Site Administrator, Library Administrator
Permission:Generate library collection reports
Importance: This report was updated to help librarians meet new reporting requirements in the state of Missouri.

50
© Copyright 2013 Follett Software Company.
What’s New in Destiny 11.0 51
© Copyright 2013 Follett Software Company.
Library Manager
New Icons for FollettShelf EBooks
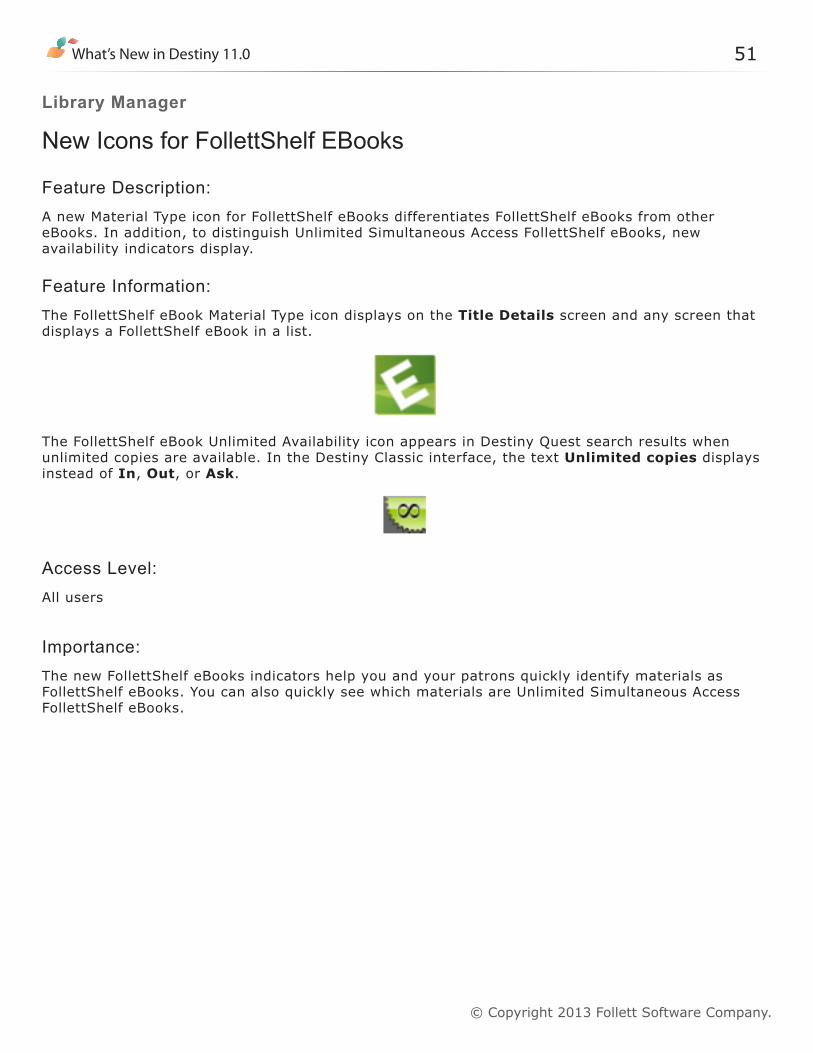
Feature Description:A new Material Type icon for FollettShelf eBooks differentiates FollettShelf eBooks from other eBooks. In addition, to distinguish Unlimited Simultaneous Access FollettShelf eBooks, new availability indicators display.
Feature Information:The FollettShelf eBook Material Type icon displays on the Title Details screen and any screen that displays a FollettShelf eBook in a list.
The FollettShelf eBook Unlimited Availability icon appears in Destiny Quest search results when unlimited copies are available. In the Destiny Classic interface, the text Unlimited copies displays instead of In, Out, or Ask.
Access Level:All users
Importance: The new FollettShelf eBooks indicators help you and your patrons quickly identify materials as FollettShelf eBooks. You can also quickly see which materials are Unlimited Simultaneous Access FollettShelf eBooks.

52
© Copyright 2013 Follett Software Company.
What’s New in Destiny 11.0 53
© Copyright 2013 Follett Software Company.
Library Manager
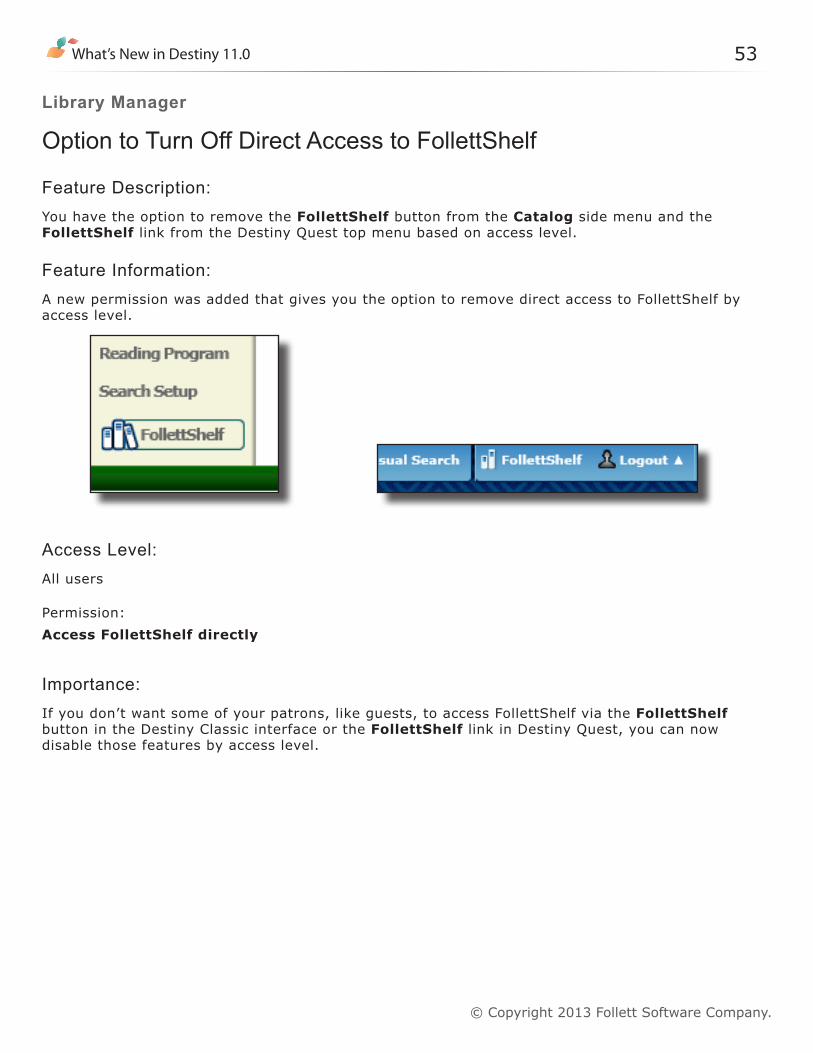
Option to Turn Off Direct Access to FollettShelf
Feature Description:You have the option to remove the FollettShelf button from the Catalog side menu and the FollettShelf link from the Destiny Quest top menu based on access level.
Feature Information:A new permission was added that gives you the option to remove direct access to FollettShelf by access level.
Access Level:All users
Permission:Access FollettShelf directly
Importance: If you don’t want some of your patrons, like guests, to access FollettShelf via the FollettShelf button in the Destiny Classic interface or the FollettShelf link in Destiny Quest, you can now disable those features by access level.

54
© Copyright 2013 Follett Software Company.
What’s New in Destiny 11.0 55
© Copyright 2013 Follett Software Company.
Library Manager
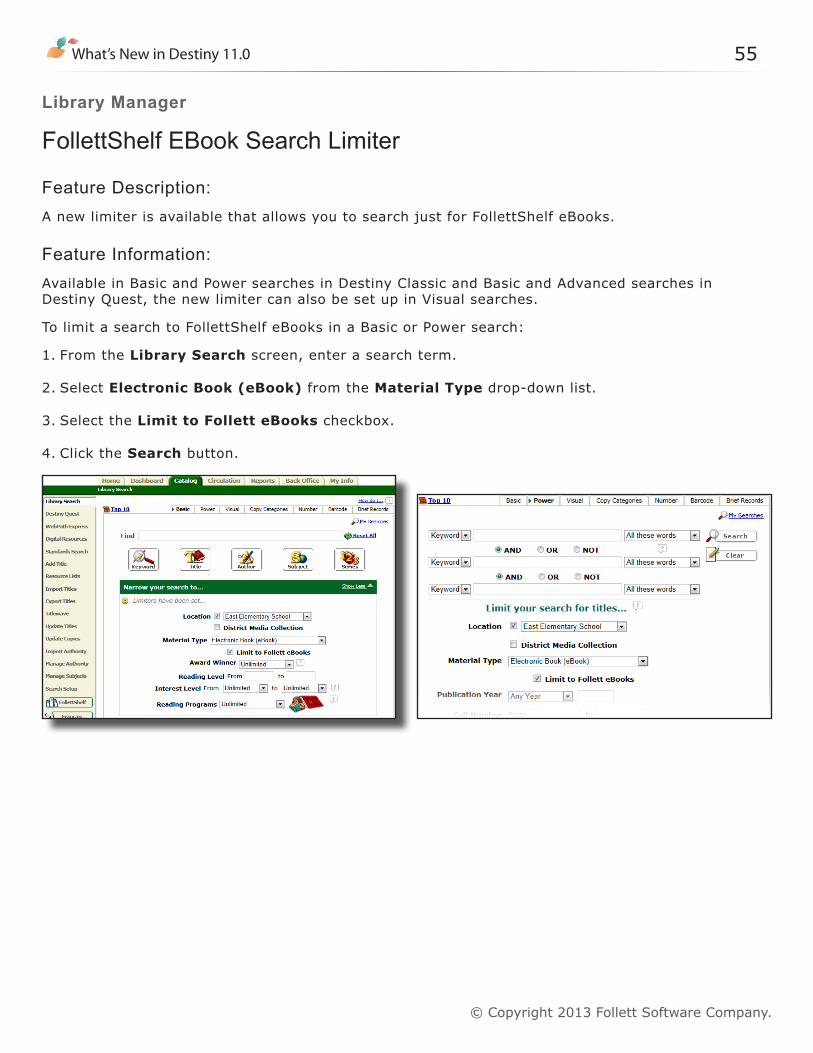
FollettShelf EBook Search Limiter
Feature Description:A new limiter is available that allows you to search just for FollettShelf eBooks.
Feature Information:Available in Basic and Power searches in Destiny Classic and Basic and Advanced searches in Destiny Quest, the new limiter can also be set up in Visual searches.
To limit a search to FollettShelf eBooks in a Basic or Power search:
1. From the Library Search screen, enter a search term.
2. Select Electronic Book (eBook) from the Material Type drop-down list.
3. Select the Limit to Follett eBooks checkbox.
4. Click the Search button.
56
© Copyright 2013 Follett Software Company.
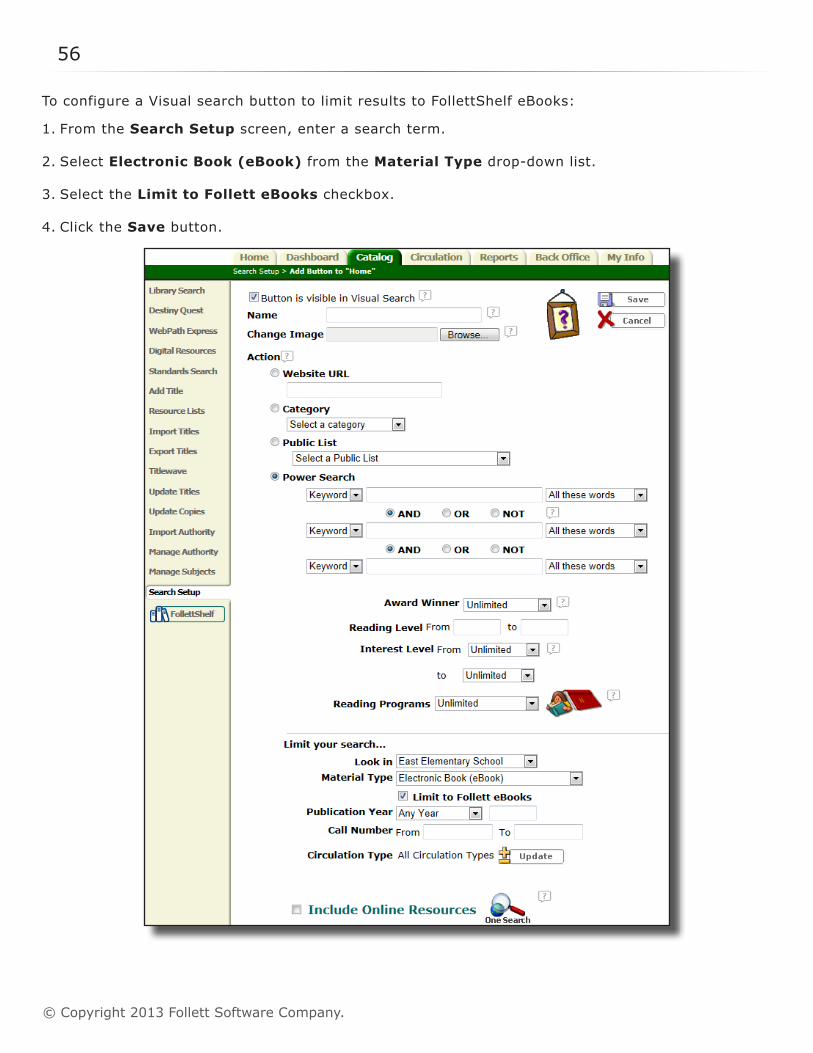
To configure a Visual search button to limit results to FollettShelf eBooks:
1. From the Search Setup screen, enter a search term.
2. Select Electronic Book (eBook) from the Material Type drop-down list.
3. Select the Limit to Follett eBooks checkbox.
4. Click the Save button.
What’s New in Destiny 11.0 57
© Copyright 2013 Follett Software Company.
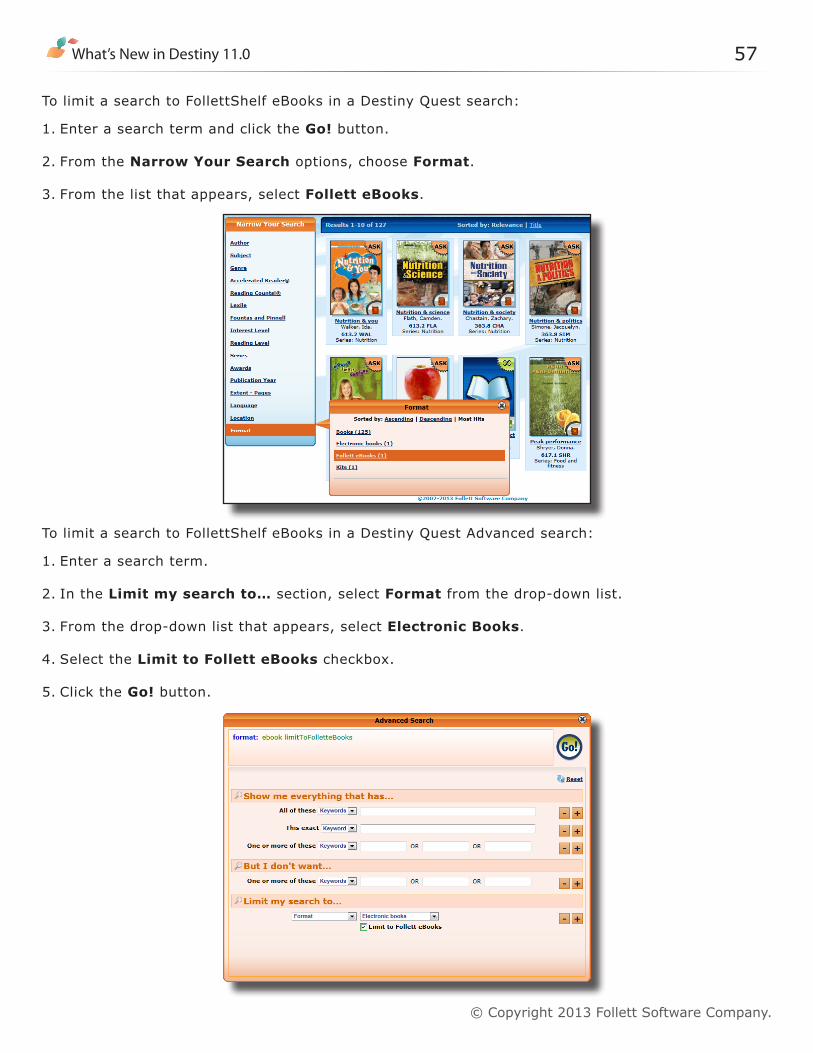
To limit a search to FollettShelf eBooks in a Destiny Quest search:
1. Enter a search term and click the Go! button.
2. From the Narrow Your Search options, choose Format.
3. From the list that appears, select Follett eBooks.
To limit a search to FollettShelf eBooks in a Destiny Quest Advanced search:
1. Enter a search term.
2. In the Limit my search to… section, select Format from the drop-down list.
3. From the drop-down list that appears, select Electronic Books.
4. Select the Limit to Follett eBooks checkbox.
5. Click the Go! button.
58
© Copyright 2013 Follett Software Company.
Access Level:All users
Importance: The new search limiter allows you to narrow search results to FollettShelf eBooks.

What’s New in Destiny 11.0 59
© Copyright 2013 Follett Software Company.
Library Manager
FollettShelf eBooks Hidden in FollettShelf are Hidden in Destiny
Feature Description:When a FollettShelf Update takes place, FollettShelf eBook title records that are hidden in FollettShelf and have no local copies in Destiny are removed from that local library’s catalog.
Feature Information:To remove eBook titles marked as Hidden in FollettShelf from the local library’s catalog, you must complete the following: • Hide the unwanted titles in FollettShelf.• Delete any local copies of the unwanted FollettShelf eBooks.
The next FollettShelf Update, whether started manually or automatically, removes any hidden FollettShelf ebook title record that has no local copies from that library’s catalog.
Keep in mind that removing the title does not delete the title. When a title is removed, Destiny disassociates the title from the library. A disassociated title remains in the district collection for other libraries to use, but it no longer appears in the search results of local searches, which effectively hides FollettShelf eBook titles at sites that do not have copies.
Access Level:Site Administrator, Library Administrator
Permissions:Allow FollettShelf administrationManage Copies, Delete
Importance: You may wish to hide titles at specific sites. For example, you may not want elementary students to see high school level eBooks. Now books that are hidden in your FollettShelf will be hidden in Destiny, as well.

60
© Copyright 2013 Follett Software Company.

What’s New in Destiny 11.0 61
© Copyright 2013 Follett Software Company.
Library Manager
Destiny Quest Mobile v1�6
Feature Description:Enhancements to Destiny Quest Mobile in the areas of eBooks, RDA, and holds allow you to access more functions from your mobile phone. In addition, you can now rate the app in its app store.
Feature Information:
EBooks• In Destiny Quest Mobile search results, the FollettShelf eBook Unlimited Availability icon appears
when unlimited copies are available instead of In, Out, or Ask.
• Patrons can add and remove FollettShelf eBooks in their My List.
62
© Copyright 2013 Follett Software Company.
Holds
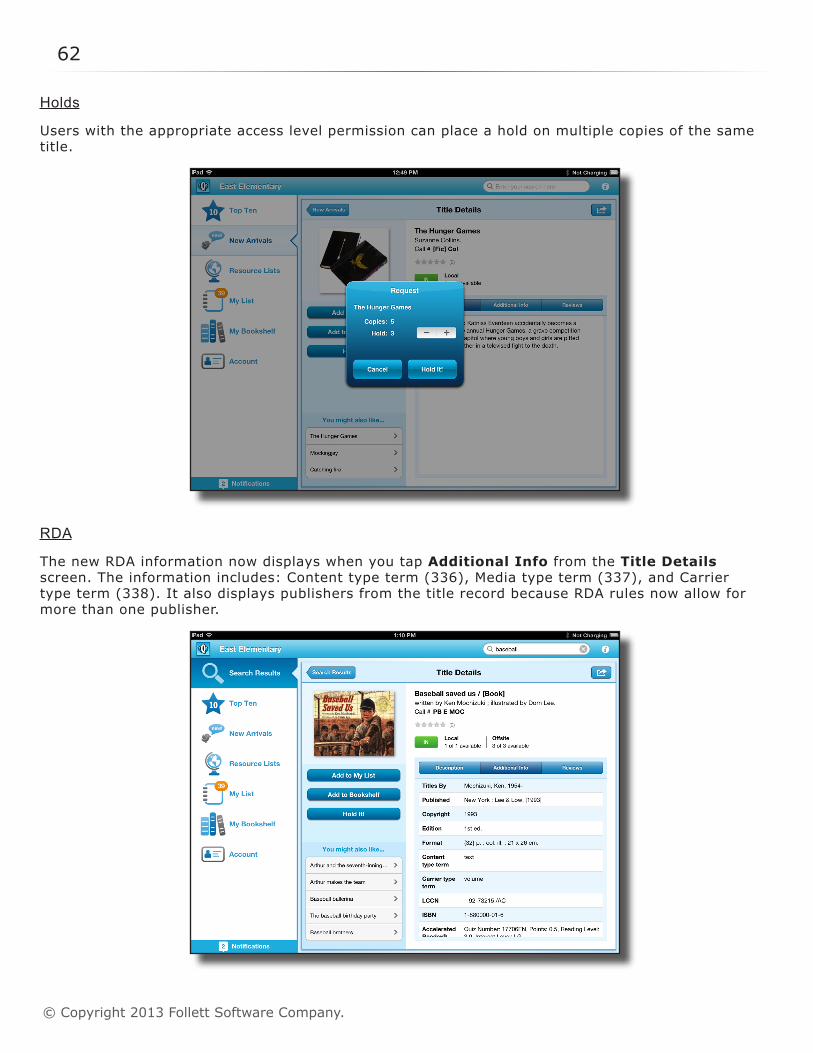
Users with the appropriate access level permission can place a hold on multiple copies of the same title.
RDA
The new RDA information now displays when you tap Additional Info from the Title Details screen. The information includes: Content type term (336), Media type term (337), and Carrier type term (338). It also displays publishers from the title record because RDA rules now allow for more than one publisher.
What’s New in Destiny 11.0 63
© Copyright 2013 Follett Software Company.
Ratings
You can now rate the Destiny Quest Mobile app in its store. After 10 searches, a message appears asking you to rate the app. You have three options: Rate the app, No Thanks (the messages does not reappear), Remind me later (the message reappears after another 10 searches). A Rate Destiny Quest link also appears on the About screen.
Access Level:All users
Importance: These enhancements reflect the enhancements made in Destiny v11.0 to eBook, holds, and RDA functionality. The Ratings feature allows you to provide valuable feedback about the app.

64
© Copyright 2013 Follett Software Company.
What’s New in Destiny 11.0 65
© Copyright 2013 Follett Software Company.
Digital Content Subscriptions

66
© Copyright 2013 Follett Software Company.
What’s New in Destiny 11.0 67
© Copyright 2013 Follett Software Company.
Digital Content Subscriptions
Push One Search Configuration to Other Sites
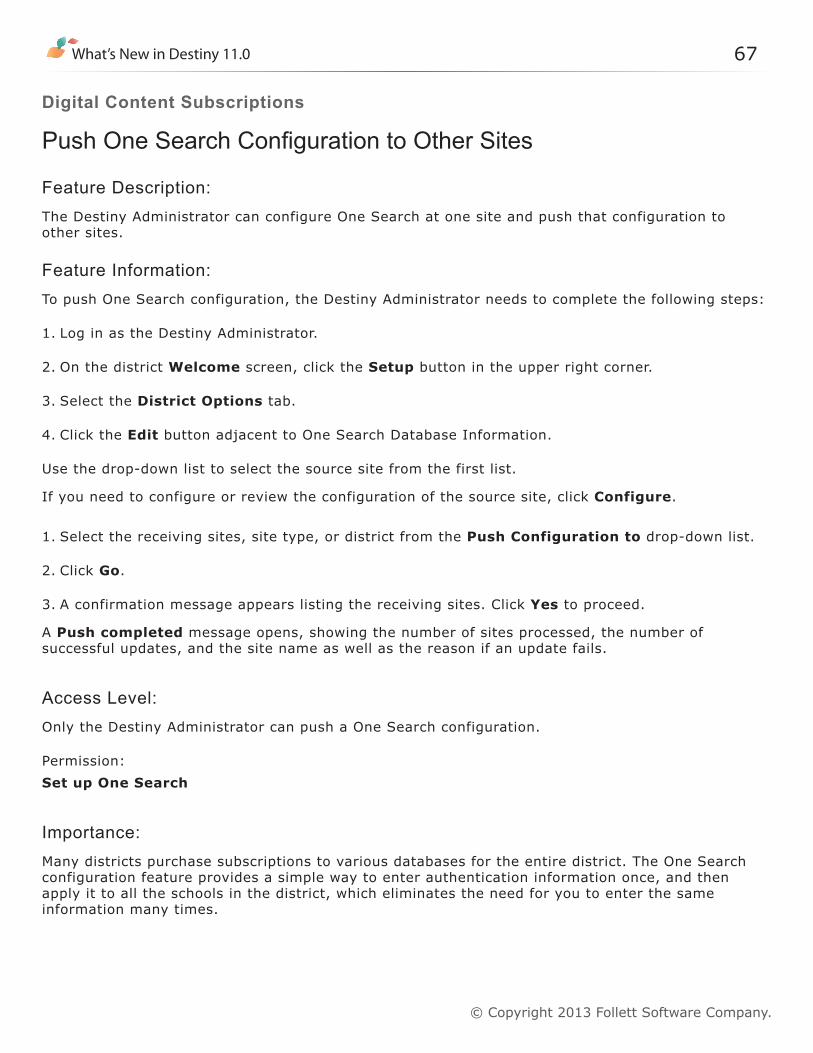
Feature Description:The Destiny Administrator can configure One Search at one site and push that configuration to other sites.
Feature Information:To push One Search configuration, the Destiny Administrator needs to complete the following steps:
1. Log in as the Destiny Administrator.
2. On the district Welcome screen, click the Setup button in the upper right corner.
3. Select the District Options tab.
4. Click the Edit button adjacent to One Search Database Information.
Use the drop-down list to select the source site from the first list.
If you need to configure or review the configuration of the source site, click Configure.
1. Select the receiving sites, site type, or district from the Push Configuration to drop-down list.
2. Click Go.
3. A confirmation message appears listing the receiving sites. Click Yes to proceed.
A Push completed message opens, showing the number of sites processed, the number of successful updates, and the site name as well as the reason if an update fails.
Access Level:Only the Destiny Administrator can push a One Search configuration.
Permission:Set up One Search
Importance: Many districts purchase subscriptions to various databases for the entire district. The One Search configuration feature provides a simple way to enter authentication information once, and then apply it to all the schools in the district, which eliminates the need for you to enter the same information many times.

68
© Copyright 2013 Follett Software Company.
What’s New in Destiny 11.0 69
© Copyright 2013 Follett Software Company.
Digital Content Subscriptions
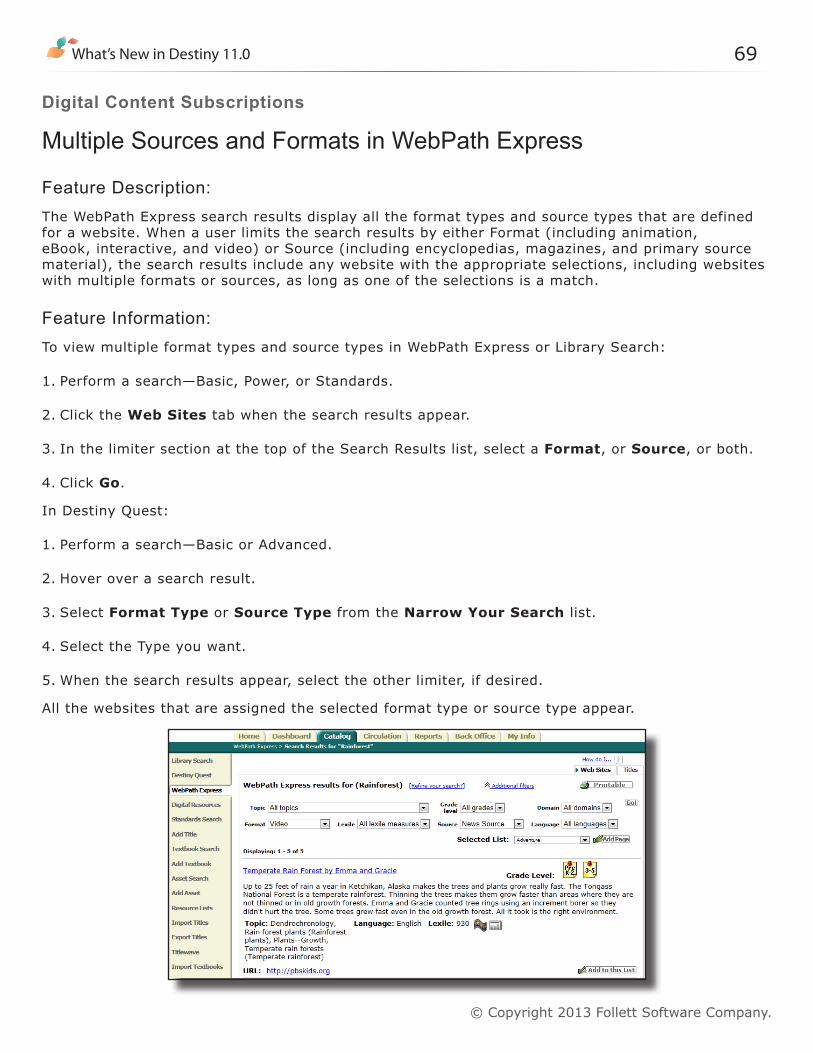
Multiple Sources and Formats in WebPath Express
Feature Description:The WebPath Express search results display all the format types and source types that are defined for a website. When a user limits the search results by either Format (including animation, eBook, interactive, and video) or Source (including encyclopedias, magazines, and primary source material), the search results include any website with the appropriate selections, including websites with multiple formats or sources, as long as one of the selections is a match.
Feature Information:To view multiple format types and source types in WebPath Express or Library Search:
1. Perform a search—Basic, Power, or Standards.
2. Click the Web Sites tab when the search results appear.
3. In the limiter section at the top of the Search Results list, select a Format, or Source, or both.
4. Click Go.
In Destiny Quest:
1. Perform a search—Basic or Advanced.
2. Hover over a search result.
3. Select Format Type or Source Type from the Narrow Your Search list.
4. Select the Type you want.
5. When the search results appear, select the other limiter, if desired.
All the websites that are assigned the selected format type or source type appear.

70
© Copyright 2013 Follett Software Company.
Format Type and Source Type Icons
Icon Format Type Icon Source Type
AnimationDictionary or Thesaurus
Audio Encyclopedia
Biography Magazine
eBook Map/Atlas
Educational Game News source
Image collectionPrimary source material
Interactive
Music
Video
Access Level:The Site Administrator must activate WebPath Express access.
Permission:Search WebPath Express
Importance: WebPath Express users can limit their search to websites based on source, format, or both and find all appropriate websites.
What’s New in Destiny 11.0 71
© Copyright 2013 Follett Software Company.
Digital Content Subscriptions
Reading Program Service Frequency Update Option
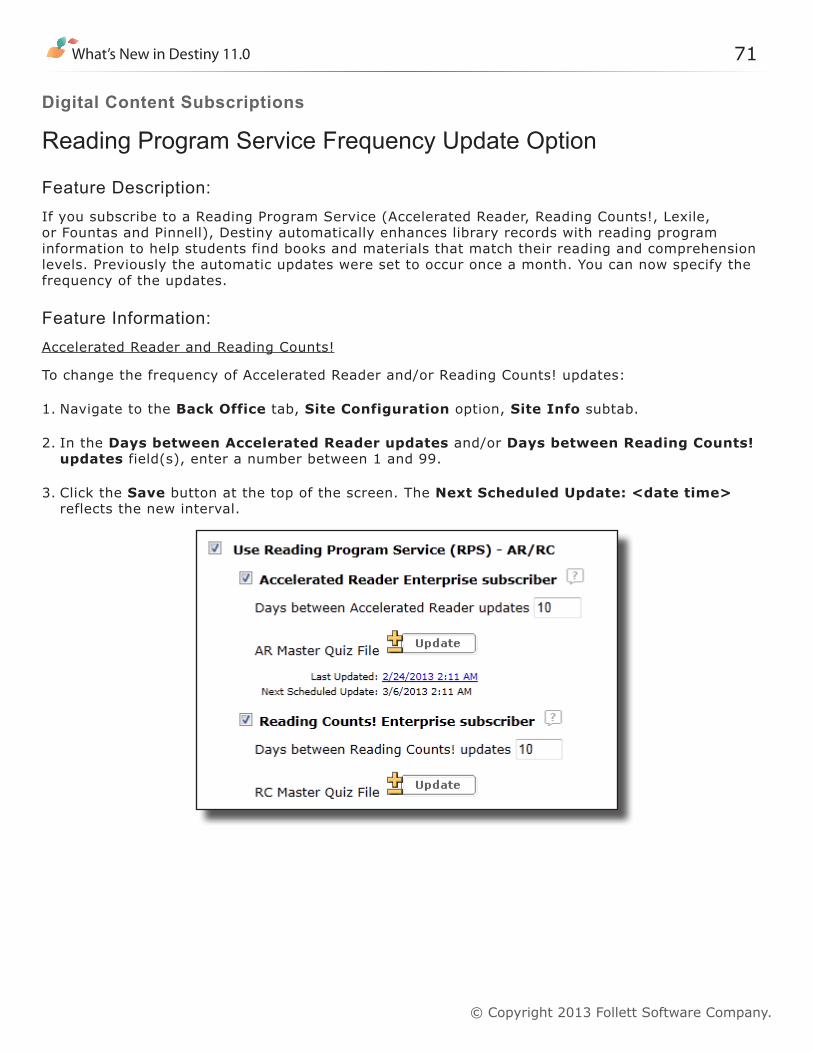
Feature Description:If you subscribe to a Reading Program Service (Accelerated Reader, Reading Counts!, Lexile, or Fountas and Pinnell), Destiny automatically enhances library records with reading program information to help students find books and materials that match their reading and comprehension levels. Previously the automatic updates were set to occur once a month. You can now specify the frequency of the updates.
Feature Information:Accelerated Reader and Reading Counts!
To change the frequency of Accelerated Reader and/or Reading Counts! updates:
1. Navigate to the Back Office tab, Site Configuration option, Site Info subtab.
2. In the Days between Accelerated Reader updates and/or Days between Reading Counts! updates field(s), enter a number between 1 and 99.
3. Click the Save button at the top of the screen. The Next Scheduled Update: <date time> reflects the new interval.
72
© Copyright 2013 Follett Software Company.
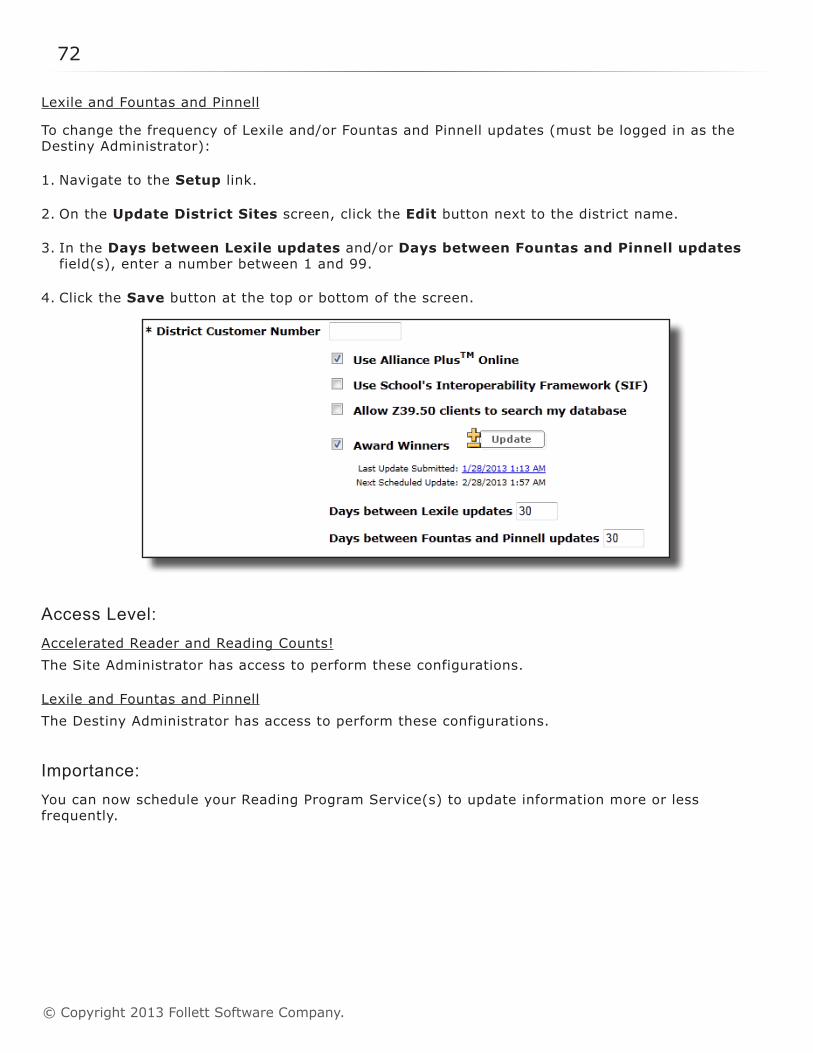
Lexile and Fountas and Pinnell
To change the frequency of Lexile and/or Fountas and Pinnell updates (must be logged in as the Destiny Administrator):
1. Navigate to the Setup link.
2. On the Update District Sites screen, click the Edit button next to the district name.
3. In the Days between Lexile updates and/or Days between Fountas and Pinnell updates field(s), enter a number between 1 and 99.
4. Click the Save button at the top or bottom of the screen.
Access Level:Accelerated Reader and Reading Counts!The Site Administrator has access to perform these configurations.
Lexile and Fountas and PinnellThe Destiny Administrator has access to perform these configurations.
Importance: You can now schedule your Reading Program Service(s) to update information more or less frequently.
What’s New in Destiny 11.0 73
© Copyright 2013 Follett Software Company.
Digital Content Subscriptions
Cataloging Update for Fountas and Pinnell Guided Reading
Feature Description:Catalogers have the option of entering the term “Guided Reading” instead of one of the existing options for Fountas and Pinnell terms (“fountas,” “pinnell,” “fp,” “f&p,” and “f & p”) in subfield b of the 521 tag.
Note: These terms are case sensitive. The indicators are 8 and #, as usual.
Feature Information:Library searches limited to Fountas and Pinnell levels now include title records cataloged with the term “Guided Reading” in 521 subfield b.
Access Level:All users
Importance: Search results include materials that are within the selected level range and that have any of the following in the 521 subfield b tag: Guided Reading, fountas, pinnell, fp, f&p, or f & p.

74
© Copyright 2013 Follett Software Company.
What’s New in Destiny 11.0 75
© Copyright 2013 Follett Software Company.
Destiny Textbook Manager

76
© Copyright 2013 Follett Software Company.

What’s New in Destiny 11.0 77
© Copyright 2013 Follett Software Company.
Textbook Manager
Price for Fine Calculations
Feature Description:You can now use either the Replacement Price from the title record or the Purchase Price from the copy record to calculate fines. Destiny can also factor in the condition of the textbook when calculating fines if you set up automatic conditioning in Textbook Policies.
Feature Information:To select use of the Replacement Price from the title record or the Purchase Price from the copy record to calculate fines:
1. Navigate to the Back Office tab, Site Configuration option, Circulation subtab.
2. Locate the Textbook Options: Create fines using… section.
3. Select either the Replacement price from title, which is the default selection, or the Purchase price from copy radio button.
4. Select the Prorate fine amount based on copy condition checkbox if you want Destiny to factor in the condition of the textbook and your school has set up automatic conditioning.
5. Click the Save button to save the changes made to the Site Configuration options.
78
© Copyright 2013 Follett Software Company.
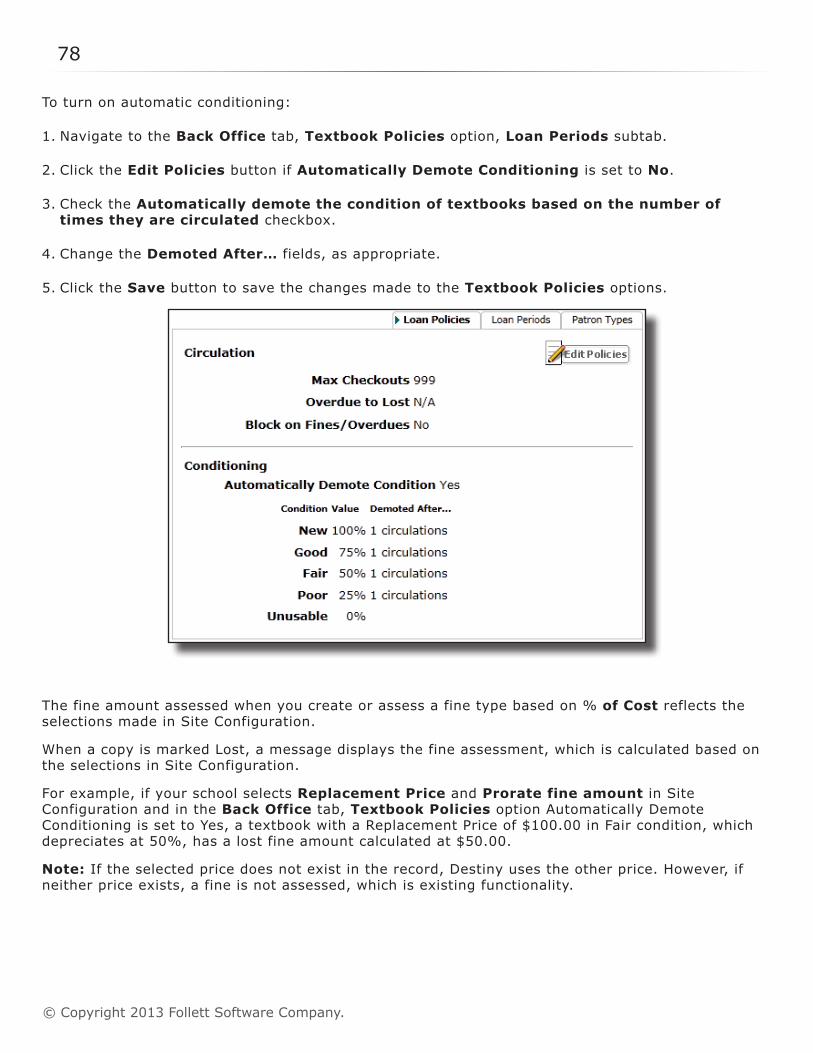
To turn on automatic conditioning:
1. Navigate to the Back Office tab, Textbook Policies option, Loan Periods subtab.
2. Click the Edit Policies button if Automatically Demote Conditioning is set to No.
3. Check the Automatically demote the condition of textbooks based on the number of times they are circulated checkbox.
4. Change the Demoted After… fields, as appropriate.
5. Click the Save button to save the changes made to the Textbook Policies options.
The fine amount assessed when you create or assess a fine type based on % of Cost reflects the selections made in Site Configuration.
When a copy is marked Lost, a message displays the fine assessment, which is calculated based on the selections in Site Configuration.
For example, if your school selects Replacement Price and Prorate fine amount in Site Configuration and in the Back Office tab, Textbook Policies option Automatically Demote Conditioning is set to Yes, a textbook with a Replacement Price of $100.00 in Fair condition, which depreciates at 50%, has a lost fine amount calculated at $50.00.
Note: If the selected price does not exist in the record, Destiny uses the other price. However, if neither price exists, a fine is not assessed, which is existing functionality.
What’s New in Destiny 11.0 79
© Copyright 2013 Follett Software Company.
Access Level:The Site Administrator or Textbook Administrator must set up the Site Configuration options. Users who will add textbook fines or assess lost copy fines must have the proper permission enabled.
Permissions:Change textbook site preferencesAdd textbook fines (requires View textbook fines)
Importance: Destiny Textbook Manager, Destiny Library Manager, and Destiny Asset Manager now use the same process to calculate fines.

80
© Copyright 2013 Follett Software Company.
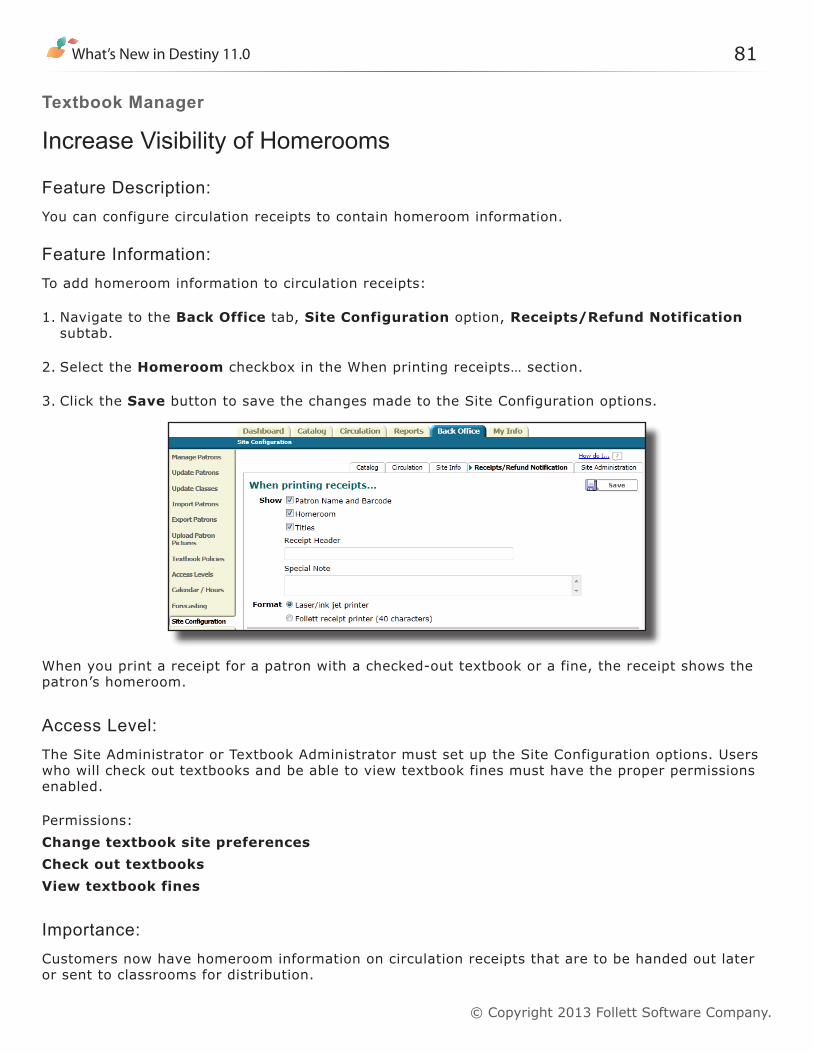
What’s New in Destiny 11.0 81
© Copyright 2013 Follett Software Company.
Textbook Manager
Increase Visibility of Homerooms
Feature Description:You can configure circulation receipts to contain homeroom information.
Feature Information:To add homeroom information to circulation receipts:
1. Navigate to the Back Office tab, Site Configuration option, Receipts/Refund Notification subtab.
2. Select the Homeroom checkbox in the When printing receipts… section.
3. Click the Save button to save the changes made to the Site Configuration options.
When you print a receipt for a patron with a checked-out textbook or a fine, the receipt shows the patron’s homeroom.
Access Level:The Site Administrator or Textbook Administrator must set up the Site Configuration options. Users who will check out textbooks and be able to view textbook fines must have the proper permissions enabled.
Permissions:Change textbook site preferencesCheck out textbooks View textbook fines
Importance: Customers now have homeroom information on circulation receipts that are to be handed out later or sent to classrooms for distribution.

82
© Copyright 2013 Follett Software Company.
What’s New in Destiny 11.0 83
© Copyright 2013 Follett Software Company.
Destiny Asset Manager

84
© Copyright 2013 Follett Software Company.
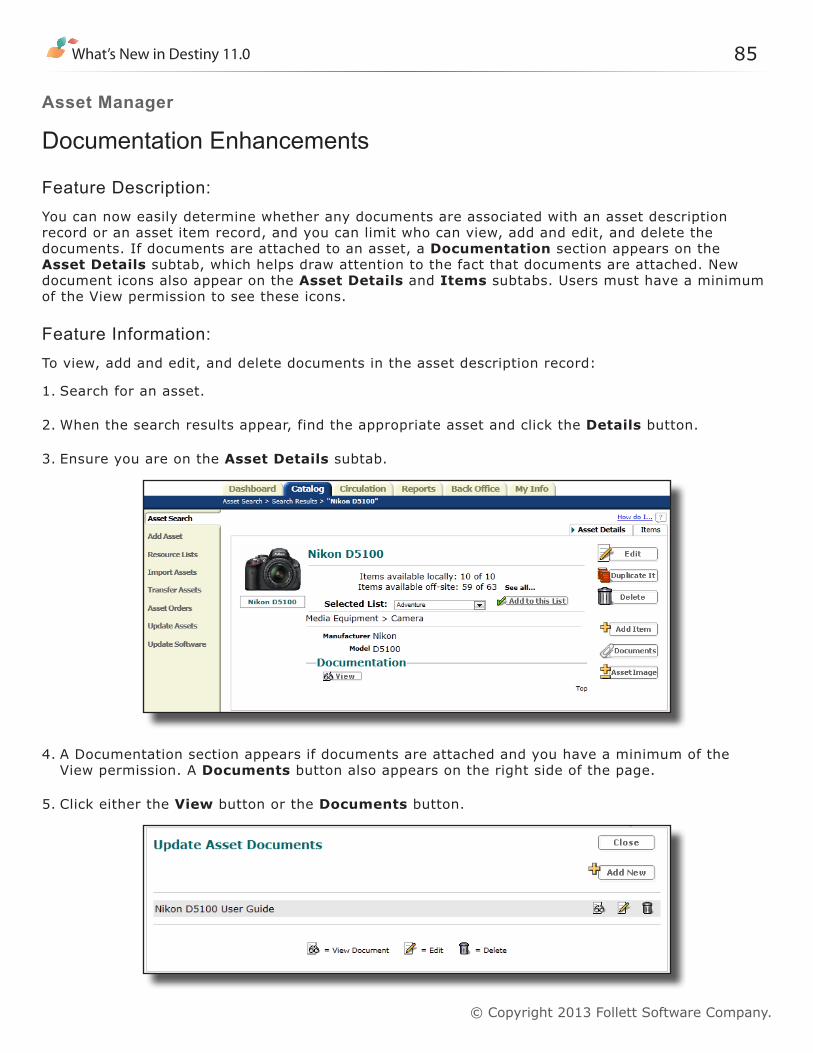
What’s New in Destiny 11.0 85
© Copyright 2013 Follett Software Company.
Asset Manager
Documentation Enhancements
Feature Description:You can now easily determine whether any documents are associated with an asset description record or an asset item record, and you can limit who can view, add and edit, and delete the documents. If documents are attached to an asset, a Documentation section appears on the Asset Details subtab, which helps draw attention to the fact that documents are attached. New document icons also appear on the Asset Details and Items subtabs. Users must have a minimum of the View permission to see these icons.
Feature Information:To view, add and edit, and delete documents in the asset description record:
1. Search for an asset.
2. When the search results appear, find the appropriate asset and click the Details button.
3. Ensure you are on the Asset Details subtab.
4. A Documentation section appears if documents are attached and you have a minimum of the View permission. A Documents button also appears on the right side of the page.
5. Click either the View button or the Documents button.
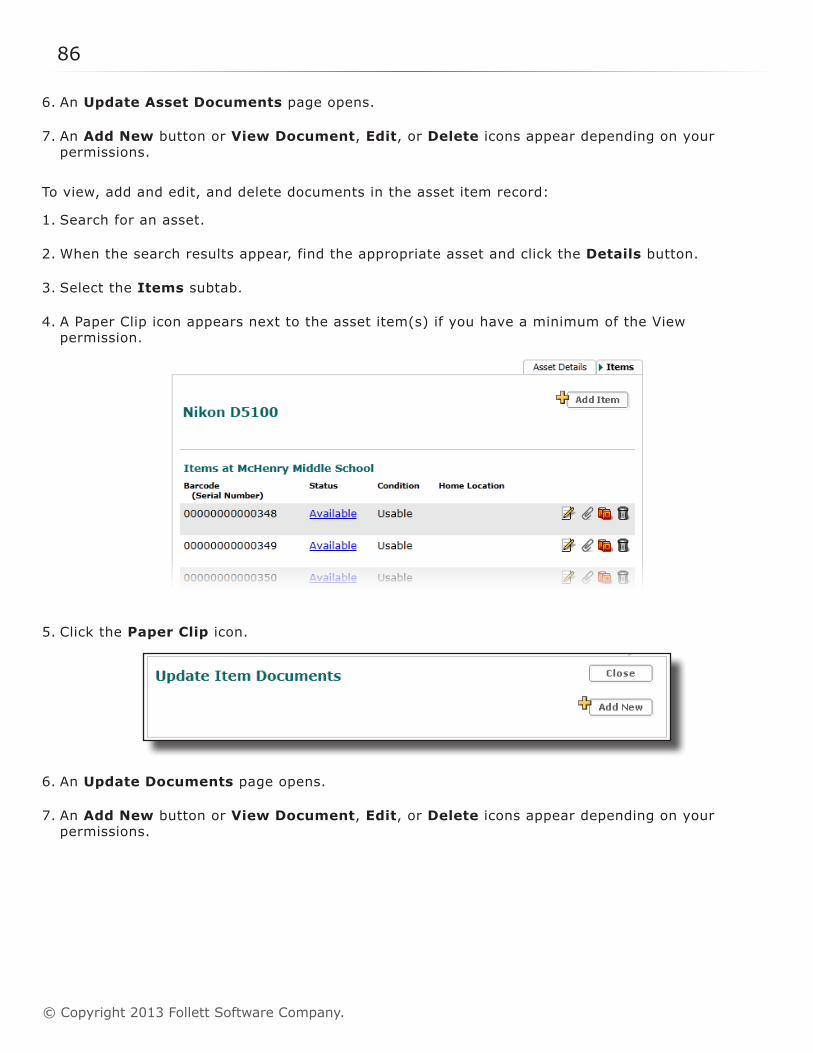
86
© Copyright 2013 Follett Software Company.
6. An Update Asset Documents page opens.
7. An Add New button or View Document, Edit, or Delete icons appear depending on your permissions.
To view, add and edit, and delete documents in the asset item record:
1. Search for an asset.
2. When the search results appear, find the appropriate asset and click the Details button.
3. Select the Items subtab.
4. A Paper Clip icon appears next to the asset item(s) if you have a minimum of the View permission.
5. Click the Paper Clip icon.
6. An Update Documents page opens.
7. An Add New button or View Document, Edit, or Delete icons appear depending on your permissions.
What’s New in Destiny 11.0 87
© Copyright 2013 Follett Software Company.
Access Level:The Destiny Administrator, District Asset User, Site Administrator, and Asset Administrator have the permissions to view, add and edit, or delete documentation by default. For other users to view, add and edit, or delete documentation, the proper permissions must be enabled.
Permissions:View asset description documentationAdd/Edit asset description documentationDelete asset description documentationView asset item documentationAdd/Edit asset item documentationDelete asset item documentation
Importance: You can easily determine whether any documents are associated with an asset description record or an asset item record.

88
© Copyright 2013 Follett Software Company.
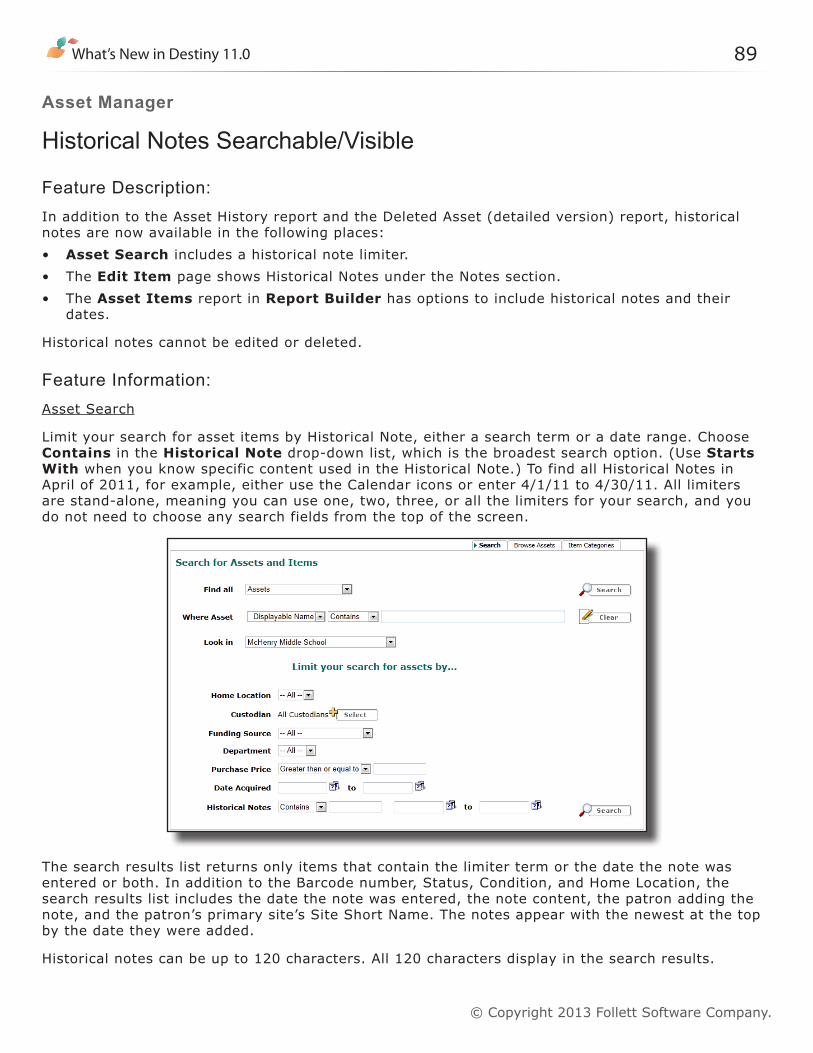
What’s New in Destiny 11.0 89
© Copyright 2013 Follett Software Company.
Asset Manager
Historical Notes Searchable/Visible
Feature Description:In addition to the Asset History report and the Deleted Asset (detailed version) report, historical notes are now available in the following places: • Asset Search includes a historical note limiter.• The Edit Item page shows Historical Notes under the Notes section.• The Asset Items report in Report Builder has options to include historical notes and their
dates.
Historical notes cannot be edited or deleted.
Feature Information:Asset Search
Limit your search for asset items by Historical Note, either a search term or a date range. Choose Contains in the Historical Note drop-down list, which is the broadest search option. (Use Starts With when you know specific content used in the Historical Note.) To find all Historical Notes in April of 2011, for example, either use the Calendar icons or enter 4/1/11 to 4/30/11. All limiters are stand-alone, meaning you can use one, two, three, or all the limiters for your search, and you do not need to choose any search fields from the top of the screen.
The search results list returns only items that contain the limiter term or the date the note was entered or both. In addition to the Barcode number, Status, Condition, and Home Location, the search results list includes the date the note was entered, the note content, the patron adding the note, and the patron’s primary site’s Site Short Name. The notes appear with the newest at the top by the date they were added.
Historical notes can be up to 120 characters. All 120 characters display in the search results.
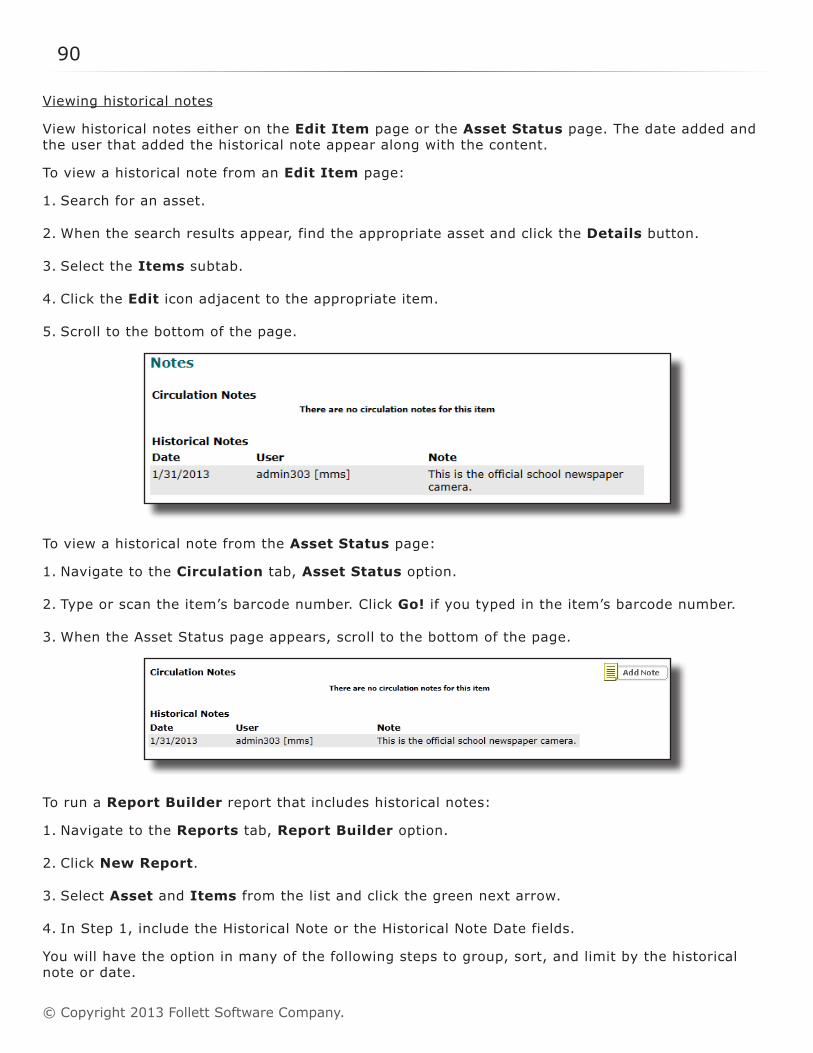
90
© Copyright 2013 Follett Software Company.
Viewing historical notes
View historical notes either on the Edit Item page or the Asset Status page. The date added and the user that added the historical note appear along with the content.
To view a historical note from an Edit Item page:
1. Search for an asset.
2. When the search results appear, find the appropriate asset and click the Details button.
3. Select the Items subtab.
4. Click the Edit icon adjacent to the appropriate item.
5. Scroll to the bottom of the page.
To view a historical note from the Asset Status page:
1. Navigate to the Circulation tab, Asset Status option.
2. Type or scan the item’s barcode number. Click Go! if you typed in the item’s barcode number.
3. When the Asset Status page appears, scroll to the bottom of the page.
To run a Report Builder report that includes historical notes:
1. Navigate to the Reports tab, Report Builder option.
2. Click New Report.
3. Select Asset and Items from the list and click the green next arrow.
4. In Step 1, include the Historical Note or the Historical Note Date fields.
You will have the option in many of the following steps to group, sort, and limit by the historical note or date.
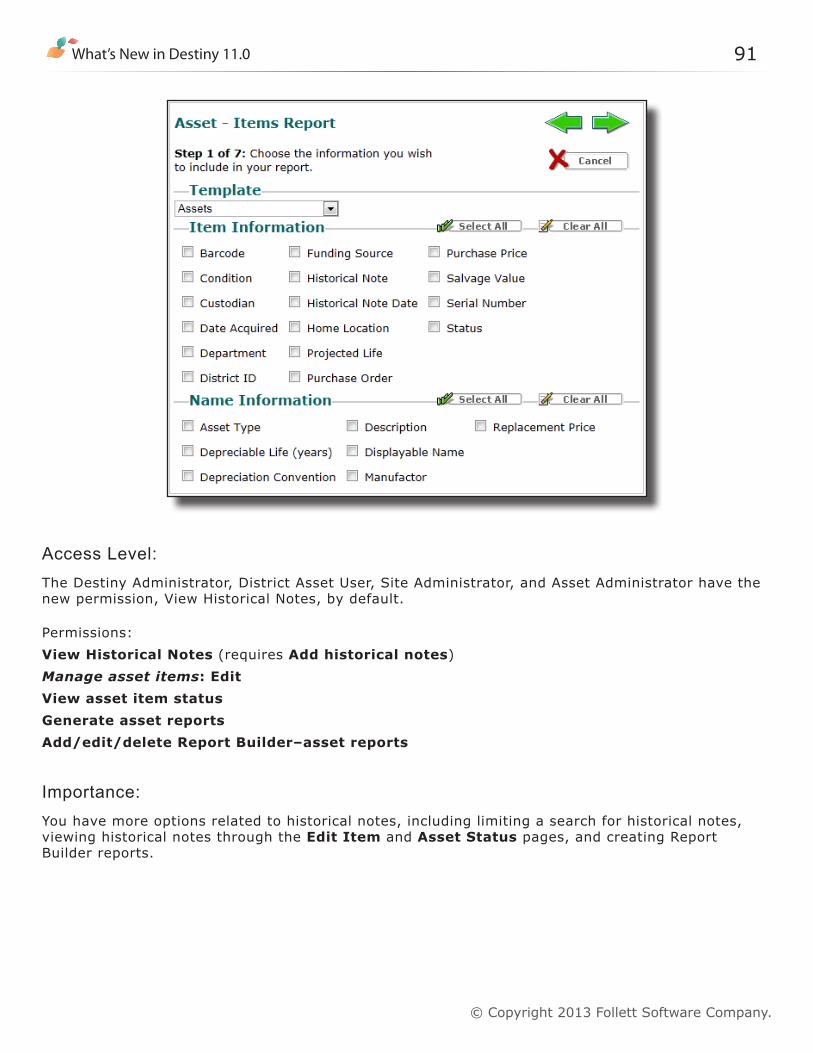
What’s New in Destiny 11.0 91
© Copyright 2013 Follett Software Company.
Access Level:The Destiny Administrator, District Asset User, Site Administrator, and Asset Administrator have the new permission, View Historical Notes, by default.
Permissions:View Historical Notes (requires Add historical notes)Manage asset items: Edit View asset item status Generate asset reportsAdd/edit/delete Report Builder–asset reports
Importance: You have more options related to historical notes, including limiting a search for historical notes, viewing historical notes through the Edit Item and Asset Status pages, and creating Report Builder reports.

92
© Copyright 2013 Follett Software Company.
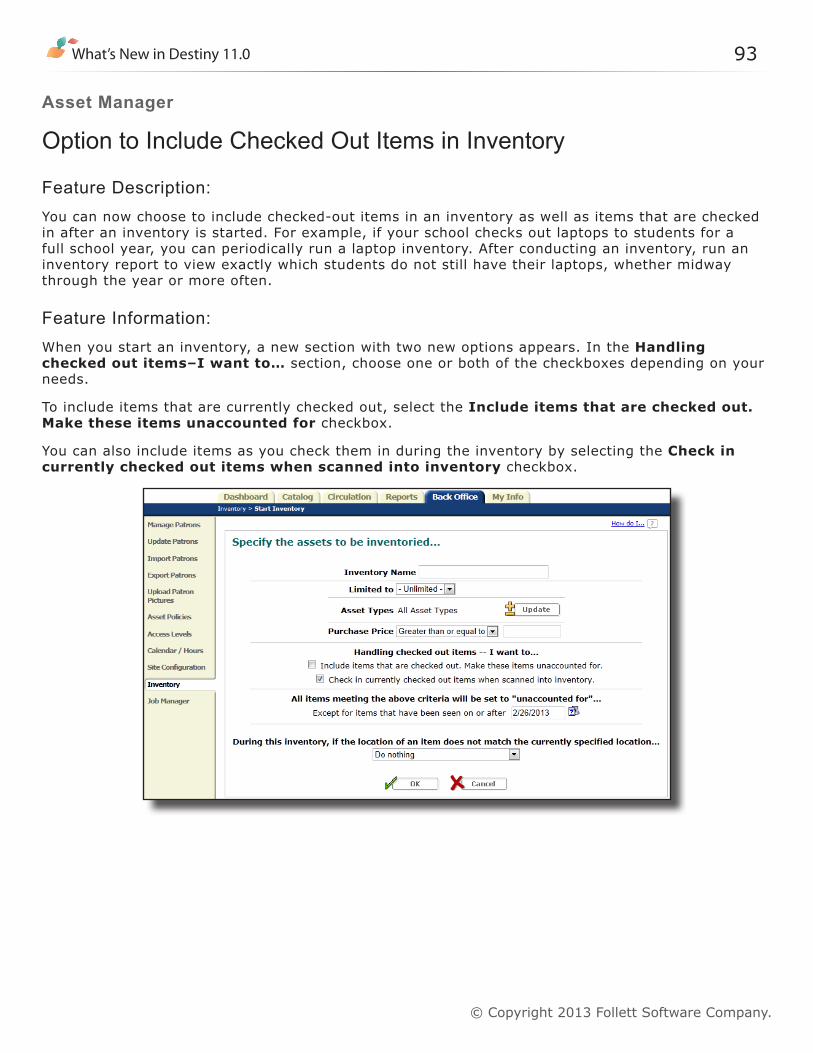
What’s New in Destiny 11.0 93
© Copyright 2013 Follett Software Company.
Asset Manager
Option to Include Checked Out Items in Inventory
Feature Description:You can now choose to include checked-out items in an inventory as well as items that are checked in after an inventory is started. For example, if your school checks out laptops to students for a full school year, you can periodically run a laptop inventory. After conducting an inventory, run an inventory report to view exactly which students do not still have their laptops, whether midway through the year or more often.
Feature Information:When you start an inventory, a new section with two new options appears. In the Handling checked out items–I want to… section, choose one or both of the checkboxes depending on your needs.
To include items that are currently checked out, select the Include items that are checked out. Make these items unaccounted for checkbox.
You can also include items as you check them in during the inventory by selecting the Check in currently checked out items when scanned into inventory checkbox.
94
© Copyright 2013 Follett Software Company.
Access Level:The Site Administrator, Asset Administrator, or a limited number of staff usually start an inventory at the site level. Staff members with the Inventory assets permission can perform an inventory without starting an inventory.
Permission:Start new/finalize asset inventory
Importance: You can now run frequent inventories of checked-out items while maintaining their checked-out status, as well as find out who has Unaccounted-for items checked out.
What’s New in Destiny 11.0 95
© Copyright 2013 Follett Software Company.
Asset Manager
Patron Statistics—Historical Report Enhancements
Feature Description:The Patron Statistics—Historical report allows you to examine the circulation totals of your patrons. The report does not include circulations to departments or locations. You can view summary information or individual patron statistics, as well as limit the report to a particular site, time frame, or patron group.
Feature Information:To generate a Patron Statistics—Historical Report:
1. Navigate to the Reports tab, Patron Reports option.
2. Click the Patron Statistics—Historical hyperlink.
3. If you are a district patrons manager, select the site from the For list. If not, skip to step 4.
4. Enter the date range for which you want the statistics in the For patron activity fields.
5. If you have more than one Destiny product, select the material type from the Circulations of drop-down list.
6. Select either Summary Only or Details from the Show drop-down list. A Summary includes a list of each group, the number of patrons in that group, and total circulations. A Details report adds each patron’s name, barcode number, and number of circulations.
7. Decide whether to group information by Patron Type, Patron Status, Grade Level, Homeroom, or a user defined field. You can select up to four groups. Note: Patrons that do not have information in the Group by field are listed under Other.
8. In the Only include the following checkboxes, clear the checkboxes for the patron types or statuses whose statistics you wish to exclude.
9. After making all your selections, click Run Report.
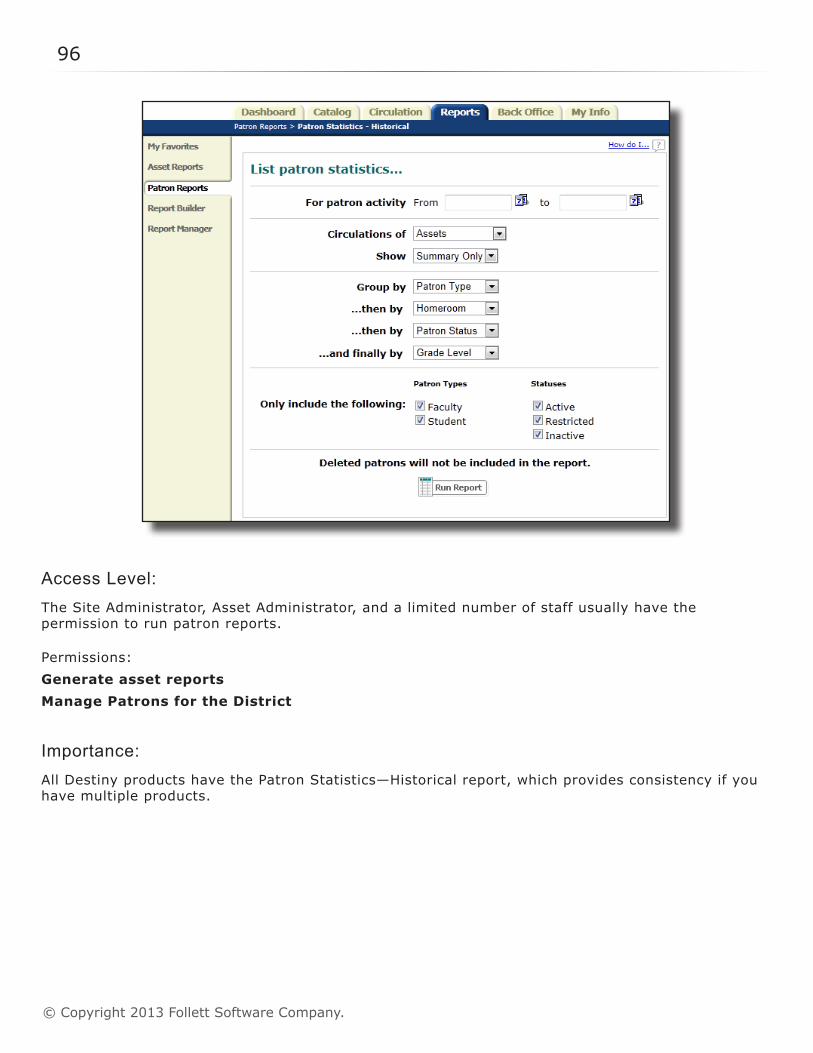
96
© Copyright 2013 Follett Software Company.
Access Level:The Site Administrator, Asset Administrator, and a limited number of staff usually have the permission to run patron reports.
Permissions:Generate asset reportsManage Patrons for the District
Importance: All Destiny products have the Patron Statistics—Historical report, which provides consistency if you have multiple products.
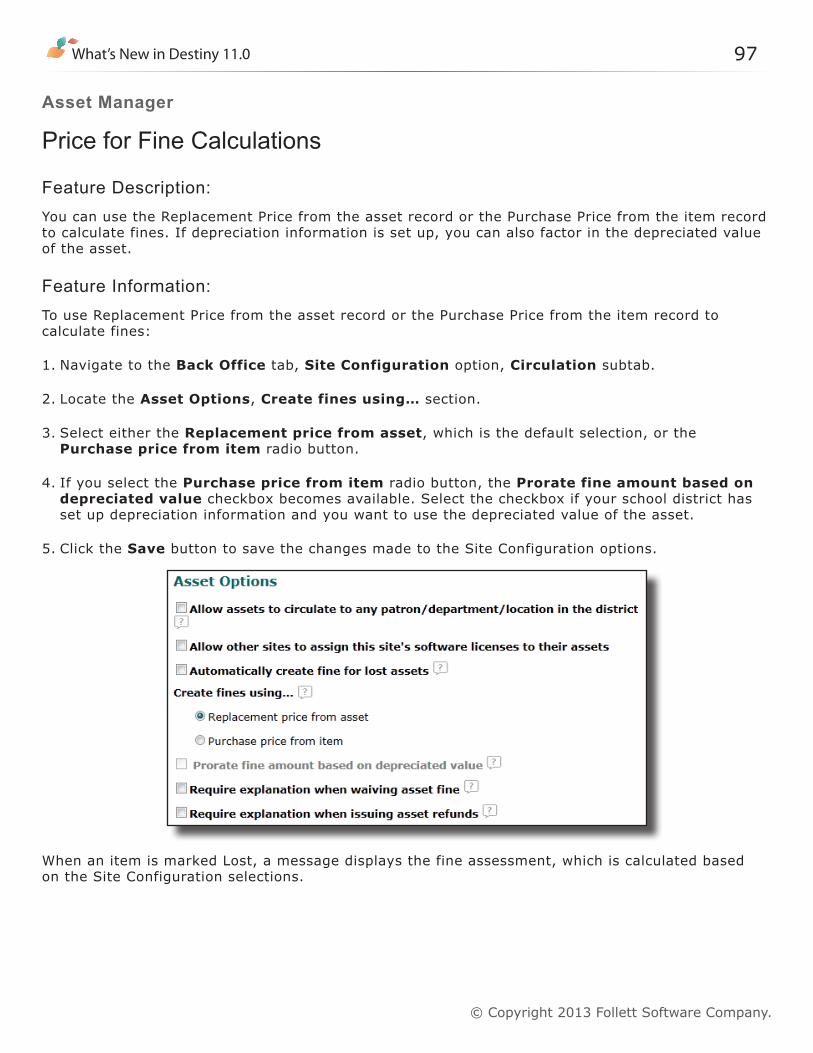
What’s New in Destiny 11.0 97
© Copyright 2013 Follett Software Company.
Asset Manager
Price for Fine Calculations
Feature Description:You can use the Replacement Price from the asset record or the Purchase Price from the item record to calculate fines. If depreciation information is set up, you can also factor in the depreciated value of the asset.
Feature Information:To use Replacement Price from the asset record or the Purchase Price from the item record to calculate fines:
1. Navigate to the Back Office tab, Site Configuration option, Circulation subtab.
2. Locate the Asset Options, Create fines using… section.
3. Select either the Replacement price from asset, which is the default selection, or the Purchase price from item radio button.
4. If you select the Purchase price from item radio button, the Prorate fine amount based on depreciated value checkbox becomes available. Select the checkbox if your school district has set up depreciation information and you want to use the depreciated value of the asset.
5. Click the Save button to save the changes made to the Site Configuration options.
When an item is marked Lost, a message displays the fine assessment, which is calculated based on the Site Configuration selections.
98
© Copyright 2013 Follett Software Company.
Access Level:The Site Administrator or Asset Administrator must set up the Site Configuration options. Users who will assess lost asset fines must have the proper permissions enabled.
Permissions:Change asset site preferencesAdd asset fines (requires View asset fines)
Importance: Destiny Asset Manager, Destiny Textbook Manager, and Destiny Library Manager now use the same process to calculate fines.
What’s New in Destiny 11.0 99
© Copyright 2013 Follett Software Company.
Asset Manager
Update Assets—Individual, Batch, and Global Updates
Feature Description:You can now perform individual, batch, and global updates at the district and site levels on item record fields without opening individual item records.
Individual Update: • Choose from 8 additional fields; a total of 14 fields are available. • Define a new Home Location or Department.• Change item status to Lost or Stolen, even if it is currently checked out.
Batch Update: • Choose from 8 additional fields; a total of 13 fields are available. • Define a new Home Location or Department.• Change item status to Lost or Stolen, even if it is currently checked out.
Global Update: • Choose from 8 additional fields. • Define a new Home Location or Department.• Change item status to Lost or Stolen, even if it is currently checked out.
Feature Information:Individual Update:
You can update the existing Custodian field by scanning an item’s barcode. The following fields, also existing, have added options:• Department (site only)—Use the Other button to define a Department not in the list.• District Identifier—If District Identifier is the only field you are updating, the cursor toggles
between the Asset Barcode box and the District Identifier box, which allows you to enter record District Identifier numbers rapidly by scanning the barcodes one after the other.
• Home Location—Use the Other button to define a Home Location not in the list.• Serial Number—If Serial Number is the only field you are updating, the cursor toggles between
the Asset Barcode box and the Serial Number box, which allows you to enter serial numbers rapidly by scanning the barcodes one after the other.
• Status—Additional Lost and Stolen choices.
The following fields are now available for updates: • Condition: Choose Usable, Damaged, Unusable.• Date Acquired: Enter the date in the blank text box or use the Calendar icon—reflects the
Region Format defined on the Edit District page.• Funding Source: Choose from the defined Funding Sources or use the Other button to define a
new Funding Source.• Item Categories (site only): Choose from the defined Item Categories or use the Other button
to define a new Item Category.
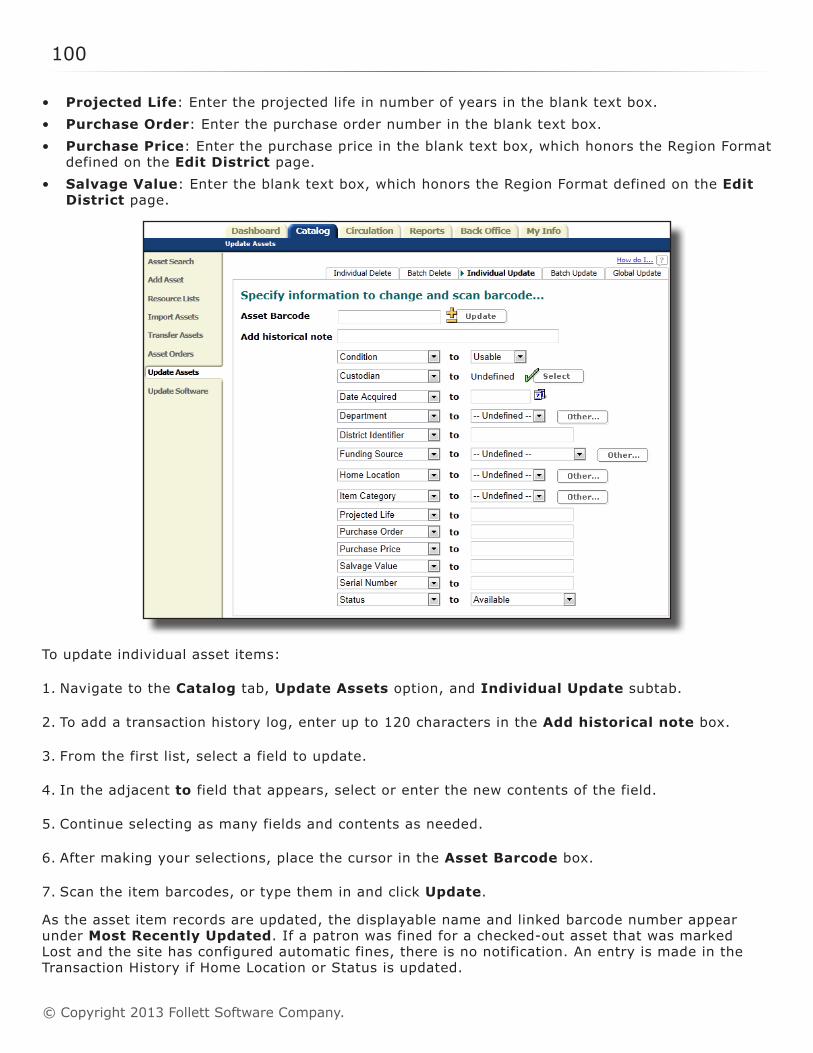
100
© Copyright 2013 Follett Software Company.
• Projected Life: Enter the projected life in number of years in the blank text box.• Purchase Order: Enter the purchase order number in the blank text box.• Purchase Price: Enter the purchase price in the blank text box, which honors the Region Format
defined on the Edit District page.• Salvage Value: Enter the blank text box, which honors the Region Format defined on the Edit
District page.
To update individual asset items:
1. Navigate to the Catalog tab, Update Assets option, and Individual Update subtab.
2. To add a transaction history log, enter up to 120 characters in the Add historical note box.
3. From the first list, select a field to update.
4. In the adjacent to field that appears, select or enter the new contents of the field.
5. Continue selecting as many fields and contents as needed.
6. After making your selections, place the cursor in the Asset Barcode box.
7. Scan the item barcodes, or type them in and click Update.
As the asset item records are updated, the displayable name and linked barcode number appear under Most Recently Updated. If a patron was fined for a checked-out asset that was marked Lost and the site has configured automatic fines, there is no notification. An entry is made in the Transaction History if Home Location or Status is updated.
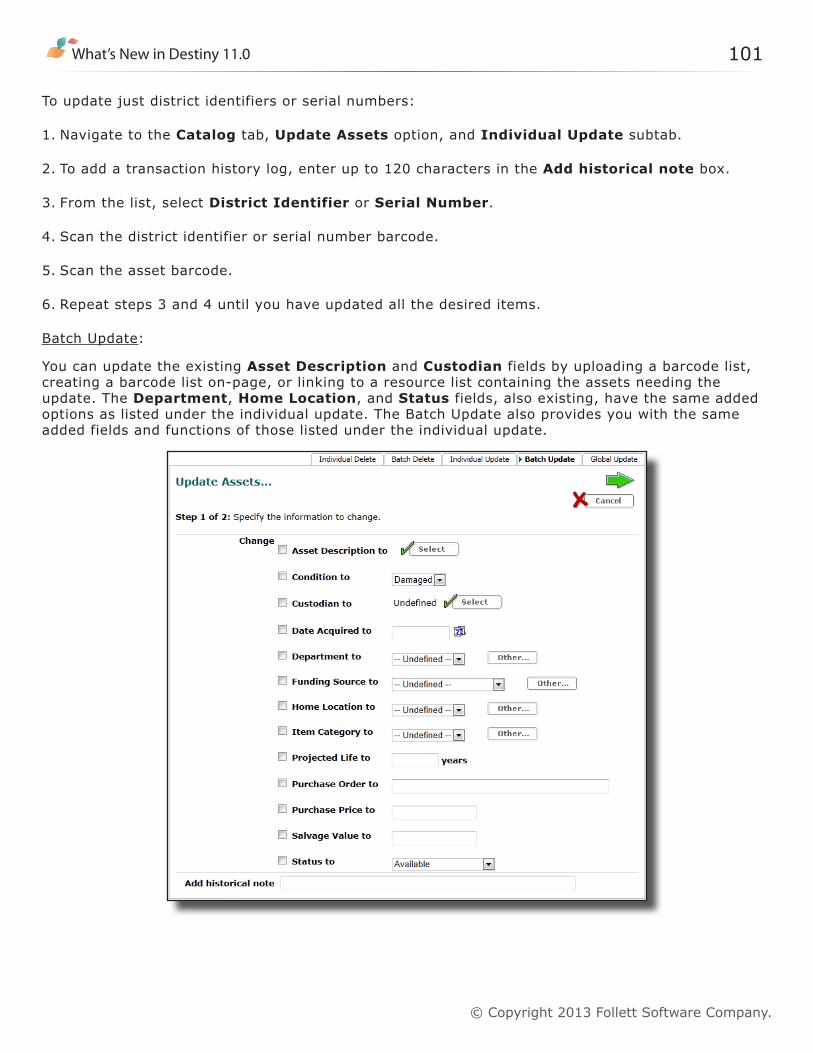
What’s New in Destiny 11.0 101
© Copyright 2013 Follett Software Company.
To update just district identifiers or serial numbers:
1. Navigate to the Catalog tab, Update Assets option, and Individual Update subtab.
2. To add a transaction history log, enter up to 120 characters in the Add historical note box.
3. From the list, select District Identifier or Serial Number.
4. Scan the district identifier or serial number barcode.
5. Scan the asset barcode.
6. Repeat steps 3 and 4 until you have updated all the desired items.
Batch Update:
You can update the existing Asset Description and Custodian fields by uploading a barcode list, creating a barcode list on-page, or linking to a resource list containing the assets needing the update. The Department, Home Location, and Status fields, also existing, have the same added options as listed under the individual update. The Batch Update also provides you with the same added fields and functions of those listed under the individual update.
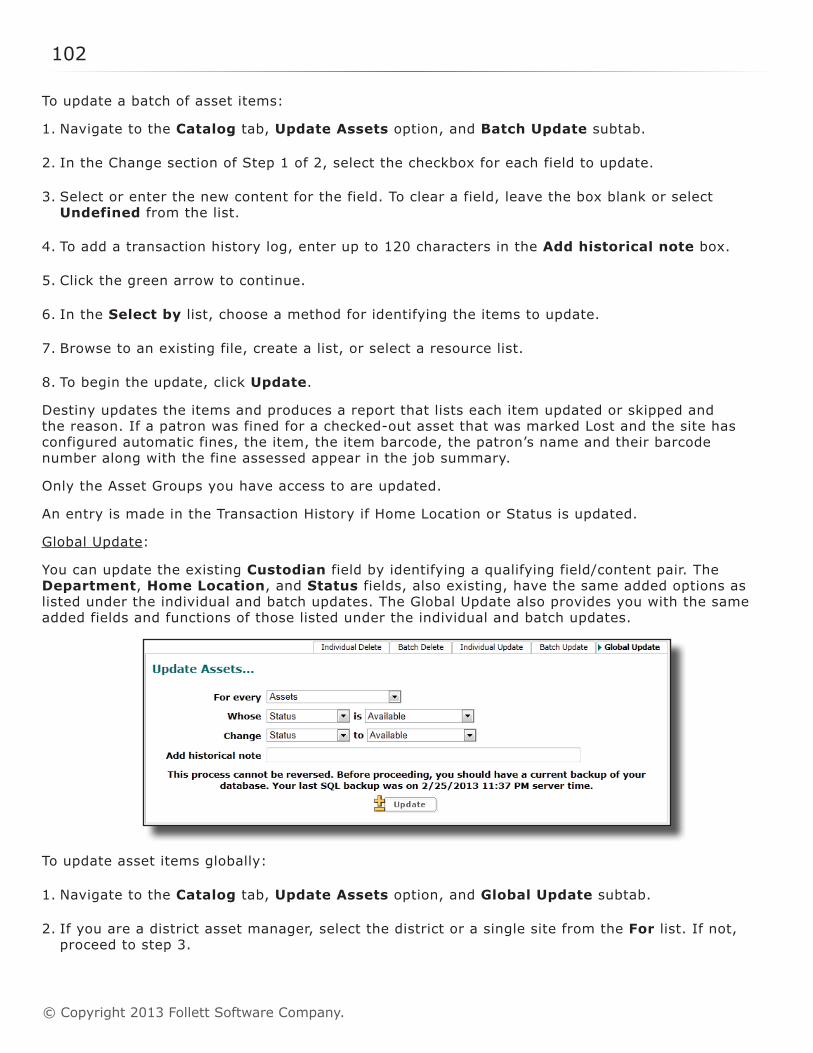
102
© Copyright 2013 Follett Software Company.
To update a batch of asset items:
1. Navigate to the Catalog tab, Update Assets option, and Batch Update subtab.
2. In the Change section of Step 1 of 2, select the checkbox for each field to update.
3. Select or enter the new content for the field. To clear a field, leave the box blank or select Undefined from the list.
4. To add a transaction history log, enter up to 120 characters in the Add historical note box.
5. Click the green arrow to continue.
6. In the Select by list, choose a method for identifying the items to update.
7. Browse to an existing file, create a list, or select a resource list.
8. To begin the update, click Update.
Destiny updates the items and produces a report that lists each item updated or skipped and the reason. If a patron was fined for a checked-out asset that was marked Lost and the site has configured automatic fines, the item, the item barcode, the patron’s name and their barcode number along with the fine assessed appear in the job summary.
Only the Asset Groups you have access to are updated.
An entry is made in the Transaction History if Home Location or Status is updated.
Global Update:
You can update the existing Custodian field by identifying a qualifying field/content pair. The Department, Home Location, and Status fields, also existing, have the same added options as listed under the individual and batch updates. The Global Update also provides you with the same added fields and functions of those listed under the individual and batch updates.
To update asset items globally:
1. Navigate to the Catalog tab, Update Assets option, and Global Update subtab.
2. If you are a district asset manager, select the district or a single site from the For list. If not, proceed to step 3.
What’s New in Destiny 11.0 103
© Copyright 2013 Follett Software Company.
3. From the For every list, select the asset types to update. This list only shows Asset Groups to which you have access.
4. From the Whose list, select the item field, and in the is box, select the information in the field that you want Destiny to find. These selections determine the records Destiny updates.
5. From the Change list, select the field that you want to change in the item records.
6. In the to box, select the new content for the field.
7. To add a transaction history log, enter up to 120 characters in the Add historical note box. Adding a note cannot be the only change you make in Global Update.
8. After making your selections, click Update and then Yes on the confirmation message.
Destiny updates the asset items and generates a report summarizing the update and listing all the items changed or skipped and the reason a field was skipped.
If a patron was fined for a checked-out asset that was marked Lost and the site has configured automatic fines, the asset description, item, item’s barcode number, the patron’s name and their barcode number along with the fine assessed appear in the job summary
An entry is made in the Transaction History if Home Location or Status is updated.
Access Level:The Site Administrator, Asset Administrator, or a limited number of staff usually have the permission to manage assets.
Permissions:Manage asset items: EditTo update Item Categories: Add/edit/delete/assign item categoriesTo add historical notes: Add historical notesTo add a new Home Location: Manage locationsTo add a new Department: Manage Site Administration OptionsTo update Status to Lost or Stolen: Mark asset items “Lost” or “Stolen”The district asset manager has access to this page but does not have the site only options.
Importance: You can update multiple item record fields at once without opening each individual item record by performing individual, batch, and global updates.

104
© Copyright 2013 Follett Software Company.
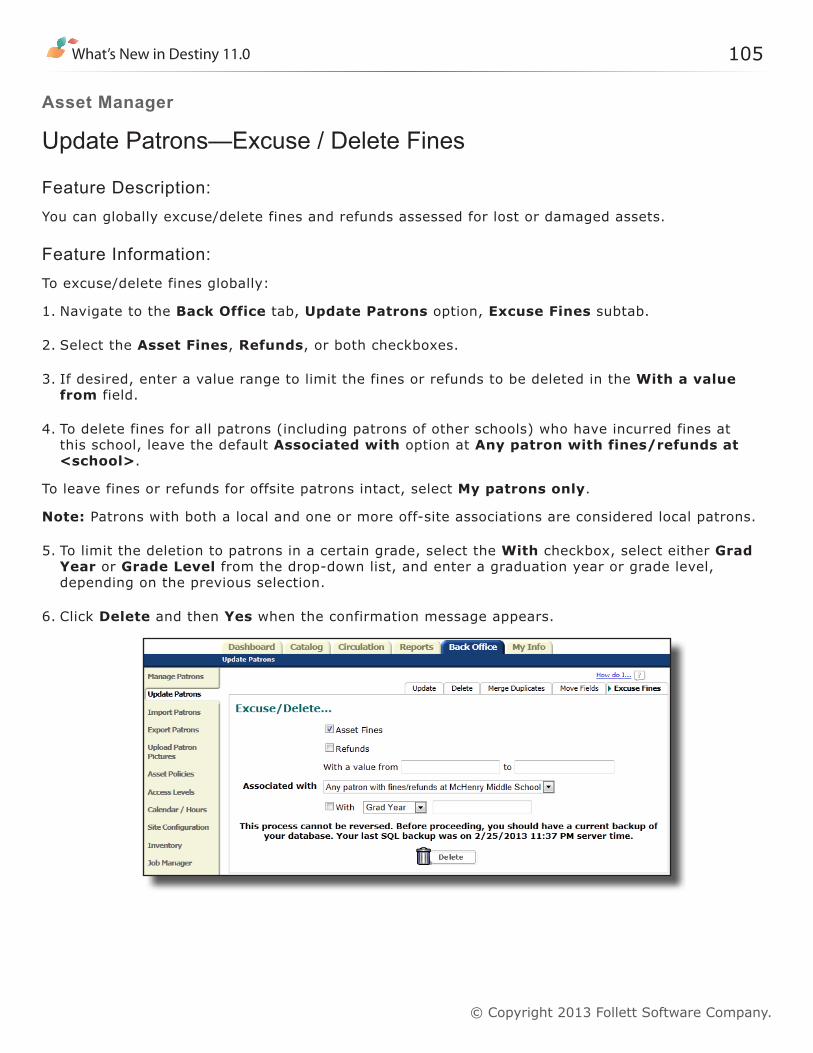
What’s New in Destiny 11.0 105
© Copyright 2013 Follett Software Company.
Asset Manager
Update Patrons—Excuse / Delete Fines
Feature Description:You can globally excuse/delete fines and refunds assessed for lost or damaged assets.
Feature Information:To excuse/delete fines globally:
1. Navigate to the Back Office tab, Update Patrons option, Excuse Fines subtab.
2. Select the Asset Fines, Refunds, or both checkboxes.
3. If desired, enter a value range to limit the fines or refunds to be deleted in the With a value from field.
4. To delete fines for all patrons (including patrons of other schools) who have incurred fines at this school, leave the default Associated with option at Any patron with fines/refunds at <school>.
To leave fines or refunds for offsite patrons intact, select My patrons only.
Note: Patrons with both a local and one or more off-site associations are considered local patrons.
5. To limit the deletion to patrons in a certain grade, select the With checkbox, select either Grad Year or Grade Level from the drop-down list, and enter a graduation year or grade level, depending on the previous selection.
6. Click Delete and then Yes when the confirmation message appears.
106
© Copyright 2013 Follett Software Company.
Destiny does the following:• Deletes the fines, refunds, or both, as selected.• Adds a Fine Deleted or Refund Deleted entry on each patron’s Fine Details page for fines
and refunds deleted through this process. (To view Fine Details, navigate to Back Office tab, Manage Patrons option. After searching for a patron, click View History, and then the Details button adjacent to the appropriate fine.)
• Produces an Excuse/Delete Fines report in the Job Manager, which lists the following information for each fine:
▪ Thetypeoffine(Asset)
▪ Thereasonforthefine(Damaged or Lost)
▪ The asset description
▪ Thefineamount
▪ The patron’s name and barcode number (and Short Site Name for offsite patrons)
Access Level:The Site Administrator has this new permission turned on by default.
Permission:Globally delete fines (Previously existing for Destiny Library Manager and Destiny Textbook Manager customers.)
Importance: At the end of the school year, you can globally delete fines if your school will not collect the fines from students.