harmonic measurement software user's manual (iec 61000-3 ... · this manual applies to iec...
TRANSCRIPT

User’sManual Harmonic Measurement
Software (IEC 61000-3-12 Compliant)
IM 761922-05E4th Edition

Product RegistrationThank you for purchasing YOKOGAWA products.
YOKOGAWA provides registered users with a variety of information and services.Please allow us to serve you best by completing the product registration form accessible from our homepage.
http://tmi.yokogawa.com/
PIM 103-03E

iIM 761922-05E
Thank you for purchasing the Harmonic Measurement Software (Model 761922).This user’s manual describes the handling precautions, functions, and operating procedures of the Harmonic Measurement Software within the Harmonic/Flicker Measurement Software. To ensure correct use, please read this manual thoroughly before beginning operation.Keep this manual for quick reference in the event a question arises.For information about the handling precautions, functions, and operating procedures of WT3000 Precision Power Analyzer and the Voltage Fluctuation and Flicker Measurement Software as well as the handling and operating procedures for Windows, see the manuals for those products.
Notes• The contents of this manual are subject to change without prior notice as a result of
continuing improvements to the instrument’s performance and functions. The figures given in this manual may differ from those that actually appear on your screen.
• Every effort has been made in the preparation of this manual to ensure the accuracy of its contents. However, should you have any questions or find any errors, please contact your nearest YOKOGAWA dealer.
• Copying or reproducing all or any part of the contents of this manual without YOKOGAWA’s permission is strictly prohibited.
• The TCP/IP software of this product and the document concerning the TCP/IP software have been developed/created by YOKOGAWA based on the BSD Networking Software, Release 1 that has been licensed from University of California.
Trademarks• Microsoft, Windows, Windows XP, Windows Vista, Windows 7, and Excel are either
registered trademarks or trademarks of Microsoft Corporation in the United States and/or other countries.
• Adobe and Acrobat are trademarks of Adobe Systems Incorporated.• Other company and product names are trademarks or registered trademarks of their
respective holders.• For purposes of this manual, the TM and ® symbols do not accompany their
respective trademark names or registered trademark names.
Revisions1st Edition: January 20082nd Edition October 20103rd Edition April 20124th Edition July 2014
4th Edition : July 2014 (YMI)All Rights Reserved, Copyright © 2008, Yokogawa Electric CorporationAll Rights Reserved, Copyright © 2010, Yokogawa Meters & Instruments Corporation
ii IM 761922-05E
Notes about Using This Software
Storing the CD-ROMKeep the original CD-ROM for this software in a safe place. To use this software, install it on a PC hard disk, and run it from the PC.
Using the Software• Do not operate the WT while using this software. Doing so may cause errors.• Disable the PC’s standby mode. When a PC goes into standby mode, it may stop this
software’s operations.• This software can only control one WT at a time. Also, it cannot connect multiple PCs
to the same WT.• If a connection error disrupts the connection between the WT and the PC, turn the WT
OFF and then ON again.
iiiIM 761922-05E
How to Use This Manual
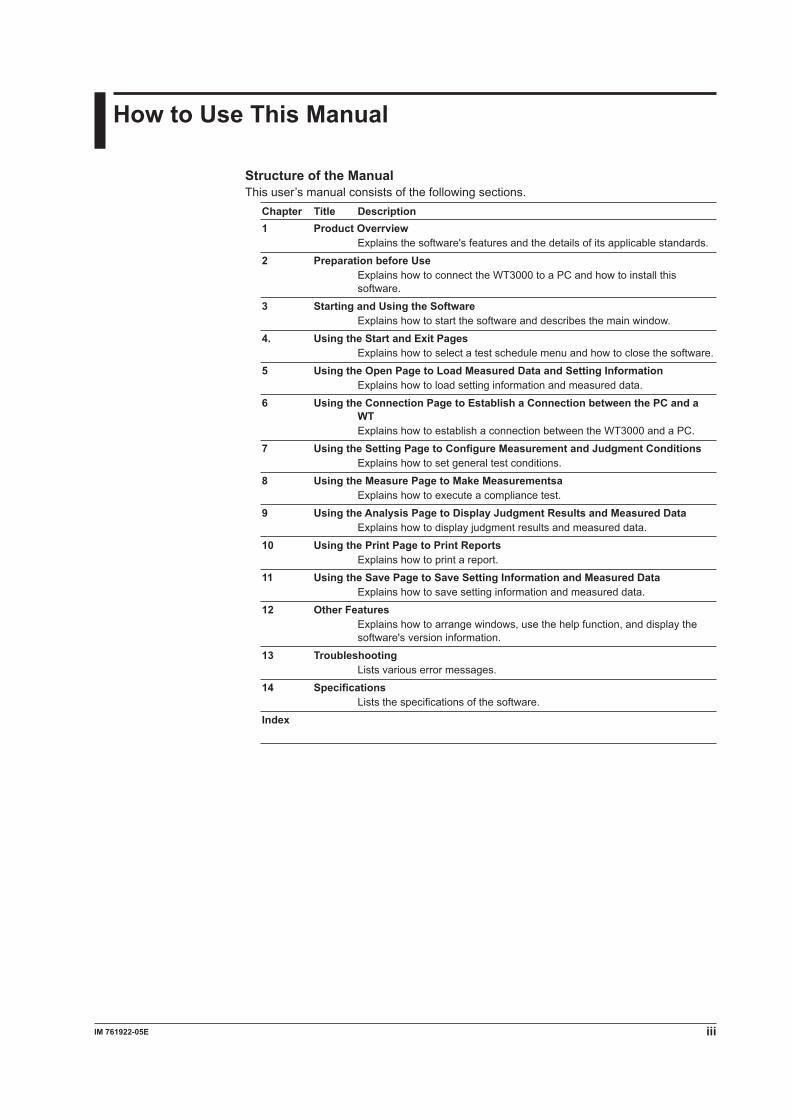
Structure of the ManualThis user’s manual consists of the following sections.
Chapter Title Description1 Product Overrview Explains the software's features and the details of its applicable standards.
2 Preparation before Use Explains how to connect the WT3000 to a PC and how to install this
software.
3 Starting and Using the Software Explains how to start the software and describes the main window.
4. Using the Start and Exit Pages Explains how to select a test schedule menu and how to close the software.
5 Using the Open Page to Load Measured Data and Setting Information Explains how to load setting information and measured data.
6 Using the Connection Page to Establish a Connection between the PC and a WT
Explains how to establish a connection between the WT3000 and a PC.
7 Using the Setting Page to Configure Measurement and Judgment Conditions Explains how to set general test conditions.
8 Using the Measure Page to Make Measurementsa Explains how to execute a compliance test.
9 Using the Analysis Page to Display Judgment Results and Measured Data Explains how to display judgment results and measured data.
10 Using the Print Page to Print Reports Explains how to print a report.
11 Using the Save Page to Save Setting Information and Measured Data Explains how to save setting information and measured data.
12 Other Features Explains how to arrange windows, use the help function, and display the
software's version information.
13 Troubleshooting Lists various error messages.
14 Specifications Lists the specifications of the software.
Index
iv IM 761922-05E
Software Versions That This Manual Applies To
This manual applies to IEC 61000-3-12-compliant WT3000 Harmonic Measurement Software versions 5.01 or later. If you are using an older version, you will not be able to use all of the features described in this manual. The software version is displayed in the upper right of this software’s window.
Correspondence with IEC61000-3-12This manual mainly covers IEC61000-3-12 Edition 2.0. For explanations related to IEC61000-3-12 Edition 1.0, see followings.CD: Manuals\English\761922\Manuals Old File name: IEC61000-3-12 Users Manual xxx.pdf (xxx: Edition No.)PC: Manuals\Old File name: EN_IEC61000-3-12 Users Manual xxx Edition.pdf (xxx: Edition No.)

vIM 761922-05E
Terms and Conditions of the Software License
Yokogawa Electric Corporation and Yokogawa Meters & Instruments Corporation, a Japanese corporation (hereinafter called “Yokogawa”), grants permission to use this Yokogawa Software Program (hereinafter called the “Licensed Software”) to the Licensee on the conditions that the Licensee agrees to the terms and conditions stipulated in Article 1 hereof. You, as the Licensee (hereinafter called “Licensee”), shall agree to the following terms and conditions for the software license (hereinafter called the “Agreement”) based on the use intended for the Licensed Software. Please note that Yokogawa grants the Licensee permission to use the Licensed Software under the terms and conditions herein and in no event shall Yokogawa intend to sell or transfer the Licensed Software to the Licensee.Licensed Software Name: Harmonic/Flicker Measurement Software (Model 761922)Number of License: 1
Article 1 (Scope Covered by these Terms and Conditions)1.1 The terms and conditions stipulated herein shall be applied to any Licensee who purchases the Licensed Software on the condition that the Licensee consents to agree
to the terms and conditions stipulated herein.1.2 The “Licensed Software” herein shall mean and include all applicable programs and documentation, without limitation, all proprietary technology, algorithms, and know-
how such as a factor, invariant or process contained therein.
Article 2 (Grant of License)2.1 Yokogawa grants the Licensee, for the purpose of single use, non-exclusive and non-transferable license of the Licensed Software with the license fee separately
agreed upon by both parties. 2.2 The Licensee is, unless otherwise agreed in writing by Yokogawa, not entitled to copy, change, sell, distribute, transfer, or sublicense the Licensed Software.2.3 The Licensed Software shall not be copied in whole or in part except for keeping one (1) copy for back-up purposes. The Licensee shall secure or supervise the copy
of the Licensed Software by the Licensee itself with great, strict, and due care. 2.4 In no event shall the Licensee dump, reverse assemble, reverse compile, or reverse engineer the Licensed Software so that the Licensee may translate the Licensed
Software into other programs or change it into a man-readable form from the source code of the Licensed Software. Unless otherwise separately agreed by Yokogawa, Yokogawa shall not provide the Licensee the source code for the Licensed Software.
2.5 The Licensed Software and its related documentation shall be the proprietary property or trade secret of Yokogawa or a third party which grants Yokogawa the rights. In no event shall the Licensee be transferred, leased, sublicensed, or assigned any rights relating to the Licensed Software.
2.6 Yokogawa may use or add copy protection in or onto the Licensed Software. In no event shall the Licensee remove or attempt to remove such copy protection.2.7 The Licensed Software may include a software program licensed for re-use by a third party (hereinafter called “Third Party Software”, which may include any software
program from affiliates of Yokogawa made or coded by themselves.) In the case that Yokogawa is granted permission to sublicense to third parties by any licensors (sub-licensor) of the Third Party Software pursuant to different terms and conditions than those stipulated in this Agreement, the Licensee shall observe such terms and conditions of which Yokogawa notifies the Licensee in writing separately.
2.8 In no event shall the Licensee modify, remove or delete a copyright notice of Yokogawa and its licenser contained in the Licensed Software, including any copy thereof.
Article 3 (Restriction of Specific Use)3.1 The Licensed Software shall not be intended specifically to be designed, developed, constructed, manufactured, distributed or maintained for the purpose of the
following events: a) Operation of any aviation, vessel, or support of those operations from the ground;, b) Operation of nuclear products and/or facilities;, c) Operation of nuclear weapons and/or chemical weapons and/or biological weapons; or d) Operation of medical instrumentation directly utilized for humankind or the human body.3.2 Even if the Licensee uses the Licensed Software for the purposes in the preceding Paragraph 3.1, Yokogawa has no liability to or responsibility for any demand or
damage arising out of the use or operations of the Licensed Software, and the Licensee agrees, on its own responsibility, to solve and settle the claims and damages and to defend, indemnify or hold Yokogawa totally harmless, from or against any liabilities, losses, damages and expenses (including fees for recalling the Products and reasonable attorney’s fees and court costs), or claims arising out of and related to the above-said claims and damages.
Article 4 (Warranty)4.1 The Licensee shall agree that the Licensed Software shall be provided to the Licensee on an “as is” basis when delivered. If defect(s), such as damage to the medium
of the Licensed Software, attributable to Yokogawa is found, Yokogawa agrees to replace, free of charge, any Licensed Software on condition that the defective Licensed Software shall be returned to Yokogawa’s specified authorized service facility within seven (7) days after opening the Package at the Licensee’s expense. As the Licensed Software is provided to the Licensee on an “as is” basis when delivered, in no event shall Yokogawa warrant that any information on or in the Licensed Software, including without limitation, data on computer programs and program listings, be completely accurate, correct, reliable, or the most updated.
4.2 Notwithstanding the preceding Paragraph 4.1, when third party software is included in the Licensed Software, the warranty period and terms and conditions that apply shall be those established by the provider of the third party software.
4.3 When Yokogawa decides in its own judgement that it is necessary, Yokogawa may from time to time provide the Licensee with Revision upgrades and Version upgrades separately specified by Yokogawa (hereinafter called “Updates”).
4.4 Notwithstanding the preceding Paragraph 4.3, in no event shall Yokogawa provide Updates where the Licensee or any third party conducted renovation or improvement of the Licensed Software.
4.5 THE FOREGOING WARRANTIES ARE EXCLUSIVE AND IN LIEU OF ALL OTHER WARRANTIES OF QUALITY AND PERFORMANCE, WRITTEN, ORAL, OR IMPLIED, AND ALL OTHER WARRANTIES INCLUDING ANY IMPLIED WARRANTIES OF MERCHANTABILITY OR FITNESS FOR A PARTICULAR PURPOSE ARE HEREBY DISCLAIMED BY YOKOGAWA AND ALL THIRD PARTIES LICENSING THIRD PARTY SOFTWARE TO YOKOGAWA.
4.6 Correction of nonconformity in the manner and for the period of time provided above shall be the Licensee’s sole and exclusive remedy for any failure of Yokogawa to comply with its obligations and shall constitute fulfillment of all liabilities of Yokogawa and any third party licensing the Third Party Software to Yokogawa (including any liability for direct, indirect, special, incidental or consequential damages) whether in warranty, contract, tort (including negligence but excluding willful conduct or gross negligence by Yokogawa) or otherwise with respect to or arising out of the use of the Licensed Software.
Article 5 (Infringement)5.1 If and when any third party should demand injunction, initiate a law suit, or demand compensation for damages against the Licensee under patent right (including utility
model right, design patent, and trade mark), copy right, and any other rights relating to any of the Licensed Software, the Licensee shall notify Yokogawa in writing to that effect without delay.
5.2 In the case of the preceding Paragraph 5.1, the Licensee shall assign to Yokogawa all of the rights to defend the Licensee and to negotiate with the claiming party. Furthermore, the Licensee shall provide Yokogawa with necessary information or any other assistance for Yokogawa’s defense and negotiation. If and when such a claim should be attributable to Yokogawa, subject to the written notice to Yokogawa stated in the preceding Paragraph 5.1, Yokogawa shall defend the Licensee and negotiate with the claiming party at Yokogawa’s cost and expense and be responsible for the final settlement or judgment granted to the claiming party in the preceding Paragraph 5.1.
5.3 When any assertion or allegation of the infringement of the third party’s rights defined in Paragraph 5.1 is made, or when at Yokogawa’s judgment there is possibility of such assertion or allegation, Yokogawa will, at its own discretion, take any of the following countermeasures at Yokogawa’s cost and expense.
a) To acquire the necessary right from a third party which has lawful ownership of the right so that the Licensee will be able to continue to use the Licensed Software; b) To replace the Licensed Software with an alternative one which avoids the infringement; or c) To remodel the Licensed Software so that the Licensed Software can avoid the infringement of such third party’s right.5.4 If and when Yokogawa fails to take either of the countermeasures as set forth in the preceding subparagraphs of Paragraph 5.3, Yokogawa shall indemnify the Licensee
only by paying back the price amount of the Licensed Software which Yokogawa has received from the Licensee. THE FOREGOING PARAGRAPHS STATE THE ENTIRE LIABILITY OF YOKOGAWA AND ANY THIRD PARTY LICENSING THIRD PARTY SOFTWARE TO YOKOGAWA WITH RESPECT TO INFRINGEMENT OF THE INTELLECTUAL PROPERTY RIGHTS INCLUDING BUT NOT LIMITED TO, PATENT AND COPYRIGHT.

vi IM 761922-05E
Article 6 (Liabilities)6.1 If and when the Licensee should incur any damage relating to or arising out of the Licensed Software or service that Yokogawa has provided to the Licensee under the
conditions herein due to a reason attributable to Yokogawa, Yokogawa shall take actions in accordance with this Agreement. However, in no event shall Yokogawa be liable or responsible for any special, incidental, consequential and/or indirect damage, whether in contract, warranty, tort, negligence, strict liability, or otherwise, including, without limitation, loss of operational profit or revenue, loss of use of the Licensed Software, or any associated products or equipment, cost of capital, loss or cost of interruption of the Licensee’s business, substitute equipment, facilities or services, downtime costs, delays, and loss of business information, or claims of customers of Licensee or other third parties for such or other damages. Even if Yokogawa is liable or responsible for the damages attributable to Yokogawa and to the extent of this Article 6, Yokogawa’s liability for the Licensee’s damage shall not exceed the price amount of the Licensed Software or service fee which Yokogawa has received. Please note that Yokogawa shall be released or discharged from part or all of the liability under this Agreement if the Licensee modifies, remodels, combines with other software or products, or causes any deviation from the basic specifications or functional specifications, without Yokogawa’s prior written consent.
6.2 All causes of action against Yokogawa arising out of or relating to this Agreement or the performance or breach hereof shall expire unless Yokogawa is notified of the claim within one (1) year of its occurrence.
6.3 In no event, regardless of cause, shall Yokogawa assume responsibility for or be liable for penalties or penalty clauses in any contracts between the Licensee and its customers.
Article 7 (Limit of Export)Unless otherwise agreed by Yokogawa, the Licensee shall not directly or indirectly export or transfer the Licensed Software to any countries other than those where Yokogawa permits export in advance.
Article 8 (Term)This Agreement shall become effective on the date when the Licensee receives the Licensed Software and continues in effect unless or until terminated as provided herein, or the Licensee ceases using the Licensed Software by itself or with Yokogawa’s thirty (30) days prior written notice to the Licensee.
Article 9 (Injunction for Use)During the term of this Agreement, Yokogawa may, at its own discretion, demand injunction against the Licensee in case that Yokogawa deems that the Licensed Software is used improperly or under severer environments other than those where Yokogawa has first approved, or any other condition which Yokogawa may not permit.
Article 10 (Termination)Yokogawa, at its sole discretion, may terminate this Agreement without any notice or reminder to the Licensee if the Licensee violates or fails to perform this Agreement. However, Articles 5, 6, and 11 shall survive even after the termination.
Article 11 (Jurisdiction)Any dispute, controversies, or differences between the parties hereto as to interpretation or execution of this Agreement shall be resolved amicably through negotiation between the parties upon the basis of mutual trust. Should the parties fail to agree within ninety (90) days after notice from one of the parties to the other, both parties hereby irrevocably submit to the exclusive jurisdiction of the Tokyo District Court (main office) in Japan for settlement of the dispute.
Article 12 (Governing Law)This Agreement shall be governed by and construed in accordance with the laws of Japan. The Licensee expressly agrees to waive absolutely and irrevocably and to the fullest extent permissible under applicable law any rights against the laws of Japan which it may have pursuant to the Licensee’s local law.
Article 13 (Severability)In the event that any provision hereof is declared or found to be illegal by any court or tribunal of competent jurisdiction, such provision shall be null and void with respect to the jurisdiction of that court or tribunal and all the remaining provisions hereof shall remain in full force and effect.
Terms and Conditions of the Software License

viiIM 761922-05E
3
2
1
4
5
6
7
8
9
10
11
12
13
14
Index
Contents
Notes about Using This Software ..................................................................................................... iiHow to Use This Manual .................................................................................................................. iiiSoftware Versions That This Manual Applies To .............................................................................. ivTerms and Conditions of the Software License.................................................................................v
Chapter 1 Product Overview1.1 Explanation of Functions .................................................................................................. 1-11.2 PC System Requirements ................................................................................................ 1-81.3 Applicable Standards ....................................................................................................... 1-91.4 Flow of Operation ........................................................................................................... 1-151.5 Terminology Related to Harmonics ................................................................................ 1-17
Chapter 2 Preparation before Use2.1 Connecting the WT3000 and the PC ................................................................................ 2-12.2 Setting the GP-IB Control ................................................................................................. 2-32.3 Setting the Ethernet Control ............................................................................................. 2-52.4 Installing the Software ...................................................................................................... 2-7
Chapter 3 Starting and Using the Software3.1 Starting the Software ........................................................................................................ 3-13.2 Basic Operations .............................................................................................................. 3-3
Chapter 4 Using the Start and Exit Pages4.1 Selecting a Test Schedule Menu ...................................................................................... 4-14.2 Closing the Software ........................................................................................................ 4-6
Chapter 5 Using the Open Page to Load Measured Data and Setting Information5.1 Loading Setting Information and Measured Data ............................................................. 5-15.2 Checking the Repeatability of the Measured Data ........................................................... 5-5
Chapter 6 Using the Connection Page to Establish a Connection between the PC and a WT6.1 Establishing a New Connection Between the PC and a WT ............................................ 6-16.2 Using the Connection Settings from a Loaded File .......................................................... 6-56.3 Using the Same Connection Settings as Before .............................................................. 6-66.4 EndingaConnectionbySwitchingtoOfflineMode ......................................................... 6-7
Chapter 7 Using the Setting Page to Configure Measurement and Judgment Conditions7.1 Setting General Test Conditions ....................................................................................... 7-17.2 Setting the WT3000 Measurement Conditions ................................................................. 7-47.3 Setting the WT3000 Judgment Conditions ....................................................................... 7-9
Chapter 8 Using the Measure Page to Make Measurements8.1 Previewing Harmonic Data and Waveform Data .............................................................. 8-18.2 Making Harmonic Measurements ..................................................................................... 8-6

viii IM 761922-05E
Contents
Chapter 9 Using the Analysis Page to Display Judgment Results and Measured Data9.1 Displaying a Graph of All Judgments ............................................................................... 9-19.2 Displaying a List and Graph of Ih/Iref Values ..................................................................... 9-79.3 Displaying a List and Graph of Rsce Values .................................................................... 9-129.4 Displaying a Harmonic Bar Graph .................................................................................. 9-159.5 Displaying a List of Measured Harmonic Values ............................................................ 9-179.6 Displaying a Trend Graph ............................................................................................... 9-189.7 Displaying a Waveform Graph ........................................................................................ 9-22
Chapter 10 Using the Print Page to Print Reports10.1 Setting a Report’s Title and Comments .......................................................................... 10-110.2 Setting the Print Mode, Print Language and Output Form ............................................. 10-410.3 Setting Print Details (Detail Setting) ............................................................................... 10-510.4 Printing ........................................................................................................................... 10-6
Chapter 11 Using the Save Page to Save Setting Information and Measured Data11.1 Saving Setting Information and Measured Data ..............................................................11-111.2 Saving Measured Data in CSV Format ...........................................................................11-5
Chapter 12 Other Features12.1 Cascading Windows ....................................................................................................... 12-112.2 Tiling Windows ............................................................................................................... 12-212.3 Using the Help Function ................................................................................................. 12-312.4 Viewing Version Information ........................................................................................... 12-5
Chapter 13 Troubleshooting13.1 Troubleshooting .............................................................................................................. 13-113.2 Error Messages .............................................................................................................. 13-2
Chapter 14 SpecificationsSpecifications .............................................................................................................................. 14-1
Index

1-1IM 761922-05E
Product Overview3
2
1
4
5
6
7
8
9
10
11
12
13
14
Index
1.1 Explanation of Functions
This software application (761922) measures the harmonics of electrical equipment according to the IEC Standard (see section 1.3 for an overview) and indicates/saves the results of judgments made according to the standard.
Applicable Measurement InstrumentsThis software can be used with YOKOGAWA’s measurement instruments listed below. This user’s manual (IM761922-05E) describes the case when this software is used in combination with the WT3000. For information about the handling precautions, functions, and operating procedures of the WT3000, see the respective manuals.
Product ModelWT3000 760301, 760302, 760303, and 760304
Applicable StandardFor the applicable standards, see section 1.3.
Setting Up Test Schedule MenusYou can arrange the following steps as you like to create test schedule menus.
Start: Select and edit test schedule menus.
Open: Load measured data and WT setting information files.
Connection: Configure the connection between the PC and a WT.
Setting: Set compatibility and measurement conditions.
Measure: Measure voltage fluctuation and flicker.
Analysis: Display measured results as bar and trend graphs.
Print: Print screen images and reports.
Save: Save measured data and setting information files.
Exit: Close the software.
Chapter 1 Product Overview

1-2 IM 761922-05E
You can start this software and then operate it according to the order of one of the test schedule menus. By designing appropriate menus, you can make the testing process smoother. You can also avoid forgetting and skipping steps when you have to repeat the same process over and over again.Here are more details about each step:
Start
Select and edit test schedule menus. There are four preset standard menus available in addition to custom menus that you can make yourself (located under the “User Setting” option button).
Open
Loading Setting InformationYou can load setting information files that contain information such as the measurement mode, bar graph and list display formats, standard and measurement settings, the measurement time, and report titles and comments (reports contain information such as judgment results and lists and graphs of measured data values).
Loading Measured Data and Waveform DataYou can load the harmonic measurement data, waveform data, harmonic measurement conditions, and setting information that have been saved to a file.
Connection
Use to connect the PC on which this software is installed to a WT through a GP-IB or Ethernet interface.
1.1 Explanation of Functions
1-3IM 761922-05E
Product Overview3
2
1
4
5
6
7
8
9
10
11
12
13
14
Index
Setting
Standard and Measurement SettingsYou can set judgment conditions according to the IEC 61000-3-12 standard.
Setting the Measurement TimeThe measurement time is the time between the start of the measurement to the end of the measurement. The time for measuring harmonics is set in units of 1 s in advance. The harmonics can be measured continuously for the specified time. The measurement time can be changed when equipment that emits harmonics that fluctuate over time is measured or when confirming that the emitted harmonics do not change even when the equipment is operated over extended time.
Measure
There are three measurement modes that you can select from the Measure submenu: Compliance test, Harmonic preview, and Waveform preview. The software acquires different types of data and performs different operations for each measurement mode.
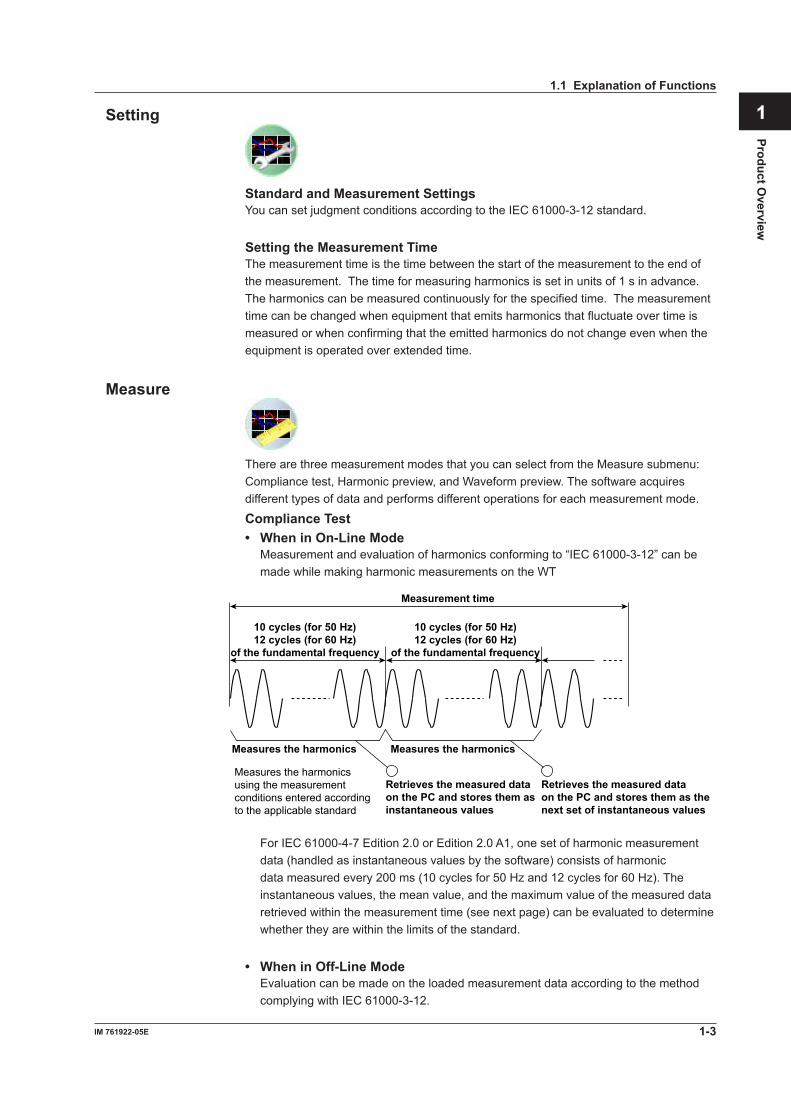
Compliance Test• When in On-Line Mode Measurement and evaluation of harmonics conforming to “IEC 61000-3-12” can be
made while making harmonic measurements on the WT
10 cycles (for 50 Hz)12 cycles (for 60 Hz)
of the fundamental frequency
10 cycles (for 50 Hz)12 cycles (for 60 Hz)
of the fundamental frequency
Measures the harmonics Measures the harmonics
Retrieves the measured dataon the PC and stores them asinstantaneous values
Retrieves the measured dataon the PC and stores them as thenext set of instantaneous values
Measures the harmonics using the measurement conditions entered according to the applicable standard
Measurement time
For IEC 61000-4-7 Edition 2.0 or Edition 2.0 A1, one set of harmonic measurement data (handled as instantaneous values by the software) consists of harmonic data measured every 200 ms (10 cycles for 50 Hz and 12 cycles for 60 Hz). The instantaneous values, the mean value, and the maximum value of the measured data retrieved within the measurement time (see next page) can be evaluated to determine whether they are within the limits of the standard.
• When in Off-Line Mode Evaluation can be made on the loaded measurement data according to the method
complying with IEC 61000-3-12.
1.1 Explanation of Functions

1-4 IM 761922-05E
Harmonic PreviewYou can only select Harmonic preview in online mode. As the WT measures the harmonic current, you can observe the harmonic fluctuations as they appear on a list of measured values. Unlike the compliance test, the harmonic preview is only for observing the state of a harmonic current. It does not determine whether or not a device conforms to certain standards. New data replaces old data. The software only retains the most recently acquired values.
10 cycles (for 50 Hz)12 cycles (for 60 Hz)
of the fundamental frequency
10 cycles (for 50 Hz)12 cycles (for 60 Hz)
of the fundamental frequency
Measures theharmonics
Measures theharmonics
Measures the harmonics using the measurement conditions entered according to the applicable standard
Retrieves the measured data on the PC and displays a bar
Retrieves the measured data on the PC and displays a bar graph or numerical listThe previous measured data is updated and does not remain.
Waveform PreviewYou can only select Waveform preview in online mode. As the WT measures the harmonic current, you can observe the measured waveform. Unlike the compliance test, the waveform preview is only for observing the state of a waveform. It does not determine whether or not a device conforms to certain standards. New data replaces old data. The software only retains the most recently acquired waveform.
Approx. 2 cycles at thefundamental frequency
Samples thewaveform data
Approx. 2 cycles at thefundamental frequency
Samples thewaveform data
Retrieves the waveform data on the PC and displays the waveform
Retrieves the waveform data on the PC and displays the waveformThe previous waveform data is updated and does not remain.
1.1 Explanation of Functions
1-5IM 761922-05E
Product Overview3
2
1
4
5
6
7
8
9
10
11
12
13
14
Index
Starting/Stopping MeasurementsHarmonic measurement on the WT can be started from your PC when in On-Line mode. The measurement cannot be started when in Off-Line mode.• Compliance Test After you start WT harmonic current analysis from your PC, the PC will acquire
and save the values that the WT measures. All of the data that is acquired during the specified measurement time is saved. After the specified measurement time is reached, the PC will automatically end measurement and data acquisition. You can also stop data acquisition from the PC before the measurement time is reached.
• Harmonic Preview and Waveform Preview After you start WT harmonic current analysis from your PC, the PC will acquire the
values that the WT measures. New data replaces old data. The software only retains the most recently acquired data. Unlike the compliance test, the harmonic and waveform previews are only for observing the state of a harmonic current. They do not determine whether or not a device conforms to certain standards.
Analysis
The result of the evaluation as to whether the harmonic current data up to order 40 is within the limits of IEC 61000-3-12 and the corresponding measured data can be displayed. Various displays below are possible only when in harmonic measurement mode.
Display of the Evaluation Result within the Entire Measurement TimeEvaluation can be made as to whether all of the harmonic measurement data in the measurement time are within the limits according to the settings specified in “Setting the Standard and Measurement Environment” (as described earlier), and the results can be displayed collectively.
List and Bar Graph Displays of Ih/IrefThe software displays the measured values of Ih/ Iref and the standard limits of those values for each harmonic order in both a list and a bar graph. You can use colors to indicate whether a value is under its limit or not. The software judges based on the average, maximum, and instantaneous values that are acquired in a period of measurement (instantaneous values are the values that are acquired at each measurement of the harmonic current).
List and Bar Graph Displays of RsceThe software displays the measured values of Rsce for each harmonic and the limits set by the standard for those values in both a list and a bar graph. You can use colors to indicate whether a value is under its limit or not. The software judges based on the average and maximum values that are acquired in a period of measurement.
Bar Graph Display of Harmonic Voltage, Current, and Phase AngleYou can display the measured data for each harmonic in a bar graph. The software will display the instantaneous values in the bar graph (instantaneous values are the values that are acquired at each measurement of the harmonic current).
List Display of Harmonic Voltage, Current, and Phase AngleYou can display the measured data for each harmonic in a list. The software will display the instantaneous values in the list (instantaneous values are the values that are acquired at each measurement of the harmonic current).
1.1 Explanation of Functions

1-6 IM 761922-05E
Trend Graph Display of Harmonic MeasurementsFor each harmonic, you can use a trend graph to show how the harmonic measurement data fluctuates over time.
Waveform Display of Voltage and CurrentYou can display a waveform that is measured immediately after the measurement time finishes. The software will display approximately two waveform periods. You can click on an area to display a cursor and show the instantaneous values there.
To create reports, you can attach titles and comments to harmonic measurement data lists and bar graphs and then save them to .pdf or .bmp files or print them.
Save
Saving Setting InformationYou can save setting information, such as measurement settings, measurement time, bar graph and list display formats, and report titles and comments, to an .ini file (reports contain information such as judgment results and lists and graphs of measured data values).
Saving Measured Data and Waveform DataThe software can save the measured data and waveform data that it acquires from the WT to an .fdt file. When the software saves this data, it will also save the WT harmonic measurement conditions along with the setting information described above to an .ini file.
Saving Measured Data and Waveform Data to CSV FormatYou can use this software to save the harmonic measurement data and waveform data that the PC has acquired from the WT to a CSV file. This software cannot load CSV files, but you can use another program on the PC to load and view the CSV files that you save.
1.1 Explanation of Functions

1-7IM 761922-05E
Product Overview3
2
1
4
5
6
7
8
9
10
11
12
13
14
Index
Exit
Use to close the software.
Online Mode and Offline ModeOnline ModeThe software is in online mode when the PC is connected to the WT through a GP-IB or Ethernet interface. The software must be in online mode to acquire harmonic data from the WT as the data is being measured. You can switch to Online mode from the Connection page. In online mode, you can change the WT settings from the PC.
Offline ModeYou can load previously saved harmonic measurement data into the software. You can change the settings and reanalyze the loaded data, and you can display a variety of lists and graphs.
1.1 Explanation of Functions
1-8 IM 761922-05E
1.2 PC System Requirements
PCCPUPentium 4 1.5 GHz or higher (recommended)
Memory1 GB or more (recommended)
Hard Disk500 MB or more of free space
Operating SystemMicrosoft Windows XP, Windows Vista*1, or Windows 7*1.*1 Both 32-bit versions and 64-bit versions are supported.
Communication CardGP-IBOne of the following GPIB boards or cards by National Instruments.You will need the driver version that is listed below for your OS or a later version (NI-488.2).
PCI-GPIB PCI-GPIB+ PCMCIA-GPIB PCMCIA-GPIB+ GPIB-USB-HSWindows XP 1.60*2 1.60*2 1.60*2 1.60*2 2.8.1Windows Vista 2.7.2 2.7.2 not supported not supported 2.8.1Windows 7 2.7.2 2.7.2 not supported not supported 2.8.1
*2 however, version 2.3 is not supported).
EthernetA 100BASE-TX Ethernet port.
Display, Printer, and MouseMust be compatible with the operating systems listed above.
WT3000WT3000 firmware version 4.11 or higher with the following functions.• Advanced calculation feature (/G6 option)• GP-IB interface (standard) or Ethernet interface (/C7 option)
Correspondence between WT3000 Firmware Versions and IEC61000-4-7If the WT3000 firmware version is 4.11 or later, you can select the IEC61000-4-7 edition number.IEC61000-4-7 edition numbers
• Edition 1.0• Edition 2.0• Edition 2.0 A1
IEC61000-4-7 defines requirements for measurement instruments. For details, see chapter 14. If the WT3000 firmware version is between 4.01 and 4.10, the edition number is fixed to IEC61000-4-7 Edition 2.0.
NoteFor information on updating the WT3000 firmware, contact your nearest YOKOGAWA dealer.
1-9IM 761922-05E
Product Overview3
2
1
4
5
6
7
8
9
10
11
12
13
14
Index
1.3 Applicable Standards
This software supports the following standards:• The IEC 61000-3-12 Second Edition, and First Edition• EN 61000-3-12 : 2011: 2005• The IEC 61000-3-17 First Edition, Second Edition, and A1 of Second EditionThis section provides an overview of the standards. For more detailed information,
please refer to the standards themselves.
ScopeThe IEC 61000-3-12 First Edition harmonic current emission standard applies to electronic equipment that: (1) operates with single-phase 230-V 50-Hz or three-phase 400-V 50-Hz public low voltage power supply systems, and (2) has a rated input current that is above 16 A but not greater than 75 A.
LimitsIEC61000-3-12 Ed. 2.0
There are four types of limits:• Limits for equipment other than balanced three-phase equipment• Limits for balanced three-phase equipment• Limits for balanced three-phase equipment under specified conditions (a, b, and c)• Limits for balanced three-phase equipment under specified conditions (d, e, and f)
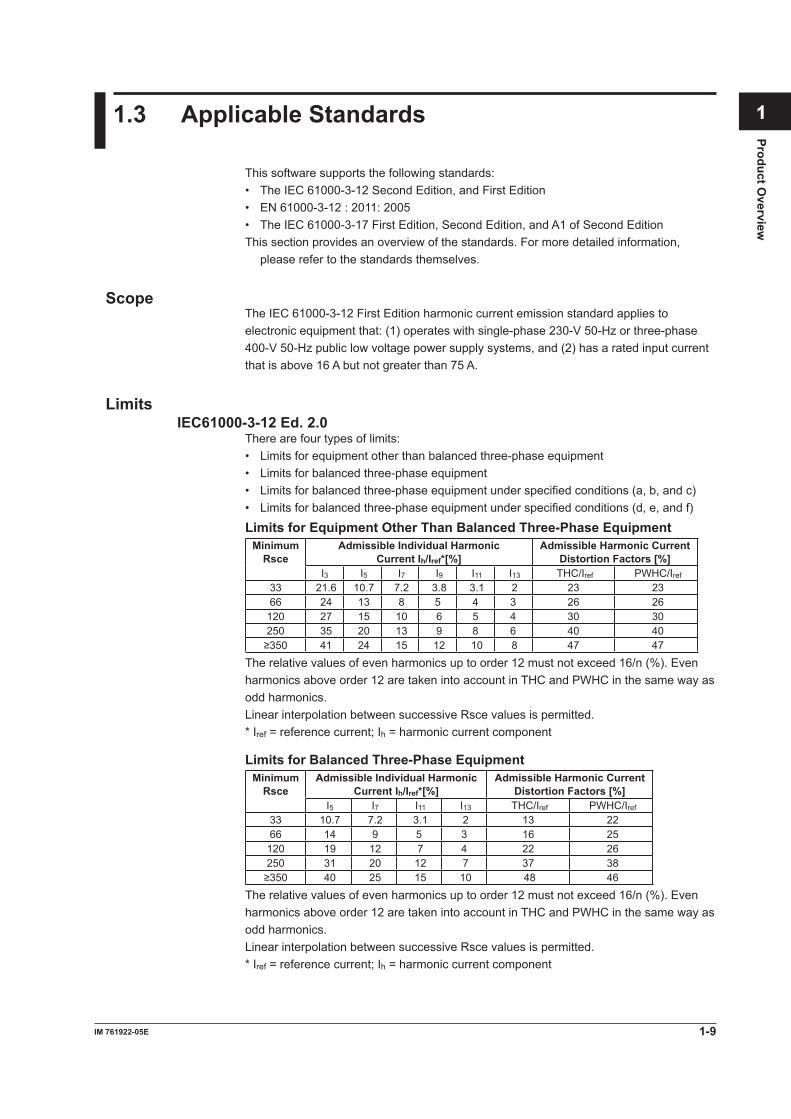
Limits for Equipment Other Than Balanced Three-Phase EquipmentMinimum
RsceAdmissible Individual Harmonic
Current Ih/Iref*[%]Admissible Harmonic Current
Distortion Factors [%]I3 I5 I7 I9 I11 I13 THC/Iref PWHC/Iref
33 21.6 10.7 7.2 3.8 3.1 2 23 2366 24 13 8 5 4 3 26 26
120 27 15 10 6 5 4 30 30250 35 20 13 9 8 6 40 40≥350 41 24 15 12 10 8 47 47
The relative values of even harmonics up to order 12 must not exceed 16/n (%). Even harmonics above order 12 are taken into account in THC and PWHC in the same way as odd harmonics.Linear interpolation between successive Rsce values is permitted.* Iref = reference current; Ih = harmonic current component
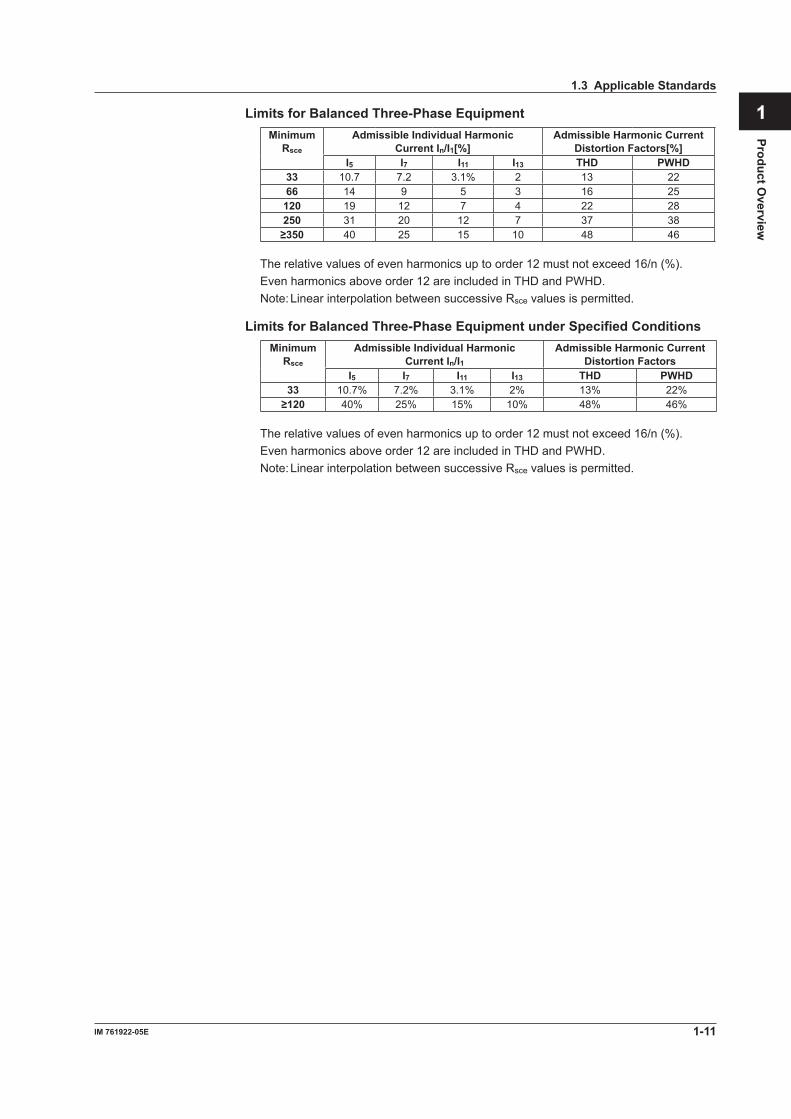
Limits for Balanced Three-Phase EquipmentMinimum
RsceAdmissible Individual Harmonic
Current Ih/Iref*[%]Admissible Harmonic Current
Distortion Factors [%] I5 I7 I11 I13 THC/Iref PWHC/Iref
33 10.7 7.2 3.1 2 13 2266 14 9 5 3 16 25120 19 12 7 4 22 26250 31 20 12 7 37 38≥350 40 25 15 10 48 46
The relative values of even harmonics up to order 12 must not exceed 16/n (%). Even harmonics above order 12 are taken into account in THC and PWHC in the same way as odd harmonics.Linear interpolation between successive Rsce values is permitted.* Iref = reference current; Ih = harmonic current component
1-10 IM 761922-05E
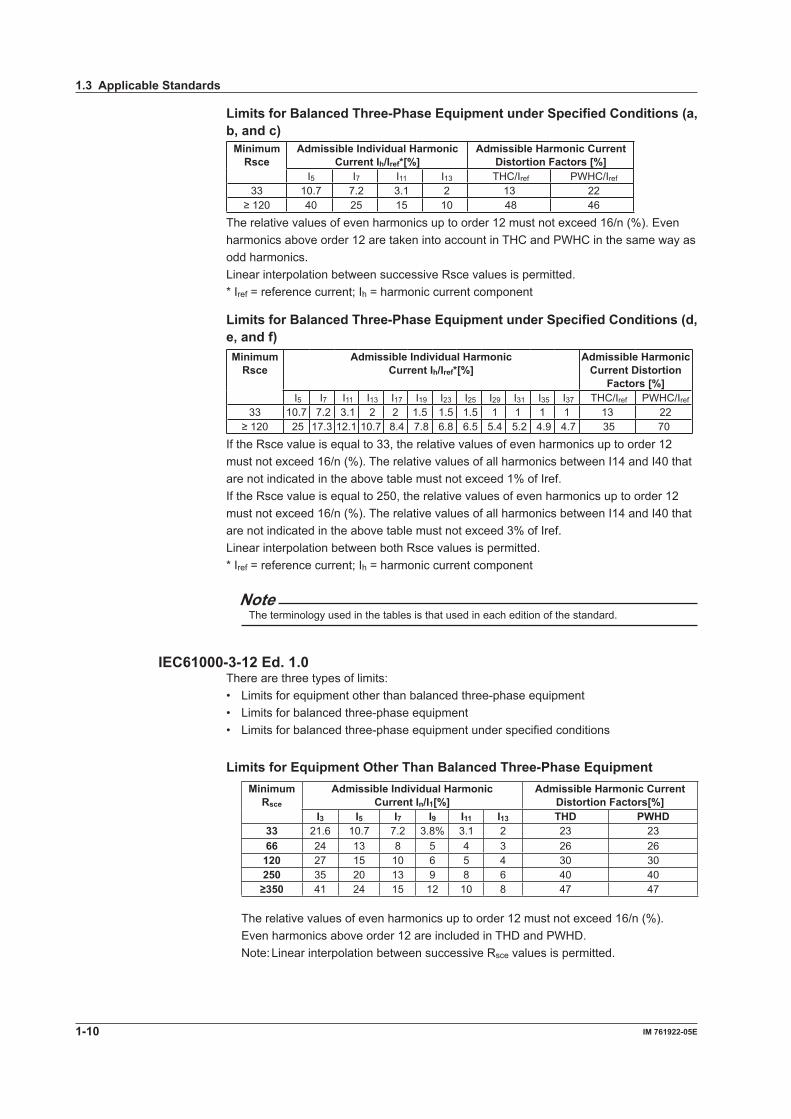
Limits for Balanced Three-Phase Equipment under Specified Conditions (a, b, and c)
Minimum Rsce
Admissible Individual HarmonicCurrent Ih/Iref*[%]
Admissible Harmonic Current Distortion Factors [%]
I5 I7 I11 I13 THC/Iref PWHC/Iref
33 10.7 7.2 3.1 2 13 22≥ 120 40 25 15 10 48 46
The relative values of even harmonics up to order 12 must not exceed 16/n (%). Even harmonics above order 12 are taken into account in THC and PWHC in the same way as odd harmonics.Linear interpolation between successive Rsce values is permitted.* Iref = reference current; Ih = harmonic current component
Limits for Balanced Three-Phase Equipment under Specified Conditions (d, e, and f)Minimum
RsceAdmissible Individual Harmonic
Current Ih/Iref*[%]Admissible Harmonic
Current Distortion Factors [%]
I5 I7 I11 I13 I17 I19 I23 I25 I29 I31 I35 I37 THC/Iref PWHC/Iref
33 10.7 7.2 3.1 2 2 1.5 1.5 1.5 1 1 1 1 13 22≥ 120 25 17.3 12.1 10.7 8.4 7.8 6.8 6.5 5.4 5.2 4.9 4.7 35 70
If the Rsce value is equal to 33, the relative values of even harmonics up to order 12 must not exceed 16/n (%). The relative values of all harmonics between I14 and I40 that are not indicated in the above table must not exceed 1% of Iref.If the Rsce value is equal to 250, the relative values of even harmonics up to order 12 must not exceed 16/n (%). The relative values of all harmonics between I14 and I40 that are not indicated in the above table must not exceed 3% of Iref.Linear interpolation between both Rsce values is permitted.* Iref = reference current; Ih = harmonic current component
NoteThe terminology used in the tables is that used in each edition of the standard.
IEC61000-3-12 Ed. 1.0There are three types of limits:• Limits for equipment other than balanced three-phase equipment• Limits for balanced three-phase equipment• Limits for balanced three-phase equipment under specified conditions
Limits for Equipment Other Than Balanced Three-Phase EquipmentMinimum
Rsce
Admissible Individual HarmonicCurrent In/I1[%]
Admissible Harmonic Current Distortion Factors[%]
I3 I5 I7 I9 I11 I13 THD PWHD33 21.6 10.7 7.2 3.8% 3.1 2 23 2366 24 13 8 5 4 3 26 26
120 27 15 10 6 5 4 30 30250 35 20 13 9 8 6 40 40≥350 41 24 15 12 10 8 47 47
The relative values of even harmonics up to order 12 must not exceed 16/n (%). Even harmonics above order 12 are included in THD and PWHD. Note: Linear interpolation between successive Rsce values is permitted.
1.3 Applicable Standards
1-11IM 761922-05E
Product Overview3
2
1
4
5
6
7
8
9
10
11
12
13
14
Index
Limits for Balanced Three-Phase EquipmentMinimum
Rsce
Admissible Individual HarmonicCurrent In/I1[%]
Admissible Harmonic Current Distortion Factors[%]
I5 I7 I11 I13 THD PWHD33 10.7 7.2 3.1% 2 13 2266 14 9 5 3 16 25120 19 12 7 4 22 28250 31 20 12 7 37 38≥350 40 25 15 10 48 46
The relative values of even harmonics up to order 12 must not exceed 16/n (%). Even harmonics above order 12 are included in THD and PWHD. Note: Linear interpolation between successive Rsce values is permitted.
Limits for Balanced Three-Phase Equipment under Specified ConditionsMinimum
Rsce
Admissible Individual HarmonicCurrent In/I1
Admissible Harmonic Current Distortion Factors
I5 I7 I11 I13 THD PWHD33 10.7% 7.2% 3.1% 2% 13% 22%≥120 40% 25% 15% 10% 48% 46%
The relative values of even harmonics up to order 12 must not exceed 16/n (%). Even harmonics above order 12 are included in THD and PWHD. Note: Linear interpolation between successive Rsce values is permitted.
1.3 Applicable Standards
1-12 IM 761922-05E
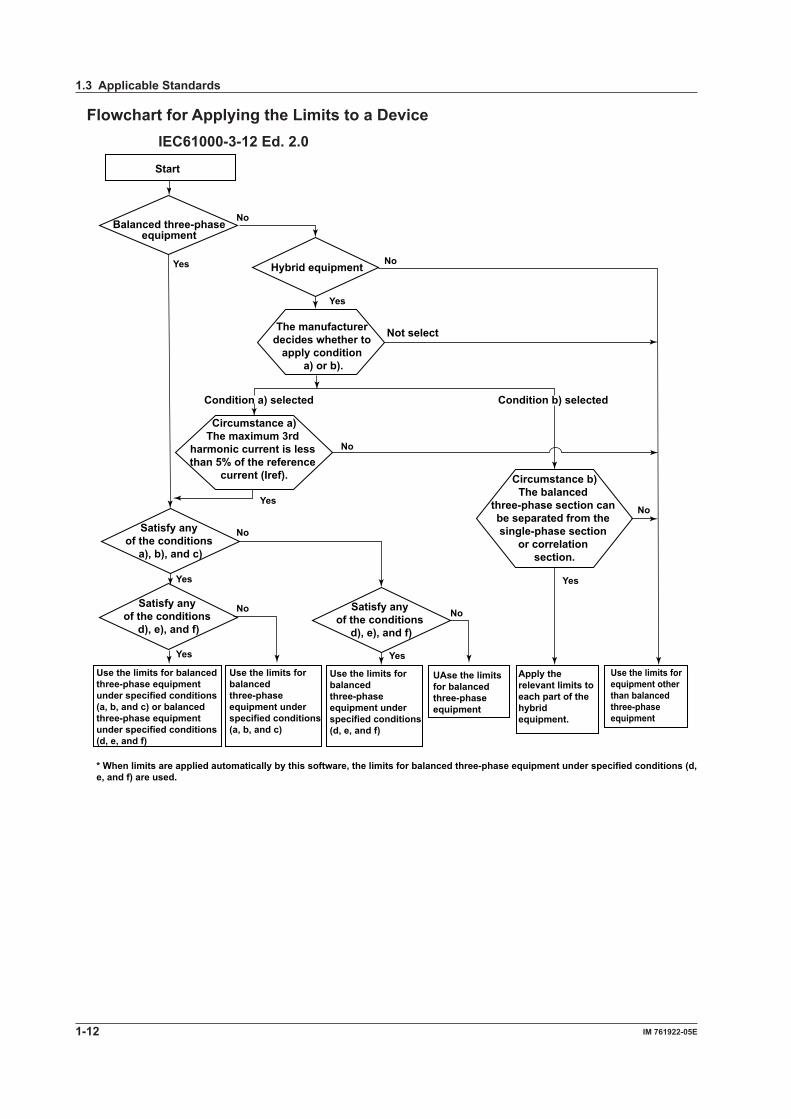
Flowchart for Applying the Limits to a DeviceIEC61000-3-12 Ed. 2.0
Satisfy any of the conditions
d), e), and f)
Satisfy any of the conditions
d), e), and f)
Circumstance b)The balanced
three-phase section can be separated from the single-phase section
or correlation section.
Apply the relevant limits to each part of the hybrid equipment.
Start
No
Yes
Balanced three-phaseequipment
Hybrid equipment
The manufacturer decides whether to
apply condition a) or b).
Circumstance a)The maximum 3rd
harmonic current is less than 5% of the reference
current (Iref).
Condition b) selectedCondition a) selected
No
Yes
Not select
No
No
No
NoNo
Satisfy any of the conditions
a), b), and c)
Use the limits for balanced three-phase equipment under specified conditions (a, b, and c) or balanced three-phase equipment under specified conditions (d, e, and f)
Use the limits for balanced three-phase equipment under specified conditions (a, b, and c)
Use the limits for balanced three-phase equipment under specified conditions (d, e, and f)
Yes
Yes
YesYes
Yes
* When limits are applied automatically by this software, the limits for balanced three-phase equipment under specified conditions (d, e, and f) are used.
Use the limits forequipment other than balanced three-phase equipment
UAse the limits for balanced three-phaseequipment
1.3 Applicable Standards
1-13IM 761922-05E
Product Overview3
2
1
4
5
6
7
8
9
10
11
12
13
14
Index
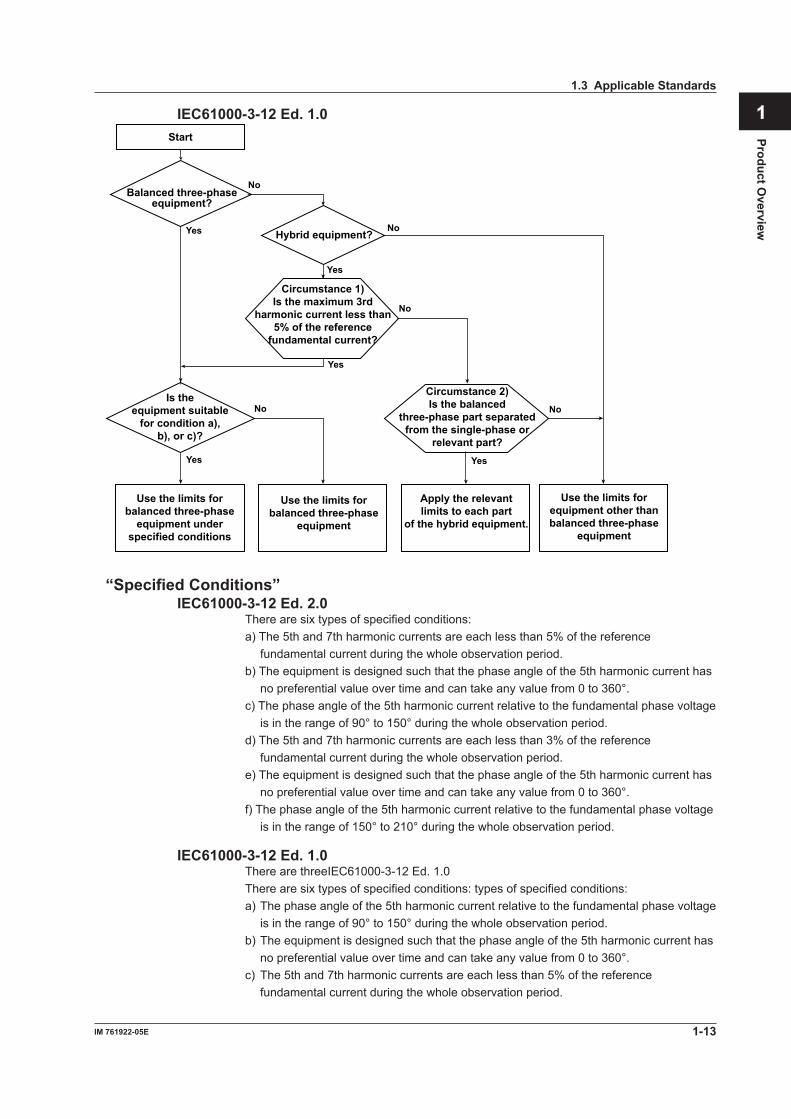
IEC61000-3-12 Ed. 1.0Start
Circumstance 1)Is the maximum 3rd
harmonic current less than5% of the reference
fundamental current?
No
No
Use the limits for balanced three-phase
equipment
Use the limits for balanced three-phase
equipment under specified conditions
Use the limits for equipment other than balanced three-phase
equipment
Balanced three-phase equipment?
No
Yes
Hybrid equipment?
Yes
No
Is the equipment suitable
for condition a), b), or c)?
Circumstance 2)Is the balanced
three-phase part separatedfrom the single-phase or
relevant part?
Apply the relevant limits to each part
of the hybrid equipment.
Yes
Yes Yes
No
“Specified Conditions”IEC61000-3-12 Ed. 2.0
There are six types of specified conditions:a) The 5th and 7th harmonic currents are each less than 5% of the reference
fundamental current during the whole observation period.b) The equipment is designed such that the phase angle of the 5th harmonic current has
no preferential value over time and can take any value from 0 to 360°.c) The phase angle of the 5th harmonic current relative to the fundamental phase voltage
is in the range of 90° to 150° during the whole observation period.d) The 5th and 7th harmonic currents are each less than 3% of the reference
fundamental current during the whole observation period.e) The equipment is designed such that the phase angle of the 5th harmonic current has
no preferential value over time and can take any value from 0 to 360°.f) The phase angle of the 5th harmonic current relative to the fundamental phase voltage
is in the range of 150° to 210° during the whole observation period.
IEC61000-3-12 Ed. 1.0There are threeIEC61000-3-12 Ed. 1.0There are six types of specified conditions: types of specified conditions:a) The phase angle of the 5th harmonic current relative to the fundamental phase voltage
is in the range of 90° to 150° during the whole observation period.b) The equipment is designed such that the phase angle of the 5th harmonic current has
no preferential value over time and can take any value from 0 to 360°.c) The 5th and 7th harmonic currents are each less than 5% of the reference
fundamental current during the whole observation period.
1.3 Applicable Standards

1-14 IM 761922-05E
The WT3000 Window Function (Measurement Period)The width of the window function (measurement period) for the measurements on the WT3000 is 200 ms (10 cycles at 50 Hz and 12 cycles at 60 Hz) as defined by IEC61000-4-7 Edition 2.0 or Edition 2.0 A1.
1.3 Applicable Standards

1-15IM 761922-05E
Product Overview3
2
1
4
5
6
7
8
9
10
11
12
13
14
Index
1.4 Flow of Operation
To display and judge harmonic measurement data using this software, the WT and PC must be connected, the software must be installed, WT measurement conditions must be set, and judgment conditions of the applicable standard must be set. Follow the steps below.There are two methods for connecting the PC and the WT: GP-IB and Ethernet (WT3000 option).
Preparation Flow Chart
Connect the WT and PC (section 2.1)
Install the IEC 61000 software (section 2.4)
Prep
arat
ion
Test Flowchart
Start the IEC launcher (section 3.1)
Pre-
test
pre
para
tion
and
conf
igur
atio
n
Select a standard (section 3.1)
IEC 61000-3-12
Start the IEC 61000-3-12 Harmonic Measurement Software (section 3.1)
IEC 61000-3-2Harmonic Measurement See IM 761922-06EIEC 61000-3-3Voltage Fluctuationand Flicker Measurement See IM 761922-07EIEC 61000-3-11Voltage Fluctuationand Flicker Measurement See IM 761922-04E
Other program/standard
No
YesThe Open item is in the test schedule
menu Open (chapter 5)Load data and settings
No
YesThe Connection item is in the test schedule
menuConnection (chapter 6)Configure WT connection settings
No
YesThe Setting item is in the testschedule menu
Setting (chapter 7)Set Test Conditions
To the next page
Start (chapter 4)Set and select test schedule menus
* If you select IEC61000-3-12 Ed. 1.0, see the older edition of the instruction manual (ferer to page iv) for chapters 7 (configuration), 8 (test), and 9 (analysis).

1-16 IM 761922-05E
Proc
essi
ng o
f Tes
t Res
ults
No
YesThe Print item is in the test schedule menu
Print (Chapter 10)Print a report
No
YesThe Save item is in the test schedule menu
Save (Chapter 11)Save data and settings
Test
exe
cutio
nPr
oces
sing
of t
est r
esul
tsNo
YesThe Measure item is in the test schedule menu
Measure (Chapter 8)Measure and perform a test
No
YesThe Analyze item is in the test schedule menu
Analysis (chapter 9)Analyze measured data
Continued from previous page
Close the IEC launcher
Close the IEC 61000-3-12 Harmonic MeasurementSoftware (chapter 4)
1.4 Flow of Operation

1-17IM 761922-05E
Product Overview3
2
1
4
5
6
7
8
9
10
11
12
13
14
Index
1.5 Terminology Related to Harmonics
Harmonics refer to sine waves whose frequency is an integer multiple of the fundamental wave (normally sine waves of commercial frequency 50-Hz or 60-Hz) excluding the fundamental frequency.
Fundamental Wave (Fundamental Component)The sine wave with the longest period among the different sine waves derived from the periodic complex wave. Or the sine wave that has the fundamental frequency within the components of the complex wave.
Fundamental FrequencyThe frequency corresponding to the longest period in the periodic complex wave. The frequency of the fundamental wave.
Distorted WaveA wave that differs from the fundamental wave.
Higher HarmonicA sine wave with frequency that is an integer multiple (twice or greater) of the fundamental frequency.
Harmonic ComponentWaveform component with frequency that is an integer multiple (twice or greater) of the fundamental frequency.
Harmonic OrderInteger ratio of the harmonic frequency with respect to the fundamental frequency. IEC defines the maximum harmonic order that is measured to be 40.
PLL SourceWhen measuring harmonics, the fundamental period (period of the fundamental signal) must be determined in order to analyze the higher orders. The PLL (Phase Locked Loop) source is the signal that is used to determine the fundamental period.
Ssc (Short Circuit Power)
Unominal2
ZUnominal: Systematic nominal line voltageZ: System impedance of the power source frequency at the common connection point.
Sequ (Rated Apparent Power of the Equipment)Sequ is calculated using one of the following formulas depending on the type of equipment.
a) Up Iequ Single-phase equipment and the single-phase components of composite equipment
b) Ui Iequ Interphase equipmentc) √3 • Ui Iequ Balanced three-phase equipment and the three-phase components
of composite equipmentd) √3 • Ui Iequ max(Ed2.0) Unbalanced three-phase equipment 3 • Up Iequ max (Ed1.0)Up: Rated voltage (single phase)Ui: Rated voltage (line)Iequ:The manufacturer-specified rated line current of a device or one of its componentsIequ max: The maximum actual current value out of the three phases

1-18 IM 761922-05E
Rsce (]short circuit ratio)Rsce is calculated using one of the following formulas depending on the type of equipment.
a) Ssc Single-phase equipment and the single-phase components of composite 3 • Sequ equipment
b) Ssc Interphase equipment 2 • Sequ
c) Ssc Three-phase equipment and the three-phase components of composite Sequ equipment.
Terminology in IEC61000-3-12 Edition 2.0THC (Total harmonic current) (Ed. 2.0)The sum of the r.m.s values of harmonic current components from orders 2 to 40.
THC (Total Harmonic Component)Sum (rs value) of harmonic currents of orders 2 to 40.
h = 2
Ih: The rms current of each harmonic order h: The harmonic order
40
Ih2
PWHC (Partial Weighted Harmonic Current
h = 2
Ih: The rms current of each harmonic order h: The harmonic order
40
h·Ih2
Iref (reference current)Equipment’s r.m.s input current defined by the standard and used to determine the emission limits.
Terminology in IEC61000-3-12 Edition 1.0THC (Total Harmonic Component) (Ed. 1.0)Sum (rs value) of harmonic currents of orders 2 to 40.
n = 2
In: The rms current of each harmonic order n: The harmonic order
40
In2
1.5 Terminology Related to Harmonics
1-19IM 761922-05E
Product Overview3
2
1
4
5
6
7
8
9
10
11
12
13
14
Index
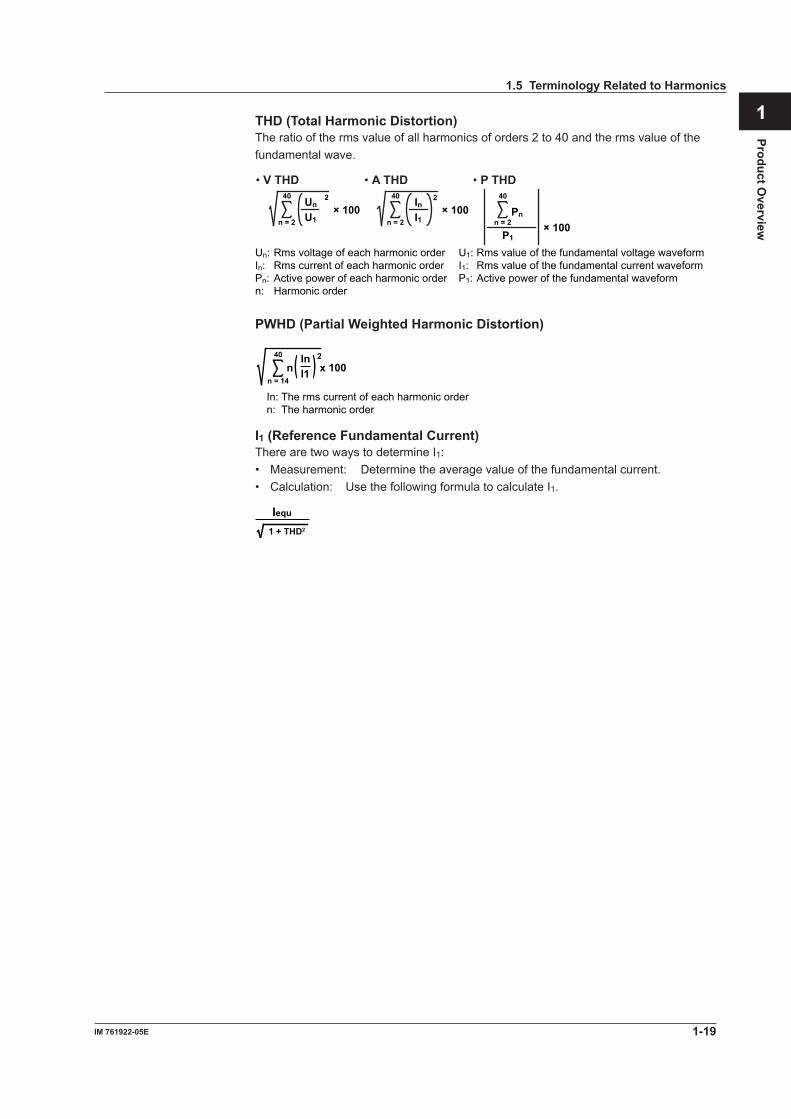
THD (Total Harmonic Distortion)The ratio of the rms value of all harmonics of orders 2 to 40 and the rms value of the fundamental wave.
Un: Rms voltage of each harmonic order U1: Rms value of the fundamental voltage waveformIn: Rms current of each harmonic order I1: Rms value of the fundamental current waveformPn: Active power of each harmonic order P1: Active power of the fundamental waveformn: Harmonic order
• V THD • A THD • P THD
n = 2
40
Pn
P1 × 100n = 2
40 InI1
× 1002
n = 2
40 Un
U1× 100
2
PWHD (Partial Weighted Harmonic Distortion)
n = 14
In: The rms current of each harmonic order n: The harmonic order
40
n x 100InI1( ) 2
I1 (Reference Fundamental Current)There are two ways to determine I1:• Measurement: Determine the average value of the fundamental current.• Calculation: Use the following formula to calculate I1.
Iequ
1 + THD2
1.5 Terminology Related to Harmonics

2-1IM 761922-05E
Preparation before Use
3
2
1
4
5
6
7
8
9
10
11
12
13
14
Index
2.1 Connecting the WT3000 and the PC
CAUTIONWhen connecting or disconnecting communication cables, make sure to turn OFF the PC and the WT. Otherwise, erroneous operation or damage to the internal circuitry may result.
When Controlling the WT through the GP-IBThe GP-IB available on the WT is a 24-pin connector that conforms to the IEEE St’d 488-1978. Use a GP-IB cable that conforms to this standard. Connect the cable to the GP-IB connector on the rear panel of the WT. For details on the connection procedure and the specifications of the GP-IB interface, see the WT3000 Communication Interface User’s Manual IM760301-17E on the CD-ROM. Use an appropriate connector for your PC to connect the other end of the GP-IB cable.
Chapter 2 Preparation before Use
2-2 IM 761922-05E
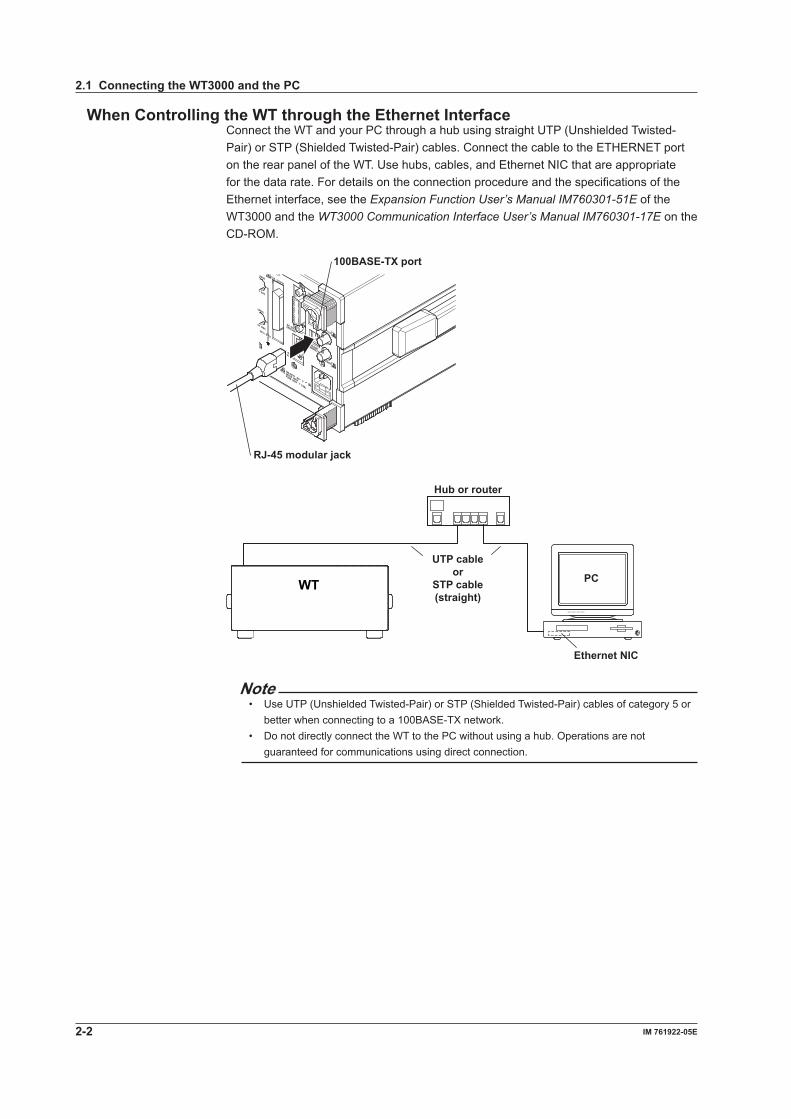
When Controlling the WT through the Ethernet InterfaceConnect the WT and your PC through a hub using straight UTP (Unshielded Twisted-Pair) or STP (Shielded Twisted-Pair) cables. Connect the cable to the ETHERNET port on the rear panel of the WT. Use hubs, cables, and Ethernet NIC that are appropriate for the data rate. For details on the connection procedure and the specifications of the Ethernet interface, see the Expansion Function User’s Manual IM760301-51E of the WT3000 and the WT3000 Communication Interface User’s Manual IM760301-17E on the CD-ROM.
100BASE-TX port
RJ-45 modular jack
Hub or router
UTP cableor
STP cable(straight)
PC
Ethernet NIC
WT
Note• Use UTP (Unshielded Twisted-Pair) or STP (Shielded Twisted-Pair) cables of category 5 or
better when connecting to a 100BASE-TX network.• Do not directly connect the WT to the PC without using a hub. Operations are not
guaranteed for communications using direct connection.
2.1 Connecting the WT3000 and the PC

2-3IM 761922-05E
Preparation before Use
3
2
1
4
5
6
7
8
9
10
11
12
13
14
Index
2.2 Setting the GP-IB Control
Procedure1. Press MISC to display the Misc menu.
2. Press the Remote Control soft key to display the Remote Ctrl menu.
3. Press the Device soft key to select GP-IB.Only the communication interface selected here is enabled. The WT does not accept commands that are transmitted to other unselected communication interfaces.
4. Press the cursor keys to set the address.

2-4 IM 761922-05E
ExplanationTo use the software in On-Line mode through the GP-IB interface, operate the WT to select GP-IB.
Setting the AddressSet the WT address within the following range.1 to 30
Each device that can be connected via GP-IB has a unique address within the GP-IB system. This address is used to distinguish the device from others. Therefore, make sure that the WT address does not overlap with other devices when connecting the WT to the PC.
Note• Do not change the address while the controller (PC) or other devices are using the GP-IB
system.• When connecting the WT to a single PC and controlling the WT using this software, multiple
communication interfaces cannot be used simultaneously.• Use a GP-IB card by National Instruments on the PC end. For details, see section 1.2.• The software may not operate correctly, if an adapter is inserted in the middle of the
connection between the WT and the PC (for example, GP-IB-to-USB adapter). For details, contact your nearest YOKOGAWA dealer.
2.2 Setting the GP-IB Control

2-5IM 761922-05E
Preparation before Use
3
2
1
4
5
6
7
8
9
10
11
12
13
14
Index
2.3 Setting the Ethernet Control
ProcedureSetting the Ethernet Interface
1. Press MISC to display the Misc menu.
2. Press the Remote Control soft key to display the Remote Ctrl menu.
3. Press the Device soft key to select Network.Only the communication interface selected here is enabled. The WT does not accept commands that are transmitted to other unselected communication interfaces.
Setting the User Name and Password4. Press the User Account soft key to display the User Account dialog box.
5. Press the cursor keys to select User Name.
6. Press SET to display the keyboard.
7. Use the keyboard on the WT to enter the user name.For the keyboard operation of the WT, see the WT User’s Manual.
8. Press the cursor keys to select Password.
9. Press SET to display the keyboard.
10. Use the keyboard on the WT to enter the password.Enter the password twice for confirmation.A password is not required if the login name is anonymous.For the keyboard operation of the WT, see the WT User’s Manual.

2-6 IM 761922-05E
Setting the Timeout Value11. Press the cursor keys to select Time Out.
12. Press SET to display the timeout time selection box.
13. Press the cursor keys to set the timeout value.
14. Press SET or ESC to close the box.
Setting TCP/IPYou must enter TCP/IP settings to control the WT from a PC through the network. For the setup procedure, see the Expansion Function User’s Manual IM760301-51E of the WT3000.
ExplanationTo use the software in On-Line mode through the network, operate the WT to select Network.
Setting the User Name• Enter the user name to allow access to the WT.• Enter up to 15 characters.• The characters that can be used are 0-9, A-Z, %, _, ( ) (parentheses), - (minus sign).• If you specify anonymous, the WT can be accessed from the PC without a password.
Setting the Password• Enter the password of the user name to allow access to the WT.• Enter up to 15 characters.• The characters that can be used are 0-9, A-Z, %, _, ( ) (parentheses), - (minus sign).• If you set the user name to anonymous, the WT can be accessed from the PC without
a password.
Setting the Timeout ValueThe WT closes the connection to the network if there is no access for a certain period of time (timeout value).The available settings are 1 to 3600 s, or Infinite. The default value is Infinite.
Note• To activate the settings, you must power cycle the WT.• When connecting the WT to a single PC and controlling the WT using this software, multiple
communication interfaces cannot be used simultaneously.• The software may not operate correctly, if an adapter is inserted in the middle of the
connection between the WT and the PC (for example, GP-IB-to-USB adapter). For details, contact your nearest YOKOGAWA dealer.
2.3 Setting the Ethernet Control

2-7IM 761922-05E
Preparation before Use
3
2
1
4
5
6
7
8
9
10
11
12
13
14
Index
2.4 Installing the Software
ProcedureHave the CD-ROM containing the software ready. Exit all programs that are currently running before starting the installation. If an older version of the Harmonic/Flicker Measurement Software is installed, uninstall it first.The following procedures are for installing the software on Windows XP. The screens shown in the figure may vary depending on the OS that is running on the PC.
1. Start Windows.
Set the user name to Administrator when starting up.
2. Place the installation CD-ROM containing the software into the CD-ROM drive.
3. Double-click My Computer, then the CD-ROM icon.
4. Double-click Setup.exe. InstallShield Wizard starts.
5. Click Next.
2-8 IM 761922-05E
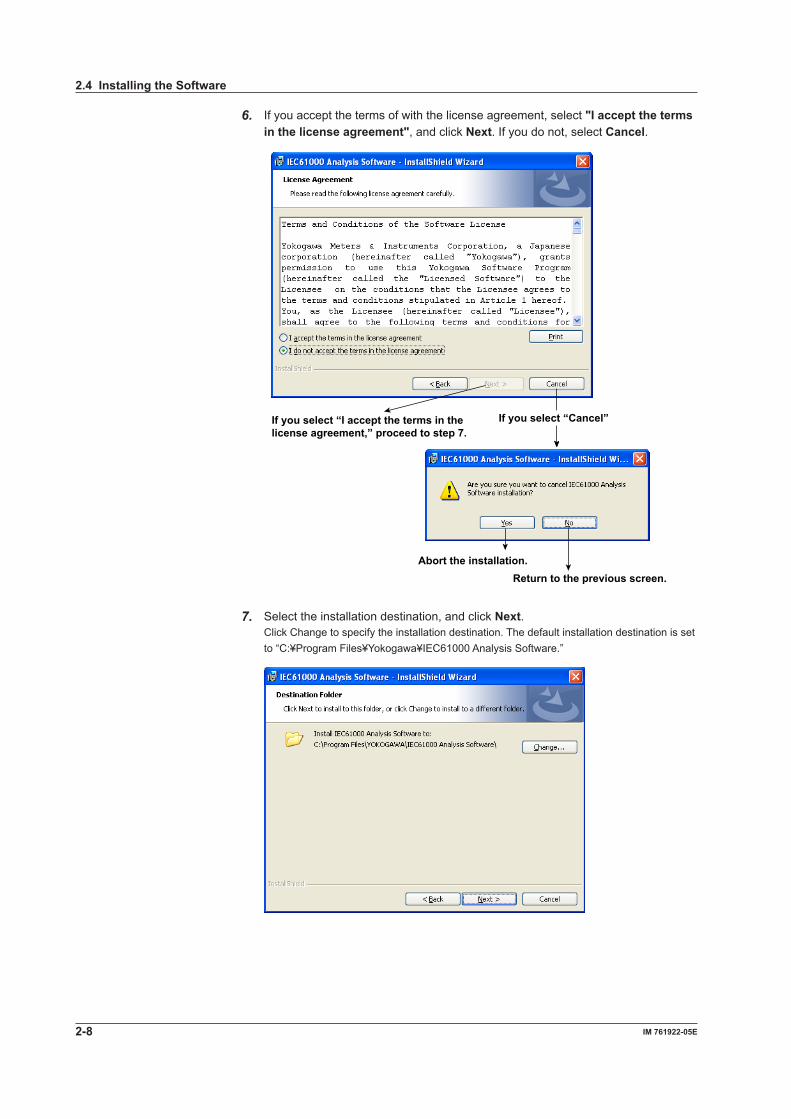
6. If you accept the terms of with the license agreement, select "I accept the terms in the license agreement", and click Next. If you do not, select Cancel.
If you select “I accept the terms in the license agreement,” proceed to step 7.
If you select “Cancel”
Abort the installation.Return to the previous screen.
7. Select the installation destination, and click Next.Click Change to specify the installation destination. The default installation destination is set to “C:¥Program Files¥Yokogawa¥IEC61000 Analysis Software.”
2.4 Installing the Software
2-9IM 761922-05E
Preparation before Use
3
2
1
4
5
6
7
8
9
10
11
12
13
14
Index
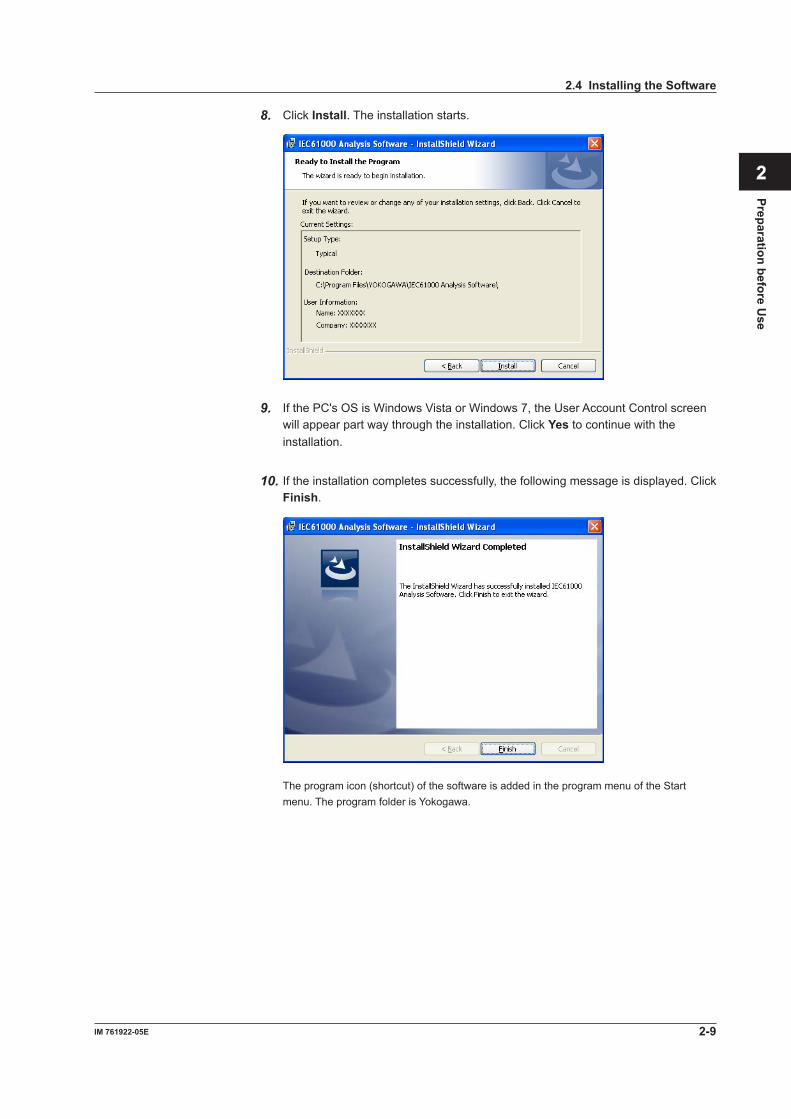
8. Click Install. The installation starts.
9. If the PC's OS is Windows Vista or Windows 7, the User Account Control screen will appear part way through the installation. Click Yes to continue with the installation.
10. If the installation completes successfully, the following message is displayed. Click Finish.
The program icon (shortcut) of the software is added in the program menu of the Start menu. The program folder is Yokogawa.
2.4 Installing the Software

2-10 IM 761922-05E
Uninstalling the SoftwareThe procedure below is for uninstalling the software program on Windows XP.
1. On the task bar, click the Start button and choose Control Panel.
2. Double-click Add or Remove Programs from the Control Panel.
3. Select IEC61000 Analysis Software in the Add or Remove Programs window and click Remove.
4. A confirmation dialog box for removing the program opens. Click Yes to delete the program. Clicking No will cancel the removal operation.
5. The software program is uninstalled.
6. If the PC's OS is Windows Vista or Windows 7, the User Account Control screen will appear part way through the uninstallation. Click Yes to continue with the uninstallation.
2.4 Installing the Software

3-1IM 761922-05E
Starting and Using the Softw
are
3
2
1
4
5
6
7
8
9
10
11
12
13
14
Index
3.1 Starting the Software
ProcedureStarting the Software
1. From the Start menu, choose Programs > Yokogawa > IEC61000 Analysis > IEC61000. The IEC 61000 software starts.The procedure above applies when the default software installation destination and program folder are used. If you changed the installation destination or program folder at installation, select the corresponding location.
After you start the software, the IEC Launcher appears. Use it to select the appropriate standard.
Selecting a Standard2. Select IEC61000-3-12 to open the IEC 61000-3-12 Harmonic Measurement
Software.
Closes the IEC launcher
Starts the IEC 61000-3-12Harmonic Measurement Software
Chapter 3 Starting and Using the Software

3-2 IM 761922-05E
ExplanationYou can start this software by accessing its shortcut from the start menu’s program folder. This software is installed in the location that you specified in the previous chapter.
Selecting a StandardTo analyze the harmonics of a device with an electric current above 16 A and not greater than 75 A, select IEC 61000-3-12. The Harmonic Measurement Software will start. If you select a different standard, the program that corresponds to that standard will start. For information about the programs that correspond to other standards, see their user’s manuals.
3.1 Starting the Software

3-3IM 761922-05E
Starting and Using the Softw
are
3
2
1
4
5
6
7
8
9
10
11
12
13
14
Index
3.2 Basic Operations
Information area
Setting and display area
The following types of information are displayed.• Configuration dialog boxes• Measurement and judgment results• Print previews• Information about loaded or saved files
Menu area
The test schedule menu items, such as Connection, Measure, and Print, appear here.When you click an icon, its submenu appears. Icons that cannot be selected are grayed out.
Submenu area
In the Start window, you select the test schedule menu here. In other windows, boxes for configuring the settings of the selected menu item appear here.
The currently selected icon is highlighted.
Judgment results (chapter 8)
Compliance judgment standard number and edition
Software version
Help button (chapter 12)
Information bar: Notices appear here.
Connection status: Online/offline (see chapter 6)
3-4 IM 761922-05E
Menu Area Icons
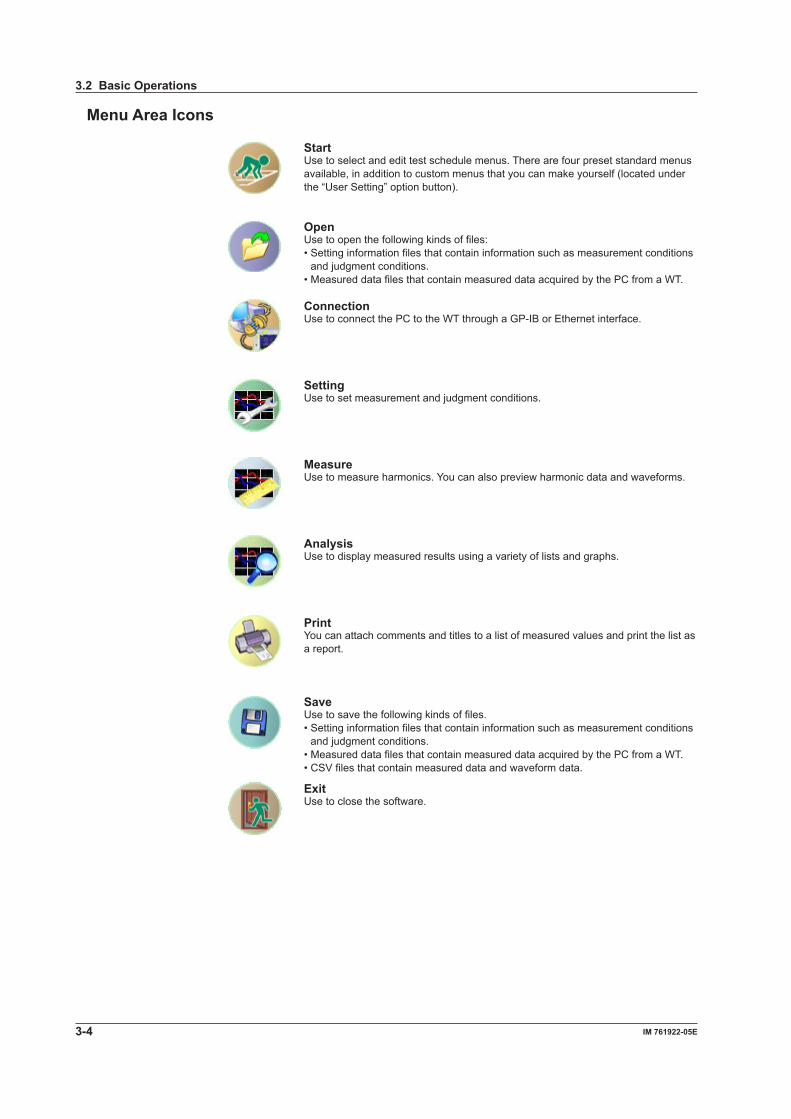
StartUse to select and edit test schedule menus. There are four preset standard menus available, in addition to custom menus that you can make yourself (located under the “User Setting” option button).
OpenUse to open the following kinds of files:• Setting information files that contain information such as measurement conditions
and judgment conditions.• Measured data files that contain measured data acquired by the PC from a WT.
ConnectionUse to connect the PC to the WT through a GP-IB or Ethernet interface.
SettingUse to set measurement and judgment conditions.
MeasureUse to measure harmonics. You can also preview harmonic data and waveforms.
AnalysisUse to display measured results using a variety of lists and graphs.
PrintYou can attach comments and titles to a list of measured values and print the list as a report.
SaveUse to save the following kinds of files.• Setting information files that contain information such as measurement conditions
and judgment conditions.• Measured data files that contain measured data acquired by the PC from a WT.• CSV files that contain measured data and waveform data.
ExitUse to close the software.
3.2 Basic Operations

4-1IM 761922-05E
Using the Start and Exit Pages
3
2
1
4
5
6
7
8
9
10
11
12
13
14
Index
4.1 Selecting a Test Schedule Menu
Procedure
1. Select the icon in the menu area. The Start submenu appears.
Standard (page 4-2)There are four standard menus.
User Setting (page 4-3)You can select and edit specific custom test schedule menus.
Chapter 4 Using the Start and Exit Pages

4-2 IM 761922-05E
Selecting One of the Standard Menus2. Click Standard.
3. Select one of the following test schedule menus. The test schedule menu that you select will appear in the menu area on the left.• New Measurement• Save Data Analysis• Save Data Print• Repeat Measurement
Menu areaThe icons of the test schedule menu that you select appear.
4.1 Selecting a Test Schedule Menu
4-3IM 761922-05E
Using the Start and Exit Pages
3
2
1
4
5
6
7
8
9
10
11
12
13
14
Index
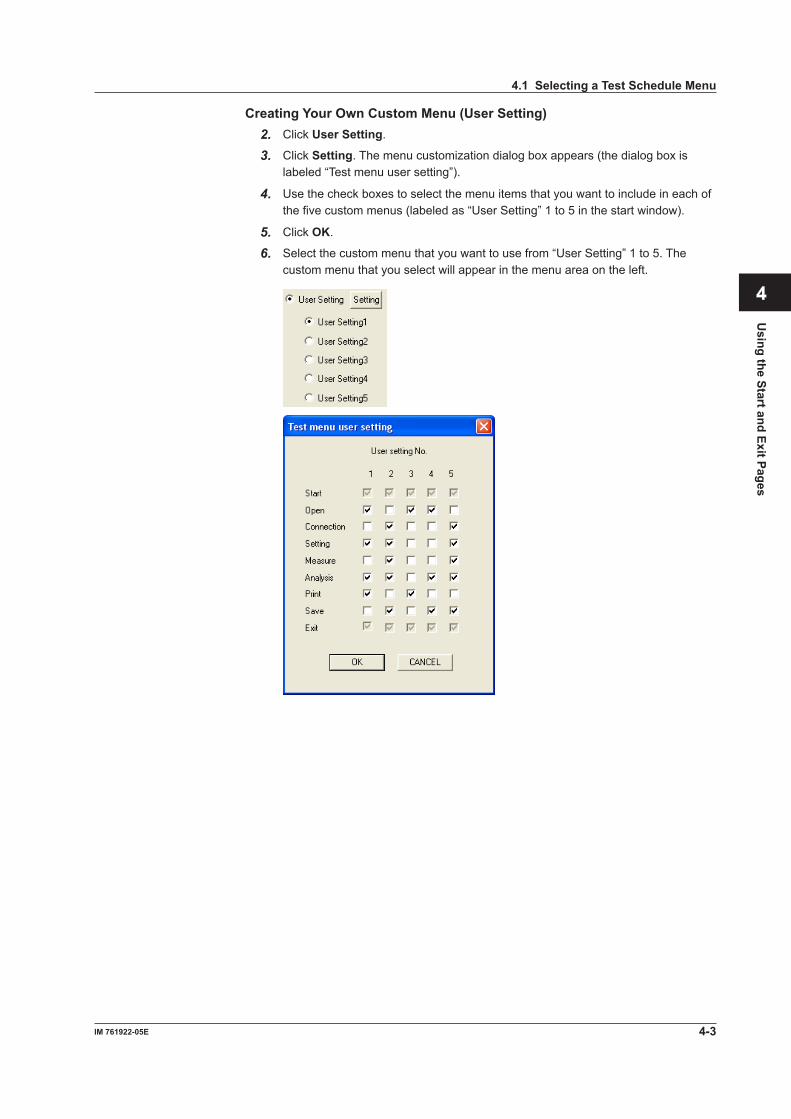
Creating Your Own Custom Menu (User Setting)2. Click User Setting.
3. Click Setting. The menu customization dialog box appears (the dialog box is labeled “Test menu user setting”).
4. Use the check boxes to select the menu items that you want to include in each of the five custom menus (labeled as “User Setting” 1 to 5 in the start window).
5. Click OK.
6. Select the custom menu that you want to use from “User Setting” 1 to 5. The custom menu that you select will appear in the menu area on the left.
4.1 Selecting a Test Schedule Menu

4-4 IM 761922-05E
ExplanationSelecting a Test Schedule MenuA test schedule menu lays out the overall test structure. You can choose from test schedule menus that contain different combinations of the following 9 steps. For more information on each step, see sections 1.1 and 2.3.
Start: Select and edit test schedule menus.
Open: Load measured data and WT setting information files.
Connection: Configure the connection between the PC and a WT.
Setting: Set compatibility and measurement conditions.
Measure: Measure voltage fluctuation and flicker.
Analysis: Display measured results as bar and trend graphs.
Print: Print screen images and reports.
Save: Save measured data and setting information files.
Exit: Close the software.
Icon Display
Icon NumberThis number indicates an icon’s order in a menu.
Standard MenusThe following four standard menus are available.• New Measurement: Set measurement and judgement conditions, make
measurements, and then print and save the data.• Save Data Analysis: Analyze, print, and save data that was measured and saved in
the past.• Save Data Print: Print data that was measured and saved in the past.• Repeat Measurement: Make measurements with the same measurement and
judgement conditions that you used for the previous measurement, and print and save data without analyzing it.
4.1 Selecting a Test Schedule Menu

4-5IM 761922-05E
Using the Start and Exit Pages
3
2
1
4
5
6
7
8
9
10
11
12
13
14
Index
Setting Up Custom MenusYou can create custom test schedule menus by selecting what steps to include in them. You can create up to five different custom test schedule menus.• Start and Exit steps are always selected. You cannot deselect them.• The steps are arranged in the order that they appear in in the menu customization
dialog box. You cannot change this order.
Icon Activation/DeactivationSome icons cannot be selected out of order. These icons are grayed out.
Selectable (activated) Not selectable (deactivated)
For example, the Measure icon cannot be selected when the Connection menu has been set such that the software is in offline mode. Icons such as Open, Connection, and Setting cannot be selected during measurement.
The following is a list of each icon and when it cannot be selected.
Start During measurementOpen During measurementConnection During measurementSetting During measurementMeasurement When the software is in offline modeAnalysis During measurement, or when there is no measured data to analyzePrint During measurement, or when there is no measured data to printSave During measurement, or when there is no measured data to saveExit During measurement
4.1 Selecting a Test Schedule Menu
4-6 IM 761922-05E
4.2 Closing the Software
Procedure
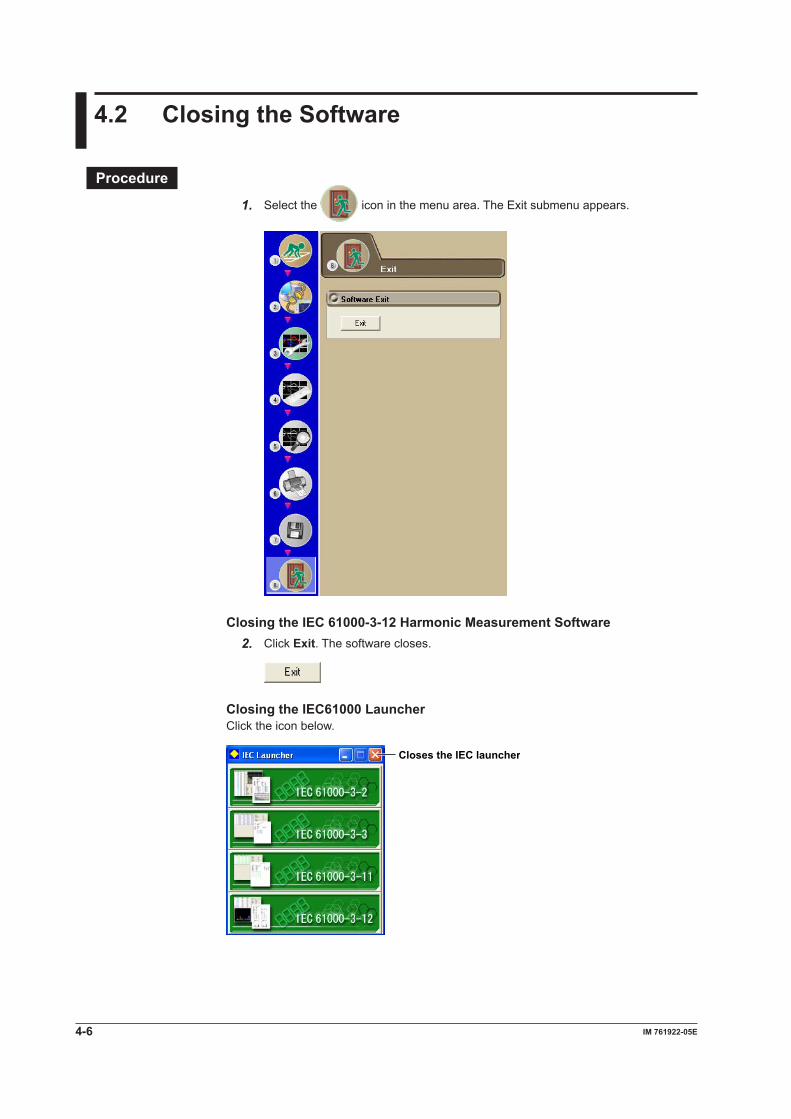
1. Select the icon in the menu area. The Exit submenu appears.
Closing the IEC 61000-3-12 Harmonic Measurement Software2. Click Exit. The software closes.
Closing the IEC61000 LauncherClick the icon below.
Closes the IEC launcher

5-1IM 761922-05E
Using the O
pen Page to Load Measured D
ata and Setting Information
3
2
1
4
5
6
7
8
9
10
11
12
13
14
Index
5.1 Loading Setting Information and Measured Data
Procedure
1. Select the icon in the menu area. The Open submenu appears.
Load (page 5-2) Select the type of data to load.
Load Information (page 5-2) Select a file to open. When you select a file, its information appears.
Repeatability (section 5.2)Analyzes the repeatability of measured data.(Appears only when Load (see above) is set to Examine Repeatability)
Chapter 5 Using the Open Page to Load Measured Data and Setting Information

5-2 IM 761922-05E
Selecting the Type of Data to Load2. Select one of the two data types listed under Load.
Selecting a File to Open3. Specify the file location. There are two places where you can specify the file
location.• Under Load Information in the submenu• At the top of the setting and display areaWhen you specify the file location, information about the files that can be loaded appears in the setting and display area.
4. Select a file to open. When there is more than one available file, you can select which file to open using one of the following two methods.• ClicknexttotheFileNameboxunderLoadInformation.Alistofavailablefiles
appears. Select a file from the list.• Select a file to open from one of the files listed in the setting and display area.
5. Click Load, or double-click the file you want to open. The software will open the measured data or setting information file.
Note• When the software is in online mode, it will switch to offline mode if you load setting
information or measured data.• If an error occurs while loading the setting information, the settings are reset to their default
values.• If an error occurs while loading measured data or setting information, the data may not be
loaded properly. Confirm the filename and extension and then reopen the file.• You cannot load setting information, measured data, or waveform data while making
measurements.
5.1 Loading Setting Information and Measured Data

5-3IM 761922-05E
Using the O
pen Page to Load Measured D
ata and Setting Information
3
2
1
4
5
6
7
8
9
10
11
12
13
14
Index
Configuring File Information Display Settings1. Right-click the file information heading area at the top of the setting and display
area. A list of the different types of information that can be displayed appears.
2. Select the type of information that you want to be displayed.
ExplanationLoading Setting InformationYou can load the setting information that has been saved using the procedure described in section 11.1.• A dash appears in the General Data and Manual Data columns for setting information
files.• Setting information file names have the following extension. Extension: .ini• Setting information files contain the following:
• Measurement and judgment conditions (see chapter 7) Data that has been acquired from the WT or loaded from a file can be judged using
loaded judgment conditions.• Display settings (see chapters 8 and 9).• Report titles and comments (see section 10.1) You can put comments and titles on reports of data acquired from the WT or loaded
from files, and then print and save the reports. For more information about printing and saving, see chapters 10 and 11.
Loading Measured Data, Waveform Data, and Setting Information• You can load the measured data, waveform data, and setting information that has
been saved using the procedure described in section 11.1.• You cannot load measured data, waveform data, or setting information while running
the harmonic or waveform preview on the Measure page.• An asterisk appears in the Measured data column for files that contain measured data.• Files that contain measured data are composed of two types of files with the following
extensions. Extension: .fdt Measured data .ini Setting information
NoteThis software cannot load CSV files.
5.1 Loading Setting Information and Measured Data
5-4 IM 761922-05E
Kinds of File Information• Date: When the file was saved. Displayed in this format: year/month/day hour:minute:
second• Report Title (See section 10.1)• Report Comment (See section 10.1)• Measured Data: When measured data is included in a file, an asterisk appears.• Clickortoswitchbetweensortinginascendinganddescendingorder.
5.1 Loading Setting Information and Measured Data

5-5IM 761922-05E
Using the O
pen Page to Load Measured D
ata and Setting Information
3
2
1
4
5
6
7
8
9
10
11
12
13
14
Index
5.2 Checking the Repeatability of the Measured Data
Procedure1. Select the icon in the menu area. The Open submenu appears. For general
information about the Open submenu, see section 5.1.
2. Select Examine Repeatability listed under Load.
Selecting a File to Open3. Specify the file location. There are two places where you can specify the file
location.• Under Load Information in the submenu
• At the top of the setting and display area When you specify the file location, information about the files that can be loaded appears
in the setting and display area.
4. Select a file to open. You can select which file to open using one of the following two methods. Information about the selected file is displayed at the bottom of the setting and display area in the file analysis list.• ClicknexttotheFileNameboxunderLoadInformation.Alistofavailablefiles
appears. Select a file from the list and Click Load.
• Double-click a file in the measured data file list.• Drag a file from the measured data file list to the file analysis list.
• Click while a file is selected in the measured data file list.• Right-click a file in the measured data file list, and then click Add.
NoteThis software can load data saved in files with .fdt and .ini extensions. This software cannot load CSV files (files with .csv extensions).

5-6 IM 761922-05E
5. Repeat step 4 to select all of the files that you want to compare.
Specify the measured data file location.
Measured data file list
Click to add the file currently selected in the upper measured data file list to the lower file analysis list.
File analysis listA list of the files selected for repeatability analysis.
Unselecting a File Selected for Analysis6. To unselect a file selected for analysis:
• Click while a file is selected in the file analysis list.• Drag a file in the file analysis list to .• Press DELETE while a file is selected in the file analysis list.• Right-click a file in the file analysis list, and then click Delete.
Starting Analysis7. Click Analysis Execution. The analysis menu appears, and the results of the
analysis of the measured data's repeatability appear.
Note• If only one file has been selected for analysis, the Analysis Execution button will be
unavailable.• If the software is in online mode, it will switch to offline mode when analysis starts.• In the analysis menu, items other than repeatability will be dimmed and unavailable.• When you start analysis, the Measure and Save menus will be dimmed and unavailable.
5.2 Checking the Repeatability of the Measured Data
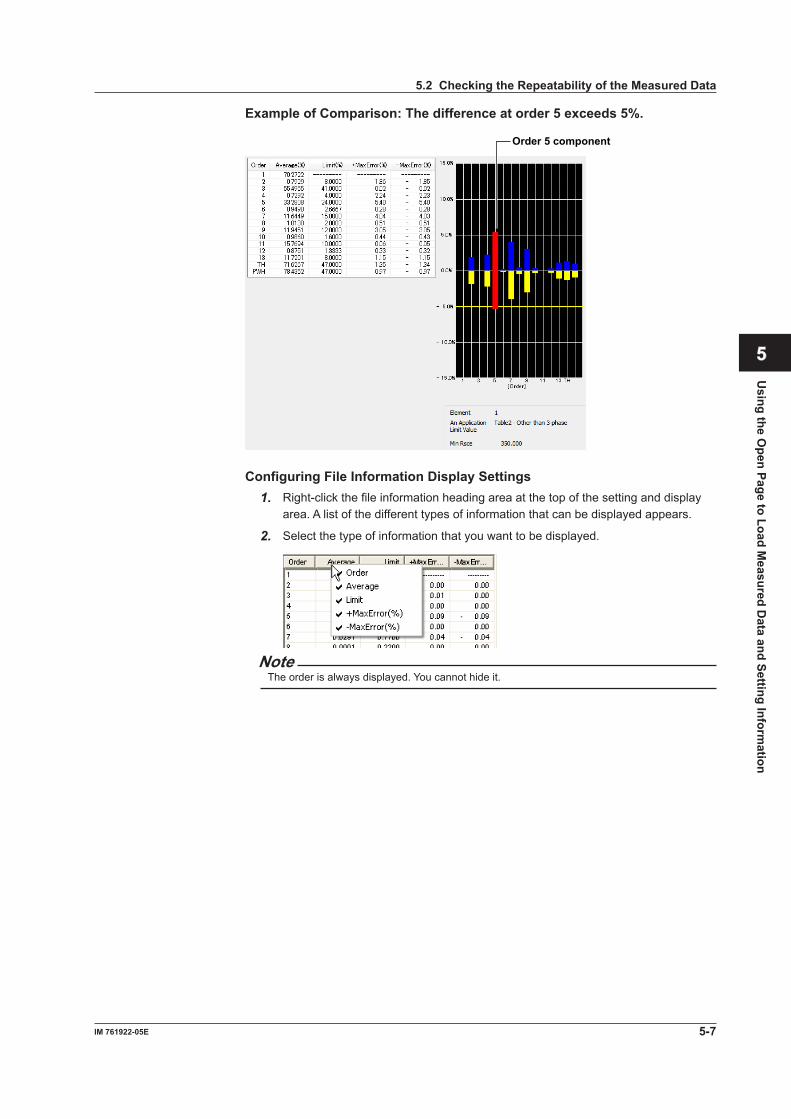
5-7IM 761922-05E
Using the O
pen Page to Load Measured D
ata and Setting Information
3
2
1
4
5
6
7
8
9
10
11
12
13
14
Index
Example of Comparison: The difference at order 5 exceeds 5%.
Order 5 component
Configuring File Information Display Settings1. Right-click the file information heading area at the top of the setting and display
area. A list of the different types of information that can be displayed appears.
2. Select the type of information that you want to be displayed.
NoteThe order is always displayed. You cannot hide it.
5.2 Checking the Repeatability of the Measured Data

5-8 IM 761922-05E
ExplanationThe mean value in the harmonics measurement data saved to files can be compared, and the difference in the measured data can be displayed on a bar graph and list for each order. This function can be used to evaluate whether the difference between data measured under the same measurement conditions when harmonics are measured using the same product or same product model is within 5% of the limits (confirmation of repeatability).
Repeatability of Measurement Data WindowThe following figure shows an example of comparison.
Average
+5% line
–5% line–Max Error
(yellow)
+Max Error(blue)
Red when the 5% line is exceeded Bar graph displayList display
Maximum (Mnmax)Maximum value among the average values of harmonic currents of each order
Minimum (Mnmin)Minimum value among the average values of harmonic currents of each order
Average (Mnmean)Average of the average values of each order of harmonic currents of the selected
file+Max Error
Ratio (%) of the difference between Mnmax and Mnmean of each order
Mnmax – MnmeanLimit × 100
–Max ErrorRatio (%) of the difference between Mnmin and Mnmean of each order
Mnmin – MnmeanLimit × 100
5.2 Checking the Repeatability of the Measured Data

5-9IM 761922-05E
Using the O
pen Page to Load Measured D
ata and Setting Information
3
2
1
4
5
6
7
8
9
10
11
12
13
14
Index
Color• Bar Graph The bar graph that is displayed for each order is displayed using a length converted
from the +Max Error or –Max Error. The meaning of the colors is indicated in the following table.
Blue Difference (error) less than the +5% line for +Max Error.
Yellow Difference (error) less than the –5% line for –Max Error.
Red Difference (error) greater than or equal to the +5% line for +Max Error. Difference (error) greater than or equal to the –5% line for –Max Error.* The names of the sample colors of Microsoft Word or Excel are used for the names of the
colors.
• List The average, limit, +maximum error, and –maximum error for each order are displayed
using values in black.
Number of Files That Can Be ComparedTo evaluate the repeatability of the measured data, multiple files must be selected.Number of files that can be compared: 2 to 10
Note• Even if only one file is selected, the Repeatability of Measurement Data window will open. In
this case, no comparison is made.• To evaluate the repeatability, check that the measured data saved to the file to be compared
was measured under the following conditions.• Same DUT (not the same model, but the same equipment).• Same test conditions.• Same test equipment.• Same atmospheric conditions (when the DUT is affected by them).
5.2 Checking the Repeatability of the Measured Data
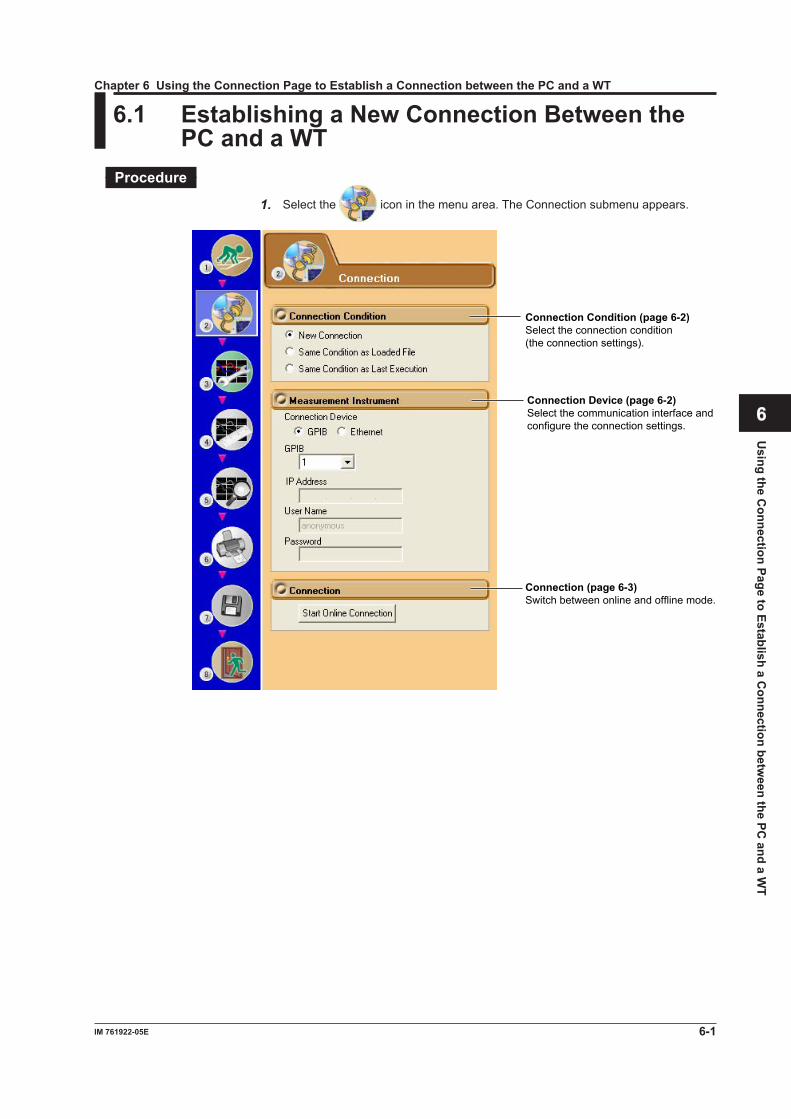
6-1IM 761922-05E
Using the C
onnection Page to Establish a Connection betw
een the PC and a W
T
3
2
1
4
5
6
7
8
9
10
11
12
13
14
Index
6.1 Establishing a New Connection Between the PC and a WT
Procedure
1. Select the icon in the menu area. The Connection submenu appears.
Connection Condition (page 6-2)Select the connection condition (the connection settings).
Connection Device (page 6-2)Select the communication interface and configure the connection settings.
Connection (page 6-3)Switch between online and offline mode.
Chapter 6 Using the Connection Page to Establish a Connection between the PC and a WT

6-2 IM 761922-05E
Connection Condition2. Select New Connection.
Note• You can only select Same Condition as Loaded File if you load setting information or
measured data using the procedure described in section 5.1.• You cannot select Same Condition as Last Execution when you first start up the software.
Connection Device3. Select GPIB or Ethernet.
• If you select GP-IB, proceed to step 4.• If you select Ethernet, proceed to step 5.
Selecting a Communication Address (GP-IB)4. Select the GP-IB address of the WT that you intend to connect to.
Proceed to step 6.
NoteGP-IB address number 0 is reserved for the PC and cannot be selected.
6.1 Establishing a New Connection Between the PC and a WT

6-3IM 761922-05E
Using the C
onnection Page to Establish a Connection betw
een the PC and a W
T
3
2
1
4
5
6
7
8
9
10
11
12
13
14
Index
Setting the IP Address, User Name, and Password (Ethernet)5. Set the IP address, user name, and password of the WT that you intend to
connect to.
Making the Connection6. Click Start Online Connection. The software will establish a connection between
the PC and the WT. The configuration and measurement operations listed onwards can be performed once the software has automatically determined that communication is possible.
Note• You cannot proceed to measurement, analysis, printing, or saving until an online connection
has been established.• If you click Start Online Connection and establish a connection, but the connected WT is not
in a measurement-ready state, a communication error will occur. If the GP-IB address, IP address, user name, or password is wrong, or if the PC is simply unable to connect to the WT, a communication error will occur.
6.1 Establishing a New Connection Between the PC and a WT

6-4 IM 761922-05E
ExplanationSelecting a Communication Address• GP-IB
• Select the GP-IB address of the WT that you intend to connect to. Selectable range: 1 to 30
• Ethernet• Set the IP address of the WT that you intend to connect to. Selectable range: 0.0.0.0 to 255.255.255.255• You can set the user name and password of the WT that you intend to connect to. Usable characters: Those characters that the WT supports.
Displaying Connection Conditions and StatusThe connection conditions that you set in the Connection submenu appear in the setting and display area along with the current connection status.
Disconnected (offline) Connection condition
Connected (online)
The connection status also appears in the information area.
Connection status
Note• It can take more than 10 seconds to switch from offline to online mode.• We recommend that you use a National Instruments GP-IB card. GP-IB cards made by
other companies may not function properly.
6.1 Establishing a New Connection Between the PC and a WT

6-5IM 761922-05E
Using the C
onnection Page to Establish a Connection betw
een the PC and a W
T
3
2
1
4
5
6
7
8
9
10
11
12
13
14
Index
6.2 Using the Connection Settings from a Loaded File
Procedure
1. Select the icon in the menu area. The Connection submenu appears. For
general information about the Connection submenu, see section 6.1.
2. Select Same Condition as Loaded File under Connection Condition.
NoteYou can only select Same Condition as Loaded File if you load setting information using the process described in section 5.1.
Making the Connection3. Click Start Online Connection. The software will establish a connection between
the PC and the WT. The configuration and measurement operations listed onwards can be performed once the software has automatically determined that communication is possible.
Note• You cannot proceed to measurement, analysis, printing, or saving until an online connection
has been established.• If you click Start Online Connection and establish a connection, but the connected WT is not
in a measurement-ready state, a communication error will occur. If the GP-IB address, IP address, user name, or password is wrong, or if the PC is simply unable to connect to the WT, a communication error will occur.
ExplanationFollow this procedure to use the settings from a file that has been loaded according to the procedure described in “Loading Setting Information” in section 5.1.
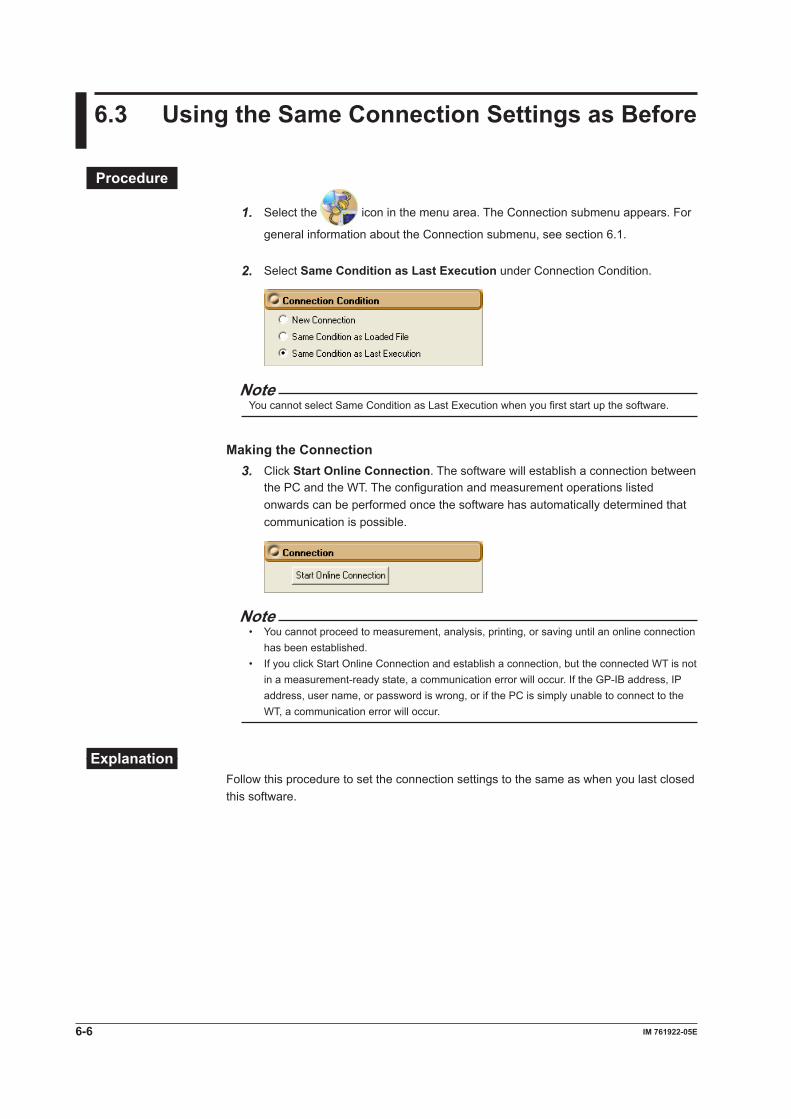
6-6 IM 761922-05E
6.3 Using the Same Connection Settings as Before
Procedure
1. Select the icon in the menu area. The Connection submenu appears. For
general information about the Connection submenu, see section 6.1.
2. Select Same Condition as Last Execution under Connection Condition.
NoteYou cannot select Same Condition as Last Execution when you first start up the software.
Making the Connection3. Click Start Online Connection. The software will establish a connection between
the PC and the WT. The configuration and measurement operations listed onwards can be performed once the software has automatically determined that communication is possible.
Note• You cannot proceed to measurement, analysis, printing, or saving until an online connection
has been established.• If you click Start Online Connection and establish a connection, but the connected WT is not
in a measurement-ready state, a communication error will occur. If the GP-IB address, IP address, user name, or password is wrong, or if the PC is simply unable to connect to the WT, a communication error will occur.
ExplanationFollow this procedure to set the connection settings to the same as when you last closed this software.

6-7IM 761922-05E
Using the C
onnection Page to Establish a Connection betw
een the PC and a W
T
3
2
1
4
5
6
7
8
9
10
11
12
13
14
Index
6.4 Ending a Connection by Switching to Offline Mode
Procedure
1. Select the icon in the menu area. The Connection submenu appears. For
general information about the Connection submenu, see section 6.1.
2. When you are in online mode, click Exit online connection. The software will disconnect from the WT.

7-1IM 761922-05E
Using the Setting Page to C
onfigure Measurem
ent and Judgment C
onditions
3
2
1
4
5
6
7
8
9
10
11
12
13
14
Index
7.1 Setting General Test Conditions
Procedure
1. Select the icon in the menu area. The Setting submenu appears.
Wiring pattern (page 7-2)Select the wiring pattern of the circuit whosecurrent you will measure.
Test conditions (page 7-2)Set the test conditions.
Input Current (page 7-2).Select the current range to measure.
Measurement time (page 7-3)Set the measurement time based on theconditions of the EUT.
In the setting and display area, you can switch between basic settings and advanced settings by clicking these buttons: . For details, see sections 7.2 and 7.3.
Basic settings
Advanced settings
Chapter 7 Using the Setting Page to Configure Measurement and Judgment Conditions
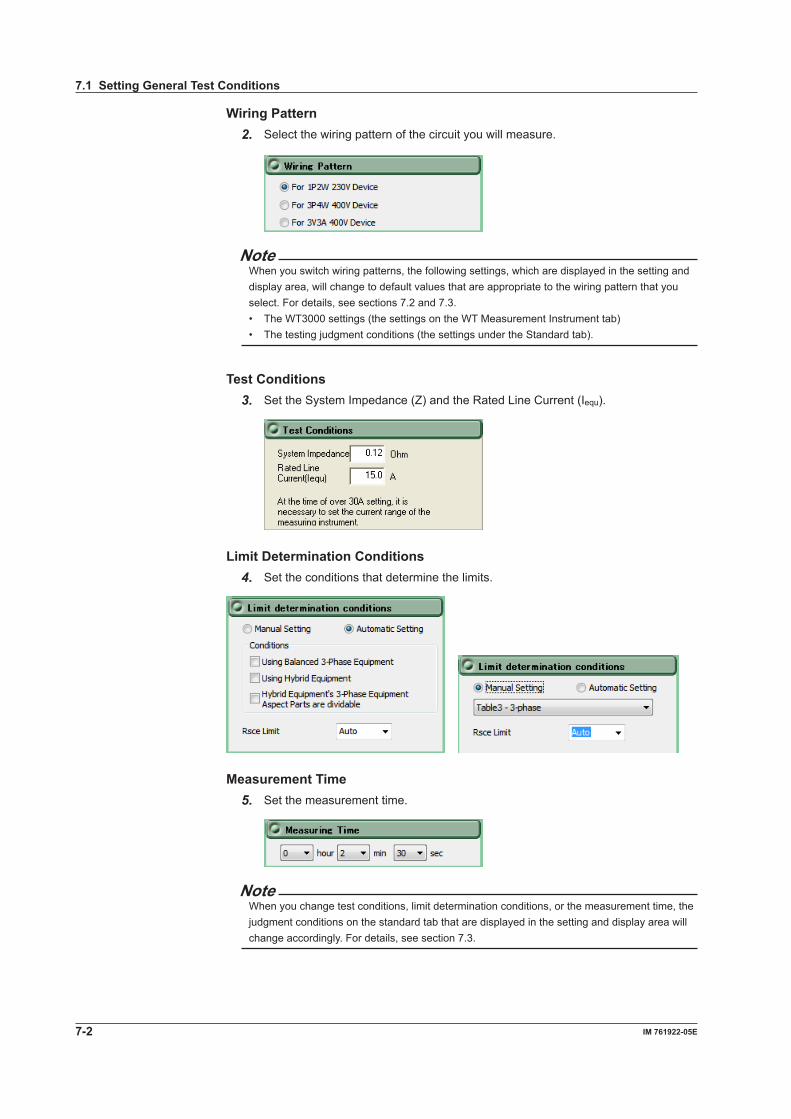
7-2 IM 761922-05E
Wiring Pattern2. Select the wiring pattern of the circuit you will measure.
NoteWhen you switch wiring patterns, the following settings, which are displayed in the setting and display area, will change to default values that are appropriate to the wiring pattern that you select. For details, see sections 7.2 and 7.3.• The WT3000 settings (the settings on the WT Measurement Instrument tab)• The testing judgment conditions (the settings under the Standard tab).
Test Conditions3. Set the System Impedance (Z) and the Rated Line Current (Iequ).
Limit Determination Conditions4. Set the conditions that determine the limits.
Measurement Time5. Set the measurement time.
NoteWhen you change test conditions, limit determination conditions, or the measurement time, the judgment conditions on the standard tab that are displayed in the setting and display area will change accordingly. For details, see section 7.3.
7.1 Setting General Test Conditions
7-3IM 761922-05E
Using the Setting Page to C
onfigure Measurem
ent and Judgment C
onditions
3
2
1
4
5
6
7
8
9
10
11
12
13
14
Index
ExplanationTest ConditionsYou can set the system impedance (Z) and the rated line current (Iequ) within these ranges:Systemimpedance(Z):0.01to1000ΩRated line current (Iequ): 0 to 1000 A
If you set the rated line current (Iequ) to a value greater than 20 A, in order to keep the voltage drop caused by the input impedance of the current input circuit to 0.15 Vrms or less, use a current sensor to measure the current rather than directly connecting the current to the WT. Set the WT current range and sensor ratios according to the procedure in section 7.2.
Limit Determination ConditionsSet the conditions that determine the limits. This setting determines what limits will be applied when testing. For details about the values of the limits, see section 1.3.
Measurement TimeThe measurement time is the time between the start of the measurement to the end of the measurement. The time for measuring harmonics can be set in advance. The harmonics can be measured continuously for the specified time. The measurement time can be changed when equipment that emits harmonics that fluctuate over time is measured or when confirming that the emitted harmonics do not change even when the equipment is operated over extended time.
Selectable range: 0 H 0 M 1 S to 24 H 0 M 0 S in units of 1 s.• An error occurs if a time exceeding 24 hours is specified.• If the measurement time is set to 0 H 0 M 0 S and the measurement is started,
measurement continues until you choose Stop Test from the Measure menu or click the stop test icon on the toolbar.
NoteDepending on the environment of the PC onto which this software was installed, an error occurs if you specify a time longer than the memory area that can be reserved. In this case, you may be able to increase the available time by exiting other applications or by increasing the amount of memory available to the PC.
7.1 Setting General Test Conditions

7-4 IM 761922-05E
7.2 Setting the WT3000 Measurement Conditions
Procedure1. Select the WT Measurement Instrument tab in the setting and display area. The
WT3000 measurement condition configuration dialog box appears.
2. Click the basic settings button or the advanced settings button .3. Configure the various settings.
NoteWhen you select the basic settings button, the following settings are unavailable. To adjust these settings, click the advanced settings button.• Frequency Filter and Filter Copy Exec• Scaling Copy Exec• All of the settings under Scaling
Set the CT ratio.Select the scale.
If using external current sensors, set the conversion ratio.Select the current range.
Select the voltage range.Select the frequency filter.
Object to be measuredSelect the elements to be measured.
Copies the range settings made hereto all other elements
Copies the frequency filter settings madehere to all other elements
Set the VT ratio.
Set the scaling factor.
Copies the scale settings made here toall other elements
PLL sourceSelect the fundamental signal source usedto determine the harmonic orders.
Wiring pattern
Basic settings buttonAdvanced settings button
Select the standard edition number.

7-5IM 761922-05E
Using the Setting Page to C
onfigure Measurem
ent and Judgment C
onditions
3
2
1
4
5
6
7
8
9
10
11
12
13
14
Index
ExplanationStandard Edition NumberIf the WT firmware version is 4.11 or later, you can select the IEC61000-4-7 edition number.IEC61000-4-7 edition numbers• Edition 1.0• Edition 2.0• Edition 2.0 A1IEC61000-4-7 define requirements for measurement instruments. For details, see chapter 14. If the WT3000 firmware version is between 4.01 and 4.10, the edition number is fixed to IEC61000-4-7 Edition 2.0.
Copying the Frequency FilterYou can copy the frequency filter settings configured for one element to all other elements with the same wiring.
Copying the RangeYou can copy the range settings configured for one element to all other elements with the same wiring. The voltage range and the current range are copied.
Copying the Scaling SettingsYou can copy the scaling settings configured for one element to all other elements with the same wiring. The settings that are copied are:• External current sensor conversion ratio• VT ratio• CT ratio• Scaling factor
For information about the following settings and how to make settings from the WT, see the WT3000 User’s Manual (IM760301-01E).
Setting Corresponding user’s manual and sectionWiring Pattern IM760301-01E Section 4.1PLL source IM760301-51E Section 7.5Frequency filter IM760301-01E Section 4.8Voltage/current range IM760301-01E Sections 4.3 and 4.4Scaling IM760301-01E Section 4.5
Note• When the wiring system is pattern 1 (when all are 1P2W), filter, range, and scaling are
copied to all other elements.• When taking measurements with this software, the antialiasing filter cutoff frequency is fixed
at 5.5 kHz.• To make accurate measurements, turn ON the frequency filter of the input element set to
PLL source.• The exponential average function of the WT3000 is ON.
7.2 Setting the WT3000 Measurement Conditions

7-6 IM 761922-05E
Shared Settings between the Submenu and the Setting and Display AreaWhen you change the following settings in the submenu, the settings in the setting and display area will also change.• Wiring Pattern (see page 7-7)• Test Conditions (see section 7.3)• Conditions for applying limits (see section 7.3)• Measurement time (see section 7.3)
The settings in the submenu will not change when you change the settings in the setting and display area.When the settings in the submenu and the setting and display area are different, the settings in the setting and display area take precedence.
Submenu area Setting and display area
These settings have priority.
Change
No change ×
* The default Wiring value varies depending on the number of WT elements.
Number of WT Elements Default Setting1 1P2W2 1P2W-1P2W3 1P2W-1P2W-1P2W4 1P2W-1P2W-1P2W-1P2W
7.2 Setting the WT3000 Measurement Conditions

7-7IM 761922-05E
Using the Setting Page to C
onfigure Measurem
ent and Judgment C
onditions
3
2
1
4
5
6
7
8
9
10
11
12
13
14
Index
Setting Changes Based on Wiring Pattern SelectionWhen you select a wiring pattern in the Setting submenu, the settings marked off in the following figures change to their default values. The values in the figures are the default values.
*1
U1*3
OFF
OFF
*4
*2
* The default Wiring value varies depending on the number of WT elements.
Wiring Pattern 1Element 2Element 3Element 4ElementFor 1P2W 230V Devices 1P2W 1P2W-1P2W 1P2W-1P2W-1P2W 1P2W-1P2W-1P2W-1P2WFor 3P4W 400V Devices 1P2W*5 1P2W-1P2W*5 3P4W 3P4W-1P2WFor 3P3W 400V Devices 1P2W*5 1P2W-1P2W*5 3V3A 3V3A-1P2W
*5 An error message appears, because there are not enough elements.*2, *4 The default setting for Object and Voltage Range varies depending on the wiring pattern.
Wiring Pattern Object Voltage RangeFor 1P2W 230V Devices Element 1 300VFor 3P4W 400V Devices SigmaA *6 300VFor 3P3W 400V Devices SigmaA *6 600V
*6 If the error described above in *5 occurs because of the selected wiring pattern, Object is automatically set to Element 1.
*3 The default setting depends on the wiring pattern as shown below.
Wiring Pattern Label SettingFor 1P2W 230V Devices IEC 61000-4-7 Ed2.0A1*7
For 3P4W 400V Devices IEC 61000-4-7 Ed2.0A1*7
For 3P3W 400V Devices IEC 61000-4-7 Ed2.0A1*7
*7 The default setting depends on the WT firmware version as shown below. • For versions 4.11 and later, the setting is Ed2.0A1. • For versions before 4.11, the setting is Ed2.0.
7.2 Setting the WT3000 Measurement Conditions

7-8 IM 761922-05E
Setting Changes Based on Current Range SelectionWhen you select a current range in the Setting submenu, the settings marked off in the following figures will also change.
7.2 Setting the WT3000 Measurement Conditions
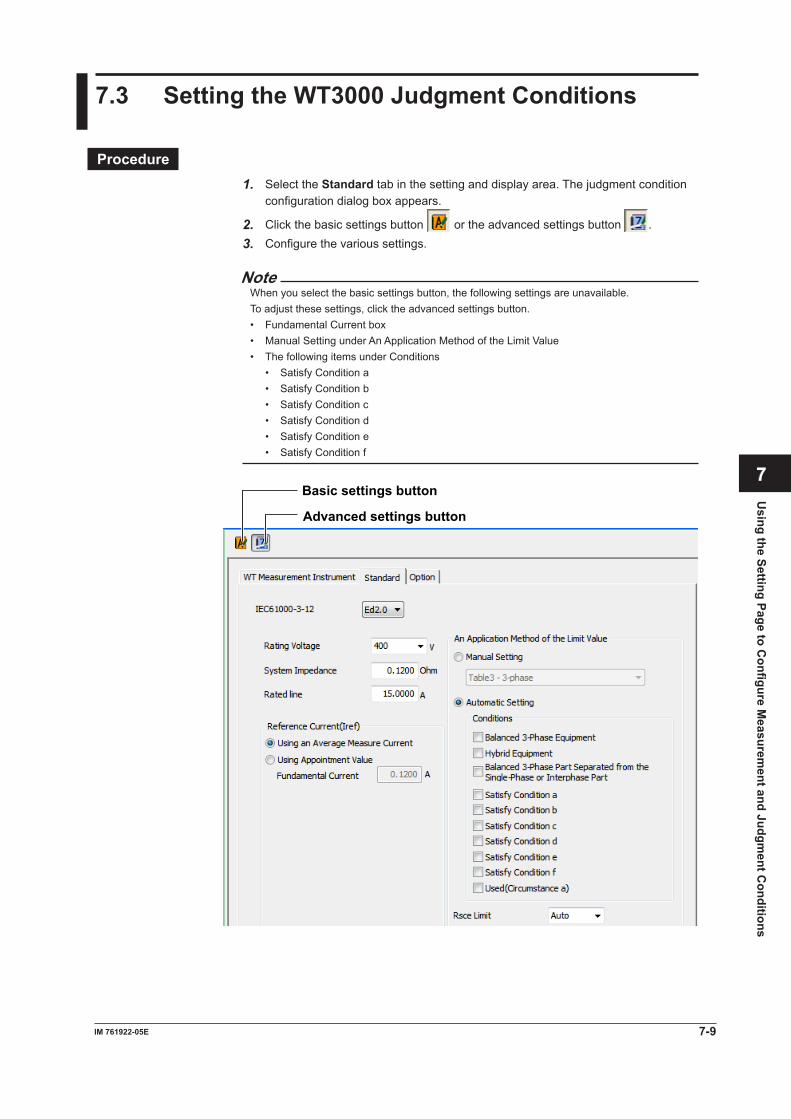
7-9IM 761922-05E
Using the Setting Page to C
onfigure Measurem
ent and Judgment C
onditions
3
2
1
4
5
6
7
8
9
10
11
12
13
14
Index
7.3 Setting the WT3000 Judgment Conditions
Procedure1. Select the Standard tab in the setting and display area. The judgment condition
configuration dialog box appears.
2. Click the basic settings button or the advanced settings button .3. Configure the various settings.
NoteWhen you select the basic settings button, the following settings are unavailable.To adjust these settings, click the advanced settings button.• Fundamental Current box• Manual Setting under An Application Method of the Limit Value• The following items under Conditions
• Satisfy Condition a• Satisfy Condition b• Satisfy Condition c• Satisfy Condition d• Satisfy Condition e• Satisfy Condition f
Basic settings button
Advanced settings button

7-10 IM 761922-05E
ExplanationFor explanations of these terms, see section 1.5.
Rated VoltageFor the rated voltage, you can choose one of the voltages listed below or specify a different voltage.• When the selected wiring pattern is 1P2W 230V: 100, 200, or 230• When the selected wiring pattern is 3P4W 400V: 115, 230, or 400• When the selected wiring pattern is 3V3A 400V: 200 or 400
System impedance (Z), and rated line current (Iequ)You can set the system impedance (Z) and the rated line current (Iequ) within these ranges:• Systemimpedance(Z):0.01to1000Ω• Rated line current (Iequ): 0 to 1000 A
If you set the rated line current (Iequ) to a value greater than 20 A, in order to keep the voltage drop caused by the input impedance of the current input circuit to 0.15 Vrms or less, use a current sensor to measure the current rather than directly connecting the current to the WT. Set the WT current range and sensor ratios according to the procedure in section 7.2.
Reference Current (Iref)You can select the reference current from the following options.• Using an Average Measure Current• Using Appointment Value
Rsce LimitFor the limit value, you can select how to apply the Rsce limit.
• Auto• Fixed (select from the drop-down menu)• Fixed (a specific value): 1 to 999
If you set the Rsce limit using a method other than Auto and a value exceeding the range of limit to be applied is specified, compliance is determined using the maximum or minimum value within the range.
Measurement TimeThe measurement time is the time between the start of the measurement to the end of the measurement. The time for measuring harmonics can be set in advance. The harmonics can be measured continuously for the specified time. The measurement time can be changed when equipment that emits harmonics that fluctuate over time is measured or when confirming that the emitted harmonics do not change even when the equipment is operated over extended time.
Selectable range: 0 H 0 M 1 S to 24 H 0 M 0 S in units of 1 s.• An error occurs if a time exceeding 24 hours is specified.• If the measurement time is set to 0 H 0 M 0 S and measurement is started,
measurement continues until you choose Stop Test from the Measure menu or click the stop test icon on the toolbar..
Note Depending on the environment of the PC onto which this software was installed, an error occurs if you specify a time longer than the memory area that can be reserved. In this case, you may be able to increase the available time by exiting other applications or by increasing the amount of memory available to the PC.
7.3 Setting the WT3000 Judgment Conditions
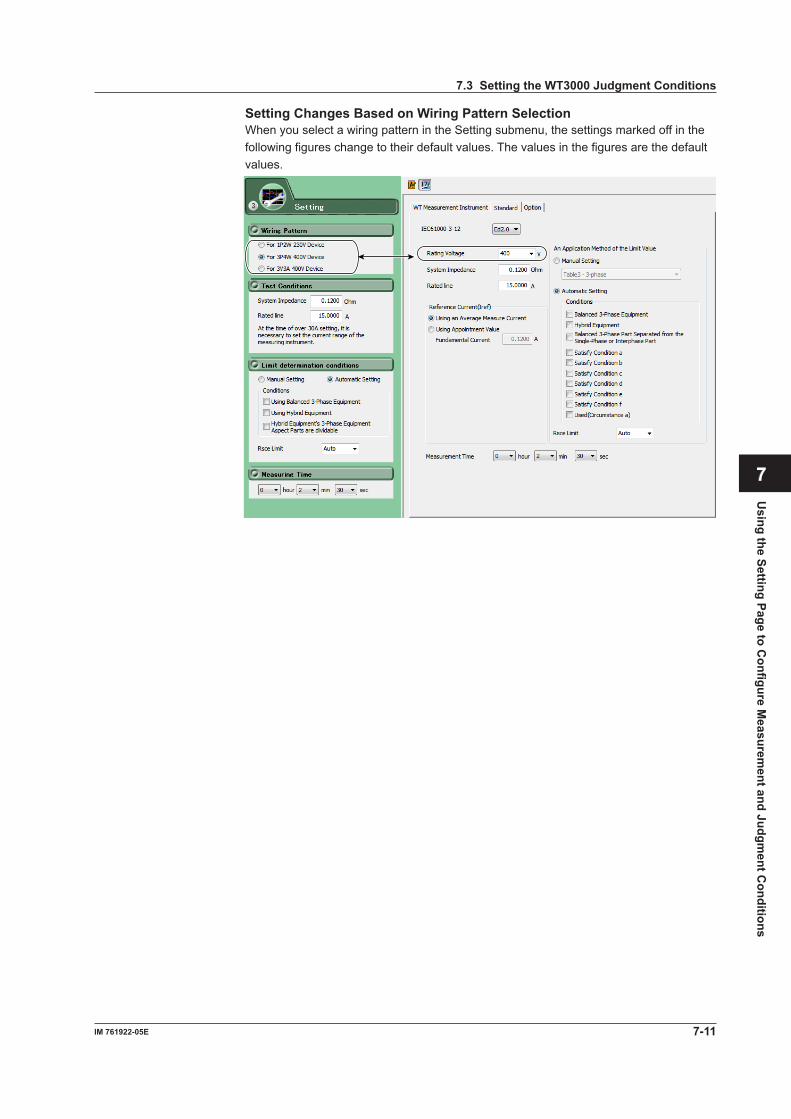
7-11IM 761922-05E
Using the Setting Page to C
onfigure Measurem
ent and Judgment C
onditions
3
2
1
4
5
6
7
8
9
10
11
12
13
14
Index
Setting Changes Based on Wiring Pattern SelectionWhen you select a wiring pattern in the Setting submenu, the settings marked off in the following figures change to their default values. The values in the figures are the default values.
7.3 Setting the WT3000 Judgment Conditions

7-12 IM 761922-05E
Setting Changes Based on Test ConditionWhen you set test condition in the Setting submenu, the settings marked off in the following figures change to their default values. The values in the figures are the default values.
7.3 Setting the WT3000 Judgment Conditions

7-13IM 761922-05E
Using the Setting Page to C
onfigure Measurem
ent and Judgment C
onditions
3
2
1
4
5
6
7
8
9
10
11
12
13
14
Index
Setting Changes Based on Limit Determination Condition (Automatic Setting)
When you set limit determination condition in the Setting submenu, the settings marked off in the following figures change to their default values. The values in the figures are the default values.
7.3 Setting the WT3000 Judgment Conditions
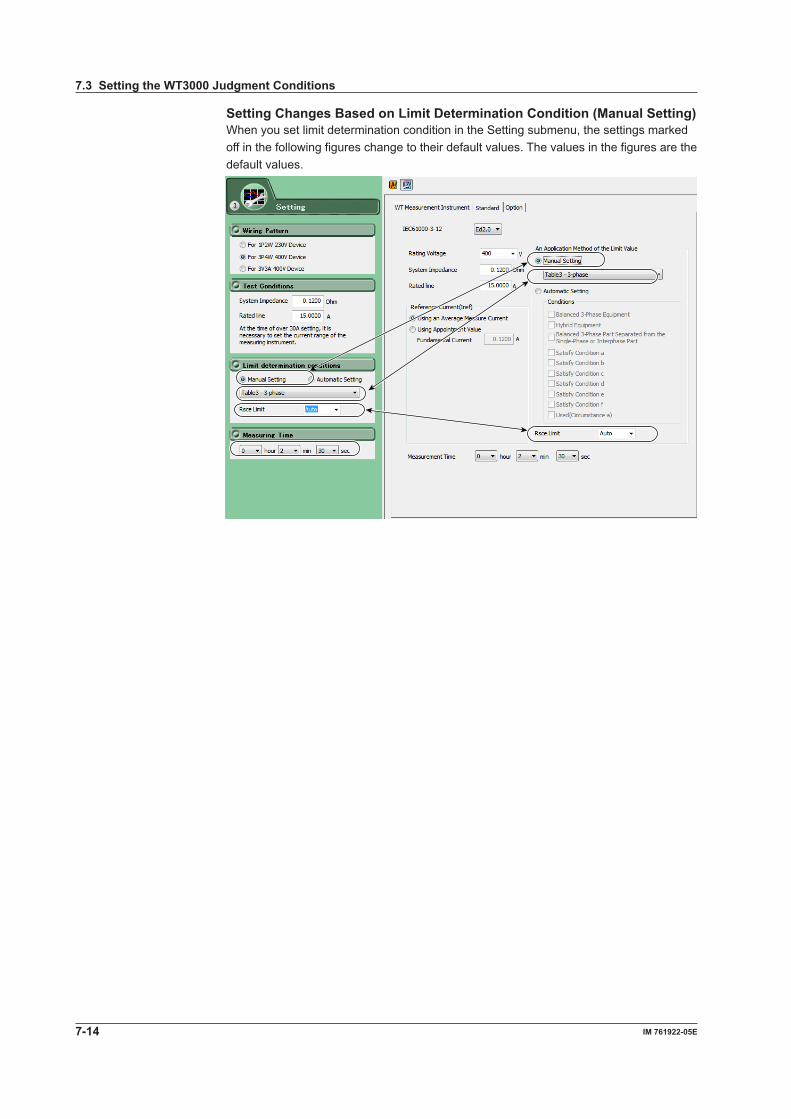
7-14 IM 761922-05E
Setting Changes Based on Limit Determination Condition (Manual Setting)When you set limit determination condition in the Setting submenu, the settings marked off in the following figures change to their default values. The values in the figures are the default values.
7.3 Setting the WT3000 Judgment Conditions

7-15IM 761922-05E
Using the Setting Page to C
onfigure Measurem
ent and Judgment C
onditions
3
2
1
4
5
6
7
8
9
10
11
12
13
14
Index
Setting Changes Based on Measuring Time Setting)When you set Measuring time in the Setting submenu, the settings marked off in the following figures change to their default values. The values in the figures are the default values.
7.3 Setting the WT3000 Judgment Conditions

8-1IM 761922-05E
Using the M
easure Page to Make M
easurements
Chapter 8 Using the Measure Page to Make Measurements
3
2
1
4
5
6
7
8
9
10
11
12
13
14
Index
8.1 Previewing Harmonic Data and Waveform Data
Procedure
1. Select the icon in the menu area. The Measure submenu appears.
Test preview (page 8-2)Before you start a test, you can checkharmonic measurement data and waveform data. You can execute acompliance test without previewing data.
Compliance test (page 8-6)Executes a compliance test basedon harmonic measurement.

8-2 IM 761922-05E
8.1 Previewing Harmonic Data and Waveform Data
An Example of the Setting and Display Area during a PreviewSampled data countWhen a preview is being displayed, the display here is 0/0. When a compliance test is being executed, the numberof times measured data has been acquired is displayed (for details, see section 8.2).
Measure timeWhen a preview is being displayed, the display here is 0.0sec/[the measurement time set accordingto the procedure described in chapter 7]. When a compliance test is being executed, the amount oftime for which measured data has been acquired is displayed (for details, see section 8.2).
Window arrangement buttons For details, see chapter 12.
Displays cascaded windows
Displays tiled windows
Select the element whose data you want to display.
Harmonic order (1 to 40)Rms voltage values for each harmonic order
Rms current values for each harmonic orderThe current phase angle of each harmonic order relative to the fundamental current However, the phase angle shown in the line for order 1 (-4.4747° in this example) is the phase angle of the fundamental current waveform relative to the fundamental voltage waveform.
Input element
The fundamental frequencyof the PLL source
Active power of all phases2
Total harmonic current Voltage harmonic distortion factor
Power harmonic distortion factor Current harmonic distortion factor
Phase angle of the 5th harmonicPartial weighted harmonic distortion Reference fundamental current3
Minimum short circuit ratio3
Power supply short circuit ratio3
Application Limit1
1 If you set the conditions for applying limits to auto, the limit values are not displayed in the preview or when a compliance test is executed.
2 Sigma W is the active power for all grouped phases (all measured input elements).
3 Values are not displayed during a preview or compliance test. Values appear on the Analysis page (chapter 8).

8-3IM 761922-05E
Using the M
easure Page to Make M
easurements
Previewing Harmonic Data2. Select the Preview check box.
3. Select Harmonic preview.
4. Click Start Previewing.
NoteWhen you preview the harmonics of a current, the data that had been acquired or loaded before the preview is discarded. Be sure to save any compliance test data before you begin a harmonic preview (for information on how to save data, see chapter 11).
Stopping a Harmonic PreviewClick Stop Previewing.
Selecting the Element Whose Data You Want to DisplayClick . If input elements 1 to 3 are being measured, as you click the icon, the displayed data will switch from element 1, to element 2, to element 3, to element 1, and soon.Clicktoselectanelementdirectly.
8.1 Previewing Harmonic Data and Waveform Data
3
2
1
4
5
6
7
8
9
10
11
12
13
14
Index
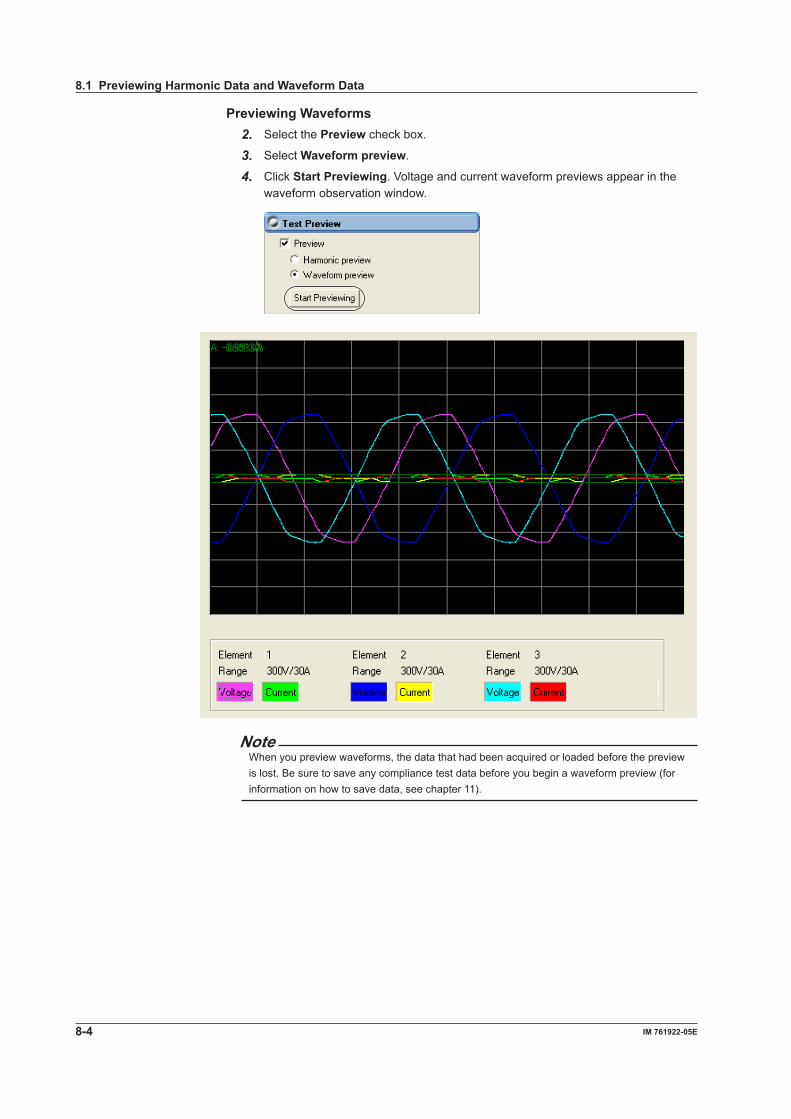
8-4 IM 761922-05E
Previewing Waveforms2. Select the Preview check box.
3. Select Waveform preview.
4. Click Start Previewing. Voltage and current waveform previews appear in the waveform observation window.
NoteWhen you preview waveforms, the data that had been acquired or loaded before the preview is lost. Be sure to save any compliance test data before you begin a waveform preview (for information on how to save data, see chapter 11).
8.1 Previewing Harmonic Data and Waveform Data

8-5IM 761922-05E
Using the M
easure Page to Make M
easurements
Showing/Hiding Specific WaveformsYou can show or hide an element’s voltage or current waveform by clicking on the Voltage and Current buttons for each element in the show/hide box.
Show/hide box
Stopping a Waveform PreviewClick Stop Previewing.
ExplanationChanging the Y-Axis Scale (the Size of the Voltage and Current Waveforms)• Linear scaling is used. Logarithmic scaling is not supported.• The measurement range specified for the WT is used as the maximum value, 1.0, on
the Y-axis (see section 7.2 for details on setting the range).
Display ColorsThe following colors are assigned to the waveforms of each input element in order, starting with the lowest numbered element. If you are previewing the waveforms of elements 1, 2, and 3, the following colors will be assigned to the element’s voltage and current waveforms:
Element Voltage Waveform Current WaveformElement 1 Pink Bright greenElement 2 Blue YellowElement 3 Turquoise Red
* The colors and corresponding names are the same as those in Microsoft Word and Microsoft Excel.
8.1 Previewing Harmonic Data and Waveform Data
3
2
1
4
5
6
7
8
9
10
11
12
13
14
Index

8-6 IM 761922-05E
8.2 Making Harmonic Measurements
Procedure
1. Select the icon in the menu area. The Measure submenu appears. For
general information about the Measure submenu, see section 8.1.
Starting a Test2. Click Start Test. A dialog box opens that indicates that you have to wait before
measurement starts. Then measured harmonic values appear in the measured harmonic values list window.
Stopping a Test• Stopping Automatically The software will stop testing automatically once the specified measurement time has
been reached.
• Stopping Manually Click Stop Test. If the WT is measuring, it will stop when measurement ends normally
and data has been acquired.
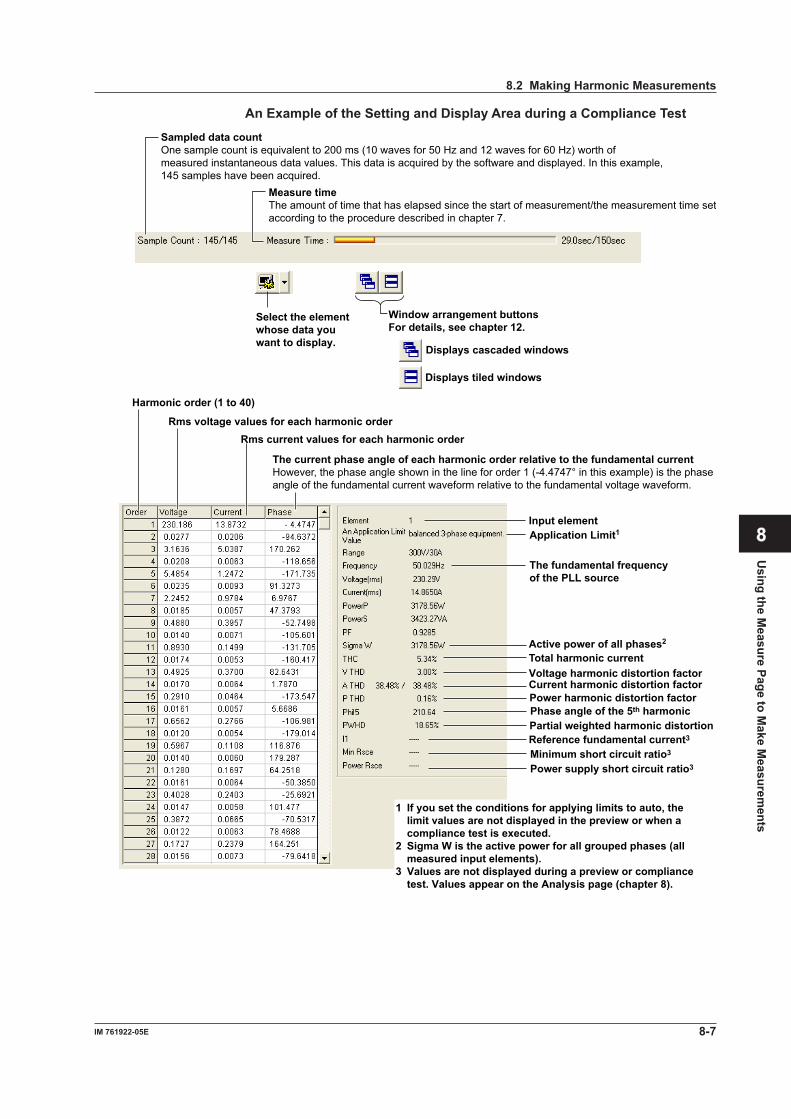
8-7IM 761922-05E
Using the M
easure Page to Make M
easurements
An Example of the Setting and Display Area during a Compliance TestSampled data countOne sample count is equivalent to 200 ms (10 waves for 50 Hz and 12 waves for 60 Hz) worth ofmeasured instantaneous data values. This data is acquired by the software and displayed. In this example,145 samples have been acquired.
Measure timeThe amount of time that has elapsed since the start of measurement/the measurement time setaccording to the procedure described in chapter 7.
Window arrangement buttons For details, see chapter 12.
Displays cascaded windows
Displays tiled windows
Select the element whose data you want to display.
Harmonic order (1 to 40)
Rms voltage values for each harmonic orderRms current values for each harmonic order
The current phase angle of each harmonic order relative to the fundamental current However, the phase angle shown in the line for order 1 (-4.4747° in this example) is the phase angle of the fundamental current waveform relative to the fundamental voltage waveform.
Input element
The fundamental frequency of the PLL source
Active power of all phases2
Total harmonic current Voltage harmonic distortion factor
Power harmonic distortion factor Current harmonic distortion factor
Phase angle of the 5th harmonic Partial weighted harmonic distortion Reference fundamental current3
Minimum short circuit ratio3
Power supply short circuit ratio3
Application Limit1
1 If you set the conditions for applying limits to auto, the limit values are not displayed in the preview or when a compliance test is executed.
2 Sigma W is the active power for all grouped phases (all measured input elements).
3 Values are not displayed during a preview or compliance test. Values appear on the Analysis page (chapter 8).
8.2 Making Harmonic Measurements
3
2
1
4
5
6
7
8
9
10
11
12
13
14
Index

8-8 IM 761922-05E
Judgment DisplayOnce the test is finished, the overall judgment appears in the information area.
Judgment
If all of the elements that are tested pass, PASS appears. Otherwise, FAIL appears.
PASS
FAIL
NoData
ExplanationJudgmentsPASS will appear in the following circumstances. Confirm the minimum measured Rsce from the Analysis page (see chapter 8 for details).• The equipment passed with the limit for Rsce=33.• The equipment did not pass with the limit for Rsce=33, but it did pass with the limit for
the minimum Rsce that was calculated based on measurements.• The equipment did not pass with the limit for Rsce=33, but it did pass with the limit for
the specified minimum Rsce.
Error Messages during MeasurementThe following error message may appear when measurement is executed in Harmonic Measurement mode.
This software retrieves large amount of measured data from the WT. The error message may appear if the CPU on the PC is overloaded and cannot keep up with the data transfer. Lighten the load placed on the CPU on the PC by checking the points listed below.• Do not operate or run other programs.• Close memory-resident programs (turn them OFF).• Disable the standby mode.• Use the software on a PC that satisfies the system requirements given in section 1.2.
8.2 Making Harmonic Measurements
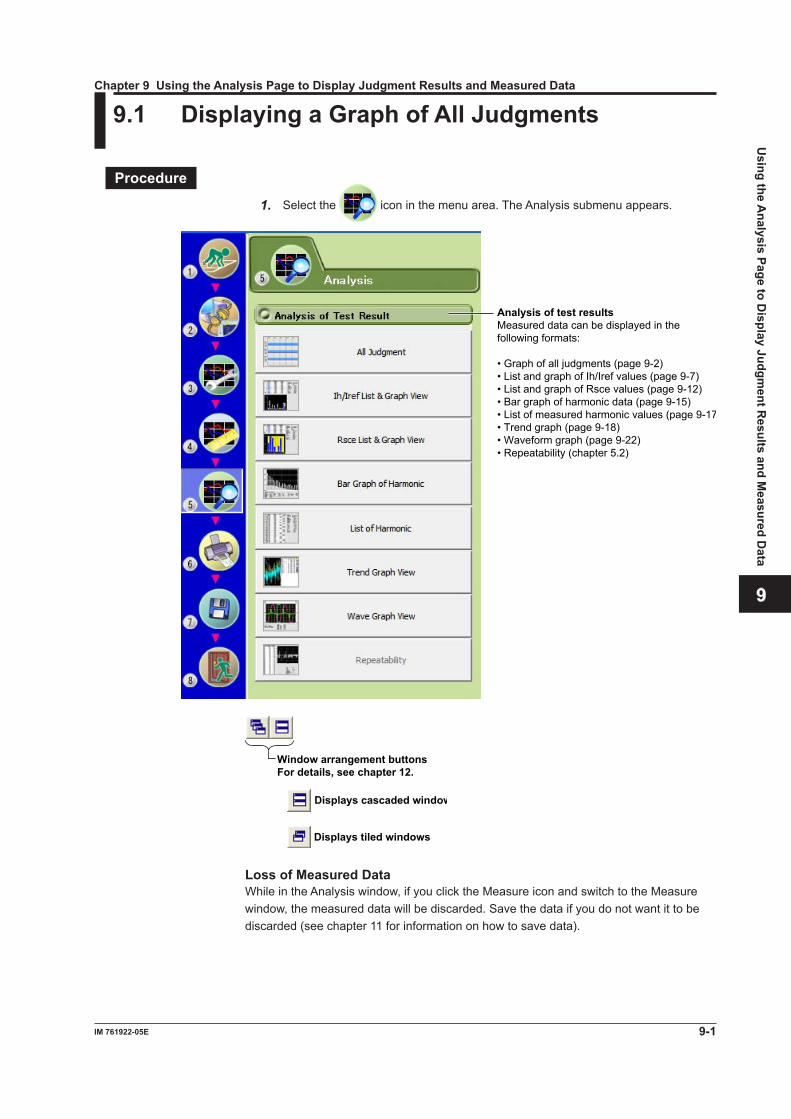
9-1IM 761922-05E
Using the A
nalysis Page to Display Judgm
ent Results and M
easured Data
3
2
1
4
5
6
7
8
9
10
11
12
13
14
Index
9.1 Displaying a Graph of All Judgments
Procedure
1. Select the icon in the menu area. The Analysis submenu appears.
Analysis of test resultsMeasured data can be displayed in thefollowing formats:
• Graph of all judgments (page 9-2)• List and graph of Ih/Iref values (page 9-7)• List and graph of Rsce values (page 9-12) • Bar graph of harmonic data (page 9-15)• List of measured harmonic values (page 9-17)• Trend graph (page 9-18) • Waveform graph (page 9-22)• Repeatability (chapter 5.2)
Window arrangement buttonsFor details, see chapter 12.
Displays cascaded windows
Displays tiled windows
Loss of Measured DataWhile in the Analysis window, if you click the Measure icon and switch to the Measure window, the measured data will be discarded. Save the data if you do not want it to be discarded (see chapter 11 for information on how to save data).
Chapter 9 Using the Analysis Page to Display Judgment Results and Measured Data

9-2 IM 761922-05E
Displaying a Graph of All Judgments2. Click All Judgment. A graph of all judgments appears.
Sampled datacount
Measuretime
Zoom in/zoom out/display all (page 9-4)
Judgment graphThis graph shows the judgment results for all data within the measurement time. The judgments for each element are displayed in different colors, depending on the judgment results. The judgment results that are displayed here will change if you shift the displayed time range using the display range bar.
Display range barThis bar indicates where the currently displayed period of time is within the measurement time.
Cursor(page 9-4).
Scroll barYou can drag (the slider) with the mouse or click toselect the measured data that you want to display. Whenyou move the slider, the measure time, sample countnumber, and cursor position change accordingly.
9.1 Displaying a Graph of All Judgments

9-3IM 761922-05E
Using the A
nalysis Page to Display Judgm
ent Results and M
easured Data
3
2
1
4
5
6
7
8
9
10
11
12
13
14
Index
ExplanationThe software displays a graph that shows whether each of the values for Ih/Iref that are measured within the specified measurement time are within their limits according to the settings described in section 7.3, “Setting the WT3000 Judgment Conditions.”
The input elements that are measured vary depending on the Wiring Pattern setting (see chapter 7 for details). The software makes judgments for every input element that is set in the Wiring Pattern setting.
Evaluation ColorsThe meaning of the evaluation colors indicated in the evaluation graph is shown in the following table. Below are the conditions of Condition 1 and Condition 2.
• Condition 1 The maximum harmonic current over the measurement time is within 1.5 times the
specified limit. Evaluation is made on each order.
• Condition 2 The mean harmonic current over the measurement time is within the specified limit.
Evaluation is made on each order.
BlueBoth conditions 1 and 2 are met.WhiteA limit has not been specified.Yellow
• Condition 1 is met.• Condition 2 is not met.
Orange• Condition 1 is not met.• Condition 2 is met.
RedNeither condition 1 or 2 is met.
* The colors and corresponding names are the same as those in Microsoft Word and Microsoft Excel.
If the display of the measured data within the measurement time only contains blue, white, and turquoise, the overall judgment result will be PASS. If any of the data within the measurement time is yellow, orange, or red, the displayed judgment result will be FAIL.
9.1 Displaying a Graph of All Judgments

9-4 IM 761922-05E
Zooming In and Out
Display all: Displays the whole measurement time Zoom out
Zoom in
Cursor
The Zoom In and Zoom Out IconsEach time you click one of the zoom icons, the software will zoom in or zoom out from the cursor. The zoom levels are:
25 s 50 s 100 s (1 min 40 s) 200 s (3 min 20 s) 400 s (6 min 40 s) 800 s (13 min 20 s) 1600 s (26 min 40 s) 3200 s (53 min 20 s) • • •
The entire measurement time
If a zoom out would cause the zoomed display to show more than 75% of the measurement time, the entire measurement time will be displayed. For example, if the measurement time is 1 h, the 3200 s (53 min 20 s) level will not be displayed because it would show 89% of the entire measurement time.
9.1 Displaying a Graph of All Judgments
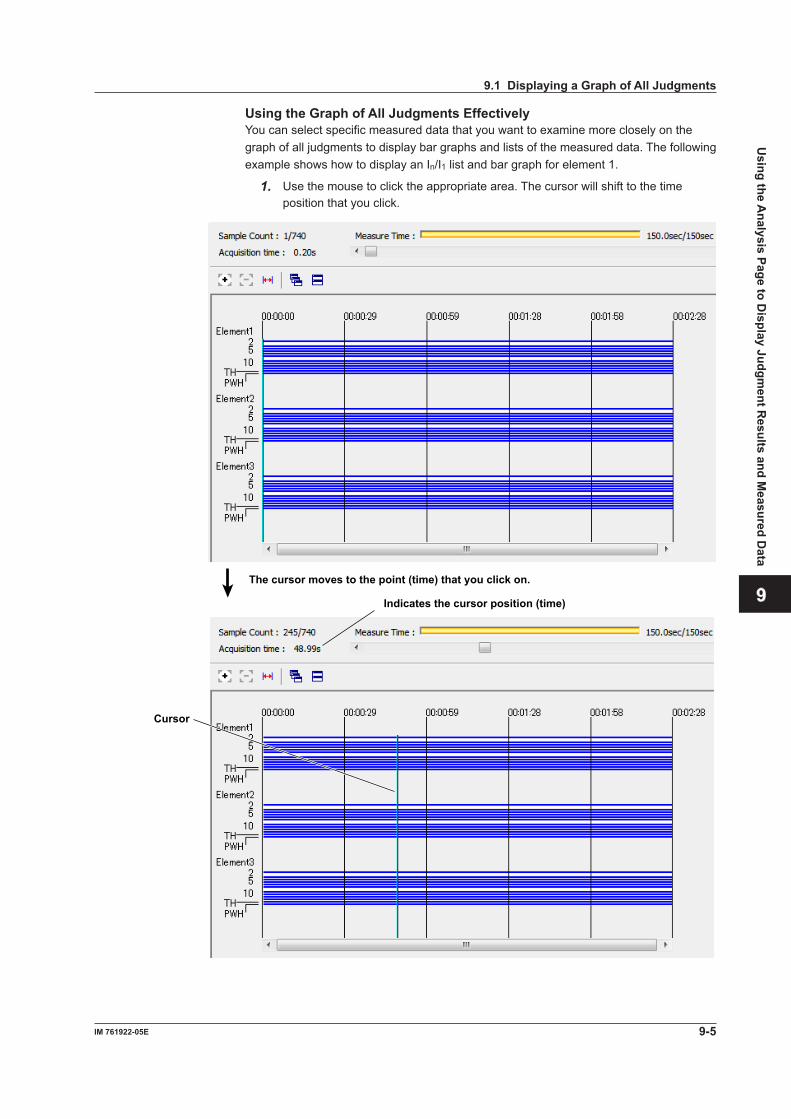
9-5IM 761922-05E
Using the A
nalysis Page to Display Judgm
ent Results and M
easured Data
3
2
1
4
5
6
7
8
9
10
11
12
13
14
Index
Using the Graph of All Judgments EffectivelyYou can select specific measured data that you want to examine more closely on the graph of all judgments to display bar graphs and lists of the measured data. The following example shows how to display an In/I1 list and bar graph for element 1.
1. Use the mouse to click the appropriate area. The cursor will shift to the time position that you click.
The cursor moves to the point (time) that you click on.
Cursor
Indicates the cursor position (time)
9.1 Displaying a Graph of All Judgments
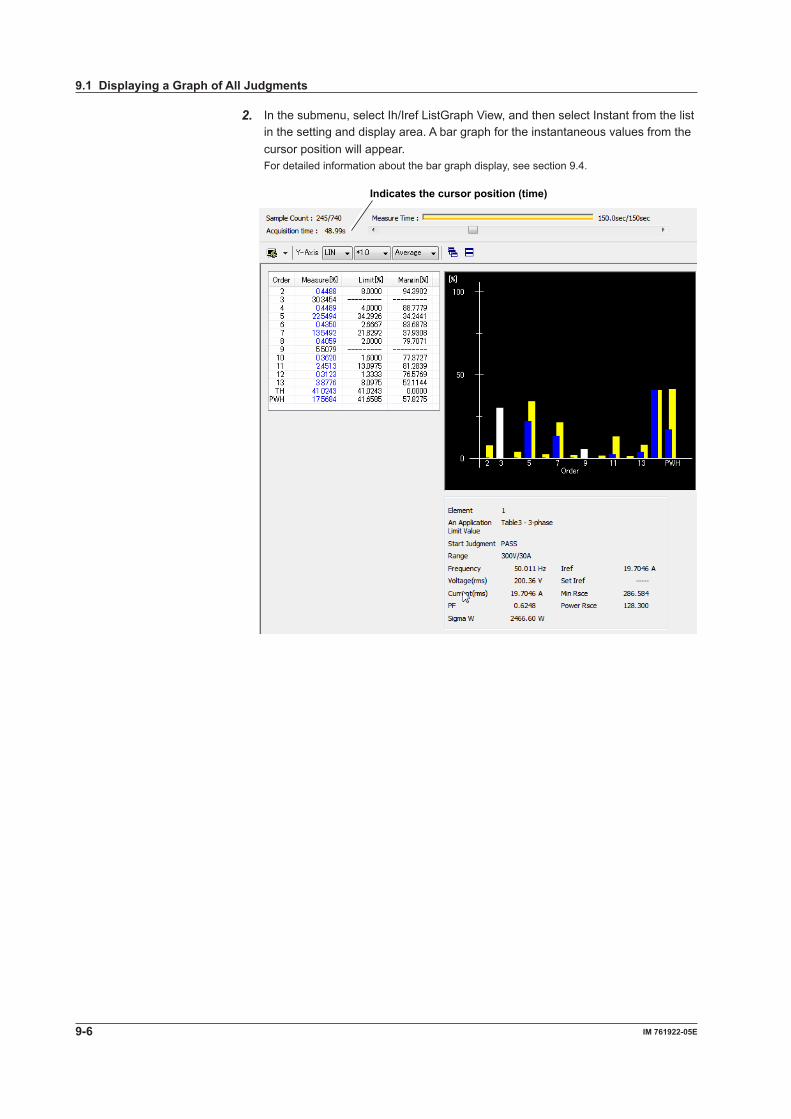
9-6 IM 761922-05E
2. In the submenu, select Ih/Iref ListGraph View, and then select Instant from the list in the setting and display area. A bar graph for the instantaneous values from the cursor position will appear.For detailed information about the bar graph display, see section 9.4.
Indicates the cursor position (time)
9.1 Displaying a Graph of All Judgments

9-7IM 761922-05E
Using the A
nalysis Page to Display Judgm
ent Results and M
easured Data
3
2
1
4
5
6
7
8
9
10
11
12
13
14
Index
9.2 Displaying a List and Graph of Ih/Iref Values
Procedure
1. Select the icon in the menu area. The Analysis submenu appears. For
general information about the Analysis submenu, see section 9.1.
Displaying a List and Graph of Ih/Iref Values2. Click Ih/Iref ListGraph View. A list and graph of Ih/ref values appear.
Select the element whose data you want to display.
Input element
The fundamental frequencyof the PLL source
Minimum short circuit ratioPower supply short circuit ratio
Scroll bar When displaying instantaneous values, you can drag (the slider) with the mouse or click to select the measured data that you want to display. When you move the slider, the measure time, sample count number, and displayed measured data (instantaneous values) change accordingly.
Reference fundamental current
Element judgment

9-8 IM 761922-05E
Selecting the Y-Axis (Current Magnitude) Scale• Selecting the Type of Y-Axis Scale Select LIN (linear) or LOG (logarithmic).
• Selecting the Magnification When the type of scale is LIN, select *100.0, *10.0, *5.0, *2.0, *1.0, *0.5, or *0.1. When the type of scale is LOG, select *100.0, *10.0, *1.0, or *.1.
Selecting Average, Maximum, or Instantaneous ValuesSelect Average, Maximum, or Instant.
Selecting the Element Whose Data You Want to DisplayClick . If input elements 1 to 3 are being measured, as you click the icon the displayed data will switch from element 1, to element 2, to element 3, to element 1, and soon.Clicktoselectanelementdirectly.
ExplanationList Display
Measured Value (%)The software calculates the measured current values for each harmonic order using the following formula:
×100 lhlref
Ih: Harmonic current component Iref: Reference current
Limit (%)The software calculates the limits according to the standard based on the settings described in chapter 7.
MarginIndicates the margin to the limit. For each order, the margin is derived from the following equation using the limits and measured values displayed in the list.
× 100Limit – measured valueLimit
9.2 Displaying a List and Graph of Ih/Iref Values

9-9IM 761922-05E
Using the A
nalysis Page to Display Judgm
ent Results and M
easured Data
3
2
1
4
5
6
7
8
9
10
11
12
13
14
Index
Bar Graph DisplayAverage/Maximum/Instantaneous ValueThe software displays bar graphs and lists in three ways depending on whether you select to display average, maximum, or instantaneous values. This section explains the differences between each display.• Average value display
• Values and bars for each harmonic order The software averages the measured data (instantaneous values) of each
harmonic order that is acquired within the measurement time and displays those averages.
• Measured items that appear to the right of the list The software averages the values acquired for each measured item within the
measurement time and displays those averages.• Limit values and bars The software displays numbers and yellow bars that indicate the values of the
limits.
• Maximum value display• Values and bars for each harmonic order The software finds and displays the maximum value from each harmonic order’s
measured values by comparing the instantaneous values that have been acquired within the measurement time.
• Items that appear to the right of the list The software finds and displays the maximum value for each measured item
by comparing the instantaneous values that have been acquired within the measurement time.
• Limit values and bars The software displays numbers and yellow bars that are 1.5 times greater than the
values of the limits.
• Instantaneous value display• Values and bars for each harmonic order The software displays the instantaneous values acquired within the measurement
time for each harmonic order.• Measured items that appear to the lower right of the list The software displays the instantaneous values acquired within the measurement
time.• Limit values and bars The software displays numbers and yellow bars that are 1.5 times greater than the
values of the limits.• Selecting values Use the scroll bar to change the displayed instantaneous values.
NoteWhen the software is displaying average or maximum values, using the scroll bar will have no effect on the Ih/Iref list and graph displays.
9.2 Displaying a List and Graph of Ih/Iref Values

9-10 IM 761922-05E
Bar Display ColorsThe lengths for the bar graphs are determined by the size of the measured data that they represent. The meanings of bar colors are as follows:
BlueDoes not exceed the limit.RedExceeds the limit.WhiteA limit has not been specified.YellowThe limit specified by the standard.
* The colors and corresponding names are the same as those in Microsoft Word and Microsoft Excel.
9.2 Displaying a List and Graph of Ih/Iref Values

9-11IM 761922-05E
Using the A
nalysis Page to Display Judgm
ent Results and M
easured Data
3
2
1
4
5
6
7
8
9
10
11
12
13
14
Index
Items that appear to the right of bar graphs.
Input element
The frequency of the PLL source fundamental waveform
Reference fundamental current
Minimum short circuit ratioPower supply short circuit ratio
Element judgment
Element JudgmentIf the software returns a PASS judgment for each item in the currently displayed element, PASS appears here. Otherwise FAIL appears.
PASS will appear in the following circumstances. Confirm the minimum measured Rsce.• The equipment passed with the limit for Rsce=33.• The equipment did not pass with the limit for Rsce=33, but it did pass with the limit for
the minimum Rsce that was calculated based on measurements.• The equipment did not pass with the limit for Rsce=33, but it did pass with the limit for
the specified minimum Rsce.
Minimum Rsce (Minimum Short Circuit Ratio)See the explanation under “Rsce Limit (Minimum Rsce)” in section 9.3.
Ssc (Short Circuit Power)Corresponds to the minimum Rsce, which is calculated based on measurement.
Power Supply Rsce (Power Supply Short Circuit Ratio)The short circuit ratio of the power supply of the testing device. According to the standard, the relationship between the minimum Rsce and the power supply Rsce must be as described below. Confirm that the results are in compliance with the standard.
• Equipment other than balanced three-phase equipment Minimum Rsce < Power supply Rsce
• Balanced three-phase equipment Minimum Rsce < Power supply Rsce
• Balanced three-phase equipment under specified conditions Minimum Rsce × 1.6 < Power supply Rsce
Graph Window-List Window CorrespondenceWhen you use the scroll bar to display the measured data at a specific acquisition time in one window, the measured data at the same acquisition time is also displayed in the other window.
9.2 Displaying a List and Graph of Ih/Iref Values

9-12 IM 761922-05E
9.3 Displaying a List and Graph of Rsce Values
1. Select the icon in the menu area. The Analysis submenu appears. For
general information about the Analysis submenu, see section 9.1.
Displaying a List and Graph of Rsce Values2. Click Rsce List&Graph View. A list and graph of Rsce values appear.
Select the element whose data you want to display.
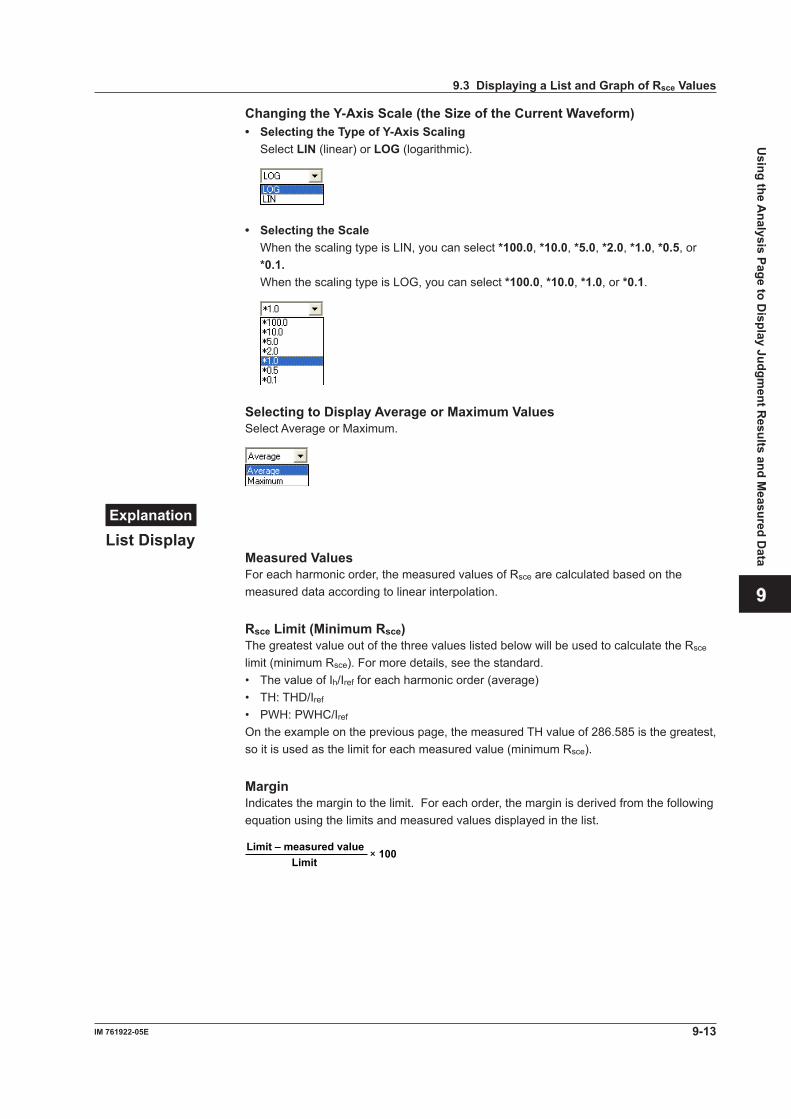
9-13IM 761922-05E
Using the A
nalysis Page to Display Judgm
ent Results and M
easured Data
3
2
1
4
5
6
7
8
9
10
11
12
13
14
Index
Changing the Y-Axis Scale (the Size of the Current Waveform)• Selecting the Type of Y-Axis Scaling Select LIN (linear) or LOG (logarithmic).
• Selecting the Scale When the scaling type is LIN, you can select *100.0, *10.0, *5.0, *2.0, *1.0, *0.5, or
*0.1. When the scaling type is LOG, you can select *100.0, *10.0, *1.0, or *0.1.
Selecting to Display Average or Maximum ValuesSelect Average or Maximum.
ExplanationList Display
Measured ValuesFor each harmonic order, the measured values of Rsce are calculated based on the measured data according to linear interpolation.
Rsce Limit (Minimum Rsce)The greatest value out of the three values listed below will be used to calculate the Rsce limit (minimum Rsce). For more details, see the standard.• The value of Ih/Iref for each harmonic order (average)• TH: THD/Iref
• PWH: PWHC/Iref
On the example on the previous page, the measured TH value of 286.585 is the greatest, so it is used as the limit for each measured value (minimum Rsce).
MarginIndicates the margin to the limit. For each order, the margin is derived from the following equation using the limits and measured values displayed in the list.
× 100Limit – measured valueLimit
9.3 Displaying a List and Graph of Rsce Values
9-14 IM 761922-05E
Bar Graph DisplayAverage/MaximumThe software displays bar graphs and lists in three ways depending on whether you select to display average, maximum, or instantaneous values. This section explains the differences between each display.• Average Value Display
• Values and bars for each harmonic order The software averages the measured data of each harmonic order acquired within
the measurement time and displays those averages.• Measured items that appear to the right of the list The software averages the values acquired for each measured item within the
measurement time and displays those averages.• Limit values and bars The software displays numbers and yellow bars that indicate the values of the
limits.
• Maximum Value Display• Values and bars for each harmonic order The software finds and displays the maximum value from each harmonic order’s
measured values by comparing the instantaneous values that have been acquired within the measurement time.
• Items that appear to the right of the list The software finds and displays the maximum value for each measured item
by comparing the instantaneous values that have been acquired within the measurement time.
• Limit values and bars The software displays numbers and yellow bars that are 1.5 times greater than the
values of the limits.
NoteUsing the scroll bar will have no effect on the Rsce list and bar graph displays.
Bar Display ColorsThe lengths for the bar graphs are determined by the size of the measured data that they represent. The meanings of bar colors are as follows:
BlueDoes not exceed the limit.RedExceeds the limit.WhiteA limit has not been specified.YellowThe limit specified by the standard.
* The colors and corresponding names are the same as those in Microsoft Word and Microsoft Excel.
9.3 Displaying a List and Graph of Rsce Values

9-15IM 761922-05E
Using the A
nalysis Page to Display Judgm
ent Results and M
easured Data
3
2
1
4
5
6
7
8
9
10
11
12
13
14
Index
9.4 Displaying a Harmonic Bar Graph
1. Select the icon in the menu area. The Analysis submenu appears. For
general information about the Analysis submenu, see section 9.1.
Displaying a Harmonic Bar Graph2. Click Bar Graph of Harmonic. A harmonic bar graph appears.
Select the element whose data you want to display. Scroll barYou can drag (the slider) with the mouse or click to selectthe measured data that you want to display. When you move theslider, the measure time, sample count number, and displayedmeasured data (instantaneous values) change accordingly.

9-16 IM 761922-05E
Changing the Y-Axis Scale (the Size of the Current Waveform)• Selecting the Type of Y-Axis Scaling Select LIN (linear) or LOG (logarithmic).
• Selecting the Scale When the scaling type is LIN, you can select *100.0, *10.0, *5.0, *2.0, *1.0, *0.5, or
*0.1. When the scaling type is LOG, you can select *100.0, *10.0, *1.0, or *0.1.
Selecting the Measurement Function to DisplaySelect A, V, or Deg (for current, voltage, or phase angle).
ExplanationBar Graph of Harmonic Current or VoltageThe software displays the instantaneous values acquired within the measurement time for each harmonic order.
Bar Graph of Harmonic Phase AnglesBar graphs of the phase angle of the harmonic current with respect to the fundamental current for each order can be displayed. However, the phase angle with respect to the fundamental voltage is displayed on the bar graph for the fundamental current.• When the harmonic phase is leading the fundamental current, a positive phase angle
is indicated; when the harmonic phase is lagging the fundamental current, a negative phase angle is indicated.
• When the fundamental current is leading the fundamental voltage, a negative phase angle is indicated; when the fundamental current is lagging the fundamental voltage, a positive phase angle is indicated.
Bar Graph Display ColorThe bar graph is displayed in white.
NoteThis bar graph does not display limits, because there are no current, voltage, or phase angle limits.
Selecting Instantaneous ValuesUse the scroll bar to change the displayed instantaneous values.
9.4 Displaying a Harmonic Bar Graph

9-17IM 761922-05E
Using the A
nalysis Page to Display Judgm
ent Results and M
easured Data
3
2
1
4
5
6
7
8
9
10
11
12
13
14
Index
9.5 Displaying a List of Measured Harmonic Values
1. Select the icon in the menu area. The Analysis submenu appears. For general information about the Analysis submenu, see section 9.1.
Displaying a List of Measured Harmonic Values2. Click List of Harmonic. A list of measured harmonic (instantaneous) values
appears.
Select the element whose data you want to display. Scroll barYou can drag (the slider) with the mouse or click to selectthe measured data that you want to display. When you move theslider, the measure time, sample count number, and displayedmeasured data (instantaneous values) change accordingly.

9-18 IM 761922-05E
9.6 Displaying a Trend Graph
1. Select the icon in the menu area. The Analysis submenu appears. For general information about the Analysis submenu, see section 9.1.
Displaying a Trend Graph2. Click Trend Graph View. A trend graph appears.
Configuring a Trend Graph
Display range upper limits
Display range lower limits
Cursor (page 9-21).
Zoom in/zoom out (page 9-21)
GridYou can select the type of grid that will be displayed in the trend display areafrom Dotted, Line, and None.• Dotted: A grid with dotted lines is displayed.• Line: A grid with solid lines is displayed.• None: No grid is displayed.
Auto range• When the auto range button is pressed The range changes automatically to match the loaded data.• When the auto range button is not pressed When you click the Upper or Lower column headings, a combo box appears that allows you to set the display range upper and lower limits for each trace.
Show/hide trace settings box (page 9-19)
Tortal Indication Display the waveform in the all measure time
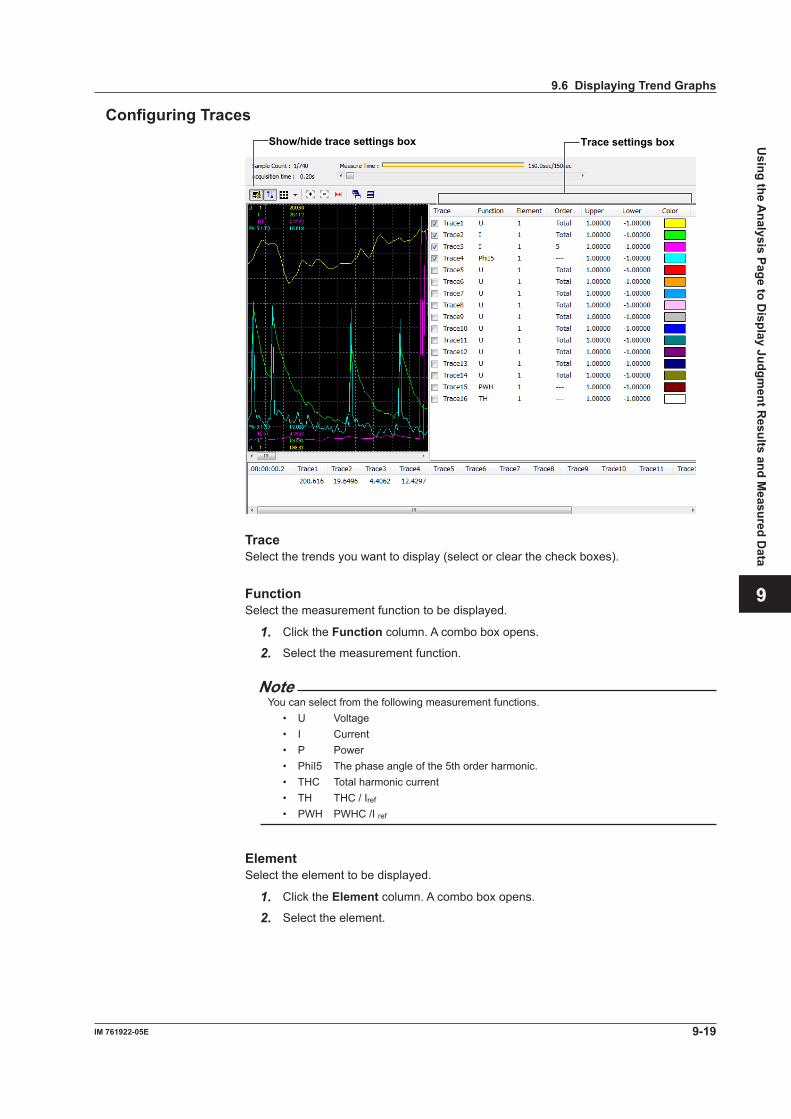
9-19IM 761922-05E
Using the A
nalysis Page to Display Judgm
ent Results and M
easured Data
3
2
1
4
5
6
7
8
9
10
11
12
13
14
Index
Configuring Traces
Show/hide trace settings box Trace settings box
TraceSelect the trends you want to display (select or clear the check boxes).
FunctionSelect the measurement function to be displayed.
1. Click the Function column. A combo box opens.
2. Select the measurement function.
NoteYou can select from the following measurement functions.
• U Voltage• I Current• P Power• PhiI5 The phase angle of the 5th order harmonic.• THC Total harmonic current• TH THC / Iref
• PWH PWHC /I ref
ElementSelect the element to be displayed.
1. Click the Element column. A combo box opens.
2. Select the element.
9.6 Displaying Trend Graphs

9-20 IM 761922-05E
OrderSelect the harmonic order that you want to display.
1. Click the Order column heading. A dialog box appears.
2. Select the harmonic order you want to display.
Upper and LowerIf the Auto Ranging check box is not selected, set the Upper and Lower limit of the display range.
1. Click the Upper or Lower column. A combo box opens.
2. Set the upper or lower limit value of the display range.
ColorSelect the display color of the trend.
1. Click the Color column. A combo box opens.
2. Select the display color of the trend.
9.6 Displaying Trend Graphs
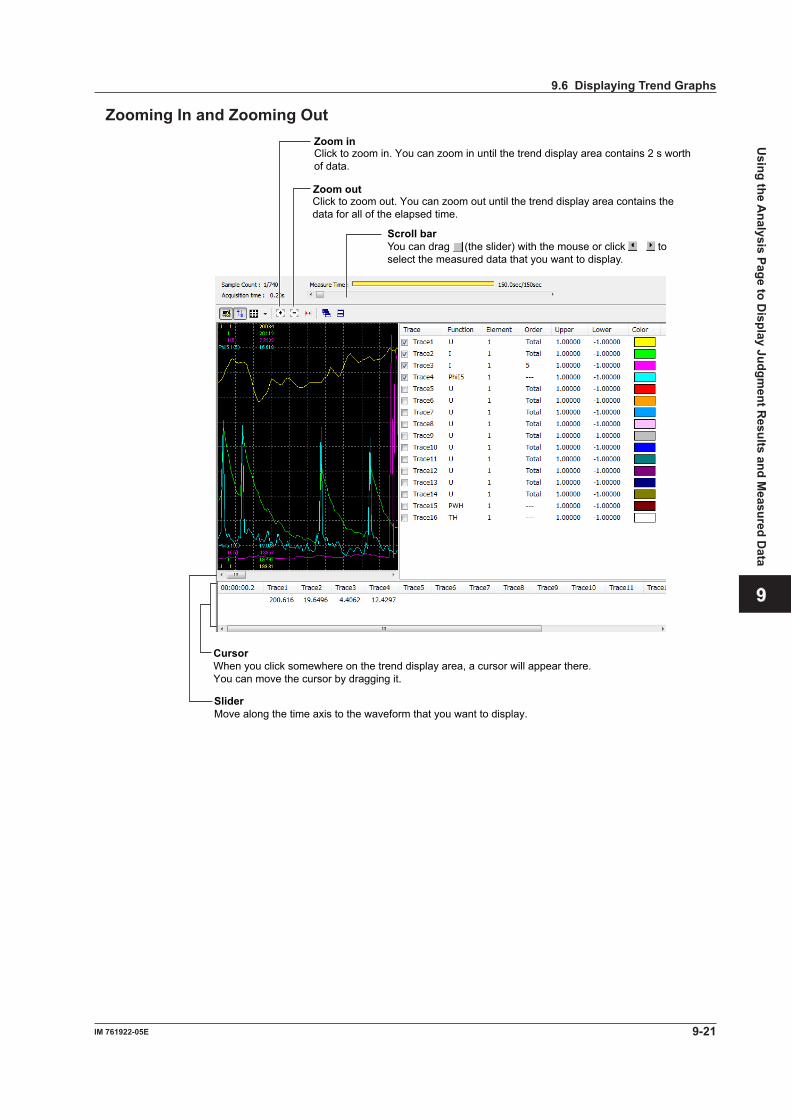
9-21IM 761922-05E
Using the A
nalysis Page to Display Judgm
ent Results and M
easured Data
3
2
1
4
5
6
7
8
9
10
11
12
13
14
Index
Zooming In and Zooming Out
Zoom out
Zoom in Click to zoom in. You can zoom in until the trend display area contains 2 s worth of data.
Click to zoom out. You can zoom out until the trend display area contains the data for all of the elapsed time.
Scroll bar You can drag (the slider) with the mouse or click to select the measured data that you want to display.
CursorWhen you click somewhere on the trend display area, a cursor will appear there.You can move the cursor by dragging it.
SliderMove along the time axis to the waveform that you want to display.
9.6 Displaying Trend Graphs
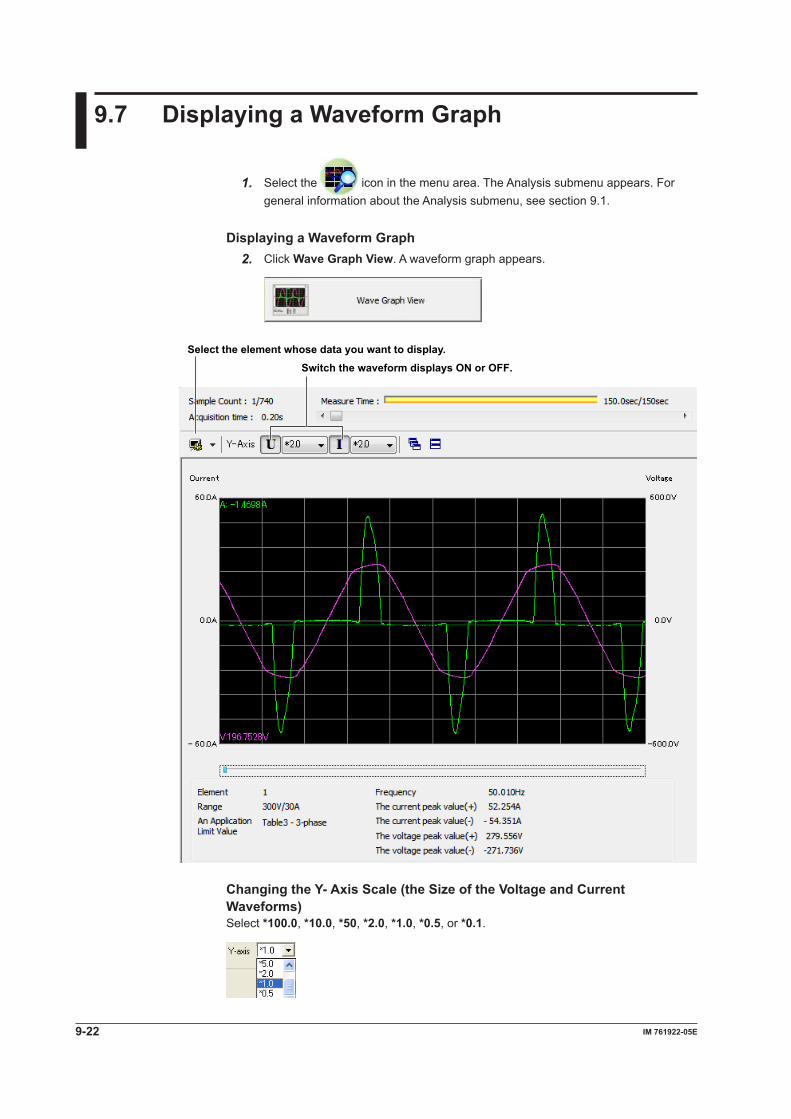
9-22 IM 761922-05E
9.7 Displaying a Waveform Graph
1. Select the icon in the menu area. The Analysis submenu appears. For general information about the Analysis submenu, see section 9.1.
Displaying a Waveform Graph2. Click Wave Graph View. A waveform graph appears.
Select the element whose data you want to display.Switch the waveform displays ON or OFF.
Changing the Y- Axis Scale (the Size of the Voltage and Current Waveforms)Select *100.0, *10.0, *50, *2.0, *1.0, *0.5, or *0.1.

9-23IM 761922-05E
Using the A
nalysis Page to Display Judgm
ent Results and M
easured Data
3
2
1
4
5
6
7
8
9
10
11
12
13
14
Index
Using the Cursor to Display Current and Phase Angle ValuesWhen you click an area of the waveform, a cursor will appear there. The current and phase angle values at the cursor position will be displayed.
Slider Cursor Voltage value
Current value
ExplanationThe waveform data is acquired immediately after the measurement for a compliance test is finished. The software acquires and displays a waveform graph of about two periods using 2200 points of current and voltage waveform data. You can display waveform graphs for each WT input element. This waveform data is different than the waveform data that is displayed in the waveform preview.
NoteUsing the scroll bar will have no effect on the waveform graph display.
Numeric Value Displays below the Graph• Frequency The average value of all frequencies (frequency of the fundamental signal of the PLL
source) within the measurement time.
• Current Peak (+) Maximum positive value of the current waveform displayed.
• Current Peak (–) Maximum negative value of the current waveform displayed.
• Voltage Peak (+) Maximum positive value of the voltage waveform displayed.
• Voltage Peak (–) Maximum negative value of the voltage waveform displayed.
9.7 Displaying a Waveform Graph
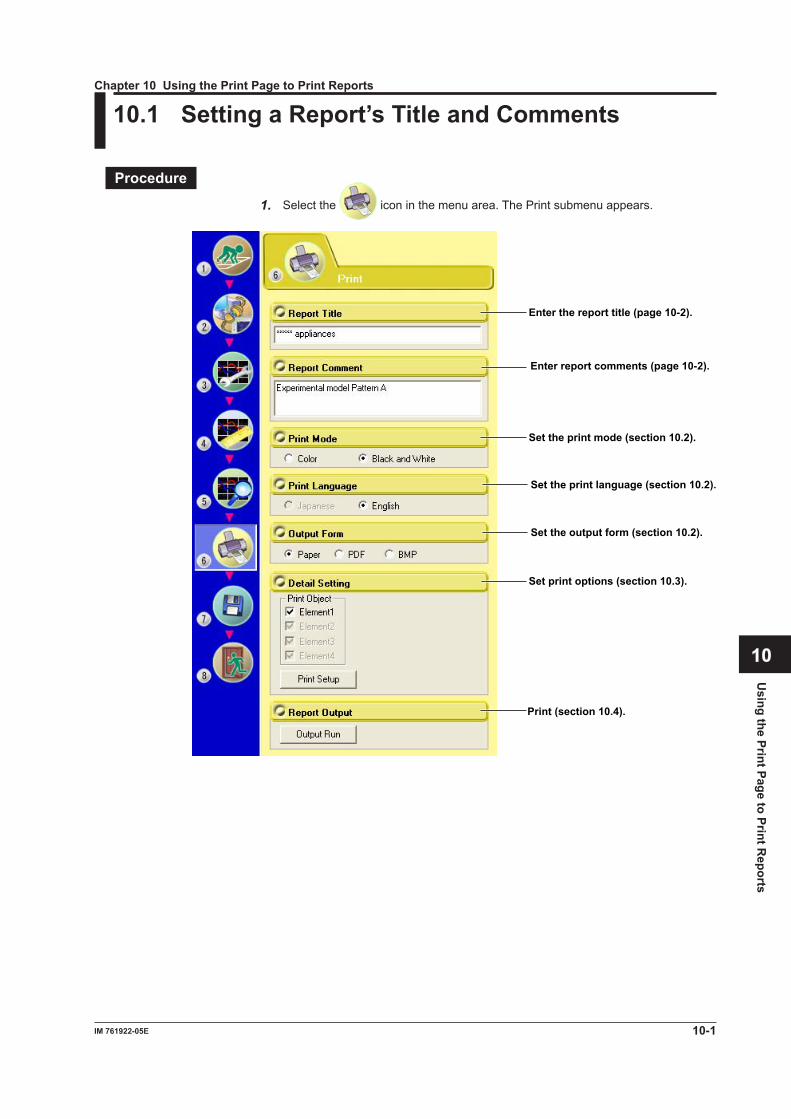
10.1 Setting a Report’s Title and Comments
Procedure
1. Select the icon in the menu area. The Print submenu appears.
Enter report comments (page 10-2).
Enter the report title (page 10-2).
Set the print mode (section 10.2).
Set the print language (section 10.2).
Set print options (section 10.3).
Print (section 10.4).
Set the output form (section 10.2).
Chapter 10 Using the Print Page to Print Reports
10-1IM 761922-05E
Using the Print Page to Print R
eports
3
2
1
4
5
6
7
8
9
10
11
12
13
14
Index
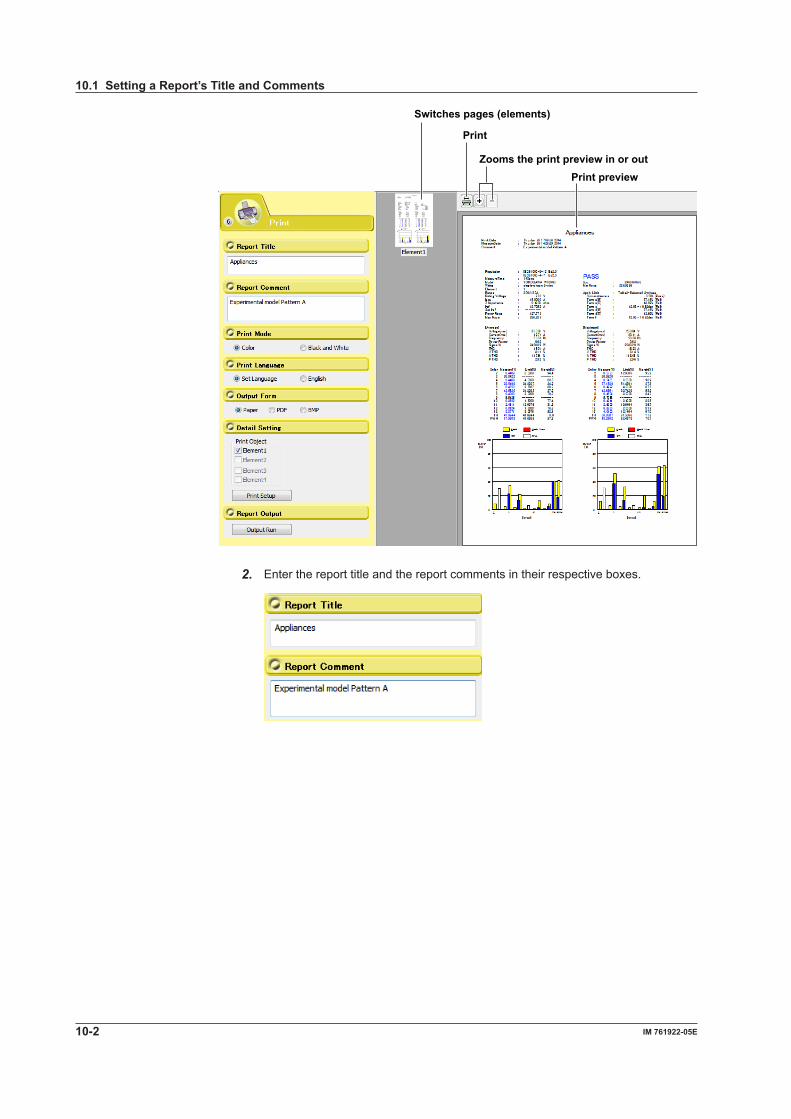
Print preview
Switches pages (elements)
Zooms the print preview in or out
2. Enter the report title and the report comments in their respective boxes.
10.1 Setting a Report’s Title and Comments
10-2 IM 761922-05E

ExplanationYou can create reports using the data measured with the software.
Switching the Page to Display a Print Preview OfThe following pages can be displayed in the print preview.• Element• Average (Ave) or Maximum (Max) of each element* Switching is possible between average and maximum when the apply limit is "Specified condition d,e,f".
Print Preview Display RangeIf the print preview is being zoomed in on, the displayed area is indicated with a red frame.
Moving the Print Preview Display RangeDrag the red frame (which indicates the display range) to move the display range.
Setting the Title and Comment of ReportsAs necessary, you can set the title and comment of a report.• Number of Characters That Can Be Entered See the table below.
Item Number of Characters That Can Be EnteredTitle Up to 40 characters can be entered.Comment Up to 1000 characters can be entered. Up to 90 characters can be displayed on one line. Up to 6 lines can be displayed.
10.1 Setting a Report’s Title and Comments
10-3IM 761922-05E
Using the Print Page to Print R
eports
3
2
1
4
5
6
7
8
9
10
11
12
13
14
Index
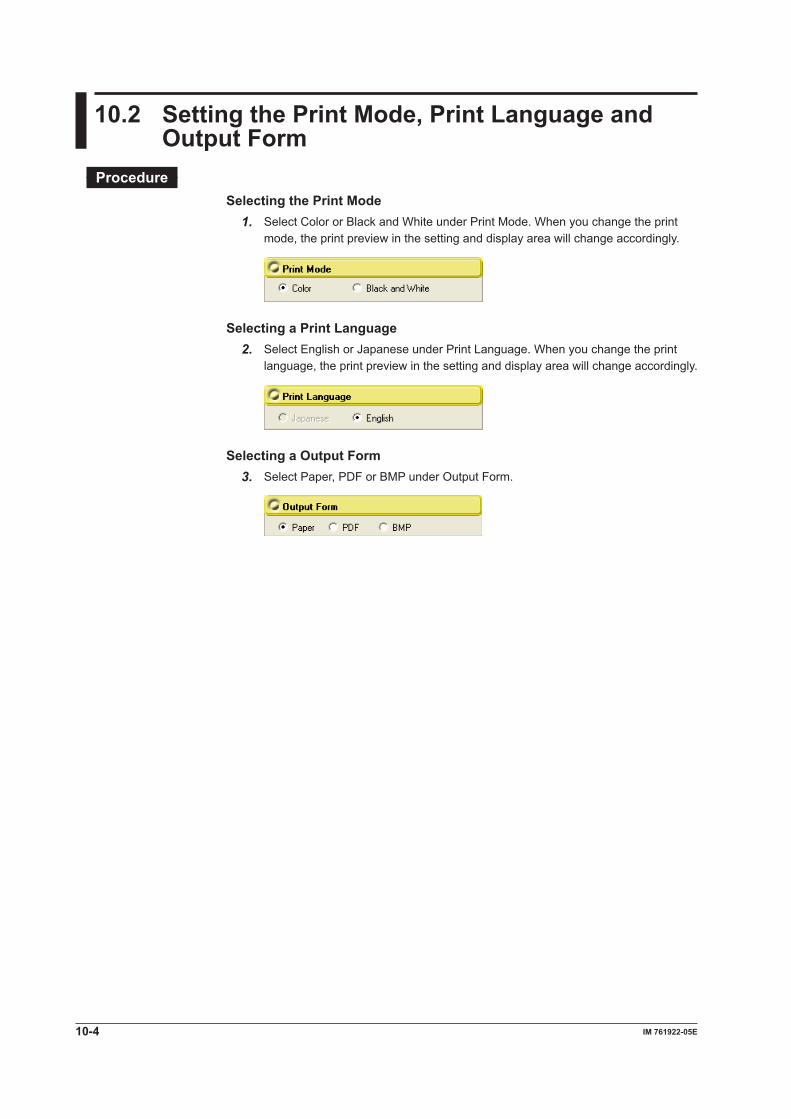
10.2 Setting the Print Mode, Print Language and Output Form
ProcedureSelecting the Print Mode
1. Select Color or Black and White under Print Mode. When you change the print mode, the print preview in the setting and display area will change accordingly.
Selecting a Print Language2. Select English or Japanese under Print Language. When you change the print
language, the print preview in the setting and display area will change accordingly.
Selecting a Output Form3. Select Paper, PDF or BMP under Output Form.
10-4 IM 761922-05E

10.3 Setting Print Details (Detail Setting)
ProcedureSelecting the Elements Whose Data You Want to Print
1. In the Print Object box, select the elements whose data you want to print.
Setting Up the Printer1. Choose Print Setup. The Print Setup dialog box opens.
2. Enter appropriate settings for Printer, Size, Source, and Orientation.
3. Click OK.
ExplanationSelecting the Elements Whose Data You Want to PrintYou can select the elements that were selected under Measure Object. The Measure Object setting is explained in section 7.2.
Print SetupMake printer settings according to your system environment.
10-5IM 761922-05E
Using the Print Page to Print R
eports
3
2
1
4
5
6
7
8
9
10
11
12
13
14
Index

10.4 Printing
ProcedurePrinting a ReportYou can print a report when measured data has been acquired or has been loaded from memory.
1. Click Output Run.• If Paper has been selected, proceed to step 2.• If PDF or BMP has been selected, proceed to step 3.
2. Enter appropriate settings for Printer, Range, Copies, etc. Click OK. The report is printed.
3. Set the location and file name to save to. Click Save. The report is saved in the specified output format (PDF or BMP).
Printing a Report Using the Print Button1. Click the button. A Print dialog box appears.2. Enter appropriate settings for Printer, Range, Copies, etc. Click OK. The report
is printed.
10-6 IM 761922-05E
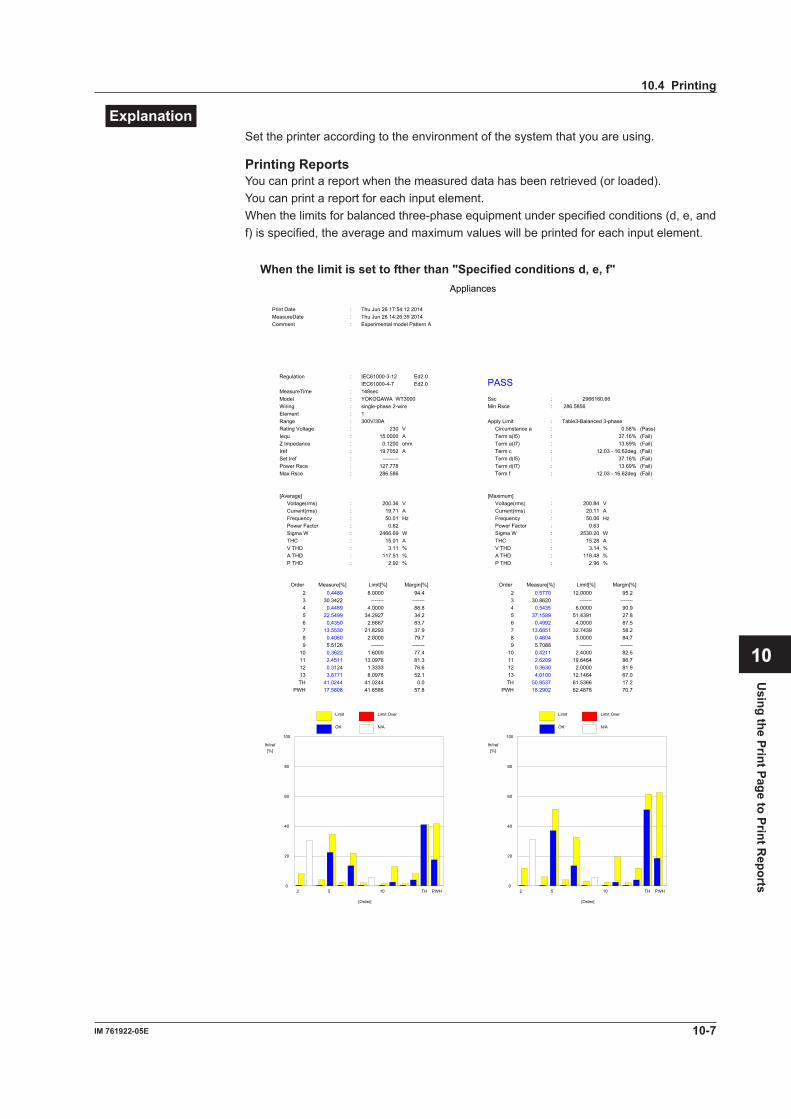
ExplanationSet the printer according to the environment of the system that you are using.
Printing ReportsYou can print a report when the measured data has been retrieved (or loaded).You can print a report for each input element.When the limits for balanced three-phase equipment under specified conditions (d, e, and f) is specified, the average and maximum values will be printed for each input element.
When the limit is set to fther than "Specified conditions d, e, f"
Appliances
Print Date : Thu Jun 26 17:54:12 2014MeasureDate : Thu Jun 26 14:26:39 2014Comment : Experimental model Pattern A
Regulation : IEC61000-3-12 Ed2.0IEC61000-4-7 Ed2.0
MeasureTime : 148secPASS
Model : YOKOGAWA WT3000Wiring : single-phase 2-wireElement : 1Range : 300V/30ARating Voltage : 230 VIequ : 15.0000 AZ Impedance : 0.1200 ohmIref : 19.7052 ASet Iref : ---------Power Rsce : 127.778Max Rsce : 286.586
Ssc : 2966160.66Min Rsce : 286.5856
Apply Limit : Table3-Balanced 3-phaseCircumstance a : 0.58% (Pass)Term a(I5) : 37.16% (Fail)Term a(I7) : 13.69% (Fail)Term c : 12.03 - 16.62deg (Fail)Term d(I5) : 37.16% (Fail)Term d(I7) : 13.69% (Fail)Term f : 12.03 - 16.62deg (Fail)
[Average]Voltage(rms) : 200.36 VCurrent(rms) : 19.71 AFrequency : 50.01 HzPower Factor : 0.62Sigma W : 2466.69 WTHC : 15.01 AV THD : 3.11 %A THD : 117.51 %P THD : 2.92 %
[Maximum]Voltage(rms) : 200.84 VCurrent(rms) : 20.11 AFrequency : 50.06 HzPower Factor : 0.63Sigma W : 2530.20 WTHC : 15.28 AV THD : 3.14 %A THD : 118.48 %P THD : 2.96 %
Order OrderMeasure[%] Measure[%]Limit[%] Limit[%]Margin[%] Margin[%]2 2 0.4489 0.5770 8.0000 12.0000 94.4 95.23 3 30.3422 30.8620------- -------------- -------4 4 0.4489 0.5435 4.0000 6.0000 88.8 90.95 5 22.5499 37.1589 34.2927 51.4391 34.2 27.86 6 0.4350 0.4992 2.6667 4.0000 83.7 87.57 7 13.5530 13.6851 21.8293 32.7439 37.9 58.28 8 0.4060 0.4604 2.0000 3.0000 79.7 84.79 9 5.5126 5.7088------- -------------- -------
10 10 0.3622 0.4211 1.6000 2.4000 77.4 82.511 11 2.4511 2.6209 13.0976 19.6464 81.3 86.712 12 0.3124 0.3630 1.3333 2.0000 76.6 81.913 13 3.8771 4.0100 8.0976 12.1464 52.1 67.0TH TH 41.0244 50.9537 41.0244 61.5366 0.0 17.2
PWH PWH 17.5808 18.2902 41.6586 62.4878 57.8 70.7
2 5 10 TH PWH
[Order]
Ih/Iref [%]
0
20
40
60
80
100
Limit
OK
Limit Over
N/A
2 5 10 TH PWH
[Order]
Ih/Iref [%]
0
20
40
60
80
100
Limit
OK
Limit Over
N/A
10.4 Printing
10-7IM 761922-05E
Using the Print Page to Print R
eports
3
2
1
4
5
6
7
8
9
10
11
12
13
14
Index

When the limit is set to fther than "Specified conditions d, e, f" (Average)
Appliances (Average)
Print Date : Thu Jun 26 20:00:24 2014MeasureDate : Thu Jun 26 19:51:14 2014Comment : Experimental model Pattern A
Regulation : IEC61000-3-12 Ed2.0IEC61000-4-7 Ed2.0
MeasureTime : 148secFAIL
Model : YOKOGAWA WT3000Wiring : single-phase 2-wireElement : 1Range : 300V/30ARating Voltage : 230 VIequ : 15.0000 AZ Impedance : 0.1200 ohmIref : 19.7052 ASet Iref : ---------Power Rsce : 127.778Max Rsce : 309.420
Ssc : 3202492.08Min Rsce : >= 250.0000
Apply Limit : Table5-Balanced 3-phase under specified(d,e,f)Circumstance a : 0.58% (Pass)Term a(I5) : 37.16% (Fail)Term a(I7) : 13.69% (Fail)Term c : 12.03 - 16.62deg (Fail)Term d(I5) : 37.16% (Fail)Term d(I7) : 13.69% (Fail)Term f : 12.03 - 16.62deg (Fail)
[Average]Voltage(rms) : 200.36 VCurrent(rms) : 19.71 AFrequency : 50.01 HzPower Factor : 0.62Sigma W : 2466.72 W
THC : 15.01 AV THD : 3.11 %A THD : 117.50 %P THD : 2.92 %
Order OrderMeasure[%] Measure[%]Limit[%] Limit[%]Margin[%] Margin[%]2 0.4498 8.0000 94.4 3 30.3419 ------- -------4 0.4495 4.0000 88.8 5 22.5496 25.0000 9.86 0.4354 2.6667 83.7 7 13.5528 17.3000 21.78 0.4062 2.0000 79.7 9 5.5128 ------- -------
10 0.3624 1.6000 77.4 11 2.4521 12.1000 79.712 0.3126 1.3333 76.6 13 3.8776 10.7000 63.814 0.2652 3.0000 91.2 15 3.5250 3.0000 -17.516 0.2215 3.0000 92.6 17 1.8228 8.4000 78.318 0.1839 3.0000 93.9 19 0.4238 7.8000 94.620 0.1554 3.0000 94.8 21 1.1497 3.0000 61.722 0.1350 3.0000 95.5 23 1.2938 6.8000 81.024 0.1187 3.0000 96.0 25 0.8117 6.5000 87.526 0.1026 3.0000 96.6 27 0.4435 3.0000 85.228 0.0903 3.0000 97.0 29 0.6678 5.4000 87.630 0.0821 3.0000 97.3 31 0.7192 5.2000 86.232 0.0753 3.0000 97.5 33 0.4240 3.0000 85.934 0.0694 3.0000 97.7 35 0.1858 4.9000 96.236 0.0629 3.0000 97.9 37 0.4759 4.7000 89.938 0.0605 3.0000 98.0 39 0.5101 3.0000 83.040 0.0576 3.0000 98.1 TH 41.0241 35.0000 -17.2
PWH 17.5821 70.0000 74.9
2 10 20 30 40 TH PWH
[Order]
Ih/Iref [%]
0
20
40
60
80
100
Limit
OK
Limit Over
N/A
10.4 Printing
10-8 IM 761922-05E
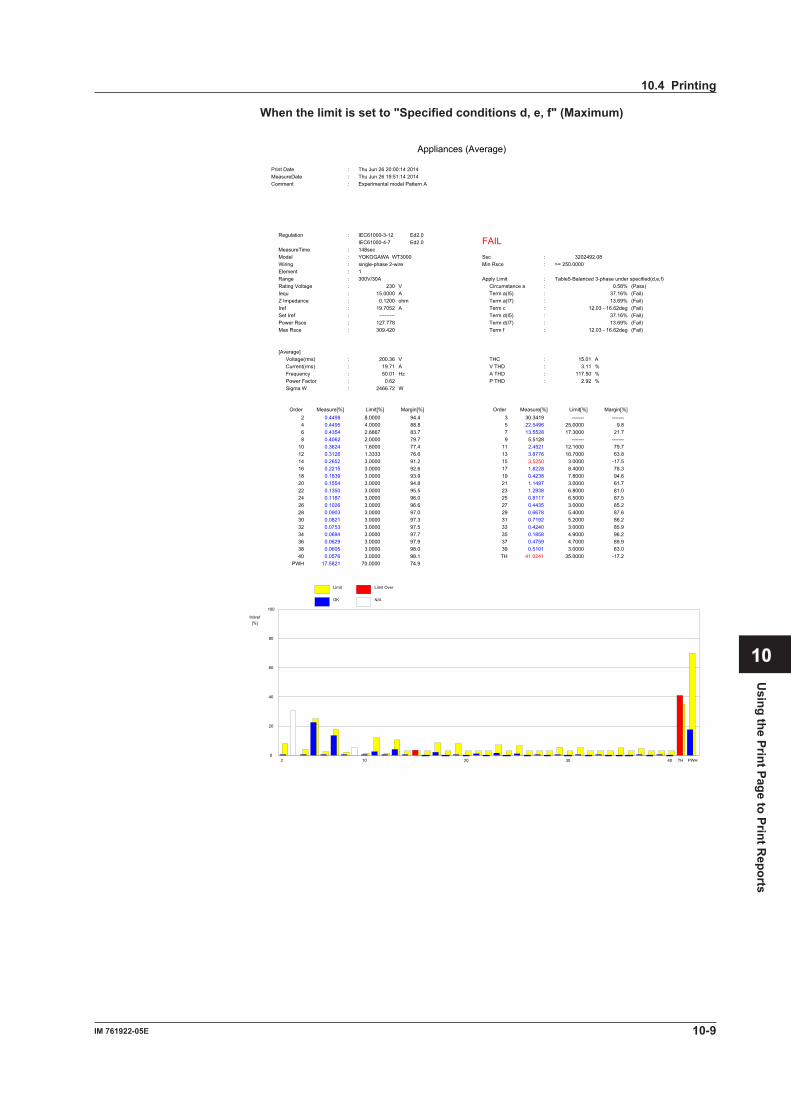
When the limit is set to "Specified conditions d, e, f" (Maximum)
Appliances (Average)
Print Date : Thu Jun 26 20:00:14 2014MeasureDate : Thu Jun 26 19:51:14 2014Comment : Experimental model Pattern A
Regulation : IEC61000-3-12 Ed2.0IEC61000-4-7 Ed2.0
MeasureTime : 148secFAIL
Model : YOKOGAWA WT3000Wiring : single-phase 2-wireElement : 1Range : 300V/30ARating Voltage : 230 VIequ : 15.0000 AZ Impedance : 0.1200 ohmIref : 19.7052 ASet Iref : ---------Power Rsce : 127.778Max Rsce : 309.420
Ssc : 3202492.08Min Rsce : >= 250.0000
Apply Limit : Table5-Balanced 3-phase under specified(d,e,f)Circumstance a : 0.58% (Pass)Term a(I5) : 37.16% (Fail)Term a(I7) : 13.69% (Fail)Term c : 12.03 - 16.62deg (Fail)Term d(I5) : 37.16% (Fail)Term d(I7) : 13.69% (Fail)Term f : 12.03 - 16.62deg (Fail)
[Average]Voltage(rms) : 200.36 VCurrent(rms) : 19.71 AFrequency : 50.01 HzPower Factor : 0.62Sigma W : 2466.72 W
THC : 15.01 AV THD : 3.11 %A THD : 117.50 %P THD : 2.92 %
Order OrderMeasure[%] Measure[%]Limit[%] Limit[%]Margin[%] Margin[%]2 0.4498 8.0000 94.4 3 30.3419 ------- -------4 0.4495 4.0000 88.8 5 22.5496 25.0000 9.86 0.4354 2.6667 83.7 7 13.5528 17.3000 21.78 0.4062 2.0000 79.7 9 5.5128 ------- -------
10 0.3624 1.6000 77.4 11 2.4521 12.1000 79.712 0.3126 1.3333 76.6 13 3.8776 10.7000 63.814 0.2652 3.0000 91.2 15 3.5250 3.0000 -17.516 0.2215 3.0000 92.6 17 1.8228 8.4000 78.318 0.1839 3.0000 93.9 19 0.4238 7.8000 94.620 0.1554 3.0000 94.8 21 1.1497 3.0000 61.722 0.1350 3.0000 95.5 23 1.2938 6.8000 81.024 0.1187 3.0000 96.0 25 0.8117 6.5000 87.526 0.1026 3.0000 96.6 27 0.4435 3.0000 85.228 0.0903 3.0000 97.0 29 0.6678 5.4000 87.630 0.0821 3.0000 97.3 31 0.7192 5.2000 86.232 0.0753 3.0000 97.5 33 0.4240 3.0000 85.934 0.0694 3.0000 97.7 35 0.1858 4.9000 96.236 0.0629 3.0000 97.9 37 0.4759 4.7000 89.938 0.0605 3.0000 98.0 39 0.5101 3.0000 83.040 0.0576 3.0000 98.1 TH 41.0241 35.0000 -17.2
PWH 17.5821 70.0000 74.9
2 10 20 30 40 TH PWH
[Order]
Ih/Iref [%]
0
20
40
60
80
100
Limit
OK
Limit Over
N/A
10.4 Printing
10-9IM 761922-05E
Using the Print Page to Print R
eports
3
2
1
4
5
6
7
8
9
10
11
12
13
14
Index

11.1 Saving Setting Information and Measured Data
Procedure
1. Select the icon in the menu area. The Save submenu appears.
Save Method (page 11-2)Select the type of data to save and the file format to save it to.
Save Information (page 11-2)Set the location and file name to save to.
Execute save operation (page 11-2).
Chapter 11 Using the Save Page to Save Setting Information and Measured Data
11-1IM 761922-05E
Using the Save Page to Save Setting Inform
ation and Measured D
ata
3
2
1
4
5
6
7
8
9
10
11
12
13
14
Index

Configuring File Information Display Settings1. Right-click the file information heading area at the top of the setting and display
area. A list of the different types of information that can be displayed appears.
2. Select the type of information that you want to display.
Saving the Measured DataYou can save the measured data when the measured data has been retrieved (or loaded).
1. Click Save > Save Measured Data.
2. After selecting a folder in the Save in box, enter the name of the file you want to save in the File name box.
3. Click Save to save the measured data.
Section 10.1 explains how to set report titles and comments.
NoteYou cannot save the measured data while the measurement is in progress.
11.1 Saving Setting Information and Measured Data
11-2 IM 761922-05E

Saving the Setting Information1. Click Save > Save Setting Information.
2. After selecting a folder in the Save in box, enter the name of the file you want to save in the File name box.
3. Click Save to save the setting information.
Section 10.1 explains how to set report titles and comments.
NoteYou cannot save the setting information while the measurement is in progress.
11.1 Saving Setting Information and Measured Data
11-3IM 761922-05E
Using the Save Page to Save Setting Inform
ation and Measured D
ata
3
2
1
4
5
6
7
8
9
10
11
12
13
14
Index

ExplanationSaving Measured DataYou can use this software to save the harmonic measurement data and waveform data that the PC has acquired from the WT to a file. When the software saves this data, it will also save the WT harmonic measurement conditions along with the setting information.• An asterisk appears in the Measured Data column of the file information display area.• The following two types of files are created.
• fdt Measured data (compliance test data)• ini Setting information
File Name/Extension• You can select any file name that the PC will recognize.
Saving Setting InformationWhen in online mode, the software can save the following setting information to a file.• Measurement and judgement conditions (see chapter 7)• All display settings (see chapters 8 and 9)• Report titles and comments (see section 10.1)
File Name/Extension• You can select any file name that the PC will recognize.• Extension: .ini
11.1 Saving Setting Information and Measured Data
11-4 IM 761922-05E
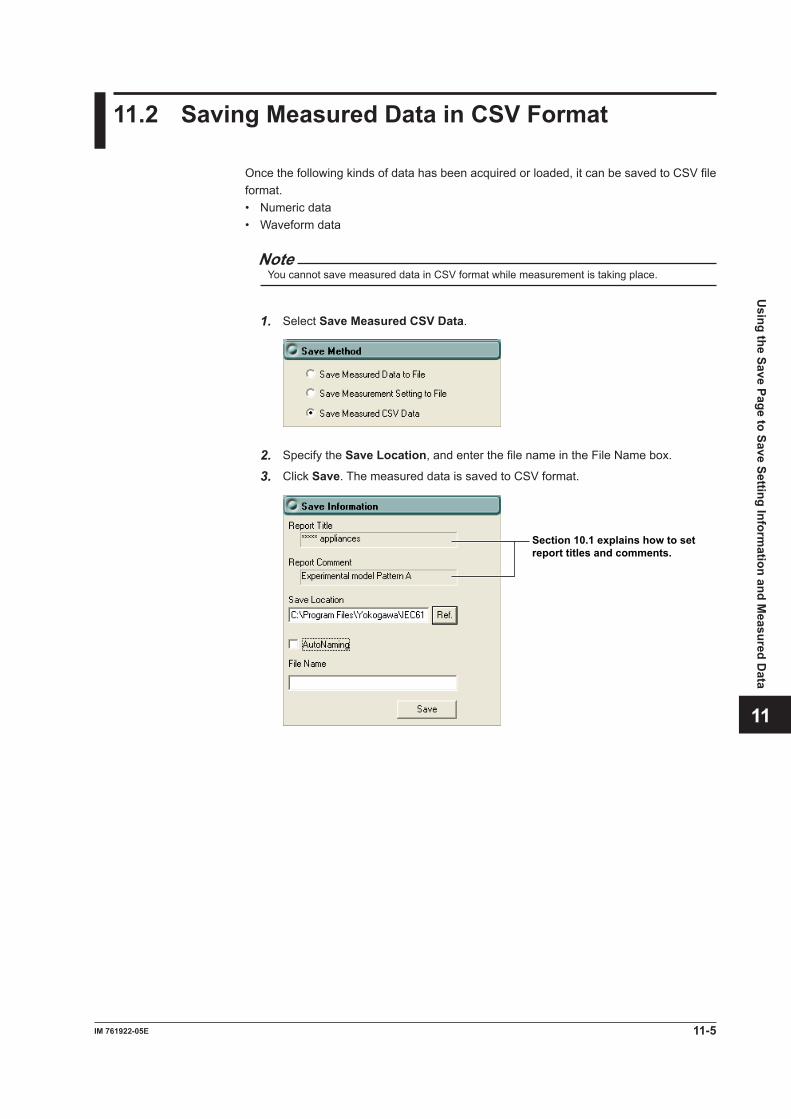
11.2 Saving Measured Data in CSV Format
Once the following kinds of data has been acquired or loaded, it can be saved to CSV file format.• Numeric data• Waveform data
NoteYou cannot save measured data in CSV format while measurement is taking place.
1. Select Save Measured CSV Data.
2. Specify the Save Location, and enter the file name in the File Name box.
3. Click Save. The measured data is saved to CSV format.
Section 10.1 explains how to set report titles and comments.
11-5IM 761922-05E
Using the Save Page to Save Setting Inform
ation and Measured D
ata
3
2
1
4
5
6
7
8
9
10
11
12
13
14
Index

ExplanationYou can save data to CSV file format after it has been acquired or loaded. When you save the data in CSV format, you can view it using a PC spreadsheet program (such as Microsoft Excel).
NoteThis software cannot load data saved to CSV format.
File Name/ExtensionYou can select any file name that the PC will recognize.• Extension: .csv
Data TypesThe following data is saved for each measured input element:
Voltage valuesCurrent valuesActive powerΦ(phaseangle)Apparent powerCircuit power factorFreqXUFreqXIUthd : Voltage THDTHD distortion factor (voltage)UthdSIthd : Current THD THD distortion factor (current)IthdSDistortion factor (P THD)PhiFreqUThcPohcPhiU1_U2PhiU1_U3Voltage waveform data (2200 points)Current waveform data (2200 points)
Data SizeUnder the following circumstances, the software will produce an approximately 6-MB file with about 18000 lines.• Wiring pattern set to 3P4W 400 V, and the measured input elements set to 1 to 3• Measurement time set to 2 min 30 s
11.2 Saving Measured Data in CSV Format
11-6 IM 761922-05E

Example of Numeric Data Saved to CSV Format and Then Opened Using Microsoft Excel
Date andtimesaved
Measured data
Measuredinputelement
Harmonic order
Harmonic measurement data
Measured data num
ber
11.2 Saving Measured Data in CSV Format
11-7IM 761922-05E
Using the Save Page to Save Setting Inform
ation and Measured D
ata
3
2
1
4
5
6
7
8
9
10
11
12
13
14
Index
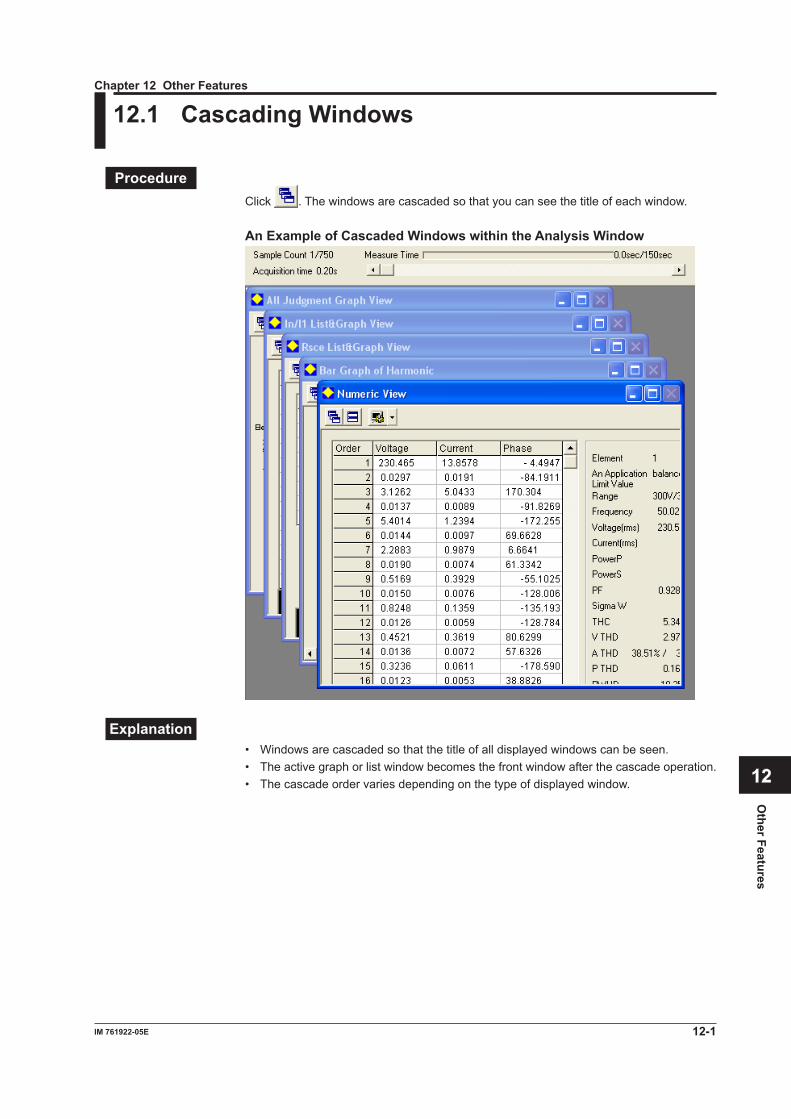
12-1IM 761922-05E
Other Features
3
2
1
4
5
6
7
8
9
10
11
12
13
14
Index
12.1 Cascading Windows
ProcedureClick . The windows are cascaded so that you can see the title of each window.
An Example of Cascaded Windows within the Analysis Window
Explanation• Windows are cascaded so that the title of all displayed windows can be seen.• The active graph or list window becomes the front window after the cascade operation.• The cascade order varies depending on the type of displayed window.
Chapter 12 Other Features
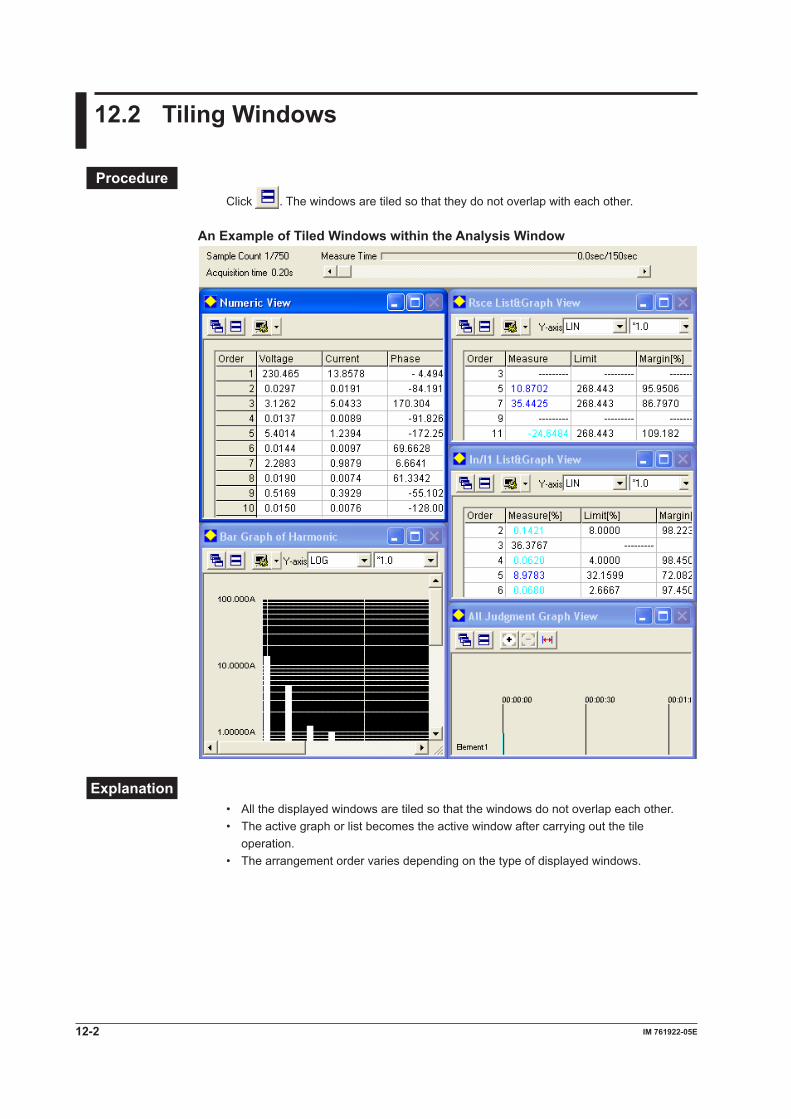
12-2 IM 761922-05E
12.2 Tiling Windows
ProcedureClick . The windows are tiled so that they do not overlap with each other.
An Example of Tiled Windows within the Analysis Window
Explanation• All the displayed windows are tiled so that the windows do not overlap each other.• The active graph or list becomes the active window after carrying out the tile
operation.• The arrangement order varies depending on the type of displayed windows.

12-3IM 761922-05E
Other Features
3
2
1
4
5
6
7
8
9
10
11
12
13
14
Index
12.3 Using the Help Function
ProcedureClick , the help button. If Adobe Reader is installed on the PC, it will start up and open the PDF User’s Manual for this software.
ExplanationOnline HelpThe user’s manual is displayed as a help document in PDF (Portable Document Format). You can find information about operating procedures of this software and terminology. You can view PDF files using Adobe Reader, a freeware.If there is an alteration notice, you can display it by clicking Help and then clicking Alterations of User’s Manual. This will open a PDF file of the alteration notice.
Viewing the Most Recent User’s Manual or Alteration NoticeTo obtain the most recent PDF files of the user’s manual and alteration notice, click “Manual Download” on the YOKOGAWA’s Web page shown below. Then, download the user’s manual and alteration notice of this software program. http://tmi.yokogawa.com/service-support/downloads/
12-4 IM 761922-05E
Rename the downloaded user’s manual and alteration notice as indicated below according to the product that you are using, and copy (overwrite) the files in the software installation folder that you specified when you carried out the steps on page 2-8. You will be able to view the most recent operating instructions by selecting the user’s manual or alteration notice from the Help menu.
Product User’s Manual File Name Alteration Notice File NameWT3000 IM761922-05E.pdf Alterations-05E.pdf
Note• You can download Adobe Reader from Adobe System’s Web page.• The most recent user’s manual and alteration notice that you can download from
YOKOGAWA’s Web page correspond to the most recent version of this software program. Update the software program as necessary. The program for updating the software can be downloaded from YOKOGAWA’s Web page above.
12.3 Using the Help Function
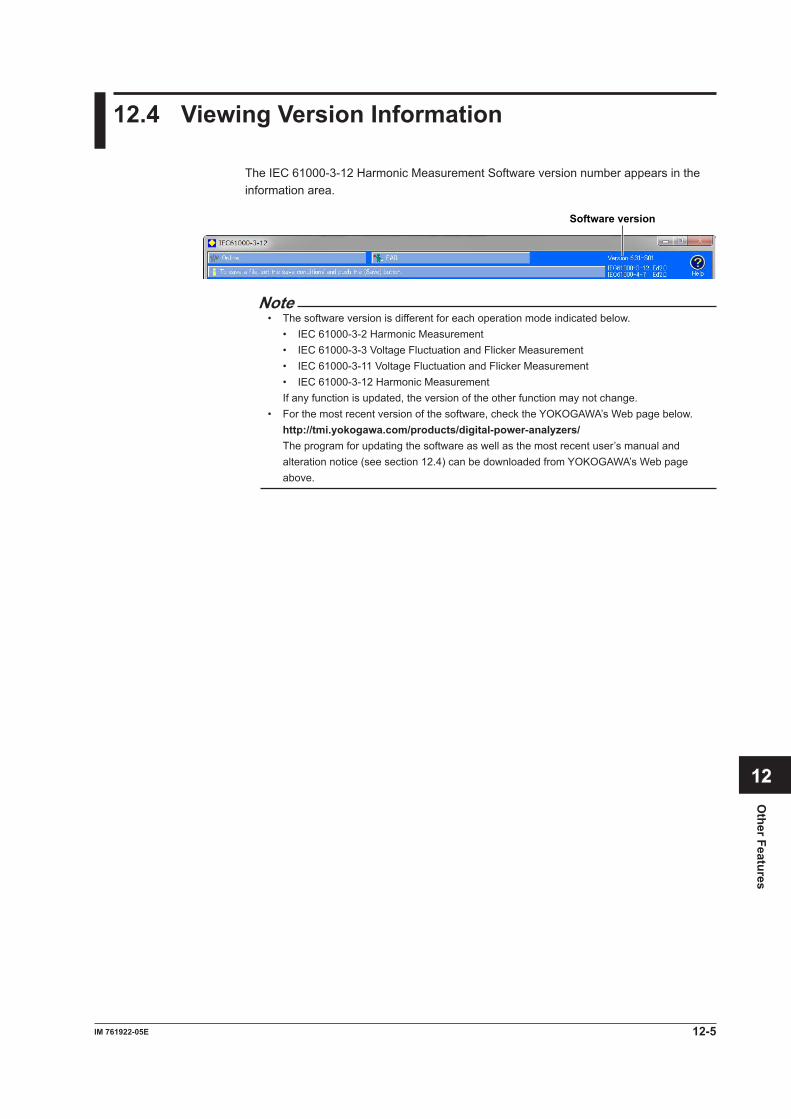
12-5IM 761922-05E
Other Features
3
2
1
4
5
6
7
8
9
10
11
12
13
14
Index
12.4 Viewing Version Information
The IEC 61000-3-12 Harmonic Measurement Software version number appears in the information area.
Software version
Note• The software version is different for each operation mode indicated below.
• IEC 61000-3-2 Harmonic Measurement• IEC 61000-3-3 Voltage Fluctuation and Flicker Measurement• IEC 61000-3-11 Voltage Fluctuation and Flicker Measurement• IEC 61000-3-12 Harmonic Measurement
If any function is updated, the version of the other function may not change.• For the most recent version of the software, check the YOKOGAWA’s Web page below. http://tmi.yokogawa.com/products/digital-power-analyzers/ The program for updating the software as well as the most recent user’s manual and
alteration notice (see section 12.4) can be downloaded from YOKOGAWA’s Web page above.
13.1 Troubleshooting
If a message is displayed on the PC display, see section 13.2, “Error Messages.” If servicing is necessary or if the software is not operating correctly after performing the corrective actions, contact your nearest YOKOGAWA dealer.
Problems and SolutionsIf you cannot connect to the WT3000 via GP-IB:
A GP-IB connection made to the WT may not work properly if the GP-IB card that is used is not made by NI (National Instruments). We recommend that you use a National Instruments GP-IB card (see section 1.2).
Measurement stops suddenly.Close the memory-resident software running on the PC. For example, if virus checking software frequently checks the communications between this software and the PC, the performance of the PC may decline drastically. If you choose to stop the virus check and use the PC, please do so in a network environment that is well protected against viruses.
13-1IM 761922-05E
Troubleshooting
Chapter 13 Troubleshooting
3
2
1
4
5
6
7
8
9
10
11
12
13
14
Index
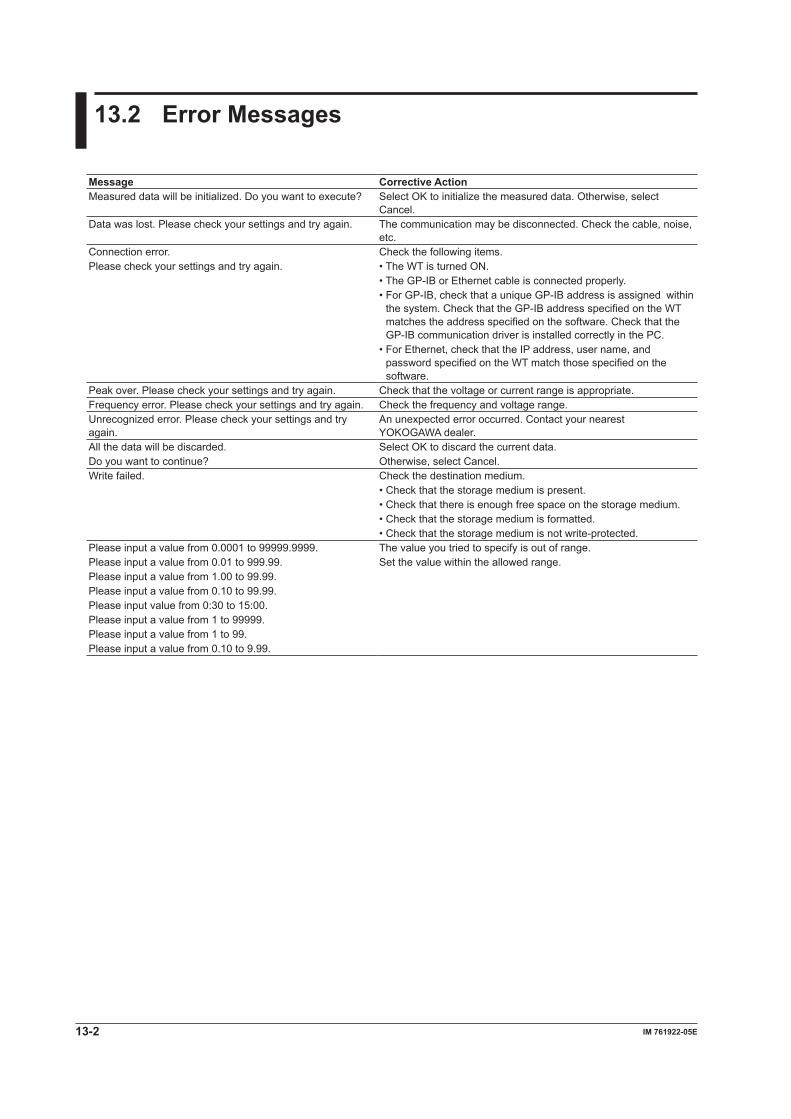
13.2 Error Messages
Message Corrective ActionMeasured data will be initialized. Do you want to execute? Select OK to initialize the measured data. Otherwise, select
Cancel.Data was lost. Please check your settings and try again. The communication may be disconnected. Check the cable, noise,
etc.Connection error. Check the following items.Please check your settings and try again. • The WT is turned ON.
• The GP-IB or Ethernet cable is connected properly.• For GP-IB, check that a unique GP-IB address is assigned within
the system. Check that the GP-IB address specified on the WT matches the address specified on the software. Check that the GP-IB communication driver is installed correctly in the PC.
• For Ethernet, check that the IP address, user name, and password specified on the WT match those specified on the software.
Peak over. Please check your settings and try again. Check that the voltage or current range is appropriate.Frequency error. Please check your settings and try again. Check the frequency and voltage range.Unrecognized error. Please check your settings and try again.
An unexpected error occurred. Contact your nearest YOKOGAWA dealer.
All the data will be discarded. Select OK to discard the current data.Do you want to continue? Otherwise, select Cancel.Write failed. Check the destination medium.
• Check that the storage medium is present.• Check that there is enough free space on the storage medium.• Check that the storage medium is formatted.• Check that the storage medium is not write-protected.
Please input a value from 0.0001 to 99999.9999. The value you tried to specify is out of range.Please input a value from 0.01 to 999.99. Set the value within the allowed range.Please input a value from 1.00 to 99.99.Please input a value from 0.10 to 99.99.Please input value from 0:30 to 15:00.Please input a value from 1 to 99999.Please input a value from 1 to 99.Please input a value from 0.10 to 9.99.
13-2 IM 761922-05E

Specifications
Item SpecificationSoftware* Harmonic measurement/judgment software that can measure harmonic currents and judge the
results of those measurements based on IEC standards. Displays and prints measurements and judgments. The software’s executable file name is IEC61000.exe.
Compatible measurement devices*
WT3000 (Models 760301, 760302, 760303, and 760304)
Applicable standards* • IEC 61000-3-12: Edition 2.0, Edition 1.0EN 61000-3-12: 2011: 2005IEC 61000-4-7: Edition 1.0, Editon 2.0, A1 of Editon 2.0
• EN 61000-3-12 (2005)Features Acquisition and loading of measured data and waveform data to be judged.
• Configuration of WT measurement conditions• Online acquisition of measured data and waveform data from the WT (online mode)• Loading of previously saved measured data and waveform data (offline mode)Measurement modes*• Compliance testing
• In online modeMeasures the harmonics of the data acquired from the WT, and judges those harmonics based on IEC 61000-3-12.
• In offline modeJudges the measured data loaded from a file according to IEC 61000-3-12.
• Harmonic previewOnly available in online mode. As the WT measures the harmonic current, the harmonic fluctuations appear on a list of measured values.
• Waveform previewOnly available in online mode. The measured waveform appears as it is measured on the WT.
Standard and measurement settingsJudgment conditions configurable in accordance with IEC 61000-3-12.
Measurement timeThe time from the start to the end of measurement.Measurement time can be set in one-second intervals within the range of 0 h 0 min 1 s to 24 h 0 min 0 s.
Report titles/commentsReport titles and comments can be entered. Report formats: color/black and white; English/Japanese. Reports are printed and saved to .bmp or .pdf files along with measured data.
Measure start/stopMeasurement can be started in online mode.
Display of judgment results, measured data, and waveform dataWhen a compliance test is performed, the software will display judgments as to whether or not the data complies with IEC 61000-3-12, along with the measured data and waveform data that was judged.• Display of all judgment results within the measurement time
Determines whether or not all of the data within the measurement time is within the set limits, and displays the result.
• Ih/Iref list and graph display Displays the measured values of Ih/Iref for each measured harmonic and the limits set by the
standard for those values in both a list and a bar graph.• Rsce list and graph display Displays the measured values of Rsce for each measured harmonic and the limits set by the
standard for those values in both a list and a bar graph.• Bar graph display of harmonic voltage, current, and phase angle Displays the measured data for each harmonic in a color-coded bar graph.• List display of harmonic voltage, current, and phase angle values Displays the measured data for each harmonic in a color-coded list.• Trend graph display
Displays a graph that shows data fluctuations over time.
Chapter 14 Specifications
14-1IM 761922-05E
Specifications
3
2
1
4
5
6
7
8
9
10
11
12
13
14
Index
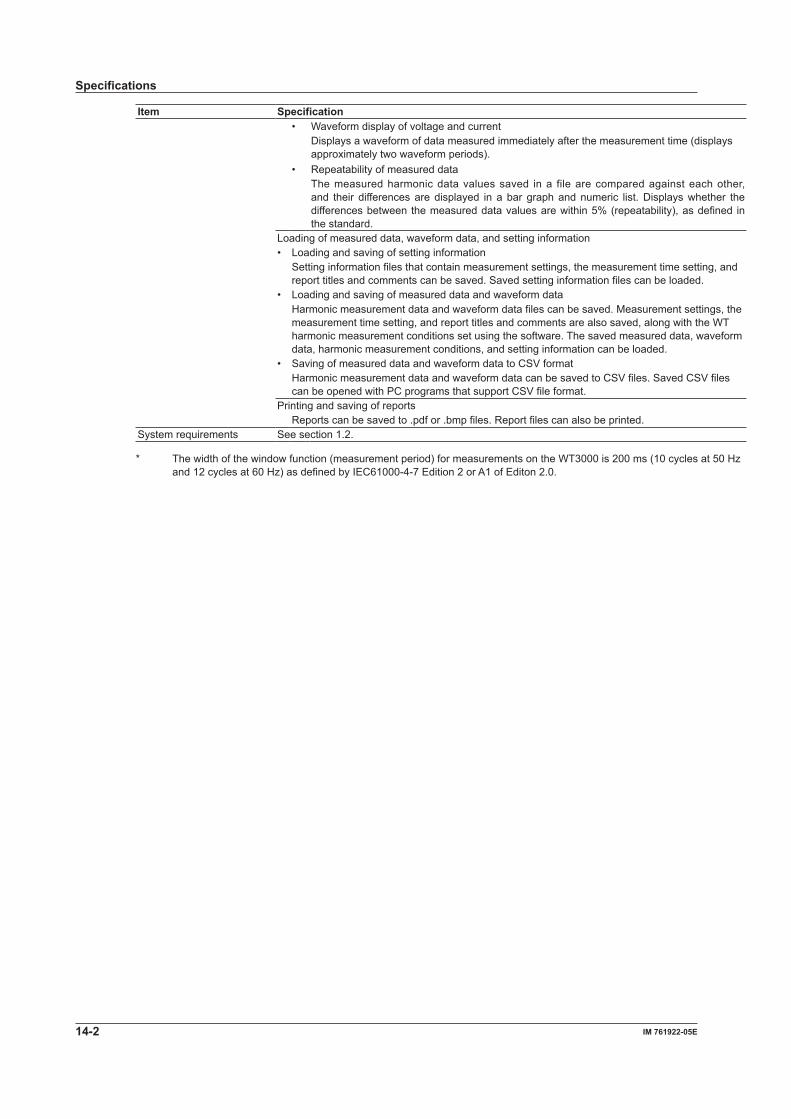
Item Specification• Waveform display of voltage and current Displays a waveform of data measured immediately after the measurement time (displays
approximately two waveform periods).• Repeatability of measured data
The measured harmonic data values saved in a file are compared against each other, and their differences are displayed in a bar graph and numeric list. Displays whether the differences between the measured data values are within 5% (repeatability), as defined in the standard.
Loading of measured data, waveform data, and setting information• Loading and saving of setting information
Setting information files that contain measurement settings, the measurement time setting, and report titles and comments can be saved. Saved setting information files can be loaded.
• Loading and saving of measured data and waveform dataHarmonic measurement data and waveform data files can be saved. Measurement settings, the measurement time setting, and report titles and comments are also saved, along with the WT harmonic measurement conditions set using the software. The saved measured data, waveform data, harmonic measurement conditions, and setting information can be loaded.
• Saving of measured data and waveform data to CSV formatHarmonic measurement data and waveform data can be saved to CSV files. Saved CSV files can be opened with PC programs that support CSV file format.
Printing and saving of reportsReports can be saved to .pdf or .bmp files. Report files can also be printed.
System requirements See section 1.2.
* The width of the window function (measurement period) for measurements on the WT3000 is 200 ms (10 cycles at 50 Hz and 12 cycles at 60 Hz) as defined by IEC61000-4-7 Edition 2 or A1 of Editon 2.0.
Specifications
14-2 IM 761922-05E
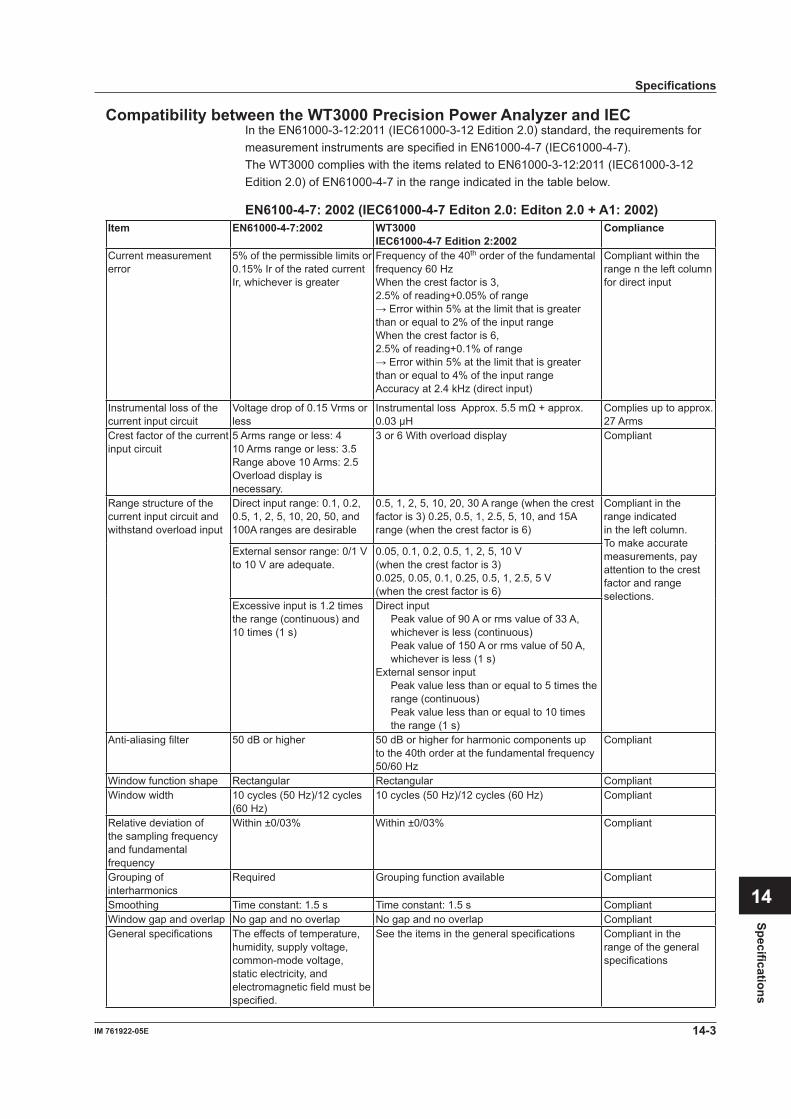
Compatibility between the WT3000 Precision Power Analyzer and IECIn the EN61000-3-12:2011 (IEC61000-3-12 Edition 2.0) standard, the requirements for measurement instruments are specified in EN61000-4-7 (IEC61000-4-7).The WT3000 complies with the items related to EN61000-3-12:2011 (IEC61000-3-12 Edition 2.0) of EN61000-4-7 in the range indicated in the table below.
EN6100-4-7: 2002 (IEC61000-4-7 Editon 2.0: Editon 2.0 + A1: 2002)Item EN61000-4-7:2002 WT3000
IEC61000-4-7 Edition 2:2002Compliance
Current measurement error
5% of the permissible limits or 0.15% Ir of the rated current Ir, whichever is greater
Frequency of the 40th order of the fundamental frequency 60 HzWhen the crest factor is 3, 2.5% of reading+0.05% of range→Errorwithin5%atthelimitthatisgreaterthan or equal to 2% of the input rangeWhen the crest factor is 6,2.5% of reading+0.1% of range→Errorwithin5%atthelimitthatisgreaterthan or equal to 4% of the input rangeAccuracy at 2.4 kHz (direct input)
Compliant within the range n the left column for direct input
Instrumental loss of the current input circuit
Voltage drop of 0.15 Vrms or less
InstrumentallossApprox.5.5mΩ+approx.0.03 µH
Complies up to approx. 27 Arms
Crest factor of the current input circuit
5 Arms range or less: 410 Arms range or less: 3.5Range above 10 Arms: 2.5Overload display is necessary.
3 or 6 With overload display Compliant
Range structure of the current input circuit and withstand overload input
Direct input range: 0.1, 0.2, 0.5, 1, 2, 5, 10, 20, 50, and 100A ranges are desirable
0.5, 1, 2, 5, 10, 20, 30 A range (when the crest factor is 3) 0.25, 0.5, 1, 2.5, 5, 10, and 15A range (when the crest factor is 6)
Compliant in the range indicated in the left column. To make accurate measurements, pay attention to the crest factor and range selections.
External sensor range: 0/1 V to 10 V are adequate.
0.05, 0.1, 0.2, 0.5, 1, 2, 5, 10 V(when the crest factor is 3)0.025, 0.05, 0.1, 0.25, 0.5, 1, 2.5, 5 V(when the crest factor is 6)
Excessive input is 1.2 times the range (continuous) and 10 times (1 s)
Direct input Peak value of 90 A or rms value of 33 A,
whichever is less (continuous) Peak value of 150 A or rms value of 50 A,
whichever is less (1 s)External sensor input Peak value less than or equal to 5 times the
range (continuous) Peak value less than or equal to 10 times
the range (1 s)Anti-aliasing filter 50 dB or higher 50 dB or higher for harmonic components up
to the 40th order at the fundamental frequency 50/60 Hz
Compliant
Window function shape Rectangular Rectangular CompliantWindow width 10 cycles (50 Hz)/12 cycles
(60 Hz)10 cycles (50 Hz)/12 cycles (60 Hz) Compliant
Relative deviation of the sampling frequency and fundamental frequency
Within ±0/03% Within ±0/03% Compliant
Grouping of interharmonics
Required Grouping function available Compliant
Smoothing Time constant: 1.5 s Time constant: 1.5 s CompliantWindow gap and overlap No gap and no overlap No gap and no overlap CompliantGeneral specifications The effects of temperature,
humidity, supply voltage, common-mode voltage, static electricity, and electromagnetic field must be specified.
See the items in the general specifications Compliant in the range of the general specifications
Specifications
14-3IM 761922-05E
Specifications
3
2
1
4
5
6
7
8
9
10
11
12
13
14
Index

EN6100-4-7: 2002 + A1 : 2009 (IEC61000-4-7 Editon 2.0 : 2002 + A1 : 2008)Item EN61000-4-7:2002
+A1:2009IEC6100-4-7 Editon 2.0:2002 + A1:2008
WT3000 Compliance
Current measurement error
5% of the permissible limits or 0.15% Ir of the rated current Ir, whichever is greater
Frequency of the 40th order of the fundamental frequency 60 HzWhen the crest factor is 3, 2.5% of reading+0.05% of range→ Error within 5% at the limit that is greater than or equal to 2% of the input rangeWhen the crest factor is 6,2.5% of reading+0.1% of range→ Error within 5% at the limit that is greater than or equal to 4% of the input rangeAccuracy at 2.4 kHz (direct input)
Compliant within the range n the left column for direct input
Instrumental loss of the current input circuit
Voltage drop of 0.15 Vrms or less
Instrumental loss Approx. 5.5 mΩ + approx. 0.03 µH
Complies up to approx. 27 Arms
Crest factor of the current input circuit
5 Arms range or less: 410 Arms range or less: 3.5Range above 10 Arms: 2.5Overload display is necessary.
3 or 6 With overload display Compliant
Range structure of the current input circuit and withstand overload input
Direct input range: 0.1, 0.2, 0.5, 1, 2, 5, 10, 20, 50, and 100A ranges are desirable
0.5, 1, 2, 5, 10, 20, 30 A range (when the crest factor is 3) 0.25, 0.5, 1, 2.5, 5, 10, and 15A range (when the crest factor is 6)
Compliant in the range indicated in the left column. To make accurate measurements, pay attention to the crest factor and range selections.
External sensor range: 0/1 V to 10 V are adequate.
0.05, 0.1, 0.2, 0.5, 1, 2, 5, 10 V(when the crest factor is 3)0.025, 0.05, 0.1, 0.25, 0.5, 1, 2.5, 5 V(when the crest factor is 6)
Excessive input is 1.2 times the range (continuous) and 10 times (1 s)
Direct input Peak value of 90 A or rms value of 33 A,
whichever is less (continuous) Peak value of 150 A or rms value of 50 A,
whichever is less (1 s)External sensor input Peak value less than or equal to 5 times the
range (continuous) Peak value less than or equal to 10 times
the range (1 s)Anti-aliasing filter 50 dB or higher 50 dB or higher for harmonic components up
to the 40th order at the fundamental frequency 50/60 Hz
Compliant
Window function shape Rectangular Rectangular CompliantWindow width 10 cycles (50 Hz)/12 cycles
(60 Hz)10 cycles (50 Hz)/12 cycles (60 Hz) Compliant
Relative deviation of the sampling frequency and fundamental frequency
Within ±0/03% Within ±0/03% Compliant
Grouping of interharmonics
RequiredApplies to the second and higher harmonics.
Grouping function availableApplies to the second and higher harmonics.
Compliant
Smoothing Time constant: 1.5 s Time constant: 1.5 s CompliantWindow gap and overlap No gap and no overlap No gap and no overlap CompliantGeneral specifications The effects of temperature,
humidity, supply voltage, common-mode voltage, static electricity, and electromagnetic field must be specified.
See the items in the general specifications Compliant in the range of the general specifications
Specifications
14-4 IM 761922-05E

Index-1IM 761922-04E
3
2
1
4
5
6
7
8
9
10
11
12
13
14
Index
Index
I Page
I1......................................................................................... 1-19icon ....................................................................................... 3-4IEC 61000-3-12 .................................................................... 1-9Iequ.............................................................................. 7-2, 7-10Ih/Iref ........................................................................... 1-9, 1-10information area.................................................................... 3-3information bar...................................................................... 3-3installation............................................................................. 2-7instantaneous values ............................................................ 9-9Iref ............................................................................. 1-18, 7-10
J Page
judgment ............................................................................... 8-8judgment conditions.............................................................. 7-9judgment display................................................................... 8-8
L Page
limit determination conditions ............................................... 7-2limits ............................................................................ 1-9, 9-13Lower .................................................................................. 9-20
M Page
magnification ........................................................................ 9-8margin.......................................................................... 9-8, 9-13maximum value ........................................................... 9-9, 9-14measured data, loading ........................................................ 5-1measured data, saving to CSV format................................. 11-5measurement conditions ...................................................... 7-4measurement period........................................................... 1-14measurement time ......................................................... 1-3, 7-2menu area ............................................................................ 3-3minimum short circuit ratio................................................... 9-11
N Page
new connection..................................................................... 6-1
O Page
offline mode .......................................................................... 1-7offline, switching to ............................................................... 6-7online .................................................................................... 6-3online mode .......................................................................... 1-7operation, flow chart ........................................................... 1-15Order .................................................................................. 9-20
P Page
password .............................................................................. 6-3PLL source ................................................................ 1-17, 9-23power supply Rsce .............................................................. 9-11power supply short circuit ratio ............................................ 9-11printer setup........................................................................ 10-5printing ................................................................................ 10-1print language ..................................................................... 10-4print mode........................................................................... 10-4P THD ................................................................................. 1-19PWH ................................................................................... 9-13PWHC ................................................................................. 1-18PWHD ................................................................................. 1-19
A Page
address ................................................................................. 6-3all judgments, graph of ......................................................... 9-1antialiasing filter .................................................................... 7-5applicable measurement instruments ................................... 1-1applicable standard .............................................................. 1-1A THD ................................................................................. 1-19average value .............................................................. 9-9, 9-14averaging .............................................................................. 7-5
C Page
cascading ........................................................................... 12-1Color ................................................................................... 9-20comments ........................................................................... 10-1communication address........................................................ 6-2compliance test..................................................................... 1-3connection ............................................................................ 6-1connection conditions ........................................................... 6-2connection device ................................................................. 6-2connection status.................................................................. 3-3CSV file, saving to ............................................................... 11-5CSV format .......................................................................... 11-5Current Peak (–) ................................................................. 9-23Current Peak (+) ................................................................. 9-23cursor.................................................................................. 9-23
D Page
distorted wave .................................................................... 1-17
E Page
Element .............................................................................. 9-19element judgment ................................................................ 9-11equipment, rated apparent power....................................... 1-17error messages................................................................... 13-2Ethernet control ............................................................. 2-2, 2-5evaluation colors................................................................... 9-3
F Page
file information ...................................................................... 5-3Frequency........................................................................... 9-23frequency filter, copying ........................................................ 7-5Function .............................................................................. 9-19functions, explanation of ....................................................... 1-1fundamental frequency ....................................................... 1-17fundamental wave .............................................................. 1-17
G Page
GP-IB control ................................................................. 2-1, 2-3graph ........................................................................... 9-7, 9-12
H Page
harmonic bar graph ............................................................ 9-15harmonic component .......................................................... 1-17harmonic measurement ........................................................ 8-6harmonic order ................................................................... 1-17harmonic preview .......................................................... 1-4, 8-3harmonic values, list of measured ...................................... 9-17help ..................................................................................... 12-3higher harmonic .................................................................. 1-17
Index

Index-2 IM 761922-04E
R Page
range, copying ...................................................................... 7-5rated apparent power of equipment.................................... 1-17rated line current................................................................. 7-10rated voltage ....................................................................... 7-10reference fundamental current .................................. 1-19, 7-10repeatability .......................................................................... 5-5report .................................................................................. 10-1report, printing .................................................................... 10-6Rsce, minimum .................................................................... 9-11
S Page
scale, type of ........................................................................ 9-8scaling settings, copying....................................................... 7-5Sequ ................................................................................... 1-17setting and display area........................................................ 3-3setting information, loading................................................... 5-1short circuit power ..................................................... 1-17, 9-11short circuit ratio ................................................................. 1-18slider ................................................................................... 9-23software, closing ................................................................... 4-6software license ........................................................................ vsoftware, starting .................................................................. 3-1software window ................................................................... 3-3specifications ...................................................................... 14-1specified conditions ............................................................ 1-13Ssc............................................................................. 1-17, 9-11standards, applicable............................................................ 1-9standard, selection ............................................................... 3-1standard test schedule menu ............................................... 4-2starting the software ............................................................. 3-1submenu area....................................................................... 3-3systematic impedance ................................................. 7-2, 7-10system requirements ............................................................ 1-8
T Page
test conditions....................................................................... 7-2test schedule menus............................................................. 1-1test schedule menu, selection .............................................. 4-1test, starting .......................................................................... 8-6test, stopping ........................................................................ 8-6TH ....................................................................................... 9-13THC .................................................................................... 1-18THD .................................................................................... 1-19tiling .................................................................................... 12-2title ...................................................................................... 10-1Trace .................................................................................. 9-19trend graph ......................................................................... 9-18
U Page
Upper .................................................................................. 9-20user name............................................................................. 6-3User Setting .......................................................................... 4-3user's manual ..................................................................... 12-3
V Page
version information ............................................................. 12-5Voltage Peak (–) ................................................................. 9-23Voltage Peak (+) ................................................................. 9-23V THD ................................................................................. 1-19
W Page
waveform graph .................................................................. 9-22waveform preview.......................................................... 1-4, 8-4window function .................................................................. 1-14windows, cascading............................................................ 12-1windows, tiling .................................................................... 12-2wiring pattern ........................................................................ 7-2
Y Page
Y-axis .................................................................................... 9-8
Z Page
zooming in ................................................................... 9-4, 9-21zooming out ................................................................. 9-4, 9-21
Index