hardipanel compressed decking - johns building...
TRANSCRIPT
AUSTRALIAMARCH 2006
TECHNICAL SPECIFICATION
HARDIPANEL® COMPRESSED SHEETSDECKING CONSTRUCTION
1 INTRODUCTION
HardiPanel® compressed sheets are made of durable compressed fibrecement technology and are ideal for external decking applications.
James Hardie fibre cement building products are resistant to moisture,rotting, fire and termites when installed and maintained as directed.
Decks may be constructed from HardiPanel compressed sheets fixedover a timber or steel frame. The choice of a particular method willdepend on the degree of waterproofing required and the deck finish.Methods detailed in this brochure are:
1. One system for a water resistant deck (see Section 4 Water resistant decks) and
2. Two options for "waterproof" decks:
a) Flexible sheet membrane method (see Clause 5.2)b) Liquid membrane (see Clause 5.3)
Before considering any particular method, there are a number offundamental principles that should be observed in all cases.
NOTE Permissible design live load on HardiPanel compressed sheet decking isnot to exceed 5kPa uniformly distributed or 2.1kN or 2.7kN point load atspecified joist spacings for 15mm or 18mm thick sheeting respectivelywith a load area of as little as 350mm2. These design loading can besustained even if the sheets become fully saturated by accident.
The specifier or other responsible party for a project, must ensure theinformation in these specifications is appropriate for the intendedapplication and that specific design and detailing is undertaken for areaswhich fall outside the scope of these specifications.
Make sure your information is up to dateWhen specifying or installing James Hardie products, ensure you have thecurrent manual. If you’re not sure you do, or if you need more information,visit www.jameshardie.com.au or Ask James Hardie™ on 13 11 03.
CONTENTS1 INTRODUCTION 2
2 PREPARATION 32.1 Fall 32.2 Step down 32.3 Drainage 32.4 Drip edge 32.5 Sheet joints 32.6 Tiling 32.7 Balustrade 3
3 CONSTRUCTION REQUIREMENTS 33.1 Framing 33.2 Joist set-out 33.3 Sheet layout 43.4 Fixing 43.5 Jointing 4
4 WATER RESISTANT DECKS 44.1 Framing 44.2 Construction details 4
5 WATERPROOF DECKS 55.1 System selection 55.2 Method 1: flexible sheet membrane 65.3 Method 2: liquid membrane 6
6 FINISHES 76.1 Finishes 76.2 Tile selection 76.3 Tile adhesives 76.4 Tiling 76.5 ‘Walk-on’ self surfaced liquid membrane
alternative 7
7 SAFE WORKING PRACTICES 8Warning 8Recommended safe working practices 8Working instructions 8Hole-forming 8Storage and handling 8Quality 8
8 PRODUCT INFORMATION 98.1 General 98.2 Product density 98.3 Durability 98.4 Alpine regions 9
9 COMPONENTS 10
10 DETAILS 12
11 WARRANTY 19
WE VALUE YOUR FEEDBACKTo continue with the development of our products and systems,we value your input. Please send any suggestions, including yourname, contact details, and relevant sketches to:
Ask James Hardie™
Fax 02 9638 [email protected]
DECKING CONSTRUCTION TECHNICAL SPECIFICATION MARCH 2006 3
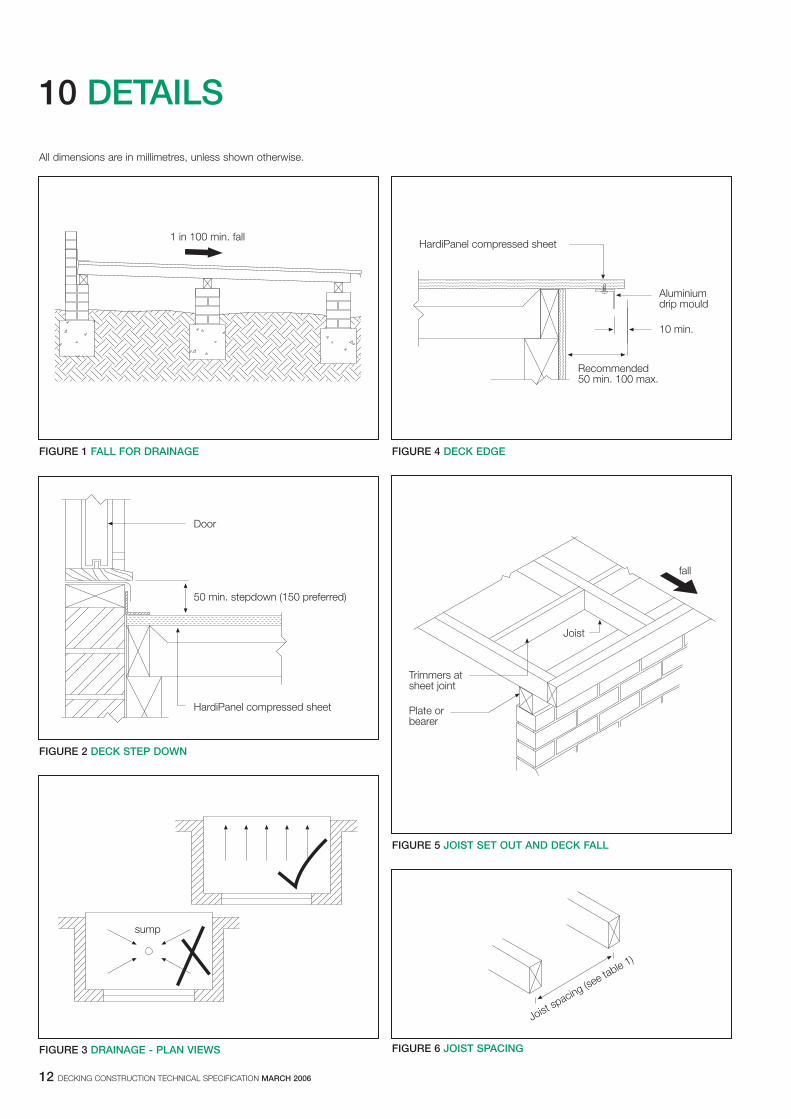
2.1 FALLDecks must have a fall to facilitate drainage.Decks must have a fall of at least 1 in 100 to avoid ponding. The fall isachieved by installing joists to the appropriate slope away from thedwelling. (See Figure 1).
2.2 STEP DOWNAllow a step down onto the deck.There must be a step down (at least 50mm but preferably 150mm) fromthe door sill level to the finished surface of the deck to adequatelyweatherproof the entry door, particularly if it is subject to rain and wind.(See Figure 2).
2.3 DRAINAGEAvoid situations where drainage of the deck surface is restricted.Allow decks to drain over the full width of the deck and over the edge.(See Figure 3). Draining to a rain water outlet located in the body of thedeck surface can cause water to build up to a depth above the perimeterflashings and must be avoided. (See Figure 3).
NOTEDo not provide fall by packing sheets, trimming tops of joists or extensivecutting of stock sized sheets into smaller sizes.
Do not use HardiPanel compressed sheets if:� the deck has to drain to a sump, or� sheeting cannot be installed with the required fall to the outlet.
2.4 DRIP EDGEProvide a drip edge.Where possible, project the HardiPanel compressed sheet beyond anysupporting walls or framing and provide a drip mould or equivalent toavoid staining of surfaces under the deck. (See Figure 4). Through acontinuous bead of James Hardie Joint Sealant, fix a 12 x 12mmaluminium angle with 6mm long No.8 cadmium plated self-tappingscrews into the underside of the HardiPanel Compressed sheet.
NOTEPilot holes must be provided for the self-tapping screws.
2.5 SHEET JOINTSDo not apply finishes directly over sheet joints, (except where tilingover a reinforced mortar bed).HardiPanel compressed sheets must be correctly jointed before finishesare applied. The joint system shown in this manual is designed to allow fordifferential movement in all the various materials used in the constructionof the deck. Refer to individual methods for installation recommendationsof finishes at movement joints.
2.6 TILINGTiles do not waterproof decks.Tiling a deck does not make it waterproof. Often the reverse occurs, withthe tiling itself preventing moisture that has penetrated the grouting or cutedges of porous tiles from thoroughly drying out, and thus maintaining adamp interface with the supporting system.
2.7 BALUSTRADINGThe balustrade upright supports must be fixed to the structural frame andnot the HardiPanel Compressed sheets.
Special consideration must also be made to any water issues that couldoccur due to the penetration of the balustrade uprights including thewaterproofing system, flashing and material durability.
2 PREPARATION 3 CONSTRUCTION REQUIREMENTS
3.1 FRAMING3.1.1 TimberJoist and trimmer width must not be less than 45mm.
It is important to use adequately seasoned timber to minimise shrinkageand associated building movement which may damage the waterproofingsystem.
Where “green” or unseasoned hardwoods are used, appropriateconstruction procedures must be adopted to compensate for theexpected high shrinkage.
Protect timber with flashing folded over framing as described in Clause 4.1 for water resistant decks.
Seek the advice of the supplier to establish if any additional measuresmay be required to protect timber in exposed conditions.
Hint: To protect against moisture ingress and rot, always prime the endgrain of timber members, together with surfaces which are permanentlyconcealed and may be in contact with other building materials.
3.1.2 Galvanised steelAlthough timber frames are illustrated throughout this publication,HardiPanel compressed sheets are equally suitable for fixing to residentialsteel frame systems to 2.5mm max BMT (base metal thickness).Specific instructions for fixing to steel frames are included whereappropriate.
Steel framing can also be used for decks.
Base metal thickness (BMT) must not exceed 2.5mm. Refer tomanufacturers for installation instructions.
NOTEFlashing is not required on steel framing or joists for waterproof decks.
3.2 JOIST SET-OUT3.2.1 DirectionJoists must run in the direction of the fall. (See Figure 5).
To achieve the best appearance, the HardiPanel compressed sheetsshould be laid in the same direction, particularly where joints are toremain permanently visible.
3.2.2 Sheet jointsSheet joints must have a minimum width of 5mm, therefore joist andtrimmer spacing must be arranged to suit. (See Figure 6).
3.2.3 Tiled decksTo limit the need to cut tiles for decks, pre-plan the joist spacing andHardiPanel compressed sheet length and width to coincide with theselected tile module.
TABLE 1For load capacity of flooring system, refer to Note in Section 1.0.
JOIST SPACING
SHEET THICKNESS (mm) MAX JOIST CENTRE (mm)
15 450
18 600
4 DECKING CONSTRUCTION TECHNICAL SPECIFICATION MARCH 2006
3.3 SHEET LAYOUTHardiPanel compressed sheets may be laid with the long edges acrossor parallel to the joists, and must be spaced with a 5mm gap betweenadjoining sheets. Sheet joints must be supported on framing. (See Figure 7).As joints will be visible in water resistant deck systems, use a set-out thatgives the best appearance.
3.4 FIXING3.4.1 TimberFor fixing to timber framing use:� No. 10 x 50mm countersunk head, Type 17, zinc clear, or;� 14 x 50mm internal hex drive, bugle rib head, Type 17, zinc alloy
coated.
3.4.2 SteelFor fixing to steel framing use No. 10 x 30mm countersunk head Tekscrews.
3.4.3 PreparationBefore drilling screw holes, place a length of masking tape in positionalong the sheet edge and drill through the tape. This will help to preventthe required sealant soiling the deck surface during the next step.
3.4.4 TreatmentScrew holes should be pre-drilled with a masonry bit and countersunk3mm deep, allowing 1mm clearance over the diameter of the screw.Thoroughly clean screw hole then fill with James Hardie joint sealant.Sealant must also be applied to the screw to ensure no water getsthrough the fixing, and to the top of the screws on completion to ensurea completely waterproof fastening.
3.4.5 Set OutSheets lying parallel to joists must be screwed at 450mm centres aroundthe edges and through the centres of each sheet.
Sheets lying across the joists must be fixed with 3 screws per joist for900mm wide sheets and 4 screws per joist for 1200mm wide sheets,equally spaced.Screws must not be closer than 12mm to a sheet edge or 50mm tocorners. (See Figure 7).
3.5 JOINTING3.5.1 GeneralAll sheets must be laid, positioned and screw-fixed before sealing thejoints. Joints must be clean, dry and free from dust to ensure satisfactoryadhesion of sealant.Masking tape as described in Clause 3.4.3 must be laid along both sidesof the joint to assist with a neat clean finish.
3.5.2 SealingJoints are sealed as follows. (See Figure 8):1. Press continuous lengths of 10mm dia. polyethylene backing rod into
the gaps between adjoining sheets, to finish approximately 6mmbelow the upper surface of the sheets.
2. Apply James Hardie joint sealant into the space immediately abovethe backing rod. Follow the recommendations outlined on the sealantcartridge for correct application.
3. The level of the sealant must finish slightly below the level of thesheet surface to avoid abrasion and scuffing. As the sealant quicklyforms a tack free surface, it is essential that the joints be smoothedwithin 10 minutes of application.
4. Remove masking tape immediately after applying sealant.
NOTE: Avoid excessive foot traffic on the deck for at least 24 hours toallow sealant to set and dry out. Adverse weather conditions mayincrease this period to 48-72 hours.
4 WATER RESISTANTDECKS
4.1 FRAMINGEven if you do not require a waterproof deck, it is recommended that thedeck be made as water resistant as possible (ie that water penetration beminimised) as it can lead to damage such as dry rot where timberframing is used.
To reduce the potential for dry rot in timber framework, one or more ofthe following methods is recommended:
a) Use treated timber framingb) Flood the tops of the joist with a timber preservative available from
most paint suppliers.c) Take strips of flashing and fold over timber joists and trimmers as
shown. (See Figures 7 and 8). These strips should be cut 50mmwider than the timber joists.
d) Use corrosion resistant steel framing. Unlike timber framing,galvanised steel framing requires no additional treatment orprotection.
NOTEIf a water resistant deck is not intended to be tiled, it MUST have adurable coating applied. Refer to paint manufacturer for a suitable,durable coating and maintenance requirements. HardiPanel compressedsheets cannot be left RAW.
4.2 CONSTRUCTION DETAILS4.2.1 GeneralFor general construction detail refer to Section 10.
4.2.2 Wall FlashingsA continuous strip of James Hardie 45 x 45mm PVC cellular cornermould is used as the primary flashing at the deck and wall junction. (See Figures 9 and 10).
To allow for relative movements between the deck and wall, the angle isbonded to the deck only with two continuous beads of James Hardiejoint sealant.
The angle must then be over-flashed with a suitable flashing from the wall.
The over-flashing must be tucked up behind the wall cladding or chasedinto the brickwork in the conventional manner. (See Figures 9 and 10).
4.2.3 Finishes - tiles, brick stenciling, etc.The expressed joints between all adjacent sheets act as movement joints.If you are covering HardiPanel compressed sheets with tiles, stencilfinishes, trafficable liquid membrane or similar, these movement jointsmust be carried up through the finish and expressed. (See Figure 11).
DECKING CONSTRUCTION TECHNICAL SPECIFICATION MARCH 2006 5
5 WATERPROOF DECKS
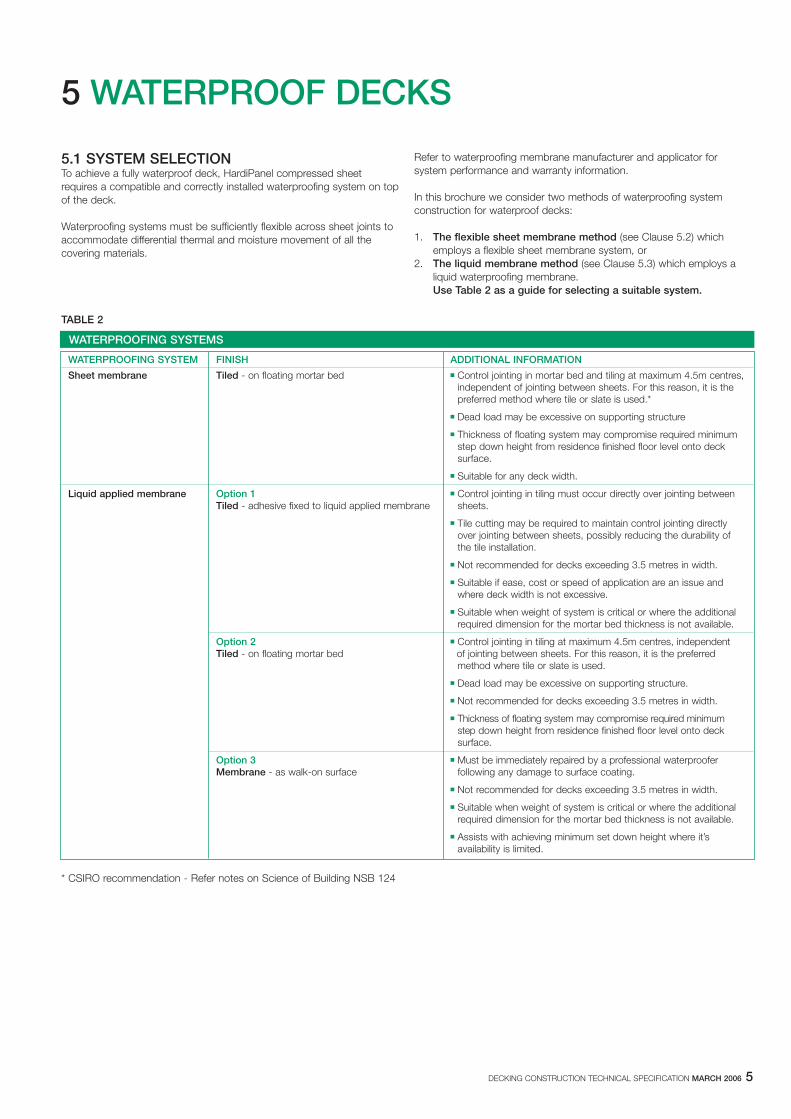
5.1 SYSTEM SELECTIONTo achieve a fully waterproof deck, HardiPanel compressed sheetrequires a compatible and correctly installed waterproofing system on topof the deck.
Waterproofing systems must be sufficiently flexible across sheet joints toaccommodate differential thermal and moisture movement of all thecovering materials.
TABLE 2
* CSIRO recommendation - Refer notes on Science of Building NSB 124
Refer to waterproofing membrane manufacturer and applicator forsystem performance and warranty information.
In this brochure we consider two methods of waterproofing systemconstruction for waterproof decks:
1. The flexible sheet membrane method (see Clause 5.2) whichemploys a flexible sheet membrane system, or
2. The liquid membrane method (see Clause 5.3) which employs aliquid waterproofing membrane.Use Table 2 as a guide for selecting a suitable system.
WATERPROOFING SYSTEMS
WATERPROOFING SYSTEM FINISH ADDITIONAL INFORMATION
Sheet membrane Tiled - on floating mortar bed � Control jointing in mortar bed and tiling at maximum 4.5m centres,independent of jointing between sheets. For this reason, it is the preferred method where tile or slate is used.*
� Dead load may be excessive on supporting structure
� Thickness of floating system may compromise required minimum step down height from residence finished floor level onto deck surface.
� Suitable for any deck width.
Liquid applied membrane Option 1 � Control jointing in tiling must occur directly over jointing betweenTiled - adhesive fixed to liquid applied membrane sheets.
� Tile cutting may be required to maintain control jointing directlyover jointing between sheets, possibly reducing the durability ofthe tile installation.
� Not recommended for decks exceeding 3.5 metres in width.
� Suitable if ease, cost or speed of application are an issue and where deck width is not excessive.
� Suitable when weight of system is critical or where the additional required dimension for the mortar bed thickness is not available.
Option 2 � Control jointing in tiling at maximum 4.5m centres, independent Tiled - on floating mortar bed of jointing between sheets. For this reason, it is the preferred
method where tile or slate is used.
� Dead load may be excessive on supporting structure.
� Not recommended for decks exceeding 3.5 metres in width.
� Thickness of floating system may compromise required minimum step down height from residence finished floor level onto deck surface.
Option 3 � Must be immediately repaired by a professional waterproofer Membrane - as walk-on surface following any damage to surface coating.
� Not recommended for decks exceeding 3.5 metres in width.
� Suitable when weight of system is critical or where the additional required dimension for the mortar bed thickness is not available.
� Assists with achieving minimum set down height where it’s availability is limited.
6 DECKING CONSTRUCTION TECHNICAL SPECIFICATION MARCH 2006
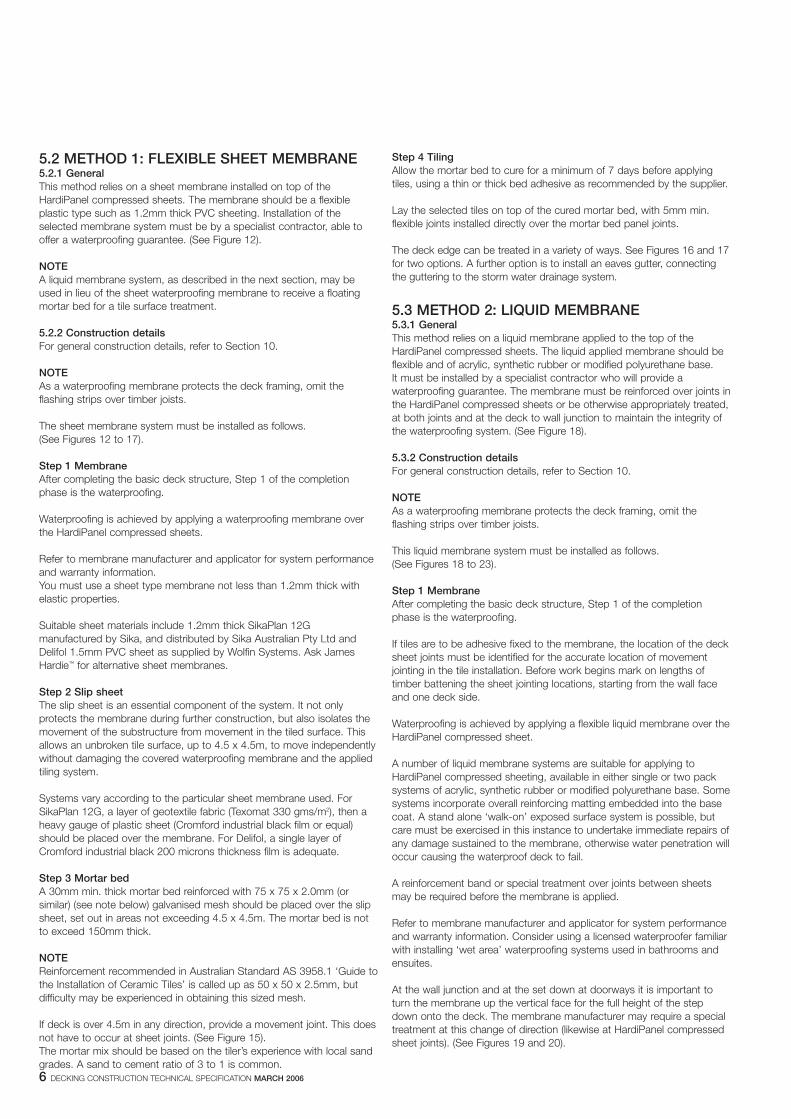
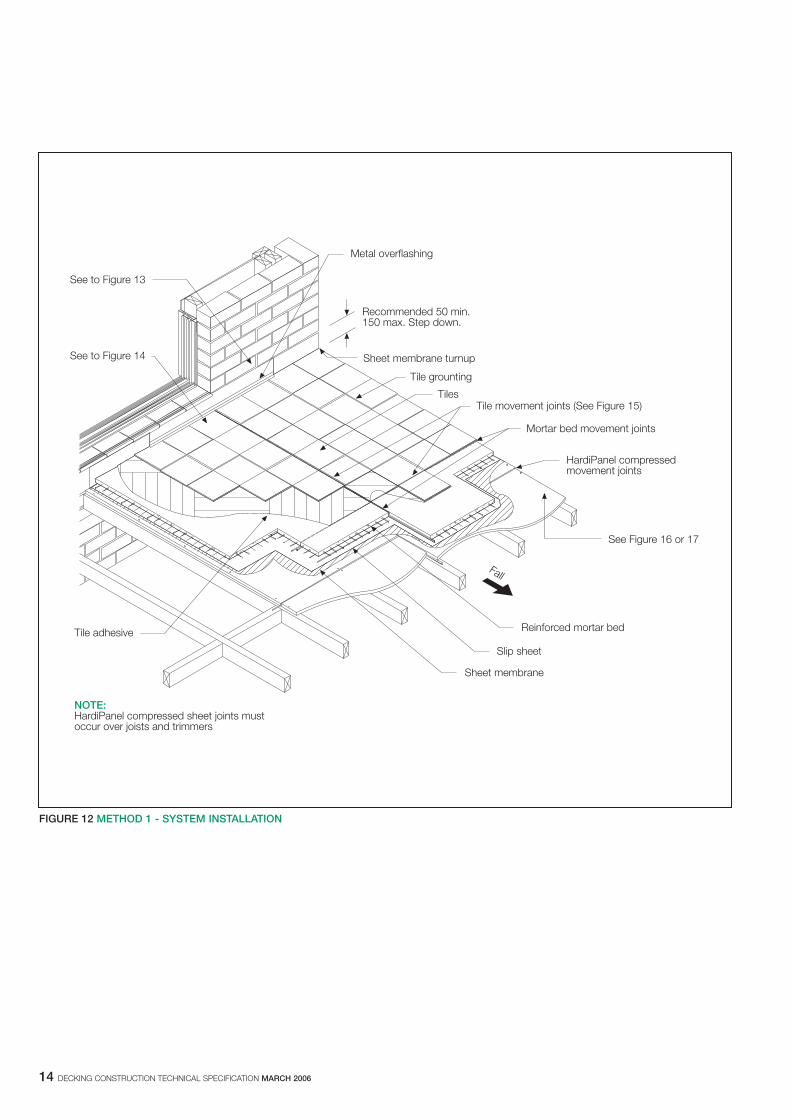
5.2 METHOD 1: FLEXIBLE SHEET MEMBRANE5.2.1 GeneralThis method relies on a sheet membrane installed on top of theHardiPanel compressed sheets. The membrane should be a flexibleplastic type such as 1.2mm thick PVC sheeting. Installation of theselected membrane system must be by a specialist contractor, able tooffer a waterproofing guarantee. (See Figure 12).
NOTE A liquid membrane system, as described in the next section, may beused in lieu of the sheet waterproofing membrane to receive a floatingmortar bed for a tile surface treatment.
5.2.2 Construction detailsFor general construction details, refer to Section 10.
NOTE As a waterproofing membrane protects the deck framing, omit theflashing strips over timber joists.
The sheet membrane system must be installed as follows. (See Figures 12 to 17).
Step 1 MembraneAfter completing the basic deck structure, Step 1 of the completionphase is the waterproofing.
Waterproofing is achieved by applying a waterproofing membrane overthe HardiPanel compressed sheets.
Refer to membrane manufacturer and applicator for system performanceand warranty information.You must use a sheet type membrane not less than 1.2mm thick withelastic properties.
Suitable sheet materials include 1.2mm thick SikaPlan 12Gmanufactured by Sika, and distributed by Sika Australian Pty Ltd andDelifol 1.5mm PVC sheet as supplied by Wolfin Systems. Ask JamesHardie™ for alternative sheet membranes.
Step 2 Slip sheetThe slip sheet is an essential component of the system. It not onlyprotects the membrane during further construction, but also isolates themovement of the substructure from movement in the tiled surface. Thisallows an unbroken tile surface, up to 4.5 x 4.5m, to move independentlywithout damaging the covered waterproofing membrane and the appliedtiling system.
Systems vary according to the particular sheet membrane used. ForSikaPlan 12G, a layer of geotextile fabric (Texomat 330 gms/m2), then aheavy gauge of plastic sheet (Cromford industrial black film or equal)should be placed over the membrane. For Delifol, a single layer ofCromford industrial black 200 microns thickness film is adequate.
Step 3 Mortar bedA 30mm min. thick mortar bed reinforced with 75 x 75 x 2.0mm (orsimilar) (see note below) galvanised mesh should be placed over the slipsheet, set out in areas not exceeding 4.5 x 4.5m. The mortar bed is notto exceed 150mm thick.
NOTEReinforcement recommended in Australian Standard AS 3958.1 ‘Guide tothe Installation of Ceramic Tiles’ is called up as 50 x 50 x 2.5mm, butdifficulty may be experienced in obtaining this sized mesh.
If deck is over 4.5m in any direction, provide a movement joint. This doesnot have to occur at sheet joints. (See Figure 15).The mortar mix should be based on the tiler’s experience with local sandgrades. A sand to cement ratio of 3 to 1 is common.
Step 4 TilingAllow the mortar bed to cure for a minimum of 7 days before applyingtiles, using a thin or thick bed adhesive as recommended by the supplier.
Lay the selected tiles on top of the cured mortar bed, with 5mm min.flexible joints installed directly over the mortar bed panel joints.
The deck edge can be treated in a variety of ways. See Figures 16 and 17for two options. A further option is to install an eaves gutter, connectingthe guttering to the storm water drainage system.
5.3 METHOD 2: LIQUID MEMBRANE5.3.1 GeneralThis method relies on a liquid membrane applied to the top of theHardiPanel compressed sheets. The liquid applied membrane should beflexible and of acrylic, synthetic rubber or modified polyurethane base. It must be installed by a specialist contractor who will provide awaterproofing guarantee. The membrane must be reinforced over joints inthe HardiPanel compressed sheets or be otherwise appropriately treated,at both joints and at the deck to wall junction to maintain the integrity ofthe waterproofing system. (See Figure 18).
5.3.2 Construction detailsFor general construction details, refer to Section 10.
NOTE As a waterproofing membrane protects the deck framing, omit theflashing strips over timber joists.
This liquid membrane system must be installed as follows.(See Figures 18 to 23).
Step 1 MembraneAfter completing the basic deck structure, Step 1 of the completionphase is the waterproofing.
If tiles are to be adhesive fixed to the membrane, the location of the decksheet joints must be identified for the accurate location of movementjointing in the tile installation. Before work begins mark on lengths oftimber battening the sheet jointing locations, starting from the wall faceand one deck side.
Waterproofing is achieved by applying a flexible liquid membrane over theHardiPanel compressed sheet.
A number of liquid membrane systems are suitable for applying toHardiPanel compressed sheeting, available in either single or two packsystems of acrylic, synthetic rubber or modified polyurethane base. Somesystems incorporate overall reinforcing matting embedded into the basecoat. A stand alone ‘walk-on’ exposed surface system is possible, butcare must be exercised in this instance to undertake immediate repairs ofany damage sustained to the membrane, otherwise water penetration willoccur causing the waterproof deck to fail.
A reinforcement band or special treatment over joints between sheetsmay be required before the membrane is applied.
Refer to membrane manufacturer and applicator for system performanceand warranty information. Consider using a licensed waterproofer familiarwith installing ‘wet area’ waterproofing systems used in bathrooms andensuites.
At the wall junction and at the set down at doorways it is important toturn the membrane up the vertical face for the full height of the stepdown onto the deck. The membrane manufacturer may require a specialtreatment at this change of direction (likewise at HardiPanel compressedsheet joints). (See Figures 19 and 20).
DECKING CONSTRUCTION TECHNICAL SPECIFICATION MARCH 2006 7
Step 2 Adhesive fixed tilingThe completion phase is the tiling.
The liquid applied membrane must be fully cured before the tiles areapplied. Premature laying of the tiles may result in the softening orsubsequent re-emulsification of the membrane.
Always check required curing times with the supplier prior to application.This is important to ensure you do not use a system with a slow curetime if you plan a quick follow-on tile installation.
Use a thin or thick bed tile adhesive recommended by the adhesivemanufacturer as being suitable for the selected tile, as well as beingcompatible with the liquid applied membrane on the decking. A crosscheck with the membrane manufacturer is recommended.
A 5mm wide control joint is required in the thickness of the tiling over allHardiPanel compressed sheet joints. Use the marked battens describedin Step 1 to locate the control joints over the membraned deck joints.Seal the tile control joint with a sealant recommended by the tile supplier,applied over a suitable bond breaker such as a tape or backing rodwhere the tile is very thick. (See Figure 21).
All other joints in the tiling can be filled with grouting recommended bythe tile supplier for external decking and the selected tiles, preferably aflexible variety.
NOTES If you want a floating mortar bed and applied floor tiling over the liquidmembrane, follow Method 1 substituting the flexible sheet membrane forthe liquid membrane.
In this case the slip sheet and the floating mortar bed must not beinstalled over the liquid membrane until the membrane is fully cured,otherwise softening and subsequent failure of the membrane will occur.
6.1 FINISHES6.1.1 GeneralThe following brief notes do not cover all aspects of tiling. Further adviceshould be sought from specialists in that area. The following publicationsare also recommended:� CSIRO Notes of Science of Building NSB124. � Australian Standard AS 3958.1 ‘Part 1 Guide to the Installation of
Ceramic Tiles’. � Australian Standard AS 2358 ‘Adhesives - For Fixing Ceramic Tiles’.
6.2 TILE SELECTIONCare should be taken to ensure tiles are suitable for outdoor use subjectto foot traffic, preferably with anti-slip surfaces.
NOTEAvoid porous tiles with high water absorption, particularly if tiles are to becut to size at control joints or at perimeter of deck.
6.3 TILE ADHESIVESTiles should be applied with proprietary adhesives that conform toAustralian Standard AS 2358. Use a tile adhesive recommended forexposed exterior applications. The selection of either a thin bed or thickbed type will depend on the tile size, thickness variation and whether tileshave lugs on the back. Care must be taken to ensure that the adhesivethickness will allow full bedding of the tile over the entire surface. Where aliquid membrane has been used, the adhesive must be compatible.
Sand-cement mortars without polymer modification must not be used.PVA based adhesion promoters must not be used as these materialstend to re-emulsify when wet.
6.4 TILINGRefer to individual methods for installation recommendations of finishes atmovement joints.A grout width of 2mm min. should be allowed for tiles up to 100mm x100mm and proportionally wider for larger tiles. A wider grout width mayalso be desired to accommodate irregularities in tiles. Use a groutrecommended for external deck applications.
6.5 ‘WALK-ON’ SELF SURFACED LIQUID MEMBRANE ALTERNATIVE
Where a liquid membrane system incorporating an in-built surfacecoating has been selected as the required option, ensure thatmanufacturer’s instructions are followed.
NOTE: Any damage to the surface coating must be repaired immediatelyto ensure that the system maintains its integrity.
6 FINISHES

8 DECKING CONSTRUCTION TECHNICAL SPECIFICATION MARCH 2006
7 SAFE WORKING PRACTICES
WORKING INSTRUCTIONSRefer to recommended safe working practices before starting any cuttingor machining of product.
HardiBlade® saw bladeThe HardiBlade® saw blade used with a dust-reducing saw and HEPAvacuum extraction allows for fast, clean cutting of James Hardie fibrecement products. A dust-reducing saw uses a dust deflector or a dustcollector which can be connected to a vacuum system. When sawing,clamp a straight-edge to the sheet as a guide and run the saw base platealong the straight edge when making the cut.
HOLE-FORMINGFor smooth clean cut circular holes:� Mark the centre of the hole on the sheet.� Pre-drill a pilot hole.� Using the pilot hole as a guide, cut the hole to the appropriate diameter
with a hole saw fitted to a heavy duty electric drill.
For irregular holes:� Small rectangular or circular holes can be cut by drilling a series of small
holes around the perimeter of the hole then tapping out the waste piecefrom the sheet face.
� Tap carefully to avoid damage to sheets, ensuring the sheet edges areproperly supported.
STORAGE AND HANDLINGTo avoid damage, all James Hardie building products should be storedwith edges and corners of the sheets protected from chipping.
James Hardie building products must be installed in a dry state andprotected from rain during transport and storage. The product must belaid flat under cover on a smooth level surface clear of the ground toavoid exposure to water, moisture, etc.
QUALITYJames Hardie conducts stringent quality checks to ensure any productmanufactured falls within our quality spectrum. It is the responsibility ofthe builder to ensure the product meets aesthetic requirements beforeinstallation. James Hardie will not be responsible for rectifying obviousaesthetic surface variations following installation.
WARNING - DO NOT BREATHE DUST AND CUTONLY IN WELL VENTILATED AREAJames Hardie products contain sand, a source of respirable crystallinesilica which is considered by some international authorities to be a causeof cancer from some occupational sources. Breathing excessive amountsof respirable silica dust can also cause a disabling and potentially fatallung disease called silicosis, and has been linked with other diseases.Some studies suggest smoking may increase these risks. Duringinstallation or handling: (1) work in outdoor areas with ample ventilation; (2) minimise dust when cutting by using either 'score and snap' knife, fibrecement shears or, where not feasible, use a HardiBlade® saw blade anddust-reducing circular saw attached to a HEPA vacuum; (3) warn others inthe immediate area to avoid breathing dust; (4) wear a properly-fitted,approved dust mask or respirator (e.g. P1 or P2) in accordance withapplicable government regulations and manufacturer instructions to furtherlimit respirable silica exposures. During clean-up, use HEPA vacuums orwet cleanup methods - never dry sweep. For further information, refer toour installation instructions and Material Safety Data Sheets available atwww.jameshardie.com.au. FAILURE TO ADHERE TO OUR WARNINGS,MATERIAL SAFETY DATA SHEETS, AND INSTALLATION INSTRUCTIONSMAY LEAD TO SERIOUS PERSONAL INJURY OR DEATH.
JAMES HARDIE RECOMMENDED SAFE WORKING PRACTICES
CUTTING OUTDOORS1. Position cutting station so wind will blow dust away from the user or
others in working area.2. Use a dust reducing circular saw equipped with HardiBlade® saw blade
and HEPA vacuum extraction.
DRILLING/OTHER MACHININGWhen drilling or machining you should always wear a P1 or P2 dust maskand warn others in the immediate area.
IMPORTANT NOTES1. NEVER use a power saw indoors.2. NEVER use a circular saw blade that does not carry the HardiBlade® logo.3. NEVER dry sweep - Use wet suppression or HEPA vacuum.4. NEVER use grinders.5. ALWAYS follow tool manufacturers’ safety recommendations.
P1 or P2 respirators should be used in conjunction with above cuttingpractices to further reduce dust exposures. Additional exposure informationis available at www.jameshardie.com.au to help you determine the mostappropriate cutting method for your job requirements. If concern still existsabout exposure levels or you do not comply with the above practices, youshould always consult a qualified industrial hygienist or contact James Hardie for further information.
DECKING CONSTRUCTION TECHNICAL SPECIFICATION MARCH 2006 9
8 PRODUCT INFORMATION
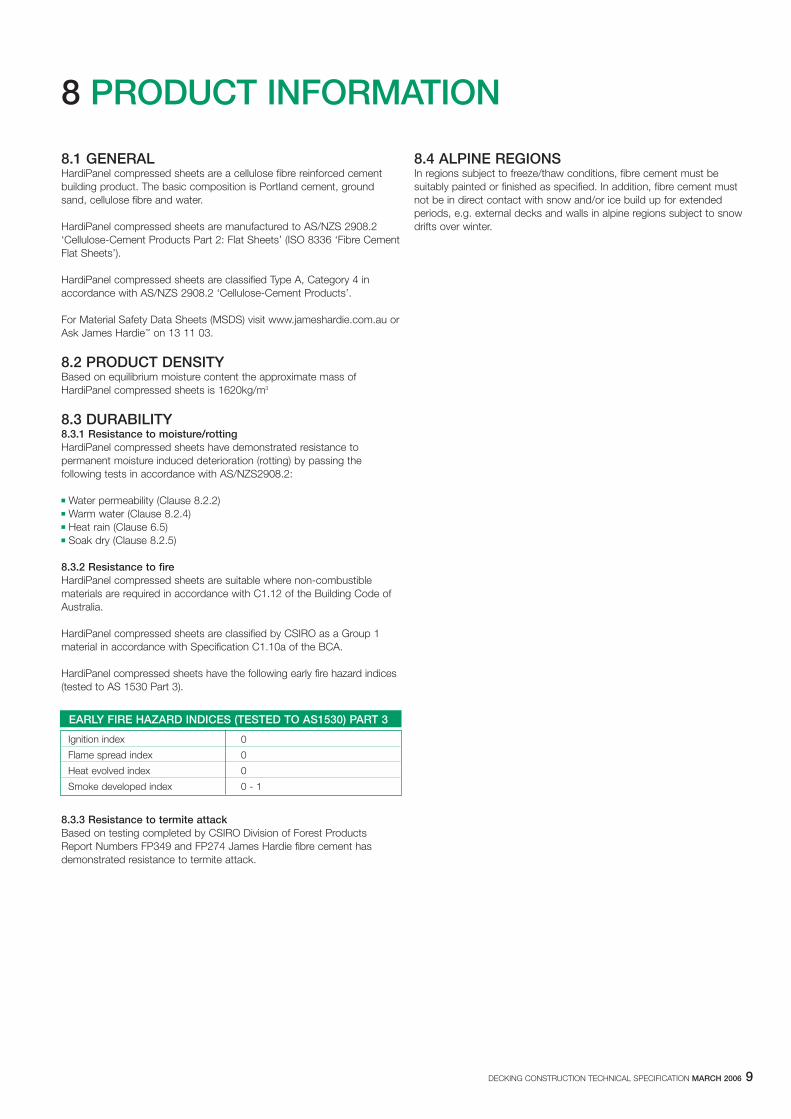
8.1 GENERALHardiPanel compressed sheets are a cellulose fibre reinforced cementbuilding product. The basic composition is Portland cement, groundsand, cellulose fibre and water.
HardiPanel compressed sheets are manufactured to AS/NZS 2908.2‘Cellulose-Cement Products Part 2: Flat Sheets’ (ISO 8336 ‘Fibre CementFlat Sheets’).
HardiPanel compressed sheets are classified Type A, Category 4 inaccordance with AS/NZS 2908.2 ‘Cellulose-Cement Products’.
For Material Safety Data Sheets (MSDS) visit www.jameshardie.com.au orAsk James Hardie™ on 13 11 03.
8.2 PRODUCT DENSITYBased on equilibrium moisture content the approximate mass of HardiPanel compressed sheets is 1620kg/m3
8.3 DURABILITY8.3.1 Resistance to moisture/rottingHardiPanel compressed sheets have demonstrated resistance topermanent moisture induced deterioration (rotting) by passing thefollowing tests in accordance with AS/NZS2908.2:
� Water permeability (Clause 8.2.2)� Warm water (Clause 8.2.4)� Heat rain (Clause 6.5)� Soak dry (Clause 8.2.5)
8.3.2 Resistance to fireHardiPanel compressed sheets are suitable where non-combustiblematerials are required in accordance with C1.12 of the Building Code ofAustralia.
HardiPanel compressed sheets are classified by CSIRO as a Group 1material in accordance with Specification C1.10a of the BCA.
HardiPanel compressed sheets have the following early fire hazard indices(tested to AS 1530 Part 3).
8.3.3 Resistance to termite attackBased on testing completed by CSIRO Division of Forest ProductsReport Numbers FP349 and FP274 James Hardie fibre cement hasdemonstrated resistance to termite attack.
EARLY FIRE HAZARD INDICES (TESTED TO AS1530) PART 3
Ignition index 0
Flame spread index 0
Heat evolved index 0
Smoke developed index 0 - 1
8.4 ALPINE REGIONSIn regions subject to freeze/thaw conditions, fibre cement must besuitably painted or finished as specified. In addition, fibre cement mustnot be in direct contact with snow and/or ice build up for extendedperiods, e.g. external decks and walls in alpine regions subject to snowdrifts over winter.
* Not available in WA
10 DECKING CONSTRUCTION TECHNICAL SPECIFICATION MARCH 2006
9 COMPONENTS
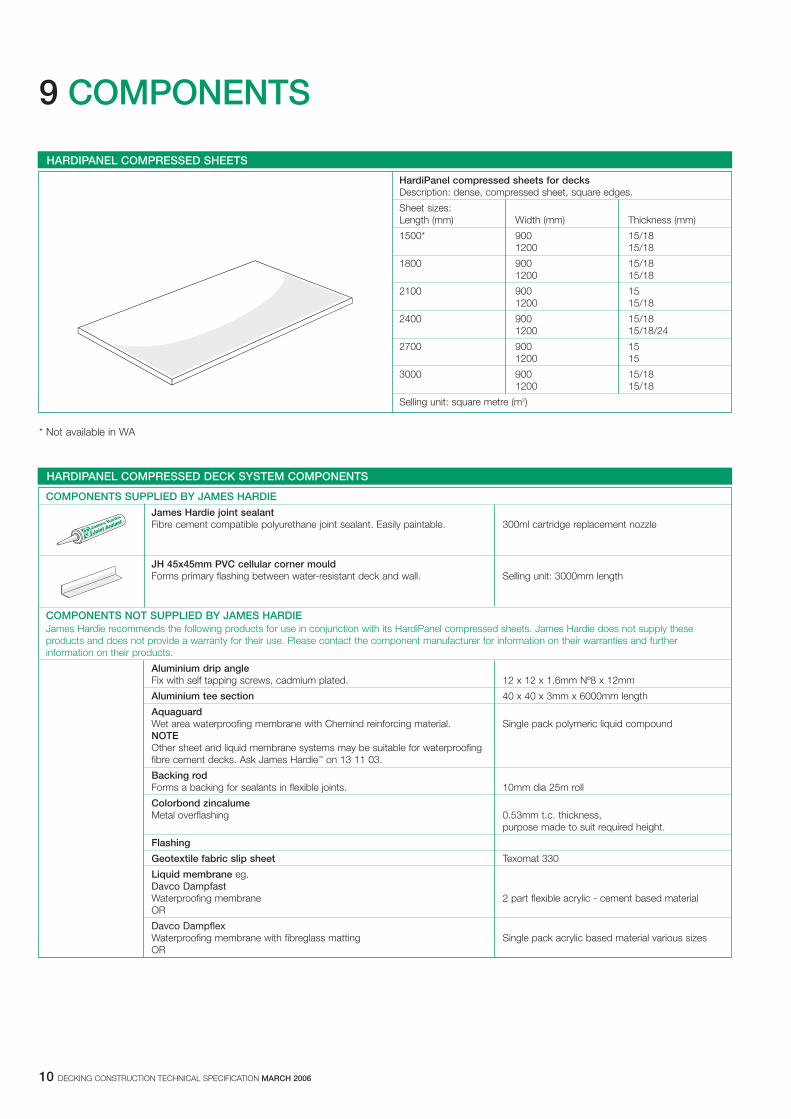
HARDIPANEL COMPRESSED SHEETS
HardiPanel compressed sheets for decksDescription: dense, compressed sheet, square edges.
Sheet sizes:Length (mm) Width (mm) Thickness (mm)
1500* 900 15/181200 15/18
1800 900 15/181200 15/18
2100 900 151200 15/18
2400 900 15/181200 15/18/24
2700 900 151200 15
3000 900 15/181200 15/18
Selling unit: square metre (m2)
HARDIPANEL COMPRESSED DECK SYSTEM COMPONENTS
COMPONENTS SUPPLIED BY JAMES HARDIE
James Hardie joint sealantFibre cement compatible polyurethane joint sealant. Easily paintable. 300ml cartridge replacement nozzle
JH 45x45mm PVC cellular corner mouldForms primary flashing between water-resistant deck and wall. Selling unit: 3000mm length
COMPONENTS NOT SUPPLIED BY JAMES HARDIEJames Hardie recommends the following products for use in conjunction with its HardiPanel compressed sheets. James Hardie does not supply theseproducts and does not provide a warranty for their use. Please contact the component manufacturer for information on their warranties and further information on their products.
Aluminium drip angleFix with self tapping screws, cadmium plated. 12 x 12 x 1.6mm Nº8 x 12mm
Aluminium tee section 40 x 40 x 3mm x 6000mm length
AquaguardWet area waterproofing membrane with Chemind reinforcing material. Single pack polymeric liquid compoundNOTEOther sheet and liquid membrane systems may be suitable for waterproofing fibre cement decks. Ask James Hardie™ on 13 11 03.
Backing rodForms a backing for sealants in flexible joints. 10mm dia 25m roll
Colorbond zincalumeMetal overflashing 0.53mm t.c. thickness,
purpose made to suit required height.
Flashing
Geotextile fabric slip sheet Texomat 330
Liquid membrane eg.Davco DampfastWaterproofing membrane 2 part flexible acrylic - cement based materialOR
Davco DampflexWaterproofing membrane with fibreglass matting Single pack acrylic based material various sizesOR
DECKING CONSTRUCTION TECHNICAL SPECIFICATION MARCH 2006 11
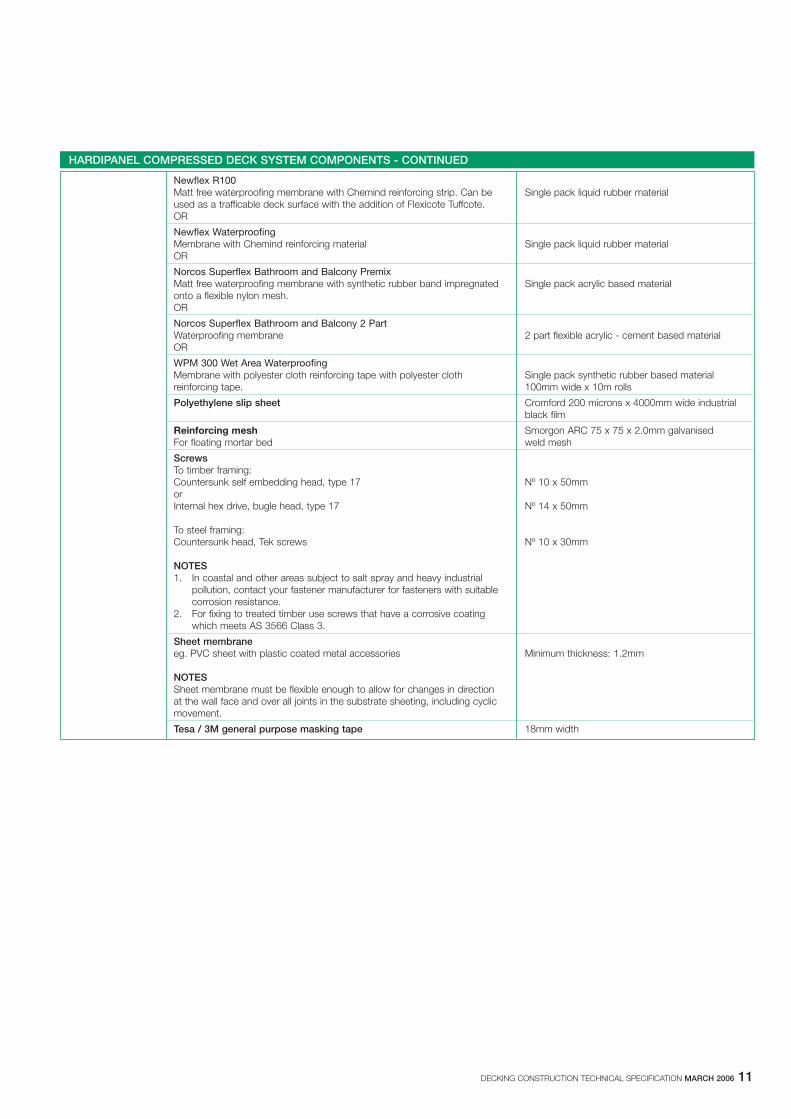
HARDIPANEL COMPRESSED DECK SYSTEM COMPONENTS - CONTINUED
Newflex R100Matt free waterproofing membrane with Chemind reinforcing strip. Can be Single pack liquid rubber materialused as a trafficable deck surface with the addition of Flexicote Tuffcote.OR
Newflex WaterproofingMembrane with Chemind reinforcing material Single pack liquid rubber materialOR
Norcos Superflex Bathroom and Balcony PremixMatt free waterproofing membrane with synthetic rubber band impregnated Single pack acrylic based materialonto a flexible nylon mesh.OR
Norcos Superflex Bathroom and Balcony 2 PartWaterproofing membrane 2 part flexible acrylic - cement based materialOR
WPM 300 Wet Area WaterproofingMembrane with polyester cloth reinforcing tape with polyester cloth Single pack synthetic rubber based materialreinforcing tape. 100mm wide x 10m rolls
Polyethylene slip sheet Cromford 200 microns x 4000mm wide industrial black film
Reinforcing mesh Smorgon ARC 75 x 75 x 2.0mm galvanisedFor floating mortar bed weld mesh
ScrewsTo timber framing:Countersunk self embedding head, type 17 Nº 10 x 50mmorInternal hex drive, bugle head, type 17 Nº 14 x 50mm
To steel framing:Countersunk head, Tek screws Nº 10 x 30mm
NOTES1. In coastal and other areas subject to salt spray and heavy industrial
pollution, contact your fastener manufacturer for fasteners with suitablecorrosion resistance.
2. For fixing to treated timber use screws that have a corrosive coatingwhich meets AS 3566 Class 3.
Sheet membraneeg. PVC sheet with plastic coated metal accessories Minimum thickness: 1.2mm
NOTESSheet membrane must be flexible enough to allow for changes in directionat the wall face and over all joints in the substrate sheeting, including cyclicmovement.
Tesa / 3M general purpose masking tape 18mm width
All dimensions are in millimetres, unless shown otherwise.
12 DECKING CONSTRUCTION TECHNICAL SPECIFICATION MARCH 2006
1 in 100 min. fall
FIGURE 1 FALL FOR DRAINAGE
Door
50 min. stepdown (150 preferred)
HardiPanel compressed sheet
FIGURE 2 DECK STEP DOWN
sump
FIGURE 3 DRAINAGE - PLAN VIEWS
HardiPanel compressed sheet
Recommended50 min. 100 max.
Aluminiumdrip mould
10 min.
FIGURE 4 DECK EDGE
fall
Joist
Trimmers atsheet joint
Plate orbearer
FIGURE 5 JOIST SET OUT AND DECK FALL
FIGURE 6 JOIST SPACING
Joist spacing (se
e table 1)
10 DETAILS

DECKING CONSTRUCTION TECHNICAL SPECIFICATION MARCH 2006 13
FIGURE 7 DECK FIXING
fall5 min.
James Hardiejoint sealant
Screw fixing at
450 max. centres 12 min.from edges
Backing rod
NOTE:Sheet joints mustoccur over joistsand trimmers
Joist width noless than 45
Flashing
50 min.from corners
Backingrod
12min.Maskingtape
Flashing (onlyfor timberframing towater resistantdecks)
HardiPanelcompressedsheet
James Hardiejoint sealant
12min.
FIGURE 8 DECK JOINTING
FIGURE 9 WATER RESISTANT DECK - WALL FLASHING,LIGHTWEIGHT CLADDING DETAIL
Flashing folded over joist
Frame
50 min. from F.F.L. tofinished deck surface
Wall cladding
Lead or flashing
45 x 45mm PVC angle
Two continuous beads of sealant
HardiPanel compressedsheet
DPC
Lead or flashing chased into mortarjoint under DPC
45 X 45mm PVC angle
Two continuous beads of sealant
HardiPanel compressed sheet
Flashing foldedover joist
Brick wall
FIGURE 10 WATER RESISTANT DECK - WALL FLASHING MASONRY DETAIL
Joint
INCORRECT CORRECT
FIGURE 11 WATER RESISTANT DECK - MOVEMENT JOINTS DETAIL
14 DECKING CONSTRUCTION TECHNICAL SPECIFICATION MARCH 2006
Metal overflashing
Recommended 50 min.150 max. Step down.
Sheet membrane turnup
Tile grounting
TilesTile movement joints (See Figure 15)
Mortar bed movement joints
HardiPanel compressedmovement joints
See Figure 16 or 17
Fall
Reinforced mortar bed
Slip sheet
Sheet membrane
NOTE:HardiPanel compressed sheet joints mustoccur over joists and trimmers
Tile adhesive
See to Figure 13
See to Figure 14
FIGURE 12 METHOD 1 - SYSTEM INSTALLATION
DECKING CONSTRUCTION TECHNICAL SPECIFICATION MARCH 2006 15
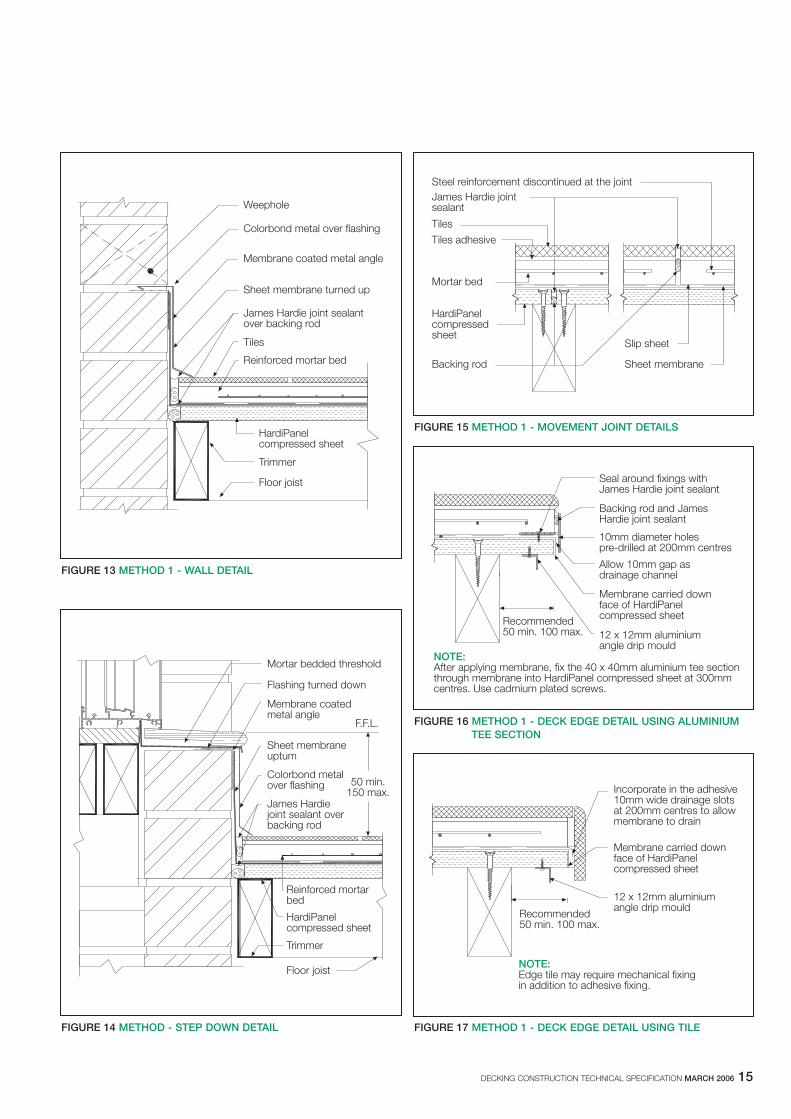
Weephole
Colorbond metal over flashing
Membrane coated metal angle
Sheet membrane turned up
James Hardie joint sealantover backing rod
Tiles
Reinforced mortar bed
HardiPanelcompressed sheet
Trimmer
Floor joist
FIGURE 13 METHOD 1 - WALL DETAIL
Mortar bedded threshold
Flashing turned down
Membrane coatedmetal angle
F.F.L.
Sheet membraneuptum
Colorbond metalover flashing
James Hardiejoint sealant overbacking rod
50 min.150 max.
Reinforced mortarbed
Floor joist
HardiPanelcompressed sheet
Trimmer
FIGURE 14 METHOD - STEP DOWN DETAIL
Steel reinforcement discontinued at the jointJames Hardie jointsealant
Tiles
Tiles adhesive
Mortar bed
HardiPanelcompressedsheet
Backing rod Sheet membrane
Slip sheet
FIGURE 15 METHOD 1 - MOVEMENT JOINT DETAILS
Seal around fixings withJames Hardie joint sealant
Backing rod and JamesHardie joint sealant
10mm diameter holespre-drilled at 200mm centres
NOTE:After applying membrane, fix the 40 x 40mm aluminium tee sectionthrough membrane into HardiPanel compressed sheet at 300mmcentres. Use cadmium plated screws.
Recommended50 min. 100 max. 12 x 12mm aluminium
angle drip mould
Membrane carried downface of HardiPanelcompressed sheet
Allow 10mm gap asdrainage channel
FIGURE 16 METHOD 1 - DECK EDGE DETAIL USING ALUMINIUM TEE SECTION
Incorporate in the adhesive10mm wide drainage slotsat 200mm centres to allowmembrane to drain
Membrane carried downface of HardiPanelcompressed sheet
12 x 12mm aluminiumangle drip mould
Recommended50 min. 100 max.
NOTE:Edge tile may require mechanical fixingin addition to adhesive fixing.
FIGURE 17 METHOD 1 - DECK EDGE DETAIL USING TILE
16 DECKING CONSTRUCTION TECHNICAL SPECIFICATION MARCH 2006
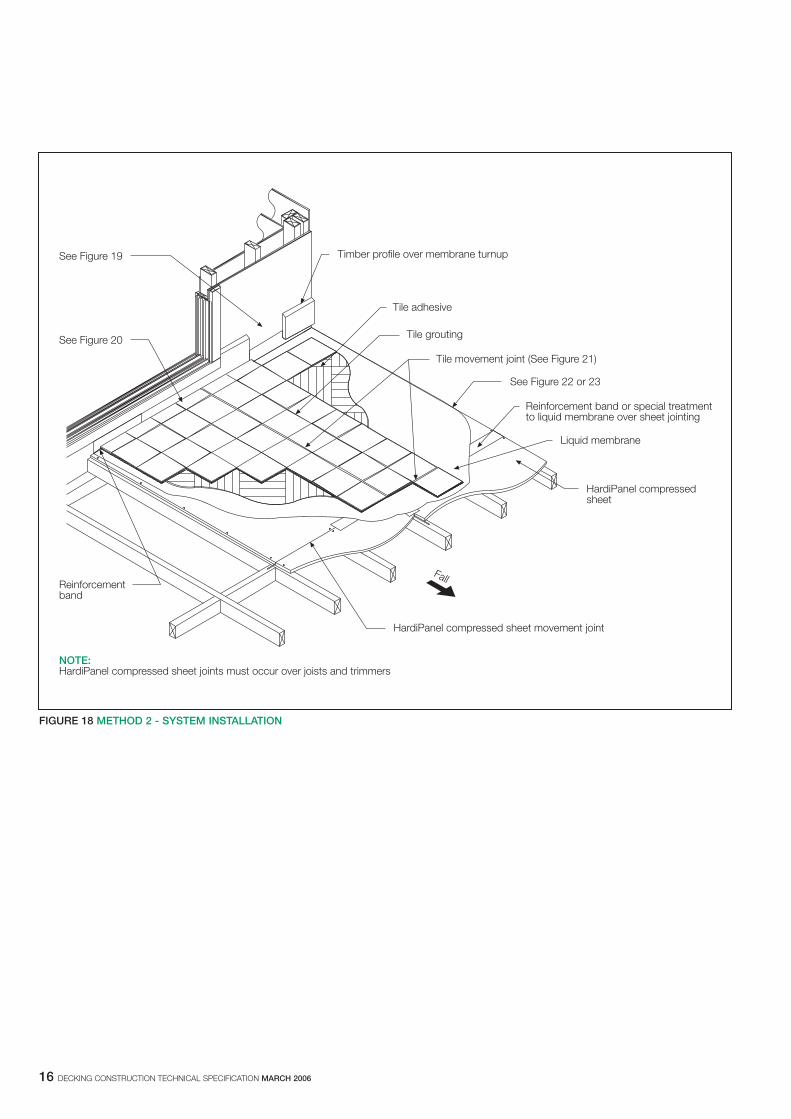
See Figure 19
See Figure 20
Timber profile over membrane turnup
Tile adhesive
Tile grouting
Tile movement joint (See Figure 21)
See Figure 22 or 23
Reinforcement band or special treatmentto liquid membrane over sheet jointing
Liquid membrane
HardiPanel compressedsheet
Fall
HardiPanel compressed sheet movement joint
NOTE:HardiPanel compressed sheet joints must occur over joists and trimmers
Reinforcementband
FIGURE 18 METHOD 2 - SYSTEM INSTALLATION
DECKING CONSTRUCTION TECHNICAL SPECIFICATION MARCH 2006 17
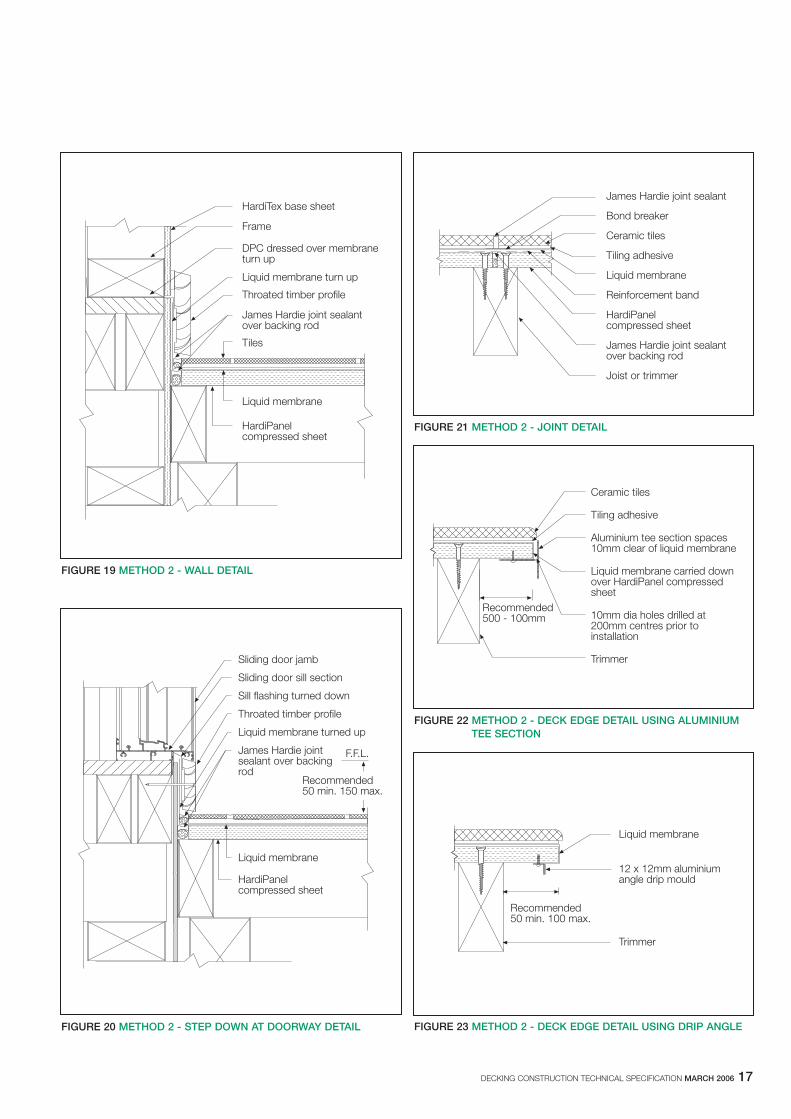
HardiTex base sheet
Frame
DPC dressed over membraneturn up
Liquid membrane turn up
Throated timber profile
James Hardie joint sealantover backing rod
Tiles
Liquid membrane
HardiPanelcompressed sheet
FIGURE 19 METHOD 2 - WALL DETAIL
Sliding door jamb
Sliding door sill section
Sill flashing turned down
Throated timber profile
Liquid membrane turned up
James Hardie jointsealant over backingrod
Recommended50 min. 150 max.
F.F.L.
HardiPanelcompressed sheet
Liquid membrane
FIGURE 20 METHOD 2 - STEP DOWN AT DOORWAY DETAIL
James Hardie joint sealant
Bond breaker
Ceramic tiles
Tiling adhesive
Liquid membrane
Joist or trimmer
James Hardie joint sealantover backing rod
HardiPanelcompressed sheet
Reinforcement band
FIGURE 21 METHOD 2 - JOINT DETAIL
Ceramic tiles
Tiling adhesive
Aluminium tee section spaces10mm clear of liquid membrane
Liquid membrane carried downover HardiPanel compressedsheet
10mm dia holes drilled at200mm centres prior toinstallation
Trimmer
Recommended500 - 100mm
FIGURE 22 METHOD 2 - DECK EDGE DETAIL USING ALUMINIUM TEE SECTION
Liquid membrane
12 x 12mm aluminiumangle drip mould
Trimmer
Recommended50 min. 100 max.
FIGURE 23 METHOD 2 - DECK EDGE DETAIL USING DRIP ANGLE

18 DECKING CONSTRUCTION TECHNICAL SPECIFICATION MARCH 2006
NOTES
DECKING CONSTRUCTION TECHNICAL SPECIFICATION MARCH 2006 19
11 WARRANTY
James Hardie Australia Pty Limited ("James Hardie") warrants to the firstpurchaser of the product and the last purchaser prior to installation of theproduct for a period of 10 years from the date of purchase that theHardiPanel® compressed sheets (the "Product"), will be free from defectsdue to defective factory workmanship or materials and, subject tocompliance with the conditions below, will be resistant to cracking, rotting,fire and damage from termite attacks to the extent set out in JamesHardie’s relevant published literature current at the time of installation.James Hardie warrants for a period of 12 months from the date ofpurchase that the accessories supplied by James Hardie will be free fromdefects due to defective factory workmanship or materials.
Nothing in this document shall exclude or modify any legal rights acustomer may have under the Trade Practices Act or otherwise whichcannot be excluded or modified at law.
CONDITIONS OF WARRANTYThe warranty is strictly subject to the following conditions:
a) James Hardie will not be liable for breach of warranty unless theclaimant provides proof of purchase and makes a written claim eitherwithin 30 days after the defect would have become reasonablyapparent or, if the defect was reasonably apparent prior toinstallation, then the claim must be made prior to installation;
b) this warranty is not transferable;
c) the Product must be installed and maintained strictly in accordancewith the relevant James Hardie literature current at the time ofinstallation and must be installed in conjunction with the componentsor products specified in the literature. To obtain copies of suchliterature contact Ask James Hardie on 13 11 03. Further, all otherproducts, including coating and jointing systems, applied to or usedin conjunction with the Product must be applied or installed andmaintained strictly in accordance with the relevant manufacturer’sinstructions and good trade practice;
d) the project must be designed and constructed in strict compliancewith all relevant provisions of the current BCA, regulations andstandards;
e) the claimant’s sole remedy for breach of warranty is (at JamesHardie’s option) that James Hardie will either supply replacementproduct, rectify the affected product or pay for the cost of thereplacement or rectification of the affected product;
f) James Hardie will not be liable for any losses or damages (whetherdirect or indirect) including property damage or personal injury,consequential loss, economic loss or loss of profits, arising incontract or negligence or howsoever arising. Without limiting theforegoing James Hardie will not be liable for any claims, damages ordefects arising from or in any way attributable to poor workmanship,poor design or detailing, settlement or structural movement and/ormovement of materials to which the Product is attached, incorrectdesign of the structure, acts of God including but not limited toearthquakes, cyclones, floods or other severe weather conditions orunusual climatic conditions, efflorescence or performance ofpaint/coatings applied to the Product, normal wear and tear, growthof mould, mildew, fungi, bacteria, or any organism on any Productsurface or Product (whether on the exposed or unexposed surfaces);
g) all warranties, conditions, liabilities and obligations other than thosespecified in this warranty are excluded to the fullest extent allowed by law;
h) if meeting a claim under this warranty involves re-coating ofProducts, there may be slight colour differences between the originaland replacement Products due to the effects of weathering andvariations in materials over time.
DISCLAIMERThe recommendations in James Hardie’s literature are based on goodbuilding practice, but are not an exhaustive statement of all relevantinformation and are subject to conditions (c), (d), (f) and (g) above.Further, as the successful performance of the relevant system dependson numerous factors outside the control of James Hardie (eg quality ofworkmanship and design) James Hardie shall not be liable for therecommendations in that literature and the performance of the relevantsystem, including its suitability for any purpose or ability to satisfy therelevant provisions of the Building Code of Australia ("BCA"), regulationsand standards.

COPYRIGHT MARCH 2006© JAMES HARDIE AUSTRALIA PTY LTD ABN 12 084 635 558TM AND ® DENOTES A TRADEMARK OR REGISTERED MARKOWNED BY JAMES HARDIE INTERNATIONAL FINANCE BV.