hands-on dynamic routing challenge - iplab3. enables ospf routing and enters router configuration...
TRANSCRIPT

Hands-onDynamic Routing Challenge
Internet Engineering June 26th 2019By Teaching Assistance
1
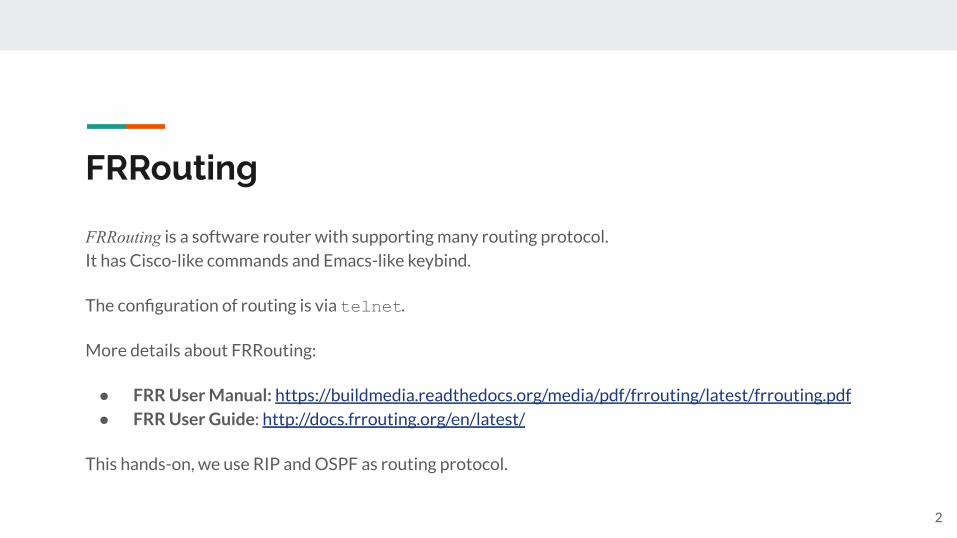
FRRouting
FRRouting is a software router with supporting many routing protocol.
It has Cisco-like commands and Emacs-like keybind.
The configuration of routing is via telnet.
More details about FRRouting:
● FRR User Manual: https://buildmedia.readthedocs.org/media/pdf/frrouting/latest/frrouting.pdf
● FRR User Guide: http://docs.frrouting.org/en/latest/
This hands-on, we use RIP and OSPF as routing protocol.
2

Get Ready
The previous container we used before doesn’t install FFRouting.
Therefore, you have to
● Install a new docker image
● Use new makefile for hands-on
For the details, please see the next page.
3

Install a New Docker Image1. Create a working directory
$ mkdir ~/Desktop/ieng && cd $_2. Download a docker image.
$ curl -O https://iplab.naist.jp/class/2019/materials/hands-on/03/frr.tar3. Install it.
$ docker load < frr.tar
4

Use New makefile
1. Download the makefile.
$ cd ~/Desktop/ieng$ curl -O https://iplab.naist.jp/class/2019/materials/hands-on/03/makefile
2. Execute make command on the same directory as the downloaded makefile.
$ make
If you created the container called R1 or R2 or R3 or R4, you will get error messages like below:
docker: Error response from daemon: Conflict.Then, please run the following command:
$ make cleanBack to the procedure no.2(see the above), then execute make command.
**But when you type $ make clean, your hosts which you created before are removed.**
The error with (ignored) at the end, like Error 1 (ignored) is harmless error. Please ignore it. 5

RIP
6

Login the Router
To login to the virtual router for the RIP, use telnet.The port is 2602, and the password is ieng.
1. Attach the container
2. $ telnet localhost 2602a. You can use 127.0.0.1 instead of localhost
3. Type ieng if they asked Password:
7
①②
③

? and TAB key
In router, you can use ? and TAB key.
If type ? key, you can see help.
If type TAB key, you can be autocomplete function.
8
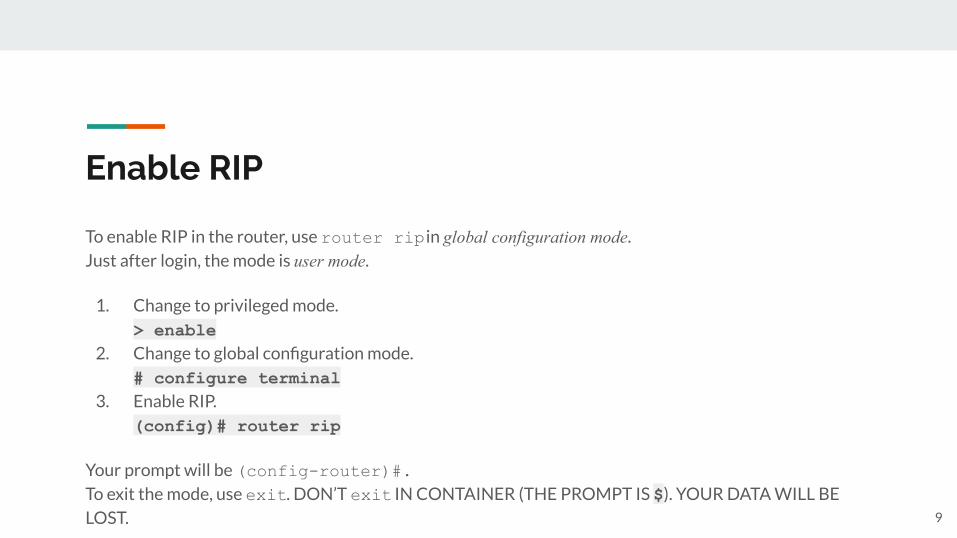
Enable RIP
To enable RIP in the router, use router rip in global configuration mode.
Just after login, the mode is user mode.
1. Change to privileged mode.
> enable2. Change to global configuration mode.
# configure terminal3. Enable RIP.
(config)# router rip
Your prompt will be (config-router)#.To exit the mode, use exit. DON’T exit IN CONTAINER (THE PROMPT IS $). YOUR DATA WILL BE
LOST. 9

Specify the router
After be enabled RIP mode, specify the router you want to enable RIP via network command.
(config-router)# network <network>/<mask>
If the router connects multiple network, you have to specify each network.
10
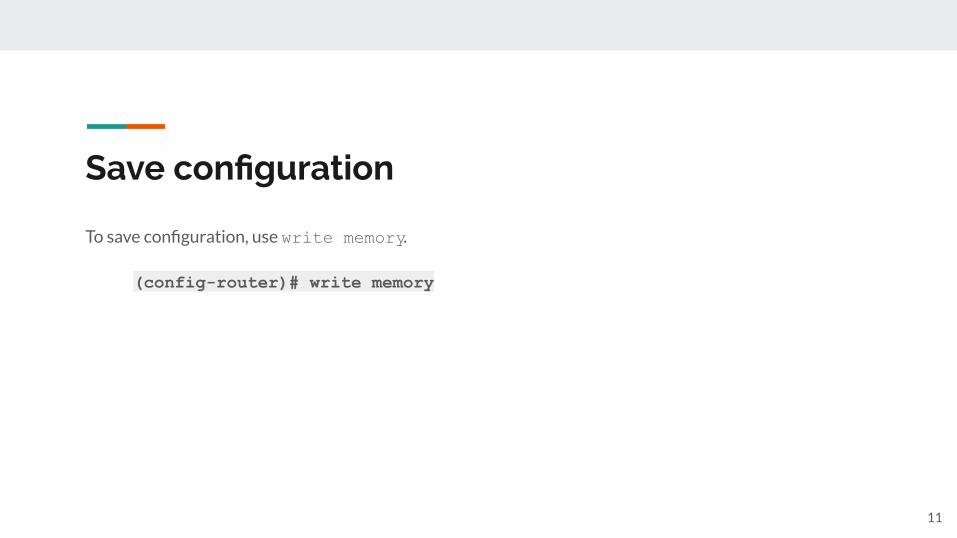
Save configuration
To save configuration, use write memory.
(config-router)# write memory
11

Show RIP routes
To show the routes, use show ip rip in user mode or privileged mode.
# show ip rip
To show current RIP status, use show ip rip status in user mode or privileged mode.
# show ip rip status
12
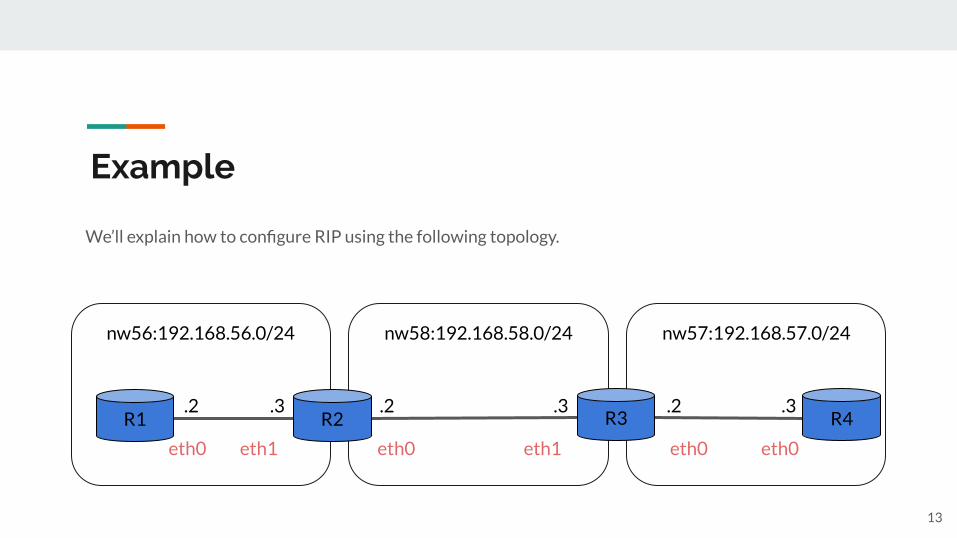
Example
13
We’ll explain how to configure RIP using the following topology.
nw57:192.168.57.0/24nw58:192.168.58.0/24nw56:192.168.56.0/24
R4R1 R2 R3
eth0 eth0 eth0 eth0eth1eth1
.2 .3 .2 .3 .2 .3

Configure RIP on R1
1. Login R1
2. Enable RIP
> enable# configure terminal(config)# router rip
3. Enable routing on an IP network
(config-router)# network 192.168.56.0/244. Write configuration in memory
(config-router)# write memory5. Exit until privileged mode
(config-router)# exit(config)# exit
14
R1 R2
eth0 eth1
.2 .3
nw56:192.168.56.0/24

RIP status of R1
When run show ip rip status, you know…
1. RIP send every 30±50% seconds.
2. The next RIP will send after 29 seconds.
3. Timeout is 180 seconds.
4. eth0 send and receive RIP.
5. The networks RIP is routing area. 192.168.56.0/24
6. No host RIP sends.
7. etc...
When run show ip rip, you know there is no
routing table of nw57 and nw58. 15
①②③
④
⑤
⑥

Configure RIP on R2
16
R1 R2
eth0 eth0 eth1eth1
.2 .3 .2 .3
nw56:192.168.56.0/24 nw58:192.168.58.0/24
1. Login R2
2. Enable RIP
> enable# configure terminal(config)# router rip
3. Enable routing on an IP network
(config-router)# network 192.168.56.0/24(config-router)# network 192.168.58.0/24
4. Write configuration in memory
(config-router)# write memory

RIP status of R1 again
Let’s run show ip rip status on R1 again.
You know 192.168.56.3 sends RIP packets.
When run show ip rip, you know there is routing
table of nw58. But there is no nw57.
17

Configure RIP on R3
18
R1 R3
eth0 eth0 eth1eth1
.2 .3 .2 .3
nw58:192.168.58.0/24 nw57:192.168.57.0/24
1. Login R3
2. Enable RIP
> enable# configure terminal(config)# router rip
3. Enable routing on an IP network
(config-router)# network 192.168.57.0/24(config-router)# network 192.168.58.0/24
4. Write configuration in memory
(config-router)# write memory

RIP status of R1 again
When run show ip rip, you know there are
routing table of nw57 and nw58.
19
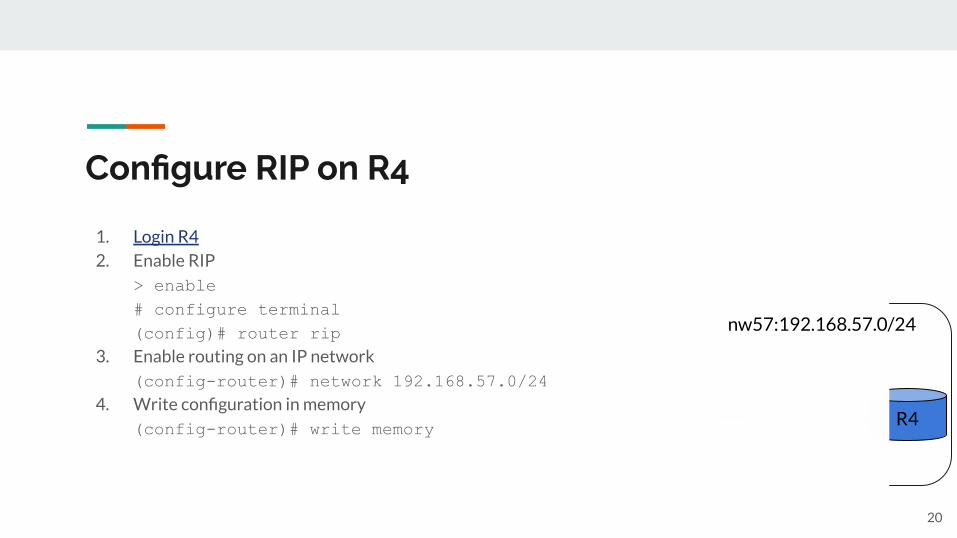
Configure RIP on R4
1. Login R4
2. Enable RIP
> enable# configure terminal(config)# router rip
3. Enable routing on an IP network
(config-router)# network 192.168.57.0/244. Write configuration in memory
(config-router)# write memory
20
R4
eth0 eth0
.2 .3
nw57:192.168.57.0/24

Ping from R1 to R4
21
Congratulations! Let’s ping from R1 to R4.

OSPF
22

Introduction
Before you start routing by OSPF, you need to remove previous setting by RIP.
Therefore, follow the below procedure.
1. Run make clean at the directory which has makefile
$ make clean
2. Run make the same directory
$ make
23

Example Network Topology
24
nw56:192.168.56.0/24 nw58:192.168.58.0/24 nw57:192.168.57.0/24
R4R1 R2 R3
area 0area 1
eth0 eth0 eth0 eth0eth1eth1

Access to the RouterLet's access the virtual router via telnet.The information is as follows: - port : 2604 - password : ieng
1. Attach the containerE.g. R2$ docker attach R2
2. Restart the service$ sudo /etc/init.d/frr restart
3. Access to hostA's virtual router of the OSPF $ telnet localhost 2604
25

Configuration of OSPF4. Enables privileged EXEC mode
> enable
5. Enters global configuration mode# configure terminal
6. Enables OSPF routing and enters router configuration mode(config-terminal)# router ospf
7. Defines an interface on which OSPF runs and defines the area ID for that interface(config-terminal)# network <network ip address>/<mask> area <area ID>
26
When you type the commands, it changes the prompt.

Configuration of OSPF(Cons.)8. Save the configuration
(config-terminal)# write memory9. Exits router configuration mode and returns to privileged EXEC mode
(config-terminal)# end10. End a telnet session
(Router-id)# exit11. Confirm the configuration
(Router-id)# show running-configuration12. Confirm the configuration from local machine
$ ip route
It takes a little time to renew the configuration because Hello packet sends every 10 sec.
27

Procedure to Configure the Network (R1)
After connecting the routers with telnet, follow below the procedure: (hints)
28
1. Enables priviledged EXEC mode> enable
2. Enters global configuration mode# configure terminal
3. Enables OSPF routing and enters router configuration mode(config-terminal)# router ospf
4. Defines an interface on which OSPF runs and defines the area ID for that interface(config-terminal)# network 192.168.56.0/24 area 0

Procedure to Configure the Network (R2)
29
1. Enables priviledged EXEC mode> enable
2. Enters global configuration mode# configure terminal
3. Enables OSPF routing and enters router configuration mode(config-terminal)# router ospf
4. Defines an interface on which OSPF runs and defines the area ID for that interface(config-terminal)# network 192.168.56.0/24 area 1(config-terminal)# network 192.168.58.0/24 area 0
After connecting the routers with telnet, follow below the procedure: (hints)
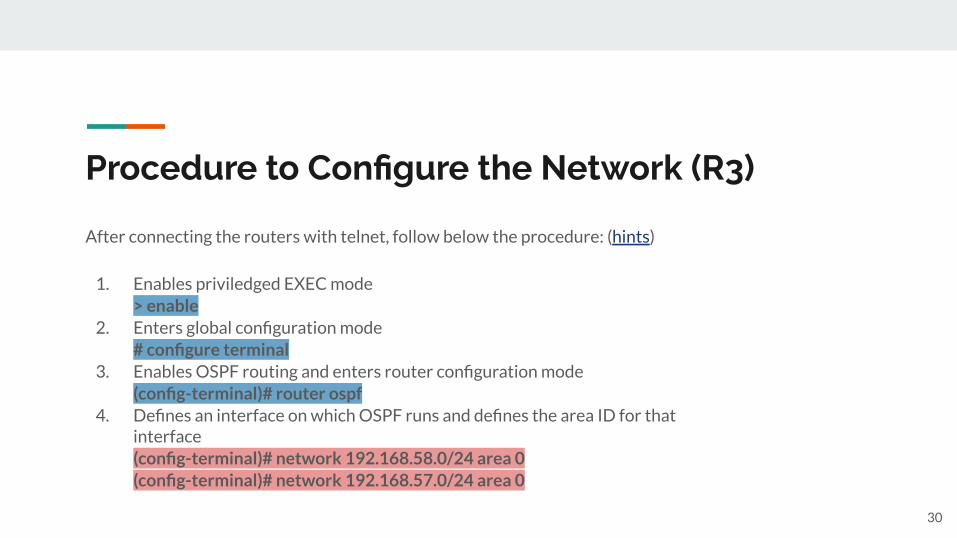
Procedure to Configure the Network (R3)
30
1. Enables priviledged EXEC mode> enable
2. Enters global configuration mode# configure terminal
3. Enables OSPF routing and enters router configuration mode(config-terminal)# router ospf
4. Defines an interface on which OSPF runs and defines the area ID for that interface(config-terminal)# network 192.168.58.0/24 area 0(config-terminal)# network 192.168.57.0/24 area 0
After connecting the routers with telnet, follow below the procedure: (hints)

Procedure to Configure the Network (R4)
31
1. Enables priviledged EXEC mode> enable
2. Enters global configuration mode# configure terminal
3. Enables OSPF routing and enters router configuration mode(config-terminal)# router ospf
4. Defines an interface on which OSPF runs and defines the area ID for that interface(config-terminal)# network 192.168.57.0/24 area 0
After connecting the routers with telnet, follow below the procedure: (hints)

The Changing of Routing Table by OSPF
Before the configuration
After the configuration
32
The routing table was added.

Congratulations!
33
Let's try to send ping from R1(address : 192.168.56.2) to R4(address : 192.168.57.3).
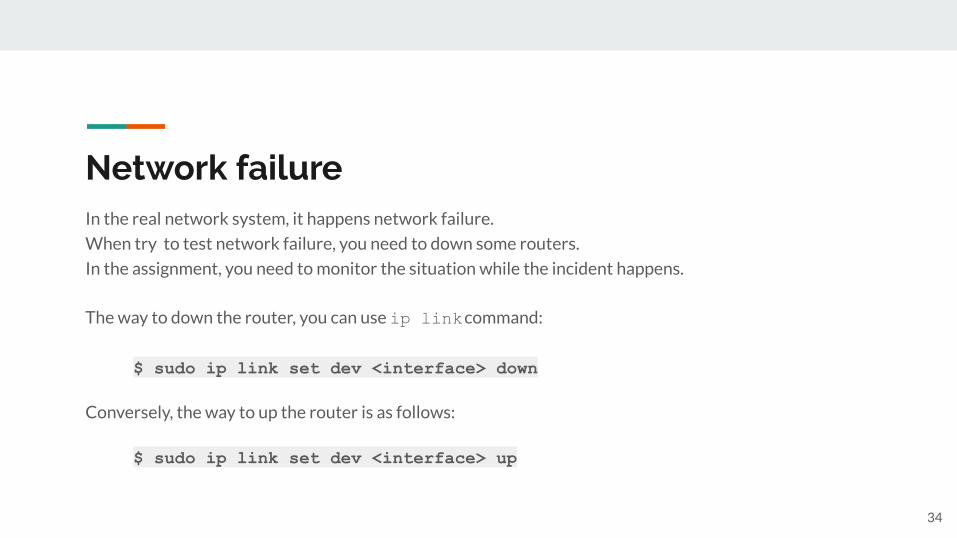
Network failure
34
In the real network system, it happens network failure.
When try to test network failure, you need to down some routers.
In the assignment, you need to monitor the situation while the incident happens.
The way to down the router, you can use ip link command:
$ sudo ip link set dev <interface> down
Conversely, the way to up the router is as follows:
$ sudo ip link set dev <interface> up

Execute a Program Periodically
To execute a program periodically, use watch command:
$ watch -n <INTERVAL_SECONDS> <COMMAND>
35

Enjoy the Assignment
36

If you faced a problem,Please contact us.
37

NOTICE
The assignment has “Design your own network by yourself.” as optional. But you CAN’T use the containers you created before.If you want to try, please remake the container following the guide.
38