hand building techniques
TRANSCRIPT
www.ceramicartsdaily.org | Copyright © 2009, Ceramic Publications Company | Three Great Handbuilding Techniques | i
how to make pottery using the pinch, coil
and slab methods
ceramic artsdaily.org
three great
handbuilding techniques
www.ceramicartsdaily.org | Copyright © 2009, Ceramic Publications Company | Three Great Handbuilding Techniques | 1
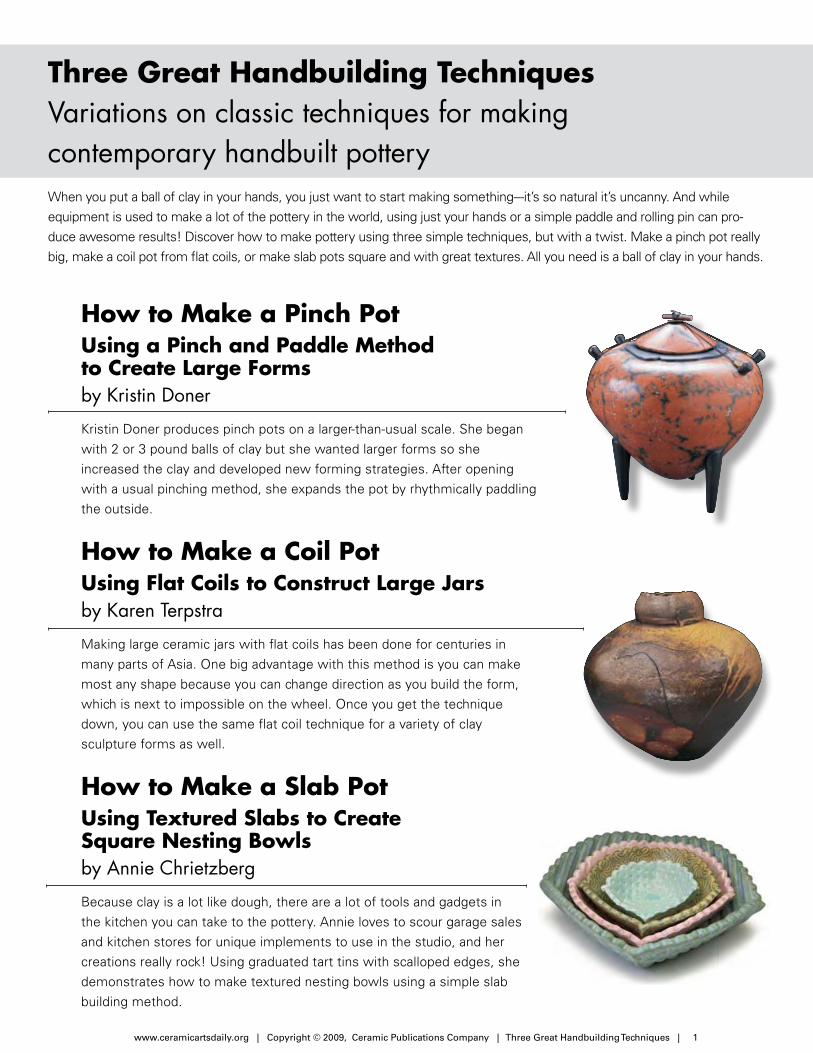
How to Make a Pinch Pot Using a Pinch and Paddle Method to Create Large Forms by Kristin Doner
Kristin Doner produces pinch pots on a larger-than-usual scale. She began with 2 or 3 pound balls of clay but she wanted larger forms so she increased the clay and developed new forming strategies. After opening with a usual pinching method, she expands the pot by rhythmically paddling the outside.
How to Make a Coil Pot Using Flat Coils to Construct Large Jars by Karen Terpstra
Making large ceramic jars with flat coils has been done for centuries in many parts of Asia. One big advantage with this method is you can make most any shape because you can change direction as you build the form, which is next to impossible on the wheel. Once you get the technique down, you can use the same flat coil technique for a variety of clay sculpture forms as well.
How to Make a Slab Pot Using Textured Slabs to Create Square Nesting Bowls by Annie Chrietzberg
Because clay is a lot like dough, there are a lot of tools and gadgets in the kitchen you can take to the pottery. Annie loves to scour garage sales and kitchen stores for unique implements to use in the studio, and her creations really rock! Using graduated tart tins with scalloped edges, she demonstrates how to make textured nesting bowls using a simple slab building method.
Three Great Handbuilding TechniquesVariations on classic techniques for making contemporary handbuilt potteryWhen you put a ball of clay in your hands, you just want to start making something---it’s so natural it’s uncanny. And while equipment is used to make a lot of the pottery in the world, using just your hands or a simple paddle and rolling pin can pro-duce awesome results! Discover how to make pottery using three simple techniques, but with a twist. Make a pinch pot really big, make a coil pot from flat coils, or make slab pots square and with great textures. All you need is a ball of clay in your hands.
www.7greatpotteryprojects.org | Copyright © 2007, Ceramic Publications Company | 2�
I know I’m not the only overly-involved-with-clay-person out there who brings more things home from a kitchen store for the studio than for the kitchen. So, as I was browsing through a kitchen
store, I came across tart tins with scalloped edges and removable bottoms (figure 1), and knew I’d found some-thing that would be fun and easy to use. I bought four of them in graduated sizes thinking: nesting bowls!
To get a square-ish form from a round slab requires removing darts of clay. After experimenting with differ-ent dart ratios, I settled on somewhere between a third and a half of the radius. To make the darts template, I traced around the scallops on the cutting edge of the tart tin (figure 2). Ignoring the low points of the scallops, I cut out a circle and folded it along two perpendicular
diameters, so that the folds made a perfect cross. I then found a point somewhere between third and a half way along the radius to cut the darts to. I folded the tem-plate in half and cut out a wedge, then used that wedge to cut identical darts all the way around (figure 3). Ex-plore the possibilities of different-sized darts, different numbers of darts and different placement of darts. As long as you keep ratios similar from one template to the next, the bowls should nest.
Bevel the darts by pointing the knife point towards the center on each side so you’ll be switching the angle of the knife for each side of the dart. As always with slab work, score, then slip, then score again to create an interface so the seam stays together. You may also want to add a small coil along the seams, since you’re changing the
by Annie Chrietzberg
Project #7
Nesting Bowls
Nesting bowls provide an opportunity for using a variety of textures and glazes.
Finished piece photo by JC Bourque | Process photos by Shannon Waxman
www.ceramicartsdaily.org | Copyright © 2009, Ceramic Publications Company | Three Great Handbuilding Techniques | 2
How to Make a Pinch PotUsing a Pinch and Paddle Method to Create Large Forms
by Kristin Doner
ph
ot
os
: ja
me
s p
at
ric
k d
aw
so
n, m
ax
ima
ge
My journey with clay has been a process of discovery and rediscovery. At times, the process has been forced, leading me to pro-duce works that I consider over engineered,
forms that stand apart from those that emerge from a more intuitive process. When I disengaged my conscious thought and allowed my work to develop through a more intuitive process, the result was a more satisfying expres-sion, one that speaks from a deeper part of myself.
I am often surprised how intuitive responses interact with conscious inspirations to produce unexpected out-comes. For example, ancient history has been an inspira-tion for me. I feel connected with the past when examin-ing an ancient artifact, realizing that the item in my hand was likely an integral part of someone’s life centuries ago. I am also fascinated by the impact of time and en-vironment on the surface of these artifacts. Frequently, organic textures and earthy colors appear in random fashion, having developed from centuries of exposure to the elements. There’s little doubt that these artifacts
have had an influence on my work, as witnessed by my choice of glaze treatments and my classical use of form.
The “less is more” aesthetic has also had an effect on my work. I try to reduce an expression to the pure essentials, to focus clearly on the main point of my work—form. My goal is pure simplicity of form achieved through gently sloping lines and as few distractions as possible.
To develop my sensitivity for form, I used to sit with pencil and paper sketching half silhouettes. These half forms trick the eye in a wonderful way. By building upon the visual informa-tion of one half of the form, the mind completes the other half. The result is an instant critique of the essential elements.
Zeroing in on an intriguing form, I used to sketch out ev-ery aspect of the completed piece in full detail, then apply the appropriate techniques to bring the expression to life. These conscious exercises were interesting to a point, but they lacked the spirit and vitality that I hungered for in my work. Eventually, I put down the pencil and started working intui-tively. Letting go in this way allowed me to develop beyond the limitations of overengineered ideas.
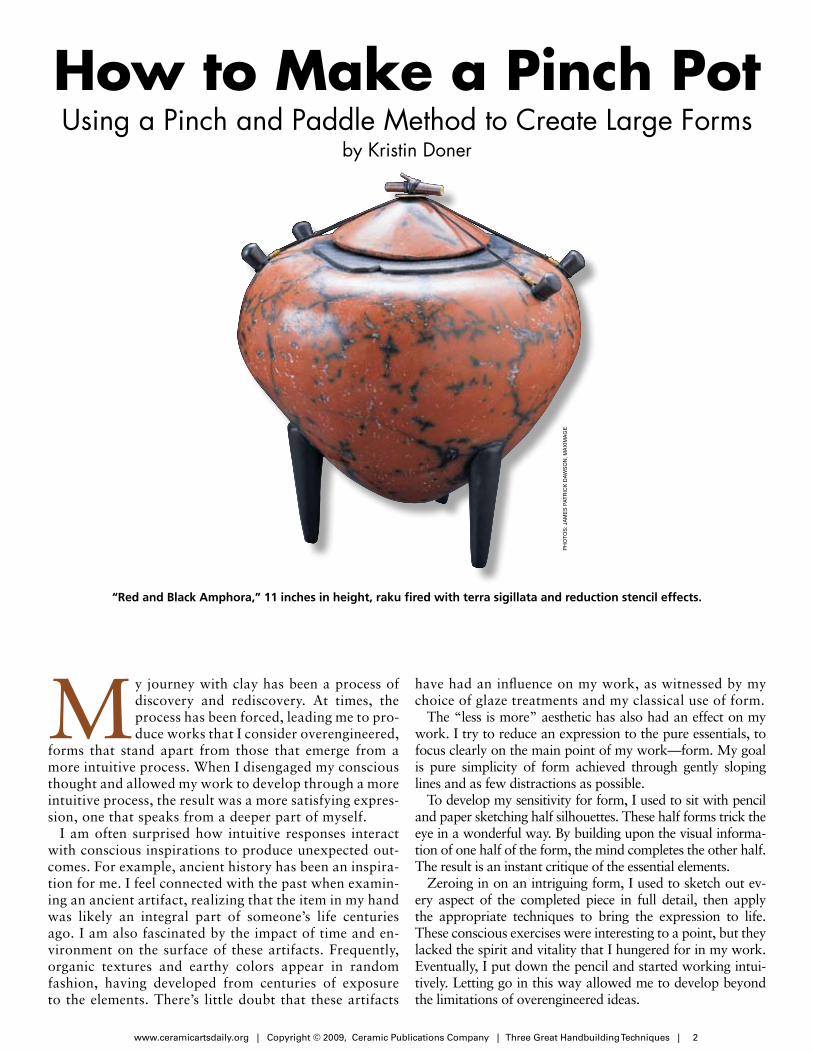
“Red and Black Amphora,” 11 inches in height, raku fired with terra sigillata and reduction stencil effects.
www.ceramicartsdaily.org | Copyright © 2009, Ceramic Publications Company | Three Great Handbuilding Techniques | 3
ProcessAs I found myself turning repeatedly to the pinching
technique, I decided to start producing these pinchpots, but on a larger-than-usual scale. I was determined to re-tain the simplicity of form while emphasizing its essen-tial elements. As I allowed my intuition to take charge of developing form, I was able to focus on technique in a more active way.
When I began working with 2- or 3-pound balls for each pinchpot, the increase in mass demanded entirely new forming strategies. Use of a paddle, the size of the paddle, and the balance between drying and working times, all had an impact on the outcome.
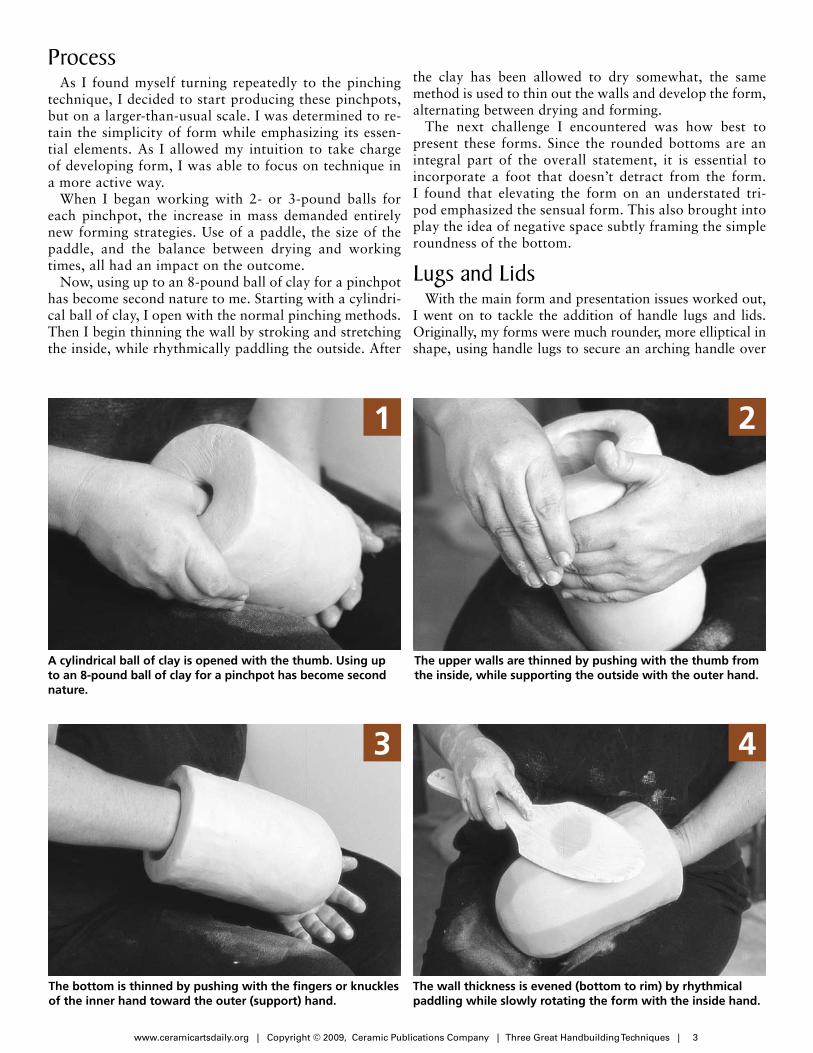
Now, using up to an 8-pound ball of clay for a pinchpot has become second nature to me. Starting with a cylindri-cal ball of clay, I open with the normal pinching methods. Then I begin thinning the wall by stroking and stretching the inside, while rhythmically paddling the outside. After
A cylindrical ball of clay is opened with the thumb. Using up to an 8-pound ball of clay for a pinchpot has become second nature.
The upper walls are thinned by pushing with the thumb from the inside, while supporting the outside with the outer hand.
1 2
The wall thickness is evened (bottom to rim) by rhythmical paddling while slowly rotating the form with the inside hand.
4
The bottom is thinned by pushing with the fingers or knuckles of the inner hand toward the outer (support) hand.
3
the clay has been allowed to dry somewhat, the same method is used to thin out the walls and develop the form, alternating between drying and forming.
The next challenge I encountered was how best to present these forms. Since the rounded bottoms are an integral part of the overall statement, it is essential to incorporate a foot that doesn’t detract from the form. I found that elevating the form on an understated tri-pod emphasized the sensual form. This also brought into play the idea of negative space subtly framing the simple roundness of the bottom.
Lugs and LidsWith the main form and presentation issues worked out,
I went on to tackle the addition of handle lugs and lids. Originally, my forms were much rounder, more elliptical in shape, using handle lugs to secure an arching handle over
www.ceramicartsdaily.org | Copyright © 2009, Ceramic Publications Company | Three Great Handbuilding Techniques | 4
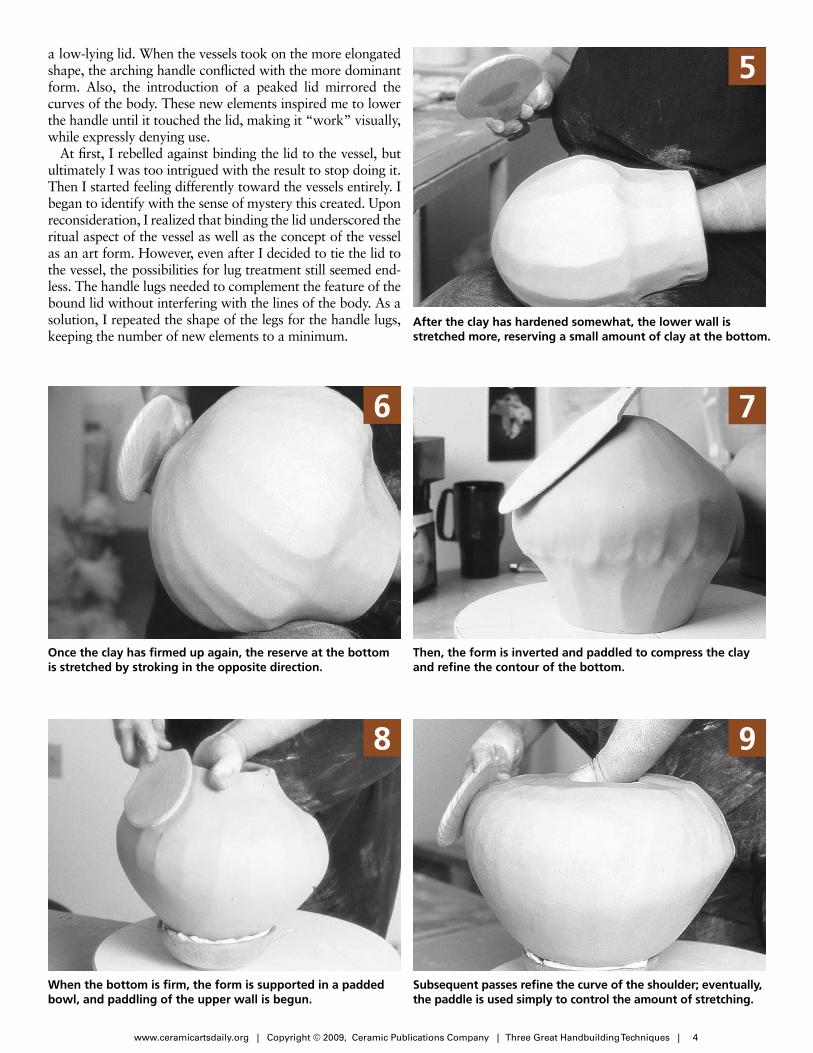
Then, the form is inverted and paddled to compress the clay and refine the contour of the bottom.
When the bottom is firm, the form is supported in a padded bowl, and paddling of the upper wall is begun.
Subsequent passes refine the curve of the shoulder; eventually, the paddle is used simply to control the amount of stretching.
7
8 9
Once the clay has firmed up again, the reserve at the bottom is stretched by stroking in the opposite direction.
After the clay has hardened somewhat, the lower wall is stretched more, reserving a small amount of clay at the bottom.
5
6
a low-lying lid. When the vessels took on the more elongated shape, the arching handle conflicted with the more dominant form. Also, the introduction of a peaked lid mirrored the curves of the body. These new elements inspired me to lower the handle until it touched the lid, making it “work” visually, while expressly denying use.
At first, I rebelled against binding the lid to the vessel, but ultimately I was too intrigued with the result to stop doing it. Then I started feeling differently toward the vessels entirely. I began to identify with the sense of mystery this created. Upon reconsideration, I realized that binding the lid underscored the ritual aspect of the vessel as well as the concept of the vessel as an art form. However, even after I decided to tie the lid to the vessel, the possibilities for lug treatment still seemed end-less. The handle lugs needed to complement the feature of the bound lid without interfering with the lines of the body. As a solution, I repeated the shape of the legs for the handle lugs, keeping the number of new elements to a minimum.
www.ceramicartsdaily.org | Copyright © 2009, Ceramic Publications Company | Three Great Handbuilding Techniques | 5
How to Make a Coil PotUsing Flat Coils to Construct Large Jars
by Karen Terpstra
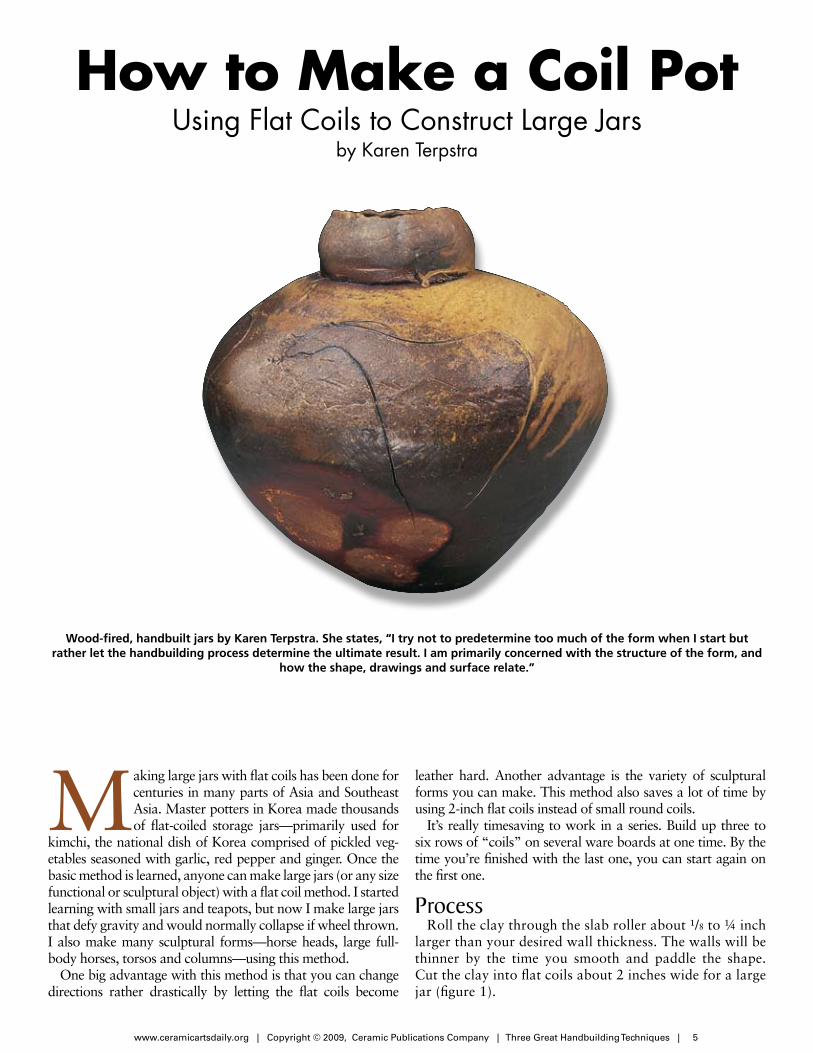
Wood-fired, handbuilt jars by Karen Terpstra. She states, “I try not to predetermine too much of the form when I start but rather let the handbuilding process determine the ultimate result. I am primarily concerned with the structure of the form, and
how the shape, drawings and surface relate.”
Making large jars with flat coils has been done for centuries in many parts of Asia and Southeast Asia. Master potters in Korea made thousands of flat-coiled storage jars—primarily used for
kimchi, the national dish of Korea comprised of pickled veg-etables seasoned with garlic, red pepper and ginger. Once the basic method is learned, anyone can make large jars (or any size functional or sculptural object) with a flat coil method. I started learning with small jars and teapots, but now I make large jars that defy gravity and would normally collapse if wheel thrown. I also make many sculptural forms—horse heads, large full-body horses, torsos and columns—using this method.
One big advantage with this method is that you can change directions rather drastically by letting the flat coils become
leather hard. Another advantage is the variety of sculptural forms you can make. This method also saves a lot of time by using 2-inch flat coils instead of small round coils.
It’s really timesaving to work in a series. Build up three to six rows of “coils” on several ware boards at one time. By the time you’re finished with the last one, you can start again on the first one.
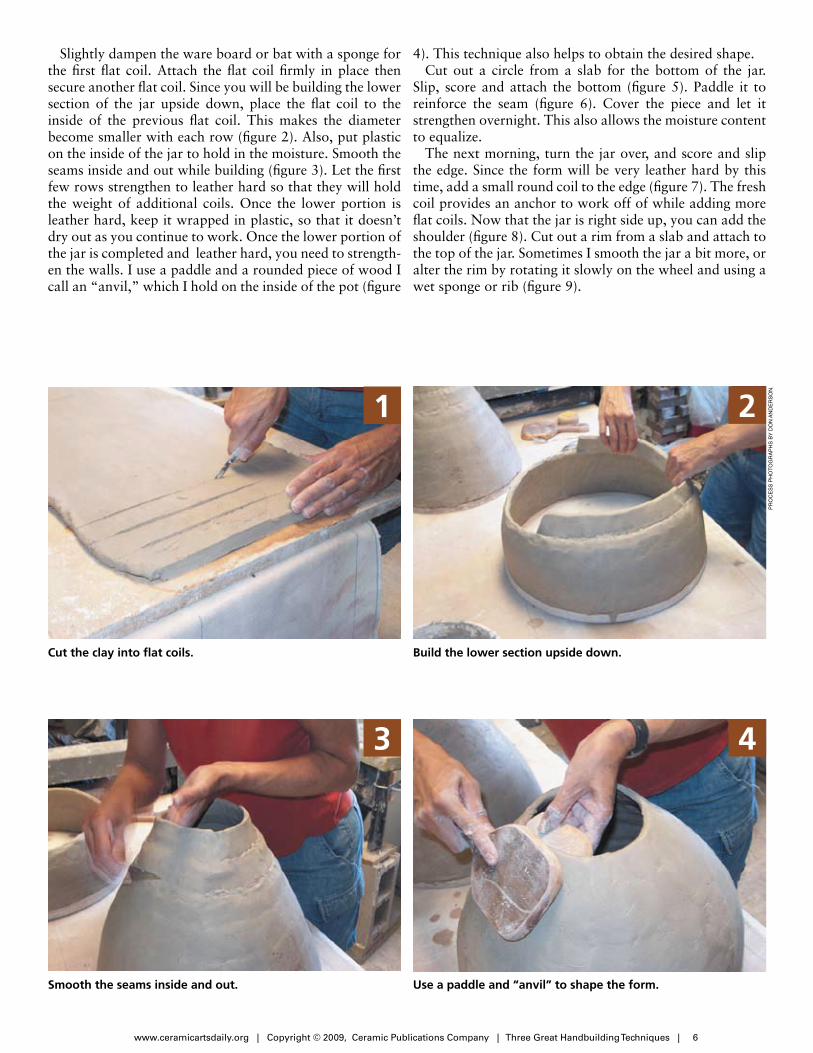
ProcessRoll the clay through the slab roller about ¹/8 to ¼ inch
larger than your desired wall thickness. The walls will be thinner by the time you smooth and paddle the shape. Cut the clay into flat coils about 2 inches wide for a large jar (figure 1).
www.ceramicartsdaily.org | Copyright © 2009, Ceramic Publications Company | Three Great Handbuilding Techniques | 6
1 2
3 4p
ro
ce
ss
ph
ot
og
ra
ph
s b
y d
on
an
de
rs
on
.
Slightly dampen the ware board or bat with a sponge for the first flat coil. Attach the flat coil firmly in place then secure another flat coil. Since you will be building the lower section of the jar upside down, place the flat coil to the inside of the previous flat coil. This makes the diameter become smaller with each row (figure 2). Also, put plastic on the inside of the jar to hold in the moisture. Smooth the seams inside and out while building (figure 3). Let the first few rows strengthen to leather hard so that they will hold the weight of additional coils. Once the lower portion is leather hard, keep it wrapped in plastic, so that it doesn’t dry out as you continue to work. Once the lower portion of the jar is completed and leather hard, you need to strength-en the walls. I use a paddle and a rounded piece of wood I call an “anvil,” which I hold on the inside of the pot (figure
4). This technique also helps to obtain the desired shape.Cut out a circle from a slab for the bottom of the jar.
Slip, score and attach the bottom (figure 5). Paddle it to reinforce the seam (figure 6). Cover the piece and let it strengthen overnight. This also allows the moisture content to equalize.
The next morning, turn the jar over, and score and slip the edge. Since the form will be very leather hard by this time, add a small round coil to the edge (figure 7). The fresh coil provides an anchor to work off of while adding more flat coils. Now that the jar is right side up, you can add the shoulder (figure 8). Cut out a rim from a slab and attach to the top of the jar. Sometimes I smooth the jar a bit more, or alter the rim by rotating it slowly on the wheel and using a wet sponge or rib (figure 9).
Cut the clay into flat coils. Build the lower section upside down.
Smooth the seams inside and out. Use a paddle and “anvil” to shape the form.

www.ceramicartsdaily.org | Copyright © 2009, Ceramic Publications Company | Three Great Handbuilding Techniques | 7
7 8
9
5 6
Attach the bottom. Reinforce the seam.
Flip the form over and add a coil. Add the shoulder.
Attach the top. Most any shape and size is possible, including sculptural forms, using this method.

www.ceramicartsdaily.org | Copyright © 2009, Ceramic Publications Company | Three Great Handbuilding Techniques | 8www.7greatpotteryprojects.org | Copyright © 2007, Ceramic Publications Company | 2�
I know I’m not the only overly-involved-with-clay-person out there who brings more things home from a kitchen store for the studio than for the kitchen. So, as I was browsing through a kitchen
store, I came across tart tins with scalloped edges and removable bottoms (figure 1), and knew I’d found some-thing that would be fun and easy to use. I bought four of them in graduated sizes thinking: nesting bowls!
To get a square-ish form from a round slab requires removing darts of clay. After experimenting with differ-ent dart ratios, I settled on somewhere between a third and a half of the radius. To make the darts template, I traced around the scallops on the cutting edge of the tart tin (figure 2). Ignoring the low points of the scallops, I cut out a circle and folded it along two perpendicular
diameters, so that the folds made a perfect cross. I then found a point somewhere between third and a half way along the radius to cut the darts to. I folded the tem-plate in half and cut out a wedge, then used that wedge to cut identical darts all the way around (figure 3). Ex-plore the possibilities of different-sized darts, different numbers of darts and different placement of darts. As long as you keep ratios similar from one template to the next, the bowls should nest.
Bevel the darts by pointing the knife point towards the center on each side so you’ll be switching the angle of the knife for each side of the dart. As always with slab work, score, then slip, then score again to create an interface so the seam stays together. You may also want to add a small coil along the seams, since you’re changing the
by Annie Chrietzberg
Project #7
Nesting Bowls
Nesting bowls provide an opportunity for using a variety of textures and glazes.
Finished piece photo by JC Bourque | Process photos by Shannon Waxman
How to Make a Slab PotUsing Textured Slabs to Create Square Nesting Bowls
by Annie Chrietzberg
Nesting bowls provide an opportunity for using a variety of textures and glazes.

www.ceramicartsdaily.org | Copyright © 2009, Ceramic Publications Company | Three Great Handbuilding Techniques | 9www.7greatpotteryprojects.org | Copyright © 2007, Ceramic Publications Company | 2�
orientation of the slab. Use sponges or small pieces of foam to keep the sides of the bowl just where you want them while you work on the join.
After all four corners are well joined, turn the piece over. Anytime you need to turn a piece over, find foam if needed, and wareboards or bats, and find a way to flip the piece without touching it. Run a finger or a well-wrung-out sponge over the backside of the seam, eliminating any sharpness and sealing it. Repeat these directions with every size tart tin and template that you have, and you will have a lovely little set of nesting bowls.
With four nesting bowls, you’ll want to explore the potential using eight different textures—match textures from the top of one bowl to the bottom of the next, let the textures cycle through the set—there are so many possibilities!
1Tart tins with removable bottoms make excellent studio tools!
Create a darting template by tracing around the edge. Ignore the scallops when cutting the circle.
To make sure your bowls nest, use the same dart propor-tions on each template.
Clean texture tools before using to avoid the little crumbs of clay that can mar the texture, then dust clean texture tools with cornstarch so that they will release easily.
Before applying texture, check your slab for size. Leaving an inch or so leeway gives you some room to maneuver if there are flaws in the texture. Smooth the slab with a soft rib.
2 3
4 5
1
2 3
4 5

www.ceramicartsdaily.org | Copyright © 2009, Ceramic Publications Company | Three Great Handbuilding Techniques | 10
7
8 9
6
10 11