half tila crystal wheels - beads baubles & jewels · bead origami presents… half tila crystal...
TRANSCRIPT

Bead Origami Presents…
Half Tila Crystal Wheels Created by Cindy Holsclaw
www.beadorigami.com beadorigami.etsy.combeadorigami.blogspot.com facebook.com/beadorigami Create a sparkly bracelet out of rivoli crystals and half tila beads! This project features an easy method to bezel a rivoli crystal, using half tila beads and only a few rounds of the circular peyote stitch. Finish the edge of this bezel with additional half tila beads that give the finished beaded component movement and texture, and connect several of these components together for a dazzling bracelet! The same method can be applied to create pendants and matching earrings!
Materials for a 7 1/2” bracelet:• 1 g 15° Japanese seed beads (color A)• 2 g 15° Japanese seed beads (color B)• 9 g Miyuki half tila beads (color C)• 4.5 g Miyuki half tila beads (color D)• 9 g Miyuki half tila beads (color E)• (7) 14 mm rivoli crystals• (1) two-strand tube bar magnet clasp• Fireline thread, 6 or 8 lb test
Optional Materials for a longer bracelet, a matching pendant, or matching earrings:• 18 mm rivoli crystals• 27 mm round crystals• 13 mm briolette crystals• A pair of ear wires• A silk ribbon
Tools:• Beading Needle, size 11 or 12• Scissors• Beading Awl
Bead Origamiwww.beadorigami.com
© 2014 by Cindy Holsclaw of Bead Origami. Page 1

Materials Notes: • Since this design requires evenly-shaped seed beads, be sure to cull your seed beads for an even size prior to beginning this project.• Check your half tila beads for chipped edges before incorporating them into the beadwork.
Notes on Illustrations:• Each step of this pattern has at least one figure or photo that
shows the beadwork at the end of the corresponding step. • A red dot marks the last bead exited in the previous step. • Newly-added beads are more saturated than the beads already
added to the beadwork.• A dotted line marks the thread path of beads passed through during
a given step.
Instructions:Weaving the base of the bezelNote: keep your thread tension firm while weaving this design
Step 1: Cut and stretch a 3 ft (1 m) length of thread. Pick up• (10) Miyuki half tila beads (C)
Pass through all the beads in the same direction using the same set of half tila holes, and continue through the first half bead strung. Pass through the other hole of this half tila bead to step up to the next round.
Step 2: Using the second set of holes of the C beads, use the circular peyote stitch to add
• (1) Miyuki half tila bead (D)in-between each consecutive pair of C beads. Continue through the next D bead, and pass through the other hole of this D bead to step up to the next round.
Bead Origamiwww.beadorigami.com
© 2014 by Cindy Holsclaw. All rights reserved. Page 2
The five small beads used in this project
Figure 1
Figure 2

Step 3: Using the second set of holes of the D beads, use the circular peyote stitch to add
• (1) Miyuki half tila bead (C)in-between each consecutive pair of D beads. Continue through the next C bead, and pass through the other hole of this C bead to step up to the next round.
Enclosing the rivoli
Step 4: Carefully insert the 14 mm rivoli face-up into the center of the beadwork. Using the second set of holes of the C beads, use the circular peyote stitch to add
• (1) 15° Japanese seed bead (A)in-between each consecutive pair of C beads.
Step 5: Carefully pull the working thread to enclose the rivoli inside the bezel, and pass through all the C and A beads in a circle again, to secure. Pass through the other hole of this C bead, and continue through the next hole of
the next D bead along the edge of the bezel.
Bead Origamiwww.beadorigami.com
© 2014 by Cindy Holsclaw. All rights reserved. Page 3
Figure 3
Figure 4
Figure 5

Adding the edging beadsStep 6: Pick up
• (1) Miyuki half tila bead (E)• (3) 15° Japanese seed beads (B)
Pass through the other hole of the E bead, and move these four beads down the working thread so that they sit up against the edge of the component.
Step 7: Locate the next D bead along the edge of the component, and pass through the hole of this D bead that sits along the back edge of the component. Carefully pull the thread so that the E bead sits at a diagonal angle along the edge of the component.
Step 8: Pick up• (1) Miyuki half tila bead (E)• (3) 15° Japanese seed beads (B)
Pass through the other hole of the E bead. Pass through the other hole of the D bead that your working thread is exiting from, so that the E bead that you added during this step sits up against the previous E bead.
Step 9: Repeat Steps 6-8 to add E and B beads along the entire edge of your component. Weave your tail thread into the back of the beadwork to secure it, and trim. Do not trim your working thread; set the beaded component aside.
Bead Origamiwww.beadorigami.com
© 2014 by Cindy Holsclaw. All rights reserved. Page 4
Figure 6
Figure 7
Figure 8
Figure 9
Photo 9
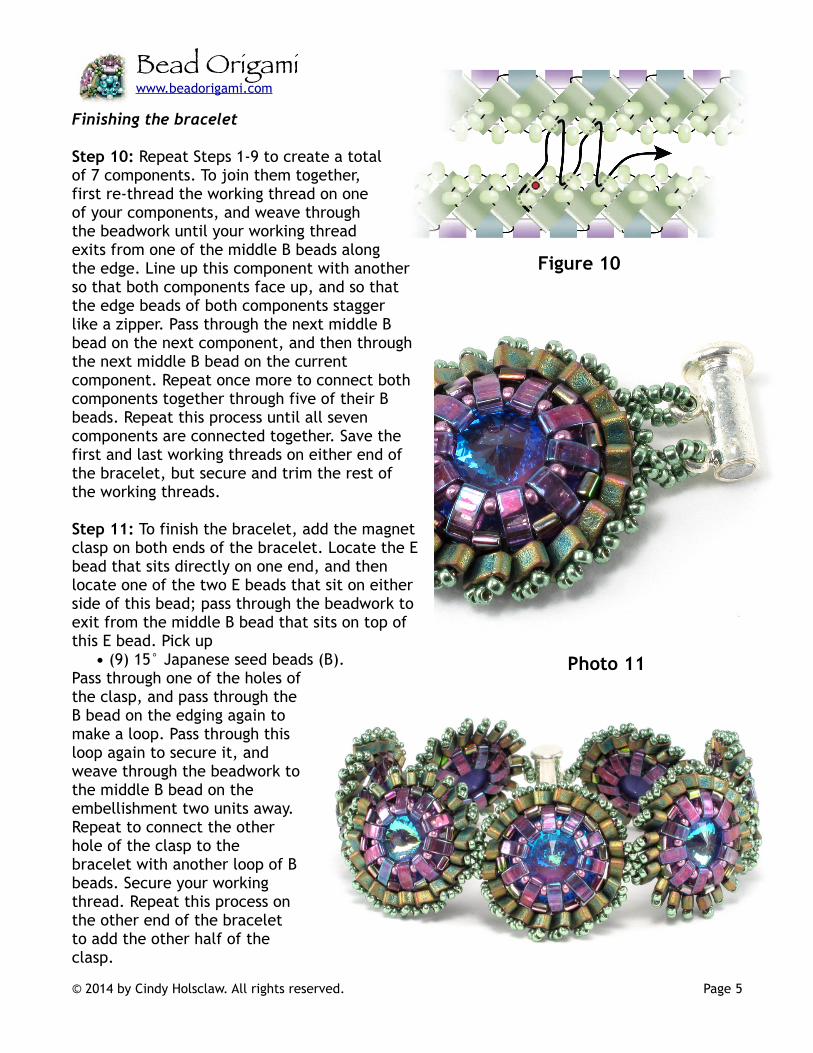
Finishing the bracelet
Step 10: Repeat Steps 1-9 to create a total of 7 components. To join them together, first re-thread the working thread on one of your components, and weave through the beadwork until your working thread exits from one of the middle B beads along the edge. Line up this component with another so that both components face up, and so that the edge beads of both components stagger like a zipper. Pass through the next middle B bead on the next component, and then through the next middle B bead on the current component. Repeat once more to connect both components together through five of their B beads. Repeat this process until all seven components are connected together. Save the first and last working threads on either end of the bracelet, but secure and trim the rest of the working threads.
Step 11: To finish the bracelet, add the magnet clasp on both ends of the bracelet. Locate the E bead that sits directly on one end, and then locate one of the two E beads that sit on either side of this bead; pass through the beadwork to exit from the middle B bead that sits on top of this E bead. Pick up
• (9) 15° Japanese seed beads (B).Pass through one of the holes of the clasp, and pass through the B bead on the edging again to make a loop. Pass through this loop again to secure it, and weave through the beadwork to the middle B bead on the embellishment two units away. Repeat to connect the other hole of the clasp to the bracelet with another loop of B beads. Secure your working thread. Repeat this process on the other end of the bracelet to add the other half of the clasp.
Bead Origamiwww.beadorigami.com
© 2014 by Cindy Holsclaw. All rights reserved. Page 5
Figure 10
Photo 11

Variations and InspirationsThis method can be used to bezel an 18 mm rivoli for a slightly larger component; simply add 13 C beads during Step 1 (add an A bead in-between each of these beads too), and increase the rest of the beads appropriately. The bracelet can be lengthened by replacing one or more of the 14 mm rivolis with 18 mm rivolis. Additionally, a matching pendant can be made with this method; use a 27 mm round crystal, increase the starting number of A beads from 10 to 19, and add a beaded bail to finish the pendant.
These components also make easy matching earrings! Omit the E beads on part of the edging, or add briolette crystals for other possible variations.
Contact Information For questions or comments,
please e-mail [email protected]
Bead Origamiwww.beadorigami.com
© 2014 by Cindy Holsclaw of Bead Origami. All rights reserved. Page 6