guide to version 7 - bluebeam technical...
TRANSCRIPT

7Bluebeam PDF Revu® ®
Guideto version 7

Bluebeam PDF Revu - changing your world,one PDF at a time. Bluebeam PDF Revu was designed tochange the world of PDF as we knew it. We wanted to take awaythe frustration, the confusion, and the anxiety associated with PDF.And, we did.
We built an application that was intuitive - it just made sense. Allthe markup tools you need, day in, day out, were placed right onyour desktop, a click or two away. But we didn't stop there. Wecreated break-through technologies such as Tool Chest, MultiView™,Sync, Markups list, DynamicDefault™, Profiles, and CompareDocuments to make your life easier. Even better, we built Revu tobe fully customizable - from the desktop Profiles to the columns inyour Markups summary, Revu can be all you want it to be. And yet,with all the innovative and revolutionary features, we still felt therewas something more we could do.
So, we developed the world's only PDF solution that remembers.Every annotation you make is recorded in your Tool Chest - virtuallyeliminating the need to do the same thing twice. As you work,Revu works. Its as simple as that.
Welcome to Bluebeam PDF Revu. Enjoy.
1

2
Make it your own. Get started by selecting youruser Profile and your preferred desktop look.We know that each of you who uses Bluebeam PDF Revu does so withdifferent objectives. Regardless of your profession, work, or needs,we want to make it easy. So, eight Profiles are provided to help youget started.
The Default Profile is selected, well, by default. It includes text editing,advanced markups and other tools, perfectly balanced for theproficient user. We also include advanced Profiles for designers,lawyers, construction professionals, tablet users, or even the powerusers who want everything and the kitchen sink. If you wish to simplyview PDF files, there’s a Profile for that too. Change your mind - not toworry. Go to View/Profiles in Revu and select something else orcreate your own.
As far as the background, some of you prefer the dark look, some ofyou the light. The options are there for you. For those who prefer theclassic look that uses Windows system colors, pick #3, or change thelook later by going to Edit > Preferences > General.

Bluebeam PDF Revu. Introducing an easier,simpler PDF product that begins at the Start.Here, you can review quick tips and tutorials, have direct access tovideos and resources from our web site, or simply open, create, orbegin with a new PDF file.
The Revu desktop is simple to navigate. At the top and right aretoolbars (these can be moved to your preference). At the left, right,and bottom are dock panels1 that can be opened and closed toexpose tools such as Bookmarks, Thumbnails, Tool Chest, Markups,Properties, Search and so forth. Look for the little triangles in theblue box.
1
1 1
3

MultiView™. An innovative way to see your worksixteen times over. Why limit yourself to one tabbed view, ortwo, or even three, when you can split1 your screen up to sixteen timesand sync them all to pan and zoom in unison. View and compare thesame document in different areas or different documents in the samearea. Document review has never been easier.
In addition to MultiView, Bluebeam PDF Revu includes viewingoptions2 to view your document in single-page mode, continuous,side-by-side, and side-by-side continuous mode. By default,single-page mode will zoom with your mouse wheel while continuousmode will scroll. Also, quickly fit to page, page width or height withbuttons3 in the lower left corner. Finally, in the lower right corner, youwill see navigation tools4 to page forward or back, jump to thebeginning or end, or even jump to a previous view in history.
1 2 3 4
4

Page Assembly. It’s just a right-click away.Make your document your own by combining, reordering, inserting,deleting, copying, extracting, numbering, or even rotating pages -all from the Thumbnails panel. First, reorder pages by dragging anddropping pages in your Thumbnails panel. Just click a page, hold theleft mouse button, drag to a different location and release. If youneed to copy a page, select the page, press Ctrl-C, go to a newlocation in the same or a different PDF document and press Ctrl-V.If you wish to get a little fancier, simply right-click1 on any thumbnailview and the above menu appears. From here, you can really getcarried away.
1
5
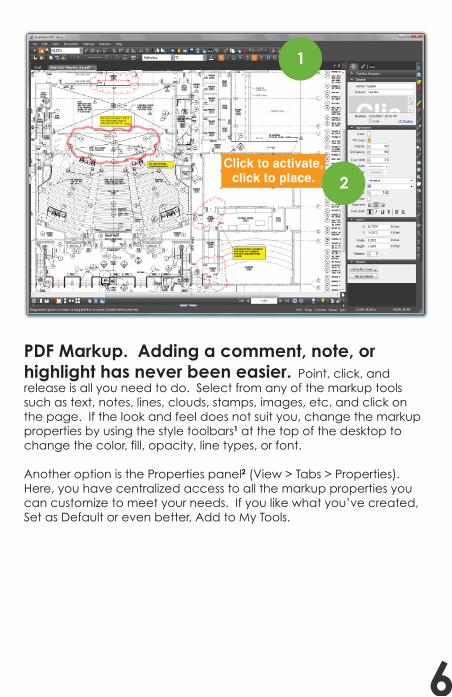
PDF Markup. Adding a comment, note, orhighlight has never been easier. Point, click, andrelease is all you need to do. Select from any of the markup toolssuch as text, notes, lines, clouds, stamps, images, etc. and click onthe page. If the look and feel does not suit you, change the markupproperties by using the style toolbars1 at the top of the desktop tochange the color, fill, opacity, line types, or font.
Another option is the Properties panel2 (View > Tabs > Properties).Here, you have centralized access to all the markup properties youcan customize to meet your needs. If you like what you’ve created,Set as Default or even better, Add to My Tools.
1
2
6

Tool Chest. Why create the same annotationagain and again if you don’t have to? Revu breaksnew ground with Tool Chest1, a revolutionary technology that keepstrack of all your markups as you create them. As you add yourcomments and customize them, you have the option to drag themfrom Recent Tools to My Tools for use in future sessions. Double-clickon the icon in the Tool Chest and you will see it switch from “DrawingMode” to “Properties Mode.” Now, create a brand new annotationusing the same properties as a previous annotation. Double-clickagain and switch back to the Drawing Mode to replicate the markupexactly as you created it - it couldn’t be any simpler.
Plus, use the Tool Chest toolbar to increase or decrease the icon sizes,add or remove tools, view the Properties panel, or manage your ToolSets. Adding your own Tool Set is simple - click the Manage Tool Setsicon, click Add, enter a Title, click OK and see it on your list of ToolSets. Now, drag and drop your tools from Recent Tools here to getanother level of organization. It’s up to you.
1
7

Flatten + Layers is brilliant. Some of you flatten markupsand some of you create layered PDF files - but how many of youflatten markups into layers. Only Bluebeam has the ability to organizeyour markups in distinct layers that you can toggle on or off. How?It’s easy. Add all the comments you like onto the PDF file. Go toDocument > Flatten Markups or click on the toolbar icon1, check offCreate Layer2 at the top of the dialog and enter a name for the layer.Click Flatten and be amazed. Your markups are now on their ownlayer that you can toggle from the Layers panel (View > Tabs >Layers, Alt-O). Repeat as needed.
If you prefer to flatten without creating a layer, just click Flatten fromthe menu (without checking off Create Layer) and the markup layerwill be merged into the PDF content stream, i.e., into one layer. Thisensures that when you, or anyone else for that matter, views or printsthe PDF, your markups will be visible. Or, if you simply wish to flattena single markup, right-click on the markup and select flatten.Simple enough? We think so.
1
8
2

Comparing drawings will never be the sameonce you give Revu a try. Using a proprietarymethodology, we automatically scale, rotate, and align two drawingrevisions, then meticulously highlight all identified differences witheasy to see clouds. Did I mention this was all automatic? Plus, sincethe clouds are markups, you can use the Markups list to step througheach difference one by one.
Go to Document > Compare Documents. Select the original or basedocument (Document A). Then select the revised document(Document B). Click OK. It’s that simple. If you wish to change theappearance of the cloud markup or to select whether these arescanned PDF files, PDF files from the same printer driver or fromdifferent printer drivers, select your Comparison Type at the bottom orclick Advanced for more options. It doesn’t get better than that!Well, actually, it does.
9

Sometimes you needto be picky. We know thatviewports can shift locations,layouts change, or you wouldlike to compare many files. With6.0 and above, you canmanually select a window1 orviewport to compare.
Grab a window on the originaldrawing and Revu will comparethe exact same area on thesecond drawing.
Or, if you wish to align twodrawings manually due to a shiftin the layout, select Pick Points2,pick four points on eachdrawing and we will do the rest.
If you want to go crazy and batch compare a number of drawings,go to File > Batch Processing > Compare Documents. Load your files,line them up, and hit OK.
1 2
10

Headers, footers, date, page numbers, Batesnumbers. Because sometimes you just have toleave a number. After you select Document > Headers &Footers or click on the toolbar icon1, you can add text, page numbers,Bates numbers, or a date to your document in any of six locations.Just click in any of the six boxes and either enter custom text, or clickone of the buttons for Page Number, Date, or Bates Number. Onceyou have done so, customize the appearance of your header orfooter by editing the font. A preview will be shown in the lower halfof the dialog. That’s it!
If you want to add a Header or Footer to multiple documentssimultaneously, just click the Add Files button in the lower left cornerand select the files you wish to use. If you have already entered text,by simply adding additional files, your header or footer willautomatically apply to those files as well. Use the arrow line icon tonavigate between documents.
1
11

Batch Processing. A fantastic tool for processingmultiple PDF files in a single transaction. If you wishto convert several documents to PDFs at once, select File > CreatePDF > From Multiple Files1. Or, if you wish to print several PDFdocuments in one print job, do so with Batch Processing > Print. Otherbatch processing features are batch Headers & Footers, Crop & PageSetup, Repair Page Content, and Flatten Markups.
The beauty of the Batch Processing tool is that you start the sameway - select a group of files you wish to process together. Next,depending on the action chosen, you follow the respective menus tocomplete the action. For the most part, you simply select your files,select your options, and execute.
1
12

13
Point and click - well almost. Bluebeam PDF Revuincludes a quick and simple way to create PDF files from imagesdirectly from your scanner or camera. Scan to PDF functionalityreduces the number of steps needed to convert paper documentsor digital camera images to PDF for electronic markup and sharing.
Make sure your scanner or camera is connected to your computerand turned on (of course). Go to the File menu and selectCreate PDF From Scanner or Camera. A wizard will take youthrough the simple process of completing the scan.

Text Edit. If you wish to insert or remove text,insert or strikethrough text, or even just underlinetext, you are only a click away. From the toolbar, selectthe text edit function you require and you are off and running. The EditText1 function allows you to insert, delete, or replace text within a PDFfile (assuming the fonts are embedded). The Review Text (Shift-V)feature is great for proofreading text. Simply select the tool and begin.If you insert the cursor between text, it will add a caret with the notecallout. If you highlight text, it will automatically add a strikethrough.When used in conjunction with the Reuse tool, click once and you’reset until you escape. You can also add an underline (U), squigglyunderline (Shift-U) or strikethrough (D) by selecting the tool from thetoolbar or the Markup menu.
1
14

Search with ease. Bluebeam PDF Revu provides the abilityto search a PDF document for both content within the PDF file andmarkups added to the PDF file. Select the binocular icon1 from thetoolbar or go to Edit > Search (Ctrl-F) to begin.
Type the word or phrase2 you wish to find within the currentdocument, all open documents, or even a folder. Select your options(Search Pages, Search Markups, Case Sensitive, Whole Words Only).Click Search.
The Results will appear in the lower portion of the Search panel3.Simply click on a result to be taken to the page where the searchterm appears. The term will be highlighted within the document.
Check the box to the left of the search result to perform an actionsuch as: hyperlink, mark for redaction, highlight, underline, squigglyor strikethrough. Even better, you can replace the word(s) with theReplace Checked tool. What does this mean? You can use theSearch function in Revu to perform batch text edits, redaction, orreplacements. Wow.
1
2
3
15

Secure your PDF. Make sure your privilegedand confidential information remains that way.Bluebeam PDF Revu provides two ways to secure your PDF file. First,require a password1 to open (open password) the PDF file. Second,limit printing and editing a PDF file without the appropriate password.This is a great way to limit a receiver’s ability to annotate or edit aPDF file unless you specifically provide them the Master Passwordfor access.
Access the security menu by going to Document > Security, selectingthe padlock icon in the lower-right corner of the desktop or pressingCtrl-L.
But wait, there's more. Set up security profiles and use the customsettings feature to secure your PDF file in one click. Or, if you arelooking to secure a number of PDF files simultaneously, use thebatch-lock feature. Go to File/Batch Processing/Security.
1
16

Redaction. When Top Secret, or at leasthighly confidential, text or graphics should bepermanently removed from your PDF file, youcan do it. Bluebeam PDF Revu includes a very powerful tool forsecuring and protecting your confidential information - Redaction.This tool allows you to permanently delete/remove content fromyour PDF, whether it is text or graphics. Once applied, there is nogoing back.
The Redaction1 process has three steps. First, you Mark for Redaction(Shift-R) the text or graphics you wish to delete. Second, via theProperties Tab (View > Tabs > Properties), you define the appearanceof the redact field. Click the redact field you wish to modify andchange the appearance using the properties panel. Third, when youare ready to permanently remove the text or graphic element fromyour PDF file, select Apply Redaction (Shift-A) from the toolbar. Theredaction is final so we recommend that you save a new copy ofthe document.
For “batch” redaction, use the Search functionality to find a term,select all or a portion of the results, and mark for redaction.
1
17

Markups list. A list, a table, and a wholelot more. Have you ever wanted to sort a list of markups, maybefilter out unwanted records, insert your own custom columns, or justgenerate a summary in PDF or .csv to bring into Excel? Well, you can.Bluebeam PDF Revu has the most advanced markup tracking1
technology on the market today.
With the ability to sort columns, filter out markups based on propertiessuch as color, author, status, etc., as well as insert custom columnsand append a markup list report to a PDF file, it truly is cutting edge.Import (or export) markups with ease as you append anotherreviewer’s comments to yours for a composite overview. If asummary list is what you desire, click the summary button from theMarkups toolbar and you will see options for a .csv, .xml, or .pdfoutput, or choose to print the summary to a local printer. Even better,what appears on your Markups list is what appears in your summary.Sort, filter, and include notes in the Comments field and be assuredthat it will be included in your summary - just what you would expect.
1
18

Takeoff, eh. Online measurement or takeoffscouldn’t be easier. If you are looking to count, measurelength, area, volume, perimeter, or even an angle, Revu has the righttool for you. It’s easy to get started - select the Measure Profile in thelower right corner of your desktop or select the Measure Tool (ruler)from your toolbars to turn on the Measurements tab1. Your optionsare at the top of the tab.
To measure, click Calibrate and set the scale. Pick two points as farapart as possible (zoom into the drawing, click on the first point, usethe arrows on your keyboard or hold the center mouse wheel downto pan, pick the second point), then enter the measurement. Enter aDepth to calculate the volume. Also, when counting, resume aprevious count by right-clicking on the mouse and selecting“resume count” from the context menu.
If you wish to set a different scale for a region or viewport, go to theViewports section of the tab and click Add. Move the crosshairs(pointer) to the drawing and hold your left mouse button to define aregion. Enter a name. The new Viewport will be highlighted - selectCalibrate within Viewports to set the scale and you are good to go.
1
19

Attach or embed files in your PDF to create acomplete package of documents for review.Select from two options. Either insert a file into the PDF itself so that itis visible on the face of the document, or embed the file in thedocument without a visible icon1.
To insert a file that is visible, click the paperclip icon2 from the toolbar.To embed a file in the document so that it is not visible, open up theFile Properties tab (View > Tabs > Properties, Alt-P) and click thepaperclip icon from the File Properties toolbar3 at the top of the tab.It’s that easy.
12
3
20

21
Is it a list, a folder, a container? Yes. Yes. Yes.PDF Packages enable you to organize project files and folders in asingle PDF container to easily share them electronically. Any typeof file can be wrapped into a PDF Package to deliver to clients orcolleagues, then opened in its native format by the recipient.Double-click to launch a file or right-click and select Open. Itsthat easy.
Go to File > Create PDF > PDF Package and you are off andrunning. From the main screen you can Add Files, Add Folder, orcreate a New Folder. As you do, you will see your items appear inthe table below. Again, its that easy.

Bookmarks - more than a table of contents -it’s a way to tell your story. With Revu, bookmarks take ona life of their own. It’s more than just jumping from one page to thenext. A bookmark can be a designated snapshot view or window ona page, it can take you to a place on the Internet, or it can open upa file you wish to share. Just add a bookmark and apply an action.
To add a bookmark, click on the Bookmarks tab1 in the left panel. If itis not visible, go to View > Tabs > Bookmarks (Alt-B) to open. On thetop of the tab, you will notice a number of toolbars to expand andcollapse bookmarks, add, delete, set an action, or even change theproperties. Everything you need is just a click away.
To set an action such as Snapshot View or Open File, click the gear orAction button. Select your action and go for it. If you find yourselfmerging files or deleting pages resulting in broken bookmarks, use theAudit Bookmarks function to automatically highlight the issues.
1
22

23
The few, the proud, the only PDF solutionwith Flags! Like bookmarks, PDF Flags jump to a specific page,website or file. These are actions. What makes Flags special is thatit can not only take you to a specific page, but there is a visualcue as to where you should be looking - i.e., the flag. So, for thoseof you who like to use those sticky notes to highlight sections,signature lines, or notes in a very large document, we created thesame for you, electronically. Maybe we should call themsticky flags.
Look for the little red flag in the upper right corner and click on it.This illustration above shows the Flags panel open. To add a flagthat places an annotation (visual Flag) on the PDF, look for theFlag icon on your toolbar. It has a little infinity symbol with it too.You can even change the appearance of the Flag by rightclicking and selecting Properties. To insert a PDF flag without avisual markup, click on the Flag icon with a plus (+) in the Flagspanel (shown in blue).

Access the Web in a tab - WebTab™ - genius!Yet another Bluebeam innovation, we bring you the Internet in Revu.No longer do you have to open a separate web browser to researchplans, specs, supplies, or brochures. Anything and everything youneed on the Web and through the Web is accessible right fromwithin Revu.
Search for whatever you need, click to open a PDF file1, and beamazed as it automatically launches within Revu. To copy or insertpages from the PDF document, simply select the appropriate pagesfrom the Thumbnails tab and right-click to copy (Ctrl-C) and paste(Ctrl-V) into your original PDF file. It’s that easy to create acompilation, add new content to your document, or insertbackup files.
Plus, we include direct access to Google, The BlueBook (suppliers,contractors, and subs), CADdetails2 (drawings, specs, and productimages), McMaster-Carr (465,000 products), and Sweets Catalog(building materials, products, manufacturers). Feel free to add yourown home pages or favorites for easy access.
2
1
24

45°
Top Tips & Secretsfrom Bluebeam insiders
Group markups by right-clicking on them and selecting Groupor by pressing Ctrl-G. Once markups are grouped, hold the Shift key downto manipulate the individual markups, release Shift and the markups willautomatically regroup.
Rotate markups by grabbing the orange control pointat the top of a markup. Hold the Shift key down to rotate to anexact angle.
Tablet users can pan and zoom withtheir pen by double-tapping on the screen to pull up thezoom control. Drag your pen up (+) or down (-) to zoom in/out -move the pen outside of the zoom control and pan as normal.Oh, and don’t forget, Revu includes pressure sensitivity and inkcopy/paste interoperability with Journal™ and OneNote™.
The Dimmer is very useful when reviewing markups ona color PDF. Look for the light bulb in the lower right corner ofyour desktop.
Select multiple markups by using the Lasso Toolor right-click on the mouse, hold, and drag the pointer acrossmultiple markups.
Reuse is a simple way to minimize clicks. If you plan touse the same markup annotation type repeatedly, click Reuse(right-bottom of workspace) and eliminate the need to selectthe same tool over and over again.
Reuse
Grid shows the grid on the workspace - the distance betweenpoints can be changed in Edit > Preferences > Grid & Snap. Snapwill snap markup endpoints to the Grid. Content will snap to theunderlying content (assuming content is vector). Sync willsynchronize all split views so that you can pan and zoom multipleviews of the same or different files at the same time.
Grid
Snap
Sync
Content
Zoom versus page down. If you select Single Page Modeto view a document, the mouse wheel defaults to zoom in/out.If you select Continuous Mode, the center mouse wheel defaultsto page scroll. You can select your default preferences inEdit > Preferences.
25

© 2009 Bluebeam Software, Inc. All rights reserved. Bluebeam®, Revu® and the Bluebeam logo areregistered trademarks of Bluebeam Software, Inc. Other company and product names are trademarksor registered trademarks of their respective owners.