guide to using a symbiota-based portal · web view4. managing user ... the labels can be printed...
TRANSCRIPT

Guide to Using a Symbiota-based Portal
developed for users of the Consortium of California Herbaria (CCH2) Portal
Version 2
Katelin D. Pearson, Jenn Yost
last updated February 19, 2019
For questions, additions, or suggestions, contact Katie Pearson at [email protected]
Contents
1. Navigating the CCH2 portal website..................................................................................................2
CCH2 portal guide | 1
2. Creating a new user..........................................................................................................................3
3. Managing your profile and collections(s)..........................................................................................3
3.1 Data Editor Control Panel............................................................................................................3
3.2 Administration Control Panel......................................................................................................4
4. Managing user permissions...............................................................................................................6
5. Adding specimen records..................................................................................................................7
6. Searching and sorting specimen records...........................................................................................7
7. Editing existing specimen records.....................................................................................................9
7.1 Explanation of Record Editor tabs...............................................................................................9
7.1 Explanation of Occurrence Data fields.......................................................................................10
7.2 Batch editing specimen records.................................................................................................12
7.3 Batch editing scientific names...................................................................................................13
8. Importing record data.....................................................................................................................13
9. Adding determination/annotation data..........................................................................................15
10. Printing labels or annotations.......................................................................................................16
11. Managing loans, gifts, and exchanges...........................................................................................17
Appendix 1: Processing Status............................................................................................................18
References..........................................................................................................................................18
CCH2 portal guide | 2
1. Navigating the CCH2 portal website
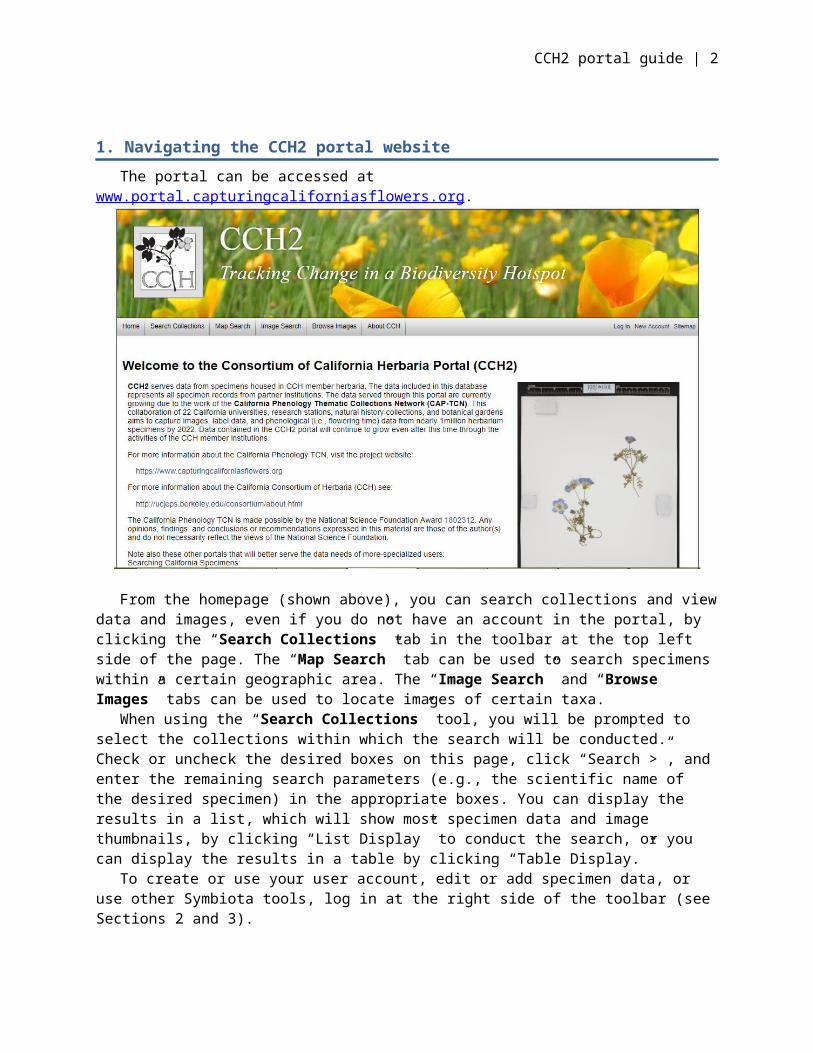
The portal can be accessed at www.portal.capturingcaliforniasflowers.org.
From the homepage (shown above), you can search collections and view data and images, even if you do not have an account in the portal, by clicking the “Search Collections” tab in the toolbar at the top left side of the page. The “Map Search” tab can be used to search specimens within a certain geographic area. The “Image Search” and “Browse Images” tabs can be used to locate images of certain taxa.
When using the “Search Collections” tool, you will be prompted to select the collections within which the search will be conducted. Check or uncheck the desired boxes on this page, click “Search >”, and enter the remaining search parameters (e.g., the scientific name of the desired specimen) in the appropriate boxes. You can display the results in a list, which will show most specimen data and image thumbnails, by clicking “List Display” to conduct the search, or you can display the results in a table by clicking “Table Display.”
To create or use your user account, edit or add specimen data, or use other Symbiota tools, log in at the right side of the toolbar (see Sections 2 and 3).
For a video tutorial of the basic uses of a Symbiota-based portal, visit the SCAN TCN website below. Note that the SCAN portal is not identical to the CCH2 portal, but the layout will be similar
http://www.lep-net.org/?page_id=403

CCH2 portal guide | 3
2. Creating a new user
Users must create their own accounts by clicking “New Account” near the top right side of the portal website. They will be prompted to provide a login name, password, and contact information. When creating an account, make sure to record your login name and password in a safe place for future reference. These can be recovered via email if necessary. Once you have finished entering the required information, click the box next to “I am not a robot” and click “Create Login.”
A new user will not be able to manage collection data until they are granted appropriate permissions (see Section 4).
3. Managing your profile and collections(s)
To manage your collection(s), click “My Profile” at the top right corner of the portal homepage. You will see a page like the one below.
The “Species Checklists” tab allows you to create and share personal species checklists for research, education, or other uses. Species in the checklist can be linked to voucher specimens, enabling you to download custom checklists of specimens for the species on your list. This function will not be described in detail in this guide.
The “Specimen Management” tab is where you will manage your specimen data. Upon clicking this tab, you will see a “Collection Management” box. If you have administrative or data editing permissions for a collection, the name of the collection will be listed in this box. If you do not see your collection listed in this box and you know who the administrator(s) for the collection is(are), contact them directly so they can grant you appropriate permissions. If you do not know an administrator for the collection or you believe you are the administrator, contact Katie ([email protected]) for assistance.
Depending on your administrative permissions, when you click on name of your collection in the “Collection Management” box you will see one, both, or neither of the following control panels.
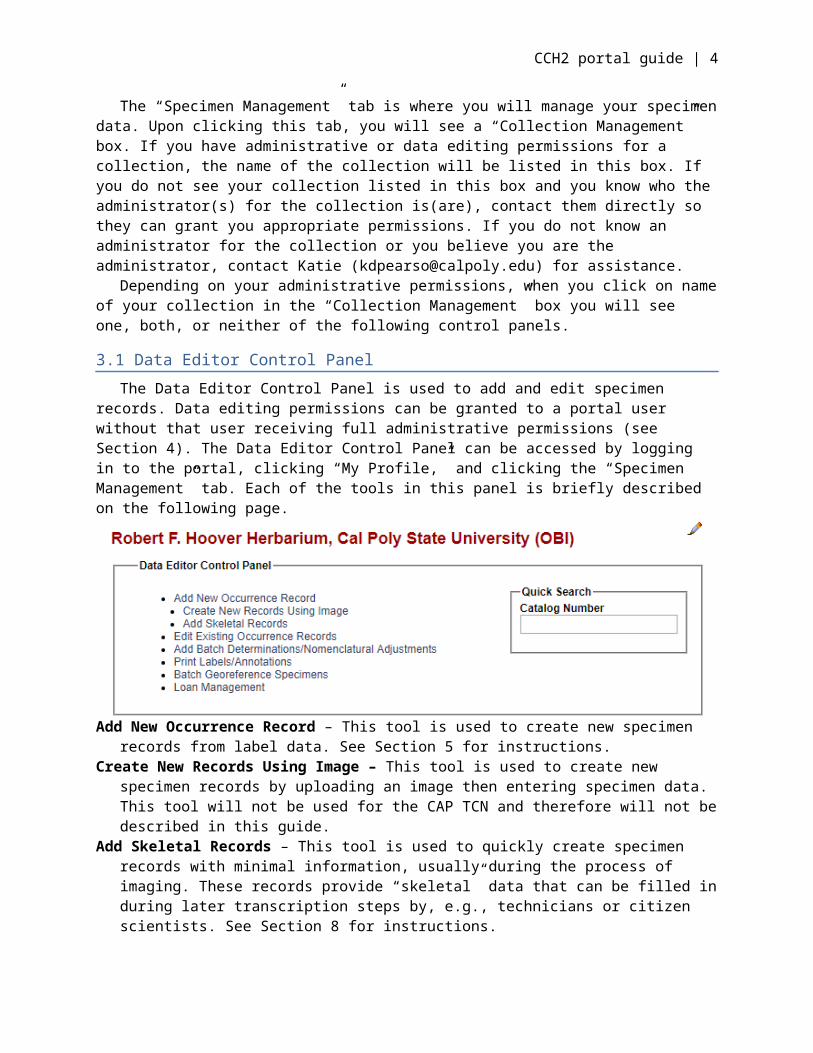
3.1 Data Editor Control Panel
The Data Editor Control Panel is used to add and edit specimen records. Data editing permissions can be granted to a portal user without that user receiving full administrative permissions (see Section 4). The Data Editor Control Panel can be accessed by logging in to the portal, clicking “My Profile,” and clicking the “Specimen Management” tab. Each of the tools in this panel is briefly described on the following page.
CCH2 portal guide | 4
Add New Occurrence Record – This tool is used to create new specimen records from label data. See Section 5 for instructions.
Create New Records Using Image – This tool is used to create new specimen records by uploading an image then entering specimen data. This tool will not be used for the CAP TCN and therefore will not be described in this guide.
Add Skeletal Records – This tool is used to quickly create specimen records with minimal information, usually during the process of imaging. These records provide “skeletal” data that can be filled in during later transcription steps by, e.g., technicians or citizen scientists. See Section 8 for instructions.
Edit Existing Occurrence Records – This tool is used to add or edit data of records that already exist in the portal. See Section 7 for instructions.
Add Batch Determinations/Nomenclatural Adjustments – This tool can be used to add determination/annotation information and/or change the scientific name of a number of specimens all at once. The user can define whether the change is due to a new determination (i.e., identification and annotation by a taxonomic expert) or adjusted nomenclature for the taxon based on taxonomic research. See Section 10 for instructions.
Print Labels/Annotations – This tool can be used to print specimen labels or barcodes for records with data entered in the portal. It allows collectors to enter their collection data directly into the portal and print pre-formatted labels rather than requiring collectors to type and format labels only to have technicians re-type label data later in the process. The tool also allows collection managers or determiners to print pre-formatted annotation labels after entering determination data via the “Add Batch Determinations/Nomenclatural Adjustments” tool. The labels can be printed from the browser, downloaded as a CSV file, or downloaded as a Word file. See Section 11 for instructions.
Batch Georeference Specimens - This tool can be used to update the geographic coordinates of a number of specimens all at once. This function will be described in a later version of this guide.
Loan Management – This tool can be used to keep track of outgoing and incoming loans, gifts, and exchanges of specimens using the appropriate tab on the Loan Management Main Menu. See Section 12 for instructions.
3.2 Administration Control Panel
The Administration Control Panel is used to perform higher-level data processing and is thus only available to users with administrative permissions (see Section 4). It can be accessed by logging in to the portal, clicking “My Profile,” and clicking the “Specimen Management” tab. The tools available in the Administration Control Panel are described in the following pages.
CCH2 portal guide | 5
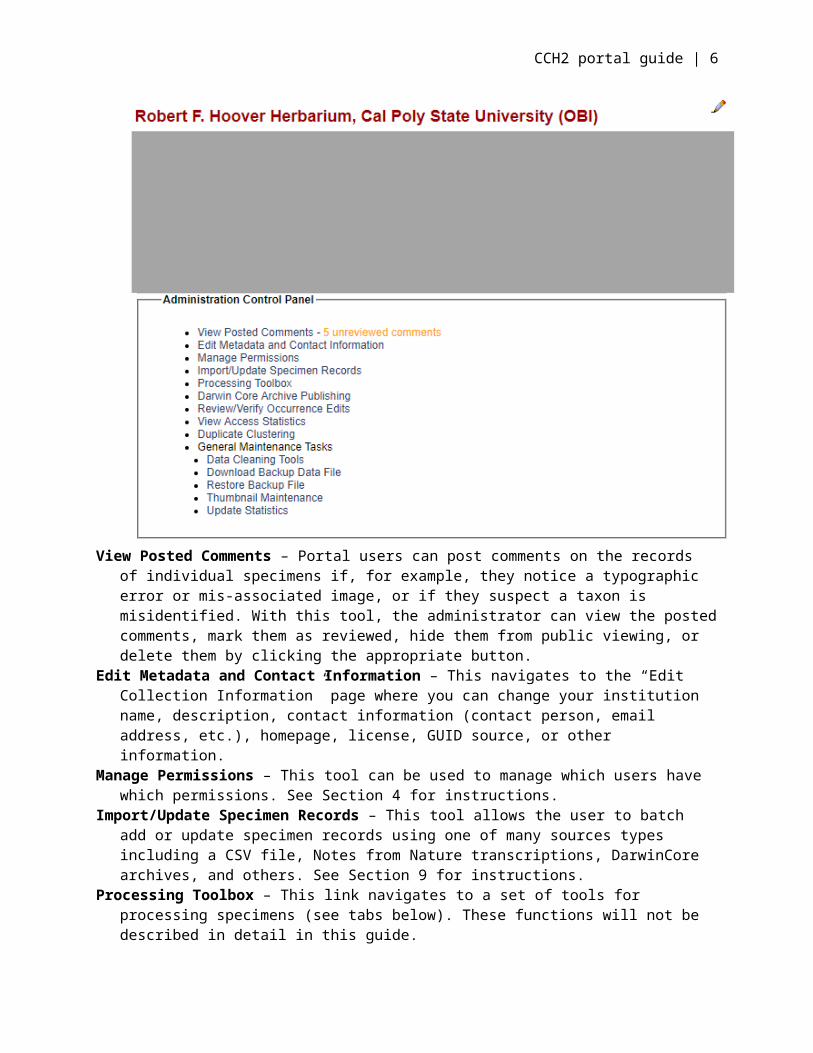
View Posted Comments – Portal users can post comments on the records of individual specimens if, for example, they notice a typographic error or mis-associated image, or if they suspect a taxon is misidentified. With this tool, the administrator can view the posted comments, mark them as reviewed, hide them from public viewing, or delete them by clicking the appropriate button.
Edit Metadata and Contact Information – This navigates to the “Edit Collection Information” page where you can change your institution name, description, contact information (contact person, email address, etc.), homepage, license, GUID source, or other information.
Manage Permissions – This tool can be used to manage which users have which permissions. See Section 4 for instructions.
Import/Update Specimen Records – This tool allows the user to batch add or update specimen records using one of many sources types including a CSV file, Notes from Nature transcriptions, DarwinCore archives, and others. See Section 9 for instructions.
Processing Toolbox – This link navigates to a set of tools for processing specimens (see tabs below). These functions will not be described in detail in this guide.
Darwin Core Archive Publishing – This tool allows the user to publish occurrence data to a collection by uploading a Darwin Core Archive. See Section 9 for instructions.
Review/Verify Occurrence Edits – This tool can be used by the administrator to review edits to specimen records that have been made by other users. The administrator can select the edits he/she wishes to accept or reject, click either the “apply edits” or “revert edits” bubble, respectively, and click “Update Selected Records” to apply the approval/rejection.
CCH2 portal guide | 6
View Access Statistics – This tool allows the administrator to view use of specimens in their collection. The results can be viewed as a summary count or full records, and the results can be filtered according to the access type of date of access.
Duplicate Clustering – This tool allows the user to view and evaluate potential duplicate specimens housed at other institutions by matching specimens with the same collector, collector number, and collection date. The user can view all duplicate specimens or just duplicate specimens with conflicting identifications.
General Maintenance TasksData Cleaning Tools – Available tools include a duplicate record identification tool for discovering
accidental duplicate catalog numbers; a political geography tool to help fix and standardize country, state/province, and county designations; and a taxonomy tool that aids in locating and fixing taxonomic errors and inconsistencies (see Section 7.3 for instructions on the latter).
Download Backup Data File – This tool allows the user to download a copy of all collection data besides images. This file can be used for archiving or as a backup before making batch edits to the collection.
Restore Backup File – If systematic errors in the collection have been discovered, likely resulting from an erroneous batch editing process, the collection data can be reset to a previous “version” of the data using this tool, provided the user has previously downloaded a backup data file, preferably shortly before the erroneous batch process.
Thumbnail Maintenance – This tool will build thumbnail images based on the specimen imagesUpdate Statistics – Click this link to update collection statistics such as specimen counts and to
update null fields (e.g., scientific name fields for specimens that were only identified to family) within the collection.
4. Managing user permissions
Non-users may freely access specimen records and images. All users may comment on specimen records. However, only users who have been granted data editing or administrative permissions may edit specimen records and images. There are three levels of permissions:
Data editor: Users with these permissions will be able to add and edit occurrence records, add batch nomenclatural adjustments, print labels or annotations, batch georeference specimens, or use the “loan management” tool. These users will NOT be able to delete records once they are created. Student workers, interns, and other data entry personnel should be granted this level of permission.
Administrator: Users with these permissions have all data editing permissions and can access all the tools in the Administration Control Panel (see Section 3.2).
Rare Species Reader: Users with these permissions have no data editing or administrative capabilities. However, they are able to view locality information for rare and protected species, which is normally redacted for non-users and users lacking these or data editor/administrator permissions.
To view and edit user permissions for your collection(s), navigate to your Administration Control Panel (see Section 3) and click “Manage User Permissions.”
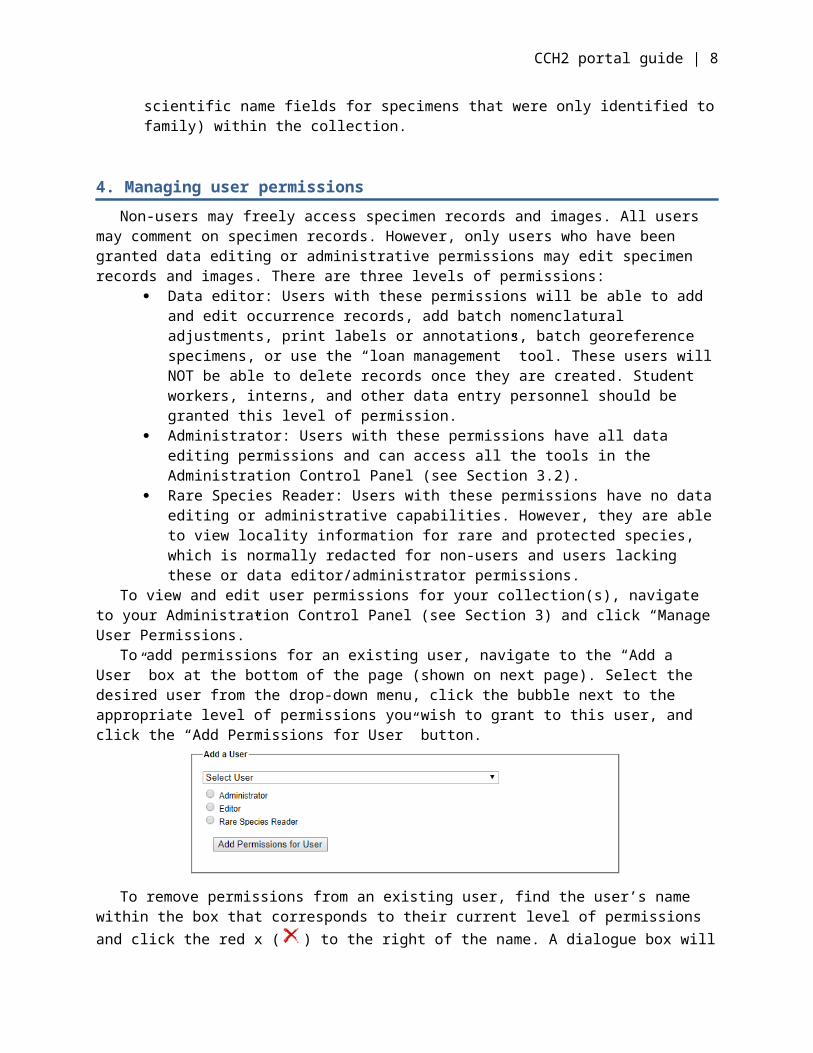
To add permissions for an existing user, navigate to the “Add a User” box at the bottom of the page (shown on next page). Select the desired user from the drop-down menu, click the bubble next to the appropriate level of permissions you wish to grant to this user, and click the “Add Permissions for User” button.

CCH2 portal guide | 7
To remove permissions from an existing user, find the user’s name within the box that corresponds to their current level of permissions and click the red x ( ) to the right of the name. A dialogue box will pop up to ask you whether you are sure of your choice. If you are, click OK.
To change the permissions of an existing user from one level to another, follow the above instructions to first remove their current permissions, then follow the instructions to add the new permissions for the user. It is also possible to add multiple different levels of permissions to the same user, but because this would be redundant, it is recommended to remove the user from one list and add them to the other as described here.
For a video on this topic created by the LepNet TCN, visit their website below. Note that the SCAN portal is not identical to the CCH2 portal, but will be similar in format.
http://www.lep-net.org/?page_id=403
5. Adding specimen records
New specimen records can be added by navigating to Add New Occurrence Record or Add Skeletal Records in Data Editor Control Panel (see Section 3). For the CAP TCN, we will mostly be adding new records using the Add Skeletal Records tool (see Section 8). However, if you need to add a record and all or most of its associated data, you should use the Add New Occurrence Record option. See Section 7 for an explanation on how to use the Record Editor tool and its data fields.
6. Searching and sorting specimen records
(adapted from Skema & Barber 2018)The Record Search Form in the portal provides the means to search and sort your entire collection.
Access the form by navigating to your collection management page (see Section 3), then click “Edit Existing Occurrence Records” in the “Data Editor Control Panel.” You will see a screen like that shown below:
CCH2 portal guide | 8
You can enter a search term in any field shown. Hover over a field to see particular instructions for how to best enter search terms for that field (e.g., must enter space before and after dash when entering a range into catalog number). To search using any data field not shown on the form, select a field from the dropdown menu next to “Custom Field 1,” select a modifier from the dropdown menu next to it, and enter the search term in the last box to the right on that line. You may add additional
custom fields by clicking on the pencil with the plus sign ( ) at the end of the line for Custom Field 1. You can search for records using as many fields as you wish.
NOTE
A straight search term returns only exact matches. For example, if you enter “Edgar T. Wherry” in the “Collector” field, you will only be returned those records with the exact same spelling, spacing, and punctuation as your entry. Use a percent sign (%) to loosen the search parameters. This acts as a ‘contains’ statement. For example, entering “%Wherry” will return any collector name with Wherry in it (e.g., Edgar T. Wherry, E.T. Wherry, Edgar T Wherry, Amelia Wherry Spencer). Searching with percent signs can also be a good way to find spelling errors in your collection’s data.
To sort the results of your search, use the “Sort by:” field in the lower right corner. For example, if you select “Date Last Modified” from the Sort by drop down, then select “descending” from the drop down menu next to it, you will be returned a table of all records in order of when they were modified from most recent to least recent.
You can view the results of your search by clicking “Display Editor” or “Display Table.” If you click “Display Editor,” you will see the editing window (see Section 7) for the first record that matches your search, and the other records that match your search can be viewed by clicking the arrows to the top right of the form (circled in black below). If you click “Display Table,” the results of your search will be displayed as a table that includes most data fields available for these records.
NOTE
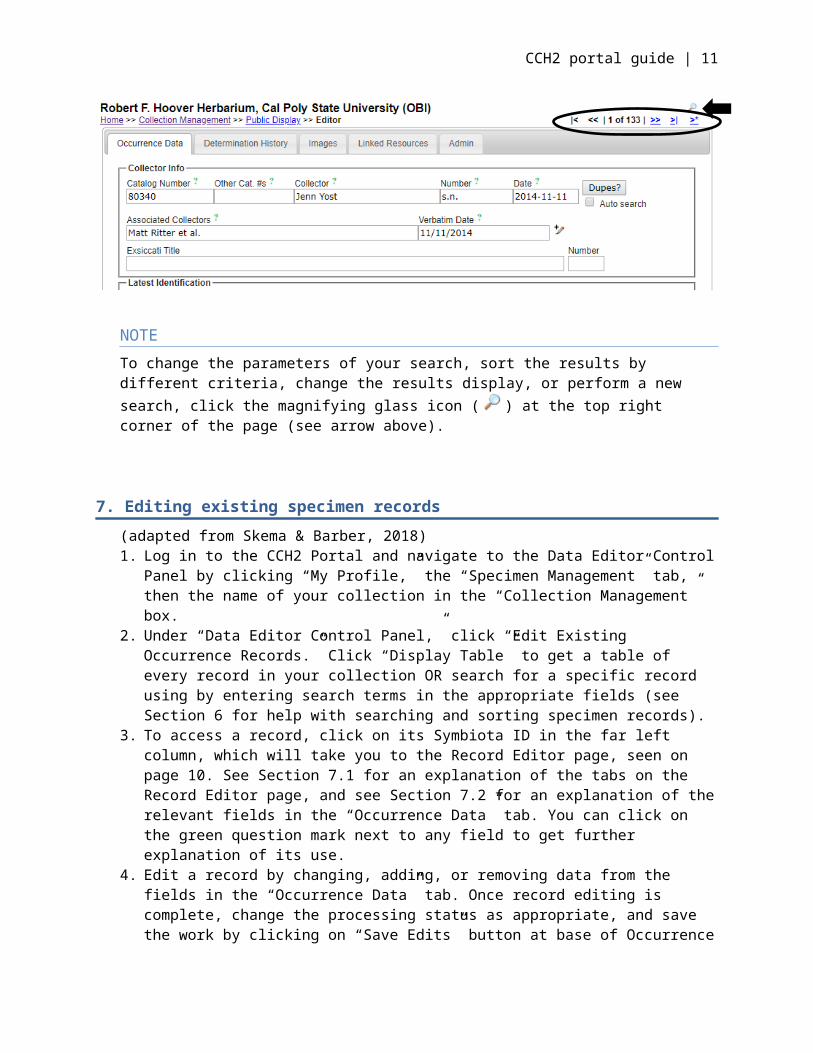
To change the parameters of your search, sort the results by different criteria, change the results display, or perform a new search, click the magnifying glass icon ( ) at the top right corner of the page (see arrow above).

CCH2 portal guide | 9
7. Editing existing specimen records
(adapted from Skema & Barber, 2018)1. Log in to the CCH2 Portal and navigate to the Data Editor Control Panel by clicking “My Profile,”
the “Specimen Management” tab, then the name of your collection in the “Collection Management” box.
2. Under “Data Editor Control Panel,” click “Edit Existing Occurrence Records.” Click “Display Table” to get a table of every record in your collection OR search for a specific record using by entering search terms in the appropriate fields (see Section 6 for help with searching and sorting specimen records).
3. To access a record, click on its Symbiota ID in the far left column, which will take you to the Record Editor page, seen on page 10. See Section 7.1 for an explanation of the tabs on the Record Editor page, and see Section 7.2 for an explanation of the relevant fields in the “Occurrence Data” tab. You can click on the green question mark next to any field to get further explanation of its use.
4. Edit a record by changing, adding, or removing data from the fields in the “Occurrence Data” tab. Once record editing is complete, change the processing status as appropriate, and save the work by clicking on “Save Edits” button at base of Occurrence Data tab in Record Editor or by hitting ‘Enter’ once or twice on your keyboard, depending on the browser and/or operating system.
NOTE
If an image of the specimen is available, you can view it to help edit the record. To increase the specimen image size, hover over any outer boundary of the image until you see an arrow and drag to the desired size. To zoom in on one area of the image, hold down the Ctrl key (Cmd on Mac) and click on an area of interest. Alternatively, you can hold down the Shift key, left click, and drag the cursor up. To zoom out, do the same but drag down.
7.1 Explanation of Record Editor tabs
Upon opening the Record Editor page, you will see 4-5 tabs, depending on your level of permissions. The image shown below is of the Record Editor page for a user with administrative permissions. A brief explanation of each tab is provided below.
Occurrence Data – See explanation of fields in Section 7.2.Determination History – where annotations are shown and can be entered. Annotations can also be
batch uploaded from separate files. See Section 10 for instructions for using this tool.Images – provides information on image(s) associated with the record. An image can be deleted here, if
need be. To do this, click the pencil icon for the relevant image. Under “Delete Image,” click the box for “Remove image from server,” then click the “Delete Image” button.
Linked Resources – allows linkage of checklists, duplicates, and genetic resources to the recordAdmin – tracks changes made to Edit History, allows for transfers of specimens between collections, and
provides a means for deleting an occurrence record. Only users with administrative permissions (see Section 4) can delete specimen records.
CCH2 portal guide | 10
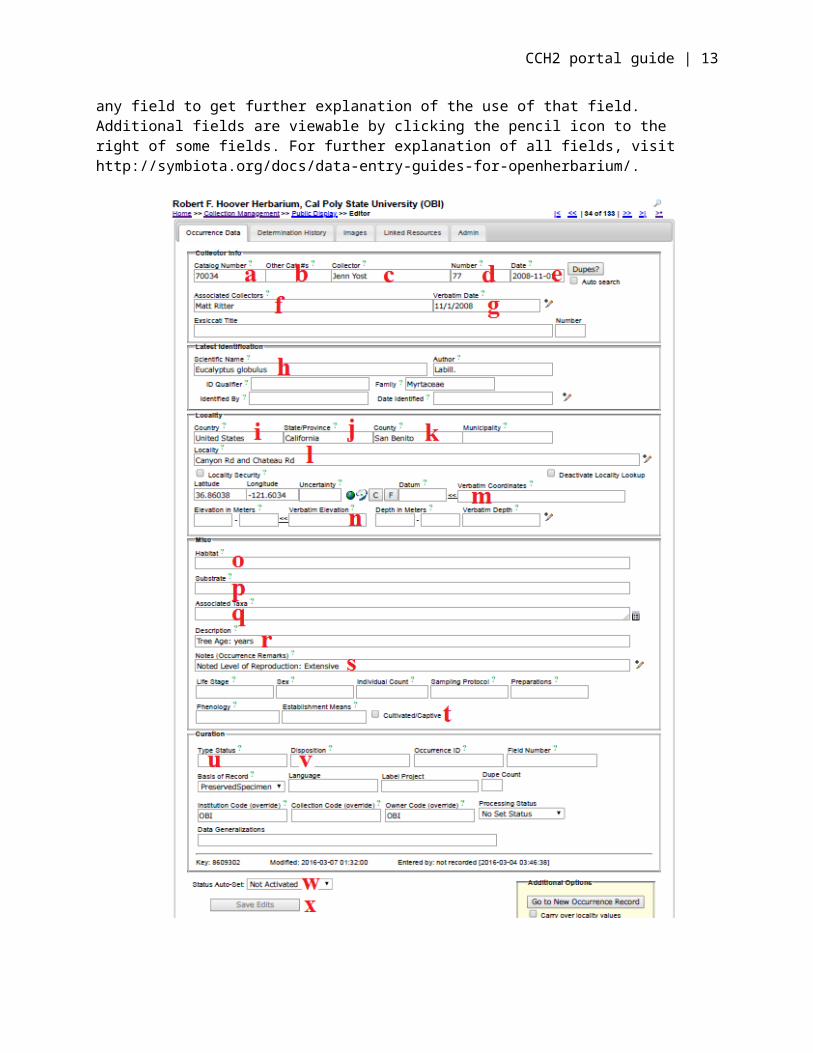
7.1 Explanation of Occurrence Data fields
(adapted from Skema & Barber 2018)The major fields of interest are described in the following two pages. In the portal, you can click on
the green question mark next to any field to get further explanation of the use of that field. Additional fields are viewable by clicking the pencil icon to the right of some fields. For further explanation of all fields, visit http://symbiota.org/docs/data-entry-guides-for-openherbarium/.
CCH2 portal guide | 11
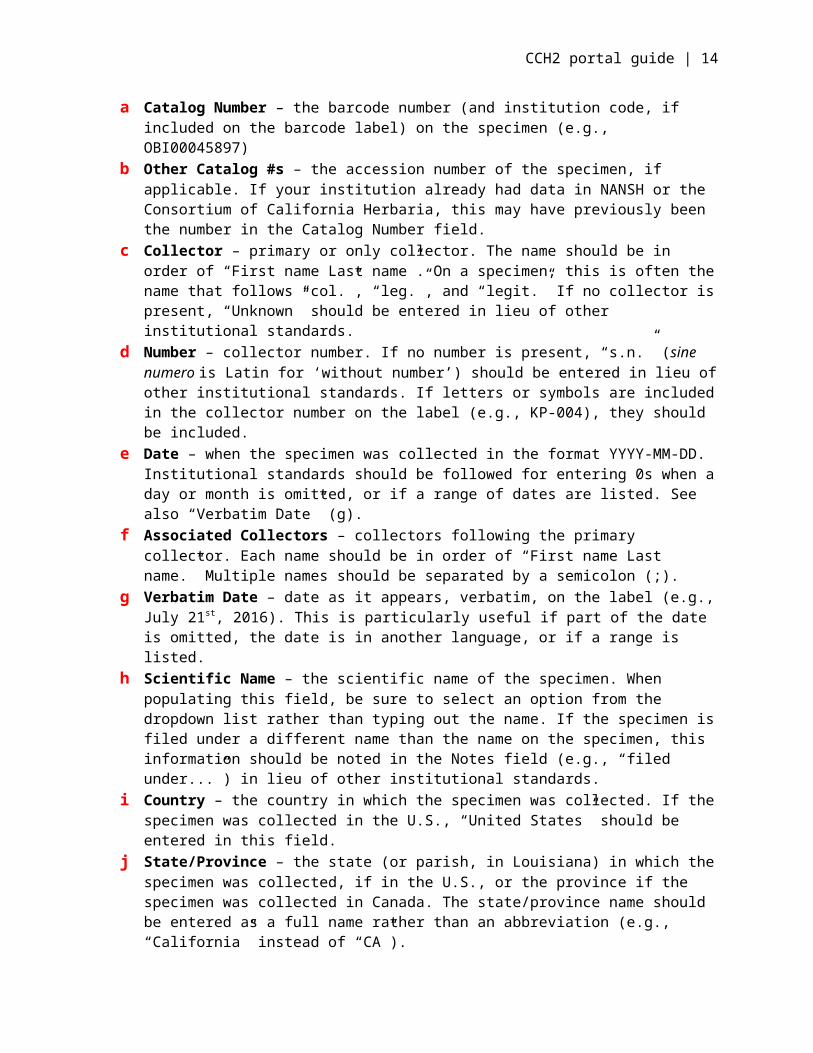
a Catalog Number – the barcode number (and institution code, if included on the barcode label) on the specimen (e.g., OBI00045897)
b Other Catalog #s – the accession number of the specimen, if applicable. If your institution already had data in NANSH or the Consortium of California Herbaria, this may have previously been the number in the Catalog Number field.
c Collector – primary or only collector. The name should be in order of “First name Last name”. On a specimen, this is often the name that follows “col.”, “leg.”, and “legit.” If no collector is present, “Unknown” should be entered in lieu of other institutional standards.
d Number – collector number. If no number is present, “s.n.” (sine numero is Latin for ‘without number’) should be entered in lieu of other institutional standards. If letters or symbols are included in the collector number on the label (e.g., KP-004), they should be included.
e Date – when the specimen was collected in the format YYYY-MM-DD. Institutional standards should be followed for entering 0s when a day or month is omitted, or if a range of dates are listed. See also “Verbatim Date” (g).
f Associated Collectors – collectors following the primary collector. Each name should be in order of “First name Last name.” Multiple names should be separated by a semicolon (;).
g Verbatim Date – date as it appears, verbatim, on the label (e.g., July 21st, 2016). This is particularly useful if part of the date is omitted, the date is in another language, or if a range is listed.
h Scientific Name – the scientific name of the specimen. When populating this field, be sure to select an option from the dropdown list rather than typing out the name. If the specimen is filed under a different name than the name on the specimen, this information should be noted in the Notes field (e.g., “filed under...”) in lieu of other institutional standards.
i Country – the country in which the specimen was collected. If the specimen was collected in the U.S., “United States” should be entered in this field.
j State/Province – the state (or parish, in Louisiana) in which the specimen was collected, if in the U.S., or the province if the specimen was collected in Canada. The state/province name should be entered as a full name rather than an abbreviation (e.g., “California” instead of “CA”).
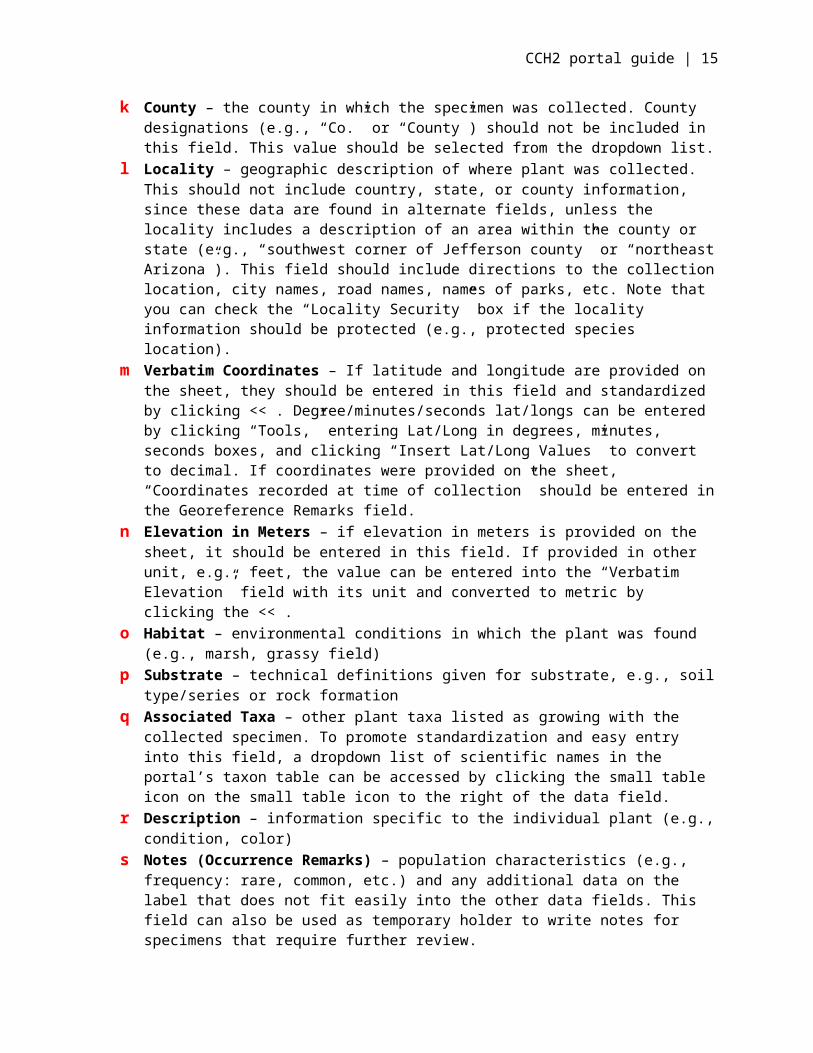
k County – the county in which the specimen was collected. County designations (e.g., “Co.” or “County”) should not be included in this field. This value should be selected from the dropdown list.
l Locality – geographic description of where plant was collected. This should not include country, state, or county information, since these data are found in alternate fields, unless the locality includes a description of an area within the county or state (e.g., “southwest corner of Jefferson county” or “northeast Arizona”). This field should include directions to the collection location, city names, road names, names of parks, etc. Note that you can check the “Locality Security” box if the locality information should be protected (e.g., protected species location).
m Verbatim Coordinates – If latitude and longitude are provided on the sheet, they should be entered in this field and standardized by clicking << . Degree/minutes/seconds lat/longs can be entered by clicking “Tools,” entering Lat/Long in degrees, minutes, seconds boxes, and clicking “Insert Lat/Long Values” to convert to decimal. If coordinates were provided on the sheet, “Coordinates recorded at time of collection” should be entered in the Georeference Remarks field.
n Elevation in Meters – if elevation in meters is provided on the sheet, it should be entered in this field. If provided in other unit, e.g., feet, the value can be entered into the “Verbatim Elevation” field with its unit and converted to metric by clicking the << .
o Habitat – environmental conditions in which the plant was found (e.g., marsh, grassy field)

CCH2 portal guide | 12
p Substrate – technical definitions given for substrate, e.g., soil type/series or rock formationq Associated Taxa – other plant taxa listed as growing with the collected specimen. To promote
standardization and easy entry into this field, a dropdown list of scientific names in the portal’s taxon table can be accessed by clicking the small table icon on the small table icon to the right of the data field.
r Description – information specific to the individual plant (e.g., condition, color)s Notes (Occurrence Remarks) – population characteristics (e.g., frequency: rare, common, etc.)
and any additional data on the label that does not fit easily into the other data fields. This field can also be used as temporary holder to write notes for specimens that require further review.
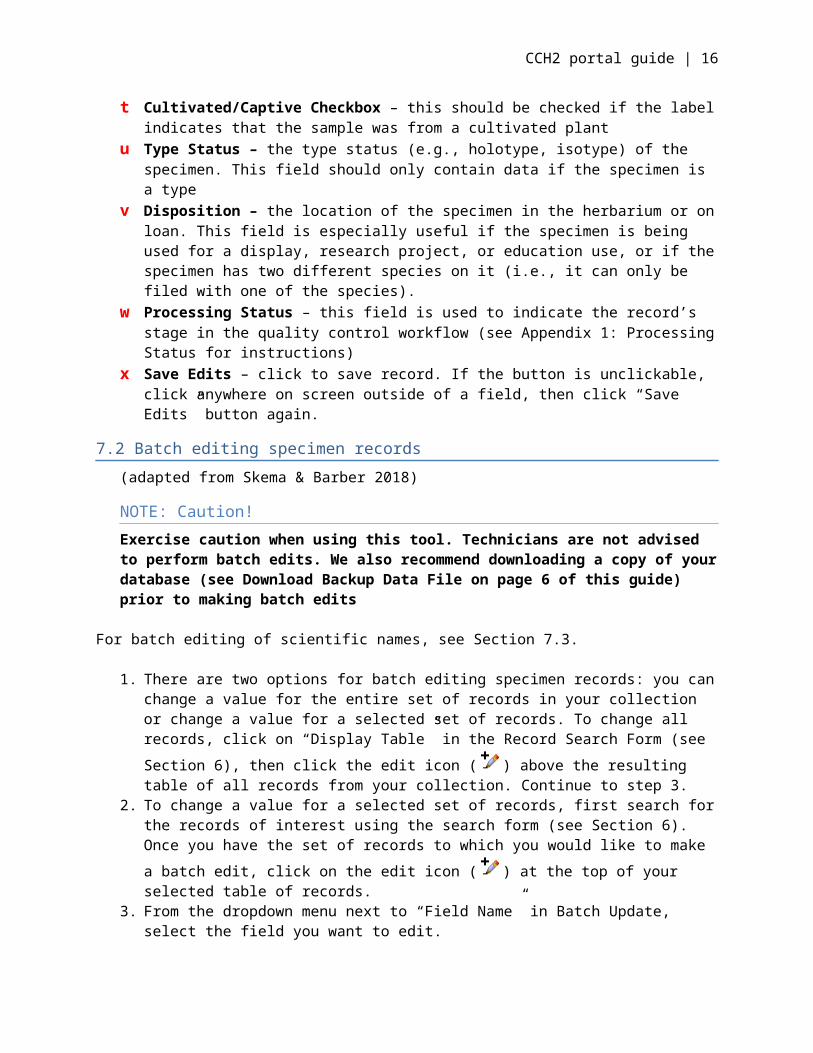
t Cultivated/Captive Checkbox – this should be checked if the label indicates that the sample was from a cultivated plant
u Type Status – the type status (e.g., holotype, isotype) of the specimen. This field should only contain data if the specimen is a type
v Disposition – the location of the specimen in the herbarium or on loan. This field is especially useful if the specimen is being used for a display, research project, or education use, or if the specimen has two different species on it (i.e., it can only be filed with one of the species).
w Processing Status – this field is used to indicate the record’s stage in the quality control workflow (see Appendix 1: Processing Status for instructions)
x Save Edits – click to save record. If the button is unclickable, click anywhere on screen outside of a field, then click “Save Edits” button again.
7.2 Batch editing specimen records
(adapted from Skema & Barber 2018)
NOTE: Caution!
Exercise caution when using this tool. Technicians are not advised to perform batch edits. We also recommend downloading a copy of your database (see Download Backup Data File on page 6 of this guide) prior to making batch edits
For batch editing of scientific names, see Section 7.3.
1. There are two options for batch editing specimen records: you can change a value for the entire set of records in your collection or change a value for a selected set of records. To change all records, click on “Display Table” in the Record Search Form (see Section 6), then click the edit
icon ( ) above the resulting table of all records from your collection. Continue to step 3.2. To change a value for a selected set of records, first search for the records of interest using the
search form (see Section 6). Once you have the set of records to which you would like to make a
batch edit, click on the edit icon ( ) at the top of your selected table of records.3. From the dropdown menu next to “Field Name” in Batch Update, select the field you want to
edit.4. In “Current Value:” enter the text that is presently in the field you want to edit.5. In “New Value:” enter the text that you want to be in the edited field.6. Choose if you want to match the whole field or just match any part.7. Click “Batch Update Field” to enact your batch edit. A pop-up screen will tell you the number of
records to be updated, warn you that the replace operation cannot be undone, and prompt you to OK the update. Proceed with caution and see examples below.
CCH2 portal guide | 13
NOTE: Caution!
It is easy to inadvertently change text you did not intend to change. Generally, the more specific your “Current Value:” text, the less likely you are to run into unintended consequences. If possible, get an estimate from your record table of how many records should be affected, and check that against the number of records cited in the warning. If the numbers do not match, rethink your strategy.It is not possible to check the record count when sorting by “Modified By” first. Doing so returns a count of the number of fields edited by the “Modified By” user for all records to be affected, rather than the number of records to be affected.
Examples
Example of a good use of batch edit: Standardizing plant collector names. If you are standardizing all Wherry’s collections to “Edgar T. Wherry,” then you could enter “E. T. Wherry” in Current Value and “Edgar T. Wherry” in New Value in batch edit for the collector field name, and update. Repeat for alternate forms of this name (e.g., “E T Wherry,” Edgar T Wherry”).Example of a bad use of batch edit: Changing cardinal directions. For example, if you entered “n.” in Current Value and “N” in New Value in batch edit for the locality in an attempt to change lower case abbreviated instances of the cardinal direction north, you would accomplish that, but you would also change any other character string with “n.” such as a sentence ending in the letter n. This would result in batch misplacements of “N” where “n.” should be. For example, “Next to the station. East side” would be transformed into “Next to the statioN East side.”
7.3 Batch editing scientific names
(adapted from Skema & Barber 2018)There are two options for batch editing scientific names, each appropriate for different situations.
Taxonomic cleaning tools are one way to change scientific names. To use these, click on “Data Cleaning Tools” in your Administration Control Panel (see Section 3.2). Scroll down to the Taxonomy section and click “Analyze taxonomic names.” Select the desired resource by checking the box next to it (Catalog of Life, Tropicos, or both). Leave “Names Processed per Run” at 20 and leave “Start Index” blank. Select the radio dial next to “Semi-Manual” and then click “Analyze Taxonomic Names.” Carefully look through the list. When you find a suggested name that is correct, click “remap to this taxon.” These tools may be useful if you have scientific names that are misspelled.
The nomenclature adjustment tool may be useful if the names are spelled correctly but are otherwise incorrect or outdated. To use it, click “Add Batch Determinations/Nomenclatural Adjustments” in your Administration Control Panel. See Section 10 for instructions on how to use this tool.
8. Importing record data
For the most part in the CAP TCN project, the project management team (primarily Jason Alexander, Katie Pearson, and Ed Gilbert) will assist you with importing batches of record data into your collection. Nevertheless, these instructions are provided here to guide you through this process should you need to add additional large sets of specimen records (e.g., specimen data from a recent collecting expedition).
There are a number of ways to import data into the portal discussed here: http://symbiota.org/docs/specimen-search-engine/interoperability-of-specimen-data/
CCH2 portal guide | 14
and here:http://symbiota.org/docs/specimen-upload-procedure-2/In this section, we will discuss one of the simplest methods of uploading specimen data: importing a
comma-separated value (CSV) file. CSV files can be created by using the Save As function in Microsoft Excel or another spreadsheet program and changing the saved file type. A CSV file uploaded to the portal needs only to include a column for catalog number (i.e., barcode number) and can include any number of additional fields, each as its own column in the CSV file.
NOTE
The following steps should NOT be followed if you are simply trying to update a single field or handful of fields in the portal. The Text File Import Tool will entirely replace records that match the catalog numbers in your upload file.
To batch upload specimen data as a CSV file, navigate to the Import/Update Specimen Records tool in the Administration Control Panel (see Section 3.2). Click “Full Text File Import.” On the resulting page, click the “Choose File” button and navigate to the desired CSV file. Click “Open.” Make sure the “Automap Fields” box is checked, and click “Analyze File” button. You will then be taken to page that will look similar to the one shown below. The length and contents of the Source Field/Target Field table will depend on what columns were included in the original CSV file.
CCH2 portal guide | 15
At this point, you will select which fields in your CSV file (Source Fields) will correspond to which fields in the Symbiota portal (Target Fields). Check that each of the auto-mapped fields was appropriately assigned. Check the Symbiota Data Field Guide (http://symbiota.org/docs/symbiota-occurrence-data-fields-2/) for definitions of each data field, should you have any questions about the appropriate field to which to map your data. Katie Pearson ([email protected]) can also help you determine the appropriate data field. Once you are satisfied with your field-to-field mapping (see note on next page), click the “Save Mapping” button.
NOTE
If the scientific names in your CSV file include taxonomic authorship (e.g., Acer circinatum Pursh), map this field to the Target Field use “scientificname.” If the scientific names included in your CSV file do NOT include taxonomic authorship (e.g., Acer circinatum), map this field to “sciname.”
Change the processing status as appropriate (see Appendix 1 for instructions on the use of Processing Status for the CAP TCN) and click “Start Upload.” You will be taken to a page that will update periodically while Symbiota ingests your data. Do not navigate away from this page until you see the message “Upload Procedure Complete” (see below).
9. Adding determination/annotation data
Navigate to this tool by accessing the Data Editor Control Panel (see Section 3) and clicking “Add Batch Determinations/Nomenclatural Adjustments.” To select the specimens to which determination data will be added (“Define Specimen Recordset”), either enter a list of catalog numbers (separated by commas) in the “Catalog Number:” field or select a taxon to evaluate by entering its name in the “Taxon:” field. If the latter option is used, a table of specimens of the indicated taxon will appear below the “Define Specimen Recordset” box, demonstrated in the image on the next page. You can then select all the specimens that you wish to annotate by checking or unchecking the boxes in the leftmost column of the table. Use the “Select/Deselect all Specimens” to uncheck all the boxes if you would prefer to select specimens one by one rather than eliminating those that do not need to be annotated.
CCH2 portal guide | 16
Add information about the name change in the “New Determination Details” box. Here you can indicate whether the change is due to a new identification (“Identification Adjustment/Verification”) or a nomenclatural change (“Nomenclatural Adjustment”). An identification qualifier (e.g., “aff.” or “cf.”) can be added in the “Identification Qualifier:” field. Enter the new scientific name in the “Scientific Name” field, and the “Author:” field will automatically populate if the taxon is already in the taxon table. If the taxon is not in the taxon table, you will have to manually enter the author of the scientific name. You should also enter the name of the determiner in the “Determiner:” field, as well as the full date of determination in the “Date:” field. You can indicate the confidence in the determination (Low, Medium, or High) in the “Confidence of Determination:” field, list your determination references in the “Reference:” field, or include any other notes in the “Notes:” field. Finally, if you check the “Make this the current determination” box, the scientific name will be updated for the selected records. Otherwise, the determination will be added to the specimens’ records, but the name will not be changed. You can also print determination/annotation labels by checking the “Add to Annotation Print Queue” box and using the label manager tool (described below).
10. Printing labels or annotations
To print specimen labels, navigate to the Data Editor Control Panel (see Section 3) and click “Print Labels/Annotations.” Search for the desired specimens by entering search terms in one or many of the available fields in the “Define Specimen Recordset” box and clicking “Filter Specimen Records.” Select all the specimens for which you want to print labels by checking or unchecking the boxes in the leftmost column of the table. Use the “Select/Deselect all Specimens” box to check or uncheck all the boxes as necessary.
CCH2 portal guide | 17
At the bottom of the page in the “Label Printing” box, you can then enter a desired heading (e.g., “Robert F. Hoover Herbarium (OBI)”, heading mid-section (e.g., state or family), heading suffix (any additional text information), and label footer (e.g., the name of the project for which the specimen was collected) for all labels to be printed. You can also select from a number of other options in the “Label Printing” box including whether you want to print the specimen barcode.
Once you have selected your desired options, you can print the labels directly from your browser, export the specimen data to a CSV file (similar to an Excel file, this format can be used with mail merge to produce labels), or export the labels to a Word document (DOCX file) by clicking the appropriate button. An example label for printing from the browser is shown below. Note that the boxes to include the barcode and the catalog number were checked when generating this label.
11. Managing loans, gifts, and exchanges
Navigate to the loan management tool by accessing the Data Editor Control Panel (see Section 3) and clicking “Loan Management.” You will see the following tabs:
To add a new outgoing loan, click the green plus sign near the right side of the “Outgoing Loans” page. You will be prompted to enter a Loan Identifier (a unique number to mark the identity of the loan) and select an institution to which the loan is being sent from the dropdown list. If the institution is not found in the dropdown list, click the green plus sign to the right of the “Send to Institution:” field and enter the required information. Click “Create Loan” when you have finished entering the required information in the “New Outgoing Loan” box.
Once you click “Create Loan,” you will be taken to the Loan Out Details page. Here you can add information about the loan and generate loan paperwork using the appropriate boxes. To link specimens to the loan, click the “Specimens” tab, click the green plus sign, enter the catalog number of the desired
CCH2 portal guide | 18
specimen in the field (preferably by scanning the barcode of the physical specimen), and click “Add Specimen.” Repeat as necessary. To edit an outgoing loan or link specimens to the loan in the future, navigate to the “Outgoing Loans” tab and click on the loan identifier (number or name given to the loan) directly to the right of the appropriate bullet point.
To add a new incoming loan, repeat the procedure outlined above using the “Incoming Loans” tab. Note that specimens cannot be linked to incoming loans.
To add a gift or exchange, repeat the procedure outlined above using the Gifts/Exchanges tab. You will be able to enter the number of specimens in either the “gift” boxes or “exchange” box.
Appendix 1: Processing Status
(adapted from Skema & Barber 2018)Processing Status is a field in Symbiota that helps keep track of what stage a record is at in the
workflow. There is no one standard for how to use the different levels of Processing Status across all users of Symbiota, although there is some standardization within projects. If each user in a particular collection uses the processing status field consistently, both in remembering to change the status as required, and in assigning the appropriate status, it is of great help to the workflow. The following table shows the recommended definitions for the status levels in Processing Status to use for the California Phenology TCN.
Status DefinitionUnprocessed skeletal record (typically with just an image and catalog number)Pending Review volunteer/technician transcribed record and had no problems/questions
ORrecord imported from a dataset that was previously minimally quality controlled
Expert Required volunteer/technician transcribed or reviewed record and had problem(s)/questions (volunteer/technician should leave concise notes in Occurrence Remarks to explain problem/question)
Reviewed record transcribed; transcription reviewed and correctORrecord imported from a dataset that was previously quality controlled
Stage 3 record problematic; to be researchedClosed record transcribed, georeferenced, and fully reviewed (or as best as possible
given available information)
References
Skema C, Barber A. 2018. Mid-Atlantic Megalopolis digitization standards and training manual. Morris Arboretum of University of Pennsylvania. Available from https://docs.wixstatic.com/ugd/6f7156_800579c353574e59918cfb541172d749.pdf