guide to machining guide to machining carpenter specialty alloys
TRANSCRIPT

GUIDE TO MACHINING CARPENTER SPECIALTY ALLOYS
GU
IDE
TO
MA
CH
ININ
GC
AR
PE
NT
ER
SP
EC
IALT
Y A
LLO
YS
Carpenter Technology Corporation
Wyomissing, PA 19610 U.S.A.
1-800-654-6543
Visit us at www.cartech.com
For on-line purchasing in the U.S.,
visit www.carpenterdirect.com

Contents
Introduction ............................................................................. 1
General Stainless Material and Machining Characteristics .... 3
Classification of Stainless Steels .............................................. 5
Basic Families and Designations ........................................ 5
Austenitic Alloys ......................................................... 5
Ferritic Alloys ............................................................... 7
Martensitic Alloys ...................................................... 7
Duplex Alloys ............................................................. 8
Precipitation-Hardenable Alloys ................................. 8
Free-Machining Alloys ...................................................... 9
Project 70+® Stainless Enhanced-Machining Alloys ........ 12
Machinability of Stainless Steels ........................................... 15
Definitions of Machinability .............................................. 15
General Machining Properties .......................................... 16
Austenitic Alloys ........................................................ 16
Ferritic and Martensitic Alloys ................................... 18
Duplex Alloys ............................................................. 19
Precipitation-Hardenable Alloys ................................. 20
Relative Machinability of Stainless Steels
and Other Alloys .................................................................. 22
The Carpenter Selectaloy® Method ......................................... 23
Criteria for Selecting ......................................................... 23
Selecting for Corrosion Resistance ................................... 26
Selecting for Mechanical Strength .................................... 26
Enhanced Selectaloy® Diagram ........................................ 27
Nitrogen Strengthened Grades ......................................... 27
Other Grades to Consider ................................................. 29
Guide to MachiningCARPENTER SPECIALTY ALLOYS
Guide to MachiningCARPENTER SPECIALTY ALLOYS
Traditional Machining Operations .......................................... 31
General Considerations and Guidelines ............................ 31
Turning ... Speeds & Feeds—Turning can be found on pages 37 to 40
Turning Parameters ........................................................... 35 Single-Point Turning Tools ................................................. 35 Cutoff Tools ...................................................................... 41 Form Tools ........................................................................ 41 Shaving Tools .................................................................... 42
Trouble-Shooting Check Chart .......................................... 43
Drilling ... Speeds & Feeds—Drilling can be found on pages 48 and 49
General Guidelines ............................................................ 45 Drilling Parameters ........................................................... 46 Grinding of Drills ............................................................... 46 Small-Diameter Drills ........................................................ 47 Special Drills ..................................................................... 49
Trouble-Shooting Check Chart .......................................... 51
Tapping ... Speeds & Feeds—Tapping can be found on pages 57 and 58
Types of Holes and Taps ................................................... 55 Percent of Thread ............................................................. 58 Grinding of Taps ................................................................ 60
Trouble-Shooting Check Chart .......................................... 61
Threading ... Speeds & Feeds—Threading can be found on page 65 to 66
Die Threading .................................................................... 63 Types of Chasers and Geometries .................................... 63 Die-Threading Parameters and Cutting Fluid .................... 65 Percent of Thread ............................................................. 66 Thread Rolling ................................................................... 67
Trouble-Shooting Check Chart .......................................... 68

Guide to MachiningCARPENTER SPECIALTY ALLOYS
Milling ... Speeds & Feeds - Milling can be found on pages 71 and 72
Types of Milling Cutters .................................................... 69
Grinding of Milling Cutters ................................................ 70
Milling Parameters and Cutting Fluid ................................ 73
Trouble-Shooting Check Chart .......................................... 74
Broaching ... Speeds & Feeds - Broaching can be found on pages 79 and 80
General Guidelines ............................................................ 77
Broach Design and Grinding ............................................. 77
Trouble-Shooting Check Chart .......................................... 81
Reaming ... Speeds & Feeds - Reaming can be found on pages 85 and 86
General Guidelines ............................................................ 83
Types of Reamers ............................................................. 83
Grinding and Care of Reamers .......................................... 84
Reaming Parameters ........................................................ 87
Alignment ......................................................................... 87
Trouble-Shooting Check Chart .......................................... 88
Sawing ... Speeds & Feeds - Sawing can be found on page 90
General Guidelines ............................................................ 89
Sawing Parameters ........................................................... 89
Grinding
Wheels ........................................................................... 91
Grinding Parameters ....................................................... 91

Other Specialty Metals ... Speeds & Feeds—Other Carpenter Specialty
Alloys can be found on pages 93 to 112
These include:
• Carpenter Tool Steels
• Carpenter High Temperature Alloys
— Nickel-Base and Cobalt-Base
• Carpenter Electronic Alloys
Cutting Fluids ............................................................... page 113
• Stainless Steel Cutting Oils
• Emulsifiable Fluids
• General Practices
Cleaning and Passivating ............................................... page 119
• Cleaning Before Heat Treating
• Passivating
• Citric Acid Passivation
Nontraditional Machining Operations ............. pages 123 to 136
• Abrasive Jet Machining
• Abrasive Water Jet Machining
• Electrochemical Machining
• Electrochemical Grinding
• Electrical Discharge Machining
• Electron Beam Machining
• Laser Beam Machining
• Plasma Arc Machining
• Chemical Machining
Guide to MachiningCARPENTER SPECIALTY ALLOYS

Helpful Tables ................................................... pages 137 to 167
• Automatic Machining Efficiency Index Table
• Machine Hours Per 1,000 Pieces
• Approximate Stock Required to Make 1,000 Pieces
• Weights of Steel Bars Per Lineal Foot
• Decimal Sizes of Drills & Length of Drill Points
• Drills for Tapped Holes
• Table of Cutting Speeds
• Fractions, Decimal & Metric Equivalents
• Hardness Conversion Table
• Wire Gauges
• Formulas
Guide to MachiningCARPENTER SPECIALTY ALLOYS

1
Carpenter Technology Corporation (“Carpenter”) is a materials
company making specialty alloys and engineered parts for dozens
of industries with hundreds of applications. Specialty Alloys
Operations, our specialty steel and alloy manufacturer and
distributor, comprises the core business. Dynamet Incorporated,
a Carpenter company, produces bar and coil products from titanium
and other alloys. Carpenter Powder Products makes and sells tool
and high speed steels and specialty alloy powder products. The
Engineered Products Group is a consortium of companies that
makes precision drawn products, complex ceramic parts, thin-
wall tubing and other engineered materials.
Since 1928, when Carpenter introduced the world’s first free-
machining stainless steel, we have been concentrating on the
business of making stainless and other specialty alloys more
useful and more profitable to industry.
Our record of accomplishment in this endeavor has been gratifying.
Through never-ending research, exacting quality controls and rigid
production techniques, we have led the field in the introduction
of new and improved specialty alloys and services to help industry
improve product quality and reduce fabricating costs.
The Carpenter list of "firsts" is impressive. It includes the first
free-machining stainless, Type 416 . . . the first free-machining
chrome-nickel stainless, Type 303 . . . the first free-machining Invar,
Free-Cut Invar "36"® alloy . . . and this evidence of leadership
continues with the widespread acceptance of the Project 70®
stainless and Project 7000® stainless grades and now
Project 70+® stainless.
Through these constant efforts to improve specialty alloy quality,
we have built every known production and performance advantage
Introduction

2
into every machining bar we produce. But no specialty steel can
be so good that it will perform satisfactorily in the shop when it
s mishandled or misunderstood.
The purpose of this book is to help you, the fabricator, get
every benefit out of the Carpenter specialty alloys you machine.
The machining tables are intended to provide you with suggested
starting feeds and speeds. Machine setup, tooling and other fac-
tors beyond Carpenter’s control will affect actual performance.
A section on machining Carpenter tool steels, high temperature
alloys, and electronic alloys is also included. These are tabbed
together under "Other Specialty Metals."
If the answer to your particular machining problem cannot be
found here, we hope you will call us at 1-800-654-6543 for help.
Or, refer to our online technical information database at
www.cartech.com. Registration is free.

3
Stainless steels do not constitute a single, well-defined material;
but, instead, consist of several families of alloys, each generally
having its own characteristic microstructure, type of alloying and
range of properties. To complicate the matter, further compositional
differences within each family produce an often bewildering variety
of alloys suited to a wide range of applications. The common thread
among the alloys is the presence of a minimum of about 11 percent
chromium to provide the excellent corrosion and oxidation resistance
which is the chief characteristic of the materials.
Because of the wide variety of stainless steels available, a
simple characterization of their machinability can be somewhat
misleading. As shown in later sections of this booklet, the machin-
ability of stainless steels varies from low to very high, depending
on the final choice of alloy. In general, however, stainless steels are
considered more difficult to machine than certain other materials,
such as aluminum or low-carbon steels. Stainless steels have been
characterized as “gummy” during cutting, showing a tendency to
produce long, stringy chips, which seize or form a built-up edge
(BUE) on the tool. Machine operators may cite reduced tool life
and degraded surface finish as consequences. These broad observa-
tions are due to the following properties, which are possessed by
stainless steels to different extents:
General Stainless Material and Machining Characteristics

4
1. high tensile strength
2. large spread between yield strength and ultimate
tensile strength
3. high ductility and toughness
4. high work-hardening rate
5. low thermal conductivity
Despite these properties, stainless steels are machinable, as long as it
is recognized that they behave differently from other materials, and,
consequently, must be machined using different techniques.
In general, more power is required to machine stainless steels
than carbon steels; cutting speeds must often be lower; a positive
feed must be maintained; tooling and fixtures must be rigid; chip
breakers or curlers may be needed on the tools; and care must be
taken to ensure good lubrication and cooling during cutting.

5
Basic Families and Designations
Stainless steels can be divided into five families. Four are based
on the characteristic microstructure of the alloys in the family:
austenitic, ferritic, martensitic or duplex (austenitic plus ferritic).
The fifth family, the precipitation-hardenable alloys, is based on
the type of heat treatment used, rather than microstructure.
In addition, stainless steels may be divided into the non-free-
machining alloys and the free-machining alloys. Free-machining
alloys form a limited group that cuts across the basic families.
Finally, both non-free-machining and free-machining alloys may
be available in the Project 70+® stainless version having enhanced-
machining properties compared to the standard alloys.
Because of the variety of stainless steels, it is usually possible
to obtain an alloy possessing the desired set of attributes, unless
they are mutually exclusive. This same wealth of alloys can create
problems during the selection process, simply because of the number
of alloys that must be considered and evaluated for their suitability.
An invaluable aid in this process is Carpenter’s Selectaloy® method,
described later in this booklet. The following sections describe the
basic characteristics which may be important during the selection
process for a particular stainless steel.
Austenitic Alloys
Austenitic stainless steels have a face-centered cubic structure
and are nonmagnetic in the annealed condition. The alloys can
be subdivided into two categories: the standard alloys, such as
Type 304, containing nickel to provide the austenitic structure;
Classification of Stainless Steels

6
and those containing instead a substantial quantity of manganese,
usually with higher levels of nitrogen and in many cases nickel.
Examples of the latter are 22Cr-13Ni-5Mn, 21Cr-6Ni-9Mn and
15-15LC® stainless. Nitrogen may also be used to provide
strengthening in the chromium-nickel grades, as in Type 304HN.
The standard chromium-nickel alloys with lower nitrogen levels
have tensile yield strengths of 30-40 ksi (205-275 MPa) in the
annealed condition, while alloys containing higher nitrogen have
yield strengths up to about 70 ksi (480 MPa).
Austenitic stainless steels possess good ductility and toughness,
even at cryogenic temperatures, and can be hardened substantially
by cold working. The degree of work hardening depends on alloy
content. Austenitic stainless steels with a lower alloy content may
become magnetic due to transformation of austenite to martensite
during cold working or even machining, if the surface is heavily
deformed. A corrective anneal or the selection of an alloy with
a lower work-hardening rate may be necessary if a low magnetic
permeability is required for the intended application. Corrosion
resistance of austenitic alloys varies from good to excellent, again
depending on alloy content.
The most common austenitic stainless steel is Type 304, which
contains approximately 18 percent chromium and 8 percent nickel.
In addition to the alloying variations noted above, higher chromium,
higher nickel, molybdenum or copper may be added to improve
particular aspects of corrosion or oxidation resistance. Examples
are Type 316, Type 309, Type 310 and 20Cb-3® stainless. Many of
the more corrosion-resistant alloys, such as 20Cb-3 stainless, have
nickel levels high enough to rate classification as nickel-base alloys.
Titanium or columbium is added to stabilize carbon in alloys such as
Type 321 or Type 347, in order to prevent intergranular corrosion
after elevated-temperature exposure. Conversely, carbon levels are
reduced to low levels during melting to produce the AISI “L” or “S”
alloys, such as Type 304L, Type 316L or Type 309S.

7
Ferritic Alloys
Ferritic stainless steels have a body-centered cubic structure and
are magnetic. In the annealed condition they have a tensile yield
strength of about 40-50 ksi (275-345 MPa). They are generally
hardenable only by cold working, but not to the same extent as
the austenitic stainless steels. The alloys possess fairly good
ductility in the annealed condition, but are not used where tough-
ness is a concern. They have a broad range of corrosion resistance,
depending on alloy content. However, as a class, they are considered
less corrosion resistant than the austenitic alloys.
The most well-known alloy of this family is Type 430, which is an
iron-base alloy with 16-18 percent chromium. Other alloys, such
as Type 405 or Type 409, contain lower chromium. Higher levels
of chromium are used in alloys such as Type 443 or Type 446 for
improved corrosion or oxidation resistance. Molybdenum is added
to certain alloys, such as Type 434, in order to improve corrosion
resistance, particularly in chloride-containing solutions. Titanium
or columbium is used to stabilize carbon and nitrogen in order to
improve the as-welded properties of alloys like Type 409.
Martensitic Alloys
Martensitic stainless steels have a body-centered cubic/tetragonal
structure and are magnetic. In the annealed condition they have a
tensile yield strength of about 40 ksi (275 MPa) and, like the ferritic
alloys, can be moderately hardened by cold working. However,
martensitic alloys are normally heat treated by hardening plus
tempering to yield strength levels up to about 280 ksi (1930 MPa),
depending primarily on carbon level. The alloys exhibit good
ductility and toughness, which decrease, however, as strength
capability increases.
The most commonly used alloy of this family is Type 410, which
contains about 12 percent chromium and 0.1 percent carbon to
provide strengthening. Carbon level and, consequently, strength

8
capability increase in the series Type 420, Type 440A, Type 440B,
and Type 440C. Chromium is increased, particularly in the latter
three alloys, to maintain corrosion resistance since chromium is
removed from solution, forming carbides with increasing carbon
level. Molybdenum may be added to improve mechanical proper-
ties or corrosion resistance, as in TrimRite® stainless. Nickel may
be added for the same reasons, as in Type 414. Nickel also serves
to maintain the desired microstructure, preventing excessive free
ferrite, when higher chromium levels are used to improve corrosion
resistance in a lower-carbon alloy like Type 431. The limitations on
alloy content required to maintain the desired fully martensitic
structure limit the corrosion resistance obtainable with martensitic
alloys to only moderate levels.
Duplex Alloys
Duplex stainless steels contain a mixture of ferrite and austenite
and are magnetic. They have tensile yield strengths of about 80 ksi
(550 MPa) in the annealed condition, or about twice that of the
standard austenitic alloys. Strength can be increased by cold
working. The alloys have good ductility and toughness along
with excellent corrosion resistance.
The original alloy in this classification was 7-Mo® stainless or
Type 329, which contains chromium, molybdenum and sufficient
nickel to provide the desired balance of ferrite and austenite. More
recent alloys, such as 7-Mo PLUS® stainless, also contain nitrogen
and a different austenite/ferrite balance.
Precipitation-Hardenable Alloys
Precipitation-hardenable stainless steels are categorized by their
ability to be age hardened to various strength levels. The alloys
can be subdivided into the austenitic (e.g., Pyromet® alloy A-286),
martensitic (e.g., Custom 630, 17Cr-4Ni) or semi-austenitic
classifications (e.g., Pyromet alloy 355). The latter alloys may have
an austenitic structure for formability, but can be subsequently
9
Free-Machining Alloys
Free-machining alloys contain a free-machining additive such
as sulfur to form inclusions which significantly improve overall
machining characteristics. In some cases, other compositional
changes may be made either within or outside the broad
compositional ranges of the corresponding non-free-machining
alloy. Such additional compositional changes may serve to improve
machining characteristics beyond that obtained by the simple
addition of the free-machining agent.
transformed to martensite and aged to the desired strength level.
Depending on the type of alloy, precipitation-hardenable stainless
steels can reach tensile yield strength levels of up to 250 ksi (1725
MPa) in the aged condition. Cold working prior to aging can result
in even higher strengths. The alloys generally have good ductility
and toughness with moderate-to-good corrosion resistance. A better
combination of strength and corrosion resistance is obtainable than
with the martensitic alloys.
The most well-known precipitation-hardenable stainless steel is
Custom 630. It contains chromium and nickel, as do all precipitation-
hardenable stainless steels, with copper for age hardening
and columbium to stabilize carbon. Age-hardening agents used
in other alloys include titanium (Custom 455® stainless),
aluminum (PH 13-8 Mo*), and columbium (Custom 450® stainless).
Molybdenum may be added to improve mechanical properties or
corrosion resistance. Both molybdenum and copper are added for
corrosion resistance in Custom 450 stainless. Carbon is normally
restricted, except in semi-austenitic alloys such as Pyromet alloy 355
where it is necessary to provide the desired phase transformations.
*Registered trademark of AK Steel Corp.

10
- - - - - - - - - - - - - - - - - - - - - - - - - - - - - - - - - - - - - - - - - - - - - - - - - -
- - - - - - - - - - - - - - - - - - - - - - - - - - - - - - - - - - - - - - - - - - - - - - - - - -
- - - - - - - - - - - - - - - - - - - - - - - - - - - - - - - - - - - - - - - - - - - - - - - - - -
- - - - - - - - - - - - - - - - - - - - - - - - - - - - - - - - - - - - - - - - - - - - - - - - - -
- - - - - - - - - - - - - - - - - - - - - - - - - - - - - - - - - - - - - - - - - - - - - - - - - -
- - - - - - - - - - - - - - - - - - - - - - - - - - - - - - - - - - - - - - - - - - - - - - - - - -
It is important to recognize that the benefit of improved machining
characteristics is not obtained without changes in other properties.
In particular, the following properties may be degraded by the
addition of a free-machining agent:
1. corrosion resistance
2. transverse ductility and toughness
3. hot workability
4. cold formability
5. weldability
In some cases, variants of the basic free-machining alloy are available
to provide an optimum combination of machinability with another
property. However, the trade-off among the various properties must
still be considered when selecting an alloy; i.e., the ease of machining
must be balanced against the possible reduction in other important
properties, such as corrosion resistance.
Table 1 shows the relationship between non-free-machining and
free-machining alloys within the ferritic, martensitic and austenitic
families. Free-machining alloys are currently not available in the
duplex or precipitation-hardenable families. Since duplex alloys are
noted for excellent corrosion resistance but have somewhat limited
hot workability, the addition of a free-machining agent, which would
likely degrade both properties, would be undesirable. Likewise,
precipitation-hardenable alloys are noted for good toughness at
high strength levels, making it undesirable to add large amounts
of a free-machining agent, which would degrade toughness.
Contact a Carpenter representative for alloy availability.

11
Ferritic Type 430 — Type 430F 18Cr-2Mo — 182-FM(a)
Type 434 — Type 434F
Martensitic Type 410 Type 416-Se Type 416 Type 420 — No.5F(b)
Type 440C Type 440-Se Type 420F Type 440F
Austenitic — — Type 203 Type 304 Type 303Se Type 303 Type 303Al Modified®(c)
Type 302 HQ — Type 302HQ-FM®(d)
Type 316 — Type 316F Type 347 Type 347-Se Type 347F
Table 1 shows that the best-known alloys in the three families
represented, Type 430 (ferritic), Type 410 (martensitic) and
Type 304 (austenitic), have corresponding free-machining alloys.
In addition, the more corrosion-resistant molybdenum-bearing alloys
18Cr-2Mo and Type 316 have free-machining versions in the ferritic
and austenitic families, respectively; and the higher-carbon, higher-
strength alloys Type 420 and Type 440C have free-machining
versions in the martensitic family. Thus, there are a variety of basic
free-machining alloys available to satisfy the two most important
selection criteria for stainless steels—corrosion resistance and
mechanical properties (strength/hardness).
A variety of other distinctions may be made among the other alloys
listed in Table 1. Free-machining versions are available for Type 347,
a columbium-stabilized austenitic alloy, and for Type 302HQ, a
copper-bearing alloy noted for a low work-hardening rate and
Correspondence of Non-Free-Machining and Free-Machining Stainless Steels
Non-Free-MachiningAlloys
Related Free-Machining AlloysSe-bearing Alloys S-bearing Alloys
(a) Does not contain Ti(b) Not hardenable(c) Contains Al(d) Contains lower Cu
Table 1
Contact a Carpenter representative for alloy availability.

12
excellent cold formability for an austenitic alloy. The free-machining
version of Type 302HQ, 302HQ-FM® stainless, is intended to offer
a good combination of cold formability and machinability. Another
alloy which can offer this combination of properties is Type 303Al
Modified® stainless. The selenium-bearing free-machining alloys
such as Type 303 Se are also noted for better cold formability than
the sulfur-bearing alloys, and may be used where machined surface
finish is more important than tool life. Type 203, which lacks a
corresponding non-free-machining version, is a high-manganese,
high-copper alloy with excellent machinability for an austenitic alloy.
It can be substituted for Type 303, where specifications permit.
Finally, versions of Type 303, Type 416, and Type 430F are
available to provide combinations of properties not obtainable
with the standard alloys. The compositions of such versions still
fall within the broad ranges of the standard alloy. For instance,
Type 303 and Type 416 are available in “forging quality” versions,
intended to provide a good combination of hot workability and
machinability. Type 416 is also available in a “bright quench” version,
Type 416 BQ, intended to provide a higher quenched hardness level
after bright hardening. Type 430F is available as “solenoid quality”
versions, Type 430F Solenoid Quality and Type 430FR Solenoid
Quality, for optimum soft-magnetic properties.
Project 70+® Stainless Enhanced-Machining Alloys
As described earlier, compositions of alloys may be modified within
the broad limits to provide an optimum combination of properties.
In a similar manner, compositions may be modified to provide
optimum machining performance alone. Processing of the alloy may
also be modified to further improve machining performance. This
approach has been taken with both non-free-machining and free-
machining alloys, resulting in enhanced-machining alloys, several
of which are designated by Carpenter as Project 70+® stainless alloys,
13
and meet the same specifications as the standard alloys. It should
be noted that the enhanced-machining versions of the non-free-
machining alloys provide machining performance superior to that
of the corresponding standard alloys, but still do not provide the
machinability of comparable free-machining alloys. However,
other properties, such as corrosion resistance, ductility, toughness,
weldability, cold formability, etc., will be superior to those of the
corresponding free-machining alloy. Thus, the enhanced-machining
versions of the non-free-machining alloys provide a way to obtain
improved machining performance without significant degradation
of other properties. Table 2 provides a listing of the alloys that are
available with enhanced machining performance.
Certain of the alloys in Table 2 are available in more than one
enhanced-machining version. For instance, Type 416 is available
in an enhanced-machining version still meeting certain minimum
hardness requirements, and, in a version designated No. 5-F,
providing even higher machining performance but having
limited hardness capability.
Machinability of stainless steels can be affected by changes in
processes to provide a variety of levels of machining performance.
The level of machinability necessary and the compromises to be
made with other properties depend on the needs of the user. Before
specifying or purchasing an alloy, consult Carpenter Specialty Alloys
Operations to determine the proper alloy, or, more important, the
proper version of the alloy, and its availability.
Project 70+® Type 304/304L Project 70+® Type 416 Project 70+ Type 316/316L Project 70+ Type 303 Type 309 A.B.Q® No. 5-F Project 70+ Custom 630 Project 70+ 15Cr-5Ni
Machining Alloy Versions of:Enhanced-Machining Alloys Free-Machining Alloys
Table 2
14
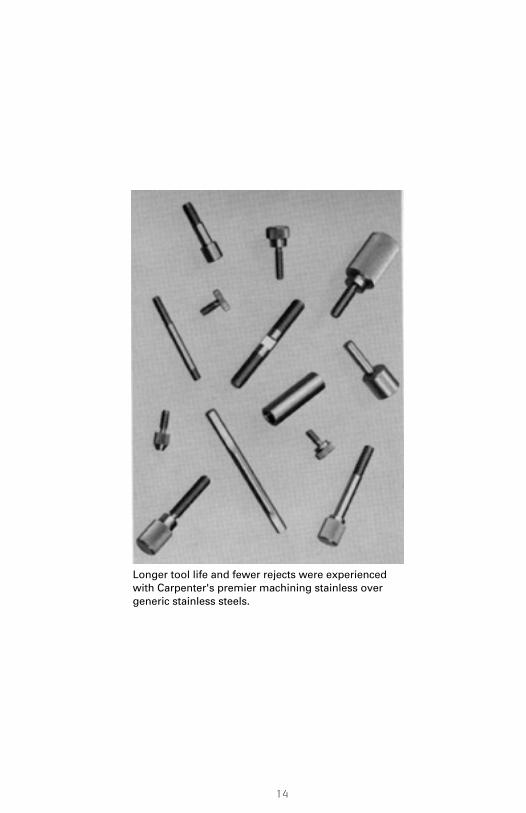
Longer tool life and fewer rejects were experienced with Carpenter's premier machining stainless over generic stainless steels.

15
Definitions of Machinability
Defining “machinability” is not a simple matter for two reasons.
First, machinability does not mean the same thing to everyone.
If the specific aspect of machinability one is interested in is not
defined, there will be no basis for a common discussion or under-
standing. Second, machinability can only be evaluated in a complex,
multi-variable system. Again, if all the variables are not defined,
misunderstanding can result.
The following list includes some of the specific definitions included
in the general concept of machinability:
1. tool life or tool wear 2. machined surface finish 3. chip disposability, or how easily chips are removed from the cutting area 4. maximum cutting rate 5. productivity, or how quickly the largest number of acceptable parts can be produced
These definitions may be interdependent in various ways. For
instance, machined surface finish depends on how the tool is
wearing. Cutting rate is related to tool life, but is influenced by
other factors. Productivity obviously can encompass all the
other factors.
Machinability of Stainless Steels

16
Some of the variables which may affect the perception of
machinability are as follows:
1. rigidity of the tooling or fixtures
2. type of tools, e.g., high-speed steel versus carbide 3. tool design, e.g., rake angles, relief angles, etc. 4. type and composition of the cutting fluid, e.g., mineral- oil-base cutting fluids versus emulsifiable cutting fluids
In addition, the type of machining operation itself can affect the
perception of machinability. For instance, alloys may behave
differently in drilling than in turning.
Because of these and other variables involved, machinability
rankings among alloys must be viewed with caution. Such rankings
may not apply to all aspects of machining performance or to all types
of machining operations, and may vary from producer to producer.
In addition, the rankings should only be used on a relative basis;
absolute, or numerical, comparisons are only for illustrative purposes
and cannot be expected to apply in all cases, even for the same type
of machining operation.
General Machining Properties
Austenitic Alloys
Austenitic stainless steel, of all the groups, is the most difficult to
machine. Compared with ferritic and martensitic alloys, typical
austenitic alloys have a higher work-hardening rate, a wider spread
between yield and ultimate tensile strengths, and higher toughness
and ductility. When machining austenitic stainless steels, particularly
the non-free-machining alloys, tools will run hotter with more ten-
dency to a large built-up edge; chips will be stringier with a tendency
to tangle, making their removal difficult; there will be a tendency

17
- - - - - - - - - - - - - - - - - - - - - - - - - - - - - - - - - - - - - - - - - - - - - - - - - -
- - - - - - - - - - - - - - - - - - - - - - - - - - - - - - - - - - - - - - - - - - - - - - - - - -
- - - - - - - - - - - - - - - - - - - - - - - - - - - - - - - - - - - - - - - - - - - - - - - - - -
- - - - - - - - - - - - - - - - - - - - - - - - - - - - - - - - - - - - - - - - - - - - - - - - - -
for inadequate or marginal tool rigidity to result in chatter; and cut
surfaces will be work-hardened and difficult to machine if cutting
is interrupted or feed rate is too low. Because of these factors, the
precautions spelled out for machining stainless steels in general
must be particularly adhered to for austenitic alloys.
The greatest benefit to the machinability of austenitic stainless
steels is brought about by the addition of free-machining agents
such as sulfur. For example, Type 303 has a machinability rating
between those of the non-free-machining (Type 430F, Type 410)
and free-machining (Type 430F, Type 416, etc.) versions of the
ferritic and annealed low-carbon martensitic alloys. The following
variables also will influence machinability:
1. cold drawing
2. work-hardening rate, as modified by alloy content
3. grain size
A moderate cold draft has generally been regarded as beneficial to
the overall machining characteristics of austenitic stainless steels.
The cold draft will reduce the ductility of the material, which results
in cutting with a cleaner chip and less tendency toward a built-up
edge. A better machined surface finish will result. Drilling, however,
may be favored by softer material.
The high work-hardening rate of the lower-alloy-content austenitic
stainless steels can be decreased by additions of manganese or
copper. Such additions will also increase machinability. Austenitic
free-machining alloys making use of additions of manganese or
copper include Type 203 and 302HQ-FM® stainless. Although higher
alloy content generally reduces work-hardening rate, it may not
necessarily benefit machinability. Highly alloyed austenitic stainless
steels, such as Type 310 and 20Cb-3® stainless, tend to be more
difficult to machine.

18
- - - - - - - - - - - - - - - - - - - - - - - - - - - - - - - - - - - - - - - - - - - - - - - - - - -
- - - - - - - - - - - - - - - - - - - - - - - - - - - - - - - - - - - - - - - - - - - - - - - - - - -
- - - - - - - - - - - - - - - - - - - - - - - - - - - - - - - - - - - - - - - - - - - - - - - - - - -
- - - - - - - - - - - - - - - - - - - - - - - - - - - - - - - - - - - - - - - - - - - - - - - - - - -
Grain size will generally increase strength and reduce ductility.
Grain size also changes the flow characteristics of the material at
the cutting edge. At typical tensile properties, a finer grain size
will increase the tendency toward built-up edge and stringy chips.
However, combining a fine grain structure with high cold drafts will
increase surface finishes and improve chip characteristics.
Ferritic and Martensitic Alloys
Free-machining ferritic alloys (Type 430F, etc.) and annealed,
low-carbon free-machining martensitic alloys (Type 416, etc.) are
the easiest to machine of the stainless steels. In fact, their machin-
ability ratings approach and in some cases are comparable to those
of certain free-machining carbon steels. The non-free-machining
lower-chromium ferritic alloys (Type 430) and annealed, low-carbon,
straight-chromium martensitic alloys (Type 410) are also generally
easier to machine than the majority of other non-free-machining
alloys. The higher-chromium ferritic alloys, such as Type 446, are
considered by some to be somewhat more difficult to machine than
the lower-chromium alloys, due to “gumminess” and stringy chips.
Other than the presence or lack of a free-machining additive like
sulfur, the machining characteristics of martensitic stainless steels
are influenced by the following variables:
1. hardness level
2. carbon content
3. nickel content
Increasing hardness level for a particular alloy results in a decrease
in machinability as measured by tool life, drillability, etc. Surface
finish and chip characteristics, however, can be improved by machin-
ing harder material. Type 416 is normally supplied in one of three
hardness ranges: annealed (condition A), 262HB max.; intermediate
temper (condition T), 248-302HB; or hard temper (condition H),

19
293-352HB. Based on the above information, condition T
is expected to provide a good combination of tool life and
machined surface finish.
As the carbon content increases from Type 410 to Type 420
to Type 440C, or from Type 416 to Type 420F to Type 440F,
machinability decreases. With higher carbon levels, there also
tends to be a smaller difference in machinability between the
corresponding free-machining and non-free-machining versions.
These effects are primarily due to the increasing quantities of
abrasive chromium carbides present as carbon level increases in
this series of alloys. As a further detriment to machinability,
annealed hardness level increases with increasing carbon level.
Nickel content also influences machinability by increasing
annealed hardness levels. Consequently, alloys such as Type 414
and Type 431 will be more difficult to machine than Type 410 in
the annealed condition.
Duplex Alloys
The machinability of duplex stainless steels is limited by their
high annealed strength level. The machinability of the duplex alloy
7-Mo PLUS® stainless lies between that of a high-nitrogen austenitic
alloy, 22Cr-13Ni-5Mn, and a conventional austenitic alloy, Type 316.
Note that 7-Mo PLUS stainless has a hardness level comparable to
that of 22Cr-13Ni-5Mn, but provides better machinability. However, it
does not machine as well as Type 316.
Other nitrogen-bearing duplex alloys are expected to machine
similarly to 7-Mo PLUS stainless. At this point, there are no
enhanced-machining versions of duplex alloys.

20
Precipitation-Hardenable Alloys
The machinability of precipitation-hardenable stainless steels
depends on the type of alloy and its hardness level. Martensitic
precipitation-hardenable stainless steels are often machined in the
solution-treated condition, so that only a single aging treatment is
required afterward to reach the desired strength level. In this condi-
tion, the relatively high hardness limits machinability. Most of these
alloys machine comparably to or somewhat worse than an austen-
itic alloy such as Type 304 in its non-enhanced-machining version.
Stainless 17Cr-4Ni is available in an enhanced-machining version,
Project 70+® Custom 630 stainless, which approaches the machin-
ability of Project 70+ Type 304 stainless.
Martensitic precipitation-hardenable stainless steels may also be
machined in an aged condition so that heat treating can be avoided
and closer tolerances maintained. The ease of cutting generally
varies with the hardness or heat-treated condition, with harder
material requiring more horsepower to machine. The use of coated
carbide tools or coated high speed steels such as M48 or T15 may
enable these alloys to be machined in the hardened condition. Chips
are less stringy and surface finishes are better, but the increased
hardness can result in faster tool wear. Tool coatings such as TiAlN
or TiCN can help decrease tool wear.
In the annealed, austenitic condition, semi-austenitic alloys can be
expected to machine with difficulty, somewhat worse than an alloy
like Type 302, which has a high work-hardening rate. Pyromet®
Alloy 350 and Pyromet Alloy 355 can be supplied in an equalized
and over-tempered condition, which will provide the best
machinability from a tool wear position. As with the martensitic
precipitation-hardenable alloys, machining is possible in the age
hardened condition.

21
Austenitic precipitation-hardenable alloys, such as Pyromet Alloy
A-286, machine quite poorly, requiring slower cutting rates than
even the highly-alloyed austenitic stainless steels. Machining in an
aged condition will require coated carbide tooling and a rigid setup.

22
Relative Machinability of Stainless Steels and Other Alloys
Contact a Carpenter representative for alloy availability.

23
The Carpenter Selectaloy® Method
The problem facing the manufacturer working with stainless
steels becomes the difficult one of choosing the right steel
for a particular job.
While many attempts have been made to portray a simple
picture of the stainless steel family, Carpenter’s Selectaloy®
method represents perhaps the first useful selection method
for the stainless steel industry.
Criteria for Selecting
Before one can utilize this method, there are certain variables
which must be considered in the choice of any stainless steel.
The proper selection technique for the application/evaluation of
each of the more than 50 grades of stainless steel is based upon
five important criteria.
In order of importance, these requirements are:
1. Corrosion Resistance - The primary reason for specifying
stainless steel. The level of corrosion resistance required
and the corrosive environment expected must be known
when selecting a stainless alloy. If corrosion were not a
problemthere would be little need for using stainless steel.
2. Mechanical Properties - In particular, special emphasis
should be placed upon the alloy’s strength. Together with
the corrosion resistance factor, this second requirement
designates the specific alloy type for the application.

24
3. Fabrication Operations - How the material is to be processed.
This includes such special considerations as the steel’s ability to
be machined, welded,cold headed, etc.
4. Total Cost - The overall value analysis figure of the stainless
steel, including initial alloy price, fabrication costs, and the effec-
tive life expectancy of the finished product.
5. Product Availability - Availability of the raw material from
the mill, service center, warehouse, or supplier is a final consid-
eration in choosing the most economical and practical stainless
steel.
Although these factors have long been known throughout the
industry, a careful consideration of their relative importance has
often been a time consuming and frustrating experience for the
veteran stainless metallurgist as well as the apprentice. This problem
arises not from a lack of information, but is a result of the publication
of volumes of uncoordinated material.
Carpenter Specialty Alloys has developed a simple selection
technique for choosing the proper stainless steel for the end use
application that you have in mind. It is called the Selectaloy Method
for classifying and selecting stainless steel.

25
Carpenter’s Selectaloy® Method is easy to use.
Contact a Carpenter representative for alloy availability.
The Selectaloy Projection utilizes 11 basic stainless steels which
are representative of certain classifications of types of stainless
alloys. The first five steels: 20Cb-3® stainless, Type 316, Type 304,
Type 430, and Type 405, are plotted vertically in order of their
resistance to corrosion, the most important criterion in choosing
stainless steel. Note Type 304 is midway between 20Cb-3 stainless
(most resistant) and Type 405 (least resistant) on the corrosion
scale. Reading across the chart, the steels increase in strength as
you move away from Type 405. Simple additions of carbon plus
chromium increase the strength capability of Type 410, Type 420
and Type 440-C while maintaining their corrosion resistance.
All five factors previously mentioned must be considered before
making your selection; however, it is wise to start with corrosion
resistance.
Selectaloy® Method for Stainless Steels

26
Selecting for Corrosion Resistance
As you see on the Selectaloy chart, the effectiveness of corrosion
resistance begins with an alloy like Type 405, which is useful in less
severe environments, and rises in effectiveness along the left side of
the chart until it reaches its peak corrosion resistance with 20Cb-3
stainless, an austenitic stainless steel.
When you are looking for the right stainless for a particular applica-
tion, it is often best to begin your search with Type 304—the most
widely used 18-8 stainless. Its middle level of corrosion resistance
makes it a candidate for a wide range of corrodents from foodstuffs
to organic chemicals.
Should your industrial process require a higher level of resistance,
you would move up the Selectaloy scale to Type 316, which adds
molybdenum to the composition, helping it to resist process
chemicals, acids, bleaches and other highly corrosive materials.
If your application requires less in the way of corrosion resistance
than these types offer, perhaps Type 430 or even Type 405 on the
lowest level of corrosion resistance may suffice. Conversely, for the
most severe corrosive environments you would move to the top level,
20Cb-3 stainless, which provides optimum resistance to hundreds of
industrial and process corrodents (including up to 40% sulfuric acid
at the boiling point).
Once corrosion levels have been determined, careful consideration
of mechanical properties is necessary to select the proper grade
for the application.
Selecting for Mechanical Strength
Supposing the corrosion resistance of Type 405 is adequate but
higher strength is needed, moving over to Type 410 may provide
the combination of properties required.

27
Nitrogen Strengthened Grades
Many applications require a balanced combination of improved
strength and corrosion resistance. When seeking greater strength
with good corrosion resistance, the specifier should check the family
of nitrogen-strengthened alloys shown in the Enhanced Selectaloy
Diagram. The five alloys in the second column have comparable
Enhanced Selectaloy® Diagram
Enhanced Selectaloy® Diagram
When seeking greater strength with good corrosion resistance, the
specifier should check the family of nitrogen-strengthened and other
alloys shown in the Enhanced Selectaloy Diagram.
Contact a Carpenter representative for alloy availability.
However, in many cases, the strength offered by Type 410 may
not be sufficient. For greater strength and hardness, at the same
level of corrosion resistance, Type 420 is specified. And for products
requiring the highest hardness values within the same corrosion-
resistance level, you would move extreme right to Type 440-C,
the stainless steel with the greatest hardness.

28
mechanical properties, with yield strength of 50 ksi (345 MPa) to
70 ksi (482 MPa) as annealed, and strength levels in excess of
100 ksi (689 MPa) when cold worked.
A new nitrogen strengthened grade, BioDur® 108 alloy, discussed
in the following "Other Grades to Consider" section, has an annealed
yield strength in excess of 85 ksi (586 MPa) with a tensile strength
in excess of 130 ksi (896 MPa).
These alloys are austenitic stainless grades with nitrogen added
for improved strength and corrosion resistance. All of them, except
Gall-Tough® stainless, remain nonmagnetic even after severe cold
working.
The group starts with 18Cr-2Ni-12Mn stainless, which has corrosion
resistance similar to Type 430 stainless. It offers an excellent com-
bination of toughness, ductility, corrosion resistance, strength and
good fabricability. Farther up the scale are Gall-Tough stainless,
Gall-Tough PLUS® stainless and 21Cr-6Ni-9Mn stainless. These three
grades have corrosion resistance ranging between Type 304 stainless
and Type 316 stainless with twice the yield strength and excellent
high temperature strength.
Gall-Tough stainless and Gall-Tough PLUS stainless, which are resis-
tant to galling, may be considered for applications such as valve and
pump components, shafts, bridge pins, fasteners, wire and orthodon-
tic parts. 21Cr-6Ni-9Mn stainless has been used generally for airframe
and aircraft engine parts, steam and autoclave components, parts
exposed to reciprocating engine exhausts, etc.
The most corrosion resistant stainless in this family is
22Cr-13Ni-5Mn stainless. This alloy has better corrosion resistance
than Type 316 stainless, and twice the yield strength. It provides
high level resistance to pitting and crevice corrosion and very good
resistance in many reducing and oxidizing acids and chlorides.

29
Other Grades to Consider
Custom 465® stainless is a premium melted, martensitic, age hard-
enable alloy capable of about 260 ksi (1793 MPa) ultimate tensile
strength when peak aged. The alloy was designed to have excellent
notch tensile strength and fracture toughness in this condition.
Overaging provides a superior combination of strength, toughness
and stress corrosion cracking resistance compared with other high
strength precipitation hardenable stainless alloys such as Custom 455
stainless or PH 13-8 Mo* stainless.
This alloy may be considered for medical instruments such as screw-
drivers, nut drivers, and instruments for clamping, spreading and
impacting; for a variety of aerospace applications including aircraft
landing gear, engine mounts, flap tracts, actuators, tail hooks and
other structural components; also for shafting subject to heavy
stress, bolts, fasteners and other parts requiring an exceptional
combination of high strength, toughness and corrosion resistance.
BioDur® 108 alloy is a fully austenitic stainless steel with less than
0.05% nickel that has been designed as a candidate to meet high
standards for bio-compatibility in medical applications. Tests for
cytotoxicity, irritation, acute systemic toxicity and pyrogenicity
have indicated that the alloy is a good candidate for implanted
medical devices.
High nitrogen content gives this alloy improved levels of tensile and
fatigue strength as compared with nickel-containing alloys such as
BioDur 22Cr-13Ni-5Mn alloy and BioDur 734 alloy. The resistance
of BioDur 108 alloy to pitting and crevice resistance is superior to
Type 316L alloy and equal to that of BioDur 22Cr-13Ni-5Mn alloy
and BioDur 734 alloy. The new alloy is produced by the ElectroSlag
Remelting (ESR) process to assure its microstructural integrity and
cleanness.

30
BioDur 108 alloy could be considered for use in applications requir-
ing high levels of strength and corrosion resistance. Candidate appli-
cations include implantable orthopedic devices such as bone plates,
bone screws, spinal fixation components, hip and knee components,
jewelry, orthodontic applications and other medical components/in-
struments fabricated by forging and machining.
*PH 13-8 Mo stainless is a registered trademark of AK Steel Corp..

31
General Considerations and Guidelines
Note that feeds and speeds in machining tables are suggested
starting points. Depending on a number of factors including
tool condition and operator experience, you may be able to
increase the values.
There is no single set of rules or simple formula that will prove best
for all machining situations. The requirements of pertinent specifi-
cations together with the equipment and the materials being used
must determine the machining parameters that will apply. Stainless
steels have a high alloy content which reduces machinability, but
free-machining stainless steels are available which compare favorably
with some free-machining carbon steels. As discussed previously, the
characteristics of stainless steels that have the greatest influence on
machinability include: relatively high tensile strength; high work-
hardening rate, particularly for the austenitic alloys; and high ductil-
ity. These factors explain the material’s tendency to form a built-up
edge during machining. The chips removed in machining exert high
pressures on the nose of the tool, and therefore tend to weld fast.
This causes the tool to run hot. In addition, the low thermal conduc-
tivity of stainless steels contributes to a rapid heat buildup.
Difficulties in machining stainless steels as a result of the above
factors can be minimized by observing the following points:
1. Because more power is generally required to machine
stainless steels, equipment should be used only up to
about 75% of the rating for carbon steels.
Traditional Machining Operations
32
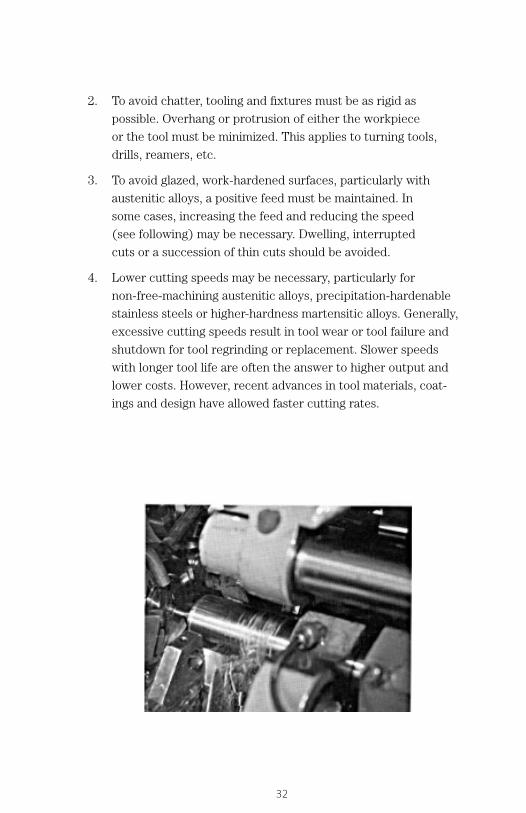
2. To avoid chatter, tooling and fixtures must be as rigid as
possible. Overhang or protrusion of either the workpiece
or the tool must be minimized. This applies to turning tools,
drills, reamers, etc.
3. To avoid glazed, work-hardened surfaces, particularly with
austenitic alloys, a positive feed must be maintained. In
some cases, increasing the feed and reducing the speed
(see following) may be necessary. Dwelling, interrupted
cuts or a succession of thin cuts should be avoided.
4. Lower cutting speeds may be necessary, particularly for
non-free-machining austenitic alloys, precipitation-hardenable
stainless steels or higher-hardness martensitic alloys. Generally,
excessive cutting speeds result in tool wear or tool failure and
shutdown for tool regrinding or replacement. Slower speeds
with longer tool life are often the answer to higher output and
lower costs. However, recent advances in tool materials, coat-
ings and design have allowed faster cutting rates.

33
5. Tools, both high-speed steel and carbide, must be kept sharp,
with a fine finish to minimize friction with the chip. A sharp
cutting edge produces the best surface finish and provides the
longest tool life. In order to produce the best cutting edge on
high-speed steel tools, 60 grit roughing should be followed by
120 grit and 150 grit preparation. Honing or stoning produces
an even finer finish.
6. Cutting fluids must be selected or modified to provide
proper lubrication and heat removal. Fluids must be
carefully directed to the cutting area at a sufficient flow
rate to prevent overheating.

Turning Parameters
Turning operations on automatic screw machines, turret lathes and
CNC lathes involve so many variables that it is impossible to make specific
recommendations which would apply to all conditions. Suggested tool angles,
cutting speeds and feeds are primarily starting points for each specific job.
The turning tables on pages 37 and 39 represent reasonable speeds and feeds
for single-point turning and the tables on pages 38 and 40 for cut-off and
forming operations.
Single-Point Turning Tools
Grinding tools properly is particularly important in machining stainless
steels. Figure 1 illustrates suggested starting geometries for high-speed
steel single-point turning tools. Tools with a 5 to 20° positive top rake angle
for HSS tooling will generate less heat and cut more freely with a cleaner
surface. It also is beneficial to select as large a tool as possible to provide a
greater heat sink, as well as a more rigid setup. To ensure adequate support
for the cutting edge, the front clearance angle should be kept to a minimum,
i.e., 7 to 10°, as shown. Austenitic stainless steels, due to their toughness
and work-hardening characteristics, require tools ground with top rake
angles on the high side of the 5 to 20° range to control the chips and may
require increased side clearance angles to prevent rubbing and localized
work hardening.
The non-free-machining stainless steels tend to produce long, stringy chips
which can be very troublesome. This difficulty can be alleviated by using
chip curlers or chip breakers which, in addition to controlling long chips, also
reduce friction on the cutting edge of the tool. Chip breakers or curlers for
the free-machining stainless steels do not need to be as deep as those for the
non-free-machining alloys. Otherwise, the depth of cut and feed rate usually
govern the width and depth of the curler or breaker. Heavier chips require
TURNING
35
Turning
deeper curlers or breakers; however, they must be ground without weakening
the cutting edge. If a chip curler or breaker cannot be ground into the tool, it
is advisable to have a steep top rake angle.
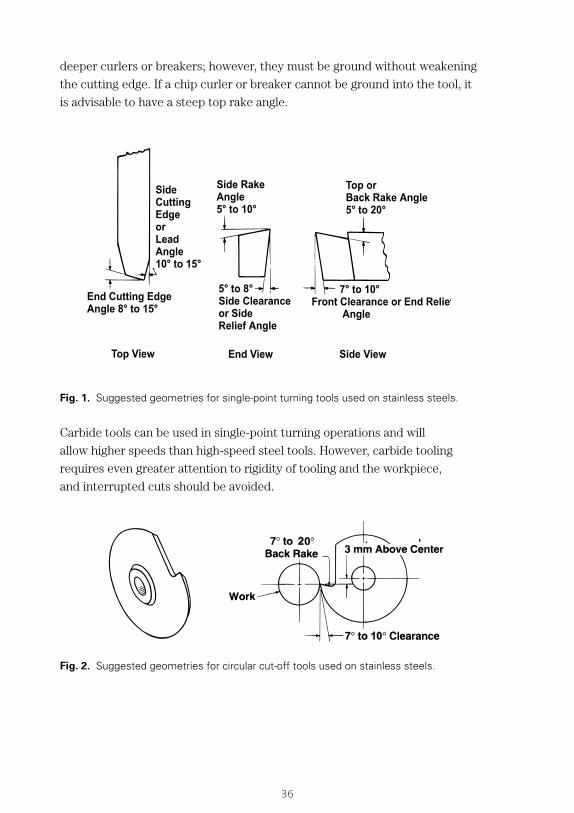
Fig. 1. Suggested geometries for single-point turning tools used on stainless steels.
Carbide tools can be used in single-point turning operations and will
allow higher speeds than high-speed steel tools. However, carbide tooling
requires even greater attention to rigidity of tooling and the workpiece,
and interrupted cuts should be avoided.
Fig. 2. Suggested geometries for circular cut-off tools used on stainless steels.
36

37
410
416
No. 5 BQ
Project 70+® 416
No. 5-F
420
420F
431
440A/440B
440C
440F
430
430F/430FR
443
182-FM
302/304/316
302HQ-FM®
303
Project 70+® 303
303Al Modified®
203
321/347
20Cb-3® Stainless
18Cr-2Ni-12Mn
21Cr-6Ni-9Mn
22Cr-13Ni-5Mn
.150 120 .015 C6 435 570 .015 .025 150 .007 C7 535 670 .007 .150 192 .015 C6 615 765 .015 .025 204 .007 C7 715 815 .007 .150 192 .015 C6 615 765 .015 .025 204 .007 C7 665 815 .007 .150 210 .015 C6 640 795 .015 .025 240 .007 C7 715 895 .007 150 255 .015 C6 680 855 .015 .025 295 .007 C7 755 955 .007 .150 102 .015 C6 375 500 .015 .025 120 .007 C7 450 600 .007 .150 126 .015 C6 465 590 .015 .025 156 .007 C7 535 665 .007 .150 96 .015 C6 350 475 .015 .025 114 .007 C7 425 575 .007 .150 90 .015 C6 325 425 .015 .025 96 .007 C7 400 550 .007 .150 78 .015 C6 290 375 .015 .025 90 .007 C7 340 475 .007 .150 102 .015 C6 425 525 .015 .025 120 .007 C7 475 575 .007 .150 120 .015 C6 435 570 .015 .025 150 .007 C7 535 670 .007 .150 198 .015 C6 600 735 .015 .025 222 .007 C7 675 835 .007 .150 114 .015 C2 400 500 .015 .025 132 .007 C3 475 600 .007 .150 210 .015 C6 625 800 .015 .025 — 220 .007 C7 675 900 .007 .150 102 .015 C2 350 450 .015 .025 120 .007 C3 400 525 .007 .150 140 .018 C2 470 600 .018 .025 171 .0084 C3 530 660 .0084 .150 120 .015 C2 425 525 .015 .025 144 .007 C2 475 600 .007 .150 105 .015 C2 425 600 .015 .025 130 .007 C2 500 700 .007 .150 171 .018 C2 580 700 .018 .025 202 .0084 C2 680 800 .0084 .150 120 .015 C2 435 570 .015 .025 144 .007 C2 485 605 .007 .150 105 .015 C2 425 600 .015 .025 130 .015 C2 425 600 .015 .150 102 .015 C2 385 490 .015 .025 120 .007 C3 435 565 .007 .150 78 .015 C2 290 375 .015 .025 90 .007 C3 390 425 .007 .150 72 .015 C6 250 300 .015 .025 84 .007 C7 300 350 .007 .150 66 .015 C6 250 300 .015 .025 84 .007 C7 300 350 .007 .150 66 .015 C6 250 300 .015 .025 84 .007 C7 300 350 .007
Project 70+® 304/316
Tool Mtl.
Stainless SteelsTurning—Single Point and Box Tools
Carbide Tools (inserts)
Alloy(Annealed Condition)
Depth of Cut(inches)
Speed(fpm)
Feed (ipr)
Micro-Melt® PowderHigh Speed Tools Speed (fpm)
Un-coated Coated
Feed(ipr)
Tool Mtl.
M48, T15
M48, T15
M48, T15
M48, T15
M48, T15
M48, T15
M48, T15
M48, T15
M48, T15
M48, T15
M48, T15
M48, T15
M48, T15
M48, T15
M48, T15
M48, T15
M48, T15
M48, T15
M48, T15
M48, T15
M48, T15
M48, T15
M48, T15
M48, T15
M48, T15
M48, T15
M48, T15
Contact a Carpenter representative for alloy availability.
The speeds and feeds in the following charts are conservative recommendations for initial setup. Higher speeds and feeds may be attainable depending on machining environment.

38
M48, T15 108 .001 .001 .002 .0015 .001 .001 .001 C6 390 .004 .0055 .007 .005 .004 .0035 .0035 M48, T15 120 .0015 .002 .0025 .002 .0015 .001 .001 C6 408 .004 .005 .007 .005 .004 .0035 .0035 M48, T15 162 .0015 .002 .0025 .002 .0015 .001 .001 C6 420 .004 .005 .007 .005 .004 .0035 .0035 M48, T15 180 .0015 .002 .0025 .002 .0020 .0015 .001 C6 432 .004 .005 .007 .005 .004 .0035 .0035M48, T15 192 .002 .0025 .003 .0025 .002 .002 .002 C6 444 .004 .005 .007 .005 .004 .0035 .0035 M48, T15 90 .001 .0015 .002 .015 .001 .001 .001 C6 330 .004 .005 .006 .005 .004 .003 .003M48, T15 120 .001 .0015 .002 .0015 .0015 .001 .001 C6 390 .004 .005 .007 .005 .004 .0035 .0035 M48, T15 78 .001 .001 .0015 .0015 .001 .001 .0005 C6 240 .004 .0055 .007 .005 .004 .0035 .003 M48, T15 66 .001 .001 .0015 .001 .001 .001 .0005 C6 246 .004 .0055 .007 .005 .004 .0035 .0035 M48, T15 60 .001 .001 .0015 .001 .001 .001 .0005 C6 210 .003 .003 .0045 .003 .002 .002 .002 M48, T15 90 .001 .001 .0015 .0015 .001 .001 .0005 C6 300 .004 .055 .007 .005 .004 .0035 .0035 M48, T15 108 .001 .001 .0015 .0015 .001 .001 .001 C6 390 .004 .0055 .007 .005 .004 .0035 .0035 M48, T15 180 .0015 .002 .0025 .0025 .002 .0015 .001 C6 480 .004 .0055 .007 .005 .004 .0035 .0035 M48, T15 96 .001 .0015 .002 .002 .0015 .001 .001 C6 360 .004 .0055 .007 .005 .004 .0035 .0035 M48, T15 180 .0015 .002 .0025 .002 .002 .0015 .001 C6 350 .004 .0055 .007 .005 .004 .0035 .0035 M48, T15 90 .001 .0015 .002 .0015 .001 .001 .001 C2 330 .004 .0055 .007 .005 .004 .0035 .0035 M48, T15 124 .0018 .0024 .0024 .0024 .0018 .0012 .0012 C2 468 .0048 .0066 .0084 .0060 .0048 .0042 .0042 M48, T15 108 .0015 .002 .0025 .002 .0015 .0015 .001 C2 360 .004 .005 .007 .006 .005 .0015 .001 M48, T15 100 .015 .002 .0024 .0025 .0018 .0015 .001 C2 325 .015 .002 .0024 .0025 .0018 .0015 .001 M48, T15 156 .0018 .0024 .0024 .0025 .0018 .0018 .0012 C2 507 .0048 .0060 .0096 .0072 .0060 .0048 .0036 M48, T15 102 .0015 .002 .0025 .002 .0015 .0015 .001 C2 330 .004 .005 .007 .006 .005 .004 .003 M48, T15 100 .015 .002 .0024 .0025 .0018 .0015 .001 C2 325 .015 .002 .0024 .0025 .0018 .0015 .001 M48, T15 96 .001 .0015 .002 .0015 .001 .001 .001 C2 360 .004 .0055 .007 .005 .004 .035 .0035 M48, T15 60 .001 .0015 .002 .001 .001 .001 .001 C2 210 .004 .0055 .007 .005 .004 .0035 .0035 M48, T15 54 .001 .001 .0015 .0015 .001 .0007 .0007 C6 192 .004 .0055 .0045 .004 .003 .002 .002 M48, T15 48 .001 .001 .0015 .0015 .001 .0007 .0007 C6 168 .004 .0055 .0045 .004 .003 .002 .002 M48, T15 48 .001 .001 .0015 .0015 .001 .0007 .0007 C6 168 .004 .0055 .0045 .004 .003 .002 .002
410
416
No. 5 BQ
Project 70+® 416
No. 5-F
420
420F
431
440A/440B
440C
440F
430
430F/430FR
443
182-FM
302/304/316
302HQ-FM®
303
Project 70+® 303
303Al Modified®
203
321/347
20Cb-3® Stainless
18Cr-2Ni-12Mn
21Cr-6Ni-9Mn
22Cr-13Ni-5Mn
Feed (inches per revolution)
Speed(fpm)
1/16
Cut-Off and Form Tools Width (inches)
1/8 1/4 1/2 1 1½ 2
Alloy(Annealed Condition)
Tool Mtl.
Car-bide Tools
Project 70+® 304/316
Micro-Melt®
Powder HS
Tools
Stainless Steels Turning—Cut-Off and Form Tools
Contact a Carpenter representative for alloy availability.

39
17Cr-4Ni .150 M48, 80 .015 C6 300 450 .015 .025 T15 95 .007 C7 350 525 .007
.150 M48, 80 .015 C6 330 425 .015 .025 T15 95 .007 C7 350 525 .007
.150 M48, 60 .015 C6 290 390 .015 .025 T15 75 .007 C7 325 425 .007 .150 M48, 60 .015 C6 265 325 .015 .025 T15 75 .007 C7 300 390 .007 .150 M48, 30 .015 C6 180 225 .015 .025 T15 45 .007 C7 200 275 .007 Project 70+® .150 M48, 90 .015 C6 400 520 .015 Custom 630 .025 T15 105 .007 C7 450 595 .007
.150 M48, 90 .015 C6 375 475 .015 .025 T15 105 .007 C7 425 550 .007
.150 M48, 70 .015 C6 325 425 .015 .025 T15 85 .007 C7 375 475 .007 .150 M48, 70 .015 C6 300 375 .010 .025 T15 85 .007 C7 350 425 .005 .150 M48, 40 .010 C6 210 275 .010 .025 T15 55 .005 C7 250 310 .005 Custom 450® .150 M48, 84 .015 C6 310 400 .015 .025 T15 108 .007 C7 350 475 .007
.105 M48, 78 .015 C6 290 350 .015 .025 T15 90 .007 C7 310 425 .007
.150 M48, 66 .015 C6 250 325 .010 .025 T15 78 .007 C7 300 375 .005
.150 M48, 42 .010 C6 170 225 .010 .025 T15 48 .005 C7 200 260 .005 Custom 465® .150 M48, 72 .015 C6 270 350 .010Custom 455® .025 T15 84 .007 C7 325 425 .005PH 13-8 Mo* 15Cr-5Ni .150 M48, 48 .010 C6 190 250 .010 .025 T15 54 .005 C7 225 290 .005
Project 70+® .150 M48, 132 .015 C6 415 540 .019 15Cr-5Ni .025 .025 T15 150 .010 C7 485 620 .009 .150 M48, 102 .013 C6 385 490 .013 .025 T15 126 .008 C7 445 530 .006 Pyromet® .150 M48, 84 .015 C6 280 400 .015 350 & 355 .025 T15 90 .007 C7 350 475 .007 .150 M48, 72 .015 C6 270 350 .010 .025 T15 84 .007 C7 325 400 .005
.150 M48, 48 .010 C6 190 250 .010 .025 T15 54 .005 C7 225 280 .005
Double Aged H 1150-M
Speed (fpm)
Carbide Tools (inserts)Micro-Melt® PowderHigh Speed Tools
Feed(ipr)
Un-coated Coated
Tool Mtl.
Tool Material
Speed(fpm)
Precipitation Hardening AlloysTurning—Single Point and Box Tools
Alloy
Depth of Cut, (inches)
Feed (ipr)
Aged H 1150 H 1100 H 1075
Aged
Aged H 1025
Double Aged H 1150-M
Aged H 900 H 925
Aged Rc 38-40
Aged Over Rc 40
Equalized & Over Tempered
Aged
Aged H 900 H 925
Aged H 1050-H 1000
Aged H 1150-H 1100
Solution Treated
Aged H 1025
Aged H 1150 H 1100 H 1075
Solution Treated
Solution Treated
Annealed
*Registered trademark of AK Steel Corp.
Contact a Carpenter representative for alloy availability.
Solution Treated
Aged H 900 H 925

40
Precipitation Hardening AlloysTurning—Cut-Off and Form Tools
Feed (ipr)Tool Material
17Cr-4Ni M48, T15 60 .0012 .0015 .002 .002 .0016 .0013 .0011 C6 205 .0012 .0015 .002 .002 .0016 .0013 .0011
M48, T15 70 .0012 .0015 .002 .002 .0016 .0013 .0011 C6 205 .0012 .0015 .002 .002 .0016 .0013 .0011
M48, T15 65 .0012 .0015 .002 .002 .0016 .0013 .0011 C6 200 .0012 .0015 .002 .002 .0016 .0013 .0011 M48, T15 34 .0012 .0015 .002 .002 .0016 .0013 .0011 C6 110 .0012 .0015 .002 .002 .0016 .0013 .0011
M48, T15 25 .0012 .0015 .002 .002 .0016 .0013 .0011 C6 95 .0012 .0015 .002 .002 .0016 .0013 .0011
Project 70+® M48, T15 75 .001 .0015 .002 .0015 .001 .001 .0005 Custom 630 C6 225 .003 .003 .004 .003 .002 .002 .002
M48, T15 100 .0015 .002 .0025 .002 .0015 .001 .001 C6 250 .003 .003 .0045 .003 .002 .002 .002
M48, T15 85 .001 .0015 .002 .0015 .001 .001 .0005 C6 225 .003 .003 .0045 .003 .002 .002 .002 M48, T15 45 .001 .001 .0015 .0015 .001 .001 .0005 C6 150 .003 .003 .0045 .003 .002 .002 .002
M48, T15 35 .001 .001 .0015 .0015 .001 .001 .0005 C6 125 .0025 .0025 .004 .0025 .0015 .0015 .0015
Custom 450® M48, T15 84 .001 .0015 .002 .0015 .001 .001 .0005 C6 240 .003 .0045 .006 .003 .0025 .0025 .0015
Custom 465® M48, T15 72 .001 .0015 .002 .0015 .001 .0007 .0005Custom 455® C6 216 .003 .005 .007 .005 .004 .0035 .0035PH 13-8 Mo*15Cr-5Ni M48, T15 36 .001 .001 .0015 .0015 .001 .0005 .0005 C6 132 .003 .003 .0045 .003 .002 .002 .002
Project 70+® M48, T15 96 .0017 .0020 .0025 .0028 .0022 .0019 .0017 15Cr-5Ni C6 312 .0021 .0024 .0029 .0032 .0024 .0021 .0019
M48, T15 84 .0014 .0017 .0022 .0025 .0019 .0016 .0014 C2 288 .0016 .0019 .0024 .0027 .0020 .0017 .0015
Pyromet® M48, T15 54 .001 .001 .0015 .0015 .001 .001 .0005 350 & 355 C6 210 .0025 .0025 .003 .003 .0025 .0025 .0015
M48, T15 48 .001 .001 .0015 .0015 .001 .0005 .0005 C6 204 .0025 .003 .004 .003 .002 .002 .002
M48, T15 30 .001 .001 .0015 .0015 .001 .0005 .0005 C6 132 .0025 .0025 .0035 .0025 .0015 .0015 .0015
Alloy
*Registered trademark of AK Steel Corp.
Speed(fpm)
1/16 1/8 1/4 1/2 1½ 21
Car-bide Tools
Annealed
Micro-Melt®
Powder HS
Tools
Cut-Off and Form Tool Width (inches)
Solution Treated
Double Aged H 1150-M
Aged H 1075 - H 1100 - H 1150
Aged H 1025
Solution Treated
Double Aged H 1150-M
Aged H 1075 - H 1100 - H 1150
Aged H 900 - H 925
Solution Treated
Aged H 1025
Aged H 900 - H 925
Aged—Rc 38-40
Aged
Solution Treated
Aged
Aged—Over Rc 40
Equalized & Overtempered
Contact a Carpenter representative for alloy availability.

41
Cut-off Tools
Either blade-type or circular cut-off tools are used for stainless steel
applications. Blade-type tools usually have sufficient bevel for side
clearance, i.e., 3° minimum, but may need greater clearance for deep
cuts. In addition, they should be ground to provide for top rake and
front clearance. The front clearance angle is 7 to 10°; a similar angle
is used for top rake, or a radius or shallow concavity may be ground
instead. The end cutting edge angle may range from 5° or less to 15°,
with the angle decreasing for larger-diameter material.
Carbide-tipped cut-off tools may be used. However, shock loading
from interrupted cuts must be taken into consideration when
selecting the carbide.
Form Tools
Form tools are usually dovetail, circular, or insert. The speeds and
feeds for form tools are influenced by the width of the tool in relation
to the diameter of the bar, the amount of overhang and the contour
or shape of the tool. Generally, the width of the form tool should not
exceed 1-1/2 times the diameter of the workpiece; otherwise, chatter
may be a problem.
Dovetail form tools should be designed with a front clearance angle
of 7 to 10°, and be ground with a top rake angle of 5 to 20°. Angles for
circular form tools are similar, as shown in Figure 3. Higher rake angles
within the 5 to 20° range may be used for roughing operations and lower
rake angles for finishing. The design of the tool should incorporate
sufficient side clearance or relief angles, typically 1 to 5° depending on
depth of cut, to prevent rubbing and localized heat build-up, particularly
during rough forming. It may also be necessary to round corners. A finish
form or shave tool may be necessary to obtain the final shape, especially
for deep or intricate cuts.

42
Cable ends and conduit cap that were machined from Carpenter's premium stain-less Types 303 and 304.
Fig. 3. Suggested geometries for circular form tools used on stainless steels.
Carbide-tipped or carbide-insert tooling may be used for forming
operations. However, as with cut-off tools, shock loading from
interrupted cuts must be taken into consideration.
Shaving Tools
A shaving tool may be used to obtain optimum machined surface finish
or close tolerances on formed parts. Shaving tools remove metal with
a tangential rather than a radial cut, with the workpiece supported by
integral rollers. Usually a thin layer of metal (approximately .004–.008 in.
or .1–.2 mm) is removed at relatively high speeds. The tool must have
a very smooth finish on the cutting edge since the finish of the tool will
influence the finish of the part. A clearance angle of about 10° is
normally needed.

Tool “rides”work.
Cannothold closetolerance.
Poor orrough finish.
Work glazesor hardens.
Tools “hog in.”
Circular formtools gall andbind on sides.
Trouble-Shooting Check Chart TURNING
• Is tool heavy enough? Does it have enough mass to carry off generated heat? • Check cutting fluid as it might be too rich in sulphur base oil and should be cut back with a coolant such as paraffin base oil.
• Tool ground with too coarse a grinding wheel. • Not enough mechanical support due to grinding large concavity in front clearance. Use straight angular grind with minimum clearance, usually between 7° and 10°.
• Top rake angle not steep enough. Should be 5° to 20° angle.
• Also indicates need of “chip curler.” If curler is used, it is not deep and wide enough. • Stoning top rake to a fine smoothness helps chips slide off. • Tool set too low.
• Rough turn to .003/.005" over finished size and shave, using light cut at a fast speed. • Check cutting fluid to be sure mixture has enough paraffin oil to serve as coolant for dissipating heat.
• Check cutting tool. If ground on coarse grit wheel and not stoned, this is natural result. • Cut may be too heavy. • Stock may be too soft, and is “picking up.”
• Close tolerances are not readily obtainable on heavy cuts. Machine to .003/.005” over finished size and tolerance required and then take a shave or finishing cut with fairly fast speed. Have cutting fluid on thin side for cooling purposes.
• Tool not sharp enough. • Top rake angle not steep enough, causing “bugging.” • Look for “play or looseness” in machine or tool. • Feed too low.
• Tool either dull or riding too far above center of work.
• The use of a solid type steady-rest will glaze or work-harden job—change to roller type steady-rest.
• Rake angles too small. • Also check side clearance.
• Stock may be extra dead soft. • Carriage may be loose.
• Cutting edge of tool below center line. See sketch on page 42.
• Cut too deep for side clearance allowed. Increase angle of side clearance. If this goes beyond allowable limits of finished piece, a shaving operation will have to be added.
Tool heats badly.
Cutting edgebreaks off.
Chips pile on top of tool.
Work cutswith taper.
PROBLEM: POSSIBLE SOLUTIONS:
43
• Stock too soft or cut too heavy. Add shaving operation, taking a light fast finishing cut (.002/.008"). Experienced operators are doing this and eliminating grinding before thread cutting for Class 3 fits.
• Cutting fluid may be too thin. Add more sulphur base oil. • Spindle speed too high. Check with tables on pages 37 and 38. • Material too hard for type of turning tool being used.
• Generally an indication of too rich a mixture of sulphur base oil. Add paraffin oil until excessive wear is reduced.
• See No. 5 on page 33 for information on grinding and stoning of cutting edge. Following these suggestions has generally increased tool life from 10 to 60%. Several cases reported higher than this.
• Look for a “bug” on cutting edge. Sometimes a small one remains after grinding. This starts building up metal right away, resulting in undersized cut. Stoning after grinding will eliminate this. • Mechanical adjustment of machine may be required.
• Tool is not being held tight in fixture, causing vibration.
• Tool is not properly set with center line of work.
• Excessive clearance angles tend to cause chatter.
• Too heavy a cut or too light a machine. • A roller steady-rest will help to prevent chattering. • Check for looseness in tool holder. Tool may have too much overhang.
• Tool too wide.
• Not enough clearance angle. Tool rubbing against work, creating friction heat. This requires more pressure to feed tool and the rubbing causes poor finish. • Dull tool.
• This occurs when tool has chip groove which is carried through the front of tool or cutter. This can be overcome by proper regrinding.
Cannot takefinish cut close
enough for thread-ing.
Tools burn.
Excessivetool wear.
Tools won’thold edge.
Tool cutsundersize after
grinding.
Double chips.
Chatter marks.
Tool heatsexcessively andfinish is rough.
PROBLEM: POSSIBLE SOLUTIONS:
44

General Guidelines
In any drilling operation, the following factors are important:
1. Work must be kept clean and chips removed frequently, since dirt and
chips act as an abrasive to dull the drill.
2. Drills must be carefully selected and correctly ground.
3. Drills must be properly aligned and the work firmly supported.
4. A stream of cutting fluid must be properly directed at the hole.
5. Drills should be chucked for shortest drilling length to avoid whipping or
flexing, which may break drills or cause inaccurate work.
6. Drill coatings, such as TiN, TiAlN, & TiCN, should extend the wear
resistance.
When working with stainless steels, particularly the austenitic alloys, it is
advisable to use a sharp three-cornered punch rather than prick punch to
avoid work hardening the material at the mark. Drilling templates or guides
may also be useful.
To relieve chip packing and congestion, drills must occasionally be backed
out. The general rule for HSS drills is to drill to a depth of three to four times
the diameter of the drill for the first bite, one or two diameters for the second
bite and around one diameter for each of the subsequent bites. This is not a
good technique for carbide drills. Carbide drills have a tendency to break on
a peck operation. A groove ground parallel to the cutting edge in the flute for
chip clearance will allow deeper holes to be drilled per bite, particularly with
larger-size drills. The groove breaks up the chip for easier removal.
DRILLING
45
Drilling

Drills should not be allowed to dwell during cutting, particularly with
austenitic stainless steels. Allowing the drill to dwell or ride glazes the
bottom of the hole, making restarting difficult. Therefore, when relieving
chip congestion, drills must be backed out quickly and reinserted at full
speed to avoid glazing.
Drills with a non-cutting land at the point should be avoided. This
non-cutting land only pushes material away from the center and will work
harden the material. This action can cause hard spots in the center of the
material and lead to premature drill failure. Use a split point or a manu-
facturer's variation of a split point to maintain a cutting action.
Drilling Parameters
Drill feed is an important factor in determining the rate of production.
Because proper feed increases drill life and production between grinds,
it should be carefully selected for each job. The drilling tables on pages
48 and 49 list feeds and speeds for various size drills.
Grinding of Drills
It is especially important to grind drills correctly. Figure 4 shows
suggested geometries for high-speed steel drills to be used with stainless
steels. The point angle should be 130° to 140°, although a smaller angle
may be used for easier-to-machine alloys. A larger angle produces a more
easily removed chip when drilling hard or tough alloys. This wider angle
also promotes a straighter hole. The use of a split point drill tip reduces
the amount of cold work in the material at the point, thus extending drill
life. The lip clearance should be between 9° and 15°, and the two cut-
ting edges must be equal in length and angle. The web thickness at the
point should be about 12.5% of the drill diameter, or less. A thinner web
reduces feed pressure, heat generation, and glazing or work-hardening of
the bottom of the hole. Grinding fixtures should be used when regrinding
drills. For best results in grinding high-speed steel drills, medium-grain,
soft-grade dry wheels should be used. Blueing or burning is to be avoided,
as is quenching. Quenching will often check or crack the drill if it has
been overheated.
46


48
M42 60-70 .001 .003 .006 .010 .013 .016 .021 .025 C2 Coated 205 .0005 .001 .006 .0085 .0111 .0128 .0158 .0158 M42 95-110 .001 .003 .006 .010 .014 .017 .021 .025 C2 Coated 275 .001 .003 .006 .0085 .0119 .0136 .0158 .0158 M42 95-110 .001 .003 .006 .010 .014 .017 .021 .025 C2 Coated 240 .001 .003 .006 .0085 .0119 .0136 .0158 .0158 M42 120-144 .0014 .0042 .0066 .012 .0155 .019 .024 .028 C2 Coated 290 .001 .003 .006 .0085 .0119 .0136 .0158 .0158 M42 110-140 .001 .003 .006 .010 .014 .017 .021 .025 C2 Coated 295 .001 .003 .006 .0085 .0119 .0136 .0158 .0158 M42 55-65 .001 .003 .006 .010 .013 .016 .021 .025 C2 Coated 205 .0005 .003 .006 .0085 .0111 .0128 .0158 .0158 M42 65-75 .001 .003 .006 .010 .014 .017 .021 .025 C2 Coated 280 .0005 .003 .006 .0085 .0119 .0136 .0158 .0158 M42 50-60 .001 .003 .005 .007 .010 .012 .015 .018 C2 Coated 150 .001 .003 .005 .006 .0085 .0096 .0113 .0113 M42 45-55 .001 .003 .006 .010 .014 .017 .021 .025 C2 Coated 140 .0005 .002 .004 .006 .0077 .0088 .0098 .0098 M42 40-50 .001 .003 .005 .007 .009 .011 .014 .018 C2 Coated 135 .0005 .002 .004 .006 .0077 .0088 .0098 .0098 M42 60-70 .001 .002 .004 .007 .010 .012 .015 .018 C2 Coated 160 .001 .002 .004 .006 .0085 .0096 .0113 .0113 M42 100-150 .001 .003 .006 .010 .014 .017 .021 .025 C2 Coated 310 .001 .003 .006 .0085 .0119 .0136 .0158 .0158 M42 50-65 .001 .002 .004 .007 .010 .012 .015 .018 C2 Coated 150 .001 .003 .005 .006 .0085 .0096 .0113 .0113 M42 50-60 .001 .002 .004 .007 .010 .012 .015 .018 C2 Coated 140 .0005 .002 .004 .006 .0085 .0096 .0113 .0113 M42 78-98 .0012 .0024 .0048 .0084 .012 .0204 .0252 .030 C2 Coated 180 .0005 .002 .004 .006 .0085 .0096 .0113 .0113 M42 70-90 .001 .003 .006 .010 .014 .012 .015 .018 C2 Coated 200 .0005 .002 .004 .006 .0085 .0096 .0113 .0113 M42 120 .001 .003 .006 .010 .014 .017 .021 .025 C2 Coated 240 .0008 .003 .006 .0085 .0119 .0136 .0158 .0158 M42 91-130 .0012 .0036 .0072 .012 .0168 .0204 .0252 .030 C2 Coated 240 .001 .003 .006 .0085 .0119 .0136 .0158 .0158 M42 65-90 .001 .003 .006 .010 .014 .017 .021 .025 C2 Coated 200 .001 .003 .006 .0085 .0119 .0136 .0158 .0158 M42 120 .001 .003 .006 .010 .014 .017 .021 .025 C2 Coated 240 .0008 .003 .006 .0085 .0119 .0136 .0158 .0158 M42 50-60 .001 .002 .004 .007 .010 .012 .015 .018 C2 Coated 130 .001 .002 .004 .006 .0085 .0096 .0113 .0113 M42 45-55 .001 .003 .006 .010 .014 .017 .021 .025 C2 Coated 140 .0005 .002 .004 .006 .0077 .0088 .0098 .0098 M42 45-55 .001 .002 .004 .007 .010 .012 .015 .018 C2 Coated 140 .0005 .002 .004 .006 .0077 .0088 .0098 .0098 M42 50-60 .001 .002 .004 .007 .010 .012 .015 .018 C2 Coated 155 .0005 .002 .004 .006 .0077 .0088 .0098 .0098 M42 45-50 .001 .002 .004 .007 .010 .012 .015 .018 C2 Coated 150 .0005 .002 .004 .006 .0077 .0088 .0098 .0098
Stainless Steels Drilling
Speed(fpm)
HighSpeed Tools
Nominal Hole Diameter (inches)
Feed (inches per revolution)
1½ 23/41/16 1/8 1/4 1/2 1Alloy
(Annealed Condition)
410
416
No. 5 BQ
Project 70+® 416
No. 5-F
420 420F 431
440A/440B
440C 430
430F/430FR
443
302/304/316
Project 70+® 304/316Project 70+ 304L/316L302HQ-FM®
303
Project 70+® 303
303Al Modified®
203
321/347
20Cb-3® Stainless
18Cr-2Ni-12Mn
21Cr-6Ni-9Mn
22Cr-13Ni-5Mn
The speeds and feeds in the following charts are conservative recommendations for initial setup. Higher speeds and feeds may be attainable depending on machining environment.
Contact a Carpenter representative for alloy availability.

49
17Cr-4Ni M42 50 .001 .002 .004 .007 .008 .010 .012 .015
M42 50 .001 .002 .004 .007 .008 .010 .012 .015
M42 45 .001 .002 .004 .007 .008 .010 .012 .015 M42 40 .001 .002 .004 .007 .008 .010 .012 .015
M42 20 .001 .002 .004 .007 .008 .010 .012 .015
Project 70+® M42 55 .001 .002 .004 .007 .008 .010 .012 .015 Custom 630 M42 65 .001 .002 .004 .007 .009 .011 .013 .016
M42 50 — .002 .004 .007 .008 .010 .012 .015 M42 40 — .002 .004 .006 .008 .009 .011 .012
M42 30 — .001 .002 .003 .004 .004 .004 .004 Custom 450® M42 50 .001 .002 .004 .007 .008 .010 .012 .015
M42 45 .001 .002 .004 .007 .008 .010 .012 .015
M42 35 — .002 .004 .007 .008 .010 .012 .015
M42 25 — .001 .002 .003 .004 .004 .004 .004
Custom 465®
Custom 455® M42 50 .001 .002 .004 .007 .008 .010 .012 .015PH 13-8 Mo* 15Cr-5Ni M42 35 — .001 .002 .003 .004 .004 .004 .004
Project 70+® M42 70 .0014 .0024 .0044 .0074 .0084 .0104 .0124 .0154 15Cr-5Ni M42 60 — .0022 .0042 .0072 .0082 .0102 .0122 .0152
Pyromet® M42 50 .001 .002 .004 .007 .008 .010 .012 .015 350 & 355 M42 35 — .002 .004 .006 .008 .009 .011 .012
Precipitation Hardening AlloysDrilling
Alloy
*Registered trademark of AK Steel Corp.
HighSpeedTools
Nominal Hole Diameter (inches)
Feed (inches per revolution)
1½ 23/41/161/8 1/4 1/2 1
Aged—900 - 950
Solution Treated
Double Aged—H 1150M
Aged—H 1075 - H 1100 - H 1150
Aged—H 1025
Aged—H 900 - H 925
Solution Treated
Double Aged—H 1150M
Aged—H 1025
Aged—H 900 - H 925
Solution Treated
Aged—1100 - 1150
Aged—1000 - 1050
Aged
Annealed
Solution Treated
Aged
Equalized & Overtempered
Aged—Rc 38 - 40
Aged—Over Rc 40
Aged—H 1075 - H 1100 - H 1150
Contact a Carpenter representative for alloy availability.
Special Drills
As noted previously, drills should be chucked for shortest drilling
length. However, some jobs require exceptionally deep drilled holes,
where the depth of the hole is eight to ten times the diameter.
Therefore, short chucking is impossible. In such cases, special drills

50
In addition to deep hole gun drilling, these thermometer thermocouple wells were turned, threaded, tapped, reamed and milled for use in the chemical and petroleum industries.
known as crankshaft hole drills may be useful. These drills were
originally designed to drill oil holes in forged crankshafts and connect-
ing rods, but have found widespread use in drilling deep holes. They
are made with a very heavy web and a higher spiral or helix angle to
aid in chip removal. They usually have a notched point-type of web
thinning which is done on a sharp-cornered hard grinding wheel.
A cotter pin drill should be used to drill small cross holes in the heads
of bolts, screws, pins, etc. Like a crankshaft hole drill, it is a more heavily
constructed drill which withstands abnormal strains and has a faster or
higher helix angle to aid in chip removal.
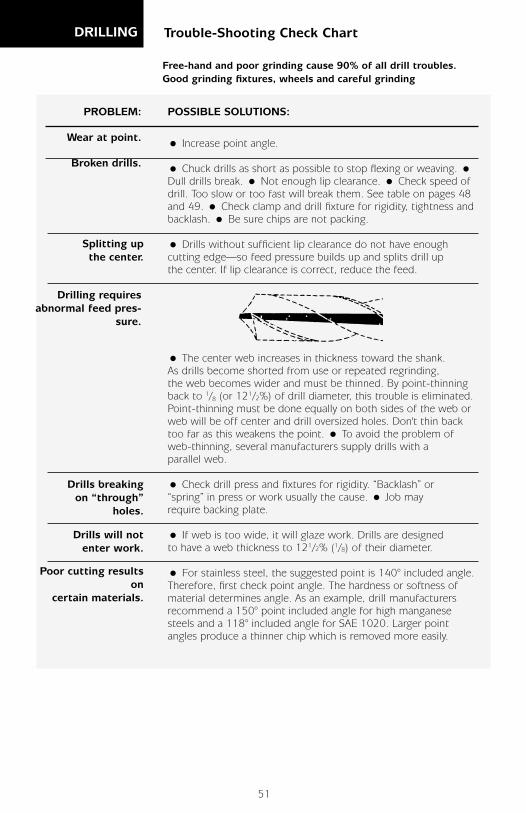
Trouble-Shooting Check Chart DRILLING
• Increase point angle.
• Chuck drills as short as possible to stop flexing or weaving. • Dull drills break. • Not enough lip clearance. • Check speed of drill. Too slow or too fast will break them. See table on pages 48 and 49. • Check clamp and drill fixture for rigidity, tightness and backlash. • Be sure chips are not packing.
• Drills without sufficient lip clearance do not have enough cutting edge—so feed pressure builds up and splits drill up the center. If lip clearance is correct, reduce the feed.
• The center web increases in thickness toward the shank. As drills become shorted from use or repeated regrinding, the web becomes wider and must be thinned. By point-thinning back to 1/8 (or 121/2%) of drill diameter, this trouble is eliminated. Point-thinning must be done equally on both sides of the web or web will be off center and drill oversized holes. Don't thin back too far as this weakens the point. • To avoid the problem of web-thinning, several manufacturers supply drills with a parallel web.
• Check drill press and fixtures for rigidity. “Backlash” or “spring” in press or work usually the cause. • Job may require backing plate.
• If web is too wide, it will glaze work. Drills are designed to have a web thickness to 121/2% (1/8) of their diameter.
• For stainless steel, the suggested point is 140° included angle. Therefore, first check point angle. The hardness or softness of material determines angle. As an example, drill manufacturers recommend a 150° point included angle for high manganese steels and a 118° included angle for SAE 1020. Larger point angles produce a thinner chip which is removed more easily.
Wear at point.
Broken drills.
Splitting upthe center.
Drilling requires abnormal feed pres-
sure.
PROBLEM: POSSIBLE SOLUTIONS:
Free-hand and poor grinding cause 90% of all drill troubles.
Good grinding fixtures, wheels and careful grinding
Drills breaking on “through”
holes.
Poor cutting results on
certain materials.
Drills will not enter work.
51

• Check volume of cutting fluid. Is it flooding drill? This condition is either pool lubrication or cutting fluid is too rich in sulphurized base oil and should be cut back with suitable blending oil. • Undersized drill jig bushing will wear drill.
• Not enough clearance back of the cutting edge.
• Check drill jig bushing for size; usually an oversized drill jig bushing causes chipping.
• Generally this trouble comes from worn chuck, or nicks on tang, as well as burrs or dirt. Check these items and be sure shank fits into sleeve or taper snugly. Sleeves may be in poor condition.
• Check bearings and spindles of drill press. Sloppy fits are generators of this trouble. This trouble prevails mostly on small drills, so if press is all right, try grinding a secondary angle of 7° to 9°, which will back up the cutting edge and stop hogging or “digging in.”
• Several factors lead to this condition, any one of which can be the cause. Generally it is due to too fast a feed. Try a higher speed and slower feed. • If this does not correct the trouble, check the drill for proper grinding.
• Check cutting fluid for volume. Be sure enough reaches the drill. • Poor chip elimination may be the cause.
• Check entire setup, including machine.
• Assuming that cutting fluid is of correct mixture and in sufficient volume, this is then caused by too high a speed. Reduce speed until trouble disappears. • Flutes clogged with chips.
Drill wears un-dersize quickly.
Poor cutting with a sharp
drill.
Trouble-Shooting Check Chart DRILLING
PROBLEM: POSSIBLE SOLUTIONS:
Chipping of“margin.”
Breakage ofdrill tang.
Drill“digs in.”
Rough surface in finished
hole.
Drill breakageon outer
corners ofcutting edges.
52
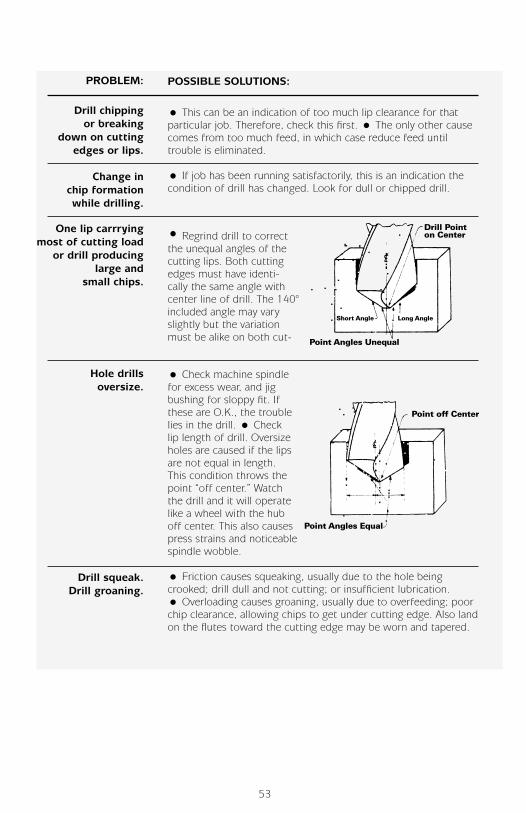
• This can be an indication of too much lip clearance for that particular job. Therefore, check this first. • The only other cause comes from too much feed, in which case reduce feed until trouble is eliminated.
• If job has been running satisfactorily, this is an indication the condition of drill has changed. Look for dull or chipped drill.
• Check machine spindle for excess wear, and jig bushing for sloppy fit. If these are O.K., the trouble lies in the drill. • Check lip length of drill. Oversize holes are caused if the lips are not equal in length. This condition throws the point “off center.” Watch the drill and it will operate like a wheel with the hub off center. This also causes press strains and noticeable spindle wobble.
• Friction causes squeaking, usually due to the hole being crooked; drill dull and not cutting; or insufficient lubrication.
• Overloading causes groaning, usually due to overfeeding; poor chip clearance, allowing chips to get under cutting edge. Also land on the flutes toward the cutting edge may be worn and tapered.
Change in chip formation while drilling.
Drill chipping or breaking
down on cutting edges or lips.
One lip carrrying most of cutting load
or drill producing large and
small chips.
PROBLEM: POSSIBLE SOLUTIONS:
• Regrind drill to correct the unequal angles of the cutting lips. Both cutting edges must have identi-cally the same angle with center line of drill. The 140° included angle may vary slightly but the variation must be alike on both cut-
Hole drills oversize.
Drill squeak.Drill groaning.
53

Types of Holes and Taps
The initial hole bears an important role in securing a finished tapped hole
of the desired quality. The tap is simply a cutting tool and is not intended
for correcting a small or poorly drilled hole. Holes having a work-hardened
surface due to improper drilling or reaming technique will also cause
problems during tapping.
Basically there are two types of holes prepared for tapping: the open or
through hole and the blind hole. For open or through holes, taps of either
the spiral-fluted or the straight-flute spiral-pointed type can be used, as
shown in Figure 5. They are particularly desirable when tapping the softer
and non-free-machining alloys because they provide adequate chip relief.
The spiral-pointed tap cuts with a shearing motion. It has the least amount
of resistance to the thrust, and the entering angle deflects the chips so that
they curl out ahead of the tap. This prevents packing in the flutes, a frequent
cause of tap breakage. When backing out a spiral-pointed tap, there is less
danger of roughing the threads in the tapped part. The spiral-pointed tap
should not be used in blind or closed holes unless there is sufficient untapped
depth to accommodate the chips. To tap blind holes, special spiral-pointed
bottoming taps are available. However, spiral-fluted taps with a spiral of the
same hand as the thread are suggested, since they are designed to draw chips
out of the hole.
TAPPING
55
Tapping

Fig. 5. Typical taps used for stainless steels, with suggested geometries and
grinding techniques.
The “class of fit” required for the threads will also be a factor in tap
selection. The following three classes are standard:
Class 1 - Loose fit largest tolerance range
Class 2 - General purpose fit moderate tolerance range
Class 3 - High-accuracy fit tight tolerance range
The class of fit determines whether a cut thread tap, ground thread tap
or a precision ground thread tap is necessary. A cut thread tap is used
for Class 1 fits; ground thread taps are used for Class 2 fits; and
precision ground thread taps are used for Class 3 fits.
Chip removal is also important for close tolerance tapping. When
the wrong tap is selected, chips crowd into the flutes; therefore, the
flutes should not be too shallow or the lands too wide. Often the
56


Trouble-Shooting Check Chart TAPPING
• Two factors cause this trouble. First, oversized drill holes. Was drill selected from an old “Standard Table”? These tables have errors, particulary on fine pitches. Check drill size with formulas on page 59 • Second, are you using a cut thread tap when a ground thread tap is needed? Remember, a cut thread tap seldom is suitable for anything but Class 1 fit. Commercial ground taps cut Class 2 fits. Precision ground taps cut Class 3 fits. Be sure you are using the right type of tap for the job.
• Usually due to tap holder taking slightly different angle each time. If you are using “floating” holder, check how much it wobbles. Often changing to an accurate, rigid holder overcomes this trouble. • Check flutes; if shallow, chips will pack causing tap to cut oversize. • Wrong grid on chamfer can also cause inaccurate holes. • Was hole drilled accurately to size and roundness?
• Loading or pick-up on tap surfaces causes most tap breakage. As soon as this is observed, it should be corrected. To let it go means the pick-up will finally be so great that tap will weld in hole and power of machine will break it. Check lubrication. Other causes of loading are lands too wide, chips packing in flutes, or dull tap.
• If all other factors and variables have been carefully checked, try a back relief grind on the heel of the tap. This overcomes tap tearing threads when backing out. • Insufficient hook angle can also cause roughness in threads.
• Tap may be too hard (over Rockwell C-63) for type of material being cut. Grind broken teeth entirely away and tap will be serviceable.
• This can usually be overcome by polishing the tap after grinding. The better the tap is polished, the less tendency for loading. • Are flutes of tap undercut from regrinding? (See sketch on page 56.)
• See sketches on page 56 for correct method and grinding wheel shape.
• Chamfer must be ground uniformly on all flutes using the proper angle. (See page 60.)
Loose fits won't meet toler-
ance.
Tapped holes not consis-
tently accurate.
Roughness in threads.
Tap overloading caused
by pick-up.
Brokenteeth.
Loading on stringy soft metals.
Flutes require regrinding.
Poor threads and high tap
breakage.
PROBLEM: POSSIBLE SOLUTIONS:
61
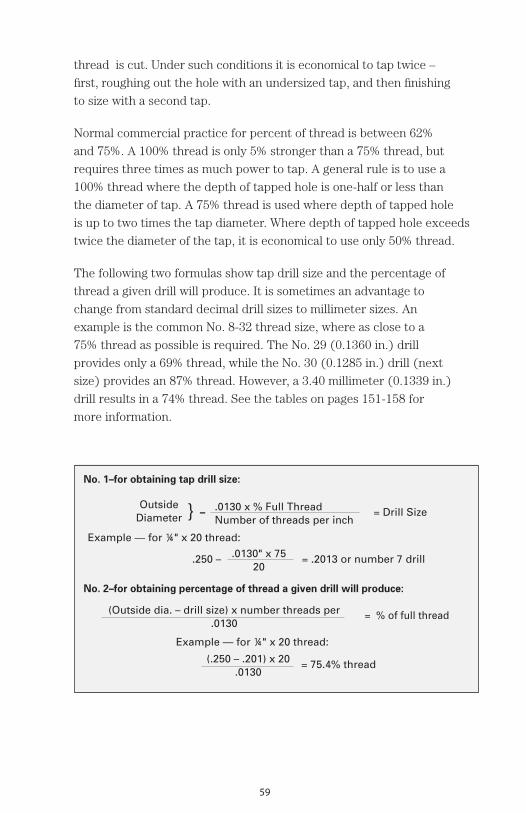
• Chamfer ground even but point diameter too small, throw-ing all the load of cutting on too small a portion of the chamfer. Chamfer must be ground uniformly on all flutes using the proper angle. (See page 59.) • Check hardness of tap—may not be hard enough (under Rockwell C-59) for type of material being cut.
• Generally an indication of improperly ground or dull tap.
• Check hole diameter. Drills may have worn enough to be cutting undersized. • Check to see if axis of hole and tap are parallel. • Check for chips packing in flute. This can develop if flutes are shallow or lands too wide. Chips can be controlled perfectly, and are, in well designed and correctly ground taps. Power required to break chip packing often more than required to tap. On deep holes this will break taps.
• This is usually caused when tap cuts oversized hole, leaving no support to tap when backing out, thereby permitting it to cut.
• A “floating” tap holder or wobbly spindle contribute to this condition. • Also check back relief. (See sketch on page 56.)
• This invariably is due to tapping speed being too high. Check the chart shown on pages 57 and 58.
• Usually a sign of tapping speed being too low. Check charts on pages 57 and 58.
• General information is on page 110. As added precaution for tapping, check to make sure cutting fluid is flooding the tap constantly while it is in the hole. Be sure pressure of cutting fluid is strong enough to wash chips away. • Generally, tapping speeds are not fast enough to heat the tap. Therefore, coolants are not necessary. It is more important to use a good cutting fluid that will prevent wear and friction on the tap. It also reduces power required to cut.
• Use the next size larger tap drill.
High power con-sumption and quick
dulling of tap.
Tap slows up. More power required.
Tap cuts when back-ing out.
Tap runs hot; dulls too fast.
Tap drags badly.
Cuttingfluids.
Threadsswell.
PROBLEM: POSSIBLE SOLUTIONS:
62

Die Threading
Types of Chasers and Geometries
Thread chasers for self-opening die heads are made of high-speed steel.
The standard commercial chasers generally have a satisfactory life when
they are kept sharp and correctly ground for the materials cut.
Figure 6 shows suggested geometries for the four main types of thread-
cutting tools. The most generally used chaser for close-tolerance threads
is the tangent-type. It is particularly adaptable for heavy-duty jobs, such
as producing long, coarse threads. The tangent-type chaser maintains
thread size better on heavy-duty work and provides good life between
grinds. Whenever possible a 20° throat angle should be used. However,
where the threads do not run into a shoulder, a 15° throat is desirable.
THREADING
Fig. 6. Typical thread chasers used for stainless steels, with suggested geometries.
63
Thread
ing

The circular-type is considered to be the universal thread chaser, as it
is adaptable to all types of threads and will work equally well on tubing.
This type of chaser should generally have a 25° throat angle.
The insert type of chaser is widely used. It produces good threads on
non-free-machining alloys at a low cost. A 20° throat angle is usually
suitable for this type of chaser.
The radial-type of chaser will produce very smooth threads, since it is
ground to follow the shape or contour of the threaded piece. On screw
machine jobs, where extremely fine threads are required for stainless
steel parts, this type of chaser has been used successfully. Radial chasers
typically have a 20° throat angle.
The throat angle or chamfer will vary slightly from the typical figure given
for each of the chasers described, according to the type of thread being
cut and the grade of stainless steel machined. In general, it is advisable
to use a 1-1/2 to 3 thread chamfer or lead on the throat. This will usu-
ally produce a smooth thread with a fine finish and increase chaser life
between grinds. The advantage of using a long throat angle is that each
tooth makes a smaller cut and, consequently, produces cleaner threads.
As an example, in one particular case a 45° throat angle produced a chip
approximately 0.018 in. (0.46 mm) thick, while a 15° throat angle pro-
duced a chip only 0.0065 in. (0.17 mm) thick.
When threading close to a shoulder where a long throat angle cannot be
used, it may be necessary to grind only a 1/2 or 1 thread chamfer on the
chaser. If this short throat angle produces a rough thread, a smooth finish
can be obtained by running the chaser over the workpiece a second time,
or the thread can be cut in two operations by first taking a rough cut and
then finishing with a second cut.
64


Trouble-Shooting Check Chart THREADING
• Sharp chasers cut better threads. Don't run your chaser too long. It costs less to grind them more often.
• A die head clogged with chips or having weak springs will result in pool threads and possible breakage of chasers.
• You will avoid trouble if the throat angles in the set are ground exactly alike. Chasers with short chamfer or throat angles tend to chip or break. Short chamfers require slower cutting speeds and the chasers will have shorter life between grinds.
• When sharpening chasers you will prevent burning by taking light cuts with a soft wheel. Grinding too slow with heavy cuts, or a hard wheel, will burn the chaser and cause grinding checks.
• A bad start of the die head on the work is most likely the reason for getting a thin first thread, If you want all your threads to be good, check the work and threading spindle for proper alignment and be sure they are O.K. Bad alignment will bring on trouble.
• Where possible, chamfer or bevel the work so all chasers will start cutting at the same time. Die head and work must line up properly to avoid eccentric threads. A good bevel on the work is important in getting concentric threads.
• Rough threads often result when cutting at too high a speed; cutting fluid is not properly blended—or dirty oil loaded with fine chips that act as an abrasive. On circular chasers, rough threads can also result from too much face angle—it is best to hold to an angle of 1½°.
• If there is not enough hook angle on the face of the chaser, the top of the threads will be rough.
• If threads are oversize, it may be caused by excess pressure on the thread rolls or soft stock. In either case the pressure should be reduced. If the blank is too large, this, too will cause oversize threads and can be adjusted by using the correct blank.
• Undersize threads generally require increased pressure due to hard stock or insufficient pressure on the thread rolls. In the case of hard stock, it may be necessary to try a softer stock. Undersize threads can also result from the blank being too small.
• Poor threads can generally be corrected by checking the blank size, adjusting for even pressure on twin thread rolls, or replacing a work thread roll.----------------------------------------------------------------------------
68

Types of Milling Cutters
Various high-speed steel cutters are shown in Figure 7. Tooling with carbide
inserts may also be used, particularly for alloys which are more difficult to
machine. As a general rule, smoothest finishes are obtained with helical or
spiral cutters running at high speed, particularly for cuts over 0.75 in. (19
mm) wide. Helical cutters cut with a shearing action and, as a result, cut
more freely and with less chatter than straight-tooth cutters. Coarse-tooth
or heavy-duty cutters work under less stress and permit higher speeds than
fine-tooth or light-duty cutters. They also have more space between the
teeth to aid in chip disposal.
For heavy, plain milling work, a heavy-duty cutter with a faster, 45° left-hand
spiral is preferred. The higher angle allows more teeth to contact the work at
the same time. This puts a steady pressure on the arbor and spindle, thereby
reducing chatter. In wide, slab milling, such cutters are particularly necessary
to produce smooth finishes and avoid chatter.
Unlike plain milling cutters which have teeth only on the circumference,
straddle or side mill cutters have cutting teeth on each side, as well as on the
circumference or periphery. Such cutters will mill on both sides of a part or
mill shallow slots. For milling shoulders it is common to use half-side cutters
that have teeth only on one side and on the circumference.
Milling deep slots in stainless steel sometimes presents the problems of
chatter, binding and jamming of wide chips. These difficulties can be elimi-
nated by using a staggered-tooth cutter. Its alternating teeth cut only one-half
of the slot, thereby taking a smaller bite and producing a shorter chip.
MILLING
69
Milling

For end milling of stainless steels, the solid-shank end mill is preferred be-
cause of its high strength.
Fig. 7. Typical milling cutters used for stainless steels, with suggested geometries.
Grinding of Milling Cutters
Figure 7 shows rake angle and width of land, as well as primary and
secondary clearance for high-speed steel cutters. The geometries shown
give sufficient strength and clearance. On cutters up to 4 in. (102 mm)
in diameter, the maximum clearance shown in the figure should be used,
remembering that small cutters require a greater clearance angle than
large cutters. Sufficient clearance behind the cutting edge of every tooth
is necessary to avoid a rubbing or burnishing action. Excessive vibration
may indicate the cutter has insufficient clearance (rigidity of the tooling
and fixtures should also be considered). Hogging-in generally indicates
too much rake (or possibly too high a cutting speed).
70


• Check rake angle. Too much rake will cause “hogging in.”
• Check speed.
• Check clearance, especially on cutters with more than one cutting surface. If clearance is not enough, rubbing will cause vibration. • Check cutting fluid. Binding may be result of too heavy an oil, not carrying away heat fast enough.
• Add paraffin oil to cutting fluid. Too much sulphur base oil wears away cutting edge, as sulphur is abrasive.
• Check cutting fluid. Mixture may be too thin. Assuming cutting speed is not too fast, add more sulphur base oil.
• Check width of land and clearance. This is definite indication the land is too wide.
• Change to a staggered tooth side mill with alternating spiral teeth. • Check alignment to tool and work, axis of cutter may not be parallel with work. • If using a plain slitting saw, change to one with side chip clearance. These saws have standard concave sides, and on some jobs the depth of this concavity may have to be increased to eliminate galling the sides of the work.
• Check how work is clamped. Work piece can be sprung from over-tightening of clamp or vise.
• Some pieces, due to shape are hard to hold. Often, a piece of paper slipped under work will help to prevent slipping.
• If cutter is sharp and clearances sufficient, plus good lubrication, this job requires a helical tooth cutter which has a shearing action that cuts more freely. • If you are using a helical tooth cutter, look for backlash in machine, a loose arbor or a worn shank on miller. • Check solid shank cutters for nicks. A nick leaves a high spot and cutter works loose.
Trouble-Shooting Check Chart MILLING
Cutter“hogs in.”
Excessive vibration.
Cutter wears badly without
galling or heating up.
Cutter “bugs” up and burns.
Cutter burnishing behind cutting
edge.
Plain milling cutter binds in
deep slots.
Cuts not straight.
Work piece slips.
Chatter on straight tooth
cutter.
PROBLEM: POSSIBLE SOLUTIONS:
74

• This is an indication that cutter was removed from arbor for grinding. Once a shell end mill or face mill is on arbor, don't take it off. You can seldom reset it as it was.
• Generally this is due to “poor housekeeping.” Cleanliness is of major importance. Dirt or a fine chip can be caught between the arbor and the spindle or between the cutter and the arbor. This will cause the cutter to run several thousandths out-of-true. • Also a “sprung” arbor or a “burred” spacer will cause same trouble.
• Again “good housekeeping.” This can be from chips between the work and the fixture or chips and dirt in the “T” slots, causing misalignment when clamping fixture. Brush or blow all chips away before a new work piece is mounted.
• Cut is too light. Cutter not biting into steel. Increase depth of cut.
• Your last cut was too heavy. Take a lighter cut and increase speed for better finish. • Check for dull tool.
• Feed too high. • Surface speed too low. Increase SFM slowly until proper speed is ascertained.
• Change to a coarser tooth cutter. Too many teeth cutting at same time. A coarser tooth cutter will allow more space between teeth and relieve chip packing. • May be due to chip packing, caused by low oil pressure or misdirected flow so that ships are not washed out of teeth or flutes.
• This will show up by cutter “hogging in.” Use smaller rake angle.
• Not enough clearance on top and sides. Cutter is binding. Grind for more clearance. • Check size of arbor. It should not
Shell end mill won't cut accu-
rately after grinding.
PROBLEM: POSSIBLE SOLUTIONS:
Cutter does not run true.
Work cutsout-of-square.
Work burnishes.
Poor or rough finishing cut.
Indication of high pressure
on cutters.
Too much rake.
Vibration.
75

General Guidelines
Broaching is a fast way to remove metal either externally or internally,
and produces a finished job to close tolerances. The only limitation is that
there must be no interference with the movement or passage of the broach.
Broaching machines fall into two general classes, vertical or horizontal.
Either can be used for push or pull broaching.
For internal broaching, a properly drilled or reamed hole is satisfactory.
For external or surface broaching, preliminary machining operations are
seldom required.
It is essential that chips not be allowed to build up during broaching.
Otherwise, damage to the broach may result from chip packing. Damage
may also occur if the broach is not properly aligned, resulting in excessive
localized load on the teeth.
Broach Design and Grinding
Broaches for stainless alloys have been made of Micro-Melt® Powder high
speed steel and Micro-Melt Maxamet® alloy. A broach is a simple tool to
handle, because the broach manufacturer builds into it the necessary feed
and depth of cut by steps from one tooth to another. Basically, a broach can
incorporate the roughing cut, the semi-finished cut and the final precision
cut, as shown in Figure 8, or any combination of these operations. Some
broaches are made with burnishing buttons when a burnished finish
is required. Since the form or shape of a broach tooth is unlimited,
there is no limitation to the shape or contour of broached surfaces.
BROACHING
77
Bro
aching

Fig. 8. Typical broaching tool used for stainless steels, with suggested
geometries and grinding techniques.
In designing the radius for the broach, the manufacturer provides
maximum tooth strength and a pocket for chips. The broach manu-
facturer may also incorporate into the broach, depending on the job,
such items as side relief (flat broaches), undercut and clearance
(spline broaches) and chip breakers (to handle wide chips).
When a broach becomes dull, it should be resharpened only on a
broach grinder or returned to the manufacturer to be reground. For
internal broaches, the back-off angle should be held to a minimum,
preferably 2° and not to exceed 5°, as shown in Figure 8. Too much back-
off angle will shorten broach life due to size reduction from resharpening.
Any nicks on the cutting edges of the broach will score the surface of the
work. Therefore, careful handling is very important.
78


Trouble-Shooting Check Chart BROACHING
• Packing of chips due to improper grinding (see sketch on page 78) may be one cause for broken teeth. • Chip packing on stainless can occur where a continuous chip is being made and the proper clearance has not been provided for. • On surface broaching a large error in alignment can throw too heavy a load on teeth, causing breakage. • Always check your holder first for straight travel before a part is actually broached. • When placing broach inserts in holder, be sure everything is clean and free from grit or chips. Foreign matter can force inserts out of line.
• Check steps of inserts with dial indicator. A small difference in their height may tear teeth.
• Check insert assembly in holder to see if screws are too long or too short. If the insert is loose, the screws are too long and a loose insert will not cut accurately. This is also cause of some insert breakage. If screws are too short and are pulled up with force, the screw hole becomes weak and eventually pulls out. Be sure your screws are the right length and then tighten them without excessive force.
• This is usually due to “poor housekeeping.” You may have assembled it with a chip or some other foreign matter between insert and holder and the force of tightening screws broke it. All broach inserts are made of fully hardened high speed steel, which contributes further to easy breakage.
• Look for loose clamps. • Check loading fixture and seating of pieces. Improper loading and chip accumulation are causes.
Broken teeth.
Spoiled work or broken insert on surface broach.
Insert breaks in assembly.
Poor finish and variation in size
on broached surface.
PROBLEM: POSSIBLE SOLUTIONS:
Broaching, of all machine operations, is the one where “good housekeeping” is the most essential. Not only should broach teeth be brushed often but broaching machines present many places with relatively small clearances where chips may lodge and jam, causing damage to the machine and broach. Chips are unavoidable and are broaching's greatest menace.
81

• Check alignment. See that direction of pull is at right angles to face place. • Check center axis of broach with axis of face plate as these must be in line. This is very important where part is held in a cup in the face place. • If a “follow rest” is used, this also must be in perfect alignment with pullhead and face plate.
• Check the center of the starting hole. It probably is not centralized with broach center.
• This is caused by “drifting.” On round holes one side does not clean up. On spline broaches the splines will be eccentric. See above recommendation to eliminate drifting.
• Again this is usually the result of “drifting.”
• Also check cutting fluid. If too rich in sulphur, cut back with paraffin base oil.
• Inserts may have feather edge and require stoning. • Parts not held tight enough. • Part vibrates from forcing the cut.
• Chatter can also develop from using too light a machine.
• Check hydraulic system.
• Look for something loose while broach is cutting. • Part may be “springing” due to cutting force. • Check clamps. Are they strong enough? • Check for deflection in machine.
• Dead soft steel is draggy and can be the cause of this condition.
Parts will not hold size.
Chatter.
Excessive wear and dulling of teeth.
Round or spline broaches
cut off center.
Drifting.
Breakage of in-ternal broach.
PROBLEM: POSSIBLE SOLUTIONS:
Tearing and/or heavy burrs.
82

General Guidelines
Reaming is used to finish previously drilled or bored holes to provide
accurate dimensions and a smooth finish. It is important that ample
material be left from the previous operation to permit the reamer to
take a definite cut, particularly with non-free-machining austenitic
alloys. This will allow the reamer to get below any work-hardened
layer. In addition, it will prevent burnishing or glazing, production of
holes which are undersized or have a poor finish, and rapid tool wear.
Types of Reamers
Figure 9 shows several typical high-speed steel reamers. Carbide-
tipped reamers may also be used. Spiral-fluted reamers with a helix
angle of approximately 7° are suggested. There is less tendency for
this type of reamer to chatter, and better chip clearance is secured.
This is particularly true for interrupted cuts, such as in a keyway.
Left-hand (reverse) spiral reamers with right-hand cutting or rotation
are suggested. Right-hand spiraling of the flutes with right-hand
rotation helps the tool to cut more freely, but makes it feed into
the work too rapidly.
When tapered holes must be reamed, any one of the standard taper
reamers, ground for stainless steels, will provide a satisfactory finish.
However, the hole must first be carefully drilled or bored.
REAMING
83
Ream
ing

Fig. 9. Typical reamers used for stainless steels, with suggested geometries.
Grinding and Care of Reamers
The clearances and cutting rakes suggested in Figure 9 will minimize
binding and apply to either solid or inserted-blade type high-speed
steel reamers. Narrow lands are recommended to minimize rubbing
and, consequently, chatter or binding. Cutting edges should be stoned
to a fine finish, since any coarse grinding marks remaining on the reamer
will transfer their pattern to the finished hole. The chamfer must be
concentric with all flutes to avoid cutting eccentric holes.
Reamers should be handled and stored carefully, preferably in individual
racks or boxes with partitions. If the reamer is dropped on metal or hit by
other tools, it may be nicked, as all unprotected areas are ground working
edges. When not in use, high-speed steel reamers should be protected
from corrosion with a complete coating of oil. A small rust spot on the
cutting edge will start a pit or nick. A deep nick can spoil the reamer
for any further fine work.
84

85
410 M48, T15 108 C2 110 .003 .006 .010 .014 .018 .022416 M48, T15 150 C2 145 .003 .008 .013 .018 .022 .025No. 5 BQ M48, T15 150 C2 145 .005 .008 .013 .018 .022 .025Project 70+® 416 M48, T15 156 C2 150 .005 .008 .013 .018 .022 .025No. 5-F M48, T15 162 C2 155 .005 .008 .013 .018 .022 .025420 M48, T15 90 C2 95 .003 .006 .010 .014 .018 .022420F M48, T15 104 C2 110 .004 .006 .010 .014 .017 .021431 M48, T15 78 C2 85 .003 .005 .008 .012 .015 .018440A/440B M48, T15 78 C2 85 .003 .006 .010 .015 .018 .021440C M48, T15 68 C2 75 .003 .006 .010 .015 .018 .021440F M48, T15 80 C2 100 .003 .006 .010 .015 .018 .021430 M48, T15 102 C2 105 .003 .005 .008 .012 .015 .018430F/430FR M48, T15 156 C2 150 .005 .008 .013 .018 .022 .025443 M48, T15 90 C2 95 .003 .005 .008 .012 .015 .018302/304/316 M48, T15 84 C2 90 .003 .005 .008 .012 .015 .018Project 70+® 304/316 M48, T15 124 C2 130 .0036 .006 .0096 .0144 .018 .0216Project 70+ 304L/316L M48, T15 124 C2 130 .0036 .006 .0096 .0144 .018 .0216302HQ-FM® M48, T15 102 C2 105 .003 .005 .008 .012 .015 .018303 M48, T15 98 C2 100 .005 .008 .013 .018 .022 .025Project 70+® 303 M48, T15 140 C2 143 .006 .0096 .0156 .0216 .0264 .0300303Al Modified® M48, T15 102 C2 105 .005 .008 .013 .018 .022 .025203 M48, T15 98 C2 100 .005 .008 .013 .018 .022 .025321/347 M48, T15 84 C2 90 .003 .005 .008 .012 .015 .01820Cb-3® Stainless M48, T15 72 C2 80 .003 .005 .008 .011 .014 .01718Cr-2Ni-12Mn M48, T15 72 C2 80 .003 .005 .008 .012 .015 .01821Cr-6Ni-9Mn M48, T15 72 C2 80 .003 .005 .008 .012 .015 .01822Cr-13Ni-5Mn M48, T15 72 C2 80 .003 .005 .008 .012 .015 .018
Feed (inches per revolution) Reamer Diameter (inches)
Speed (fpm)
Tool Mtl.
CarbideTools (inserts)
Speed (fpm)
Tool Mtl. 1/8 1/4 1/2 1½ 21
Micro-Melt® Powder HS Tools
Stainless SteelsReaming
Contact a Carpenter representative for alloy availability.
The speeds and feeds in the following charts are conservative recommendations for initial setup. Higher speeds and feeds may be attainable depending on machining environment.
Alloy(Annealed Condition)

86
17Cr-4Ni M48, T15 55 C2 175 .003 .005 .008 .011 .015 .018 M48, T15 60 C2 190 .003 .005 .008 .011 .015 .018
M48, T15 45 C2 140 .003 .005 .008 .011 .015 .018
M48, T15 35 C2 115 .003 .005 .008 .011 .015 .018
M48, T15 28 C2 95 .003 .005 .008 .011 .015 .018
Project 70+® M48, T15 70 C7 200 .003 .005 .008 .011 .015 .018 Custom 630 M48, T15 75 C2 210 .003 .005 .008 .011 .015 .018
M48, T15 55 C2 160 .003 .005 .008 .011 .015 .018
M48, T15 45 C2 135 .003 .004 .006 .010 .013 .016
M48, T15 40 C2 110 .001 .001 .001 .001 .001 .001
Custom 450® M48, T15 72 C2 190 .003 .005 .008 .011 .015 .018
M48, T15 78 C2 190 .003 .005 .008 .011 .015 .018
M48, T15 54 C2 150 .003 .005 .008 .011 .015 .018
M48, T15 42 C2 125 .001 .001 .001 .001 .001 .001
M48, T15 72 C2 190 .003 .005 .008 .011 .015 .018 M48, T15 36 C2 100 .001 .001 .001 .001 .001 .001
M48, T15 90 — — .0033 .0053 .0083 .0106 .0127 .0159 — — C2 95 .0043 .0086 .0128 .0164 .0206 .0247
M48, T15 66 — — .0033 .0056 .0089 .0110 .0136 .0161 — — C2 75 .0043 .0066 .0099 .0156 .0191 .0209
M48, T15 72 C2 190 .003 .005 .008 .011 .015 .018
M48, T15 36 C2 10 .001 .001 .001 .001 .001 .001
M48, T15 — — — — — — — — —
Feed (inches per revolution) Reamer Diameter (inches)
AlloySpeed (fpm)
Tool Mtl.
Speed (fpm)
Tool Mtl. 1/8 1/4 1/2 1½ 21
Custom 465®
Custom 455®
PH 13-8 Mo*15Cr-5Ni
Project 70+®
15Cr-5Ni
Pyromet® 350 & 355
*Registered trademark of AK Steel Corp.
CarbideTools (inserts)
Micro-Melt® Powder HS Tools
Precipitation Hardening AlloysReaming
Solution Treated
Double Aged H 1150M
Aged H 1075 - H 1150
Aged H 1025
Aged H 900 - H 925
Solution Treated
Double Aged H 1150M
Aged H 1075 - H 1150
Aged H 1025
Aged H 900 - H 925
Solution Treated
Aged H 1100 - H 1150
Aged H 1000 - H 1050
Aged H 900 - H 950
Annealed
Aged
Solution Treated
Aged
Equalized and Overtempered
Aged Rc 38 - 40
Aged Over Rc 40
Contact a Carpenter representative for alloy availability.

87
Reaming Parameters
Feeds and speeds for both roughing and finishing operations are listed
in tables on pages 85 and 86 for both high-speed steel and carbide tool-
ing. When finish of the hole is not critical, the parameters for roughing
can be used. Smooth finishes require significantly lower speeds. When
both size and finish are important, a two-step operation should be used
with both roughing and finishing cuts.
Alignment
A frequent source of trouble in machine reaming is caused when
the axis of the spindle is not in proper alignment with the axis of the
reamer. Two noticeable types of misalignment occur, (1) parallel and
(2) angular. Corrections for either or both must sometimes be made in
a single setup. Cause for misalignment, singly or in combination, can be
due to wear in the ways, wear or dirt in the sleeve or tool clamp, or poor
leveling of the machine. These troubles are generally indicated when a
rigidly held reamer produces a poor finish and oversized or eccentric
holes, especially at the start of a hole.
To correct misalignment, the machine and tool holders should be exam-
ined for chips, dirt, worn sleeves or worn bushings. Turret lathes and
multispindle automatic screw machines should be examined for worn
ways and improper indexing. A quick way to correct for these conditions
and get proper alignment is to use floating holders. It should be noted
that some floating holders compensate only for parallel misalignment,
while others correct for both parallel and angular misalignment.

Trouble-Shooting Check Chart REAMING
• Check spindle speed. It may be too fast. • Check cutting fluid as it must also be good coolant. You may be using too rich a mixture and need paraffin to thin it out, which is helpful in carrying off heat.
• Check cutting fluid as it may be too rich in sulphur base oil and needs to be thinned out. Sulphur is abrasive and if your mixture is heavy, it will wear away cutting edge rapidly. See page 115 for “rule-of-thumb” governing judgment of mixture.
• Reamer should not be rotated backward to remove from hole. Either pass reamer through hole or withdraw without stopping forward rotation.
• Check chamfer. It must be concentric with all flutes. A poor start means a poor job. • Check alignment of work with tool. Misalignment may be due to poor work-holding fixtures. Fine chips and incorrect setting will also cause this trouble. Try using a “floating holder.”
• If you know reamer is sharp and correctly ground and your cutting fluids are satisfactory, reduce spindle speed.
• Check the lands, if using a straight fluted reamer. They may be too wide and are rubbing, which causes chatter. • Also sometimes caused by dull reamer, or drilled hole too large which does not let reamer get a good bite. • There is less tendency to chatter with spiral fluted reamers. • Check rigidity of tool holder; try small chamfer at start of hole.
• This occurs mostly when reaming 18-8 types. Reamer is not biting in deep enough to get good cut. Acts like letting a drill dwell and work-hardens surface of steel. Deeper bite will usually correct this fault.
• Reamer was ground with too coarse a wheel. Use a finer grit, free-cutting grinding wheel; being careful not to burn edges of reamer. See No. 5 on page 33. It is characteristic for tools to leave the pattern of the grinding wheel on the part.
• Check clearance and rake angles with sketches on page 84. If reamer is within these limits, it will not bind. • Wide lands or insufficient back-off angle can also cause binding.
• This comes from careless handling and storage when not in use. Handle them as carefully as the reamer manufacturer does when he ships them to you. Store in individual boxes or racks with separations. Remember, the cutting edge is always vulnerable. • Reamers should be well covered with oil when not in use, as a small rust spot on the cutting edge will start a pit or nick.
Cutting edges burn.
Cutting edges wear badly
or dull rapidly.
Hole cuts ec-centric.
Roughfinish.
Chatter.
Work glazes or burnishes.
Tool marks in finished
reamed hole.
Reamerbinds.
Nicks in flutes.
PROBLEM: POSSIBLE SOLUTIONS:
88

General Guidelines
Stainless steels can be sawed with band saws or power hack saws using
high-speed steel blades. Speed and feed depend primarily on the hardness
of the material, and the pitch of the blade depends on the size of the mate-
rial. Thicker materials are cut with coarser teeth to avoid clogging with chips.
On the other hand, when sawing thin-gauge material or tubing, a sufficiently
fine-tooth saw is required so that at least two or three teeth are cutting at all
times. A coarse-tooth saw, besides bridging the work, will gouge out metal
and break teeth.
Sawing Parameters
Guidelines for power hack sawing are shown in the table on page 90.
Speeds for band saws range from 50 to 100 ft/min. (15 to 30 m/min.),
with harder materials requiring a lower speed. Nominal pitches for band
saw blades generally range from 8-10 teeth/in. (2.5-3 mm) for material
up to 0.25 in. (6 mm) thick, to 3-6 teeth/in. (4-8.5 mm) for material
1.5 in. (38 mm) thick or greater.
SAWING
Saw
ing
89

410416No. 5 BQProject 70+® 416No. 5-F420420F431440A/440B440C440F430430F/430FR443302/304/316Project 70+® 304/316Project 70+ 304L/316L302HQ-FM®
303Project 70+® 303303Al Modified®
203321/34720Cb-3® Stainless 18Cr-2Ni-12Mn21Cr-6Ni-9Mn
3/4 to2
Stainless SteelsSawing—Power Hack Saw
SpeedMaterial Thickness (inches)Pitch (teeth per inch)
Under1/4
Feed
1/4 to3/4
Over2
Strokes/Minute
Inches/Stroke
Precipitation Hardening AlloysSawing—Power Hack Saw
10 6 6 4 80 .006
10 10 6 4 55 .005 10 10 6 4 45 .004
All Grades
Aged 275-325 BHNAged 325-375 BHN
Alloy(Annealed Condition)
Solution Treated
10 10 6 4 120 .006 10 10 6 4 125 .006 10 10 6 4 140 .006 10 10 6 4 140 .006 10 10 6 4 160 .006 10 10 6 4 115 .006 10 10 6 4 135 .006 10 10 6 4 85 .005 10 10 6 4 60 .005 10 10 6 4 55 .005 10 10 6 4 110 .006 10 10 6 4 115 .005 10 10 6 4 125 .009 10 10 6 4 110 .005 10 10 6 4 90 .005 10 10 6 4 100 .005 10 10 6 4 100 .005 10 10 6 4 100 .006 10 10 6 4 100 .006 10 10 6 4 110 .006 10 10 6 4 100 .006 10 10 6 4 100 .006 10 10 6 4 90 .005 10 10 6 4 70 .005 10 10 6 4 70 .005 10 10 6 4 70 .005 10 10 6 4 80 .005
Contact a Carpenter representative for alloy availability.
The speeds and feeds in the following charts are conservative recommendations for initial setup. Higher speeds and feeds may be attainable depending on machining environment.
90

Wheels
Aluminum oxide wheels are most commonly used for stainless steels. Silicon
carbide wheels may also be used, but at a reduced wheel life; therefore, their
use is limited to special applications. Medium-density wheels of hardness
grades H to L are generally selected for stainless steels, although harder wheels
are used for thread grinding. Grit sizes commonly used are 46, 54 or 60; finer
grits may be used to produce a finer finish. Vitrified-bond wheels are normally
used, although the stronger resinoid-bond wheels are preferred for equipment
operated at higher speeds. Grinding wheels used previously to grind another
metallic material should not be used to grind a stainless steel, since particles
of the other material may be imbedded in the stainless steel, affecting its
corrosion resistance.
Grinding Parameters
For many grinding operations, typical wheel speeds are 5000 to 6500 ft/min.
(1520 to 1980 m/min.). For surface grinding, table speeds are 50 to 100 ft/min.
(15 to 30 m/min.), with a downfeed of up to 0.002 in/pass (0.050 mm/pass) for
roughing and 0.0005 in./pass (0.013 mm/pass) for finishing, and a crossfeed of
0.050 to 0.500 in./pass (1.3 to 13 mm/pass). Thread grinding is done at higher
speeds with harder wheels, as mentioned previously.
GRINDING
91
Grind
ing

93
OTHER SPECIALTY METALS
.150 — — C3 340 400 .015 .025 — — C3 380 500 .007
.150 — — C3 105 140 .010 .025 — — C3 125 160 .005 .150 — — C6 275 350 .020 .025 — — C7 350 450 .007
.150 — — C7 215 280 .015 .025 — — C7 280 350 .007
.100 — — C2 135 160 .015 .025 — — C3 160 190 .007 .100 — — C2 120 140 .010 .025 — — C3 140 165 .007
.100 — — C2 70 80 .010 .025 — — C3 90 100 .007 .100 — — C2 65 75 .010 .025 — — C3 80 95 .007 .100 — — C2 60 70 .010 .025 — — C3 70 80 .007 .100 — — C2 90 100 .010 .025 — — C3 100 110 .007
Tool Material
Speed(fpm)
Feed(ipr)
Speed (fpm)
Un-coated Coated
Tool Mtl.
High Temperature AlloysTurning—Single Point and Box Tools
Carbide Tools (inserts)
Alloy
Depth of Cut
(inches)Feed (ipr)
Micro-Melt® PowderHigh Speed Tools
—
—
—
—
—
—
—
—
—
—
Annealed
Aged
Annealed
Rc 35
Solution Treated
Aged
Solution Treated
Aged
Solution Treated
Solution Treated
NiMark® 250NiMark 300NiMark 350
Stainless Type 410Greek AscoloyAMS 5616
19-9 DL19-9 DXPyromet® N-155Pyromet A-286Pyromet V-57
Pyromet® 718Pyromet 625Pyromet X750Pyromet 751Pyromet 80AWaspaloy
Pyromet® 90Pyromet 41
Pyromet® 680
Contact a Carpenter representative for alloy availability.
The speeds and feeds in the following charts are conservative recommendations for initial setup. Higher speeds and feeds may be attainable depending on machining environment.
Other

.150 36 .010 C2 100 120 .010 .025 48 .005 C3 110 130 .005
.150 96 .015 C6 350 400 .020 .025 130 .007 C7 400 490 .007
.150 144 .015 C6 400 485 .020 .025 192 .007 C7 475 625 .007
.150 90 .015 C6 300 375 .020 .025 126 .007 C7 385 475 .007
.150 192 .015 C6 525 600 .015 .025 210 .007 C7 575 650 .007
.150 120 .015 C6 450 600 .015 .025 150 .007 C7 550 750 .007
.150 198 .015 C6 575 750 .015 .025 222 .007 C7 650 850 .007
.150 120 .015 C6 450 600 .015 .025 150 .007 C7 550 750 .007
.150 198 .015 C6 575 750 .015 .025 222 .007 C7 650 850 .007
.150 96 .015 C2 275 300 .015 .025 120 .007 C3 320 365 .007
M48, T15
M48, T15
M48, T15
M48, T15
M48, T15
M48, T15
M48, T15
M48, T15
M48, T15
M48, T15
Speed(fpm)
Tool Material
Feed(ipr)
Speed (fpm)
Un-coated Coated
Tool Mtl.
Electronic AlloysTurning—Single Point and Box Tools
Carbide Tools (inserts)
Alloy
Depth of Cut
(inches)Feed (ipr)
Micro-Melt® PowderHigh Speed Tools
Carpenter High Permeability "49"®
Carpenter Invar "36"®
Hiperco® 50 AKovar®
Electrical IronSilicon Core Iron A & B
Silicon Core Iron ̀A-FM & B-FM
Silicon Core Iron C
430F & 430 FR Solenoid Quality
Chrome Core® 8
Chrome Core 8-FM
Chrome Core 12
Chrome Core 12-FM
Free-Cut Invar "36"®
Contact a Carpenter representative for alloy availability.
94

GUIDE TO MACHINING CARPENTER SPECIALTY ALLOYS
GU
IDE
TO
MA
CH
ININ
GC
AR
PE
NT
ER
SP
EC
IALT
Y A
LLO
YS
Carpenter Technology Corporation
Wyomissing, PA 19610 U.S.A.
1-800-654-6543
Visit us at www.cartech.com
For on-line purchasing in the U.S.,
visit www.carpenterdirect.com