guide to academic appointments using web forms and … · guide to academic appointments using web...
TRANSCRIPT

LaserFiche Appointments Manual
Guide to Academic Appointments Using
Web Forms and LaserFiche8
Human Resources Version
Discovery Commons
September 2013

LASERFICHE APPOINTMENTS MANUAL HR Faculty of Medicine
2
Table of Contents Appointments Processed in the LaserFiche Appointments System ............................................................. 3
Introduction to the Components of the Appointments System ................................................................... 4
Where do the Users Fit In ............................................................................................................................. 6
Human Resources Procedures ...................................................................................................................... 7
Adding Comments to the Dossier ............................................................................................................... 10
Adding Documents to the Dossier .............................................................................................................. 10
Using LaserFiche to E-Mail Documents ....................................................................................................... 11
Changing the Status of a Dossier ................................................................................................................ 13
Column Headings – Refining your View, Sorting your Lists ........................................................................ 15
Appendix A - Quick Reference to Appointments System Websites............................................................ 19
Appendix B – Clinical Appointments Workflow .......................................................................................... 20
Appendix C – non-Clinical Appointments Workflow................................................................................... 21

LASERFICHE APPOINTMENTS MANUAL HR Faculty of Medicine
3
Appointments Processed in the LaserFiche Appointments System
All Clinical MD appointments including foreign-trained physician appointments, and
clinical cross appointments
Junior Promotions (this refers solely to clinical appointments where the applicant is
moving from the rank of Lecturer to Assistant Professor )
Status-Only Appointments
Non-budgetary cross appointments
Adjunct and Visiting Appointments
Part-time appointments

LASERFICHE APPOINTMENTS MANUAL HR Faculty of Medicine
4
Introduction to the Components of the Appointments System The Appointments Workflow is carried out over 5 different, but inter-related modules. These
will be described in more detail as we go through the Appointments workflow but the following
is a brief description of the role each application plays in the system.
See Appendix A for a Quick Reference to the Websites Discussed in this Manual
1. The Guide to Academic Appointments (http://aca.med.utoronto.ca/) will guide you, in a
step-by-step process, to the correct appointment category for your candidate and will show a
list of the list of documents required in each appointment category’s application package. The
Guide also contains links to online application forms and to other helpful information.
2. Online Application Forms (2) and Document Submission form (1). By using these online
forms an appointment candidate (or their agent) can apply for an academic appointment AND
submit many of the required documents for the appointment. Links to these forms are in the
above-mentioned Guide to Academic Appointments but their URLs may be bookmarked or
placed in other information pages for quick access. These forms supersede the paper forms
currently in use. Submission and subsequent acceptance of an online application form triggers
a sequence of events in LaserFiche that result in a dossier (folder) being created for the
applicant and the insertion of any documents attached to the application form into that
dossier.
There are 2 online applications form, one for clinical MD appointments and one for non-MD
appointments.
The Document Submission form is used to submit supplementary documents to a dossier that
has already been created (i.e. through the acceptance of an application form).
• Appointment Categories
•Documents Required
Guide to Academic Appointmens
•Clinical MD
•Other Academic
•Supplementary Documents
Web Forms •Edit / Accept
Web Applications
•Departmental Data
Web Forms Manager
• Approval Process Management
LaserFiche • DAC and
Hospital Access to Dossiers
Read-Only Portal

LASERFICHE APPOINTMENTS MANUAL HR Faculty of Medicine
5
Application Form for Clinical MD Appointments:
http://documents.med.utoronto.ca/WebForms/clinical
Application Form for Other Academic (non-MD) Appointments:
http://documents.med.utoronto.ca/WebForms/nonclinical
Form For Submitting Supplementary Documentation:
http://documents.med.utoronto.ca/WebForms/appointmentdocs
3. WebForms Manager: Using the Online Forms Manager
(http://documents.med.utoronto.ca/WebForms) the Departmental Coordinators (DCs) can
review the submitted applications forms, correct then if necessary, add information to the
form, reject or place a form on hold, or accept a form. When an application form is accepted
several functions begin, not the least of which is the automatic creation of a dossier for the
candidate in LaserFiche document system. All of the functions that take place when a form is
accepted are described in detail in the department coordinator’s manual.
4. LaserFiche: LaserFiche (http://documents.med.utoronto.ca/laserfiche8) is the central
document management system for this project. LaserFiche is configured to allow key staff
members (e.g. department coordinators, Human Resources staff and the Dean or the Dean’s
Representatives) to route application packages through an approval process. It will accept,
store and display documents for an appointment candidate, create unique ID numbers, allow
changes to the access rights on document sets, record workflow events, create personalized
Letters of Offer (if desired), and send notification e-mails, with attachments, to various
stakeholders throughout the approval process.
5. Read-Only Portal: The Read-only Portal (http://documents.med.utoronto.ca/appointments)
allows persons who are not licensed to use the full version of LaserFiche to view the documents
in a candidate’s dossier. It is used as part of the approval process mentioned above. The
department coordinator and Human Resources staff can control when documents become
visible on the Read-only Portal, and to whom. This portal will be used by members of
Departmental Appointments Committees (DACs), Hospital Coordinators (HC), and by members
of the FAAC to view the contents of a dossier.

LASERFICHE APPOINTMENTS MANUAL HR Faculty of Medicine
6
Where do the Users Fit In
Online Applications / Document Submission
UsersApplicants (or their Agents)
Department Coordinators (DCs)
Hospital Contacts (HC)
Web Forms Manager
Users
Department Coordinators (DCs)
LaserFiche Appointments System
UsersDepartment Coordinators (DCs)
Human Resources Reviewer (HR)
Dean / Vice Dean / Chair of FAAC
Read-Only Portal
UsersDepartmental Appointments Committee
Members (DAC)
FAAC Committee Members
Hospital Coordinators (HC)
Guide to Academic Appointments
UsersFaculty Members (or Agent)
Potential Faculty Members (or Agent)
Department Coordinators (DCs)
Hospital Contacts (HC)

LASERFICHE APPOINTMENTS MANUAL HR Faculty of Medicine
7
Human Resources Procedures
1. Log in to the LaserFiche management module by either
a. double clicking on the desktop client icon on your desktop (preferred option*) OR
b. going to the website http://documents.med.utoronto.ca/laserfiche8/
Once at the log in screen for either view of the application, the log in data is
Repository = Appointments
user name = {your assigned user name} Password = password
2. In the left-hand side bar, double-click on the folder named Human Resources.
You may SORT the list of candidate dossiers that appears by double clicking on the column
heading by which you want the dossiers sorted. For example, double click on the column
heading ‘Department’ to sort by Department.
To see different column headings, see page 15 for the section about Column Headings.
3. Double click on one of the folders with the candidate’s name and appointment id number
Note that if you are using the online application (see step 1) you have opened up a new tab
in your browser by doing this. You are now logged in at two tabs and both should be closed
when you are done.
4. Notice that a tab called Current Folder opens up and you can see the list of documents in
the dossier.
5. You will see a variety of documents, the mix of which depends on the documents required
by the appointment category and rank. Two documents will always be there:
a. Lastname_firstname_appointmentid_Clinical Appointment Application’
This is the application form and contains most of the pertinent candidate data
collected from the web application form.
b. Lastname_firstname_appointmentid_Appointment Status.
This is where, after reviewing the contents of the dossier, you will select a course of
action for this dossier and where you can make notes. These notes will be included
in any e-mail notification to the Department and will remain visible on this template
after it has passed from your control. Notes will be visible to the Department

LASERFICHE APPOINTMENTS MANUAL HR Faculty of Medicine
8
Coordinator, the Vice Deans, the Chair of the FAAC and the Dean.
6. Review the documents in the dossier.
7. You now have 3 options:
a. Return the dossier back to the Department Coordinator for amendment.
Open the Appointment Status template (the document in the Current Folder that
has a purple icon).
Write your comments, as desired, in the box titled HR Comments.
In the drop down box above it (called HR Approval Status) select ‘Incomplete:
Return to Dept Coordinator.
At the top of the template, click on Save or, if you are using the desktop client, at the
bottom of the template, click on OK.
The Department Coordinator will be advised by automatic e-mail of the return. Your
comments will be included in this e-mail and will also be visible to them when they
open the Appointment Status template.
b. Accept the dossier and forward it to one of the Vice Deans, the FAAC or the Dean.
i. Send to {name of Vice Dean}
Selecting this option creates a shortcut of the dossier in a folder accessible by
the Vice Dean. It also notifies the Vice Dean of the existence of a dossier that
requires his/her review. Any comments you wrote in the HR Comments box
will be visible to the Vice Dean in the Appointment Status Template.
ii. Send to FAAC
Selecting this option creates a shortcut of the dossier in a folder accessible by
all the members of the FAAC in the read-only portal. It also notifies the
Chair of the FAAC of the existence of a dossier that requires his/her review.
Note: once the FAAC has reviewed a dossier, it is up to the Chair of the FAAC
to change the status of a dossier to ‘Send to Dean’. You may do so on their
behalf but, if so, you will do it by logging in as if you were the Chair of the
FAAC, instead of HR. There is a separate, shorter, instruction manual for
members of the FAAC. Once the Chair of the FAAC selects an option in

LASERFICHE APPOINTMENTS MANUAL HR Faculty of Medicine
9
LaserFiche, the shortcut to the dossier disappears from the committee’s view
in the read-only portal..
iii. Send to Dean
Selecting this option creates a shortcut of the dossier in a folder accessible by
the Dean. It also notifies the Dean of the existence of a dossier that requires
his/her review. Any comments you wrote in the HR Comments box will be
visible to the Dean in the Appointment Status Template.
c. HR Approved – select this when approval at the HR level is the FINAL approval
required for this dossier. This is usually for concurrent appointments.
To Save and Activate any of the selections above,
In the web module, click on Save at the top of the template
OR
in the desktop module, click on Okay at the bottom of the template.
8. If you chose option ‘b’ above, in due course, the Dean or a Vice Dean will approve or defer
the candidate by selecting the appropriate action on their view of the repository. When
that happens, both HR and the Department Coordinator receive e-mail notification about
what has occurred. The Department Coordinator will take over from here.
At this point, or shortly later, you may decide to manually delete the dossier shortcut from
your view: Unlike from the views of the Vice Dean, the Dean and the FAAC, it does not
disappear automatically. Due to technical limitations, it can only be deleted when using the
desktop version of the application.
Again, the dossier will remain visible in the HR folder until it is manually deleted by HR. It
can only be deleted in the desktop version of the application. Because it is only a shortcut
to the dossier and not the actual dossier, deleting it does not delete the real dossier held in
the department’s view.
**This completes the section Human Resources Procedures**

LASERFICHE APPOINTMENTS MANUAL HR Faculty of Medicine
10
Adding Comments to the Dossier
As has been mentioned in Step 7, there is a place for HR to make comments in the Appointment
Status template. It is a box in the template titled HR Comments. The space may look small but
will actually hold up to 2000 characters. The template panel can be widened on your screen
and the box itself is scrollable.
Comments made here are visible to the Vice Dean, the Dean, the Chair of the FAAC, and to the
Department Coordinators. They will be included in any e-mail notification sent back to the
Department Coordinators.
If you would like to add lengthier comments you may create a Word document or a PDF on
your own and add it to the dossier as a new document. See below for adding documents to the
dossier.
Adding Documents to the Dossier
The Department Coordinator, the Dean, the Vice Deans, the Chair of the FAAC and HR have
permission to add documents to the dossier. There are two methods for doing this; either one
can be used.
Please refrain from including spaces, commas, hyphens, and special characters in your file
names. Underscores are allowed.
A. From the LaserFiche management module
a. Log in to review the documents as is described above.
b. Make sure the Current Folder tab is open.
c. In the menu at the top of the LaserFiche window (not the menu at the top of
your browser), select File and then Import.
d. Browse to and select the document you would like to import and click Start
Import.
e. IGNORE ANY MESSAGES BOXES THAT APPEAR and click Next.
B. Using the Supplementary Document Submission Web Form
a. Go to http://documents.med.utoronto.ca/WebForms/appointmentdocs
b. Fill the required information. The Applicant ID is the number that is part of
the dossier folder name (lastname_firstname_Applicant ID). Use just the

LASERFICHE APPOINTMENTS MANUAL HR Faculty of Medicine
11
number; lastname_firstname is not part of the Applicant ID.
Your e-mail will be used to send a confirmation e-mail that the file was
successfully uploaded.
c. Use the Browse button to select your file. You will know the file has attached
to the form when you see a green bar on the form.
You may attach multiple files at a time.
DO NOT click on the green bar that appears on the form to indicate the file is
attached to the form. Clicking on the green bar disrupts the file’s attachment
to the form and will result in the file not being uploaded.
d. Click Submit.
Using LaserFiche to E-Mail Documents (e.g. Notifying Provost of Status –Only, Full Professor Appointments)
In the preceding section, we talked about how the Appointments approval workflow is set up to
send automated notification e-mails to the Vice Dean, the Dean, the FAAC, and/or back to the
Department Coordinator. The Provost, however, is not included in this list of automated e-
mails.
It is easy to send copies of documents directly from LaserFiche to anyone using your Outlook e-
mail application.
I. Open the Current Folder tab for the candidate so that you can see the list of the
documents. (steps 1 – 4 of the last section)
II. Select the documents you want to send by highlighting the file names. You may select
more than one. The ‘templates’ not attach to your e-mail even if they are selected.
III. Hover your mouse pointer over the selected documents, right click, and select ‘Send
Document in E-Mail’. The box below will appear with your selected documents listed.

LASERFICHE APPOINTMENTS MANUAL HR Faculty of Medicine
12
Make sure that the Files radio button is selected and click on ‘Create E-Mail. If you have
Microsoft Outlook on your desktop you should not have to change any other settings.
IV. Clicking ‘Create e-Mail’ should open up your own e-mail client with copies of these files
attached. Send the e-mail to whoever has a need to see them.

LASERFICHE APPOINTMENTS MANUAL HR Faculty of Medicine
13
Changing the Status of a Dossier The status of a dossier is controlled and recorded on the candidate’s ‘Appointment Status’
template. This is the file with the purple (or green) icon in dossier. It is created when the
dossier is created. Double click on this file to open it.
The status of a dossier defines for whom the contents of the dossier are visible. (i.e. Human
Resources cannot see appointment dossiers from the departments until the DAC Approval
Status is set to approved. Likewise, the FAAC, the Vice Dean or the Dean cannot see the
dossiers until the HR Approval Status is set to Send to…{name}).
Permission to change a dossier status is limited to the user controlling that portion of the
workflow (see Appendix A).
The Appointment Status sheet also records events as they occur in the workflow. In the
illustrations below we can see the date the application form was submitted and the date the
supplementary data form was submitted. As the workflow progresses, further events will be
recorded.

LASERFICHE APPOINTMENTS MANUAL HR Faculty of Medicine
14
A. To change the status of a dossier using the desktop client
Double click on the Appointment Status file in the dossier (the one with the green icon). You
will see a new template open and a new tab on the top of the screen.
You will only be able to change the status of a workflow in areas where you have control.
Change the status from the drop down box and click OK.
Open the Appointment Status file again (green icon), and you will see that the status change
event was recorded in the box at the lower end of the template called Appointment Status
History.
B. To change the status of a dossier using the web
Double click on the Appointment Status file in the dossier (the one with the green icon). You
will see a new template open and a new tab on the top of the screen. (Click back and forth
between the two tabs to see what they represent.)
You will only be able to change the status of a workflow in areas where you have control.
Change the status from the drop down box and click okay.

LASERFICHE APPOINTMENTS MANUAL HR Faculty of Medicine
15
Go back to the Current Folder tab to see the dossier contents again, double click on the
Appointment Status file again, and you will see that the status change event was recorded in
the box at the lower end of the template called Appointment Status History.
Column Headings – Refining your View, Sorting your Lists
When viewing a list of pending or accepted appointees you may want to see some information
about them displayed in the columns. The information people want displayed is quite variable,
and can be individual to each department, hospital, or user. Not every piece of metadata is
available, or desirable, as a column heading, but there are some that may be helpful. Other
metadata may be used as a column header by default but may not be very useful.
The most useful metadata, we think, that can be used in columns comes from the Candidate
Information template. This is the template that holds the data from the application form.
A. To change what column headings are displayed on the desktop client (for Department
Coordinators, Human Resources Coordinators, the Vice Dean, the FAAC or the Dean):
Right click on any existing column header >> From the drop-down box select Template Fields >>
Select Candidate Information >> Select the desired metadata for a column heading.
Below is an image of what departments may find useful. We could have selected, as a column
header, Department as well as Department Division. Hospital Coordinators on the Public Portal
and Human Resources staff may find that useful, but Department Coordinators only see their
own department’s list of appointees anyway, so for them, that information would be
redundant.
B. To change what columns are displayed on the web client (for Department Coordinators,
Human Resources Coordinators, the Vice Dean, the FAAC or the Dean):
Right click on any existing column header >> Select configure columns >> In the leftmost box,
make sure Browser Columns is highlighted >> In the middle box, under Available Columns,
select Template >> Scroll down to Candidate Information >> Directly under Candidate

LASERFICHE APPOINTMENTS MANUAL HR Faculty of Medicine
16
Information, one by one, highlight the fields you would like to see used as columns and click the
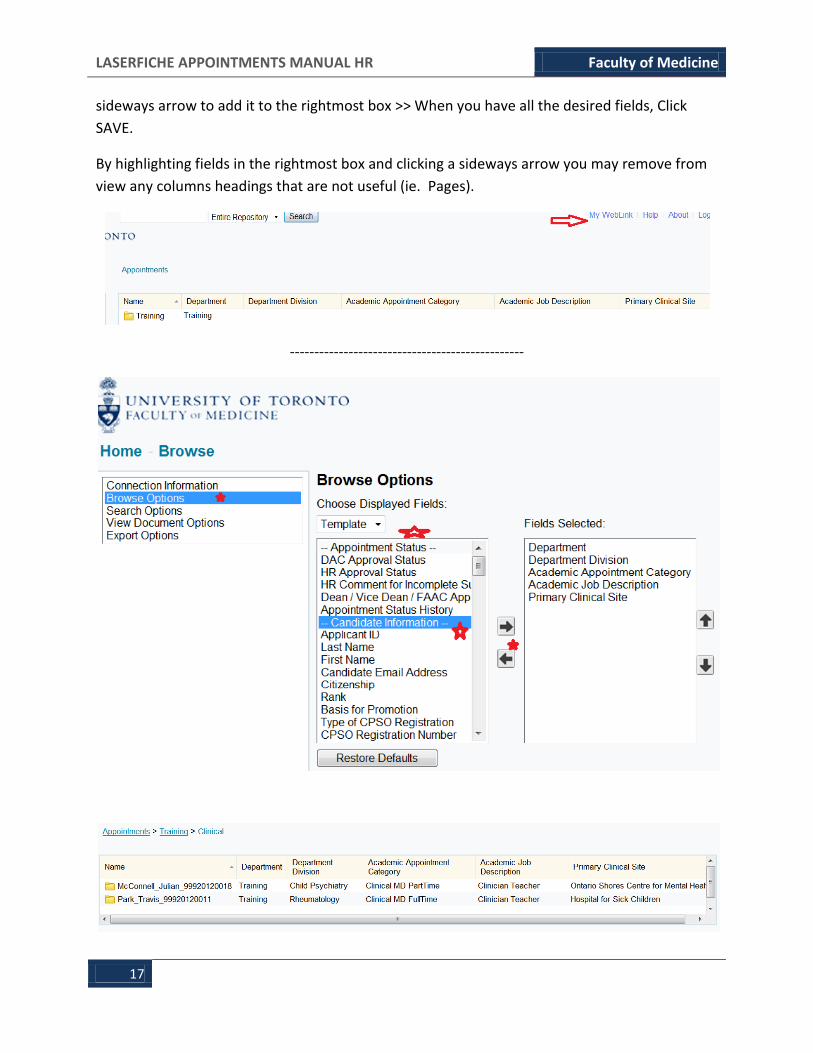
sideways arrow to add it to the rightmost box >> When you have all the desired fields, Click
SAVE.
By highlighting fields in the rightmost box and clicking a sideways arrow you may remove from
view any columns headings that are not useful (ie. Pages).
C. To change what columns are displayed on the Public Portal (for Hospital Coordinators and
DAC members):
After logging in, click on My WebLink in the top-right area of the screen >> In the leftmost box,
make sure Browse Options is highlighted >> In the middle box, under Choose Displayed Fields,
select Template >> Scroll down to Candidate Information >> Directly under Candidate
Information, one by one, highlight the fields you would like to see as columns and click the
LASERFICHE APPOINTMENTS MANUAL HR Faculty of Medicine
17
sideways arrow to add it to the rightmost box >> When you have all the desired fields, Click
SAVE.
By highlighting fields in the rightmost box and clicking a sideways arrow you may remove from
view any columns headings that are not useful (ie. Pages).
------------------------------------------------

LASERFICHE APPOINTMENTS MANUAL HR Faculty of Medicine
18
And remember that you can sort your list by columns: Simply left-click on the column header
to sort the list of appointees alphabetically, by the metadata in that column.

LASERFICHE APPOINTMENTS MANUAL HR Faculty of Medicine
19
Appendix A - Quick Reference to Appointments System Websites
Online Applications / Document Submission
http://documents.med.utoronto.ca/WebForms/nonclinical/
http://documents.med.utoronto.ca/WebForms/clinical
http://documents.med.utoronto.ca/WebForms/appointmentdocs
Web Forms Manager
http://documents.med.utoronto.ca/WebForms
LaserFiche Appointments System
http://documents.med.utoronto.ca/LaserFiche8
Read-Only Portal
http://documents.med.utoronto.ca/appointments
Guide to Academic Appointments
http://aca.med.utoronto.ca

LASERFICHE APPOINTMENTS MANUAL HR Faculty of Medicine
20
Appendix B – Clinical Appointments Workflow

LASERFICHE APPOINTMENTS MANUAL HR Faculty of Medicine
21
Appendix C – non-Clinical Appointments Workflow