guide - submit a development application
TRANSCRIPT

OFFICIAL
Guide for Relevant Authorities and Applicants
Submit a Development Application Version 3.3 21 January 2022
This Guide includes Software Version 3.32.0 features and functionality

OFFICIAL Guide for Applicants Submit a Development Application Page 2 of 50 and Relevant Authorities
Table of Contents Development Application Information to Provide .................................................................... 3
Start a New Application .......................................................................................................... 4
Save and open an application draft .................................................................................... 5
1. Select Development Location ..................................................................................... 6
Address Search ...................................................................................................... 6
Title or Plan Search ................................................................................................ 7
Map Search ............................................................................................................ 9
Cannot find the council land or water development location? ............................... 10
Add selected location(s) ....................................................................................... 12
2. Provide Applicant Details .......................................................................................... 14
Option 1 – Add Me ............................................................................................... 14
Option 2 – Add someone else .............................................................................. 15
Tip for adding a PO Box address .......................................................................... 16
3. Provide Contact Details............................................................................................. 17
Primary Contact.................................................................................................... 17
Land Owners ........................................................................................................ 19
Invoice Contact .................................................................................................... 22
4. Provide Development Details .................................................................................... 25
5. Choose Development Elements and Refine .............................................................. 26
6. Choose Consent Timing and Assessing Relevant Authority ...................................... 28
Planning Consent ................................................................................................. 30
Land Division Consent.......................................................................................... 31
Building Consent .................................................................................................. 32
7. Acknowledge Declarations ........................................................................................ 39
Electricity Declaration ........................................................................................... 39
Native Vegetation Declaration .............................................................................. 40
8. Upload Technical Documents and Drawings ............................................................. 41
Upload individual documents ................................................................................ 41
Upload all documents as one file .......................................................................... 42
Pre-lodgement agreement .................................................................................... 43
9. Review and Submit Development Application ........................................................... 44
Development on council land or on/over water development ................................ 44
Share the application with someone else .......................................................................... 47

OFFICIAL Guide for Applicants Submit a Development Application Page 3 of 50 and Relevant Authorities
Development Application Information to Provide The following pages outline the required information and documentation to be uploaded in order to complete your development application. Locations Search and add the location of the proposed development.
Applicants The individual(s) or business submitting the proposed development application.
Primary Contact The individual(s) or business who will be contacted by phone and/or receive direct communications either by email or post, requesting documentation and/or information.
Land Owners The land owners are the individual(s) or business that have the interest in the land and registered on the Certificate of Title.
Invoice Contact The individual(s) or business who will receive direct communications either by email or post for all financial matters, e.g. Fee Advice seeking payment, tax invoices and refund advices.
Development Details
Provide details of the current and proposed uses on the development site, development cost and details of the proposed development.
What do you want to do?
Provide what is to be developed on the site, for example new house, carport etc. More information about the application is requested based on the element(s) chosen, for example a ‘New House’ element will ask questions about a brush fence, modifying a driveway and septic/sewer information.
Consents Based on the information supplied, the consents required are determined (i.e. Planning, Land Division, Building), and provides an option of applying for both consents at this time, or just one and will apply for remaining consents later. Upon choosing the consent(s) applying for at this time, then elect who is to assess the consent, i.e. assessment manager/panel or independent assessor.
Declarations Read and acknowledge the Electricity Declaration and the Native Vegetation Declaration (when available).
Documents Upload proposed development technical drawings, copy of insurance policy (as applicable), CITB receipt, pre-lodgement agreement (as applicable) etc.
Review Provides details of the information entered for review, and an opportunity to make edits prior to submitting the development application for development approval.

OFFICIAL Guide for Applicants Submit a Development Application Page 4 of 50 and Relevant Authorities
Start a New Application 1. Click on Start a new application to open the development application.
2. Read through the Before you start information. Follow the link ‘what you need to supply for a development application’ to view a list of the documentation you will need to upload cross-check against the documentation provided by the professional (e.g. building, surveyor, engineer, architect etc.)
3. Click on Next to continue.
OFFICIAL Guide for Applicants Submit a Development Application Page 5 of 50 and Relevant Authorities
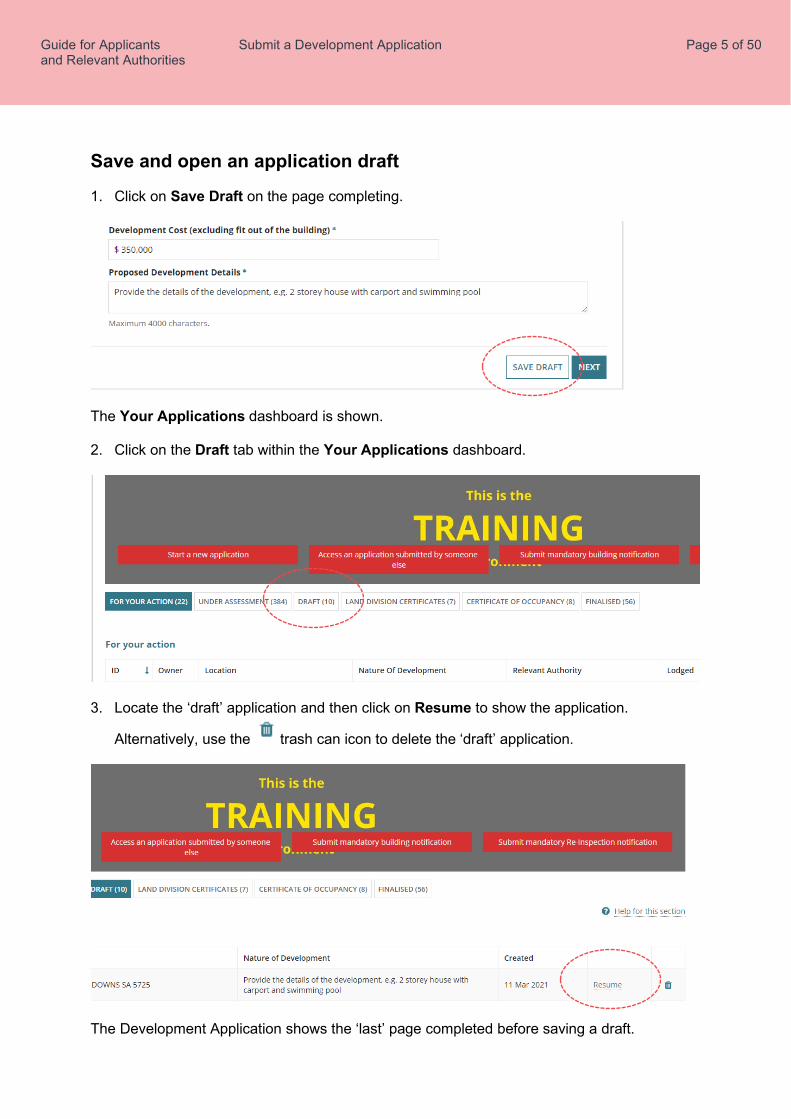
Save and open an application draft
1. Click on Save Draft on the page completing.
The Your Applications dashboard is shown. 2. Click on the Draft tab within the Your Applications dashboard.
3. Locate the ‘draft’ application and then click on Resume to show the application.
Alternatively, use the trash can icon to delete the ‘draft’ application.
The Development Application shows the ‘last’ page completed before saving a draft.

OFFICIAL Guide for Applicants Submit a Development Application Page 6 of 50 and Relevant Authorities
1. Select Development Location
Address Search
1. Type in the Address Search the address of the development.
When searching for a location within a street number range, e.g. 89-91 then enter the range to return a location match.
2. Select the matching address.
The Address Search and the Property Data table show the selected location details.
3. Repeat steps if more than one location.

OFFICIAL Guide for Applicants Submit a Development Application Page 7 of 50 and Relevant Authorities
Title or Plan Search
When electing to search for the property by a ‘title’ or ‘plan’ you will need to have at hand the Title or Plan details. Newly Created Allotment and/or Tenancy Development Perform a search using the ‘parent’ Certificate of Title (CT) to locate the proposed development location for a tenancy or newly created allotment(s) where the Certificate of Title (CT) has not yet been created.
1. Click TITLE OR PLAN SEARCH. Performing a Title Search
2. Click on the Prefix Type field drop-down to make selection, e.g. CT-Certificate of Title.
3. Type the Volume number and Folio number.
4. Click SEARCH to return a location match.
5. Click on the checkbox against the Location to select and then complete Add selected
location(s) instructions.
6. Repeat steps if more than one location.

OFFICIAL Guide for Applicants Submit a Development Application Page 8 of 50 and Relevant Authorities
Performing a Plan Search
1. Click on the Plan Type field drop-down to make selection, e.g. D – Deposited Plan.
2. Type the Plan Number, e.g. 28814
3. Click on the Parcel Type field drop-down to make selection, e.g. Allotment.
4. Type the Parcel Number, e.g. 4.
5. Click SEARCH to return a location match.
6. Click on the checkbox against the Location to select and then complete Add selected location(s) instructions.
7. Repeat steps if more than one location.

OFFICIAL Guide for Applicants Submit a Development Application Page 9 of 50 and Relevant Authorities
Map Search
Find a location by zooming in and out on the map.
1. Click MAP SEARCH.
2. Zoom into the map to find the location using the Zoom buttons .
3. Click on the map with the mouse and drag the map down / up or sideways to locate the location.
4. Left-click the mouse to ‘drop a pin’ on the property location
5. Click on the checkbox against the Location to select and then complete Add selected location(s) instructions.
6. Repeat steps if more than one location.
OFFICIAL Guide for Applicants Submit a Development Application Page 10 of 50 and Relevant Authorities
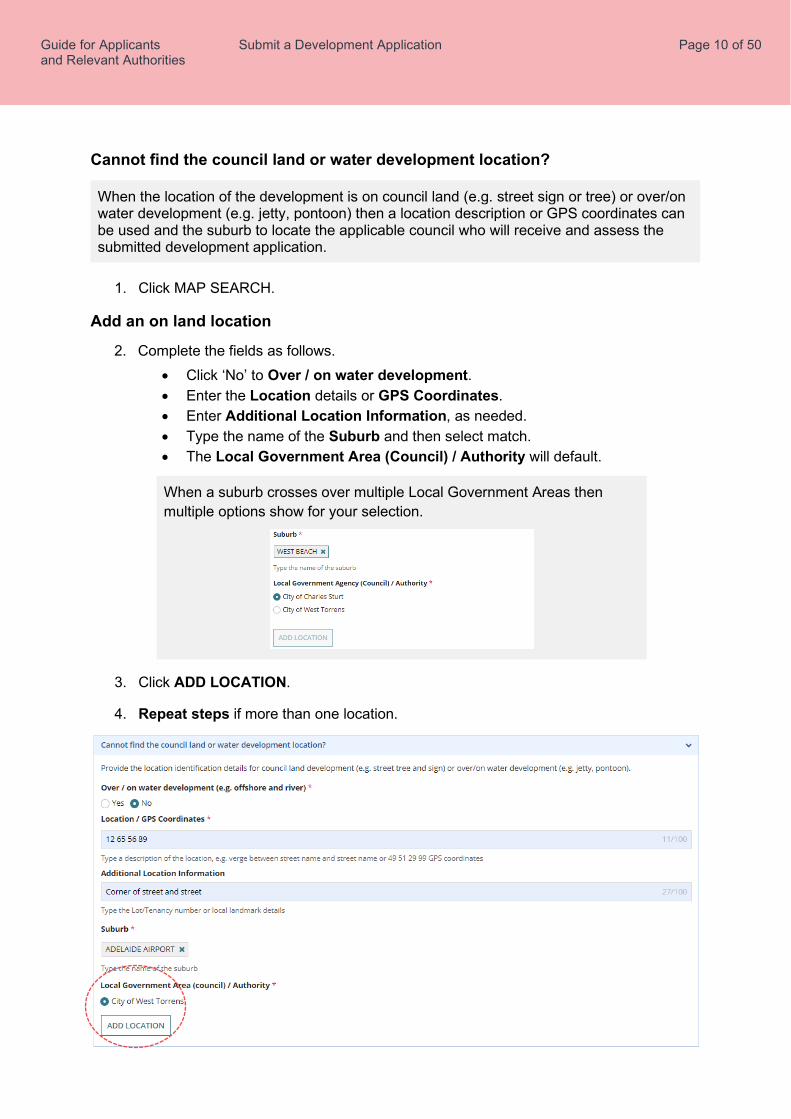
Cannot find the council land or water development location?
When the location of the development is on council land (e.g. street sign or tree) or over/on water development (e.g. jetty, pontoon) then a location description or GPS coordinates can be used and the suburb to locate the applicable council who will receive and assess the submitted development application.
1. Click MAP SEARCH.
Add an on land location
2. Complete the fields as follows. • Click ‘No’ to Over / on water development. • Enter the Location details or GPS Coordinates. • Enter Additional Location Information, as needed. • Type the name of the Suburb and then select match. • The Local Government Area (Council) / Authority will default.
When a suburb crosses over multiple Local Government Areas then multiple options show for your selection.
3. Click ADD LOCATION.
4. Repeat steps if more than one location.

OFFICIAL Guide for Applicants Submit a Development Application Page 11 of 50 and Relevant Authorities
Add an on/over water location
5. Complete the fields as follows. • Click ‘Yes’ to Over / on water development. • Enter the Location details or GPS Coordinates. • Enter Additional Location Information, as needed. • Suburb defaults to ‘No suburb’ • Local Government Area (Council) / Authority defaults to State Planning
Commission.
6. Click ADD LOCATION.
7. Repeat steps if more than one location.

OFFICIAL Guide for Applicants Submit a Development Application Page 12 of 50 and Relevant Authorities
Add selected location(s)
The Property Data table will show a single location match or multiple location matches.
1. Click on the location(s) checkbox to select required location(s).
2. Click ADD SELECTED.
The selected property location/s are displayed in the selected Locations table.
OFFICIAL Guide for Applicants Submit a Development Application Page 13 of 50 and Relevant Authorities
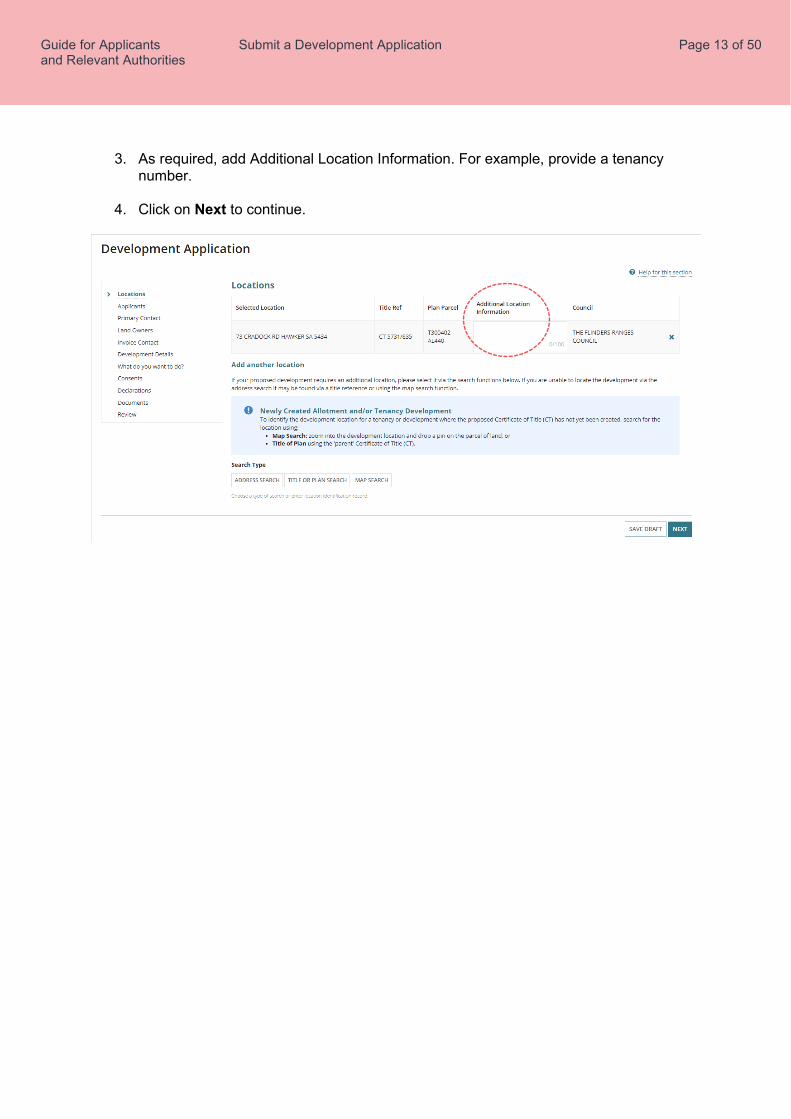
3. As required, add Additional Location Information. For example, provide a tenancy number.
4. Click on Next to continue.

OFFICIAL Guide for Applicants Submit a Development Application Page 14 of 50 and Relevant Authorities
2. Provide Applicant Details
The ‘applicant’ is an individual, or business that is legally responsible for the development application. When I am submitting this application on behalf of the applicant(s) listed below option is only visibly to relevant authority’s inputting a development application on behalf of an applicant. Noting, remove the ‘tick’ from the checkbox when you are not submitting an application on behalf of an applicant.
1. From the options choose one of the following:
• Add Me as the applicant, or • Add someone else either as an individual or a business.
Option 1 – Add Me
2. Click on Add Me to use my details.
Additional options are then available:
• Add another applicant as required. • Edit to update your contact details and change your preferred contact method
default of ‘Email’ to ‘Post’. • Delete to remove an applicant.
3. Click on Next to continue.

OFFICIAL Guide for Applicants Submit a Development Application Page 15 of 50 and Relevant Authorities
Option 2 – Add someone else
4. Click on Add someone else.
Additional applicant type options are then available:
• Individual provide the contact details of a person. • Business provide the contact details of a business. • Crown Agency is not applicable.
5. Complete the contact details fields and then Add Applicant to save.
6. Click on Next to continue.

OFFICIAL Guide for Applicants Submit a Development Application Page 16 of 50 and Relevant Authorities
Tip for adding a PO Box address
1. Click on Enter the address manually.
2. Leave the Postal Address field blank.
3. Complete the Street Address fields with the PO Box details.

OFFICIAL Guide for Applicants Submit a Development Application Page 17 of 50 and Relevant Authorities
3. Provide Contact Details
Primary Contact
There can ‘only’ be one primary contact and this person will receive all communications during the assessment of the development application, for example; request for documentation, requests for information, decision and approval notifications.
Important! Complete the ‘Share a development application with another instructions’ to give the contact access to your development application to perform an action requested by the relevant authority and view documentation issued on making a decision.
Option 1 – Add Me
1. Click on Add Me to use my details.
Additional options are then available:
• Edit to update your contact details and change your preferred contact method default of ‘Email’ to ‘Post’.
• Delete to remove the contact.
2. Click on Next to continue.

OFFICIAL Guide for Applicants Submit a Development Application Page 18 of 50 and Relevant Authorities
Option 2 – Add one of the other contacts you have added
3. Click on Add (contact name).
Additional options are then available: • Edit to update your contact details and change your preferred contact method
default of ‘Email’ to ‘Post’. • Delete to remove the contact.
4. Click on Next to continue. Option 3 – Add someone else
5. Click on Add someone else.
Additional applicant type options are then available:
• Individual provide the contact details of a person. • Business provide the contact details of a business. • Crown Agency is not applicable.
6. Complete the contact details fields and then Add Contact Person to save.
7. Click on Next to continue.

OFFICIAL Guide for Applicants Submit a Development Application Page 19 of 50 and Relevant Authorities
Land Owners
The land owners are the individual(s) or business that have the interest in the land and registered on the Certificate of Title.
Important! Complete the ‘Share a development application with another instructions’ to give the contact access to your development application to perform an action requested by the relevant authority and view documentation issued on making a decision.
Option 1 – Add Me
1. Click on Add Me to use my details.
Additional options are then available: • Edit to update your contact details and change your preferred contact method
default of ‘Email’ to ‘Post’. • Delete to remove ‘me’ as a land owner.
2. Click on Next to continue.
Option 2 – Add one of the other contacts you have added
3. Click on Add (contact name).

OFFICIAL Guide for Applicants Submit a Development Application Page 20 of 50 and Relevant Authorities
Additional options are then available: • Edit to update your contact details and change your preferred contact method
default of ‘Email’ to ‘Post’. • Delete to remove the ‘applicant’ land owner. • Add another land owner as required.
4. Click on Next to continue. Option 3 – Add someone else
5. Click on Add someone else.
Additional applicant type options are then available: • Individual provide the contact details of a person. • Business provide the contact details of a business. • Crown Agency is not applicable.
6. Complete the contact details fields and then Add Land Owner to save.

OFFICIAL Guide for Applicants Submit a Development Application Page 21 of 50 and Relevant Authorities
Additional options are then available: • Edit to update your contact details and change your preferred contact method
default of ‘Email’ to ‘Post’. • Delete to remove the ‘primary contact’ as a land owner. • Add another land owner as required.
7. Click on Next to continue.

OFFICIAL Guide for Applicants Submit a Development Application Page 22 of 50 and Relevant Authorities
Invoice Contact
There can ‘only’ be one invoice contact and typically this person is also the ‘primary contact’ and they will receive all communications during the assessment of the development application in relation to fee payments and/or refunds (when applicable).
Important! Complete the ‘Share a development application with another instructions’ to give the contact access to your development application to perform an action requested by the relevant authority and view documentation issued on making a decision.
Option 1 – Add Me
1. Click on Add Me to use my details.
Additional options are then available:
• Edit to update your contact details and change your preferred contact method default of ‘Email’ to ‘Post’.
• Delete to remove ‘me’ as a land owner.
2. Click on Next to continue.

OFFICIAL Guide for Applicants Submit a Development Application Page 23 of 50 and Relevant Authorities
Option 2 – Add one of the other contacts you have added
3. Click on Add (contact name).
4. Click on Next to continue. Option 3 – Add someone else
5. Click on Add someone else.
6. Complete the contact details fields and then Add Invoice Person to save.

OFFICIAL Guide for Applicants Submit a Development Application Page 24 of 50 and Relevant Authorities
Additional options are then available: • Edit to update your contact details and change your preferred contact method
default of ‘Email’ to ‘Post’. • Delete to remove the ‘primary contact’ as a land owner.
7. Click on Next to continue.

OFFICIAL Guide for Applicants Submit a Development Application Page 25 of 50 and Relevant Authorities
4. Provide Development Details
1. Complete the Development Details as follows.
• Current Use – write a description of what is on the site before your development application, e.g. house
• Proposed Use – write a description of what is on the site after your development
application, e.g. house
• Development Cost – provide a dollar value (excluding the fit out of the building)
• Proposed Development Details – write a description of the proposed development
2. Click on Next to continue.

OFFICIAL Guide for Applicants Submit a Development Application Page 26 of 50 and Relevant Authorities
5. Choose Development Elements and Refine
The ‘elements’ enable you to specify what you want to develop, for example a new house, with a shed and carport or garage, and based on the selection/s you may be prompted to refine the element.
1. Click on each element of your proposed development.
2. Click on Show more elements to view more options.
3. When refining the element you will be prompted with relevant options from the Planning and Design code (see image below).
4. Click on Next to continue and provide more information about your application.
OFFICIAL Guide for Applicants Submit a Development Application Page 27 of 50 and Relevant Authorities
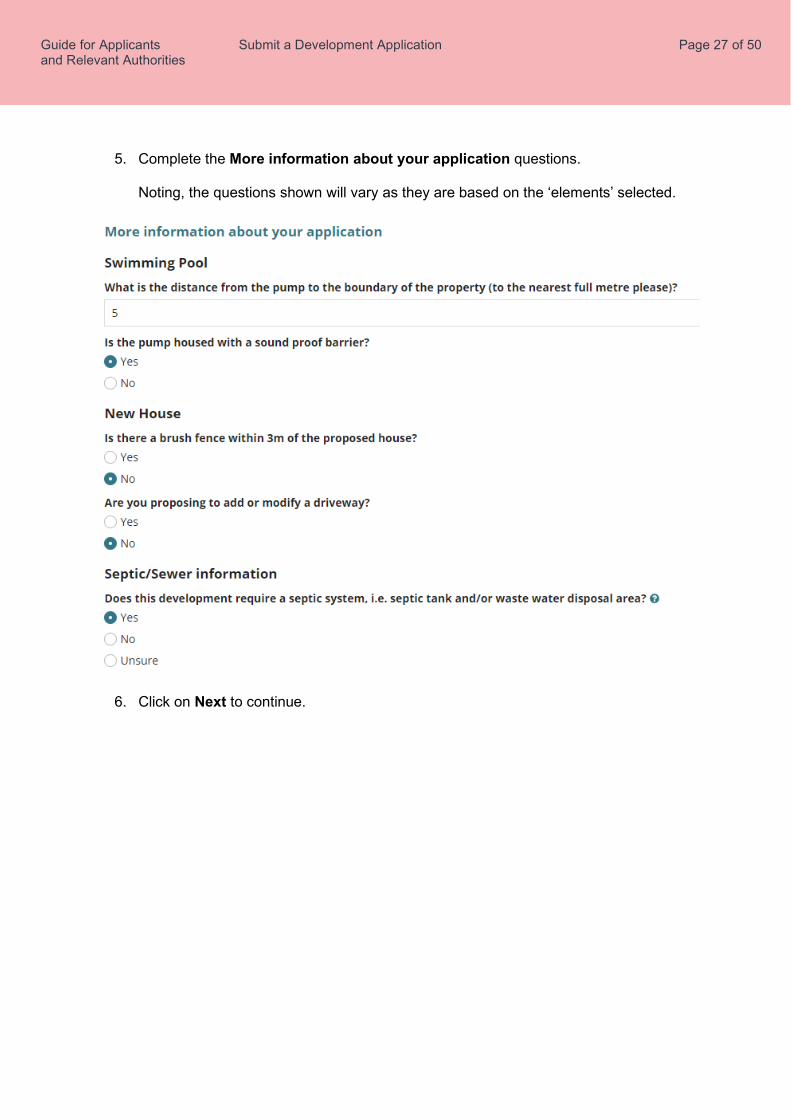
5. Complete the More information about your application questions.
Noting, the questions shown will vary as they are based on the ‘elements’ selected.
6. Click on Next to continue.

OFFICIAL Guide for Applicants Submit a Development Application Page 28 of 50 and Relevant Authorities
6. Choose Consent Timing and Assessing Relevant Authority
Based on the information provided you are advised of the Consents required, in this example both Planning and Building consent are required.
1. Choose the response to question ‘Have any of the required consents for this development already been granted using a different system? • No consents granted under a different system and then complete the Planning
Consent questions.
• Yes the development application consent has already been granted (i.e. pre 31st July 2020 under the Development Act).

OFFICIAL Guide for Applicants Submit a Development Application Page 29 of 50 and Relevant Authorities
2. Click on the Planning Consent radio button to select.
Complete the Details of the consent(s) already granted fields as follows from the Decision Notification Form (DNF) and then proceed to complete the Building Consent questions.
• Application Number • Type or select the date consent(s) Granted
• Relevant Authority select: a. Council b. Private certifier and then select the private certifier from the field drop-down.
c. Other and then type the name of the relevant authority from the DNF.

OFFICIAL Guide for Applicants Submit a Development Application Page 30 of 50 and Relevant Authorities
Planning Consent
1. Choose When should this consent be assessed? • Assess now • Assess later - choose this option when you may need further advice, e.g. from an
Independent Assessor.
2. Choose Who should assess your planning consent? • Assessment Panel/Assessment Manager identified by location of the
development site • Independent accredited professional then search for the name of the accredited
professional to add their details.
3. Choose If public notification is required, who would you like to erect the sign on the land? • Applicant – you will be responsible for the costs for printing the sign and placing
on the land. • Relevant Authority – you may incur additional fees.
OFFICIAL Guide for Applicants Submit a Development Application Page 31 of 50 and Relevant Authorities
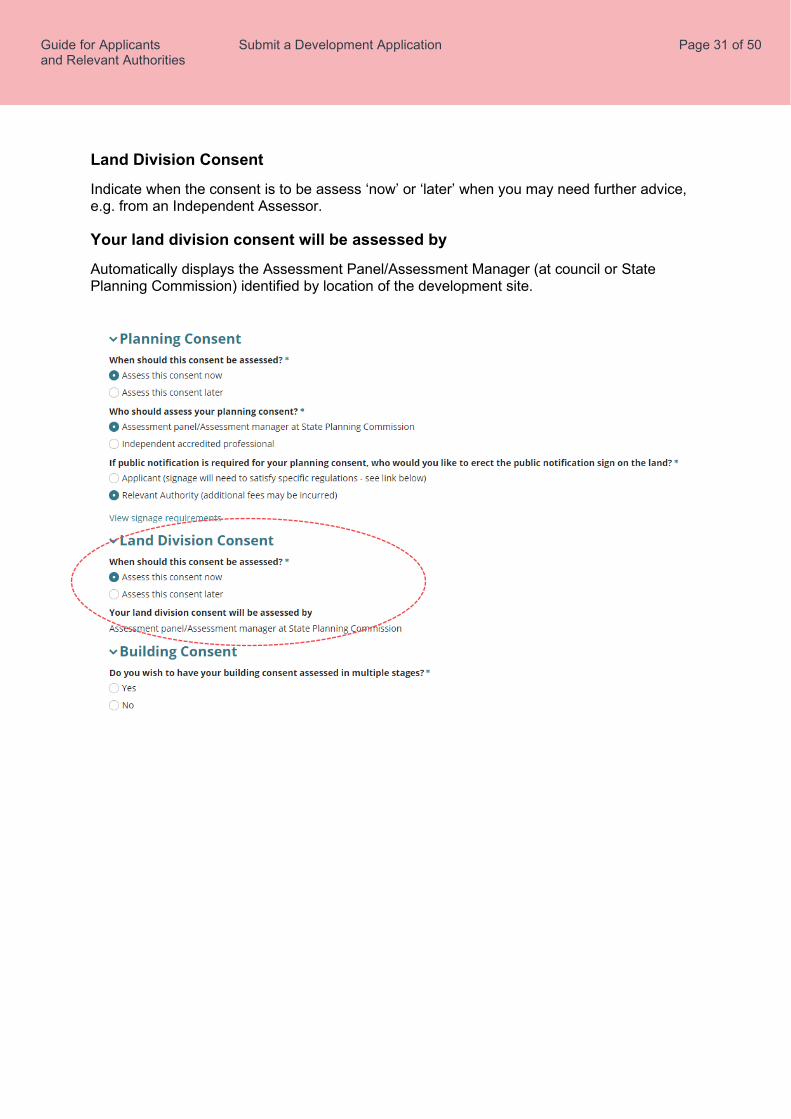
Land Division Consent
Indicate when the consent is to be assess ‘now’ or ‘later’ when you may need further advice, e.g. from an Independent Assessor.
Your land division consent will be assessed by
Automatically displays the Assessment Panel/Assessment Manager (at council or State Planning Commission) identified by location of the development site.

OFFICIAL Guide for Applicants Submit a Development Application Page 32 of 50 and Relevant Authorities
Building Consent
Option 1: Staged Building Consent
When the assessment of the stages is; • Now an on-screen message advises the stages will be combined and
assessed together as a single consent. • Later for all stages on completion of the ‘Planning Consent’ you will need to
‘Apply for staged building consent’.
1. Choose ‘Yes’ to question Do you wish to have your building consent assessed in
multiple stages?
2. Provide a Description for Stage 1.
3. Choose when to assess the stage. • Now then choose who to assess the building consent. • Later then complete the next stage.
4. Provide a Description for Stage 2.
5. Choose when to assess the stage.
• Now then choose who to assess the building consent. • Later then Add another stage or continue with answering the next question.
6. Click on Next to continue.

OFFICIAL Guide for Applicants Submit a Development Application Page 33 of 50 and Relevant Authorities
Not a staged Building consent – Assess Later
1. Click on No.
2. Click on Assess this consent later.
3. Click on Next to continue.
A warning message displays when the ‘Planning Consent’ has already been granted and the building consent to be assessed later. To resolve the warning, update the building consent to be assessed ‘now’ and continue to complete the application.

OFFICIAL Guide for Applicants Submit a Development Application Page 34 of 50 and Relevant Authorities
Not a staged Building consent – Assess Now
1. Click on No.
2. Click on Assess this consent now.
3. Choose Who should assess your building consent? • Council identified by location of the development site. • Independent accredited professional then search for the name of the accredited
professional to add their details.

OFFICIAL Guide for Applicants Submit a Development Application Page 35 of 50 and Relevant Authorities
4. Indicate if the Construction Industry Training Fund Levy (CITB) has been paid. • Yes and enter the receipt number. Next, answer the question Has a builder or contractor has been engaged for the proposed development?
• No. Continue to question Has a builder or contractor been engaged for the proposed development?
5. Indicate if a builder or contractor has been engaged for the proposed
development.
• No have not engaged a builder or contractor. Click on Next to continue and complete the Acknowledge Declarations.
• Yes and then answer the question Is the development being constructed by an Owner Builder?

OFFICIAL Guide for Applicants Submit a Development Application Page 36 of 50 and Relevant Authorities
6. Indicate if the development is being constructed by an owner builder.
• Yes, an owner builder. Click on Next to continue and complete the Acknowledge Declarations.
• No, then continue to select from the application contacts or add someone else.
7. Choose Who is the builder or contractor for the proposed development? yourself
as the applicant, a contact or Add someone else.
Add builder / contractor
8. Click on Add someone else to enter the builder details and then Add Builder or Contractor to save.

OFFICIAL Guide for Applicants Submit a Development Application Page 37 of 50 and Relevant Authorities
9. Select Individual or Business.
10. Complete the shown fields with the contractor / builder contact details.
11. Click Add Builder or Contractor to save.
12. Click on Add another builder or contractor or click Next to continue.

OFFICIAL Guide for Applicants Submit a Development Application Page 38 of 50 and Relevant Authorities
13. A summary of the consents to be submitted follows and allows changes to the Assessment order if required.
14. Click on Next to complete the declarations.

OFFICIAL Guide for Applicants Submit a Development Application Page 39 of 50 and Relevant Authorities
7. Acknowledge Declarations
Electricity Declaration
1. Read through the declaration and determine whether the proposed building construction is not contrary to the regulations prescribed for the purposes of section 86 of the Electricity Act 1996 and then make the applicable selection.
2. Read through the More Information notes providing further information on section 86
of the Electricity Act 1996 and section 3(1) of the Planning, Development and Infrastructure Act 2016).
3. When No selected then complete the Technical Regulator Required Declaration options.

OFFICIAL Guide for Applicants Submit a Development Application Page 40 of 50 and Relevant Authorities
Native Vegetation Declaration
When the development location is located in the ‘Native Vegetation Zone’ then the Native Vegetation Declaration is displayed. If the application is supported by a report, then upload during the completion of Upload Technical Documents and Drawings steps.
1. Read through the declaration and then select the applicable declaration statement.
As needed follow the link to the Regulation 18(2)(a) of the Native Vegetation Regulation 2017 for more information.
2. On completion, move to the Next page.

OFFICIAL Guide for Applicants Submit a Development Application Page 41 of 50 and Relevant Authorities
8. Upload Technical Documents and Drawings
Before you begin, the technical documents and drawings provided by the developer, architect or builder, must be in an electronic format for upload. Reports and CITB Receipt When information provided requires a document to be uploaded an on-screen prompt will advise to upload in order to proceed to the next page. For example, native vegetation report, or CITB receipt. Consent(s) already granted documentation When Planning Consent ‘granted’ pre 31st July 2020, the following documentation provided by the assessing Relevant Authority must be uploaded ‘individually’ in order to proceed.
• Category: Transitional Applications Type: Decision Notification Form • Category: Transitional Applications Type: Stamped Plans
Upload individual documents
1. Click on Upload to locate drawings, plans etc. saved on your computer.
2. Drag and drop the document within the Open window into the Drop files here field.
3. Repeat drag and drop until all documents uploaded.
4. Click on Cancel to close the Open window.
5. Categorise the documents using the ‘category’ and ‘type’ drop-down lists.

OFFICIAL Guide for Applicants Submit a Development Application Page 42 of 50 and Relevant Authorities
Upload all documents as one file
A building developer, architect, engineer etc. may provide all the technical documentation in one file via email or USB device.
1. Select Upload to open the saved document folder location and drag-and-drop into the
document field or open.
2. Select ‘Other’ from the Document Category field.
3. Select ‘Other Documents’ or ‘Planning Documents’ from the Document Category field.
4. Type a description of the documents contained within the one document file.

OFFICIAL Guide for Applicants Submit a Development Application Page 43 of 50 and Relevant Authorities
Pre-lodgement agreement
How do pre-lodgement agreements work? A pre-lodgement agreement is reached between development applicants and referral agencies prior to lodging an application for planning consent. Pre-lodgement agreements can be reached with any referral body. The process eliminates the need for referrals to be undertaken during the formal assessment process, thereby reducing assessment timelines and potential delays for the development application.
1. Click on the applicable response to the question do you have an agreement with a
State Government agency related to your application? (Pre-lodgement agreement)
• Yes then continue to answer the questions to follow. • No then click on Next to review the application details and submit.
2. Select Who is the pre-lodgement agreement with? from the drop-down listing.
3. Click Add Another (if applicable).
4. Click on Next to review the application details and submit.

OFFICIAL Guide for Applicants Submit a Development Application Page 44 of 50 and Relevant Authorities
9. Review and Submit Development Application
A summary of your development application displays, providing you an opportunity to read through the information provided, and make any edits (as necessary) by navigating to the applicable page through the navigation menu on the left-hand side.
1. Click on Hide Application Details to show less information, as required.
Development on council land or on/over water development
For applications with development on council land or on/water development the Development Locations table will show no information in the Title Ref or Plan Parcel fields as a manual spatial capture is required; indicated on the map image.

OFFICIAL Guide for Applicants Submit a Development Application Page 45 of 50 and Relevant Authorities
2. Scroll to the bottom of the page to read and complete the declaration.
3. Submit your development application for assessment and approval.
You will receive confirmation of your submission and an ID number created for your development application.
4. Click on Done to exit and return to Your application dashboard.

OFFICIAL Guide for Applicants Submit a Development Application Page 46 of 50 and Relevant Authorities
On return to the Your applications dashboard go to the Under Assessment tab to view the submitted development application, and then sign out.

OFFICIAL Guide for Applicants Submit a Development Application Page 47 of 50 and Relevant Authorities
Share the application with someone else
Once the application is submitted next is to share access with the application contacts (i.e. primary contact, invoice contact, land owner/s) so they can perform actions on the application throughout the development application assessment process. Examples of actions the contacts will perform:
• Payment of fees. The ‘invoice contact’ receives the notification and makes payment.
• Provide information. The ‘primary contact’ receives the notification and uploads the information within the application’s document store.
1. Click on the Under Assessment tab to locate the application.
Alternatively, use the Search feature and the ID number to locate.
2. Click on the ID number of the application to view.
3. Click on Sharing access within the Development Application screen.

OFFICIAL Guide for Applicants Submit a Development Application Page 48 of 50 and Relevant Authorities
4. The Access Code is shown and provide this number and the application ID over the phone or in an email.
Use the Refresh access code option if the code has expired.
5. To send instructions on how to use the system to the contact who is being shared
access to the application, type their email address in the Email Address field and then Send Email to complete the sharing.
A list of people that have access to your applications is also available from the Sharing Access screen which allows you to check if your contacts have successfully accessed the application and revoke ‘sharing access’ from a contact.
Revoke Sharing Access
6. Click on the trash can icon.
7. Click on Confirm to complete the action.


OFFICIAL