guide for training outreach workers - hydraid biosand water filter
TRANSCRIPT
Water, Sanitation, and Hygiene Improvement Training Package for the Prevention of Diarrheal Disease
GUIDE FOR TRAINING OUTREACH WORKERS
►Guide for Training Outreach Workers ►Collection of Resource Materials ►Outreach Worker’s Handbook 2009 This publication was produced for review by the United States Agency for International Development. It was prepared by the Academy for Educational Development’s Hygiene Improvement Project.

The USAID Hygiene Improvement Project (HIP) is a six-year (2004–2010) project funded by the USAID Bureau for Global Health, Office of Health, Infectious Diseases and Nutrition, led by the Academy for Educational Development (contract # GHS-I-00-04-00024-00) in partnership with ARD Inc., the IRC International Water and Sanitation Centre , and The Manoff Group, Inc. HIP aims to reduce diarrheal disease prevalence through the promotion of key hygiene improvement practices, such as hand washing with soap, safe disposal of feces, and safe storage and treatment of drinking water at the household level. Contact Information: USAID Hygiene Improvement Project Academy for Educational Development 1825 Connecticut Avenue, NW Washington, DC 20009-5721 Tel. 202-884-8000; Fax: 202-884-8454 [email protected] - www.hip.watsan.net Submitted to: Merri Weinger Office of Health, Infectious Diseases and Nutrition Bureau for Global Health U.S. Agency for International Development Washington, DC 20523

ACKNOWLEDGEMENTS
A large undertaking, the WASH training package has an appropriately large list of persons to acknowledge. The basic concept for the document was a longstanding idea of Merri Weinger, USAID Program Manager for Hygiene Improvement. Merri has provided feedback and suggestions throughout the development process. This activity was managed, in turn, by Catherine O’Brien, Elizabeth Younger (behavior change advisors on the HIP staff), and Christina Fontecchio from The Manoff Group (a subcontractor to the Academy for Educational Development for HIP). Thomas Leonhardt, a veteran training consultant, did much of the writing. Michael Favin (Manoff Group), Christina Fontecchio, and Elizabeth Younger wrote some shorter sections and did extensive editing. Marie Stoner (Manoff Group) served as operational manager, inputting many of the edits and revisions and coordinating changes with consultants, staff, and collaborators. Wendy Putnam formatted and copyedited the documents, and Patricia Mantey coordinated their publication and dissemination. Many reviewers, both HIP technical staff and outside expert reviewers, provided technical reviews and suggestions. These persons included: HIP Elizabeth Younger Sarah Fry Julia Rosenbaum Sandra Callier Expert Reviewers Scott Tobias, ARD Inc. (and HIP) Danielle Lantagne, Centers for Disease Control (CDC) Regula Meierhofer and Samuel Luzi, Water and Sanitation in Developing Countries (Sandec) Sally Bloomfield, International Scientific Forum on Home Hygiene Suzanne Ferron, consultant Christopher Seremet, Catholic Relief Services Dennis Warner, Catholic Relief Services Valerie Curtis, London School of Hygiene and Tropical Medicine Carolien Van der Voorden, WSSCC Lucy Russell, Oxfam Finally, ChildFund International kindly field-tested the draft package through their Zambia field office and provided very useful feedback. Key persons at ChildFund included David Shanklin, Sadia Parveen, Lydia Jume, Rachel A. Maris-Wolf, and the ChildFund Zambia staff. We would also like to acknowledge several technical consultations and reviews of the materials by the Peace Corps staff, in particular Doreen Salazar, Water and Sanitation Specialist.

ACRONYMS AIDS Acquired Immune Deficiency Syndrome
CDC Centers for Disease Control and Prevention
CLTS Community-Led Total Sanitation
HIP Hygiene Improvement Project
HIV Human Immunodeficiency Virus
IPC Interpersonal Communication
MOH Ministry of Health
NGO Non-Governmental Organization
ORS Oral Rehydration Salts
PVO Private Voluntary Organization
SODIS Solar Water Disinfection
SSS Sugar Salt Solution
UN United Nations
USAID United States Agency for International Development
WASH Water, Sanitation, and Hygiene
WHO World Health Organization

TABLE OF CONTENTS PREFACE ............................................................................................................................................................ 1
INTRODUCTION .............................................................................................................................................. 8 WORKSHOP MATERIALS ..................................................................................................................... 16 MENU FOR SELECTING WHICH SESSION TO DO ..................................................................... 17
MODULE 1: INTRODUCTORY ACTIVITIES SESSION 1: ORIENTATION TO THE TRAINING WORKSHOP ............................................... 18 SESSION 2: INTRODUCTION TO WASH ......................................................................................... 29 SESSION 3: ROLE OF THE OUTREACH WORKER ...................................................................... 36 SESSION 4: KEY PRACTICES FOR PREVENTING DIARRHEA ............................................... 41 SESSION 5: CONTAMINATION CYCLE ........................................................................................... 47
MODULE 2: MAKING WATER SAFE TO DRINK SESSION 1: PRETREATMENT ............................................................................................................. 55 SESSION 2: CHLORINATION .............................................................................................................. 61 SESSION 3: BOILING WATER ............................................................................................................. 69 SESSION 4: SODIS METHOD ............................................................................................................... 75 SESSION 5: FILTRATION ...................................................................................................................... 82 SESSION 6: TRANSPORTING, STORING, AND RETRIEVING WATER ................................ 87 SESSION 7: HELPING FAMILIES CHOOSE .................................................................................... 93 SESSION 8: WATER SYNTHESIS ....................................................................................................... 101
MODULE 3: HAND WASHING SESSION 1: HOW TO WASH OUR HANDS .................................................................................... 105 SESSION 2: WHEN TO WASH OUR HANDS ................................................................................. 112 SESSION 3: HOW MUCH WATER DOES IT TAKE TO WASH YOUR HANDS WELL? .... 119 SESSION 4: BUILDING A TIPPY TAP .............................................................................................. 126 SESSION 5: HAND WASHING SYNTHESIS ................................................................................... 131
MODULE 4: HANDLING FECES SESSION 1: THE FECAL-ORAL ROUTE ......................................................................................... 136 SESSION 2: PROPER FECES DISPOSAL ......................................................................................... 143 SESSION 3: LATRINE BASICS ............................................................................................................ 152
MODULE 5: INTERPERSONAL COMMUNICATION SESSION 1: INTERPERSONAL COMMUNICATION FOR IMPROVED PRACTICES ........ 164 SESSION 2: USING DISCUSSION TOOLS AND FACILITATING JOINT PLANNING ..... 172 SESSION 3: OPPORTUNITIES/TECHNIQUES FOR HYGIENE PROMOTION ................... 185
MODULE 6: ACTION PLANNING SESSION 1: ACTION PLANNING ..................................................................................................... 190
MODULE 7: TRACKING PROGRESS SESSION 1: USING TOOLS TO TRACK AND REPORT PROGRESS ...................................... 195
APPENDICES APPENDIX 1 – POSSIBLE TASKS FOR OUTREACH WORKER ....................................................... 202 APPENDIX 2 – TIPS ON DEMONSTRATIONS, ROLE PLAY, AND GROUP DISCUSSION ....... 203 APPENDIX 3 – SELF-ASSESSMENT FORM ............................................................................................. 206 APPENDIX 4 – SAMPLE QUESTIONS AND EVALUATION TEMPLATES .................................. 207 APPENDIX 5 – WEBSITES/LINKS ............................................................................................................. 210 APPENDICES 6–8 –HALF-DAY, ONE-DAY, AND THREE-DAY SAMPLE WORKSHOPS ....... 212

GUIDE FOR TRAINING OUTREACH WORKERS
PREFACE
PREFACE 1
PREFACE: LETTER TO PROGRAM MANAGER AND TRAINER
The USAID-funded Hygiene Improvement Project has compiled a training package to facilitate work in water, sanitation, and hygiene (WASH) around the world. This training guide, along with its accompanying Outreach Worker’s Handbook and Collection of Resource Materials, is intended for use by any organization that works with or is about to start working with outreach workers—local individuals who work at the community level. Your organization has decided—or is in the process of deciding—to provide your outreach workers with training so they will be prepared to work in communities to help people adopt healthier behaviors related to water, sanitation, and hygiene. These new or improved practices will result in significantly fewer cases of diarrhea (and therefore less illness and fewer deaths), especially among children. In addition, these new practices may well have psychological benefits such as increased feelings of pride/prestige, of being good parents, and of contributing to the community’s welfare. If your organization is already involved in WASH activities, these materials can help your outreach workers become more effective at persuading individuals, families, and groups in their communities to adopt new and healthier behaviors to reduce the incidence of diarrhea. Regardless of your organizational focus, these materials can make a link to improved WASH practices in the following ways:
• Family planning: Improved WASH practices lead to less diarrhea and childhood illness and
better child survival, which are linked to couples’ interest in family planning.
• HIV/AIDS: Improved WASH practices are critical for persons living with HIV/AIDS because they live at high risk of contracting diarrhea, which can cause or contribute to their premature death. These persons are potentially a source of diarrhea in the community, since they are highly susceptible to it.
• Food production: Preventing diarrhea in the community is potentially of interest to food
production projects for two reasons. Diarrhea among persons working in agriculture, or among their children, reduces their availability and productivity, sometimes at critical harvest
PREFACE
PREFACE
2
or planting times. If one purpose of improved food production is consumption by the family itself, then diarrhea among family members works to reduce the positive impact of increased and/or more healthful food consumption.
• Income generation: As in the case of food production, diarrhea among both adults and children
in a family reduces the amount of time available and ability to focus on productive tasks, so preventing diarrhea has a complementary benefit. It also reduces the resources used on treatment, enabling them to be used elsewhere.
It is likely that your outreach workers are already carrying out such tasks as:
• Giving group talks or demonstrations • Making home visits • Counseling and joint problem solving with families • Collecting and/or leading community members to collect information on their conditions,
resources, and opinions • Planning, implementing, and monitoring activities
These are precisely the type of skills that lend themselves to effectively promoting improved WASH practices. In some cases, all that outreach workers lack is knowledge of WASH, strategies for improving family WASH practices, and an orientation to using job aids and other supports. Should your organization decide to sponsor WASH training for your outreach workers, you, as a program manager, will be responsible for a number of tasks before, during, and after the training. The following recommendations and suggestions will give you a broad idea of the scope of the task you are about to undertake. (In the Introduction starting on p. 8, you will find more detailed information about the Guide for Training Outreach Workers, Outreach Worker’s Handbook, and the workshop.) HIP developed these materials through a wide review of WASH technical and training materials. The HIP materials most directly reflect the experiences of several USAID-funded projects—the Environmental Health Project (I and II) and HIP—in such countries as the Dominican Republic, Nicaragua, Uganda, Peru, Madagascar, and Ethiopia. The draft materials were revised based on valuable feedback from a field test that ChildFund International conducted in Zambia.
Deciding If You Should Incorporate WASH Activities into Your Program
You, the program manager, should begin at the strategic level by thinking about and answering a series of questions that will help you put the WASH activities into an organizational context that ensures congruence with other activities. For example:

PREFACE
PREFACE
3
• How important is diarrhea as a cause of illness and deaths in the communities where your project works?
• How will this training and the subsequent WASH activities of the outreach workers fit into
the existing programmatic framework of your organization?
• How will adding a WASH component to an existing program or project change (help or hinder) the program or project and its ability to achieve its goals and objectives?
• What resources (financial, human, and material) are available to support the addition of a
WASH training and outreach component?
• How will the results of the outreach workers’ efforts be monitored, evaluated, and reported?
• On which aspects of WASH would the outreach workers concentrate their efforts? The decision to start with water, sanitation, and/or hygiene should be made as a function of the organization’s programmatic priorities and local needs and conditions.

PREFACE
PREFACE
4
Preparing for the Training
Once you and your organization have decided to undertake WASH outreach activities and there is a “fit” with your other program activities, there are a number of steps you, the program manager, should take to prepare for the training.
1. You should familiarize yourself with both this Training guide, which will be used by the trainer, as well as with the accompanying Outreach Worker’s Handbook and the Collection of Resource Materials that the outreach workers will use during training and in their community work. This will give you a clear idea about roles, responsibilities, and scope of the training and its follow-on activities.
2. You or the trainer (see the note to trainer on p. 5) will need to gather certain information
(such as national, regional, or local level WASH statistics) that will be presented during the training. These statistics should help the trainer and outreach workers understand the broad WASH context in which they are working. Suggestions for different kinds of statistics can be found in Module 1, Session 2, p. 33, of this guide or p. 7 of the Outreach Worker’s Handbook.
3. If your organization has already conducted assessments of local WASH conditions, the
information from these assessments should be summarized in a way that both the trainer and outreach workers can understand easily. This information may facilitate the selection of target communities as well as help you determine the focus of promotional activities in the field.
4. You and the trainer should be familiar with the WASH conditions in the communities where
the outreach workers will be conducting activities and be clear about your expectations (results or outputs). This will help the outreach workers know broadly where to focus efforts, although conditions may vary somewhat from community to community.
5. Designate someone to handle the logistical aspects of the training: selecting the participants,
arranging the lodging for the participants, selecting the venue, making arrangements for meals, etc.
6. The introduction section contains a generic list of WASH tasks for outreach workers. As
program manager, you should use the items contained in the job description to help craft a task list appropriate for your program’s outreach workers. You should then use that list to help you complete the next item in this list (#7).
7. One of the most important decisions you and the trainer need to make is which sessions you
will offer to your outreach workers. To help you do this, there is a menu of options on pp. 14–15 with suggestions about which sessions you might include in the training. The length of the training will vary according to which sessions you choose to include. Appendices 6–8 outline half-day, one-day, and three-day trainings. The shorter workshops are for raising awareness. To conduct all of the sessions in this Training guide (covering all three major WASH key practices—safe water, feces disposal, and hand washing) requires a training of at least four days.

PREFACE
PREFACE
5
8. It is impossible to create a generic manual—intended for use in any country where there are
outreach workers—that does not need to be adapted to be relevant and appropriate for each particular setting. There are instructions on how to do this adaptation in various places in the text.
Trainer Note: You (the program manager) and/or the trainer need to choose the most important sessions as well as MODIFY any sessions that have information that is not relevant for your country (for example, remove information about chlorination products that are not available in your country or remove information on alum if alum is not available in your country).
The Outreach Worker’s Handbook is provided in both PDF form and in Word form, so that you might adapt the handbook to the particular needs of the outreach workers being trained by your program. Please keep in mind that page numbers have been cross-referenced between the Guide for Training Outreach Workers and the Outreach Worker’s Handbook. Therefore, if you make changes in the handbook, you will need to change the references to those page numbers in the training guide. This training package suggests tools to facilitate data collection for monitoring the progress of outreach workers and tracking changes in WASH practices in the community. These tools require a certain level of literacy and numeracy. You are free to adapt and use them or not. If appropriate, decide how you want to integrate WASH monitoring into your existing monitoring instruments and procedures, what data need to be collected, and how the data will be used. The tools included here can help your program collect data at two levels: Individual/Household Level—The outreach worker uses an assessment and joint problem-solving card (Discussion Card) to determine the current behaviors in a household and to mutually plan with the community member how to improve behaviors. The Household Tracking Sheet helps the outreach worker document the current and negotiated improved behaviors for each household. The Discussion Card(s) and Household Tracking Sheet are intended to facilitate such counseling activities. Multiple Household/Communitywide—The Consolidation Sheet helps gather in one place the information collected by multiple outreach workers within one community or geographic area. The Bar Graph helps the outreach worker turn the numbers on the Consolidation Sheet into a bar graph, which is a more visual way to present the data that is useful when giving feedback to the community on its progress. Use of the Consolidation Sheet and Bar Graph is optional, so you, the program manager, need to decide if these are useful tools for the program. (Giving the community feedback on how it is doing on key WASH practices both reminds and motivates people to try to do better.) Visual aids and handouts used by outreach workers both in the field and in the training workshop are supplied in the Collection of Resource Materials. It is highly desirable that you adapt these illustrations to fit the local cultural context and then make sufficient copies. Information to help you do this can be found on pp. 11–14 below and in the Collection of Resource Materials—“Adapting Visual Aids.”

PREFACE
PREFACE
6
Information is available concerning session, daily, and workshop evaluations (Appendix 4), as well as templates for developing outreach worker self-appraisal forms (Appendix 3). This information can also be found in the Collection of Resource Materials.
Supporting the Training of the Outreach Workers
It is recommended that you, the program manager, take the following steps to support the participants while the training program is in progress:
1. Welcome the participants to the training program and tell them that they have the organization’s approval and support. Explain how their new tasks will help meet organizational goals and objectives by improving household and community practices that will prevent diarrhea and child deaths, what (in general) they will do to improve WASH, what kind of support they can expect once in the field, etc.
2. Monitor the progress of the workshop to see that participants understand the technical
content, that the training conditions are favorable for learning, and that the participants are motivated to undertake their new roles. If it is logistically feasible, an effective way to train the outreach workers is to have them spend time in the workshop learning one set of skills, then venture into their communities to try out their newly acquired skills, and then return to the classroom to discuss what they learned and receive more training in preparation for their next community experience.
Supporting Your Outreach Workers in the Field
There are steps you should take to assist the outreach workers after the training is complete:
1. Make every effort to put the outreach workers’ newly acquired skills and knowledge into
practice as soon as possible. The longer they wait, the more they’ll forget what was learned in the training. Take advantage of their enthusiasm and motivation.
2. Make sure they have the supplies and materials they need. The activities they will be
conducting in the field require some locally available items (such as containers and water treatment products). There are low-cost options for most of these materials.
3. Provide supportive supervision to them, particularly in the first months following training,
since WASH activities and related skills are likely to be new to them.

PREFACE
PREFACE
7
4. Assist the outreach workers with their monitoring forms and tasks if your organization decides to gather WASH data.
5. Conduct debriefing sessions where the outreach workers can compare notes, think about
lessons learned, and develop new ways and practices for their work. The Training guide refers to many websites where you can find additional information (see Appendix 5). Finally, an introductory word or two to share with the trainer(s):
1. Preparing to implement any workshop takes a lot of time. The general rule is two days of preparation for every day of workshop. Once you and the trainer(s) have selected the workshop topics appropriate for your community (the section on pp. 14–15 will help), you should allow your trainers enough time to carry out the preparations. The preparation will involve finding out information as well as gathering materials such as bottles, water, basins, soap, and cloth, and photocopying forms and tools for participants. These tasks are in addition to the logistical and administrative tasks involved in staging a workshop.
2. The Training guide has been written purposefully in a “recipe” style, so that someone whose
primary duties are not related to training will be able to implement the workshop. Experienced trainers may find the training directions too detailed and should treat them accordingly. Also, please feel free to have experienced trainers “upgrade” the training methodologies based on their level of comfort with training and the content.
3. The timing for the various activities is generous. You may find that you are able to complete
an activity well within the suggested timeframe. For example, an experienced trainer may be able to complete the introductory activities in a relatively short period of time on the first morning. Please remember timing suggestions are illustrative.
4. Finally, the session objectives have been written in terms of what the participants should be
able to do. They are learner-focused. They guide the content of the session and help both trainer and participant to assess the acquisition of new knowledge and skills. Acquisition of WASH knowledge is not an end in itself, but should serve as a basis for what the participants will do in the field.
Good luck!

GUIDE FOR TRAINING OUTREACH WORKERS
INTRODUCTION
INTRODUCTION 8
INTRODUCTION TO THE MANUAL, WORKSHOP, AND MATERIALS HIP compiled this training package as part of its mandate from USAID under contract number GHS-I-00-04-00024-00. To facilitate work being done in WASH around the world, USAID asked HIP to develop a Guide for Training Outreach Workers and an Outreach Worker’s Handbook for use by a wide variety of organizations seeking to add WASH activities to their current programs or to start a diarrhea reduction program. The purpose of this guide is to support the training of local outreach workers to carry out activities at the community level to reduce diarrhea. It outlines a training workshop for outreach workers that may be facilitated by NGOs, PVOs, the Ministry of Health, or any other organization that desires to combat diarrheal disease. After participating in the workshop, outreach workers should be able to use the knowledge and skills acquired to carry out activities within their own organization’s program, using as supports the accompanying Outreach Worker’s Handbook and Collection of Resource Materials.
Workshop Objectives This manual is intended to enable users to organize a workshop that prepares outreach workers to:
1. Describe the national and local WASH situation (using data) 2. Define their role and responsibilities as an outreach worker 3. Describe the three key WASH practices and acceptable and unacceptable ways to carry them
out 4. Explain and replicate in the community the various WASH activities demonstrated during
the workshop 5. Demonstrate effective communication skills 6. Use appropriate monitoring tools to record their progress

INTRODUCTION
INTRODUCTION
9
7. Outline how they will move forward with activities once the workshop is over (prepare an action plan)
Workshop Methodology The workshop:
• Uses structured learning activities: presentations, group discussions, group work, role plays, practical exercises, etc.
• Engages the participants (outreach workers) through active involvement in exercises and small groups
• Enables participants to experience the same activities they will be carrying out in their communities
• Incorporates an Outreach Worker’s Handbook and communication materials that the outreach workers can later use in the field
Session Methodology and Structure Methodology Based on adult learning principles, each session is structured according to the following seven steps that incorporate the “experiential learning cycle”:
• Introducing the session (some kind of icebreaker or climate setter) • Presenting the session’s objectives • Offering a structured experience to the participants (such as a role play) • Processing (talking about) that experience • Drawing new learning and conclusions from the experience and the processing • Planning how to use the new skills and knowledge • Summarizing the session and linking it to the next session
Structure The Training guide is organized by modules and sessions. Each session has:
• A title page with session objectives • A “session-at-a-glance” table with activities, times, and needed materials • Detailed training instructions for the trainer
This manual teaches an approach to improved hygiene that focuses on supportive counseling supported by group activities. There are also several other processes for improving hygiene in

INTRODUCTION
INTRODUCTION
10
communities. More information on these approaches can be found under Websites/Links (Appendix 5) of the manual.
How to Use This Guide and the Outreach Worker’s Handbook The Guide This guide provides easy-to-follow instructions to the trainer on how to conduct the sessions. Before beginning a workshop, the trainer(s) should become familiar with the guide and its contents. The level of detail provided is for those who are less experienced in the field of training. More experienced trainers should feel free to skip over directions they don’t need or to modify recommended training techniques. The sponsoring organization should make decisions on which modules, sessions, and exercises to include or exclude based on: (1) the organization’s and outreach workers’ priority concerns in diarrhea prevention, (2) the acceptability and feasibility of various approaches to diarrhea prevention in the program area, and (3) the trainees’ existing knowledge and capabilities. The trainer(s) should work with the program to incorporate into the training any existing or new educational materials or job aids that the outreach workers will be expected to use. In addition to instructions to the trainers, individual sessions may contain explanatory trainer notes and suggestions about what to say to the participants. This information will typically appear in boxes. At the end of the suggestions for individual sessions are references to various appendices. The guide is keyed directly to the Outreach Worker’s Handbook (given in italics with a page number) as well as to a variety of hygiene-promotion materials found in the Collection of Resource Materials. The Outreach Worker’s Handbook During the workshop the Outreach Worker’s Handbook will be the source of complementary technical information that the trainer can use as s/he sees fit. It also contains a section where the outreach workers (if they are able) can record their reactions, new knowledge, and action planning steps. Following the workshop, the outreach workers will take the Outreach Worker’s Handbook back to their communities. There it will serve as a resource to support them in carrying out their activities. In addition to the complementary technical information and the journal, the Outreach Worker’s Handbook contains several job aids. The job aids are one-page instruction sheets on how to carry out the various demonstrations that are featured as part of the training of community outreach workers, as well as tools to facilitate communication between an outreach worker and a family or small group. Thus, the outreach workers who wish to repeat the awareness-raising demonstrations in the community will have a step-by-step guide for doing so and will not have to rely on their recall from the workshop.

INTRODUCTION
INTRODUCTION
11
Collection of Resource Materials The collection contains samples of the materials (visual aids and other resources) for the training as well as for use by outreach workers in actual programs. The sample materials were developed for specific countries and programs. It is highly recommended that these communication materials be adapted for your specific program. However, this is a significant task that needs to take place before the training is held for outreach workers. The Collection of Resource Materials is linked to the Guide for Training Outreach Workers and the Outreach Worker’s Handbook.
Logistics for the Workshop Carefully select the venue for the workshop so that participants will be comfortable and ready to learn. If possible, have the participants sit at a table (five or six per table) in such a way that they can all see the trainer as well as have face-to-face discussions at their tables. The following diagram illustrates the recommended placement of tables.
.
Visual Aids for Outreach Workers’ Training and Use in the Community This information on adapting visual aids can also be found in the Collection of Resource Materials. Visual aids, whether counseling cards, posters, slides, or other types of illustrations, are designed to facilitate dialogue and learning. Alone, well-designed visual materials can convey information, remind people to do something, and motivate action. Used as an aid to interpersonal communication, they can enhance oral communication and help a mother, family, or group stay engaged. Visual aids should play a key role in training community outreach workers. They can also
Facilitators

INTRODUCTION
INTRODUCTION
12
be important tools that outreach workers use to teach, motivate, and work with people in their communities. The visual aids and other resources for the workshop and for use in the field are contained in the Collection of Resource Materials (sample communication materials on hygiene improvement) that accompanies this manual. The sample materials are referenced in the Training Guide. However, it is highly recommended that program managers and trainer(s) adapt these materials for their training and program. This means not only that the drawings need to be adapted but also that the content of the materials should be adapted. Programs may also want or need to adapt the basic layout and design of the materials so they are easier to use, for example based on how people read: left to right, right to left, or down the page. How literate the outreach workers are will determine if and how much text is included in counseling cards and other materials they will use as job aids. Role and Preparation of Appropriate Visual Illustrations The following information is provided for those who wish to deepen their understanding of the role of visuals and how to create and use effective visual aids as supports for work in the community. As part of the Collection of Resource Materials, a compendium of visual aid materials provides examples of appropriate visual tools for program managers in many different settings. Depending on their quality and appropriateness, visuals can either help or inhibit good communication. While the drawings in the sample materials are generally well done, simply lifting and using those in other cultural settings may not be effective. Although illustration quality is very important for all materials, it is particularly important for “stand-alone materials” such as posters or pamphlets that are viewed independently by community members and not explained or used by an outreach worker to teach and stimulate conversation. In general, both the type of material and its content should be consistent with its purpose. The following table summarizes types of materials and the purposes for which they are most appropriate:
“Correct” Advice Perceptive readers will note that there are small inconsistencies in the “advice” that some of the sample materials convey. While the persons who prepared this Training Guide did assess the best global recommendations regarding hygiene practices, some practices lack full consensus. So it is possible that the persons preparing the various materials either were not aware of the latest technical recommendations or that their advice simply reflects the lack of consensus. This situation makes it imperative that organizations or programs designing or adapting materials check both globally (via the Internet, for example) and locally (with in-country experts) for their technical recommendations.

INTRODUCTION
INTRODUCTION
13
Purpose Types of Materials To facilitate dialogue and problem solving
Counseling cards or flipcharts, divided into sections for (1) assessment of current practices and (2) discussion and joint problem solving regarding new practices (best used by an outreach worker with an individual family member or members); community demonstrations, dramas, festivals, large flipcharts, and scheduled radio programs can stimulate interest, but the key to stimulating changes in practice is to take advantage of that interest by leading good discussions about real problems and possible solutions.
To remind These could be something hanging from the ceiling, posted on the wall, or simply placed strategically to remind people to do certain things. Stickers or tippy taps (Module 3, Session 4) can both remind people to wash hands with soap. Reminder materials are especially important for behaviors that should be repeated many times each day, such as many of the diarrhea-prevention behaviors.
To motivate Motivation is best done person-to-person, but the right poster, film, radio spot, or program can also engage people emotionally. Providing feedback to the community as a whole, e.g., on how many families in their community have improved latrines, can motivate others through “social pressure.” It is important to note that a lot of experience indicates that simply giving people the “facts” about how diarrhea happens and what they need to do to prevent it is not effective for motivating new practices. People need to be engaged emotionally. The new practices they adopt need to satisfy their felt needs (e.g., to be better thought of by their neighbors), not those of public health specialists.
To teach Again this is often done best person-to-person (or by group demonstrations), but posters or pamphlets showing something step-by-step can be supportive.
To provide information
Posters can work fine to inform people of some special occasion, e.g., a community meeting, but they do not have a long lifespan in most community settings. They are not good for conveying complicated information.
The best way to prepare effective and acceptable illustrations is to have an artist work hand in hand with the “target audience” for the illustrations. In selecting an artist, it is paramount that the artist acknowledges that his/her purpose is not to produce beautiful art but rather to create drawings that are attractive, understood, and congenial to the audience. This may mean, for example, that the artist will have to eliminate visual elements such as shadows or lines on a forehead if these confuse the audience. Even certain moods and expressions may not be acceptable. For example, community people may not want to see people who are “too sad” or “too old.” You can only learn such things by working closely with your audience as you develop the materials. The best process is for the artist to go to the field to work with community members. Have him or her visit several communities and go into homes, perhaps taking photos. Have the artist actually work together with groups of mothers to decide jointly how to visually show certain concepts. The artist can do rough drawings and the mothers can react and make suggestions. Once there are draft materials, they should be pretested, at least briefly. Again, pretesting can involve a formal study, but even one day visiting a couple of communities and getting the reactions of various people to the draft materials is very worthwhile. You want to learn about:

INTRODUCTION
INTRODUCTION
14
• How clearly the basic idea is communicated and understood • Relevance and appropriateness to family, community, culture • Believability (Does everything look “right” [realistic]?) • Likes and dislikes, if there is anything offensive • What people believe the material/drawing is suggesting that they do and if they feel they can
do it Remember, you want to ask not only about comprehension and opinions but also about suggestions for improvements. If you are pretesting counseling materials, have a few outreach workers use the materials to counsel mothers or families. Both the workers and the community members should then be interviewed to obtain their reactions and suggestions. Sometimes the program and artist need to compromise between what the audience requests and the potential effectiveness of the material. For example, people often want to see homes, furniture, and other conditions that they aspire to rather than what they currently have. It makes no sense to draw faucets and sinks if people obtain and store their water in ceramic vases. The program and/or trainer(s) should provide sufficient copies of all visual materials and incorporate them into the training.
Determining Workshop Topics The following suggestions are intended to help the managers of the organization or program think through a number of decisions before planning and organizing the training.
• The first decision is whether the program and outreach workers will address all or only some of the three key practices (drinking safe water, safe feces disposal, and hand washing with soap).
Trainer’s Note In addition to the three key practices mentioned in this manual (water, sanitation, and hand washing), there are many other behaviors that affect hygiene. Some of these behaviors include food hygiene, refuse disposal, and home hygiene. Similarly, there are other hygiene-related diseases (skin, eye, and respiratory) that are not mentioned in this manual, which may require the promotion of a different set of hygiene practices.
• A second major program-design decision is whether the organization will simply promote
improved health-related practices or will also provide or facilitate “technologies” that make it easier to carry out these practices, e.g., water containers with a cover and spigot, hand soap, or chlorine drops or tablets to disinfect water. A program does not have to directly provide

INTRODUCTION
INTRODUCTION
15
or facilitate technologies in situations where other organizations are already doing so in the project area. Such a situation holds great potential for collaboration.
• A third decision concerns what options the program and its outreach workers will
promote—options related to both practices and technologies. For example, will the program promote all four acceptable approaches to water purification (treating with chlorine, solar disinfection, filtration, and boiling) or fewer approaches? Will the project promote only hand washing with soap or also hand washing with ash or sand? If the program will promote tippy taps to families that are concerned with having enough water for hand washing, what design and materials will it promote?
Such decisions are key not only for program and training design but also for the design of assessment and joint planning materials that are used for one-on-one or group dialogue and joint planning. How should a program go about gathering information on which to base such decisions? The steps are outlined in Improving Health through Behavior Change http://manoffgroup.com/resources/ProcessGuideWeb.pdf (English) and http://manoffgroup.com/resources/GuiaPractica.pdf (Spanish) as well as other resource books that can be accessed through the websites listed in Appendix 5. At a minimum, the process should include:
• Talking over these issues with other development organizations working in the same region • Interviewing key informants in other organizations, including people like Ministry of Health
(MOH) environmental health technicians • Collecting, reading, and extracting insights from reports and studies
Persons from the organization or program should also spend some time on the ground in communities, either informally observing and chatting with leaders and families about hygiene issues or more formally carrying out in-depth interviews, focus group discussions, and trials of improved practices to learn what people are currently doing and what they are willing and able to do that is better for their health.

INTRODUCTION
INTRODUCTION
16
Workshop Materials (Quantity based on 20 workshop participants)
MATERIALS QUANTITY
Name tents/tags 20 Welcome sign 1 5X8 index cards with national/local statistics 10 x # of tables 5X8 index cards with key practices 3 x # of tables Plastic bottles with clean water and salt 4 Plastic bottle with clean water 1 Plastic bottle with water and some particles 1 Plastic bottle with mildly dirty water 1 Plastic bottle with very dirty water 1 Long piece of hair (or similar object) 1 Local chlorine products (if available) 1-3 Disposable cups 20 Magnifying glass 1 2.5 liter clean, plastic bottle with no label # of tables Water 15 liters Slanted metallic surface 1 Biosand or ceramic filter (if available) 1 Container with tight-fitting lid (e.g. jerry can) 1 Long-handled ladle 1 Spigot 1 Pictures illustrating ways to treat, store, and serve water 1-4 Pitcher of water 1 Washtubs 6 Towels 4 Large tub of mud 1 Extra small pieces of paper 20 Soap dish and soap 1 Tippy tap 1 Stop watch 1 5 liter plastic container with handle # of tables Candle # of tables Matches # of tables Pliers # of tables Tube # of tables Flipchart (easel and paper) 1 box of 4 pads Markers (4 red, 4 black, 4 blue, 4 green) 16 Tape 3 Large tracking sheets 20 Copies of job description 20 Copies of self-assessment form and key 20 Copies of tracking sheets 20 Collection of Resource Materials 20 Outreach Worker’s Handbook 20

INTRODUCTION
INTRODUCTION
17
Menu for Selecting Which Sessions To Do
MODULE/SESSION WATER HAND
WASHING SAFE FECES DISPOSAL
M-1/S-1 – Orientation ● ● ● M-1/S-2 – Introduction ● ● ● M-1/S-3 – Outreach Worker ● ● ● M-2/S-4 – Key Practices ● ● ● M-1/S-5 – Contamination ● M-2/S-1 – Pretreatment ● M-2/S-2 – Chlorination ● M-2/S-3 – Boiling Water ● M-2/S-4 – SODIS Method ● M-2/S-5 – Filtration ● M-2/S-6 – Transporting ● M-2/S-7 – Helping Families ● M-2/S-8 – Water Synthesis ● M-3/S-1 – How to Wash ● ● M-3/S-2 – When to Wash ● ● M-3/S-3 – Water and Time ● M-3/S-4 – Tippy Tap ● M-3/S-5 – Hand Washing ● M-4/S-1 – Dangers ● M-4/S-2 – Disposal ● M-4/S-3 – Latrines ● M-5/S-1 – Interpersonal Com. ● ● ● M-5/S-2 – Discussion Tools ● ● ● M-5/S-3 – Opportunities ● ● ● M-6/S-1 – Action Planning ● ● ● M-7/S-1 – Tracking Progress ● ● ●

GUIDE FOR TRAINING OUTREACH WORKERS MODULE 1: INTRODUCTORY ACTIVITIES
Session 1
SESSION 1: ORIENTATION TO THE TRAINING 18
INTRODUCTORY ACTIVITIES: ORIENTATION TO THE TRAINING WORKSHOP Session Objectives By the end of this session, participants will have: 1. Introduced themselves. 2. Made their expectations for the workshop known. 3. Received a program overview (workshop timing and goals). 4. Established workshop guidelines. 5. Assessed their level of WASH knowledge. 6. Listed topics they would like to practice or learn more about during the workshop.

MODULE 1
SESSION 1: ORIENTATION TO THE TRAINING 19
SESSION AT A GLANCE: Orientation to the Training Workshop Activity Time Materials A. Introductions/Welcome The trainers and participants introduce themselves—organizational welcome.
15 minutes - Flipchart, tape, markers - Name tents - Welcome sign on door or wall
B. Expectations The participants explore their expectations for the workshop.
20 minutes - Flipchart, tape, markers - Outreach Worker’s Handbook
C. Overview The trainers give an overview of the workshop flow, timing, and goals.
10 minutes - Copies of the agenda/objectives for each individual and/or on flipchart
- “Parking lot” chart - Outreach Worker’s Handbook p.
3 D. Guidelines & Objectives The trainer and participants explore workshop guidelines and review the first day’s flow.
20 minutes - Flipchart, tape, markers - Flipchart page with day one
flow
E. Self-Assessment The participants, working individually and with partners, assess their level of knowledge of WASH and record where they’d like to improve.
25 minutes - Outreach Worker’s Handbook or Collection of Resource Materials
90 minutes

MODULE 1
SESSION 1: ORIENTATION TO THE TRAINING 20
PREPARING TO TEACH THIS SESSION: Orientation to the Training Workshop Before you present Module 1, Session 1:
1. Read the session first and note where prewritten flipcharts are needed (welcome sign, introduction points, expectations for the workshop, agenda and objectives, day one’s flow, parking lot*, instructions for completing, correcting, and processing the assessment).
2. Gather supplies: a flipchart easel(s), markers, paper for the easel (no smaller than 2 x 2.5 feet
[60 cm x 75 cm]), tape, and cardboard for name tents.
3. Make copies of the workshop agenda/objectives, one per participant, or put agenda/objectives on flipchart paper written large enough for everyone to see. (To save paper, a copy of the objectives can be found on p. 3 of Outreach Worker’s Handbook.) The trainer and program manager will need to develop a custom-made agenda based on the program they wish to deliver.
4. Make one copy of the WASH self-assessment for each participant and a key for correcting
the assessment. (To save paper, an alternative is to have the participants work in the Outreach Worker’s Handbook pp. 3–5 where there is a copy of the assessment and the key. A copy is also available in the Collection of Resource Materials.)
5. Make sure participants have their Outreach Worker’s Handbook.
6. Have a big, colorful WELCOME sign posted on the wall or training room door.
7. Have name tents or name tags ready for the participants to write their names (what they’d
like to be called during the workshop), either at the tables as they come in, or give them out as participants introduce themselves.
8. List the first day’s activities on flipchart paper with approximate times so the participants
know how day one will flow. (The actual timing and the sessions delivered will depend on the programmatic decisions made by the organization.) The day should include breaks and lunch.
* Parking Lot: A parking lot is a flipchart page hung in the room where everyone can see it and where the trainer records items that are brought up during a session that need to be addressed later.

MODULE 1
SESSION 1: ORIENTATION TO THE TRAINING 21
TRAINING ACTIVITIES: Orientation to the Training Workshop A. Introductions (15 minutes)
1. Welcome the participants and then introduce yourself (if co-facilitating, yourselves). Give enough background information for each trainer to establish professional credibility but without going on too long. Give any essential administrative or logistical information. Briefly explain why the participants are there.
2. Ask the participants to stand and introduce themselves, giving their name, organization, title, and one thing they like to do outside of work that most people don’t know. (Put introduction points on a flipchart, if necessary.)
Trainer Note: Do not let individual participants speak too long about why they wanted to be part of the workshop.
3. Recognize the variety of backgrounds and areas of expertise and congratulate the
participants on their willingness to become outreach workers (or to take on new tasks).
B. Expectations (20 minutes)
1. Explain that even though they don’t know a lot of the details as yet, you would like to ask each participant to record in his/her Outreach Worker’s Handbook on p. 65 (in the space for reflections/conclusions) what s/he would like to learn during the workshop. If writing in the guide is time consuming or difficult because of participants’ comfort in writing, an alternative is to ask the participants to express their expectations while you record them on a flipchart.
2. After a few minutes, go from individual to individual, gathering expectations and recording
them on a flipchart. If there are duplicates, simply show this by using check marks.
Trainer Note: If participants have given their expectations orally, check off those that are mentioned more than once. Hang this flipchart where it can be seen by the participants.
3. Tell the participants as you review the objectives for the workshop and the workshop’s
agenda that they should be thinking whether or not their expectation(s) will be met. Explain that if they don’t see where their expectation(s) will be met, they should raise their hands after the overview of the workshop.

MODULE 1
SESSION 1: ORIENTATION TO THE TRAINING 22
C. Workshop Overview (10 minutes)
1. Pass out the copies of the overall workshop agenda/objectives or post a copy on flipchart paper where everyone can see it. This workshop will enable participants to:
• Describe the national and local WASH situation (using data support) • Define the role and responsibilities of an outreach worker • Describe the three key WASH practices • Explain and replicate in the community the various WASH activities demonstrated
during the workshop • Select and negotiate the best options for improved practices with families in the
community • Demonstrate effective communication skills • Use the appropriate monitoring tools to record their progress • Outline how they will move forward with activities once the workshop is over (prepare
an action plan)
2. Review the objectives and the agenda of the entire workshop. Point out breaks, lunch, and ending time.
Trainer Note: There is no need to go into too many details reviewing the objectives since specific learning objectives will be presented at the beginning of each session.
3. When you have finished the overview, ask the participants to look at their expectations. Ask
if there are any that they feel won’t be met. Give a rationale for those that can’t be met.
Trainer Note: If the participants have brought up an expectation that won’t be met, it is important to explain why. If there are expectations that could be met later, for example outside of class, put them on the parking lot, making sure you get back to the items on the parking lot by the end of the workshop.
4. Explain the role of the Outreach Worker’s Handbook and then have the participants look briefly
at their copies.

MODULE 1
SESSION 1: ORIENTATION TO THE TRAINING 23
Trainer Note: Explain that the Outreach Worker’s Handbook will serve as a technical reference during this workshop and again later when they are doing their sessions in the community. It is also a place where they can record what they’ve learned and their thoughts about being a WASH community outreach worker as the workshop goes forward. If writing in the Outreach Worker’s Handbook is time consuming or uncomfortable for the participants, they should be offered the chance to share their learning, thoughts, and conclusions orally while you or a volunteer participant records them on flipchart. Explain how the Outreach Worker’s Handbook contains both visual aids and resources for the training and for use in the community.
D. Guidelines for the Workshop and Agenda for Day One (20 minutes)
1. Say that for any workshop to be a success, certain guidelines help establish an atmosphere for learning. Ask the participants what guidelines they would like to establish and record these on a flipchart.
Trainer Note: You may need to “jump start” this exercise with a few guidelines of your own. Make sure they explore some of the less obvious guidelines, active listening, for example. Some other guidelines might be: be respectful of different opinions, let each person finish talking, be on time, and turn off cell phones. The trainer may want to cut off discussion because of time constraints.
2. Record and post these in sight.
3. Review the day’s flow using the prepared flipchart.
E. Self-Assessment in WASH (25 minutes)
1. Introduce the self-assessment tool by saying that it is not a test but a way for them to discover aspects of WASH that they might want to make an extra effort to learn about.
Trainer Note: Make sure you emphasize the fact that this is a self-assessment and results will not be shared with others. If participants are unable to do this exercise in writing, read the questions and answer choices out loud, then ask for several participants’ opinions on the correct answers.

MODULE 1
SESSION 1: ORIENTATION TO THE TRAINING 24
2. Distribute the assessment and ask each participant to fill it out. When participants have
finished, distribute the answer sheet or show where it is in the Outreach Worker’s Handbook (p. 6) and have the participants self score. (To save paper, the participants can work directly on a copy of the assessment in the Outreach Worker’s Handbook on p. 3.) If time allows, have the participants work in pairs to discuss their answers.
3. Ask the participants if doing this exercise makes them want to learn more about certain
topics.
4. Finally, have individual participants record in their Outreach Worker’s Handbook on p. 65 (space for conclusions/reflections), two or three specific things they’d like to work on during the training. If it would be easier for the participants, or in the interest of time, this can be done in open group discussion with the trainer recording on a flipchart.
Trainer Note: If writing in the Outreach Worker’s Handbook is not an option, have them report orally while you, the trainer, records the specific reflections on the flipchart, e.g. gain more knowledge about hand washing, improve my communication skills, etc.
5. Remind them that at the end of the workshop, they’ll return to these items to assess how
much they have improved their knowledge and skills during the workshop and to make sure all their answers were, in fact, correct.
6. Link to the next session: an introduction to WASH on the national and local levels. They will
begin to get a picture of the WASH situation in their country and community.

MODULE 1
SESSION 1: ORIENTATION TO THE TRAINING 25
ASSESSMENT TOOL (Handout: Copy in the Outreach Worker’s Handbook)
Please circle all correct response(s). When you have finished, wait for the trainer to tell you what to do. Those questions for which there is only one correct response are marked with *. The other questions may have more than one correct response.
1. Which of the following, when used correctly, makes water safe to drink?
a. boiling it b. adding chlorine or Clorox to it c. filtering it d. disinfecting it in sunlight e. letting particles in the water settle to the bottom
2. What is the best definition of diarrhea?*
a. passing loose or watery stools 3 or more times a day b. passing loose or watery stools once a day c. passing loose or watery stools at least 10 times a day
3. Which of the following water sources may be contaminated?
a. river b. lake c. piped water d. covered, hand-dug well e. borehole f. rain catchment
4. What is the safest way to store drinking water?*
a. in a clay pot b. in a clean oil drum c. in a bucket d. in a container with narrow mouth and lid e. in a container with a tight lid, narrow-neck, and spigot
5. What are the essential things that somebody needs to wash their hands?
a. water b. soap or ash or sand c. running water d. towel
6. If soap is not available, what other products can be used as soap substitutes to
wash your hands?
a. only water

MODULE 1
SESSION 1: ORIENTATION TO THE TRAINING 26
b. cinders/ash c. sand d. bleach
7. When should you wash your hands?
a. before preparing or eating food b. after using the latrine c. after helping a young child use the latrine d. when attending to someone who is sick e. after scratching your head f. after changing a baby’s diaper g. after using your Outreach Worker’s Handbook
8. Which of these can help germs go from person to person?
a. flies b. cup/ gourd used for scooping water out of storage container c. touching d. uncovered containers
9. What is the safest way of disposing of fecal waste?*
a. leaving the waste in the open air b. putting the waste in a covered latrine c. dumping it in a stream d. leaving the waste out in the rain
10. How far should a pit latrine be from a well?*
a. at least 3 meters b. at least 6 meters c. at least 15 meters downhill d. it doesn’t matter
11. When negotiating with a person(s) to help that person(s) adopt a new way of
doing something, it is important to:
a. establish rapport with the person(s) b. ask questions to assess what they are doing now c. let them determine what it is they might do d. present some options e. help them identify barriers for carrying out their new action f. all of the above
12. When talking to a community member about preventing diarrhea, you should
remember to:
a. use appropriate gestures and eye contact b. comment on the listener’s clothes

MODULE 1
SESSION 1: ORIENTATION TO THE TRAINING 27
c. monopolize the conversation to get your point across d. listen carefully to what is said e. all of the above
__________________________________________________________________

MODULE 1
SESSION 1: ORIENTATION TO THE TRAINING 28
Key
Copy in the Outreach Worker’s Handbook p. 6 and in the Collection of Resource Materials.
1. a, b, c, d 7. a, b, c, d, f 2. a 8. all 3. all 9. b 4. e 10. c 5. a, b 11. f 6. b, c 12. a, d

GUIDE FOR TRAINING OUTREACH WORKERS MODULE 1 Session 2
SESSION 2: AN INTRODUCTION TO WASH 29
AN INTRODUCTION TO WATER, SANITATION, AND HYGIENE (WASH) Session Objectives By the end of this session, the participants will be able to: 1. Describe briefly the importance of WASH for combating diarrheal disease. 2. Relate some national and local statistics (or other relevant facts) on diarrheal disease from
their country or community. 3. Describe what the local WASH issues mean for outreach workers, their work, and their
communities.

MODULE 1
SESSION 2: AN INTRODUCTION TO WASH 30
SESSION AT A GLANCE: Introduction to WASH Activity Time Materials A. Introduction: WASH Snapshot Participants get a quick overview of the session and some highlights from the talking points so they understand the importance of WASH.
10 minutes - Flipchart, markers, tape - Talking points prepared ahead
of time on flipchart about the importance of diarrheal disease
B. Large Group Discussion Participants discuss local conditions using the guide questions.
30 minutes - Flipchart, markers, tape - Guide questions on flipchart
C. Conclusions and Summary The participants record conclusions, thoughts, and new information they have learned in their Outreach Worker’s Handbook, and the trainer does a quick summary.
10 minutes - Outreach Worker’s Handbook. - Drawing conclusions task on
flipchart paper - Flipchart page of key points
50 minutes

MODULE 1
SESSION 2: AN INTRODUCTION TO WASH 31
PREPARING TO TEACH THIS SESSION: Introduction to WASH Before you present Module 1, Session 2:
1. Familiarize yourself with some national and especially local statistics (if available). Some excellent sources: the Demographic and Health Survey, the Outreach Worker’s Handbook, WHO websites, documents produced by the country’s Ministry of Health, reports done by other organizations on WASH, and your own organization’s files. Consult with your program manager. See “Some Talking Points” below for suggestions and examples of meaningful statistics to share with the participants. For those wanting even more details, check the various websites listed in Appendix 5.
2. From the menu of questions on p. 34 of this guide in the detailed trainer notes, select the
most relevant ones for your program (and community) and put them on a flipchart, one per page. The discussion stimulated by the questions and the responses should serve to paint a “picture” of the local WASH situation based on the participants’ own observations about what is happening in their community.
3. Be ready to summarize the exercise once the participants have completed their discussion. If
appropriate, talk about the organization’s commitment and/or programmatic focus related to diarrheal disease. This should complement the brief overview given during the organizational introduction in the first session.
4. Remember that the goal of this session is to provide a technical context for the work the
outreach worker will be doing, and not to overwhelm the participants with data. Use statistics and data based on the participants’ ability to deal with this kind of information.
5. Reference p. 65 in the Outreach Worker’s Handbook where they record their thoughts about the
importance of diarrheal disease and what the local information means for them and their communities.
6. Prepare a chart with summary points. You might need some statistics here. 7. If appropriate use the following talking points to make some introductory remarks about the
importance of combating childhood diarrheal disease.

MODULE 1
SESSION 2: AN INTRODUCTION TO WASH 32
SOME TALKING POINTS: Introduction to WASH Introduction to Diarrheal Disease and Children’s Health Diarrheal diseases take a tremendous toll on children and their families in developing countries. “Diarrhea is one of the biggest killers of children under five worldwide, accounting alone for 17% of deaths in this age-group” (IYS Advocacy Kit, UN-Water 2008, Talking Points). Diarrhea kills children when it causes them to lose so much water that their vital organs can no longer function. This is called “dehydration,” which means losing water. Diarrhea affects children’s nutritional status, how mothers spend their time, how much time pupils are absent from school, household expenses for treatment as well as the cost of lost work, wages, and productivity. It is estimated that 80 percent of all cases of diarrhea can be attributed to three major causes (WHO 2008*):
• Inadequate sanitation • Poor hygiene • Unclean water
There are numerous ways that the germs that cause diarrhea can enter a person’s body:
• Fluids (through contaminated water) • Fields (resulting from defecation outdoors) • Flies (transmitting disease) • Fingers (dirty hands to mouth) • Food (infected by fluids, flies, or fingers and then ingested)
Certain hygiene practices have been proven to have the greatest potential for preventing diarrhea. These so-called key practices are:
• Safe disposal of feces • Correct hand washing • Safe drinking water
Studies show that, when performed correctly and consistently, each of these key practices can reduce diarrhea cases by 20 percent to 50 percent. Correct hand washing in particular has also been shown to prevent many cases of respiratory disease. Almost one-tenth of the global disease burden (not limited to diarrheal diseases) could be prevented by improving water supply, sanitation, hygiene, and management of water resources (*Prüss-Üstün, A., Bos, R., Gore, F., Bartram, J. 2008. Safer water, better health: costs, benefits and sustainability of interventions to protect and promote health. Geneva: World Health Organization.)

MODULE 1
SESSION 2: AN INTRODUCTION TO WASH 33
TRAINING ACTIVITIES: Introduction to WASH A. Introduction to the Session (10 minutes)
1. State that in the previous session, participants learned a little about the training program they
are about to go through, and they took a self-assessment quiz to determine their present levels of knowledge about WASH. Explain that in this session, they will get a brief overview of the national and local situations with regard to diarrheal disease so they can better understand the significance of their work as WASH outreach workers.
2. State that diarrheal disease (diarrhea) takes a terrible toll on children and that over a million
children die each year from diarrhea-related diseases. By improving the way we properly dispose of our waste (feces), by doing a better job of washing our hands, and by drinking safe water, we can greatly reduce the number of deaths due to diarrhea.
Trainer Note: If appropriate for the audience, insert a few national and local statistics here, if such data are available. Examples of local statistics could be: • % of children under five who had diarrhea in last two weeks • Rank and % of diarrhea as a cause of childhood deaths • % of households with a safe sanitary solution (latrine, etc.) • % of households with “access to water” (within a 15 minute
walk) and/or % that treat their drinking water • Any data on hand washing (% of households with soap)
Refer to p. 7 in the Outreach Worker’s Handbook for more information. Useful links for finding local and national statistics are also available in Appendix 5.
B. Large Group Discussion: The Local WASH Situation (20 minutes minimum)
1. Tell the participants they are going to discuss the local WASH situation by looking at some
questions.
2. Open the discussion by revealing the first question on the flipchart and continue for as long as appropriate. Under each question, record the highlights of the discussion so that at the end of the time, you have a more or less complete picture of the local WASH situation.

MODULE 1
SESSION 2: AN INTRODUCTION TO WASH 34
Diarrhea Questions:
• Is diarrhea common among children in your community? • Are there more cases during certain times of the year? • If so, when does the number of cases increase? • Why do you think that the number of cases increases at certain times of the year? • Are you aware of children in your community who have died from dehydration/
diarrhea? If so, tell us about it.
Water Questions:
• Where do most people get their water? • How do they carry their water from the source? • How do most people store their water at home? • Do people treat the water in any way before drinking it? If so, how? • Are there times of the year when water is scarce? • How many different ways do people treat their water? (e.g. bleach, filters, boiling,
sunlight, etc.)
Feces Disposal Questions:
• Where do most people go to relieve themselves? • How do mothers dispose of their children’s feces? • Do people relieve themselves near wells? • How do most people manage animal feces near or in their houses?
Hand Washing Questions:
• How often do people wash their hands? • When are people most likely to wash their hands? • What do they use? • Do most houses have soap? • What do people do when soap is not available? • What do people do when water is scarce?
B. Large Group Discussion: Implications (10 minutes)
1. In your own words, talk again about the importance of combating diarrheal disease (diarrhea) both nationally and locally. Use the information from the above discussion to illustrate your points.
2. Now ask the participants what the local information implies for them, their families, and their communities. Have them begin to think about some of the conditions, issues, and problems that exist locally with regard to access to potable water, correct hand washing, and

MODULE 1
SESSION 2: AN INTRODUCTION TO WASH 35
proper disposal of human waste. If time permits, record some of these implications on the flipchart. Keep these posted as reminders for the duration of the workshop.
Trainer Note: The participants will have the chance to make more specific WASH observations during the sessions to follow. Remember this is a “first impressions” discussion. Care should be taken not to feel the need to defend or correct any of the observations made in response to the questions.
C. Conclusions and Summary (10 minutes)
1. Ask the participants to turn to p. 65 in the Outreach Worker’s Handbook. Have the following task on flipchart paper: Looking back at the answers to the discussion questions, which are posted on the flipcharts:
• Write down two or three things that you learned during this exercise. • What do you want to remember about local WASH conditions when you’re working
as an outreach worker with individuals, families, and community groups?
Trainer Note: If participants are uncomfortable with writing, this summary exercise may be done orally while you record answers on a piece of flipchart paper.
1. Summarize or ask for volunteers to summarize some of the key points especially with regard
to local WASH conditions. (You will need some local information.)
Summary Points: • Globally diarrhea causes over a million deaths per year. • Nationally, diarrhea causes (fill in number) deaths per year. • Locally, diarrhea causes (fill in number) illness per year. • Based on the discussion, some important WASH issues for our community are….
Trainer Note: Tell the participants that they should be ready to propose summary points for some of the following sessions. It is less passive and will help them remember the essential points.
2. Transition to the next session by saying that they will begin to learn more about their specific
roles and tasks as outreach workers, having received this overview of the WASH situation.
GUIDE FOR TRAINING OUTREACH WORKERS MODULE 1 Session 3
SESSION 3: THE ROLE OF THE OUTREACH WORKER 36
THE ROLE OF THE OUTREACH WORKER Session Objective By the end of this session, the participants will be able to: 1. Describe in general terms their roles and duties as WASH community outreach workers in the
context of their organization’s present programs.

MODULE 1
SESSION 3: THE ROLE OF THE OUTREACH WORKER 37
SESSION AT A GLANCE: Role of the Outreach Worker Activity Time Materials A. Large Group Brainstorm Participants brainstorm what it means to be a facilitator as distinct from a trainer.
10 minutes
- Flipchart, tape, markers
B. Large Group Work Participants read the job description of a WASH outreach worker.
10 minutes
- Outreach worker job description developed by the program manager on flipchart
- Options: Make copies or use Outreach Worker’s Handbook
C. Large Group Discussion Participants brainstorm questions they might have after reading the job description.
15 minutes
- Flipchart, tape, markers
D. Summary
10 minutes - Prepared summary chart
45 minutes

MODULE 1
SESSION 3: THE ROLE OF THE OUTREACH WORKER 38
PREPARING TO TEACH THIS SESSION: Role of the Outreach Worker Before you present Module 1, Session 3:
1. The programs that outreach workers work with are dedicated to improving a range of conditions, including families’ incomes, agricultural productivity, social conditions, health status, and WASH conditions. Examine (or work with program staff to create) a job description of the outreach workers you are training. Then work with the project team to adjust the job description by adding or otherwise incorporating new or altered tasks that will allow the workers to effectively address WASH.
2. Once you’ve decided what tasks apply to your outreach workers, prepare a summary on a
flipchart. Possible Tasks for Outreach Workers Related to Improving WASH
The following tasks are related to improving WASH and may not include broader responsibilities that the outreach workers in your program have. Considering only their duties related to WASH, select tasks relevant for the outreach workers of your program. Use those tasks to develop your program’s own job description or incorporate them into your outreach workers’ existing job description.
• Facilitate assessments of the WASH situation in the community using participatory exercises such as leading discussions of photos or drawings, creating a WASH map, leading a walk focusing on hygiene, or coordinating a community hygiene baseline survey.
• Advocate with community leaders and influential people to support WASH improvements. • Help establish, support, and participate in a community health committee that focuses on or
addresses WASH issues. • Help establish, support, and participate in a community water committee (which monitors
and/or maintains and repairs the water system and collects fees). • Liaise with resource organizations: local health facilities, NGOs, private companies, and
manufacturers and distributors of sanitation-related technology, hand washing, and water treatment supplies.
• Conduct regular home visits/counseling on diarrhea prevention, consisting of an assessment
of current conditions and practices and joint problem-solving to assist with improvements.

MODULE 1
SESSION 3: THE ROLE OF THE OUTREACH WORKER 39
• Lead participatory group discussions on WASH issues.
• Put on demonstrations to teach WASH-related actions (e.g., how to wash hands properly, how to construct a latrine, how to chlorinate water correctly).
• Organize events to promote improved WASH practices (health fairs, school-based WASH
activities, contests, public demonstrations, etc.). • Monitor or manage monitoring of WASH practices and conditions.
TRAINING ACTIVITIES: Role of the Outreach Worker A. Large Group Work: Brainstorm (10 minutes)
1. Review the main points from sessions one and two and remind the participants that they will be spending time as WASH outreach workers and that the goal of this workshop is to get them ready to perform that role. Say that in the last session they learned about the importance of combating diarrheal disease (diarrhea), especially locally, and that they talked about some of the local WASH conditions that they might address as they go into the community. They did this by answering and discussing some specific questions, which are posted on the wall.
2. Ask the participants to quickly brainstorm “what it means to be a facilitator rather than a trainer.” Record their responses on a flipchart. Use the notes below to discuss some of the differences very briefly. Tell the participants that they will be acting more as facilitators with the members of the community rather than educators. Also note that facilitating requires more skills than simply giving people information, but that the results are worth the effort.
Trainer Note: A traditional trainer views the job as telling people information, and a participatory trainer sees the job as drawing out as much information and ideas from participants as possible before providing any key points that were missed. Facilitation means guiding experiential, participatory activities rather than talking to passive participants. It also means, in this program, that outreach workers will interact with their audiences to help them make their own best choices rather than just imparting knowledge. For the purposes of this workshop and related to the tasks of the outreach workers, the terms facilitation and joint planning seem most appropriate for what the outreach workers “do” with their audiences, remembering the overall goal is to promote healthy practices by addressing some of the causes of diarrhea.
MODULE 1
SESSION 3: THE ROLE OF THE OUTREACH WORKER 40
B. Large Group Work (10 minutes)
1. Ask for a volunteer (s) to read aloud the WASH tasks for an outreach worker (as amended by the program).
C. Large Group Discussion (15 minutes)
1. Ask the large group to tell you what questions they have about their roles as outreach workers/facilitators. Record these on a flipchart. Explain that they will come back to these questions at the very end of the workshop and that by that time, many will be answered. Post the questions prominently so they are visible during the workshop. These questions might be posted next to the conclusions they drew about local WASH conditions in the areas where they will be working.
2. Close the session by saying that now they have a general idea of what they’re expected to do, they will be spending the next couple of days getting ready. Say that they will have time together to learn technical information about WASH and will explore the Outreach Worker’s Handbook and a Collection of Resource Materials that will help them in the field.
D. Summarize the Key Points (10 minutes) Summary Points:
• Being a facilitator/outreach worker is different than being a trainer/educator. • A WASH outreach worker’s job is to help people decide how to adopt healthier
behaviors, activities, and practices in the community to prevent diarrhea. • The outreach worker plans together with the audience rather than telling them what
to do.
Trainer Note: If appropriate, ask a participant to summarize the key points. This technique can be used for any of the sessions. (This note will not be repeated.)
Thank participants for their participation and mention that in the next session they will be introduced to the best key practices for preventing diarrheal diseases in their communities.

GUIDE FOR TRAINING OUTREACH WORKERS MODULE 1 Session 4
SESSION 4: KEY PRACTICES FOR PREVENTING DIARRHEA 41
KEY PRACTICES FOR PREVENTING DIARRHEA Session Objectives By the end of this session, the participants will be able to: 1. Describe the three key practices for reducing diarrheal disease. 2. Describe their role in helping people adopt healthy water, sanitation, and hand washing
behaviors.

MODULE 1
SESSION 4: KEY PRACTICES FOR PREVENTING DIARRHEA 42
SESSION AT A GLANCE: Key Practices, Improved Health, Diarrhea Prevention Activity Time Materials A. Re-introduction The trainer, referring to the previous discussion on WASH, re-introduces the concept of 3 key practices from session 2.
10 minutes - Flipchart, markers, tape, and flipcharts with each key practice on a page
- Outreach Worker’s Handbook for information on 3 key practices
B. Large Group Discussion/Brainstorm The participants learn key practices and some ways to achieve them.
15 minutes - Information in the Outreach Worker’s Handbook on 3 key practices
- Pictures for the example (if needed)
- Collection of Resource Materials C. Revisiting the Brainstorming Trainer complements the information offered by the participants during the brainstorming.
20 minutes - Discussion tools for demonstration
D. Review and Summary Participants review the outreach worker job description and go over a summary of the session.
10 minutes - The outreach worker job description from previous session
55 minutes

MODULE 1
SESSION 4: KEY PRACTICES FOR PREVENTING DIARRHEA 43
PREPARING TO TEACH THIS SESSION: Key Practices, Improved Health, Diarrhea Prevention Before you present Module 1, Session 4:
1. Read the entire session and prepare any flipcharts (for example, one key practice per blank flipchart page for hanging).
2. Gather all necessary supplies.
3. Remind the participants to have their Outreach Worker’s Handbook and Collection of Resource
Materials handy.
4. Refresh your own memory regarding the three key practices. This session serves as a more concrete introduction to the ways in which the outreach workers can encourage important preventive practices.
5. Have the discussion tools available for demonstration.
6. Be ready to point out where in the Outreach Worker’s Handbook participants can record
additional information about their roles.
7. Prepare a summary chart of the key points made during the session.
TRAINING ACTIVITIES: Key Practices, Improved Health, Diarrhea Prevention A. Re-introduction of the Three Key Practices (10 minutes)
1. Briefly revisit the discussion on the national and local WASH contexts by highlighting two or three of the important WASH issues faced in the community. Go back, if appropriate, to the flipcharts generated earlier in session 2. Tell the participants that they will be helping their communities by motivating and facilitating individuals, families, and groups to take steps necessary to carry out the three key practices in a way that will protect their children’s and families’ health.

MODULE 1
SESSION 4: KEY PRACTICES FOR PREVENTING DIARRHEA 44
2. Refer back to session 2 to the conclusions about WASH generated by the participants. Re-introduce and explain the three key practices. If appropriate, have the participants read aloud the important points about each of the key practices.
Trainer Note: The three key practices are: 1) correct washing of hands with soap; 2) proper disposal of feces; and 3) treating, storing, and retrieving water so it’s potable (safe to drink). The goal of a key practice is to reduce the incidence and consequences of diarrhea and other illnesses. Achieving all the key practices can have a tremendous impact on reducing diarrhea. Taking small steps toward achieving the key practices can also have a positive impact. Additional information regarding key practices can be found in the Outreach Worker’s Handbook.
It should also be noted that there are many other hygiene-related behaviors that are not covered under that three key practices in this manual. Such behaviors include: peeling and washing fresh food before eating, heating or reheating cooked foods at a high temperature before eating, keeping flies off food, and never consuming animal products that have been improperly stored or insufficiently cooked.
B. Key Practices and How to Achieve Them: Brainstorming (15 minutes)
1. Put the prepared key practice flipchart(s) on the easel. Ask the participants to think of the basic things that families can do to achieve each key practice.
2. Record these suggestions as the group offers them. This is a brainstorming session, so accept all answers.
Trainer Note: For the key practice of drinking and using potable water, the water should be: 1. Treated using chlorination, filtration, sunlight (SODIS), or boiling. 2. Transported properly. 3. Stored safely. 4. Retrieved and served in ways that avoid recontaminating it.
For the key practice of correctly washing hands: 1. Soap (or another cleaning agent) should be used. 2. The person should rub fingers and hands together well (for 20
seconds if possible). 3. The hands should be rinsed with flowing water. 4. The hands should be air-dried or dried with a clean cloth,
although clean cloths are often not available. 5. The hands should be washed at key times: after defecation or
contact with feces, before eating or preparing food.

MODULE 1
SESSION 4: KEY PRACTICES FOR PREVENTING DIARRHEA 45
For the key practice of safely disposing of feces: 1. All feces (including that of infants and young children) should
be put into a latrine and then the opening covered, and the latrine should be kept clean of fecal matter, OR
2. The feces should be deposited in a hole and then covered with dirt (less preferred but also acceptable).
3. Say that sometimes it is not possible for an individual, family, or group to do everything that is
necessary to achieve the key practice right away. They may not have the resources, for example.
4. Give the following example in your own words. If appropriate, support your example with
some pictures or drawings.
5. To reduce the risk of recontaminating treated water, the very best way is to store it in a narrow-neck container with a tight-fitting lid and a spigot. However, some families cannot afford to buy such a container or they are not available in the local market, so it is important to discuss with these families what they might be able to do to improve the way they currently store water. For instance, if they currently store their water in an open container (such as a big pot), a slightly safer (although not ideal) alternative is to keep a lid on the pot. This is not ideal because it is very easy to recontaminate the water by touching it with a dirty cup/bowl and fingers when serving the water. Retrieving the water using a ladle (long handled scoop) that is hanging inside the water container is recommended. An even safer alternative would be to store water in a narrow-neck container (like a clean jerry can) with a lid. Then people cannot dip anything into the water, thus reducing the risk of recontamination. Using the “Mikikir” (counseling) card for hygiene and sanitation p. 39, row E, in the Outreach Worker’s Handbook, draw or show the different options for storing water. Discuss which options are most likely and least likely to lead to contamination.
6. Use the narrative below to continue to shape the job description. If the participants are already
experienced outreach workers, lead a discussion about how they currently help their audiences to adopt new behaviors, emphasizing the important points. If the participants are relatively new to outreach work, put important talking points on the flipchart.
7. Tell the participants that the job of an outreach worker is to ask questions and make
observations about what each group, family, or individual is currently doing and to help them select “small doable actions” (which are also referred to as “improved practices”) that will move them closer to achieving the key practice. The individual or family members must be both willing and able to perform the new practice(s).
8. As an outreach worker, you should be aware that many factors enter into the picture when it
comes to adopting new ways of doing things. Part of the job is to discover what some of those factors are and to reduce the number of barriers that stand in the way. For example, individuals who want to adopt a new practice will be surrounded by people who may or may not be supportive of their efforts, such as neighbors or family members. There may be cultural barriers, such as a strong belief that men and women should not share the same latrine. Your job is to make it as easy as possible for individuals to do something new. If the individuals or

MODULE 1
SESSION 4: KEY PRACTICES FOR PREVENTING DIARRHEA 46
family members are unable to implement a suggested new practice, you can help them find something they can do that will move them closer to the key practice. You will have the chance to explore how to do this in future sessions.
C. Revisiting the Brainstorming (20 minutes)
1. Using the flipchart sheets where the participants’ suggestions on how to implement the key practices are recorded, revisit each one and make sure the suggestions are correct. Ask the group to comment on any idea that does not seem a step in the right direction. Add any items that are missing. Post these.
2. Ask the participants to look at the charts from session 2 with their description of local conditions. Lead a quick discussion about which of the key practices are priorities in their particular communities.
3. Leave the flipcharts on the wall so that the participants can see them.
4. Introduce the discussion tools by telling the participants that they will use these tools when they are working with their community members. The discussion tools will help them and their audiences identify what’s happening now and what new practices they might undertake. The tools also serve as a way to track changes as people move toward adopting new and better practices on their way to achieving the key practices. The following discussion tools are found in the Outreach Worker’s Handbook. See p. 35 for assessment of feces disposal, see p. 34 for assessment of hand washing, and see p. 33 for assessment of water source and storage.
5. Tell the participants that they will have the chance to practice using the cards later in the workshop.
D. Review of the Job Description and Summary (10 minutes)
1. Remind participants that their job is to help their audiences (individuals, families, and groups) do things differently, which will lead toward achieving a key practice. All of this is to prevent diarrhea. Ask them if they have any questions about their job.
2. Summarize Key Points (using a prepared flipchart page).
Summary Points:
• The three key practices • Their job is to help individuals improve their health by changing behaviors and
thereby reducing diarrhea • The discussion tools will help them with their tasks
3. Tell them that in the next sessions they are going to explore ways to make water safe to drink.

GUIDE FOR TRAINING OUTREACH WORKERS MODULE 1 Session 5
SESSION 5: THE CONTAMINATION CYCLE 47
THE CONTAMINATION CYCLE AND DIARRHEA Session Objectives By the end of this session, the participants will be able to: 1. Describe the contamination cycle.
2. Describe the connection between contamination and diarrhea.
3. Classify practices related to diarrhea as positive, negative, or neutral.
4. Optional: review some common local practices contributing to water contamination.

MODULE 1
SESSION 5: THE CONTAMINATION CYCLE 48
SESSION AT A GLANCE: Contamination Cycle Activity Time Materials A. Introduction Participants make the linkage between the previous session and this one. Review session objectives.
5 minutes - Flipchart, tape, markers
B. Climate Setters Participants engage in two exercises that help them to see that even “clear” water might be contaminated.
10 minutes + 10 minutes
- 4 plastic bottles with clean water and a large measure of salt
- 1 plastic bottle or glass with water; one long hair (or other long thin object like a blade of grass)
- Feces sample C. Large Group Activity Participants classify practices as positive, negative, or uncertain.
30 minutes - 3 flipchart pages marked with positive, negative, uncertain faces
- Illustrations–Collection of Resource Materials
D. Demonstration Trainer uses the “contamination cycle” poster with labels to explain how germs travel and the consequences followed by a discussion of local situation.
20 minutes - Labeled poster of the contamination cycle
- If local data are available, put on poster
E. Reading in the Outreach Worker’s Handbook Participants read aloud about diarrhea.
10 minutes - Outreach Worker’s Handbook (more about diarrhea)
F. Drawing Conclusions and Review Participants record new information they have learned and future plans in the Outreach Worker’s Handbook and trainer summarizes key points.
10 minutes - Outreach Worker’s Handbook - Prepared summary page
95 minutes

MODULE 1
SESSION 5: THE CONTAMINATION CYCLE 49
PREPARING TO TEACH THIS SESSION: Contamination Cycle Before you present Module 1, Session 5:
1. Gather all materials (four clean plastic bottles filled with potable water; salt; a sample of feces; one bottle or glass with water in it; and one long, very thin object such as a human hair, blade of grass, or piece of thread). In two of the four bottles, dissolve lots of the salt so that the water is still clear but very salty to the taste.
2. Have three posters (on A4 or 8 1/2 x 11 paper) ready with the following titles: Diarrhea, No
Diarrhea, and Uncertain. On the “diarrhea” sheet, draw a sad face, for the “no diarrhea” sheet draw a happy face, and for the “uncertain” sheet use a face with a horizontal line for the mouth. Tape these up in the room so that they aren’t visible to the participants.
3. Prepare the illustrations of positive, negative, and uncertain behaviors. Examples can be
found in the Collection of Resource Materials in the section labeled Module 1, Session 5. 4. Mark p. 14 in the Outreach Worker’s Handbook, which provides more detail about diarrhea. 5. Prepare two posters for the routes of contamination, one with labels and one without. A
sample poster can be found in the Collection of Resource Materials and p. 41 in the Outreach Worker’s Handbook.
6. Prepare a flipchart page with key points to summarize at the conclusion of the session. 7. Optional: review any information from Module 1, Session 4 that describes common local
practices such as where children of different ages defecate and what happens to the feces afterwards.
MODULE 1
SESSION 5: THE CONTAMINATION CYCLE 50
TRAINING ACTIVITIES: Contamination Cycle A. Introduction to the Session (5 minutes)
1. Introduce this session by saying that in the last four sessions participants learned about the workshop itself, received some information about the importance of WASH, began to sort out their roles, and in the last session looked at the three key practices and how they will help people in their communities adopt new behaviors.
2. Continue by saying that in this session, participants are going to begin to explore the WASH
themes they will be addressing in their community: water, safe feces disposal, and hand washing.
Trainer’s Note: Explain that not only will they be learning all about hygiene but they will also have the chance to actually experience the very same activities they will carry out in their own communities.
3. Say that by the end of this session, they should be able to describe the contamination cycle
(the various pathways that germs follow to get inside people and cause diarrhea), including the connection between the contamination of water and diarrhea. They should also be able to conduct the salt and the hair demonstrations in the field.
4. Say that they should remember that the goal is to create awareness about the three key practices and to help their audiences adopt better ways (practices) of ensuring they have potable water, that they are washing their hands properly, and that they are disposing of feces in a safe way. The purpose of these activities is to get people thinking about the key practices and what they are presently doing. In general, these activities are most appropriate prior to having more personal interactions with a smaller group of community members using the discussion tools.
B. Climate Setter One (10 minutes) Part One: Salty Water—Clear but Unpleasant
1. Show the participants the two bottles of water, one with dissolved salt in it. Ask them to look closely and see if they can tell any difference between the two. Take a couple of responses.
2. Ask for two volunteers to come forward. Show the two bottles again one at a time (salty and not salty) to the participants and ask them to raise their hands if they think the water in both bottles is “safe” to drink. Ask why.

MODULE 1
SESSION 5: THE CONTAMINATION CYCLE 51
3. Pour some of the not-salty water in two glasses. Now ask the volunteers to drink. Have the
participants watch their faces. Pour some of the salty water into two glasses and ask the volunteers to drink. Again, have the participants watch their faces.
4. Reinforce the point that although water may appear clean, clear, and safe, it can contain things that you can’t see that can make people ill.
Trainer Note: You might want to introduce the local term “small bugs” or its equivalent if the word “germ” is not understood. In some areas, the words “dirt” or “dirtiness” work.
Part Two: Clear but Contaminated
1. Tell the participants that they are going to continue to look at water and possible ways it can become contaminated but still not look harmful.
2. Place the sample of the feces where everyone can see it. Hold one end of the hair, thread, or
blade of grass in each hand and run it through the feces. Put the hair (or blade of grass) into the glass of water and then remove it.
3. Ask for a volunteer to drink the water—only to see their reaction. DO NOT ALLOW
ANYONE TO CONSUME THIS WATER.
4. Conduct a discussion of the group’s reaction and stress that although the water looked clear, it is, in fact, contaminated with feces and that this is the reality in many of our communities —the water looks clean and clear (from the well, river, borehole, tap), but it has feces in it.
Trainer Note: Be careful handling the feces—avoid touching it with your hand! Also, if this activity is not culturally appropriate, feel free to substitute using feces for other kinds of things that make water “dirty” like dirt. If you do choose to use a substitution, the idea that feces and open defecation leads to water contamination must still be discussed.
C. Large Group Activity: Classifying Practices/Actions (30 minutes)
1. Tell the participants that you are going to show them pictures (sample pictures located in the Collection of Resource Materials). Say that some of the pictures depict positive actions against diarrhea; some are negative ones that could put people at risk of getting diarrhea; and some actions you might be uncertain about (they may or may not lead to diarrhea). Tell them that as you show the pictures, they should go stand under the poster that they think best indicates how they feel about the picture.

MODULE 1
SESSION 5: THE CONTAMINATION CYCLE 52
Trainer Note: Once everyone is under a poster, ask one person from the group to explain why s/he chose that poster. It is important to realize that although a picture may be considered “positive,” “negative,” or “uncertain,” there can be scenarios in which a practice might fit into another category. For example the picture of the kettle with boiling water is usually categorized as “positive” because boiling water kills germs. However, boiled water can easily become contaminated again (so a participant could choose to stand under the “uncertain”/ “straight mouth face” sign). It is not necessary for all participants to agree. What is important is that everyone understands which practices in each picture can protect a person against diarrhea or increase the risk of getting diarrhea.
2. Repeat with as many of the pictures as time allows. Move quickly but encourage discussion.
D. Demonstration with the labeled “Contamination Cycle” poster (20 minutes)
1. Show the Contamination Cycle poster (see Collection of Resource Materials, Module 1, Session 5) to the participants so that everyone can see it and review the key ideas:
• The cycle starts with people defecating in the open. • The feces spread out on the ground and contaminate food crops, people, and
animals. • Feces on the ground attract flies and flies contaminated with feces land on food that
people eat. • Feces on the ground may be spread by rain or other water. • People who do not wash their hands after using the toilet spread germs. • Feces in the soil often contaminate the water supply and then we drink contaminated
water.
2. Then lead a discussion about local sources of water. If local data are available, display the charts.
• Where do most families get their water? • Could there be contamination even if the water appears “clear and clean”? • What might be some of the community sources of contamination? • What are their observations about how significant a problem diarrhea is?
3. Ask the group if they think children’s feces or adult feces have more germs or contamination
that cause diarrhea. After responses, explain that children’s feces have more germs in them and are therefore more dangerous.

MODULE 1
SESSION 5: THE CONTAMINATION CYCLE 53
E. Reading More about Diarrhea (10 minutes)
1. Have the participants turn to p. 14 in the Outreach Worker’s Handbook. Ask for a volunteer(s) to read aloud. Explain that they should not memorize this information but should know where to find it in the handbook. Emphasize that they SHOULD NOT read this information when conducting sessions in their communities.
What is diarrhea? Liquid bowel movements that occur more than three times a day. Why do we get diarrhea? Because germs enter our body. How do germs enter our body? • When we consume food contaminated with feces (because the food has been
contaminated by someone’s hands, flies, water, soil, or was not well washed). • When we drink untreated water. • When we eat with dirty hands. • When children put their dirty hands in their mouths.
Why is diarrhea dangerous? Continuous diarrhea causes a loss of liquid in the body, resulting in dehydration and malnutrition. Who gets diarrhea and who does it affect the most? Children under five years of age are affected most. Old people and people who are already weakened by an illness (such as HIV/AIDS or cancer) are also very vulnerable to diarrhea. It is dangerous because the person with diarrhea can become dehydrated very quickly and die.
2. Ask if anyone has any questions.
F. Conclusions and Review of Key Points (10 minutes)
1. Have the participants turn to p. 66 in their Outreach Worker’s Handbook. Have them answer the questions:
• What have you learned today about diarrhea and the contamination cycle? • Are the salt and hair activities something you might be able to do in your
community? • What might you have to change so that your participants grasp the concepts? • How might the demonstrations help your participants change their behavior?
Trainer Note: This exercise can also be done orally.

MODULE 1
SESSION 5: THE CONTAMINATION CYCLE 54
Summary Points:
• The cycle starts with people defecating in the open. • Feces can be spread through the ground to contaminate food crops, people, and
animals. • Feces on the ground attract flies and flies contaminated with feces land on food that
people eat. • Feces on the ground may be spread by rain or other water. • People who do not wash their hands after using the toilet spread germs. • Feces in the soil contaminate our water supply and then we drink contaminated
water.
2. Tell them that in the next session, they are going to look at “dirty” water and ways to make it look clean. However, such “pretreatment” does not make water safe to drink. Even after pretreatment, people should treat the water in another recommended way before drinking it.

GUIDE FOR TRAINING OUTREACH WORKERS MODULE 2: MAKING WATER SAFE TO DRINK
Session 1
SESSION 1: PRETREATMENT 55
PRETREATMENT Session Objectives By the end of this module, the participants will be able to: 1. Describe the different types of “dirty” (unclear/muddy) water and local names.
2. Describe the four methods for pretreating water by making “dirty” water clear (but not
drinkable/potable).
3. List advantages and disadvantages of the different methods for making dirty water clear but not potable.
4. Identify community barriers to implementing the four methods.
Water Clarity/Turbidity: Water that is cloudy or has tiny visible particles (water that looks dirty) is called turbid. If turbid water is not an issue in your location, you can skip this session. If there is a problem with turbidity during all or part of the year (for example, in the rainy season), and you do include this session, be sure to explain clearly that pretreatment or clarifying water is a preliminary step that improves water clarity but does not yet make it safe to drink. Only include the pretreatment methods that are used or are available in your area. After clarifying turbid water, people still need to treat it using one of these four methods: boiling, filtering, chlorinating, or using solar disinfection.

MODULE 2
SESSION 1: PRETREATMENT 56
SESSION AT A GLANCE: Pretreatment Activity Time Materials A. Introduction to the Session 5 minutes
- Flipchart, tape, markers
B. Climate Setter Participants look at some samples of “dirty” water and talk about their own water, local words, etc.
10 minutes
- Samples of water in clear bottles: clear, some particles, quite “dirty” and chocolate-y, etc. (at the discretion of the trainer)
C. Large Group Discussion Participants talk about local methods for dealing with dirty water and trainer outlines 4 methods.
20 minutes
- Flipchart, tape, markers - Posters you prepare with 4
methods, 1 method per poster
D. Small Group Work Participants look at poster and discuss advantages and disadvantages of the various methods and which ones might work with their communities. Discuss barriers to pretreatment.
20 minutes
- Prepared flipchart page with methods and pros and cons columns for each method
- Markers and tape - Posters with methods - Flocculants if available
E. Table Work (Optional) Participants experiment with different methods.
30 minutes - Materials depend on which methods the tables will explore
F Reading, Conclusions, and Review The participants answer questions about what they’ve learned.
20 minutes - Outreach Worker’s Handbook for conclusions
- Outreach Worker’s Handbook for more information
- Prepared summary page
105 minutes with optional activity, 75 without

MODULE 2
SESSION 1: PRETREATMENT 57
PREPARING TO TEACH THIS MODULE: Pretreatment Before you present Module 2, Session 1:
1. Decide whether or not this demonstration is relevant for your area. It may be that “dirty-looking water” is not a problem. The session can also be done with one or two types of dirty water since the major objective is to learn about the different methods of making dirty water clear, which is the first step in making it safe to drink.
2. Carefully gather and store all needed materials before the session.
3. Collect samples of local water (or make them by mixing water and dirt) in clear, small
containers: clear water; water with floating debris; cloudy water (with some dirt/particles floating in it, but you can still sort of see through it); and muddy water (so dirty/muddy that it looks like hot chocolate, coffee, dark tea, or cocoa). Keep containers hidden until you are ready to show them to the participants in the climate setter. The selection of water samples will depend on local conditions, so the trainer should choose appropriate samples to use.
Investigate if flocculants (“settling-out agents” such as alum, moringa, racket, or any commercial product for pretreating water) are available. If yes, collect samples of each.
4. Prepare a flipchart page with a chart*:
Method/ Pros and Cons
Positive Factors Negative Factors
Cloth filtration Sand filtration Settling and decanting Flocculants
*Sample completed chart is available on p. 11 of the Outreach Worker’s Handbook.
5. Prepare posters illustrating the four methods (cloth, sand, settling, and flocculants) large enough so the participants can see them. Sample images can be found in the Outreach Worker’s Handbook pp. 42–43.
6. Mark the page(s) in the Outreach Worker’s Handbook for drawing conclusions and extra
reading. 7. Prepare a flipchart with key points for summary at the end of the session. 8. If optional activity (E) is chosen (where the participants experiment with the different ways
to pretreat water), assemble the necessary equipment for locally used methods: different

MODULE 2
SESSION 1: PRETREATMENT 58
types of cloth, a sand filter, containers for settling and decanting, and some examples of locally available flocculants (if available). Make sure no one samples the water.
9. The four recommended treatment methods described in the following sessions make water
safer (potable but not completely safe) from the germs that cause diarrhea and other illness, but they do NOT completely remove/kill the diarrhea-causing germs or address chemical contamination such as arsenic.
TRAINING ACTIVITIES: Pretreatment A. Introduction to the Session (5 minutes)
1. Say that during this session the participants will explore the various ways in which water can be pretreated (or clarified) to remove particles, mud, or other debris that makes the water appear “dirty.” Stress the fact that this session is about pretreating water to get it ready for further treatment to make it potable. Remind the participants about the salty water and the water with the feces and hair (or long grass or thread). The water looked clear, but was, in fact, contaminated, so even if you pretreat it to make it look clear, it still needs to be treated to make it safe for drinking. Share the objectives for the session.
B. Climate Setter (10 minutes)
1. Uncover the four samples of water. Ask the participants how they would describe the different samples. Get them to call out some terms in their local language that describe the different degrees of “dirty” water. Ask them how they perceive (see) the different samples. Record some of the words and expressions on a flipchart. If appropriate, share with the participants where you got the water samples.
Trainer Note: Do not belabor this activity. Its purpose is to get the participants to think about “dirty” water that will need to be clarified.
C. Large Group Discussion (20 minutes)
1. Ask the participants to talk about some of the ways that they’ve noticed people in the community deal with “dirty” water.
2. Write these on a flipchart.
3. Using the posters, briefly talk about the ways that can be used to pretreat dirty water in your
communities to remove some contaminants. Relate what you present about the methods to what they’ve discussed earlier about local ways that people pretreat their water. Touch briefly on the mechanics of how the methods work. Introduce the notion of flocculants (settling

MODULE 2
SESSION 1: PRETREATMENT 59
agents) and ask the participants to name local products (either commercial or indigenous) if available. If Guinea worm is endemic to the area, mention the need to filter water with a tightly woven cloth, as the cloth will remove the tiny insects carrying the Guinea worm larvae.
D. Small Group Work (20 minutes)
1. Count off by fours. Move into groups. Using the flipchart prepared in the “session-at-a-glance” section with methods and pros and cons, invite participants to record what might be some of the advantages/disadvantages of the locally available methods (cloth, sand, settling, and flocculants). Have them fill out their charts. A sample prefilled chart is on p. 11 of the Outreach Worker’s Handbook and in the Collection of Resource Materials. Display the group work.
Trainer Note: Point out that most pretreatment methods work fine as a preliminary step for any of the four treatment methods. However, if the final treatment method being considered is chlorination:
• People should use a double dose of chlorination following cloth filtration.
• Chlorination should not be used following pretreatment using flocculation with moringa seed or racket. Another treatment method should be used following these pretreatments.
2. Given their knowledge about the community and the ways people already pretreat their
water, ask the participants which methods they think the people in the community might now adopt if they are not pretreating their water. Discuss some of the barriers to pretreating water. Record these, if appropriate, for use at the end of the module on water for purposes of summarizing barriers.
3. Lead a discussion about how the need to pretreat water to clarify it may vary. For instance, local rivers may have clear water during the dry season but very muddy water during the rainy season. Water from a well or borehole may also change depending on whether or not it is protected. So families may need to clarify their water sometimes and not need to clarify it at other times.
E. OPTIONAL Table Work: Experimenting with Pretreatments (30 minutes)
Trainer Note: If time permits, have the participants practice some of the methods. If equipment is not available, implement the simplest method, e.g., cloth filtration using a tightly woven cloth. If settling-out agents are available locally, using flocculants can be interesting as particles in the water can be seen settling to the bottom of the container (especially if you can get a clear/see-through container).

MODULE 2
SESSION 1: PRETREATMENT 60
F. Reading, Drawing Conclusions, and Review (20 minutes)
1. Supplemental materials on water clarity are located in the Collection of Resource Materials in the materials for Module 2, Session 1.
2. Ask the participants to turn to p. 67 in their Outreach Worker’s Handbook and then answer the
following questions:
• What have you learned about pretreating water? • What are you going to remember about the different methods of pretreating (clarifying)
water if you conduct these activities for an audience in the community?
Trainer Note: These questions may be answered orally while the trainer records the thoughts and observations on a flipchart.
Review the key points of the session using the prepared flipchart. Summary Points:
• Dirty-looking water should be pretreated or clarified before it is treated to make it safe to drink. It is also important to filter water through tightly woven cloth to remove Guinea worm eggs prior to treating the water with any method in Guinea worm-infested areas.
• Dirty water can be pretreated by several methods (fill in list of locally available methods).
• Pretreating water does not make it safe for drinking (potable). • Some advantages of the methods are _______ (fill in based on discussion). • Some barriers to using the methods are ________ (fill in based on discussion).
Say that the next sessions will cover four different ways to treat water to make it safe to drink. First, they are going to learn about chlorinating water, which is one way to make it safe for drinking.
Trainer Note: Skip any treatment methods that are not feasible in the outreach workers’ communities. For example, if no chlorine products or filters are available for sale, do not teach those methods, unless your program intends to make those products available. If there is a shortage of wood or other fuel for boiling water, you should skip that module (as long as there are feasible alternatives).

GUIDE FOR TRAINING OUTREACH WORKERS MODULE 2 Session 2
SESSION 2: HOW TO CHLORINATE WATER 61
HOW TO CHLORINATE WATER TO MAKE IT SAFE TO DRINK Session Objective By the end of this module, the participants will be able to: 1. Chlorinate water following the chlorination procedure described in this manual or the
MOH’s strategy using a locally available commercial product.

MODULE 2
SESSION 2: HOW TO CHLORINATE WATER 62
SESSION AT A GLANCE: Chlorination Activity Time Materials A. Introduction to the Session Trainer introduces the topic of chlorination to treat water and session objective.
5 minutes
- Flipchart, tape, markers
B. Climate Setter Participants are asked if they’ve ever heard about adding (local product name here) to water to make it potable/safe to drink.
5 minutes
- Possible samples of local products on a table.
- Descriptions and drawings of products if no samples available.
C. Large Group Activity Trainer demonstrates chlorinating water. Advantages and disadvantages, cost, access to product, and barriers, etc. are discussed.
15 minutes
- Poster with steps for locally available commercial product
- Bottles for the tables - Water - Disposable cups - Depending on the product
instructions, provide the correct-sized container
- Flipchart page with pros, cons, comments
D. Practice (Optional) Participants practice chlorinating water.
15 minutes
- Containers for each table - Poster with steps for
demonstration E. Reading and Conclusions Participants read the question and answer section and record conclusions in their handbooks. Summary of key points.
10 minutes - Outreach Worker’s Handbook for drawing conclusions and more information
- Prepared flipchart page with summary of key points
50 minutes (35 if no table work)

MODULE 2
SESSION 2: HOW TO CHLORINATE WATER 63
PREPARING TO TEACH THIS MODULE: Chlorination Before you present Module 2, Session 2
1. Gather some packets of the locally available commercial chlorination product (see the list below for some possibilities). Check on any Ministry of Health protocols for use of products/bleach/chlorine for disinfecting water (making it potable).
2. Gather all the containers. (See “session at a glance.”) The volume (size) of the containers will
depend on the instructions for using the local product to chlorinate water. For example, a 2.5 liter bottle may be indicated or a 20 liter container may be indicated.
3. Develop appropriate messages on the dangers of using local bleach (see trainer note below).
4. Review the supplemental information on chlorination found at the end of this session.
Procedures relating to chlorination differ from country to country. 5. Prepare a flipchart page with headings “pros,” “cons,” and “comments,” and another with
key points for the summary. 6. Prepare a poster with steps for using available chlorine-based commercial products, such as
those listed below.* Sample posters for PUR, WaterGuard, and Aquatabs are located in the Collection of Resource Materials. If instructions for the locally available product(s) are not in the collection, try to find them locally.
Should You Cover this Session? Many experts would recommend that this session be used only if there are reliable commercially available chlorine-based products on the market for the express purpose of disinfecting water. This is because local bleach products can have inconsistent chlorine content and therefore any generic instructions on using locally available bleach cannot be guaranteed to disinfect water. However, in some countries, the Ministry of Health has established protocols regarding chlorination using locally available bleach. Consult with your local hygiene expert or Ministry of Health officials regarding chlorination recommendations.
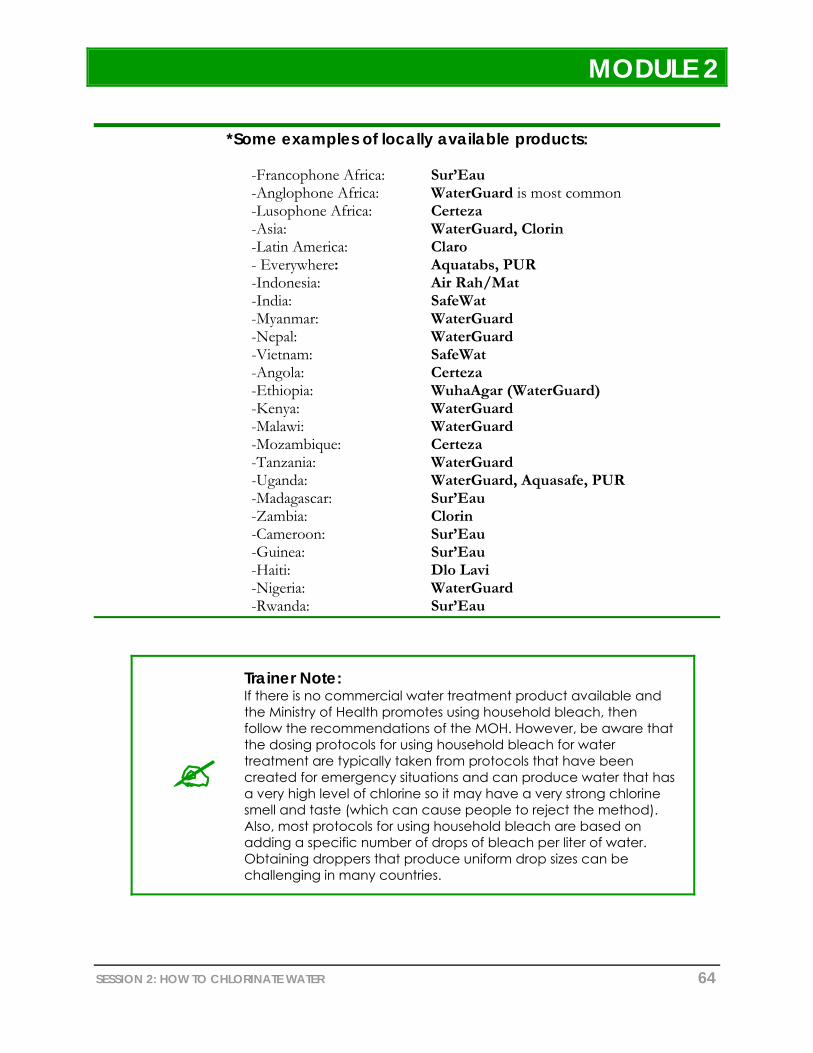
MODULE 2
SESSION 2: HOW TO CHLORINATE WATER 64
*Some examples of locally available products:
-Francophone Africa: Sur’Eau -Anglophone Africa: WaterGuard is most common -Lusophone Africa: Certeza -Asia: WaterGuard, Clorin -Latin America: Claro - Everywhere: Aquatabs, PUR -Indonesia: Air Rah/Mat -India: SafeWat -Myanmar: WaterGuard -Nepal: WaterGuard -Vietnam: SafeWat -Angola: Certeza -Ethiopia: WuhaAgar (WaterGuard) -Kenya: WaterGuard -Malawi: WaterGuard -Mozambique: Certeza -Tanzania: WaterGuard -Uganda: WaterGuard, Aquasafe, PUR -Madagascar: Sur’Eau -Zambia: Clorin -Cameroon: Sur’Eau -Guinea: Sur’Eau -Haiti: Dlo Lavi -Nigeria: WaterGuard -Rwanda: Sur’Eau
Trainer Note: If there is no commercial water treatment product available and the Ministry of Health promotes using household bleach, then follow the recommendations of the MOH. However, be aware that the dosing protocols for using household bleach for water treatment are typically taken from protocols that have been created for emergency situations and can produce water that has a very high level of chlorine so it may have a very strong chlorine smell and taste (which can cause people to reject the method). Also, most protocols for using household bleach are based on adding a specific number of drops of bleach per liter of water. Obtaining droppers that produce uniform drop sizes can be challenging in many countries.
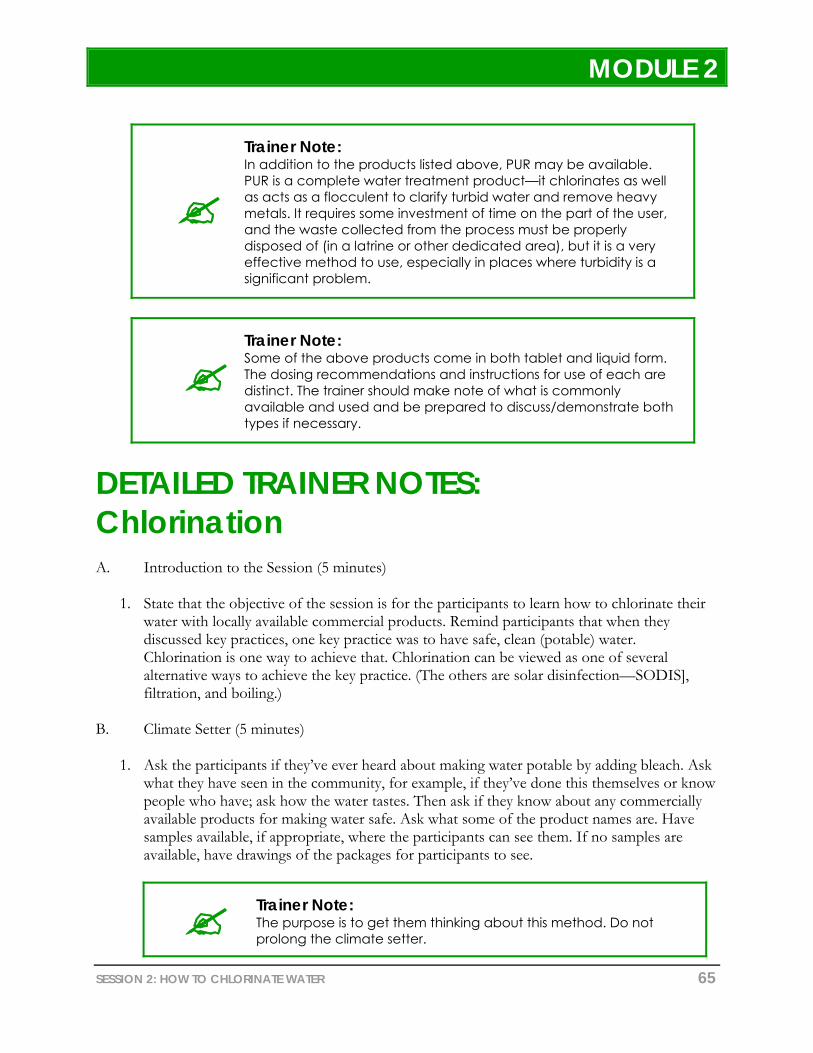
MODULE 2
SESSION 2: HOW TO CHLORINATE WATER 65
Trainer Note: In addition to the products listed above, PUR may be available. PUR is a complete water treatment product—it chlorinates as well as acts as a flocculent to clarify turbid water and remove heavy metals. It requires some investment of time on the part of the user, and the waste collected from the process must be properly disposed of (in a latrine or other dedicated area), but it is a very effective method to use, especially in places where turbidity is a significant problem.
Trainer Note: Some of the above products come in both tablet and liquid form. The dosing recommendations and instructions for use of each are distinct. The trainer should make note of what is commonly available and used and be prepared to discuss/demonstrate both types if necessary.
DETAILED TRAINER NOTES: Chlorination A. Introduction to the Session (5 minutes)
1. State that the objective of the session is for the participants to learn how to chlorinate their water with locally available commercial products. Remind participants that when they discussed key practices, one key practice was to have safe, clean (potable) water. Chlorination is one way to achieve that. Chlorination can be viewed as one of several alternative ways to achieve the key practice. (The others are solar disinfection—SODIS], filtration, and boiling.)
B. Climate Setter (5 minutes)
1. Ask the participants if they’ve ever heard about making water potable by adding bleach. Ask what they have seen in the community, for example, if they’ve done this themselves or know people who have; ask how the water tastes. Then ask if they know about any commercially available products for making water safe. Ask what some of the product names are. Have samples available, if appropriate, where the participants can see them. If no samples are available, have drawings of the packages for participants to see.
Trainer Note: The purpose is to get them thinking about this method. Do not prolong the climate setter.

MODULE 2
SESSION 2: HOW TO CHLORINATE WATER 66
C. Large Group Activity (15 minutes)
Trainer Note: If more than one chlorination product is available in your country, you need to go through steps 1 and 2 below for each product.
1. Provide the participants with a copy of the instructions on how to use the locally available
chlorine water treatment product(s). It is best if the instructions have clear illustrations showing each step.
Trainer Note: Examples of instructions for some products (WaterGuard Liquid, WaterGuard Tablets, AquaSafe, and PUR) are in the Collection of Resource Materials, but these are meant to be illustrative. You need to get the instructions that are specific to the brand/products that are locally available. It is best if you can either display the instructions in a large poster format that is big enough that everyone can see clearly or distribute smaller size copies to each of the participants so that they can follow along.
2. Demonstrate to the entire group how to use the product to make water safe to drink by
following the instructions. 3. Ask them to smell it. Discuss some of the advantages and disadvantages. What are some of
the barriers to using the product? For example, cost, accessibility? What are some reasons that people might not want to chlorinate? Record these on the flipchart. Save this chart for the last session in the module on water so the participants can recall barriers, enablers, etc. for each of the treatment alternatives (a sample chart is available on p. 9 of the Outreach Worker’s Handbook and in the Collection of Resource Materials section for Module 2, Session 8). After the time indicated on the packaging instructions for the product (usually 30 minutes), let the participants taste the water that has been treated by the commercial product and get their reactions. (This might be done at a break.)
Explain that if the water has a chlorine taste, this can be reduced/eliminated by shaking the container (to make air bubbles in the water), then taking the lid off and letting it sit for a few minutes before putting the lid back on. The process may need to be done several times to reduce the taste/smell of chlorine.
Trainer Note: The air bubbles that form in the water “grab” some of the chlorine and take it out of the water when the bubbles pop, thus reducing the taste and smell of chlorine.

MODULE 2
SESSION 2: HOW TO CHLORINATE WATER 67
4. Explain that even though the chlorine residual protects against recontamination, care must be taken not to re-infect the water once the product has been added. Also say that chlorinated water, if not recontaminated, will stay safe to drink for at least one week (if it is stored in a container that has a narrow-neck and tight-fitting cap). After one week, it may no longer be safe to drink. If the chlorinated water is stored in a wide mouth container (that would allow the water to be touched by a cup, scoop, or hand) or without a tightly fitting cap, then the water should only be used for drinking for one day. Ask the participants how a family might prevent recontamination.
Trainer Note: All water in the storage container needs to be used or dumped before adding newly treated water. This is important so that the “new” batch of treated water is not mixed with the “old” batch.
D. OPTIONAL: Practice Chlorinating Water (15 minutes)
1. With the supplies (proper sized containers, water, and chlorine products) on the table, have the groups practice. Walk from table to table to make sure they are doing this correctly. Put the chlorinated water aside for 30 minutes and then have the participants taste it and talk about the taste.
E. Review, Reading, and Drawing Conclusions (10 minutes)
1. Have the participants read in the question and answer section about chlorination as they have done in the past sessions (p. 15 in the Outreach Worker’s Handbook). A. If water has a strong chlorine taste after treating it, how can I eliminate the
chlorine taste? You should shake the container and then open it. Repeat this process several times if the water still has a chlorine flavor.
B. How long does chlorinated water last?
Chlorinated water stored in a narrow-neck container with a tightly fitting lid can be stored and used for seven days and should then be used for non-drinking purposes. Chlorinated water that is stored in a container with a wide opening or with no lid (or a lid that does not fit tightly) should be used for non-drinking purposes after 24 hours.
Trainer Note: Remember to ask for volunteers and restate that the purpose is not to memorize the information, but to know where to find it.
An alternative to reading might be a “treasure hunt” whereby participants need to look through the supplemental information on chlorination in the Outreach Worker’s Handbook and find the answer(s) to question(s) about chlorination.

MODULE 2
SESSION 2: HOW TO CHLORINATE WATER 68
Supplemental information on chlorination can also be found in the Collection of Resource Materials. If you so choose, participants may refer to these sheets for additional information.
2. Have them record, in their Outreach Worker’s Handbook on pp. 67–68, the answers to the
following questions: • What did you learn about chlorinating water? • What are you going to say when people say it tastes bad? • Can you plan how you will conduct this session with a community group? • What do you want to remember?
Trainer Note: The above questions may be answered orally and the answers written on flipchart paper.
3. Review the key points.
Summary Points:
• The local products for treating water with chlorine are ______ (fill in the blank). • Precautions about the product ______ (fill in the blank). • Water disinfected with ______ (fill in name of product) will remain safe for one week, if
stored in a narrow-neck container with tight-fitting cover, or for 24 hours if stored in wide-neck container or loose fitting or no cover container.
• Some of the barriers to using (name of product) are ______ (fill in the blank).
4. Transition to the next session on boiling water: State that chlorination is one way to disinfect (treat) water and that next they are going to look at how to boil water to make it safe for consumption. Boiling is another alternative for treatment.

GUIDE FOR TRAINING OUTREACH WORKERS MODULE 2 Session 3
SESSION 3: HOW TO BOIL WATER 69
HOW TO BOIL WATER TO MAKE IT SAFE TO DRINK Session Objectives By the end of this module, the participants will be able to: 1. Boil water following the boiling procedure described. 2. Explain the importance of safe storage and serving after boiling.

MODULE 2
SESSION 3: HOW TO BOIL WATER 70
SESSION AT A GLANCE: Boiling Water Activity Time Materials A. Introduction to the Session Trainer links this to the previous sessions and presents the session’s objectives.
5 minutes
- Flipchart, tape, markers
B. Climate Setter Trainer asks about the group’s and community’s experiences with boiling water, the pros and cons, etc.
10 minutes
- Flipchart, tape, markers
C. Large Group Activity Trainer and participants review the procedure for boiling water. Debate the pros and cons in detail. Discuss cost, availability of fuel, etc.
15 minutes
- Poster or mini-posters with steps for boiling
- Flipchart paper with two columns: pros and cons of boiling water
- Leave room on pro/con paper for other information related to boiling
D. Reading, Drawing Conclusions, and Review
10 minutes
- Outreach Worker’s Handbook for more information
- Outreach Worker’s Handbook for recording conclusions
- Prepared flipchart summary
40 minutes
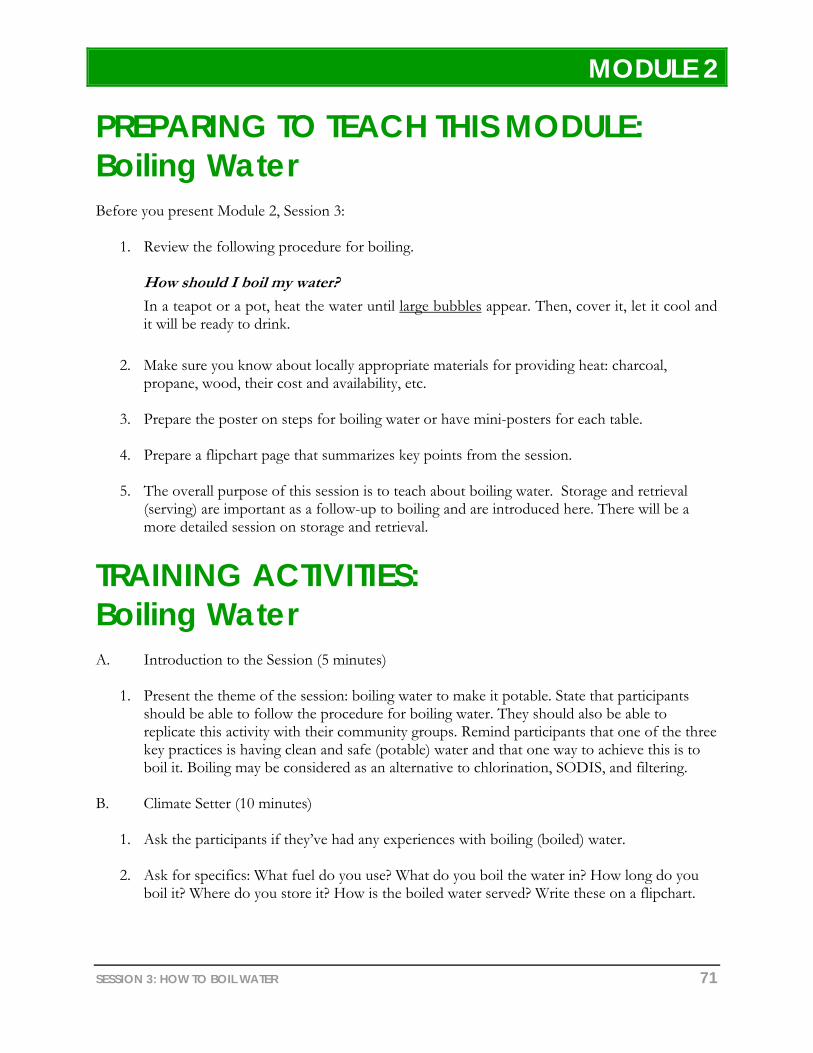
MODULE 2
SESSION 3: HOW TO BOIL WATER 71
PREPARING TO TEACH THIS MODULE: Boiling Water Before you present Module 2, Session 3:
1. Review the following procedure for boiling.
How should I boil my water?
In a teapot or a pot, heat the water until large bubbles appear. Then, cover it, let it cool and it will be ready to drink.
2. Make sure you know about locally appropriate materials for providing heat: charcoal,
propane, wood, their cost and availability, etc. 3. Prepare the poster on steps for boiling water or have mini-posters for each table. 4. Prepare a flipchart page that summarizes key points from the session. 5. The overall purpose of this session is to teach about boiling water. Storage and retrieval
(serving) are important as a follow-up to boiling and are introduced here. There will be a more detailed session on storage and retrieval.
TRAINING ACTIVITIES: Boiling Water A. Introduction to the Session (5 minutes)
1. Present the theme of the session: boiling water to make it potable. State that participants should be able to follow the procedure for boiling water. They should also be able to replicate this activity with their community groups. Remind participants that one of the three key practices is having clean and safe (potable) water and that one way to achieve this is to boil it. Boiling may be considered as an alternative to chlorination, SODIS, and filtering.
B. Climate Setter (10 minutes)
1. Ask the participants if they’ve had any experiences with boiling (boiled) water. 2. Ask for specifics: What fuel do you use? What do you boil the water in? How long do you
boil it? Where do you store it? How is the boiled water served? Write these on a flipchart.

MODULE 2
SESSION 3: HOW TO BOIL WATER 72
Trainer Note: The first part of the climate setter is to gain participants’ reactions to boiling/boiled water. The second question is to highlight some of the specifics.
C. Large Group Activity (15 minutes)
1. Using the poster (or mini-posters at the tables), point to each step and have the participants read aloud, if appropriate. For the step on clarifying turbid water, adapt it to reflect how water is clarified locally.
2. Inform them that it is possible to treat clean and “dirty” (muddy/opaque) water using
boiling. If the water is “dirty” (muddy/opaque), it should be pretreated to make it clear (see Module 2, Session 1). When large bubbles appear the water is safe to drink (once it cools).
Trainer Note: WHO recommendations say to boil water until large bubbles start to pop across the surface of the water. The CDC recommends boiling 1 minute to ensure that large bubbles have appeared and the water has been adequately heated.
3. Stage a quick debate about the advantages (pros) and disadvantages (cons) of using boiling as
a way to make water safe to drink. Divide the group into two. Have them meet and have one group draw up a list of pros and the other group the cons. When ready, take one response from each group and record the responses on the flipchart paper. Talk about cost, barriers to the method, issues related to the fuel used, storage and serving issues, etc. Probe with the participants to see if there might be some things people can do or things in the environment that can “encourage” one to boil water. There may also be environmental issues that discourage the use of boiling, such a scarcity of wood. Record these.
Mention briefly how important it is to let the water cool and then be placed in a secure
storage container, preferably with a narrow-neck, tight-fitting lid, and a spigot to avoid recontamination. Emphasize that boiled water should only be kept for a week (if it is stored in a narrow-necked container with a tight-fitting lid) or for 24 hours (if it is NOT stored in a narrow-necked container with a tight-fitting lid). Say that they will look at storage and retrieval later in more detail.
Save this flipchart page for the final activity in the water modules.
D. Reading, Review, and Drawing Conclusions (10 minutes)

MODULE 2
SESSION 3: HOW TO BOIL WATER 73
1. Read from the question and answer section on boiling water, pp. 15–16 in the Outreach Worker’s Handbook. (An alternative to reading is to have the participants hunt for answers to questions that the trainer has posted.)
A. How should I boil my water?
In a teapot or a pot, heat the water until large bubbles appear. Then cover it, let it cool and it will be ready to drink.
B. Can I use the boiling method to treat VERY TURBID (as dark as chocolate)
water? Yes, you can directly boil even highly turbid water without pretreatment. However, if the appearance of the water bothers people, you can eliminate the turbidity of the water by filtering through a tightly woven cloth, using alum (or another locally recommended flocculent method), or letting it sit undisturbed for 12 hours, so that the dirt settles to the bottom and the water looks clear. Then, transfer the clear water to another container (leaving the dirt behind). See also the session on water clarity for other ways to make turbid water ready for boiling. Afterwards, pour the clear water into another container and discard the residue remaining in the first container. Once the water is clear, boil it until large bubbles appear.
C. How long does boiled water last?
Boiled water only lasts 24 hours. It should be used for purposes other than drinking after that.
2. Have the participants look in their Outreach Worker’s Handbook p. 68 for the answers to the
following questions:
• What did you learn about boiling water that you didn’t know before? • What will you remember to do when you’re conducting this session as an outreach
worker?
Trainer Note: The above questions may be answered orally and the answers recorded on a flipchart by the trainer.
3. Review the main points of the session.
Summary Points:
• Boiling is a way to make water safe. • Boiled water needs to be stored and served properly. • Care needs to be taken not to recontaminate boiled water. • Whether boiling is the best treatment in a particular community depends on many
factors.

MODULE 2
SESSION 3: HOW TO BOIL WATER 74
• Make sure large bubbles appear in the water, not just the small bubbles on the side of the container.
• Use or dump “old” water before adding “newly treated” water.
4. Make the link to the next session on the SODIS (solar disinfection) method of purifying water. Say that they’ve looked at two ways of treating water to make it safe to drink and that using the power of the sun is another method.

GUIDE FOR TRAINING OUTREACH WORKERS MODULE 2 Session 4
SESSION 4: HOW TO USE SODIS 75
HOW TO USE SUNLIGHT (THE SODIS METHOD) TO MAKE WATER SAFE TO DRINK Session Objectives By the end of this session, the participants will be able to: 1. Treat water using the SODIS method. 2. Outline some of the advantages and disadvantages of SODIS. 3. List some of the guidelines for using the SODIS method.
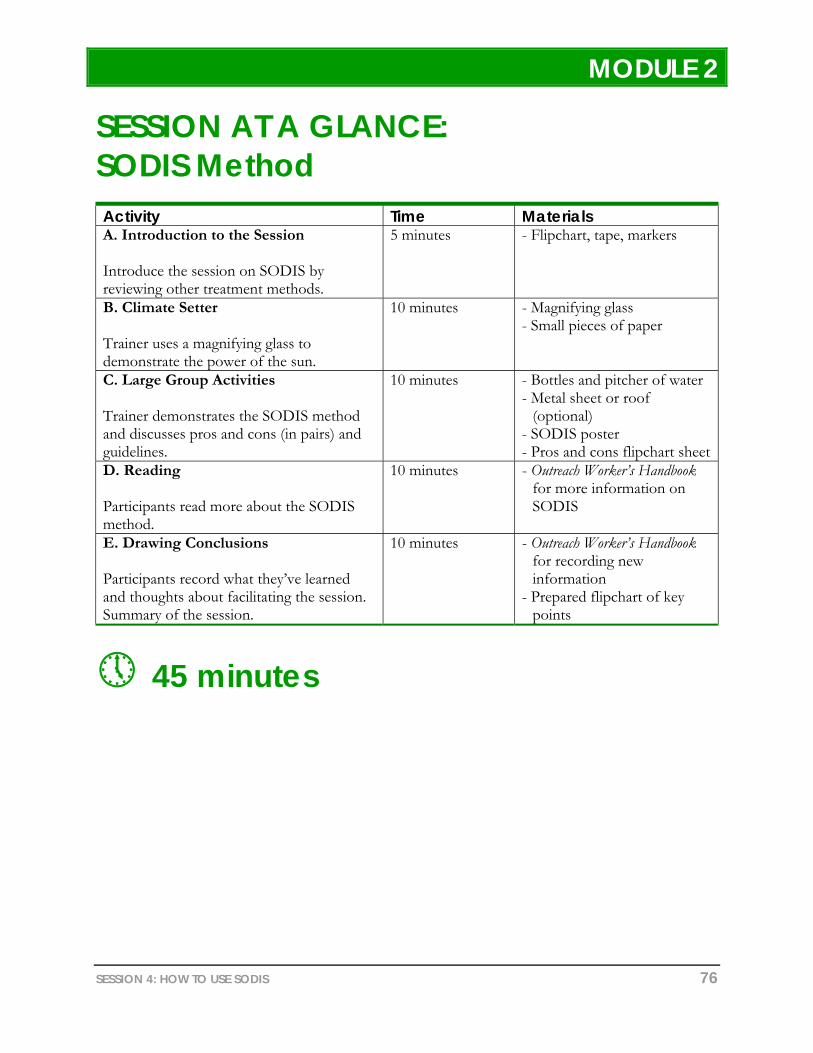
MODULE 2
SESSION 4: HOW TO USE SODIS 76
SESSION AT A GLANCE: SODIS Method Activity Time Materials A. Introduction to the Session Introduce the session on SODIS by reviewing other treatment methods.
5 minutes - Flipchart, tape, markers
B. Climate Setter Trainer uses a magnifying glass to demonstrate the power of the sun.
10 minutes
- Magnifying glass - Small pieces of paper
C. Large Group Activities Trainer demonstrates the SODIS method and discusses pros and cons (in pairs) and guidelines.
10 minutes
- Bottles and pitcher of water - Metal sheet or roof
(optional) - SODIS poster - Pros and cons flipchart sheet
D. Reading Participants read more about the SODIS method.
10 minutes - Outreach Worker’s Handbook for more information on SODIS
E. Drawing Conclusions Participants record what they’ve learned and thoughts about facilitating the session. Summary of the session.
10 minutes - Outreach Worker’s Handbook for recording new information
- Prepared flipchart of key points
45 minutes

MODULE 2
SESSION 4: HOW TO USE SODIS 77
PREPARING TO TEACH THIS SESSION: SODIS Method Before you present Module 2, Session 4 on SODIS:
1. Gather the plastic bottles and make sure they are clean and clear with no labels (bottles should not be more than 10 cm in diameter). Glass bottles can be used for SODIS, as long as they have a reusable lid.
2. Have pitchers of clear water ready so you can fill the plastic (or glass) bottles.
3. If possible, bring a magnifying glass and small bits of paper for the demonstration. If not,
prepare a demonstration that shows the power of the sun. For example, put pieces of black and white cloth into the direct sunlight and feel how “hot” the black cloth gets as compared to the white cloth. If the session is done on a cloudy day, substitute a discussion about how the participants feel when working under the sun, the feeling of the sun on the skin, etc. as opposed to sitting in the shade.
4. Prepare a pros and cons flipchart sheet for SODIS. 5. Determine the local word or concept of “germ” (viruses/bacteria).
6. Prepare a flipchart page that summarizes key session points.
Trainer Note: SODIS should be offered as an alternative only if PET plastic bottles are widely available. You can identify PET bottles because, unlike PVC-type plastic bottles, they burn easily (with a sweet smell). If PVC bottles are also available, the participants need to understand that they should not be used for SODIS. Glass bottles can be used for SODIS, as long as they have a reusable lid.
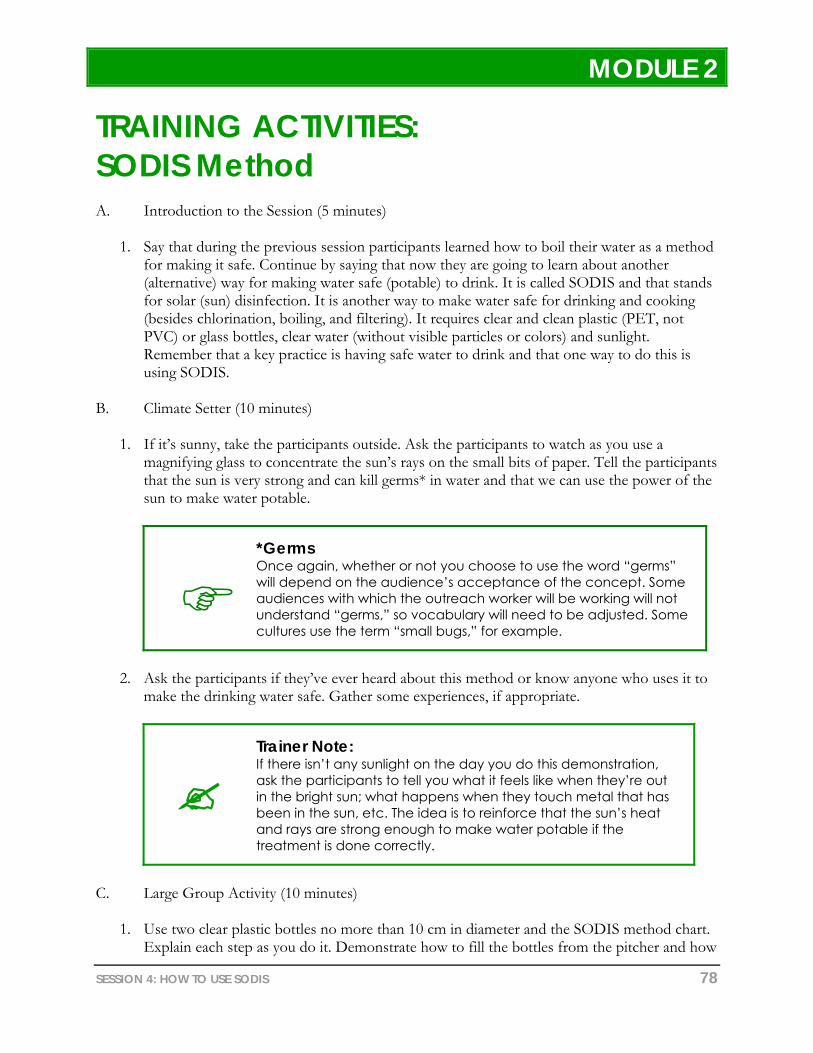
MODULE 2
SESSION 4: HOW TO USE SODIS 78
TRAINING ACTIVITIES: SODIS Method A. Introduction to the Session (5 minutes)
1. Say that during the previous session participants learned how to boil their water as a method for making it safe. Continue by saying that now they are going to learn about another (alternative) way for making water safe (potable) to drink. It is called SODIS and that stands for solar (sun) disinfection. It is another way to make water safe for drinking and cooking (besides chlorination, boiling, and filtering). It requires clear and clean plastic (PET, not PVC) or glass bottles, clear water (without visible particles or colors) and sunlight. Remember that a key practice is having safe water to drink and that one way to do this is using SODIS.
B. Climate Setter (10 minutes)
1. If it’s sunny, take the participants outside. Ask the participants to watch as you use a magnifying glass to concentrate the sun’s rays on the small bits of paper. Tell the participants that the sun is very strong and can kill germs* in water and that we can use the power of the sun to make water potable.
*Germs Once again, whether or not you choose to use the word “germs” will depend on the audience’s acceptance of the concept. Some audiences with which the outreach worker will be working will not understand “germs,” so vocabulary will need to be adjusted. Some cultures use the term “small bugs,” for example.
2. Ask the participants if they’ve ever heard about this method or know anyone who uses it to
make the drinking water safe. Gather some experiences, if appropriate.
Trainer Note: If there isn’t any sunlight on the day you do this demonstration, ask the participants to tell you what it feels like when they’re out in the bright sun; what happens when they touch metal that has been in the sun, etc. The idea is to reinforce that the sun’s heat and rays are strong enough to make water potable if the treatment is done correctly.
C. Large Group Activity (10 minutes)
1. Use two clear plastic bottles no more than 10 cm in diameter and the SODIS method chart. Explain each step as you do it. Demonstrate how to fill the bottles from the pitcher and how

MODULE 2
SESSION 4: HOW TO USE SODIS 79
the bottles should be laid on their sides, preferably on a metallic sheet in a safe place, like a tin roof. Emphasize that on a sunny day, the water will be ready to drink in six hours. Say that if it is cloudy, it will take two days. If there is continuous rain, do not use SODIS.
2. Say that you can’t use SODIS with highly turbid (unclear) water because the little bits floating in the water make it difficult for the sun to penetrate and kill the germs. Filtration as pretreatment needs to be done for chlorination and SODIS at high turbidity levels. A simple test is available to check if water needs to be filtered before SODIS is applied: hold fingers behind the bottle—no filtration is necessary if you still can see the fingers through the bottle. Another method is to put the filled bottle on the headline of a newspaper—no pretreatment is necessary if you can see the letters while looking from the opening to the bottom of the bottle. Refer back to the feces/hair (or grass or thread) and salt session to remind participants that water may look clear but not be potable.
Trainer Note: Water should first be filtered through a tightly woven cloth before SODIS is applied in areas with Guinea worm.
3. Remind them that water treated by SODIS should be stored in the same bottle in which it
was treated and that after opening the bottle you should drink the water in 24 hours. Make sure to emphasize that they should not drink directly from the bottle, but pour the water into a clean glass.
4. Divide the participants into pairs. Tell one member of the team to think about all of the advantages of SODIS and the other team member to think of all the disadvantages. Their job is to convince each other of the advantages and disadvantages of this method.
5. After the discussions in pairs, ask for volunteers to offer pros and cons in the large group. Put the ideas on a flipchart and save it for the final session in the water module. Add anything they’ve left out.
D. Reading (10 minutes)
1. Have the participants turn to p. 16 in their Outreach Worker’s Handbook for questions and answers about SODIS. Emphasize again that they do not have to memorize this information but should know where to find it. Have them read aloud the question and then have someone read the answer.
A. What is the SODIS method? It is a water disinfection method that uses sunlight. With this method, the sun’s
ultraviolet light and high water temperature (due to heat from the sun) destroy germs in the water.
B. What materials do I need in order to use the SODIS method?
1. Clean, transparent plastic (or glass) PET bottles (with lids) that hold up to 2.5 liters (10 cm diameter maximum)

MODULE 2
SESSION 4: HOW TO USE SODIS 80
2. Clear water 3. Corrugated metal (optional)
C. How do I treat water using SODIS? Fill a clean plastic (or glass) bottle with clear water, then screw on the lid. Lay the bottle
in direct sunlight for six hours. It is a good idea, but not absolutely necessary, to lay the bottle on a piece of corrugated metal. If it is cloudy or raining off and on (but not all day), leave the bottle exposed to the sky for two days. Afterward, allow the bottle to cool and the water will be ready to drink.
D. Can I use SODIS if it is raining all day? No, because the SODIS method only works when enough of the sun’s rays reach the
water. E. Must I use only transparent plastic bottles for the SODIS method?
Yes, you should only use colorless, transparent plastic soft drink or mineral water bottles that are no more than 10 cm in diameter. YOU SHOULD NOT USE bottles that are green, brown, blue, etc. (because colored plastic does not allow the sun’s rays to disinfect the water). Glass bottles can also be used for SODIS, as long as they have a reusable lid.
F. What size bottles should I use for SODIS? Bottles that are no more than 10 cm in diameter (typically bottles that hold up to 2.5
liters). G. What do I do if my bottles are scratched? If your bottles are very scratched or opaque, discard them and use other bottles. H. Should I take the labels off of the bottles? Yes, because the labels prevent the sun’s rays from disinfecting the water. I. Can I use SODIS with turbid water? Turbid water can be used, but it has to be pretreated to reduce turbidity: hold fingers
behind the bottle—no filtration is necessary if you still can see the fingers through the bottle. You can reduce turbidity with all the methods mentioned (cloth, filtration, sand filtration, settling/decanting, moringa flocculation, racket flocculation, or alum flocculation). Boil if a sufficient reduction in turbidity cannot be achieved.
Another method of determining if pretreatment is needed is to put the filled bottle on the headline of a newspaper—no pretreatment is necessary if you can see the letters by looking from the opening to the bottom of the bottle.
Sample instructions: place the open bottle upright onto the SODIS logo or the headline
of a newspaper. Look through the mouth of the bottle down toward the logo or the newspaper. The water is clear enough for the SODIS application if you still can read the headline of the newspaper.
J. Where should I store water treated with SODIS? Water treated with SODIS should be stored in the same bottles in which it was treated.

MODULE 2
SESSION 4: HOW TO USE SODIS 81
K. How long does water treated with SODIS last? Once a bottle of water treated with SODIS has been opened, it should only be kept 24
hours and then it should be used for purposes other than drinking because there is a strong possibility that it could be recontaminated.
L. Should I drink water treated with SODIS straight from the bottle (putting my
mouth on the bottle)? No, because you could contaminate the water if the bottle comes into contact with your
mouth. To drink the water, pour it into a clean glass.
An alternative activity is to give the participants some questions to answer about SODIS and let them find the answers in the supplemental information. Additional information can also be found in the Collection of Resource Materials.
E. Drawing Conclusions (10 minutes)
1. Have the participants turn to p. 69 in their Outreach Worker’s Handbook and answer the following questions:
• What did you learn about the SODIS method? • What do you want to remember about this demonstration when you do it as an
outreach worker?
Trainer Note: The questions may be answered orally and the answers recorded by the trainer on flipcharts.
2. Using the prepared flipchart page, review the key points of the session.
Summary Points:
• SODIS is another (alternative) way to make water potable, but can only be used with clear water.
• Leave the bottles for six hours in sunlight; two days if it’s cloudy. • Keep the water in the same bottle; don’t drink from the bottle. • The water will stay clean for 24 hours; after 24 hours, discard it or use it for cleaning
or watering the crops.
3. Say that in the next session, they will learn about filtration. Filtration— along with boiling, SODIS, and chlorination—is a way to achieve the key practice of having safe, clean water.
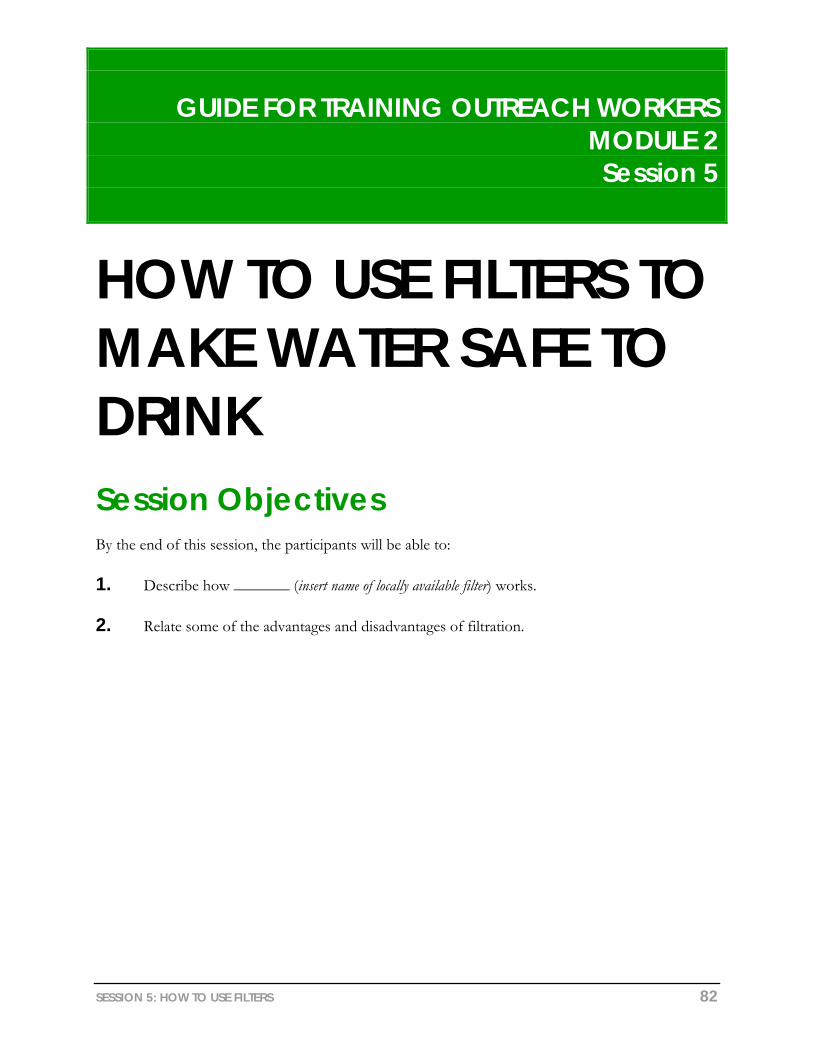
GUIDE FOR TRAINING OUTREACH WORKERS MODULE 2 Session 5
SESSION 5: HOW TO USE FILTERS 82
HOW TO USE FILTERS TO MAKE WATER SAFE TO DRINK Session Objectives By the end of this session, the participants will be able to: 1. Describe how _______ (insert name of locally available filter) works. 2. Relate some of the advantages and disadvantages of filtration.
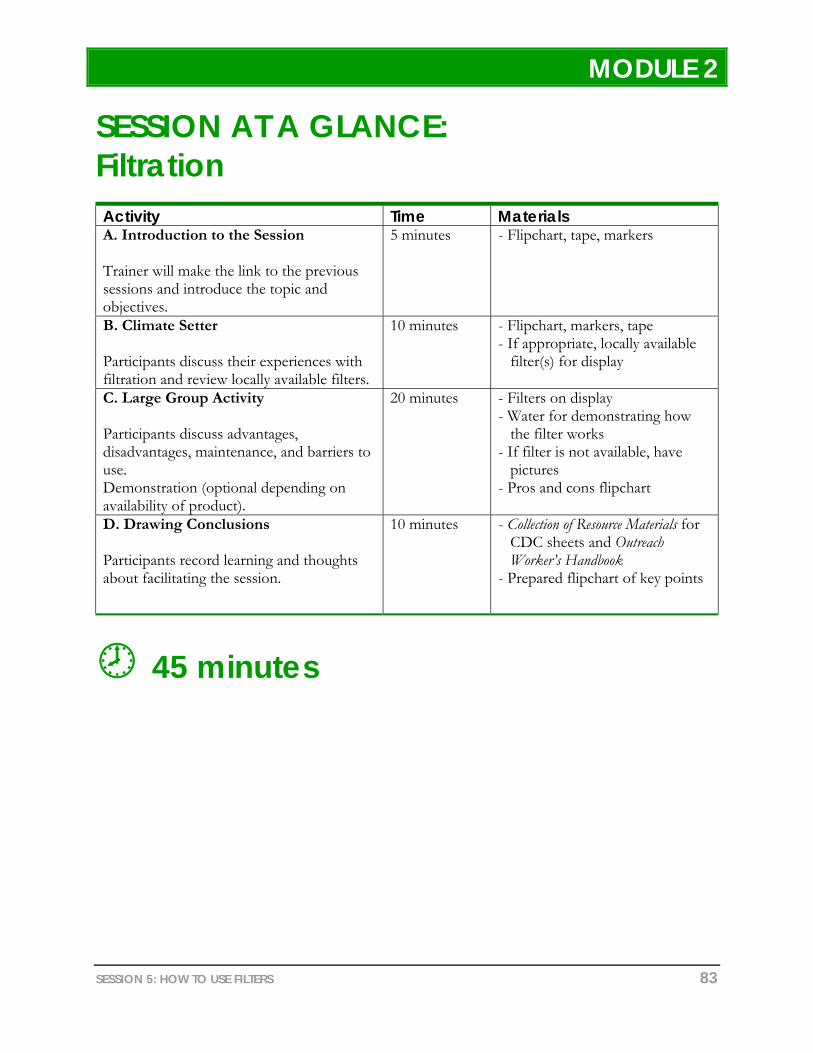
MODULE 2
SESSION 5: HOW TO USE FILTERS 83
SESSION AT A GLANCE: Filtration Activity Time Materials A. Introduction to the Session Trainer will make the link to the previous sessions and introduce the topic and objectives.
5 minutes
- Flipchart, tape, markers
B. Climate Setter Participants discuss their experiences with filtration and review locally available filters.
10 minutes
- Flipchart, markers, tape - If appropriate, locally available
filter(s) for display
C. Large Group Activity Participants discuss advantages, disadvantages, maintenance, and barriers to use. Demonstration (optional depending on availability of product).
20 minutes
- Filters on display - Water for demonstrating how
the filter works - If filter is not available, have
pictures - Pros and cons flipchart
D. Drawing Conclusions Participants record learning and thoughts about facilitating the session.
10 minutes - Collection of Resource Materials for CDC sheets and Outreach Worker’s Handbook
- Prepared flipchart of key points
45 minutes

MODULE 2
SESSION 5: HOW TO USE FILTERS 84
PREPARING TO TEACH THIS SESSION: Filtration Before you present Module 2, Session 5:
Trainer Note: The program manager will need to make a decision about whether or not to include this session. If a filtration product (sand or ceramic) is not available on the local market, or if the product is expensive and therefore not practical, this session should probably not be done. If the trainer wishes to make sure all four alternatives for making water potable are touched upon, but filters are not appropriate for the program, use some of the supplemental materials and simply show the participants how filters work.
1. If appropriate, have a model of the different filtration product(s) available (ceramic or
Biosand filters). If not, have large poster pictures/photos for showing what the product looks like. Sample pictures are available in the Collection of Resource Materials section for Module 2, Session 5.
2. Set up a demonstration table. 3. Have glasses so participants can taste water. 4. For additional information, a description of some ceramic filters can be found in the
Collection of Resource Materials. 5. Prepare a summary flipchart of key session points.
TRAINING ACTIVITIES: Filtration A. Introduction to the Session (5 minutes)
1. Say that during the previous sessions they have learned ways to treat water (chlorination, boiling, SODIS). Remind participants that filtration is another (alternative) way of making water potable.
2. During this session they will learn about a final way to make water safe for drinking and explore some of the pros and cons of filtration.
MODULE 2
SESSION 5: HOW TO USE FILTERS 85
3. Remind participants that they looked at filtration to make water clear using materials like cloth. Emphasize that filtration for pretreatment does not make water safe (potable) for drinking. It simply removes matter from the water.
4. State that during this session, the filter they will be discussing is the (local name).
5. Present the objectives for the session.
B. Climate Setter (10 minutes)
1. Ask the participants if someone they know has had experience(s) with using sand or ceramic filters for making water potable. Quickly take some answers.
2. Revisit the session on water clarity and remind participants again that there were several ways to make water clearer, but they didn’t make it potable (pouring it through a cloth, letting it settle, or using a flocculent [settling agent], etc.).
3. Introduce the model, if available. If a model is not available, have a picture of the locally
available filter. C. Large Group Activity (20 minutes)
1. Invite the participants to stand around the demonstration table where you have installed the filter. Demonstrate how to use the (local name). When water has come through, have the participants taste it.
2. Ask the participants to return to their seats. Ask about the advantages, disadvantages, costs,
availability of products, barriers to use, etc. Record the information on the pros and cons flipchart page. Remind the participants that they are collecting lots of information about how to treat water related to the local situation. You can post the pros and cons flipchart with the other flipcharts from the previous sessions on how to treat water so that it’s potable (sample p. 9 of the Outreach Worker’s Handbook and in the Collection of Resource Materials Module 2, Session 8).
D. More on Filtration and Drawing Conclusions (10 minutes)
1. Have the participants turn to p. 69 in their Outreach Worker’s Handbook to answer the following questions:
• What did you learn about filtration? • What do you want to remember about this lesson when you do it as an outreach
worker?
Trainer Note: The questions may be answered orally and the answers recorded by the trainer on flipcharts.

MODULE 2
SESSION 5: HOW TO USE FILTERS 86
Summarize the key points using the prepared flipchart page:
• Biosand and ceramic filtration makes water safe to drink. • Filters must be maintained at all times. • Advantages and disadvantages are _________ (fill in from discussion).
2. Remind the participants that there are four ways to obtain clean drinking water: boiling, chlorination, SODIS, and filters.
3. Next they are going to take a look at some of the ways in which water is transported,
stored, and served (retrieved) so that it remains potable. Achieving the key practice of safe, clean water requires both effective treatment of the water and safe storage and retrieval.

GUIDE FOR TRAINING OUTREACH WORKERS MODULE 2 Session 6
SESSION 6: TRANSPORTING, STORING, AND RETRIEVING WATER 87
TRANSPORTING, STORING, AND RETRIEVING WATER Session Objective By the end of this session, the participants will be able to:
1. Describe three acceptable alternative ways for handling water during transport, storage, and retrieval (serving).

MODULE 2
SESSION 6: TRANSPORTING, STORING, AND RETRIEVING WATER 88
SESSION AT A GLANCE: Transporting, Storing, and Retrieving Water Activity Time Materials A. Introduction to the Session Trainer links to the previous sessions and introduces the topic and objective.
5 minutes
- Flipchart, tape, markers
B. Climate Setter Participants discuss how the families in their communities transport, store, and serve water.
10 minutes
- Flipchart, tape, markers
C. Large Group Activity Participants review the poster about transporting, storing, and serving water (handbook, p. 44). Optional: Show equipment: tight-lidded containers and long-handled ladles. Discuss safety of the procedures.
10 minutes
- Containers with tight-fitting lids - Long-handled ladles, a glass
(optional), container with spigot
- Poster in Collection of Resource Materials
D. Reading 15 minutes - Outreach Worker’s Handbook E. Drawing Conclusions Participants record what they’ve learned and thoughts about facilitating the session in the community. Summary.
10 minutes - Outreach Worker’s Handbook - Prepared flipchart of key points
50 minutes

MODULE 2
SESSION 6: TRANSPORTING, STORING, AND RETRIEVING WATER 89
PREPARING TO TEACH THIS SESSION: Transporting, Storing, and Retrieving Water Before you present Module 2, Session 6:
1. Familiarize yourself with the local conditions for transporting/carrying, storing, and serving (or retrieving) water.
2. If possible, find a container with a lid that seals tightly, a long-handled dipper, a glass, and a
container that has a tight-fitting cover and a spigot. 3. Prepare a summary flipchart of key session points.
DETAILED TRAINER NOTES: Transporting, Storing, and Retrieving Water A. Introduction to the Session (5 minutes)
1. Say that during the previous sessions they have learned about how to treat water to make it safe for drinking (potable). There are four alternatives. Ask the participants to name them (boiling, chlorination, filtration, SODIS).
2. During this session they will learn about ways to safely carry (transport), store, and retrieve/serve water. By ensuring safe transporting, storing, and retrieving of water, contamination is reduced and the goal of achieving our key practice of having safe, clean (potable) water available to drink is more likely to be achieved.
B. Climate Setter (10 minutes)
1. In the large group, ask two participants how water gets to their houses. Ask two different participants how they store water in their homes. Finally, ask two different participants how they serve their water. Draw or record these on a flipchart and post.
Trainer Note: If you feel that the participants are reluctant to talk about themselves, ask them about “other” families in their communities or in the communities where they are going to work.

MODULE 2
SESSION 6: TRANSPORTING, STORING, AND RETRIEVING WATER 90
Trainer Note: Do not overdo this activity. The idea is to get the participants thinking about carrying, storing, retrieving, and serving water.
C. Large Group Activity (10 minutes)
1. Place the “How Do We Take Care of Our Drinking and Cooking Water” poster so that everyone can see it or use the illustration in the Outreach Worker’s Handbook p. 44 so the participants can follow along (also available in the Collection of Resource Materials).
2. Let the participants know that there are three situations they must consider in taking care of
their water: transporting/carrying, storing, retrieving/serving.
3. Talk about the ways that water is transported. Use examples given in the climate setter as a starting point. Explain the first illustration, stating that the best way to transport water is in a clean container with a tightly sealed lid. Optional: Show the container with the tight-fitting lid and pass it around (for example, a clean jerry can with a cap).
4. Ask the participants how they store their water. Talk about the ways that water is stored. Show the illustration and say that for storing water, it is best to use a narrow-neck, covered container with a spigot. That way nothing can touch the water (dipper, cup, or hand). Water should be retrieved/served by pouring it from the container or from a spigot. If a narrow-neck container is not available, then the water should be served by dipping a long-handled ladle (scoop) into the water, being careful that the person’s hand does not touch the water. The ladle should be stored (preferably) by hanging it inside the water storage vessel. If it cannot be hung inside, it needs to be hung on a nail on the wall and washed and protected from dust and dirt. The ladle should not be stored by laying it on the water container because it can get contaminated. Water should be served in clean containers (glasses, etc.). Line E of the Mikikir (counseling) card on p. 40 of the Outreach Worker’s Handbook and the bottom of the row of the “How Do We Take Care of Our Drinking and Cooking Water” card in the handbook, p. 44, illustrate the different methods of storing water.
5. Review some of the transporting/carrying, storing, and retrieving methods so they can begin
to relate what they’ve been studying to actual conditions in the community. Talk about ways that water is stored that are less than “ideal,” e.g., in uncovered wide-mouth pots, in clay pots with a piece of cloth covering the opening, etc.
D. Reading (15 minutes)
Have the participants turn to p. 17 in their Outreach Worker’s Handbook and read more about carrying, storing, and retrieving water. Emphasize again that they do not have to memorize this information but should know where it’s found. Have them read aloud the question and then have someone read the answer. An alternative to reading is to have the participants search for the answers to some questions as they peruse the supplemental information. A. When I gather water, how should I transport it?
You should transport it in a container with a lid.

MODULE 2
SESSION 6: TRANSPORTING, STORING, AND RETRIEVING WATER 91
B. How do I take water out of the container to consume it? For storing water, it is best to use a narrow-neck, covered container with a spigot. That
way nothing can touch the water (dipper, cup, or hand). Water should be retrieved/ served by pouring it from the container or from a spigot.
If a narrow-neck container is not available, then the water should be served by dipping a long-handled ladle (scoop) into the water being careful that the person’s hand does not touch the water. Never dip a bowl, cup, or your hands into the container with your treated water because you can recontaminate it. The ladle should be stored (preferably) by hanging it inside the water storage vessel. If it cannot be hung inside, it needs to be hung on a nail on the wall and washed and protected from dust and dirt. The ladle should not be stored by laying it on the water container because it can get contaminated. Water should be served in clean containers (glasses, etc.). If you treated your water using SODIS, serve it directly from the bottle in which it was treated.
C. Where should I store my treated water? You should keep chlorinated, boiled, and filtered water in a narrow-neck container with
a lid that seals it well, preferably with a spigot (tap). Water treated with SODIS should be kept in the same bottles in which it was treated.
E. Drawing Conclusions (10 minutes)
1. Have the participants turn to p. 70 in their Outreach Worker’s Handbook to answer the following questions:
• What did you learn about carrying, storing, and retrieving water? • What do you want to remember about this lesson when you do it as an outreach
worker?
Trainer Note: The questions may be answered orally and the answers recorded by the trainer on flipcharts.
2. Summarize the key points using the prepared flipchart page:
• Water can become contaminated while carrying, storing, or retrieving it. • The best way to carry water is in a covered container. • The best way to store water is in a covered container with a spigot (tap). • The best way to retrieve water is to take it from the spigot or pour it out. • Never dip a bowl, cup, or your hands into the container with your treated water
because you can recontaminate it. • Always serve water in something clean.

MODULE 2
SESSION 6: TRANSPORTING, STORING, AND RETRIEVING WATER 92
3. If appropriate, make the link to the next session: which water treatment method shall families use? Say that in this session, they will talk about ways of helping families decide which alternatives are right for them.

GUIDE FOR TRAINING OUTREACH WORKERS MODULE 2 Session 7
SESSION 7: HELPING FAMILIES CHOOSE 93
HELPING FAMILIES CHOOSE Session Objectives At the end of this session, the participants will have: 1. Reviewed systematically the advantages and disadvantages of the different methods for
treating, carrying, storing, and retrieving water in their community.
2. Developed some strategies for helping families to select the best methods of treating water.

MODULE 2
SESSION 7: HELPING FAMILIES CHOOSE 94
SESSION AT A GLANCE: Helping Families Choose Activity Time Materials A. Introduction to the Session Trainer makes a link back to the previous sessions and introduces the topic and objectives.
5 minutes
- Flipchart, tape, markers - Summary points on flipcharts
from previous sessions for a quick review (treatment, carrying, storing, retrieving, and serving)
B. Climate Setter Ask the participants to make some choices about pictures.
10 minutes
- Pictures (or drawings) of some different ways to treat, carry, store, and serve water
C. Small Group Work Participants work on listing the different advantages of the various water treatment methods.
20 minutes
- Any posters from previous sessions
- Flipcharts from previous sessions on water
- Four flipchart pages for each treatment alternative
D. Large Group Discussion Participants discuss advantages, disadvantages, and circumstantial barriers for determining treatment options based on table work.
20 minutes - Flipchart sheets from small group work in the previous activity
E. Drawing Conclusions and Review Participants record what they’ve learned and thoughts about facilitating the session. Summary of session. Final water planning.
45 minutes - Outreach Worker’s Handbook - Prepared summary flipchart
page and questions on flipchart paper
100 minutes

MODULE 2
SESSION 7: HELPING FAMILIES CHOOSE 95
PREPARING TO TEACH THIS SESSION: Helping Families Choose
Trainer Note: This session is written as though all methods were covered in the workshop. However, if you skipped one treatment method (for example, filtration, because there are no locally available or affordable filters) then you should not work with that method during this session.
Before teaching Module 2, Session 7, you should:
1. Gather some of the different pictures (that were used in the previous sessions) for treating, carrying, storing, and retrieving water. Pair them up. You will present two pictures to the participants and ask them to make a choice. This serves as an introduction to “making a choice.”
2. Gather the flipcharts from the previous sessions where you and the participants recorded
information (pros, cons, benefits, costs, etc.) about the different treatments (chlorination, SODIS, filtering, and boiling) and the carrying, storing, and serving of water. Hang them on the wall so the participants can see them (sample on p. 9-10 of the Outreach Worker’s Handbook, in the Collection of Resource Materials Module 2, Session 8, and at the end of this session).
4. Prepare four blank flipchart pages titled: Chlorination Advantages, Boiling Advantages,
Filtration Advantages, and SODIS Advantages. Again, if you didn’t teach one of the methods, do not prepare that flipchart page.
Now prepare four blank flipchart pages titled: Chlorination Disadvantages, Boiling
Disadvantages, Filtration Disadvantages, and SODIS Disadvantages. Again, if you didn’t teach one of the methods, do not prepare a flipchart.
5. Prepare a flipchart page with summary points from the session.
6. Prepare a large chart for the final water summary and planning activity, one per organization
represented at the training, or one per table if participants are from the same organization. Put the final water summary questions on the flipchart.
MODULE 2
SESSION 7: HELPING FAMILIES CHOOSE 96
TRAINING ACTIVITIES: Helping Families Choose A. Introduction to the Session (15 minutes)
1. Say that during the previous sessions they have learned about sources of contamination and how to treat, transport, store, and retrieve/serve water, and now they are going to continue exploring the advantages and disadvantages of the different methods, compare them, and discuss some strategies for helping individuals, families, and groups in the community to make the best and most appropriate decisions on how to improve their safe water consumption practices.
B. Climate Setter (10 minutes)
1. Using the pairs of pictures depicting different ways to treat, transport, store, retrieve, and serve water, show a pair to the participants. For example, show a clay pot with no lid and another container with a lid and spigot. Ask a volunteer to tell you which s/he prefers and why. Play the game for several rounds or until the pairs of pictures are used up.
Trainer Note: The idea is to get them to tell which is preferred and why, in other words to make a choice and justify the choice. Do not belabor this activity. The point is to get them thinking about the topic at hand, which is how to help families choose the right way for them.
C. Small Group Task (20 minutes)
1. Divide the large group into smaller groups, one group for each water treatment method studied previously (chlorination, boiling, SODIS, filtration).
2. Give each group one of the prepared flipchart sheets. Instruct the groups to think of as
many advantages as they can for the treatment method: chlorination, boiling, SODIS, and filtration by sand/ceramics. Then have them look at the disadvantages. Encourage them to go back and look at the flipcharts from the previous sessions where they listed some of the advantages and disadvantages. The idea is to expand their thinking about some of the pros and cons (advantages and disadvantages) (samples available in the Collection of Resource Materials Module 2, Session 8, in the Outreach Worker’s Handbook p. 9, and at the end of this session).
3. Once each group is finished, have them hang their flipchart sheets on the wall and invite
everyone to walk around and look at them. Invite participants from other groups to make contributions to the flipchart sheets, adding advantages or disadvantages.

MODULE 2
SESSION 7: HELPING FAMILIES CHOOSE 97
4. Once everyone has visited the group work, have the participants return to their seats.
D. Large Group Discussion (20 minutes)
1. Open a large group discussion once everyone has visited the posters. Ask which of the four treatment methods most families might prefer and why. What might other families prefer and why? What about the information they discussed early in the training about local WASH conditions?
Trainer Note: This discussion will be based on the information on the flipchart sheets. The idea is to help the participants gain information about the different methods so they are ready to work with the communities.
2. Let them know that each method has advantages and disadvantages. For example, treated
water can be safely used for different lengths of time, depending on the treatment method used. Different methods take different amounts of time and effort, entail more or less out-of-pocket costs, yield water that tastes differently, and are better or worse for treating larger quantities of water more easily. No one method is right for every family. The basic rule is that the method should be matched to the families’ conditions and preferences (samples available in Collection of Resource Materials Module 2, Session 8, in the Outreach Worker’s Handbook p. 9-10, and at the end of this session).
3. Ask again which methods for making water healthy to drink they think are most appropriate
for the communities in which they will be working.
E. Drawing Conclusions, Review, and Planning (45 minutes)
1. Have them turn to p. 70 in the Outreach Worker’s Handbook. Answer the following questions:
• Recalling the definition of facilitation vs. training, what did you learn about facilitating a discussion around preferred treatment methods for water?
• What do you want to remember about this session when you facilitate it as an outreach worker?
Trainer Note: The above questions may be answered orally and the answers recorded on a flipchart by the trainer.
Additional information on choosing water treatment methods is also available in the chart on page 99.

MODULE 2
SESSION 7: HELPING FAMILIES CHOOSE 98
Summary points for this session:
• Each method has advantages and disadvantages. Hand out the chart on pp. 99–100 and ask participants to study it for a few moments, then ask for comments.
• You can help individual families figure out which method will work for them.
2. Explain that in the next session the participants will have the chance to synthesize all they’ve learned about water and begin to make some decisions about what they might do in the community.

MODULE 2
SESSION 7: HELPING FAMILIES CHOOSE 99
Considerations for Deciding Appropriate Water Treatment Methods in Particular Settings Method Positive Factors Negative Factors Boiling water • Some or many families are already
boiling water. • Fuel is easily available and free or
affordable. • Fuel burns relatively cleanly &/or
young children are not greatly exposed to smoke from fire (because well-ventilated, children kept at distance, etc.).
• Mothers have time to boil.
• Few families already boil drinking water.
• The fuel used is not easily available unless purchased.
• Taking fuel is causing deforestation and flooding.
• Burning fuel creates lots of smoke that babies are exposed to (indoor burning, babies near fire, poor ventilation).
• Mothers are already too busy to boil. • Families don’t take sufficient care in
storing and retrieving their water. Chlorination • Commercial product available,
accessible, and affordable. • Instructions for use are clear and
understood. • Clorox or another chlorine product
is available, accessible, affordable, and not sold diluted.
• People can understand and are motivated to follow simple instructions (e.g., mix Sugar Salt Solution [SSS], Oral Rehydration Salts [ORS] correctly).
• No commercial product is available, accessible, and affordable.
• Instructions are not clear and understood.
• Clorox or other chlorine products are sometimes or often sold diluted or concentration is not consistent.
• People have trouble following simple instructions (e.g., problems with correct mixing of SSS or ORS).
• Clorox is not culturally acceptable for treating water (e.g., because of local beliefs such as it’s used to cause abortions).
• Families dislike taste of properly chlorinated water.
• The water is turbid. Filtration • Effective filters are available,
accessible, and affordable. • Instructions for use are clear and
understood. • The family has time to use and
maintain the filter properly.
• Effective filters are not available, accessible, and affordable.
• Instructions for use are not clear and understood.
• Mothers are already too busy to use and maintain filter.
SODIS • Mostly sunny climate is needed.
• Families either can purchase safe (PET) plastic bottles or program can provide bottles or they are easily
• Cloudy, rainy climate doesn’t work. • Many families cannot purchase safe
(PET) plastic bottles, nor can they get them for free.

MODULE 2
SESSION 7: HELPING FAMILIES CHOOSE 100
found in the trash.• People can understand and are
motivated to follow simple instructions (e.g., problems with correct mixing of SSS or ORS).
• There is a cadre of community-based workers that can monitor solar disinfection.
• People have trouble following simple instructions (e.g., problems with correct mixing of SSS or ORS).
• Families need to treat large volumes of water.
• There is no cadre of community-based workers who can monitor correct solar disinfection.

GUIDE FOR TRAINING OUTREACH WORKERS MODULE 2 Session 8
SESSION 8: WATER SYNTHESIS 101
SYNTHESIS SESSION ON WATER: BARRIERS AND MOTIVATIONS Session Objectives By the end of this session, the participants will have: 1. Consolidated their insights on what they’ve learned about water. 2. Identified some of the major issues facing the community regarding potable water. 3. Identified some of the potential audiences for possible mutual planning sessions. 4. Explored barriers and motivators for adopting new practices.

MODULE 2
SESSION 8: WATER SYNTHESIS 102
SESSION AT A GLANCE: Water Synthesis
Activity Time Materials A. Introduction to the Session Trainer reviews highlights from previous sessions on water.
5 minutes - Flipchart, tape, markers - All previous session posters on
water
B. Large Group Activity Participants discuss how to apply what they’ve learned about water treatment to their specific communities.
60 minutes - Flipchart, tape, markers - All previous session posters on
water - Copies of the consolidation
matrix for water (Outreach Worker’s Handbook p. 29) for each table and/or large copy for the front of the room
65 minutes

MODULE 2
SESSION 8: WATER SYNTHESIS 103
PREPARING TO TEACH THIS SESSION: Water Synthesis
Before teaching Module 2, Session 8, you should:
1. Gather all the previous sessions’ flipcharts on water. 2. Make copies of the Consolidation Matrix for Water (Outreach Worker’s Handbook p. 29 and in
the Collection of Resource Materials) for each table or have one very large copy in the front of the room.
TRAINING ACTIVITIES: Water Synthesis
A. Introduction to the Session (5 minutes)
1. Review the highlights of the sessions on water or ask the participants what key points they remember regarding the locally accessible ways to treat water and the best ways to transport, store, and retrieve water. Make sure you have the flipcharts from the previous water sessions hanging where the participants can see them.
2. Tell the participants that during this session they will have the chance to consolidate all their
thoughts about water, especially from the discussion in the previous session on helping families choose.
At the end of the session, participants will have a clearer idea of where they might want to focus their work to make sure people have potable water.
B. Large Group Activity (60 minutes)
1. Move the participants so that they are sitting with others from their own organization, if appropriate. Post or distribute copies of the Consolidation Matrix for Water.
Ask each group (or individual participants) to think about the following:
• Based on what they’ve learned about the importance of clean and safe (potable)
water, what, for them, are some of the major WASH issues that should be addressed in the community?
• Who are some of the potential audiences they should be working with (individuals, families, groups)? Be specific.
• What are some of the prevalent current practices regarding water treatment?

MODULE 2
SESSION 8: WATER SYNTHESIS 104
• What could the community members be doing instead of some of the current (not so ideal) behaviors?
• Which water treatment, transport, storage, retrieval/serving behaviors are viable for most of the community members?
• What are some of the barriers to getting people to change their behaviors? • What are some of the factors that will help people change (enablers) their behavior? • What, of the activities they saw demonstrated, might they do in the community?
Trainer Note: The idea is to have them think about the different communities where their organization is presently working and use that as the basis for filling in the table. They should try to fill out at least one column for a community.
CONSOLIDATION MATRIX FOR WATER
Major Water Issues Community
One Community
Two Community
Three Possible clients for mutual planning or opportunities for creating awareness for water
Current behaviors regarding water
Some possible alternatives
Barriers to adopting new practices
Enablers to adopting new practices
Specific potential activities for the outreach worker
3. Conduct a large group discussion. Charts can be posted around the room for a gallery walk,
if time permits. 4. Make the link with the next session now that the participants have completed their study of
water. Remind them that they are going to take a look at how to help individuals, families, and groups improve their ability to have clean hands. They will have four sessions on hand washing and then the chance at the conclusion to synthesize their thoughts as they plan for activities in the field.

GUIDE FOR TRAINING OUTREACH WORKERS MODULE 3 Session 1
SESSION 1: HOW TO WASH OUR HANDS 105
HOW TO WASH OUR HANDS Session Objectives By the end of this session, the participants will be able to: 1. Demonstrate how to properly wash their hands.
2. Know how to wash hands in an area where water is scarce.

MODULE 3
SESSION 1: HOW TO WASH OUR HANDS 106
SESSION AT A GLANCE: How to Wash Our Hands Activity Time Materials A. Introduction Trainer introduces the topic of hand washing and presents the objectives.
5 minutes - Flipchart, tape, markers - Poster
B. Climate Setter Trainer, using drawings, gets the participants to think about dirty and clean hands.
5 minutes - Two drawings: dirty hands and clean hands
C. Demonstration 1 Trainer shows dirty hands and correct washing procedures.
10 minutes - Pitcher of water - Tub of water - Soap - Tub of mud
D. Demonstration 2 How hands can carry germs from one person to another.
5 minutes None
F. Reading, Drawing Conclusions, and Summary
10 minutes - Outreach Worker’s Handbook - Prepared page with key points
for summary
35 minutes

MODULE 3
SESSION 1: HOW TO WASH OUR HANDS 107
PREPARING TO TEACH THIS SESSION: How to Wash Our Hands Before you present Module 3, Session 1:
1. Gather all the required items: soap, water, pitcher, and basin. Have the tub of mud covered so the participants can’t see what’s inside.
2. Prepare copies of the “How Do We Wash Our Hands” poster, one for each table (ideal)
and/or one for hanging in front of the room. The poster is available in the Outreach Worker’s Handbook p. 45 and Collection of Resource Materials.
3. Make 2 drawings: 1) draw a person with demonstrably dirty hands and 2) draw a person with
“clean” hands. 4. Research some locally appropriate ways that people clean their hands when water isn’t
available (sand, ashes, cinders, wiping with cloth, etc.). In most settings, people use water so this may not be an issue.
5. Prepare a flipchart page with key points from the session to use as a summary.
Trainer Note: This session on how to wash hands may be combined with the session on when to wash hands. They are separated here in case the community outreach worker would like to do two separate sessions.
TRAINING ACTIVITIES: How to Wash Our Hands A. Introduction to the Session (5 minutes)
1. Welcome the participants. Tell them that during this session they are going to learn about how to wash their hands properly and how dirty hands can transmit germs.
Trainer Note: Once again, be aware of using the word “germs.” Make sure that participants understand the concept of germs, and use the appropriate term in the local language, if possible.

MODULE 3
SESSION 1: HOW TO WASH OUR HANDS 108
B. Climate Setter (5 minutes)
1. Walk around the room with the two drawings (dirty/“clean” hands).
2. Ask for some volunteers to answer questions (examples below) by pointing.
• Which person would you like to fix your meals? • Which person would you like to weed your garden? • Which person would you like to hand you pills when you’re sick? • Which person would you like to change your bicycle tire?
3. Say that for many activities, we like people with clean hands. For some activities, it doesn’t
matter. Stress that hands can look “clean” and still be dirty. Recall the session on “clear” but “not safe (potable)” water when the water was clear, but in fact was contaminated by feces. Hands also can look clean but may not be, so it’s better to be safe and wash them properly. We’re going to learn about how to correctly wash hands during this session.
C. Demonstration One (10 minutes)
1. Invite one volunteer to participate in an exercise without saying what that exercise will be. 2. Have the volunteer stand in front of the room so everyone can see him or her and have the
volunteer put hands in the tub of mud that you have uncovered. 3. Ask the volunteer to make sure that his/her hands are covered with mud. 4. Then ask the volunteer to smell hands and say what it smells like. 5. Then ask the volunteer to look closely at his/her hands and describe the feeling of having
dirty hands. 6. Again, so everyone can see and follow along, have the volunteer wash his/her hands as s/he
would normally. Ask the participants to be sure to watch everything that the volunteer does. 7. Now ask the volunteer to describe how his/her hands smell and feel. 8. Then ask the participants to tell you what steps the volunteer followed during the hand
washing. 9. Record these on a flipchart. Have a discussion about what they might do differently from
what the volunteer did while washing: “Which steps might be missing?” “What would you do differently?”

MODULE 3
SESSION 1: HOW TO WASH OUR HANDS 109
Trainer Note: The idea here is to have a list of steps for hand washing generated by the volunteer and the participants, which you can then compare with the poster. The end product will be a “corrected” list of steps generated first with input from the participants and the volunteer and then supplemented with information from the poster and facilitator.
9. Show the “How Do We Wash Our Hands?” poster. Review the steps on the poster.
Compare the poster with the list of steps generated by the volunteer and the participants.
We wet our hands and lather them with soap. We rub our hands 3 times. We rinse our hands with a stream of water. We air dry our hands or dry them with a clean towel.
USAID/HIP and MSH/Peru
10. Explain that treated (chlorinated, boiled, SODIS, filtered) water isn’t necessary to wash hands. However, they MUST use soap or an abrasive such as sand or ash. Say it’s best to rinse under a stream of water and let the hands air dry. In some locations, recommendations

MODULE 3
SESSION 1: HOW TO WASH OUR HANDS 110
include drying hands on a clean cloth or towel, although a clean cloth or towel is unlikely to be available in many settings. Air drying is the best alternative in most situations.
11. If soap is not available or affordable, people can use ash, sand, or even mud as an alternative
to soap, as long as they wash and rinse (with running water) thoroughly. The sand or ash act as an abrasive and “rub off” the dirt and germs.
D. Demonstration Two (5 minutes)
1. Invite another volunteer to the front of the room without explaining what you’re going to do. Stand next to the volunteer so that everyone can see you and the volunteer. Simulate a violent coughing fit, covering your mouth with your hand. Then offer that same hand to the person for a handshake and greeting.
2. Ask the participants what they just saw. Ask what did they think might happen when you
shake the volunteer’s hand. Listen carefully to the answers. 3. Lead a discussion with the large group about how our hands are always dirty with germs (like
when they were covered with mud) even if we can’t see the germs. Make the connection about how we transmit germs from one person to another with our hands. Ask the participants to tell you what other tasks they do that can get their hands dirty.
E. Reading, Review, and Drawing Conclusions (10 minutes)
1. Ask the participants to review p. 18 in the Outreach Worker’s Handbook about washing hands by reading selected passages. Additional information for trainers and participants is also available in the Collection of Resource Materials section for Module 3, Session 1. An alternative to reading aloud is to pose a question to the group and then let them search for the answer in the supplemental materials. A. Who should wash their hands?
Everyone should wash their hands: adults, the elderly, young people, children, and babies. If children are unable to wash hands by themselves, an adult should help them.
B. With what should we wash our hands? We should wash our hands with water and soap. To wash our hands correctly, we wet them, soap them, rub them together at least three times, clean under our nails, and rinse them with running water. We air dry them by shaking them or we use a clean towel or rag (only if a clean one is available).
C. If I don’t have soap, what can I use as a substitute? Soap is the best cleanser to use, but if no soap is available or affordable, you can use ash, sand, or even mud as an alternative to soap because all of these are abrasive so they help loosen (or “rub off”) the germs or dirt. You should then rinse under a stream of water.

MODULE 3
SESSION 1: HOW TO WASH OUR HANDS 111
D. Is “clean” water, i.e., pure or treated water, necessary for washing my hands? No, washing your hands with any water makes them cleaner if you also use a cleaning agent such as soap, sand, or ash. It is better to rinse your hands with running water.
2. Then on p. 71 in the Outreach Worker’s Handbook ask participants to record their thoughts
about teaching this session as an outreach worker:
• What did they learn? • Do they think the demonstrations will work with their audiences? Why or why not?
Trainer Note: The questions may be answered orally and the answers recorded by the trainer on a flipchart.
3. Review summary points:
• Sometimes hands get dirty. • Sometimes hands don’t appear dirty but can still transmit germs. • The steps for proper hand washing are _________ (fill in from the two lists). • Ash, sand, and mud are possible substitutes for soap. • When water is scarce, we _________ (fill in from the discussion).
4. Make the link to the next session. Now that they know how to wash their hands, it’s
important to know when to wash their hands (at what moments).

GUIDE FOR TRAINING OUTREACH WORKERS MODULE 3: HAND WASHING
Session 2
SESSION 2: WHEN TO WASH OUR HANDS 112
WHEN TO WASH OUR HANDS Session Objectives By the end of this session, the participants will be able to: 1. Identify four key moments for hand washing.
2. Describe local conditions regarding hand washing and begin thinking about what they’ve
learned and planning how to apply it when they’re working with their own audiences.

MODULE 3
SESSION 2: WHEN TO WASH OUR HANDS 113
SESSION AT A GLANCE: When to Wash Our Hands
Activity Time Materials A. Introduction
Trainer introduces the topic of when to hand wash and presents the objectives.
5 minutes - Flipchart, tape, markers
B. Climate Setter
Trainer asks the participants to volunteer to tell the others when they wash their hands.
5 minutes - Flipchart, tape, markers
C. Table Task
Trainer distributes the pictures from the poster and asks the participants to sort them according to “before” or “after.”
10 minutes - Sets of six images from poster cut out: one set of six images for each table
- Extra images from magazines showing a range of human activities
D. Large Group Discussion
Participants report on and talk about their sorting. Trainer and other groups correct as necessary.
10 minutes None
E. Table Task
Participants add anything they want to the “before” and “after” columns.
10 minutes - Extra small pieces of paper and markers on the table (optional)
F. Reading, Drawing Conclusions, and Review of Hand Washing
Participants take turns reading from the Outreach Worker’s Handbook and record their answers.
45 minutes - Outreach Worker’s Handbook
85 minutes

MODULE 3
SESSION 2: WHEN TO WASH OUR HANDS 114
PREPARING TO TEACH THIS SESSION: When to Wash Our Hands Before you present Module 3, Session 2:
1. Photocopy (or cut out of magazines) some pictures of people doing everyday tasks—
changing diapers, preparing food, putting on their clothes, brushing teeth—enough for about five pictures per table.
2. If pictures are not available and the participants have some degree of literacy, you can write
the phrases suggested in step number 1, above, (and add more examples) on pieces of paper. The idea is to present a range of human activities so the participants can discuss when they should wash their hands.
3. Mark the Outreach Worker’s Handbook p. 19 for the question and answers on when to wash
hands and mark the reflections/conclusions page at the end of the handbook, p. 71. 4. Take a page of flipchart paper and make a list of key points from the session.
TRAINING ACTIVITIES: When to Wash Our Hands A. Introduction to the Session (5 minutes)
1. Welcome the participants. Tell them that during this session they are going to learn about the critical times for washing their hands. They should be able to identify at least four times when they should wash their hands. Conclude that there are “before” times (washing hands before something) and “after” times (washing hands after something). Do not reveal the four times, which are: before preparing food, before eating food, after using the toilet, and after cleaning the baby’s bottom.
2. Continue by saying that at the end of the session, they will have a chance to take a look at some of the conditions and practices regarding hand washing in their own communities and how they might help people use improved hand washing techniques.
B. Climate Setter (5 minutes)
1. Ask the participants when they presently wash their hands with soap or another cleansing agent such as ash.
MODULE 3
SESSION 2: WHEN TO WASH OUR HANDS 115
Trainer Note: If people seem reluctant to discuss their own habits, phrase the question as, “When do people in your community wash their hands?”
2. Then ask what they’ve noticed about hand washing in their community so as to get some
more details: How many times a day do they wash their own hands? Do they help their children wash? Do many people wash with water only? What products do they use? How much does soap cost? Etc.
3. Record their answers as they call them out on a piece of flipchart paper.
Trainer Note: Do not belabor this climate setter. The purpose is to get the participants thinking about when they wash their hands.
C. Table Task (10 minutes)
1. Distribute the sets of pictures (or words)—one set of pictures per table. Add extra images of
human activity as needed. 2. Tell the participants to sort all the images/pictures into two groups: in one group put
pictures of people doing things that require them to wash hands before they do them (like preparing meals); in the other group put pictures of people doing things that require them to wash their hands after they do them (like changing the baby).
3. Give them a couple of minutes to sort the pictures. Walk around as they work. If the
participants say “it doesn’t matter,” tell them to establish a third category of pictures.
Trainer Note: Some of this information was covered in the previous session. Refer back to that session if necessary. Remember as a general guideline (also found in the handbook p. 19): Key times for washing hands: • Before eating • Before preparing food • After going to the latrine or the bathroom • After changing diapers or otherwise contacting
feces Other times: • Before breastfeeding • After returning from the field

MODULE 3
SESSION 2: WHEN TO WASH OUR HANDS 116
D. Large Group Discussion (10 minutes)
1. Have the groups report the results of their sorting exercise. Let the reports be the basis for some discussion. Some possible questions to get started:
• How many “before” pictures do you have? • How many “after” pictures do you have? • How many pictures did your group put into the “didn’t matter” group? • What did your group notice about the pictures? • Can your group estimate how many times someone would wash his or her hands if
that person washed when recommended? • What do you think are the most critical times for washing hands?
E. Table task (10 minutes)
1. After each table has reported, have the participants go back and add anything they feel should be part of the two lists (e.g., before praying). They can write these on paper.
F. Reading, Drawing Conclusions, and Reviewing (45 minutes)
1. Ask the participants to review the questions and/or the poster below about the times when hands should be washed. The questions are available in the Outreach Worker’s Handbook p. 19, and the poster is available on p. 46 in the Outreach Worker’s Handbook and in the Collection of Resource Materials.
A. When should we wash our hands?
Key times: • Before eating • Before preparing food • After going to the latrine or the bathroom • After changing diapers or otherwise coming into contact with feces Other times: • Before breastfeeding • After returning from the field

MODULE 3
SESSION 2: WHEN TO WASH OUR HANDS 117
As an alternative activity, ask the participants a couple of questions and have them search for the answers in the supplemental reading.
2. Then record on p. 71-72 in the Outreach Worker’s Handbook their thoughts about teaching this
session as an outreach worker:
• What did they learn about when to wash their hands? • Do they think they can use the pictures to illustrate when the best times are to wash
hands? • Would the sorting exercise work in their community?
Trainer Note: This may be done orally with the trainer recording the answers on a flipchart.
3. Review summary points from this session:

MODULE 3
SESSION 2: WHEN TO WASH OUR HANDS 118
• You wash your hands before __________ (fill in). • You wash your hands after __________ (fill in). • You should always wash your hands with soap or ashes or sand, because water alone
will not get them clean enough, and you should rinse them using running/pouring water.
4. Link to the next session: The next session takes a look at how much water is necessary for
proper hand washing.

GUIDE FOR TRAINING OUTREACH WORKERS MODULE 3 Session 3
SESSION 3: HOW MUCH WATER DOES IT TAKE? 119
HOW MUCH WATER DOES IT TAKE TO WASH YOUR HANDS WELL? Session Objectives By the end of this session, the participants will be able to: 1. Demonstrate how much time and water it takes to wash hands well.
2. Describe several ways to overcome water scarcity in order to achieve “ideal” hand washing.

MODULE 3
SESSION 3: HOW MUCH WATER DOES IT TAKE? 120
SESSION AT A GLANCE: Amount of Water for Hand Washing Activity Time Materials A. Introduction Trainer introduces the topic of water use and the session’s two objectives.
5 minutes - Flipchart, tape, markers
B. Climate Setter Trainer asks participants to think about how long it might take to properly wash hands.
5 minutes - Flipchart, tape, markers
C. Large Group Work Participants will observe how much water is used for proper hand washing.
30 minutes - Bar of soap - Water container (jerry can,
pitcher, jug) filled with water - 2 buckets or basins large enough
to catch several liters of water - A large cup to measure
wastewater - Flipchart with water calculation
table drawn D. Reading, Drawing Conclusions, and Reviewing
20 minutes - Outreach Worker’s Handbook for more information on hand washing with tippy taps
- Outreach Worker’s Handbook for drawing conclusions
- Chart for summary points
60 minutes

MODULE 3
SESSION 3: HOW MUCH WATER DOES IT TAKE? 121
PREPARING TO TEACH THIS SESSION: Amount of Water for Hand Washing Before you present Module 3, Session 3:
1. Copy the water calculation table (p. 123) on a large flipchart. 2. Gather all the necessary materials: basins, buckets, measuring cup, etc., and ensure a good
supply of water, if possible. 3. Also collect soap and, if appropriate, ashes and/or sand as a cleansing agent. 4. Set up a hand washing station.
TRAINING ACTIVITIES: Amount of Water for Hand Washing A. Introduction to the Session (5 minutes)
1. Explain that in this session participants will learn more about overcoming barriers to proper hand washing. Hand washing should be made as easy as possible by keeping water and the cleansing agent in several places: beside the latrine, outside the kitchen or eating area, and next to a bedbound person’s bed. When there is a lack of convenient hand washing stations with water and soap, it is much less likely that people will wash their hands well and when needed. Another reason that people do not wash their hands is that it can use a fair amount of water, which can be difficult for households that have limited access to water or have to pay for water.
Let’s start by talking about how much water is needed to wash your hands properly.
B. Climate Setter (5 minutes)
1. Ask the participants to guess how much water it takes to effectively wash hands that:
• Are very dirty from working in the fields • Look clean but just changed the baby’s dirty diaper
2. Record participant answers on the flipchart.
C. Large Group Demonstration and Table Task (30 minutes)

MODULE 3
SESSION 3: HOW MUCH WATER DOES IT TAKE? 122
Trainer Note: Have hand washing supplies ready on a table for the demonstration and measurement: bar of soap, a water container (e.g., jerry can, pitcher, jug) filled with water, and a bucket/bowl large enough to catch several liters of water. Also have available four large cups or vessels with which to measure the wastewater.
1. Ask for one volunteer to come in front of the training room to demonstrate correct hand
washing for all the participants. Ensure someone assists him or her so the water can flow to rinse hands. Ask the observers to remember the steps learned in the last session on the proper ways to wash your hands and have them coach the hand washing volunteer on correct technique. Ensure that all the wastewater is caught in the basin/bucket.
Trainer Note: Encourage the group to focus on correct technique, not on the amount of water. Pour water over the volunteer’s hands, and use as much as reasonably possible. You do not want to try to be careful and reduce the amount of water in this demonstration. This contrasts later with the savings using the tippy tap in the next exercise. Be sure to keep the cups nearby so they can be used to measure the water from hand washing with the tippy tap.
2. Fill a cup with wastewater from the basin and pour it into an empty bottle/basin. Continue
until the wastewater is gone, having the participants count the number of cups that it took. Have the group take notice of how full the bottle/basin is (mostly full, overflowing, half full, etc.) and display it somewhere in view. Explain that they are going to use this measurement in the next exercise.
Trainer Note: Place the bottle/basin with the measured amount in a location where it can be easily seen by all participants. Toward the end of this module you will compare this amount with the amount of water used by washing hands with a tippy tap.
3. Next, explain that participants will look at how many times a day a typical family needs to
wash their hands and how much water that household would need. Ask the participants to think about a family of six and figure roughly how many times a day this means they will wash their hands. Let’s assume that this family of six has an infant, one toddler less than two years of age, two older children, one man who is ill and bedbound and takes medication three times per day, and one woman who currently has her menstrual period.

MODULE 3
SESSION 3: HOW MUCH WATER DOES IT TAKE? 123
4. Walk the participants through the following table (posted on the wall or a flipchart), briefly explaining the numbers and the math, but not dwelling on it.
Trainer Note: See completed table below. The point of this exercise is not to teach the outreach workers HOW to do this, but rather to illustrate the large amount of water a family would need to practice “ideal” hand washing. As you are walking through the table, if the participants disagree with the estimations, you can change the estimated numbers. If you do, be sure to also change the total.
Water Calculation Table Example for Family of Six (including one infant, one toddler, two older children, one man who takes medication three times per day and is bedbound, and one woman who currently has her period)
Example Column “A”
Number of times a day/ each person
Column “B”
Number of family members doing
this
Total number of times a day
(Multiply Column
A x Column B) After defecation
2
4 (woman, man, 2 older children)
(2 babies don’t wash THEIR hands)
8
After changing a nappy/diaper and cleaning a baby’s bottom
6 2 12
After changing material used to absorb menstrual blood
4 (menstrual
period) 1
4
Before preparing food/cooking 3 2 (mother and
daughter) 6
Before taking/giving medication 3 1 (father) 3
Before eating 3 4 12 Before feeding 3 1 (toddler that is
eating solids) 3
Before breastfeeding 6 1 (baby that is still breastfeeding) 6
TOTAL 54 TIMES A DAY
MODULE 3
SESSION 3: HOW MUCH WATER DOES IT TAKE? 124
5. Explain that now they have an estimate that this family of six needs to be washing their
hands 54 times per day.
Trainer Note: Fifty-four times per day is from the total for the table above. If the participants have changed the numbers as you go through the table, then refer to the estimated number they came up with.
6. Tell participants that they will now multiply the number of washes a family must do per day
(e.g., 54 hand washings per day in the example above) by the amount of water it takes to wash your hands. Locate this bottle/basin filled with water used in just ONE hand washing and ask the participants to imagine 54 of those bottles/basins. THIS is the amount of water it would take our example family to wash their hands each day in an ideal fashion.
7. Acknowledge to participants that it takes a lot of water for a family of six to wash their hands properly! Lead a discussion with the group, asking participants about the following key points:
a. What kind of container is used in the communities to transport water? b. How far do people in the community have to go to get their water? c. How many extra trips to the water source (e.g., well, tap, etc.) would be required
each day to follow the ideal recommendation of hand washing at the critical times? d. Who actually transports the water (young girls, the woman of the household?) What
would this extra burden mean for them?
8. Now ask participants if these kinds of issues will affect whether someone will or will not wash their hands at critical times. Spend two minutes gathering responses.
9. Acknowledge to the participants that indeed the amount of water required to wash hands at
each critical moment can be a major barrier to families actually practicing hand washing. Tell them that it is the job of the outreach worker to help families figure out how to overcome this barrier.
10. Spend another two minutes and facilitate a discussion with the participants about what they
might say to a family that feels that it doesn’t have enough water to wash hands. Record the key messages on the flipchart. Make sure you get their ideas in their own words.
MODULE 3
SESSION 3: HOW MUCH WATER DOES IT TAKE? 125
Trainer Note: At this stage, the participants might or might not have any ideas about what a family can do to minimize water usage. If the discussion is stuck, guide it by:
• Asking how the outreach worker would work with a family to prioritize certain times for hand washing over others from the list.
• Asking if anyone has seen or heard of any devices that let you wash your hands using a small amount of water. Tell the participants that you will later review how to make and use a device that is called a tippy tap, which helps you save water when hand washing, but do not spend very much time discussing tippy taps now since they will be covered in the next session.
D. Reading, Drawing Conclusions, and Reviewing Hand Washing (20 minutes)
1. Ask the participants to turn to p. 18 in the Outreach Worker’s Handbook to see more information on hand washing (these are the same pages as Module 3, Session 1 and Module 3, Session 2). Since this information has already been covered in the training, it does not have to be discussed again here.
2. Then, on p. 72 of the Outreach Worker’s Handbook, have participants record their thoughts
about teaching this session as an outreach worker:
• What did they learn about the amount of water necessary for hand washing? • Do they think they can help a family find ways to address a lack of water availability?
(Note that they will be learning much more about tippy taps in the next session.)
Trainer Note: This may be done orally, with the trainer recording the answers on a flipchart.
3. Review summary points:
• The amount of water necessary for “ideal” hand washing is substantial and can
present a major barrier to hand washing. Even when people know that they should wash, they frequently don’t because there is simply not enough water.
• Outreach workers working with families can do much to help families find ways to practice hand washing, even when water is scarce. These strategies include helping families prioritize times for hand washing and using a tippy tap to conserve water.
4. Link to the next section by saying they are going to look at how to build a tippy tap.

GUIDE FOR TRAINING OUTREACH WORKERS MODULE 3 Session 4
SESSION 4: BUILDING A TIPPY TAP 126
BUILDING A TIPPY TAP Session Objective By the end of this session, the participants will be able to: 1. Describe how to build and install a tippy tap.

MODULE 3
SESSION 4: BUILDING A TIPPY TAP 127
SESSION AT A GLANCE: Building a Tippy Tap Activity Time Materials A. Introduction Trainer introduces the topic of tippy taps and the session’s one objective.
5 minutes - Flipchart, tape, markers
B. Climate Setter Trainer asks the participants to relate any experiences they might have had with tippy taps.
5 minutes - Flipchart, tape, markers
C. Large Group Demonstration Trainer outlines how to build, install, and use a tippy tap.
30 minutes - Poster with illustrations of tippy tap construction and use
- Candle - Pliers - 5 liter plastic container
D. Table Task Participants build a tippy tap at the table.
30 minutes - Enough supplies for each table
E. Reading, Drawing Conclusions, and Review
15 minutes - Outreach Worker’s Handbook for more information on tippy taps
- Outreach Worker’s Handbook for drawing conclusions
- Chart for summary points
85 minutes

MODULE 3
SESSION 4: BUILDING A TIPPY TAP 128
PREPARING TO TEACH THIS SESSION: Building a Tippy Tap Before you present Module 3, Session 4:
1. In most cases, tippy taps are used for water conservation, but they are also a quick and convenient way to set up hand washing stations in appropriate places that remind people to wash their hands at critical times. This session should be included if the program manager determines that the construction and use of tippy taps would be feasible in the program area.
2. Select a tippy tap design from the Collection of Resource Materials or from a local design that
families use effectively. Print out the design for use in the session. Make sure materials (plastic containers, candle, pliers, strings, and hooks) are available. If cost is an issue, plan to do only the demonstration and eliminate the table work of building a tippy tap. Plan the demonstration so that everyone can see.
3. If appropriate, have other types of containers available, such as gourds or clean jerry cans,
which might be used for tippy taps instead of the plastic containers. 4. Prepare (or use previously created) flipcharts with review points from the sessions on hand
washing. Have these available. 5. Prepare a flipchart sheet with review points for the session.
TRAINING ACTIVITIES: Building a Tippy Tap A. Introduction to the Session (5 minutes)
1. Welcome the participants. Tell them that during this session they are going to learn how to build a tippy tap. They will have the chance to see how a tippy tap is made and will work on building a tippy tap at their tables (only if materials are available).
B. Climate Setter (5 minutes)
1. Begin by asking the participants if they think people in the community have enough water
for their needs. If not, ask the participants what people do to conserve or minimize the use of water.

MODULE 3
SESSION 4: BUILDING A TIPPY TAP 129
If people state there is not enough water or that water has to be carried to the house from an outside water source, mention that one way to help economize water for hand washing is to use a tippy tap.
2. Explain that in the previous sessions they focused on when and how to wash hands. In the
last module, they saw how much water it takes to wash hands well. Say that often water is scarce in the community or has to be hauled long distances to the household and that by building tippy taps, families can do effective hand washing with just a little bit of water.
3. Having a tippy tap in one or more key places near the house is a good reminder that hands
should be washed and enables people to do so more easily. Ask where people should place tippy taps. The best places would be just outside the latrine and just outside the kitchen area.
C. Large Group Demonstration (30 minutes)
1. Invite everyone to stand around the table. 2. With the poster in view, build a tippy tap, following the steps on the poster.
Trainer Note: Several designs for making tippy taps are shown in the Collection of Resource Materials. Work with the design(s) that you feel is (are) most feasible for the local communities.
D. Table Task (30 minutes)
1. Have each table build a tippy tap. 2. Once each table has a tippy tap, see if there’s time to hang them up and use them. 3. Initiate a discussion of how they might introduce this concept into their communities. 4. If feasible, allow some participants to use the tippy taps to wash their hands. Ask for their
reactions; e.g., “How was washing your hands using the tippy tap?”
E. Reading, Drawing Conclusions, and Reviewing (15 minutes)
1. On pp. 72–73 in the Outreach Worker’s Handbook they should record their thoughts about teaching this session as an outreach worker:
• What did they learn about building tippy taps? • What materials are available in the community for building a tippy tap? • Do they think they can demonstrate this in the community?

MODULE 3
SESSION 4: BUILDING A TIPPY TAP 130
Trainer Note: This may be done orally, with the trainer recording the answers on flipchart paper.
2. Review summary points:
• Tippy taps are easy to build. • Tippy taps allow people to wash their hands using very little water. • Tippy taps may be made out of locally available materials. • Tippy taps remind us to wash our hands and help us to do it better. • Good places to place a tippy tap are in the food preparation area and near a latrine.
3. Link to the next section by saying the next session will be a hand washing synthesis.

GUIDE FOR TRAINING OUTREACH WORKERS MODULE 3 Session 5
SESSION 5: HAND WASHING SYNTHESIS 131
HAND WASHING SYNTHESIS Session Objectives By the end of this session, the participants will be able to: 1. Summarize what they’ve learned about hand washing. 2. Identify some of the major issues facing the community regarding hand washing. 3. Identify some of the potential audiences you will be working with to promote good hand
washing. 4. Describe barriers and motivators for adopting new practices around hand washing.

MODULE 3
SESSION 5: HAND WASHING SYNTHESIS 132
SESSION AT A GLANCE: Hand Washing Synthesis
Activity Time Materials A. Introduction to the Session Participants review highlights of hand washing sessions.
5 minutes - Flipchart, tape, markers - All the previous session
posters on hand washing
B. Large Group Activity Participants discuss how to apply what they’ve learned about hand washing to their specific communities.
60 minutes - Flipchart, tape, markers - All previous session posters on
hand washing - Copies of the matrix for each
table and/or large copy for the front of the room
65 minutes

MODULE 3
SESSION 5: HAND WASHING SYNTHESIS 133
PREPARING TO TEACH THIS SESSION: Hand Washing Synthesis Before you present Module 3, Session 5:
1. Gather all the previous sessions’ flipcharts on hand washing. 2. Make copies of the Hand Washing Matrix on p. 30 of the Outreach Worker’s Handbook (also in
Collection of Resource Materials Module 3, Session 5) for each table or have one very large copy in front of the room. A chart of common barriers and solutions is also available at the end of this session, on p. 12 of the Outreach Worker’s Handbook, and in the Collection of Resource Materials.
DETAILED TRAINER NOTES: Hand Washing Synthesis A. Introduction to the Session (5 minutes)
1. Review the highlights of the sessions on hand washing or ask the participants what key
points they remember regarding when and how to wash hands, how to dry hands, how much water and time it takes, and how to build a tippy tap (if that session was done). Make sure you have the flipcharts from the previous hand washing sessions hanging where the participants can see them.
2. Tell the participants that during this session they will have the chance to consolidate all their
thoughts about hand washing. At the end of the session, they will have a clearer idea of what strategies they might want to promote in the area of proper hand washing with soap.
B. Large Group Activity (60 minutes)
1. Move the participants so that they are sitting with others from their own organization, if appropriate. Post or distribute copies of the Hand Washing Matrix (Outreach Worker’s Handbook, p. 30 or Collection of Resource Materials section for Module 3, Session 5). A chart of common barriers and solutions is also available at the end of this session, on p. 12 of the Outreach Worker’s Handbook, and in the Collection of Resource Materials. Ask each group (or individual participants) to think about the following:
• Based on what they’ve learned about the importance of hand washing with soap, why is this an important practice to promote?

MODULE 3
SESSION 5: HAND WASHING SYNTHESIS 134
• Who are some of the potential audiences they should be working with (individuals, families, groups, schools, and children)? Be specific.
• What are some of the prevalent current practices regarding hand washing? • What could the community members be doing instead of some of the current (not
so ideal) behaviors? • What are some of the barriers to changing people’s behaviors? • What are some of the enabling factors that will help people change their behavior? • What, of the activities they saw demonstrated, might they do in their community?
Trainer Note: The idea is to have participants think about the different communities where their organization is presently working and use that as the basis for filling in the table. They should try to fill out at least one column.
Consolidation Matrix for Hand Washing Major Hand Washing Issues
Community One Community Two Community Three
Possible community members for mutual planning or opportunities for creating awareness
Current behaviors regarding hand washing
Some possible alternatives
Barriers to adopting new practices
Enablers to adopting new practices
Specific potential activities for the outreach worker
2. Conduct a large group discussion as necessary. Charts can be posted around the room for a
gallery walk, if time permits. The chart at the end of this session should be used to facilitate this discussion.
Below is some additional information about barriers to hand washing that can be used in this discussion.

MODULE 3
SESSION 5: HAND WASHING SYNTHESIS 135
Common reasons why people don’t wash their hands as recommended (barriers)
What an outreach worker can do to address this barrier
People don’t know how important the practice is. They don’t connect dirty hands with diarrhea, and/or they consider diarrhea a “normal” and not dangerous condition.
Explain/teach/demonstrate the concept of dehydration—that diarrhea leads to children losing so much water that they get sick and can die. Mention what happens to crops when they don’t get enough water. Acknowledge that children with diarrhea are too common now, but that it doesn’t have to be that way—one of they key ways to reduce diarrhea is good hand washing.
Hands don’t look dirty. Use coughing and sneezing in hand exercise.
Soap is not easily available to purchase or affordable.
First try to motivate people to purchase hand soap, even if it is difficult. Note that the bar of soap can be cut into smaller pieces, so one bar can be “spread” across multiple hand washing stations. If people feel that they cannot buy soap, then ask them to wash with ashes, sand, or mud…whichever is most acceptable and available.
People have poor access to water, so they don’t want to use too much for things like hand washing.
There are three basic ideas to consider together with the mothers or families: (1) use a tippy tap or some other water-saving device; (2) figure out a way to get more water for the family; (3) when water is most scarce, wash only at the most critical times (in most places, after defecating, cleaning a baby’s bottom or diaper, or otherwise coming into contact with feces).
People are too busy. Try to motivate hand washing with soap as often as possible, but emphasize the most critical times.
People don’t have a good place to wash where all the supplies (soap, water, etc.) are located together.
Encourage every family to prepare at least one hand washing station, ideally one at the latrine and one where food is prepared; engage respected community members to do the same.
People don’t wash at critical times. Teach what the most critical times are; prioritize critical times if washing at all recommended times is not acceptable or feasible.
People don’t wash thoroughly enough. Organize public demonstrations, using children and adults, to model good hand washing technique.
People dry hands on whatever soft material is available (often dirty).
Encourage people to air dry.
3. Link with the next module and session now that they have completed their studies of water.
They are going to be looking at the key practice of proper and safe disposal of human waste (feces). There are three sessions on isolating feces: 1) a review of the dangers, 2) how to dispose/isolate feces, and 3) latrines.

GUIDE FOR TRAINING OUTREACH WORKERS MODULE 4: HANDLING FECES
Session 1
SESSION 1: THE FECAL-ORAL ROUTE 136
THE FECAL-ORAL ROUTE: THE DANGERS OF CONTAMINATION Session Objectives By the end of this session, the participants will be able to: 1. Identify some common community practices related to the disposal of feces. 2. Review how feces can be spread by the five F’s. 3. Remind people about the specific dangers of and diseases related to contamination by feces. 4. Identify the steps on the “sanitation ladder.”

MODULE 4
SESSION 1: THE FECAL-ORAL ROUTE 137
SESSION AT A GLANCE: The Fecal-Oral Route Activity Time Materials A. Introduction Trainer introduces the topic of why feces can be dangerous and presents the four objectives for the session.
5 minutes - Flipchart paper, markers, tape
B. Climate Setter Trainer asks the participants to discuss some of the common practices in the community related to defecation, especially how feces are disposed of.
10 minutes - Flipchart paper, markers, tape
C. Large Group Discussion and Task Trainer reminds participants about the concept of the five F’s introduced in Module 1, Session 5.
30 minutes - Five cards and five flipchart pages with one word each: food, flies, fingers, field, fluids
- Drawing of someone defecating openly
D. Large Group Discussion and Contest Participants discuss some of the known dangers (diseases) related to open defecation and the sanitation ladder is introduced.
10 minutes - Complementary information, if needed, about diseases not mentioned during the discussion
- Sanitation ladder drawings
E. Reading, Conclusions, and Planning
45 minutes - Outreach Worker’s Handbook
100 minutes
MODULE 4
SESSION 1: THE FECAL-ORAL ROUTE 138
PREPARING TO TEACH THIS SESSION: The Fecal-Oral Route Before you present Module 4, Session 1:
1. If possible, have copies of the sanitation ladder (see next page), one for each table. 2. Be aware that there may be reluctance to talk about this subject. Also make sure you find the
locally appropriate words that are used to refer to feces, defecation, etc. 3. Prepare a set of cards with the words “food,” “flies,” “fingers,” “field,” and “fluids,” one set
per table and one set for the trainer, and write each word on a flipchart page. (Pictures for the F diagram are also available in the Collection of Resource Materials in the section titled Module 4, Session 1).
4. Prepare a culturally appropriate drawing (or use a predrawn picture) of someone defecating
openly (samples in Collection of Resource Materials section for Module 1, Session 5). 5. Do some preliminary research about diseases transmitted by the oral-fecal route such as
hepatitis A, cholera, typhoid, giardia, amoebic dysentery, rotavirus, or polio. In general, many of the diseases that have diarrhea as a symptom can be transmitted from contact with contaminated feces. The participants should not be overwhelmed with a lot of technical information about all the diseases but should realize how many diseases are associated with the oral-fecal route.
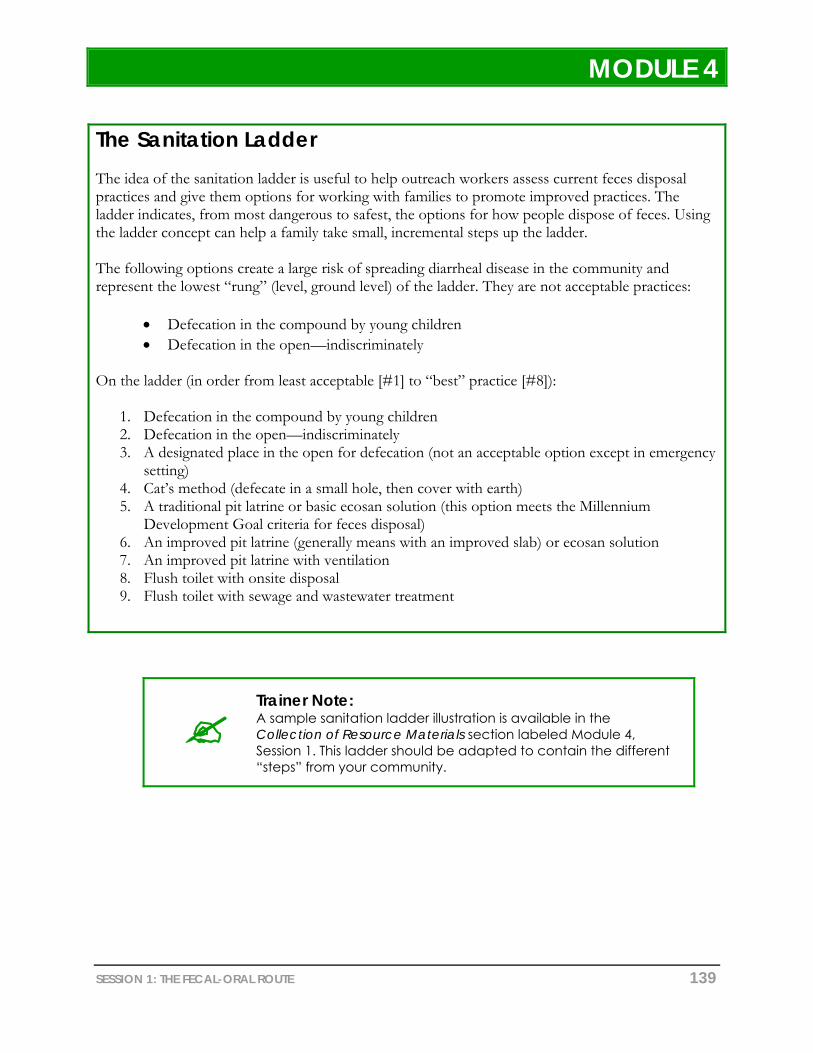
MODULE 4
SESSION 1: THE FECAL-ORAL ROUTE 139
The Sanitation Ladder The idea of the sanitation ladder is useful to help outreach workers assess current feces disposal practices and give them options for working with families to promote improved practices. The ladder indicates, from most dangerous to safest, the options for how people dispose of feces. Using the ladder concept can help a family take small, incremental steps up the ladder. The following options create a large risk of spreading diarrheal disease in the community and represent the lowest “rung” (level, ground level) of the ladder. They are not acceptable practices:
• Defecation in the compound by young children • Defecation in the open—indiscriminately
On the ladder (in order from least acceptable [#1] to “best” practice [#8]):
1. Defecation in the compound by young children 2. Defecation in the open—indiscriminately 3. A designated place in the open for defecation (not an acceptable option except in emergency
setting) 4. Cat’s method (defecate in a small hole, then cover with earth) 5. A traditional pit latrine or basic ecosan solution (this option meets the Millennium
Development Goal criteria for feces disposal) 6. An improved pit latrine (generally means with an improved slab) or ecosan solution 7. An improved pit latrine with ventilation 8. Flush toilet with onsite disposal 9. Flush toilet with sewage and wastewater treatment
Trainer Note: A sample sanitation ladder illustration is available in the Collection of Resource Materials section labeled Module 4, Session 1. This ladder should be adapted to contain the different “steps” from your community.

MODULE 4
SESSION 1: THE FECAL-ORAL ROUTE 140
TRAINING ACTIVITIES: The Fecal-Oral Route A. Introduction to the Session (5 minutes)
1. Welcome the participants. Tell them that during this session they are going to learn about how feces can be spread, how they can be dangerous, and something about how people in the community dispose of their feces. They will also be introduced to the concept of the sanitation ladder, which they will learn more about in the next session.
B. Climate Setter (10 minutes)
1. Ask the participants to name some of the common defecation practices in the community (use the culturally appropriate word) and how people presently dispose of their feces.
Trainer Note: The answers will vary according to the degree of development in the area of sanitation. The answers may range from “flush toilet” to “in the field/woods.”
2. Record their answers on a piece of flipchart paper. 3. Ask their opinions about each of the answers: What do you think about this practice? What
are positive and negative aspects to the current practices? Do not belabor this discussion. There is no need to record the opinions.
Trainer Note: By asking about “opinions” there is no judgment implied about the behavior. Reinforce the idea that they are not there to evaluate the practices but to begin thinking about how to get people to adopt a different, safer behavior.
C. Large Group Discussion and Task (30 minutes)
1. Review the concept of the five F’s (see Module 1, Session 5, p. 41 ) and distribute the cards,
one set per table (sample pictures for the F diagram are also available in the Collection of Resource Materials section for Module 4, Session 1).
2. Hold up the picture of the person openly defecating and ask the participants what happens
when someone defecates in the open?
MODULE 4
SESSION 1: THE FECAL-ORAL ROUTE 141
Take a few answers. Then ask: Where do the feces go? What happens to them when it rains? How do people feel
about stepping in feces? Does the smell of feces in the community bother people? What is the perception of someone who defecates in open areas?
3. Complement the discussion by emphasizing that all feces is potentially dangerous and needs
to be “treated with care” because all feces contain germs that can cause illnesses in people. This is why feces should be deposited in a latrine or toilet where they cannot be transported by one of several possible routes—water, dirt, food, flies, or hands—into the mouths of other people. When someone sick defecates in the open, s/he is putting everyone at risk of catching the same illness.
4. Show a set of the five F cards and have the five flipchart pages with the five F’s on them
posted. 5. Then ask each table to write one action on their cards that the community could take to help
stop the spread of feces by that particular method. (For example, on the fingers card, the group might write “make sure everybody washes his or her hands following defecation.”)
Trainer Note: Although “flies” is stated as one of the five F’s, this manual focuses on water, sanitation, and hand washing. To research more information on home hygiene and preventing flies, please refer to the websites and links in Appendix 5.
6. When the tables are done, go around the room and collect the suggestions. Record their
answers on a flipchart and then open the discussion and let people add suggestions. Push the group to come up with as many different ways as possible.
D. Large Group Discussion and Contest (10 minutes)
1. Ask the participants if they know of some diseases that are spread by not removing feces from the environment. Give each table a couple of minutes to brainstorm. See which table can generate the most diseases (prize optional).
2. Take, verify, and record the answers. If some of the common diseases (listed in the
introduction to this session) have been left out, add those to the list. Talk briefly about some of the symptoms. For example: “cholera, which causes severe dehydration due to diarrhea.”
3. Conclude by introducing the sanitation ladder and saying that a few measures taken by
people can greatly reduce the spread of feces and thus help “break” the cycle of feces getting into mouths. Show each step on the ladder. Explain that they will look at the ladder in more detail in the next session.

MODULE 4
SESSION 1: THE FECAL-ORAL ROUTE 142
E. Reading, Conclusions, and Review (45 minutes)
1. Ask the participants to turn to p. 19 in the Outreach Worker’s Handbook to the question and answer section on the proper disposal of feces. Have them read aloud each question and answer. Remind them again that they do not have to memorize all this but should know where to find it in the Outreach Worker’s Handbook.
An alternative way to have the participants become familiar with the supplemental
information is to ask them questions (individually, in pairs, trios, by tables, etc.) and have a “treasure hunt” where everyone looks in the Outreach Worker’s Handbook to see who can find the right answer first.
2. Then on pp. 73–74 in the Outreach Worker’s Handbook, record their thoughts about teaching
this session as an outreach worker:
• What did you learn during this session? • Are you comfortable enough with the subject matter to facilitate a session with an
individual, family, or group? • What are you going to remember about the five F’s when you are working with
members of the community? • What else do you need to know/to do to be ready?
Trainer Note: This may be done orally with the trainer recording answers on a flipchart.
3. Summary points:
• Some of the current practices in the community • How each of the F’s can spread feces • Some of the serious diseases spread by not isolating feces • What are the potential dangers and perceptions of open defecation in the community • The steps on the sanitation ladder
4. State that in the next session, they are going to take a look in more depth at ways to properly
dispose of fecal material.

GUIDE FOR TRAINING OUTREACH WORKERS MODULE 4 Session 2
SESSION 2: PROPER FECES DISPOSAL 143
PROPER FECES DISPOSAL
Session Objectives At the end of this session, the participants will be able to: 1. Identify where most of the community members are on the sanitation ladder regarding their
method of feces disposal. 2. Discuss the pros and cons of the various steps/methods of disposal on the ladder. 3. Relate why it’s especially important that the feces of children, animals, and invalids be
properly disposed. 4. List three possible ways to properly clean oneself following defecation (make sure to include
hand washing with soap).

MODULE 4
SESSION 2: PROPER FECES DISPOSAL 144
SESSION AT A GLANCE: Proper Feces Disposal Activity Time Materials A. Introduction Trainer introduces the topic of feces disposal, reviews how feces can be harmful, and presents the four objectives for the session.
5 minutes - Flipchart paper, markers, tape
B. Climate Setter Trainer quickly reviews the sanitation ladder and asks the participants how most community members dispose of their feces and why.
10 minutes - Flipchart paper, markers, tape - Copy of the sanitation ladder
from previous session (p. 139, or Outreach Worker’s Handbook p. 20 or Collection of Resource Materials) posted or one copy per table
C. Table Discussion and Task For each step on the ladder, participants discuss the pros and cons of the disposal/isolation method.
30 minutes - Flipchart paper with steps on the ladder down the left hand side and two columns (pro and con)
D. Large Group Brainstorm and Discussion Participants discuss how they might get community members to “move up the ladder,” and why it’s especially important to ensure the proper disposal of feces from children, animals, and invalids.
25 minutes - Flipchart paper, markers, tape
E. Large Group Discussion Review of proper methods of cleaning oneself following defection.
10 minutes - Outreach Worker’s Handbook
F. Reading, Conclusions, and Planning 20 minutes - Outreach Worker’s Handbook
100 minutes

MODULE 4
SESSION 2: PROPER FECES DISPOSAL 145
PREPARING TO TEACH THIS SESSION: Proper Feces Disposal Before you present Module 4, Session 2:
1. Be prepared to summarize briefly the previous session about why feces are potentially dangerous and why open defecation is harmful, as well as the oral-fecal route.
2. Have copies ready of the sanitation ladder (see previous session, also in Outreach Worker’s
Handbook p. 20; sample illustration available in Collection of Resource Materials section for Module 4, Session 1), one large copy for posting or copies for each table. On a piece of flipchart paper, put the steps of the ladder down the left hand side and label the top “pro” and “con.” Use only those steps on the ladder that are appropriate for the community.
3. Do research on some of the more common practices in the community regarding feces
disposal and methods of cleaning oneself afterward.
TRAINING ACTIVITIES: Proper Feces Disposal A. Introduction to the Session (5 minutes)
1. Welcome the participants. Tell them that during this session they are going to learn more about the sanitation ladder, look at actual community practices, and talk about ways to get the community members to properly dispose of (isolate) their feces. In addition, there will be a review of hand washing and cleaning practices with special attention to its importance following defecation.
B. Climate Setter (10 minutes)
1. Quickly review the different steps on the sanitation ladder and ask where the participants think most community members are at the present time regarding feces disposal. Extend the conversation to talk about the feces of babies, sick people, and animals and why it’s important to think about the correct disposal of these kinds of waste.
The steps on the sanitation ladder are: 1. Defecation in the compound by young children 2. Defecation in the open—indiscriminately 3. A designated place in the open for defecation (not an
acceptable option unless in an emergency setting) 4. Cat’s method (in a small hole and covered with earth)

MODULE 4
SESSION 2: PROPER FECES DISPOSAL 146
5. A traditional pit latrine or basic ecosan solution (this option meets the Millennium Development Goal criteria for feces disposal)
6. An improved pit latrine (generally means improved slab) or ecosan solution
7. An improved pit latrine with ventilation 8. Flush toilet with onsite disposal 9. Flush toilet with sewage and wastewater treatment
2. Record their answers on a piece of flipchart paper. 3. Ask participants what they think about these practices. Do not belabor this discussion.
There is no need to record the opinions.
Trainer Note: By asking about “opinions,” there is no judgment implied about the behavior. Much of this will be review from the previous lesson. The program may well want to record these opinions for use in creating messaging.
C. Table Discussion and Task (30 minutes)
1. Referring to the sanitation ladder list on the wall or the copies on the desk, ask the
participants at each table to talk about the pros and the cons of a couple of the methods of disposing of excreta and to record those on flipchart paper. (The number of methods per table will vary depending on the number of tables.)
Trainer Note: The idea in the previous activity was for the participants to think about the community’s practices and to express their opinions about such practices. In this activity participants talk about the steps on the ladder and their pros and cons.
2. When the tables have completed and posted their work, ask the participants what they’ve
begun to conclude about the steps on the ladder. Take a few answers.
D. Large Group Brainstorm and Discussion (25 minutes)
1. Put the flipchart pages where everyone can see them. Ask the participants to look again at the pros and cons and to remember how most community members currently dispose of their feces.
MODULE 4
SESSION 2: PROPER FECES DISPOSAL 147
2. Open the discussion by asking the participants how they might get community members to “move up the ladder.” Encourage creative ideas.
Trainer Note: At this point, don’t worry too much about the specificity of their ideas. This will come in the final analysis following the session on latrines. If the session on latrines will not be covered, then the synthesis session on management of feces should be done following this session.
3. Record the ideas and save them for the synthesis session.
E. Large Group Discussion (10 minutes)
1. Ask the participants to recall the most important things to remember when it comes to handling feces (proper disposal of feces and hand washing!).
2. Take and record a couple of answers. 3. Remind participants about how to wash their hands (based on what they remember from the
hand washing sessions). Talk about “washing” with soap or ash, air drying, how long to wash, etc.
4. Ask a volunteer how they clean feces off a baby’s bottom (following the baby’s soiling). Talk
about the importance of the special needs of sick or elderly people: their feces should be properly disposed of in a way that doesn’t contaminate the caregiver and/or other members of the family.

MODULE 4
SESSION 2: PROPER FECES DISPOSAL 148
Optional Learning Activity This activity will take at least two hours and requires some preparatory time, but it can be a good learning experience that has the additional benefit of getting the participants out of the training room. Preparation:
1. Meet with community leaders of an area very close to the training location to ask their permission to conduct the activity in their community.
2. Option 1: Prepare a form for participants to use to assess how many families are at particular steps on the sanitation ladder. Option 2: Design a simple survey form on sanitary solutions in the community. Some suggested questions are found below.
3. Prepare questions for a discussion after the community visit (both options).
Implementation: Option 1, assessing where families are on the sanitation ladder: Begin by dividing the participants into teams of three or four persons each. Have each team visit 10 homes in the nearby community. If possible, they should speak briefly with an adult or older child to ask about where the family goes to the bathroom. If no one is available, participants should try to observe where, but if they cannot see where, then they should move on to another residence and not count that one in their 10. Team members should rotate the roles of talking and recording. The group should use the form with the sanitation ladder to tick where each family’s sanitary solution is on the ladder. Later, back in the training location, each group should report on their findings (how many families at each level of the ladder). One volunteer can consolidate the findings for the entire community. Then the facilitator should lead a discussion of the findings, asking such questions as:
• How do you feel about these findings? • How similar are the sanitary conditions here to those in your own community? • How feasible is it for families in the community visited to move up the sanitation ladder? • What support would they need from an outreach worker to move up the ladder? • Could people move up more than one step at a time?
Option 2, doing a simple survey of sanitary conditions in the community: Begin by dividing the participants into teams of three or four persons each. Have each team visit 10 homes in the nearby community. They should speak briefly with an adult or older child to ask permission to visit the area where the family goes to the bathroom. If no one is available, they should move on to another residence and not count that one in their 10. The group should use the survey form that the trainer(s) prepared. It should consist of five to 10 aspects of sanitation that the trainees can observe, e.g.:

MODULE 4
SESSION 2: PROPER FECES DISPOSAL 149
• How many homes do/don’t have a latrine? • How many homes do/don’t have feces on the ground nearby? • How many latrines are/are not at least 10 meters from the home and any stream or river? • How many latrines do/don’t have a hand washing station nearby? • How many latrines do/don’t have walls? • How many latrines do/don’t have at least 2 meters between the seat and the waste in the
hole? • How many are/are not structured to be comfortable and safe for an eight year old child? • How many do/don’t have windows or a chimney for ventilation? • How many latrines do/don’t stink badly? • How many latrines do/don’t have feces stains on the floor or seat?
Later, back in the training location, each group should report on its findings. One volunteer can consolidate the findings for the entire community. Then the facilitator should lead a discussion of the findings, asking such questions as:
• How do you feel about these findings? • Which sanitation conditions should be priorities to address in this community: (1) lack of
latrines, (2) poor condition/maintenance of the latrines, (3) poor use of the latrines? • How similar are the sanitary conditions here to those in your own community? • How feasible is it for families in the community visited to move up the sanitation ladder? • What support would families need from an outreach worker to move up the ladder? • Could people move up more than one step at a time?
F. Reading, Conclusions, and Planning (20 minutes)
1. Ask the participants to turn to p. 35 in the Outreach Worker’s Handbook (assessment of feces disposal, also available in the Collection of Resource Materials). Ask them to read, if appropriate.
Trainer Note: A diagnostic sanitation ladder tool about properly disposing of feces may feature fewer steps, depending on the community.

MODULE 4
SESSION 2: PROPER FECES DISPOSAL 150

MODULE 4
SESSION 2: PROPER FECES DISPOSAL 151
Trainer Note: This drawing is meant to be illustrative. Water and quicklime, or water and ash, can also be used to clean the latrine. It should also be noted that open defecation is especially dangerous when shallow wells are in use. In all cases, to be safe, a latrine should be situated 15 meters downhill from the water source, and the pit of the pit latrine should be located 2 meters above the groundwater table.
An alternative way to have the participants become familiar with the supplemental information is to ask them questions (individually, in pairs, trios, tables, etc.) and have a treasure hunt where everyone looks in the Outreach Worker’s Handbook to see who can find the right answer first.
2. Then ask them to record their thoughts about teaching this session as an outreach worker on p. 74 in the Outreach Worker’s Handbook:
• What did you learn in this session about feces disposal? • Are you comfortable with the subject matter? • What are you going to remember about the sanitation ladder? • What kinds of problems might families have in improving how they dispose feces?
What are some strategies they might use to make improvements?
Trainer Note: This may be done orally with the trainer recording answers on a flipchart.
3. Summary points:
• Most community members are currently disposing of their feces by _______ (fill in). • Each step on the ladder has advantages and disadvantages, but it’s important to
move up the ladder in order to isolate feces and their contamination potential. • Proper washing following defecation is critical.
4. State that in the next session they are going to take a look at latrines.
Trainer Note: This session on latrines is optional, depending on the local conditions. Most of the information can be synthesized and put into a document.

GUIDE FOR TRAINING OUTREACH WORKERS MODULE 4 Session 3
SESSION 3: LATRINE BASICS 152
LATRINE BASICS: THE USE AND MAINTENANCE OF HOUSEHOLD LATRINES Session Objectives By the end of this session, the participants will be able to: 1. List the five basic principles to follow regarding latrines in general.
2. Identify five basic maintenance recommendations for keeping latrines clean. 3. List three rules for correct use of latrines. 4. Describe the four location and sizing criteria for latrines (optional).

MODULE 4
SESSION 3: LATRINE BASICS 153
SESSION AT A GLANCE: Latrines Activity Time Materials A. Introduction Trainer introduces the topic and the session’s three objectives (four, if locating and building latrines is included).
5 minutes - Flipchart paper, markers, tape
B. Climate Setter Trainer asks the participants to discuss the situation in the community regarding latrines and their use/nonuse.
10 minutes - Flipchart paper, markers, tape
C. Discussion by Halves Participants discuss what they think might be the five guiding principles for any latrine and the five basic maintenance rules for keeping them clean.
15 minutes - Flipchart paper, markers, tape
D. Triads Participants discuss how to get people to use latrines and then how to use them correctly.
20 minutes - Flipcharts, markers, tape
E. Optional Handouts Handouts to be distributed to those who are interested only.
F. Review, Conclusions
10 minutes
G. Synthesis
45 minutes - Copies of the matrix
105 minutes with the synthesis

MODULE 4
SESSION 3: LATRINE BASICS 154
PREPARING TO TEACH THIS SESSION: Latrines Before you present Module 4, Session 3:
1. Make sure that this session is appropriate. In many cases, outreach workers will be more
involved in helping motivate people to use a latrine and keep it clean, or perhaps in connecting community members with local vendors or masons, than actually in latrine construction. In such cases, this session can be skipped.
2. Familiarize yourself with some of the materials on latrine construction, use, and
maintenance. The information presented here is very basic. Additional information can be found through the websites/links in Appendix 5.
3. Make sure that the information on location, sizing, and minimum quality standards is
presented to the participants in handouts. (Available in the Outreach Worker’s Handbook pp. 21–23 and in the Collection of Resource Materials.)
4. There is no one global standard about how far from a water source a latrine should be
placed. Find out what local authorities and the ministry guidelines say. 5. Make copies of the Feces Disposal Matrix for synthesizing the work done about disposal of
feces (also in Outreach Worker’s Handbook p. 31). A sample chart of key points related to feces disposal is also available at the end of this session, in the Outreach Worker’s Handbook p. 13, and in the Collection of Resource Materials section for Module 4, Session 2.
TRAINING ACTIVITIES: Latrines A. Introduction to the Session (5 minutes)
1. Welcome the participants to this session. Tell them they are going to look at some of the basics of latrines, but that the session is only a start if they are very interested in the topic. Tell them they will cover basic principles regarding any latrine, some maintenance guidelines, and some suggestions for the correct use of latrines. The session will also touch on latrine construction, but participants are unlikely to play a key role in this as community outreach workers.
B. Climate Setter (10 minutes)

MODULE 4
SESSION 3: LATRINE BASICS 155
1. Open this session by asking the participants what they think the current situation is in the community with regards to presence and use of latrines. Take a couple of answers. Find out why latrines are built and not used, for example. Or why people are reluctant culturally to build latrines, etc. What do participants think motivates families to build latrines?
How Do Sanitation-Improvement Conditions in Urban Areas Differ from Those in Rural Areas?
There are three basic “scenarios” in urban areas, as described below.
Dense urban population, economically active, have title to land, have household water service. There may or may not be a formal sewer system. Issues here are to get people hooked up to sewers instead of doing what they are doing—piping their wastewater into informal canals, the street, ditches. Household facilities might not be the issue, but rather the contamination caused by improper wastewater disposal. The needs are for adequate sewers, with everyone connected, and, ultimately, treatment of the wastewater.
Dense, urban, very poor squatter population, just receiving land rights and services such as water. It is likely that water is piped or tanked for public distribution. It is also possible that rainwater is collected. There will be different kinds of onsite and perhaps neighborhood collection and treatment systems in these situations. If there is enough water, and if the water can be pumped into household storage tanks, there may be flush toilets with onsite disposal— infiltration pit or septic tank with infiltration pit. There might also be condominial (low bore) sewerage, with household or neighborhood septic tanks, before disposal into a common leach field or infiltration pit. These condominial systems can eventually be connected to a public sewer, once one is installed. Onsite dry options are typically just dry pit latrines, although composting latrines are certainly possible. Both pour-flush and dry-pit latrines will fill with solids and will either have to be emptied or closed out and a new adjacent pit constructed. Septic tanks or pits in limited land areas will require solids handling and disposal. In areas where there is land tenure, there is usually a better chance of private-sector services for solids handling and disposal. Another option is the construction of shared bathrooms that are operated on a charge-per-use system by a private-sector entity that also provides upkeep.
Very poor urban squatter populations with no land tenure. Water comes from rainwater or a truck supplied by private-sector vendors. Water for flush toilets is unlikely to be available. Dry options (pit and composting) are the only ones available, or perhaps depositing feces in plastic bags, then throwing them away. Informal public latrines with pay-per-use systems are possible. Usually there is not enough space for double-rotating pit options, and dry pits will require emptying when full. This is typically done informally, with emptiers using hand tools and dumping solids wherever convenient. Some areas in Africa are investigating the use of plastic bags that are disposed of in the solid waste stream. Composting toilets are possible in these areas as well, but are a bit pricy for most slum dwellers and also require more operation and maintenance than people can provide (e.g., urine separation, additives to feces, stirring, storage, and manual disposal).

MODULE 4
SESSION 3: LATRINE BASICS 156
The main differences among urban dwellers are those created by densities and by unstable land tenure. High density complicates use of all technologies, and families with tenure are more likely to invest in home improvements. And of course poverty is an issue as well as is government inattention to the poor
Rural areas, by virtue of available space and relatively secure tenure, give owners more economic options with much lower operational and maintenance issues than the urban situation. In rural areas households can install different disposal pits that can fill and be sealed for years before they are then emptied of what is benign black soil, whereas lack of space in urban scenarios often negates the multiple-pit option and forces households to find a way to remove, handle, and dispose of fresh “biosolids.” Add a high water table, periodic flooding, or rock substrate to the poor urban squatter community, and the technical situation is even more complicated.
Source: Scott Tobias, ARD Inc.
C. Discussion Task (two discussion groups) (15 minutes)
1. Ask the participants on one side of the room to think about what would be a good set of
guiding principles for any latrine. 2. Ask the participants on the other side of the room to discuss at least five ways to keep
latrines clean. 3. Give them time to talk and then take some answers. For the guiding principles, make sure
they include:
• Adequate pit depth to last a family at least two years—ask about local practice • Placement at the back of the house within 10 meters and at least 15 meters
(downhill) from a water source • Pit should not go into ground water—especially if people in the village get water
from wells • Hole must have a cover to discourage flies • Privacy, comfort, and safety
4. Take a couple of answers for keeping them clean. Make sure they include:
• Check the structure daily to make sure it’s solid. • Wash down or sweep into the hole any fecal material that’s on the slab. • Verify that the platform is solid. • Keep animals out of the latrine. • Don’t allow insects to live in the latrine. • Clean the slab daily with quicklime or ashes by sprinkling a handful or two on the
slab to soak up moisture around the hole and then sweep into the pit. • Clean concrete slabs with water and bleach or soap.

MODULE 4
SESSION 3: LATRINE BASICS 157
Handout: Locating and Sizing Latrines
Latrines should ideally be located:
• Within 10 meters from kitchen or homestead • At least 15 meters downhill from a water source • At the back of a dwelling house for privacy purposes • At least 1.5 meters above highest seasonal groundwater table
Size could be measured using the arm length (about 50 cm). A rope with a stake can be used to draw circles. If families will not accept these standards or physical conditions do not permit them to be followed, the best advice may be to locate the latrine as far as possible without discouraging people from using it because it’s too far.
Digging the pit:
• Dig the latrine to a depth of at least 4 arm lengths (2 meters), but 3 or 4 meters is preferable.
Some places with very favorable soil conditions can even go deeper. Or dig as deep as soil conditions allow.
• The pit should be more than 1.5 meters above the highest groundwater table and free of cracks.
• If there is water in your latrine from an underground source, backfill the pit with soil until there is no splashing. If people in the village use shallow wells for drinking water, add and compact 1.5 meters more of soil.
• See instructions below for building a pit that is lined or a pit that is not lined.
One basic option for covering the latrine hole:
• Cut thick and strong logs of wood and put across the hole. • Cover the space between the logs with smaller and thinner branches or pieces of wood. • Cover the wood with dirt, pound, and smooth the surface, leaving the squat hole, which is
25x35 cm. • The slab should be above the surrounding ground level so that water will not drain into it.
Other cultural traditions call for a simple squat hole, with nothing for the user to sit on. Constructing the superstructure (walls and roof):
Refer to local construction practices, noting that the walls must afford privacy; a door is preferred, as is a roof that keeps rain out.
MODULE 4
SESSION 3: LATRINE BASICS 158
More detailed notes on pit digging: If you are constructing a pit that will not be lined:
1. Mark the spot and make a circle that has a diameter of two arm lengths (1 meter). You can lay out the circle by marking the diameter of the hole on the ground.
2. Put a peg in the middle of these marks and tie a rope onto the peg. 3. Stretch out the rope from the peg to one of the marks you made and tie a small pointed
piece of wood onto the rope at that point. By moving this pointed piece of wood around and marking the ground, you will have a perfect circle that is 1 meter in diameter.
If you will be installing a casing (lining) for the pit, you need to make the hole wider. For many soil conditions you will only have to line the top 50 cm of the pit. For very poor soils, you will have to line the entire pit from the bottom to the top.
1. Lengthen your measuring rope by the width of the casing. 2. To install a 50 cm lining at the top of the pit, dig about 1 arm length (50 cm) straight down
inside this wider circle. 3. Build a stone masonry or mud and grass mortar or use a bamboo mat around the wall of the
50 cm-deep pit. 4. When this casing is installed, complete the excavation by digging down from the wall of the
casing. 5. If the casing is stone, it is likely that the pit will now have a diameter of about 2 arm lengths
(about 1 meter). 6. If the lining is to cover the entire pit, you will have to dig the wide hole all the way to the
bottom and install the casing from the bottom to the top of the hole. If you are going to install a round concrete slab, no matter what the soil conditions, you will need to make sure that it has something strong to sit on:
1. Make sure that you dig a pit that is about half an arm length narrower than the diameter of the slab.
2. Make sure that you build a stone or mud mortar rim (not a bamboo one) around the top of the hole that supports the slab.
3. The rim is built the same as the casing described above, except it can be only half an arm length (25 cm) deep.

MODULE 4
SESSION 3: LATRINE BASICS 159
Minimum Quality Standards for Latrine Construction
• Given the limited economic resources of the average family, hardware for sanitation and hygiene should be selected with a focus on “appropriate technologies” that are locally sustainable and have an impact on protecting health.
• The generally accepted definition of “sanitation coverage” requires that a household have access to a sealed, cleaned, and maintained latrine. “Sealed” means that there are covers for the hole in the slab and that any ventilation pipe is screened. This is a minimum standard for a pit latrine.
• Improved traditional pit latrines meet these minimum standards and may be the most appropriate design in many settings.
• Sanitation systems should not be constructed that contaminate ground or surface water or otherwise compromise human health or environmental quality. The construction of systems that dispose of raw sewage into a surface water source or into groundwater is not permitted.
• All latrines, household or institutional, should have access to a hand washing station with sufficient water for multiple hand washings and a cleansing agent (soap, ash, sand).
• Appropriate low-cost hardware for hand washing that consumes little water is easily furnished (see session on tippy taps) or locally available.
• Institutional latrines and toilets that see high usage (compared to the household latrines) should maintain minimum standards for a pit latrine, but must also have a slab that is easily covered and cleaned—concrete SanPlats (sanitation platforms) are a low-cost and reasonable technology.
The use of local materials to build slabs and superstructures is encouraged as a strategy to reduce or eliminate external subsidies. Adverse conditions for construction of pit latrines (high groundwater tables, soils that cannot be excavated, or soils that collapse easily) limit low-cost options for sanitation and may require a program to offer subsidies for adequate feces disposal options. Selected information adapted from: Training Manual on Hygiene and Sanitation Promotion and Community Mobilization for Volunteer Health Promoters. USAID/HIP.
D. Discussion in Trios (20 minutes)
1. Count off by threes. Ask each trio to come up with some reasons why latrines are not used, or used improperly.
2. When each trio has worked for a couple of minutes, take some of the responses and write
them on a flipchart.
3. In the large group, for each reason that a latrine is not used, have the participants come up with a counter argument. (For example, for the reason “It’s too smelly,” a counter argument might be that “it’s easy to install proper ventilation, keep clean, or cover the hole.”)

MODULE 4
SESSION 3: LATRINE BASICS 160
4. Discuss some of the points about the protocol of latrine use. This might include: putting a tippy tap near so people can wash their hands immediately upon exiting the latrine, keeping a supply of wiping material handy inside the latrine, respecting people’s privacy, etc.
E. Distribute Handout on Locating and Sizing of Latrines and Minimum Quality Standards.
(The handout can be found at the end of this session or in the Collection of Resource Materials.)
Trainer Note: A sample chart of key points related to feces disposal is also available at the end of this session if you choose to review it (also in the Outreach Worker’s Handbook p. 13 and in the Collection of Resource Materials section for Module 4, Session 2).
F. Review and Conclusions: (10 minutes)
1. Ask if there are any questions. Review some of the summary points below, if necessary. 2. Summary points (to be filled in based on the discussion):
• Five guiding principles for any latrine • Top recommendations for keeping latrines well-maintained and clean • Some strategies for getting people to use latrines
G. Synthesis on Feces Management and Latrines (45 minutes)
1. Ask the participants to think about the following questions and to construct a chart, as they
did with water and with hand washing. Remind them this is the third chart they’ve developed and they will use these charts to help them start their work in the community. Use the table found at the end of this session to facilitate this conversation.
• What are some of the most pressing problems in the community regarding the
effective disposal/isolation of feces? • Who are some of the potential audiences for targeting your activities? • What are some of the most prevalent behaviors related to disposal? • What are some of the barriers to improved practices? • What are some of the enabling factors? • What are some of the motivational activities from the water, hand washing, and feces
sessions that might be done in the community?
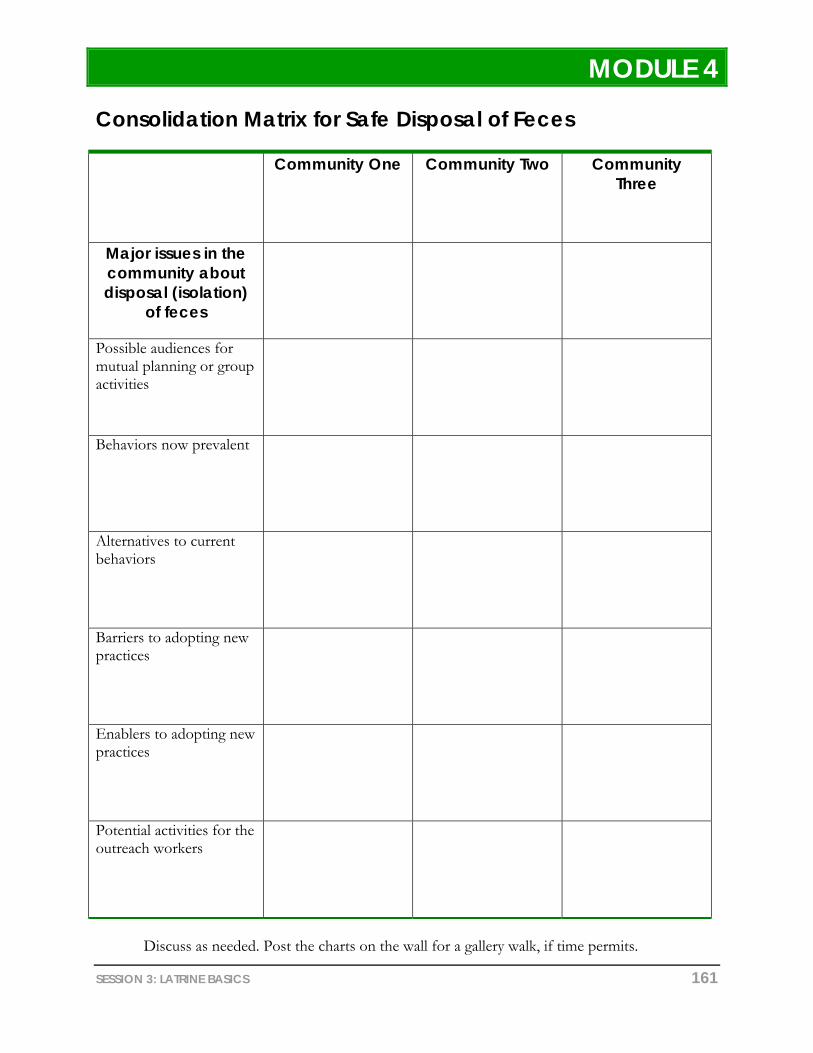
MODULE 4
SESSION 3: LATRINE BASICS 161
Consolidation Matrix for Safe Disposal of Feces
Community One Community Two Community Three
Major issues in the community about disposal (isolation)
of feces
Possible audiences for mutual planning or group activities
Behaviors now prevalent
Alternatives to current behaviors
Barriers to adopting new practices
Enablers to adopting new practices
Potential activities for the outreach workers
Discuss as needed. Post the charts on the wall for a gallery walk, if time permits.
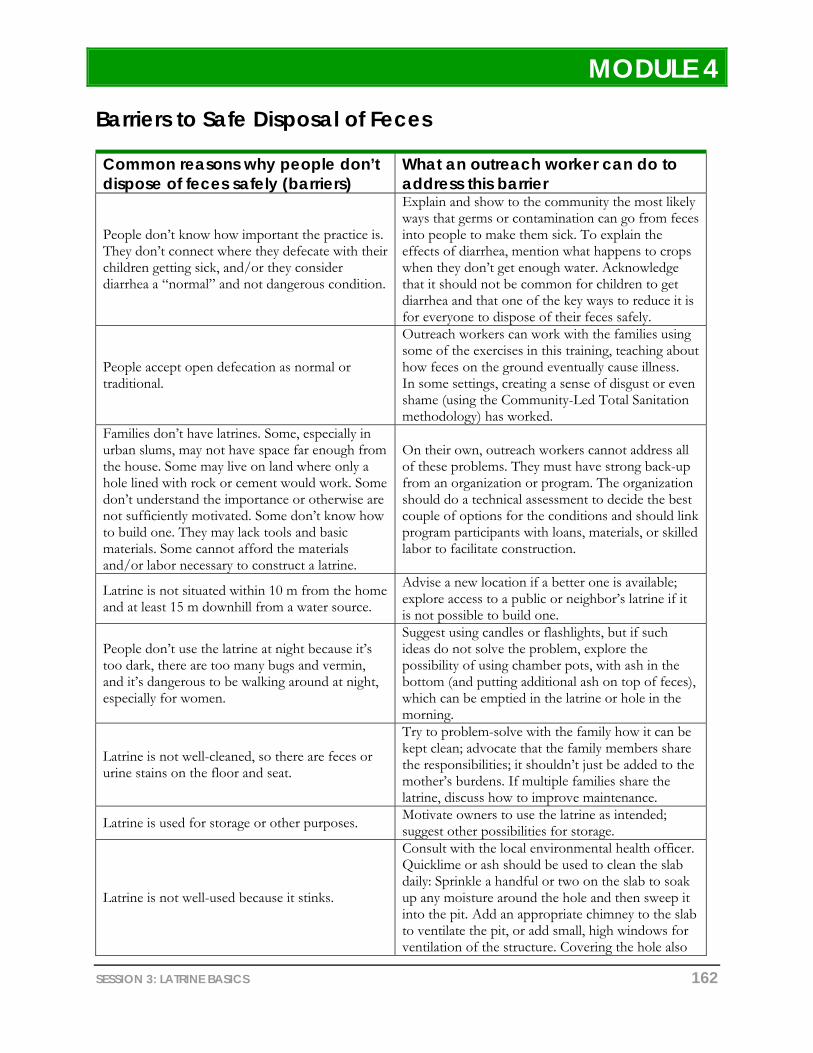
MODULE 4
SESSION 3: LATRINE BASICS 162
Barriers to Safe Disposal of Feces Common reasons why people don’t dispose of feces safely (barriers)
What an outreach worker can do to address this barrier
People don’t know how important the practice is. They don’t connect where they defecate with their children getting sick, and/or they consider diarrhea a “normal” and not dangerous condition.
Explain and show to the community the most likely ways that germs or contamination can go from feces into people to make them sick. To explain the effects of diarrhea, mention what happens to crops when they don’t get enough water. Acknowledge that it should not be common for children to get diarrhea and that one of the key ways to reduce it is for everyone to dispose of their feces safely.
People accept open defecation as normal or traditional.
Outreach workers can work with the families using some of the exercises in this training, teaching about how feces on the ground eventually cause illness. In some settings, creating a sense of disgust or even shame (using the Community-Led Total Sanitation methodology) has worked.
Families don’t have latrines. Some, especially in urban slums, may not have space far enough from the house. Some may live on land where only a hole lined with rock or cement would work. Some don’t understand the importance or otherwise are not sufficiently motivated. Some don’t know how to build one. They may lack tools and basic materials. Some cannot afford the materials and/or labor necessary to construct a latrine.
On their own, outreach workers cannot address all of these problems. They must have strong back-up from an organization or program. The organization should do a technical assessment to decide the best couple of options for the conditions and should link program participants with loans, materials, or skilled labor to facilitate construction.
Latrine is not situated within 10 m from the home and at least 15 m downhill from a water source.
Advise a new location if a better one is available; explore access to a public or neighbor’s latrine if it is not possible to build one.
People don’t use the latrine at night because it’s too dark, there are too many bugs and vermin, and it’s dangerous to be walking around at night, especially for women.
Suggest using candles or flashlights, but if such ideas do not solve the problem, explore the possibility of using chamber pots, with ash in the bottom (and putting additional ash on top of feces), which can be emptied in the latrine or hole in the morning.
Latrine is not well-cleaned, so there are feces or urine stains on the floor and seat.
Try to problem-solve with the family how it can be kept clean; advocate that the family members share the responsibilities; it shouldn’t just be added to the mother’s burdens. If multiple families share the latrine, discuss how to improve maintenance.
Latrine is used for storage or other purposes. Motivate owners to use the latrine as intended; suggest other possibilities for storage.
Latrine is not well-used because it stinks.
Consult with the local environmental health officer.Quicklime or ash should be used to clean the slab daily: Sprinkle a handful or two on the slab to soak up any moisture around the hole and then sweep it into the pit. Add an appropriate chimney to the slab to ventilate the pit, or add small, high windows for ventilation of the structure. Covering the hole also

MODULE 4
SESSION 3: LATRINE BASICS 163
helps to reduce smell. Latrine is not well-used because it is infested with worms or bugs. Consult with the local environmental health officer.
Latrine hole is filling up with water. Move the latrine location if that is feasible and will solve the problem, or build a rock-lined or cement-walled hole, if feasible.
Latrine is not well-used because there is no wiping material.
Buy toilet paper or have children collect paper trash or leaves for wiping. Once used, it can be burned or buried. In places where people use water to clean, problem-solve to make enough water available.
Family cannot/will not build latrine because it has no tools to dig hole.
Community can facilitate the shared use of appropriate digging tools.
In some cultures, it is not acceptable for men and women to share the same latrine.
A family could either build a second latrine, or could negotiate with its neighbor so that one family’s latrine could be designated for the women and one for the men.
Children up to age 6 or 8 do not use the latrine because they are afraid of falling in the hole, and they are allowed to defecate anywhere.
Explain that children’s feces have even more germs and contamination than adults’, so they must defecate either in a chamber pot (with ashes if possible) or a latrine. Keep a sanded board in the latrine to cover part of the hole when a child uses it.
2. Make the link to the next session on interpersonal communication.
Explain that now that they have technical content about WASH, they will explore some communication techniques and possible types of messages for working with their audiences.
GUIDE FOR TRAINING OUTREACH WORKERS MODULE 5: INTERPERSONAL COMMUNICATION
Session 1
SESSION 1: INTERPERSONAL COMMUNICATION 164
INTERPERSONAL COMMUNICATION FOR IMPROVED PRACTICES Session Objectives By the end of this session, the participants will be able to: 1. Define interpersonal communication (IPC). 2. Identify characteristics of effective IPC. 3. Practice IPC with a colleague and get some feedback.

MODULE 5
SESSION 1: INTERPERSONAL COMMUNICATION 165
SESSION AT A GLANCE: IPC for Improved Practices Activity Time Materials A. Introduction Trainer introduces the idea of IPC for improving practices and presents the three session objectives.
5 minutes - Flipchart, tape, markers
B. Climate Setter Trainer asks the participants to remember a time when they had a good “exchange” (conversation) with someone. Have them tell what made it a “good” (interesting, worthwhile) conversation.
5 minutes - Flipchart, tape, markers
C. Large Group Task Participants are invited to present some definitions of IPC. Discuss the importance of IPC to the success of an outreach worker.
10 minutes - Flipchart, tape, markers - Prepared definition of IPC
D. Large Group Discussion Brainstorming on the elements that come into play to make a successful conversation: evident and subtle.
10 minutes - Flipchart paper, markers, tape - Chart with title: Elements for
Success
E. Practice The participants practice IPC and receive feedback.
30 minutes - Topics on flipchart
F. Drawing Conclusions and Summary 10 minutes - Outreach Worker’s Handbook - Prepared chart with key points
70 minutes

MODULE 5
SESSION 1: INTERPERSONAL COMMUNICATION 166
PREPARING TO TEACH THIS SESSION: IPC for Improved Practices Before you present Module 5, Session 1:
1. Prepare a list of culturally appropriate, non-WASH topics for practice, such as: • What are your favorite techniques for getting the best deal in the market? • What works to get your children to behave when they are naughty? • What do you do to relieve stress? • What would you do to improve overall conditions in the community?
Add to this list so the participants can select from a good variety of topics.
2. Put a definition of IPC on a piece of flipchart paper. 3. Use or modify the following checklist for observing IPC practices (also in Outreach Worker’s
Handbook p. 24 or in the Collection of Resource Materials).
Trainer Note: This checklist is used in the next session as well.
4. Prepare a flipchart page with elements for a successful conversation, as described below. 5. Prepare a summary page for the end of the session with key points.
6. Make copies of the observation sheet.
Yes No Appropriate body language (eye contact, smile, gestures) Respectful social distance between speakers Asking lots of questions Showing interest by leaning forward Active listening Removing obstacles in the way (no barriers) Paraphrasing to signal you’ve heard and understood (taking care not to tell someone what they think or interpreting them)
Appropriate use of silence Nodding or verbal signals to demonstrate listening and encourage the speaker to continue

MODULE 5
SESSION 1: INTERPERSONAL COMMUNICATION 167
7. Explore the relevant discussion tools and the process for using Xs and Os to denote current practices and target practices.
TRAINING ACTIVITIES: IPC for Improved Practices A. Introduction to the Session (5 minutes)
1. Welcome the participants. 2. Explain that up to now, they have looked at the local WASH conditions, reviewed what they
will be doing as outreach workers, and learned about the three key practices and how they will be helping their audiences make choices about adopting the new practices: washing hands with soap, drinking/storing/serving potable water, and effectively disposing of human feces. Now participants are going to talk about how they will work with their audiences to get them to adopt healthier behaviors. In all of their work, communication, especially interpersonal communication (IPC), will be very important.
Trainer Note: Remind participants that they will have a toolkit of techniques, visual aids, and materials to help them with their tasks, but that their ability to communicate on a very personal basis will be the foundation of everything they do.
3. Introduce them to the topic of IPC and let them know that there will be four objectives for
the session: • Define IPC • Identify characteristics of effective IPC • Improve IPC skills by practicing with a colleague and getting feedback • Use the concept of step-by-step improved practices to negotiate behavior change
through IPC B. Climate Setter (5 minutes)
1. Ask the participants to remember a time when they had a good (interesting, worthwhile, helpful) conversation with a friend or colleague. Have some volunteers tell you what made it a good conversation.
2. Record these on a flipchart as the participants offer their ideas.

MODULE 5
SESSION 1: INTERPERSONAL COMMUNICATION 168
Trainer Note: There is no need to belabor this exercise. Its purpose is to get participants thinking about the topic at hand.
C. Large Group Discussion/Task (10 minutes)
1. Now ask the participants to propose some definitions of what they think IPC is.
Trainer Note: If the participants are experienced outreach workers working in other sectors, a quick review of IPC may be all that’s necessary.
2. Jot down key phrases and ideas offered by the participants on a flipchart. 3. Then propose a definition yourself and see if it meets their approval. “Interpersonal communication is oral (spoken) and nonverbal (eye contact, gestures,
posture, facial expression, etc.) communication between people: sending, receiving, interpreting, and sending back ideas and information.”
Use the narrative in the trainer note below to talk about the importance of IPC. Experienced outreach workers will no doubt be familiar with the information. For less experienced outreach workers, put essential points on a flipchart as you discuss.
Trainer Note: When we say IPC we mean outreach workers communicating with individuals, families, and groups for a variety of purposes: informing, listening, planning, and affirming, for example. The ability to communicate well is critical to the success of an outreach worker. Even with all the good intentions, posters, and equipment, an outreach worker’s ability to jointly plan new practices with the individual, group, or family will depend on the outreach worker’s ability to communicate well. We need to remember that communication has three parts: what someone says, how someone says it (voice tone), and nonverbal communication. Good communication requires that two or more people talk back and forth. Outreach workers usually communicate with individuals in the community during home visits, in group discussions (sometimes stimulated by a talk, demonstration, drama, story, etc.), or at health fairs or demonstrations.

MODULE 5
SESSION 1: INTERPERSONAL COMMUNICATION 169
D. Large Group Discussion (10 minutes)
1. Go back to the climate setter and look at some of the elements that the participants identified as contributing to a successful conversation. Add any item below that is missing:
• Appropriate body language (eye contact, smile, gestures) • Nodding or verbal signals to demonstrate listening and encourage the speaker to
continue • Respectful distance between speakers • Asking lots of questions • Showing interest by leaning forward • Showing sensitivity to the other person’s needs • Active listening • Removing physical obstacles in the way • Paraphrasing to signal you’ve heard and understood • Encouraging the other person to talk • Appropriate use of silence
2. Make the point that good communication requires that the participants have the right
attitude. If each person does not respect the other and value what the other is saying, the communication is not likely to be very productive.
3. Summarize the discussion by saying that good communication is a skill that can be improved
by practice, and then post the elements of good communication where everyone can see them.
4. Tell the participants that they will have a chance to give themselves feedback using a self-
assessment form every time they do a session in the community. (This form can be found on p. 54 of the Outreach Worker’s Handbook and will be covered in more detail in the session on Action Planning).
5. Post the list of items included in the checklist (that was prepared before the session) in the
front of the room where everyone can see it. Invite the participants to propose additions or changes to the list.
F. Practice (30 minutes)
1. Tell the participants they are now going to have the chance to practice IPC on a topic that isn’t related to WASH. In this way, they won’t have to worry about the “what” (topic) of the conversation and can and should focus on using the good IPC skills they’ve been discussing.
2. Have the participants move into groups of three. Explain that each person will have the
chance to explore a topic with someone, the chance to observe and give feedback, and the chance to be the partner (respondent) in a conversation, so there will be three rounds of practice. Have them select their roles for the first round (asker, answerer, and observer). Once they’ve done this, hand an observation sheet to each observer. Have the first person

MODULE 5
SESSION 1: INTERPERSONAL COMMUNICATION 170
“asker” pick a topic from the list of topics. The “asker” will pose the question to the “answerer” and should ensure that a dialogue ensues. The “observer” should watch the conversation between the “asker” and “answerer” and note on observer’s sheet what is and is not done during the role play. The observer remains silent during the role play and gives feedback to the “asker” after the role play is completed.
3. Make sure all the trios are ready. 4. Give the signal to start. Tell the participants they will have about seven minutes. When they
hear the next signal, they should stop the conversation and get some feedback from the observer on how the conversation went. Then they should change roles so that the person asking the questions is now answering, etc.
Trainer Note: Do three rounds so that everyone has the chance to ask, answer, and observe.
5. When the time is up, ask the participants for some reactions to the conversations:
• What did they notice that the “asker” did well? • What could the “asker” have done more of? • What could the “asker” have done less of? • Did it turn into a conversation? • What, if anything, got in the way of the “conversation?” • What will everyone do differently next time? • What do they want to remember when conducting conversations in the community
with an individual or family? • What was hard/easy?
E. Drawing Conclusions (10 minutes)
1. Ask the participants to think back on the large group discussion and on their experience in a conversation. On p. 75 in the Outreach Worker’s Handbook, have them write down what they’ve learned about IPC. They should also write what they plan on doing once they’re back home, to continue to practice their skills.
Trainer Note: This may also be done orally with the trainer recording answers on the flipchart.
2. Additional information on IPC is included on pp. 25–28 in the Outreach Worker’s Handbook.
Have the participants note that this information is available for later use. 3. Review summary points:

MODULE 5
SESSION 1: INTERPERSONAL COMMUNICATION 171
• Definition of IPC • Characteristics of good (effective) IPC • What we’ve learned from our practice
4. Link to the next session. Remind the participants that IPC is the foundation, and that in the
next session they are going to learn about using the discussion cards, one of the most important tools they will use. They will also have the chance to practice the art and science of joint planning with their audiences.

GUIDE FOR TRAINING OUTREACH WORKERS MODULE 5 Session 2
SESSION 2: USING DISCUSSION TOOLS 172
USING DISCUSSION TOOLS AND FACILITATING JOINT PLANNING FOR IMPROVED PRACTICES
Session Objectives By the end of this session, the participants will be able to: 1. Define joint planning for improved WASH practices. 2. List the steps in a successful joint planning conversation.
3. Use the discussions tools to help them and their audiences jointly plan for improved WASH
practices.
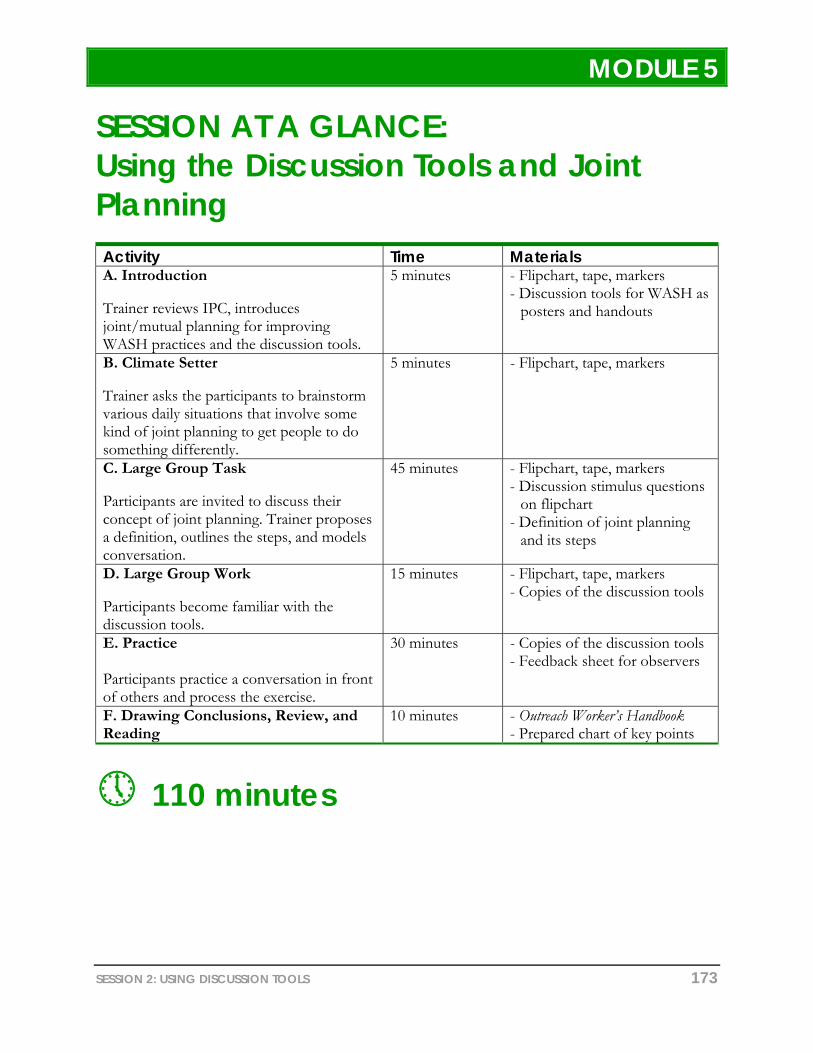
MODULE 5
SESSION 2: USING DISCUSSION TOOLS 173
SESSION AT A GLANCE: Using the Discussion Tools and Joint Planning Activity Time Materials A. Introduction Trainer reviews IPC, introduces joint/mutual planning for improving WASH practices and the discussion tools.
5 minutes - Flipchart, tape, markers - Discussion tools for WASH as
posters and handouts
B. Climate Setter Trainer asks the participants to brainstorm various daily situations that involve some kind of joint planning to get people to do something differently.
5 minutes - Flipchart, tape, markers
C. Large Group Task Participants are invited to discuss their concept of joint planning. Trainer proposes a definition, outlines the steps, and models conversation.
45 minutes - Flipchart, tape, markers - Discussion stimulus questions
on flipchart - Definition of joint planning
and its steps
D. Large Group Work Participants become familiar with the discussion tools.
15 minutes - Flipchart, tape, markers - Copies of the discussion tools
E. Practice Participants practice a conversation in front of others and process the exercise.
30 minutes - Copies of the discussion tools - Feedback sheet for observers
F. Drawing Conclusions, Review, and Reading
10 minutes - Outreach Worker’s Handbook - Prepared chart of key points
110 minutes

MODULE 5
SESSION 2: USING DISCUSSION TOOLS 174
PREPARING TO TEACH THIS SESSION: Using the Discussion Tools and Joint Planning Before you present Module 5, Session 2:
1. Prepare enough copies of the discussion tools or use the ones in the Collection of Resource
Materials or Outreach Worker’s Handbook pp. 32–40. Additional examples from other countries are available in the Collection of Resource Materials.
2. Figure out how to maximize the chances for practicing joint planning. The session is based
on a “fishbowl” concept (participants observe a joint planning conversation). If time permits, participants could practice in trios exactly like they did in the previous session using a non-WASH topic.
3. Prepare the flipchart poster with the discussion steps if participants are going to practice in
groups of three. 4. Prepare one of the participants for modeling a joint planning dialogue. Do this the night
before if there isn’t enough time to do so before the session. Preparing a volunteer involves telling the volunteer to answer the questions as they normally would. As an alternative, the dialogue at the end of the session may be used.
5. Prepare a flipchart page with key learning points from the session.

MODULE 5
SESSION 2: USING DISCUSSION TOOLS 175
TRAINING ACTIVITIES: Using the Discussion Tools and Joint Planning A. Introduction to the Session (5 minutes)
1. Welcome the participants to this session on joint planning for improved WASH practices using the discussion tools. These discussion tools should be used as examples if there are locally appropriate visual aids to use. The Mikikir cards are from Ethiopia and the other tools are from projects in different parts of Peru. Additional examples from other countries are available in the Collection of Resource Materials. Discussion tools usually come in the form of counseling cards or a flipchart. There are often two types of cards or pages in these tools: (1) assessment or diagnostic cards or pages and (2) counseling/discussion/or joint planning cards or pages. The assessment cards usually contain various questions that the outreach worker can ask in order to learn about the mother’s or family’s current practices. They may have drawings so that the mother can point to her response. After giving positive feedback and pointing out practices that could be improved, the outreach worker moves to the appropriate counseling or joint planning cards. The worker and mother discuss possible solutions to practices that need improvement and eventually reach agreement on one or a few new practices that the mother will try. The counseling/joint planning cards facilitate this part of the dialogue. Examples of assessment tools and counseling cards can be found on p. 32-49 of the Outreach Worker’s Handbook and in the Collection of Resource Materials.
Trainer Note: If the program has developed a counseling activity (i.e., has developed general guidelines for outreach workers on whom to counsel, how often, and where) and developed job aids to facilitate the counseling activities, then all of these tasks should be discussed and practiced in the training workshop. Because program approaches and job aids will vary, this training guide does not include specific training activities to facilitate how to use them; however, it can provide general suggestions.

MODULE 5
SESSION 2: USING DISCUSSION TOOLS 176
Training Outreach Workers to Counsel Using Counseling Cards/Flipchart Whom to counsel, how often, where: Counseling on WASH is likely to take place during home visits, but it could also occur at a health clinic, a community event, or other times and places. During training, the participants should discuss their program’s guidelines and have ample opportunity to ask questions. If outreach workers are expected to prioritize certain families for counseling (e.g., based on whether they have a latrine or their status on certain key indicators that are being tracked), then discuss and practice this process in training. Perhaps they can be asked to prepare a home-visiting plan for one or two months and then some of the participants can explain their plan and take questions and comments. Using job aids to counsel: This training package provides various examples of counseling cards. It is highly recommended that, prior to training the outreach workers on WASH, the organization or program adapts ideas on the content, layout, and drawings to devise their own, locally appropriate set of materials. Ideally, these materials should be developed, pretested, finalized, and produced before this training. If not, the sample materials found on pp. 32–49 of the Outreach Worker’s Handbook can be used to familiarize participants with the general concept of such job aids. Additional examples from other countries are available in the Collection of Resource Materials. The training program should devote at least a half a day, but ideally a full day or longer, to teaching the outreach workers to use the counseling materials to counsel effectively. Some of the basic steps might include: Facilitate the participants’ learning of how the set of cards are (or flipchart is) organized: Give the outreach workers 5 or 10 minutes to explore the cards. Then ask such questions as: How many cards are there? What key practices are included? Are there different types of cards (pages) (e.g., assessment cards, counseling cards, introductory cards)? Facilitate the participants’ understanding of how to select which cards to use with a particular mother or family: Ask them to try to tell you how they would select which cards. After a few people have responded, note which ideas are correct and summarize how to select which cards. Facilitate the participants’ learning of how to use the assessment cards: Have a volunteer read one of the assessment cards and explain how to use it. Ask for opinions and additions and add any important missed points. Repeat this for the other assessment cards. Note that the assessment cards are intended to help the outreach worker asking questions to the mother (or other person being counseled) about the mother's current practices, perceptions, and resources (related to safe water, hand washing, and/or feces disposal). Divide into groups of three, each person taking the role of outreach worker, mother, and observer. Each group should do a role play using one assessment card and then discuss what was done well and what could be improved. Change roles twice so each person assumes each role once. Be sure that the attributes of good IPC are posted on the wall to remind participants.
Facilitate the participants’ learning of how to use the counseling (joint problem

MODULE 5
SESSION 2: USING DISCUSSION TOOLS 177
solving) cards: Have a volunteer read one the counseling cards and explain how to use it. Ask for opinions and additions and add any important missed points. Repeat this for the other counseling cards. Note that the counseling cards should facilitate giving positive feedback on current practices and also pointing out practices that need improvement; jointly discussing and agreeing on one or two of the latter to address; jointly coming up with ideas on what improvements to make and how; and confirming the agreement and the follow-up visit. Return to the same groups of three, each person taking the role of outreach worker, mother, and observer. Each group should do a role play using one counseling card to address one of the practices needing improvement from the earlier role plays, and then discuss what was done well and what could be improved. Change roles twice so each person assumes each role once. Be sure that the attributes of good IPC are posted on the wall to remind participants. If feasible, the participants should actually visit one of the project communities (where previous arrangements have been made) and accompany a community member (e.g., member of the mothers’ club or health committee) to visit two or three families each to go through the assessment and joint problem-solving process.
Trainer Note: Back at the training venue, give ample opportunity for each person to describe, and for the group to discuss, their experiences.
2. Review the previous session on IPC so that everyone understands that good IPC skills are essential for their work. Explain that in the previous session they practiced a conversation and got some feedback on their IPC. During that conversation, they didn’t have a specific objective for the conversation other than to get some general information from the “answerer.” The topics were not related to WASH so they focused on practicing good IPC skills.
In their role as an outreach worker, however, they will have an objective for their conversations with individuals, groups, and families. So they will take the skills they just worked on and use them to have a conversation where they work/plan jointly with an audience to get them to adopt an improved WASH practice.
3. Present the session’s objectives:
• Define joint planning for improved WASH practices • List the steps in a successful joint planning conversation • Use the discussion tools in joint planning
B. Climate Setter (5 minutes)

MODULE 5
SESSION 2: USING DISCUSSION TOOLS 178
1. Ask the participants to brainstorm some of their daily situations when they have to plan jointly with someone to get that person to do something differently. Take some of the examples and expand as time permits. For example: work with a child to plan how to get homework done; plan with a subordinate how to improve writing skills; plan with a spouse how to save money.
2. As the participants give their examples, ask the group or the individual giving the example to
tell you something important that they learned about planning jointly. Write these on a flipchart and post. (For example, “I learned that when I’m planning jointly with someone it’s important to listen carefully to what the other person says.”)
C. Large Group Work: Discussion and Observed Role Play (45 minutes)
1. Now ask the participants, based on some of the examples they’ve heard, to talk about their
idea of joint planning. Use some of the questions below to help stimulate the conversation:
• What is the objective of a joint planning process/conversation? • What are some successful techniques we use when we’re planning jointly? • Are we always successful? • Is there a winner or loser in joint planning? • Are there different ways to plan jointly in different situations?
Trainer Note: If time permits, an alternative to this large group discussion would be to have smaller group tables focus on the above questions, discuss, and report on their findings.
2. Now give the following definition of joint planning for improved WASH practices, and
clarify/explain where necessary:
“Joint planning is a constructive dialogue using effective IPC skills that merges the technical knowledge (what changes in practices will be beneficial) of the outreach worker with the practical knowledge of the community member (what is feasible and acceptable) to arrive at a mutually agreed-upon plan for adopting a new, more beneficial practice. The decision on what new practices to adopt and the commitment to making the change is made by the individual, group, or family members with the guidance, encouragement, and counseling of the outreach worker.”
3. Steps in the joint planning process for improving WASH practices (post the steps where
everyone can see them):
• Greet and get permission to enter into dialogue • Assess the WASH situation by observing and asking questions • Give feedback on what the household is doing well and what areas might need
improvement

MODULE 5
SESSION 2: USING DISCUSSION TOOLS 179
• Mention one or two current practices that the person(s) might do differently • Ask the community member for ideas about what changes s/he could make • As needed, make additional suggestions and mention the positive benefits (aided by a
job aid with a menu of ideas and their benefits) • Ask the community member questions with the objective of getting her/him to
commit to trying one or two specific new (and improved) practices • Together explore some difficulties that s/he might face and how to overcome them • Ask the community member to repeat what s/he has agreed to try and the general
steps s/he plans to follow to do it • Congratulate the community member • Promise to follow up with a date and time
4. Model the steps in the joint planning process for all to observe.
Ask a “volunteer” to come forward. (The person should have been prepped before this session began to play the role of a typical mother or father in the community. Use model dialogue on pp. 183–184 for preparation.) Do the role play in a “fish bowl,” that is, by having the participants stand around you and the volunteer as you model the process. They should be prepared to take notes on what they see. Read or ask the questions below slowly. Ask the participants for their reactions.
• How did the conversation/joint planning go? • What did the outreach worker do? • What were some of the reactions of the individual? • Was the outreach worker successful? • Did the discussion tool help? • Were they able to go through all the steps?
D. Exploring the Discussion Tools (15 minutes)
1. Explain that now that they’ve had a chance to look at joint planning as it relates to IPC and the use of the discussion tools, they will have the chance to practice themselves.
2. Explain how the discussion tools are used and show the other tools that were not part of the
demonstration/modeling role play in the “fish bowl.” If you choose to discuss the Mikikir cards, explain the use of X’s to mark the current behavior and O’s to mark the new anticipated practice.
Trainer Note: Refer back to the joint planning sequence they just saw during the role play.

MODULE 5
SESSION 2: USING DISCUSSION TOOLS 180
Trainer Note: Make sure they understand each of the steps for each of the topics on the tools. Underscore the principles of using the tools. The purpose of the discussion tools is to help the outreach worker assess current practices and then help identify new healthy practices that the individual, family, or group can implement in daily life. The ideal practice may not always be easy or possible for that audience. Therefore, it is better to have the person identify an “intermediary practice” that is possible to do right away with the resources at hand and that will still have a positive impact on health AND move him/her toward the ideal of the key practice. This is accomplished using good joint planning linked to IPC techniques. Think of it as a “step by step” process moving up the WASH ladder for each of the three key practices.
E. Practice (30 minutes, optional)
1. Tell participants they are now going to have the chance to practice counseling. Ask them to once again move into groups of three. (Have them pick two new partners, to the extent possible.) Tell them that this exercise will be like a role play with emphasis on practicing joint planning and IPC skills using the discussion tools. (Use the same tools that the outreach workers will use in the field; or if these are not yet finalized, use the most appropriate ones from the Outreach Worker’s Handbook.)
2. Tell them that each person will play the role of the outreach worker, the audience, or the
observer (with checklist for feedback just like in the previous session). Everyone will get the chance to play all the roles: outreach worker, audience, and observer. Give them time (about five minutes) to pick roles for the first round.
Trainer Note: To prepare for the three role plays, everyone should take about five minutes to think about the roles s/he will play. Since everyone will be an outreach worker, everyone should have an idea of how s/he will start the conversation with their audience and what s/he would like to achieve. Post the steps of the joint planning conversation. Since everyone will be an audience, participants should figure out how they will react to the outreach workers’ first questions, how stubborn they might be, etc. Since everyone will be an observer, everyone should study the observation/ feedback sheet used in the previous session.
3. Once the trios have prepared, give the signal to start. Let each conversation continue for
about five to 10 minutes. Sound the signal for the end of the first round. Check to see that

MODULE 5
SESSION 2: USING DISCUSSION TOOLS 181
everyone is on the right track. Let the observers give feedback. Start the second round, signal the time for feedback, and then start the last round with feedback.
4. After the final signal, ask each group of three to report on what happened by using process
questions like:
• How successful were the outreach workers in getting the person to agree to try a new behavior?
• How were the various outreach workers’ IPC? • How well did the outreach workers follow the steps in the joint planning process? • Ask the outreach worker how it felt to try out the joint planning process. • What are some of the challenges in this process of actually planning jointly for
adopting a new practice? • What did they individually feel they did well and what will they need to practice
before going into the community?
Trainer Note: It is very important to process this exercise fully. This is a crucial skill to learn in the three-day workshop—to get the outreach workers ready for their roles as joint planners using the discussion tools.
Congratulate everyone.
F. Drawing Conclusions, Review, and Reading (10 minutes)
1. Ask the participants to think back on the session. They should record their reflections on p. 75 of the Outreach Worker’s Handbook.
• What did you learn about using the discussion tools? • What will you do to practice using the discussion tools and IPC at home?
Trainer Note: This may also be done orally with the trainer recording answers on the flipchart.
2. Summary points:
• Definition of joint planning • Steps in joint planning • What to remember about using the discussion tools and IPC
o Remember that good IPC means talking and working together: o After greetings, ask questions to find out what the person(s) is currently doing o Then discuss small improvements that the person(s) feels s/he can make

MODULE 5
SESSION 2: USING DISCUSSION TOOLS 182
o End with a plan for what the person will try to do 3. Link to the next session, which will explore some of the techniques they can use when
working with their audiences.

MODULE 5
SESSION 2: USING DISCUSSION TOOLS 183
Example of a Dialogue (The “steps” for a good dialogue are in boxes.) Greet and get permission to enter into a dialogue.
Outreach Worker (OW): Hello Mrs. X. It’s nice to see you again. How have you and your family been? Thank you for letting me speak with you today.
Mrs. X: No problem. I remember you said you would stop by. Assess the situation by observing and asking questions.
OW: I notice that you have a clay pot filled with water on the floor and a cup sitting on the table next to it. Can you please show me how you serve your water? Where does the water come from? etc. (Ask more questions as appropriate.)
Give feedback on what the family is doing well regarding water storage and use and information on one or two of the most important areas that need improvement.
OW: It’s good that you are getting your water from the covered well and that it’s carried to your house in closed jerry cans. But I think there might be ways you could make your water even safer.
Mrs. X: What do you mean “safer?” OW: I mean so it won’t give diarrhea or other illnesses to people who drink it. Mrs. X: Oh, okay. How can I do that? OW: If you store your water in an open container, it could get contaminated or dirty so it
would then not be safe to drink. Mrs. X: How could that happen? OW: Well, since the container is not covered, dust could blow in. Also, when your kids take
out water with the cup, their dirty hands might touch the water. Ask the mother for ideas on what changes could be made.
OW: Do you have any suggestions on what you might do to keep your water clean until you or your family drinks it?
Mrs. X: I suppose I could find a banana leaf or maybe even a clean board that could cover the container. I’m not sure how to keep the kids’ hands out.
As needed, make additional suggestions and mention the positive benefits (possibly aided by a job aid).
OW: Yes, covering the water container is a great idea so your kids won’t get sick so often. Maybe you could use one of your jerry cans to store water at home? The best solution would be to buy and use a water container that has a cover and a spigot (tap) to serve the water. They cost about [amount of money] in [name of nearby town]. Can you afford that?
Mrs. X: I don’t know…I’d have to talk to my husband, but I don’t think we can afford it until we sell the ground nut crop in a few months. What should we do in the meantime?

MODULE 5
SESSION 2: USING DISCUSSION TOOLS 184
Ask questions with the objective of getting her to commit to trying one or two specific new (and improved) practices.
OW: Your idea of covering the container is a good one, but this might be easiest if you use a jerry can that already has a cap. You can also try to keep your youngest child from retrieving water because he is very likely to touch the water with dirty hands. Maybe you can move the container from the floor to a table top? You get water for him, and you and the older kids can use your long handled scoop (ladle), which I see in your kitchen to serve the water. Which of these things can you do?
Mrs. X: Well, I think we need both jerry cans to retrieve the water, so I’d like to keep using the same water container in the house. But we can do the other things.
Together explore the steps she’ll take and some difficulties the household might face and how it might overcome them.
OW: Can you tell me how you think you’ll keep the water container covered, and how you’ll keep the small children from touching the water?
Mrs. X: I’ll talk to my husband about the cover. Maybe he can find a piece of plywood that we can clean and use, but if not, I’ll use clean banana leaves and I will put the container on our table. I’ll tell our toddler to ask me, or the older kids, or my mom, to get water for him. And I’ll tell everyone that their hands should never touch the water and that they should use the ladle.
OW: That’s great. And please consider buying a safe water container in a few months when you have a little cash. Will your husband support these ideas?
Mrs. X: I’m sure he’ll support the things that I can do now, since he hates it when the kids are sick and I’m caring for them instead of working and fixing his meals. I’ll have to talk to him about the money for the special container.
Ask Mrs. X to repeat what she’s agreed to try.
OW: Okay, just to be sure that we have the same understanding, could you please repeat what new things you’re going to try?
Mrs. X: I’m going to cover my water container with clean plywood or banana leaves and put it on the table. I’ll tell the little one to let me or another person get his water, and I’ll explain to everyone about touching the water and using the ladle. When we have the cash, we’ll try to buy and use the special container.
Congratulate Mrs. X.
OW: Those are excellent ways to help make sure you have safe water and protect your family’s health, Mrs. X.
Promise follow-up with a date and time.
OW: I’ll be back in a week’s time and see how it’s going. I’ll be here in the morning before you go to the fields.

GUIDE FOR TRAINING OUTREACH WORKERS MODULE 5 Session 3
SESSION 3: OPPORTUNITIES/TECHNIQUES FOR HYGIENE PROMOTION 185
OPPORTUNITIES/ TECHNIQUES FOR HYGIENE PROMOTION Session Objectives By the end of this session, the participants will be able to: 1. Describe three ways to help audiences improve WASH practices: group discussions,
demonstrations, and role plays. 2. Practice one of the three ways.

MODULE 5
SESSION 3: OPPORTUNITIES/TECHNIQUES FOR HYGIENE PROMOTION 186
SESSION AT A GLANCE: Opportunities/Techniques for Hygiene Promotion Activity Time Materials A. Introduction to Session and Climate Setter Trainer reviews IPC and discussion tools and introduces techniques for joint planning.
10 minutes - Flipchart, tape, markers
B. Large Group Discussion The participants discuss their experiences with the three techniques.
20 minutes - Prepared flipchart pages
C. Small Group Activity At their tables, the participants work on exploring the three techniques in more depth and plan a demonstration.
45 minutes - Flipchart, tape, markers at tables
- Prepared flipchart pages
D. Review, Reading, and Drawing Conclusions The participants review the session’s themes, answer questions about the themes, and write in their Outreach Worker’s Handbooks.
20 minutes - Pages in the Outreach Worker’s Handbook for drawing conclusions and exploring supplemental information about the three techniques
95 minutes (add extra time if demonstrations are done in activity C)

MODULE 5
SESSION 3: OPPORTUNITIES/TECHNIQUES FOR HYGIENE PROMOTION 187
PREPARING TO TEACH THIS SESSION: Opportunities/Techniques for Hygiene Promotion
Before you present Module 5, Session 3:
1. Review the tips on leading group discussions, doing demonstrations, and conducting role plays so that you are familiar with these techniques. These can be found in Appendix 2, in the Outreach Worker’s Handbook pp. 50–52, and in the Collection of Resource Materials.
2. Write the name of each technique (discussion, demonstration, role play) at the top of a
flipchart page. 3. Prepare another set of flipchart pages for the tables: on a blank flipchart page, put the
technique at the top (discussion, demonstration, or role play) and beneath the title make two columns. Label one column “the best time to use” and another column “special tips.”
4. If time permits, the participants should be divided into three groups, each assigned one of
the techniques to demonstrate to the others. The only rule is that everyone in the group must participate somehow in the skit. In this way everyone is involved in the planning of the technique.
TRAINING ACTIVITIES: Opportunities/Techniques for Hygiene Promotion A. Introduction to the Session and Climate Setter (10 minutes)
1. Remind the participants that in the previous session they had the chance to apply their interpersonal communication (IPC) skills by using some tools. The discussion tools are best used with individuals or small audiences, since as an outreach worker you will be helping your audiences think about adopting new practices. Ask for a few volunteers to remind their peers about some of the lessons they learned during the IPC session and the discussion tools session.
Do this quickly to get the participants warmed up. 2. Tell the participants that during this session they are going to have the chance to explore
three new techniques they can use with their audiences in the community. These techniques

MODULE 5
SESSION 3: OPPORTUNITIES/TECHNIQUES FOR HYGIENE PROMOTION 188
will be a good way to increase their audiences’ awareness about some of the prevalent WASH conditions and how to “do” WASH practices. They are: leading group discussions, doing demonstrations, and conducting role plays. Get the groups thinking about the three techniques by asking if anyone has had any experiences (positive or negative) using one or more of the three techniques in the community or during a training. Take some answers but do not belabor this.
B. Large Group Discussion (20 minutes)
1. Using the flipchart page with “leading a group discussion” at the top, ask the participants to think about how they would go about preparing themselves for using the technique. Repeat the exercise with the other two techniques. Supplement what the participants have offered with additions from your own experience or from having read the tip sheets on the three techniques in Appendix 2 (also in the Collection of Resource Materials and Outreach Worker’s Handbook pp. 50–52). Post the flipchart pages where the participants can see them.
C. Small Group Activity (45 minutes) (more if skits are performed)
1. Arrange the participants into three groups. Assign each group one of the techniques. Pass out the prepared flipchart pages with the “best time to use” and “special tips” columns.
2. Tell the groups they have about 20 minutes to fill in the two columns with summary points
and that they will then report to the large group. 3. When time has elapsed, ask each group to quickly report to the large group. 4. Once they have given their report, assign each group one of the three techniques. Tell them
they have 15 minutes to prepare a skit that demonstrates the technique. (If time allows.) 5. Run the skits. 6. Lead a large group discussion to make sure that you hear from everyone about the
techniques. Add anything of your own either during the reports or the large group discussion.
D. Reading, Review, and Drawing Conclusions (20 minutes)
1. Ask the participants to turn to pp. 50–52 in their Outreach Worker’s Handbook. Assign a question to each table concerning each of the three techniques. The answer should be found in the supplemental materials. Have them raise their hands as soon as they’ve found the answers.
2. Review and summarize using the points below. 3. Have the participants open their Outreach Worker’s Handbook to p. 76 and answer in writing
(this may also be done orally):

MODULE 5
SESSION 3: OPPORTUNITIES/TECHNIQUES FOR HYGIENE PROMOTION 189
• What do you want to make sure you remember about leading discussions, doing demonstrations, and conducting role plays?
4. Link to the next session, which focuses on what they will do when they go back to their
“regular” jobs. It is called action planning.

GUIDE FOR TRAINING OUTREACH WORKERS MODULE 6: ACTION PLANNING
Session 1
SESSION 1: ACTION PLANNING 190
ACTION PLANNING
Session Objectives By the end of this session, the participants will be able to: 1. Use the trainer self-assessment sheet (Appendix 3, Outreach Worker’s Handbook p. 53 and in
the Collection of Resource Materials).
2. Describe fully their role as an outreach worker and answer questions about this role. 3. Establish a plan for starting their work as an outreach worker once they reach home.
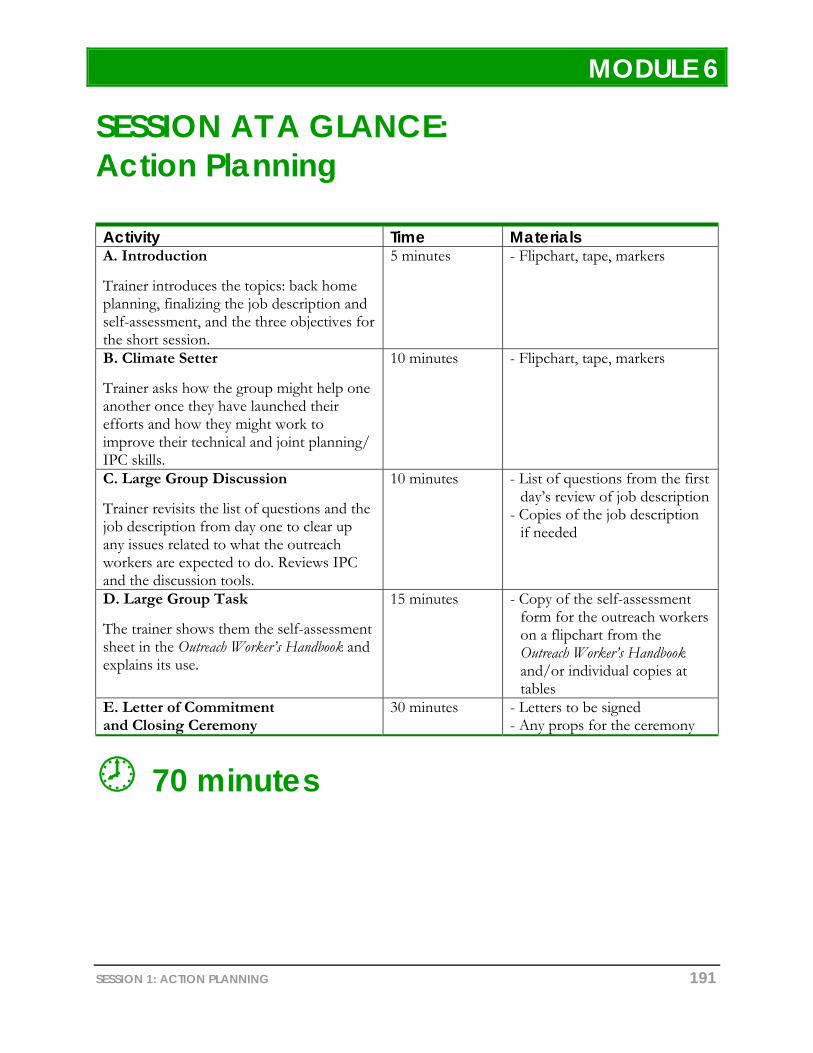
MODULE 6
SESSION 1: ACTION PLANNING 191
SESSION AT A GLANCE: Action Planning Activity Time Materials A. Introduction Trainer introduces the topics: back home planning, finalizing the job description and self-assessment, and the three objectives for the short session.
5 minutes - Flipchart, tape, markers
B. Climate Setter Trainer asks how the group might help one another once they have launched their efforts and how they might work to improve their technical and joint planning/ IPC skills.
10 minutes - Flipchart, tape, markers
C. Large Group Discussion Trainer revisits the list of questions and the job description from day one to clear up any issues related to what the outreach workers are expected to do. Reviews IPC and the discussion tools.
10 minutes - List of questions from the first day’s review of job description
- Copies of the job description if needed
D. Large Group Task The trainer shows them the self-assessment sheet in the Outreach Worker’s Handbook and explains its use.
15 minutes - Copy of the self-assessment form for the outreach workers on a flipchart from the Outreach Worker’s Handbook and/or individual copies at tables
E. Letter of Commitment and Closing Ceremony
30 minutes - Letters to be signed - Any props for the ceremony
70 minutes
MODULE 6
SESSION 1: ACTION PLANNING 192
PREPARING TO TEACH THIS SESSION: Action Planning Before you present Module 6, Session 1:
1. Know where the facilitator self-assessment form is in the Outreach Worker’s Handbook (p. 53). Also available in the Collection of Resource Materials and in Appendix 3.
2. Make sure you have the outreach worker’s job description questions from day one and have
checked off the ones that were answered during the course of the workshop. 3. Make sure that the participants have their original “pretest” assessment (Outreach Worker’s
Handbook p. 3) at hand so they can look and see if there are still areas that need to be clarified.
4. Prepare appropriate questions for the participants to answer concerning their commitment
once they leave the training.
TRAINING ACTIVITIES: Action Planning A. Introduction to the Session (5 minutes)
1. Welcome the participants to this session on planning for next steps. 2. Let them know that this is the last session. Congratulate them on how well they’ve worked
during the past ____ (fill in the number) days. 3. Present the session’s three objectives:
• Become familiar with the facilitator self-assessment sheet • Finalize the job description for an outreach worker • Plan for their jobs as outreach workers
B. Climate Setter (10 minutes)
1. Ask the participants how they might continue to improve their skills once they leave the workshop. Take several answers quickly.
2. Ask the participants how they might continue to support each other once they’re working in
the community. Take several answers quickly.

MODULE 6
SESSION 1: ACTION PLANNING 193
3. Record on flipchart if time allows.
C. Large Group Task (10 minutes)
1. Revisit the questions from day one on the job description of an outreach worker. Answer any remaining questions. If necessary, revisit the suggested tasks of an outreach worker in the Outreach Worker’s Handbook p. 8, or the program specific job description (also in the Collection of Resource Materials and Appendix 1).
2. Briefly revisit the initial “pretest” or “assessment tool” filled out by the participants. Retake
the pretest (pp. 3–5, Outreach Worker’s Handbook; also in Collection of Resource Materials and Introduction of Training Guide). Give them a couple of minutes to see where they might need to continue studying WASH, joint planning, or any of the other themes explored during the training.
3. If time permits, call on some volunteers to tell what they want to continue to work on.
D. Large Group Discussion/Task (15 minutes)
1. Show the participants where the self-assessment sheet is in the Outreach Worker’s Handbook (p. 53) or Appendix 3.
2. Guide the participants through the different desired practices (in the left column) and say
that following their sessions with their community members, they should take a few minutes to assess their performance. Continue by saying that in this way, they will have a record on how they should adjust or improve their own performance with the clients in order to attain behavior change.
E. Individual Task, Large Group Discussion, and Pairs (20–30 minutes)
1. Post the following questions on a flipchart and ask each participant to answer the questions below:
Trainer Note: Consult with the program manager to learn the most appropriate answers.
• Will you be working mainly with individuals, families, or groups? • How will you acquire supplies that you need? • When will you start and how will you introduce yourself to your audience(s)? • Will you work in teams? If so, how will you divide up the work? • Does your organization want you to track your progress and feed data to them? • What about narrative progress reports?

MODULE 6
SESSION 1: ACTION PLANNING 194
• How can you stay in contact with your fellow participants and share important lessons about helping people to change their behavior?
2. When it looks like most participants have completed their answers, ask them to find a
partner and share their responses.
Trainer Note: The idea is to spark interest/curiosity/new ideas as you share the answers to the questions.
F. Drawing Conclusions, Commitment Letter, and Ceremony (10 minutes)
1. Ask the participants to put any final reminders about what they’ve learned in their Outreach Worker’s Handbook p. 76. They should also record what they’ll do at home to launch themselves as outreach workers who promote improved water, sanitation, and hygiene practices. This may also be done orally.
2. If you are not doing Module 7, conduct the graduation ceremony, as appropriate: Hand out
certificates (see copy in the Collection of Resource Materials) or hold a little ceremony and invite any local dignitaries or WASH actors. Also pass out the workshop evaluation. (Sample questions are available in Appendix 4.)
3. Thank them heartily.
Trainer Note: If the session on data management follows, let the participants know.

GUIDE FOR TRAINING OUTREACH WORKERS MODULE 7: TRACKING PROGRESS
Session 1
SESSION 1: USING TOOLS TO TRACK PROGRESS 195
USING TOOLS TO TRACK AND REPORT PROGRESS Session Objectives By the end of this session, the participants will be able to: 1. Describe how to track progress using the discussion tool, the follow-up sheet, the
consolidated sheet, and the bar graph correctly (only if so required by the program manager/organization).

MODULE 7
SESSION 1: USING TOOLS TO TRACK PROGRESS 196
SESSION AT A GLANCE: Tracking Progress
Activity Time Materials A. Introduction Trainer introduces the topic: tracking progress using the discussion tool and the other forms, and presents the session’s one objective. Reviews organization policy with regard to keeping records.
5 minutes - Flipchart, markers, tape - Discussion tools for WASH as
posters and handouts
B. Climate Setter The trainer reviews Module 5, Session 2 where the discussion tools were introduced.
5 minutes - Flipchart paper, markers, tape - Copies of the discussion tools
C. Large Group Demonstration The trainer presents the forms and explains how numbers are transferred from the discussion tool to the follow-up sheet, to the consolidated sheet, and finally to the bar graph (if appropriate).
15 minutes - Poster-size discussion tool forms
- Large copies of tracking sheets, etc.
D. Table Task Participants, with some of the diagnostic tools filled in, try their hand at transferring numbers. Tables consolidate their numbers using the sheets, if appropriate.
45 minutes - Copies of the tools for each table (fill some in with X’s and O’s to be used as examples)
E. Review 5 minutes - Prepared flipchart of key points from the session
75 minutes (if Activity D included)
MODULE 7
SESSION 1: USING TOOLS TO TRACK PROGRESS 197
PREPARING TO TEACH THIS SESSION: Tracking Progress Before you present Module 7, Session 1:
1. Have copies of the relevant forms ready (discussion tools and follow-up sheet, and also, if needed, consolidated follow-up sheet and bar graph). These are in the Collection of Resource Materials in the data management section and discussion tools section, and in the Outreach Worker’s Handbook pp. 32–49 and 55–64.
2. If possible, have large format copies of the forms ready for demonstration. 3. Prepare a flipchart page with summary of key points. 4. Review organizational policy on the outreach worker’s role in collecting and recording data
other than for tracking progress with community audiences. 5. Optional: If the organization wishes to monitor progress using more than the individual
discussion tools, the participants can practice using the follow-up sheet, consolidated follow-up sheet, and bar graph. In order to practice using these forms, discussion tools with make-believe data will need to be supplied.
TRAINING ACTIVITIES: Tracking Progress A. Introduction to the Session (5 minutes)
1. Welcome the participants to this session on using the discussion tools and other forms for tracking progress via data management.
2. Say that during this session they are going to see how to track their target audience’s
progress using the discussion tools and some of the other forms. Review the organization’s policy regarding monitoring responsibilities of the outreach worker.
Trainer Note: It is suggested that the outreach worker use the discussion tools to keep track of progress made by their audiences. The use of the other forms for consolidating data is determined by the organization.

MODULE 7
SESSION 1: USING TOOLS TO TRACK PROGRESS 198
3. Present the session’s objective: how to track progress using the discussion tools and the other monitoring form(s).
B. Climate Setter (5 minutes)
1. Ask why it’s important for outreach workers to track their progress with an individual or family or group.
Trainer Note: Possible answers might include: They help with follow up, help us know that what we are doing is working, help with reporting back to HQ, show progress to the target groups, let target groups know they’ve progressed, motivate individuals and families, alert families to common problems that may need to be addressed through community action, etc.
2. Take a couple of answers but do not prolong this discussion. It is important to get the
participants thinking about monitoring and tracking their efforts.
C. Large Group Demonstration (15 minutes)
1. Introduce the Household Water Assessment Tool (p. 33 of the Outreach Worker’s Handbook) again in a way that everyone can see or have copies of the cards available at the tables. Also recall their use in previous sessions.
2. Demonstrate (or ask for a volunteer to show) how the tool can be used to track progress
with target audiences.
Trainer Note: Current practices of the audiences can be marked with an “X” and jointly planned practices with an “O.” As the outreach worker continues to work with the same target audience, s/he can mark new marks on same copy of the discussion tools with X’s and O’s, thus recording progress for the target audience to see, remembering that the goal is to achieve the key practice and thus improve health.
3. Discuss any challenges the outreach worker might face and work to address those issues. 4. If the outreach worker will be responsible for more levels of monitoring other than tracking
individual or family progress, go to the next exercise. D. Practice at the Tables (45 minutes)

MODULE 7
SESSION 1: USING TOOLS TO TRACK PROGRESS 199
Trainer Note: Again, the organization and program manager should determine whether or not the outreach worker will be responsible for tracking progress beyond that of the target audience. If this is the case, the workshop can cover the following instructions.
1. Hand out the Family Data Tracking Sheet. Explain that it is used to document the
information from the diagnostic tools on which individuals, groups, or families indicate their present behaviors and make their commitments to improve their behaviors. Refer to Outreach Worker’s Handbook pp. 55–64. This information is also available in the Collection of Resource Materials.
2. Hand out the Data Consolidation Sheet (found in Outreach Worker’s Handbook p. 59). Explain
that this sheet enables a person to put the information collected from all households by all the outreach workers in the community onto one sheet. This information is also available in the Collection of Resource Materials.
3. Hand out the Bar Graph (found in Outreach Worker’s Handbook pp. 57 and 60–64). Say that
bar graphs are a good way to inform community members how they are progressing. Bar graphs take the information from the consolidation sheets and make it easier to understand. They provide a view across the community. This information is also available in the Collection of Resource Materials.
4. If there is time to practice, pass out some of the prefilled in sheets with made-up data and
have the participants work at filling out the three tracking tools. 5. Process the exercise by asking about:
• Challenges to keeping records • How to overcome those challenges • The utility of the data (who is the information for and how will they use it?)
Trainer Note: Data they will not be using should not be collected.
E. Drawing Conclusions, Review, and Reading (10 minutes)
1. Show participants where in the Outreach Worker’s Handbook (pp. 55–64) they can find more information to help them with data collection. Say that if their organization would like them to keep careful records, they can refer to the information in the Outreach Worker’s Handbook. This information is also available in the Collection of Resource Materials.

MODULE 7
SESSION 1: USING TOOLS TO TRACK PROGRESS 200
An alternative to reading is to send the participants to find the answers to some questions you pose about the topic at hand.
2. On p. 76 in the Outreach Worker’s Handbook have them record what they will do at home to continue the learning process about collecting data. This may also be done orally, with the facilitator recording the responses on a flipchart.
3. If not already done in Module 6, conduct the graduation ceremony, as appropriate. Hand out
certificates (see copy in the Collection of Resource Materials) or hold a little ceremony and invite any local dignitaries or WASH actors.
4. Optional: pass out workshop evaluation. Sample questions are available in Appendix 4. 5. Review the key summary points:
• Tracking each outreach worker’s progress with individuals and families using the
discussion tools is strongly recommended. • Organizations will make their own decisions about how far to go with the
monitoring process.

GUIDE FOR TRAINING OUTREACH WORKERS APPENDICES
APPENDICES 201
APPENDICES

APPENDIX 1
APPENDIX 1 202
APPENDIX 1 Possible Tasks for Outreach Workers Related to Improving WASH Practices
The following tasks are related to improving WASH practices and may not include broader responsibilities that the outreach workers in your program have. Considering only their duties related to WASH, select those tasks relevant for the outreach workers of your program. Use those tasks to develop your program’s own job description or incorporate them into your outreach workers’ existing job description.
• Facilitate assessments of the WASH situation in the community using participatory exercises such as leading discussions of photos or drawings, doing a WASH map, leading a walk focusing on hygiene, or coordinating a community hygiene baseline survey.
• Advocate with community leaders and influential people to support WASH improvements. • Help establish, support, and participate in a community health committee that focuses on or
addresses WASH issues. • Help establish, support, and participate in a community water committee (which monitors
and/or maintains and repairs the water system, collects fees). • Liaise with resource organizations: local health facilities, NGOs, private companies,
manufacturers and distributors of sanitation-related technology, hand washing, and water treatment supplies.
• Conduct regular home visits/counseling on diarrhea prevention, consisting of an assessment
of current conditions and practices and joint problem-solving to assist with improvements. • Lead participatory group discussions on WASH issues.
• Put on demonstrations to teach WASH-related actions (e.g. proper hand washing, how to
construct a latrine, how to chlorinate water correctly). • Organize events to promote improved WASH practices (health fairs, contests, public
demonstrations, etc.) and support school-based WASH activities. • Monitor or manage monitoring of WASH practices and conditions.

APPENDIX 2
APPENDIX 2 203
APPENDIX 2 Tips on Demonstrations, Role Plays, and Group Discussions Conducting Promotional Activities in the Community In general, outreach workers will be working with three kinds of audiences: individuals, families, and general or specific groups such as mothers’ clubs, cooperatives, and school teachers. When conducting activities mainly for creating awareness and sharing information about WASH issues, the outreach worker will primarily be working with groups of people. The activities below are generally appropriate for groups of more than 10 people. When the outreach worker is conducting activities with an individual or family (to negotiate changes in behavior) s/he will be using IPC and the discussion tools.
1. Tips for Conducting Successful Demonstrations
When you are planning a demonstration for an individual, family, or group:
• Make sure you have assembled all the necessary materials and equipment. Have these readily at hand. Audiences don’t like to wait while you look for your props.
• Explain to the audience what you are about to do and why you’re doing it, then give them
time to move where they can see exactly what you’re doing.
• It can help to have pictures for each step, or, if the audience is literate, a written point-by-point description of the steps. You can also tell the audience what you’re doing as you demonstrate.
• Once the demonstration is over, ask the audience to comment on what they’ve seen (what
was new, useful, important, feasible, or not?). Generally you will have no trouble getting them to comment.
• If there’s time, you might want to repeat the demonstration with audience participation, or
have someone repeat it.
• Ask the audience members what they might do differently as a result of having seen the demonstration.

APPENDIX 2
APPENDIX 2 204
• Follow up with some negotiation (using the assessment tools and counseling cards) to get the audience members to commit to new behaviors and to talk about what would be easy or difficult for them.
2. Tips for Conducting Successful Role Plays
The following are tips for when you’re planning a role play using members of your audience (or fellow outreach workers). Be aware that in many cultures, people are reluctant to participate in anything that makes them “stand out.” Other cultures use role plays (skits) willingly. Know your audience beforehand.
• Make sure you’ve thought about what you’d like to achieve as a result of the role play. Role
plays are a technique that is best suited for exploring skills (like the steps in a counseling session) and/or attitudes (like feelings about the level of cleanliness of the village). They are also good for showing what is “normal” in the community, without embarrassing any particular individual.
• Prepare the players by giving them enough information about the characters they will play.
Give the players a couple of minutes to “get in role.”
• Have them play their roles for a determined length of time. Five minutes is a good length. Do not let the role play go on too long. If the role play goes in the wrong direction, stop the action, regroup, and start again.
• Tell the actors to step out of their roles and talk about what it was like to play the parts. This
will help them to talk about the role play as a member of the audience and not the character they were playing.
• Discuss the role play with the audience members. How did it go? Was it realistic?
• Talk about what they learned from watching the role play and what they plan to do as a
result of having seen the role play. Transition to negotiation for a new behavior, if appropriate.
3. Tips For Managing a Group Meeting/Discussion
Here are some tips for when you might have to run a meeting with a large number of participants.
• When preparing, have a clear idea of what you want to accomplish. Is the meeting primarily
for discussion, or will you need to reach agreement or a decision?
• Once everyone has assembled, explain some of the ground rules and go over the agenda, making sure you emphasize the timing.

APPENDIX 2
APPENDIX 2 205
• Facilitate by paraphrasing (saying back to the speaker what you’ve heard) and summarizing (stopping from time to time to capture the important points that have been made) as the discussion moves forward.
• Pay attention to body language and level of participation. Don’t let people monopolize the
floor.
• Encourage cross-participant dialogue and try to limit how much you yourself talk.
• Use visual aids.

APPENDIX 3
APPENDIX 3 206
APPENDIX 3: Self-Assessment Form Self-Assessment Form for Outreach Workers Counseling Families to Promote Hygiene Improvement
Name of Worker: ___________________________ Name of Organization: ____________________________ Name of Community: ________________________ Year: ____________________________
Desired Practice
Jan.
Feb.
Mar.
Apr.
May
June
July
Aug.
Sep.
Oct.
Nov.
Dec.
I was friendly and polite. I asked a lot of questions, both for assessing and planning.
I observed practices and conditions to compare what I saw with what people said.
I encouraged people to talk; I was a good listener.
I used my visual aids and other materials effectively.
I respected and tried to incorporate people’s ideas.
At the end of counseling, people clearly understand what they will try to do.
Community members are able to make the improvements we discussed.
Follow-up Steps:
Instructions: The program or project should modify this form as needed (before the training). For example, the project could ask each outreach worker to write “yes” or “no” for each practice at the end of each month. Or the outreach worker could be asked to use a scoring system, for example, 1 = always, 2 = usually, 3 = sometimes. The purpose of the follow-up step boxes is to give space for the outreach worker to write a few words about what he or she will try to do to improve during the next month. The project may decide to eliminate that section.
You, the outreach worker, should complete this form honestly. The purpose is not to evaluate, but rather to give you and your supervisor feedback so you can improve the way in which you counsel community members on how to improve their WASH practices. If all of your scores are perfect from the beginning, there is no room to improve!

APPENDIX 4
APPENDIX 4 207
APPENDIX 4 Sample Questions & Evaluation Templates Questions and Templates for Evaluating the Workshop A Word about Evaluation: By Session and by Day Trainers and program managers will want to gain a sense of how the workshop is progressing on a daily or even on a session-by-session basis. The feedback from the participants will help determine whether or not the training is on the right track, if the level of the information being presented is appropriate, and if the participants are indeed learning. Course corrections are then possible. If the trainer establishes a trusting atmosphere at the beginning of the training and allows the participants to know that their feedback is welcome, it should be easy to conduct evaluations in an open fashion by simply asking questions. At the conclusion of each session a question such as, “Did we meet the objectives for this session?” may suffice to establish a platform for discussing whether or not the session was “successful” (useful, practical, understandable, etc.). At the end of the day, ask questions such as:
• What was the highlight of the day? • What was the low point of the day? • Were the logistical arrangements conducive for learning? • How are you feeling about the amount of information? Too little? Too much? • How was the level of the technical information? Too hard? Too easy? • Which training techniques did you find most exciting? Why? • What would you do differently if you were the trainer? • What suggestions do you have for the organizers?
It may take a while for the participants to become comfortable with this type of discussion. If the participants would be more comfortable (and open) using a paper evaluation form, keep it as simple as possible by using scales of 1 to 5 or by having the participants make a check mark by their appraisal of the item.

APPENDIX 4
APPENDIX 4 208
Example One Evaluate the degree to which the logistical arrangements helped the learning: 1 2 3 4 5 /____________/____________/___________/____________/
Did little to Contributed a lot to encourage learning my learning Example Two Training techniques used in the workshop: Very useful Somewhat useful Not useful Demonstrations _________ ____________ ________ Group discussion _________ _____________ _________ Role plays _________ _____________ _________ Lecture _________ _____________ _________ Reading aloud _________ _____________ _________ The Final Evaluation At the conclusion of the training, a final evaluation will give feedback on the entire workshop to the trainer and the program manager. As with the daily evaluations, the evaluation form should be as simple and straightforward as possible and require as little writing as possible from the participants. Again, a stand-alone oral evaluation can be conducted, but participants are often reluctant to express any kind of “criticism” in public. Often, combining an oral discussion with a written evaluation allows interesting and helpful information to be obtained. Sample Final Evaluation Template
1. Rate whether or not you think the workshop objectives were met. (List workshop objectives with a 1 to 5 scale.) Describe the role of an outreach worker in the context of our program. 1 2 3 4 5 /_____________/___________/____________/____________/
Not met Somewhat met Totally met

APPENDIX 4
APPENDIX 4 209
2. Rate how helpful the following training techniques were to you.
List the training techniques used during the workshop such as lectures, demonstrations, etc. with a 1 to 5 scale. 1 2 3 4 5 /_____________/__________/____________/_____________/
Not helpful Somewhat helpful Very helpful 3. Rate the usefulness of the technical (WASH) information for your role as a WASH outreach
worker. Same kind of scale. 4. Rate the logistical and administrative arrangements as to how supportive they were for a
learning environment. Same kind of scale. 5. Rate the materials (handouts, drawings, etc.) as to how useful they will be for your work in
the community. Same kind of scale.

APPENDIX 5
APPENDIX 5 210
APPENDIX 5 Websites/Links Hygiene Improvement Project http://www.hip.watsan.net IRC International Water and Sanitation Centre http://www.irc.nl Global Public-Private Partnership for Hand Washing with Soap http://www.globalhand washing.org Solar Water Disinfection http://www.sodis.ch WELL Resource Center http://www.lboro.ac.uk/well/index.htm Water Supply and Sanitation Collaborative Council http://www.wsscc.org/interwater/ WHO/UNICEF Joint Monitoring Programme for Water and Sanitation http://www.wssinfo.org/en/welcome.html World Health Organization – Water Sanitation and Health http://www.who.int/water_sanitation_health/hygiene/envsan/en UNICEF Water, Sanitation and Hygiene http://www.unicef.org/wes/index.html Water, Engineering and Development Centre (WEDC) http://wedc.lboro.ac.uk/ Useful Site for Finding Statistics (WHO) http://www.who.int/quantifying_ehimpacts/national/en/ Global Handwashing Day www.globalhand washingday.org

APPENDIX 5
APPENDIX 5 211
WASH Visual Aids Library: All you need to run WASH activities: picture sets, photos, posters, leaflets, games, songs, radio slots, videos. Comes with instructions in English, French, and Spanish. Will be available at www.humanitarianreform.org (click on “Water Sanitation Hygiene”) Produced by the WASH Cluster Hygiene Promotion Project 2009 (c/o UNICEF) Training Manual for SODIS Promotion. SANDEC Report No.13/06, 2006 © EAWAG/ SANDEC Regula Meierhofer http://www.sodis.ch/files/TrainingManual_sm.pdf References for more information on varying approaches to hygiene in communities: The PHAST Approach http://www.who.int/water_sanitation_health/hygiene/envsan/phastep/en/index.html Community-Led Total Sanitation Approach http://www.communityledtotalsanitation.org/page/clts-approach Compendium of Hygiene and Sanitation Software Water Supply and Sanitation Collaborative Council (wsscc.org), Draft 3.0, February 2009. WASH Standards in Schools in Low-Cost Settings Edited by: John Adams, Jamie Bartram, Yves Chartier, Jackie Sims. World Health Organization, Draft, January 6, 2009. www.who.int/water_sanitation_health/hygiene/settings/wash_standards_schools_per_review2.doc Hygiene Promotion: A Practical Manual for Relief and Development By Susan Ferron, Joy Morgan, and Mario O’ Reilly, Practical Action, 2007. http://www.irc.nl/page/38052 Reference for WASH in Schools: Towards Effective Programming for WASH in Schools: A Manual on Scaling Up Programmes for Water Sanitation and Hygiene in Schools IRC International Water and Sanitation Centre, 2007. http://www.irc.nl/page/37479

APPENDIX 6
APPENDIX 6 212
APPENDICES 6–8 Alternative Workshop Plans To conduct all of the sessions in this Training Guide (covering all three major WASH key practices—safe water, feces disposal, and hand washing) requires a training of at least four days. Appendices 6, 7, and 8 provide templates for a program manager who wishes to sponsor a half-day session, a one-day session, or a three-day session on WASH. The contents of the sessions have been selected from the Training Guide, and some have been slightly modified to fit into the allotted time. It is important to understand that a half-day, one-day, or even a three-day training does not provide the necessary time for community outreach workers to acquire the skills and knowledge needed to proficiently promote the range of key WASH practices, unless the outreach workers already have a solid background in the WASH issues of the community. A three-day training may be appropriate if the outreach workers are being trained in one or two of the three main technical areas (safe water, safe feces disposal, hand washing). The short versions should be used only for raising WASH awareness or as a springboard for later programmatic action. Organizations may need to assemble their own versions of a shorter training. For example, an organization desiring to prepare its outreach workers only in hand washing promotion would select only those sessions relevant to this objective.

APPENDIX 6
APPENDIX 6 213
APPENDIX 6: The Half-Day Session
The half-day session is not long enough to train outreach workers; instead its objective is to raise awareness about the importance of WASH for the community. The session is divided into two parts: part one orients the audience to local WASH conditions and part two explores the contamination cycle. There are learning objectives for each part of the session. The learning objectives contribute to achieving the overall purpose: to raise awareness about how important it is to address WASH issues in the community. Before implementing these sessions, please read the introduction to this guide. The sessions are interactive and participatory, so audience members are best seated at tables. If this is not possible, some adaptation of the two parts will be necessary. Each part suggests preparatory steps. This half-day session is best suited for audiences that are literate, motivated, and have an interest in the community’s welfare.

APPENDIX 6
APPENDIX 6 214
Part One An Introduction to Water, Sanitation, and Hygiene (WASH) at the Local Level Session Objectives By the end of part one, the audience members should be able to: 1. Describe briefly the importance of WASH for combating diarrheal disease. 2. Relate some local statistics (or other relevant facts) on diarrheal disease in the community. 3. Describe what the local WASH issues mean for the overall health situation in the
community.

APPENDIX 6
APPENDIX 6 215
PART ONE AT A GLANCE: Introduction to WASH Activity Time Materials & Resource A. Introduction: WASH Snapshot Audience gets a quick overview of the session and some highlights from the talking points so they understand the importance of WASH.
10 minutes - Flipchart, markers, tape - Talking points prepared ahead
of time on flipchart about the importance of diarrheal disease
B. Large Group Discussion Audience discusses local conditions using the guide questions.
30 minutes - Flipchart, markers, tape - Guide questions on flipchart
C. Table Work Groups at tables brainstorm about the implications of what they’ve learned about local WASH issues for overall local health conditions.
30 minutes - Table task on flipchart paper - Flipchart paper and markers for the tables
D. Summary Facilitator or audience members summarize what they’ve learned during part one of the session.
10 minutes - Flipchart, markers, tape
80 minutes

APPENDIX 6
APPENDIX 6 216
PREPARING TO TEACH Part One: Introduction to WASH Before you present this part of the half-day session:
1. Familiarize yourself with some national and especially local statistics (if available). Some excellent sources: the Demographic and Health Survey, the Outreach Worker’s Handbook of the WASH training package, WHO websites, documents produced by the country’s Ministry of Health, reports done by other organizations on WASH, and your own organization’s files. Also see “Some Talking Points” below for suggestions and examples of meaningful statistics to share with the participants. For those desiring even more details, check the various websites listed in the appendices of the training package. Remember that the emphasis should be on local statistics.
2. From the menu of questions in the detailed trainer notes, select the most relevant questions
for your community and put them on flipchart paper, one question per page. The discussion stimulated by the questions and the responses should serve to paint a “picture” of the local WASH situation and is based on the audience’s own observations about what is happening in their community.
3. Put the table task on a flipchart: (“At your tables, given what you now know about some of
the local conditions, discuss/brainstorm with your tablemates the implications of these conditions for the community.”) If you would like the table groups to record their discussion points on a flipchart, provide paper and markers. If the audience members are seated theater style, have members talk to those around them.
4. It is important not to overwhelm the participants with too many statistics or data points. Use
statistics and data based on the participants’ ability to deal with this kind of information. Remember the overall purpose of this part of the session is to raise awareness. Data and statistics can be presented in creative ways. For example, as the facilitator, you can make a statement and have the audience members guess at the correct response. “How many children do you think die every year of diarrhea-related causes?” This creates involvement right away.
5. If appropriate, use the following talking points to make some introductory remarks about the
importance of combating childhood diarrheal disease.

APPENDIX 6
APPENDIX 6 217
Some Talking Points for the Introduction to WASH Introduction to Diarrheal Disease and Children’s Health Diarrheal diseases take a tremendous toll on children and their families in developing countries. “Diarrhea is one of the biggest killers of children under five worldwide, accounting alone for 17% of deaths in this age-group” (IYS Advocacy Kit, UN-Water 2008, Talking Points). Diarrhea kills children when it causes them to lose so much water that their vital organs can no longer function. This is called “dehydration,” which means losing water. Diarrhea affects children’s nutritional status, how mothers spend their time, how much time pupils are absent from school, and household expenses for treatment, as well as the cost of lost work, wages, and productivity. It is estimated that 80 percent of all cases of diarrhea can be attributed to three major causes (WHO 2008*):
• Inadequate sanitation • Poor hygiene • Unclean water
There are numerous ways that the germs that cause diarrhea can enter a person’s body:
• Fluids (through contaminated water) • Fields (resulting from defecation outdoors) • Flies (transmitting disease) • Fingers (dirty hands to mouth) • Food (infected by fluids, flies, or fingers and then ingested)
Certain hygiene practices have been proven to have the greatest potential for preventing diarrhea. These so-called key practices are:
• Safe disposal of feces • Correct hand washing • Safe drinking water
Studies show that, when performed correctly and consistently, each of these key practices can reduce diarrhea cases by 20 percent to 50 percent. Correct hand washing in particular has also been shown to prevent many cases of respiratory disease. Almost one-tenth of the global disease burden could be prevented by improving water supply, sanitation, hygiene, and management of water resources (*Prüss-Üstün, A., Bos, R., Gore, F., Bartram, J. Safer water, better health: costs, benefits and sustainability of interventions to protect and promote health. Geneva: World Health Organization. 2008.)

APPENDIX 6
APPENDIX 6 218
TRAINING ACTIVITIES Part One: Introduction to WASH Raising Awareness about National and Local Diarrheal Disease (10 minutes) A. Welcome and Introduction to the Session (10 minutes)
1. Welcome the participants by introducing yourself. Thank them for taking time out of their
busy schedules to come hear about the importance of water, sanitation, and hygiene issues for the community.
2. Say that in this half-day session, they will get a brief overview of the national and local situations with regard to diarrheal disease and learn about the “contamination cycle.”
3. State that diarrheal disease (diarrhea) takes a terrible toll on children and that many children die each year from diarrhea-related diseases. By improving the way we properly dispose of our waste (feces), by doing a better job of washing our hands, and by drinking potable (clean and safe, uncontaminated) water, we can greatly reduce the number of illness episodes and deaths due to diarrhea.
Trainer Note: If appropriate for the audience, insert a few national and local statistics here, if such data are available. See “Preparing to Teach” above for a creative way to present statistics. Examples of local statistics could be:
• % of children under 5 who had diarrhea in last 2 weeks
• Rank and % of diarrhea as a cause of childhood deaths
• % of households with safe sanitary solution (latrine, etc.) • % of households with “access to water” and/or % that
treat their drinking water
• Any data relative to hand washing (% of households with soap)
B. Large Group Discussion: The Local WASH Situation (30 minutes minimum)
1. Tell the participants they are going to discuss the local WASH situation by looking at some
questions.

APPENDIX 6
APPENDIX 6 219
2. Open the discussion by revealing the first question on the flipchart and continue for as long as appropriate. Under each question, record the highlights of the discussion, so that at the end of the time, you have a more or less complete picture of the local WASH situation. When each question is completed, post the flipcharts where the audience can see them.
Diarrhea Questions:
• Is diarrhea common among children in your community? • Are there more cases during certain times of the year? • If so, when does the number of cases increase? • Why do you think that the number of cases increases at certain times of the year? • Are you aware of children in your community who have died from dehydration/
diarrhea? If so, tell us about it.
Water Questions:
• Where do most people get their water? • How do they carry their water from the source? • How do most people store their water at home? • Do people treat the water in any way before drinking it? If so, how? • Are there times of the year when water is scarce? • How many different ways do people treat their water? (bleach, filters, boiling,
sunlight, etc.)
Feces Disposal Questions:
• Where do most people go to relieve themselves? • How do mothers dispose of their children’s feces? • Do people relieve themselves near wells? • How do most people manage animal feces near or in their houses?
Hand Washing Questions:
• How often do people wash their hands? • When are people most likely to wash their hands? • What do they use? • Do most houses have soap? • What do people do when soap is not available? • What do people do when water is scarce?
C. Table Work (30 minutes)

APPENDIX 6
APPENDIX 6 220
1. In your own words, talk again about the importance of combating diarrheal disease (diarrhea) both nationally and locally. Use the information from the above discussion to illustrate your points.
2. Assign the task to the tables. Have them begin to think about some of the conditions, issues, and problems that exist locally with regard to access to potable water, correct hand washing, and proper disposal of human waste. Have them record some of the implications on a flipchart.
Trainer Note: If participants are seated “theater style,” have audience members work in groups of three or four with those seated around them.
D. Summary (10 minutes) .
1. Summarize or ask for volunteers to summarize some of the key points, especially with regard to local WASH conditions. Include some of the points below, if not mentioned. Summary points:
• Globally, diarrhea causes over a million and a half deaths in children per year. • Nationally, diarrhea causes _____ (fill in number) deaths per year. • Locally, diarrhea causes _____ (fill in number) illnesses per year. • Based on the discussion, some important WASH issues for our community are….
2. Offer a quick stand up break. Transition to the next session by saying that following a short
break, they will have the chance to look at the contamination cycle.

APPENDIX 6
APPENDIX 6 221
Part Two The Importance of Drinking Safe Water: The Contamination Cycle
Session Objectives By the end of this session, the audience members will be able to: 1. Describe the contamination cycle. 2. Describe the connection between contamination and diarrhea. 3. Classify practices related to diarrhea as positive, negative, or neutral. 4. Optional: review some common local practices contributing to water contamination.

APPENDIX 6
APPENDIX 6 222
PART TWO AT A GLANCE: Contamination Cycle Activity Time Materials A. Introduction to the Session Facilitator makes the link between part one and this part of the session. Reviews what the audience members should learn.
5 minutes - Flipcharts, markers, tape - If appropriate, objectives on flipchart
B. Climate Setters Audience members engage in two exercises that help them to see that even “clear” water might be contaminated.
10 minutes + 10 minutes
- 2 plastic bottles with clean water and a large measure of salt
- 1 plastic bottle or glass with water; one long hair (or other long thin object like a blade of grass or piece of thread)
- Feces sample
C. Large Group Activity Audience classifies practices as positive, negative, or uncertain. Discussion along the way.
30 minutes - Unlabeled poster of the contamination cycle - 3 flipchart pages marked with positive, negative, uncertain faces; illustrations
- Illustrations from Collection of Resource Materials
D. Show and Tell Facilitator uses the routes of contamination poster with labels to explain how germs travel and consequences. Discussion of local situation with reference to part one.
20 minutes - Labeled poster of the contamination cycle
- If local data are available, put on poster
E. Summary Facilitator summarizes and points out supplementary information.
10 minutes - Handouts with supplemental information
85 minutes

APPENDIX 6
APPENDIX 6 223
PREPARING TO TEACH HALF-DAY SESSION PART TWO: Contamination Cycle Before you present this part of the half-day session:
1. Gather all materials (four clean plastic bottles filled with potable water, salt, one bottle or
glass with water in it, and one long very thin object such as a human hair, piece of thread, or blade of grass. In two of the four bottles, dissolve lots of salt so that the water is still clear but very salty to the taste).
2. Have three posters (on flipchart paper) ready with the following titles: Diarrhea, No
Diarrhea, and Uncertain. On the “diarrhea poster” draw a sad face, for the “no diarrhea” poster draw a happy face, and for the “uncertain poster” use a face with a horizontal line for the mouth. Tape these up in the room so that they aren’t visible to the participants.
3. Prepare the illustrations to show to the participants. They can be found in the Collection of
Resource Materials. 4. Prepare two posters for the routes of contamination: one with labels and one without. 6. Prepare a flipchart page with key points to summarize at the conclusion of the session. 7. Using the Outreach Worker’s Handbook, photocopy additional information on the
contamination cycle for distribution to the participants, should anyone desire to have more detailed information about the contamination cycle.
DETAILED TRAINER NOTES: Contamination Cycle A. Introduction to Part Two (5 minutes)
1. Welcome the audience members back from the break.
2. Continue by saying that in part one, they looked at some of the local WASH conditions and what they implied for the community. Say that in this part of the session, they are going to take a closer look at the contamination cycle: how germs travel and the relationship between contaminated water and diarrhea.
APPENDIX 6
APPENDIX 6 224
3. Say that by the end of this session, they should be able to describe the contamination cycle and the connection between the contamination of water and diarrhea. Remind audience members that the purpose is not for them to become “scientists” or technical experts, but to raise their awareness of WASH conditions in the community so that they might eventually move to act to address those conditions so their children are healthier. Suggest they might want to start with their own families.
B. Climate Setter (10 minutes) Salty Water—Clear but Unpleasant
1. Show the audience the two bottles of water, one with dissolved salt in it. Ask them to look closely and see if they can tell any difference between the two. Take a couple of responses.
2. Ask for two volunteers to come forward. Show the two bottles again one at a time (salty and not) to the audience members and ask them to raise their hands if they think the water in both bottles is “safe” to drink. Ask why.
3. Now ask the volunteers to drink. Have the audience members watch their faces.
4. Reinforce the point that although water may appear clean, clear, and safe, it can contain things that you can’t see that can make people ill.
Trainer Note: You might want to introduce the local term “small bugs” or its equivalent if the word “germ” is not understood. In some areas, the words “dirt” or “dirtiness” work.
Clear but Contaminated
1. Tell the audience members that they are going to continue to look at water and possible ways it can become contaminated but might not look harmful.
2. Ask one participant to give you a hair (or use some other long and thin object, like a blade of
grass or piece of thread). Place the sample of the feces where everyone can see it. Hold one end of the hair in each hand and run it through the feces. Dip the hair into the glass of water and then remove the hair.
3. Ask for a volunteer to drink the water—only to see their reaction. DO NOT ALLOW
ANYONE TO CONSUME THIS WATER.
4. Conduct a discussion of the group’s reaction and stress that although the water looks clear, it is, in fact, contaminated.

APPENDIX 6
APPENDIX 6 225
C. Large Group Activity Classifying Practices/Actions (30 minutes)
1. Show the “contamination cycle” (Collection of Resource Materials or Outreach Worker’s Handbook p. 41) poster to the group without the labels. Ask the audience what they think the poster is trying to tell them. Take a couple of answers, but do not belabor this exercise.
2. Tell the audience members that you are going to show them pictures. Say that some of the
pictures depict positive actions against diarrhea; some are negative, which could put people at risk of getting diarrhea; and some actions they might be uncertain about. Tell them that as you show the pictures, they should go stand under the poster that they think best indicates how they feel about the picture.
Trainer Note: Once everyone is under a poster, ask one person from the group to explain why s/he chose that poster. It is important to realize that although a picture may be considered “positive,” “negative,” or “uncertain,” there can be scenarios in which a practice might fit into another category. For example the picture of the kettle with boiling water is usually categorized as “positive” because boiling water kills germs. However, boiled water can easily become contaminated again (so a participant could choose to stand under the “uncertain”/ “straight mouth face” sign). It is not necessary for all participants to agree. What is important is that everyone understands which practices in each picture can protect a person against diarrhea or increase the risk of getting diarrhea.
3. Repeat with as many of the pictures as time allows. Move quickly while encouraging
discussion. D. Demonstration with the Labeled Poster (20 minutes)
1. Show the labeled poster to the participants so that everyone can see it and review the key ideas:
• The cycle starts with people defecating in the open. • The feces spread out on the ground and contaminate food crops, people, and
animals. • Feces on the ground attract flies, and flies contaminated with feces land on food that
people eat. • Feces on the ground may be spread by rain or other water. • People who do not wash their hands after using the toilet spread germs. • Feces in the soil contaminate our water supply and then we drink contaminated
water.

APPENDIX 6
APPENDIX 6 226
2. Then lead a discussion about local sources of water. If local data were available in part one, display those charts.
• Where do most families get their water? • Could there be contamination even if the water appears “clear and clean?” • What might be some of the community sources of contamination? • What are their observations about the number of children with diarrhea?
3. Ask the group if they think children’s feces or adult feces have more germs or contamination
that cause diarrhea. After responses, explain that children’s feces have more and are therefore more dangerous.
E. Summarizing and Reading More about Diarrhea (10 minutes)
1. Ask an audience member(s) to summarize what s/he has learned during this part of the
session. Supplement his/her points with those below. Summary Points:
• The cycle starts with people defecating in the open. • The feces spread out on the ground and contaminate food crops, people, and
animals. • Feces on the ground attract flies, and flies contaminated with feces land on food,
which people eat. • Feces on the ground may be spread by rain or other water. • People who do not wash their hands after using the toilet spread germs. • Feces in the soil contaminate our water supply and then we drink contaminated
water.
2. Thank the audience members for attending. Ask if there are any final questions.
Trainer Note: If this session and its two parts are given as part of the one-day session described in Appendix 6, make the linkage to the afternoon by stating that after lunch, the audience members will have the chance to explore the four effective ways of making water safe to drink and get a demonstration of correct hand washing.

APPENDIX 7
APPENDIX 7 227
APPENDIX 7: A Sample One-Day Session
This appendix outlines a one-day session for: 1. Raising awareness about the importance of WASH for the community. 2. Exploring the contamination cycle. 3. Exploring the four methods for making water safe to drink. 4. Demonstrating good hand washing techniques.
Trainer Note: The session adds “safe drinking water” (part three) and “hand washing” (part four) to the half-day session outlined in Appendix 6, parts one and two. When conducting this one-day session, do parts one and two from the half session in the morning and parts three and four in the afternoon.
The purpose of this one-day session is to create awareness as well as impart some basic WASH knowledge. As with the session described in Appendix 6, part one, the audience members should be literate. Seating at tables is preferred to encourage discussion and participation.
This session includes an overview of the four treatment methods to make water safe to drink. If one or more of these methods is not appropriate for your setting, please omit it.
APPENDIX 7
APPENDIX 7 228
APPENDIX 7: One-Day Session Part Three Four Methods for Making Water Safe to Drink Session Objectives By the end of part three, the audience members should be able to: 1. Describe in general the four methods for making water safe to drink. 2. Relate some of the advantages and disadvantages of each method.
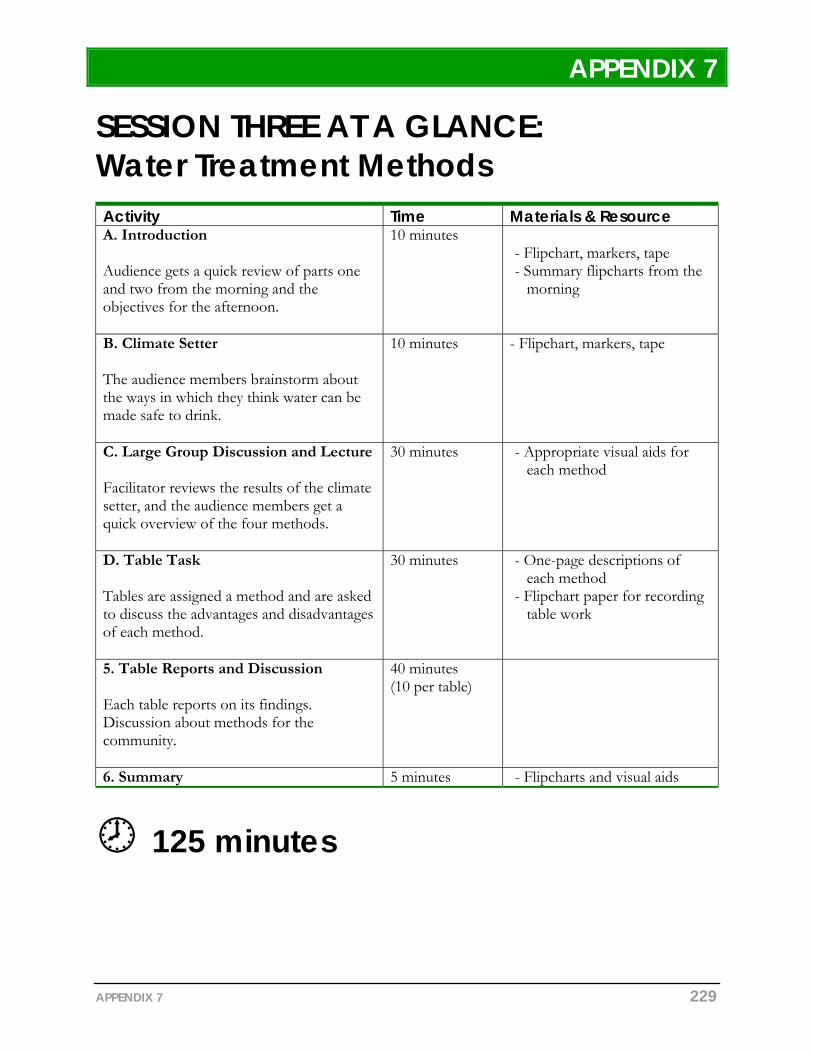
APPENDIX 7
APPENDIX 7 229
SESSION THREE AT A GLANCE: Water Treatment Methods Activity Time Materials & Resource A. Introduction Audience gets a quick review of parts one and two from the morning and the objectives for the afternoon.
10 minutes - Flipchart, markers, tape - Summary flipcharts from the
morning
B. Climate Setter The audience members brainstorm about the ways in which they think water can be made safe to drink.
10 minutes - Flipchart, markers, tape
C. Large Group Discussion and Lecture Facilitator reviews the results of the climate setter, and the audience members get a quick overview of the four methods.
30 minutes - Appropriate visual aids for each method
D. Table Task Tables are assigned a method and are asked to discuss the advantages and disadvantages of each method.
30 minutes - One-page descriptions of each method
- Flipchart paper for recording table work
5. Table Reports and Discussion Each table reports on its findings. Discussion about methods for the community.
40 minutes (10 per table)
6. Summary 5 minutes - Flipcharts and visual aids
125 minutes

APPENDIX 7
APPENDIX 7 230
PREPARING TO TEACH Part Three: Water Treatment Before you present this part of the one-day session:
1. Hang the flipcharts from the morning’s work so the audience members can see them clearly.
2. Use visual aids from the Collection of Resource Materials to illustrate the lecture points during the large group discussion. These visual aids might be table size or large posters. They should illustrate the steps for each of the water treatment methods.
3. If time permits, gather some of the materials used for the various treatment methods: large
plastic bottles for SODIS, approved bleach packets, or commercially available filters.
DETAILED TRAINER NOTES Part Three: Water Treatment A. Welcome and Introduction to the Session (10 minutes)
1. Welcome the participants back to the session.
2. Review the morning’s work by saying they learned something about the local WASH conditions and what they mean for the health of their children, and explored the contamination cycle. Spend some time reviewing and validating their earlier work.
3. Say that this afternoon they are going to look at the four ways to make water safe for
drinking and also how to properly wash their hands. They should be thinking about how to apply what they have learned to their families and eventually what they might do in the community.
B. Climate Setter (10 minutes)
1. Brainstorm with the audience members about ways to make water safe to drink. Make no
evaluative comments. Record their answers as they call them out. Encourage them to keep going if the brainstorming appears to lag.
C. Large Group Discussion and Lecture (30 minutes)
1. Using the information from the brainstorming session during the climate setter, review the four methods of treating water to make it safe to drink. Be sure to use any visual aids (objects or posters) to make the lecture as interactive as possible. Make sure any questions are answered.

APPENDIX 7
APPENDIX 7 231
D. Table Task (30 minutes)
1. Divide up the treatment methods among the audience members. Ask each group to think about as many advantages and disadvantages of their method as they can, and write them on flipchart paper that has been divided into two columns. For example, an advantage of SODIS is that it’s relatively inexpensive. A disadvantage is that it’s impractical in rainy climates (see the Considerations for Deciding Appropriate Water Treatment Methods, p. 9, in the Outreach Worker’s Handbook).
E. Table Reports and Discussion (10 minutes per table x four tables)
1. Have each group report. Discuss the advantages and disadvantages in the large group. Make
sure you address all their concerns. Discuss which methods, based on what they’ve been reviewing, might be practical for their community.
F. Summary (5 minutes)
1. Have one of the participants do a quick summary of the work, if time permits.
2. Transition to the next session by saying that following a short break, they will have the chance to look at good hand washing practices.

APPENDIX 7
APPENDIX 7 232
Appendix 7: One-Day Session Part Four Good Hand Washing Practices
Session Objective By the end of this session, part four, the audience members will be able to: 1. Describe optimal hand washing practices (when and how to properly wash their hands).

APPENDIX 7
APPENDIX 7 233
SESSION FOUR AT A GLANCE: Hand Washing Activity Time Materials A. Introduction Facilitator makes the link between part three and this part of the session.
5 minutes - Flipcharts, markers, tape - If appropriate, objective on flipchart
B. Climate Setters Audience members talk about how they presently wash their hands. Play the estimating game.
10 minutes - Basin of water, soap, towel - Flipchart, markers, tape
C. Large Group Activities Facilitator gets the audience members to think about clean and dirty hands.
15 minutes - Picture of dirty hands and picture of clean hands
- Two volunteers
D. Large Group Discussion Facilitator and audience members discuss the critical times for washing hands.
15 minutes - Flipchart, markers, tape - Poster of critical moments for
washing hands
E. Demonstration A volunteer shows correct hand washing procedures.
10 minutes - Tub of mud - Basin of water, soap, and
towel - Extra water, soap, and towel
for demonstration F. Summary Facilitator and audience discuss possibilities for demonstrations in the community and summarize part four.
15 minutes - Flipchart, markers, tape
70 minutes

APPENDIX 7
APPENDIX 7 234
PREPARING TO TEACH Part Four: Hand Washing Before you present this part of the session:
1. Gather all the required items: soap, basin, water, towels. Have a tub of mud covered so the audience members can’t see what’s inside.
2. Have copies of the hand washing poster available, either small copies for each table or a
large poster for the front of the room.
3. Two drawings: 1) a person with demonstrably dirty hands; 2) a person with “clean” hands.
4. Research some of the ways that people in the community clean their hands (wipe them off, in the stream, using tap water, etc.).
DETAILED TRAINER NOTES Part Four: Hand Washing A. Introduction to Part Four (5 minutes)
1. Welcome the audience members back from the break.
2. Make the link between part three (methods for treating water) to this part of the session (washing hands). Say that once water is treated and clean, there is another way to reduce the incidence of diarrheal disease: properly washing hands. State that in this part, they will learn when and how to effectively wash their hands.
B. Climate Setter (10 minutes)
1. Go around the room and ask the participants how they presently clean their hands: at home, in the fields, during a trip, etc. Acknowledge that it’s often hard to wash hands depending on where we find ourselves and how much we are in a hurry.
C. Large Group Activities (15 minutes)
1. Tell the audience members that you are going to walk around the room with two pictures. You are going to ask them a question, and they are to point to the picture that best represents their answer.

APPENDIX 7
APPENDIX 7 235
2. Take the two pictures and stand in front of one of the audience members. Ask participants which person they would like to fix their meals.
Trainer Note: Some other questions: • Which person would you like to weed your garden? • Which person would you like to take care of you when
you’re sick? • Which person would you like to change your baby’s diaper? • Which person would you like to change your bicycle tire?
3. Say that for many activities, we like people with clean hands. For some activities it doesn’t
matter. During this part of the session, we’re going to learn about when and how to properly wash our hands.
4. Then ask for two volunteers to come to the front of the room. Whisper to one volunteer
that she is going to pretend to meet the other volunteer and shake his hand. Before she offers her hand she’s going to cough into it.
5. Have them play out the “introduction.” 6. Ask the group how they think the person feels about being offered a “dirty” hand. If
necessary, introduce the concept of “germs.” Stress that hands can look clean and still be “dirty.” Recall the part of the session where the water looked clean but was contaminated. With hands, they may look/appear clean, but may not be. It’s always better to be safe.
D. Large Group Discussion (15 minutes)
1. The facilitator then leads a discussion with audience members about the times when they think it’s critical to have clean hands. Once the discussion is over, show the poster with the times for washing hands BEFORE an activity (such as preparing food) and when it’s critical to wash AFTER an activity (e.g. changing the baby’s diaper).
2. Ask the audience members if they can think of other times, either before or after. Remind them that some people wash their hands before they pray.
E. Demonstration (10 minutes)
1. Ask for another volunteer to come forward. Uncover the basin of mud and ask the person to put his/her hands into the mud.
2. Ask the person how that feels and smells.
3. Get a reaction from the audience members about the “dirty hands” by asking a question like,
“How does it feel when our hands are like this?”

APPENDIX 7
APPENDIX 7 236
4. Ask the audience members to stand where they can see the volunteer. Ask one audience member to time the hand washer (do this as an aside). Ask the person with the dirty hands to wash them in the basin. Ask the other audience members to make a mental note of how the volunteer washes his/her hands.
5. When the volunteer is done, have an audience member describe the actions of the volunteer as s/he washed hands. Ask the timer how long the person took to wash his/her hands.
6. Ask the audience members if they would do anything differently.
7. If necessary, do a demonstration of how to properly wash hands including air drying or with a clean towel. (In many situations it is nearly impossible to rely on finding a clean towel. If this is the case in your situation, please use air drying as the only option).
F. Summary (15 minutes)
1. Summarize or ask one of the audience members to summarize the major content from part four. Ask the audience members what they might do when they leave. Might they change the way their family members wash their hands? Are there possibilities for conducting hand washing demonstrations in school? In individual homes? At a meeting?
2. Thank the participants for their attention during the day. Ask if there are any final questions. Wish them good luck and tell them you are available for future activities, should they have an interest.

APPENDIX 8
APPENDIX 8 237
APPENDIX 8: A Sample Three-Day Workshop for Outreach Workers
Trainer Note: This part of Appendix 8 outlines the sessions that might constitute a three-day workshop for community outreach workers. It is offered for the program manager who is thinking about incorporating community outreach workers (regardless of their sector) into WASH activities and is based completely on the information contained in the Guide for Training Outreach Workers, the Outreach Worker’s Handbook, and the Collection of Resource Materials. Given the local situation, the program manager will need to make some choices about which water treatment sessions to put into the workshop. Furthermore, this agenda has deliberately omitted some of the sessions in the full training package to save time. The program manager should adapt this agenda as necessary, adding or substituting other sessions to meet the needs of the particular program.
All modules and sessions mentioned below are those modules and sessions from the full Training Guide.
Day One Morning
• Module 1, Session1: Orientation to the Training (90 minutes) • Module 1, Session 2: An Introduction to WASH (50 minutes) • Module 1, Session 3: The Role of the Outreach Worker (45 minutes) • Module 1, Session 4: Key Practices for Preventing Diarrhea(55 minutes)
Total: Approximately 4 hours, not counting break
Day One Afternoon
• Module 1, Session 5: The Contamination Cycle (95 minutes) • Module 2, Sessions 2–5 as appropriate (no more than 180 minutes; the program manager
should only include training on water treatment methods that are locally appropriate and pick out only those sessions)
• Module 2, Session 6: Transporting, Storing, and Retrieving water (50 minutes)

APPENDIX 8
APPENDIX 8 238
Total: no more than 5 hours and 30 minutes (but will be significantly less if a program only focuses on certain water treatment methods and omits the sessions on the others), not counting break
Day Two Morning
• Module 2, Session 7: Helping Families Choose (100 minutes) • Module 2, Session 8: Water Synthesis (65 minutes) • Module 3, Session 1: How to Wash Our Hands (35 minutes) • Module 3, Session 2: When To Wash Our Hands (85 minutes)
Total: approximately 5 hours, not counting break
Day Two Afternoon
• Module 3, Session 3: How Much Water Does It Take? (60 Minutes) • Module 3, Session 5: Hand Washing Synthesis (65 Minutes) • Module 4, Session 2: Proper Feces Disposal (100 minutes)
Total: approximately 4 hours, not counting break
Day Three Morning
• Module 5, Session 1: Interpersonal Communication (70 minutes) • Module 5, Session 2: Using Discussion Tools (110 minutes) • Module 5, Session 3: Opportunities/Techniques for Hygiene Promotion (95 minutes)
Total: approximately 5 hours, not counting break
Day Three Afternoon
• Module 6, Session 1: Action Planning (70 minutes)
Total: less than 2 hours