guide
DESCRIPTION
Gimp Reticle making guideTRANSCRIPT

Hello and welcome to the Gimp Reticle making tutorial! This tutorial will teach you the basics of making reticles in Gimp 2.6 You will learn how to: Draw Straight Lines, Make Rings, add glow, add colors, adjust transparency, add texture, create rets that are useable and visually appealing, How to measure/ center your reticles for accuracy, how to test, and posting them/ uploading the files for people to use! PLUS: By the end of this tutorial you will feel comfortable using gimp to edit photos unrelated to Legions or whatever game you are applying this tutorial to. Sections: Setup: Getting your interface all set up so that you can work easily and efficiently. Drawing/ Creating: making the basic shapes and elements of the reticle Coloring: adding colors/ making a second accent color for more visibility. Retouching: How to touch your rets up and make them neat Testing: How to test your reticles for usability and effectiveness Uploading: Zipping the folder and uploading it online Posting: Making a good looking post that attracts attention and how to get positive feedback + constructive criticism. Bonus: Getting your rets onto lists of people trying to create one folder with all current reticles. Good Luck on your journey!

Setup
First off, download gimp from: http://www.gimp.org/ 2nd Find your Reticles on your computer MORE ON THIS IN LATER REVISIONS Right-click your chain gun reticles called “chaingunreticle01”. Click on properties, then details. Check what the Height and Width of the file is (default 512x128): Fire up Gimp> New, and set the height and width of the file to Match the number that made the dimensions of your CG ret. Go File> Open As Layers> ChaingunReticle01, Press Control-L This should bring up the Layers toolbar: Rename ChaingunReticle01 to Default Ret Click the little white paper icon at the base of the layers toolbar and name the new layer New Ret. Click the Background Layer in the layers toolbar, then (in the toolbox) go to the paint bucket icon Click on the image, which should make a black background behind the rets Your image should now look like this (minus the blue square) And your layers like this: Click the new layer button on the layers toolbar, Name the new Layer “Center Dot” Next go to your layer called old rets, then go to the toolbar, and then to Rectangle Tool Make a square around the center of the dot in the center of the first reticle Press Control-X, this should delete the dot in the center. Click onto the layer entitled Center dot Press Control-V to paste the dot into this new layer called “center dot”. After you press control-v you will most likely see your mouse change into a little anchor symbol, and you will have another layer saying pasted. Simply click on the image anywhere to put the pasted image onto the top layer. Recap so far: We have setup our workspace in a way that is now easier to work with and easier to see what edits we have made. Firstly, we got the image open in gimp, then we added a black background for more contrast to the original rets so we can see the rets well. After that we took the center dot out of the original ret without moving it, so that now we can create our new reticles perfectly centered even when we delete the original ret.

Note: If you are still having trouble with any of these steps so far, check the video to ensure you have followed the procedure correctly. We are almost ready to begin making our own reticles! One last step in order to ensure we don’t mess up the alignment, In the layers toolbar go to the layer “Center Dot” and where it says lock, click the box. Now we are ready to start creating our own ret! Until the next section, Genericusername, Signing off
This Concludes the Setup Portion
Drawing/Creating
Welcome to the Drawing/ Creating portion of this gimp tutorial. In this section I will be showing you how to do the essential things you will need to be able to create an image in gimp. We will learn about making lines and rings, transparency, the eraser tool, and the fill bucket. We may also cover some other tools that will assist you along the process. Note: If you have already completed the above section, (setup) you should save that as whatever file name you like, and make sure it is saved as an .xcf file, and is not overwriting the old chain gun file. Onwards.
NOTE: AT ANYTIME FEEL FREE TO GO TO VIEW>ZOOM AND ADJUST THE VIEW OF THE IMAGE, THIS WILL NOT CHANGE THE IMAGE, JUST ADJUST YOUR VIEW. DOING THIS WILL ALLOW YOU TO SEE THE IMAGE BETTER AND IS ESSENTIAL!!!
First some basic tools and their uses (the toolbar is only showing the tools we will be using in this segment

Toolbar Functions: Rectangle Tool- Makes a rectangular selection for editing within Circle Tool- Makes circular and oval shaped selections for editing within Free Select Tool- Draw an area to edit within Path Tool- Make a path using dots (makes a selection to edit within) Measuring Tool- Measure the distance between two points Move Tool- Move a selected area Rotate tool- Rotate a selected area Scale Tool- Scale a selected area up or down Paint Bucket- Fill a selected area Pencil Tool-Makes a hard edge line within a selected area Spray tool- Makes a spray paint style spray within a selected area Paint Brush Tool- Makes a line with smooth edges within a selected area Eraser tool- Erases within a selected area As you can see, gimp is very reliant on having a selected area, you can use any of the top tools to select an area (recommended) or press Control-A to select all within that layer (not recommended) Foreground Color-Color that your pen or pencil or bucket will make Secondary Color- 2nd color you can switch to (Accent color) Swap Color Button- Swaps Foreground and secondary color Opacity Slider- How transparent your pen/pencil/bucket fill is Scale- Tool Size Leave these unchecked So, now that you have seen the tools that we will be using, let’s open up a new project in gimp and experiment a bit. At this point you are free to try out these functions, experiment with gimp and get a little more accustomed to the program, or if you are in a rush to start creating, feel free to skip this next bit. If you would like a few things to try, here is a couple of challenges Make a star in two different ways- (way 1, use square tool, bucket, and path tool (for cutting out star prongs) ) (way 2, use the pen tool and the “shift” key for drawing strait lines, then use the bucket to fill the middle) Make a circle, fill the circle with a color, then use the eraser tool to erase some of the inside. Adjust the size of the brush and paint a different colored circle by clicking on the foreground color and changing it. Continuing with the tutorial:

Alrite, now that we have familiarized ourselves with the tools, and played around a bit in gimp, lets get cracking on a few features or steps that can make you useful items in your reticles. After that we will start on an actual reticle How to make a ring as part of your reticle:
1) Draw a circle using the circle select tool.(you should get a dotted line around the drawn circle) 2) Bucket fill the circle with a color 3) Go to Select>Shrink> then choose from 1-4 pixels 4) Press delete Tuh-Duh, you have a ring. (this same process works with a rectangle or ANY SHAPE) Note: to get rid of the dotted line you can either go to Select>None or press Shift-Control-A
How to draw a straight line 1) Go to your pencil tool 2) Pick a point that will be the start of your line 3) Click that point 4) Hold shift 5) Click the desired end point.
Armed with this knowledge, let’s make our first simple reticle: Open up the file we made in the setup section Click the eye next to old rets: This should have gotten rid of the reticle except for the small dot in the middle (locked in center dot) Go to your Circle Tool, then in the toolbar below the tools, check “expand from center” Click on your layer called “new ret” Place your mouse exactly on top of the dot (from center dot layer) While holding shift, click and drag the circle out from the center, to the desired size, (not too big) Go to the colors in the bar and click the switcher, making white the foreground color Select the paint bucket in the toolbar and then click within the circle to fill it with the color Go to Select>Shrink and choose between 1-4 px (more px= thicker border) Press delete Go to Select> None Yours should look something like this:

Let’s add some lines for arguably better aiming Go to view> zoom set it to something around 200% and use the scroll bars so that the one ret fills most of the window Go to Pencil Tool then in the toolbar set scale to .30 Put your mouse on the center dot and click once. Hold shift and move the mouse upwards towards the top trying to get the line straight (good, bad) Once the line is straight, click again at the top to make the line Now repeat this procedure going each direction- First click center, then drag left trying to get line straight (repeat with down, then right) You should now have: Next go to your layers panel and click the eye next to the new ret layer You should now be seeing the center dot and black background only Click on the main part of new ret so it is blue, but leave the eye unchecked Go to the circle tool and set it to expand from center Draw the circle out from the center dot while holding shift (try to get the size of the ring to be roughly half of the size of the main circle-cross ret) Click the eye again on “new ret” to see if you got it to the size you would like to cut out, If it is press delete, if it is not the right size, go to Select>None, and then retry from Now our ret should look something like this: (if you want to expiriment, try making another ring that sits at the end of the lines on the inside, it should look like this: Feel free to experiment with this yourself, the reticle showed in this is purely an example for your creations, once you have finished this tutorial you are strongly encouraged to experiment!
This concludes our drawing/creating section of this tutorial

Coloring
In this section we will learn how to add some colors to our reticles and even make them 2 colors
One colored rets:
With the layer “new ret” selected, go to colors>colorize Slide Lightness down and saturation up, and then adjust hue as you like Optional: adjust saturation and lightness as well, Hit okay
Note: (80 Saturation and -40 Lightness are safe bets)
Two Colored Rets:
Making two colored rets is the preferred way to go because with two contrasting colors, even if one blends into the map the other color will be showing.
Selective Area Two-Toning
Selective area two-toning is an easy and quick way to make a reticle with two colors White and red is probably the best combination for reticles because at least one shows up on every map, so let’s use that combo for our rets. Let’s grab our paths tool and using it lets use it to select one of the lines on our reticles. We use the paths tool by clicking to make the start point (click somewhere near one of your lines but not on top of it) clicking again will make a line between those two points, another click will continue the line, we can use this to outline one of the prongs of the reticle. Once we have most of the dots in place, enter will connect the last dot to the first dot. This will make a highlighted an area, which can now be colorized. Let’s make this inner area red 360 Hue, 90 Saturation, -80 Lightness will make you a nice dark unobtrusive red that will show nicely on snow, but won’t burn your eyes on say green maps where you can see both colors. Continue to select inner areas and apply the red, so when you’re done it should look like this: Looking fairly good right? Sure, it’s a fairly good looking reticle, but maybe we could make something a little better. Lets retouch those edges where it meets the circle.
Retouching
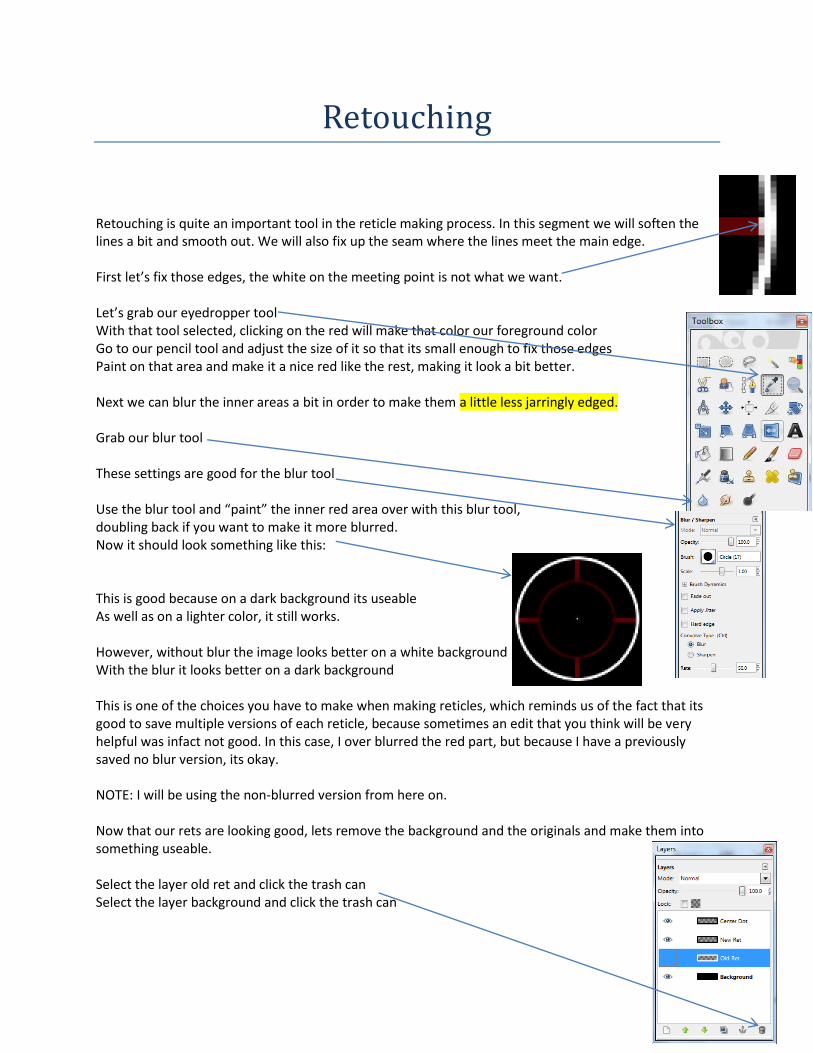
Retouching is quite an important tool in the reticle making process. In this segment we will soften the lines a bit and smooth out. We will also fix up the seam where the lines meet the main edge. First let’s fix those edges, the white on the meeting point is not what we want. Let’s grab our eyedropper tool With that tool selected, clicking on the red will make that color our foreground color Go to our pencil tool and adjust the size of it so that its small enough to fix those edges Paint on that area and make it a nice red like the rest, making it look a bit better. Next we can blur the inner areas a bit in order to make them a little less jarringly edged. Grab our blur tool These settings are good for the blur tool Use the blur tool and “paint” the inner red area over with this blur tool, doubling back if you want to make it more blurred. Now it should look something like this: This is good because on a dark background its useable As well as on a lighter color, it still works. However, without blur the image looks better on a white background With the blur it looks better on a dark background This is one of the choices you have to make when making reticles, which reminds us of the fact that its good to save multiple versions of each reticle, because sometimes an edit that you think will be very helpful was infact not good. In this case, I over blurred the red part, but because I have a previously saved no blur version, its okay. NOTE: I will be using the non-blurred version from here on. Now that our rets are looking good, lets remove the background and the originals and make them into something useable. Select the layer old ret and click the trash can Select the layer background and click the trash can

Now we will save the file as a chaingunreticle01.png Go File>Save as and then under the “all images” button we want to scroll down to PNG Save the file as chaingunreticle01.png with the png setting selected This message will pop up: Set it to merge and hit export: Set the values like this: Hit save Now you should be good to go, your chaingun reticle is workable and saved. Notes: A fair number of the default reticles are setup with like 4 of them in a row {1} {2} {3} {4} For CG: 1 is normal CG, 2 is overheated (you can’t shoot), 3-4 are irrelevant For RL: 1 is normal, 2 is for RLlevel2 with accelerated rocket, 3-4 irrelevant For GL: 1 is normal, 2 is cluster, 3-4 is irrelevant For SR: 1 is normal. 2-3-4 are irrelevant In general, design your ret for the #1 spot, and then do a slight change for the 2nd, and delete 3-4 The 2nd doesn’t have to have a real ret, it can just be a circle or text saying “Charge Held” Onward to testing and uploading!

Testing
Welcome to the testing section of this guide. In this section we will learn how to test you ret before
Uploading

How you upload your rets depends on how many you have made.
If you have just made one reticle IE a chain gun, Rocket launcher, grenade launcher, or sniper reticle,
you can make your thread (more on this later) and then post it as it with the file just as an image.
Download winzip: http://www.winzip.com/
If you have made a full set you should put the pictures in a folder and title the set “(username here)
Rets” for your first few sets, having your name as part of the title is a good idea, as you make more,
giving the file a creative name is fine. Then right click the file and hit add to winzip
You should now have a zipped up file that you can now upload to rapidshare.com
Go to rapidshare.com and make an account for free then hit upload your files and upload the zipped file
Get the download link and you are ready to post to the forums!
Posting

Go to Fallen Empires: Legions, then mods and customizations:
http://forums.instantaction.com/forumdisplay.php?63-Mods-and-Customization
Click “post new thread”
Title your thread “(creative title here) rets”
For the body of the post: Post that these are your first rets and you would like constructive criticism and helpful comments. Say that you would like suggestions on how to improve them. If you feel like this guide has been helpful to you feel free to post a link to my post of this with a note that this helped you create your rets. At the bottom attach the pictures (png files) to the post so that people can get an idea for what the rets look like.. Make the post icon something other than none (make it a smiley face or a ! point or something interesting) Hit Post PM me a message saying you posted rets after following this guide and I will be happy to assist you with retouching or any problems as well as give you feedback.
Conclusions:
Thanks for following along with this long post and listening to my advice. I hope you get good use out of this guide and are able to make your own sets of reticles after following these steps. If you would like an example for rocket, grenade, or sniper reticles I could be persuaded to make those as well. Additionally, Private Message me (Genericusername) on Instant Action if you have any questions. Consult the video for more info on steps. Happy reticle making --Genericusername