guardian user manual - hdtekhdtek.vn/images/upload/file/catalogue/guardian_software manual... ·...
TRANSCRIPT
Guardian User Manual - Page 1 / 25
Guardian User Manual
Manual version: 1.05 Company: KJ tech
Web Site: www.ekjtech.co.kr Telephone: 82-31-446-5388
Tech support E-mail: [email protected]
Guardian User Manual - Page 2 / 25
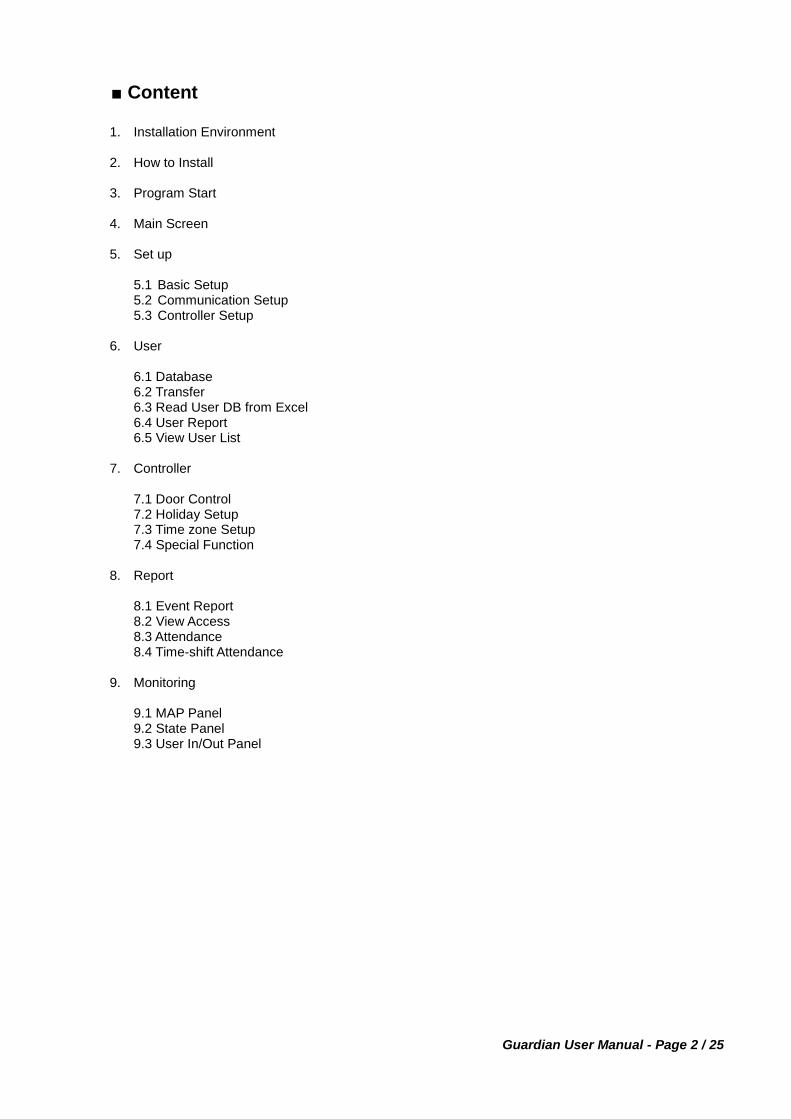
■ Content
1. Installation Environment
2. How to Install
3. Program Start
4. Main Screen
5. Set up 5.1 Basic Setup 5.2 Communication Setup 5.3 Controller Setup
6. User
6.1 Database 6.2 Transfer 6.3 Read User DB from Excel 6.4 User Report 6.5 View User List
7. Controller
7.1 Door Control 7.2 Holiday Setup 7.3 Time zone Setup 7.4 Special Function
8. Report
8.1 Event Report 8.2 View Access 8.3 Attendance 8.4 Time-shift Attendance
9. Monitoring
9.1 MAP Panel 9.2 State Panel 9.3 User In/Out Panel

Guardian User Manual - Page 3 / 25
1. Installation Environment
◈ Operating System: Window XP / Windows-7 (32bit or 64bit).
◈ VGA: More than (1024x768) resolution.
◈ HDD: We recommend more than 5G free disk space pc has.
◈ RAM: More than 256MB
◈ Microsoft office: For the report, we recommend Excel software installed in pc.
2. How to install.
◈ Setup File: “Guardian_Setup_Vxxx.exe”. (“xxx”: Version Number)
◈ Installation folder: Guardian will be installed “C:\Kjtech\Guardian” Folder automatically.
◈ Installation
Guardian User Manual - Page 4 / 25
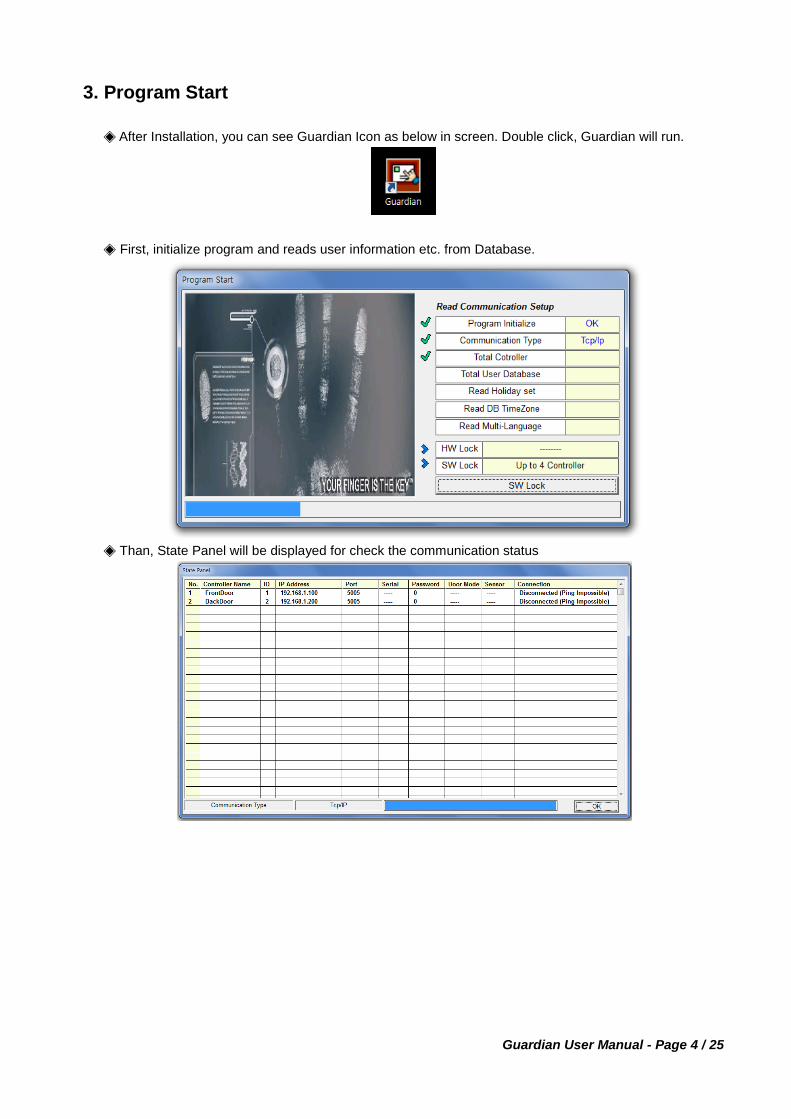
3. Program Start
◈ After Installation, you can see Guardian Icon as below in screen. Double click, Guardian will run.
◈ First, initialize program and reads user information etc. from Database.
◈ Than, State Panel will be displayed for check the communication status
Guardian User Manual - Page 5 / 25
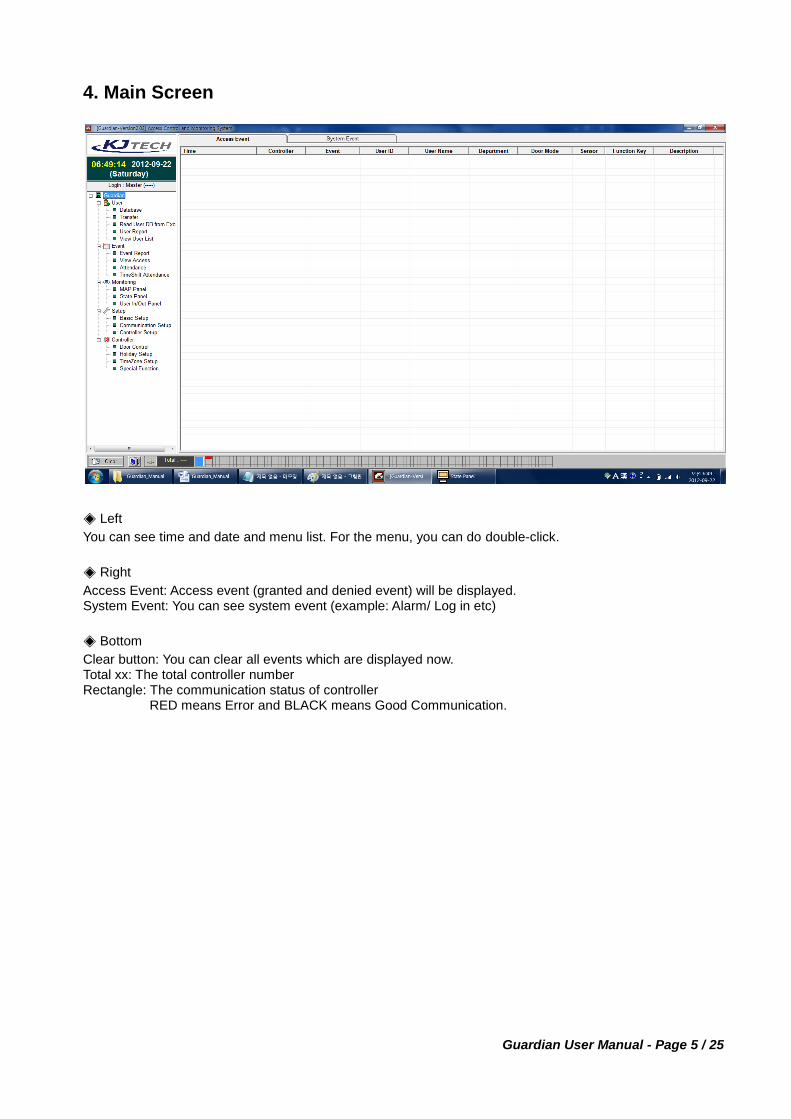
4. Main Screen
◈ Left
You can see time and date and menu list. For the menu, you can do double-click.
◈ Right
Access Event: Access event (granted and denied event) will be displayed. System Event: You can see system event (example: Alarm/ Log in etc)
◈ Bottom
Clear button: You can clear all events which are displayed now. Total xx: The total controller number Rectangle: The communication status of controller
RED means Error and BLACK means Good Communication.

Guardian User Manual - Page 6 / 25
5. Setup 5.1 Basic Setup Basic setup is divided into 4 categories: basic/function key/Special Customizing
◈ Card Type
Select card type (Standard26/Keico37/Binary) and if needed, input default Facility Code.
◈ File Position
File (setup, database, history file etc) will be saved in c:\kjtech\Guardian Folder
◈ Multi language
You can select the language type (English/Korean/User own language). If you select “User”, Please see the Multi-language text file and you can do modify string table as you want with your language. In this case, all the string in program will be display with your own language
◈ Event Option and Color
You can configure whether to save and display these events. And the color in the event list box. If you don‟t check “Save”, this event does not saved in history table. If you don‟t check “Display” this event does not displayed in the event list in main screen.
Guardian User Manual - Page 7 / 25
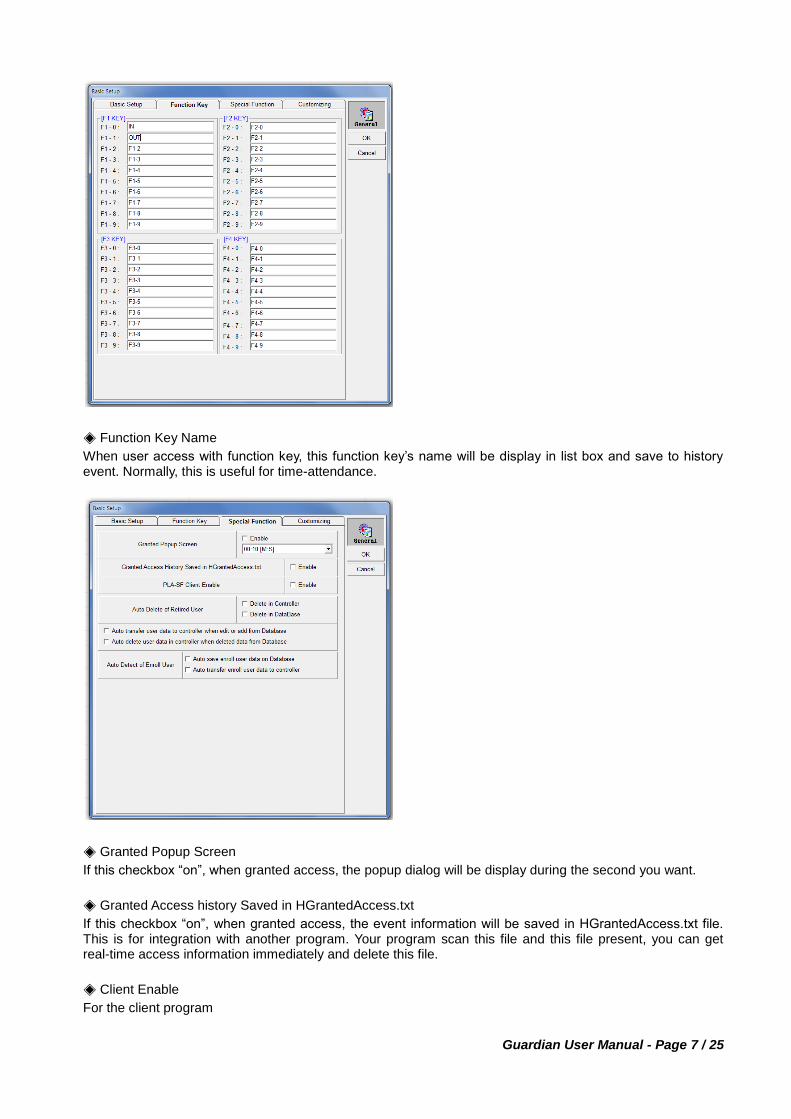
◈ Function Key Name
When user access with function key, this function key‟s name will be display in list box and save to history event. Normally, this is useful for time-attendance.
◈ Granted Popup Screen
If this checkbox “on”, when granted access, the popup dialog will be display during the second you want.
◈ Granted Access history Saved in HGrantedAccess.txt
If this checkbox “on”, when granted access, the event information will be saved in HGrantedAccess.txt file. This is for integration with another program. Your program scan this file and this file present, you can get real-time access information immediately and delete this file.
◈ Client Enable
For the client program
Guardian User Manual - Page 8 / 25
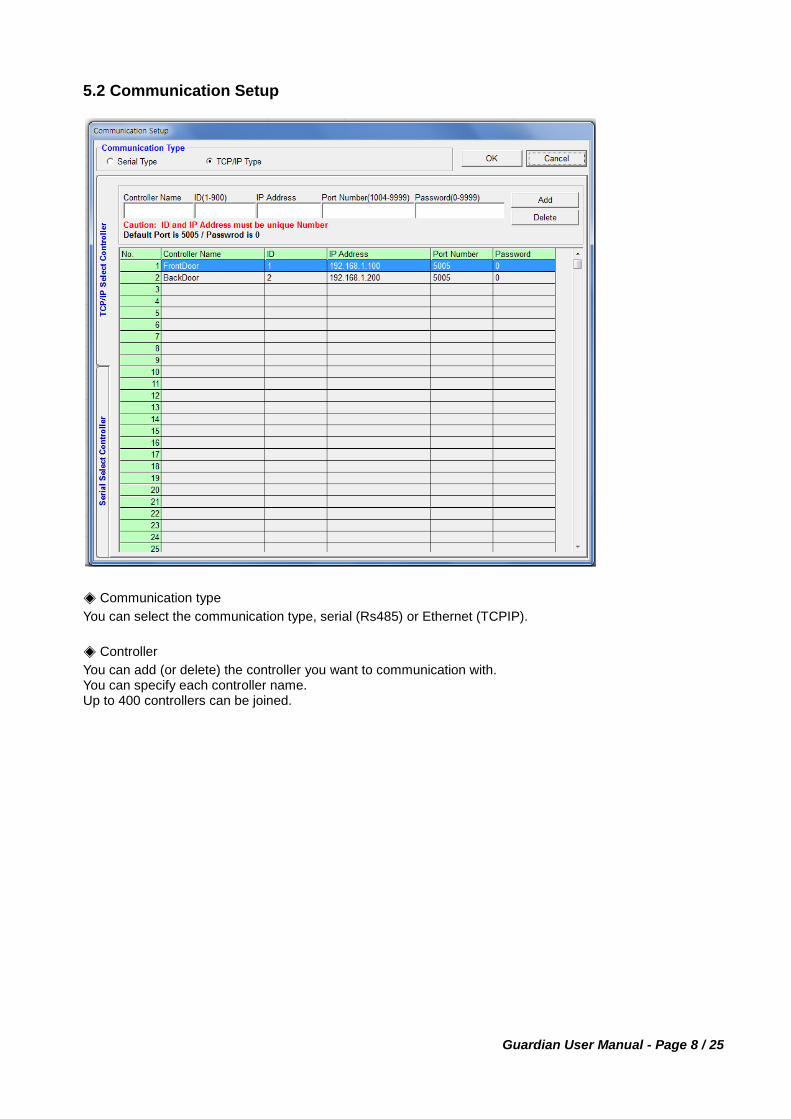
5.2 Communication Setup
◈ Communication type
You can select the communication type, serial (Rs485) or Ethernet (TCPIP).
◈ Controller
You can add (or delete) the controller you want to communication with. You can specify each controller name. Up to 400 controllers can be joined.
Guardian User Manual - Page 9 / 25
5.3 Controller Setup
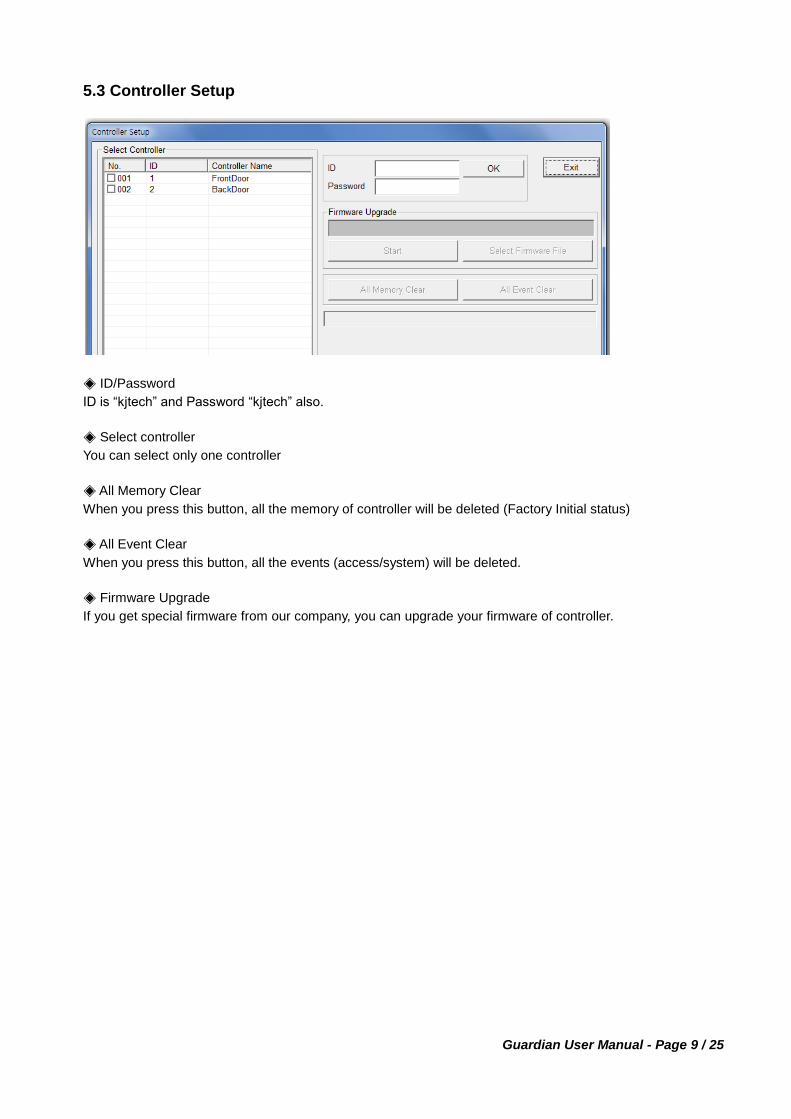
◈ ID/Password
ID is “kjtech” and Password “kjtech” also.
◈ Select controller
You can select only one controller
◈ All Memory Clear
When you press this button, all the memory of controller will be deleted (Factory Initial status)
◈ All Event Clear
When you press this button, all the events (access/system) will be deleted.
◈ Firmware Upgrade
If you get special firmware from our company, you can upgrade your firmware of controller.
Guardian User Manual - Page 10 / 25
6. User 6.1 Database
’’
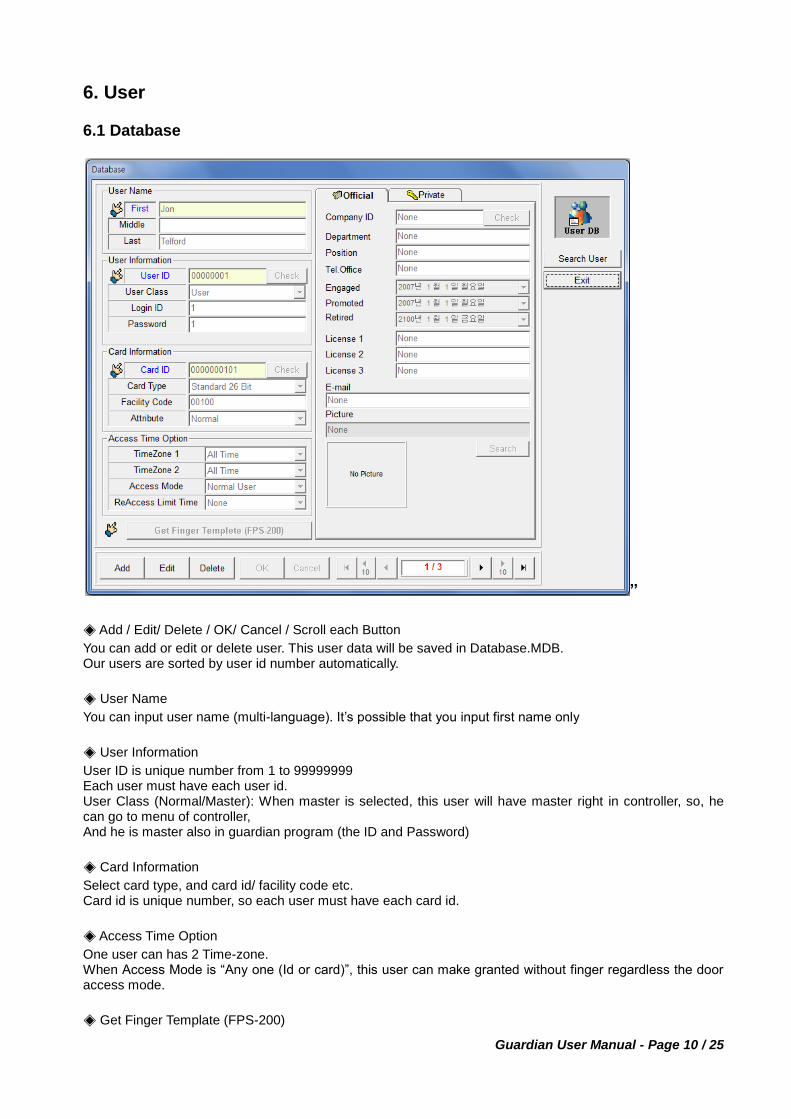
◈ Add / Edit/ Delete / OK/ Cancel / Scroll each Button
You can add or edit or delete user. This user data will be saved in Database.MDB. Our users are sorted by user id number automatically.
◈ User Name
You can input user name (multi-language). It‟s possible that you input first name only
◈ User Information
User ID is unique number from 1 to 99999999 Each user must have each user id. User Class (Normal/Master): When master is selected, this user will have master right in controller, so, he can go to menu of controller, And he is master also in guardian program (the ID and Password)
◈ Card Information
Select card type, and card id/ facility code etc. Card id is unique number, so each user must have each card id.
◈ Access Time Option
One user can has 2 Time-zone. When Access Mode is “Any one (Id or card)”, this user can make granted without finger regardless the door access mode.
◈ Get Finger Template (FPS-200)
Guardian User Manual - Page 11 / 25
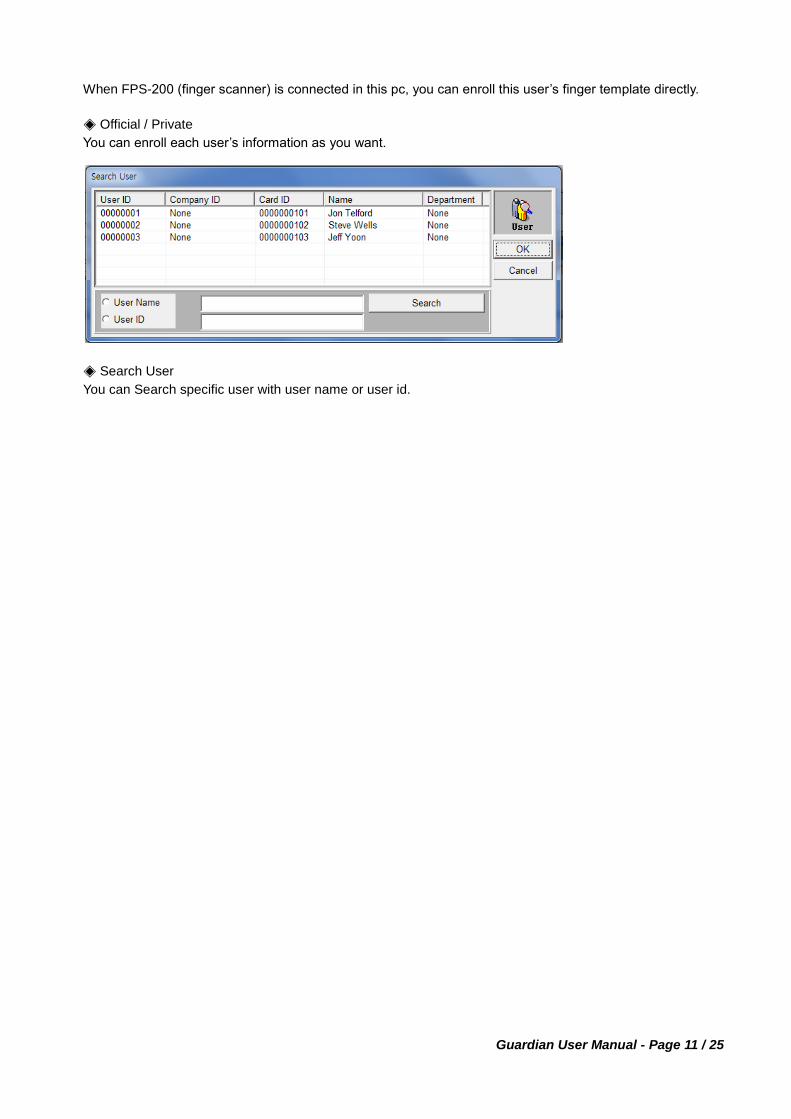
When FPS-200 (finger scanner) is connected in this pc, you can enroll this user‟s finger template directly.
◈ Official / Private
You can enroll each user‟s information as you want.
◈ Search User
You can Search specific user with user name or user id.
Guardian User Manual - Page 12 / 25
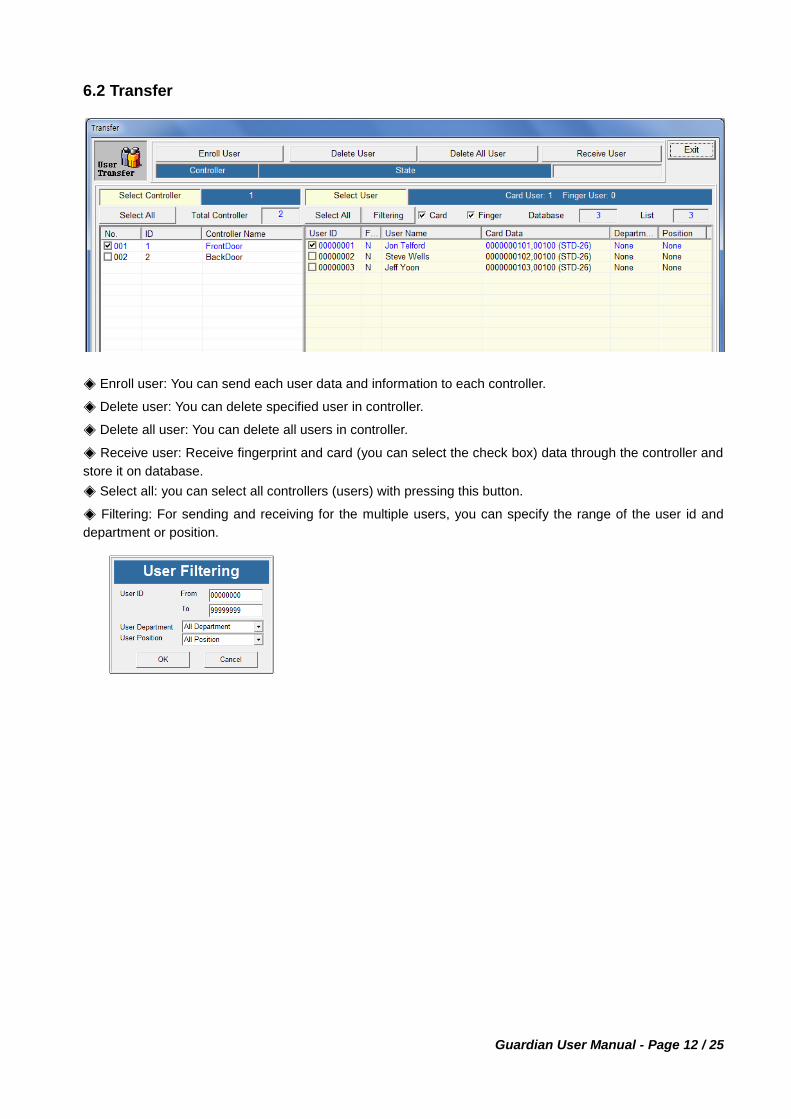
6.2 Transfer
◈ Enroll user: You can send each user data and information to each controller.
◈ Delete user: You can delete specified user in controller.
◈ Delete all user: You can delete all users in controller.
◈ Receive user: Receive fingerprint and card (you can select the check box) data through the controller and
store it on database.
◈ Select all: you can select all controllers (users) with pressing this button.
◈ Filtering: For sending and receiving for the multiple users, you can specify the range of the user id and
department or position.
Guardian User Manual - Page 13 / 25
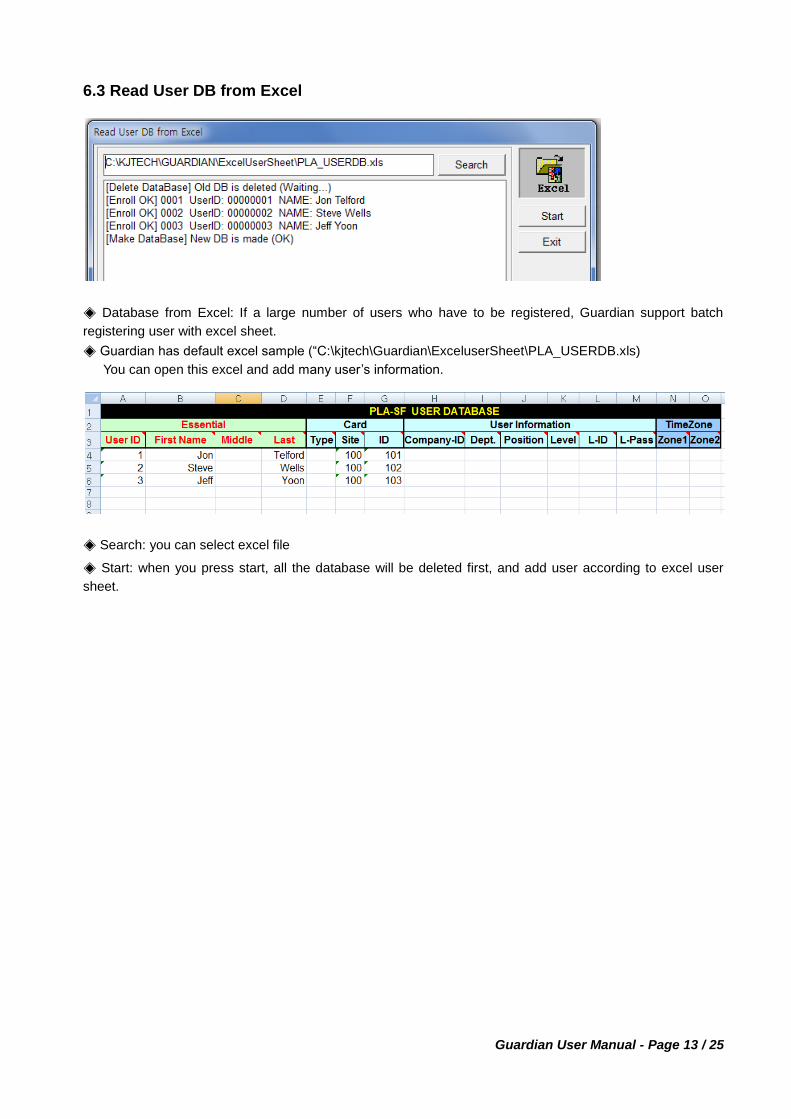
6.3 Read User DB from Excel
◈ Database from Excel: If a large number of users who have to be registered, Guardian support batch
registering user with excel sheet.
◈ Guardian has default excel sample (“C:\kjtech\Guardian\ExceluserSheet\PLA_USERDB.xls)
You can open this excel and add many user‟s information.
◈ Search: you can select excel file
◈ Start: when you press start, all the database will be deleted first, and add user according to excel user
sheet.
Guardian User Manual - Page 14 / 25
6.4 User Report
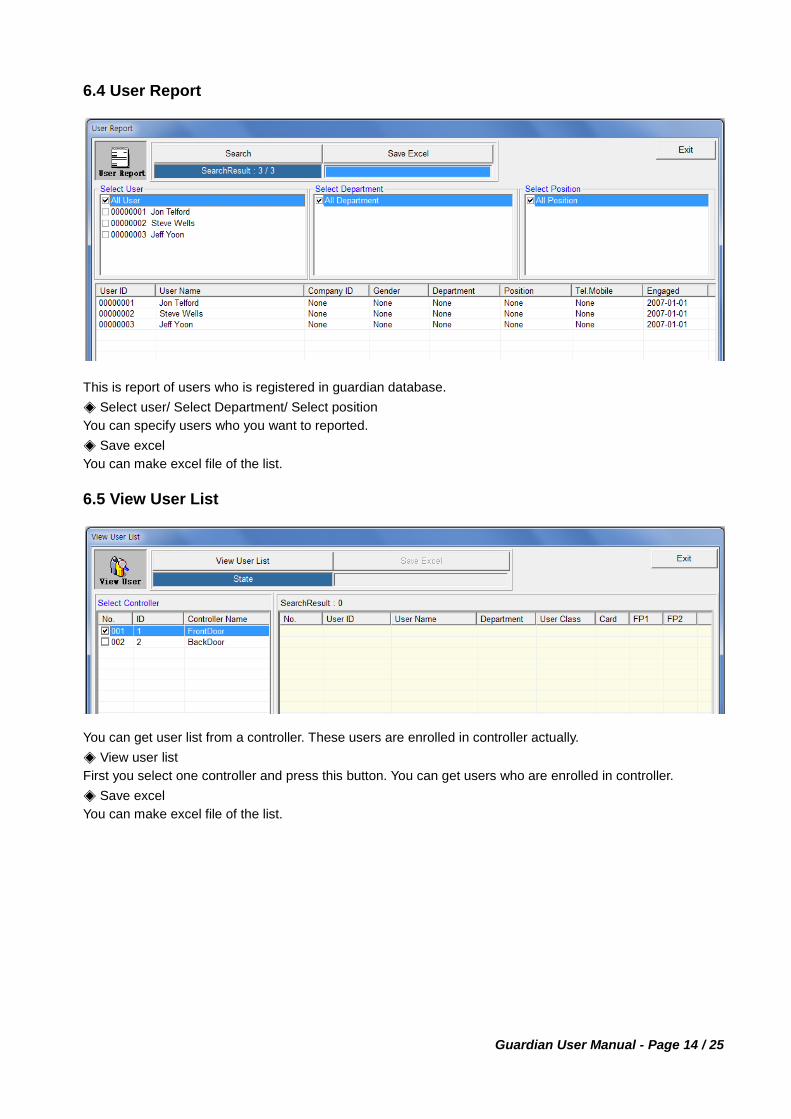
This is report of users who is registered in guardian database.
◈ Select user/ Select Department/ Select position
You can specify users who you want to reported.
◈ Save excel
You can make excel file of the list.
6.5 View User List
You can get user list from a controller. These users are enrolled in controller actually.
◈ View user list
First you select one controller and press this button. You can get users who are enrolled in controller.
◈ Save excel
You can make excel file of the list.
Guardian User Manual - Page 15 / 25
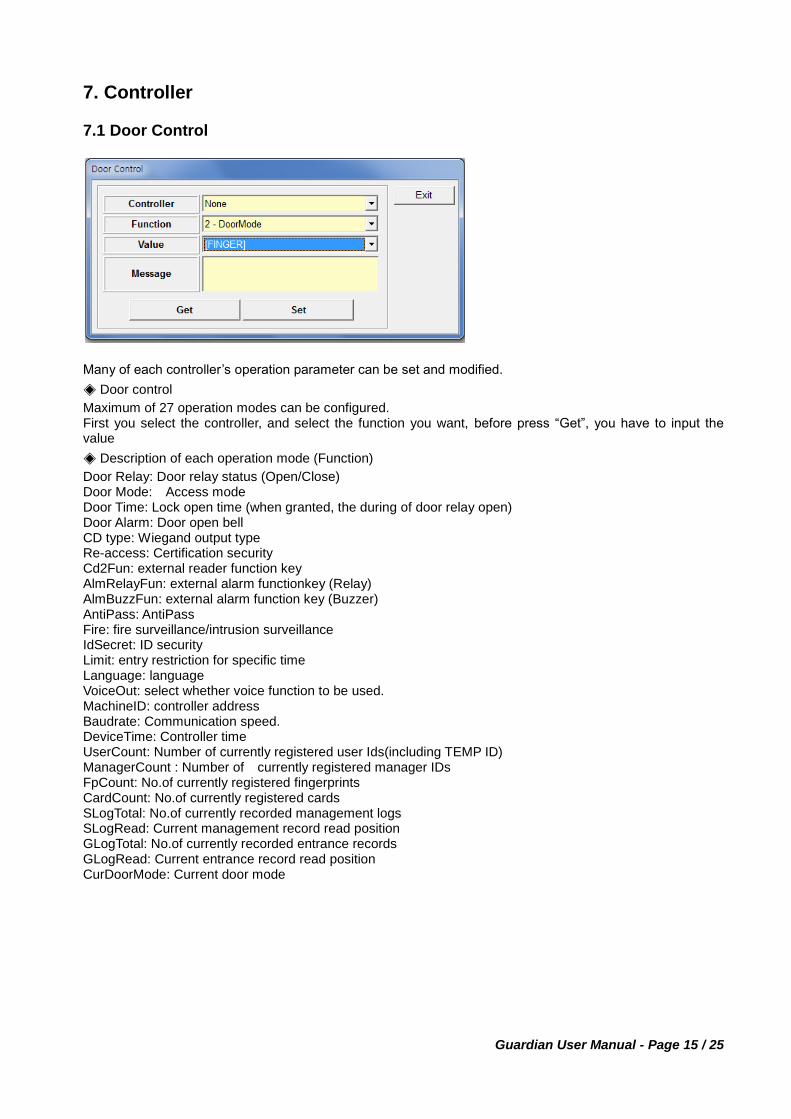
7. Controller 7.1 Door Control
Many of each controller‟s operation parameter can be set and modified.
◈ Door control
Maximum of 27 operation modes can be configured. First you select the controller, and select the function you want, before press “Get”, you have to input the value
◈ Description of each operation mode (Function)
Door Relay: Door relay status (Open/Close) Door Mode: Access mode Door Time: Lock open time (when granted, the during of door relay open) Door Alarm: Door open bell CD type: Wiegand output type Re-access: Certification security Cd2Fun: external reader function key AlmRelayFun: external alarm functionkey (Relay) AlmBuzzFun: external alarm function key (Buzzer) AntiPass: AntiPass Fire: fire surveillance/intrusion surveillance IdSecret: ID security Limit: entry restriction for specific time Language: language VoiceOut: select whether voice function to be used. MachineID: controller address Baudrate: Communication speed. DeviceTime: Controller time UserCount: Number of currently registered user Ids(including TEMP ID) ManagerCount : Number of currently registered manager IDs FpCount: No.of currently registered fingerprints CardCount: No.of currently registered cards SLogTotal: No.of currently recorded management logs SLogRead: Current management record read position GLogTotal: No.of currently recorded entrance records GLogRead: Current entrance record read position CurDoorMode: Current door mode
Guardian User Manual - Page 16 / 25
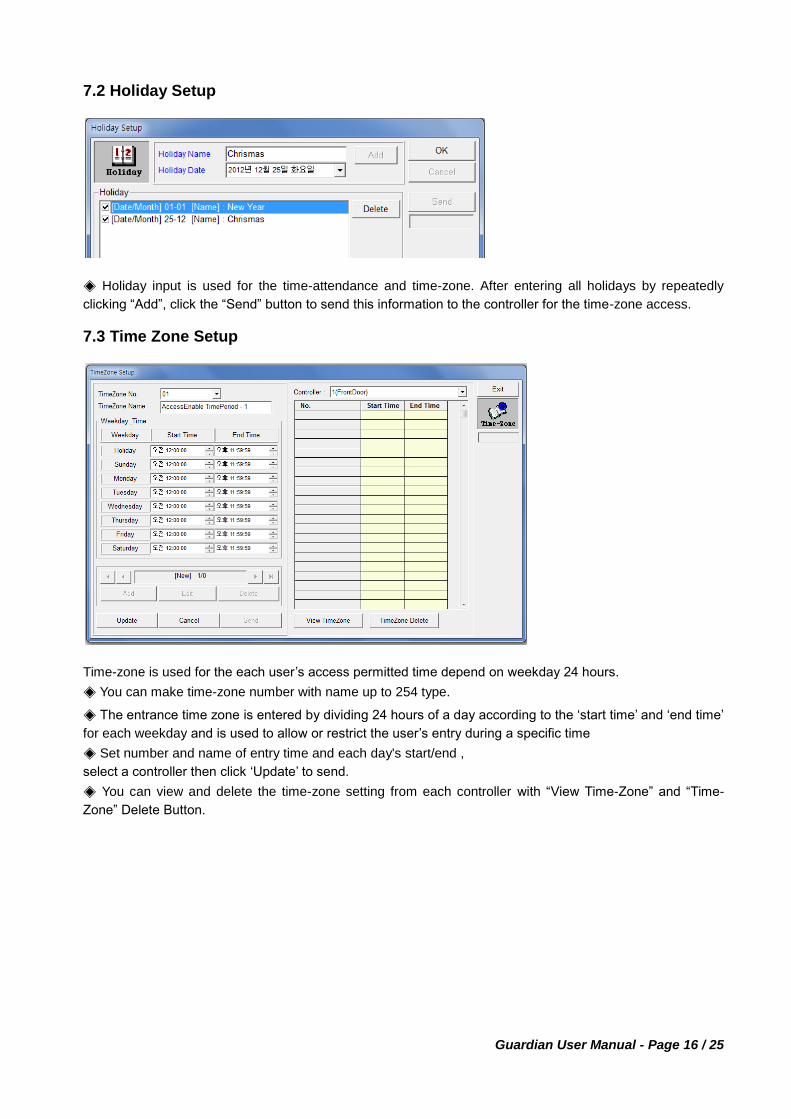
7.2 Holiday Setup
◈ Holiday input is used for the time-attendance and time-zone. After entering all holidays by repeatedly
clicking “Add”, click the “Send” button to send this information to the controller for the time-zone access.
7.3 Time Zone Setup
Time-zone is used for the each user‟s access permitted time depend on weekday 24 hours.
◈ You can make time-zone number with name up to 254 type.
◈ The entrance time zone is entered by dividing 24 hours of a day according to the „start time‟ and „end time‟
for each weekday and is used to allow or restrict the user‟s entry during a specific time
◈ Set number and name of entry time and each day's start/end ,
select a controller then click „Update‟ to send.
◈ You can view and delete the time-zone setting from each controller with “View Time-Zone” and “Time-
Zone” Delete Button.
Guardian User Manual - Page 17 / 25
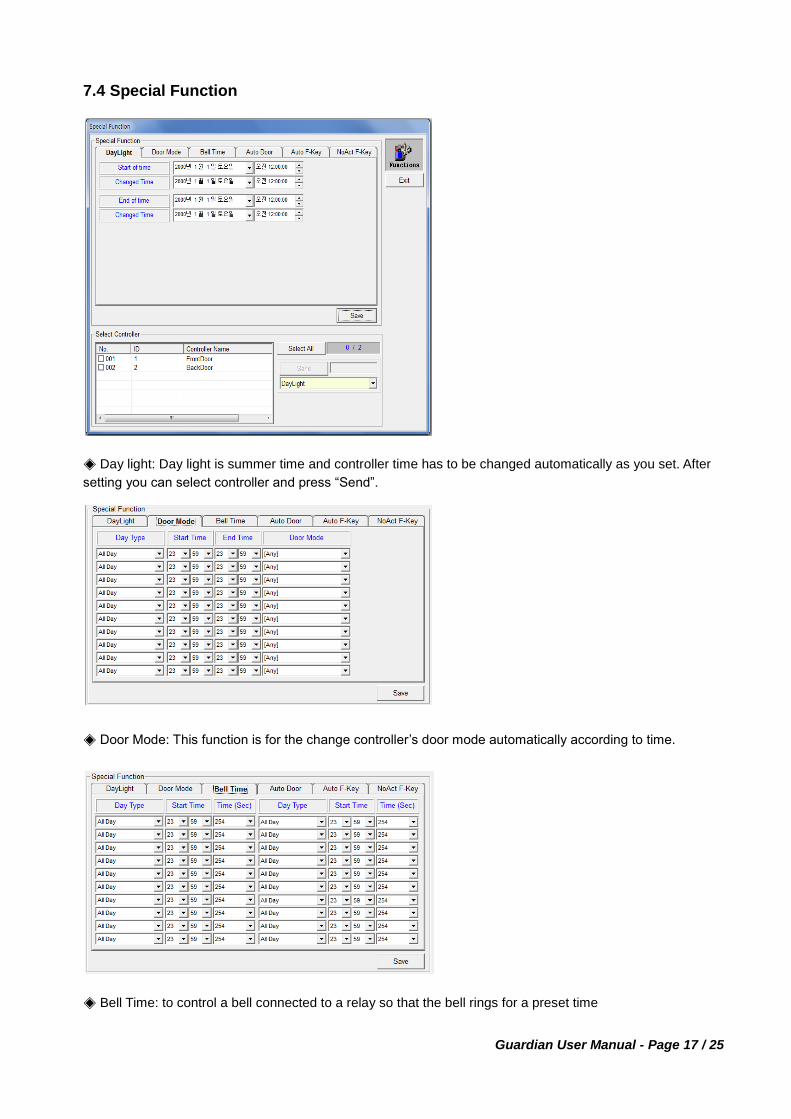
7.4 Special Function
◈ Day light: Day light is summer time and controller time has to be changed automatically as you set. After
setting you can select controller and press “Send”.
◈ Door Mode: This function is for the change controller‟s door mode automatically according to time.
◈ Bell Time: to control a bell connected to a relay so that the bell rings for a preset time
Guardian User Manual - Page 18 / 25
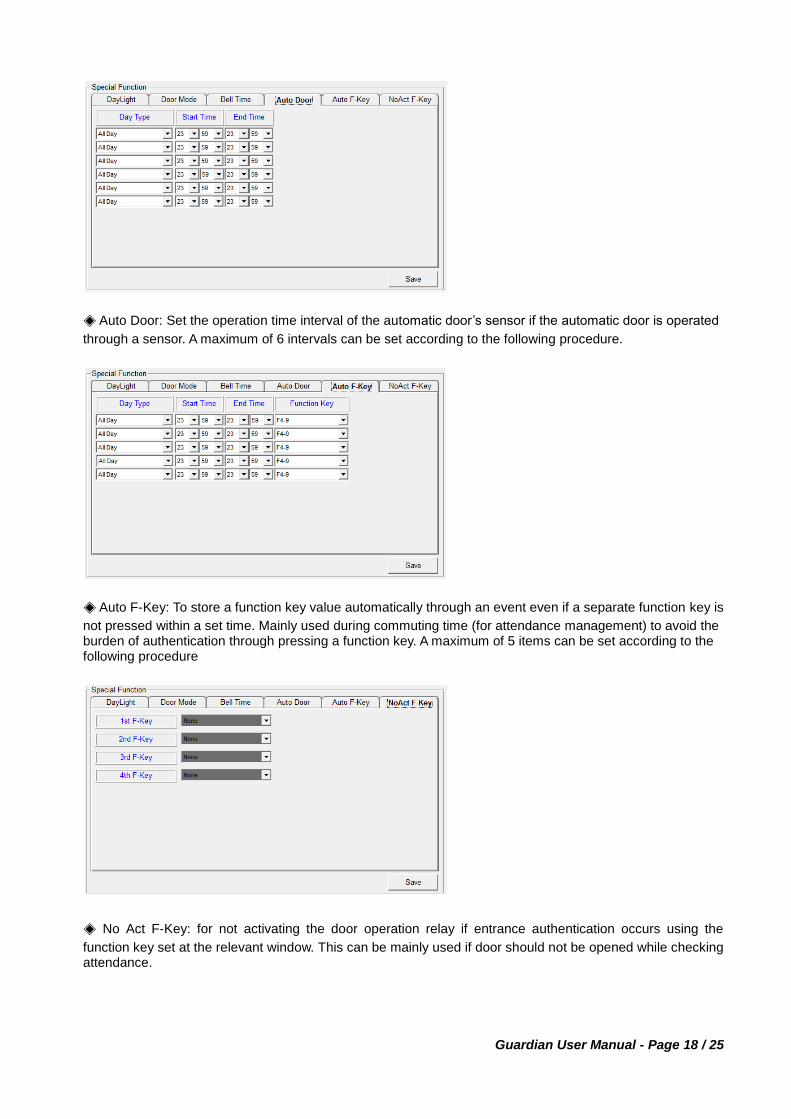
◈ Auto Door: Set the operation time interval of the automatic door‟s sensor if the automatic door is operated
through a sensor. A maximum of 6 intervals can be set according to the following procedure.
◈ Auto F-Key: To store a function key value automatically through an event even if a separate function key is
not pressed within a set time. Mainly used during commuting time (for attendance management) to avoid the burden of authentication through pressing a function key. A maximum of 5 items can be set according to the following procedure
◈ No Act F-Key: for not activating the door operation relay if entrance authentication occurs using the
function key set at the relevant window. This can be mainly used if door should not be opened while checking attendance.
Guardian User Manual - Page 19 / 25
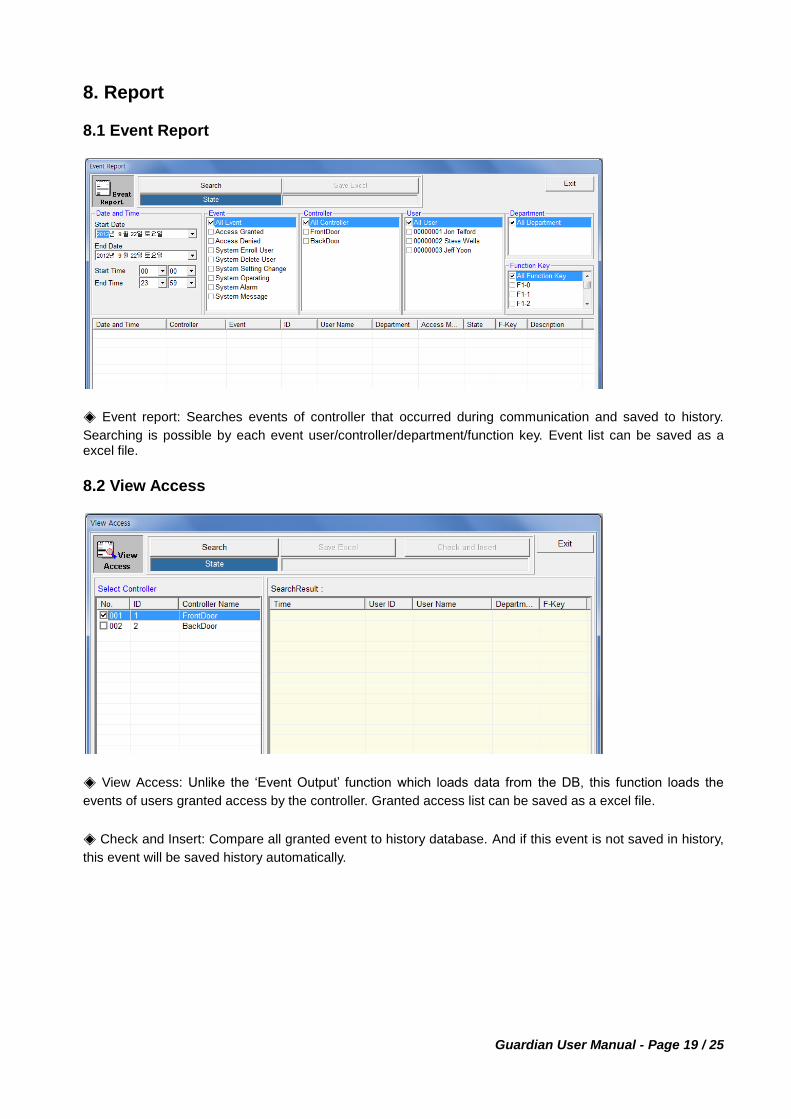
8. Report 8.1 Event Report
◈ Event report: Searches events of controller that occurred during communication and saved to history.
Searching is possible by each event user/controller/department/function key. Event list can be saved as a excel file.
8.2 View Access
◈ View Access: Unlike the „Event Output‟ function which loads data from the DB, this function loads the
events of users granted access by the controller. Granted access list can be saved as a excel file.
◈ Check and Insert: Compare all granted event to history database. And if this event is not saved in history,
this event will be saved history automatically.
Guardian User Manual - Page 20 / 25
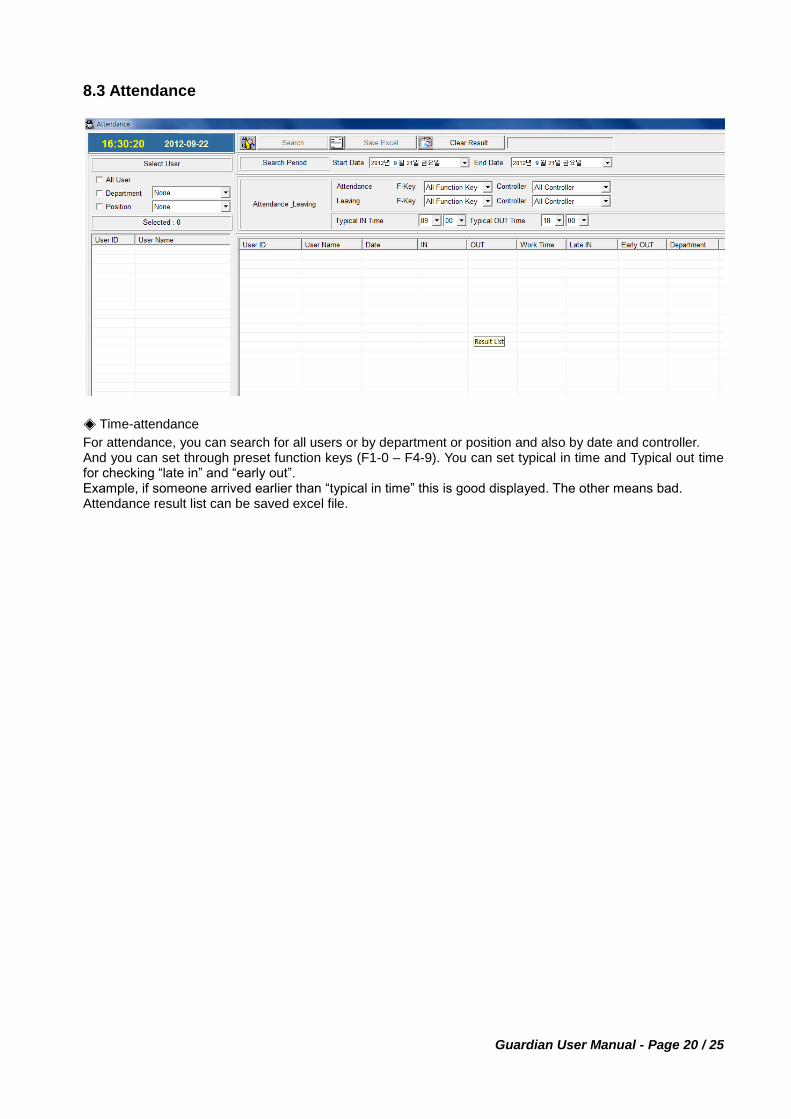
8.3 Attendance
◈ Time-attendance
For attendance, you can search for all users or by department or position and also by date and controller. And you can set through preset function keys (F1-0 – F4-9). You can set typical in time and Typical out time for checking “late in” and “early out”. Example, if someone arrived earlier than “typical in time” this is good displayed. The other means bad. Attendance result list can be saved excel file.
Guardian User Manual - Page 21 / 25
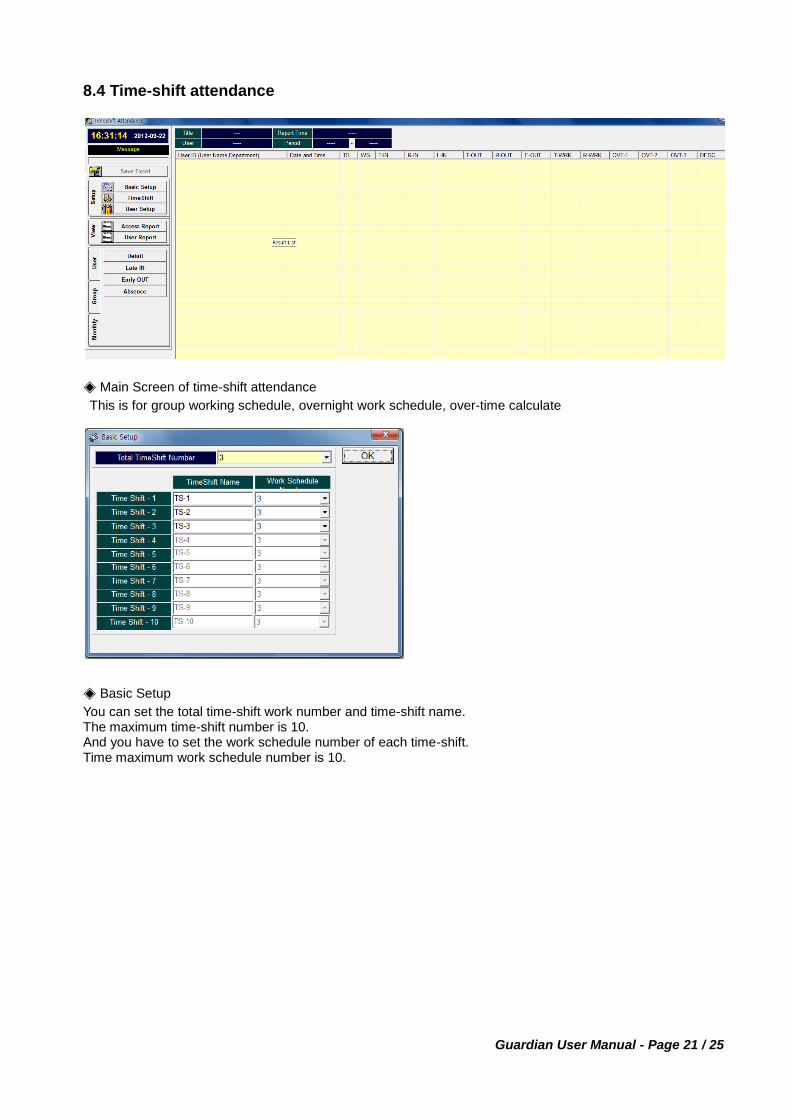
8.4 Time-shift attendance
◈ Main Screen of time-shift attendance
This is for group working schedule, overnight work schedule, over-time calculate
◈ Basic Setup
You can set the total time-shift work number and time-shift name. The maximum time-shift number is 10. And you have to set the work schedule number of each time-shift. Time maximum work schedule number is 10.
Guardian User Manual - Page 22 / 25
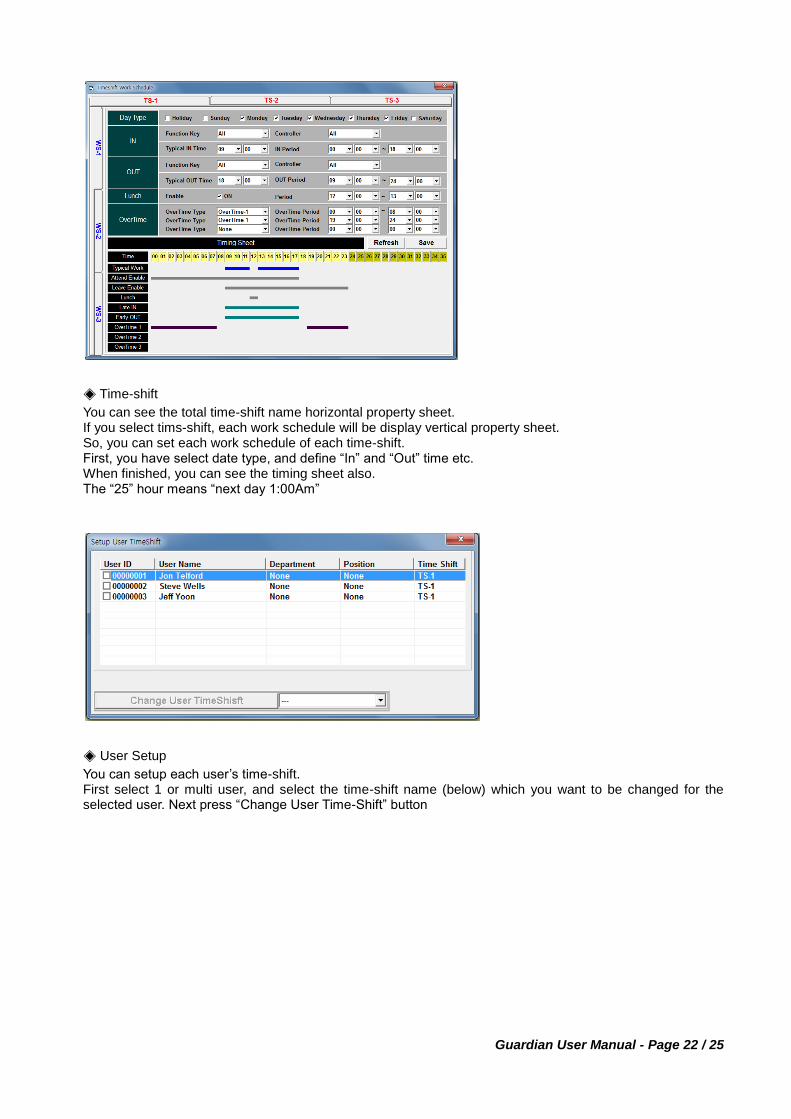
◈ Time-shift
You can see the total time-shift name horizontal property sheet. If you select tims-shift, each work schedule will be display vertical property sheet. So, you can set each work schedule of each time-shift. First, you have select date type, and define “In” and “Out” time etc. When finished, you can see the timing sheet also. The “25” hour means “next day 1:00Am”
◈ User Setup
You can setup each user‟s time-shift. First select 1 or multi user, and select the time-shift name (below) which you want to be changed for the selected user. Next press “Change User Time-Shift” button
Guardian User Manual - Page 23 / 25
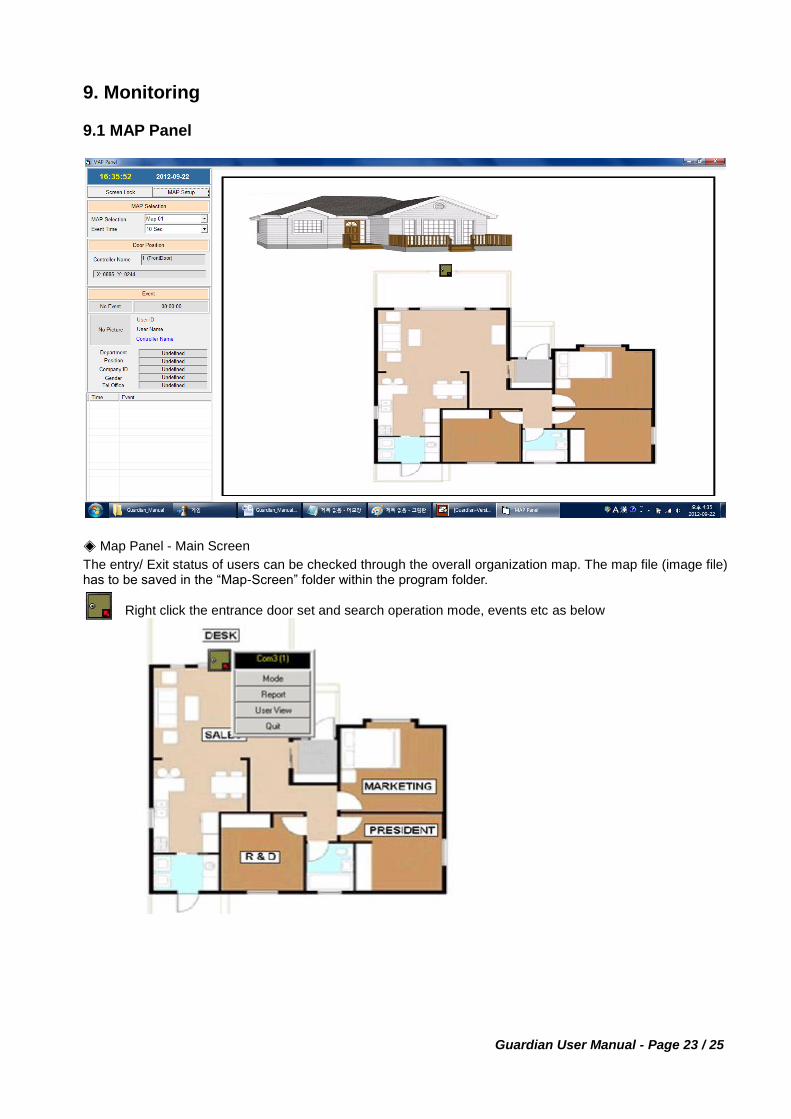
9. Monitoring 9.1 MAP Panel
◈ Map Panel - Main Screen
The entry/ Exit status of users can be checked through the overall organization map. The map file (image file) has to be saved in the “Map-Screen” folder within the program folder.
Right click the entrance door set and search operation mode, events etc as below
Guardian User Manual - Page 24 / 25
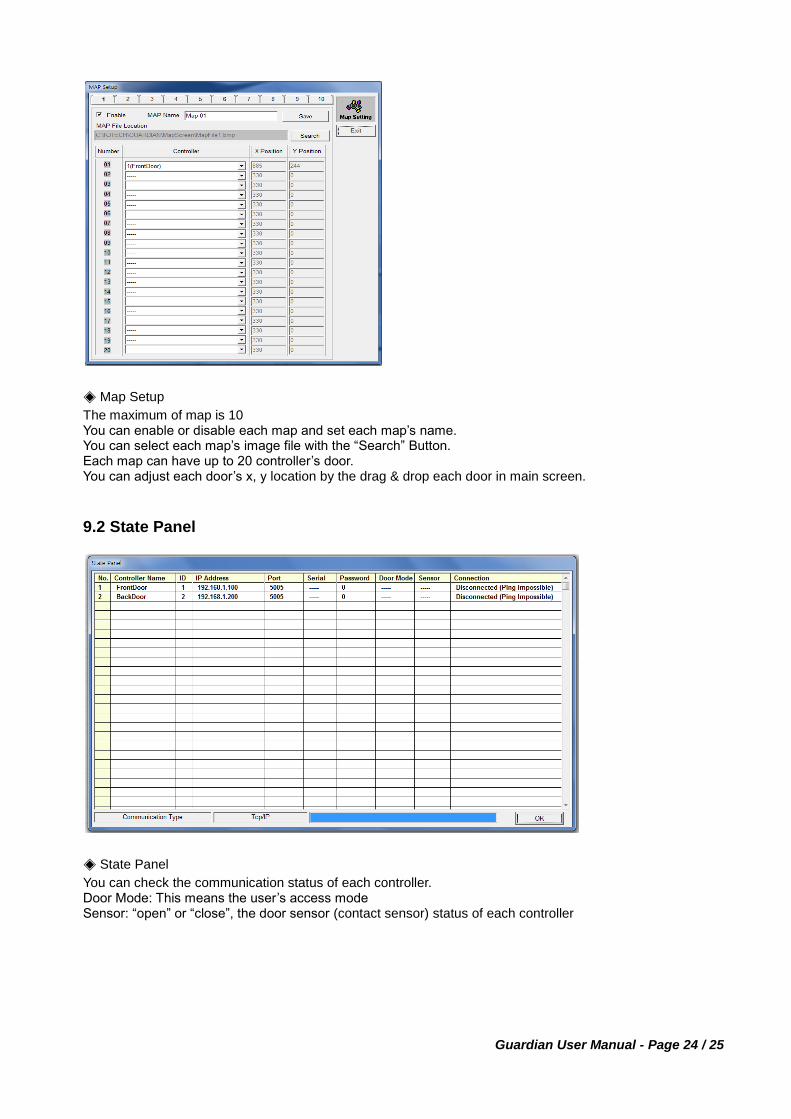
◈ Map Setup
The maximum of map is 10 You can enable or disable each map and set each map‟s name. You can select each map‟s image file with the “Search” Button. Each map can have up to 20 controller‟s door. You can adjust each door‟s x, y location by the drag & drop each door in main screen.
9.2 State Panel
◈ State Panel
You can check the communication status of each controller. Door Mode: This means the user‟s access mode Sensor: “open” or “close”, the door sensor (contact sensor) status of each controller

Guardian User Manual - Page 25 / 25
9.3 User In/Out Panel
◈ User In/Out panel:
This is for the monitoring who is in building (or Department or Room). Example) when fired, fireman wants to know, how many people are there and where? If you click an items (tree view-left side), Guardian will display the person who is in building (department or room) The scanning will be done during some period automatically.
◈ User In/Out Setup
Guardian uses 3 layers concept. It‟s Building-Department-Room Guardian can have up to 10 Buildings, and each building can have up to 10 departments, and Each department can have up to 10 buildings. For the In/Out monitoring, you have to use each controller for “in” and “out” separately. You have to define the “In” or “Out” for each building and each department and each room separately (controller and function key.)