gt-541 service manual - brotherusaservice+manual+transport.pdfcheck flow" in service manual and...
TRANSCRIPT
9. Transporting GT-541
GT-541
273
9. Transporting GT-541
This chapter describes how to transport GT-541.
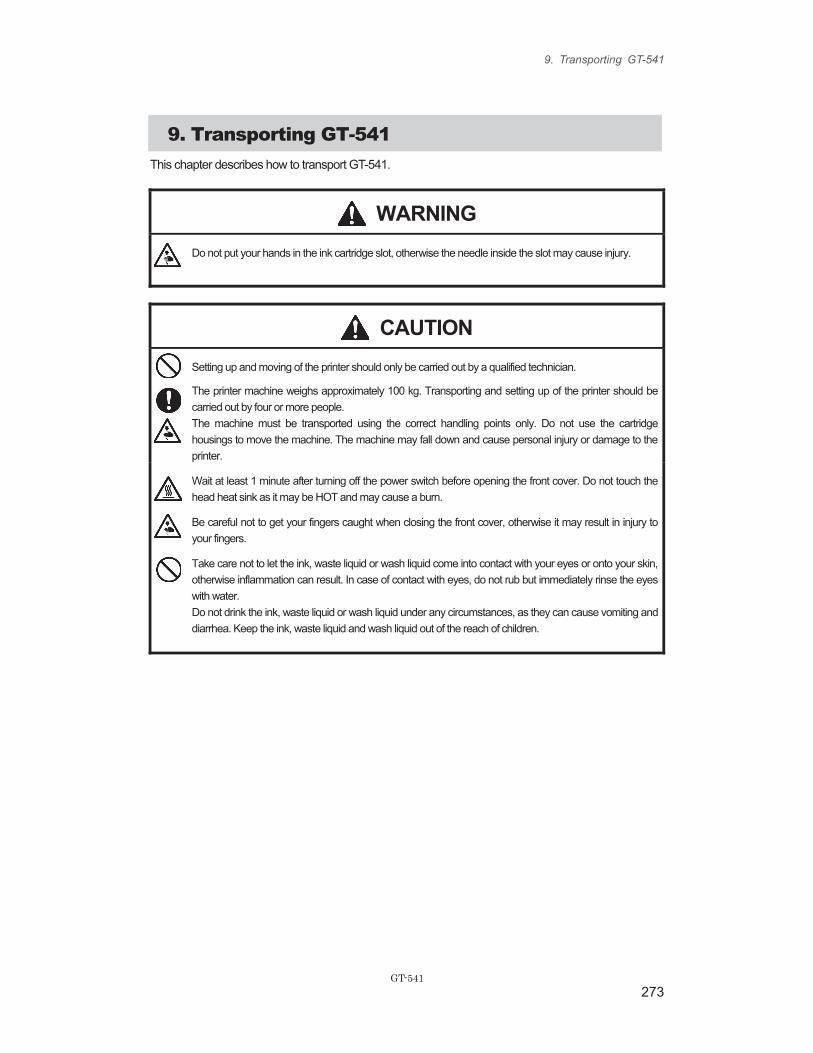
WARNING
Do not put your hands in the ink cartridge slot, otherwise the needle inside the slot may cause injury.
CAUTION
Setting up and moving of the printer should only be carried out by a qualified technician.
The printer machine weighs approximately 100 kg. Transporting and setting up of the printer should be
carried out by four or more people.
The machine must be transported using the correct handling points only. Do not use the cartridge
housings to move the machine. The machine may fall down and cause personal injury or damage to the
printer.
Wait at least 1 minute after turning off the power switch before opening the front cover. Do not touch the
head heat sink as it may be HOT and may cause a burn.
Be careful not to get your fingers caught when closing the front cover, otherwise it may result in injury to
your fingers.
Take care not to let the ink, waste liquid or wash liquid come into contact with your eyes or onto your skin,
otherwise inflammation can result. In case of contact with eyes, do not rub but immediately rinse the eyes
with water.
Do not drink the ink, waste liquid or wash liquid under any circumstances, as they can cause vomiting and
diarrhea. Keep the ink, waste liquid and wash liquid out of the reach of children.
9. Transporting GT-541
GT-541
274
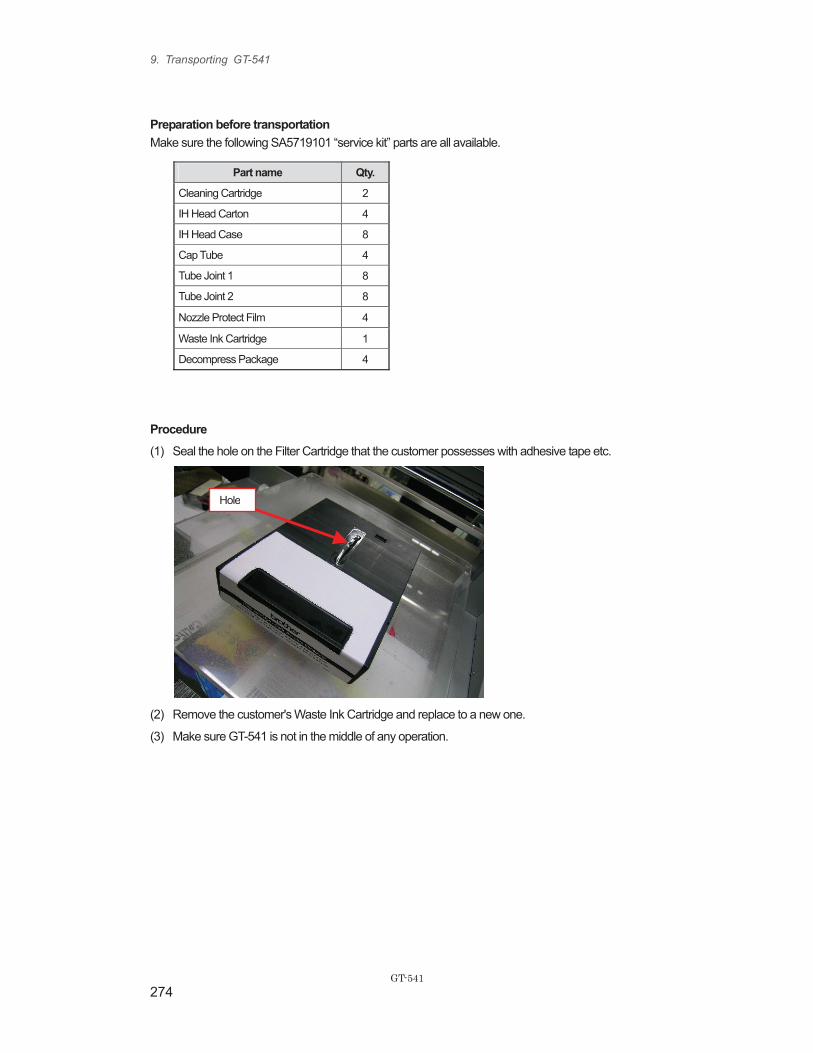
Preparation before transportation
Make sure the following SA5719101 “service kit” parts are all available.
Part name Qty.
Cleaning Cartridge 2
IH Head Carton 4
IH Head Case 8
Cap Tube 4
Tube Joint 1 8
Tube Joint 2 8
Nozzle Protect Film 4
Waste Ink Cartridge 1
Decompress Package 4
Procedure
(1) Seal the hole on the Filter Cartridge that the customer possesses with adhesive tape etc.
(2) Remove the customer's Waste Ink Cartridge and replace to a new one.
(3) Make sure GT-541 is not in the middle of any operation.
Hole
9. Transporting GT-541
GT-541
275
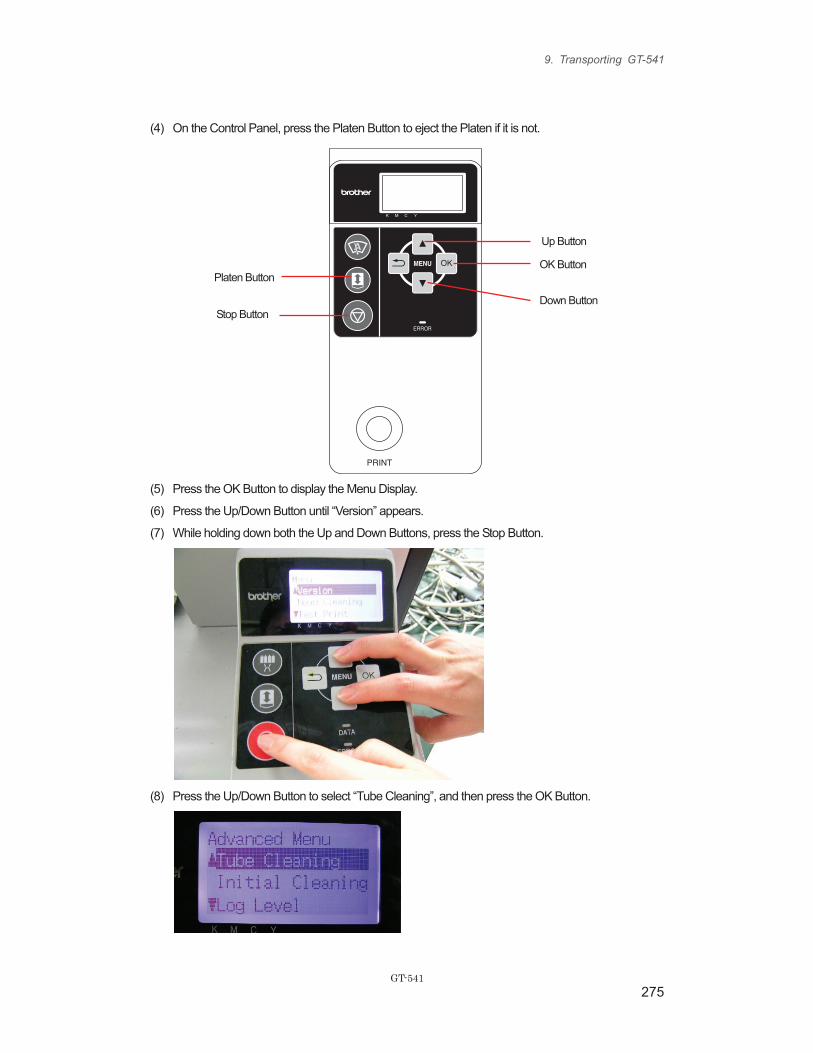
(4) On the Control Panel, press the Platen Button to eject the Platen if it is not.
(5) Press the OK Button to display the Menu Display.
(6) Press the Up/Down Button until “Version” appears.
(7) While holding down both the Up and Down Buttons, press the Stop Button.
(8) Press the Up/Down Button to select “Tube Cleaning”, and then press the OK Button.
Up Button
OK Button
Down Button
Platen Button
Stop Button

9. Transporting GT-541
GT-541
276
(9) Remove the Ink Cartridge whose ink you will drain, and then insert the Filter Cartridge, whose hole
you sealed in step (1), into the same Ink Cartridge Slot.
* The following procedure shows the example of removing the “Black” Print Head. The
procedure is the same for other colors.
(10) Press the Up/Down Button to select “Black”, and then press the OK Button.
* The following message appears. Wait until the cleaning finishes.
(11) When the Tube cleaning is finished, replace the Filter Cartridge with the Cleaning Cartridge.
“Black” Ink Cartridge Filter Cartridge
Cleaning Cartridge

9. Transporting GT-541
GT-541
277
(12) The following message is displayed after the performance of step (10) is finished.
Press the OK Button to perform the Tube cleaning.
(13) When the Tube cleaning is finished, replace the Cleaning Cartridge with the Filter Cartridge again,
and then perform the Tube cleaning.
(14) When the Tube cleaning is finished, leave the Filter Cartridge in the Black Ink Cartridge Slot, and
then perform the Tube cleaning for other colors by repeating step (9) to (13).
* One Cleaning Cartridge can be used for two colors.
(15) When the Tube cleaning is finished for all colors, check that the Filter Cartridges are inserted in all
the Ink Cartridge Slots.
(16) Turn off GT-541, and then open the Front Cover.
(17) Remove one Filter Cartridge from the Ink Cartridge Slot, then remove the adhesive tape etc. that
seals the hole, and then insert the Filter Cartridge into the Ink Cartridge Slot again.
* Make this operation for all the Filter Cartridges.
9. Transporting GT-541
GT-541
278
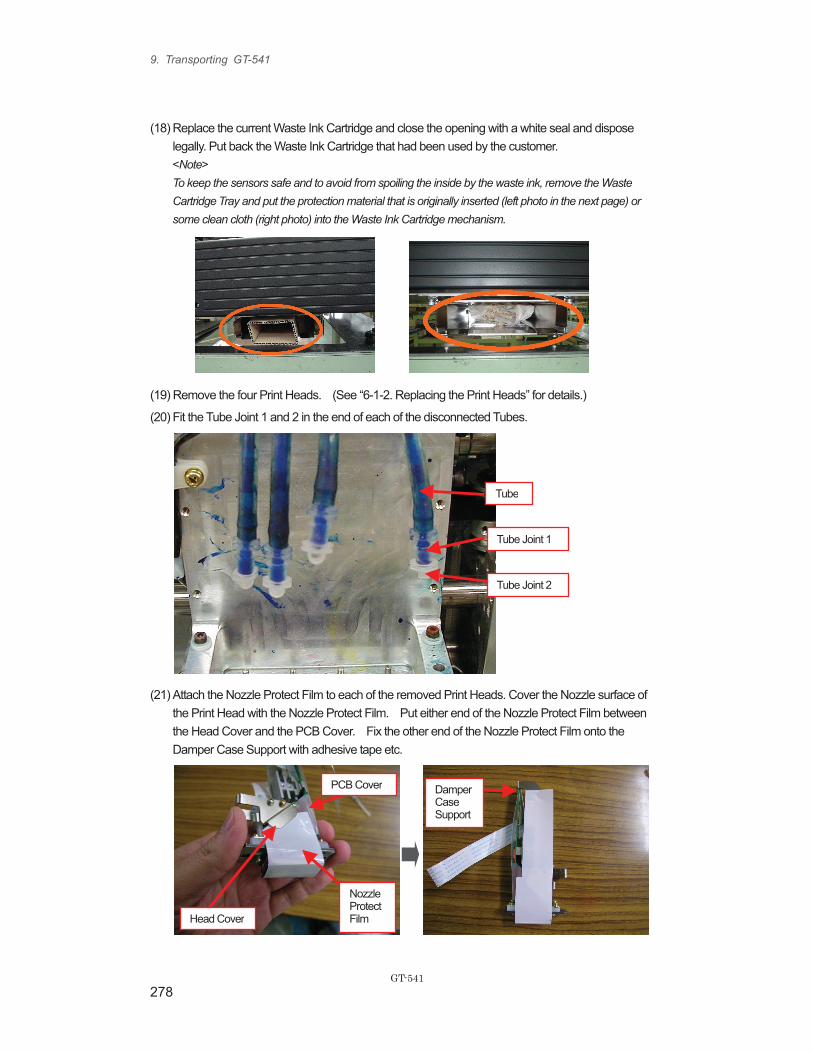
(18) Replace the current Waste Ink Cartridge and close the opening with a white seal and dispose
legally. Put back the Waste Ink Cartridge that had been used by the customer.
<Note>
To keep the sensors safe and to avoid from spoiling the inside by the waste ink, remove the Waste
Cartridge Tray and put the protection material that is originally inserted (left photo in the next page) or
some clean cloth (right photo) into the Waste Ink Cartridge mechanism.
(19) Remove the four Print Heads. (See “6-1-2. Replacing the Print Heads” for details.)
(20) Fit the Tube Joint 1 and 2 in the end of each of the disconnected Tubes.
(21) Attach the Nozzle Protect Film to each of the removed Print Heads. Cover the Nozzle surface of
the Print Head with the Nozzle Protect Film. Put either end of the Nozzle Protect Film between
the Head Cover and the PCB Cover. Fix the other end of the Nozzle Protect Film onto the
Damper Case Support with adhesive tape etc.
Tube
Tube Joint 2
Head Cover
PCB Cover
Nozzle Protect Film
Damper Case Support
Tube Joint 1
9. Transporting GT-541
GT-541
279
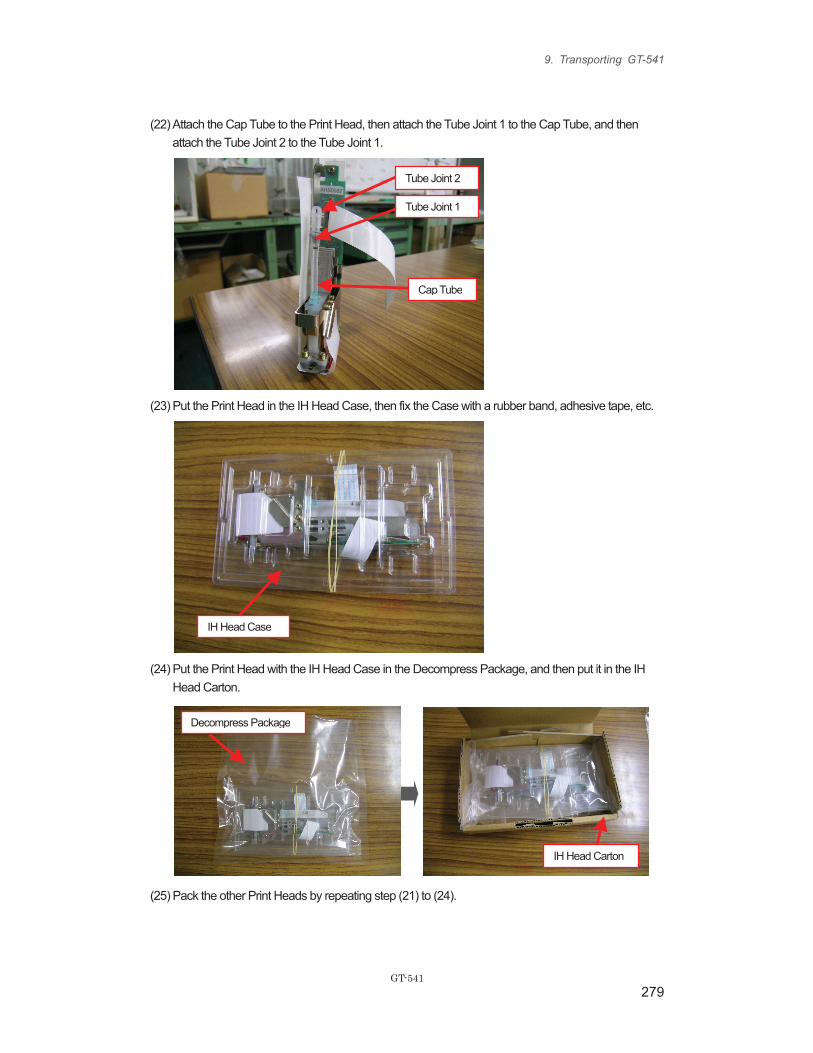
(22) Attach the Cap Tube to the Print Head, then attach the Tube Joint 1 to the Cap Tube, and then
attach the Tube Joint 2 to the Tube Joint 1.
(23) Put the Print Head in the IH Head Case, then fix the Case with a rubber band, adhesive tape, etc.
(24) Put the Print Head with the IH Head Case in the Decompress Package, and then put it in the IH
Head Carton.
(25) Pack the other Print Heads by repeating step (21) to (24).
Tube Joint 2
Tube Joint 1
Cap Tube
IH Head Case
Decompress Package
IH Head Carton
9. Transporting GT-541
GT-541
280
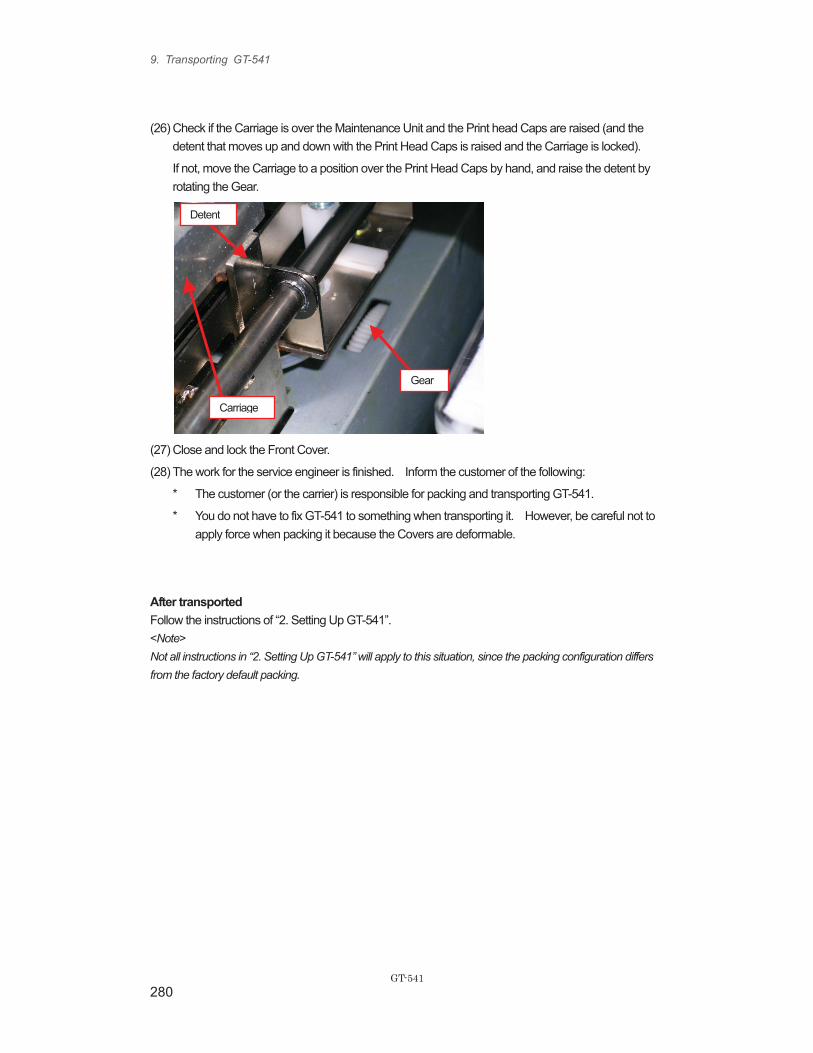
(26) Check if the Carriage is over the Maintenance Unit and the Print head Caps are raised (and the
detent that moves up and down with the Print Head Caps is raised and the Carriage is locked).
If not, move the Carriage to a position over the Print Head Caps by hand, and raise the detent by
rotating the Gear.
(27) Close and lock the Front Cover.
(28) The work for the service engineer is finished. Inform the customer of the following:
* The customer (or the carrier) is responsible for packing and transporting GT-541.
* You do not have to fix GT-541 to something when transporting it. However, be careful not to
apply force when packing it because the Covers are deformable.
After transported
Follow the instructions of “2. Setting Up GT-541”.
<Note>
Not all instructions in “2. Setting Up GT-541” will apply to this situation, since the packing configuration differs
from the factory default packing.
Carriage
Gear
Detent
9. Transporting GT-541
GT-541
281
Maintenance for a few weeks' leave
The following information is one of our suggestions to prevent the Print Heads, Caps and tubes from
clogging. Follow the "4-2-2. Check Flow" in Service Manual and solve the print quality problems after
the leave.
For about 2 weeks' leave:
(1) Before: Clean the Print Head Caps and Wiper Blade (Step 1. Cap/Wiper Cleaning). Setting the
new Wiper Cleaner is better.
(2) Pour the Wash Liquid into the Print Head Caps to avoid ink clogging.
(3) After: Open the front cover and check if the ink tubes are filled with ink, if air is in and divides the
ink, do "Initial" head cleaning after turning on the printer.
(4) Turn on the Printer. Do either "Initial" or "Powerful" head cleaning.
(5) Print the Nozzle Check Pattern and check the print quality. If necessary, follow "4-2-2. Check Flow"
and keep print quality ( e.g. nozzle cleaning).
For more than 3 weeks' leave:
(1) Before: Clean the Print Head Caps and Wiper Blade (Step 1. Cap/Wiper Cleaning). Setting the
new Wiper Cleaner is better.
(2) Turn on the printer and insert the Filter Cartridge and empty the ink with "Initial" head cleaning.
(3) Insert "Wash Liquid" cartridge and do "Initial" head cleaning (for 4 colors).
(4) Turn off the printer.
(5) After: Insert the Filter Cartridge and do "Tube Cleaning" in advanced menu.
(6) Insert each color ink cartridge and do "Initial" head cleaning.
Print the Nozzle Check Pattern and check the print quality.
10. Error Code List
GT-541
282
10. Error Code List
This section lists error messages and error codes shown in the Control Panel display, and solutions for
the errors.
10-1. Interpretation of the Display
An example of error messages
10-2. Warning messages
Error code
Message Meaning Solution (for service staff) Solution (for customers)
1000 INK LOW Black Black ink level is too low. Prepare a new black ink cartridge.
1001 INK LOW Magenta
Magenta ink level is too low.
Prepare a new magenta ink cartridge.
1002 INK LOW Cyan Cyan ink level is too low. Prepare a new cyan ink cartridge.
1003 INK LOW Yellow Yellow ink level is too low. Prepare a new yellow ink cartridge.
1010 WASTE INK FULL
The Waste Ink Cartridge is almost full.
Prepare a new Waste Ink Cartridge. You can keep printing for a while, but replacement is soon required.
1021 Wp-Blade Life The Print Head Wiper Blade needs to be replaced.
Replace the Print Head Wiper Blade.
See "7-2-9 Replacing the Wiper Blade" and replace to a new one.
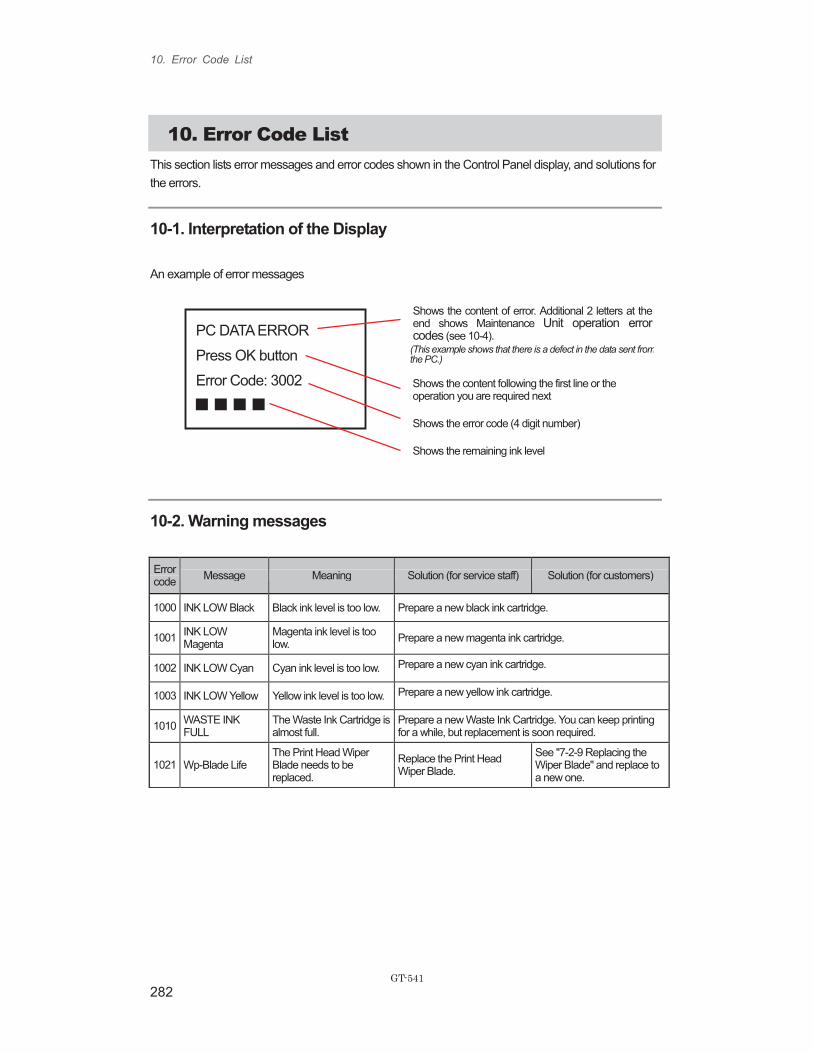
PC DATA ERROR
Press OK button
Error Code: 3002
Shows the content of error. Additional 2 letters at the end shows Maintenance Unit operation error codes (see 10-4).
(This example shows that there is a defect in the data sent fromthe PC.)
Shows the content following the first line or the operation you are required next
Shows the error code (4 digit number)
Shows the remaining ink level