growth market vehicle-diploma project-vehicle build
DESCRIPTION
the 2nd volume detailing the vehicle build processTRANSCRIPT

1
DIPLOMA PROJECT
Growth Market Bike for Visteon
Sponsor : Visteon,Pune
GUIDE : VIPUL VINZUDA
ABHILASH SUDHINDRAN
INDUSTRIAL DESIGN FACULTY (TRANSPORTATION & AUTOMOBILE DESIGN)
National Institute of DesignAhmedabad
2011
Volume : 2
PROGRAMME : Post-Graduate Diploma Programme

2

3
The Evaluation Jury recommends ABHILASH SUDHINDRAN for the
Diploma of the National Institute of Design
IN INDUSTRIAL DESIGN (TRANSPORTATION & AUTOMOBILE DESIGN)
herewith, for the project titled "GROWTH MARKET BIKE FOR VISTEON"
on fulfilling the further requirements by *
Chairman
Members :
*Subsequent remarks regarding fulfilling the requirements :
Registrar(Academics)

4

5
The story of the conceptualisation and realisation of a technology demonstration vehicle
In collaboration with

6

7
The following volume is a pictorial depiction of the prototyping phase that was carried out at DC Design in Pune.The methods depicted here are not quite the standard procedures one would probably see being carried out in a protoyping centre these days.

8

9
Table of ContentsDilip Chhabria Design 11
Tools of the trade 13
Ptototyping Phase 23
29th Nov 2010 24
4th Dec 2010 27
19th Dec 2010 29
23rd Dec 2010 30
25th Dec 2010 32 26th Dec 2010 33
27th Dec 2010 38 28th Dec 2010 43
29th Dec 2010 45
3rd Jan 2011 54
4th Jan 2011 58
5th Jan 2011 61 8th Jan 2011 62
10th Jan 2011 64
11th Jan 2011 66
12th Jan 2011 68
13th Jan 2011 72
14th Jan 2011 73
15th Jan 2011 75
18th Jan 2011 77
19th Jan 2011 79
21th Jan 2011 83
10th Feb 2011 86
11th Feb 2011 91
12th Feb 2011 94
13th Feb 2011 96
9th Mar 2011 97
16th Mar 2011 98
26th Mar 2011 100 Description of Technologies 103
Animation 121 At the 2011 Shanghai Auto Show 127
Retrsospection 137
Bibliography 141

10

11
Dilip Chhabria Design
D E S I G N
12
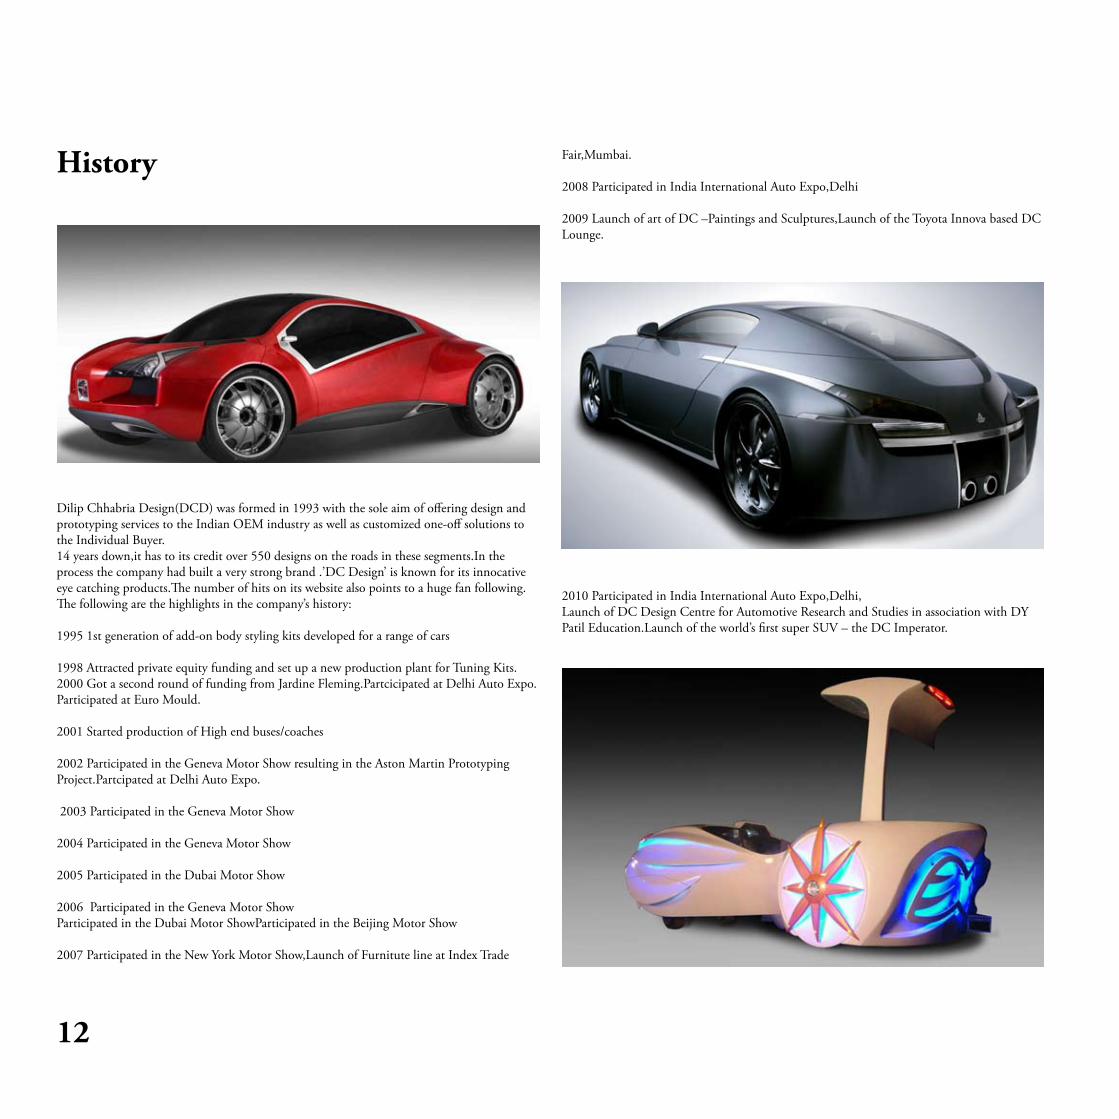
Dilip Chhabria Design(DCD) was formed in 1993 with the sole aim of offering design and prototyping services to the Indian OEM industry as well as customized one-off solutions to the Individual Buyer.14 years down,it has to its credit over 550 designs on the roads in these segments.In the process the company had built a very strong brand .’DC Design’ is known for its innocative eye catching products.The number of hits on its website also points to a huge fan following.The following are the highlights in the company’s history:
1995 1st generation of add-on body styling kits developed for a range of cars
1998 Attracted private equity funding and set up a new production plant for Tuning Kits.2000 Got a second round of funding from Jardine Fleming.Partcicipated at Delhi Auto Expo.Participated at Euro Mould.
2001 Started production of High end buses/coaches
2002 Participated in the Geneva Motor Show resulting in the Aston Martin Prototyping Project.Partcipated at Delhi Auto Expo.
2003 Participated in the Geneva Motor Show
2004 Participated in the Geneva Motor Show
2005 Participated in the Dubai Motor Show
2006 Participated in the Geneva Motor Show Participated in the Dubai Motor ShowParticipated in the Beijing Motor Show
2007 Participated in the New York Motor Show,Launch of Furnitute line at Index Trade
Fair,Mumbai.
2008 Participated in India International Auto Expo,Delhi
2009 Launch of art of DC –Paintings and Sculptures,Launch of the Toyota Innova based DC Lounge.
2010 Participated in India International Auto Expo,Delhi,Launch of DC Design Centre for Automotive Research and Studies in association with DY Patil Education.Launch of the world’s first super SUV – the DC Imperator.
History

13
The company caters to the need of a B-to-B and B-to-C client by providing appropriate solutions throught innovative automotive styling,integration of systems,highly skilled craftsmanship supported by the ability to consistently produce high class metal and composite surfaces in fit and finish.
Design PhilosophyEvocative styling: a rare capability to presage future trends and using the sensitivities in design,deal with the intangibles of distinctiveness keeping focused on contemporariness and originality.Meet client expectations on quality by benchmarking against the best in the world speed of execution that is unparalleled and materials and processes that are proven.
ServicesThe company’s interests span across a varied range of fields like:Styling vehicles,aviation and CAS
Show aar and prototype buildCustomized and Armoured vehicle buildsSpecial Purpose Vehicle buildsBespoke FurnitureStandard ProductsBody kitsArt CollectionEducation

14

15
Tools of the Trade

16
Randa Block (Sandpaper Holder) Paper (Sand Paper)
Grinder Grinder paper

17
Batthi (Welding Torch) Lighter (Torch Lighter)
Welding Thar (Welding Rod) Saansi (Metal Clamp)

18
Drilling Machine Bit (Drill Bit)
Carpage (Automotive Putty) Hardener

19
Screw Alen Screw
Nut Washer

20
Tape (Masking Tape) Marpa (Metal Grate)
Ring Paana (Ring Spanner)File
21
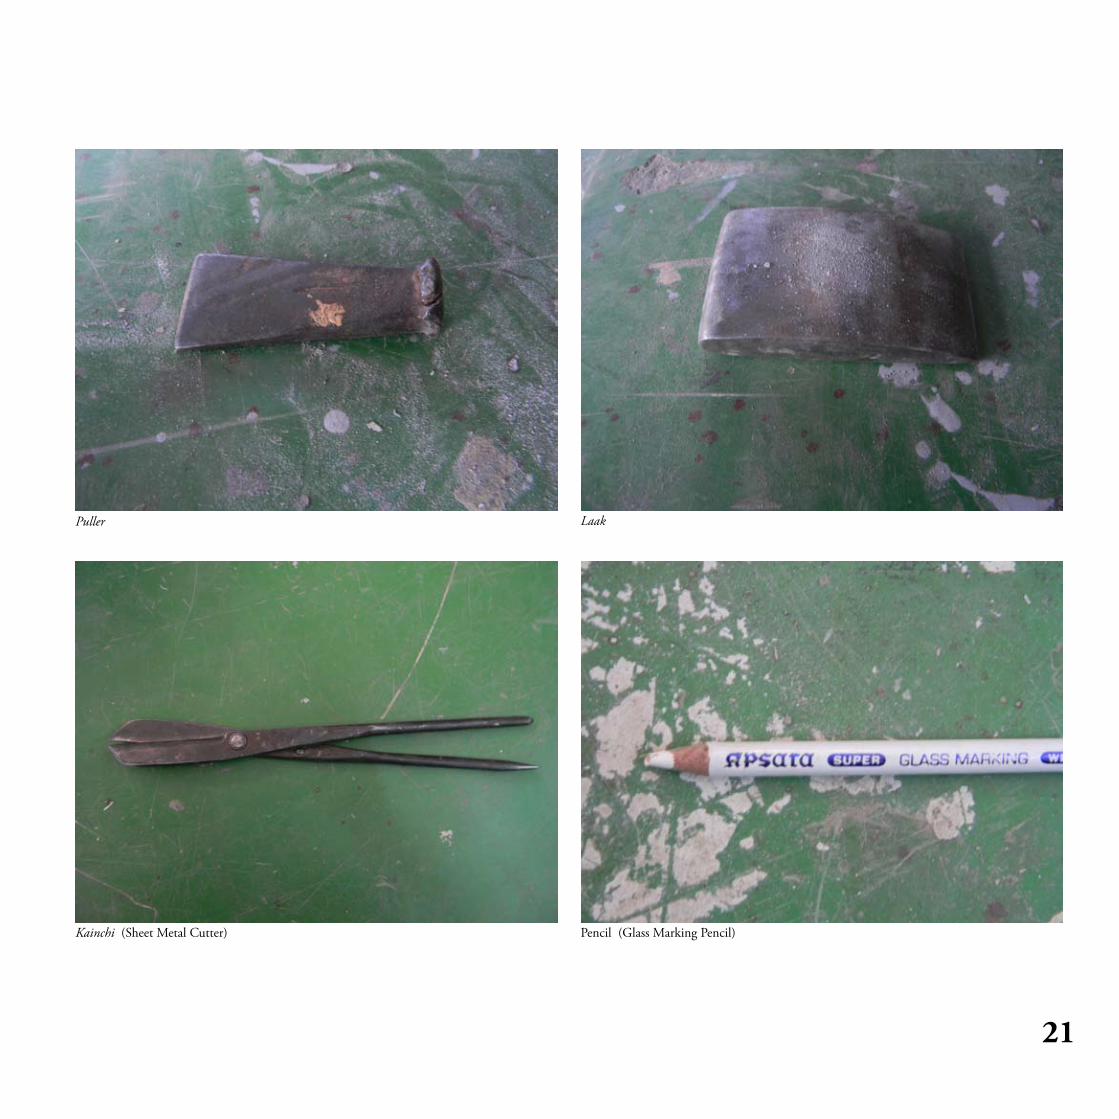
Kainchi (Sheet Metal Cutter)
Laak
Pencil (Glass Marking Pencil)
Puller

22

23
Prototyping Phase

24
29th Nov 2010
The initial renders were handed over to DC Design to initiate the prototyping phase.This happened over a friday before a weekend.Meanwhile over the weekend we ended up coming up with a newer design as we realised that a few design elements would not work on the model.We were however surprised that within just 2 days the skilled labourers at DC had already managed to knock up a prototype! And all this with just a side view of the render we had provided.It indeed was heartening to see a sketch come to life in just 2 days! However we also did communicate to them that there had been a change in the design.They were more than ready to start work on the new design.The first prototype in essence established the kind of speed and skill DC was capable of and what exactly we were up against also in terms of professionalism.
It was also interesting to see the way DC design’s method of working with protoypes.Here the clay modelling process is completely done away with unlike usual prototyping companies.The model is directly beat out of sheet metal ! The degree of skill among the labour again is exceptional.Also unlike a clay model which is a fragile structure,having a model made out completely in sheet metal gave the model a more authentic feel.A sense of robustness was instantly conveyed where we could carry out out ergonomic analysis ourselves by actually sitting on the work in progress.It was again a new experience to see this kind of work method as opposed to the clay and MDF modelling that we are accustomed to at the school.Again it was also more of a managerial role that I took on,where the actual modelling was done by somebody else and my job was to communicate my design ideas to him.Which is usually what would happen in the industry,where we would essentially as creative designers be communicating the design to 3D and clay modellers.So it was a first hand experience again to get play such a role.Initially I do admit it was a little difficult to exactly get the communication happening between us and the workforce.Howevere once the rapport was established, we each knew what the other was capable of and worked around each others strengths and work styles.
We soon got into a work culture where we would direct the design and the work would get done by the workforce of DC design.However we were also able to distinguish between the workstyles of different people.It was also a learning process watching the workforce themselves visualise forms out of basically just a sheet of metal.And how they were able to get to the required form in whatever way they deemed was approppriate.While one of them used to basically visualise forms in bits anf pieces of metals that were cut and welded together ,there was another one who would basically work with a sheet of metal by bending it to place and using the blow torch only when necessary.

25
29th Nov 2010
We realised that the distance between the fairing and the front mud guard was not convincing enough and hence we decided to change the design.
The comparison with the original platformSheet metal beat into place

26
29th Nov 2010

27
4th Dec 2010
This is the second design that was given to DC.It had a more lifted nose giving travel for the front forks and was also visually lighter while maintaing key elements of the previous design.

28
4th Dec 2010
Changes were usually marked with a glass marking pencil.The fuel tank’s shoulder was looking too flimsy so we decided to make it bigger and try and decrease the visual mass of the tank

29
19th Dec 2010
When we gave the second design( what we thought was the final design atleast), we were working with the original wheelbase and wheels of the hero honda glamour.However when we actually installed the front and rear wheels of the Yamaha FZ we realised how the vehicle began to look odd.Infact the rear wheel depicted here had to move back even further to let the monoshock fucntion properly.In the end the design looked like the rear wheel was literally trailing behind the motorcycle.Even during the sketches we had been workin with the Yamaha FZ wheelbase even in our sketches.However the sketches we wer workin on also just approximations.And those approximations when were scaled up became huge mismatches.In essence this gave us a sense of how different things were from workin on a sketch and how things looked on a full scale model.By the end of it we decided that we would have to modify the design.Since the wheelbase and wheels had changed,basically the whole proportions of the design had changed.It was impossible to work with the sketches that we had provided DC Design.We were lucky to have a workforce supplied to us that were actually accomodating and skilled enough to take on more of a “on-the go” sort of an approach.

30
23th Dec 2010 And so thats what we did.We scrapped the original idea and decided to work with the existing design elements itself but modify it on the metal.This turned to be a tedious process but we were able to see the form materialise infront of us in a way that we could actually sit on and verify .
We realised that one of the main featues that was missing in the first and the second prototype were the seats themselves.And without them it was becoming hard for us to visualise the proportions of the motrocycle.Hence it was decided that we would set the hard points of the motorcycle first.An element like the seat was prone to less change and also would help us get the stance that we wanted the rider to be seated in.Once the stance was
predetermined the rest of the vehicle could be basically designed around the rider.And so the hardpoints of the fuel tank were also modified according to the new proportions.Notice the 20 odd cm increase in the rear swing arm as opposed to the previous picture. The design elements were more like modified to suit the current wheelbase.
With the change in wheelbase

31
23th Dec 2010
The area to be manipulated is first heated to a red hot state with the blow torch.
And then beat to shape with a make shift anvil which is more like a metal bench. We used paper cut outs of the design to cut the metal sheets out and then they were heated and beat to shape.

32
25th Dec 2010
The seat seated in place.

33
26th Dec 2010

34
26th Dec 2010
Mark,snip,weld..the order of the day

35
26th Dec 2010

36
26th Dec 2010

37
26th Dec 2010

38
27th Dec 2010

39
27th Dec 2010

40
27th Dec 2010

41
27th Dec 2010
Alligning the headlamp cut out to make the headlamp mounting points.

42
27th Dec 2010

43
28th Dec 2010
Visualising form with wire frames...literally!

44
28th Dec 2010

45
29th Dec 2010

46
29th Dec 2010

47
29th Dec 2010
Getting the torch to some of the areas did proove to be a tedious task!

48
29th Dec 2010
The mudguard was completely done on the spot.The design was sketched right there on the carboard,cut out and worked with.

49
29th Dec 2010
One of the innumerable “jugaad” ways we used to obtain the surfaces and features we wanted.
Here a tightening bolt is used to obtain an inset for where the allen key will go on the front mudguard

50
29th Dec 2010

51
29th Dec 2010

52
29th Dec 2010
Notice how the front mudguards rear portion was formed.

53
29th Dec 2010 By this point the basic design and proportions of the vehicle had been laid down.We had slowly started getting into the more time consuming areas of the projects,detaling and finishing.We were however waiting for key components to arrive like the headlights and rearlights.This when we actually began to realise the importance of the details.Surfaces we had not even concieved in the design began to pop up.Areas that we did not even kno we had to deal with were there for us to deal with.It was a whole new dimension and experience of designing on the go and coming up with surfaces and form right then and there.Also that is when we also realised how invaluable it was to actually see the whole vehicle right there.It gave us an opportunity to work around the parts we had and the parts we did not have.In fact this method of working was in my opinion the best way we could have made this project work.We did not have any detailed 3D model to work unlike the usual case of prorotyping of such projects.All we had was sketches and to our luck the labour at DC were also able to cope up with every change we kept doing in the design.

54
3rd Jan 2011

55
3rd Jan 2011
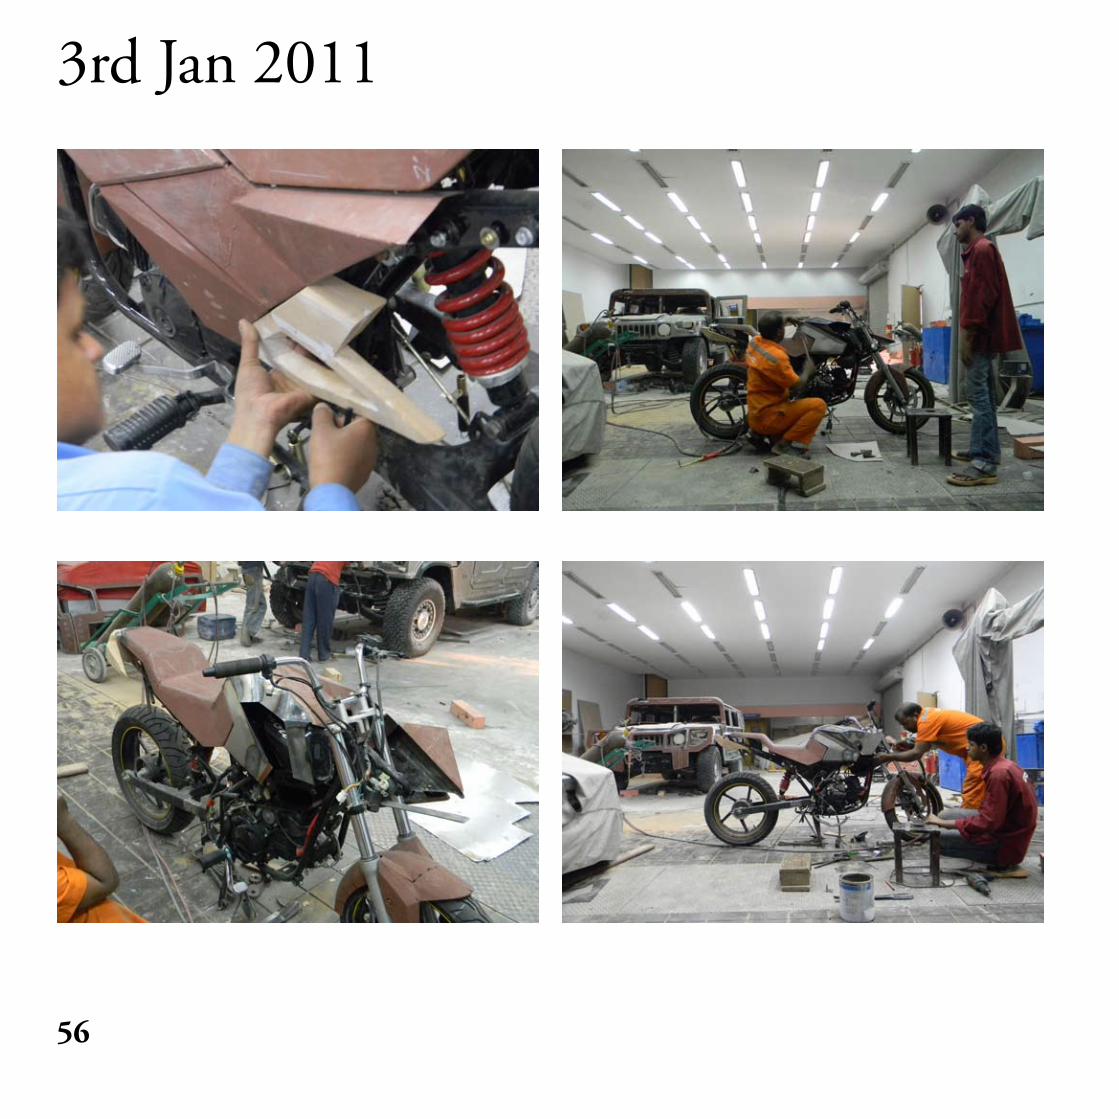
56
3rd Jan 2011

57
3rd Jan 2011

58
4th Jan 2011

59
4th Jan 2011

60
4th Jan 2011

61
5th Jan 2011
62
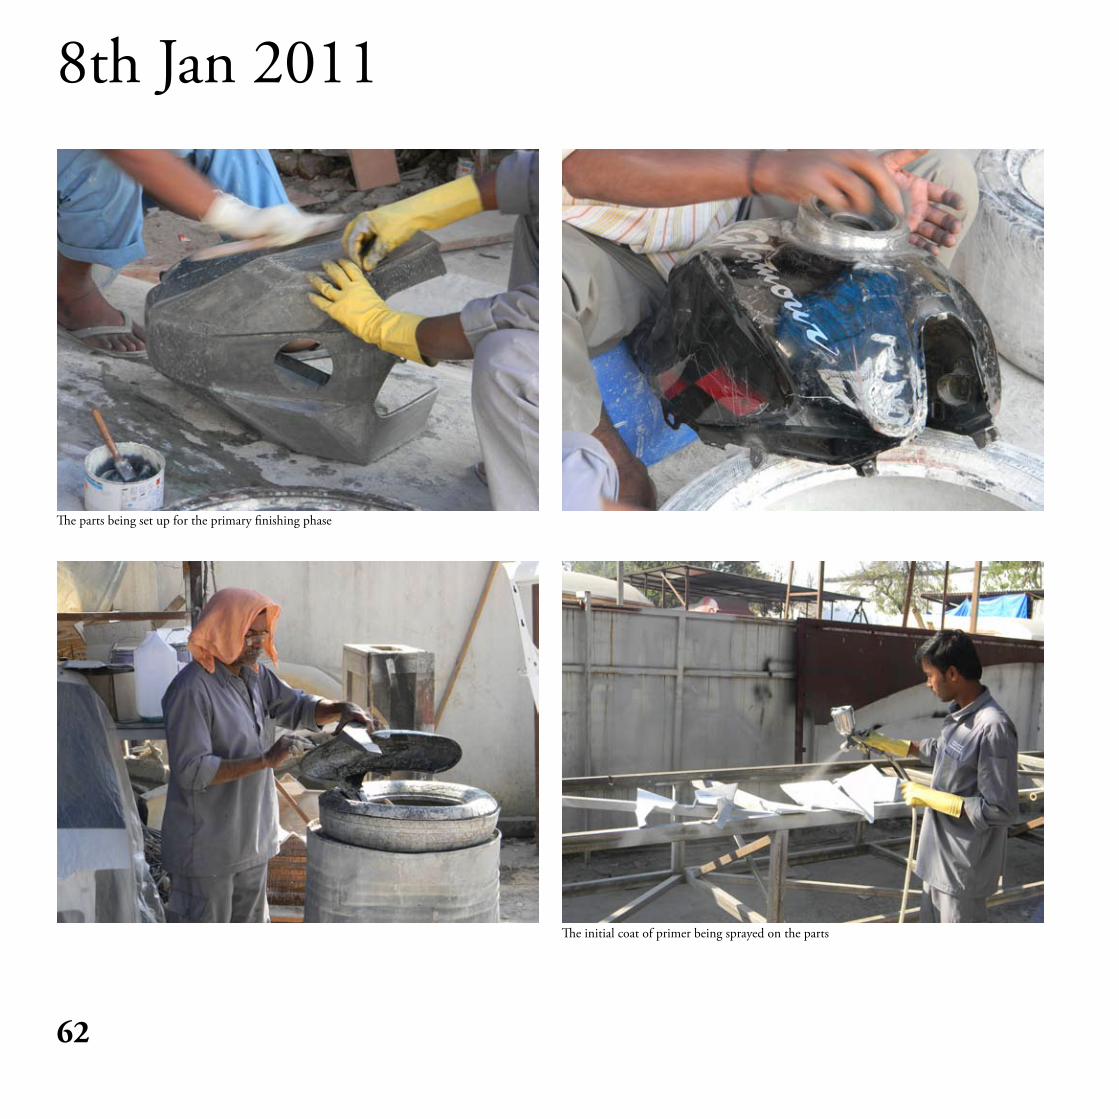
8th Jan 2011
The parts being set up for the primary finishing phase
The initial coat of primer being sprayed on the parts

63
8th Jan 2011
The arrival of the much awaited rapid prototyped headlamp housing

64
10th Jan 2011
The putty phase

65
10th Jan 2011
66
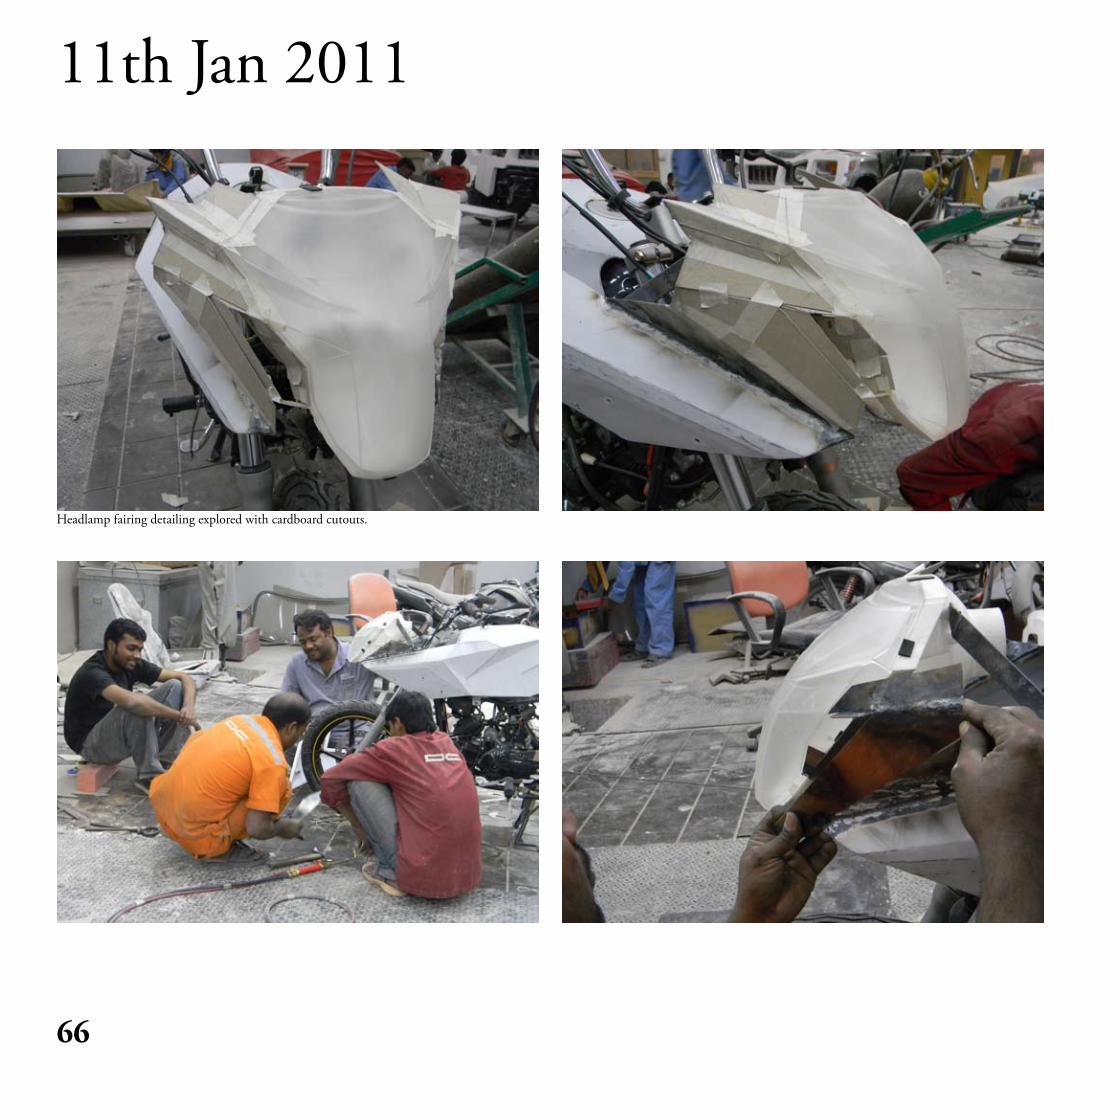
11th Jan 2011
Headlamp fairing detailing explored with cardboard cutouts.

67
11th Jan 2011

68
12th Jan 2011

69
12th Jan 2011

70
12th Jan 2011

71
12th Jan 2011

72
13th Jan 2011
One of the challenging tasks was to figure out the mounting points for the various parts.While it was okay for some of the parts’ screws and nuts to be visible,there were alot of the parts that demanded the points be hidden.So we literally had to create the part and then figure out a way to fit it on to the vehicle.The expertise of DC Design was of immense help while doing so.

73
14th Jan 2011

74
14th Jan 2011

75
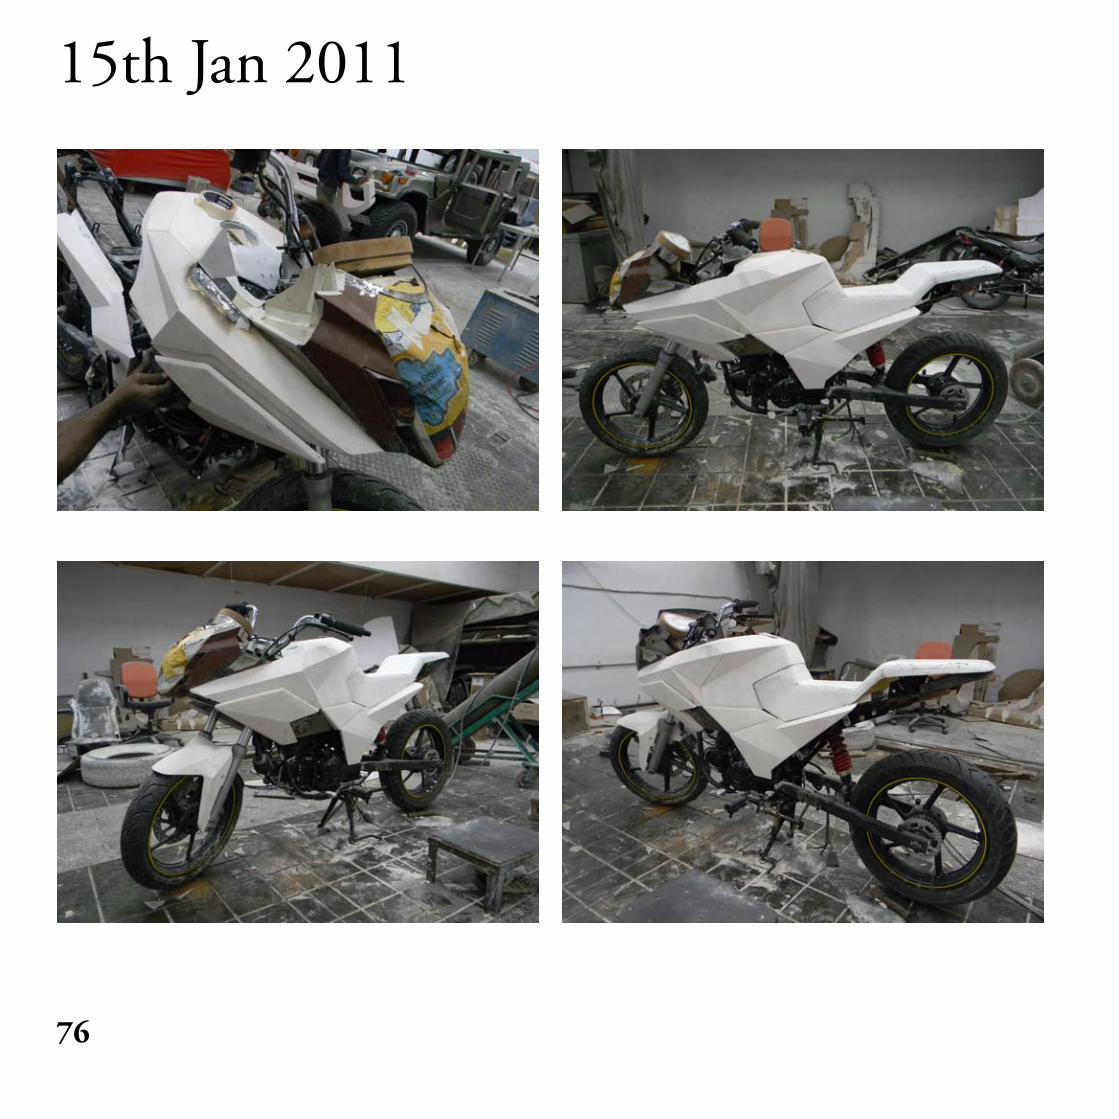
15th Jan 2011
The headlamp was covered with the newspaper to prevent the sparks coming off while the torch was being used damaging it.
76
15th Jan 2011

77
18th Jan 2011

78
18th Jan 2011
The seat being given the grinder treatment because of one of change in designs (again!! )
Co-ordinating the animation sequence

79
19th Jan 2011

80
19th Jan 2011
Testing the 3M™ Light String for the motorcycle locator function. Colour and Trim decisions galore for the seat of the motorcycle
Colour and Trim choices galore for the seat of the motorcycle

81
19th Jan 2011
Application of Autmotive Putty
Removal of excess material with a grater Finishing with the sandpaper.The workforce were able to achieve tolerances in gap upto o.5mm by hand !

82
19th Jan 2011

83
21th Jan 2011

84
21th Jan 2011

85
21th Jan 2011
Parts being readied for the FRP multiplication.

86
10th Feb 2011
The FRP fuel tanks from the metal mould we had finished earlier.

87
10th Feb 2011
Attachments being made for the FRP fitment on to the body of the vehicle.
The second finishing process with putty to overcome any flaw in the FRP pieces. Also to prepare the parts for the painting process

88
10th Feb 2011

89
10th Feb 2011

90
10th Feb 2011

91
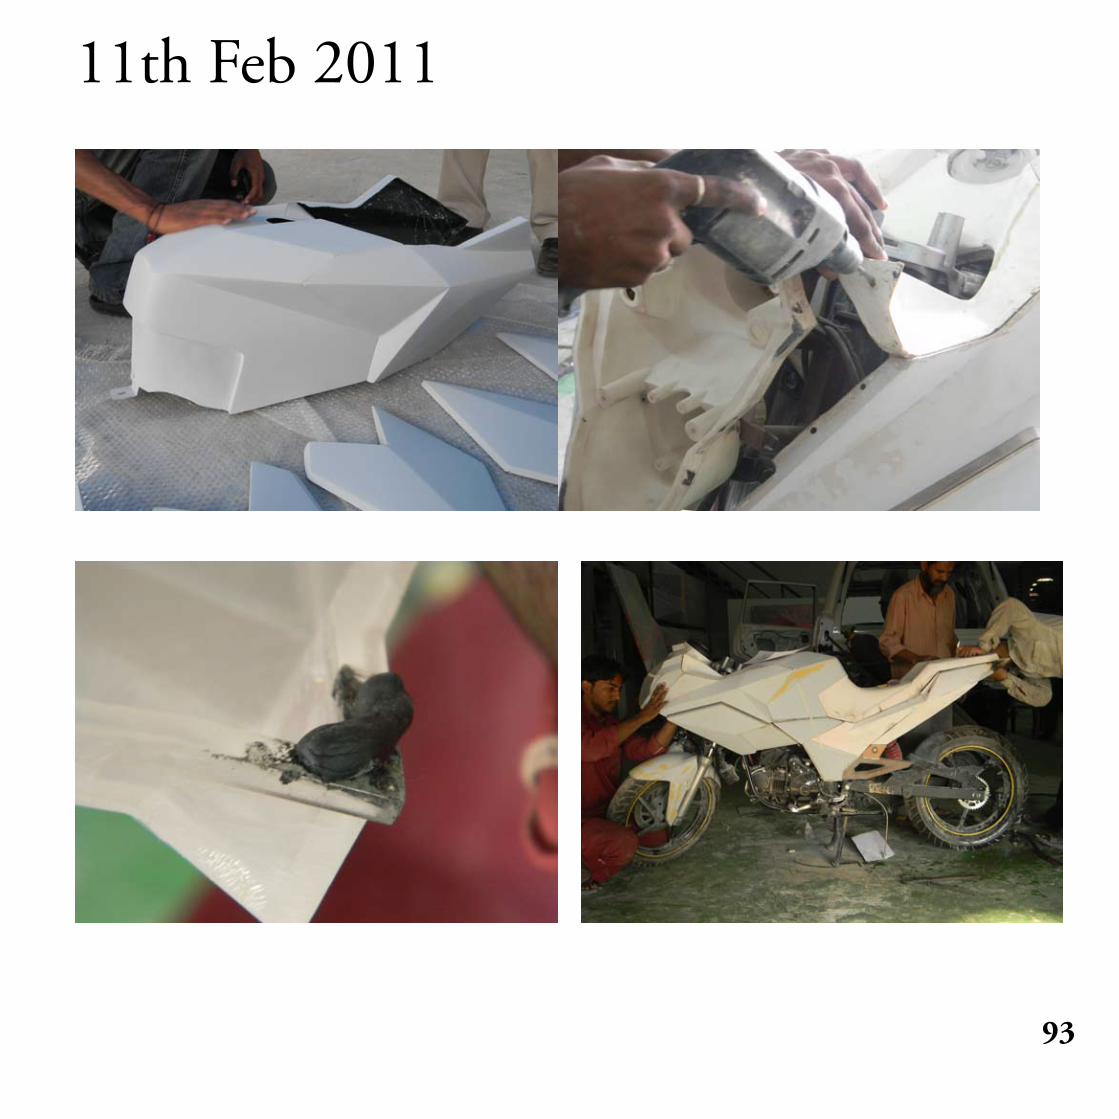
11th Feb 2011

92
11th Feb 2011
93
11th Feb 2011

94
12th Feb 2011
The applique detailing was achieved by screen printing.It did take a lot of trials and errors before we got to the final colour outputs that we wanted.
For the instrument cluster prototyping,the engineering data was sent to a supplier in China who did provide the required number of parts in an impressively short period.

95
12th Feb 2011
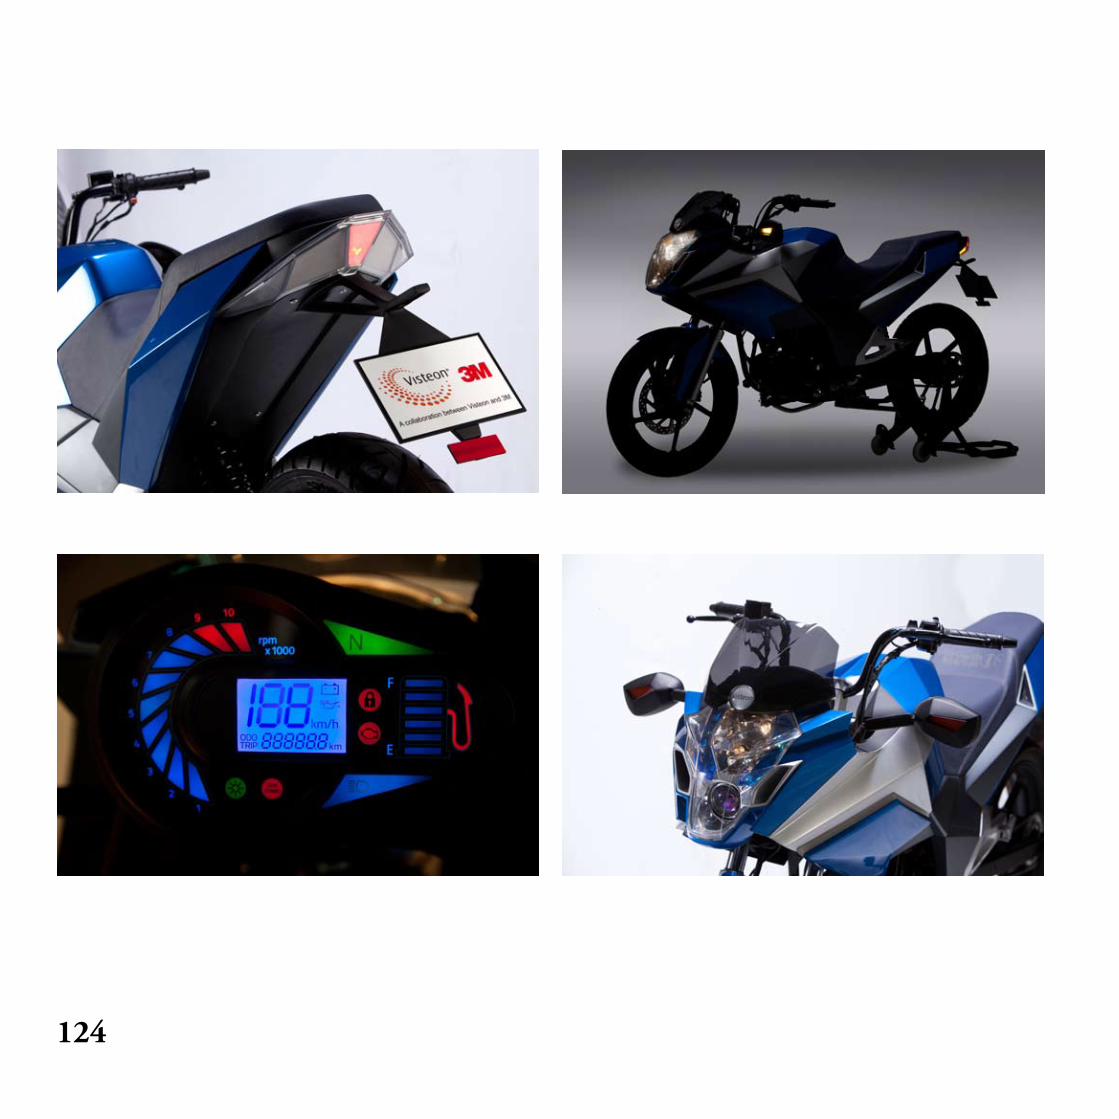
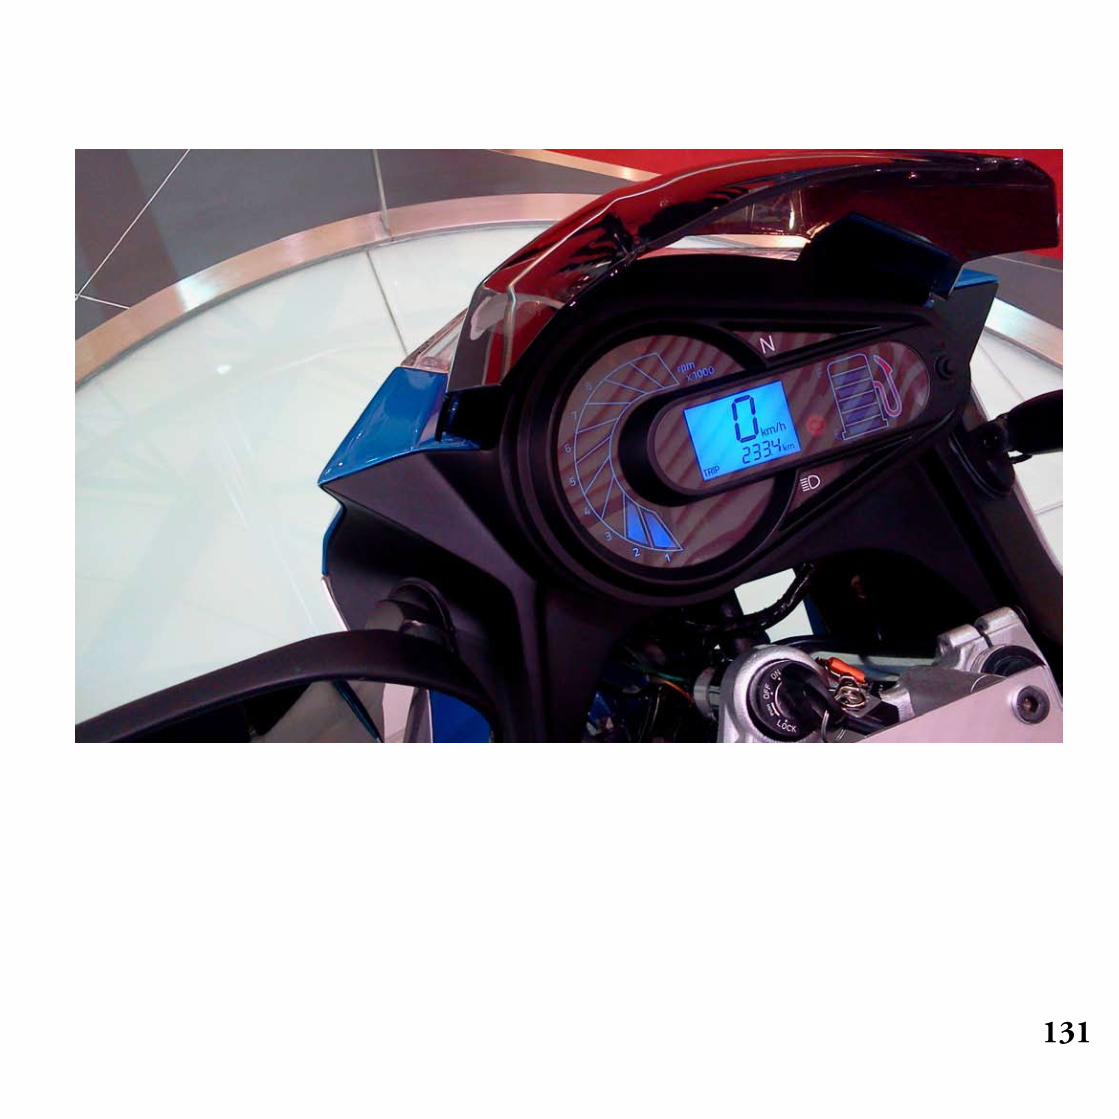
This was the preliminary test stage for the cluster and hence the uneven lighting of the segments.However these were corrected for the final model.
One of the design intents during designing the cluster was for it to be as blank as possible when it was switched off,and lighting up colourfully only when the vehicle was switched on.
The design incorporated the use of LED lit segments that made the cluster look colourful and lively.

96
13th Feb 2011

97
9th Mar 2011

98
16th Mar 2011

99
16th Mar 2011

100
26th Mar 2011
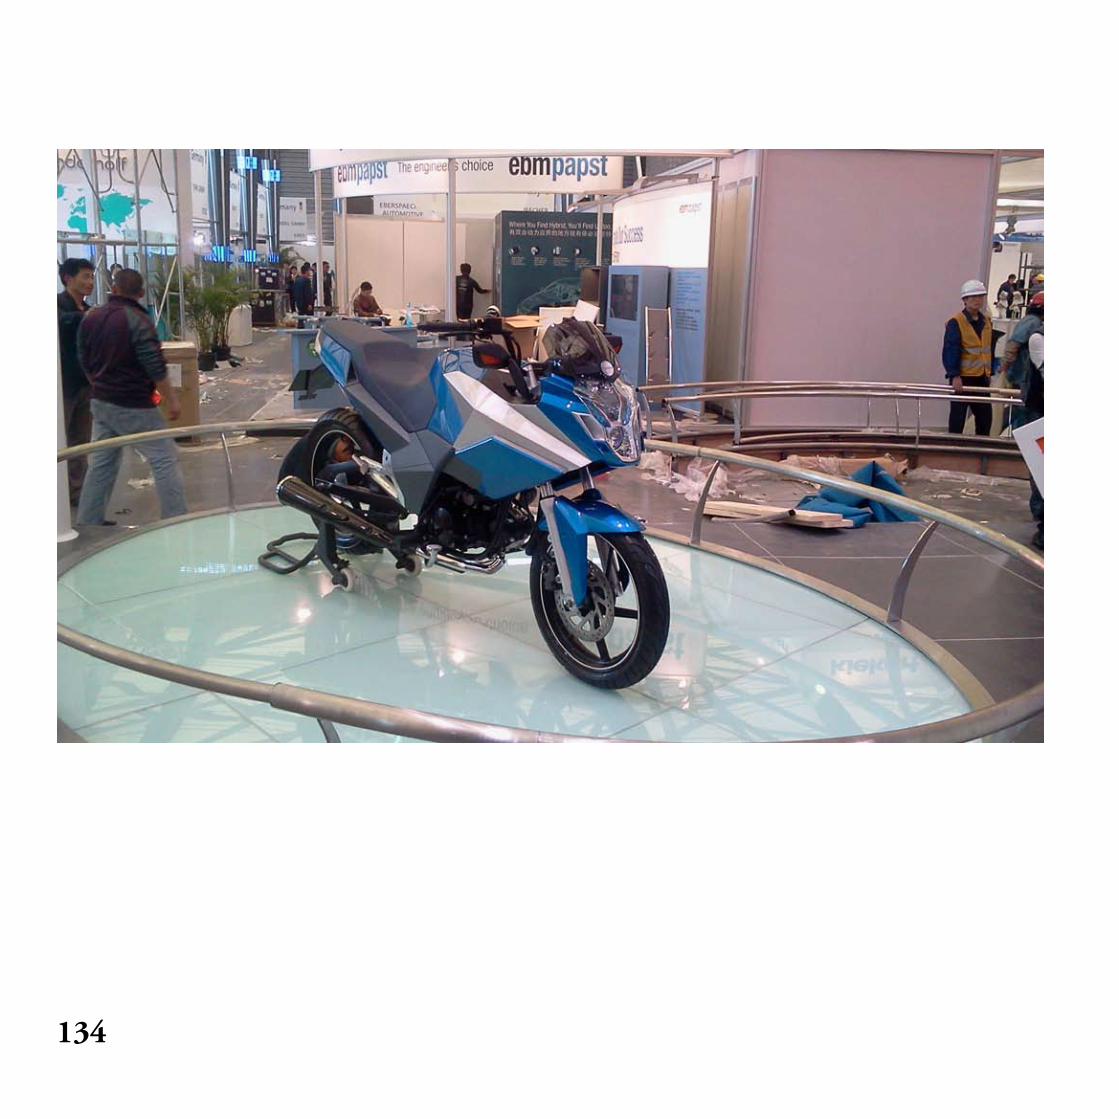
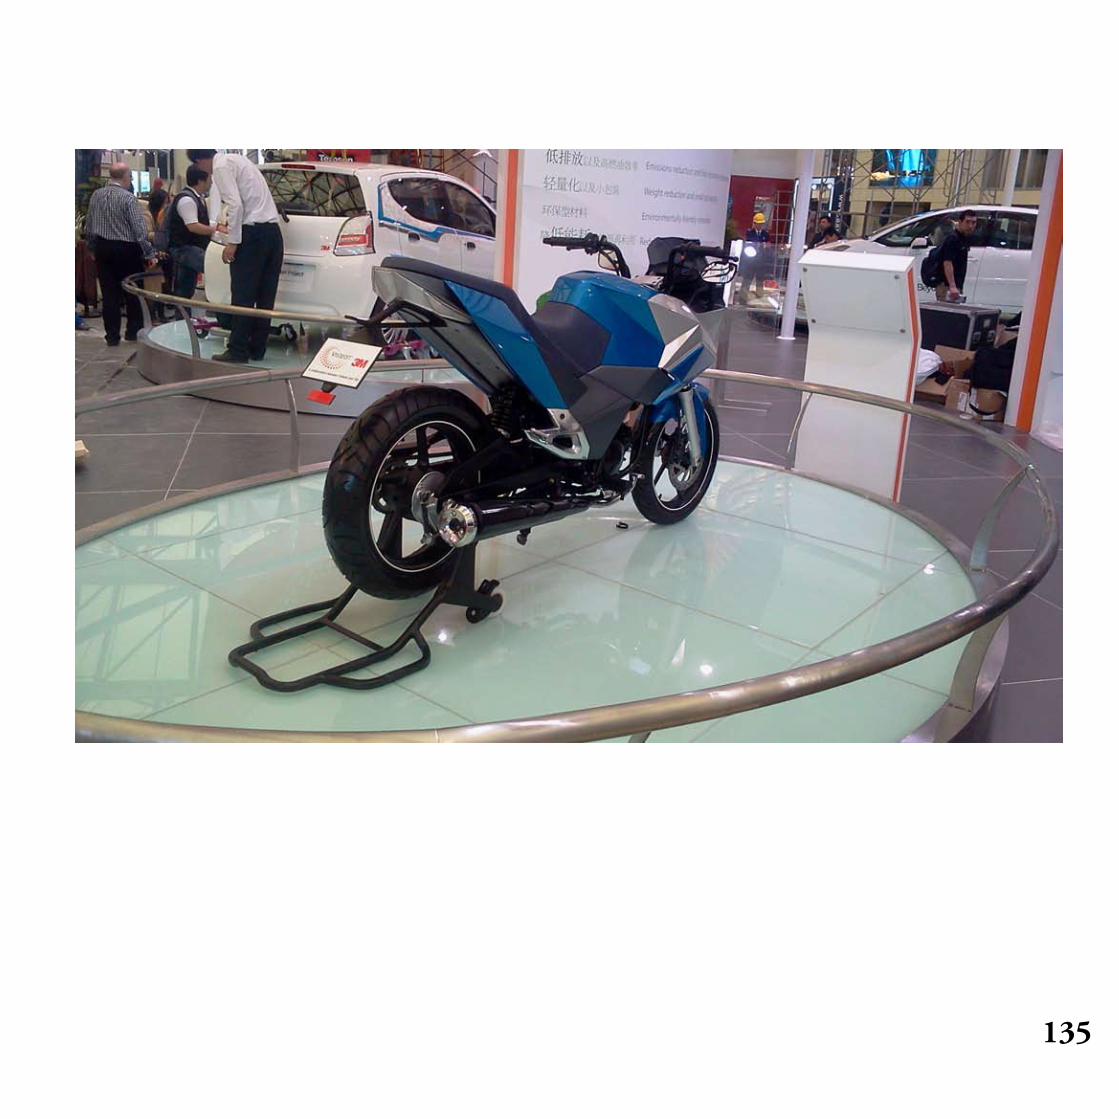
The finished motorcycle.It was indeed a rewarding experience to actually see the fruit of months of labouring.The model was completed in time to be shipped for the Shanghai Auto Show,where it premiered.

101
26th Mar 2011

102
26th Mar 2011

103
26th Mar 2011

104

105
Description ofTechnologies

106

107
Description:Utilizing advanced technology, 3M™ Acrylic Foam and Acrylic PlusAttachment Tapes are designed to adhere to a wide variety of paintsystems, including low surface energy and improved scratch- and marresistantpaints. They exhibit unique core properties that allow for stressrelaxation and exhibit high adhesion values to automotive paint systems.
Value Opportunity:• A broad product line of 3M Acrylic Foam and Acrylic Plus Tapes allowsour customers to customize vehicles without sheet metal changes.• 3M offers a wide variety of products to account for various processingconditions at our customers.
Technical Benefits:• Tapes exhibit excellent adhesion to traditional, low surface energy,and scratch- and mar-resistant paint systems.• Unique foam core provides stress relaxation.v
Description:3M™ Diamond Grade™ Reflector is a highly retroreflective microprismaticsheeting designed to enhance visibility and detection on vehicles.
Value Opportunity:Increased visibility helps improve safety. Vehicles with reflectiveconspicuity markings provide better visual information to drivers for fasterdetection and more accurate decision-making
Technical Benefits:• Durable—resists weather, dirt and aging• Aggressive adhesive• Non-corroding
3M™ Acrylic Foam Tape
3M™ Diamond Grade™ Reflector
tech sheets sourced from http://www.visteon.com/innovate/growthmarket/bike/techsheets.html

108
3M™ Dual Lock™ Reclosable Fasteners
Description:3M™ Dual Lock™ Reclosable Fasteners are mushroom-shaped stems thatsnap together tightly for dependable attachment, over and over again.
Value Opportunity:Solutions are available for a wide variety of interior applications andsubstrates with proven performance and process flexibility.
Technical Benefits:• Secure, yet easily removed• UV resistant• Strong in tensile/shear• Can be opened/closed hundreds of times• Adjustable strength
3M™ Full Wrapping Graphics
Description:3M™ Full Wrapping Graphics (FWG) is an innovative method for wrappingthe entire show surface of molded plastic parts with 3M™ Graphic Films.Using a vacuum thermoforming process, the film is applied onto theparts without the need for pre-forming.
Value Opportunity:3M Graphic Films pass automotive OEM requirements for appearance,performance and durability. For 3M FWG, the films are supplied assheets and formed over the base part, enhancing the styling andappearance, and eliminating exposed edges.
Technical Benefits:• Provides broader design freedom.• Enables an enhanced, high-quality appearance.• Requires no film pre-forming.• Eliminates the need to paint the part.• Provides a secure adhesion.
tech sheets sourced from http://www.visteon.com/innovate/growthmarket/bike/techsheets.html

109
Description:3M™ Light Management Lens provides new-to-the-world opticsfor signal lighting applications. Novel optical films enhance designflexibility while offering uniform lighting with minimal LED count.
Value Opportunity:• Cost competitive with conventional lighting• New and distinctive looks• Simplified design and modeling process• Simplified assembly• Reduced power consumption• Improved fuel efficiency• Combined tail and stop function
3M™ Light Management Lens (TPSL)
3M™ Light String
Description:3M™ Light String accentuates sporty or luxurious vehicle designs bydiscreetly lighting 3-D surfaces. It provides lighting design freedomto create long, sharp lines or softly illuminated surfaces.
Value Opportunity:• Reduced design time and costs• Improved design freedom• No tooling costs• Long length• Reduced waste during assembly
Technical Benefits:• Flexible• Cut to length• Color stability• Durable
tech sheets sourced from http://www.visteon.com/innovate/growthmarket/bike/techsheets.html
110
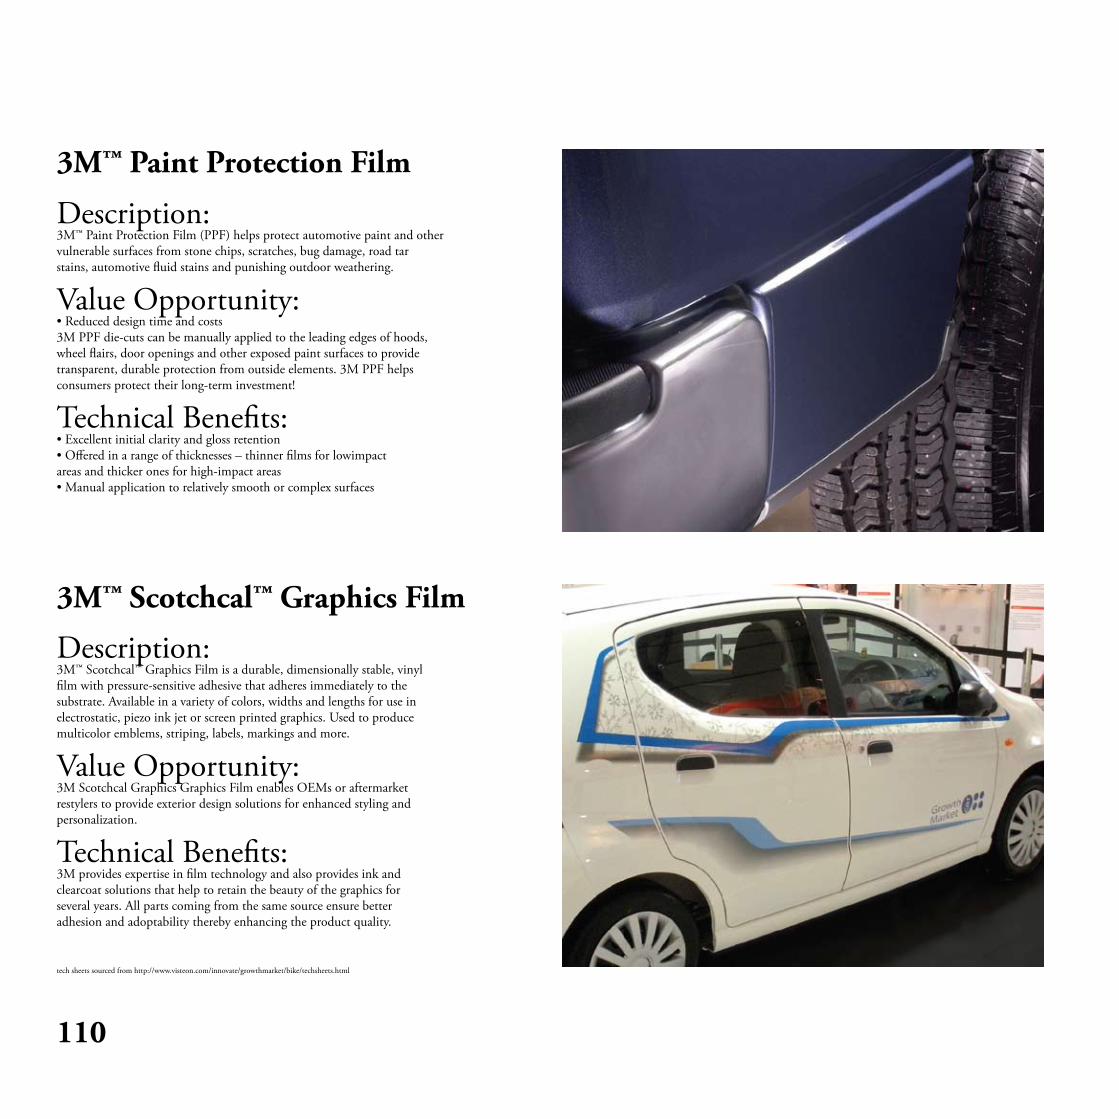
3M™ Paint Protection Film
3M™ Scotchcal™ Graphics Film
Description:3M™ Paint Protection Film (PPF) helps protect automotive paint and othervulnerable surfaces from stone chips, scratches, bug damage, road tarstains, automotive fluid stains and punishing outdoor weathering.
Value Opportunity:• Reduced design time and costs3M PPF die-cuts can be manually applied to the leading edges of hoods,wheel flairs, door openings and other exposed paint surfaces to providetransparent, durable protection from outside elements. 3M PPF helpsconsumers protect their long-term investment!
Technical Benefits:• Excellent initial clarity and gloss retention• Offered in a range of thicknesses – thinner films for lowimpactareas and thicker ones for high-impact areas• Manual application to relatively smooth or complex surfaces
Description:3M™ Scotchcal™ Graphics Film is a durable, dimensionally stable, vinylfilm with pressure-sensitive adhesive that adheres immediately to thesubstrate. Available in a variety of colors, widths and lengths for use inelectrostatic, piezo ink jet or screen printed graphics. Used to producemulticolor emblems, striping, labels, markings and more.
Value Opportunity:3M Scotchcal Graphics Graphics Film enables OEMs or aftermarketrestylers to provide exterior design solutions for enhanced styling andpersonalization.
Technical Benefits:3M provides expertise in film technology and also provides ink andclearcoat solutions that help to retain the beauty of the graphics forseveral years. All parts coming from the same source ensure betteradhesion and adoptability thereby enhancing the product quality.
tech sheets sourced from http://www.visteon.com/innovate/growthmarket/bike/techsheets.html
111
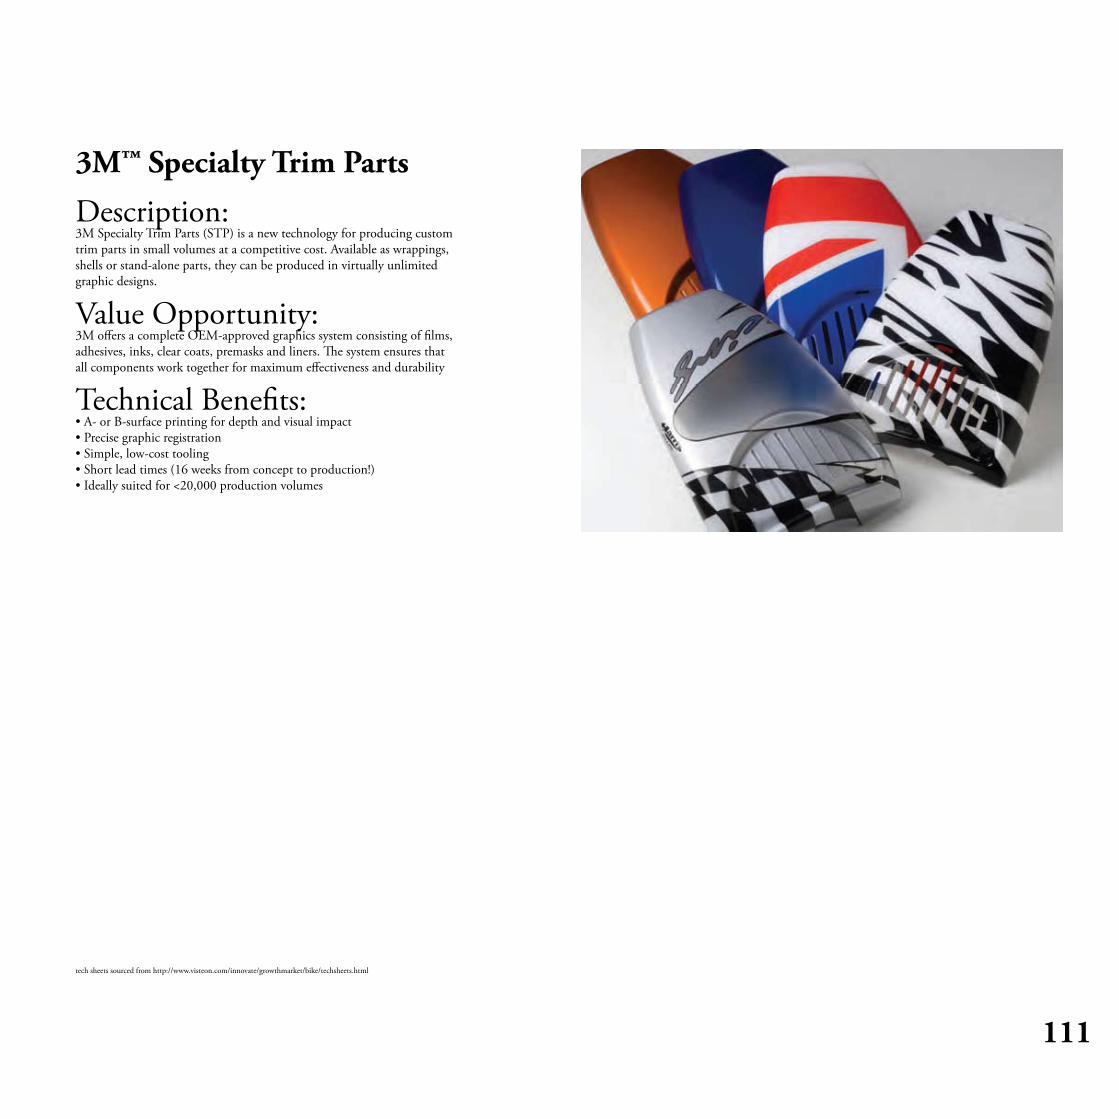
3M™ Specialty Trim Parts
Description:3M Specialty Trim Parts (STP) is a new technology for producing customtrim parts in small volumes at a competitive cost. Available as wrappings,shells or stand-alone parts, they can be produced in virtually unlimitedgraphic designs.
Value Opportunity:3M offers a complete OEM-approved graphics system consisting of films,adhesives, inks, clear coats, premasks and liners. The system ensures thatall components work together for maximum effectiveness and durability
Technical Benefits:• A- or B-surface printing for depth and visual impact• Precise graphic registration• Simple, low-cost tooling• Short lead times (16 weeks from concept to production!)• Ideally suited for <20,000 production volumes
tech sheets sourced from http://www.visteon.com/innovate/growthmarket/bike/techsheets.html

112
Engine Control UnitThe Engine Control Unit (ECU) is part of Visteon’s EngineManagement System (EMS) for motorcycles designedspecifically to provide value-priced Electronic Fuel Injection to1-cylinder and 2-cylinder engine growth market customers. Thesystem hardware and software meets growth market emissionsregulations with solutions ranging from a basic Open Loopsystem to a Closed Loop system with full sensor heater controland feedback.The compact ECU with integrated sensors can be located ontothe throttle body which reduces wiring harness complexity andcost. A remote mount stand-alone version (without integratedsensors) is also available.
Benefits:• Meets growth market emissions legislations through the useof innovative software algorithms combined with proven costeffectivehardware design.• Able to package on the smallest size engines due to smallcomponent footprint.• Environmentally rugged.• Reduced weight and manufacturing / assembly costs throughinnovative material selection and assembly design.• Reduced wiring harness complexity and cost when ECU withintegrated sensors is located onto throttle body.
Features:• Connector– 24-pin sealed automotive-grade connector system (USCAR-2)– 0.64 mm (square) GET terminal system; 5A continuous rating– Mates with Tyco wiring harness connector -638849- Key “A”– Integral plastic (30 GF PBT) housing• Integrated Sensors– Manifold Absolute Pressure (MAP) and Intake Air Temperature (IAT)– Sensors mounted through throttle housing– Mechanically compliant, gas-tight, and chemically resistant seals• Remote Sensors and Actuators– Cylinder Head Temperature (CHT)– Crank Position Sensor (CPS)– Throttle Position Sensor (TPS)– Heated Exhaust Gas Oxygen (HEGO)– Tip-over Switch (TOS)– Two Fuel Injector Drivers– Fuel Pump Relay– Malfunction Indicator Light (MIL) Driver
– Two Ignition Coil Drivers– Stepper Motor IAC• Communications– Production: K-Line capability for J1 programming and fault code retrieval– Development: CAN communication via J3 connector• Environmental Capability– Meets IP67 per IEC 60529 (as installed on throttle body in sealed system)• Dust-tight• High-pressure water spray resistant• Submersible– Resistant to engine compartment fluids– Designed to withstand peak vibration of 20 ‘G’ RMS– Operating Temperature: -20 °C to 100 °C– Storage Temperature: -20 °C to 110 °C– Operating Altitude: -305 m to 4572 m• Operating Voltage– 7 V to 18 V DC– Load dump and over-voltage protection– Reverse battery protection via external EMS power relay– Boost Battery Start: 24 V maximum for 60 seconds• EMC– Compatible to GB14023-2000• Vehicle Applications– 1-cylinder and 2-cylinder engine in motorcycles / scooters
tech sheets sourced from http://www.visteon.com/innovate/growthmarket/bike/techsheets.html

113
Front LightingVisteon offers an array of Front Lighting solutions for all vehicleclasses including growth markets.This implementation uses a halogen projector for low beamfunction and a halogen reflector for high beam function. It alsoincorporates two incandescent front position lamps with lightblue filters.Developed for growth markets, this represents a cost-effectiveand attractive solution for projection front lighting.
Benefits:• Halogen projector with high wattage (55 W) source givesbrighter, wider and homogeneous light spread with verysharp cut off. This provides superior road illumination andglare-free low beam resulting in about 70% more light on theroad over conventional HS1 (35 W) system.• The multi-reflector high beam system with 35 W halogen lightsource gives the option of using lower heat resistant materialand provides cost effective design freedom.• Two position chambers with light blue filters contribute to thefront lighting attractive appearance.
tech sheets sourced from http://www.visteon.com/innovate/growthmarket/bike/techsheets.html

114
Fuel Charge AssemblyThe Fuel Charge Assembly (FCA) is part of Visteon’s EngineManagement System (EMS) for motorcycles designedspecifically to provide value-priced Electronic Fuel Injection to1-cylinder and 2-cylinder engine growth market customers. Thesystem hardware and software meets growth market emissionsregulations with solutions ranging from a basic Open Loopsystem to a Closed Loop system with full sensor feedback.Based on design methods and manufacturing techniquesproven in high volume vehicle production, the FCA features“returnless” fuel charge technology and robust injectorretention. The compact and lightweight FCA also utilizescomposite materials for superior performance.
Benefits:• Chemical resistant• Oxidation resistant• Moisture absorption resistant• Abrasion resistant• Dimensionally stable in operating temperatures of 200 °C
tech sheets sourced from http://www.visteon.com/innovate/growthmarket/bike/techsheets.html

115
Fuel Delivery ModuleThe Fuel Delivery Module (FDM) is part of Visteon’s EngineManagement System (EMS) for motorcycles designedspecifically to provide value-priced Electronic Fuel Injection to1-cylinder and 2-cylinder engine growth market customers. Thesystem hardware and software meets growth market emissionsregulations with solutions ranging from a basic Open Loopsystem to a Closed Loop system with full sensor heater controland feedback.The compact, bottom-mounted, returnless system FDM can becustomized according to fuel tank shape. The FDM includes anintegrated Fuel Pressure Regulator (FPR). A lifetime filter andfuel level sensor can be added to the FDM.The FDM is designed for up to 450 cc engines with pressure of250 kPa. Flow performance may be customized to an OEM’srequirements. An optional fuel pump with carbon commutatorcan be added.
Benefits:• Local engineering support optimizes development cost andenables a close customer working relationship to addresslocal market needs.• Modular FDM design promotes use of common parts amongprogram models.• Tested to broad specifications based on growth marketrequirements.
Fuel Delivery Module with Lifetime Filters
Fuel Delivery Module without Lifetime Filters
Fuel LevelSensor
Lifetime Filters
tech sheets sourced from http://www.visteon.com/innovate/growthmarket/bike/techsheets.html

116
Instrument Cluster with Body Electronics Features The Instrument Cluster with Body Electronics Features benefitsfrom Visteon’s years of experience in Driver InformationSystems (instrument clusters) and Body Control Modules(BCM). This instrument cluster integrates body electronicsfeatures to provide a compelling value proposition for all vehicleclasses including growth markets.Visteon manages product projects ranging from build-to-print tohardware design with functional software development. Highvolumebuying power, extensive proven design reuse, and lowcostcountry design and manufacturing help make Visteon acost-competitive alternative.
Benefits:• Provides greatest value proposition for growth market needs.• Smallest footprint and environmentally rugged.• Increased reliability by reduced wiring harness complexity.• Scalable hardware and software architecture.• Customizable as per unique requirements.
tech sheets sourced from http://www.visteon.com/innovate/growthmarket/bike/techsheets.html

117
Mechanical Throttle BodyThe Mechanical Throttle Body (MTB) is part of Visteon’s EngineManagement System (EMS) for motorcycles designedspecifically to provide value-priced Electronic Fuel Injection to1-cylinder and 2-cylinder engine growth market customers. Thesystem hardware and software meets growth market emissionsregulations with solutions ranging from a basic Open Loopsystem to a Closed Loop system with full sensor heater controland feedback.The independently serviceable MTB locates the Engine ControlUnit (ECU), including air pressure and temperature sensors,onto the throttle. The MTB’s modular scalable design allows forapplication on different sized engine packages. The MTBfeatures twin return springs for maximum quality operation anduses an injection-molded housing made from materials provenon high volume vehicle programs.
Benefits:• Lightweight throttle construction requires less support fromthe intake manifold, allowing the use of flexible ducts todampen engine vibration and reduce overall air/fuel chargeassembly costs.• Incorporation of ECU and sensors onto the throttle bodyreduces wiring harness costs, improves system qualitythrough connector deletion and offers optimal packagingability where available space is limited.
Features:• Housing material is a high performance semi-crystalline glass-filled thermoplastic providing the followingcharacteristics– High strength– High stiffness– Excellent chemical and oxidation resistance– Stable mechanical properties in excess of 200 °C– Continuous operating temperature up to 240 °C– Comparable thermal coefficient-of-expansion to aluminum
tech sheets sourced from http://www.visteon.com/innovate/growthmarket/bike/techsheets.html

118
Rear LightingVisteon offers an array of Rear Lighting solutions for all vehicleclasses including growth markets.This implementation uses LED light sources with 3M™ LightManagement Lens technology. This creates energy efficiencyby using fewer LEDs in a thin profile.Developed for growth markets, this implementation representsa cost-effective and attractive solution for rear lighting.
Benefits:• Reduced power consumption between 75 and 90 percentthrough use of LED light sources (compared to incandescentlight sources).• Reduces warranty cost as LEDs have a longer life andincreased resistance to shock and vibration over traditionalincandescent light sources.• LEDs offer styling and packaging flexibility due toperformance and smaller size.• 3M™ Light Management Lens technology creates a uniquelit and unlit appearance using fewer LEDs
tech sheets sourced from http://www.visteon.com/innovate/growthmarket/bike/techsheets.html

119

120

121
Photoshoot

122

123
124

125

126

127
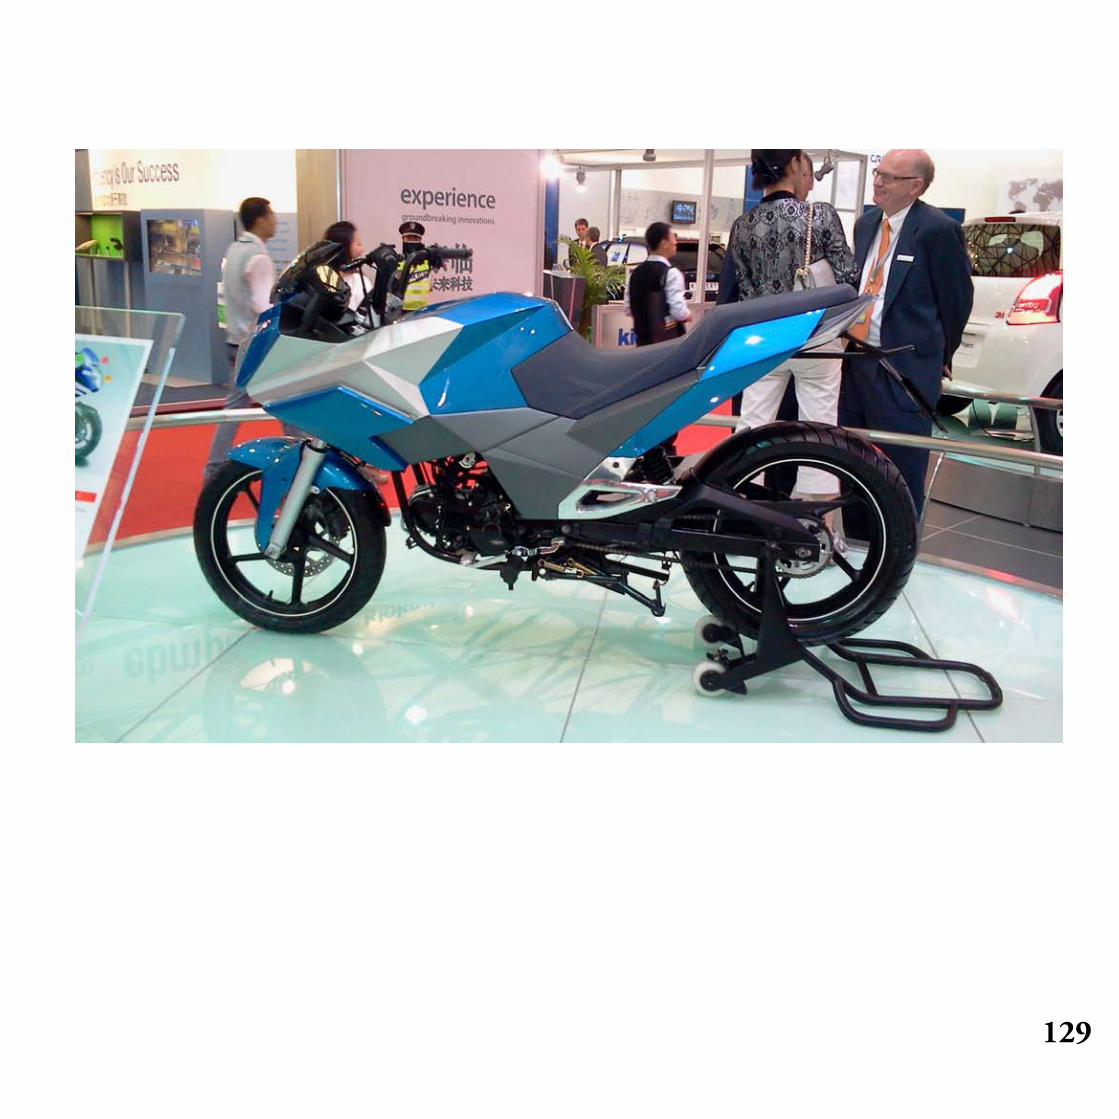
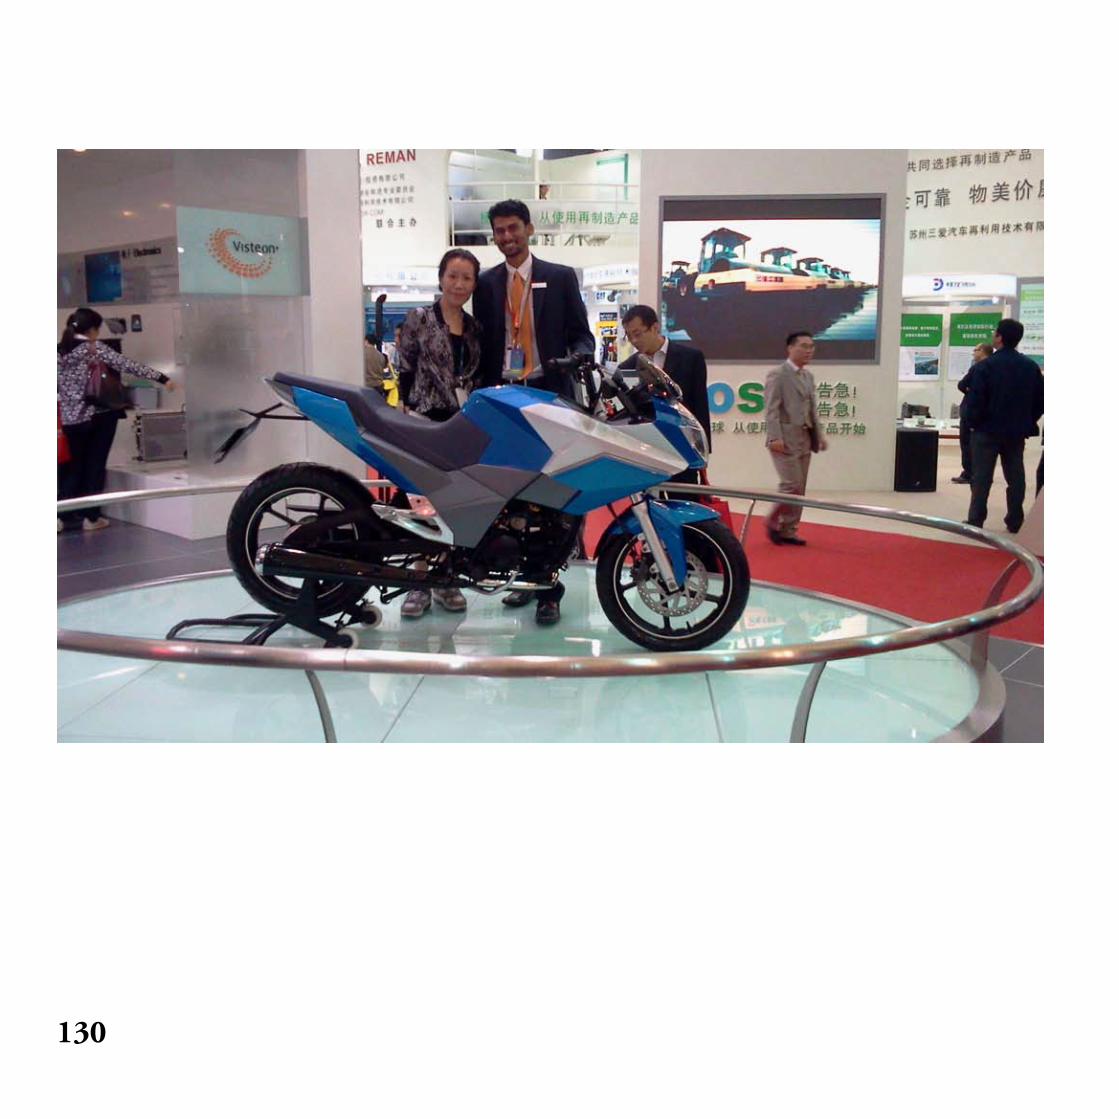
At the 2011 Shanghai AutoShow

128
129
130
131

132

133
134
135

136

137
Retrospection

138

139
It’s not everyday that you get a chance to work on a show vehicle,and even less chance of it while you happen to be a student.I would like to thank Harsha and Mark for believing in my abilities and including me in the Growth Market Vehicle Project team.
It was go from the day I joined Visteon as a design intern.We had to make a presentation the very first day that I set my foot in office.And it remained like that all through the project.The numerous hours of sketching,rendering,ideation,trips to DC design in the end paid off.The kind of learning I have received at Visteon has been more than useful to me.It actually gave me a chance to work in conjunction with some brilliant engineers and come up with a product that Visteon is proud to showcase as a vehicle completely designed and built in India.I had only always heard about the “designer-engineer” differences that prevail.It was more like the stuff of legends.At Visteon I got to experience that first hand.However I do understand now that it’s just not that the engineers are always disagreeing with the designers and that it isnt quiet the war that prevails between the both.Now I have also learnt to see it from the engineer’s point of view too.Infact being an engineer myself it was quiet easy to see where the disagreement seemed to stem from.Engineers as a breed are well, more comfortable using the tried and tested method.However as designers we constantly strive to bring something new to the project.It is probably this what ends up as a conflict where one tries to adhere to the tried,tested and well safe way of doing things and the other is trying to break free from it.It makes perfect sense now.At Visteon I had a couple of these “conflicts” . I guess I would like to look at them as mere miscommunications.It is not that the engineers are really closed to new ideas or anything,but they do require substantial backing up of data and facts when the designers propose something new.As a designer now I have learnt to do my thorough research on the topic before I propose something to the engineers.It really does ease things out.
It was a tremendous learning experience at Visteon as I also got to work on a couple of live projects.My stay there gave me an indepth and unprecedented view of what goes on inside a TIER 1 supplier’s office.I now have a better understanding of the whole system of the different TIERs in the automobile industry.Also Visteon being an international company that has its interests spanning across a numbers of areas ranging from HVACs,Exterior lightings,Interiors,instrument clusters, I got to see it all in action.Also while working on the project I learnt alot during my interactions with Chris Gattis and Simon Harris.Simon’s inputs about the initial form of the motorcycle were more than just an eye opener.It indeed made me view forms and lines in a differnt way.Constant meetings with Mark,Chris and Simon indeed helped us shape the project.Their experience of having worked with such projects earlier was shared with us in our numerous conference calls.The wonderful things about it was that they never quite stifled us with their opinions either,however they did set us back in line when they did notice us straying away.We were given our “space” and it helped too.
When we decided to initiate the prototyping phase I remember the butterflies in my stomach.The whole task was quite intimidating really.I mean the biggest model I had worked on until then was on a 1:5 scale as was made in clay.The folks at DC Design on the other hand have mastered the art of working with sheet metal.The expertise of the workforce realls blurs the line between modelmaking and artistry.They would literally conjure up forms in metal from even 2d sketches we just made!And the kind of modelling methods that DC follows was also completely different from anything I had been exposed to until then.I even doubt if I will ever get to be a part of something like this again considering how digitised everything is getting these days.Not too many prototyping companies still do things the
manual way.Also while at DC I got to understand the importance and relevance of different manufacturing processes.It was literally a dream taking shape as we saw the motorcycle be built part by part.It has been one of the most rewarding experiences in my life.And I will cherish forever the learning experience that I had while working on the Growth Market Bike Project.

140

141
Websites
car-express-news.blogspot.com/2011/03/geneva-motor-show-2011-magna-steyr-mila.htmlwww.engineeringnews.co.za/article/how-to-build-a-car-from-recycled-soft-drink-bottles-and-a-few-other-things-2007-11-30www.rinspeed.com/pages/cars/senso/pre-senso.htmwww.visteon.com/innovate/www.cardesignnews.comwww.carbodydesign.comwww.cardesign.ruwww.simkom.com
MagazinesBikeOverdriveAutoIndia
Photo CreditsHarshaRajuMark Raju
Bibliography