grounding guide article mk4links.pdf · russ andrews explains his tried and tested technique for...
TRANSCRIPT
GROUNDING GUIDE
Russ Andrews explains his tried and tested technique for optimisinggrounding in a Hi-Fi or Home Cinema system.
2
What is Earthing and Grounding?It is clearly crucial in any guide to improving yourgrounding that the basic practical difference isexplained between earthing and grounding. Thetwo are often confused and it helps to understandwhat each does.
EarthingThese two terms sound like they are describing thesame thing and so get confused. Earthing isthe term we use to talk about a connection thatinvolves the electrical safety wiring in a mainspowered (230V AC) house supply installation ormains powered equipment. It is the wire thatprovides the safe path to ground of a fault current,to prevent electrocution of the operator in theevent of a live fault to exposed metal parts. In otherwords, if a fault occurs within a component causinga live part of the internal circuit to touch theexternal casework, the earth wiresafely carries this current awayfrom the component to ground.In theory, you shouldn’t get ashock (or worse) when you touchthe casework in the event of afault.
The earth wire is a yellow/ greencable of sufficient size to carrythe likely fault current. It requiresa low resistance direct path toground; the final connection toearth somewhere outside yourhouse is usually provided by yourelectricity supply company. The resistance of thisearth may be reduced by fitting your own earthspike in the ground outside your house in additionto the one the supplier provides.
Not all mains powered HiFi equipment has thisconnection to earth, however. Much of theequipment manufactured in the last 25 or 30 yearshas been 'double insulated' where the outer caseyou see is not connected to any mains-connectedpart. The case is 'floating' and may be plastic ormetal. The mains power supply is within its own
insulated shield and the mains inlet is probably atwo-pin IEC, figure 8, or three pin IEC or ‘cloverleaf’type socket with the earth pin not connectedinternally. Source equipment and preamps are nowusually double insulated like this.
Power amps or integrated amps usually haveconventional three pin sockets with the earthconnected.
Earthing is for safety! Earthed equipmentshould always be connected to your earthed ringmain (I will discuss the quality of that earth someother time!).
GroundingGrounding is the term we use to talk aboutconnections to ground of the RFI signals picked upby the various exposed metal parts of your HiFisystem. These connections are not safety related
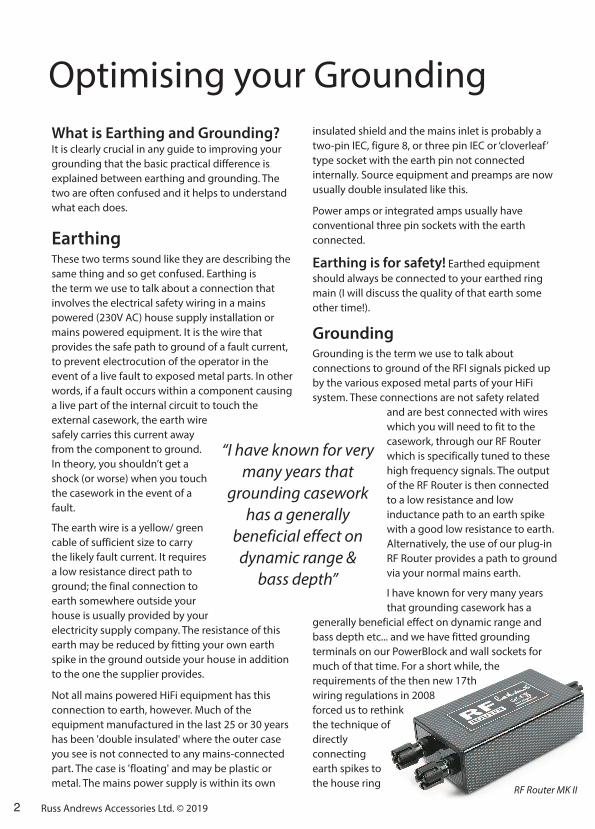
and are best connected with wireswhich you will need to fit to thecasework, through our RF Routerwhich is specifically tuned to thesehigh frequency signals. The outputof the RF Router is then connectedto a low resistance and lowinductance path to an earth spikewith a good low resistance to earth.Alternatively, the use of our plug-inRF Router provides a path to groundvia your normal mains earth.
I have known for very many yearsthat grounding casework has a
generally beneficial effect on dynamic range andbass depth etc... and we have fitted groundingterminals on our PowerBlock and wall sockets formuch of that time. For a short while, therequirements of the then new 17thwiring regulations in 2008forced us to rethinkthe technique ofdirectlyconnectingearth spikes tothe house ring
Optimising your Grounding
“I have known for verymany years that
grounding caseworkhas a generally
beneficial effect ondynamic range & bass depth”
Russ Andrews Accessories Ltd. © 2019
RF Router MK II
3
earth, as this was outlawed. They quicklyabandoned this however and made it legal again.In the meantime, talking to audio designer BenDuncan about the problem I learned that he couldsee a way to connect to an earth spike effectivelybut (then) legally and also see a second benefitin incorporating a more effective RFI dumpingcircuit in the design. Ben's circuit is frequency-optimised to provide an easy route for RFI to exitequipment chassis down to ground....... hence thename RF Router for the product.
Tests proved the efficacy of the device and weproceeded to experiment with ways to get the mostbenefit from it in any system. We began with myown big system and that of my old friend Chris.He is a retired gentleman of means, time and withan insatiable curiosity… plus, of course his greatlove and knowledge of music. Chris experimentedwith every possible combination of connectingeverything together with ground wires and routersover many months and we finally came to somevery important conclusions.
First, getting it right was absolutely essential. Smalldifferences in exactly what was connected towhat, in what order, were very important.
Second, the effects were stable, repeatable andpredictable.
Third, although his first priority was the musicaleffects, Chris could see the effects in the picturequality projected on his Home Cinema screen.
Fourth, he had turned years of grounding 'black arts'insecurity into a relaxed certainty that hisgrounding was ' good'.
I took that knowledge and tested it on very simplemodest systems to prove that it wasa general solution to correctgrounding rather than justspecific to a very specialcomplex system. And itwas! Fortunately, thecorrect grounding path isvery simple: follow thesignal path.
The preamp or integrated amp is the ‘hub’ and allsource equipment grounding cables connectdirectly to it. The preamp grounding cables connectdirectly to the power amp which is then linkeddirectly to the input of the Router. If you havespeakers with driver chassis ground connections,connect them both directly to the Router. Theoutput of the Router than connects to the ring mainearth or ground spike outside.
So why do we recommend grounding the metalequipment casework independently like this toearth? It’s important to understand how the musicsignal passing through the circuits in your sourcecomponents and amplifiers relate to the metalequipment casework that surrounds them.
In a single-ended system (i.e. one where theconnections are made with RCA (phono)interconnects), the signal consists of the musicsignal and the ground: both are needed for thesignal to flow as a circuit. The outer part of thephono plug is the ground connection and thecentre pin is for the signal. Now, this signal ground isusually (but not always) connected insideequipment to an earth point… an earth point that isalso connected to the mains earth and theequipment casework.
If you have a balanced circuit (with XLRsconnectors), the signal itself is split into positive andnegative but the third pin is essentially the same asthe signal ground in single ended circuit. Like thatcircuit the signal ground is connected via the earthpoint to the equipment casework.
So you can see that equipment casework is linked tothe signal ground: high frequency RF noise in the
signal ground appears in the casework.Because the casework is linked
to the signal ground, this alsomeans it’s relatively easy toconnect the signal ground
(via the casework) and dumpthe noise in it to earth.
“The benefits of grounding the signal this way are profound”
Russ Andrews Accessories Ltd. © 2019
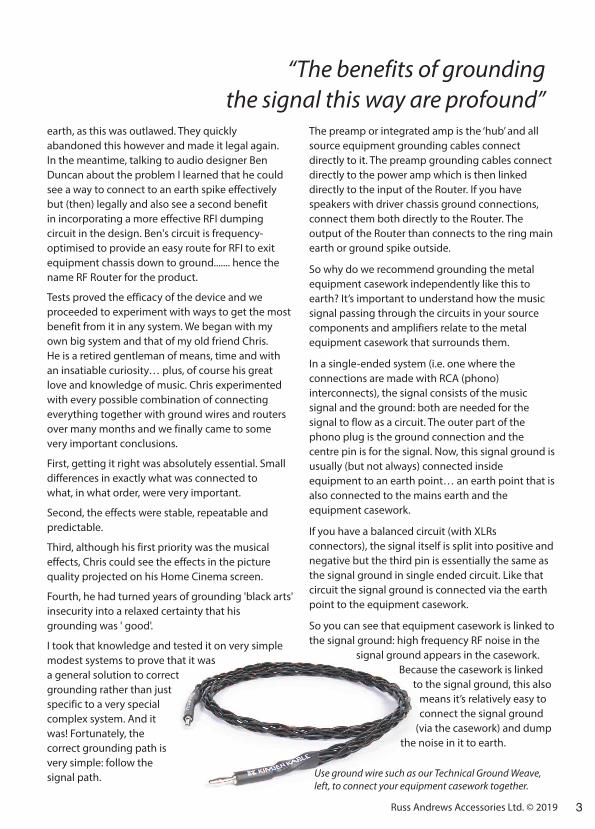
Use ground wire such as our Technical Ground Weave,left, to connect your equipment casework together.
We found the upgrading effects of grounding on alllevels of system to be so great that we have pushedGrounding up the hierarchy of upgrading steps right tothe top alongside the other mains upgrades. It alsoprompted a reassessment of mains cable earthing itself.Starting with our woven mains cables we havecompletely redesigned their construction. In the light ofthese RFI grounding issues we realised that there was animprovement to be gained by stopping the cable weaveinducing RFI noise in the earth wire: many prototypes,listening tests and RFI measurements later we are readyto launch a new range that take performance to newlevels of musicality, resolution and clarity.
We have also looked at the wires and cables we use toimplement the grounding process, finding that the wirematerial’s quality was clearly audible. The improvementsbrought by using KIMBER TC wire and Kimber silver wireturned out to be just as audible as when they are used assignal or speaker cables! And boy was Super Burn Inworthwhile ! I wouldn't be without it. Speaking ofSuperBurn In, we have a new machine (underdevelopment for the last five years!) to take the processto a whole new level.
Sound BenefitsThe benefits of grounding the signal this wayare profound. At first listen, you will be struck byhow much lower the bass goes, how muchtighter and cleaner it is. Then by how muchmore articulate, how you can hear more easilythe notes being played. Next you realise that theinstrument has a defined character, tone andpresence as a separate instrument. Next, you
may be aware of the musician playing thatinstrument, his technique and musical skill.
What is true of bass instruments is true of everyinstrument and voice. Everyone seems to beplaying better than you heard before.
After hearing all those changes you may realisethat the whole performance is so much morereal, so much like being there. Wow… don’t youwant some of that?
Russ Andrews Accessories Ltd. © 20194
SymphonyMany of you will be familiar with our long-time rangeof electromagnetic field stabilisers for the mains andarea round the system. We have recently changedsupplier to have access to the latest designs for thisuseful technology. The new product is the SymphonyPro, and is proving noticeably superior to our previousproducts in reducing the audible effects of theelectromagnetic fog we live with. As the noise andhash is reduced we notice that, alongwith the system, WE feel morerelaxed and less stressed.We think this technology isa welcome addition to oursystem grounding efforts.
Why grounding isespecially importantnowDumping RFI out of your system hasnever been more important than now.The RFI fog we endure in the name of 'staying connected' is a serious issue forthe Hi-Fi enthusiast, and it can only getworse exponentially into the future. Aswe progress through 3G, 4G and into 5Gthe mast density in the environmentincreases and the broadcast power andfrequencies go up to achieve the areacoverage and data density we alldemand. We now expect Superfastbroadband speeds of Internet access onour mobile phones anywhere we wantto use the web or social media sites.Emergency Services are ramping uptheir communication networks to givePolice, Ambulance and Fire Servicepersonnel better live voice and videocomputer-driven control. There areconcerns about the public healthaspects of these powerful digitalnetworks in towns and cities where themast density must be very high toeliminate blind spots.
You may be sensibly not using Ethernet-over-mains devices, but yourneighbours probably are because theydon't want to use cables to connect alltheir audio visual kit. Our need toprotect our musical enjoyment from thedegrading effects of 21st centurylifestyle is urgent and increasinglyimportant. We are working increasinglyhard to find effective solutions for us all.
BECOME AN EXPERT...
Grounding casework is very simple to achieve. The basic components are some grounding wires,some means of connecting the wires to thecasework, an RF Router, and a way of connectingyour RF Router to earth - either by using the plug-inversion or connecting it to either a wall socket withearth terminal or an external earth spike. Consult thediagrams on page 7 to get an idea of theconnections you need to make and consult theChoosing Your RF Router box on page 10 to identifywhich is best for you.
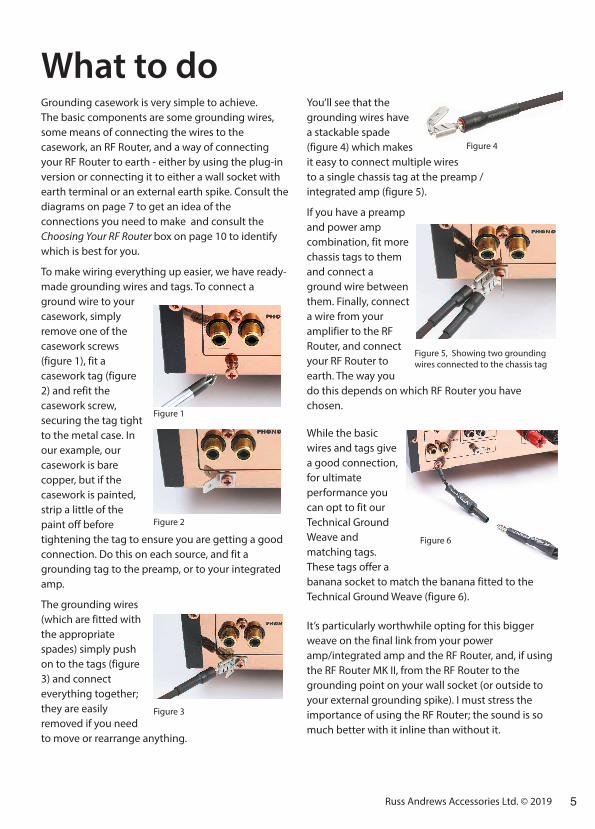
To make wiring everything up easier, we have ready-made grounding wires and tags. To connect aground wire to yourcasework, simplyremove one of thecasework screws(figure 1), fit acasework tag (figure2) and refit thecasework screw,securing the tag tightto the metal case. Inour example, ourcasework is barecopper, but if thecasework is painted,strip a little of thepaint off beforetightening the tag to ensure you are getting a goodconnection. Do this on each source, and fit agrounding tag to the preamp, or to your integratedamp.
The grounding wires(which are fitted withthe appropriatespades) simply pushon to the tags (figure3) and connecteverything together;they are easilyremoved if you needto move or rearrange anything.
You’ll see that thegrounding wires havea stackable spade(figure 4) which makesit easy to connect multiple wiresto a single chassis tag at the preamp / integrated amp (figure 5).
If you have a preampand power ampcombination, fit morechassis tags to themand connect aground wire betweenthem. Finally, connecta wire from youramplifier to the RFRouter, and connectyour RF Router toearth. The way youdo this depends on which RF Router you havechosen.
While the basicwires and tags givea good connection,for ultimateperformance youcan opt to fit ourTechnical GroundWeave andmatching tags.These tags offer abanana socket to match the banana fitted to theTechnical Ground Weave (figure 6).
It’s particularly worthwhile opting for this biggerweave on the final link from your poweramp/integrated amp and the RF Router, and, if usingthe RF Router MK II, from the RF Router to thegrounding point on your wall socket (or outside toyour external grounding spike). I must stress theimportance of using the RF Router; the sound is somuch better with it inline than without it.
Figure 1
Figure 2
Figure 3
Figure 5, Showing two groundingwires connected to the chassis tag
Figure 6
Figure 4
What to do
5Russ Andrews Accessories Ltd. © 2019
6 Russ Andrews Accessories Ltd. © 2019
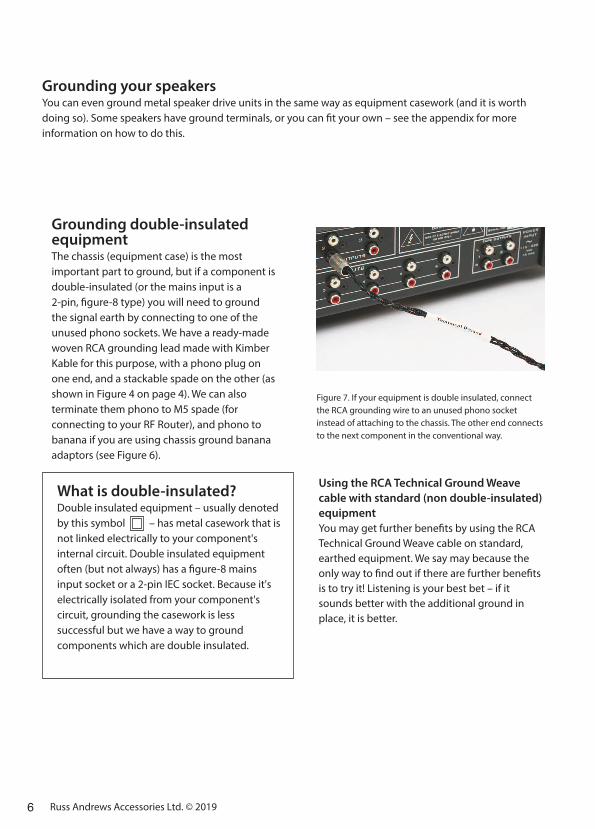
Figure 7. If your equipment is double insulated, connectthe RCA grounding wire to an unused phono socketinstead of attaching to the chassis. The other end connectsto the next component in the conventional way.
Grounding your speakersYou can even ground metal speaker drive units in the same way as equipment casework (and it is worthdoing so). Some speakers have ground terminals, or you can fit your own – see the appendix for moreinformation on how to do this.
Grounding double-insulatedequipmentThe chassis (equipment case) is the mostimportant part to ground, but if a component isdouble-insulated (or the mains input is a 2-pin, figure-8 type) you will need to groundthe signal earth by connecting to one of theunused phono sockets. We have a ready-madewoven RCA grounding lead made with KimberKable for this purpose, with a phono plug onone end, and a stackable spade on the other (asshown in Figure 4 on page 4). We can alsoterminate them phono to M5 spade (forconnecting to your RF Router), and phono tobanana if you are using chassis ground bananaadaptors (see Figure 6).
Using the RCA Technical Ground Weavecable with standard (non double-insulated)equipmentYou may get further benefits by using the RCATechnical Ground Weave cable on standard,earthed equipment. We say may because theonly way to find out if there are further benefitsis to try it! Listening is your best bet – if itsounds better with the additional ground inplace, it is better.
What is double-insulated?Double insulated equipment – usually denotedby this symbol – has metal casework that isnot linked electrically to your component'sinternal circuit. Double insulated equipmentoften (but not always) has a figure-8 mainsinput socket or a 2-pin IEC socket. Because it'selectrically isolated from your component'scircuit, grounding the casework is lesssuccessful but we have a way to groundcomponents which are double insulated.
7
All this is about dumping RFI/EMI out of the systemand into a good, low resistance earth. How do I geta good low resistance earth you may well ask? Iknow that many of you are connecting your RFRouter to the mains earth. This works well and issimple to achieve, but for very best performanceyou should connect the RF Router to an external earth spike or rod, buried in the ground outside.
This answer isn't simple, I'm afraid, because thequality of your earth depends on the soil resistivitywhich varies with type and situation. If you arelucky, a simple four foot earth spike will do a goodjob but you may find it more difficult in dry urbansituations.
It is worth doing properly, so get a good electricianinvolved at the beginning who has the measuringequipment to ensure that, whatever lengths youhave to go to, you get a reliable low resistanceearth.
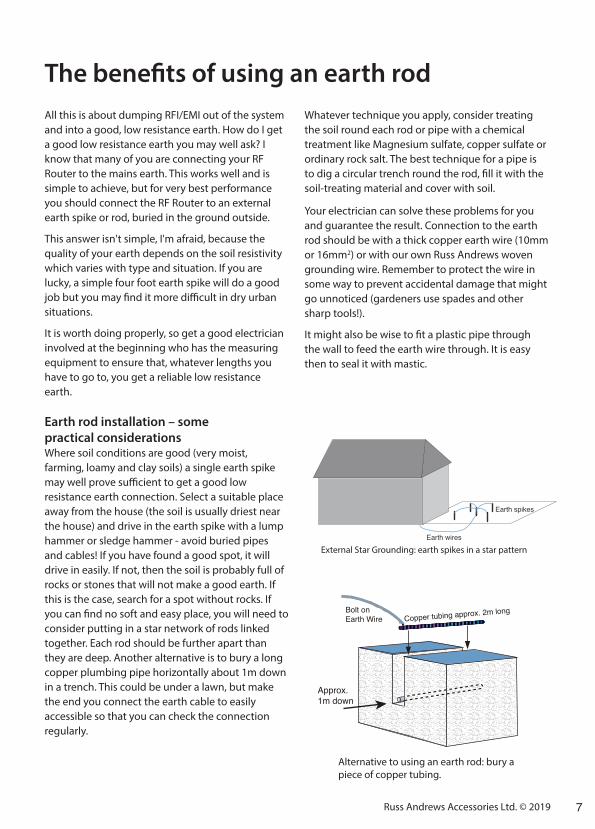
Earth rod installation – some practical considerationsWhere soil conditions are good (very moist,farming, loamy and clay soils) a single earth spikemay well prove sufficient to get a good lowresistance earth connection. Select a suitable placeaway from the house (the soil is usually driest nearthe house) and drive in the earth spike with a lumphammer or sledge hammer - avoid buried pipesand cables! If you have found a good spot, it willdrive in easily. If not, then the soil is probably full ofrocks or stones that will not make a good earth. Ifthis is the case, search for a spot without rocks. Ifyou can find no soft and easy place, you will need toconsider putting in a star network of rods linkedtogether. Each rod should be further apart thanthey are deep. Another alternative is to bury a longcopper plumbing pipe horizontally about 1m downin a trench. This could be under a lawn, but makethe end you connect the earth cable to easilyaccessible so that you can check the connectionregularly.
Whatever technique you apply, consider treatingthe soil round each rod or pipe with a chemicaltreatment like Magnesium sulfate, copper sulfate orordinary rock salt. The best technique for a pipe isto dig a circular trench round the rod, fill it with thesoil-treating material and cover with soil.
Your electrician can solve these problems for youand guarantee the result. Connection to the earthrod should be with a thick copper earth wire (10mmor 16mm2) or with our own Russ Andrews wovengrounding wire. Remember to protect the wire insome way to prevent accidental damage that mightgo unnoticed (gardeners use spades and othersharp tools!).
It might also be wise to fit a plastic pipe throughthe wall to feed the earth wire through. It is easythen to seal it with mastic.
Copper tubing approx. 2m longBolt onEarth Wire
Approx.1m down
External Star Grounding: earth spikes in a star pattern
The benefits of using an earth rod
Russ Andrews Accessories Ltd. © 2019
Alternative to using an earth rod: bury apiece of copper tubing.
8 Russ Andrews Accessories Ltd. © 2019
A A A A A
RADIO CD PLAYER DVD SKY TURNTABLE
B
CRF
ROUTER
PREAMP
POWERAMP
B
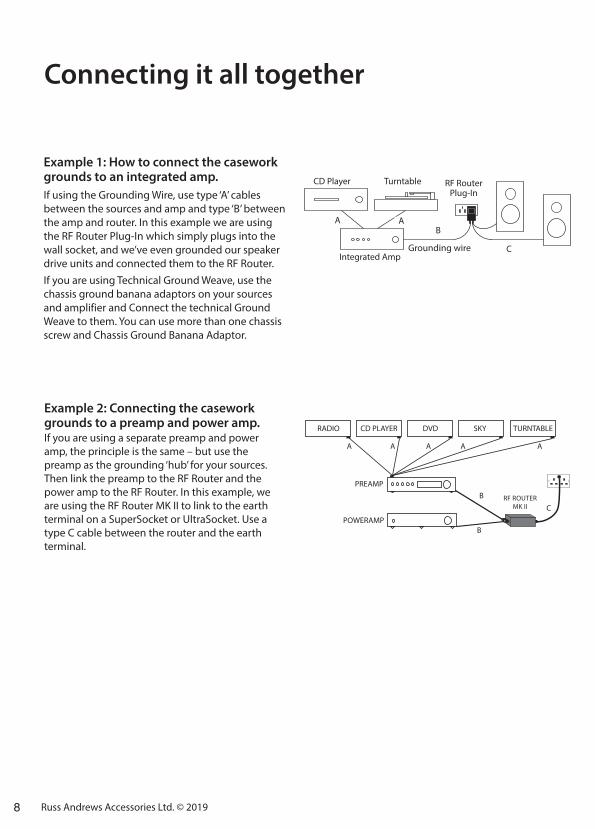
Example 1: How to connect the caseworkgrounds to an integrated amp. If using the Grounding Wire, use type ‘A’ cablesbetween the sources and amp and type ‘B’ betweenthe amp and router. In this example we are usingthe RF Router Plug-In which simply plugs into thewall socket, and we’ve even grounded our speakerdrive units and connected them to the RF Router.If you are using Technical Ground Weave, use thechassis ground banana adaptors on your sourcesand amplifier and Connect the technical GroundWeave to them. You can use more than one chassisscrew and Chassis Ground Banana Adaptor.
Example 2: Connecting the caseworkgrounds to a preamp and power amp. If you are using a separate preamp and poweramp, the principle is the same – but use thepreamp as the grounding ‘hub’ for your sources.Then link the preamp to the RF Router and thepower amp to the RF Router. In this example, weare using the RF Router MK II to link to the earthterminal on a SuperSocket or UltraSocket. Use atype C cable between the router and the earthterminal.
Connecting it all together
CD Player
Integrated Amp
Turntable RF RouterPlug-In
Grounding wire
RF ROUTERMK II
A AB
C

9
A A A A A
TUNER CD PLAYER DVD SKY TURNTABLE
C
RF ROUTERPLUG IN
PREAMP
POWERAMP POWERAMP
B
B
A A A A A
TUNER CD PLAYER DVD SKY TURNTABLE
B
C
RFROUTER
PREAMP
POWERAMP POWERAMP
RFROUTER
B
B
C
Example 3: Connecting the caseworkgrounds to a preamp and two (or more)power amps.If your system comprises a preamp and morethan one power amp (or active loudspeakers),alternatively try grounding the system via thepower amps as shown.
Example 4: Connecting Mains EarthIn this example we've also connected the ringmain earth to a second RF Router MkII. Itwon't provide a safety earth, but it gives aneffective RFI/EMI ground and is a worthwhileand noticeable improvement. Use a cablefitted with bananas at both ends to make theconnection.
Russ Andrews Accessories Ltd. © 2019
RF ROUTERMK II
RF ROUTERMK II
10
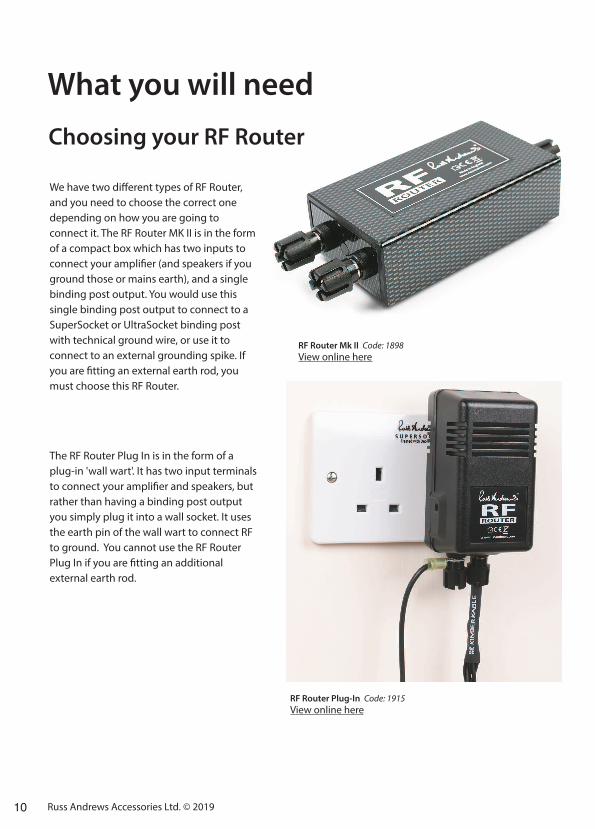
RF Router Mk II Code: 1898View online here
RF Router Plug-In Code: 1915View online here
We have two different types of RF Router,and you need to choose the correct onedepending on how you are going toconnect it. The RF Router MK II is in the formof a compact box which has two inputs toconnect your amplifier (and speakers if youground those or mains earth), and a singlebinding post output. You would use thissingle binding post output to connect to aSuperSocket or UltraSocket binding postwith technical ground wire, or use it toconnect to an external grounding spike. Ifyou are fitting an external earth rod, youmust choose this RF Router.
The RF Router Plug In is in the form of aplug-in 'wall wart'. It has two input terminalsto connect your amplifier and speakers, butrather than having a binding post outputyou simply plug it into a wall socket. It usesthe earth pin of the wall wart to connect RFto ground. You cannot use the RF RouterPlug In if you are fitting an additionalexternal earth rod.
Russ Andrews Accessories Ltd. © 2019
What you will need
Choosing your RF Router
Grounding Wire Code: 1092
Chassis Ground Banana Adaptor Code: 3197
Type A
Type B
Type C
If grounding your system with Grounding Wire,choose a pack of tags and as many Grounding Wiresas you need. The Grounding wires have differentterminations depending on where you are usingthem; consult our diagrams on page 7 to ensure youchoose the correct termination type.
If grounding your system with Technical GroundWeave, choose as many Chassis Ground BananaAdaptors as you need. The Technical GroundWeave is terminated with bananas to fit into theChassis Ground Banana Adaptors or the earthterminal of our Super/Ultra Sockets.
View online here
View online here
View online here
View online here
View online here
Chassis Tags Code: 3196
Choosing your wire
Technical Ground Weave can be terminated with bananasor spades; the cost is £15 for both ends plus the cost of thecable: ie 3m terminated would be £15 + £30 = £45
Technical Ground Weave Code: 1090
11Russ Andrews Accessories Ltd. © 2019
View online here
11 Russ Andrews Accessories Ltd. © 2019
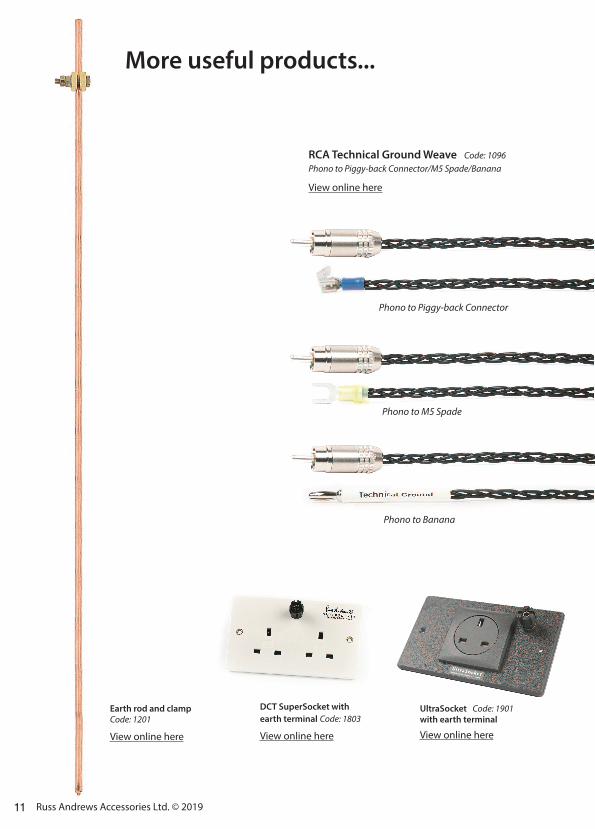
Earth rod and clampCode: 1201
View online here
DCT SuperSocket withearth terminal Code: 1803
UltraSocket Code: 1901with earth terminal
View online hereView online here
Phono to Piggy-back Connector
Phono to M5 Spade
Phono to Banana
RCA Technical Ground Weave Code: 1096Phono to Piggy-back Connector/M5 Spade/Banana
View online here
More useful products...
12
Some loudspeaker manufacturers - for example,Tannoy, in some of their higher-end and us (in the RussAndrews Quave LS1 speakers) - helpfully provide anextra binding post that lets you ground the speakerdrive units. This binding post is connected internally tothe metal chassis of the drive units, allowing you toground them in the same way as you have done withyour metal-cased amplifiers and sources.
If your speakers don’t have grounding terminals, youcan test the principle fairly easily for yourself withouthaving to modify the drive unit. When you remove thespeaker grille, you will find the tweeter(s) and one ormore drive units held in with screws. Tackle only thedrivers and tweeters with metal bodies... drivers andtweeters that have a plastic chassis do not needgrounding, of course.
Remove one screw from each driver and clean themetal around the screw hole to remove any paint.Strip the end of a piece of wire that is long enough toreach your RF Router, make a small loop in thestripped end and refit the driver screw through it sothat it makes a good tight connection with the chassis.If there is more than one driver on each speaker, youcan link them together or run two lengths of wire.Typically you would connect ground wires from bothspeakers to the second input terminal on your RFRouter, as we have shown in Example 1, on page 7.
If you like what you hear, you can make theconnection permanent, but it will involve makingmodifications inside the speaker. Make a connection atthe back of the driver (inside the cabinet) and runground wire to an extra binding post on the backplate, next to the usual speaker terminals. Then usethis to connect to your RF router permanently withground wire or weave from the new ground bindingpost. We can do this modification for you if you aren'tcomfortable doing it yourself - contact us for moreinformation.
Grounding your speakers
Appendix:
Russ Andrews Accessories Ltd. © 2019