grooming kit (cord / cordless) - aquarius-service.com · grooming kit (cord / cordless) operating...
TRANSCRIPT

Grooming Kit (cord / cordless)Operating Manual
AFTER SALES SUPPORT
www.aquarius-service.com
00800-364636 00
MODEL: 9163901 PRODUCT CODE: 91500 08/2014
GB IRE
English.........1

Content01. Product Overview ..................................................................................... 202. About these Instructions ......................................................................... 303. Safety Information ................................................................................... 304. Control elements/basic operation ........................................................905. Charging .................................................................................................. 1006. Operation ...................................................................................................1107. Cleaning and Care ...................................................................................1508. Troubleshooting ...................................................................................... 1709. Technical Data .......................................................................................... 1710. Declaration of conformity ..................................................................... 1811. Disposal .................................................................................................... 18 Warranty card .......................................................................................... 23 Warranty conditions ............................................................................... 24
Congratulations!
You have made an excellent choice with the purchase of this quality Easy® Home product.
By doing so you now have the assurance and peace of mind which comes from purchasing a product that has been manufactured to the highest standards of performance and safety, supported by the high quality standards of Aldi.
We want you to be completely satisfied with your purchase so this Easy® Home product is backed by a comprehensive manufacturer’s 3 year warranty and an outstanding after sales service through our dedicated Helpline.
We hope you will enjoy using your purchase for many years to come.
If you require technical support or in the unlikely event that your purchase is faulty please telephone our Helpline for immediate assis-tance. Faulty product claims made within the 3 year warranty period will be repaired or replaced free of charge provided that you have satisfactory proof of purchase (keep your till receipt safe!). This does not affect your statutory rights. However, be aware that the warranty will become null and void if the product is found to have been deliberately damaged, misused or disassembled.

2 AFTER SALES SUPPORT www.aquarius-service.com 00800-36 46 36 00
MODEL: 9163901 PRODUCT CODE: 91500 08/2014 Hotline free
AFTER SALES SUPPORT 3 00800-36 46 36 00 www.aquarius-service.com
Hotline free MODEL: 9163901 PRODUCT CODE: 91500 08/2014
Other accessories (no image): Wall power supply, brush, oil, scissors, operating instructions
02. About these Instructions• Before using this appliance for the first time, read through the
operating manual carefully and ensure you comply with all the safety instructions!
• The appliance should only be used as described in these instructions. • Keep these instructions for reference.• If you pass the appliance on to someone else, please include these
instructions.
03. Safety InformationIntended purposeThe 5 in 1 hair trimming set is intended exclusively for trimming human hair. Only use the device for dry hair. The device is designed for private home use and must not be used for commercial purposes. The device must only be used indoors.
Foreseeable misuseDo not use the device to cut artificial hair or animal hair.
01. Product Overview
1
2
345
67
8 9
NOTE: Check that all accessories are included and undamaged.
1. Hair trimmer attachment2. Hair Trimmer3. Battery charger4. Nose/ear hair trimmer attachment5. Beard trimmer attachment6. Precision trimmer attachment7. Razor attachment8. Comb attachments for hair trimmer attachment 3, 6, 9, 12 mm9. Comb attachment for beard trimmer attachment (5)
4 AFTER SALES SUPPORT www.aquarius-service.com 00800-36 46 36 00
MODEL: 9163901 PRODUCT CODE: 91500 08/2014 Hotline free
AFTER SALES SUPPORT 5 00800-36 46 36 00 www.aquarius-service.com
Hotline free MODEL: 9163901 PRODUCT CODE: 91500 08/2014
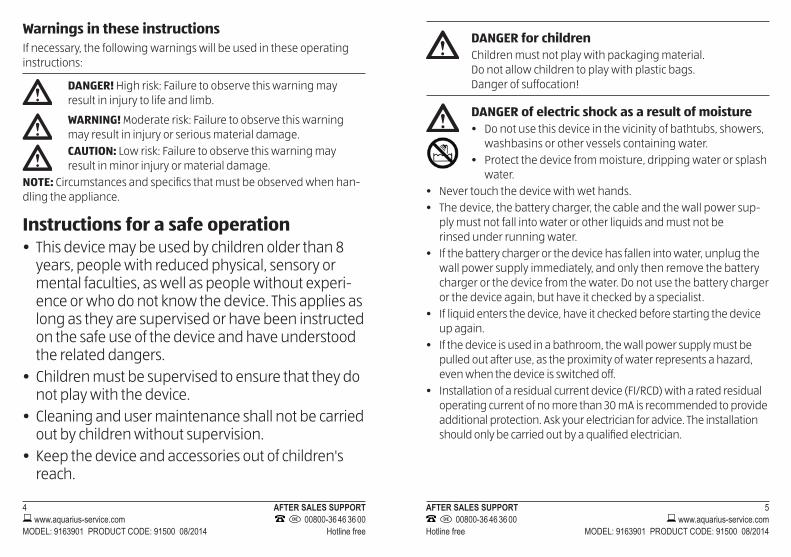
DANGER for childrenChildren must not play with packaging material. Do not allow children to play with plastic bags. Danger of suffocation!
DANGER of electric shock as a result of moisture• Do not use this device in the vicinity of bathtubs, showers,
washbasins or other vessels containing water.• Protect the device from moisture, dripping water or splash
water.• Never touch the device with wet hands.• The device, the battery charger, the cable and the wall power sup-
ply must not fall into water or other liquids and must not be rinsed under running water.
• If the battery charger or the device has fallen into water, unplug the wall power supply immediately, and only then remove the battery charger or the device from the water. Do not use the battery charger or the device again, but have it checked by a specialist.
• If liquid enters the device, have it checked before starting the device up again.
• If the device is used in a bathroom, the wall power supply must be pulled out after use, as the proximity of water represents a hazard, even when the device is switched off.
• Installation of a residual current device (FI/RCD) with a rated residual operating current of no more than 30 mA is recommended to provide additional protection. Ask your electrician for advice. The installation should only be carried out by a qualified electrician.
Warnings in these instructionsIf necessary, the following warnings will be used in these operating instructions:
DANGER! High risk: Failure to observe this warning may result in injury to life and limb.
WARNING! Moderate risk: Failure to observe this warning may result in injury or serious material damage.CAUTION: Low risk: Failure to observe this warning may result in minor injury or material damage.
NOTE: Circumstances and specifics that must be observed when han-dling the appliance.
Instructions for a safe operation• This device may be used by children older than 8
years, people with reduced physical, sensory or mental faculties, as well as people without experi-ence or who do not know the device. This applies as long as they are supervised or have been instructed on the safe use of the device and have understood the related dangers.
• Children must be supervised to ensure that they do not play with the device.
• Cleaning and user maintenance shall not be carried out by children without supervision.
• Keep the device and accessories out of children's reach.

6 AFTER SALES SUPPORT www.aquarius-service.com 00800-36 46 36 00
MODEL: 9163901 PRODUCT CODE: 91500 08/2014 Hotline free
AFTER SALES SUPPORT 7 00800-36 46 36 00 www.aquarius-service.com
Hotline free MODEL: 9163901 PRODUCT CODE: 91500 08/2014
WARNING! Handling of rechargeable batteries• Improper use can result in injuries and damages
to property! Prevent fire and explosion hazards! Please observe the following safety instructions regarding the safe handling of rechargeable batteries:
• Danger of fire! Protect rechargeable batteries against mechanical damages.
• Do not expose the device to direct sunshine or heat. The ambient temperature should not be lower than 5 °C or higher than 35 °C.
• The charge contacts on the device must not be connected by metallic objects. Rechargeable batteries may overheat and explode.
• Charge the device exclusively with the original wall power supply.• Should the electrolyte solution leak out of the rechargeable batter-
ies, avoid contact with eyes, mucous membranes and skin. Rinse immediately with plenty of clean water and consult a doctor. The electrolyte solution can cause irritation.
WARNING! Risk of injury from cutting• The points of the hair trimmer attachment, the beard trim-
mer attachment and the precision trimmer attachment are sharp. Handle with care.
• Do not use the device if the attachment shows damages. • Switch off the device before pinning up or changing the attach-
ments and each time before cleaning.
DANGER of electric shock• Do not operate the device if the device, the battery
charger, the wall power supply or the cable show visible signs of damage or if the device has been dropped.
• Connect the cable to the battery charger before plugging the wall power supply into a socket.
• Only connect the wall power supply to a properly installed easy to access socket which supplies voltage matching the rating plate. The socket must still be easily accessible after connection.
• Ensure that the cable cannot be damaged by sharp edges or hot surfaces.
• Ensure that the cable is not trapped or crushed.• Always pull at the wall power supply and never pull on the cable
when unplugging the wall power supply.• Remove the wall power supply from the socket …
… after each use, … after each charging process, … if a fault occurs, … before connecting the battery charger to the cable, … before cleaning the device and the battery charger and … during thunderstorms.
• To avoid any risk, do not make any changes to the device or accesso-ries.
• Do not replace the cable yourself either. Repairs should only be carried out by a specialist or our Service Centre.
8 AFTER SALES SUPPORT www.aquarius-service.com 00800-36 46 36 00
MODEL: 9163901 PRODUCT CODE: 91500 08/2014 Hotline free
AFTER SALES SUPPORT 9 00800-36 46 36 00 www.aquarius-service.com
Hotline free MODEL: 9163901 PRODUCT CODE: 91500 08/2014
WARNING! Risk of injury• Do not use the device on open wounds, cuts, sunburn or
blisters.• Do not push the nose/ear hair trimmer attachment too deep into
the nostril or the external ear.• Place the cable in such a way that no one trips over it or steps on it!
WARNING injury from oil applied to blades• Keep bottle of oil out of reach of children.
• Avoid contact with eyes. Should some of the oil applied to the blades get into eyes, rinse immediately with plenty of water until oil is removed.
• Do not ingest the oil applied to the blades.
CAUTION! Risk of material damage• Use the original accessories only.
• Never place the device on hot surfaces (e.g. hob plates) or near heat sources or open fire.
• Do not cover the wall power supply to prevent over heating.• In order to avoid damages to the shaving foil, do not exert excessive
pressure on the shaving foil of the razor attachment.• Do not remove the shaving foil from the shaving foil frame and do
not clean it with the brush. • Do not use any harsh or abrasive cleaning agents.
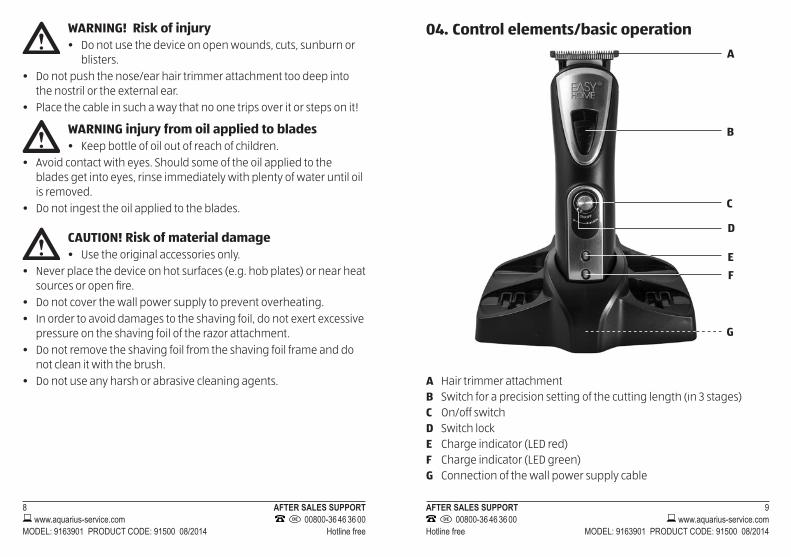
04. Control elements/basic operationA
B
C
D
E
F
G
A Hair trimmer attachmentB Switch for a precision setting of the cutting length (in 3 stages)C On/off switch D Switch lockE Charge indicator (LED red) F Charge indicator (LED green) G Connection of the wall power supply cable

10 AFTER SALES SUPPORT www.aquarius-service.com 00800-36 46 36 00
MODEL: 9163901 PRODUCT CODE: 91500 08/2014 Hotline free
AFTER SALES SUPPORT 11 00800-36 46 36 00 www.aquarius-service.com
Hotline free MODEL: 9163901 PRODUCT CODE: 91500 08/2014
1. Place the battery charger on a level surface.2. Insert the wall power supply into an easily accessible socket.3. Place the device onto the charging station. During the charging
process, the red LED is lit continuously. If the charging is completed, the red LED switches off and the green LED lights up. After removing the wall power supply or taking the device off the charging station, the green LED switches off. The operating time with fully charged batteries is approximately 60 minutes.
06. Operation
NOTES: • The hair to be cut must be dry.• The cutting length may deviate depending on the cutting angle.• First, start with a comb attachment with a longer cutting length
and then, in the course of the cutting process, use shorter cutting lengths step by step.
Regardless of the state of battery charging, the device may be used with mains operation at any time.1. In order to use the device with mains operation, ensure that the
device is switched off.2. If necessary, pull out the wall plug transformer cable from the
charging station and connect the wall power supply to the device.3. Insert the wall power supply into an easily accessible socket.4. Use the on/off switch to switch on the device.
Using the switch lockThis function prevents the unintentional switching on of the device during transportation. For switching the device on/off, the switch D must be turned to position π (ready for operation) or ø LOCK (locked).
05. Charging
Connect charging station:• An oval recess for the connection line of the wall plug transformer
is located on the bottom side of the charging station at the back edge.• A round opening is located at the front edge of the charging station.
It is covered by a latch on the bottom side ➀ for fixing the connector socket of the wall power supply.
1. Move latch towards side ➁, guide the cable of the con nector line through the oval recess at the edge, and plug the connector socket through the round opening ➂, so that the socket protrudes through the mounting into the charging station.
2. Move back latch to secure socket ➃.
➀ ➁ ➂ ➃
Charge rechargeable batteries:
CAUTION! Risk of material damage• Please note that the battery capacity will decrease during
extended periods of storage. For this reason, long recharging times should be avoided because of the interruption between the charging and discharging cycles.
NOTES:• Prior to the first use (without cable), charge the device for approx.
12 hours.• With regular use, it takes approximately 8 hours to fully charge the
batteries.• The red LED flashes, if the battery performance is too low.

12 AFTER SALES SUPPORT www.aquarius-service.com 00800-36 46 36 00
MODEL: 9163901 PRODUCT CODE: 91500 08/2014 Hotline free
AFTER SALES SUPPORT 13 00800-36 46 36 00 www.aquarius-service.com
Hotline free MODEL: 9163901 PRODUCT CODE: 91500 08/2014
3. Start by cutting the hair in the neck or on the sides and cut towards the centre of the head. Then, cut the front section of the hair to-wards the centre of the head.
4. Hold the device so that the comb attachment rests flat on the head (for attachments 6, 9 and 12 mm this side is round). Move the device evenly through the hair.
5. If possible, cut against direction of hair growth.6. In order to catch all the hair, move the device several times through
the same section of the hair.7. Use the device only with the cutting attachment and without comb
attachment to cut hair very short.8. Comb the hair repeatedly and well.
Beard trimmer attachment1. Comb the beard in the direction of growth.2. Cut the beard from the ear to the chin down-
ward. First trim the one and then the other side.3. Use the beard trimmer attachment without comb attachment to cut your
beard very short or to cut moustache and contours. The cutting edge of the beard trimmer attachment is set at right angles to the beard.
NOTE:The comb attachment is used to change the cutting length in 4 steps. The numbers 3, 4, 5, 6 correspond to cutting lengths in mm when using the fine ad-justment level 1 (slider switch at the very bottom). When using fine adjustment level 3 (slider switch at the very top), the set cutting length is reduced by 1 mm each.
Pushing on/replacing cutting attachments 1, 2, 4, 6 and 7 (→ 01. Product Overview)
WARNING! Risk of injury from cuttingSwitch off the device before replacing or changing the attachments.
1. Remove/replace an attachment by pressing it with the thumb towards the back (see figure).
2. Push on the attachments by inserting the bottom bracket of the attachment into the rail of the device and press the upper part of the attachment onto the device until it audibly and firmly locks into place.
Pushing on/replacing comb attachments 8 and 9 (→ 01. Product Overview)
1. To push on the comb attachments (8) push the corresponding attachment carefully over the hair trimmer attachment, then press the lower part of the comb attachment firmly until it locks into place.
2. To push on the comb attachment (9) for the beard trimmer attach-ment push the comb attachment carefully over the beard trimmer attachment until it firmly locks into place.
3. To remove/replace the comb attachments release the comb attach-ment at its bottom end and pull it off the device.
Hair trimmer attachment1. Comb the hair well.2. Place a sheet or cape around throat and neck to
prevent cut-off hair from dropping into the collar.

14 AFTER SALES SUPPORT www.aquarius-service.com 00800-36 46 36 00
MODEL: 9163901 PRODUCT CODE: 91500 08/2014 Hotline free
AFTER SALES SUPPORT 15 00800-36 46 36 00 www.aquarius-service.com
Hotline free MODEL: 9163901 PRODUCT CODE: 91500 08/2014
07. Cleaning and Care
DANGER! • Remove the wall power supply from the socket before
cleaning the device and the battery charger.
WARNING! • Always switch off the device before cleaning it.
CAUTION!• Do not use any harsh or abrasive cleaning agents.
NOTE: Clean the device and the respective attachments after each use.
Device1. Wipe down the casing of the device as well as the battery charger
with a damp cloth.
Comb attachments1. Remove the comb attachment. Rinse the comb attachment with
water and let it dry before using it again.
Hair trimmer, beard trimmer and precision trimmer attachment
1. Remove the attachment from the device by pressing it with the thumb towards the rear (see figure).
2. Remove the hair remnants from the attachment by using the cleaning brush included in the delivery.
3. Apply several drops of oil to the cutting edge of the attachment. Using a soft cloth, wipe off the surplus oil, if necessary. Only use acid-free oil, such as e.g. sewing machine oil.
4. Move the comb attachment so that the desired cutting length locks into place below the arrow mark (see figure).
5. Position the comb attachment with its rounded side on the beard and cut from below to above against direction of beard hair growth.
6. In order to cut your moustache, first comb it straight down. Then use either the beard trimmer attachment or the precision trimmer attachment. Starting in the middle above the mouth, and first cut the one and then the other side.
Precision trimmer attachment1. Use the precision trimmer attachment to shorten
and shape the moustache, whiskers, sideburns, or eyebrows.
2. Position the edge of the attachment at the desired height of the hairline and move the device downward.
Razor attachmentNOTE: Your skin must be clean and dry.
1. Hold the device at a right angle to the surface of the skin and move it carefully over your face.
2. Shave against the direction of beard growth.3. At parts of the face that are harder to shave, such as the chin, stretch
the skin for a better result.
Nose/ear hair trimmer attachment1. Slowly insert the metal tip into one of your
nostrils or ears.2. Move the device in circles to cut the hair.

16 AFTER SALES SUPPORT www.aquarius-service.com 00800-36 46 36 00
MODEL: 9163901 PRODUCT CODE: 91500 08/2014 Hotline free
AFTER SALES SUPPORT 17 00800-36 46 36 00 www.aquarius-service.com
Hotline free MODEL: 9163901 PRODUCT CODE: 91500 08/2014
08. Troubleshooting
DANGER! Do not attempt to repair the device yourself.• Always remove the wall power supply from the socket
whenever a fault occurs.
Fault: Please check the following:
No function • Is the power supply secured?• Batteries empty?
Cutting attachments 1, 2, 4, 6 and 7 are not running smoothly
• Attachments cleaned and if necessary, oiled?
09. Technical Data
Model / Product Code 9163901 (91500)
Wall power supply: Input voltage Output voltage Protection class Ambient conditions
100–240 V ~ 50/60 Hz 3,6 V 800 mA
II only approved for indoor use
Hair trimmer: Input voltage Rechargeable batteries Protection class Ambient temperature
3,6 V 800 mA 2x 1,2 V NiMH / HR6 (AA) / 800 mAh
III +5 °C to +35 °C
Battery charger: Input voltage Output voltage
3,6 V 800 mA 3,6 V 800 mA
In the course of product improvements we reserve the right to make technical and visual changes on the appliance or to its accessories.
Nose/ear hair trimmer attachment1. Remove the nose/ear hair trimmer attachment. Rinse it with water
and let it dry completely before using it again.
Razor attachment
CAUTION! Foil breakageDo not remove the shaving foil from the shaving foil frame and do not clean it with the brush.
1. Remove the razor attachment.2. Press on the laterally fitted buttons of the razor attachment and pull
the shaving foil frame off. In doing so, grip the shaving foil frame only at the sides and do not press on the shaving foil.
3. Clean the cutting blade with the cleaning brush included in the delivery.
4. Use running water to clean the shaving foil in the shaving foil frame and let it dry completely before placing it back on the razor attachment.
5. Place the shaving foil frame back on the razor attachment. In doing so, ensure that the fastening clip at the shaving foil frame fits into the respective recesses of the razor attach-ments and press the shaving foil frame slightly down until it locks into place.
NOTE: From time to time, place a few drops of acid-free oil (such as sewing machine oil) onto the cutting blade. Place the razor attach-ment on the device and let the device run for a couple of seconds without using it. Using a soft cloth, wipe off the surplus oil, if necessary.

18 AFTER SALES SUPPORT www.aquarius-service.com 00800-36 46 36 00
MODEL: 9163901 PRODUCT CODE: 91500 08/2014 Hotline free
AFTER SALES SUPPORT 19 00800-36 46 36 00 www.aquarius-service.com
Hotline free MODEL: 9163901 PRODUCT CODE: 91500 08/2014
• Ensure that the batteries are not damaged as you remove it. Danger of fire!
• The removed batteries must not be used again.• Never short-circuit the batteries. The contacts on the removed bat-
teries must not be connected by metallic objects. The batteries may overheat and explode.
CAUTION! Only remove the batteries to dispose of the device. The device is destroyed by removing the batteries. Never try to operate a disassembled device.
1. Disconnect the device from the mains.2. Switch on the device and let it run until the batteries
are empty.
NOTE: The batteries contain a certain amount of residual electricity even after being completely discharged. Repeatedly switching the device on and letting the motor run will drain the batteries of this residual electricity.
3. Remove the attachment from the device. (→ 07. Cleaning and Care)4. Use a cross-head screwdriver to loosen the 2 screws next to the
driving shaft.5. Use a cross-head screwdriver to loosen the screw located at the rear
half of the housing and separate the two halves of the housing with a flat object.
6. Use a cross-head screwdriver to loosen the 4 screws located at the circuit board and cut the cable connections with a wire cutter. With a pair of pliers, carefully detach the stuck batteries from the circuit board. The batteries and the device must be disposed of properly.
The nickel-metal hydride batteries used for this device may not be treated as household waste. The batteries must be disposed of properly. Contact battery distributors or local waste disposal points for this. NiMH
10. Declaration of conformityThe CE mark was applied in accordance with the correspond-ing European directives.
The conformity declaration is held by the distributor: Aquarius Deutschland GmbHAdalperostrasse 29 • 85737 Ismaning b. München • GERMANY
11. DisposalThis symbol indicates that the product must be disposed of in a separate waste collection within the European Union. This applies to the product and all accessories marked with this symbol. Products marked as such may not be discarded with normal domestic waste, but must be taken to a collection point for recycling electrical and electronic devices.
Please dispose of oil bottle only when empty.
PackagingIf you want to dispose of the packaging, make sure you comply with the environmental regulations applicable in your country.
Removing the batteriesThis device is operated with two rechargeable nickel-metal-hydride batteries, which you must remove before disposing of the device.
WARNING! Risk of injury• You must be technically minded to remove the batteries,
otherwise there is the danger of injuring yourself. If you do not have any experience with tools, you should have the batteries removed by a person who is qualified to do this.

AFTER SALES SUPPORT 21 00800-36 46 36 00 www.aquarius-service.com
Hotline free MODEL: 9163901 PRODUCT CODE: 91500 08/2014
Warranty conditionsDear Customer,The ALDI warranty offers you extensive benefits compared to the statutory obligations arising from a warranty:
Warranty period: 3 years from date of purchase.Costs: Free repair / exchange or refund.
No transport costs (please see advice).Hotline: Free hotline
ADVICE: Please contact our service hotline by phone, e-mail or fax before sending in the appliance. In order for us to be able to allow you to return your goods free of charge during the warranty period and to help us to process your claim quickly and accurately, it is crucial that you call or email us to request an RMA number (Return Material Authorisation) before you send a appliance back to us.
In order to make a claim under the warranty, please send us: the original receipt and the warranty card properly completed. the product with all components included in the packaging.
The warranty does not cover damage caused by: Accident or unanticipated events (e. g. lightning, water, fire). Improper use or transport. Disregard of the safety and maintenance instructions. Other improper treatment or modification.After the expiry of the warranty period, you still have the possibility to have your product repaired at your own expense. If the repair or the estimate of costs is not free of charge you will be informed accordingly in advance.This warranty does not limit the statutory obligation of the seller arising from a warranty. The period of warranty can only be extended in accordance with a legal standard. In countries where a (compulsory) warranty and /or spare part storage and /or a system for compensation are / is required by law, the statutory minimum conditions apply. In the event that a product is received for repair, neither the service company nor the seller will assume any liability for data or settings possibly stored on the product by the customer.
GB IRE

Aquarius Deutschland GmbHAdalperostrasse 29 . 85737 Ismaning bei München
Germanywww.carrera-products.com
Edition 04 / 2014 · PO 100090
08 / 2014
Black (K 60)