gretorp_lesson1
TRANSCRIPT

8/3/2019 gretorp_lesson1
http://slidepdf.com/reader/full/gretorplesson1 1/24
Introduction
About GretorpA note from the editor
Gretorp looks at the game of Starcraft like few players do, thinking critically about each
point of the game, each map, and each possibility and constructing his play methodicallyin order to try and be the best player he can be. Over the past year he has become
recognized as one of America’s top gamers, earning his way onto the USA B national
team after multiple tries, and improving enough to join the USA A team. Since joiningLighT, now Pandemic – Gretorp has had the opportunity to showcase his skills to the
entire foreign community; his biggest accomplishment has come at the recent IEF
Tournament. Despite going 0-5 in the group stage, he was able to take 4th place in thesecond IEF tournament held.
Abstract
This document analyzes the process of map analyzation in order to form a plan. We want
to exhaust possibilities of playing a map and determine if there exists a best plan that can be used for a particular map. Due to the complexities and variability of all different
maps, we will focus on one and try to use the map as a foundation for how we should
analyze other maps. Through this analyzation we can determine a method on which toform plans and play smarter.
Property of Andre Hengchua 1
8/3/2019 gretorp_lesson1
http://slidepdf.com/reader/full/gretorplesson1 2/24
Analyzing Map Strengths and Weaknesses: Formulating a Plan
Analyzing maps are quite difficult because in order to know what is best for the Terran
race, we must assess our capabilities, and the capabilities of the other races. However, it
is essential to analyze maps in order to be able to understand how to play the mapintelligently. Playing properly is essential to learning this game correctly.
In my opinion, it is best to start from end game first and then we slowly work our way backwards once we establish our thoughts. This sounds very vague. However, let us do
an example of a map analysis. Then we will analyze what we have done, and form a
coherent way to go about map analysis. Then we will go ahead and look at other maps.
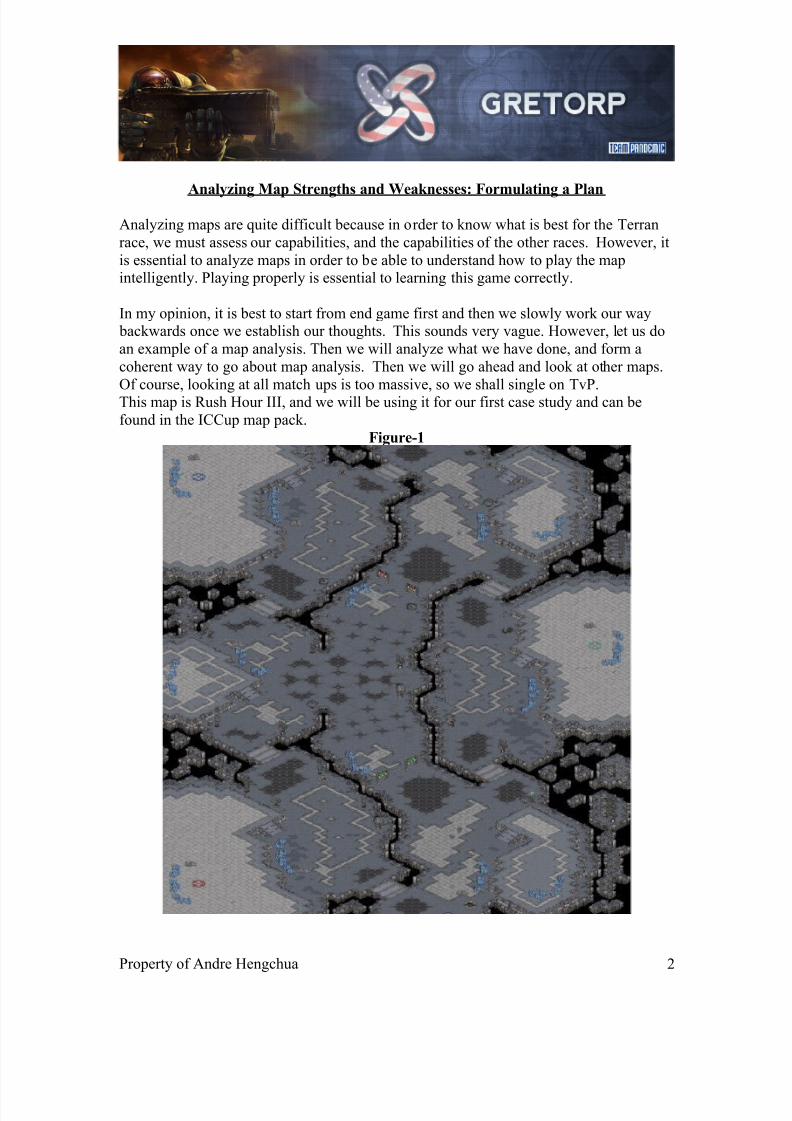
Of course, looking at all match ups is too massive, so we shall single on TvP.This map is Rush Hour III, and we will be using it for our first case study and can be
found in the ICCup map pack.
Figure-1
Property of Andre Hengchua 2

8/3/2019 gretorp_lesson1
http://slidepdf.com/reader/full/gretorplesson1 3/24
Late Game Analysis: Rush Hour III
Assessing Clusters and map layout
The first basic process I complete is to look at expansions and assess cluster expansions.But what are cluster expansions? Cluster expansions are a group of mineral patches/gas
that have an easy natural progression to take the other. That is, once we take one of the
expansions, we can very easily take the other(s) near it. This allows us to defend one position, netting at least 2 expansions. This is an important concept for all races, as it
gives strong macro timings as soon as the cluster is established, or it provides safeties as
the game progresses on, and armies do not need to be split in order to defend multiple
expansions.
Are cluster expansions more advantageous, less advantageous, or neutral for the Terran
race, in relativity to the other races?
Figure-2
Property of Andre Hengchua 3

8/3/2019 gretorp_lesson1
http://slidepdf.com/reader/full/gretorplesson1 4/24
Analyzing Figure-2, I have labeled the green circles as all of the cluster expansions, andthe red as expansions that are basically useless. I hope it is clear that the red expansions
are not plausible to capture in any normal game due to the fact that it is in the middle of
the map, and has no real substance to them.
Assessing Number of Geysers
Now we need to count the amount of gases, as this will determine how well we can tech
and how strong our tech can be, as well as the other player, i.e., how strong end game can
be for either player.
Figure-3
The ticks in Figure-3 represent how many geysers there exist per expansion. We can see
there is a total of 9 total geysers on the map, and there is only plausibility for any
individual player to hold 6 of those 9 geysers. Even so, having the 6 geysers is an
Property of Andre Hengchua 4

8/3/2019 gretorp_lesson1
http://slidepdf.com/reader/full/gretorplesson1 5/24
extreme case where the player that has 6 geysers maintains a decisive advantage, so wecan assume that there can be a max of 6 geysers.
Note: It makes sense to be analyzing a map first by its resources, sinceresources are what fuel a game and dictate game-play.
Assessing Expansion Plausibility
Now we have to judge the distance of these expansions from the main base. What we
aim to accomplish with this is to see how easily Protoss and Terran can take expansions
(cluster). Let’s talk about the plausibility of taking the expansions assuming we start at
the bottom left as Terran, and the Protoss is at the 3 o’clock position. Because of rotational symmetry in the map, anywhere I start and the other player starts has no
consequence to this analysis.
Figure-4
Property of Andre Hengchua 5

8/3/2019 gretorp_lesson1
http://slidepdf.com/reader/full/gretorplesson1 6/24
We can see in Figure-4 that the non main expansions are relatively close to the main, andthe 3rd main is a whole map distance away, making no ability for either played to expand
there. How does distance of an expansion affect a player?
Right now, I want to make a list of what we have concluded thus far.
Rush Hour III
1. All expansions are cluster expansions
2. Gas is prominent in every (cluster) expansion.
3. 3rd gas is able to be taken via a 3rd expansion.
4. There exists 2 ways to expand to acquire a 3rd base.5. Expansion distances and number of gas expansions don’t give any indication
of a build.
Assessing Tech Strength by Protoss
Now we will use the idea of going from the end and analyzing it backwards, and adjust tosee what is strong for both players. The two things we want to focus on are if carriers
and/or arbiters are strong on this map, i.e. end game strengths. Carriers require ledges,
immobility due to terrain, and non-open ground. Arbiters on the other hand require openarea large perimeter bases that are difficult to defend.
Carriers are easy to see if they’re good on or not. On rush hour III, carriers can serve as
very strong units. Abusing the lack of mobility can be possible. However, they arealways vulnerable whenever they are in the middle. There is always land beneath the
carriers, hence they are always susceptible to attack. Arbiters, however, require a bit
more analysis than Carriers do. Let’s refer to the below map:
Note* before analysis, we assume Protoss is at 3 o’clock, and the Terran is at 7
o’clock. I have also analyzed both expansions closest to the main since we havenot established which one is going to be best.
Property of Andre Hengchua 6

8/3/2019 gretorp_lesson1
http://slidepdf.com/reader/full/gretorplesson1 7/24
Figure-5
In Figure-5, I mark the green with the area that must have a perimeter of turrets/mines in order to keep stability. The red X’s are places where arbiters
have access and are strongest, and the blue circles are where units should be
rallied and, or positioned.
It’s important to note that there exists a lot of perimeter in order to safely defend
against arbiters. The amount of time and APM required to do this seems
unreasonable.
The Red X’s are important because arbiters can pass through these places
unaffected by static defense. They can then get into position to do potentiallyharmful recalls. The top left X and bottom right X are harmful because suicide
recalls can occur at the mineral lines where mines are not laid. This will
successfully shut down one of your expansions, and if high templars are available,
will shut down your other expansion having a total of two expansions shut down
Property of Andre Hengchua 7

8/3/2019 gretorp_lesson1
http://slidepdf.com/reader/full/gretorplesson1 8/24
out of an assumed 4 working expansions. This is detrimental to the game and is alosing line to play. The two middle X’s are where arbiters can get in to recall onthe main base. A death recall on the main is without a doubt a losing line since
space is limited to fit supply depots and factories anywhere else.
Lastly, stasis on Terran units over bridges halts a push until the stasis relieves.
The time it takes a stasis to stop gives Protoss a stalling method between each
200/200 encounter.
Therefore, arbiters are very strong on this map.
In conclusion, we have Carriers are neutral, and arbiters are strong. Hence, goinginto end game without an advantage is a losing line for us to play. Therefore, we
cannot simply turtle macro on 4 bases and expect to win with these looming
threats. We must find a way to either end the game at mid game, or come intoend game with an advantage.
The last thing we need to assess is where we are going to expand to. Still basedon the map we have above, the question is whether we will expand to the top or
the right hand side to claim our expansion(s), assuming the Protoss is at the 3
o’clock position. Since going into end game with neutral position is a refutedline, we must look to see how these expansions position us for mid game. It only
makes sense to analyze expansion positioning in mid game rather than end game
since end game is refuted, and mid game thus far is not.
Mid Game Analysis: Rush Hour III
Mid game opening can be explained in the amount of factories. Before we delve into
RH3, let’s just go over what the ‘amount of factories’ imply. Generally but not always,
these are what you can do with these factory numbers:
4 Factories- Defensive posturing, acquiring a 3rd base. Pushes are available only
against high tech switches. Vulture sneaks are limited. Allows good
deviation in mid to end game play.
5 Factories- Slightly stronger defense acquiring a 3rd base. Able to also push,
with small harass. Vulture sneaks are possible but weak. Economicallyspeaking, 5 fact is significantly worse than 4 fact. There might be a push
with 5 fact, but it generally disrupts economy making it very awkward
with macro/micro. Generally, 5 fact should be refuted since it doesn’t
Property of Andre Hengchua 8

8/3/2019 gretorp_lesson1
http://slidepdf.com/reader/full/gretorplesson1 9/24
exceed at getting a great economy or great pressure, but it is important tonote. I will not be covering 5 fact in this analysis for this reason.
6 Factories- Strong pushing. Very capable and threatening harass. Leaves little
room for tech/macro deviation, but will be very slow and shallow.
7 Factories- Only pushing and harass. Disallows Terran tech.
Our goal: To either win at mid game or enter end game with an advantage.
Now we must go over the plausibility of playing each of these. We need to assess
if these builds would give us either an advantage or a win. Let’s start with the
most aggressive build first, then we’ll work our way back. 7 fact allows us strong pushing and harassing and disallows any tech or further economy. Now we need
to see if we can utilize the map so a strong early push will be able to do anything.
This is going to be where experience is needed to look at a map and see plausibility. Hence, experience of the game and knowledge of each race’s
capabilities are essential requirements to be able to accurately analyze any maps.
7 Factories
First let’s talk about the principle of 7 fact. Because we invest so heavy in units,it seems silly for us to just expand and defense up. We invested so much money
into army producing structures, to switch to macro mode would be extremely
inefficient in the build. Going so many units requires us to get some materialadvantage to even out Terran disregarding a 3rd base and SCVs for units.
As we analyze, we must keep in mind that we are focusing on what we can do with our
units and we’re not really looking for opportunities to expand. Any deviations after
battles must be assessed situationally.
Property of Andre Hengchua 9
8/3/2019 gretorp_lesson1
http://slidepdf.com/reader/full/gretorplesson1 10/24
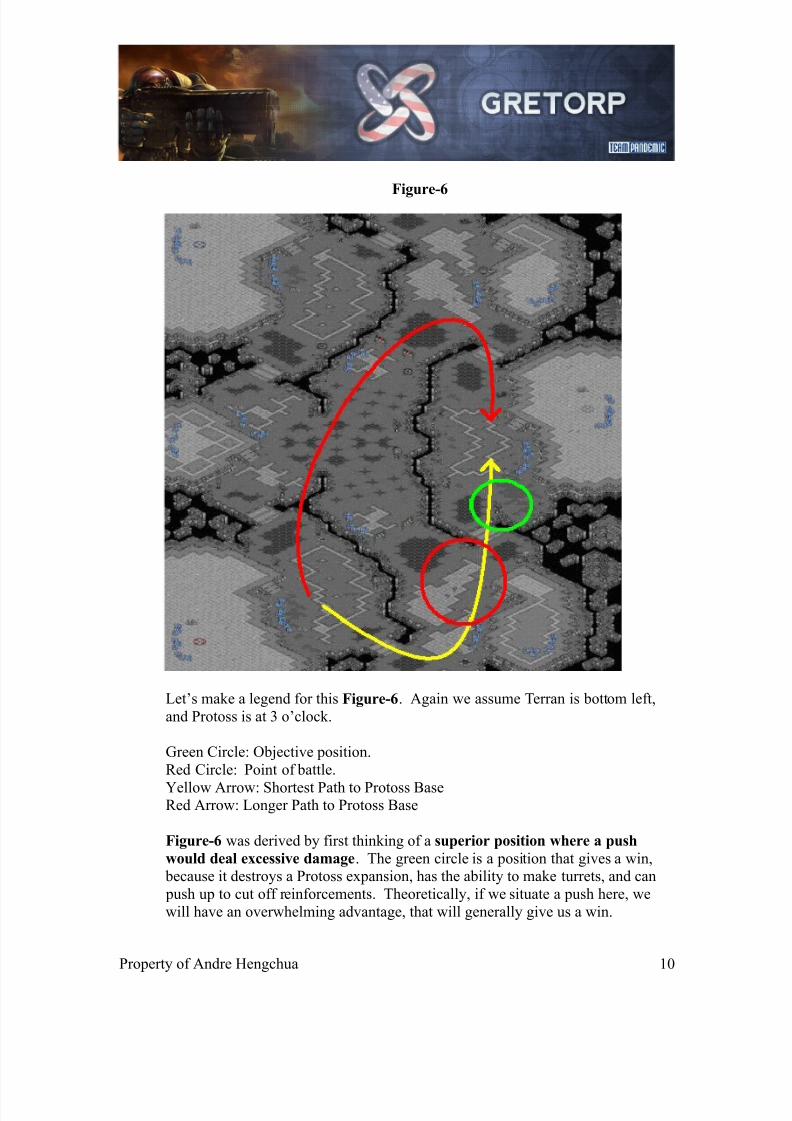
Figure-6
Let’s make a legend for this Figure-6. Again we assume Terran is bottom left,
and Protoss is at 3 o’clock.
Green Circle: Objective position.
Red Circle: Point of battle.
Yellow Arrow: Shortest Path to Protoss BaseRed Arrow: Longer Path to Protoss Base
Figure-6 was derived by first thinking of a superior position where a push
would deal excessive damage. The green circle is a position that gives a win, because it destroys a Protoss expansion, has the ability to make turrets, and can
push up to cut off reinforcements. Theoretically, if we situate a push here, we
will have an overwhelming advantage, that will generally give us a win.
Property of Andre Hengchua 10
8/3/2019 gretorp_lesson1
http://slidepdf.com/reader/full/gretorplesson1 11/24
Once we theorize a position where a push is strong, we must now look at the
feasibility of getting units into that position. Can we make it to that position
safely while also maintaining a robust position to counter attacks?
The yellow arrow is the path we will be taking. This is the shortest path.The red arrow is the farther path which is slower to reach the opponent’s base, but
nevertheless, allows a bidirectional route to the Protoss base and vice versa.
The red circle is the optimal place of attack for the Protoss. This is where the areais largest, and flanks are possible. Not saying the Protoss can’t attack at other
points, but if the Protoss doesn’t attack at this red spot, their units will not be the
most cost efficient, assuming Terran plays the pushing correctly.
We have to establish a winning position. Get to the green circle>>Take
advantage>>theoretical win.
Can we get to the green circle safely and be able to take commanding position?
This is where creativity comes in. Can we just meet with units straight up at thered area and win? Perhaps you can ask, how can we take control of the red circle
without his units being there? That way we can pass the red circle with ease, and
just go straight for the green circle. We can also ask, how can we have a unitadvantage going into the red circle? That way, we can defeat any pushes that will
be there, and we will ultimately win the game.
Once we establish a game plan on how to win at the Red circle, and push out intothe green circle, we’ve theoretically taken a large advantage and won the game.
Therefore if we want to win with 7 factories, the ultimate goal is, How can we
win at the red circle?
Then we have the linear model:
Win at red circle>>get to the green circle>>Take advantage>>theoretical
win.
So the plan would be fast expand >>get 6 factories>>win at red circle>>take
the green circle>>take advantage>>theoretical win.
Note* this is only one way to play 7 fact. There may be multiple ways to play a
map, and finding those ways and playing them determine a player’s style.
Property of Andre Hengchua 11

8/3/2019 gretorp_lesson1
http://slidepdf.com/reader/full/gretorplesson1 12/24
6 Factories
Again, we want to see the underlying features of going 6 factories now. Just like 7
factories, we invest a lot of money into unit producing structures that force us to get some
sort of material advantage. If we sit back only to macro, we become potentiallyinefficient.
How does this 6 factory differ from the 7 factory? 6 factory leaves small room for macroor tech deviations, where as 7 factory is committed to pure ground. We could consider 7
fact a deviation from 6 fact!
Think of 6 factory like this. Having 6 factories, producing SCVs and supply depots
completely fills up all minerals and gas that we can be producing. When units get traded, we don’t need depots anymore therefore giving us extra money, and if we get the
extra gas on our 2nd base we have extra gas. Therefore, when we don’t need to make
supply depots, we can replace those minerals with another factory, tech, or another
command center.
Therefore we have the same principles and we will be referring to the same graph at
Figure-6. Note that we do retain that winning line, IE, Win at red circle>>establish
green circle>>establish advantage>>theoretical win. However, the difference is that nowwe have a much broader line. We can now think how we can win at the red circle. Let’s
exhaust the different ways to claim the red spot.
1. Factory2. Starport
3. Armory
4. Command Center???
Notice that we established a strategy, and we are now using Tactics to enable this
strategy. If our tactics fail, we fail in our strategy.
4 Factories
The principle of 4 factories is to push out with the bare minimum amount of units to beable to defend a position in order to take an expansion. The position must be quite close
to the main since production capabilities are limited, and reinforcements must be sent
immediately in the event of a battle. Since this map has two ways to expand, we mustlook at both ways of expanding first, and what the advantages and disadvantages of each
of them are. Let’s take a look at expanding away from where the opposing player is, then
we’ll look at expanding towards the Protoss base.
Property of Andre Hengchua 12

8/3/2019 gretorp_lesson1
http://slidepdf.com/reader/full/gretorplesson1 13/24
Note: With the aggressive style (6 fact 7 fact) we focused on what we did with the units.With 4 fact, we get a fast expansion, so we must realize how the new space we’ve
taken affects defense and position. The more important part we want to focus on
is how the new base affects game positioning.
What I first want to look at is how it changes the base positions. We need to evaluated
distances and directionality of how to approach attacking.
Figure-7
Property of Andre Hengchua 13
8/3/2019 gretorp_lesson1
http://slidepdf.com/reader/full/gretorplesson1 14/24
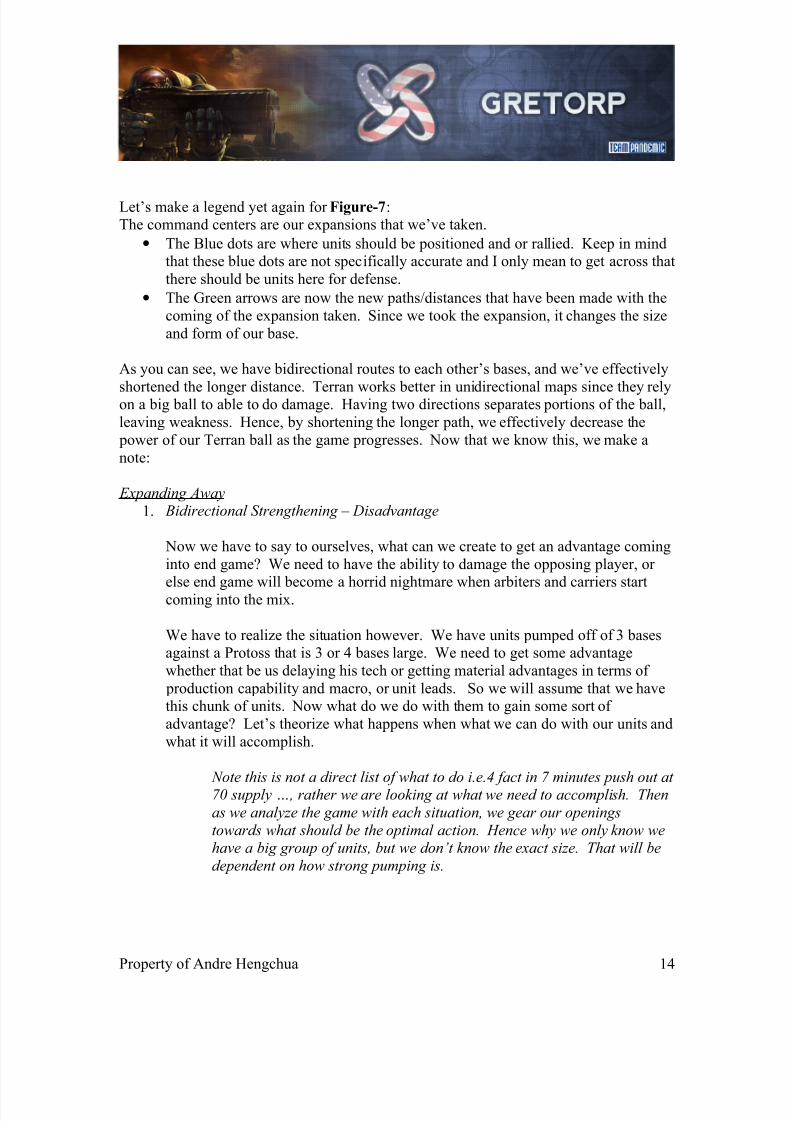
Let’s make a legend yet again for Figure-7:The command centers are our expansions that we’ve taken.
• The Blue dots are where units should be positioned and or rallied. Keep in mindthat these blue dots are not specifically accurate and I only mean to get across that
there should be units here for defense.
• The Green arrows are now the new paths/distances that have been made with the
coming of the expansion taken. Since we took the expansion, it changes the size
and form of our base.
As you can see, we have bidirectional routes to each other’s bases, and we’ve effectively
shortened the longer distance. Terran works better in unidirectional maps since they relyon a big ball to able to do damage. Having two directions separates portions of the ball,
leaving weakness. Hence, by shortening the longer path, we effectively decrease the
power of our Terran ball as the game progresses. Now that we know this, we make a
note:
Expanding Away
1. Bidirectional Strengthening – Disadvantage
Now we have to say to ourselves, what can we create to get an advantage coming
into end game? We need to have the ability to damage the opposing player, or
else end game will become a horrid nightmare when arbiters and carriers startcoming into the mix.
We have to realize the situation however. We have units pumped off of 3 basesagainst a Protoss that is 3 or 4 bases large. We need to get some advantage
whether that be us delaying his tech or getting material advantages in terms of
production capability and macro, or unit leads. So we will assume that we havethis chunk of units. Now what do we do with them to gain some sort of
advantage? Let’s theorize what happens when what we can do with our units and
what it will accomplish.
Note this is not a direct list of what to do i.e.4 fact in 7 minutes push out at 70 supply …, rather we are looking at what we need to accomplish. Then
as we analyze the game with each situation, we gear our openings
towards what should be the optimal action. Hence why we only know wehave a big group of units, but we don’t know the exact size. That will be
dependent on how strong pumping is.
Property of Andre Hengchua 14

8/3/2019 gretorp_lesson1
http://slidepdf.com/reader/full/gretorplesson1 15/24
We have 3 exits to leave from with our huge army: the south bridge, the north bridge near our 3rd gas, and where the top blue circle is (Figure-7). Which area isgoing to best for pushing out? The most vital role with an army when pushing out
is to obtain map control. If you do not have map control, then you are highly
susceptible to counter attacks. The optimal place to get center control is clearlygoing to be from the large opening at the top blue circle (Figure-7)
The pictures are given in this lecture, but they are actually the harder parts tothink up. It’s best to try to come up with these ideas with a friend if you can’t do
it by yourself and have confirmation concerning these ideas. By no means are
these the only concept from this strategy. So again, just like in analyzing 6 and 7
fact, we look at what we can do with these units and how it can position us for advantages. Hence it brings us to Figure-8.
Figure-8
Property of Andre Hengchua 15

8/3/2019 gretorp_lesson1
http://slidepdf.com/reader/full/gretorplesson1 16/24
Figure-8 contains similar marks for the legend. The command center and the blue circleremain constant. The Green arrows represent the paths on which our main force will be
traveling.
The Green arrows are again the target spot we want to get to earn a potentiallyadvantageous position. These green circles will stop any Protoss group. The yellow
arrows represent a key concept in zoning that I will go over later.
So now we have two directions of pushing. We need an advantage going into mid game.
How? The most obvious choice would be to push wherever the 3rd base of Protoss will
be, but we can’t rule out pushes to the other area yet.
Regardless, we do see pushing to the top effectively zones the top left. As soon as we
capture the top green circle, we have effectively cut any unit supply coming from the
main base to the top left. This can mean killing an over expanding Protoss base, or it can be solidifying an expansion for yourself against ground. Moreover, we have also denied
4 bases or 2 cluster expansions. This is probably the most important key role since
assuming the Protoss has the remaining expansions leads to equality in bases which is alead in the war of attrition.
Still, denying the 3rd base would constitute as an advantage in mid game since 2 basearbiter against 3 to 4 base Terran is significantly weak. Since both directions we push
has the ability to destroy and zone any expansions or potential expansions, we can keep
the Protoss on 2 base, assuming we can get to these positions.
Expanding Away
1. Bidirectional Strengthening – Disadvantage
2. Playing for Map Control – Looking for positional strangle rather
material gain
Now we must ask, can we get to these positions? How would our opening need todevelop in order to be able to take that position. Clearly we want the map to help us if
possible. The green arrows in Figure-8 are the path to the green circles. How could this
path help us if at all?
We will notice that as the size of units goes up in the Terran ball, the opening of the path
that we’re pushing becomes smaller in relativity. Smaller paths are much better for siege
tanks, hence a way we want to play is to have a more focused unit count rather thanhaving anything else. Of course, how you push is always going to be to your style,
however, we can see we’re not utilizing the map’s efficiencies for Terran by pushing with
let’s say 4 tanks and 3 vultures. We wouldn’t be utilizing spacing and the terrain to our advantage.
Property of Andre Hengchua 16

8/3/2019 gretorp_lesson1
http://slidepdf.com/reader/full/gretorplesson1 17/24
So we’ve looked at positioning and how our base has changed the landscape of the entiremap dynamics, we looked at a theoretical move with our army that we can employ to get
advantages. Now we have to look at our defensive capabilities in relativity to Protoss,
and what Protoss threatens.
Figure-9
Figure-9 now has a couple things to add now. This map is showing us the capacity to
defend.
The red ball is a place where the Protoss army could be.
The red lines are the directions on which the army can attack.
The light blue arrows are the directions of how Terran can defend, basically,the defensive capabilities of Terran with respect to mobility.
Property of Andre Hengchua 17

8/3/2019 gretorp_lesson1
http://slidepdf.com/reader/full/gretorplesson1 18/24
Again, we’ve assessed the Terran strengths, now we look to Protoss strengths to see if wecan carry out our plan – to zone the map and deny a 3rd base.
An important idea to always remember in EVERY match up is reaction time. Whenever
defending, we need to ask ourselves if we can safely defend and do all the actions neededto defend before damage is done. That is where spotters come to play. However, there
exist situations where there is no ability for spotters. This allows the attacker to have
much better initiative and tempo during their attacks, and increases the potential of their attack.
So how does this apply to Figure-9? The red arrows have no possibility to have spotters
without being cleared easily. The position is also very close to each entrance to theTerran base which makes any reaction to encounters delayed.
We can also see the distance in the light blue arrows that it takes for units to react to anattack even after reaction time. That gives the Protoss army extra time to take advantage
of the lower unit count in defense.
Without a doubt, there can be a lot of movement plays that can be done on this Terran
base. Hence:
Expanding Away
1. Bidirectional Strengthening – Disadvantage
2. Playing for Map Control – Looking for positional strangle rather
material gain.
3. Zoning sides of the map is possible with single pushes.
4. Reaction time is short and army proximities to threatening areas areclose.
5. (As a result) Susceptible to movement play. – Disadvantage
Recalling our goal: To either win at mid game or enter end game with an advantage.
This definitely does not win at mid game. Can we enter end game with an advantage?
This is unclear. We have a really nice threatening plan on denying a Protoss their 3rd
expansion, keeping them on 2 bases, and winning by attrition, but we are also at a
disadvantage to be able to take map control immediately with the looming Protoss
movement threat. We’re not going to rule this line obsolete, nor are we saying this is theway to play it. This is simply an option and a style to play just like the 6 fact option.
Our plan would be: fast expand>> 4 fact >>Control 3rd base location >>expand >> situate>>zone map>>take mineral advantage>>theoretical win.
Property of Andre Hengchua 18

8/3/2019 gretorp_lesson1
http://slidepdf.com/reader/full/gretorplesson1 19/24
We now move onto expanding the other way. Just like as we started expanding this we,we look at the dynamic change as we expand. We then check what we can do assuming
we have it, following by if there it can be done with sound play and there exists validity
in the opening.
Figure-10
Let’s make a legend yet again for Figure-10:
The command centers represent the expansions we have now.
The blue circles are where units will be positioned/rallied.
The green arrows are the new distances to get to each other’s base.
Property of Andre Hengchua 19
8/3/2019 gretorp_lesson1
http://slidepdf.com/reader/full/gretorplesson1 20/24
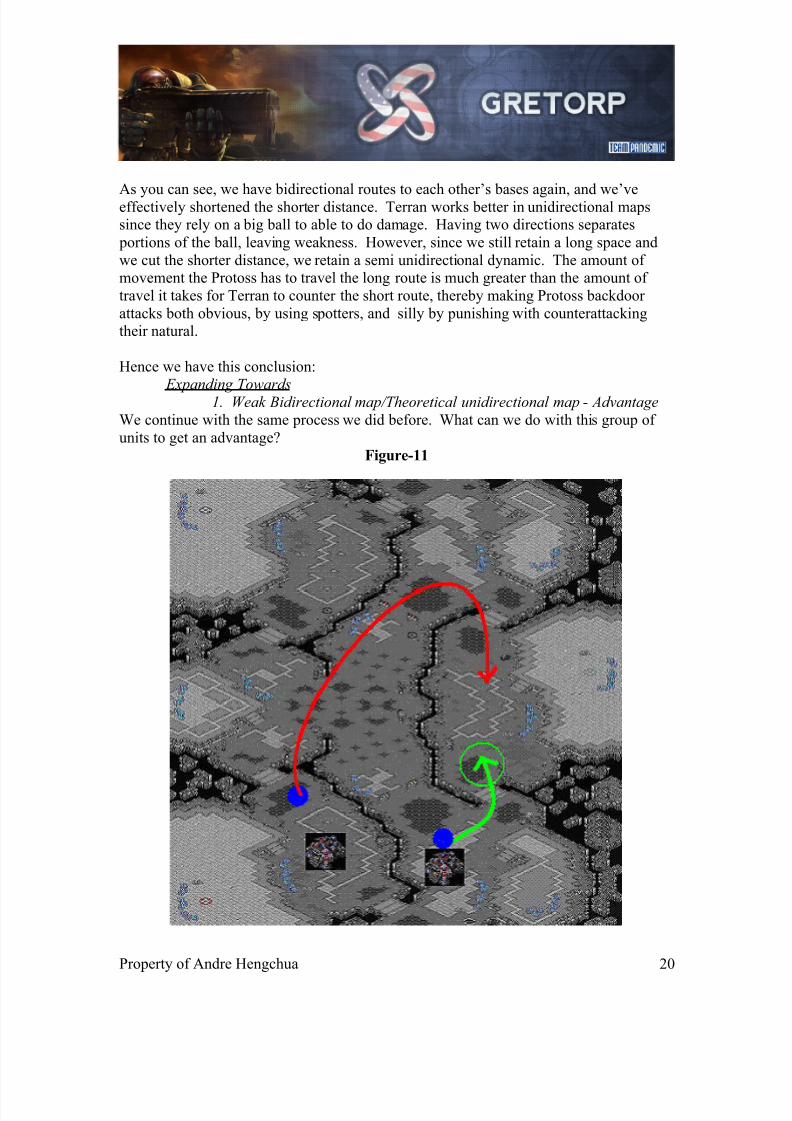
As you can see, we have bidirectional routes to each other’s bases again, and we’veeffectively shortened the shorter distance. Terran works better in unidirectional mapssince they rely on a big ball to able to do damage. Having two directions separates
portions of the ball, leaving weakness. However, since we still retain a long space and
we cut the shorter distance, we retain a semi unidirectional dynamic. The amount of movement the Protoss has to travel the long route is much greater than the amount of
travel it takes for Terran to counter the short route, thereby making Protoss backdoor
attacks both obvious, by using spotters, and silly by punishing with counterattackingtheir natural.
Hence we have this conclusion: Expanding Towards
1. Weak Bidirectional map/Theoretical unidirectional map - Advantage
We continue with the same process we did before. What can we do with this group of
units to get an advantage?
Figure-11
Property of Andre Hengchua 20

8/3/2019 gretorp_lesson1
http://slidepdf.com/reader/full/gretorplesson1 21/24
Legend for Figure-11:
The Command Centers are the expansions.
The blue dots are where units should be positioned/rallied.
The green arrow is going to be our attacking movement.The red arrow is the path we need to keep an eye on in case of backdoor attacks.
The green circle is the position we want to be taking.
Well, this actually quite exciting because we can actually use an idea that we have done
before! That green circle should be familiar! If it isn’t, think a bit before moving on.
Refer back to Figure-6 if you do not remember. The 6-7 factory concept can appliedhere! The red location was such a focal point of the strategy. We were trying so hard to
get across that and thinking up ways to get across it with units. Instead, if we push out
early and steak it out making it a really nice point of defense and rally, we bypass theentire red circle and we have a very cost effective push to that green circle! Let’s make
note of that yet again.
Expanding Towards
1. Weak Bidirectional map/Theoretical unidirectional map – Advantage2. Takes control of a critical staging spot – Advantage
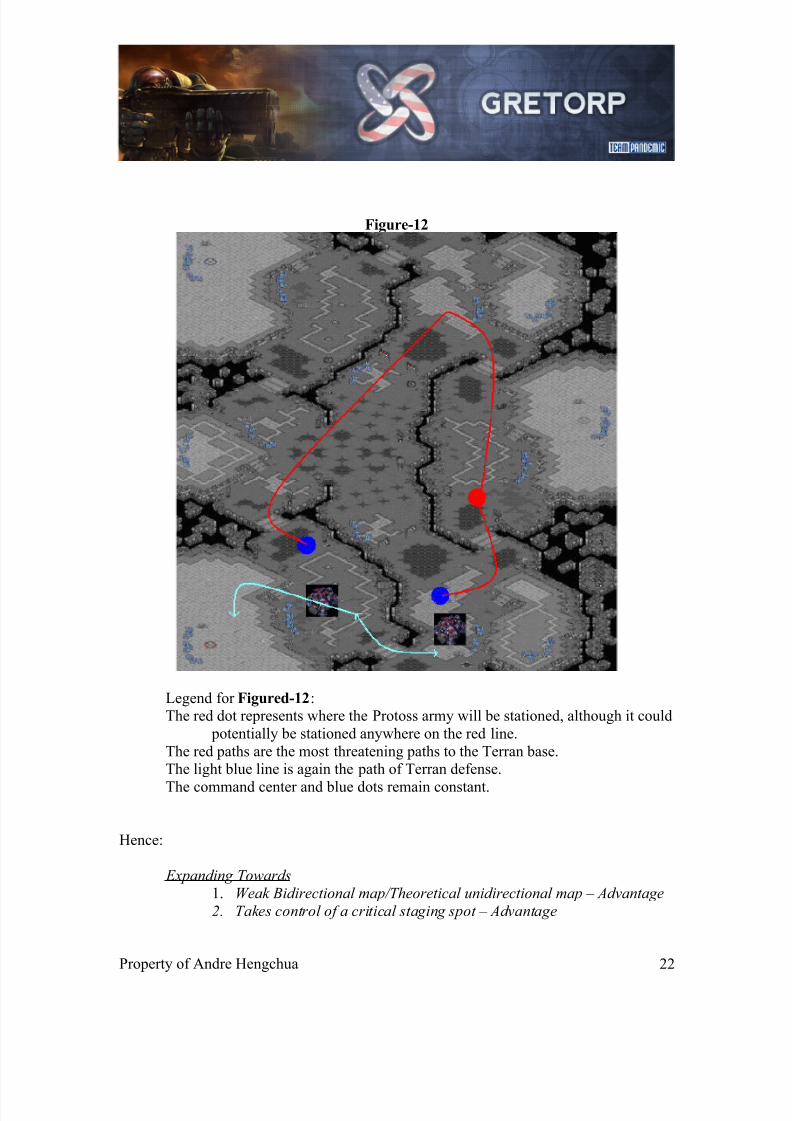
This seems like a great plan but before we get ahead of ourselves, let’s see if it’s
plausible.
Can Protoss do anything to hinder this? It seems like the Terran is choking down really
hard on the natural expansion of Protoss by stationing units right outside that bridge.
Hence why I put the Protoss army to defend that looming threat. However, if the Protossarmy was elsewhere, let’s say the center of the map, would that pose a threat while still
being able to retain the natural?
Protoss can’t really play the same movement games as before because Terran now
threatens a critical position that cuts off any reinforcements and destroy an expansion. I
cannot come up with any concrete movement threats Protoss can do assuming this
position.
*Note: See Figure-12 below
Property of Andre Hengchua 21
8/3/2019 gretorp_lesson1
http://slidepdf.com/reader/full/gretorplesson1 22/24
Figure-12
Legend for Figured-12:The red dot represents where the Protoss army will be stationed, although it could
potentially be stationed anywhere on the red line.
The red paths are the most threatening paths to the Terran base.The light blue line is again the path of Terran defense.
The command center and blue dots remain constant.
Hence:
Expanding Towards
1. Weak Bidirectional map/Theoretical unidirectional map – Advantage
2. Takes control of a critical staging spot – Advantage
Property of Andre Hengchua 22

8/3/2019 gretorp_lesson1
http://slidepdf.com/reader/full/gretorplesson1 23/24
3. No current lingering threats by Protoss –Advantage
Recalling our goal: To either win at mid game or enter end game with an advantage.
This strategy can definitely give us some advantage going into end game. We have this beautiful position, and we can keep slamming units down into the green area to remove
the Protoss natural and obstruct reinforcements.
Our plan would be: fast expand>> 4 fact >>Control 3rd base location >>expand >> situate
>>Apply pressure to take the green circle >>take unit and positional
advantage>>theoretical win.
We have just found another way to play this map. Let’s not forget we also have the
others. Let’s list what we have so far and allow me to label these:
1. 2 Base Pressure – High pressure, high intensity tactical game.
2. 3 Base Expanding away – Passive play, positional zoning.
3. 3 Base Expanding towards – Passive aggressive play, Positional suffocation.
These are 3 completely different styles, and by no means are these the only way to play
this map. However, do question the validity of how you play maps or when you see people play maps, because if you don’t see reason to people actions, then they might not
be playing the map correctly. For example, if we see a 3 base expanding away Terran
that’s trying to just push up to the other main to split the map, we know there is a
fundamental flaw with that because we can do much better by attacking the 3rd base,zoning the other main and then obtaining it.
Property of Andre Hengchua 23

8/3/2019 gretorp_lesson1
http://slidepdf.com/reader/full/gretorplesson1 24/24
Conclusion
This map analysis on Rush Hour 3 was quite overwhelming! So what did I actually do?
Let’s go over the process now in full (Terran vs. Protoss).
1. Analyze map resources
a. Look to see how many expansions there are
b. How many and where gas existc. Plausibility for expansions => This will dictate games.
2. Analyze end game strengths of opposing player.
a. Arbiters Strong?
b. Carriers Strong?3. Based on strength of end game, conclude what part of game we must focus
our strategy on.
a. Can we play standard to end game? b. Do we need to get ahead before end game?
i. Is it plausible for us to get ahead before hand?
4. Analyze that part of the game to the fullest.5. Based on the part we need to play to, construct an opening that curtails to that
position.
6. Make sure we can play up to that part. (Practice!)
This game is open to interpretation and there’s multiple ways to beat
strategies. Be open-minded to everything. Creativity gives brilliance to
this game.