greenstone by numbers:
TRANSCRIPT
GREENSTONE BY NUMBERS:A step by step, example guide to building
a digital library with Greenstone.
By
Jack KellySalem SouthLyon District Library
1 – OVERVIEW
1.1 – Collection Source Material
We are going to be building a digital library of issues from our local newspaper, the South Lyon Herald (years 1929 to 2007). This digital library will be built from roughly 60 CD's containing a range of document formats and organization methods.
The majority of the source material (19291999) is made up of TIFF image scans of the individual pages, indexed by date through a thirdparty program. This program was supplied by the company that did the original scan. Curiously, due to the nature of the database program, the TIFF images were named as .BIN files and followed an incremental (1.bin, 2.bin, 3.bin..) naming convention.
The next group of documents in our source material (20002003) is very similar to the previously mentioned group, but it differs very slightly in its indexing methods. This will be explored in later sections.
The final group of documents (20042007) abandons the third party indexing program and is simply a collection of PDF files. These have two distinct flavors. For 2004 and 2005, they are full issue PDF's named by date (ex: 07012004.pdf). For the final bunch, 2006 and 2007, they are single page PDF's with a more informative naming convention that shows date and page/section number (ex: SLH20060503A003.pdf). This final naming convention will prove useful and will be the style will adopt for this project.
1.2 – Greenstone Digital Library
For this project, we will be using an open source digital library suite called Greenstone Digital Library. It is a cross platform project that allows you to build and distribute digital library collections. You can do so either through the web or via CDROM. We will be taking advantage of the former, the webbased library, to allow this collection to be more widely accessible and less redundant.
Full information on may be found at http://www.greenstone.org
1.3 – Goals
The first version of our Herald collection was simply a collection of browseable issues. With the new Herald collection, we want an intuitive full text search and the ability to narrow our searches by dates to an arbitrary precision. This would give the collection greater usefulness in the function of the library. Patrons often come to us seeking obituaries of past relatives, only to spend hours “thumbing” through the collection because of an unsure date. Adding search capabilities should cut down on the time needed to find information and prevent unnecessary frustration on the user end.
Our secondary goal is for the collection to be more accessible to our patrons and easy to use. A collection of 60odd compact discs is quite unwieldy and very inefficient, so any centralized collection should be a vast improvement over the current situation. We also want to ensure that the user interface is easily navigated and flows well.
Finally, the production cost of this collection must be minimized as much as possible. In a small library setting such as our own, we simply cannot employ the workforce or highdollar software to create a cuttingedge database. With the open source software model, realizing this project becomes a realistic goal.
1.4 – Prerequisites for this Guide
Throughout this guide, we will be assuming some knowledge on the reader's part. The first of which is the ability to install a Linux distribution on your computer. This is a relatively simple task that most people do not have too much trouble with.
The second prerequisite for this guide is a fundamental understanding of Unix/Linux commands. This includes moving yourself and files around the system, editing text documents, modifying permissions, and the installation of software not mentioned directly in this guide. If you are unsure of any of the aforementioned, take a stroll down to any of these good tutorials to get up to snuff:
● Debian Tutorial (Ubuntu is based on Debian)http://www.debian.org/doc/manuals/debiantutorial/index.html
● Linux.org Lessons. These are very useful general (non distribution specific) lessons. The begginer's course is reccomended.http://www.linux.org/lessons/

Finally, we will expect that you have the knowledge to set up your network and server in a manner that is effective for this project. This, on a basic level, equates to having your server available for other computers to access and the ability to connect to the internet. Elements of this idea are covered in the previously mentioned Linux tutorials.
Now let's get to work!
2 – GREENSTONE SERVER INSTALLATION
2.1 – Ubuntu Server Install Overview
Throughout this guide, this font indicates code or command to enter. Code will be simply in this font, whereas commands will be indicated with a “#” prefix.
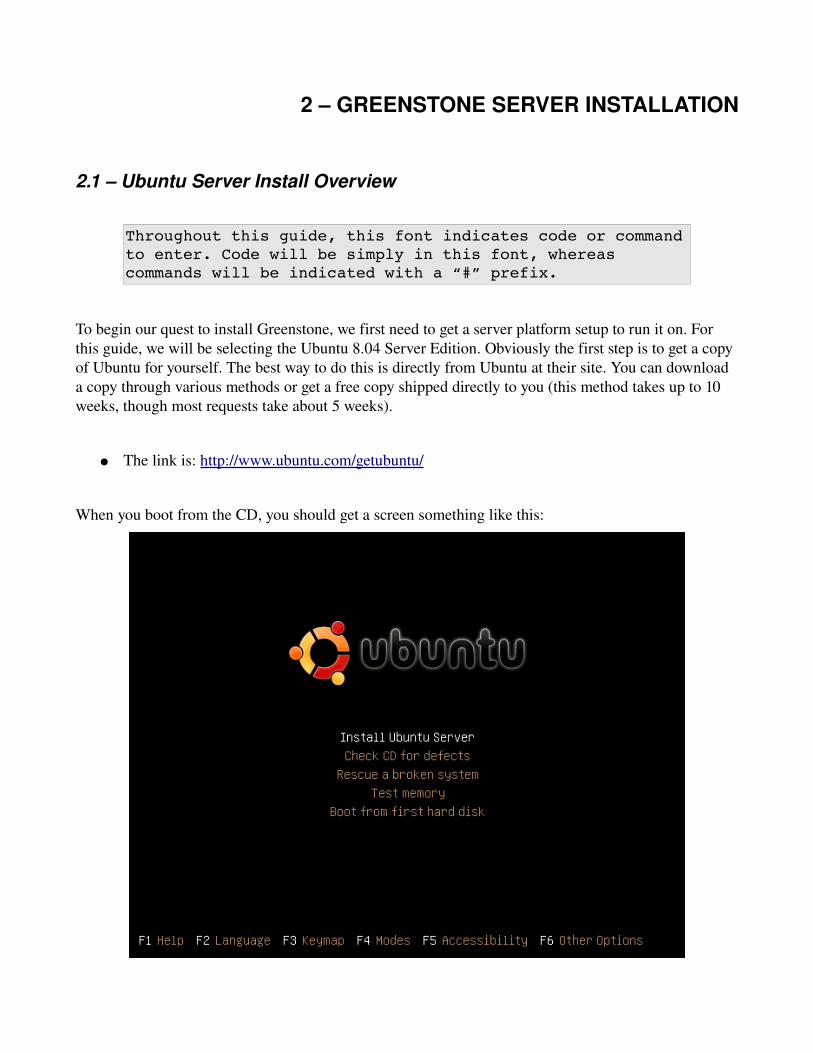
To begin our quest to install Greenstone, we first need to get a server platform setup to run it on. For this guide, we will be selecting the Ubuntu 8.04 Server Edition. Obviously the first step is to get a copy of Ubuntu for yourself. The best way to do this is directly from Ubuntu at their site. You can download a copy through various methods or get a free copy shipped directly to you (this method takes up to 10 weeks, though most requests take about 5 weeks).
● The link is: http://www.ubuntu.com/getubuntu/
When you boot from the CD, you should get a screen something like this:
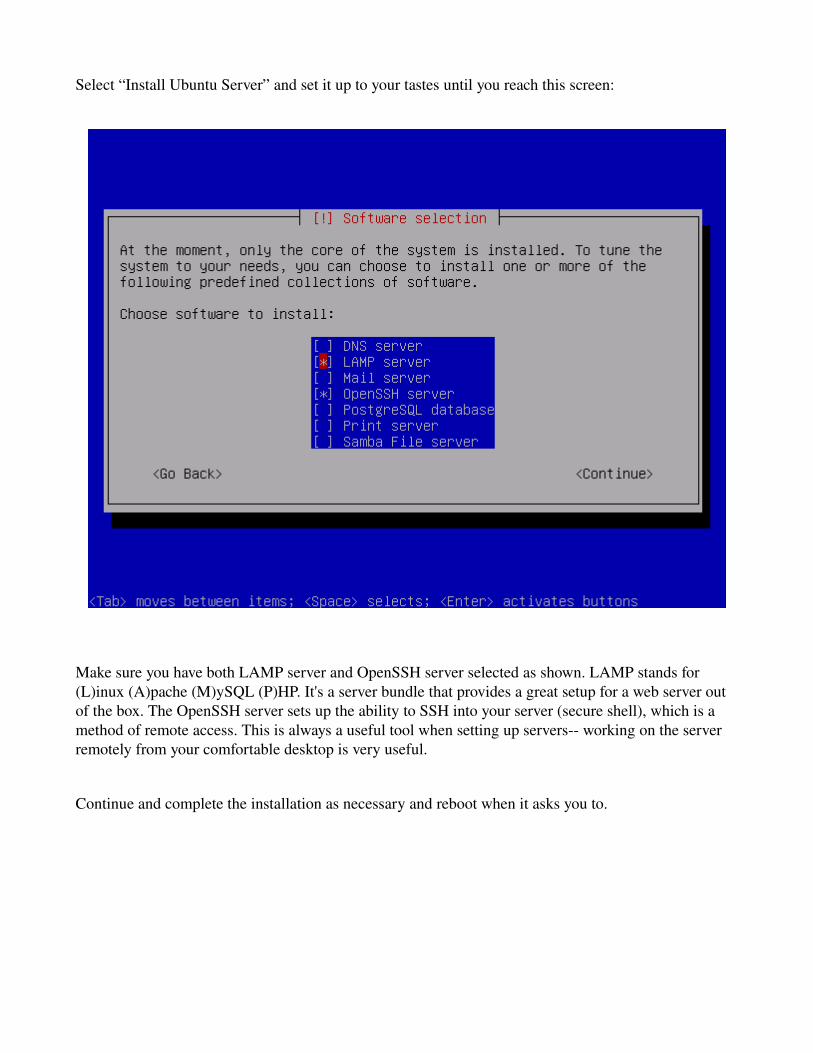
Select “Install Ubuntu Server” and set it up to your tastes until you reach this screen:
Make sure you have both LAMP server and OpenSSH server selected as shown. LAMP stands for (L)inux (A)pache (M)ySQL (P)HP. It's a server bundle that provides a great setup for a web server out of the box. The OpenSSH server sets up the ability to SSH into your server (secure shell), which is a method of remote access. This is always a useful tool when setting up servers working on the server remotely from your comfortable desktop is very useful.
Continue and complete the installation as necessary and reboot when it asks you to.
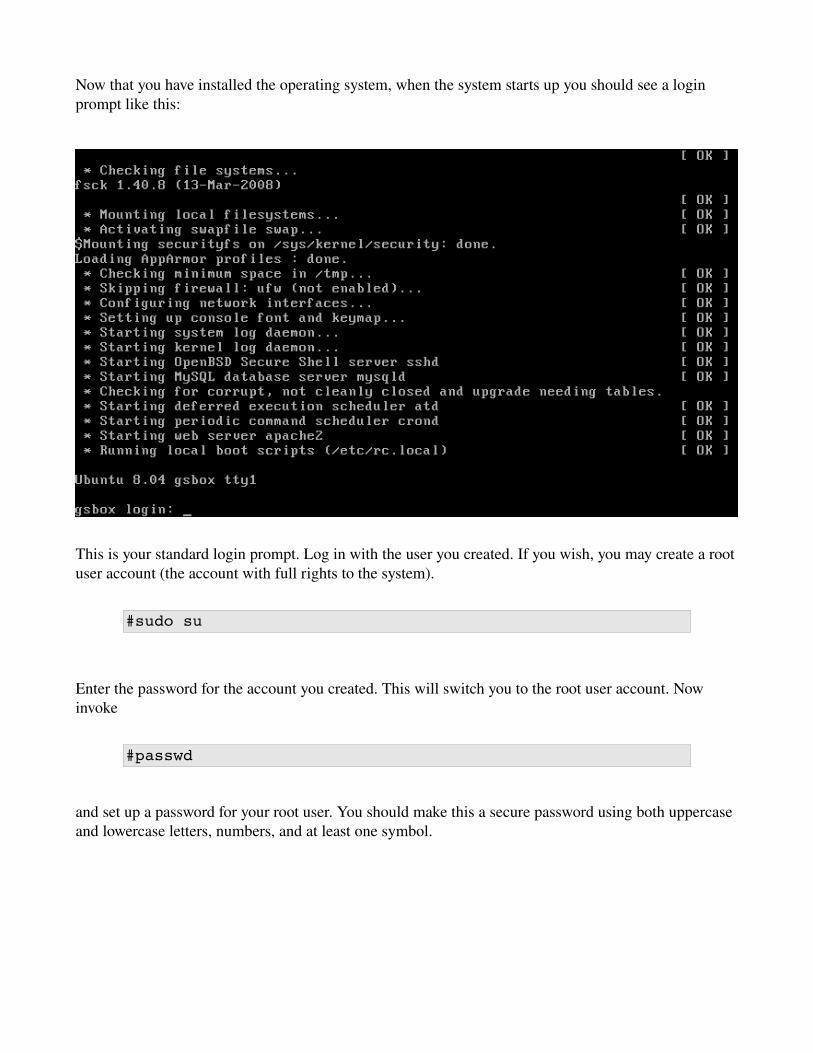
Now that you have installed the operating system, when the system starts up you should see a login prompt like this:
This is your standard login prompt. Log in with the user you created. If you wish, you may create a root user account (the account with full rights to the system).
#sudo su
Enter the password for the account you created. This will switch you to the root user account. Now invoke
#passwd
and set up a password for your root user. You should make this a secure password using both uppercase and lowercase letters, numbers, and at least one symbol.
2.2 – Basic Setup/Core Software Installation
Next, we should do a system update to make sure that all of our programs have the latest bug and security fixes.
#aptget update#aptget upgrade
You should see the first program contact the server for the most update list of programs. The second will download any new versions of programs you have installed. You should do this often to keep your server up to date. Be careful though, as sometimes programs will break if you update one of its components.
Next, we are going to install a minimal window manager (one that won't bog down the server) and some basic applications. We are also including a PDF utility required later.
#aptget install xserverxorg xfontsbase fluxbox xterm xinit firefox eterm xpdfutils
Once all of the programs finish installing, start up your new GUI. First log out by running the command
#exit
and log in as the regular user that you set up. Then run the command
#startx
to start up Fluxbox. You should get something that looks like this:

To access the menu, right click your mouse.
(For full info on how Fluxbox works, visit http://fluxboxwiki.org/index.php/Category:English_howtos)

2.3 – Greenstone Server Installation
Congrats! You have successfully set up Linux! Now we get to one of the most important parts of this guide – installing the actual Greenstone suite. First, we need to download the latest version of the server. We are using Greenstone2 for this guide, so make sure that you don't download Greenstone3 and get angry when things don't work. The most up to date version available when this guide was written was 2.80. Mosey on down to www.greenstone.org/downloads and get the latest Unix/Linux Distribution, or if you prefer, download with the direct link from the command line.
#wget prdownloads.sourceforge.net/greenstone/gsdl2.80unix.tar.gz
Once the file has finished downloading, uncompress the archive and start the installation script.
#tar zxf gsdl*#cd gsdl2.80unix/Unix #sh Install.sh
The script will ask you some simple questions about where you want to install your server and questions about your setup. You should use the default settings for just about all of the questions.
2.4 – Apache2 Configuration
Now we need to setup Apache (our web server) to handle Greenstone correctly.
#nano /etc/apache2/httpd.conf
Insert this information into the file (assumes install in /usr/local/gsdl, change accordingly):
ScriptAlias /gsdl/cgibin/ "/usr/local/gsdl/cgibin/"
<Directory "/usr/local/gsdl/cgibin">AllowOverride None Options None Order allow,deny Allow from all
</Directory>
Alias /gsdl/ "/usr/local/gsdl/"
<Directory "/usr/local/gsdl"> Options Indexes MultiViews FollowSymLinks AllowOverride None Order allow,deny Allow from all
</Directory>
Save and close the file. This set's up a directive for the web server so that whenever you visit www.yoursite.whatever/gsdl/ it will correctly find your Greenstone installation in the /usr/local/gsdl/ folder.
Voila! You have a Greenstone Server! Point your browser to http://localhost/gsdl/cgibin/library to test and see if your site is working. It should look something like this:
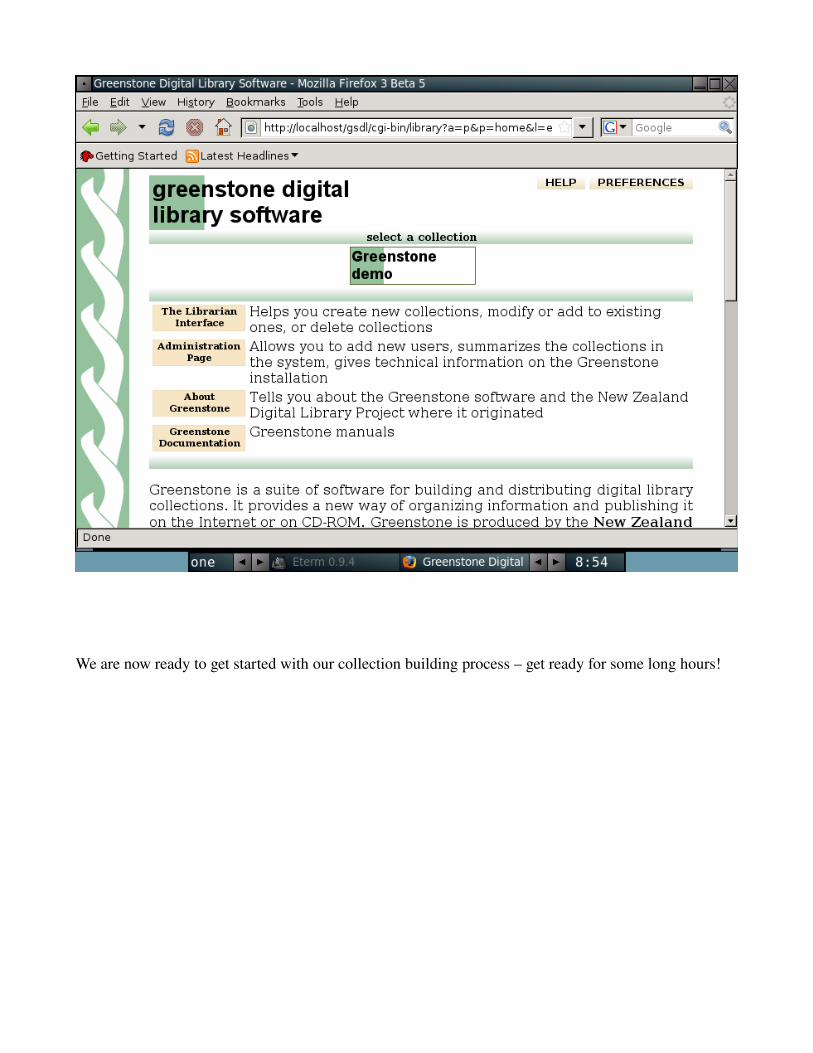
We are now ready to get started with our collection building process – get ready for some long hours!
3 – COLLECTION GATHERING AND PREPARATION
3.1 – From CD to Computer
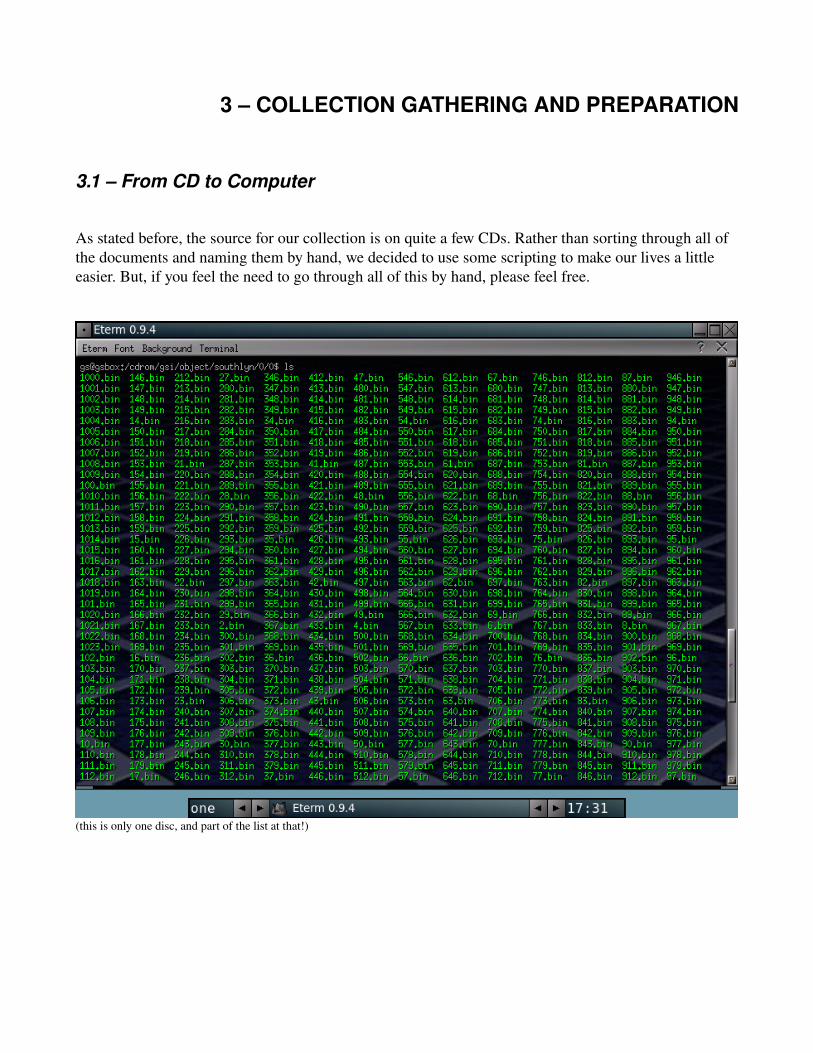
As stated before, the source for our collection is on quite a few CDs. Rather than sorting through all of the documents and naming them by hand, we decided to use some scripting to make our lives a little easier. But, if you feel the need to go through all of this by hand, please feel free.
(this is only one disc, and part of the list at that!)

These scripts will be doing lots of cleaning up and organization for us, so to understand what it's doing, we should take a closer look at the CDs themselves.
The disc contained three things relevant to our project:
● The collection of individual image files for the specific dates for which it was made. These are the thousands of files you saw in the picture at the beginning of Section 3.1.
● A file called “ae_dl1.dbf” that the database program used to link the filename to a document number assign it a page number
Simplified ae_dl1.dbf :
Image File Document ID Page
1.bin (but I'm actually a TIFF!) Document 1 1
2.bin Document 1 2
3.bin Document 1 3
4.bin Document 1 4
5.bin Document 1 5
6.bin Document 1 6
7.bin Document 2 1
8.bin Document 2 2
9.bin Document 2 3
... ... ...
● Another file called “ae_dt1.dbf” that the database program built in to the CD used to link a document to a date. This all of the image files associated with a single issue. This grouped all of the image numbers that were in the same Herald issue into a unifying document identifier.
Simplified ae_dt1.dbf :
Document ID Date
Document 1 01/01/1994
Document 2 01/08/1994
Document 3 01/15/1994
Document 4 01/22/1994
... ...
As you can see, when these files are combined, they provide enough information to sort all of the files on the CD. After about twenty minutes of copying and converting to text, all of the indexes from the discs were organized for use in sorting.
In essence, our first script will copy the image files from the CD, read the respective ae_dl1.txt and ae_dt1.txt (converted from .dbf) and rename the files to a convention that is a lot more informative:
SLH{YYYYMMDD}{N or A or B}{XXX}.tif
Where YYYY is year, MM, is month, and DD is day. The N/A/B signifies the section A or B of the newspaper or if the indexing was too early to signify, simply an N for “number”. The XXX is the numeral page number.
The handy script that does all this for us is as follows. Note, this script has references to files specific to our computers (namely the “/root/herald/” directory) and will not function correctly without modification for your own needs.
#!/bin/bash ########### Jack's Herald Sorter Thingy v2.0 ############## #This script is free to use, distribute, and modify to your likings.#Script is valid for discs containing years 19292000
#gets the disc numbers/years for the d switchdbfiles=(`ls /root/herald/`)
#if the person puts on the d switch, show the disc numbers/years
if [ "${1}" ]; then if [ "${1}" = "d" ]; then
cd /root/herald/#this is where the indexes are, you should change this part to fit#your needs cnt=1 clear echo ""; echo ""; echo " Directory List"; echo "" for i in $( ls ); do
echo "${i} ............................................ ${cnt}";
let cnt++ done echo "" exit
#if just a number is supplied, start the sorting by showing a warning
else k=5

while [ $k gt 0 ]; do clear echo ""; echo ""; echo "Directory is: ${dbfiles[`expr $1 – 1`]}" dbdir=${dbfiles[`expr $1 – 1`]} echo "$k Seconds until starting. Controlc now or never!" echo ""; echo ""; sleep 1 let k; done
fi
#if no arguments were supplied at all (a help screen)
else clear echo ""; echo ""; echo "" echo "Error: No directory supplied. Use as follows." echo " tech~# sorter [Directory number 155]" echo "for list, see sorter d" echo "" echo "Example:" echo "" echo " tech~# sorter 1 " echo "" echo "this will grab the file information for 192934" echo "Try again...." echo "" echo ""; echo ""; exit
fi
#start the fetching process
cd /root/process/ clear echo ""; echo ""; echo "Fetching Files......." echo ""; echo "";
#this makes sure that it grabs all files from the discs
cp /media/cdrom0/gsi/object/southlyn/0/0/* . cp /media/cdrom0/gsi/object/southlyn/0/1/* . cp /media/cdrom0/gsi/object/southlyn/0/2/* . cp /media/cdrom0/gsi/object/southlyn/0/3/* . cp /media/cdrom0/gsi/object/southlyn/0/4/* . clear
#make arrays out of the index filesae_dl1=(`cat /root/herald/${dbdir}/ae_dl1.txt`)
ae_dt1=(`cat /root/herald/${dbdir}/ae_dt1.txt`)
#rename all of the files to the new format for i in $( ls ); do
echo ""; echo ""; echo "Processing:" echo "" echo "${i}" echo "" echo "" obj=`basename $i .bin` doc=${ae_dl1[$obj]%,*,*,*,*,*,*,*} datef=${ae_dt1[$doc]%,*,*,*} date=${datef[*]:6:4}${datef[*]:0:2}${datef[*]:3:2} pagef=${ae_dl1[$obj]%,*,*,*,*,*,*} page=${pagef[*]#*,} if [ $page lt 10 ]; then
page=0${page} fi mv $i SLH${date}N0${page}.tif echo ""; echo ""; echo "" clear
done
#make a year folder for them to be put intofor i in $( ls ); do if [ d ${i[*]:3:4} ]; then clear else mkdir ${i[*]:3:4} fi mv $i ${i[*]:3:4} done
#move the year folder to the out folder, if it exists, move into the folder and move#its contents to an already existing year folderfor i in $( ls ); do if [ d /root/out/$i/ ]; then
cd $i mv * /root/out/$i/ cd .. rm r $i
else mv $i /root/out/
fi done #tell which disc is nextecho ""; echo ""; echo " Your next cd should be disc number `expr $1 + 1` or: " echo " Date range: ${dbfiles[$1]}" echo ""; echo "";
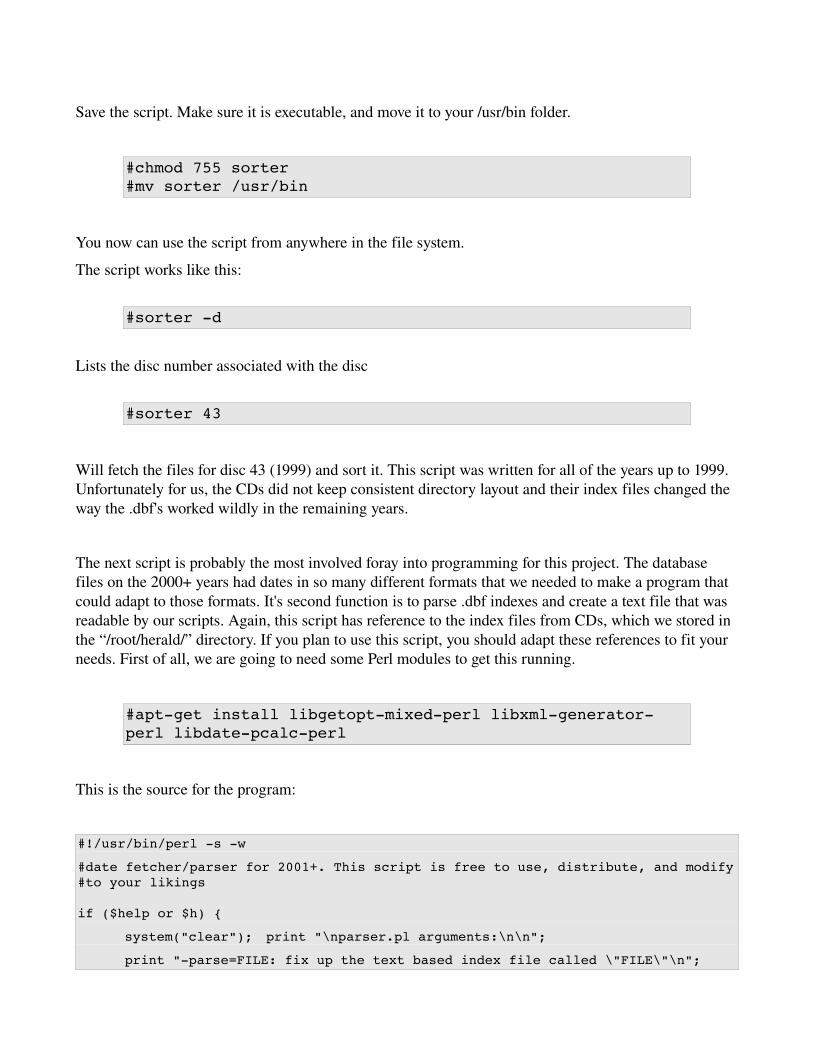
Save the script. Make sure it is executable, and move it to your /usr/bin folder.
#chmod 755 sorter#mv sorter /usr/bin
You now can use the script from anywhere in the file system.
The script works like this:
#sorter d
Lists the disc number associated with the disc
#sorter 43
Will fetch the files for disc 43 (1999) and sort it. This script was written for all of the years up to 1999. Unfortunately for us, the CDs did not keep consistent directory layout and their index files changed the way the .dbf's worked wildly in the remaining years.
The next script is probably the most involved foray into programming for this project. The database files on the 2000+ years had dates in so many different formats that we needed to make a program that could adapt to those formats. It's second function is to parse .dbf indexes and create a text file that was readable by our scripts. Again, this script has reference to the index files from CDs, which we stored in the “/root/herald/” directory. If you plan to use this script, you should adapt these references to fit your needs. First of all, we are going to need some Perl modules to get this running.
#aptget install libgetoptmixedperl libxmlgeneratorperl libdatepcalcperl
This is the source for the program:
#!/usr/bin/perl s w
#date fetcher/parser for 2001+. This script is free to use, distribute, and modify#to your likings
if ($help or $h) {
system("clear"); print "\nparser.pl arguments:\n\n";
print "parse=FILE: fix up the text based index file called \"FILE\"\n";
print "proc=DISCNAME (ex 2005_1): process files from disc \"DISCNAME\"\n";
print "h, help : show this information\n";
print "year=YEAR : year for proc is \"YEAR\"\n\n";
}
%month = (
"JANUARY" => "01",
"FEBRUARY" => "02",
"MARCH" => "03",
"APRIL" => "04",
"MAY" => "05",
"JUNE" => "06",
"JULY" => "07",
"AUGUST" => "08",
"SEPTEMBER" => "09",
"OCTOBER" => "10",
"NOVEMBER" => "11",
"DECEMBER" => "12",
);
sub parse {
open(DBF, $parse) or die "Couldn't open file: $!\n";
$parseout = ">$parse.p";
open(DBFW, $parseout) or die "Couldn't open file\nMake sure you run this in the same folder as the file you are processing\nERROR: $!\n";
#print "\n@test\n";
#open the index file, see what format it matches, then clean it up
while ($dbf=<DBF>){
if ($dbf =~ m/(\d{2})\/(\d{2})\/(\d{4}),(\d{1,2}),\d{1,2},\d/) {
$dbf =~ s/(\d{2})\/(\d{2})\/(\d{4}),(\d{1,2}),\d{1,2},\d/$3$1$2,$4/;
print DBFW $dbf;
}
elsif ($dbf =~ m/"\w+\s\d{1,2},\s\d{4}",\d{1,2},\d{1,2},\d/) {
$dbf =~ s/(")//g;
for $i (keys(%month)) {
$dbf =~ s/$i/$month{$i}/;
}
#single digit day section
$dbf =~ s/(\d{2})\s(\d),\s(\d{4}),(\d{1,2}),\d{1,2},\d/
$3${1}0$2,$4/;
#doulbe digit day section
$dbf =~ s/(\d{2})\s(\d{2}),\s(\d{4}),(\d{1,2}),\d{1,2},\d/$3${1}$2,$4/;
print DBFW $dbf;
}
elsif ($dbf =~ m/"\w+\s\d{1,2}\s\d{4}","\d{1,2}","\d{1,2}","\d"/) {
$dbf =~ s/(")//g;
for $i (keys(%month)) {
$dbf =~ s/$i/$month{$i}/;
}
#single digit day section
$dbf =~ s/(\d{2})\s(\d)\s(\d{4}),(\d{1,2}),\d{1,2},\d/$3${1}0$2,$4/;
#doulbe digit day section
$dbf =~ s/(\d{2})\s(\d{2})\s(\d{4}),(\d{1,2}),\d{1,2},\d/$3${1}$2,$4/;
print DBFW $dbf;
}
elsif ($dbf =~ m/"\d{4}\d{2}\d{2}","\d{1,2}","\d{1,2}","\d"/) {
$dbf =~ s/(")//g;
$dbf =~ s/(\d{4})(\d{2})(\d{2}),(\d{1,2}),\d{1,2},\d/$1$2$3,$4/;
print DBFW $dbf;
}
elsif ($dbf =~ m/(\"|)\w+(\"|),(\"|)\w+(\"|),(\"|)\w+(\"|),(\"|)\w+(\"|)/) {
print DBFW $dbf;
}
else {
print "\n\n!!!!!!!!!!!!!!!!WARNING!!!!!!!!!!!!!!!!\nDid not match any specified Herald index format.\n\n";
}
}
close DBF;close DBFW;
}
if ($parse and !($help or $h)) {parse();}
sub process {
if (!($year)) {print "ERROR! NO YEAR SUPPLIED! Use the year=YEAR switch!\n\n"; exit;}
if (!(d "/root/in/$proc")) {
system("mkdir /root/in/$proc");
print "Process Directory not found, creating directory.\n";
}
if (!(d "/root/out/$year")) {
system("mkdir /root/out/$year");
print "Output Directory not found, creating directory.\n";
}
# fetch files off of cdrom
if (d "/media/cdrom0/gsi/sl"){
foreach $i (0..3) {system("cp /media/cdrom0/gsi/sl/object/0/$i/* /root/in/$proc");
}
}
if (d "/media/cdrom0/obj/"){
foreach $i (0..3) {system("cp /media/cdrom0/obj/slyonlib/0/$i/* /root/in/$proc");
}
}
if (d "/media/cdrom0/gsi/object"){
foreach $i (0..3) {system("cp /media/cdrom0/gsi/object/sl/0/$i/* /root/in/$proc");
}
}
opendir(PROC, "/root/in/$proc") or die "ERROR OPENING PROC DIR: $!\n";
#grab list of .bin files
@files = grep(/\.bin$/i, readdir PROC);
#get rid of the extension (making it our object ID
foreach $i (0..$#files){$files[$i] =~ s/(\d+).(\w*)/$1/; }
#for (@files){print $_,"\n";}
if (e "/root/herald/$proc/ae_dt1.p"){open(DT, "/root/herald/$proc/ae_dt1.p") or die "ERROR OPENING DBF FOR PROCESS: $!\n";}
if (e "/root/herald/$proc/ae_dt1.txt.p"){open(DT, "/root/herald/$proc/ae_dt1.txt.p") or die "ERROR OPENING DBF FOR PROCESS: $!\n";}
if(e "/root/herald/$proc/ae_dl1"){ open(DL, "/root/herald/$proc/ae_dl1") or die "ERROR: $!\n";}
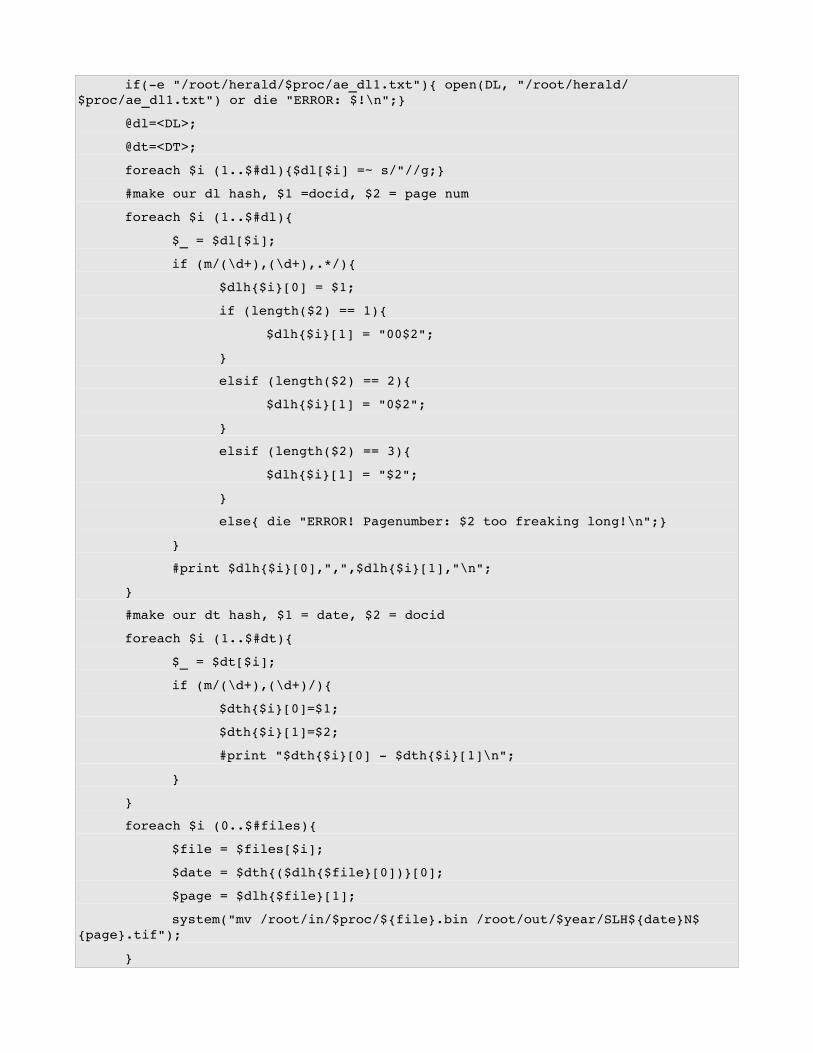
if(e "/root/herald/$proc/ae_dl1.txt"){ open(DL, "/root/herald/$proc/ae_dl1.txt") or die "ERROR: $!\n";}
@dl=<DL>;
@dt=<DT>;
foreach $i (1..$#dl){$dl[$i] =~ s/"//g;}
#make our dl hash, $1 =docid, $2 = page num
foreach $i (1..$#dl){
$_ = $dl[$i];
if (m/(\d+),(\d+),.*/){
$dlh{$i}[0] = $1;
if (length($2) == 1){
$dlh{$i}[1] = "00$2";
}
elsif (length($2) == 2){
$dlh{$i}[1] = "0$2";
}
elsif (length($2) == 3){
$dlh{$i}[1] = "$2";
}
else{ die "ERROR! Pagenumber: $2 too freaking long!\n";}
}
#print $dlh{$i}[0],",",$dlh{$i}[1],"\n";
}
#make our dt hash, $1 = date, $2 = docid
foreach $i (1..$#dt){
$_ = $dt[$i];
if (m/(\d+),(\d+)/){
$dth{$i}[0]=$1;
$dth{$i}[1]=$2;
#print "$dth{$i}[0] $dth{$i}[1]\n";
}
}
foreach $i (0..$#files){
$file = $files[$i];
$date = $dth{($dlh{$file}[0])}[0];
$page = $dlh{$file}[1];
system("mv /root/in/$proc/${file}.bin /root/out/$year/SLH${date}N${page}.tif");
}
}
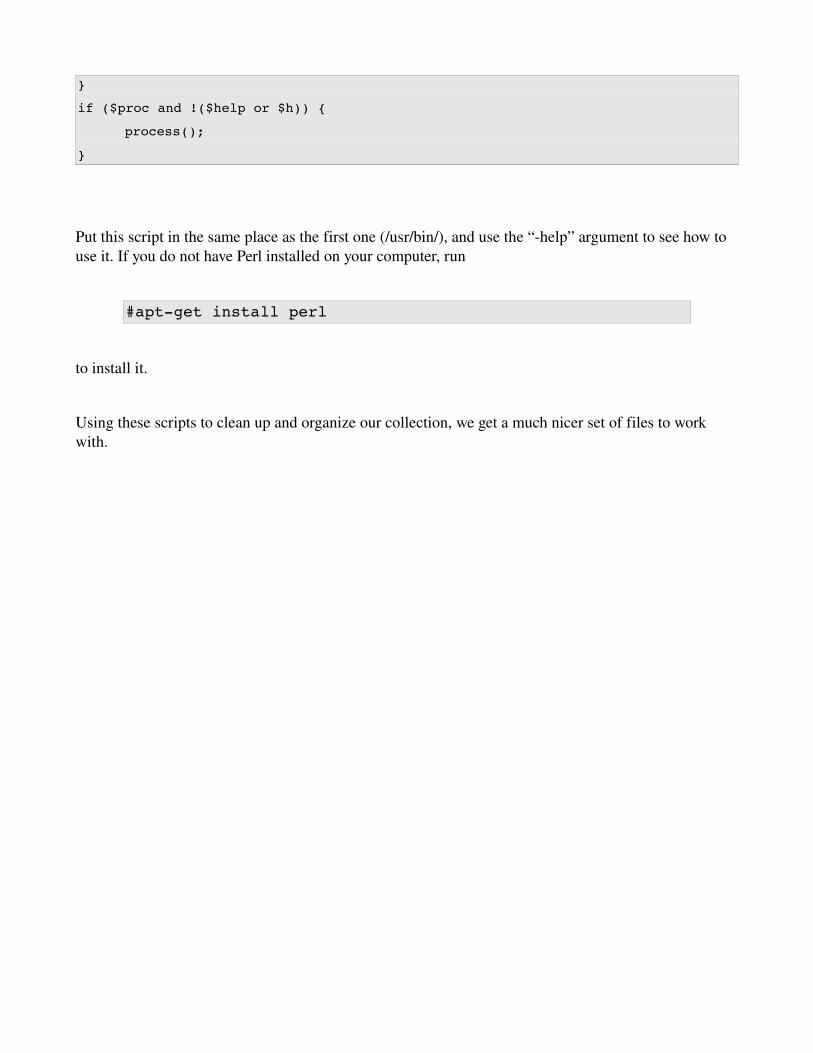
if ($proc and !($help or $h)) {
process();
}
Put this script in the same place as the first one (/usr/bin/), and use the “help” argument to see how to use it. If you do not have Perl installed on your computer, run
#aptget install perl
to install it.
Using these scripts to clean up and organize our collection, we get a much nicer set of files to work with.
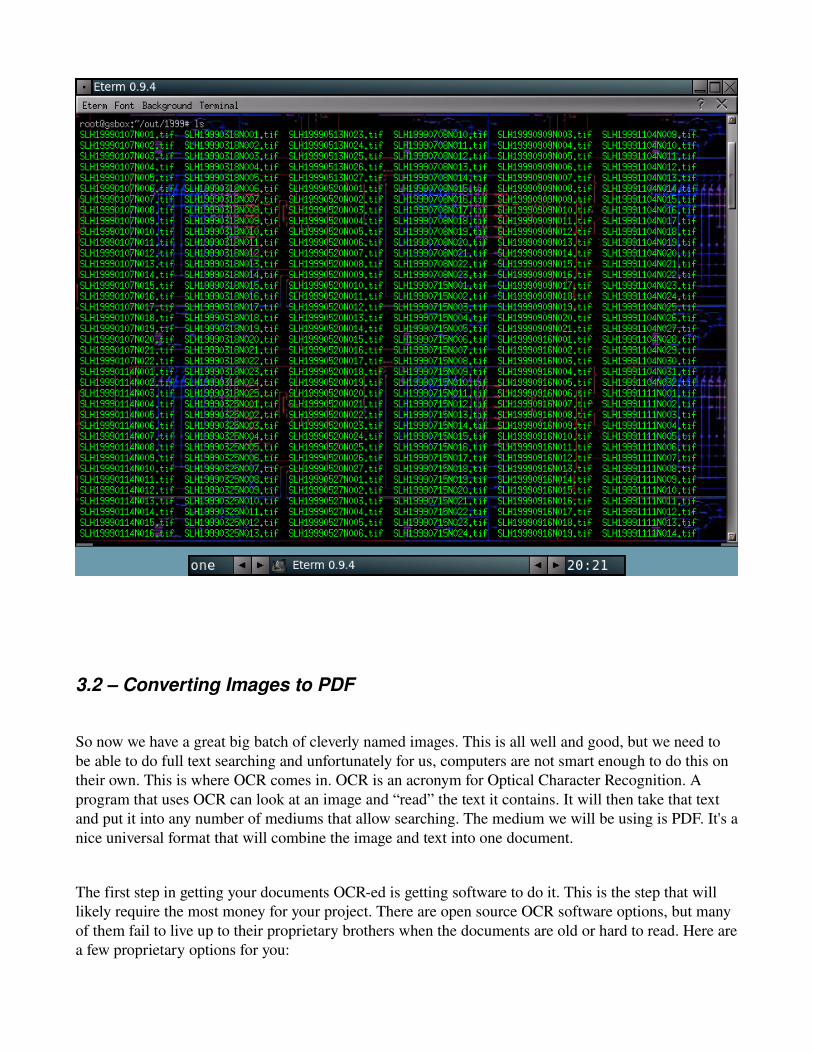
3.2 – Converting Images to PDF
So now we have a great big batch of cleverly named images. This is all well and good, but we need to be able to do full text searching and unfortunately for us, computers are not smart enough to do this on their own. This is where OCR comes in. OCR is an acronym for Optical Character Recognition. A program that uses OCR can look at an image and “read” the text it contains. It will then take that text and put it into any number of mediums that allow searching. The medium we will be using is PDF. It's a nice universal format that will combine the image and text into one document.
The first step in getting your documents OCRed is getting software to do it. This is the step that will likely require the most money for your project. There are open source OCR software options, but many of them fail to live up to their proprietary brothers when the documents are old or hard to read. Here are a few proprietary options for you:
● Vividata's OCR Shop for Linux is a fine choice and can be automated with scripts
● Nuance's OmniPage OCR software
● Readiris OCR software
The open source options are as follows;
● Tesseract (developed by Google)
● Ocrad
● OCRopus
These programs will work in one of two ways. The first is through a commandline toolset, following the form:
#ocrprogram input SLH20060503A003.tif output SLH20060503A003.pdf
This will allow for easy scripting to scan all of your documents.
#!/bin/bash#script layout for an OCR program#replace “ocrprogram” with your software executable
for i in $( ls ); do cd $i for j in $( ls ); do echo ""; echo "" echo "Processing $j"
ocrprogram $j output output.pdf
echo "" echo ""; done cd ..done

The second method is generally used with programs that have a GUI. This involves selecting all of your files (or a directory of files) and having the program scan them all en masse. This method will usually ask you for a filename convention as well – make sure to make it useful.
We had over 82,000 documents to scan and the OCR scanning process took 30 days using a computer with a 3.0 GHZ dual core processor and 2 GB of RAM. Make sure to have your scanning computer set up with a UPS to allow for a safe stop should the power go out – you don't want lose any ground in this situation.
4 – METADATA
4.1 – What is Metadata?
Metadata is most the most important part of your collection outside of the actual materials. It is the stuff that holds the whole thing together and makes the collection usable. Unfortunately for some, this is still a bit of a foggy definition to what metadata actually is. To put it simply, metadata is data about data – or in a more Greenstone specific sense – data about your collection.
For example, let's say we have a page from a 2005 issue of the South Lyon Herald. The metadata about this page is going to look like this:
● Date: 02/05/2006
● Page: A004
● Title: The South Lyon Herald
● Source File: SLH20050205A004.pdf
and so on...
An individual piece of metadata is often referred to as an element or tag.
Metadata is what Greenstone uses to organize your files and make searches, so it's imperative that we set up the metadata correctly.
4.2 – Metadata in Greenstone
Within the Greenstone suite, metadata is handled in two different ways. The first, and arguably the slowest is entering the metadata by hand. Again, we see here that having 82,000 documents will steer us away from this method pretty quickly. The second method, and much quicker with some handy programs, is the XML import method. Greenstone uses XML files to handle their metadata. It is included in a file called “metadata.xml” and uses a layout like this:
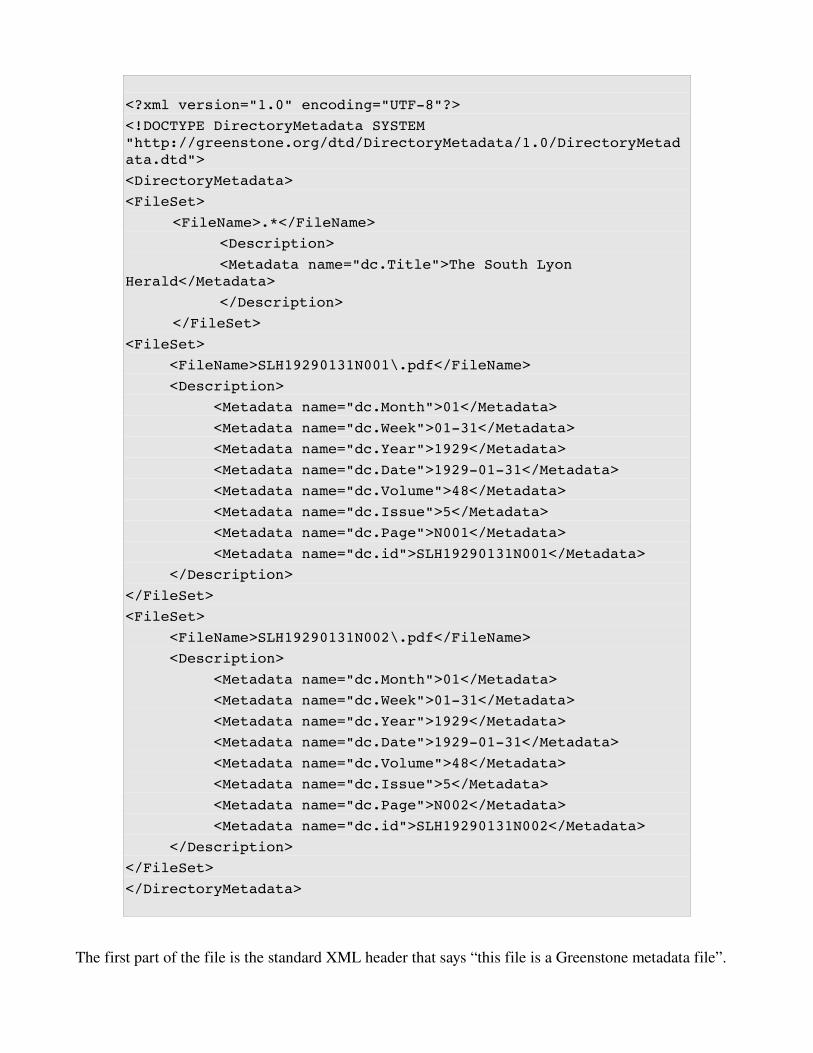
<?xml version="1.0" encoding="UTF8"?><!DOCTYPE DirectoryMetadata SYSTEM "http://greenstone.org/dtd/DirectoryMetadata/1.0/DirectoryMetadata.dtd"><DirectoryMetadata><FileSet>
<FileName>.*</FileName><Description><Metadata name="dc.Title">The South Lyon
Herald</Metadata></Description>
</FileSet><FileSet> <FileName>SLH19290131N001\.pdf</FileName> <Description> <Metadata name="dc.Month">01</Metadata> <Metadata name="dc.Week">0131</Metadata> <Metadata name="dc.Year">1929</Metadata> <Metadata name="dc.Date">19290131</Metadata> <Metadata name="dc.Volume">48</Metadata> <Metadata name="dc.Issue">5</Metadata> <Metadata name="dc.Page">N001</Metadata> <Metadata name="dc.id">SLH19290131N001</Metadata> </Description></FileSet><FileSet> <FileName>SLH19290131N002\.pdf</FileName> <Description> <Metadata name="dc.Month">01</Metadata> <Metadata name="dc.Week">0131</Metadata> <Metadata name="dc.Year">1929</Metadata> <Metadata name="dc.Date">19290131</Metadata> <Metadata name="dc.Volume">48</Metadata> <Metadata name="dc.Issue">5</Metadata> <Metadata name="dc.Page">N002</Metadata> <Metadata name="dc.id">SLH19290131N002</Metadata> </Description></FileSet></DirectoryMetadata>
The first part of the file is the standard XML header that says “this file is a Greenstone metadata file”.
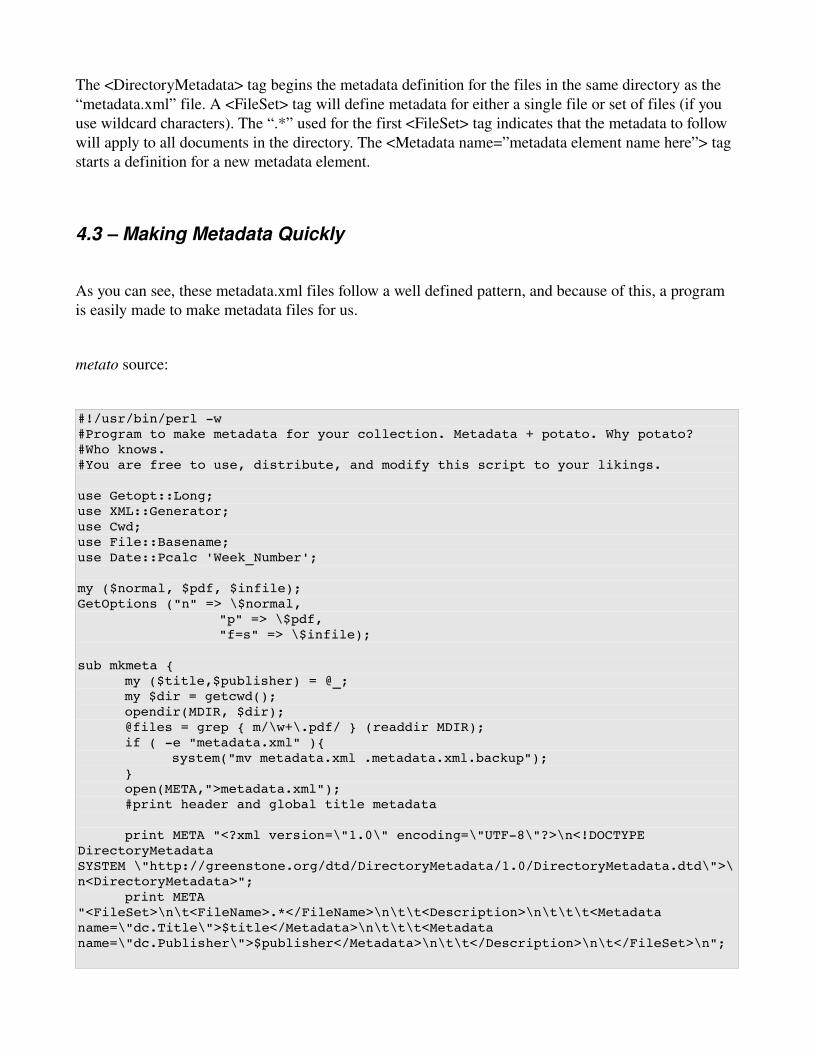
The <DirectoryMetadata> tag begins the metadata definition for the files in the same directory as the “metadata.xml” file. A <FileSet> tag will define metadata for either a single file or set of files (if you use wildcard characters). The “.*” used for the first <FileSet> tag indicates that the metadata to follow will apply to all documents in the directory. The <Metadata name=”metadata element name here”> tag starts a definition for a new metadata element.
4.3 – Making Metadata Quickly
As you can see, these metadata.xml files follow a well defined pattern, and because of this, a program is easily made to make metadata files for us.
metato source:
#!/usr/bin/perl w#Program to make metadata for your collection. Metadata + potato. Why potato?#Who knows.#You are free to use, distribute, and modify this script to your likings.
use Getopt::Long;use XML::Generator;use Cwd;use File::Basename;use Date::Pcalc 'Week_Number';
my ($normal, $pdf, $infile);GetOptions ("n" => \$normal,
"p" => \$pdf,"f=s" => \$infile);
sub mkmeta {my ($title,$publisher) = @_;my $dir = getcwd();opendir(MDIR, $dir);@files = grep { m/\w+\.pdf/ } (readdir MDIR);if ( e "metadata.xml" ){
system("mv metadata.xml .metadata.xml.backup");}open(META,">metadata.xml");#print header and global title metadata
print META "<?xml version=\"1.0\" encoding=\"UTF8\"?>\n<!DOCTYPE DirectoryMetadata SYSTEM \"http://greenstone.org/dtd/DirectoryMetadata/1.0/DirectoryMetadata.dtd\">\n<DirectoryMetadata>";
print META "<FileSet>\n\t<FileName>.*</FileName>\n\t\t<Description>\n\t\t\t<Metadata name=\"dc.Title\">$title</Metadata>\n\t\t\t<Metadata name=\"dc.Publisher\">$publisher</Metadata>\n\t\t</Description>\n\t</FileSet>\n";
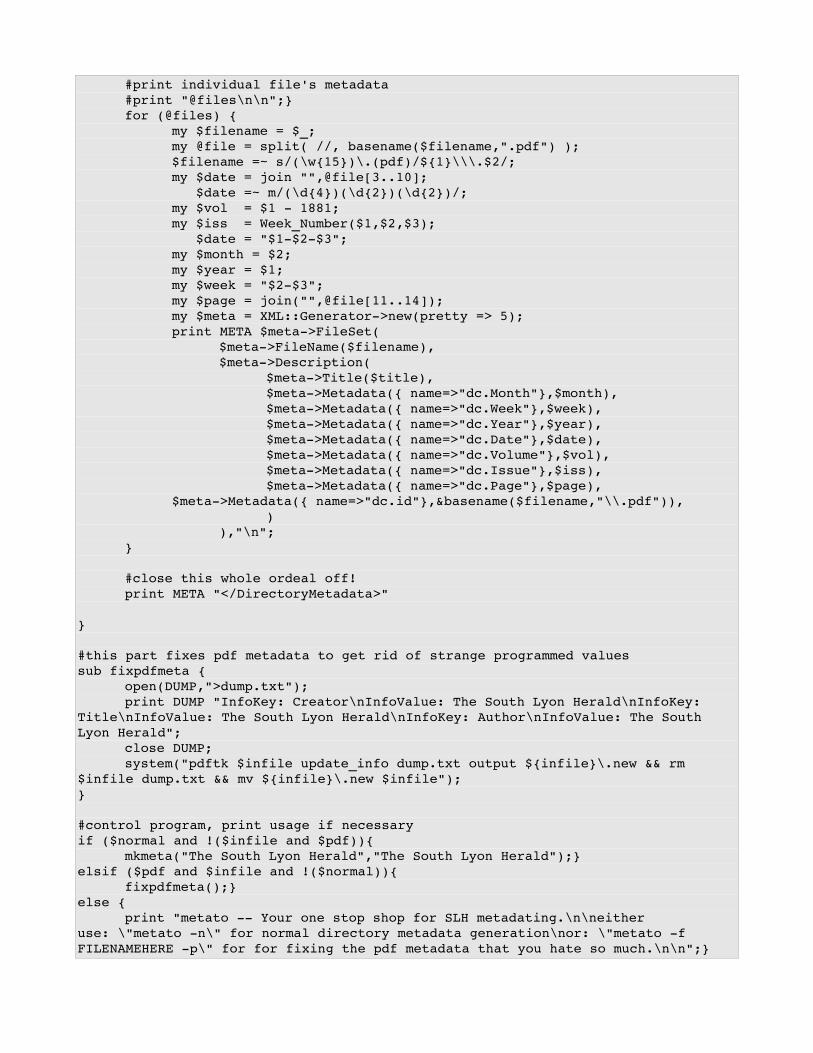
#print individual file's metadata#print "@files\n\n";}for (@files) {
my $filename = $_;my @file = split( //, basename($filename,".pdf") );$filename =~ s/(\w{15})\.(pdf)/${1}\\\.$2/;my $date = join "",@file[3..10]; $date =~ m/(\d{4})(\d{2})(\d{2})/;my $vol = $1 1881;my $iss = Week_Number($1,$2,$3); $date = "$1$2$3";my $month = $2;my $year = $1;my $week = "$2$3";my $page = join("",@file[11..14]);my $meta = XML::Generator>new(pretty => 5);print META $meta>FileSet(
$meta>FileName($filename),$meta>Description(
$meta>Title($title),$meta>Metadata({ name=>"dc.Month"},$month),$meta>Metadata({ name=>"dc.Week"},$week),$meta>Metadata({ name=>"dc.Year"},$year),$meta>Metadata({ name=>"dc.Date"},$date),$meta>Metadata({ name=>"dc.Volume"},$vol),$meta>Metadata({ name=>"dc.Issue"},$iss),$meta>Metadata({ name=>"dc.Page"},$page),
$meta>Metadata({ name=>"dc.id"},&basename($filename,"\\.pdf")),)
),"\n";}
#close this whole ordeal off!print META "</DirectoryMetadata>"
}
#this part fixes pdf metadata to get rid of strange programmed valuessub fixpdfmeta {
open(DUMP,">dump.txt");print DUMP "InfoKey: Creator\nInfoValue: The South Lyon Herald\nInfoKey:
Title\nInfoValue: The South Lyon Herald\nInfoKey: Author\nInfoValue: The South Lyon Herald";
close DUMP;system("pdftk $infile update_info dump.txt output ${infile}\.new && rm
$infile dump.txt && mv ${infile}\.new $infile");}
#control program, print usage if necessaryif ($normal and !($infile and $pdf)){
mkmeta("The South Lyon Herald","The South Lyon Herald");}elsif ($pdf and $infile and !($normal)){
fixpdfmeta();}else {
print "metato Your one stop shop for SLH metadating.\n\neither use: \"metato n\" for normal directory metadata generation\nor: \"metato f FILENAMEHERE p\" for for fixing the pdf metadata that you hate so much.\n\n";}
As with the other scripts, put this in your “/usr/bin/” directory and make it executable, because you will be using it quite a bit. The script has a secondary function that cleans up the PDF embedded metadata. This metadata is extracted by Greenstone and occasionally needs some clean up. It will probably not be required for anyone reading the guide, but is included on the offchance it is (or for anyone curious).
Before we use this program, we want to make sure we have the files organized into relevant directories. The way we will do this is by year. We will create directories called 1929 all the way up to 2007 and put the respective files inside each directory.
#mkdir `seq 1929 2007`#for k in `seq 1929 2007`; do mv SLH${k}* $k; done
Once we have them all organized, we run the command (affectionately named) inside each year directory.
#for k in `seq 1929 2007`; do cd $k; metato n; cd ..; done
and watch in awe as our metadata.xml files are created right before our eyes. Once this is done for all of the years we have in our collection, 95% of our metadata is made for us. The other 5% is extracted by Greenstone automatically in the next section.

5 – IMPORTING AND BUILDING YOUR COLLECTION
In this next section, we will be discussing how to build collections from within Greenstone. There are two distinct ways to do this; graphically through their GLI, and with the command line. We will cover both and section headings will indicate which methods are discussed.
5.1 – Building a Collection with the GLI
We have all of our source collection organized, OCRed and ready to get plugged into Greenstone. Our next step is to fire up the tool that we will allow us to do all of the work to get our collection built. To begin, we need to setup some environment variables for Greenstone to use.
#cd /usr/local/gsdl/#source setup.bash
You should get a cheery message saying “Your environment has been successfully set up to run Greenstone”. We can now get the Graphical Librarian Interface running (or GLI).
#cd gli/#source gli.sh
This will run through some messages and check for programs. Once it is finished, a window should pop up
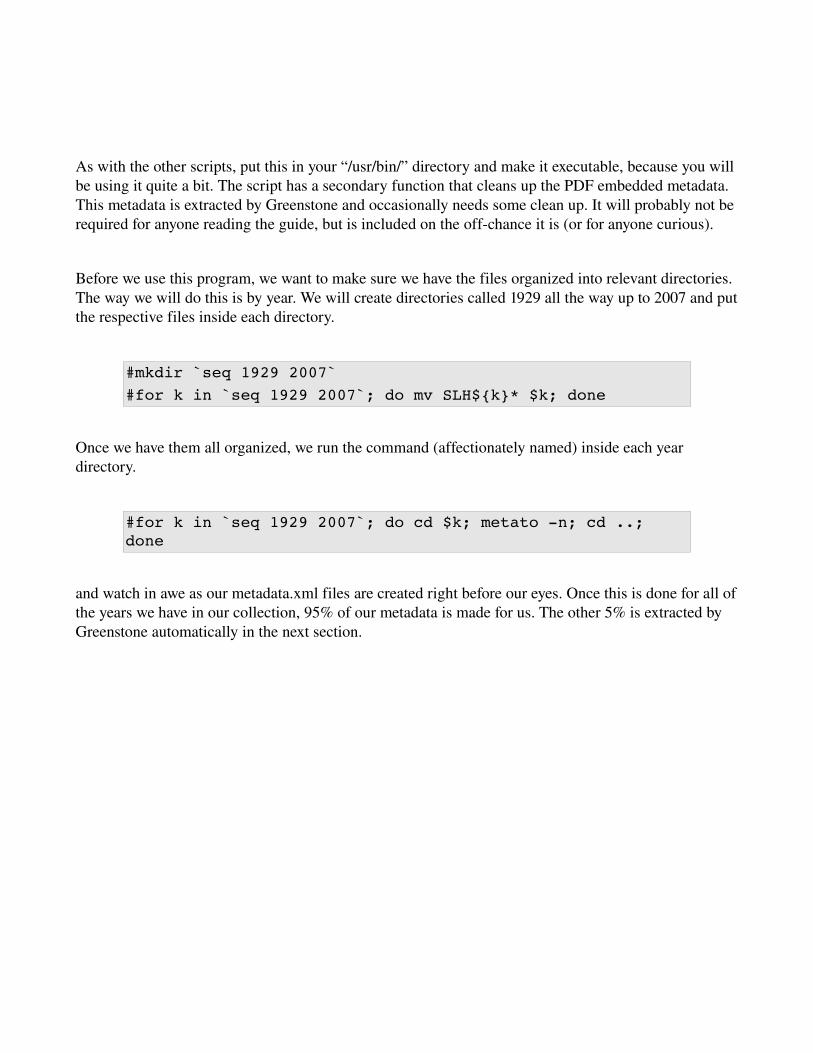
This dialog is asking for the address to the Greenstone library cgi application. Input the following address:
http://localhost/gsdl/library
After this, you may receive an error about not having ImageMagick installed on the server. If you plan on making a collection with images you can run
#aptget install imagemagick
but for our purposes, this should not be necessary. After this, the wonderful GLI should pop up.
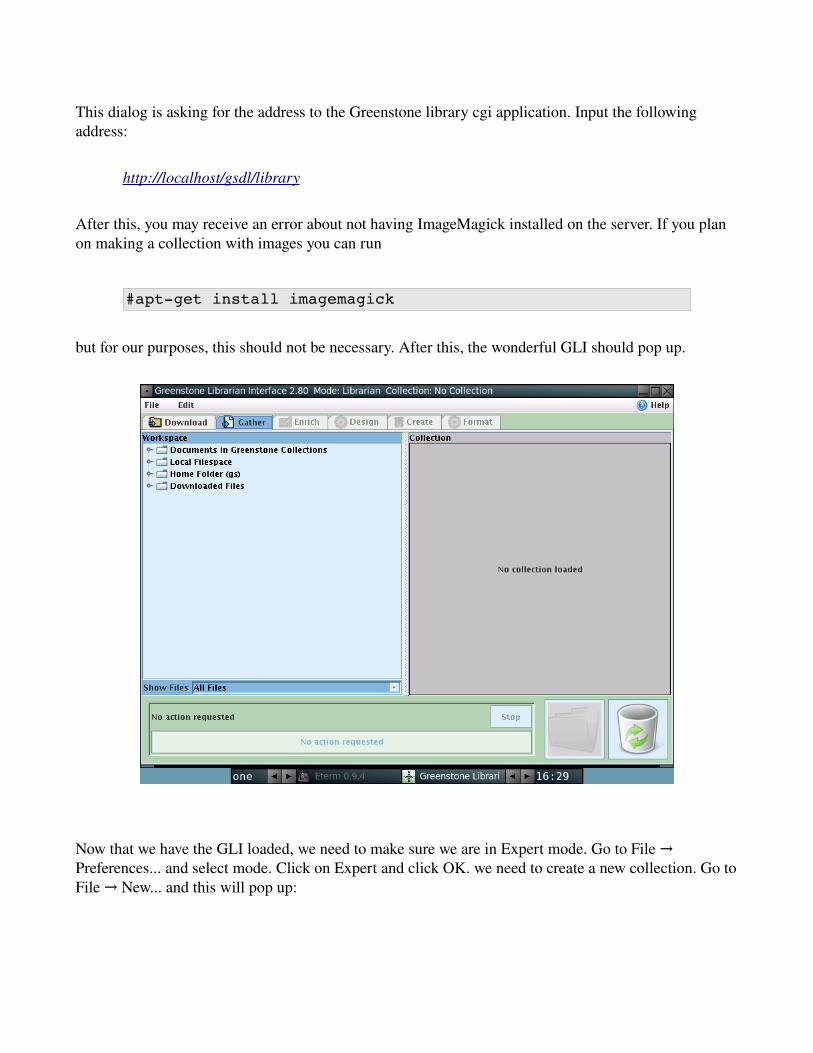
Now that we have the GLI loaded, we need to make sure we are in Expert mode. Go to File → Preferences... and select mode. Click on Expert and click OK. we need to create a new collection. Go to File → New... and this will pop up:
Make sure that you base the collection on “ New Collection “.
DRAG
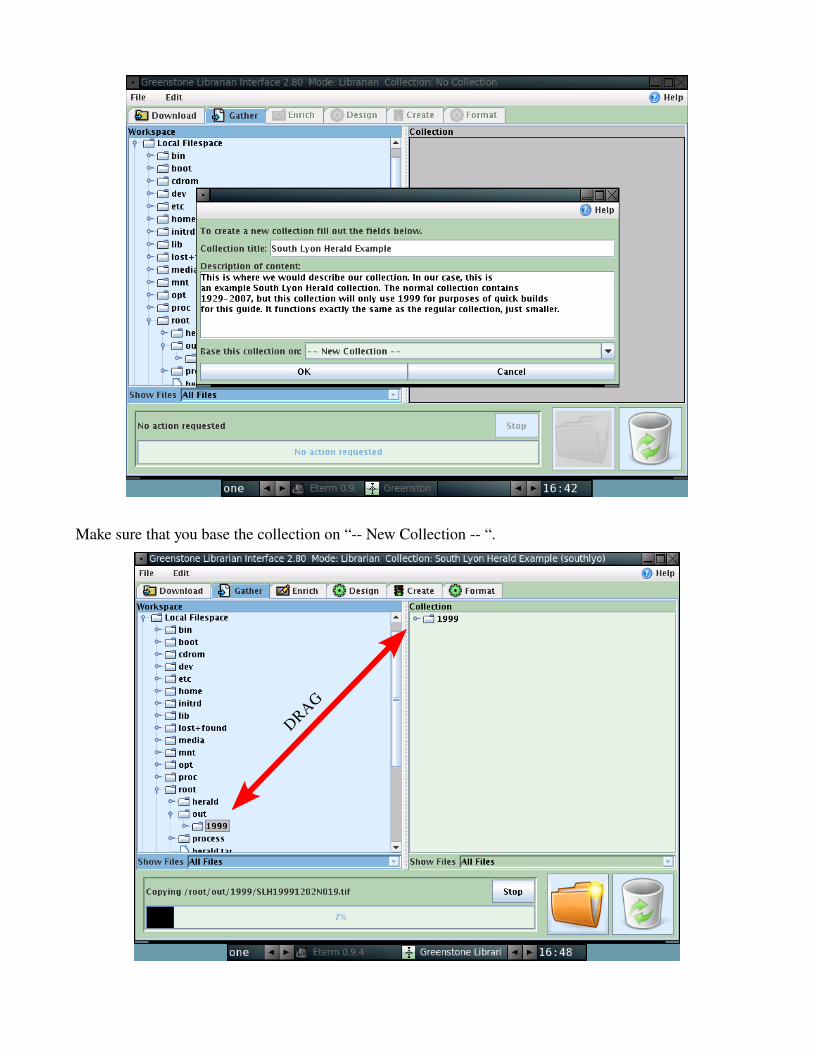
This “Gather” tab is where we will tell Greenstone which files to use for the collection. Use the “Workspace” section of the window and navigate to where our files are stored. In our case, this is in the /root/out/ directory. This is located under Local Filespace → root → out. Drag the folders from the out directory into the “Collection” area as shown. Depending on the size of the import, this can take anywhere from a minute to an hour.
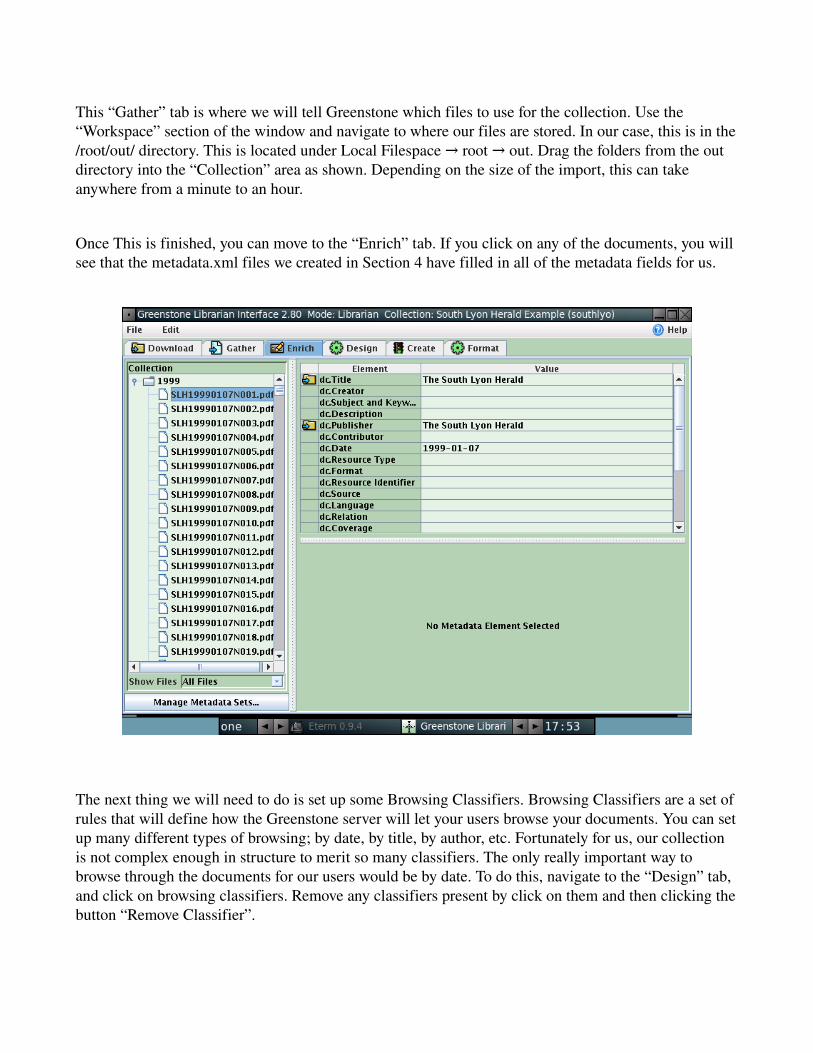
Once This is finished, you can move to the “Enrich” tab. If you click on any of the documents, you will see that the metadata.xml files we created in Section 4 have filled in all of the metadata fields for us.
The next thing we will need to do is set up some Browsing Classifiers. Browsing Classifiers are a set of rules that will define how the Greenstone server will let your users browse your documents. You can set up many different types of browsing; by date, by title, by author, etc. Fortunately for us, our collection is not complex enough in structure to merit so many classifiers. The only really important way to browse through the documents for our users would be by date. To do this, navigate to the “Design” tab, and click on browsing classifiers. Remove any classifiers present by click on them and then clicking the button “Remove Classifier”.
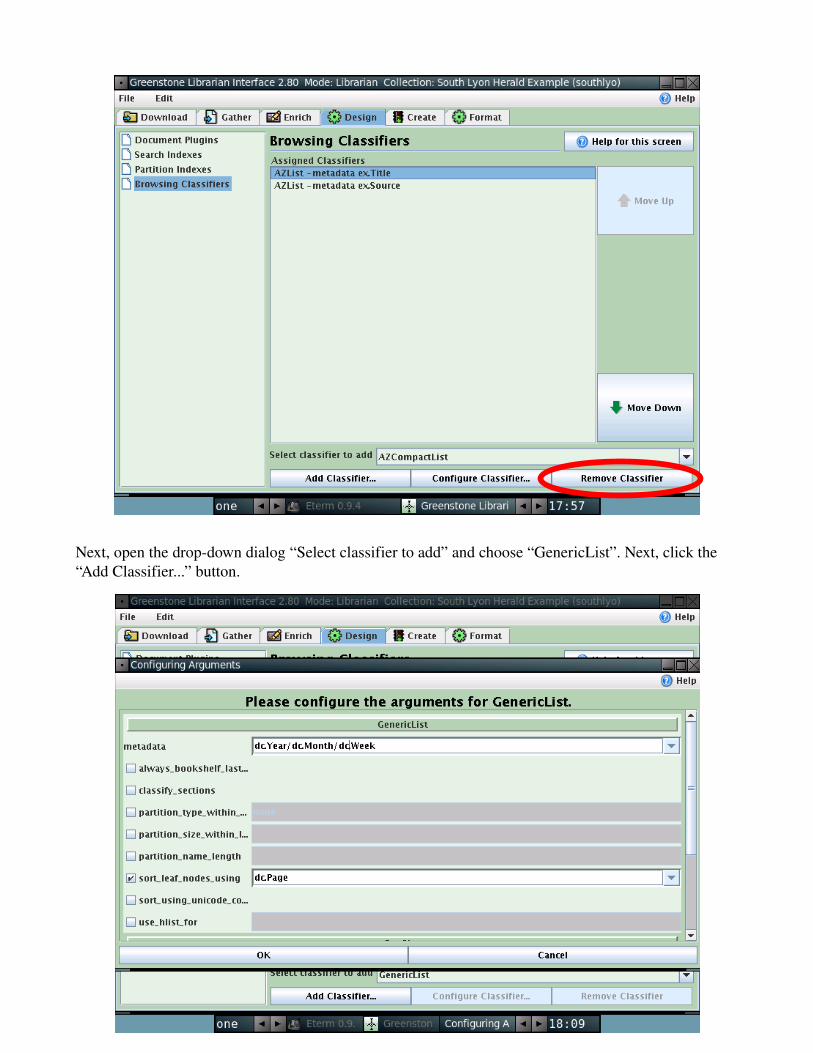
Next, open the dropdown dialog “Select classifier to add” and choose “GenericList”. Next, click the “Add Classifier...” button.
Make sure to change the following.
● Metadata field to “dc.Year/dc.Month/dc.Week”This will create a hierarchy that organizes the files by year, then month, then week. This is similar to having a file for each year, then a file for each month within each year, and then a file for each week within each month.
● Check “sort_leaf_nodes_using” and select “dc.Page” for the value. This tells greenstone to order the documents by page within each week.
● Finally, check “buttonname” and call it “Browse”. This will give the classifier a name other than “GenericList”, which does not look very classy.
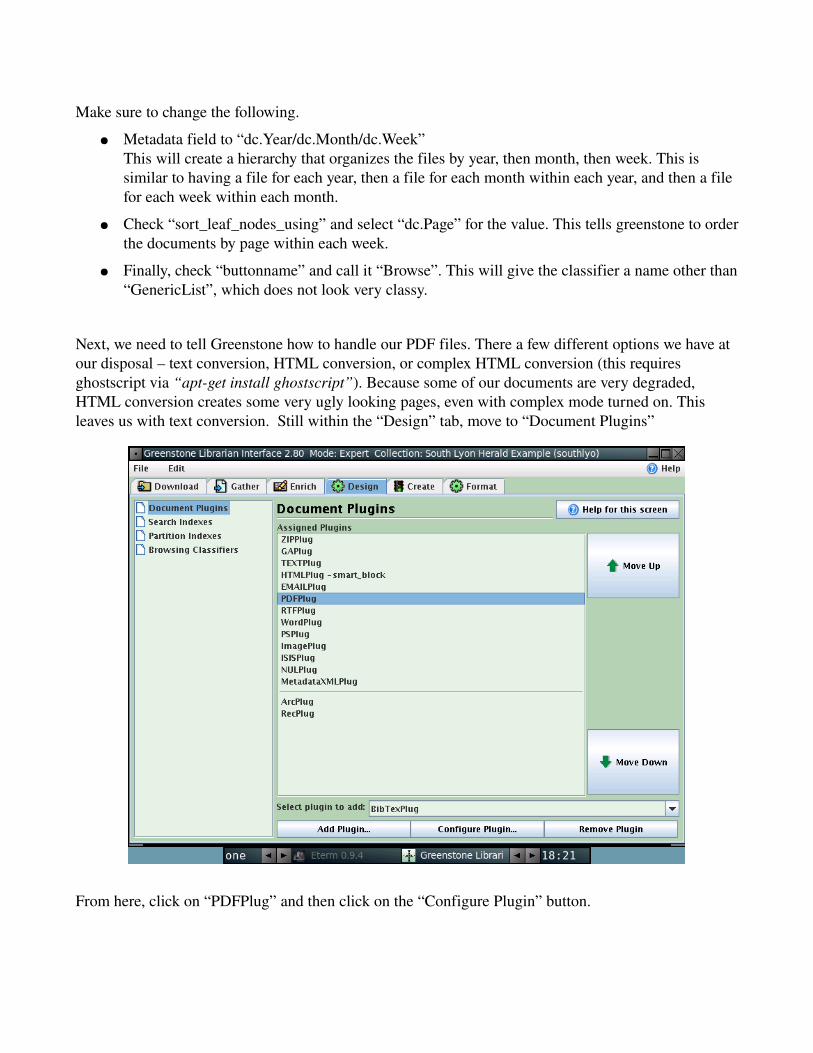
Next, we need to tell Greenstone how to handle our PDF files. There a few different options we have at our disposal – text conversion, HTML conversion, or complex HTML conversion (this requires ghostscript via “aptget install ghostscript”). Because some of our documents are very degraded, HTML conversion creates some very ugly looking pages, even with complex mode turned on. This leaves us with text conversion. Still within the “Design” tab, move to “Document Plugins”
From here, click on “PDFPlug” and then click on the “Configure Plugin” button.

Change the “convert_to” field to “text – Plain text format.” and click the “OK” button.
Our next step is to create our collection. Click on the “Create” tab. From here, click on “Import Options” from the side pane.
Do the following:
● Check the “faillog” option and give it a name like “failedissuesimport”. This will log all of the issues that fail to import, should there be any.
● Check the “OIDtype” and choose “assigned” as the option. This tells Greenstone to sort using a metadata value. Make sure not to use hashing – that method takes much longer and is not necessary due to the uniform set of IDs that we have.
● Check “OIDmetadata” and choose “dc.id” as the value. This will tell Greenstone to sort the documents by their ID (SLH19290131N001, for example).
Next, move to the “Build Options”. Here, all that is necessary is to create another fail log. Again, name it something significant like “failedissuesbuild”. Now our collection is ready to be built (finally!), so cross your fingers, hold your breath, and click the “Build Collection” button.
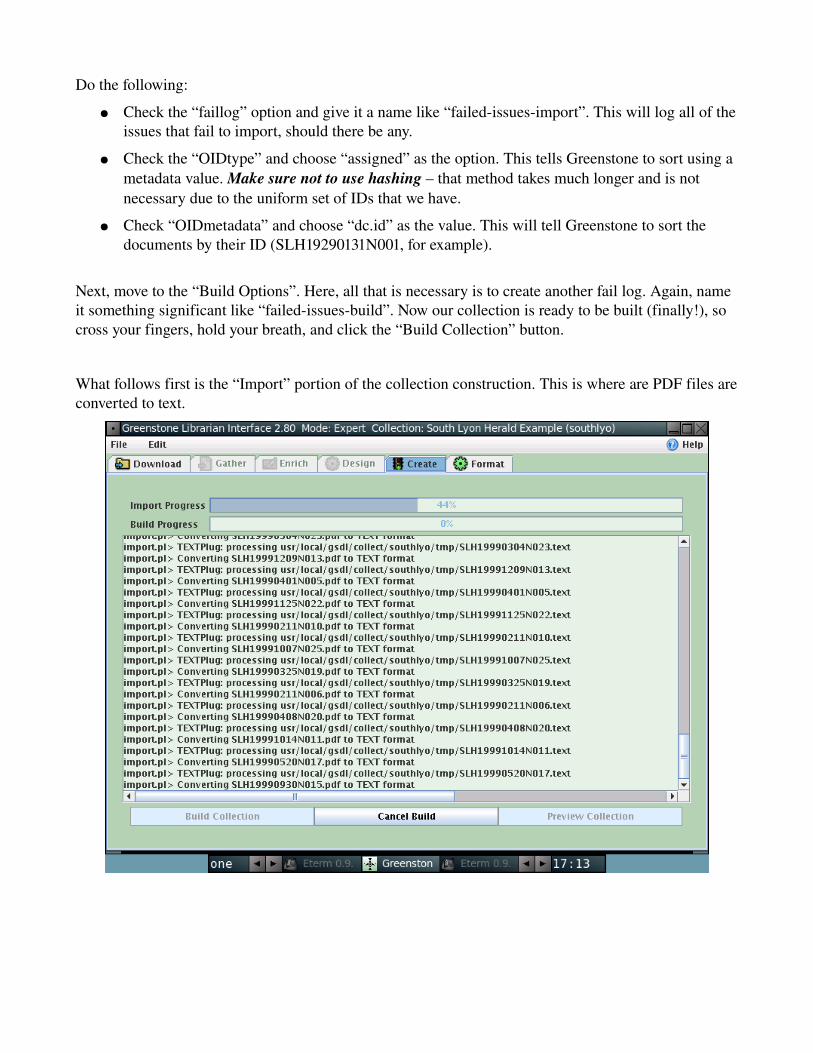
What follows first is the “Import” portion of the collection construction. This is where are PDF files are converted to text.
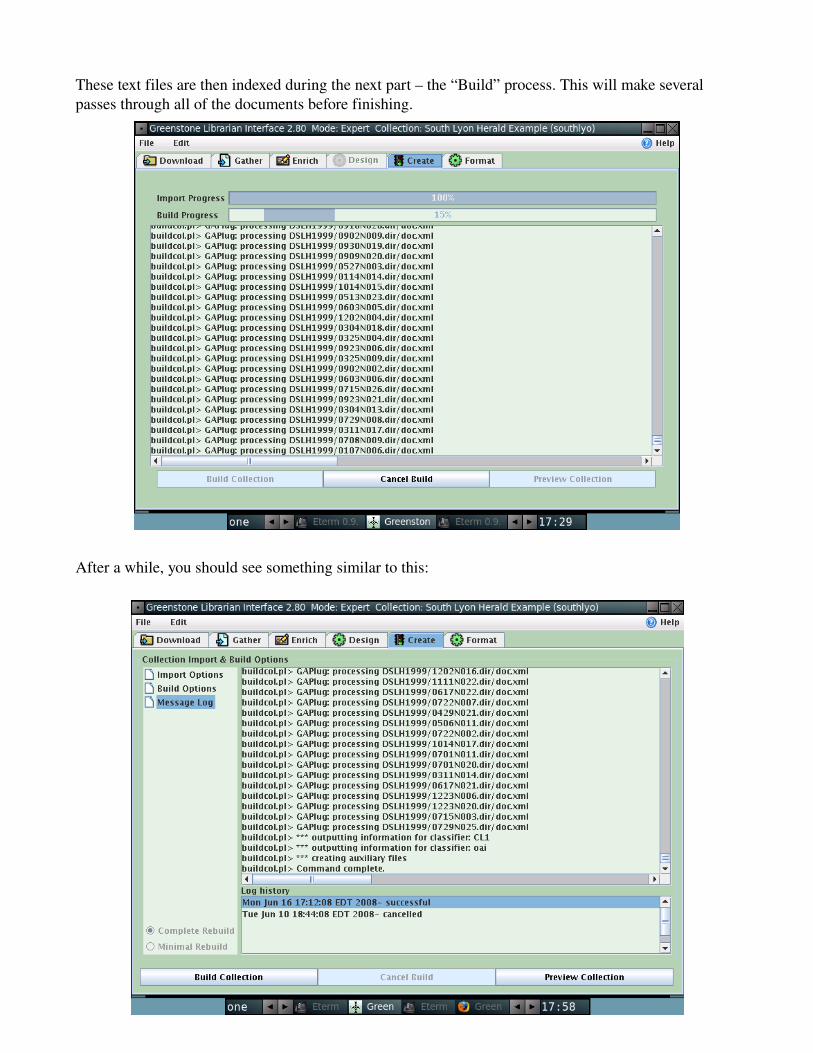
These text files are then indexed during the next part – the “Build” process. This will make several passes through all of the documents before finishing.
After a while, you should see something similar to this:
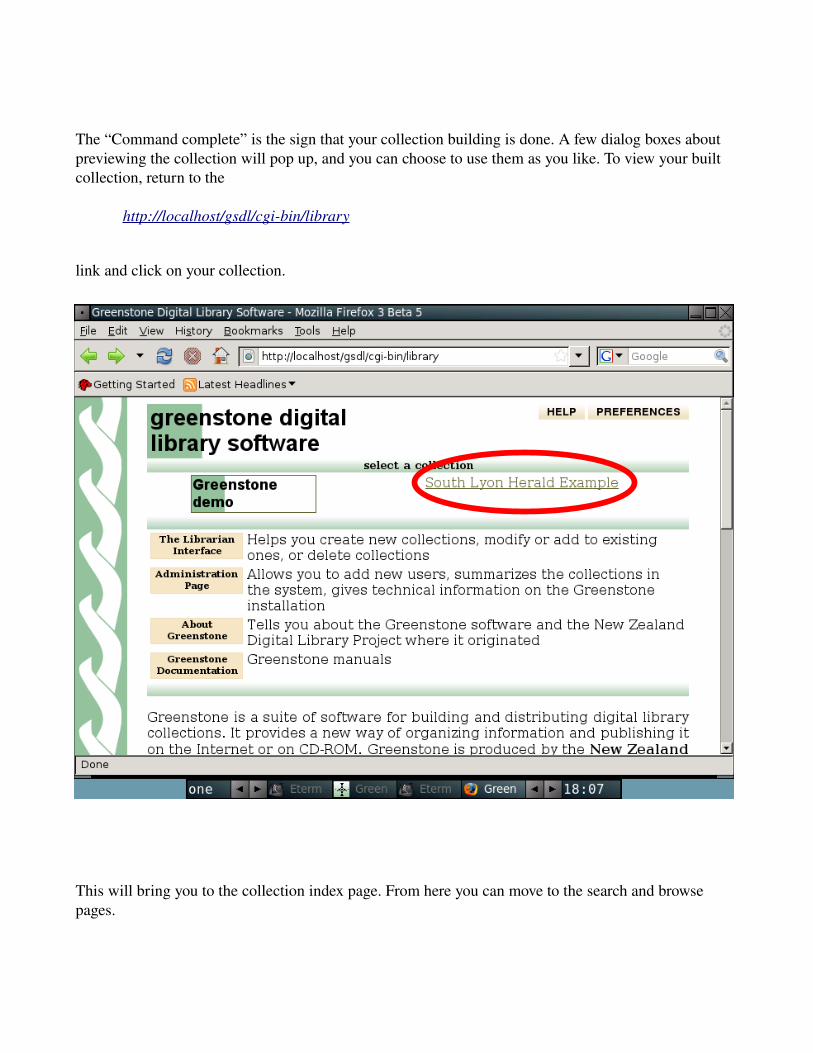
The “Command complete” is the sign that your collection building is done. A few dialog boxes about previewing the collection will pop up, and you can choose to use them as you like. To view your built collection, return to the
http://localhost/gsdl/cgibin/library
link and click on your collection.
This will bring you to the collection index page. From here you can move to the search and browse pages.
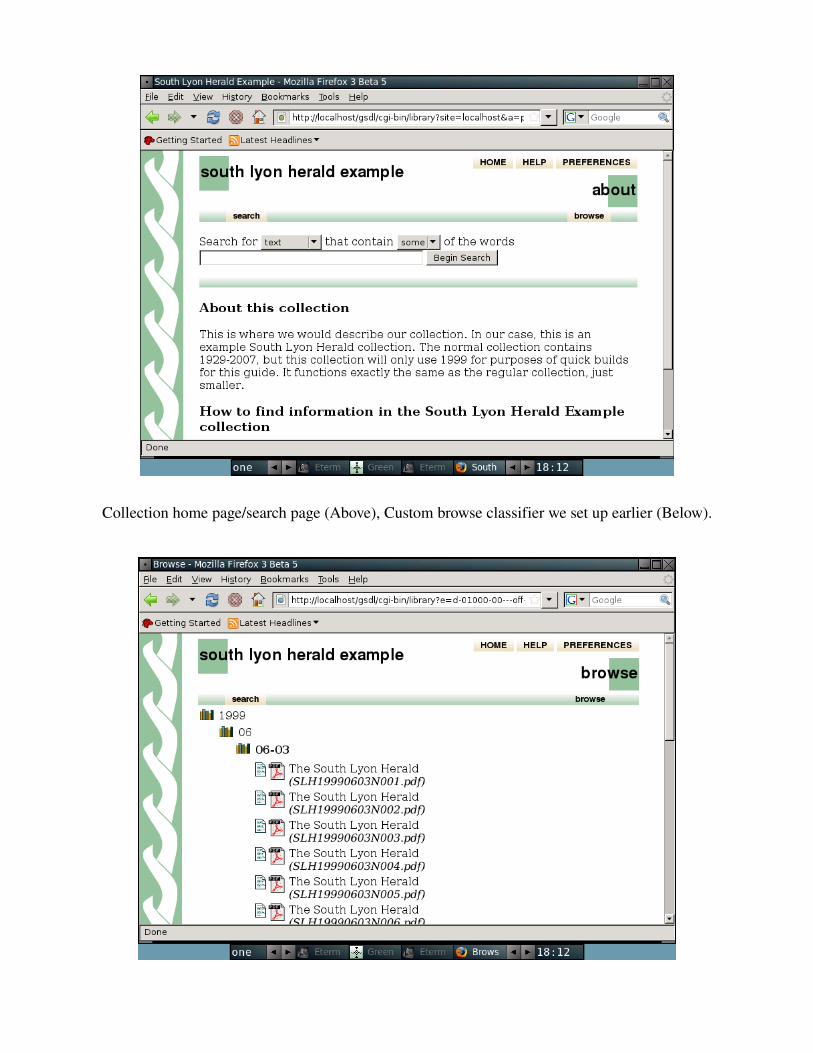
Collection home page/search page (Above), Custom browse classifier we set up earlier (Below).

As you can see, we have our collection built successfully! The rest of our work will be changing the aesthetics and page functionality. This will be covered in the next section. Next, however, we will go over how to build a collection solely from the command line.
5.2 – Building a Collection from the Command Line
This will be for users wishing to build a collection remotely, or who opted not to install a desktop environment. It may help save time during the building process as well – desktop environments are known to weigh down systems a little bit (Fluxbox does not nearly as much as others, it is designed to be lightweight).
To begin, we will need to set up our environment within Greenstone.
#cd /usr/local/gsdl/#source setup.bash
This will setup some environment variables that will let us run commonlyused scripts from anywhere in the “gsdl/” directory. Moving on, we will now create a collection within Greenstone. This will require the email address of the creator, something that will be linked to in the site later (think of this as the webmaster address).
#mkcol.pl creator [email protected] herald
You can now move into the collection directory and take a look and what's inside.
#cd collect/herald
It will have 7 directories:
1. archives – this is where your collection's final product will be. Whenever you are viewing a page through the Greenstone site, you are viewing files from inside this directory.
2. building – this is where Greenstone will build your collection. It will not build directly in the archive directory to allow for a collection to build in the background while still having a collection in use.
3. etc – as with many Unix/Linux systems, this is where configuration files are stored for your collection.
4. images – this is a pretty self explanatory one. It is a folder that has images pertaining to the collection.
5. import – this is where Greenstone (or rather, you, this time around) will copy all of the source material for the collection. Anything that goes in here will end up in the collection (outside of the metadata.xml files).
6. index – this is where Greenstone stores the indexing information for your collection that will be used for searching and organization after being built.
7. perllib – this is where Perl libraries will be stored that are relevant (or exclusive) to your collection. We won't be using this directory in this guide.
Now we need to get all of our source material into the import folder.
#cp r /root/out/1999 import/
This will take a minute or two (or maybe sixty...) depending greatly on how large your collection is. Moving on, we need to set up the configuration file for the collection.
#cd /usr/local/gsdl/collect/herald/etc#nano collect.cfg
Edit collect.cfg to this:
creator maintainer public true
buildtype mgpp
#indexes document:text document:Title document:Source indexes text Title Source defaultindex text
levels document
indexoptions accentfold casefold stem
defaultlevel document
classify GenericList metadata dc.Year/dc.Month/dc.Week sort_leaf_nodes_using dc.Page buttonname Browse
plugin ZIPPlug plugin GAPlug plugin TEXTPlug
plugin HTMLPlug smart_block plugin EMAILPlug plugin PDFPlug convert_to text plugin RTFPlug plugin WordPlug plugin PSPlug plugin ImagePlug plugin ISISPlug plugin NULPlug plugin MetadataXMLPlug plugin ArcPlug plugin RecPlug
format VList "<td valign=\"top\">[link][icon][/link]</td> <td valign=\"top\">[ex.srclink]{Or}{[ex.thumbicon],[ex.srcicon]}[ex./srclink]</td> <td valign=\"top\">[highlight] {Or}{[dc.Title],[exp.Title],[ex.Title],Untitled} [/highlight]{If}{[ex.Source],<br><i>([ex.Source])</i>}</td>"
format HList "[link][highlight][ex.Title][/highlight][/link]"
format DocumentHeading "{Or}{[parent(Top):Title],[Title],untitled}<br>"
format DocumentText "[Text]"
format DocumentButtons "Detach|Highlight"
format SearchTypes "plain,form"
collectionmeta collectionname [l=en] "South Lyon Herald Example"
collectionmeta collectionextra [l=en] "This is where we would describe our collection. In our case, this is an example South Lyon Herald collection. The normal collection contains 19292007, but this collection will only use 1999 for purposes of quick builds for this guide. It functions exactly the same as the regular collection, just smaller."
collectionmeta .document:text [l=en] "text" collectionmeta .document:Title [l=en] "titles" collectionmeta .document:Source [l=en] "filenames" collectionmeta .text [l=en] "text" collectionmeta .Title [l=en] "titles" collectionmeta .Source [l=en] "filenames"
This will set up the collection to have the same custom classifiers and sorting methods as the graphical collection building method. This will wrap up the setup of the collection build through the command line.
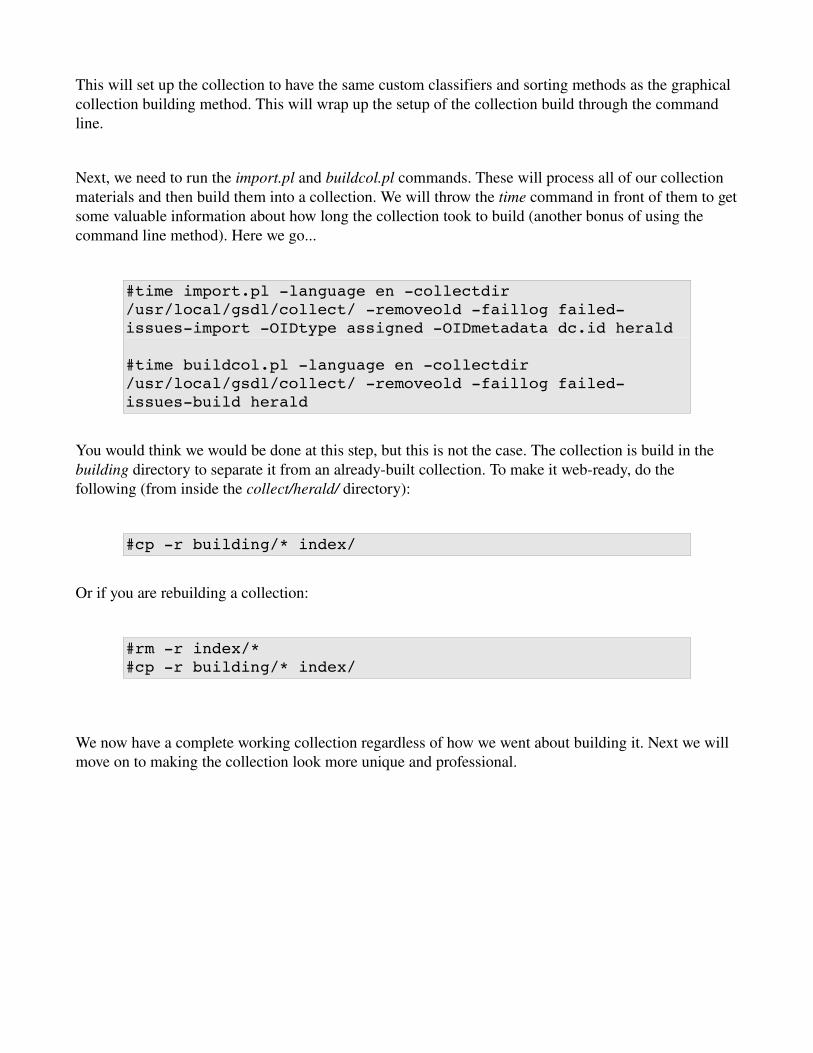
Next, we need to run the import.pl and buildcol.pl commands. These will process all of our collection materials and then build them into a collection. We will throw the time command in front of them to get some valuable information about how long the collection took to build (another bonus of using the command line method). Here we go...
#time import.pl language en collectdir /usr/local/gsdl/collect/ removeold faillog failedissuesimport OIDtype assigned OIDmetadata dc.id herald
#time buildcol.pl language en collectdir /usr/local/gsdl/collect/ removeold faillog failedissuesbuild herald
You would think we would be done at this step, but this is not the case. The collection is build in the building directory to separate it from an alreadybuilt collection. To make it webready, do the following (from inside the collect/herald/ directory):
#cp r building/* index/
Or if you are rebuilding a collection:
#rm r index/*#cp r building/* index/
We now have a complete working collection regardless of how we went about building it. Next we will move on to making the collection look more unique and professional.
6 – FORMATTING AND DESIGN OF YOUR SITE
This next section will discuss how to change the looks of your Greenstone site. While the default Greenstone theme is lovely, it won't cut it for everybody's projects.
6.1 – CSS and Greenstone
Greenstone's main method for changing the look of a page is through CSS or Cascading Style Sheets for the less acronymically inclined. CSS has been used for over a decade to centralize the styling of a website and make styling significantly easier.
This guide will not teach you to use CSS – it's outside of this guide's scope and way too big of a topic to cover – but we will point in the direction of some good CSS learning materials:
● W3Schools CSS tutorial – Great tutorial with interactive lessons (Our personal favorite)http://www.w3schools.com/css/
● W3.org CSS Primer – Good introductory lessonhttp://www.w3.org/Style/Examples/011/firstcss
● tiztag CSS Tutorial – Another good interactive tutorialhttp://www.tizag.com/cssT/index.php
... and there are many more for you to discover through Google.
Greenstone keeps its CSS in the /usr/local/gsdl/images/ folder (assumes install to /usr/local/). From there you can edit them to create some slick looking sites. The main CSS file is style.css.
Let's take a look at the kind of difference you can get with CSS....
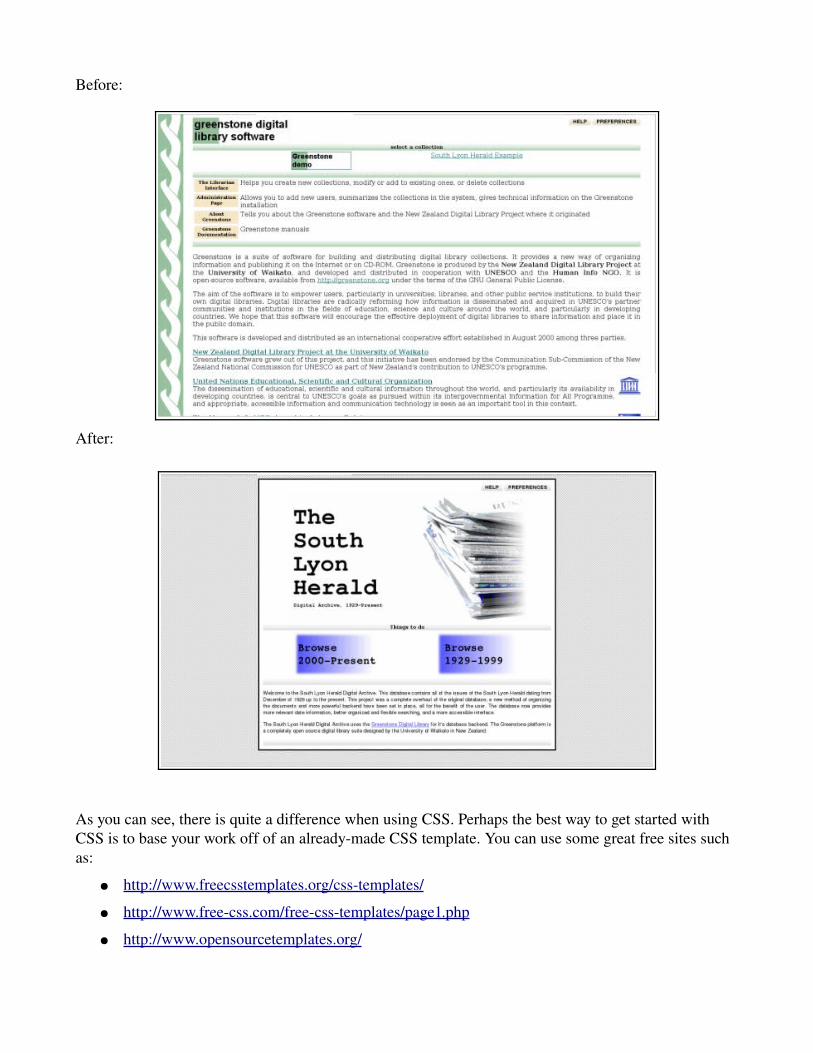
Before:
After:
As you can see, there is quite a difference when using CSS. Perhaps the best way to get started with CSS is to base your work off of an alreadymade CSS template. You can use some great free sites such as:
● http://www.freecsstemplates.org/csstemplates/
● http://www.freecss.com/freecsstemplates/page1.php
● http://www.opensourcetemplates.org/
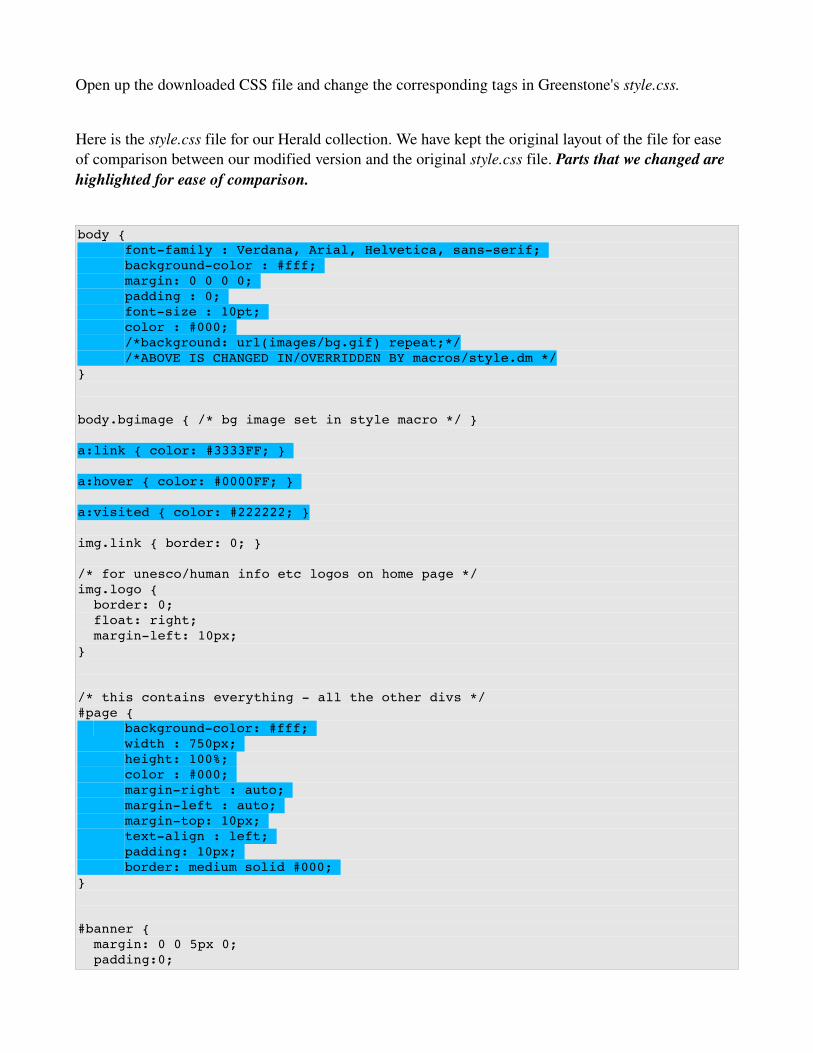
Open up the downloaded CSS file and change the corresponding tags in Greenstone's style.css.
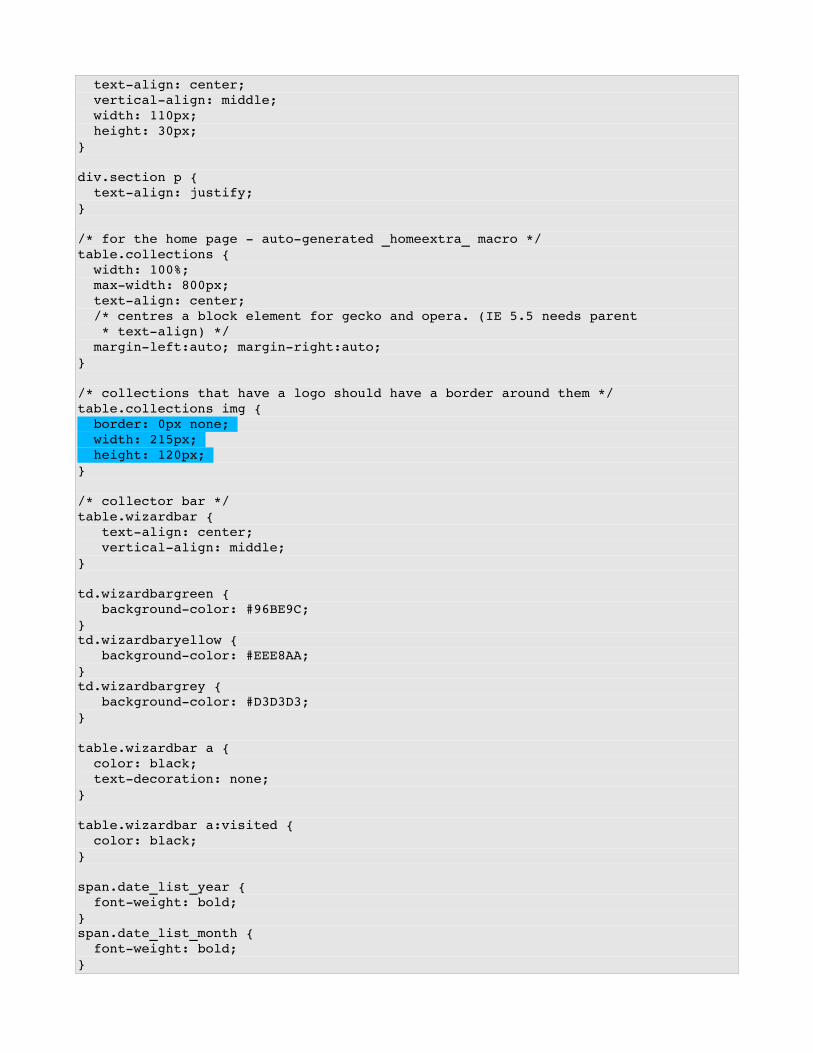
Here is the style.css file for our Herald collection. We have kept the original layout of the file for ease of comparison between our modified version and the original style.css file. Parts that we changed are highlighted for ease of comparison.
body { fontfamily : Verdana, Arial, Helvetica, sansserif; backgroundcolor : #fff; margin: 0 0 0 0; padding : 0; fontsize : 10pt; color : #000; /*background: url(images/bg.gif) repeat;*//*ABOVE IS CHANGED IN/OVERRIDDEN BY macros/style.dm */
}
body.bgimage { /* bg image set in style macro */ }
a:link { color: #3333FF; }
a:hover { color: #0000FF; }
a:visited { color: #222222; }
img.link { border: 0; }
/* for unesco/human info etc logos on home page */ img.logo { border: 0; float: right; marginleft: 10px; }
/* this contains everything all the other divs */ #page { backgroundcolor: #fff;
width : 750px; height: 100%; color : #000; marginright : auto; marginleft : auto; margintop: 10px; textalign : left; padding: 10px; border: medium solid #000;
}
#banner { margin: 0 0 5px 0; padding:0;
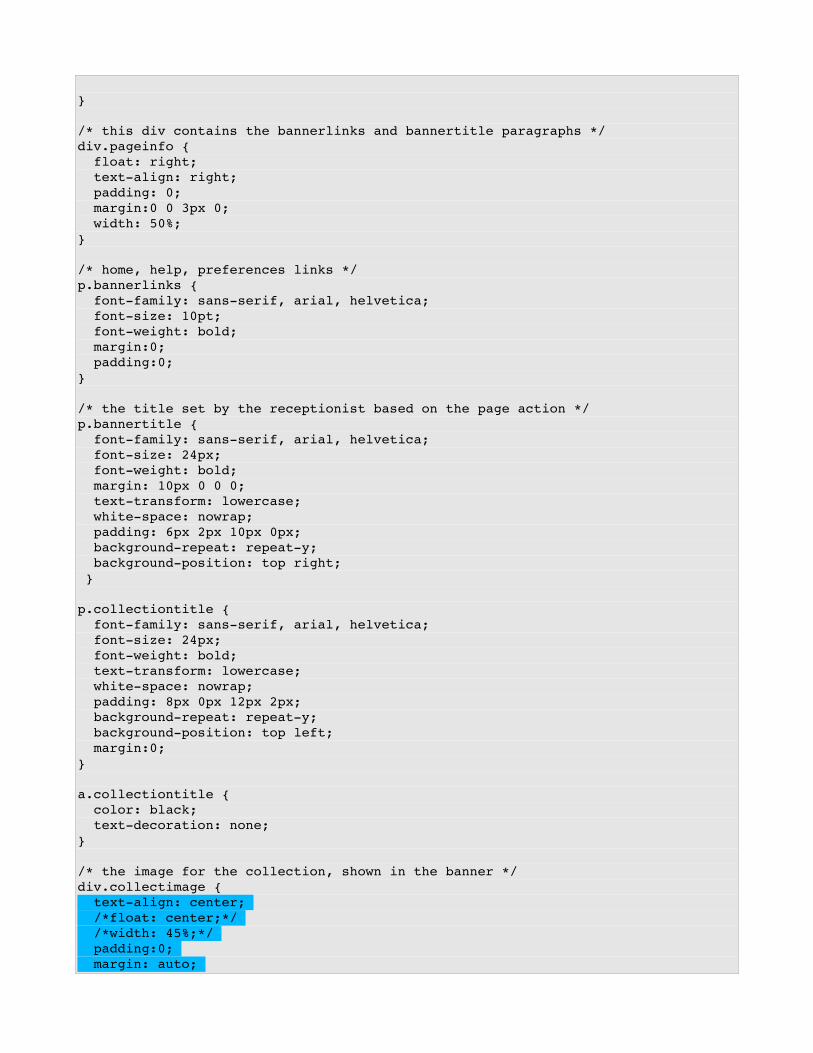
} /* this div contains the bannerlinks and bannertitle paragraphs */ div.pageinfo { float: right; textalign: right; padding: 0; margin:0 0 3px 0; width: 50%; }
/* home, help, preferences links */ p.bannerlinks { fontfamily: sansserif, arial, helvetica; fontsize: 10pt; fontweight: bold; margin:0; padding:0; }
/* the title set by the receptionist based on the page action */ p.bannertitle { fontfamily: sansserif, arial, helvetica; fontsize: 24px; fontweight: bold; margin: 10px 0 0 0; texttransform: lowercase; whitespace: nowrap; padding: 6px 2px 10px 0px; backgroundrepeat: repeaty; backgroundposition: top right; }
p.collectiontitle { fontfamily: sansserif, arial, helvetica; fontsize: 24px; fontweight: bold; texttransform: lowercase; whitespace: nowrap; padding: 8px 0px 12px 2px; backgroundrepeat: repeaty; backgroundposition: top left; margin:0; }
a.collectiontitle { color: black; textdecoration: none; }
/* the image for the collection, shown in the banner */ div.collectimage { textalign: center; /*float: center;*/ /*width: 45%;*/ padding:0; margin: auto;
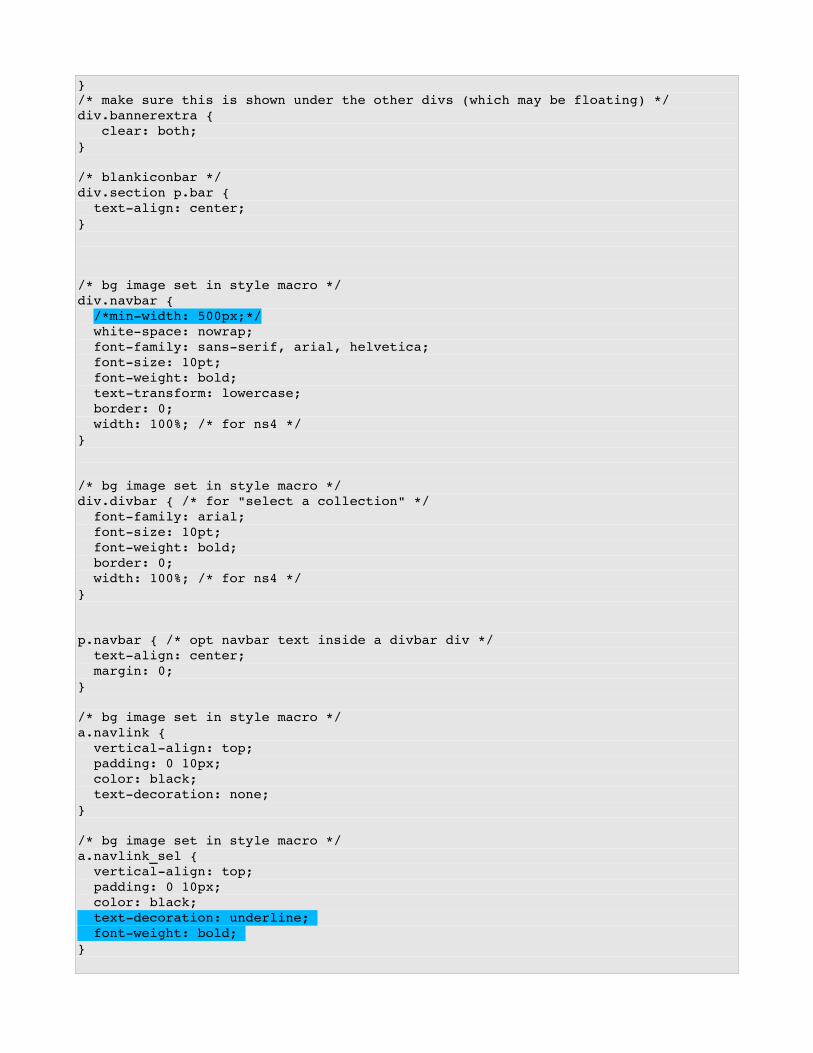
} /* make sure this is shown under the other divs (which may be floating) */ div.bannerextra { clear: both; }
/* blankiconbar */ div.section p.bar { textalign: center; }
/* bg image set in style macro */ div.navbar { /*minwidth: 500px;*/ whitespace: nowrap; fontfamily: sansserif, arial, helvetica; fontsize: 10pt; fontweight: bold; texttransform: lowercase; border: 0; width: 100%; /* for ns4 */ }
/* bg image set in style macro */ div.divbar { /* for "select a collection" */ fontfamily: arial; fontsize: 10pt; fontweight: bold; border: 0; width: 100%; /* for ns4 */ }
p.navbar { /* opt navbar text inside a divbar div */ textalign: center; margin: 0; }
/* bg image set in style macro */ a.navlink { verticalalign: top; padding: 0 10px; color: black; textdecoration: none; }
/* bg image set in style macro */ a.navlink_sel { verticalalign: top; padding: 0 10px; color: black; textdecoration: underline; fontweight: bold; }
a.navlink:visited { color: black; }
/* for the nav_ns4.dm macro only (for netscape4 support) */ a.navlink_ns4 { backgroundcolor: #e8d9b1; }
a.navlink_sel_ns4 { backgroundcolor: #96c19b; }
span.highlight { background: #ffff77; }
/* content inside the pages */ img.icon { border: 0; }
span.textselect { whitespace: nowrap; }
div.document { padding: .2em 0 0 0; clear: both; }
div.documenttext { clear: both; } /* come after any floating divs */
ul#searchresults{ liststyletype: none; margin: 0 0 .2em 0; padding:0; overflow: hidden; }
ul#searchresults li{ margin: 0; padding: 2px 0 2px 0; fontsize: 11px; fontweight: bold; width: 160px; backgroundcolor:#f7e7c5; textalign:center; } li#nextresult{ float:right; }
li#prevresult{ float:left; }
ul#searchresults li a { margin:0;
padding:0; textdecoration: none; color: black; }
div.warning { /* eg expanding more than 10 sections in table of contents */ } div.warning div.buttons { float: right; } /* continue button */
div.heading_image { float: left;
} /* optional cover image */
div.heading_title { fontsize: 14pt; } /* alternate to cover image */
div.document div.buttons { /* anything that holds buttons... toc_buttons but also continue button */ width: 100px; /* each button (inside its own div) can overflow this */ } div#toc_buttons { /* expand/contract etc "buttons" */ clear: left; /* don't put next to another float on our lefthand side */ float: left; margin: 0 15px 5px 0; }
div.button { fontsize: 11px; fontweight: bold; background: #f7e7c5; margin: 1px; border: 1px solid #eeddbb; textalign: center; verticalalign: middle; width: 110px; }
*>div.button { /* for other browsers IE6 doesn't apply this */ height: auto; width: auto; minwidth: 110px; }
span.button {} span.button a { textdecoration: none; color: black; } span.button a:hover { /* IE6 doesn't do :hover for things that aren't <A> */ background: #eeddbb; }
div.homebutton { fontsize: 11px; fontweight: bold; background: #f7e7c5; margin: 1px; border: 1px solid #eeddbb;
textalign: center; verticalalign: middle; width: 110px; height: 30px; }
div.section p { textalign: justify; }
/* for the home page autogenerated _homeextra_ macro */ table.collections { width: 100%; maxwidth: 800px; textalign: center; /* centres a block element for gecko and opera. (IE 5.5 needs parent * textalign) */ marginleft:auto; marginright:auto; }
/* collections that have a logo should have a border around them */ table.collections img { border: 0px none; width: 215px; height: 120px; }
/* collector bar */ table.wizardbar { textalign: center; verticalalign: middle; }
td.wizardbargreen { backgroundcolor: #96BE9C; } td.wizardbaryellow { backgroundcolor: #EEE8AA; } td.wizardbargrey { backgroundcolor: #D3D3D3; }
table.wizardbar a { color: black; textdecoration: none; }
table.wizardbar a:visited { color: black; }
span.date_list_year { fontweight: bold; } span.date_list_month { fontweight: bold; }
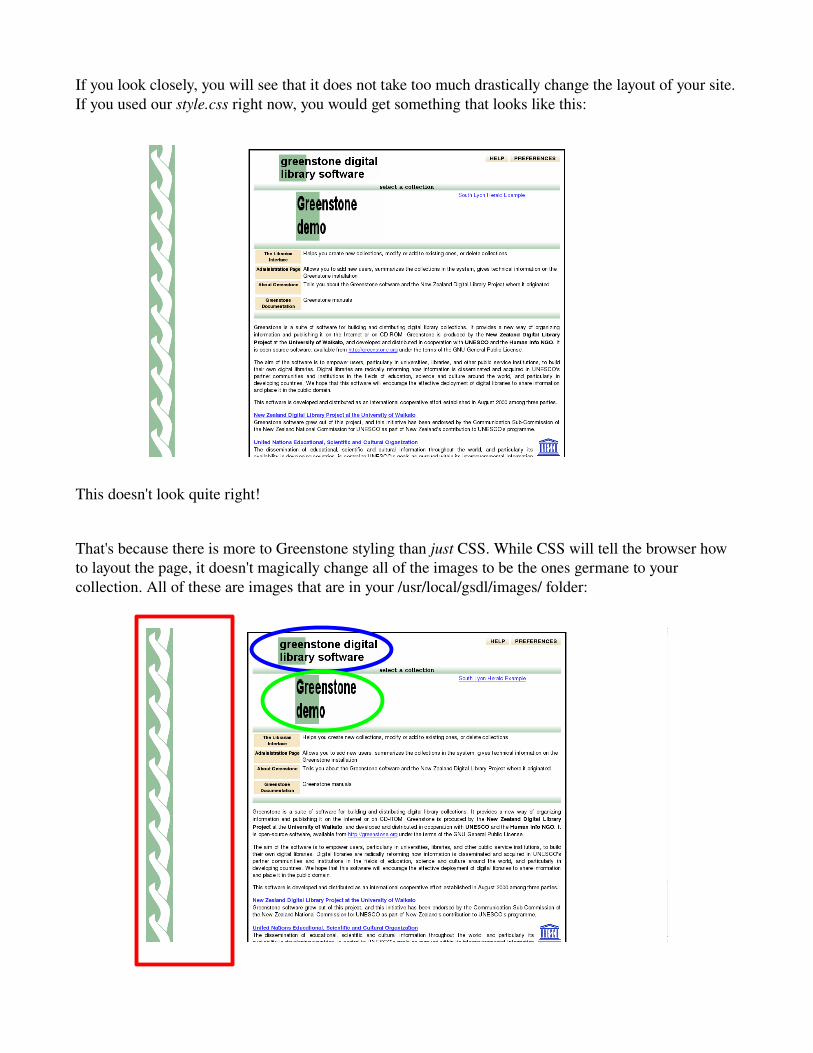
If you look closely, you will see that it does not take too much drastically change the layout of your site. If you used our style.css right now, you would get something that looks like this:
This doesn't look quite right!
That's because there is more to Greenstone styling than just CSS. While CSS will tell the browser how to layout the page, it doesn't magically change all of the images to be the ones germane to your collection. All of these are images that are in your /usr/local/gsdl/images/ folder:
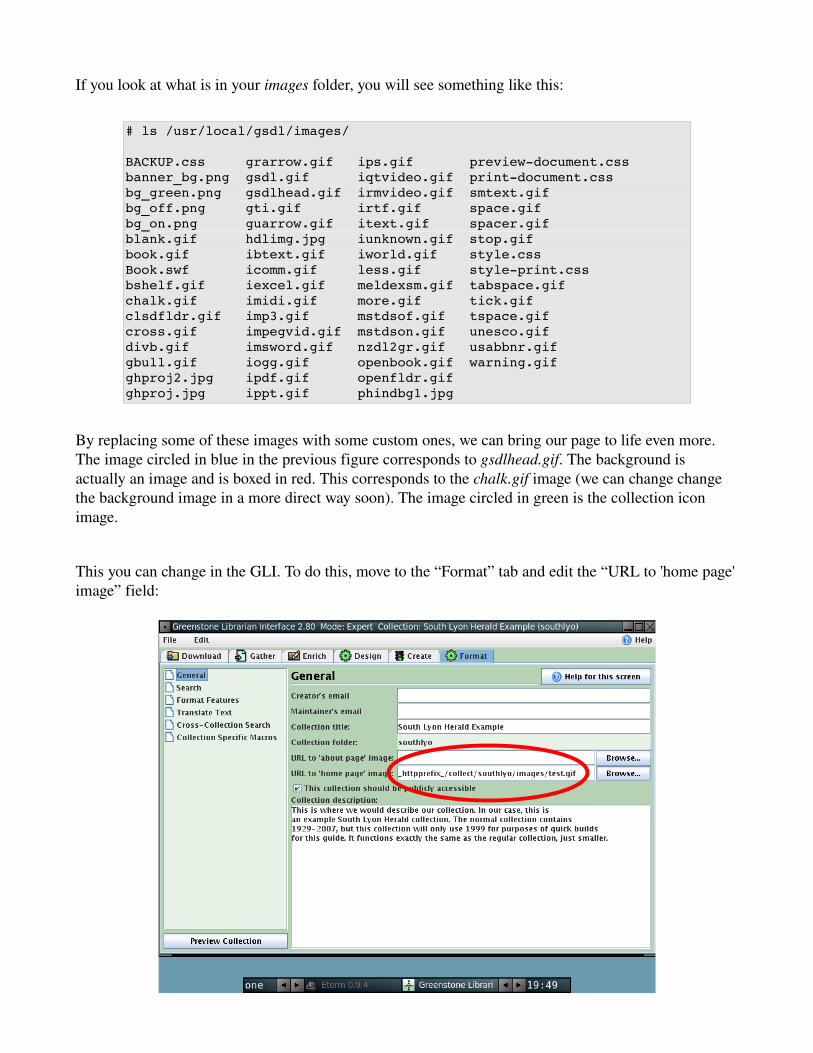
If you look at what is in your images folder, you will see something like this:
# ls /usr/local/gsdl/images/
BACKUP.css grarrow.gif ips.gif previewdocument.css banner_bg.png gsdl.gif iqtvideo.gif printdocument.css bg_green.png gsdlhead.gif irmvideo.gif smtext.gif bg_off.png gti.gif irtf.gif space.gif bg_on.png guarrow.gif itext.gif spacer.gif blank.gif hdlimg.jpg iunknown.gif stop.gif book.gif ibtext.gif iworld.gif style.css Book.swf icomm.gif less.gif styleprint.css bshelf.gif iexcel.gif meldexsm.gif tabspace.gif chalk.gif imidi.gif more.gif tick.gif clsdfldr.gif imp3.gif mstdsof.gif tspace.gif cross.gif impegvid.gif mstdson.gif unesco.gif divb.gif imsword.gif nzdl2gr.gif usabbnr.gif gbull.gif iogg.gif openbook.gif warning.gif ghproj2.jpg ipdf.gif openfldr.gif ghproj.jpg ippt.gif phindbg1.jpg
By replacing some of these images with some custom ones, we can bring our page to life even more. The image circled in blue in the previous figure corresponds to gsdlhead.gif. The background is actually an image and is boxed in red. This corresponds to the chalk.gif image (we can change change the background image in a more direct way soon). The image circled in green is the collection icon image.
This you can change in the GLI. To do this, move to the “Format” tab and edit the “URL to 'home page' image” field:
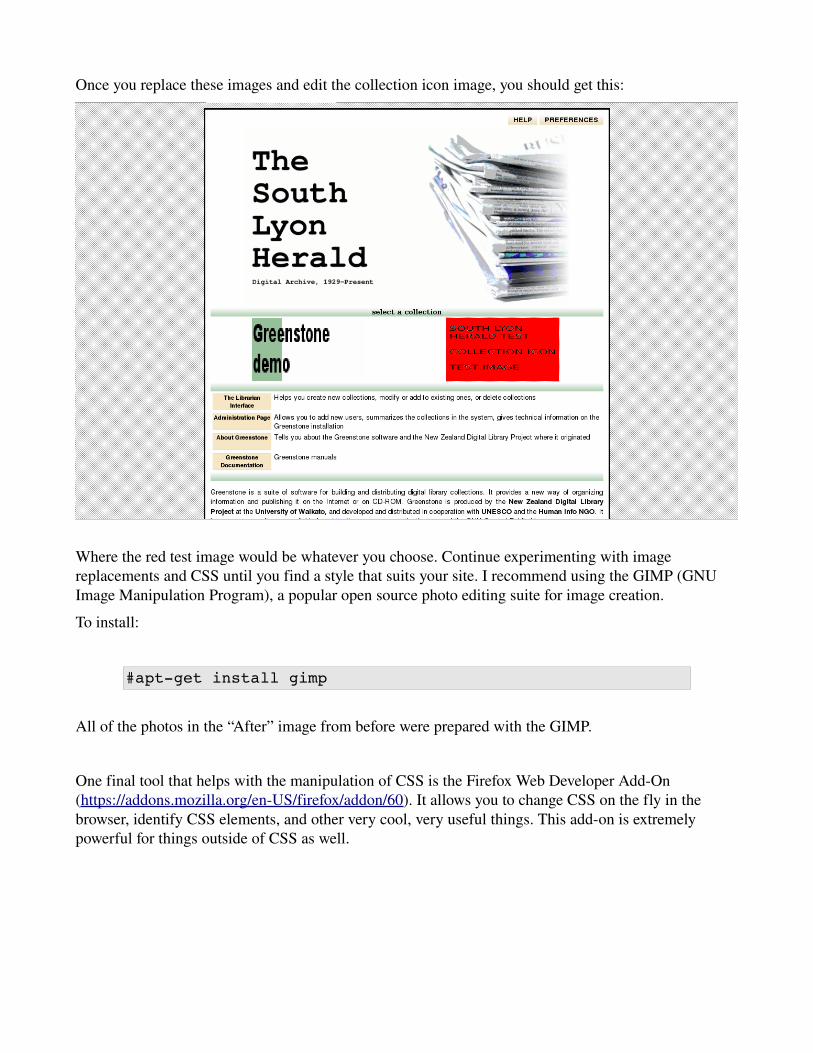
Once you replace these images and edit the collection icon image, you should get this:
Where the red test image would be whatever you choose. Continue experimenting with image replacements and CSS until you find a style that suits your site. I recommend using the GIMP (GNU Image Manipulation Program), a popular open source photo editing suite for image creation.
To install:
#aptget install gimp
All of the photos in the “After” image from before were prepared with the GIMP.
One final tool that helps with the manipulation of CSS is the Firefox Web Developer AddOn (https://addons.mozilla.org/enUS/firefox/addon/60). It allows you to change CSS on the fly in the browser, identify CSS elements, and other very cool, very useful things. This addon is extremely powerful for things outside of CSS as well.
6.2 – Format Features
Format features are a neat feature for Greenstone maintainers to play with. They are an HTML/XML type code that is interpreted by the Greenstone server and then changed into actual page features. The most interesting feature that format features offer is the ability to do conditional arguments in respect to metadata (which we have lots of!), and create some dynamically styled pages. I'll run through two neat examples that apply directly to our Herald collection.
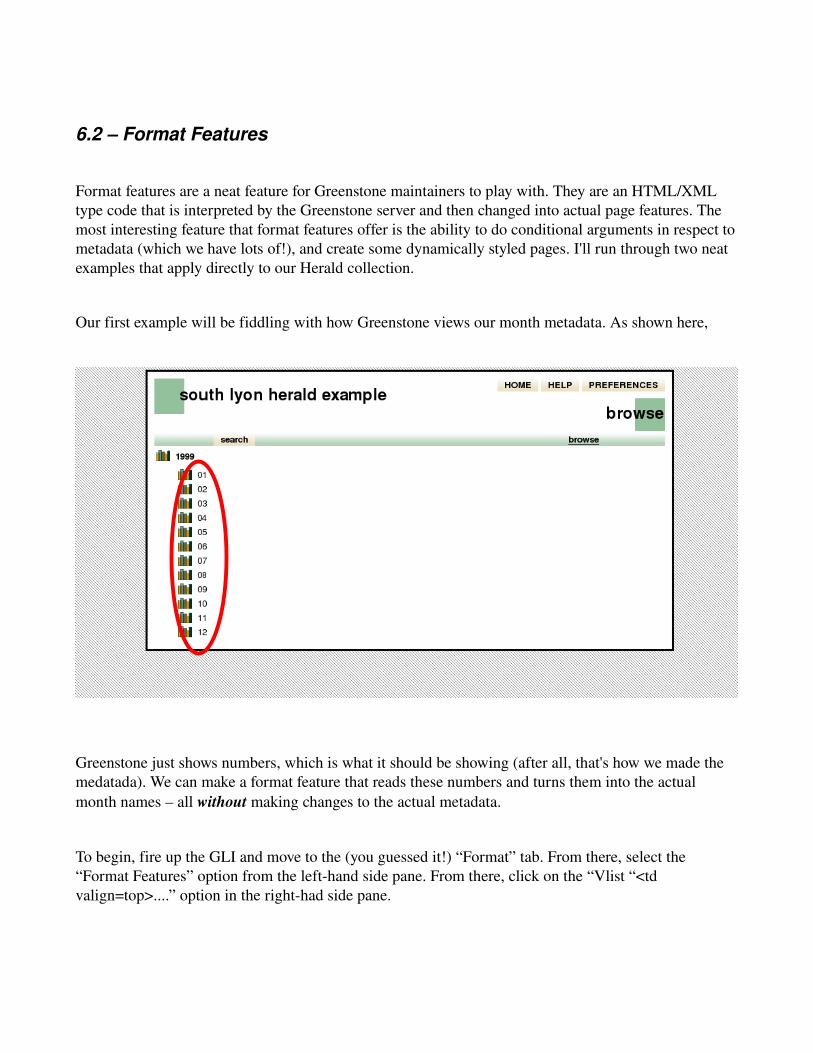
Our first example will be fiddling with how Greenstone views our month metadata. As shown here,
Greenstone just shows numbers, which is what it should be showing (after all, that's how we made the medatada). We can make a format feature that reads these numbers and turns them into the actual month names – all without making changes to the actual metadata.
To begin, fire up the GLI and move to the (you guessed it!) “Format” tab. From there, select the “Format Features” option from the lefthand side pane. From there, click on the “Vlist “<td valign=top>....” option in the righthad side pane.
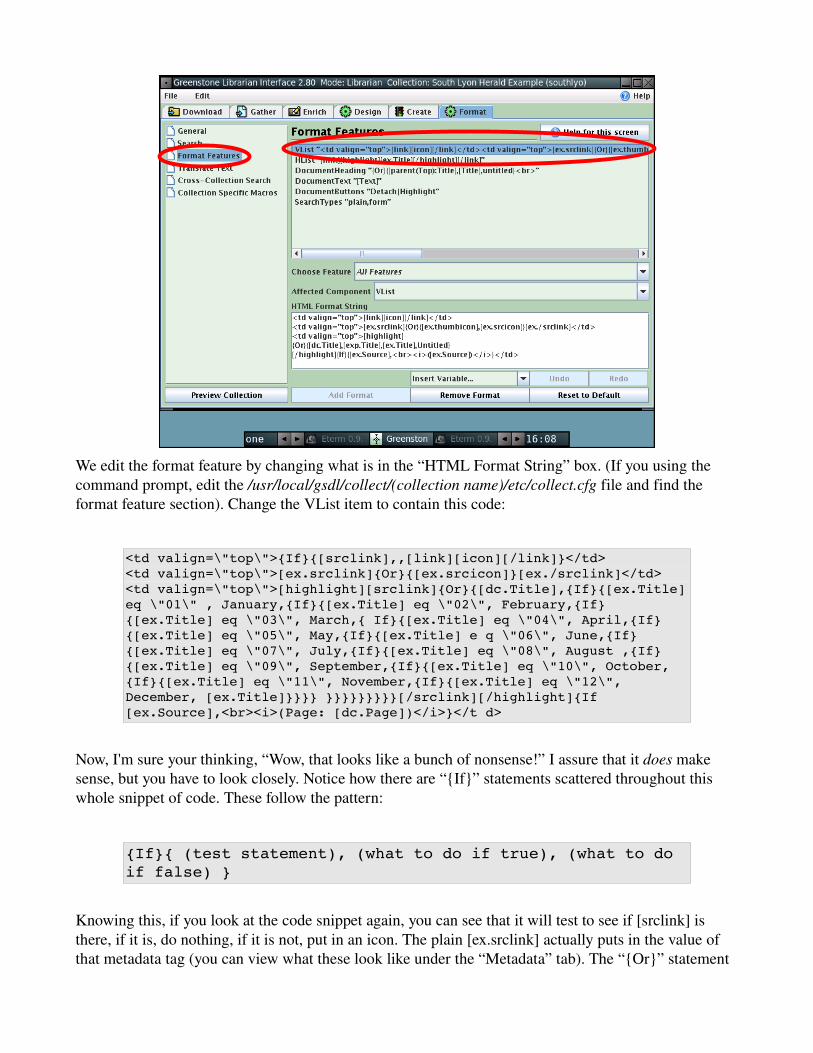
We edit the format feature by changing what is in the “HTML Format String” box. (If you using the command prompt, edit the /usr/local/gsdl/collect/(collection name)/etc/collect.cfg file and find the format feature section). Change the VList item to contain this code:
<td valign=\"top\">{If}{[srclink],,[link][icon][/link]}</td> <td valign=\"top\">[ex.srclink]{Or}{[ex.srcicon]}[ex./srclink]</td> <td valign=\"top\">[highlight][srclink]{Or}{[dc.Title],{If}{[ex.Title] eq \"01\" , January,{If}{[ex.Title] eq \"02\", February,{If}{[ex.Title] eq \"03\", March,{ If}{[ex.Title] eq \"04\", April,{If}{[ex.Title] eq \"05\", May,{If}{[ex.Title] e q \"06\", June,{If}{[ex.Title] eq \"07\", July,{If}{[ex.Title] eq \"08\", August ,{If}{[ex.Title] eq \"09\", September,{If}{[ex.Title] eq \"10\", October,{If}{[ex.Title] eq \"11\", November,{If}{[ex.Title] eq \"12\", December, [ex.Title]}}}} }}}}}}}}}[/srclink][/highlight]{If [ex.Source],<br><i>(Page: [dc.Page])</i>}</t d>
Now, I'm sure your thinking, “Wow, that looks like a bunch of nonsense!” I assure that it does make sense, but you have to look closely. Notice how there are “{If}” statements scattered throughout this whole snippet of code. These follow the pattern:
{If}{ (test statement), (what to do if true), (what to do if false) }
Knowing this, if you look at the code snippet again, you can see that it will test to see if [srclink] is there, if it is, do nothing, if it is not, put in an icon. The plain [ex.srclink] actually puts in the value of that metadata tag (you can view what these look like under the “Metadata” tab). The “{Or}” statement
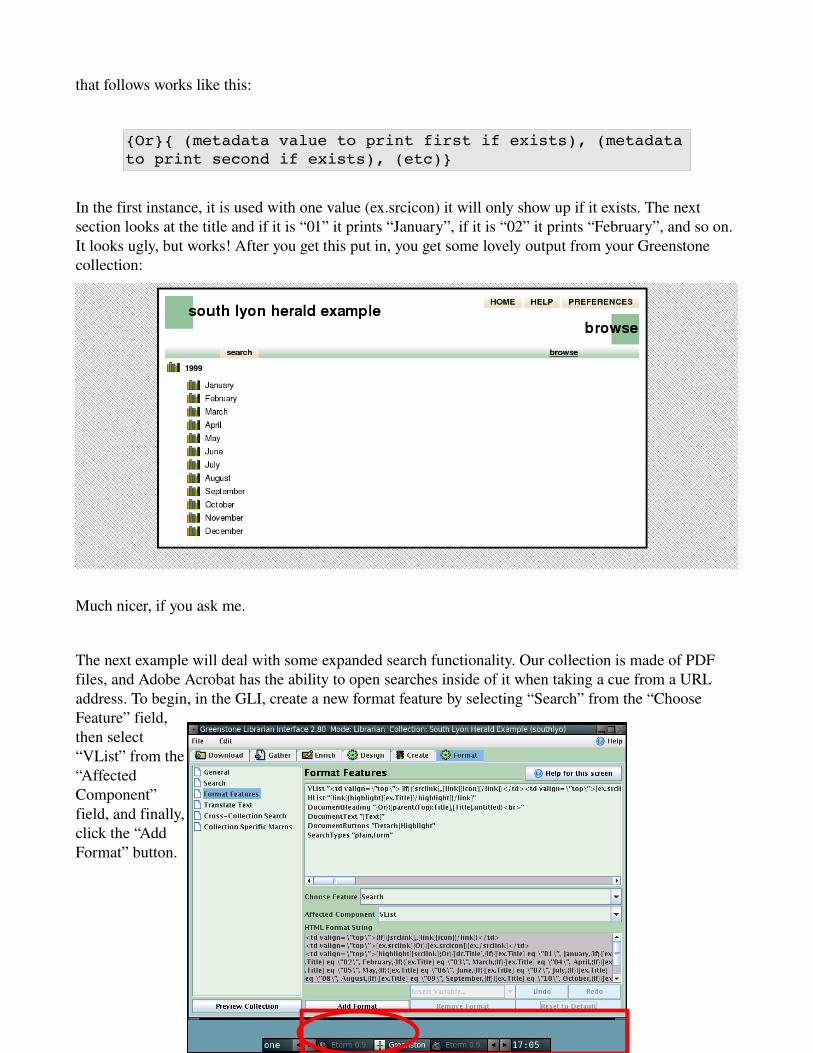
that follows works like this:
{Or}{ (metadata value to print first if exists), (metadata to print second if exists), (etc)}
In the first instance, it is used with one value (ex.srcicon) it will only show up if it exists. The next section looks at the title and if it is “01” it prints “January”, if it is “02” it prints “February”, and so on. It looks ugly, but works! After you get this put in, you get some lovely output from your Greenstone collection:
Much nicer, if you ask me.
The next example will deal with some expanded search functionality. Our collection is made of PDF files, and Adobe Acrobat has the ability to open searches inside of it when taking a cue from a URL address. To begin, in the GLI, create a new format feature by selecting “Search” from the “Choose Feature” field, then select “VList” from the “Affected Component” field, and finally, click the “Add Format” button.
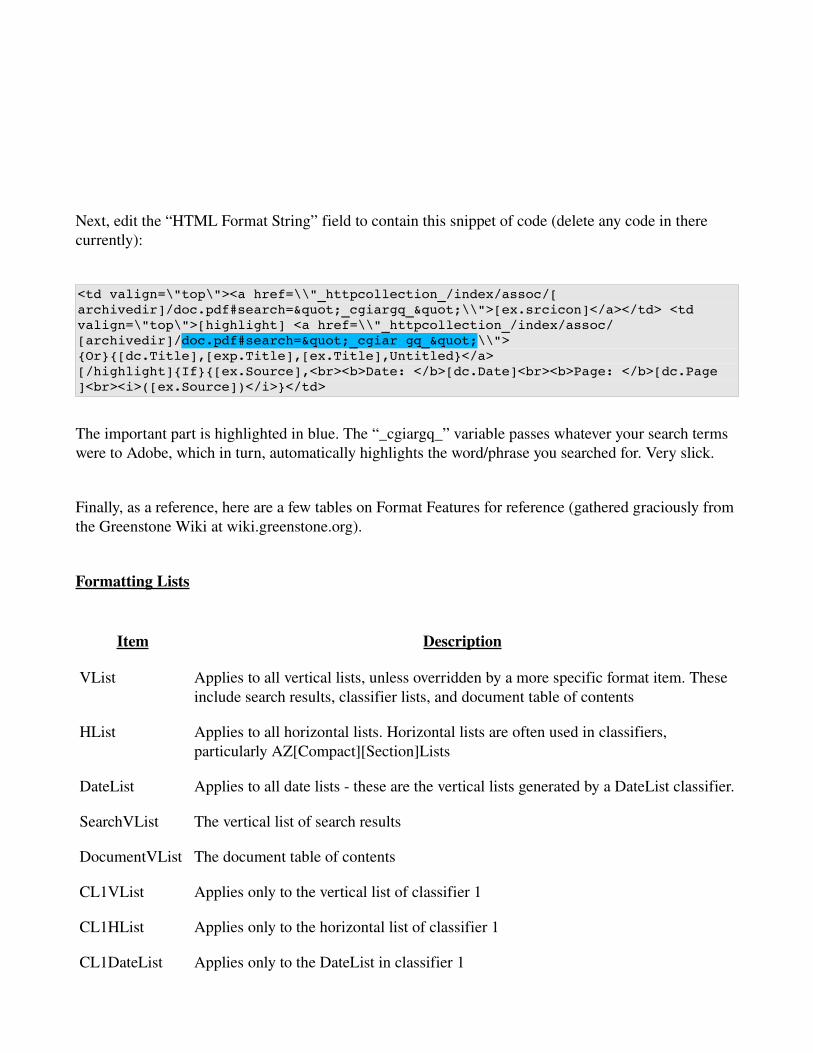
Next, edit the “HTML Format String” field to contain this snippet of code (delete any code in there currently):
<td valign=\"top\"><a href=\\"_httpcollection_/index/assoc/[ archivedir]/doc.pdf#search="_cgiargq_"\\">[ex.srcicon]</a></td> <td valign=\"top\">[highlight] <a href=\\"_httpcollection_/index/assoc/[archivedir]/doc.pdf#search="_cgiar gq_"\\">{Or}{[dc.Title],[exp.Title],[ex.Title],Untitled}</a> [/highlight]{If}{[ex.Source],<br><b>Date: </b>[dc.Date]<br><b>Page: </b>[dc.Page ]<br><i>([ex.Source])</i>}</td>
The important part is highlighted in blue. The “_cgiargq_” variable passes whatever your search terms were to Adobe, which in turn, automatically highlights the word/phrase you searched for. Very slick.
Finally, as a reference, here are a few tables on Format Features for reference (gathered graciously from the Greenstone Wiki at wiki.greenstone.org).
Formatting Lists
Item Description
VList Applies to all vertical lists, unless overridden by a more specific format item. These include search results, classifier lists, and document table of contents
HList Applies to all horizontal lists. Horizontal lists are often used in classifiers, particularly AZ[Compact][Section]Lists
DateList Applies to all date lists these are the vertical lists generated by a DateList classifier.
SearchVList The vertical list of search results
DocumentVList The document table of contents
CL1VList Applies only to the vertical list of classifier 1
CL1HList Applies only to the horizontal list of classifier 1
CL1DateList Applies only to the DateList in classifier 1
Format String items
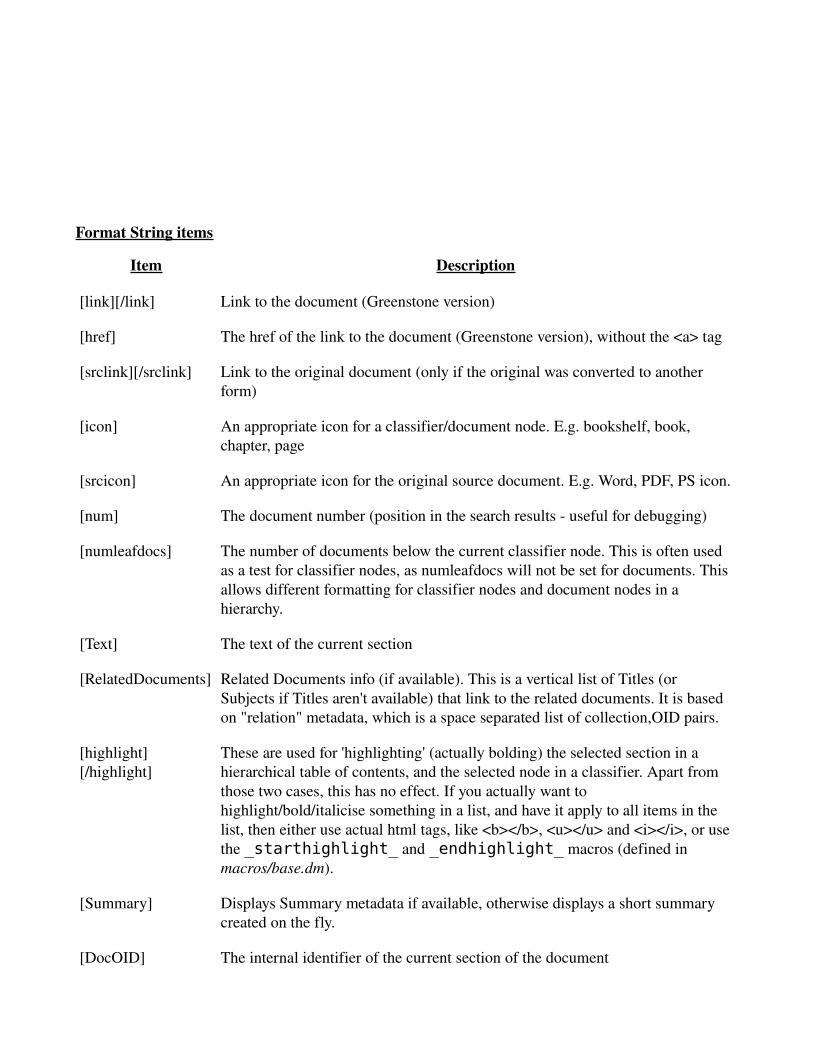
Item Description
[link][/link] Link to the document (Greenstone version)
[href] The href of the link to the document (Greenstone version), without the <a> tag
[srclink][/srclink] Link to the original document (only if the original was converted to another form)
[icon] An appropriate icon for a classifier/document node. E.g. bookshelf, book, chapter, page
[srcicon] An appropriate icon for the original source document. E.g. Word, PDF, PS icon.
[num] The document number (position in the search results useful for debugging)
[numleafdocs] The number of documents below the current classifier node. This is often used as a test for classifier nodes, as numleafdocs will not be set for documents. This allows different formatting for classifier nodes and document nodes in a hierarchy.
[Text] The text of the current section
[RelatedDocuments] Related Documents info (if available). This is a vertical list of Titles (or Subjects if Titles aren't available) that link to the related documents. It is based on "relation" metadata, which is a space separated list of collection,OID pairs.
[highlight][/highlight]
These are used for 'highlighting' (actually bolding) the selected section in a hierarchical table of contents, and the selected node in a classifier. Apart from those two cases, this has no effect. If you actually want to highlight/bold/italicise something in a list, and have it apply to all items in the list, then either use actual html tags, like <b></b>, <u></u> and <i></i>, or use the _starthighlight_ and _endhighlight_ macros (defined in macros/base.dm).
[Summary] Displays Summary metadata if available, otherwise displays a short summary created on the fly.
[DocOID] The internal identifier of the current section of the document
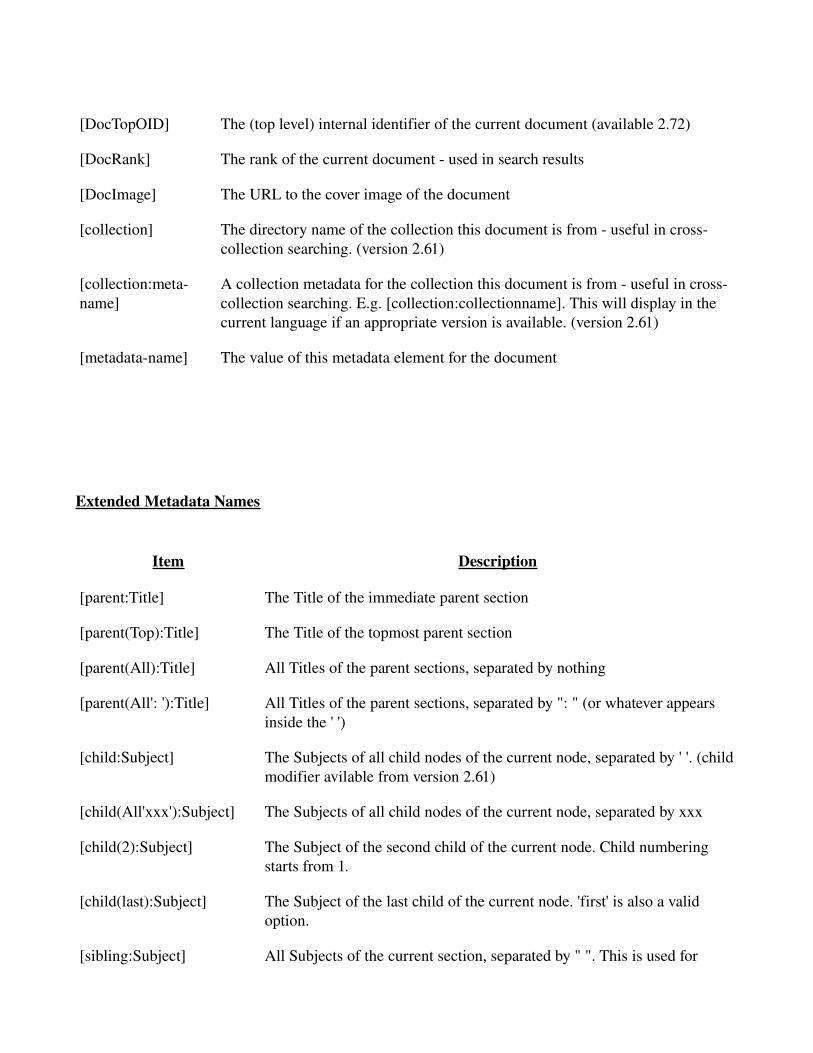
[DocTopOID] The (top level) internal identifier of the current document (available 2.72)
[DocRank] The rank of the current document used in search results
[DocImage] The URL to the cover image of the document
[collection] The directory name of the collection this document is from useful in crosscollection searching. (version 2.61)
[collection:metaname]
A collection metadata for the collection this document is from useful in crosscollection searching. E.g. [collection:collectionname]. This will display in the current language if an appropriate version is available. (version 2.61)
[metadataname] The value of this metadata element for the document
Extended Metadata Names
Item Description
[parent:Title] The Title of the immediate parent section
[parent(Top):Title] The Title of the topmost parent section
[parent(All):Title] All Titles of the parent sections, separated by nothing
[parent(All': '):Title] All Titles of the parent sections, separated by ": " (or whatever appears inside the ' ')
[child:Subject] The Subjects of all child nodes of the current node, separated by ' '. (child modifier avilable from version 2.61)
[child(All'xxx'):Subject] The Subjects of all child nodes of the current node, separated by xxx
[child(2):Subject] The Subject of the second child of the current node. Child numbering starts from 1.
[child(last):Subject] The Subject of the last child of the current node. 'first' is also a valid option.
[sibling:Subject] All Subjects of the current section, separated by " ". This is used for
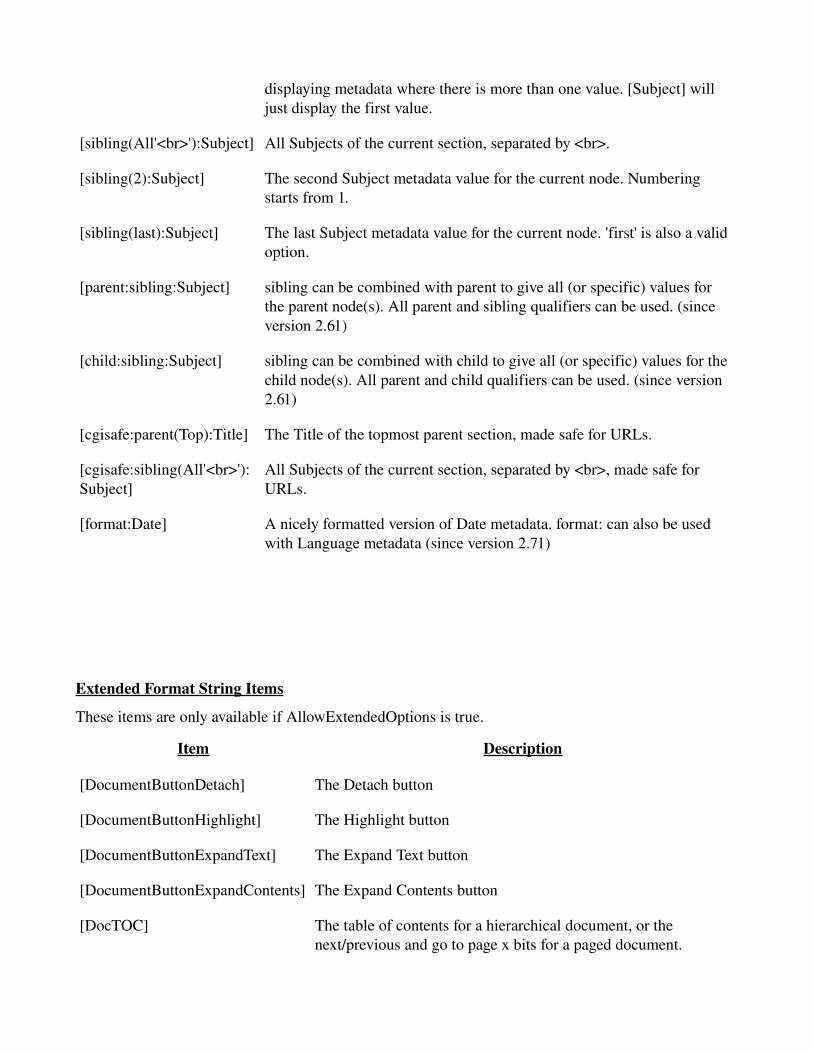
displaying metadata where there is more than one value. [Subject] will just display the first value.
[sibling(All'<br>'):Subject] All Subjects of the current section, separated by <br>.
[sibling(2):Subject] The second Subject metadata value for the current node. Numbering starts from 1.
[sibling(last):Subject] The last Subject metadata value for the current node. 'first' is also a valid option.
[parent:sibling:Subject] sibling can be combined with parent to give all (or specific) values for the parent node(s). All parent and sibling qualifiers can be used. (since version 2.61)
[child:sibling:Subject] sibling can be combined with child to give all (or specific) values for the child node(s). All parent and child qualifiers can be used. (since version 2.61)
[cgisafe:parent(Top):Title] The Title of the topmost parent section, made safe for URLs.
[cgisafe:sibling(All'<br>'):Subject]
All Subjects of the current section, separated by <br>, made safe for URLs.
[format:Date] A nicely formatted version of Date metadata. format: can also be used with Language metadata (since version 2.71)
Extended Format String Items
These items are only available if AllowExtendedOptions is true.
Item Description
[DocumentButtonDetach] The Detach button
[DocumentButtonHighlight] The Highlight button
[DocumentButtonExpandText] The Expand Text button
[DocumentButtonExpandContents] The Expand Contents button
[DocTOC] The table of contents for a hierarchical document, or the next/previous and go to page x bits for a paged document.
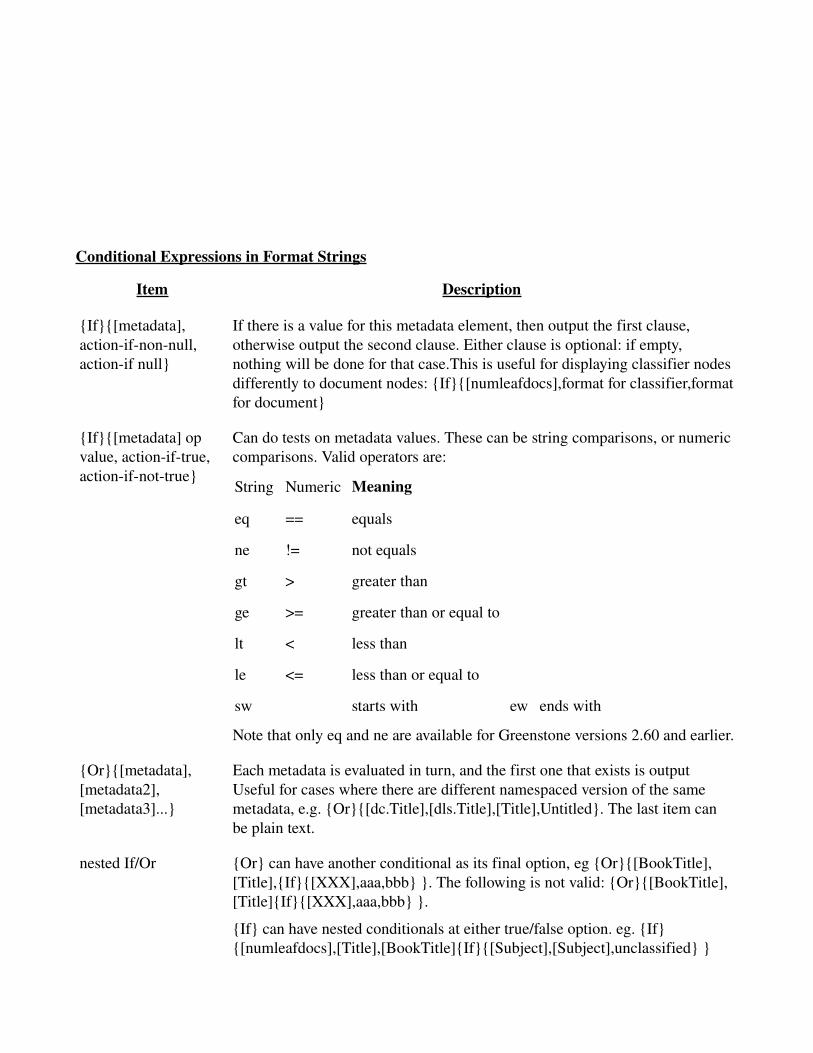
Conditional Expressions in Format Strings
Item Description
{If}{[metadata], actionifnonnull, actionif null}
If there is a value for this metadata element, then output the first clause, otherwise output the second clause. Either clause is optional: if empty, nothing will be done for that case.This is useful for displaying classifier nodes differently to document nodes: {If}{[numleafdocs],format for classifier,format for document}
{If}{[metadata] op value, actioniftrue, actionifnottrue}
Can do tests on metadata values. These can be string comparisons, or numeric comparisons. Valid operators are:
String Numeric Meaning
eq == equals
ne != not equals
gt > greater than
ge >= greater than or equal to
lt < less than
le <= less than or equal to
sw starts with ew ends with
Note that only eq and ne are available for Greenstone versions 2.60 and earlier.
{Or}{[metadata], [metadata2], [metadata3]...}
Each metadata is evaluated in turn, and the first one that exists is output Useful for cases where there are different namespaced version of the same metadata, e.g. {Or}{[dc.Title],[dls.Title],[Title],Untitled}. The last item can be plain text.
nested If/Or {Or} can have another conditional as its final option, eg {Or}{[BookTitle],[Title],{If}{[XXX],aaa,bbb} }. The following is not valid: {Or}{[BookTitle],[Title]{If}{[XXX],aaa,bbb} }.
{If} can have nested conditionals at either true/false option. eg. {If}{[numleafdocs],[Title],[BookTitle]{If}{[Subject],[Subject],unclassified} }
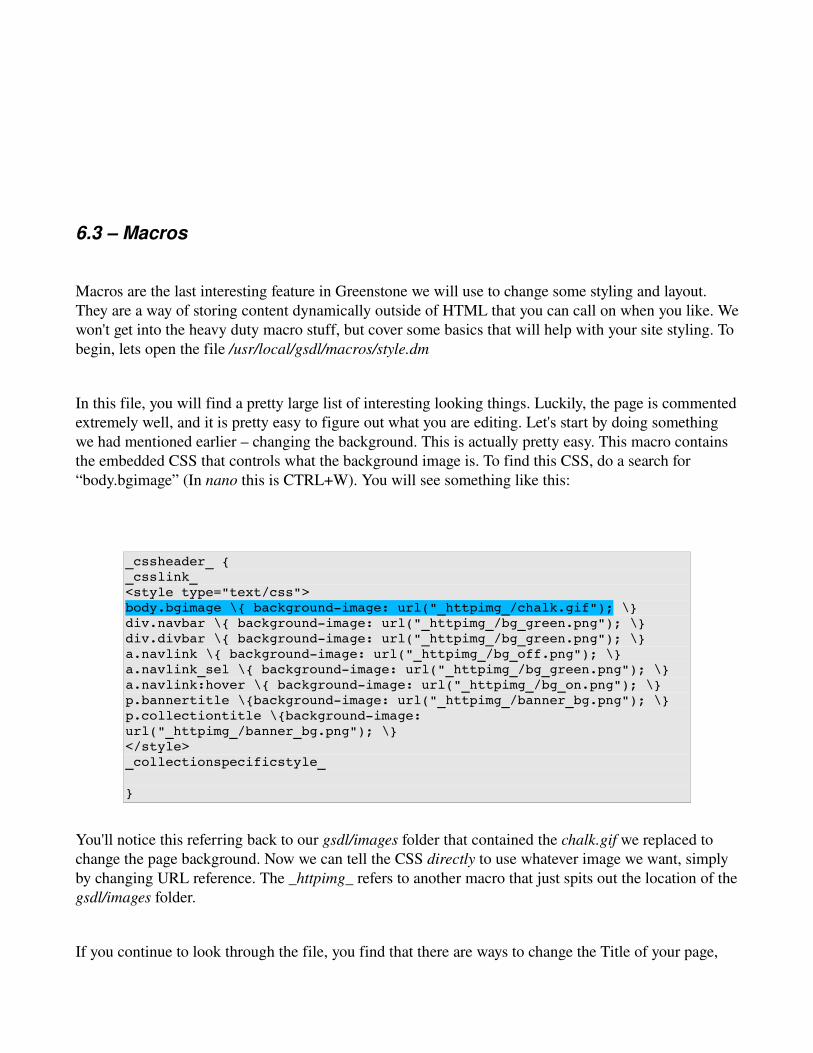
6.3 – Macros
Macros are the last interesting feature in Greenstone we will use to change some styling and layout. They are a way of storing content dynamically outside of HTML that you can call on when you like. We won't get into the heavy duty macro stuff, but cover some basics that will help with your site styling. To begin, lets open the file /usr/local/gsdl/macros/style.dm
In this file, you will find a pretty large list of interesting looking things. Luckily, the page is commented extremely well, and it is pretty easy to figure out what you are editing. Let's start by doing something we had mentioned earlier – changing the background. This is actually pretty easy. This macro contains the embedded CSS that controls what the background image is. To find this CSS, do a search for “body.bgimage” (In nano this is CTRL+W). You will see something like this:
_cssheader_ { _csslink_ <style type="text/css"> body.bgimage \{ backgroundimage: url("_httpimg_/chalk.gif"); \} div.navbar \{ backgroundimage: url("_httpimg_/bg_green.png"); \} div.divbar \{ backgroundimage: url("_httpimg_/bg_green.png"); \} a.navlink \{ backgroundimage: url("_httpimg_/bg_off.png"); \} a.navlink_sel \{ backgroundimage: url("_httpimg_/bg_green.png"); \} a.navlink:hover \{ backgroundimage: url("_httpimg_/bg_on.png"); \} p.bannertitle \{backgroundimage: url("_httpimg_/banner_bg.png"); \} p.collectiontitle \{backgroundimage: url("_httpimg_/banner_bg.png"); \} </style> _collectionspecificstyle_
}
You'll notice this referring back to our gsdl/images folder that contained the chalk.gif we replaced to change the page background. Now we can tell the CSS directly to use whatever image we want, simply by changing URL reference. The _httpimg_ refers to another macro that just spits out the location of the gsdl/images folder.
If you continue to look through the file, you find that there are ways to change the Title of your page,

change banner properties, and other style related things. There is another important macro file that you should explore as well – the home.dm file. This contains content layout and allows you to remove content from your page should you not want it. Backup both of these files and play around with them to find out how they work.

7 – FINAL PROJECT REVIEW
Collection Source:
82,000+ images extracted from thirdparty CDROMs.
Computers Used:
(MAIN SERVER) Blade style server w/ AMD Athlon 64 3200+ processor clocked at 2037 MHz with 2 GB RAM
(WORKSTATION/OCR ASSISTANCE) Dell XPS 600 w/ Pentium D Dual Core 2997 MHz Processor with 2.0 GB RAM
Operating Systems:
Debian 4.0rc3 (MAIN SERVER)Ubuntu 7.04 – 7.10 (WORKSTATION)
OCR Completion Time:
31 Days (+/ 6 Hours). Distributed load between both aforementioned computers. Numerous power outages contributed roughly 2 days worth of downtime.
Greenstone Collection Build Time:
4 Weeks.
Total Project Time:
Roughly 3 months, including research into Digital Libraries.
8 – FINAL COMMENTS
Working with Greenstone has been a great experience. This truly is the way to go when it comes to building a digital library.
In respect to this guide, I hope it has been a help to anyone reading it. I have gone to great lengths to document every step that we took in building our own digital library to help others in building theirs. I also hope that this guide will show other public libraries that it is possible to build a digital library with almost no budget at all (if you are willing to commit the time).
If anyone wishes to contact me, please feel free to send an email to
I welcome any comments, criticisms, or suggestions for changes to this guide.
Finally, and most importantly, this guide free to distribute and change to your likings. I only hope you will mention me somewhere along the line!
Jack KellySalem SouthLyon District Library