graviprobe 2.0 user manual · main project page ... manual v1.2.docx date 05/02/2018 revision 9th...
TRANSCRIPT

GRAVIPROBE 2.0 Customer User Manual
21 March 2018

Title Graviprobe 2.0 User Manual
Document Graviprobe - Customer - Manual v1.2.docx
Date
05/02/2018
Revision 9th
Page 2 of 59
Publisher dotOcean NV
Gistelse Steenweg 294/205 8200 Brugge Belgium
BE 0807.246.767
Date 21 March 2018
Author DTH, CDS
Reviser CDS
Contact [email protected]
Revisions Rev No. Date Description
1 23/08/2017 1st draft
2 24/08/2017 major amendments
3 24/08/2017 minor amendments + added External GPS
4 25/08/2017 minor changes
5 25/08/2017 minor changes
6 25/08/2017 Added usage instructions
7 31/08/2017 updated download section
8 31/08/2017 minor changes
9 01/09/2017 added downloading CSV files drops
10 01/09/2017 minor changes
11 05/02/2018 added install guide
12 15/03/2018 updated according to new types
This document is confidential and copyright protected. All rights are reserved by dotOcean NV. Nothing of this document or related information
collected can be sold, reused, or otherwise disclosed without written consent of the authors.

Title Graviprobe 2.0 User Manual
Document Graviprobe - Customer - Manual v1.2.docx
Date
05/02/2018
Revision 9th
Page 3 of 59
Contents
Contents ..............................................................................................................................................................................3
Introduction ........................................................................................................................................................................5
System Description ........................................................................................................................................................ 5
GraviProbe: Box Content .....................................................................................................................................................6
Graviprobe: Box tool placement .........................................................................................................................................7
GraviProbe Device Component Description ........................................................................................................................8
The GraviProbe device is composed of the following components: ......................................................................... 8
The GraviProbe device is supplied with the following assembly tool: ...................................................................... 8
The GraviProbe is supplied with the following accessories to perform drops:......................................................... 8
The GraviProbe device can be fitted with the following connectors: ....................................................................... 8
The GraviProbe is supplied with the following drop processing tools: ..................................................................... 9
The GraviProbe is supplied with the following support tools: .................................................................................. 9
Meaning of the coloured LED’s: ........................................................................................................................................10
The GraviProbe app ...........................................................................................................................................................11
App installation guide .................................................................................................................................................. 11
Add a google account ............................................................................................................................................. 11
Install the app via the Google play store ................................................................................................................ 14
App overview............................................................................................................................................................... 19
Menu side bar ......................................................................................................................................................... 19
Main Project page................................................................................................................................................... 20
Add project dialog .................................................................................................................................................. 21
Project measurements page ................................................................................................................................... 23
Edit project dialog ................................................................................................................................................... 24
Data graphs page .................................................................................................................................................... 25
Edit impact point page ............................................................................................................................................ 27
Edit measurement dialog........................................................................................................................................ 28
Main Device Page ................................................................................................................................................... 29
Device vitals page ................................................................................................................................................... 30
Device drop list page .............................................................................................................................................. 31
Support page .......................................................................................................................................................... 32
Performing measurements ...............................................................................................................................................33
Preparations ................................................................................................................................................................ 33
Making the drop .......................................................................................................................................................... 38
Safety notices ......................................................................................................................................................... 38
Measuring steps ..................................................................................................................................................... 38
Using the GraviProbe 2.0 app ...................................................................................................................................... 42

Title Graviprobe 2.0 User Manual
Document Graviprobe - Customer - Manual v1.2.docx
Date
05/02/2018
Revision 9th
Page 4 of 59
Establishing a connection with the device .............................................................................................................. 42
Creating a project ................................................................................................................................................... 43
Downloading and processing the data ................................................................................................................... 45
Viewing the data ..................................................................................................................................................... 46
Charging the GraviProbe 2.0 .............................................................................................................................................51
Connecting the external GPS .............................................................................................................................................52
Downloading the drop CSV file .........................................................................................................................................54
Method 1, using the export function: ..................................................................................................................... 54
Method 2, share the files on the tablet: ................................................................................................................. 55
Method 3, using a flash drive: ................................................................................................................................ 58
Method 4, connect the tablet with a computer: .................................................................................................... 59

Title Graviprobe 2.0 User Manual
Document Graviprobe - Customer - Manual v1.2.docx
Date
05/02/2018
Revision 9th
Page 5 of 59
Introduction
This user manual contains information, on how to operate the GraviProbe.
System Description
The GraviProbe is a fast and light rheological and density profiling system. It's a free fall impact instrument, analysing the
underwater sediment layers during intrusion. Under its own weight, it accelerates, and penetrates fluid and consolidated mud
layers.
The rheological and density conditions of the soil layers determine the probe’s dynamical behaviour. The data acquired, from on-
board accelerometers, inclinometers and pressure sensors, is feeding a dynamical model which determines the rheological
parameters of the intruded medium (depth, undrained shear and viscosity).
As a result, the GraviProbe is able to accurately distinguish the depth of the fluid mud, and consolidated soil layers, even in gassy
environments.
The high sensor data acquisition rates above 5 kHz, and in combination with a low drag housing, it results in high quality profiles, at
drop rates over 6 m/s.
Due to its low weight, the probe can be operated manually, from a small vessel, platform or quay, and it limits the operational
costs.

Title Graviprobe 2.0 User Manual
Document Graviprobe - Customer - Manual v1.2.docx
Date
05/02/2018
Revision 9th
Page 6 of 59
GraviProbe: Box Content
• GraviProbe main fuselage
• Lower tail section
• Upper tail section
• Fin 1
• Fin 2
• GraviProbe Tip
• M10 Lift eye
• Crown Shackle
• Dummy Connector
• ON-connector
• INOX Weight
• Battery Lock Tool
• GPS + Case
• Rope
• Tablet
• OTG cable
• USB to micro USB
• Charger + serial cable
• USB to Serial converter
• Charger for tablet
• M17 wrench

Title Graviprobe 2.0 User Manual
Document Graviprobe - Customer - Manual v1.2.docx
Date
05/02/2018
Revision 9th
Page 7 of 59
Graviprobe: Box tool placement

Title Graviprobe 2.0 User Manual
Document Graviprobe - Customer - Manual v1.2.docx
Date
05/02/2018
Revision 9th
Page 8 of 59
GraviProbe Device Component Description
The GraviProbe device is composed of the following components:
• GraviProbe main fuselage
• Lower tail section
• Upper tail section
• 2 fins
• A lift eye
• A crown shackle
• The tip
In order to perform measurements (drops), the device MUST be fully assembled according to the Quick Sheet.
The GraviProbe device is supplied with the following assembly tool:
• M17 wrench
The GraviProbe is supplied with the following accessories to perform drops:
• Inox weight
• rope
The GraviProbe device can be fitted with the following connectors:
• Dummy connector
• ON-connector
• Charger cable
IMPORTANT: there is a small difference between the dummy connector and the ON connecter. The ON connector has a red tip, to
identify it. When not using the GraviProbe, make sure that the Dummy connector is placed on the device, or the battery will be
discharged.

Title Graviprobe 2.0 User Manual
Document Graviprobe - Customer - Manual v1.2.docx
Date
05/02/2018
Revision 9th
Page 9 of 59
The GraviProbe is supplied with the following drop processing tools:
• Tablet
• Tablet charger
• OTG cable
• GPS + case
• USB to micro-USB cable
The GraviProbe is supplied with the following support tools:
• Lock Tool
• USB to Serial converter
Do NOT use the support tools without support from a dotOcean engineer.

Title Graviprobe 2.0 User Manual
Document Graviprobe - Customer - Manual v1.2.docx
Date
05/02/2018
Revision 9th
Page 10 of 59
Meaning of the coloured LED’s:
Colour Meaning Required action
Flashing blue Device is ready for performing drops None
Blue Logger Inactive Wait until device is flashing blue
Green Battery full Disconnect charger cable
Flashing green Device is charging None
Orange flashing Low battery < 10% Charge device
Fast orange flashing Very low battery < 5% Charge device
Red Device inactive Contact support
Flashing red Error, no data available Contact support
Yellow Device is booting None

Title Graviprobe 2.0 User Manual
Document Graviprobe - Customer - Manual v1.2.docx
Date
05/02/2018
Revision 9th
Page 11 of 59
The GraviProbe app
The GraviProbe 2.0 tablet is used in conjunction with the GraviProbe. To use the tablet the Graviprobe app MUST be installed via the
Google Play Store. For areas without access to the Google Play Store, the app and updates, will be provided by the dotOcean support
team.
App installation guide
Add a google account
Navigate to the settings of the tablet, and select the general tab. In the left menu, tap Accounts, then tap Add account in the left.

Title Graviprobe 2.0 User Manual
Document Graviprobe - Customer - Manual v1.2.docx
Date
05/02/2018
Revision 9th
Page 12 of 59
Select the Google option
Enter your email connected to your Google account and, tap next. Should you not have a Google account, please tap create a
new account, and follow the steps required.

Title Graviprobe 2.0 User Manual
Document Graviprobe - Customer - Manual v1.2.docx
Date
05/02/2018
Revision 9th
Page 13 of 59
Enter your password.
Tap accept, after you have read the Terms of Service and Privacy Policy.
Title Graviprobe 2.0 User Manual
Document Graviprobe - Customer - Manual v1.2.docx
Date
05/02/2018
Revision 9th
Page 14 of 59
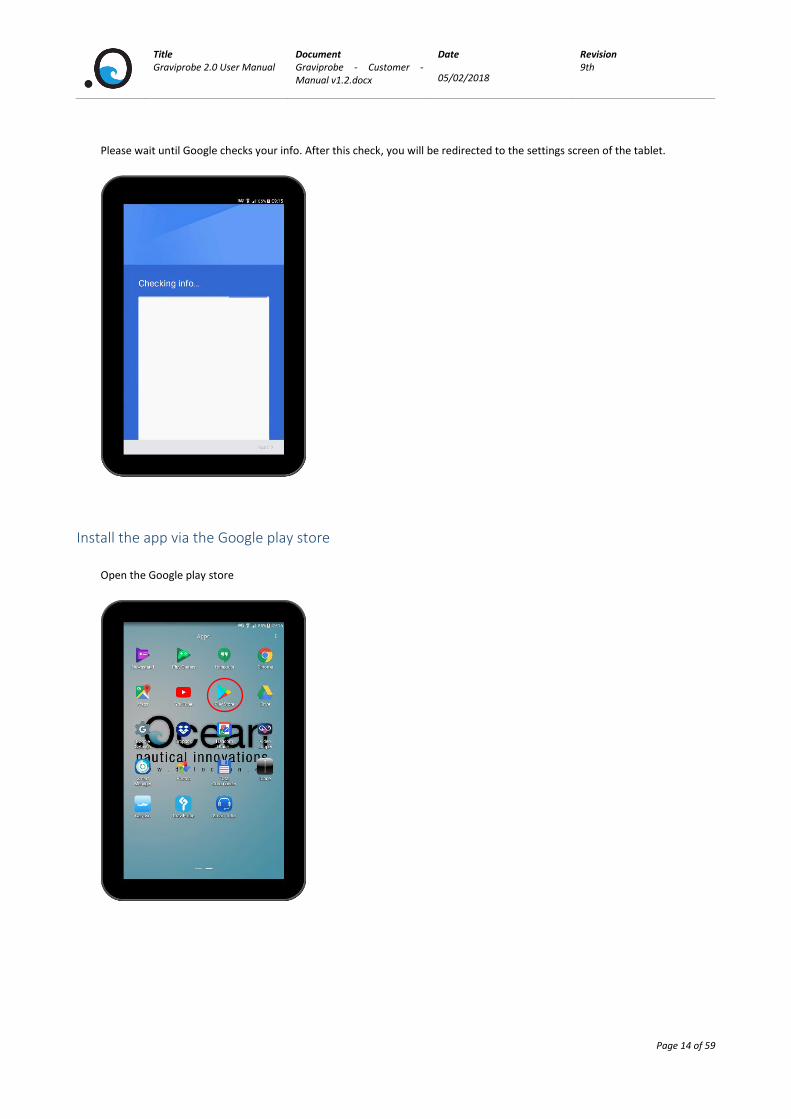
Please wait until Google checks your info. After this check, you will be redirected to the settings screen of the tablet.
Install the app via the Google play store
Open the Google play store

Title Graviprobe 2.0 User Manual
Document Graviprobe - Customer - Manual v1.2.docx
Date
05/02/2018
Revision 9th
Page 15 of 59
In the top search field enter Graviprobe

Title Graviprobe 2.0 User Manual
Document Graviprobe - Customer - Manual v1.2.docx
Date
05/02/2018
Revision 9th
Page 16 of 59
Tap the Graviprobe icon.
Tap the install button.

Title Graviprobe 2.0 User Manual
Document Graviprobe - Customer - Manual v1.2.docx
Date
05/02/2018
Revision 9th
Page 17 of 59
Tap the accept button, to let the app have access to identity, location, files and Wi-Fi connection information
Title Graviprobe 2.0 User Manual
Document Graviprobe - Customer - Manual v1.2.docx
Date
05/02/2018
Revision 9th
Page 18 of 59
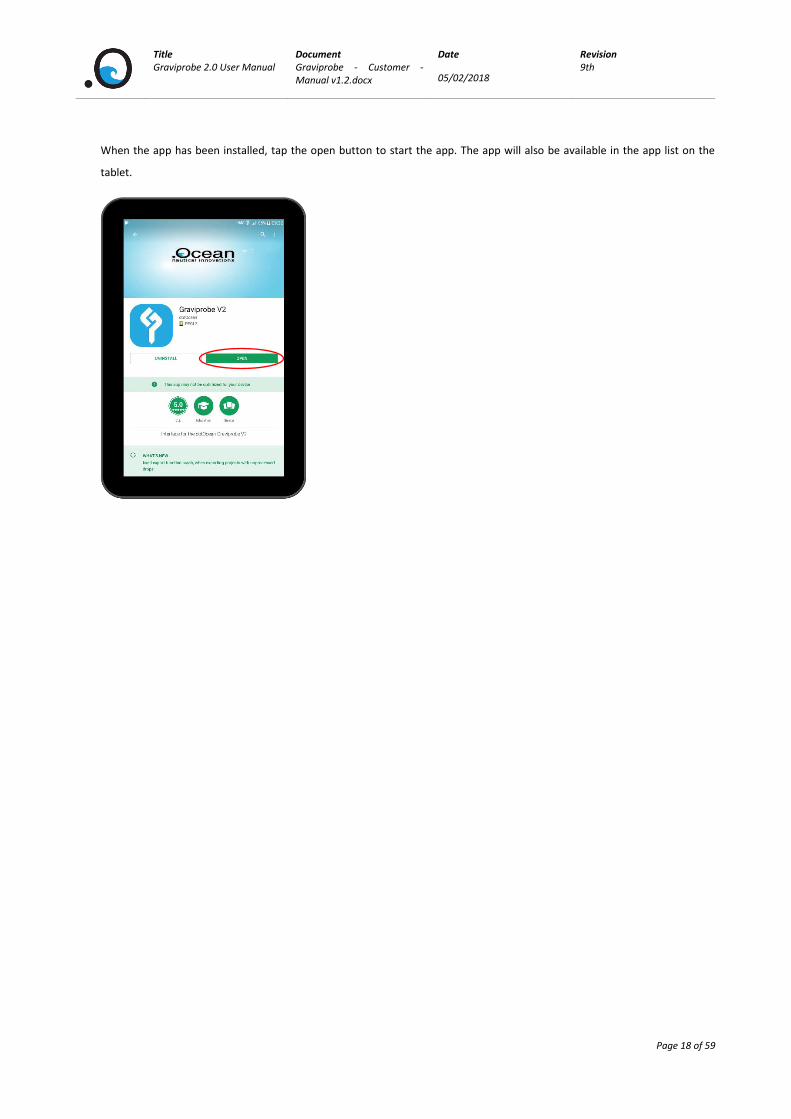
When the app has been installed, tap the open button to start the app. The app will also be available in the app list on the
tablet.
Title Graviprobe 2.0 User Manual
Document Graviprobe - Customer - Manual v1.2.docx
Date
05/02/2018
Revision 9th
Page 19 of 59
App overview
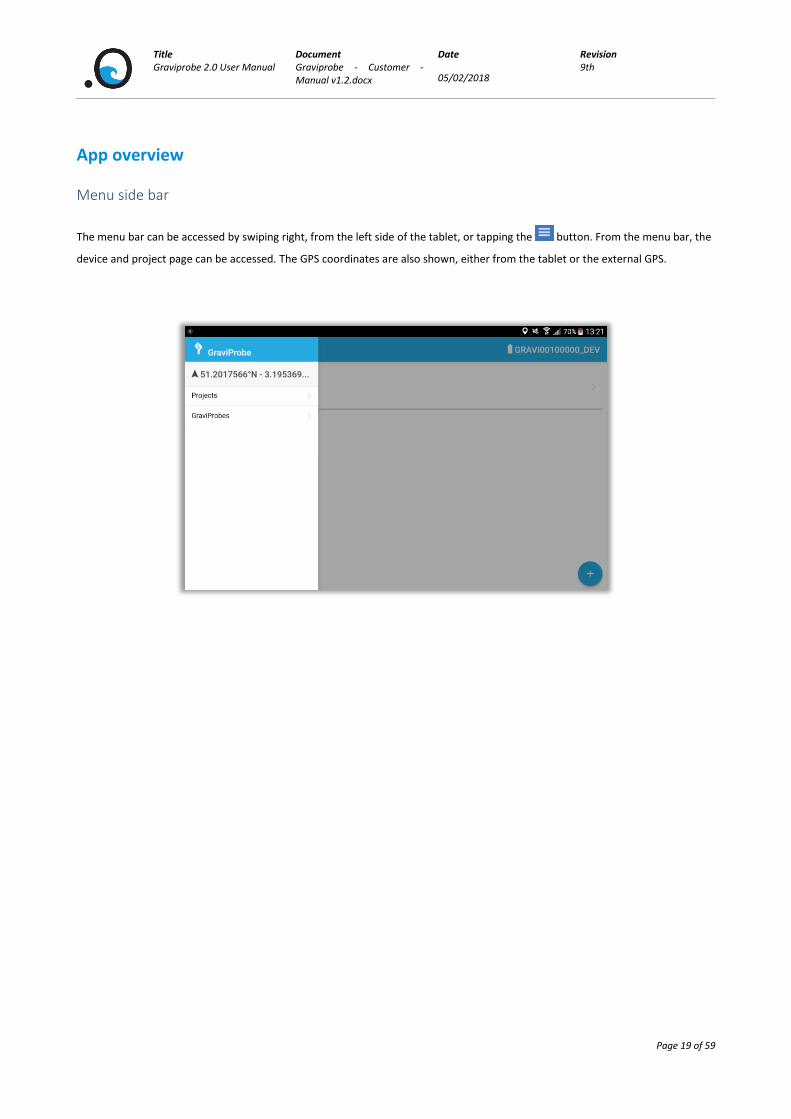
Menu side bar
The menu bar can be accessed by swiping right, from the left side of the tablet, or tapping the button. From the menu bar, the
device and project page can be accessed. The GPS coordinates are also shown, either from the tablet or the external GPS.

Title Graviprobe 2.0 User Manual
Document Graviprobe - Customer - Manual v1.2.docx
Date
05/02/2018
Revision 9th
Page 20 of 59
Main Project page
In the main project page, new projects can be created by tapping the button, previous made projects can be accessed by
tapping the project name.
The current active project is denoted by a

Title Graviprobe 2.0 User Manual
Document Graviprobe - Customer - Manual v1.2.docx
Date
05/02/2018
Revision 9th
Page 21 of 59
Add project dialog
When creating a new project, the following MUST be entered:
• Name: the project name, this will be by default Project_(number).
• Cone type: this MUST be set according to the GraviProbe type. When choosing a soil version there is an added item, namely
the Extension type. Add the number of extensions and extension types according to the way the Graviprobe is configured.
The following MAY be entered:
• Description: a description of the project may be entered here.

Title Graviprobe 2.0 User Manual
Document Graviprobe - Customer - Manual v1.2.docx
Date
05/02/2018
Revision 9th
Page 22 of 59
Title Graviprobe 2.0 User Manual
Document Graviprobe - Customer - Manual v1.2.docx
Date
05/02/2018
Revision 9th
Page 23 of 59
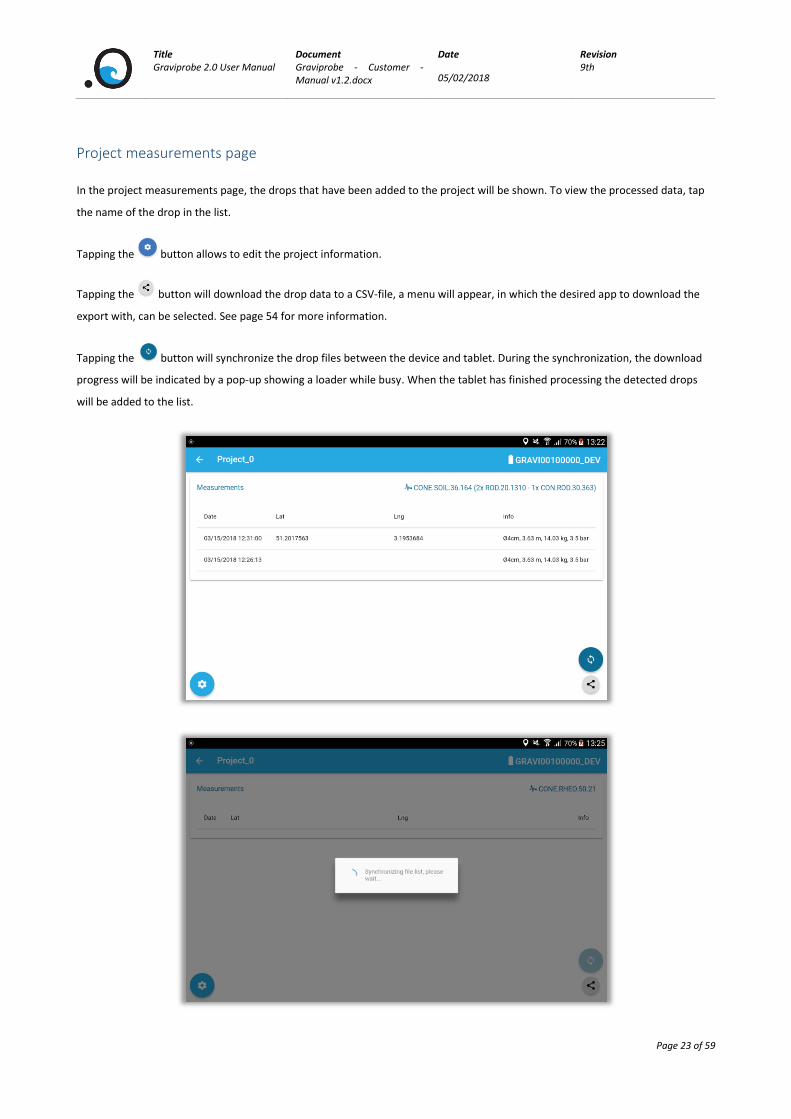
Project measurements page
In the project measurements page, the drops that have been added to the project will be shown. To view the processed data, tap
the name of the drop in the list.
Tapping the button allows to edit the project information.
Tapping the button will download the drop data to a CSV-file, a menu will appear, in which the desired app to download the
export with, can be selected. See page 54 for more information.
Tapping the button will synchronize the drop files between the device and tablet. During the synchronization, the download
progress will be indicated by a pop-up showing a loader while busy. When the tablet has finished processing the detected drops
will be added to the list.

Title Graviprobe 2.0 User Manual
Document Graviprobe - Customer - Manual v1.2.docx
Date
05/02/2018
Revision 9th
Page 24 of 59
Edit project dialog
In this dialog, it is possible to edit and save the project details.
Title Graviprobe 2.0 User Manual
Document Graviprobe - Customer - Manual v1.2.docx
Date
05/02/2018
Revision 9th
Page 25 of 59
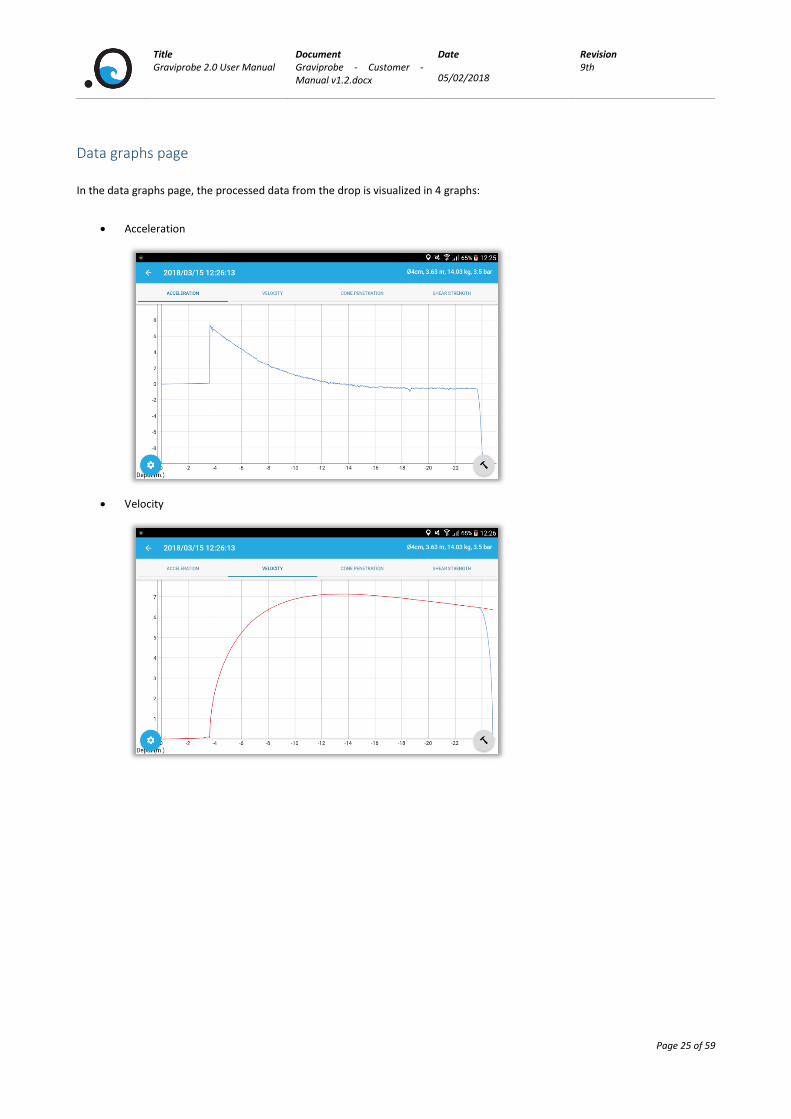
Data graphs page
In the data graphs page, the processed data from the drop is visualized in 4 graphs:
• Acceleration
• Velocity
Title Graviprobe 2.0 User Manual
Document Graviprobe - Customer - Manual v1.2.docx
Date
05/02/2018
Revision 9th
Page 26 of 59
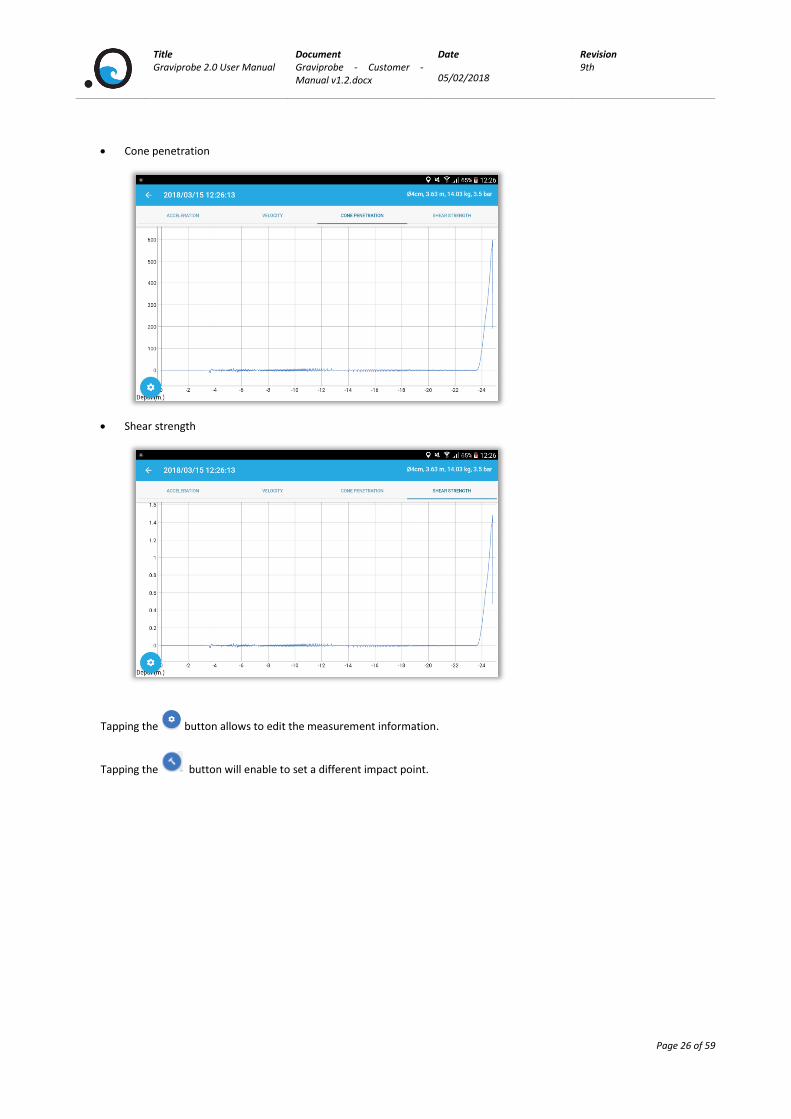
• Cone penetration
• Shear strength
Tapping the button allows to edit the measurement information.
Tapping the button will enable to set a different impact point.

Title Graviprobe 2.0 User Manual
Document Graviprobe - Customer - Manual v1.2.docx
Date
05/02/2018
Revision 9th
Page 27 of 59
Edit impact point page
In the edit impact point page, it is possible to select a new point of impact and re-process the drop. To select a new impact point,
tap the desired point on the graph. The acceleration of the selected point will be shown in the upper left corner. For more precision
in selecting the new impact point, it is recommended to zoom in on the graph, before tapping the edit impact point button. The
depth and acceleration of the selected point are shown in the upper left corner of the graph.
Then tap the save button, to continue, or the cancel button to cancel the edit.

Title Graviprobe 2.0 User Manual
Document Graviprobe - Customer - Manual v1.2.docx
Date
05/02/2018
Revision 9th
Page 28 of 59
Edit measurement dialog
In this dialog, it is possible to edit and save the measurement details.

Title Graviprobe 2.0 User Manual
Document Graviprobe - Customer - Manual v1.2.docx
Date
05/02/2018
Revision 9th
Page 29 of 59
Main Device Page
The main device page shows the device the tablet is currently connected to.
The following data is shown next to the GraviProbe logo:
• GraviProbe name
• Device IP
• Connection status
By tapping the device name, the following pages can be accessed:
• Device vitals page
• Device drop list page
• Support Page
Title Graviprobe 2.0 User Manual
Document Graviprobe - Customer - Manual v1.2.docx
Date
05/02/2018
Revision 9th
Page 30 of 59
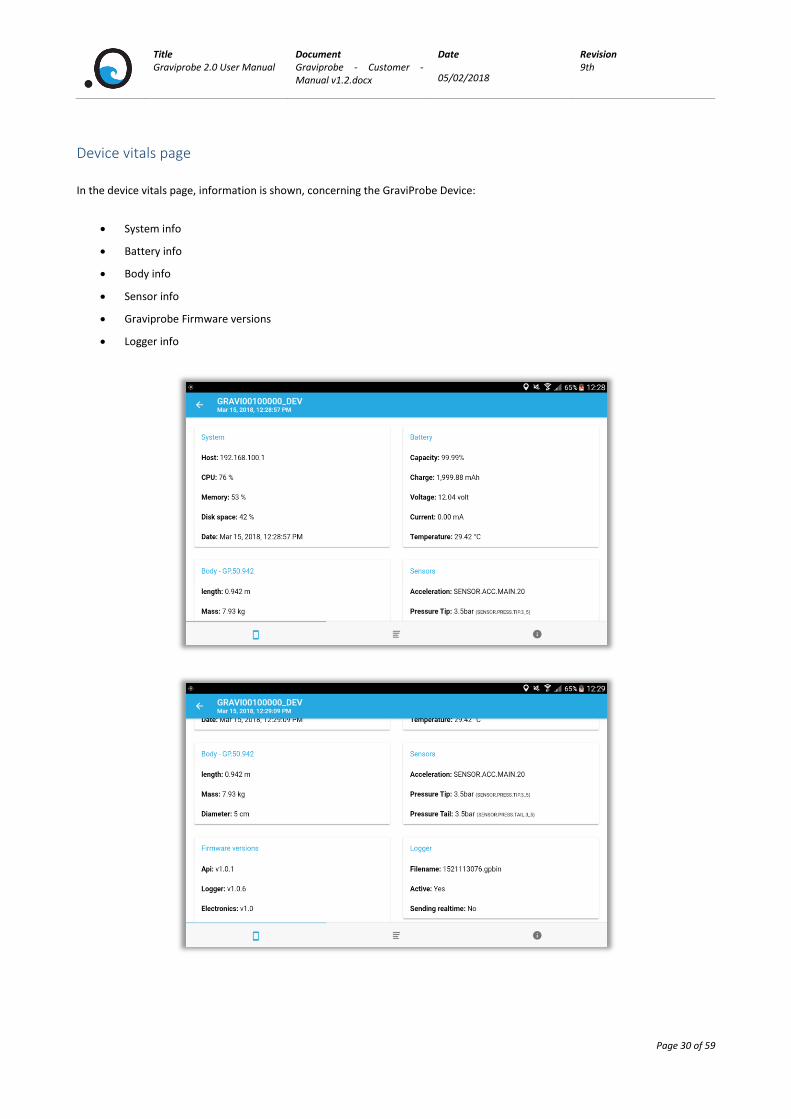
Device vitals page
In the device vitals page, information is shown, concerning the GraviProbe Device:
• System info
• Battery info
• Body info
• Sensor info
• Graviprobe Firmware versions
• Logger info

Title Graviprobe 2.0 User Manual
Document Graviprobe - Customer - Manual v1.2.docx
Date
05/02/2018
Revision 9th
Page 31 of 59
Device drop list page
The device drop list page, lists all the drops currently stored on the device.
The first check box indicates if the drop has been downloaded to the tablet, the second check box indicates if the drop has been
processed.
To download a drop, simply tap the drop filename.
To add the downloaded drop to the active project and process it, tap the filename again.
If the Graviprobe app has detected drops in the file, then it will indicate how many next to the processed check mark.

Title Graviprobe 2.0 User Manual
Document Graviprobe - Customer - Manual v1.2.docx
Date
05/02/2018
Revision 9th
Page 32 of 59
Support page
The support page shows the contact details of the dotOcean support Engineers, and a button is provided to send the log files to the
support crew.
Note: a Gmail account must be added to the tablet, and internet access must be available to send the email.

Title Graviprobe 2.0 User Manual
Document Graviprobe - Customer - Manual v1.2.docx
Date
05/02/2018
Revision 9th
Page 33 of 59
Performing measurements
Preparations
An instructional video on how to assemble the Graviprobe can be found on YouTube at:
https://www.youtube.com/watch?v=Y1gSLm6ytWQ
1. Place the ON-Connector (with the red tip) over the pins at the tail of the GraviProbe. Wait a few seconds.
While the LED’s are yellow, the device is booting. When the LED’s are blue, the device has booted.
2. Assemble the GraviProbe
Step 1:
Slide the small cylinder over the device

Title Graviprobe 2.0 User Manual
Document Graviprobe - Customer - Manual v1.2.docx
Date
05/02/2018
Revision 9th
Page 34 of 59
Step 2:
Assemble the fins and place them on the GraviProbe
Step 3:
Slide the large cylinder over the fins and the device.
Title Graviprobe 2.0 User Manual
Document Graviprobe - Customer - Manual v1.2.docx
Date
05/02/2018
Revision 9th
Page 35 of 59
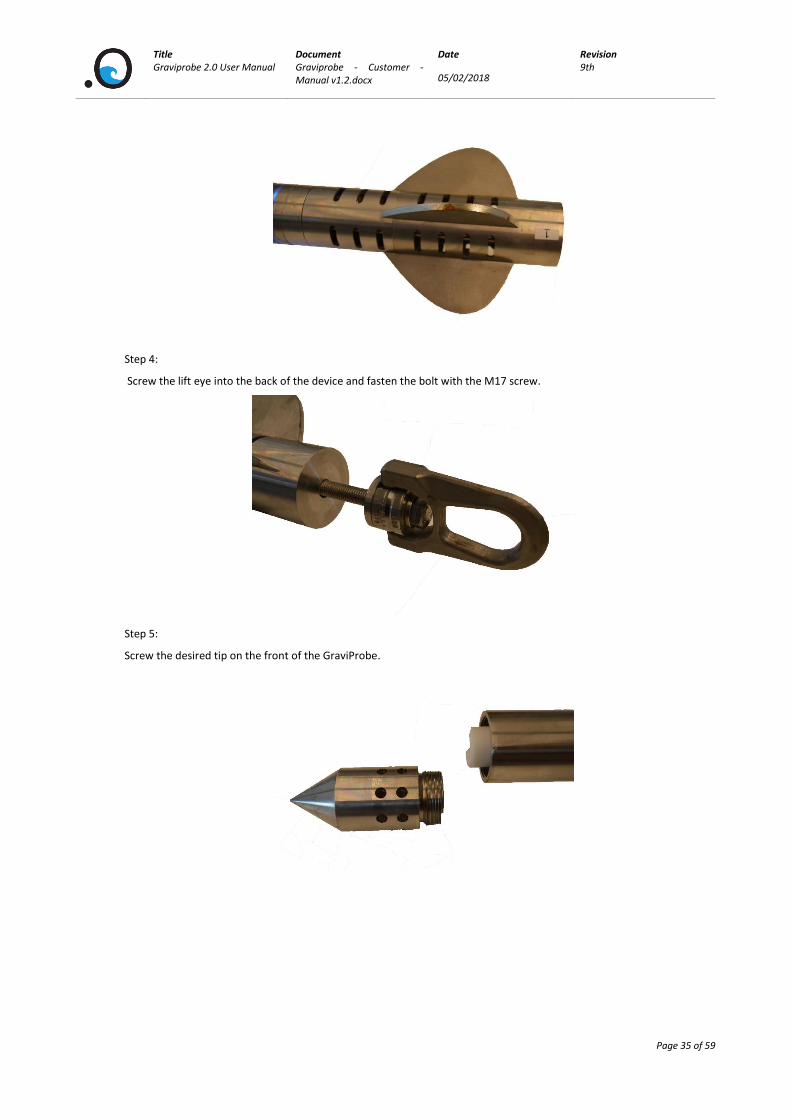
Step 4:
Screw the lift eye into the back of the device and fasten the bolt with the M17 screw.
Step 5:
Screw the desired tip on the front of the GraviProbe.
Title Graviprobe 2.0 User Manual
Document Graviprobe - Customer - Manual v1.2.docx
Date
05/02/2018
Revision 9th
Page 36 of 59
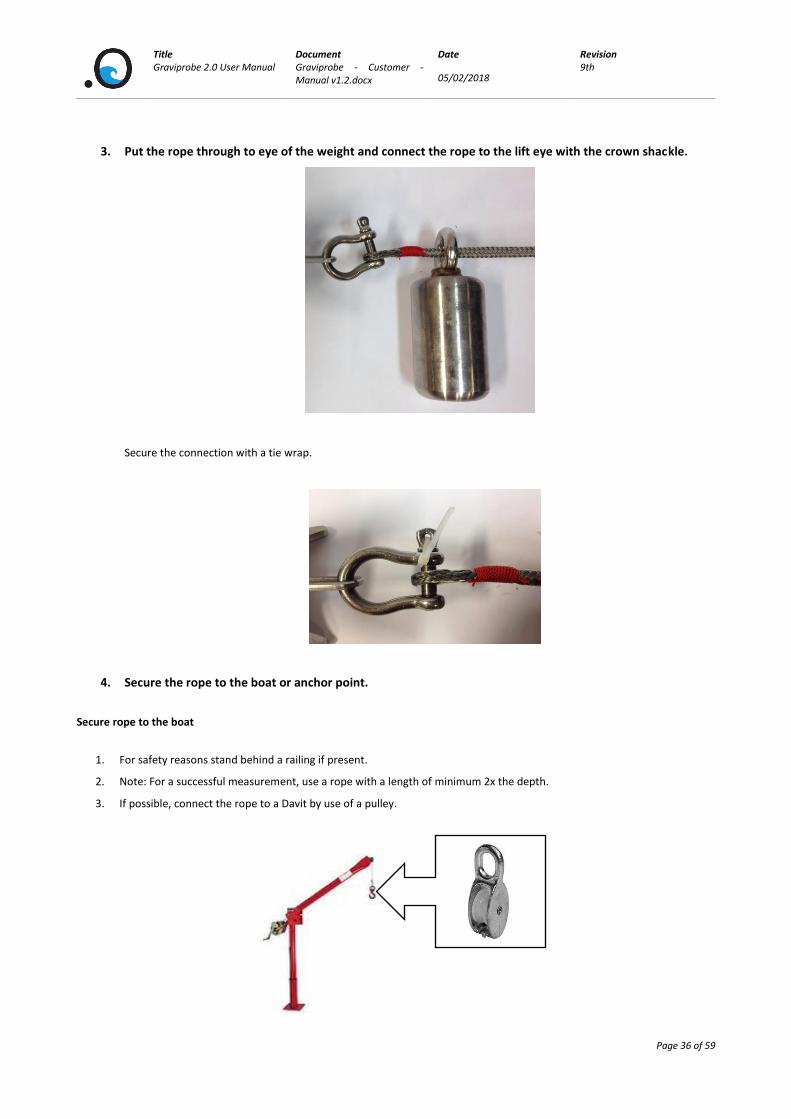
3. Put the rope through to eye of the weight and connect the rope to the lift eye with the crown shackle.
Secure the connection with a tie wrap.
4. Secure the rope to the boat or anchor point.
Secure rope to the boat
1. For safety reasons stand behind a railing if present.
2. Note: For a successful measurement, use a rope with a length of minimum 2x the depth.
3. If possible, connect the rope to a Davit by use of a pulley.

Title Graviprobe 2.0 User Manual
Document Graviprobe - Customer - Manual v1.2.docx
Date
05/02/2018
Revision 9th
Page 37 of 59
5. If the LED’s are flashing blue, the Graviprobe is recording data and the measurements can be performed.
(See: Making the drop)
6. If the LED’s are NOT flashing blue (static blue), the Graviprobe is not yet recording and one has to make
connection first with the tablet. (See: Establishing a connection with the device)

Title Graviprobe 2.0 User Manual
Document Graviprobe - Customer - Manual v1.2.docx
Date
05/02/2018
Revision 9th
Page 38 of 59
Making the drop
Safety notices
• If possible, release the device approximately 50 cm away from the edge of the boat, if unable, be careful while recovering
the device.
• The boat propeller should be SHUT OFF as soon as the weight is in the water: if ignored this can lead to loss of the
GraviProbe.
Measuring steps
1. Lower weight
• The weight needs to be lowered to a depth approximately equal to the measuring depth.
• Note: try to avoid the weight twisting the rope.

Title Graviprobe 2.0 User Manual
Document Graviprobe - Customer - Manual v1.2.docx
Date
05/02/2018
Revision 9th
Page 39 of 59
2. Lower GraviProbe
• Lower probe until the tail fins are just beneath the water surface.
• Hold for 2 seconds (stabilizing sensors).
3. Release GraviProbe
Note: Try to avoid any upward or downward movement of the rope and/or probe.

Title Graviprobe 2.0 User Manual
Document Graviprobe - Customer - Manual v1.2.docx
Date
05/02/2018
Revision 9th
Page 40 of 59
4. Wait for 5 seconds while the probe is free falling (measures the fluid-mud and sediment layer).
5. Pull up the probe and weight
Note: avoid hitting the probe against the bottom of the ship and/or the Davit!

Title Graviprobe 2.0 User Manual
Document Graviprobe - Customer - Manual v1.2.docx
Date
05/02/2018
Revision 9th
Page 41 of 59
6. Repeat the process
Note: duration of 1 measurement cycle is ±30sec (depending on the measuring depth)
Note: It’s recommended to put the probe on deck while relocating (to avoid damage and loss)

Title Graviprobe 2.0 User Manual
Document Graviprobe - Customer - Manual v1.2.docx
Date
05/02/2018
Revision 9th
Page 42 of 59
Using the GraviProbe 2.0 app
The GraviProbe 2.0 app is available on the Google Play Store. For updates, a connection to the internet must be present, and a
Google account must be added in order to receive the updates from the Google Play Store. See the App installation guide (p. 11).
Establishing a connection with the device
Go to the tablet’s configuration screen, and go to the connections tab.
If the device is ready (Static Blue LED on Graviprobe), it is possible to connect to the device’s wi-fi, simply tap the device name
in the list of wi-fi networks. The Blue LED will start flashing if the Graviprobe was able to successfully connect to the tablet. At
this point, the Graviprobe starts logging his data.

Title Graviprobe 2.0 User Manual
Document Graviprobe - Customer - Manual v1.2.docx
Date
05/02/2018
Revision 9th
Page 43 of 59
Creating a project
Open the GraviProbe 2.0 app, you’ll be redirected to the projects page. Here you can see earlier made projects, or if this is
the first time using the app, the list will be empty. To create a new project, click the plus button on the right bottom corner.
A new screen will appear, where you can enter the project name, select if the cone type of the Graviprobe (Soil, Rheology,
…), and add a description to your project. Press Save to continue, or cancel if you should change your mind. Data must be
transferred into a project in order to view the generated charts and data.

Title Graviprobe 2.0 User Manual
Document Graviprobe - Customer - Manual v1.2.docx
Date
05/02/2018
Revision 9th
Page 44 of 59
When you tap save, the new project will appear in the list with projects
Selecting the project in which data will be transferred and processed, can be done by selecting the star next to the project
name. The blue star represents the current active project. After processing, drops will be automatically added to the active
project.

Title Graviprobe 2.0 User Manual
Document Graviprobe - Customer - Manual v1.2.docx
Date
05/02/2018
Revision 9th
Page 45 of 59
Downloading and processing the data
When the device is connected to the tablet, the drop files can be downloaded to the tablet and then processed by tapping
the synchronize button . Make sure that during the synchronization, the connection between device and tablet is not
severed.
When the tablet has finished processing the detected files, the drops will be added to the list.
Drops that were synced will receive a latitude and longitude according to the position of the tablet at the time of syncing.
Drops that were added via the file list are not given position stamps.
If You wish that the lat and lng coordinates are the same as the drop site, please make sure that you sync with the device
when it is pulled back up and a stable connection can be made.

Title Graviprobe 2.0 User Manual
Document Graviprobe - Customer - Manual v1.2.docx
Date
05/02/2018
Revision 9th
Page 46 of 59
Viewing the data
Tap the menu button and navigate to the projects page, then tap your project. The logging that has been added is now
displayed in a list, sorted by date, and also the position and device used is shown.

Title Graviprobe 2.0 User Manual
Document Graviprobe - Customer - Manual v1.2.docx
Date
05/02/2018
Revision 9th
Page 47 of 59
By tapping the edit button , you can edit the projects information or remove the project:

Title Graviprobe 2.0 User Manual
Document Graviprobe - Customer - Manual v1.2.docx
Date
05/02/2018
Revision 9th
Page 48 of 59
When tapping the file, a new screen appears showing the logged data in 4 graphs:
• Acceleration
• Velocity

Title Graviprobe 2.0 User Manual
Document Graviprobe - Customer - Manual v1.2.docx
Date
05/02/2018
Revision 9th
Page 49 of 59
• Cone penetration
• Shear strength

Title Graviprobe 2.0 User Manual
Document Graviprobe - Customer - Manual v1.2.docx
Date
05/02/2018
Revision 9th
Page 50 of 59
By tapping the options button , you can change the processing profile, and add a remark to the measurement.
Tapping the button will enable to set a different impact point. See p. 24 & 25.

Title Graviprobe 2.0 User Manual
Document Graviprobe - Customer - Manual v1.2.docx
Date
05/02/2018
Revision 9th
Page 51 of 59
Charging the GraviProbe 2.0
The battery capacity can be viewed in the device vitals page. When the LED’s of the GraviProbe are flashing orange, the battery is
low and the GraviProbe needs to be charged with the provided charger cable.
To charge the GraviProbe, put the charger cable on the connector in the GraviProbe. While charging the LED’s of the GraviProbe will
flash green. If the LED’s of the GraviProbe have a static green colour, the GraviProbe is fully charged.

Title Graviprobe 2.0 User Manual
Document Graviprobe - Customer - Manual v1.2.docx
Date
05/02/2018
Revision 9th
Page 52 of 59
Connecting the external GPS
By default, the internal GPS of the tablet is used, in order to achieve greater accuracy, the external GPS can be used.
The following steps are required in order to use the external GPS:
1 On the tablet, open the settings page, and navigate to the developers’ options.
2 Scroll down to “allow mock-up locations” and activate the feature.
3 Connect the external GPS to the tablet with Bluetooth .
4 Open the Bluetooth GPS app.
Title Graviprobe 2.0 User Manual
Document Graviprobe - Customer - Manual v1.2.docx
Date
05/02/2018
Revision 9th
Page 53 of 59
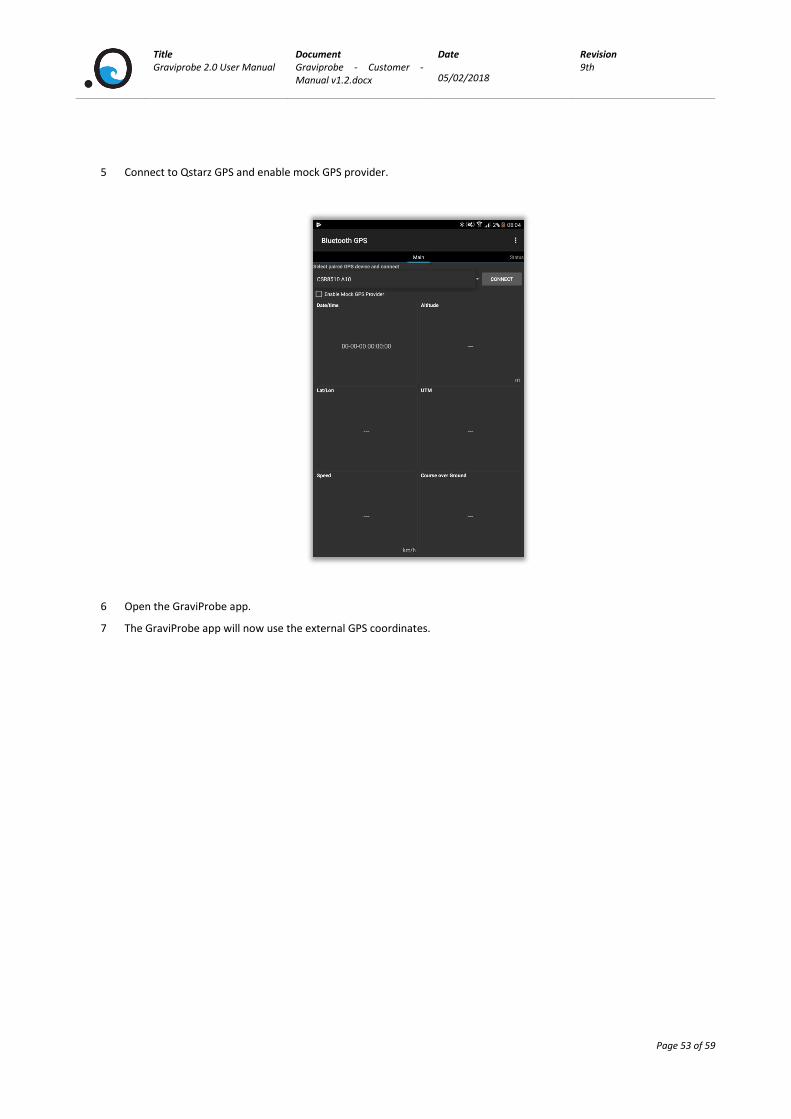
5 Connect to Qstarz GPS and enable mock GPS provider.
6 Open the GraviProbe app.
7 The GraviProbe app will now use the external GPS coordinates.

Title Graviprobe 2.0 User Manual
Document Graviprobe - Customer - Manual v1.2.docx
Date
05/02/2018
Revision 9th
Page 54 of 59
Downloading the drop CSV file
While processing a file, the GraviProbe app will analyse the data, and if a successful drop has been made, a CSV-file will be created
in a separate folder. In order to access the CSV-file, one of the following methods can be executed:
Method 1, using the export function:
1. In the project page tap the button.
2. Choose an application to share the newly created zip-file, containing the data.

Title Graviprobe 2.0 User Manual
Document Graviprobe - Customer - Manual v1.2.docx
Date
05/02/2018
Revision 9th
Page 55 of 59
Method 2, share the files on the tablet:
1. In the tablet’s main screen tap the “my files” icon.

Title Graviprobe 2.0 User Manual
Document Graviprobe - Customer - Manual v1.2.docx
Date
05/02/2018
Revision 9th
Page 56 of 59
2. In the following screen tap device storage, the file structure will expand.
3. Tap the data folder
4. Tap the Graviprobe
5. Tap the Devices folder
6. Tap the GraviProbe folder with which you performed the drop
7. This folder contains the downloaded drop-files:
Title Graviprobe 2.0 User Manual
Document Graviprobe - Customer - Manual v1.2.docx
Date
05/02/2018
Revision 9th
Page 57 of 59
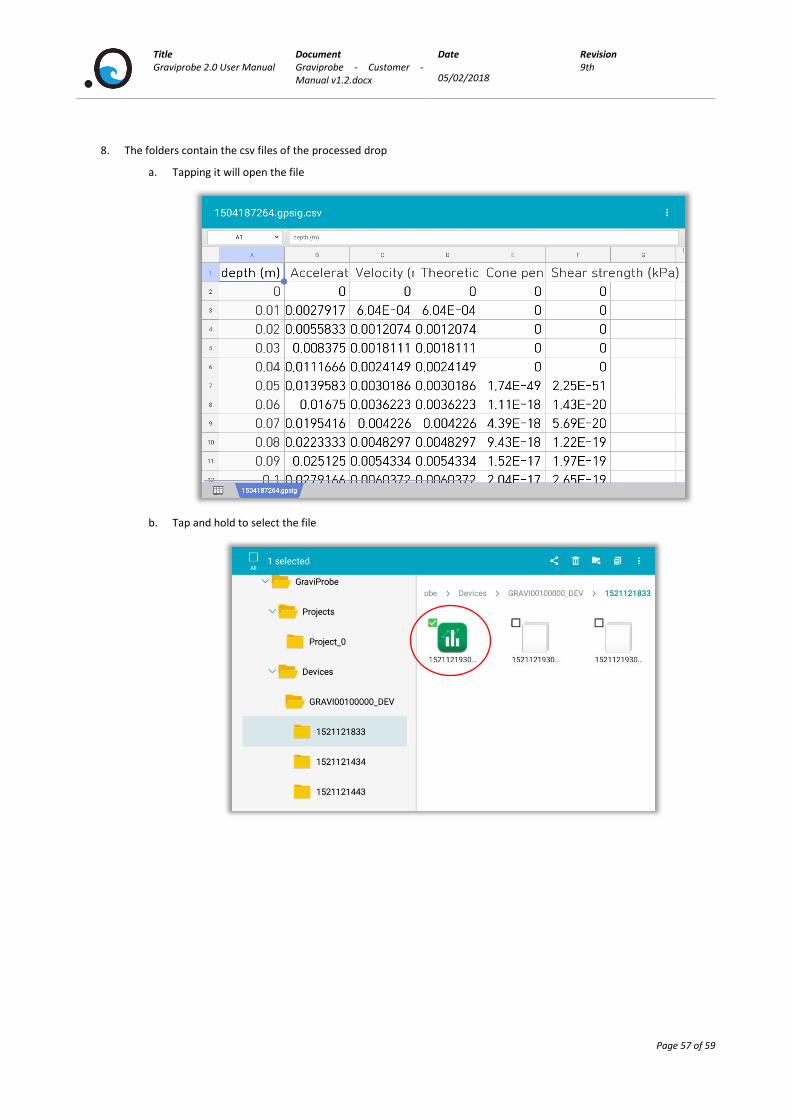
8. The folders contain the csv files of the processed drop
a. Tapping it will open the file
b. Tap and hold to select the file
Title Graviprobe 2.0 User Manual
Document Graviprobe - Customer - Manual v1.2.docx
Date
05/02/2018
Revision 9th
Page 58 of 59
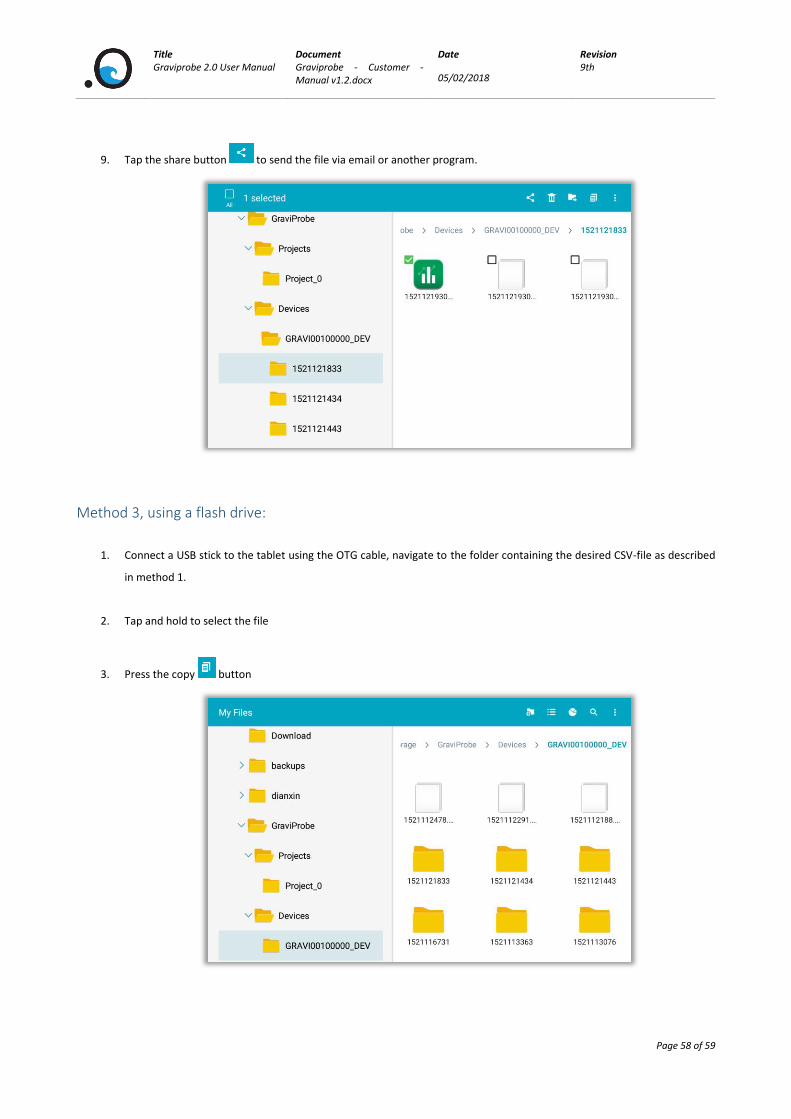
9. Tap the share button to send the file via email or another program.
Method 3, using a flash drive:
1. Connect a USB stick to the tablet using the OTG cable, navigate to the folder containing the desired CSV-file as described
in method 1.
2. Tap and hold to select the file
3. Press the copy button

Title Graviprobe 2.0 User Manual
Document Graviprobe - Customer - Manual v1.2.docx
Date
05/02/2018
Revision 9th
Page 59 of 59
4. Navigate to the connected USB stick and press the paste here button
Method 4, connect the tablet with a computer:
1. Connect the tablet to a PC or laptop using the USB to micro USB cable.
2. On the PC or laptop, in the file explorer select the tablet
3. Navigate to the folder containing the CSV-file. The file path is identical as described in method 1
4. Copy the CSV-file to the desired folder