graphic design portfolio - against the clock & indesign cs6. graphic design portfolio. ... with...
TRANSCRIPT
Adobe Illustrator Photoshop & InDesign CS6
Graphic Design Portfolio

The fonts utilized in these training materials are the property of Against The Clock, Inc., and are supplied to the legitimate buyers of the Against The Clock training materials solely for use with the exercises and projects provided in the body of the materials. They may not be used for any other purpose, and under no circumstances may they be transferred to another individual, nor copied or distributed by any means whatsoever.
A portion of the images supplied in this book are copyright © PhotoDisc, Inc., 201 Fourth Ave., Seattle, WA 98121, or copyright ©PhotoSpin, 4030 Palos Verdes Dr. N., Suite 200, Rollings Hills Estates, CA. These images are the sole property of PhotoDisc or PhotoSpin and are used by Against The Clock with the permission of the owners. They may not be distributed, copied, transferred, or reproduced by any means whatsoever, other than for the completion of the exercises and projects contained in this Against The Clock training material.
Against The Clock and the Against The Clock logo are trademarks of Against The Clock, Inc., registered in the United States and elsewhere. References to and instructional materials provided for any particular application program, operating system, hardware platform, or other commercially available product or products do not represent an endorsement of such product or products by Against The Clock, Inc.
Photoshop, Acrobat, Illustrator, InDesign, PageMaker, Flash, Dreamweaver, Premiere, and PostScript are trademarks of Adobe Systems Incorporated. Macintosh is a trademark of Apple Computer, Inc. QuarkXPress is a registered trademark of Quark, Inc. FrontPage, Publisher, PowerPoint, Word, Excel, Office, Microsoft, MS-DOS, and Windows are either registered trademarks or trademarks of Microsoft Corporation.
Other product and company names mentioned herein may be the trademarks of their respective owners.
4710 28th Street North, Saint Petersburg, FL 33714800-256-4ATC • www.againsttheclock.com
10 9 8 7 6 5 4 3 2 1 Print ISBN: 978-1-936201-19-8
Ebook ISBN: 978-1-936201-20-4
Managing Editor: Ellenn BehoriamCover & Interior Design: Erika KendraCopy Editor: Angelina KendraPrinter: Prestige Printers
Copyright © 2012 Against The Clock, Inc. All rights reserved. Printed in the United States of America. This publication is protected by copyright, and permission should be obtained in writing from the publisher prior to any prohibited reproduction, storage in a retrieval system, or transmission in any form or by any means, electronic, mechanical, photocopying, recording, or likewise.

iii
AcknowledgementsaBout against the clock
Against Th e Clock, long recognized as one of the nation’s leaders in courseware development, has been publishing high-quality educational materials for the graphic and computer arts industries since 1990. Th e company has developed a solid and widely-respected approach to teaching people how to eff ectively utilize graphics applications, while maintaining a disciplined approach to real-world problems.
Having developed the Against Th e Clock and the Essentials for Design series with Prentice Hall/Pearson Education, ATC drew from years of professional experience and instructor feedback to develop Th e Professional Portfolio Series, focusing on the Adobe Creative Suite. Th ese books feature step-by-step explanations, detailed foundational information, and advice and tips from industry professionals that off er practical solutions to technical issues.
Against Th e Clock works closely with all major software developers to create learning solutions that fulfi ll both the requirements of instructors and the needs of students. Th ousands of graphic arts profes-sionals — designers, illustrators, imaging specialists, prepress experts, and production managers — began their educations with Against Th e Clock training books. Th ese professionals studied at Baker College, Nossi College of Art, Virginia Tech, Appalachian State University, Keiser College, University of South Carolina, Gress Graphic Arts Institute, Hagerstown Community College, Kean University, Southern Polytechnic State University, Brenau University, and many other educational institutions.
aBout the author
Erika Kendra holds a BA in History and a BA in English Literature from the University of Pittsburgh. She began her career in the graphic communications industry as an editor at Graphic Arts Technical Foundation before moving to Los Angeles in 2000. Erika is the author or co-author of more than thirty books about Adobe graphic design software. She has also written several books about graphic design con-cepts such as color reproduction and prefl ighting, and dozens of articles for online and print journals in the graphics industry. Working with Against Th e Clock for more than ten years, Erika was a key partner in developing Th e Professional Portfolio Series of software training books.
contriButing authors, artists, and editors
A big thank you to the people whose artwork, comments, and expertise contributed to the success of these books:
• Randy Anderson, Oklahoma City Community College
• Olwen Bruce, Creative Backup LLC
• Bill Carberry, Adobe Certifi ed Instructor, ACI4Hire
• John Craft, Appalachian State University
• Debbie Davidson, Against Th e Clock, Inc.
• Jorge Diaz, International Academy of Design & Technology-Tampa
• Charlie Essers, Lancaster, Calif.
• Matthew Guanciale, Against Th e Clock, Inc
• Chris Hadfi eld, Doane College
• Jennifer Hair, Shawnee Mission East High School
• Pamela Harris, Missouri Southern State University
• Brian McDaniel, Central Georgia Technical College
• Michael Watkins, Baker College of Flint
Finally, thanks to Angelina Kendra, editor, for making sure that we all said what we meant to say.
iv
547Project 10: Combined Brochure
Stage 2 Working with Linked Files
Adobe InDesign supports a variety of graphics formats. Your ultimate output goal will determine the
specific type of graphics used in a particular job. For print applications such as the brochure you’re
building in this project, you should use high-resolution raster image files or vector-based graphics files.
Depending on what type of file you are importing, you have a number of options when you place
a file. This stage of the project explores the most common file formats for print design workflows.
Replace a Native illustRatoR File
As part of the Adobe Creative Suite, InDesign supports native Adobe Illustrator files
(with the “.ai” extension) that have been saved to be compatible with the PDF format.
Illustrator files can include both raster and vector information (including type and
embedded fonts), as well as objects on multiple layers in a variety of color modes
(including spot colors, which are added to the InDesign Swatches panel when the
Illustrator file is imported).
1. With boulevard.indd open, open the Links panel.
The file blvd logo.ai has been placed three times, but the file has been modified since it
was placed. Remember from Project 9: HeartSmart Newsletter, that placed files need to
be present and up to date for the file to output properly.
2. On Page 1 of the layout, use the Direct Selection tool or the Content
Grabber to select the placed graphic with the Modified warning icon.
When you select a specific instance of a file that has been placed multiple times, the item
expands in the Links panel and the selected instance is highlighted.
3. Open the Transform panel (Window>Object & Layout>Transform).
The options in the Transform panel are the same as those on the left side of the
Control panel. As you can see, the selected graphic is scaled to approximately 62%
proportionally.
The placed instance is
scaled to approximately
62% proportionally.
Only the selected
instance is highlighted.
4. In the Links panel, click the main listing for the blvd logo.ai file and then
click the Update Link button.
By selecting the main item listing instead of a specific instance, you update all instances
of that file at one time. If you want to update individual instances, you can use the
Modified warning icons on the page, or select only the specific instance in the panel and
click the Update Link button.
Select the main
item to update all
instances at once.
Update Link button
Make sure you select the
content inside the frame
and not the actual frame.
Note:
3333projectIdentity PackageYour client, Graham Apple, owns an
organic orchard in Central Florida.
He hired you to create a corporate
identity package so he can begin
branding his products to reach a
larger consumer base in gourmet
groceries throughout the Southeast.
He asked you to develop a logo, and
then create the standard identity
pieces (letterhead and envelope) that
he will use for business promotion
and correspondence.
� is project incorporates the following skills:
� Developing custom logo artwork based on an
object in a photograph
� Using a gradient mesh to create realistic color blends
� Converting type to outlines and manipulating letter
shapes to create a � nished logotype
� Using layers to easily manage complex artwork
� Creating multiple artboards to contain speci� c
projects and layouts
� Building various logo versions to meet speci� c
output requirements
� Saving EPS � les for maximum � exibility
� Printing desktop proofs of individual artboards
clie
nt c
om
men
ts
art
dire
cto
r co
mm
ents
pro
ject
ob
ject
ives
Project Meeting� e Chateau is a unique destination restaurant that consistently wins awards from local and national food and wine reviewers. � e restaurant was � rst opened in 1952 by Paul and Gina Roseman as a rest stop and diner for travelers along the Sierra Highway. While the restaurant remains in the family, it has evolved from home-style comfort food to more exotic fare such as wild game with a French twist.
� e history of the restaurant is important to us. We have a Roseman family portrait — my great-grandparents — that we’d like to include on the back of the menu. � e picture is a bit grainy and has some damage, though, and we’d like you to clean it up as much as possible. We also want to include a picture of the current executive chef, who is Paul and Gina’s great-grandniece, in the same section. � e only picture we have of her is very dark though, and we’re hoping you can make it look better.
In addition, we’ve taken several pictures of di� erent meals that Suzanne created. We want you to make sure they will look as good as possible when printed. You’re the expert, so we trust that you know what needs to be done.
Digital images come from a wide variety of sources: scanned photographs and digital cameras are the two most common, as is the case for the client’s images for this project. Some images can be used as is, or at least with only minor correction. Realistically, most professional photographers reshoot an image until they have one that doesn’t need your help.
Unfortunately, however, not every project involves a professional photographer. Consumer-level cameras have come down in price and gone up in quality to the point where many non-professionals shoot their own photos without proper skill or knowledge. � at means many of those images require a bit of help — and some require a lot.
Even when a professional photographer is involved, not every image comes from a perfectly lit studio. Location shots — where a subject is photographed in a “real-world” setting — can’t always be captured perfectly. � ose images usually need work as well. Fortunately, Photoshop provides a powerful toolset for solving most image problems, or at least improving the worst of them.
To complete this project, you will:
� Remove grain with blur and sharpen techniques
� Heal severe scratches
� Clone out major damage
� Correct minor problems with the Brightness/Contrast adjustment
� Correct tonal range with the Levels adjustment
� Correct lighting problems with the Exposure adjustment
� Correct overall color problems with the Color Balance adjustment
� Correct precise color values with the Curves adjustment
� Correct an RGB image to CMYK gamut limits
� Embed color pro� le information in a � le
� Combine multiple exposures with the Merge to HDR Pro utility
335Project 6: Menu Image Correction
CorreCt Lighting ProbLems with the exPosure Adjustment
Many images are either over- or underexposed when photographed. If an image is under- exposed, it appears dark and lacks detail in the shadows. If an image is overexposed, it appears too light and lacks detail in the highlights. You can use the Exposure adjustment to correct exposure — and thus, the overall detail and contrast in the image.
Keep in mind, however, that Photoshop cannot create information that doesn’t exist. If you have an underexposed image with no detail in the shadow areas, Photoshop cannot generate that detail for you. Some problems are simply beyond fixing.
The Exposure dialog box is designed to make tonal adjustments to 32- and 64-bit HDR (high dynamic range) images, but it also works with 8-bit and 16-bit images. The Exposure adjustment works by performing calculations in a linear color space (gamma 1.0) rather than the image’s current color space.
1. Open chicken.jpg from your WIP>Menu folder.
2. Choose Image>Adjustments>Exposure and make sure Preview is checked.
Gray Point eyedropper
White Point eyedropper
Black Point eyedropper
3. Click the White Point eyedropper, and then click the white area on the top edge of the plate.
The eyedroppers in the Exposure dialog box adjust the image’s luminance (or the degree of lightness, from white to black). By adjusting the luminance only, you can change the lightness of the image without affecting the color.
• ClickingwiththeBlackPointeyedroppershiftsthepointyouclicktoblack (0 luminance).
• ClickingwiththeWhitePointeyedroppershiftsthepointyouclicktowhite(100 luminance).
• ClickingwiththeGrayPointeyedroppershiftsthepointyouclicktogray (50 luminance).
Click here with the White Point eyedropper to define the white area of the image.
Clicking with the White Point eyedropper changes the Exposure setting.
HDR refers to high-density range (32- or 64-bit) images.
Note:
The White Point and Gray Point eyedroppers affect the Exposure value. The Black Point eyedropper affects the Offset value.
Note:
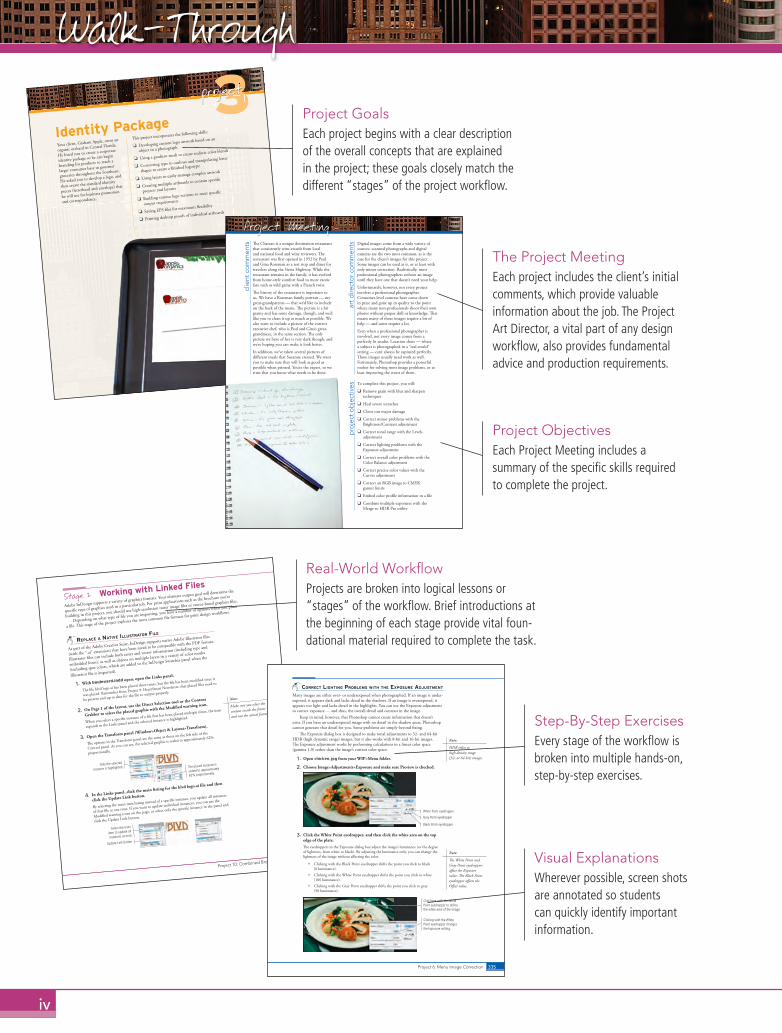
Walk-Through
Visual ExplanationsWherever possible, screen shots are annotated so students can quickly identify important information.
Step-By-Step ExercisesEvery stage of the workfl ow is broken into multiple hands-on, step-by-step exercises.
Real-World Workfl ow Projects are broken into logical lessons or “stages” of the workfl ow. Brief introductions at the beginning of each stage provide vital foun-dational material required to complete the task.
Project GoalsEach project begins with a clear description of the overall concepts that are explained in the project; these goals closely match the different “stages” of the project workfl ow.
The Project MeetingEach project includes the client’s initial comments, which provide valuable information about the job. The Project Art Director, a vital part of any design workfl ow, also provides fundamental advice and production requirements.
Project ObjectivesEach Project Meeting includes a summary of the specifi c skills required to complete the project.
v
186
fi ll i
n th
e b
lank
sho
rt a
nsw
er
Project Review
1. Explain the advantages of using a gradient mesh, compared to a regular gradient.
2. Briefl y explain two primary differences between point-type objects and area-type objects.
3. Explain the potential benefi ts of using multiple artboards rather than different fi les for different pieces.
1. The _______________ provide access to
handles that you can use to manually resize the
artboard in the workspace.
2. Press _______________ and click the eye icon
on a specifi c layer to switch only that layer
between Preview and Outline mode.
3. When _______________ are active, moving
your cursor over an unselected object reveals
the paths that make up that object.
4. The _______________ tool is used to sample
colors from an object already placed in the fi le.
5. The _______________ is used to monitor and
change the individual attributes (fi ll, stroke,
etc.) of the selected object.
6. The _______________ is the imaginary line on
which the bottoms of letters rest.
7. _______________ is the spacing between
specifi c pairs of letters (where the insertion
point is placed).
8. The _______________ command makes the
vector shapes of letters accessible to the Direct
Selection tool.
9. A _______________ is a special ink used to
reproduce a specifi c color, typically used for
one- or two-color jobs.
10. Click the _______________ in the Layers panel
to select a specifi c sublayer.
464 Project 8: Festival Poster
It’s always a good idea to begin a project as soon as
possible after getting the assignment. When working with
clients, however, you will often find that the idea for a
project comes before the actual content — sometimes long
before the client has finalized the text.
Rather than waiting until the client’s content is ready —
which is sometimes the day before a project is due — you
can design a layout using placeholders to mark the location
of pictures and text frames, and even experiment with the
appearance of different elements of the text.
With the insertion point placed in a text
frame, choosing Type>Fill with Placeholder
Text fills the active text frame with lorem
text (supposedly from a Latin treatise on
ethics written by Cicero more than 2000
years ago) using the default text-format
settings. If a text frame is linked to other text
frames, the placeholder text fills the entire
series of linked text frames.
Lorem placeholder text is valuable for
experimenting with the appearance of
paragraph text, giving you a better idea of
what blocks of copy will look like when real
content is placed in the layout.
If you press Command/Control while choosing the Fill
with Placeholder Text command, you can define a different
language to use for the placeholder text. These options are
useful if you want to experiment with a design for a layout
in which the text does not use the Roman alphabet —
again, the placeholder more accurately represents what the
final copy will look like..
IND
ESIG
N F
OUN
DATIO
NS
Designing with Placeholder Text
All four threaded text frames are filled with Japanese placeholder text.
All four threaded text frames are filled with Cyrillic placeholder text.
All four threaded text frames are filled with Roman placeholder text.
484
art
dire
cto
r co
mm
ents
clie
nt c
om
men
tsp
roje
ct ju
stifi
catio
n
Use what you learned in this project to complete the following freeform exercise. Carefully read the art director and client comments, then create your own design to meet the needs of the project.Use the space below to sketch ideas; when fi nished, write a brief explanation of your reasoning behind your fi nal design.
Portfolio Builder Project
� e Sawdust Festival is one of the longest running and well-known art shows in California, maybe even the entire United States. We’re planning our advertising campaign for the 2013 summer.
You might want to poke around our Web site to get some ideas. � ere is plenty of information about the festival’s history, and many images from previous shows.
We need an ad that will be placed in the pull-out sections of regional newspapers, and another version of the same ad that can go into magazines for travel/tourism audiences (like the WestWays magazine from AAA). Both ads should be four-color, although you should keep in mind the basic color scheme that we use on our Web site.
� e ads need to have all the relevant text. But just as important, we want the ad to be art in its own right; the visual element you create will actually be repurposed for festival souvenirs like shirts, posters, and so on.
� e former marketing director for the Miami Jazz Festival recently moved to California to become the director of the Laguna Beach Sawdust Festival. She was pleased with your work on the jazz festival project, and would like to hire you to create the advertising for next year’s art festival event.
To complete this project, you should:
� Download the Print6_PB_Project8.zip archive from the Student Files Web page to access the client-supplied text � le.
� Develop some compelling visual element that will be the central focus of the ads.
� Create an ad that � ts on a tabloid-size newspaper page (9 1/2 × 11 1/2″ with no bleeds).
� Create a second version of the same ad to � t a standard magazine trim size (8 1/4 × 10 7/8″ with 1/8″ bleeds).
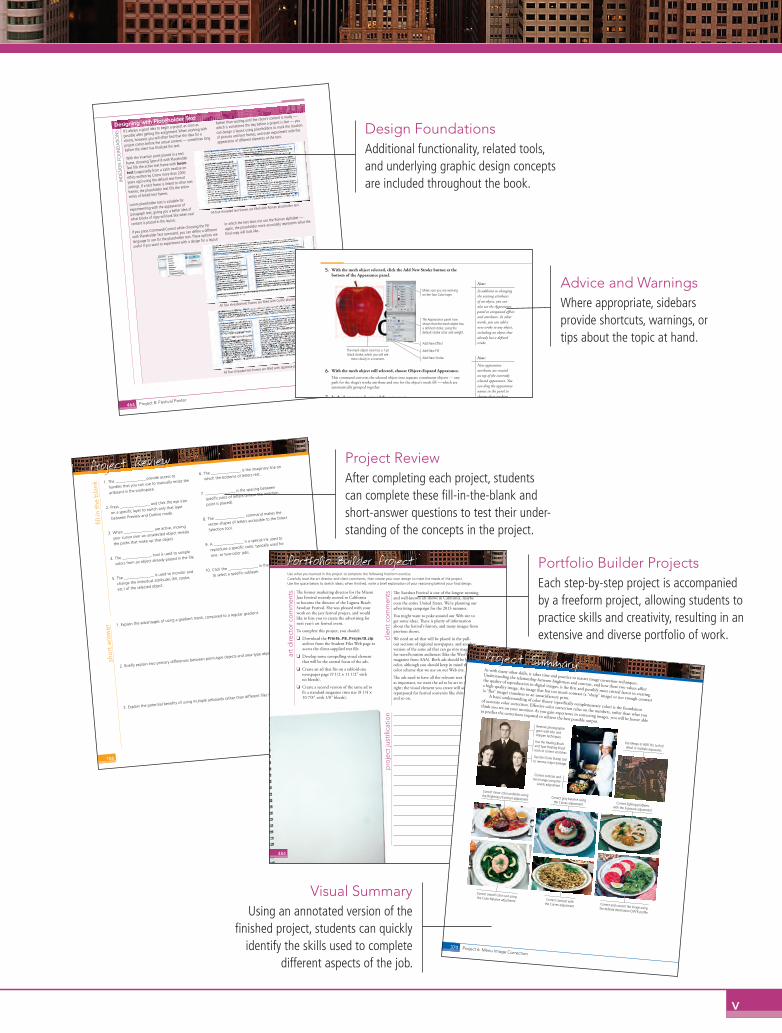
Portfolio Builder ProjectsEach step-by-step project is accompanied by a freeform project, allowing students to practice skills and creativity, resulting in an extensive and diverse portfolio of work.
171Project 3: Identity Package
5. With the mesh object selected, click the Add New Stroke button at the bottom of the Appearance panel.
The mesh object now has a 1-pt black stroke, which you will see
more clearly in a moment.
Make sure you are working on the Two Color layer.
The Appearance panel now shows that the mesh object has a defined stroke, using the default stroke color and weight.
Add New Stroke
Add New Fill
Add New Effect
6. With the mesh object still selected, choose Object>Expand Appearance.
This command converts the selected object into separate constituent objects — one path for the shape’s stroke attribute and one for the object’s mesh fill — which are automatically grouped together.
7. In the Layers panel, expand the new group.
8. Use the Layers panel to select only the mesh object in the group.
Click here to select only the mesh object.
Expanding the appearance creates separate (grouped) objects for each attribute.
In addition to changing the existing attributes of an object, you can also use the Appearance panel to compound effects and attributes. In other words, you can add a new stroke to any object, including an object that already has a defined stroke.
Note:
New appearance attributes are created on top of the currently selected appearance. You can drag the appearance names in the panel to change their stacking sequence, which can have a significant impact on the end result.
Note:
Design FoundationsAdditional functionality, related tools, and underlying graphic design concepts are included throughout the book.
Advice and WarningsWhere appropriate, sidebars provide shortcuts, warnings, or tips about the topic at hand.
Project ReviewAfter completing each project, students can complete these fill-in-the-blank and short-answer questions to test their under-standing of the concepts in the project.
Project Summary
370 Project 6: Menu Image Correction
As with many other skills, it takes time and practice to master image correction techniques.
Understanding the relationship between brightness and contrast, and how these two values a� ect
the quality of reproduction in digital images, is the � rst and possibly most critical factor in creating
a high-quality image. An image that has too much contrast (a “sharp” image) or not enough contrast
(a “� at” image) translates to an unsatisfactory print. A basic understanding of color theory (speci� cally complementary color) is the foundation
of accurate color correction. E� ective color correction relies on the numbers, rather than what you
think you see on your monitor. As you gain experience in correcting images, you will be better able
to predict the corrections required to achieve the best possible output. Remove photographic grain with blur and sharpen techniquesUse the Healing Brush and Spot Healing Brush tools to correct scratches
Use the Clone Stamp tool to remove major damage
Correct contrast and tonal range using the Levels adjustment
Correct lighting problems with the Exposure adjustment
Use Merge to HDR Pro to find detail in multiple exposures
Correct contrast with the Curves adjustment
Correct gray balance using the Curves adjustment
Correct overall color cast using the Color Balance adjustment
Correct minor color problems using the Brightness/Contrast adjustment
Correct and convert the image using the defined destination CMYK profile
Visual SummaryUsing an annotated version of the
finished project, students can quickly identify the skills used to complete
different aspects of the job.
Projects at a Glance
pro
ject
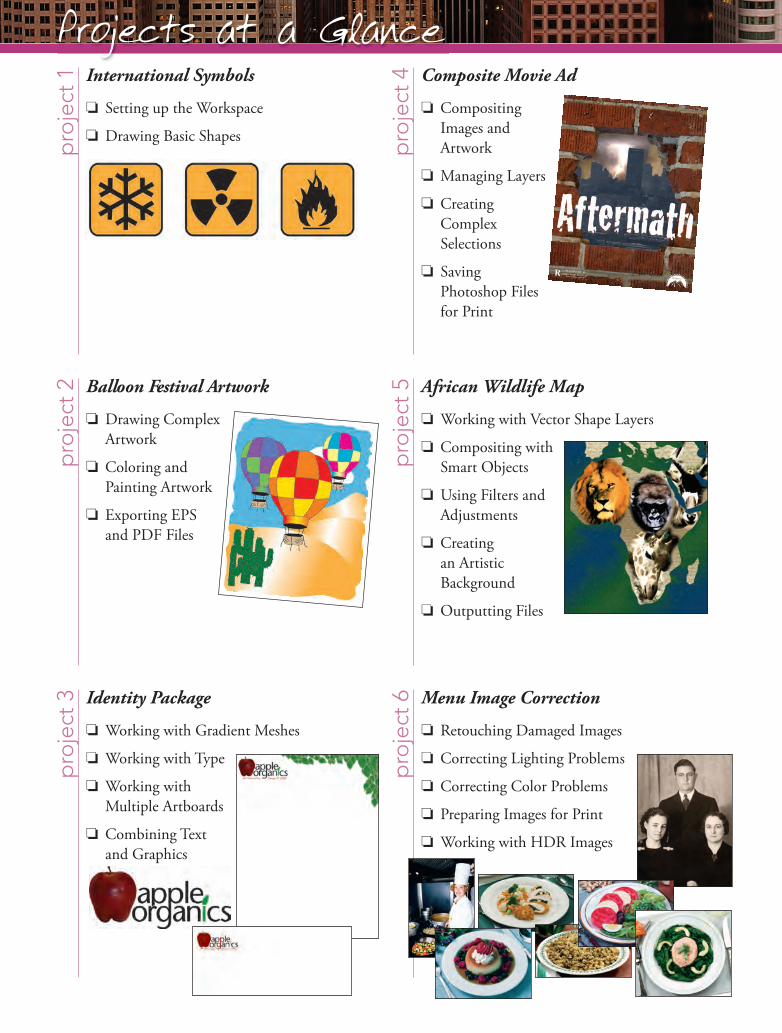
6 Menu Image Correction
o Retouching Damaged Images
o Correcting Lighting Problems
o Correcting Color Problems
o Preparing Images for Print
o Working with HDR Images
pro
ject
5 African Wildlife Map
o Working with Vector Shape Layers
o Compositing with Smart Objects
o Using Filters and Adjustments
o Creating an Artistic Background
o Outputting Files
pro
ject
4 Composite Movie Ad
o Compositing Images and Artwork
o Managing Layers
o Creating Complex Selections
o Saving Photoshop Files for Print
pro
ject
3 Identity Package
o Working with Gradient Meshes
o Working with Type
o Working with Multiple Artboards
o Combining Text and Graphics
pro
ject
2 Balloon Festival Artwork
o Drawing Complex Artwork
o Coloring and Painting Artwork
o Exporting EPS and PDF Files
pro
ject
1 International Symbols
o Setting up the Workspace
o Drawing Basic Shapes
vii
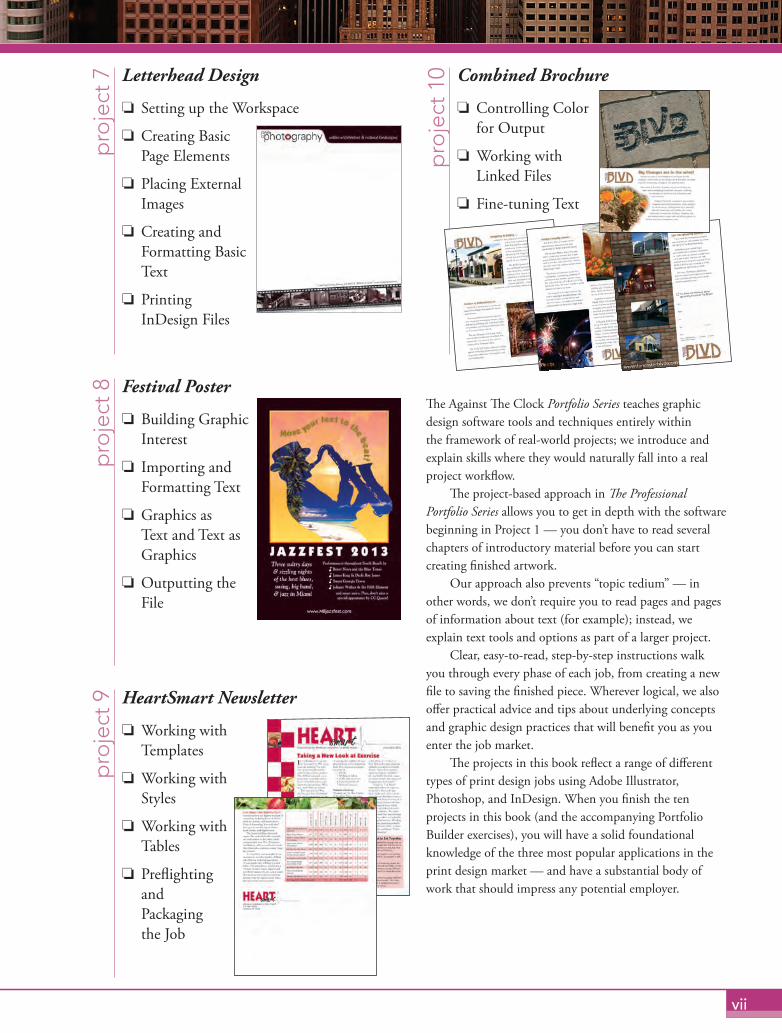
The Against The Clock Portfolio Series teaches graphic design software tools and techniques entirely within the framework of real-world projects; we introduce and explain skills where they would naturally fall into a real project workflow.
The project-based approach in The Professional Portfolio Series allows you to get in depth with the software beginning in Project 1 — you don’t have to read several chapters of introductory material before you can start creating finished artwork.
Our approach also prevents “topic tedium” — in other words, we don’t require you to read pages and pages of information about text (for example); instead, we explain text tools and options as part of a larger project.
Clear, easy-to-read, step-by-step instructions walk you through every phase of each job, from creating a new file to saving the finished piece. Wherever logical, we also offer practical advice and tips about underlying concepts and graphic design practices that will benefit you as you enter the job market.
The projects in this book reflect a range of different types of print design jobs using Adobe Illustrator, Photoshop, and InDesign. When you finish the ten projects in this book (and the accompanying Portfolio Builder exercises), you will have a solid foundational knowledge of the three most popular applications in the print design market — and have a substantial body of work that should impress any potential employer.
pro
ject
10 Combined Brochure
o Controlling Color for Output
o Working with Linked Files
o Fine-tuning Text
pro
ject
9 HeartSmart Newsletter
o Working with Templates
o Working with Styles
o Working with Tables
o Preflighting and Packaging the Job
pro
ject
8 Festival Poster
o Building Graphic Interest
o Importing and Formatting Text
o Graphics as Text and Text as Graphics
o Outputting the File
pro
ject
7 Letterhead Design
o Setting up the Workspace
o Creating Basic Page Elements
o Placing External Images
o Creating and Formatting Basic Text
o Printing InDesign Files
viii
acknowledgeMents iii
walk-through iv
getting started xvi
the adoBe cs6 user interFace 1Explore the InDesign Interface . . . . . . . . . . . . . . . . . . . . . . . . . . . . . . . . . . . . . . . . . . . . . . . . . . . . . . . 1Menus in Adobe Applications . . . . . . . . . . . . . . . . . . . . . . . . . . . . . . . . . . . . . . . . . . . . . . . . . . . . . . . . 1Understanding the Application Frame . . . . . . . . . . . . . . . . . . . . . . . . . . . . . . . . . . . . . . . . . . . . . . . . . . 3Explore the Arrangement of Application Panels . . . . . . . . . . . . . . . . . . . . . . . . . . . . . . . . . . . . . . . . . . . 5Identifying InDesign Tools . . . . . . . . . . . . . . . . . . . . . . . . . . . . . . . . . . . . . . . . . . . . . . . . . . . . . . . . . . 6Accessing Tools in Adobe CS6 Applications . . . . . . . . . . . . . . . . . . . . . . . . . . . . . . . . . . . . . . . . . . . . . 7Customizing Menus and Keyboard Shortcuts . . . . . . . . . . . . . . . . . . . . . . . . . . . . . . . . . . . . . . . . . . . 11Create a Saved Workspace . . . . . . . . . . . . . . . . . . . . . . . . . . . . . . . . . . . . . . . . . . . . . . . . . . . . . . . . . . 12Explore the InDesign Document Views . . . . . . . . . . . . . . . . . . . . . . . . . . . . . . . . . . . . . . . . . . . . . . . . 13Controlling Display Performance . . . . . . . . . . . . . . . . . . . . . . . . . . . . . . . . . . . . . . . . . . . . . . . . . . . . 18Summing up the InDesign View Options . . . . . . . . . . . . . . . . . . . . . . . . . . . . . . . . . . . . . . . . . . . . . . 19Explore the Arrangement of Multiple Documents . . . . . . . . . . . . . . . . . . . . . . . . . . . . . . . . . . . . . . . . 20Explore the Illustrator User Interface . . . . . . . . . . . . . . . . . . . . . . . . . . . . . . . . . . . . . . . . . . . . . . . . . . 23Identifying Illustrator Tools . . . . . . . . . . . . . . . . . . . . . . . . . . . . . . . . . . . . . . . . . . . . . . . . . . . . . . . . 26Summing up the Illustrator View Options . . . . . . . . . . . . . . . . . . . . . . . . . . . . . . . . . . . . . . . . . . . . . . 29Explore the Photoshop User Interface . . . . . . . . . . . . . . . . . . . . . . . . . . . . . . . . . . . . . . . . . . . . . . . . . 30Identifying Photoshop Tools . . . . . . . . . . . . . . . . . . . . . . . . . . . . . . . . . . . . . . . . . . . . . . . . . . . . . . . . 33Summing up the Photoshop View Options . . . . . . . . . . . . . . . . . . . . . . . . . . . . . . . . . . . . . . . . . . . . 35
Project 1 international syMBols 37 Stage 1 Setting up the Workspace . . . . . . . . . . . . . . . . . . . . . . . . . . . . . . . . . . . . . . . . . . . . . . . . . . . . . . . . . 39
Create a New Document . . . . . . . . . . . . . . . . . . . . . . . . . . . . . . . . . . . . . . . . . . . . . . . . . . . . . . . . . . . 39Using Smart Guides. . . . . . . . . . . . . . . . . . . . . . . . . . . . . . . . . . . . . . . . . . . . . . . . . . . . . . . . . . . . . . . 42Defi ne Smart Guide Preferences . . . . . . . . . . . . . . . . . . . . . . . . . . . . . . . . . . . . . . . . . . . . . . . . . . . . . 42Draw Basic Shapes . . . . . . . . . . . . . . . . . . . . . . . . . . . . . . . . . . . . . . . . . . . . . . . . . . . . . . . . . . . . . . . . 43Selection Basics . . . . . . . . . . . . . . . . . . . . . . . . . . . . . . . . . . . . . . . . . . . . . . . . . . . . . . . . . . . . . . . . . . 46Control Fill and Stroke Attributes . . . . . . . . . . . . . . . . . . . . . . . . . . . . . . . . . . . . . . . . . . . . . . . . . . . 47Transforming Objects with the Bounding Box . . . . . . . . . . . . . . . . . . . . . . . . . . . . . . . . . . . . . . . . . . . 49Free Transform Options . . . . . . . . . . . . . . . . . . . . . . . . . . . . . . . . . . . . . . . . . . . . . . . . . . . . . . . . . . . . 50Control Object Positioning . . . . . . . . . . . . . . . . . . . . . . . . . . . . . . . . . . . . . . . . . . . . . . . . . . . . . . . . . 53Align and Distribute Objects . . . . . . . . . . . . . . . . . . . . . . . . . . . . . . . . . . . . . . . . . . . . . . . . . . . . . . . . 56Edit Individual Grouped Elements . . . . . . . . . . . . . . . . . . . . . . . . . . . . . . . . . . . . . . . . . . . . . . . . . . . 58Using the Group Selection Tool . . . . . . . . . . . . . . . . . . . . . . . . . . . . . . . . . . . . . . . . . . . . . . . . . . . . . . 60Import Template Images . . . . . . . . . . . . . . . . . . . . . . . . . . . . . . . . . . . . . . . . . . . . . . . . . . . . . . . . . . . 61Manage Multiple Layers . . . . . . . . . . . . . . . . . . . . . . . . . . . . . . . . . . . . . . . . . . . . . . . . . . . . . . . . . . . 63
Stage 2 Drawing Basic Shapes . . . . . . . . . . . . . . . . . . . . . . . . . . . . . . . . . . . . . . . . . . . . . . . . . . . . . . . . . . . . 67Create Artwork with Lines . . . . . . . . . . . . . . . . . . . . . . . . . . . . . . . . . . . . . . . . . . . . . . . . . . . . . . . . . . 67Refl ect Drawing Objects . . . . . . . . . . . . . . . . . . . . . . . . . . . . . . . . . . . . . . . . . . . . . . . . . . . . . . . . . . . 70Rotate Drawing Objects . . . . . . . . . . . . . . . . . . . . . . . . . . . . . . . . . . . . . . . . . . . . . . . . . . . . . . . . . . . 72Divide Basic Shapes into Component Pieces . . . . . . . . . . . . . . . . . . . . . . . . . . . . . . . . . . . . . . . . . . . . 74
Contents
ix
The Stroke Panel in Depth . . . . . . . . . . . . . . . . . . . . . . . . . . . . . . . . . . . . . . . . . . . . . . . . . . . . . . . . . . 76The Pathfinder Panel in Depth . . . . . . . . . . . . . . . . . . . . . . . . . . . . . . . . . . . . . . . . . . . . . . . . . . . . . . 79Work in Isolation Mode . . . . . . . . . . . . . . . . . . . . . . . . . . . . . . . . . . . . . . . . . . . . . . . . . . . . . . . . . . . 80Use Measurements to Adjust Your Artwork . . . . . . . . . . . . . . . . . . . . . . . . . . . . . . . . . . . . . . . . . . . . . 82Draw with the Pencil Tool . . . . . . . . . . . . . . . . . . . . . . . . . . . . . . . . . . . . . . . . . . . . . . . . . . . . . . . . . . 83
Project Review . . . . . . . . . . . . . . . . . . . . . . . . . . . . . . . . . . . . . . . . . . . . . . . . . . . . . . . . . . . . . . . . . . 86
Portfolio Builder Project . . . . . . . . . . . . . . . . . . . . . . . . . . . . . . . . . . . . . . . . . . . . . . . . . . . . . . . . . 87
Project 2 Balloon Festival artwork 89 Stage 1 Drawing Complex Artwork . . . . . . . . . . . . . . . . . . . . . . . . . . . . . . . . . . . . . . . . . . . . . . . . . . . . . . . 91
Prepare the Drawing Workspace . . . . . . . . . . . . . . . . . . . . . . . . . . . . . . . . . . . . . . . . . . . . . . . . . . . . . 91Use the Pen Tool to Trace the Sketch . . . . . . . . . . . . . . . . . . . . . . . . . . . . . . . . . . . . . . . . . . . . . . . . . . 93Select and Edit Complex Paths . . . . . . . . . . . . . . . . . . . . . . . . . . . . . . . . . . . . . . . . . . . . . . . . . . . . . . 97Build Shapes from Overlapping Paths . . . . . . . . . . . . . . . . . . . . . . . . . . . . . . . . . . . . . . . . . . . . . . . . . 99More on the Shape Builder Tool . . . . . . . . . . . . . . . . . . . . . . . . . . . . . . . . . . . . . . . . . . . . . . . . . . . . 102Adjust Anchor Points and Handles . . . . . . . . . . . . . . . . . . . . . . . . . . . . . . . . . . . . . . . . . . . . . . . . . . 102Understanding Anchor Point and Bézier Curve Tools . . . . . . . . . . . . . . . . . . . . . . . . . . . . . . . . . . . . 104Add Detail with the Pencil and Line Segment Tools . . . . . . . . . . . . . . . . . . . . . . . . . . . . . . . . . . . . . 104Editing Anchor Points with the Control Panel . . . . . . . . . . . . . . . . . . . . . . . . . . . . . . . . . . . . . . . . . . 106Create Shapes with the Blob Brush Tool . . . . . . . . . . . . . . . . . . . . . . . . . . . . . . . . . . . . . . . . . . . . . . 106Using the Draw Inside Mode . . . . . . . . . . . . . . . . . . . . . . . . . . . . . . . . . . . . . . . . . . . . . . . . . . . . . . . 108
Stage 2 Coloring and Painting Artwork . . . . . . . . . . . . . . . . . . . . . . . . . . . . . . . . . . . . . . . . . . . . . . . . . . . 109Use the Color Panel to Define Custom Swatches . . . . . . . . . . . . . . . . . . . . . . . . . . . . . . . . . . . . . . . . 109Create Global Swatches . . . . . . . . . . . . . . . . . . . . . . . . . . . . . . . . . . . . . . . . . . . . . . . . . . . . . . . . . . . 111Add a Color Gradient . . . . . . . . . . . . . . . . . . . . . . . . . . . . . . . . . . . . . . . . . . . . . . . . . . . . . . . . . . . . 113Edit Global Color Swatches . . . . . . . . . . . . . . . . . . . . . . . . . . . . . . . . . . . . . . . . . . . . . . . . . . . . . . . . 115Use the Gradient Tool . . . . . . . . . . . . . . . . . . . . . . . . . . . . . . . . . . . . . . . . . . . . . . . . . . . . . . . . . . . . 117Manage Artwork with Layers . . . . . . . . . . . . . . . . . . . . . . . . . . . . . . . . . . . . . . . . . . . . . . . . . . . . . . . 120Recolor Artwork . . . . . . . . . . . . . . . . . . . . . . . . . . . . . . . . . . . . . . . . . . . . . . . . . . . . . . . . . . . . . . . . 123Recoloring Options . . . . . . . . . . . . . . . . . . . . . . . . . . . . . . . . . . . . . . . . . . . . . . . . . . . . . . . . . . . . . . 126
Stage 3 Exporting EPS and PDF Files . . . . . . . . . . . . . . . . . . . . . . . . . . . . . . . . . . . . . . . . . . . . . . . . . . . . 127Save an EPS File . . . . . . . . . . . . . . . . . . . . . . . . . . . . . . . . . . . . . . . . . . . . . . . . . . . . . . . . . . . . . . . . 127EPS Options . . . . . . . . . . . . . . . . . . . . . . . . . . . . . . . . . . . . . . . . . . . . . . . . . . . . . . . . . . . . . . . . . . . 127Save a File as PDF . . . . . . . . . . . . . . . . . . . . . . . . . . . . . . . . . . . . . . . . . . . . . . . . . . . . . . . . . . . . . . 128
Project Review . . . . . . . . . . . . . . . . . . . . . . . . . . . . . . . . . . . . . . . . . . . . . . . . . . . . . . . . . . . . . . . . . 130
Portfolio Builder Project . . . . . . . . . . . . . . . . . . . . . . . . . . . . . . . . . . . . . . . . . . . . . . . . . . . . . . . . 131
Project 3 identity Package 133 Stage 1 Working with Gradient Meshes . . . . . . . . . . . . . . . . . . . . . . . . . . . . . . . . . . . . . . . . . . . . . . . . . . . 135
Set up the Workspace . . . . . . . . . . . . . . . . . . . . . . . . . . . . . . . . . . . . . . . . . . . . . . . . . . . . . . . . . . . . 135Draw the Apple Shapes . . . . . . . . . . . . . . . . . . . . . . . . . . . . . . . . . . . . . . . . . . . . . . . . . . . . . . . . . . . 137Create a Gradient Mesh . . . . . . . . . . . . . . . . . . . . . . . . . . . . . . . . . . . . . . . . . . . . . . . . . . . . . . . . . . 138Gradient Mesh Options . . . . . . . . . . . . . . . . . . . . . . . . . . . . . . . . . . . . . . . . . . . . . . . . . . . . . . . . . . . 140Work with a Mesh Using Smart Guides . . . . . . . . . . . . . . . . . . . . . . . . . . . . . . . . . . . . . . . . . . . . . . . 143Color the Remaining Objects . . . . . . . . . . . . . . . . . . . . . . . . . . . . . . . . . . . . . . . . . . . . . . . . . . . . . . 146Use Filters to Add Object Highlights . . . . . . . . . . . . . . . . . . . . . . . . . . . . . . . . . . . . . . . . . . . . . . . . . 148The Appearance Panel in Depth. . . . . . . . . . . . . . . . . . . . . . . . . . . . . . . . . . . . . . . . . . . . . . . . . . . . . 150
Contents
x
Stage 2 Working with Type . . . . . . . . . . . . . . . . . . . . . . . . . . . . . . . . . . . . . . . . . . . . . . . . . . . . . . . . . . . . 150Create Point-Type Objects . . . . . . . . . . . . . . . . . . . . . . . . . . . . . . . . . . . . . . . . . . . . . . . . . . . . . . . . . 151Th e Character Panel in Depth . . . . . . . . . . . . . . . . . . . . . . . . . . . . . . . . . . . . . . . . . . . . . . . . . . . . . . 154Point Type vs. Area Type . . . . . . . . . . . . . . . . . . . . . . . . . . . . . . . . . . . . . . . . . . . . . . . . . . . . . . . . . . 156Manipulate Type Objects . . . . . . . . . . . . . . . . . . . . . . . . . . . . . . . . . . . . . . . . . . . . . . . . . . . . . . . . . . 157Convert Type to Outlines . . . . . . . . . . . . . . . . . . . . . . . . . . . . . . . . . . . . . . . . . . . . . . . . . . . . . . . . . 159Create Custom Graphics from Letter Shapes . . . . . . . . . . . . . . . . . . . . . . . . . . . . . . . . . . . . . . . . . . . 162
Stage 3 Working with Multiple Artboards . . . . . . . . . . . . . . . . . . . . . . . . . . . . . . . . . . . . . . . . . . . . . . . . . 164Adjust the Default Artboard . . . . . . . . . . . . . . . . . . . . . . . . . . . . . . . . . . . . . . . . . . . . . . . . . . . . . . . 164Managing Artboard Options . . . . . . . . . . . . . . . . . . . . . . . . . . . . . . . . . . . . . . . . . . . . . . . . . . . . . . . 165Use the Layers Panel to Organize Artwork . . . . . . . . . . . . . . . . . . . . . . . . . . . . . . . . . . . . . . . . . . . . . 167Copy the Artboard and Artwork . . . . . . . . . . . . . . . . . . . . . . . . . . . . . . . . . . . . . . . . . . . . . . . . . . . . 168Convert Mesh Objects to Regular Paths . . . . . . . . . . . . . . . . . . . . . . . . . . . . . . . . . . . . . . . . . . . . . . 170Add Spot Color to the Two-Color Logo . . . . . . . . . . . . . . . . . . . . . . . . . . . . . . . . . . . . . . . . . . . . . . 173Export EPS Logo Files . . . . . . . . . . . . . . . . . . . . . . . . . . . . . . . . . . . . . . . . . . . . . . . . . . . . . . . . . . . 175
Stage 4 Combining Text and Graphics . . . . . . . . . . . . . . . . . . . . . . . . . . . . . . . . . . . . . . . . . . . . . . . . . . . . 177Work with Placed Graphics . . . . . . . . . . . . . . . . . . . . . . . . . . . . . . . . . . . . . . . . . . . . . . . . . . . . . . . . 177Understanding Placed-Image Bounding Boxes . . . . . . . . . . . . . . . . . . . . . . . . . . . . . . . . . . . . . . . . . . 178Create the Envelope Layout . . . . . . . . . . . . . . . . . . . . . . . . . . . . . . . . . . . . . . . . . . . . . . . . . . . . . . . . 181Print Desktop Proofs of Multiple Artboards . . . . . . . . . . . . . . . . . . . . . . . . . . . . . . . . . . . . . . . . . . . 183
Project Review . . . . . . . . . . . . . . . . . . . . . . . . . . . . . . . . . . . . . . . . . . . . . . . . . . . . . . . . . . . . . . . . . 186
Portfolio Builder Project . . . . . . . . . . . . . . . . . . . . . . . . . . . . . . . . . . . . . . . . . . . . . . . . . . . . . . . . 187
Project 4 coMPosite Movie ad 189 Stage 1 Compositing Images and Artwork . . . . . . . . . . . . . . . . . . . . . . . . . . . . . . . . . . . . . . . . . . . . . . . . . 191
Open a File from Adobe Bridge . . . . . . . . . . . . . . . . . . . . . . . . . . . . . . . . . . . . . . . . . . . . . . . . . . . . . 192Understanding File Saving Preferences . . . . . . . . . . . . . . . . . . . . . . . . . . . . . . . . . . . . . . . . . . . . . . . . 195Resize the Image . . . . . . . . . . . . . . . . . . . . . . . . . . . . . . . . . . . . . . . . . . . . . . . . . . . . . . . . . . . . . . . . 196More on Resolution and Resampling . . . . . . . . . . . . . . . . . . . . . . . . . . . . . . . . . . . . . . . . . . . . . . . . . 198Crop the Canvas and Place Ruler Guides . . . . . . . . . . . . . . . . . . . . . . . . . . . . . . . . . . . . . . . . . . . . . . 199Th e Crop Tools in Depth . . . . . . . . . . . . . . . . . . . . . . . . . . . . . . . . . . . . . . . . . . . . . . . . . . . . . . . . . . 201Drag a File to Composite Images . . . . . . . . . . . . . . . . . . . . . . . . . . . . . . . . . . . . . . . . . . . . . . . . . . . . 206Open Files with Mini Bridge . . . . . . . . . . . . . . . . . . . . . . . . . . . . . . . . . . . . . . . . . . . . . . . . . . . . . . . 208Place a File from Mini Bridge . . . . . . . . . . . . . . . . . . . . . . . . . . . . . . . . . . . . . . . . . . . . . . . . . . . . . . 212Rasterize a Vector File . . . . . . . . . . . . . . . . . . . . . . . . . . . . . . . . . . . . . . . . . . . . . . . . . . . . . . . . . . . . 213Place Multiple EPS Graphics . . . . . . . . . . . . . . . . . . . . . . . . . . . . . . . . . . . . . . . . . . . . . . . . . . . . . . . 215
Stage 2 Managing Layers . . . . . . . . . . . . . . . . . . . . . . . . . . . . . . . . . . . . . . . . . . . . . . . . . . . . . . . . . . . . . . . 216Name Layers and Layer Groups . . . . . . . . . . . . . . . . . . . . . . . . . . . . . . . . . . . . . . . . . . . . . . . . . . . . . 216Move and Transform Smart Object Layers . . . . . . . . . . . . . . . . . . . . . . . . . . . . . . . . . . . . . . . . . . . . . 219Transform a Regular Layer . . . . . . . . . . . . . . . . . . . . . . . . . . . . . . . . . . . . . . . . . . . . . . . . . . . . . . . . . 221Transform the Background Layer . . . . . . . . . . . . . . . . . . . . . . . . . . . . . . . . . . . . . . . . . . . . . . . . . . . . 223
Stage 3 Creating Complex Selections . . . . . . . . . . . . . . . . . . . . . . . . . . . . . . . . . . . . . . . . . . . . . . . . . . . . . 226Make a Feathered Selection . . . . . . . . . . . . . . . . . . . . . . . . . . . . . . . . . . . . . . . . . . . . . . . . . . . . . . . . 226Th e Lasso Tools . . . . . . . . . . . . . . . . . . . . . . . . . . . . . . . . . . . . . . . . . . . . . . . . . . . . . . . . . . . . . . . . . 227Select a Color Range and Create a Layer Mask . . . . . . . . . . . . . . . . . . . . . . . . . . . . . . . . . . . . . . . . . 228More on Selecting a Color Range . . . . . . . . . . . . . . . . . . . . . . . . . . . . . . . . . . . . . . . . . . . . . . . . . . . 231
xi
Make and Refine a Quick Selection . . . . . . . . . . . . . . . . . . . . . . . . . . . . . . . . . . . . . . . . . . . . . . . . . . 235Arrange Layer Position and Stacking Order . . . . . . . . . . . . . . . . . . . . . . . . . . . . . . . . . . . . . . . . . . . . 237Filtering Layers . . . . . . . . . . . . . . . . . . . . . . . . . . . . . . . . . . . . . . . . . . . . . . . . . . . . . . . . . . . . . . . . . 239Common File Formats . . . . . . . . . . . . . . . . . . . . . . . . . . . . . . . . . . . . . . . . . . . . . . . . . . . . . . . . . . . 240
Stage 4 Saving Photoshop Files for Print . . . . . . . . . . . . . . . . . . . . . . . . . . . . . . . . . . . . . . . . . . . . . . . . . . 240Save a Layered TIFF File . . . . . . . . . . . . . . . . . . . . . . . . . . . . . . . . . . . . . . . . . . . . . . . . . . . . . . . . . . 240Save a Flattened TIFF File . . . . . . . . . . . . . . . . . . . . . . . . . . . . . . . . . . . . . . . . . . . . . . . . . . . . . . . . . 242
Project Review . . . . . . . . . . . . . . . . . . . . . . . . . . . . . . . . . . . . . . . . . . . . . . . . . . . . . . . . . . . . . . . . . 244
Portfolio Builder Project . . . . . . . . . . . . . . . . . . . . . . . . . . . . . . . . . . . . . . . . . . . . . . . . . . . . . . . . 245
Project 5 aFrican wildliFe MaP 247 Stage 1 Working with Vector Shape Layers . . . . . . . . . . . . . . . . . . . . . . . . . . . . . . . . . . . . . . . . . . . . . . . . 249
Review and Resample the Existing Source Image . . . . . . . . . . . . . . . . . . . . . . . . . . . . . . . . . . . . . . . . 249Create a Vector-Based Shape Layer . . . . . . . . . . . . . . . . . . . . . . . . . . . . . . . . . . . . . . . . . . . . . . . . . . 251Add to an Existing Shape Layer . . . . . . . . . . . . . . . . . . . . . . . . . . . . . . . . . . . . . . . . . . . . . . . . . . . . . 254Control and Edit a Shape Layer . . . . . . . . . . . . . . . . . . . . . . . . . . . . . . . . . . . . . . . . . . . . . . . . . . . . . 256Understanding Path Operations . . . . . . . . . . . . . . . . . . . . . . . . . . . . . . . . . . . . . . . . . . . . . . . . . . . . 257Selecting and Modifying Paths . . . . . . . . . . . . . . . . . . . . . . . . . . . . . . . . . . . . . . . . . . . . . . . . . . . . . . 260Subtract from a Shape Layer . . . . . . . . . . . . . . . . . . . . . . . . . . . . . . . . . . . . . . . . . . . . . . . . . . . . . . . 261More About Vector Shape Options . . . . . . . . . . . . . . . . . . . . . . . . . . . . . . . . . . . . . . . . . . . . . . . . . . 261More About Vector Drawing Tools . . . . . . . . . . . . . . . . . . . . . . . . . . . . . . . . . . . . . . . . . . . . . . . . . . 263Resample the Shape Layer and Change the Canvas Size . . . . . . . . . . . . . . . . . . . . . . . . . . . . . . . . . . . 265Add Color and Texture to the Shape Layer . . . . . . . . . . . . . . . . . . . . . . . . . . . . . . . . . . . . . . . . . . . . 267Understanding the Paths Panel . . . . . . . . . . . . . . . . . . . . . . . . . . . . . . . . . . . . . . . . . . . . . . . . . . . . . 270
Stage 2 Compositing with Smart Objects . . . . . . . . . . . . . . . . . . . . . . . . . . . . . . . . . . . . . . . . . . . . . . . . . . 271Compare Smart Object Layers to Normal Layers . . . . . . . . . . . . . . . . . . . . . . . . . . . . . . . . . . . . . . . . 271Understanding Channels . . . . . . . . . . . . . . . . . . . . . . . . . . . . . . . . . . . . . . . . . . . . . . . . . . . . . . . . . . 273Work with Feathered Selections in Quick Mask Mode . . . . . . . . . . . . . . . . . . . . . . . . . . . . . . . . . . . 274Apply a Layer Mask to a Smart Object Layer . . . . . . . . . . . . . . . . . . . . . . . . . . . . . . . . . . . . . . . . . . . 276Edit a Layer Mask . . . . . . . . . . . . . . . . . . . . . . . . . . . . . . . . . . . . . . . . . . . . . . . . . . . . . . . . . . . . . . . 278Accessing Brush Libraries . . . . . . . . . . . . . . . . . . . . . . . . . . . . . . . . . . . . . . . . . . . . . . . . . . . . . . . . . 282Use the Properties Panel . . . . . . . . . . . . . . . . . . . . . . . . . . . . . . . . . . . . . . . . . . . . . . . . . . . . . . . . . . 282Vector Masks vs. Pixel Masks . . . . . . . . . . . . . . . . . . . . . . . . . . . . . . . . . . . . . . . . . . . . . . . . . . . . . . . 284Convert Regular Layers to Smart Objects . . . . . . . . . . . . . . . . . . . . . . . . . . . . . . . . . . . . . . . . . . . . . 285Rasterizing Smart Objects with Masks . . . . . . . . . . . . . . . . . . . . . . . . . . . . . . . . . . . . . . . . . . . . . . . . 288Create a Clipping Mask . . . . . . . . . . . . . . . . . . . . . . . . . . . . . . . . . . . . . . . . . . . . . . . . . . . . . . . . . . . 289
Stage 3 Using Filters and Adjustments . . . . . . . . . . . . . . . . . . . . . . . . . . . . . . . . . . . . . . . . . . . . . . . . . . . . 292Apply Non-Destructive Filters to Smart Objects . . . . . . . . . . . . . . . . . . . . . . . . . . . . . . . . . . . . . . . . 292More About Photoshop Filters . . . . . . . . . . . . . . . . . . . . . . . . . . . . . . . . . . . . . . . . . . . . . . . . . . . . . . 293Apply Destructive Filters to Regular Layers . . . . . . . . . . . . . . . . . . . . . . . . . . . . . . . . . . . . . . . . . . . . 294
Stage 4 Creating an Artistic Background . . . . . . . . . . . . . . . . . . . . . . . . . . . . . . . . . . . . . . . . . . . . . . . . . . 297Use the Eyedropper Tool . . . . . . . . . . . . . . . . . . . . . . . . . . . . . . . . . . . . . . . . . . . . . . . . . . . . . . . . . . 297Fading Effects . . . . . . . . . . . . . . . . . . . . . . . . . . . . . . . . . . . . . . . . . . . . . . . . . . . . . . . . . . . . . . . . . . 297Create a Custom Gradient . . . . . . . . . . . . . . . . . . . . . . . . . . . . . . . . . . . . . . . . . . . . . . . . . . . . . . . . 299Create a Gradient Fill Layer . . . . . . . . . . . . . . . . . . . . . . . . . . . . . . . . . . . . . . . . . . . . . . . . . . . . . . . . 301Create a Pattern Fill Layer . . . . . . . . . . . . . . . . . . . . . . . . . . . . . . . . . . . . . . . . . . . . . . . . . . . . . . . . . 302
Contents
xii
Adjust Layer Order and Blending Mode . . . . . . . . . . . . . . . . . . . . . . . . . . . . . . . . . . . . . . . . . . . . . . 303Distinguishing Photoshop Blending Modes . . . . . . . . . . . . . . . . . . . . . . . . . . . . . . . . . . . . . . . . . . . . 306Liquify a Layer . . . . . . . . . . . . . . . . . . . . . . . . . . . . . . . . . . . . . . . . . . . . . . . . . . . . . . . . . . . . . . . . . 307Understanding the Liquify Filter . . . . . . . . . . . . . . . . . . . . . . . . . . . . . . . . . . . . . . . . . . . . . . . . . . . . 308
Stage 5 Outputting Files . . . . . . . . . . . . . . . . . . . . . . . . . . . . . . . . . . . . . . . . . . . . . . . . . . . . . . . . . . . . . . . 311Print the Composite Proof . . . . . . . . . . . . . . . . . . . . . . . . . . . . . . . . . . . . . . . . . . . . . . . . . . . . . . . . . 311Print Output Options . . . . . . . . . . . . . . . . . . . . . . . . . . . . . . . . . . . . . . . . . . . . . . . . . . . . . . . . . . . . 312
Project Review . . . . . . . . . . . . . . . . . . . . . . . . . . . . . . . . . . . . . . . . . . . . . . . . . . . . . . . . . . . . . . . . . 314
Portfolio Builder Project . . . . . . . . . . . . . . . . . . . . . . . . . . . . . . . . . . . . . . . . . . . . . . . . . . . . . . . . 315
Project 6 Menu iMage correction 317 Stage 1 Retouching Damaged Images . . . . . . . . . . . . . . . . . . . . . . . . . . . . . . . . . . . . . . . . . . . . . . . . . . . . 319
Remove Grain with Blur and Sharpen Techniques . . . . . . . . . . . . . . . . . . . . . . . . . . . . . . . . . . . . . . . 319Heal Severe Scratches . . . . . . . . . . . . . . . . . . . . . . . . . . . . . . . . . . . . . . . . . . . . . . . . . . . . . . . . . . . . 321Aligning the Healing Source . . . . . . . . . . . . . . . . . . . . . . . . . . . . . . . . . . . . . . . . . . . . . . . . . . . . . . . 323Clone out Major Damage . . . . . . . . . . . . . . . . . . . . . . . . . . . . . . . . . . . . . . . . . . . . . . . . . . . . . . . . . 324Th e Clone Source Panel in Depth . . . . . . . . . . . . . . . . . . . . . . . . . . . . . . . . . . . . . . . . . . . . . . . . . . . 328
Stage 2 Correcting Lighting Problems . . . . . . . . . . . . . . . . . . . . . . . . . . . . . . . . . . . . . . . . . . . . . . . . . . . . 329Correct Problems with Brightness/Contrast . . . . . . . . . . . . . . . . . . . . . . . . . . . . . . . . . . . . . . . . . . . . 329Correct Contrast and Tonal Range with Levels . . . . . . . . . . . . . . . . . . . . . . . . . . . . . . . . . . . . . . . . . 330Histogram Statistics . . . . . . . . . . . . . . . . . . . . . . . . . . . . . . . . . . . . . . . . . . . . . . . . . . . . . . . . . . . . . . 331Identifying Shadows and Highlights . . . . . . . . . . . . . . . . . . . . . . . . . . . . . . . . . . . . . . . . . . . . . . . . . 332Th e Gradient Map Adjustment . . . . . . . . . . . . . . . . . . . . . . . . . . . . . . . . . . . . . . . . . . . . . . . . . . . . . 334Correct Lighting Problems with the Exposure Adjustment . . . . . . . . . . . . . . . . . . . . . . . . . . . . . . . . 335
Stage 3 Correcting Color Problems . . . . . . . . . . . . . . . . . . . . . . . . . . . . . . . . . . . . . . . . . . . . . . . . . . . . . . 337Understanding Color Terms . . . . . . . . . . . . . . . . . . . . . . . . . . . . . . . . . . . . . . . . . . . . . . . . . . . . . . . 338Correct Color Cast with the Color Balance Adjustment . . . . . . . . . . . . . . . . . . . . . . . . . . . . . . . . . . 340Correct Gray Balance with Curves . . . . . . . . . . . . . . . . . . . . . . . . . . . . . . . . . . . . . . . . . . . . . . . . . . . 342Correct Contrast with Curves . . . . . . . . . . . . . . . . . . . . . . . . . . . . . . . . . . . . . . . . . . . . . . . . . . . . . . 345Adjusting Curves On-Screen . . . . . . . . . . . . . . . . . . . . . . . . . . . . . . . . . . . . . . . . . . . . . . . . . . . . . . . 345Curve Display Options . . . . . . . . . . . . . . . . . . . . . . . . . . . . . . . . . . . . . . . . . . . . . . . . . . . . . . . . . . . 346Automatic Color Correction . . . . . . . . . . . . . . . . . . . . . . . . . . . . . . . . . . . . . . . . . . . . . . . . . . . . . . . 349
Stage 4 Preparing Images for Print . . . . . . . . . . . . . . . . . . . . . . . . . . . . . . . . . . . . . . . . . . . . . . . . . . . . . . . 350Color Management in Th eory and Practice . . . . . . . . . . . . . . . . . . . . . . . . . . . . . . . . . . . . . . . . . . . . 351Understanding Color Modes . . . . . . . . . . . . . . . . . . . . . . . . . . . . . . . . . . . . . . . . . . . . . . . . . . . . . . . 352Defi ne Color Settings . . . . . . . . . . . . . . . . . . . . . . . . . . . . . . . . . . . . . . . . . . . . . . . . . . . . . . . . . . . . 352Understanding Rendering Intents . . . . . . . . . . . . . . . . . . . . . . . . . . . . . . . . . . . . . . . . . . . . . . . . . . . 354Identify Out-of-Gamut Colors . . . . . . . . . . . . . . . . . . . . . . . . . . . . . . . . . . . . . . . . . . . . . . . . . . . . . 356Adjust Highlight and Shadow Points for Print . . . . . . . . . . . . . . . . . . . . . . . . . . . . . . . . . . . . . . . . . . 358Converting Image Color Modes . . . . . . . . . . . . . . . . . . . . . . . . . . . . . . . . . . . . . . . . . . . . . . . . . . . . 361Converting Images to Grayscale . . . . . . . . . . . . . . . . . . . . . . . . . . . . . . . . . . . . . . . . . . . . . . . . . . . . . 363
Stage 5 Working with HDR Images . . . . . . . . . . . . . . . . . . . . . . . . . . . . . . . . . . . . . . . . . . . . . . . . . . . . . . 364Use Merge to HDR Pro . . . . . . . . . . . . . . . . . . . . . . . . . . . . . . . . . . . . . . . . . . . . . . . . . . . . . . . . . . . 364Reducing Dynamic Range for Output . . . . . . . . . . . . . . . . . . . . . . . . . . . . . . . . . . . . . . . . . . . . . . . . 366
Project Review . . . . . . . . . . . . . . . . . . . . . . . . . . . . . . . . . . . . . . . . . . . . . . . . . . . . . . . . . . . . . . . . . 368
Portfolio Builder Project . . . . . . . . . . . . . . . . . . . . . . . . . . . . . . . . . . . . . . . . . . . . . . . . . . . . . . . . 369
xiii
Project 7 letterhead design 371 Stage 1 Setting up the Workspace . . . . . . . . . . . . . . . . . . . . . . . . . . . . . . . . . . . . . . . . . . . . . . . . . . . . . . . . 373
Define a New Layout File . . . . . . . . . . . . . . . . . . . . . . . . . . . . . . . . . . . . . . . . . . . . . . . . . . . . . . . . . 373Understanding Document Presets . . . . . . . . . . . . . . . . . . . . . . . . . . . . . . . . . . . . . . . . . . . . . . . . . . . 377Create Ruler Guides . . . . . . . . . . . . . . . . . . . . . . . . . . . . . . . . . . . . . . . . . . . . . . . . . . . . . . . . . . . . . 378
Stage 2 Creating Basic Page Elements . . . . . . . . . . . . . . . . . . . . . . . . . . . . . . . . . . . . . . . . . . . . . . . . . . . . 380Create Basic Frames . . . . . . . . . . . . . . . . . . . . . . . . . . . . . . . . . . . . . . . . . . . . . . . . . . . . . . . . . . . . . . 380The Control Panel in Depth . . . . . . . . . . . . . . . . . . . . . . . . . . . . . . . . . . . . . . . . . . . . . . . . . . . . . . . 383Create a Rounded Rectangle . . . . . . . . . . . . . . . . . . . . . . . . . . . . . . . . . . . . . . . . . . . . . . . . . . . . . . . 385Clone, Align, and Distribute Multiple Objects . . . . . . . . . . . . . . . . . . . . . . . . . . . . . . . . . . . . . . . . . 387Editing Object Corners . . . . . . . . . . . . . . . . . . . . . . . . . . . . . . . . . . . . . . . . . . . . . . . . . . . . . . . . . . . 387Aligning and Distributing Objects . . . . . . . . . . . . . . . . . . . . . . . . . . . . . . . . . . . . . . . . . . . . . . . . . . . 390Create a Compound Path . . . . . . . . . . . . . . . . . . . . . . . . . . . . . . . . . . . . . . . . . . . . . . . . . . . . . . . . . 391The Pathfinder Panel in Depth . . . . . . . . . . . . . . . . . . . . . . . . . . . . . . . . . . . . . . . . . . . . . . . . . . . . . 392Create and Transform Multiple Frames . . . . . . . . . . . . . . . . . . . . . . . . . . . . . . . . . . . . . . . . . . . . . . . 393Create a Simple Line . . . . . . . . . . . . . . . . . . . . . . . . . . . . . . . . . . . . . . . . . . . . . . . . . . . . . . . . . . . . . 396Create Bézier Curves . . . . . . . . . . . . . . . . . . . . . . . . . . . . . . . . . . . . . . . . . . . . . . . . . . . . . . . . . . . . . 399Creating Irregular Shapes with the Polygon Tool . . . . . . . . . . . . . . . . . . . . . . . . . . . . . . . . . . . . . . . . 401Change Color Values . . . . . . . . . . . . . . . . . . . . . . . . . . . . . . . . . . . . . . . . . . . . . . . . . . . . . . . . . . . . . 402
Stage 3 Placing External Images . . . . . . . . . . . . . . . . . . . . . . . . . . . . . . . . . . . . . . . . . . . . . . . . . . . . . . . . . 403Place an External Graphics File . . . . . . . . . . . . . . . . . . . . . . . . . . . . . . . . . . . . . . . . . . . . . . . . . . . . . 403Content Fitting Options . . . . . . . . . . . . . . . . . . . . . . . . . . . . . . . . . . . . . . . . . . . . . . . . . . . . . . . . . . 407Place Images into Existing Frames . . . . . . . . . . . . . . . . . . . . . . . . . . . . . . . . . . . . . . . . . . . . . . . . . . . 408
Stage 4 Creating and Formatting Basic Text . . . . . . . . . . . . . . . . . . . . . . . . . . . . . . . . . . . . . . . . . . . . . . . 413Create a Simple Text Frame . . . . . . . . . . . . . . . . . . . . . . . . . . . . . . . . . . . . . . . . . . . . . . . . . . . . . . . . 413Selecting Text . . . . . . . . . . . . . . . . . . . . . . . . . . . . . . . . . . . . . . . . . . . . . . . . . . . . . . . . . . . . . . . . . . 415Place an External Text File . . . . . . . . . . . . . . . . . . . . . . . . . . . . . . . . . . . . . . . . . . . . . . . . . . . . . . . . . 417Tips and Tricks for Working with Layout Elements . . . . . . . . . . . . . . . . . . . . . . . . . . . . . . . . . . . . . . 421
Stage 5 Printing InDesign Files . . . . . . . . . . . . . . . . . . . . . . . . . . . . . . . . . . . . . . . . . . . . . . . . . . . . . . . . . 422Print a Sample Proof . . . . . . . . . . . . . . . . . . . . . . . . . . . . . . . . . . . . . . . . . . . . . . . . . . . . . . . . . . . . . 422
Project Review . . . . . . . . . . . . . . . . . . . . . . . . . . . . . . . . . . . . . . . . . . . . . . . . . . . . . . . . . . . . . . . . . 426
Portfolio Builder Project . . . . . . . . . . . . . . . . . . . . . . . . . . . . . . . . . . . . . . . . . . . . . . . . . . . . . . . . 427
Project 8 Festival Poster 429 Stage 1 Building Graphic Interest . . . . . . . . . . . . . . . . . . . . . . . . . . . . . . . . . . . . . . . . . . . . . . . . . . . . . . . . 431
Set up the Workspace . . . . . . . . . . . . . . . . . . . . . . . . . . . . . . . . . . . . . . . . . . . . . . . . . . . . . . . . . . . . 431Define Color Swatches . . . . . . . . . . . . . . . . . . . . . . . . . . . . . . . . . . . . . . . . . . . . . . . . . . . . . . . . . . . 432Color by Numbers . . . . . . . . . . . . . . . . . . . . . . . . . . . . . . . . . . . . . . . . . . . . . . . . . . . . . . . . . . . . . . . 434Create the Poster Background . . . . . . . . . . . . . . . . . . . . . . . . . . . . . . . . . . . . . . . . . . . . . . . . . . . . . . 436Define and Apply a Gradient . . . . . . . . . . . . . . . . . . . . . . . . . . . . . . . . . . . . . . . . . . . . . . . . . . . . . . . 439Modify Gradient Attributes . . . . . . . . . . . . . . . . . . . . . . . . . . . . . . . . . . . . . . . . . . . . . . . . . . . . . . . . 441The Gradient Tools . . . . . . . . . . . . . . . . . . . . . . . . . . . . . . . . . . . . . . . . . . . . . . . . . . . . . . . . . . . . . . 442Create Visual Impact with Transparency . . . . . . . . . . . . . . . . . . . . . . . . . . . . . . . . . . . . . . . . . . . . . . 444Applying Effects . . . . . . . . . . . . . . . . . . . . . . . . . . . . . . . . . . . . . . . . . . . . . . . . . . . . . . . . . . . . . . . . 448Create an Irregular Graphics Frame . . . . . . . . . . . . . . . . . . . . . . . . . . . . . . . . . . . . . . . . . . . . . . . . . . 451Clipping Path Options . . . . . . . . . . . . . . . . . . . . . . . . . . . . . . . . . . . . . . . . . . . . . . . . . . . . . . . . . . . 453

Contents
xiv
Stage 2 Importing and Formatting Text . . . . . . . . . . . . . . . . . . . . . . . . . . . . . . . . . . . . . . . . . . . . . . . . . . . 456Control Text Th reading . . . . . . . . . . . . . . . . . . . . . . . . . . . . . . . . . . . . . . . . . . . . . . . . . . . . . . . . . . 456Defi ne Manual Frame Breaks . . . . . . . . . . . . . . . . . . . . . . . . . . . . . . . . . . . . . . . . . . . . . . . . . . . . . . . 458Apply Character Formatting . . . . . . . . . . . . . . . . . . . . . . . . . . . . . . . . . . . . . . . . . . . . . . . . . . . . . . . 460Designing with Placeholder Text . . . . . . . . . . . . . . . . . . . . . . . . . . . . . . . . . . . . . . . . . . . . . . . . . . . . 464Apply Paragraph Formatting . . . . . . . . . . . . . . . . . . . . . . . . . . . . . . . . . . . . . . . . . . . . . . . . . . . . . . . 465Use Optical Margin Alignment . . . . . . . . . . . . . . . . . . . . . . . . . . . . . . . . . . . . . . . . . . . . . . . . . . . . . 467Copying Type Attributes with the Eyedropper Tool . . . . . . . . . . . . . . . . . . . . . . . . . . . . . . . . . . . . . . 467Understanding the Baseline Grid . . . . . . . . . . . . . . . . . . . . . . . . . . . . . . . . . . . . . . . . . . . . . . . . . . . . 470
Stage 3 Graphics as Text and Text as Graphics . . . . . . . . . . . . . . . . . . . . . . . . . . . . . . . . . . . . . . . . . . . . . 470Place Inline Graphics . . . . . . . . . . . . . . . . . . . . . . . . . . . . . . . . . . . . . . . . . . . . . . . . . . . . . . . . . . . . . 470Working with Anchored Objects . . . . . . . . . . . . . . . . . . . . . . . . . . . . . . . . . . . . . . . . . . . . . . . . . . . . 472Create Type on a Path . . . . . . . . . . . . . . . . . . . . . . . . . . . . . . . . . . . . . . . . . . . . . . . . . . . . . . . . . . . . 474Type on a Path Options . . . . . . . . . . . . . . . . . . . . . . . . . . . . . . . . . . . . . . . . . . . . . . . . . . . . . . . . . . . 477
Stage 4 Outputting the File . . . . . . . . . . . . . . . . . . . . . . . . . . . . . . . . . . . . . . . . . . . . . . . . . . . . . . . . . . . . . 478Export a PDF File for Print . . . . . . . . . . . . . . . . . . . . . . . . . . . . . . . . . . . . . . . . . . . . . . . . . . . . . . . . 478Resolution Options for PDF . . . . . . . . . . . . . . . . . . . . . . . . . . . . . . . . . . . . . . . . . . . . . . . . . . . . . . . 480Understanding Flattener Presets . . . . . . . . . . . . . . . . . . . . . . . . . . . . . . . . . . . . . . . . . . . . . . . . . . . . . 482
Project Review . . . . . . . . . . . . . . . . . . . . . . . . . . . . . . . . . . . . . . . . . . . . . . . . . . . . . . . . . . . . . . . . . 483
Portfolio Builder Project . . . . . . . . . . . . . . . . . . . . . . . . . . . . . . . . . . . . . . . . . . . . . . . . . . . . . . . . 484
Project 9 heartsMart newsletter 487 Stage 1 Working with Templates . . . . . . . . . . . . . . . . . . . . . . . . . . . . . . . . . . . . . . . . . . . . . . . . . . . . . . . . . 489
Manage Missing Fonts . . . . . . . . . . . . . . . . . . . . . . . . . . . . . . . . . . . . . . . . . . . . . . . . . . . . . . . . . . . 489Replace Missing and Modifi ed Graphics . . . . . . . . . . . . . . . . . . . . . . . . . . . . . . . . . . . . . . . . . . . . . . 492Th e Links Panel in Depth . . . . . . . . . . . . . . . . . . . . . . . . . . . . . . . . . . . . . . . . . . . . . . . . . . . . . . . . . 493Edit Margin and Column Guides . . . . . . . . . . . . . . . . . . . . . . . . . . . . . . . . . . . . . . . . . . . . . . . . . . . 496Understanding Master Pages . . . . . . . . . . . . . . . . . . . . . . . . . . . . . . . . . . . . . . . . . . . . . . . . . . . . . . . 498Create a New File Based on the Template . . . . . . . . . . . . . . . . . . . . . . . . . . . . . . . . . . . . . . . . . . . . . 499Implement the Newsletter Template . . . . . . . . . . . . . . . . . . . . . . . . . . . . . . . . . . . . . . . . . . . . . . . . . 501Use Mini Bridge to Place Images . . . . . . . . . . . . . . . . . . . . . . . . . . . . . . . . . . . . . . . . . . . . . . . . . . . . 502
Stage 2 Working with Styles . . . . . . . . . . . . . . . . . . . . . . . . . . . . . . . . . . . . . . . . . . . . . . . . . . . . . . . . . . . . 506Apply Template Styles . . . . . . . . . . . . . . . . . . . . . . . . . . . . . . . . . . . . . . . . . . . . . . . . . . . . . . . . . . . . 506Working with Microsoft Word Files . . . . . . . . . . . . . . . . . . . . . . . . . . . . . . . . . . . . . . . . . . . . . . . . . 508Use Mini Bridge to Place Text . . . . . . . . . . . . . . . . . . . . . . . . . . . . . . . . . . . . . . . . . . . . . . . . . . . . . . 511Edit a Paragraph to Span Columns . . . . . . . . . . . . . . . . . . . . . . . . . . . . . . . . . . . . . . . . . . . . . . . . . . 512Create a Sidebar Box . . . . . . . . . . . . . . . . . . . . . . . . . . . . . . . . . . . . . . . . . . . . . . . . . . . . . . . . . . . . . 513Edit Text Inset and Wrap Settings . . . . . . . . . . . . . . . . . . . . . . . . . . . . . . . . . . . . . . . . . . . . . . . . . . . 515Text Wrap Options . . . . . . . . . . . . . . . . . . . . . . . . . . . . . . . . . . . . . . . . . . . . . . . . . . . . . . . . . . . . . . 516
Stage 3 Working with Tables . . . . . . . . . . . . . . . . . . . . . . . . . . . . . . . . . . . . . . . . . . . . . . . . . . . . . . . . . . . . 518Place a Microsoft Excel Table . . . . . . . . . . . . . . . . . . . . . . . . . . . . . . . . . . . . . . . . . . . . . . . . . . . . . . . 518Format Cell Contents . . . . . . . . . . . . . . . . . . . . . . . . . . . . . . . . . . . . . . . . . . . . . . . . . . . . . . . . . . . . 520Format Cell Attributes . . . . . . . . . . . . . . . . . . . . . . . . . . . . . . . . . . . . . . . . . . . . . . . . . . . . . . . . . . . . 521Managing Table Setup . . . . . . . . . . . . . . . . . . . . . . . . . . . . . . . . . . . . . . . . . . . . . . . . . . . . . . . . . . . . 524Defi ne Table Fills and Strokes . . . . . . . . . . . . . . . . . . . . . . . . . . . . . . . . . . . . . . . . . . . . . . . . . . . . . . 524Controlling Cell Attributes . . . . . . . . . . . . . . . . . . . . . . . . . . . . . . . . . . . . . . . . . . . . . . . . . . . . . . . . 526Understanding Table Styles . . . . . . . . . . . . . . . . . . . . . . . . . . . . . . . . . . . . . . . . . . . . . . . . . . . . . . . . 527
xv
Stage 4 Preflighting and Packaging the Job . . . . . . . . . . . . . . . . . . . . . . . . . . . . . . . . . . . . . . . . . . . . . . . . 529Define a Preflight Profile . . . . . . . . . . . . . . . . . . . . . . . . . . . . . . . . . . . . . . . . . . . . . . . . . . . . . . . . . . 529What’s in a Preflight Profile? . . . . . . . . . . . . . . . . . . . . . . . . . . . . . . . . . . . . . . . . . . . . . . . . . . . . . . . 532Evaluate the Layout . . . . . . . . . . . . . . . . . . . . . . . . . . . . . . . . . . . . . . . . . . . . . . . . . . . . . . . . . . . . . . 534Create the Job Package . . . . . . . . . . . . . . . . . . . . . . . . . . . . . . . . . . . . . . . . . . . . . . . . . . . . . . . . . . . 536
Project Review . . . . . . . . . . . . . . . . . . . . . . . . . . . . . . . . . . . . . . . . . . . . . . . . . . . . . . . . . . . . . . . . . 538
Portfolio Builder Project . . . . . . . . . . . . . . . . . . . . . . . . . . . . . . . . . . . . . . . . . . . . . . . . . . . . . . . . 539
Project 10 coMBined Brochure 541 Stage 1 Controlling Color for Output . . . . . . . . . . . . . . . . . . . . . . . . . . . . . . . . . . . . . . . . . . . . . . . . . . . . 543
Define Application Color Settings . . . . . . . . . . . . . . . . . . . . . . . . . . . . . . . . . . . . . . . . . . . . . . . . . . . 543Assign Color Settings to an Existing File . . . . . . . . . . . . . . . . . . . . . . . . . . . . . . . . . . . . . . . . . . . . . . 544Assigning and Converting Color Profiles . . . . . . . . . . . . . . . . . . . . . . . . . . . . . . . . . . . . . . . . . . . . . . 546
Stage 2 Working with Linked Files . . . . . . . . . . . . . . . . . . . . . . . . . . . . . . . . . . . . . . . . . . . . . . . . . . . . . . . 547Replace a Native Illustrator File . . . . . . . . . . . . . . . . . . . . . . . . . . . . . . . . . . . . . . . . . . . . . . . . . . . . . 547Place a TIFF File with Alpha Transparency . . . . . . . . . . . . . . . . . . . . . . . . . . . . . . . . . . . . . . . . . . . . 548Place Multiple JPEG Images . . . . . . . . . . . . . . . . . . . . . . . . . . . . . . . . . . . . . . . . . . . . . . . . . . . . . . . 551Place a Native InDesign File . . . . . . . . . . . . . . . . . . . . . . . . . . . . . . . . . . . . . . . . . . . . . . . . . . . . . . . 554Place a Native Photoshop File . . . . . . . . . . . . . . . . . . . . . . . . . . . . . . . . . . . . . . . . . . . . . . . . . . . . . . 557Preview Separations . . . . . . . . . . . . . . . . . . . . . . . . . . . . . . . . . . . . . . . . . . . . . . . . . . . . . . . . . . . . . . 561Convert Spot Color in Illustrator . . . . . . . . . . . . . . . . . . . . . . . . . . . . . . . . . . . . . . . . . . . . . . . . . . . . 564
Stage 3 Fine-tuning Text . . . . . . . . . . . . . . . . . . . . . . . . . . . . . . . . . . . . . . . . . . . . . . . . . . . . . . . . . . . . . . . 566Enable Track Changes . . . . . . . . . . . . . . . . . . . . . . . . . . . . . . . . . . . . . . . . . . . . . . . . . . . . . . . . . . . . 566Find and Change Text . . . . . . . . . . . . . . . . . . . . . . . . . . . . . . . . . . . . . . . . . . . . . . . . . . . . . . . . . . . 567The Find/Change Dialog Box in Depth . . . . . . . . . . . . . . . . . . . . . . . . . . . . . . . . . . . . . . . . . . . . . . . 569Find and Change Text Formatting Attributes. . . . . . . . . . . . . . . . . . . . . . . . . . . . . . . . . . . . . . . . . . . 570Entering Special Characters in Dialog Boxes . . . . . . . . . . . . . . . . . . . . . . . . . . . . . . . . . . . . . . . . . . . 572Find and Change Object Attributes . . . . . . . . . . . . . . . . . . . . . . . . . . . . . . . . . . . . . . . . . . . . . . . . . . 573Check Document Spelling . . . . . . . . . . . . . . . . . . . . . . . . . . . . . . . . . . . . . . . . . . . . . . . . . . . . . . . . . 575Review Tracked Changes . . . . . . . . . . . . . . . . . . . . . . . . . . . . . . . . . . . . . . . . . . . . . . . . . . . . . . . . . . 580Export a Color-Managed PDF File . . . . . . . . . . . . . . . . . . . . . . . . . . . . . . . . . . . . . . . . . . . . . . . . . . 583Soft Proofing to Custom Profiles . . . . . . . . . . . . . . . . . . . . . . . . . . . . . . . . . . . . . . . . . . . . . . . . . . . . 583
Project Review . . . . . . . . . . . . . . . . . . . . . . . . . . . . . . . . . . . . . . . . . . . . . . . . . . . . . . . . . . . . . . . . . 586
Portfolio Builder Project . . . . . . . . . . . . . . . . . . . . . . . . . . . . . . . . . . . . . . . . . . . . . . . . . . . . . . . . 587
index 589