government of the district of columbia … when using this dc dmv parent-teen guide, please remember...
TRANSCRIPT
1
GOVERNMENT OF THE DISTRICT OF COLUMBIA DEPARTMENT OF MOTOR VEHICLES
August 2009

2
When using this DC DMV Parent-Teen Guide, please remember that it is only a summary of the law and regulations. DMV, law enforcement, and the court follow the full and exact language of the law contained in the applicable Public Laws, and DC Laws codified by Chapter 21 of Title 35 of the DC Code, as amended; Title 40 of the DC Code, as amended; and Title 18 of the District of Columbia Municipal Regulations, Vehicles and Traffic (“DCMR”), as amended. Amendments to the DC Code and 18 DCMR may be found in the DC Register. If there is a conflict between the provision of this guide and a law or regulation, this guide cannot be relied upon as law. You may purchase a copy of 18 DCMR from the Office of Documents and Administrative Issuance, 441 4th Street, NW Room 520 South, Washington DC 20001, (202)727-5090. Copies of the DC Code and 18 DCMR are available for viewing at the DC Public Library.
Disclaimer

3
IntroductionIntroductionIntroduction
Dear Parent, Your child has reached a milestone they have been anticipating which is getting on the road. It is a privilege to drive and not a right. With this privilege comes great respon-sibility for teen drivers. Part of our mission is to promote public safety by ensuring the safe operation of motor vehicles, which is the reason for this manual. According to the National Highway Traffic Safety Administration, the second leading cause of death of young people ages 15-20 years old are motor vehicle crashes. Re-search shows that inexperience, speeding, alcohol, cell phone use, and other teen passengers cause many accidents among teen drivers. Therefore, DMV wants to pro-vide a manual for parents and teens to ensure better driving skills. This manual will provide your child with the tools necessary to become a better and safer driver. It will provide step by step instructions on how to teach your child about basic driving skills, responsibility, and laws related to driving in the District of Colum-bia. It is our sincere desire that you will use this manual with your child to guide him or her through one of the greatest joys of a teenager’s life. Best wishes on your new journey together. DC Department of Motor Vehicles

4

5
Table of ContentsTable of ContentsTable of Contents
II NTRODUCTIONNTRODUCTION
CC HAPTERHAPTER 1: P 1 : P ARENTARENT ’’ SS R R OLEOLE ANDAND R R ESPONSIBILIT IESESPONSIBILIT IES . . . . . . .. . . . . . . 77
CC HAPTERHAPTER 2: H 2: H OWOW TOTO GETGET YOURYOUR D D RIVERRIVER L L ICENSEICENSE . . . . . . . . . . . .. . . . . . . . . . . . 1313
C C HAPTERHAPTER 3: R 3: R OADOAD R R ULESULES . . . . . . . . . . . . . . . . . . . . . . . . . . . . . . . .. . . . . . . . . . . . . . . . . . . . . . . . . . . . . . . . . . . . . . . . .. . . . . . . . . 1919 C C HAPTERHAPTER 4: D 4: D RIVINGRIVING T T IPSIPS . . . . . . . . . . . . . . . . . . . . . . . . . . . . . . . .. . . . . . . . . . . . . . . . . . . . . . . . . . . . . . . . . . . . . . . . .. . . . . . . . . 2929 C C HAPTERHAPTER 5: D 5: D RIVINGRIVING S S KILLSKILLS . . . . . . . . . . . . . . . . . . . . . . . . . . . . . . . .. . . . . . . . . . . . . . . . . . . . . . . . . . . . . . . . . . . . .. . . . . 3333 C C HAPTERHAPTER 6: W 6: W HATHAT TOTO DODO ININ E E MERGENCIESMERGENCIES . . . . . . . . . . . . . . . . . . .. . . . . . . . . . . . . . . . . . . 5757

6

7
Chapter 1
DRIVING AGREEMENT Even though there are laws on the books, it is benefi-cial for families to set up guidelines for responsible driving. It may prove to be essential to develop a par-ent-teen driving agreement with your teen to ensure that he/she is responsible and held accountable for making poor decisions when operating a vehicle. Clear consequences should be outlined and enforced when rules are broken. Both of you should sign and have a copy of the agreement. Some guidelines have been provided to assist you in developing your agreement below and a sample agreement can be found on the next page. Driving Guidelines
♦ Limit the number of passengers ♦ Prohibit cell phone usage, eating, and text messaging while driving ♦ Forbid alcohol or drug use by the driver and all passengers ♦ Follow all traffic rules, especially the speed limit ♦ Always wear seat belts ♦ Provide information on destinations, passengers, and estimated times of arrival to parents
Consequences for Breaking the Rules
♦ The loss of driving privileges for an amount of time should relate to the severity of the vio-lation
♦ The consequences for breaking the rules should be developed beforehand. Some exam-ples of the most common violations include:
• Using alcohol and/or drugs • Getting a speeding ticket • Talking on a cell phone or text messaging • Not wearing a seat belt • Causing an accident • Breaking curfew • Going to unauthorized locations • Having too many passengers in the vehicle
Parent’s Roles and Responsibilities

8
Chapter 1
9
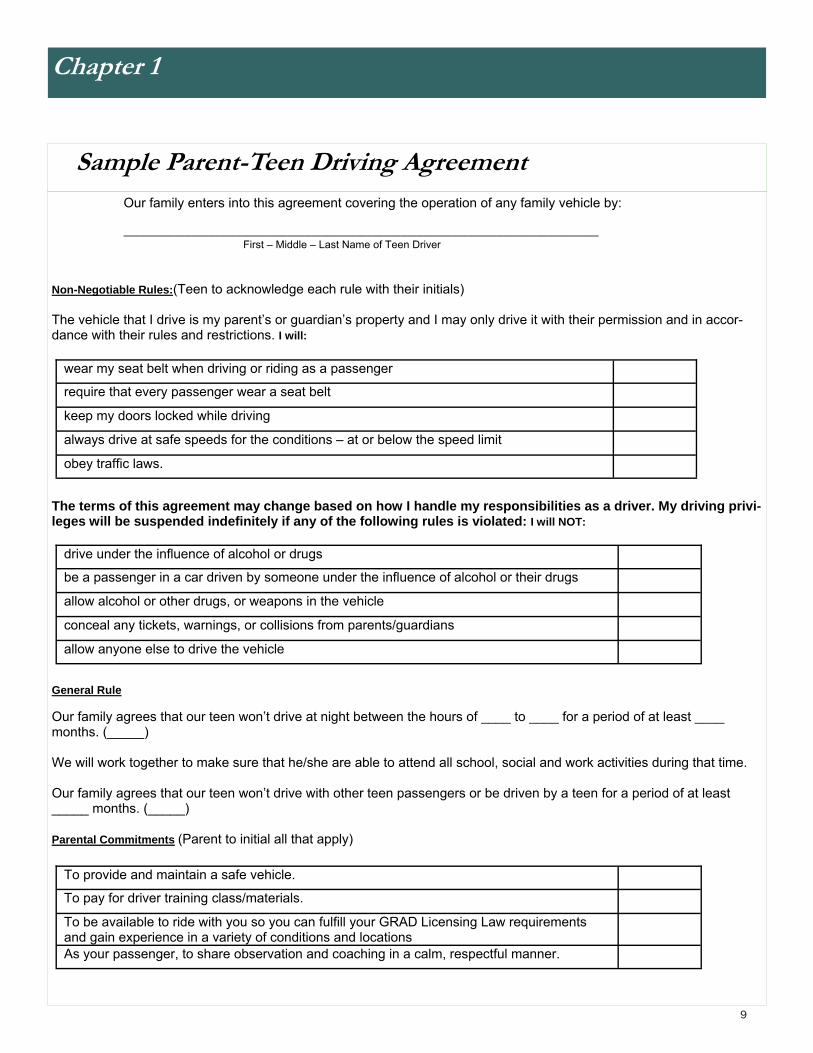
Sample Parent-Teen Driving Agreement Our family enters into this agreement covering the operation of any family vehicle by: ____________________________________________________________________________________ First – Middle – Last Name of Teen Driver Non-Negotiable Rules:(Teen to acknowledge each rule with their initials) The vehicle that I drive is my parent’s or guardian’s property and I may only drive it with their permission and in accor-dance with their rules and restrictions. I will:
The terms of this agreement may change based on how I handle my responsibilities as a driver. My driving privi-leges will be suspended indefinitely if any of the following rules is violated: I will NOT:
General Rule Our family agrees that our teen won’t drive at night between the hours of ____ to ____ for a period of at least ____ months. (_____) We will work together to make sure that he/she are able to attend all school, social and work activities during that time. Our family agrees that our teen won’t drive with other teen passengers or be driven by a teen for a period of at least _____ months. (_____) Parental Commitments (Parent to initial all that apply)
wear my seat belt when driving or riding as a passenger
require that every passenger wear a seat belt
keep my doors locked while driving
always drive at safe speeds for the conditions – at or below the speed limit
obey traffic laws.
drive under the influence of alcohol or drugs
be a passenger in a car driven by someone under the influence of alcohol or their drugs
allow alcohol or other drugs, or weapons in the vehicle
conceal any tickets, warnings, or collisions from parents/guardians
allow anyone else to drive the vehicle
To provide and maintain a safe vehicle.
To pay for driver training class/materials.
To be available to ride with you so you can fulfill your GRAD Licensing Law requirements and gain experience in a variety of conditions and locations
As your passenger, to share observation and coaching in a calm, respectful manner.
Chapter 1

10
Chapter 1
Sample Parent-Teen Driving Agreement (continued) Courtesies and Considerations: (Teen to acknowledge with initials) As a new driver in our family, you agree to comply with the following courtesies and considerations.
Consequences The terms of this agreement may change based on how I handle my responsibilities as a driver. My driving privileges will be suspended indefinitely if any of the following rules is violated:
We understand and agree to these driving conditions and rules. ___________________________________ __________________________ Parents/Guardians Signature Date ___________________________________ __________________________ Teen Driver’s Signature Date
I will provide my parent with my destination and time of return.
I will call home if I feel I will not make curfew.
I will not eat, drink, or smoke in the car.
I will not drive outside of agreed upon boundaries.
I will pull over and park the vehicle before using my cell phone, pager, or any other electronic devices.
I will always treat pedestrians, cyclists, and other motorists with courtesy.
Violations Loss of Privileges Penalty
use alcohol or other drugs while driving. Indefinite suspension
Turn permit in the DMV
receive ticket for speeding. Lose driving privileges
Weeks Months
Other:
do not make all passengers wear seat belts. Lose driving privileges
Weeks Months
Other:
lie about where you were going with the car. Lose driving privileges
Weeks Months
Other:
come home late without calling. Lose driving privileges
Weeks Months
Other:
violate the agreed-upon passenger restriction. Lose driving privileges
Weeks Months
Other:
violate the agreed-upon nighttime restriction. Lose driving privileges Weeks Months
Other:
Chapter 1

11
Parent’s Roles and Responsibilities (continued)
DRIVING D ISTRACTION
Driving is a risky activity. According to the National Highway and Traffic Administration, the single leading cause of teen deaths are motor vehicle crashes (35%) and nearly 272,000 teens are injured annually. The Fatality Analysis Reporting System shows that more than two-thirds of teen occupants killed in crashes are not wearing safety belts. Therefore, you should encourage teens to wear their seat belts at all times. Wearing a seat belt saves thousands of lives a year.
Here are some other causes of traffic crashes: ♦ Driving an unfamiliar vehicle without first adjusting the
mirror and seat, selecting entertainment options, and locating lights, turn signal and windshield wipers.
♦ Focusing attention on passengers
♦ Eating, drinking or smoking while you drive
♦ Engaging in intense, complicated, emotional, or lengthy conversations on cell phones or with passengers
♦ Changing the radio, CD or tape while you are driving
♦ Engaging in personal grooming tasks
♦ Reading road maps or books while driving
♦ Carrying unsecured cargo or objects
If you find yourself doing any of these things routinely, you may be doing more things at one time than you can safely manage.
Solutions: ♦ If the books you are reading are too great of a temptation, place them in the trunk of the vehi-
cle until you arrive at your destination
♦ Secure everyone and everything that could be a distraction
♦ Don’t wait until you are driving to plan your route or grooming. Plan before you go. Leave a little earlier; it will get you there less stressed and more safely.
Chapter 1

12
Chapter 1
♦ Pre-set the climate control, radio, CD and tape player, identify the location of signals, wipers and lights in the vehicle
♦ Do not have complex or emotional conversations on the phone or with passengers until you arrive at your destination
♦ If a passenger is distracting you, pull over where it is safe and legal to do so. Don’t start driv-ing until the situation is under control.
♦ When you are hungry or thirsty, take a break from driving
KEEPING YOUR L ICENSE
In order to keep your driver license, you must drive safely at all times. You can lose your license for the following reasons:
♦ Convicted of any drug related charge ♦ A conviction for driving under the influence of alcohol or drugs ♦ Refusing to be tested for alcohol or drugs if you are asked to do so by a police officer ♦ Leaving the scene of an accident in which you are involved, without identifying yourself ♦ Giving false information when applying for a driver license ♦ Failing to settle a financial judgment made against you for damages resulting from a motor vehicle accident ♦ Using a motor vehicle to commit a felony or causing the death of someone in a motor vehicle accident ♦ Having too many points on your driving record (8 points or more)
Parent’s Roles and Responsibilities
KNOW YOUR SPEED LIMITS SPEED LIMIT LAWS/UNLESS OTHERWISE POSTED
♦ DC City Streets 25 miles per hour ♦ Alleys 15 miles per hour ♦ School Zones 15 miles per hour ♦ Ordinary Highways 30 – 50 miles per hour ♦ Divided Highways 30 – 55 miles per hour ♦ Interstate Highways 55 – 75 miles per hour ♦ If not posted 25 miles per hour

13
How to get your Driver License
Chapter 2
QUALIFICATIONS FOR TEENS TO GET A D ISTRICT OF COLUMBIA L ICENSE
Anyone who operates a motor vehicle or motorcycle on public roadways in the District of Columbia is required to have a driver license. You may obtain a DC driver license if you:
♦ Are at least 17 years old (learner permit at age 16); ♦ Are able to submit proof of full legal name, date of birth, social security number and DC
residency; ♦ Have successfully completed the knowledge test, skills road test and vision screenings; ♦ Have parental/guardian consent if under age 18; ♦ Surrender any driver license or identification card previously held; ♦ Have not had your license suspended, revoked, or denied; ♦ Comply with medical requirements; ♦ Have no outstanding debt to the District of Columbia or unpaid fines for moving traffic vio-
lations in other jurisdictions.

14
Chapter 2
How to get your Driver License (continued)
TYPES OF L ICENSES FOR GRAD’S Gradual Rearing of Adult Drivers (GRAD) Program. The GRAD program allows novice drivers (16 - 21 years of age) to safely gain driving experience before obtaining full driving privileges. A learner permit allows you to operate a motor vehicle when supervised by another driver who is 21 years or older, has a valid full driver license and is seated next to you in the passenger front seat. LEARNER PERMIT
To obtain a learner permit you must: ♦ Be at least 16 years old of age ♦ Pass the knowledge test and vision test
If you are under the age of 18, you must also have a parental consent form signed by your parent/guardian. The learner permit is valid for one (1) year and is renewable once.
PROVISIONAL L ICENSE To obtain a provisional license you must:
♦ Be at least 16 years, 6 months old. ♦ You must have held a valid learner permit for at least 6 months and have no pointable viola-
tions. ♦ Provide a signed 40 hours Certification of Eligibility for Provisional License Application form certifying that you have at least 40 hours of driving experience accompanied by a licensed driver who is 21 years or older and who has a valid, full driver license. ♦ Take and pass the road skills test.
The provisional license is valid for one (1) year and is renewable. Prior to age 18, you are not al-lowed to operate a vehicle for compensation.
FULL DRIVER L ICENSE Once you have held your provisional driver license for at least 6 months you must: Have no pointable moving violations for 12 consecutive months;
♦ Practiced night driving for at least 10 hours, provide a signed Certification of Eligibility for Full Driver License Application certifying that you have at least 10 hours of night driving experi-ence accompanied by a licensed driver (s) who is 21 years or older and who has a valid, full driver license. Once you complete these steps, you may then be issued a full driver license (Class D).
15
How to get your Driver License (continued)
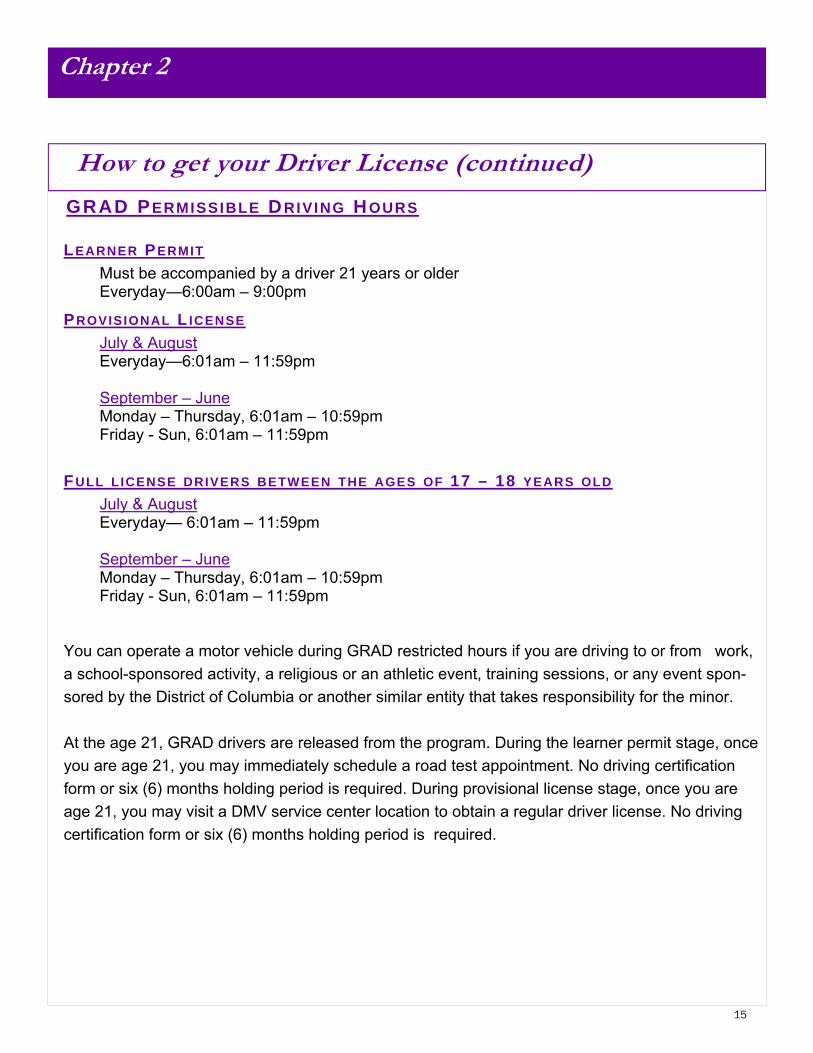
GRAD PERMISSIBLE DRIVING HOURS
LEARNER PERMIT Must be accompanied by a driver 21 years or older Everyday—6:00am – 9:00pm
PROVISIONAL L ICENSE July & August Everyday—6:01am – 11:59pm September – June Monday – Thursday, 6:01am – 10:59pm Friday - Sun, 6:01am – 11:59pm
FULL LICENSE DRIVERS BETWEEN THE AGES OF 17 – 18 YEARS OLD July & August Everyday— 6:01am – 11:59pm September – June Monday – Thursday, 6:01am – 10:59pm Friday - Sun, 6:01am – 11:59pm
You can operate a motor vehicle during GRAD restricted hours if you are driving to or from work, a school-sponsored activity, a religious or an athletic event, training sessions, or any event spon-sored by the District of Columbia or another similar entity that takes responsibility for the minor. At the age 21, GRAD drivers are released from the program. During the learner permit stage, once you are age 21, you may immediately schedule a road test appointment. No driving certification form or six (6) months holding period is required. During provisional license stage, once you are age 21, you may visit a DMV service center location to obtain a regular driver license. No driving certification form or six (6) months holding period is required.
Chapter 2
16
How to get your Driver License (continued)
Chapter 2
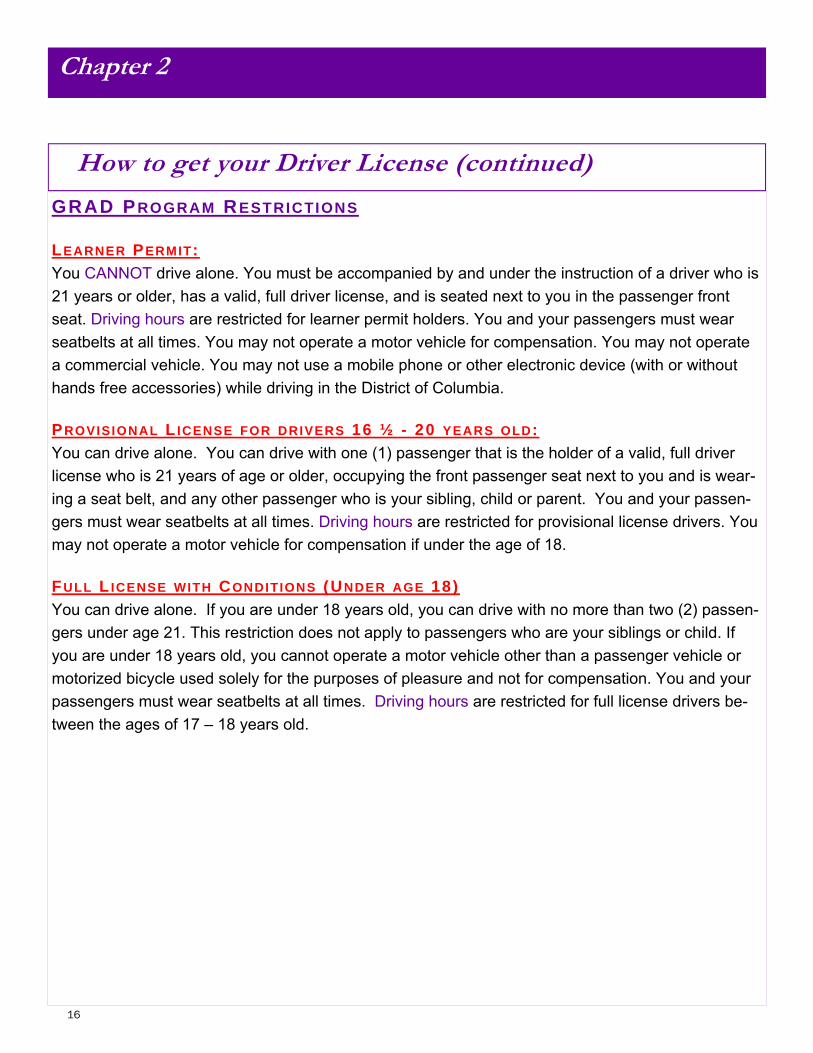
GRAD PROGRAM RESTRICTIONS LEARNER PERMIT: You CANNOT drive alone. You must be accompanied by and under the instruction of a driver who is 21 years or older, has a valid, full driver license, and is seated next to you in the passenger front seat. Driving hours are restricted for learner permit holders. You and your passengers must wear seatbelts at all times. You may not operate a motor vehicle for compensation. You may not operate a commercial vehicle. You may not use a mobile phone or other electronic device (with or without hands free accessories) while driving in the District of Columbia. PROVISIONAL L ICENSE FOR DRIVERS 16 ½ - 20 YEARS OLD: You can drive alone. You can drive with one (1) passenger that is the holder of a valid, full driver license who is 21 years of age or older, occupying the front passenger seat next to you and is wear-ing a seat belt, and any other passenger who is your sibling, child or parent. You and your passen-gers must wear seatbelts at all times. Driving hours are restricted for provisional license drivers. You may not operate a motor vehicle for compensation if under the age of 18. FULL L ICENSE WITH CONDITIONS (UNDER AGE 18) You can drive alone. If you are under 18 years old, you can drive with no more than two (2) passen-gers under age 21. This restriction does not apply to passengers who are your siblings or child. If you are under 18 years old, you cannot operate a motor vehicle other than a passenger vehicle or motorized bicycle used solely for the purposes of pleasure and not for compensation. You and your passengers must wear seatbelts at all times. Driving hours are restricted for full license drivers be-tween the ages of 17 – 18 years old.
17
GRAD PROGRAM ENFORCEMENTS LEARNER PERMIT STAGE: If you are under 18, your parent/legal guardian is notified of your GRAD violations. Any pointable traffic violation for which you admit to, have been found liable for, or convicted of will extend the amount of time you must wait to apply for a provisional license. You must be free of any pointable traffic violation for which points were or could have been assessed for six (6) consecutive months before graduating to the provisional license stage. During your learner permit stage, if 8 points or more have been assessed against you or you have violated any GRAD program restrictions, you will be subject to a ninety (90) days suspension of your learner permit and payment of a reinstatement fee. PROVISIONAL L ICENSE STAGE: If you are under 18, your parent/legal guardian is notified of your GRAD violations. Any pointable traffic violation that you admit to, have been found liable for, or convicted of will extend the amount of time you must wait to apply for a full license. You must be violation free for twelve (12) consecu-tive months before graduating to the full license with conditions stage. During your provisional li-cense stage, if you violate any GRAD program restrictions, you will be subject to a thirty (30), sixty (60) or ninety (90) days suspension of your provisional license depending upon whether it is your first, second, third or more violation of GRAD program restrictions. These penalties are in addition to any other penalty that may be applicable. Additionally, like any other driver, you will be automatically suspended if your point total reaches 10. After suspension, you will be required to pay a reinstate-ment fee to reinstate your provisional license.
How to get your Driver License
Chapter 2

18

19
Road Rules
TRAFFIC CONTROL DEVICES
There are traffic rules that say where, when and how fast you can drive. These rules help to keep traffic moving safely. Your teen will need to know the different traffic control devices including traffic signals, signs and pavement markings. They must obey these signals unless a police officer is di-recting traffic.
TRAFFIC SIGNALS – GREEN – YELLOW – RED TRAFFIC LIGHTS AND ARROWS Traffic signals are lights that tell you when or where to stop and go. A “Green” light means you can go if it is safe. A “Yellow” light means caution and a “RED” light means stop. Traffic lights are usu-ally at intersections and are green, yellow, and red, from bottom to top, when together. There are some intersections and other locations where there are single green, yellow or red lights.
A steady GREEN traffic light means you can go through the intersection. You must yield to emergency vehicles and others as required by law. If you are stopped and then the light turns green, you must allow crossing traffic to clear the intersection be-fore you go ahead. If you are turning left, a steady green traffic green light means you may turn, but only when safe to do so. Oncoming traffic has the right-of-way. Be alert for signs that prohibit lefts turns. A GREEN arrow means you can safely turn in the direction of the arrow. There should be no on-coming or crossing traffic while the arrow is green. A steady YELLOWYELLOW traffic light means the traffic light is about to change to red. You must stop at the crosswalk of the intersection when you see a yellow light. If you are in the intersection when the yellow light comes on, do not stop but continue through to clear the intersection. A YELLOWYELLOW arrow means that the light is going to turn red. You should slow down and stop completely before entering the intersection. A flashing YELLOWYELLOW traffic light means slow down and proceed with caution.
Chapter 3

20
Road Rules (continued) A steady RED traffic light means stop. You must wait until the traffic light turns green and there is no crossing traffic before you may move ahead. If you are turning right, after coming to a full stop and if there is no sign prohibiting the turn on a red light, you may turn right on red.
A flashing RED traffic light means the same as a stop sign. You must come to a full stop and then may proceed when it is safe to do so.
A RED arrow means you must stop and you cannot go in the direction of the arrow. You may proceed when the red arrow disappears and a green arrow or steady light appears.
Non-Functioning Traffic Lights A non-functioning traffic signal should be treated as though it were a stop sign at a four-way intersection. Pedestrian Signals (Motorists Must Yield to Pedestrians)
Pedestrians must obey traffic and pedestrian signals. Pedestrians must obey the WALK and DON’T WALK lights, or the lighted picture of a walking person (meaning Walk) and an upraised hand (meaning Don’t Walk). If there are no pedestrian signals at the intersection, pedestrians must obey the red, yellow, and green traffic lights. Even when the pedestrians are not following the rules you must yield right of way.
Chapter 3
21
Road Rule (continued)
SIGNS Signs are divided into three basic categories. Each has its own special shape. The three categories are Regulatory, Warning and Guide signs.
REGULATORY SIGNS These signs are square, rectangular or have a special shape and are usually white, red or black with black, red, white, or green letters or symbols. They give you information about rules for traffic direction, lane use, turning, speed, parking and other special situations. Common types of regula-tory signs are:
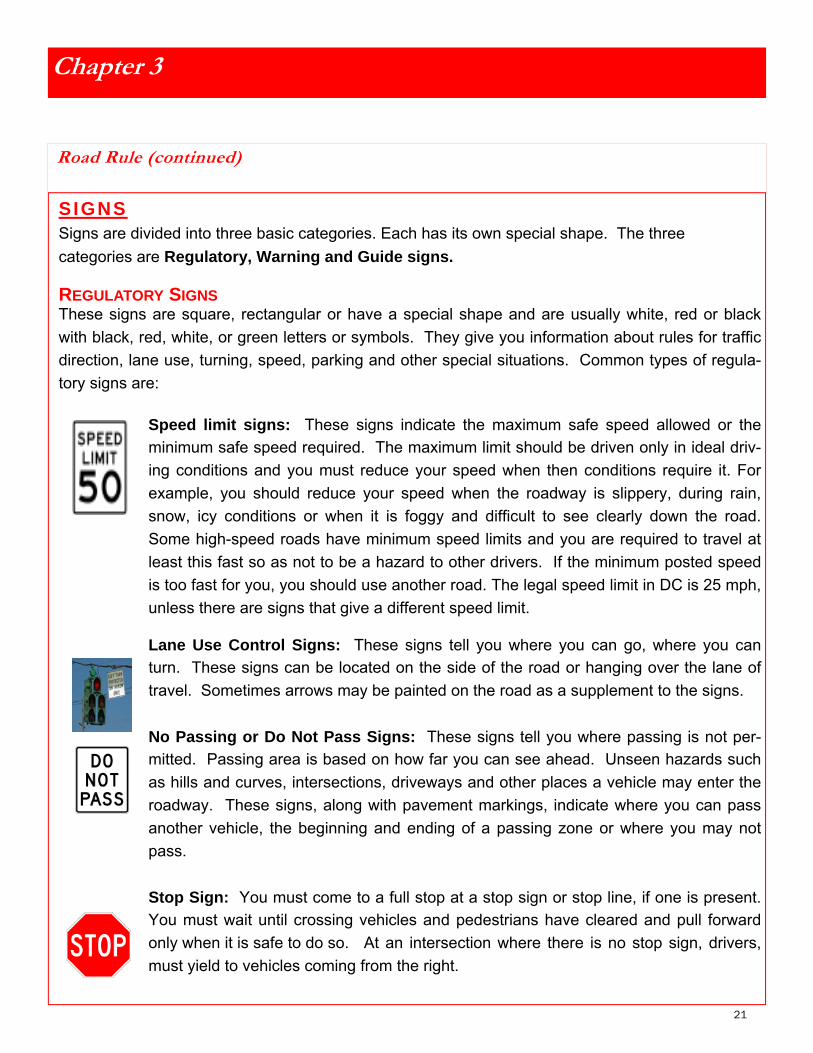
Speed limit signs: These signs indicate the maximum safe speed allowed or the minimum safe speed required. The maximum limit should be driven only in ideal driv-ing conditions and you must reduce your speed when then conditions require it. For example, you should reduce your speed when the roadway is slippery, during rain, snow, icy conditions or when it is foggy and difficult to see clearly down the road. Some high-speed roads have minimum speed limits and you are required to travel at least this fast so as not to be a hazard to other drivers. If the minimum posted speed is too fast for you, you should use another road. The legal speed limit in DC is 25 mph, unless there are signs that give a different speed limit. Lane Use Control Signs: These signs tell you where you can go, where you can turn. These signs can be located on the side of the road or hanging over the lane of travel. Sometimes arrows may be painted on the road as a supplement to the signs. No Passing or Do Not Pass Signs: These signs tell you where passing is not per-mitted. Passing area is based on how far you can see ahead. Unseen hazards such as hills and curves, intersections, driveways and other places a vehicle may enter the roadway. These signs, along with pavement markings, indicate where you can pass another vehicle, the beginning and ending of a passing zone or where you may not pass. Stop Sign: You must come to a full stop at a stop sign or stop line, if one is present. You must wait until crossing vehicles and pedestrians have cleared and pull forward only when it is safe to do so. At an intersection where there is no stop sign, drivers, must yield to vehicles coming from the right.
Chapter 3
22
Road Rules (continued)
Chapter 3
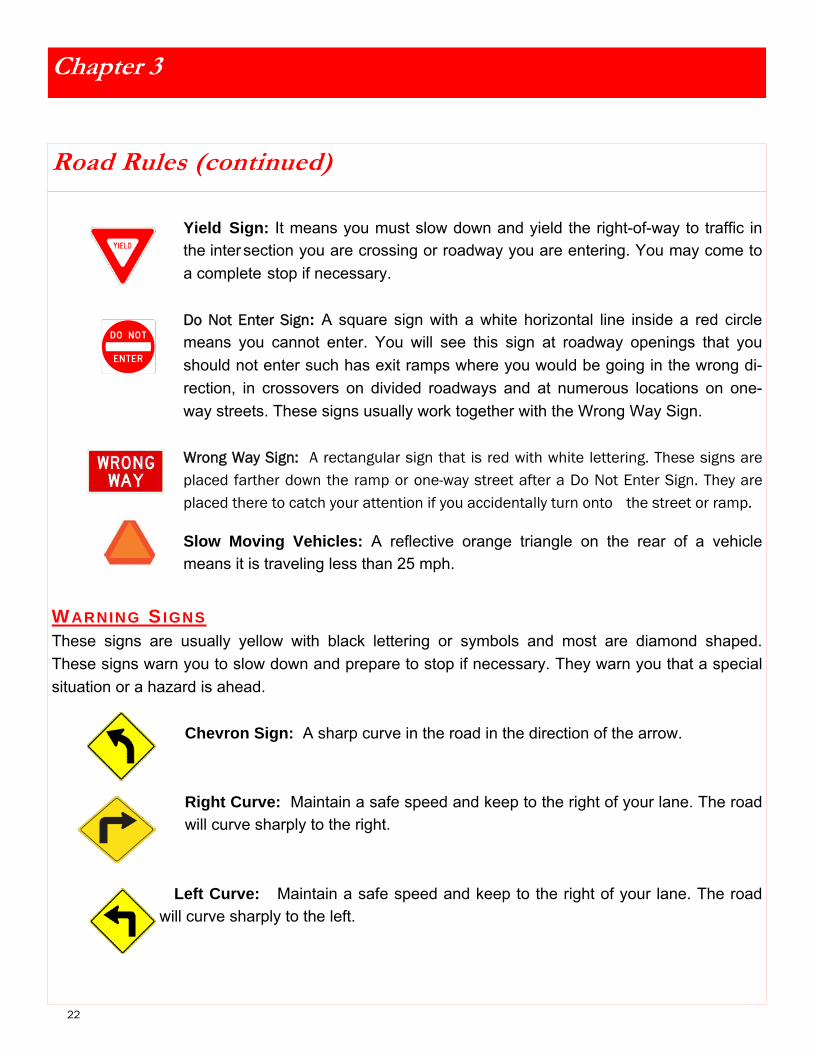
Yield Sign: It means you must slow down and yield the right-of-way to traffic in
the inter section you are crossing or roadway you are entering. You may come to a complete stop if necessary.
Do Not Enter Sign: A square sign with a white horizontal line inside a red circle
means you cannot enter. You will see this sign at roadway openings that you should not enter such has exit ramps where you would be going in the wrong di-rection, in crossovers on divided roadways and at numerous locations on one-way streets. These signs usually work together with the Wrong Way Sign.
Wrong Way Sign: A rectangular sign that is red with white lettering. These signs are
placed farther down the ramp or one-way street after a Do Not Enter Sign. They are placed there to catch your attention if you accidentally turn onto the street or ramp.
Slow Moving Vehicles: A reflective orange triangle on the rear of a vehicle means it is traveling less than 25 mph.
WARNING S IGNS These signs are usually yellow with black lettering or symbols and most are diamond shaped. These signs warn you to slow down and prepare to stop if necessary. They warn you that a special situation or a hazard is ahead. Chevron Sign: A sharp curve in the road in the direction of the arrow. Right Curve: Maintain a safe speed and keep to the right of your lane. The road will curve sharply to the right.
Left Curve: Maintain a safe speed and keep to the right of your lane. The road will curve sharply to the left.

23
Road Rules (continued)
Series of Curves: Several curves are ahead. Drive slowly and carefully.
Road Entering Curve: The main road curves to the right with a side road entering from the left. Advisory Speed Sign: The highest speed you should travel around the curve ahead is 35 miles per hour. Advisory speed signs may be used with any diamond-shaped warning sign. Merging Traffic: Traffic may be merging into your lane from another roadway. You should watch out for traffic entering your lane and reduce speed.
Two-Way Traffic Ahead: The one-way street or roadway ahead ends. You will then be facing oncoming traffic. Divided Highway Ahead: The highway ahead is divided into two one-way roadways. Keep to the right. Divided Highway Ends: The divided highway on which you are traveling ends ahead. You will then be on a roadway with two-way traffic. Keep to the right. Lane Ends: In this example, traffic in the right lane must merge left. Drivers in the left lane should allow others to merge smoothly.
Intersections: The signs below show types of intersections. They warn you about possible prob-lems with crossing vehicles, turning vehicles, or vehicles traveling your way that may be turning. Watch out for these problems whenever you approach intersections. Cross Road Side Road T Intersection Y Intersection
Chapter 3

24
Listed below are more common road signs: Slippery When Wet: In wet weather, reduce your speed. Do not speed up or brake
quickly. Make turns at a very slow speed.
Low Clearance: Do not enter the bridge or tunnel if your vehicle is taller than the height listed on the sign.
Hill/Down Grade: There is a steep hill ahead. Slow down and be ready to shift to lower gear to control speed and save brakes.
Traffic Signal Ahead: Traffic signals are present at intersection ahead. Slow down and prepare to stop; the signal may not be immediately visible.
Stop Sign Ahead: Slow down and prepare to stop; the stop sign may not be immedi-ately visible.
Pedestrian Crossing: This sign is used at or in advance of marked crosswalks to warn you that pedestrians may be crossing. School Crossing: This sign means slow down and that you are near a marked crossing. Watch for children crossing the road and stop if necessary. Obey signals from any crossing guards. The speed limit driving past a school building or its grounds is 15 mph while school is in session.
When approaching a stopped school bus, with alternately flashing red lights, the driver of the vehicle must stop not less than 15 feet from the bus. If you are approach-ing from the opposite side you must also stop not less than 15 feet from the bus. If you are traveling on a divided road and are on the opposite side of the bus, you may pass but use caution. Bicycle/Motor Vehicle Shares The Road: Used at roadway pinch points (no shoulder, narrow lanes, etc.) to warn you, as a motorist, to provide adequate space for bicyclists to share the roadway.
Road Rules (continued)
Chapter 3

25
Road Rule (continued)
Work Zone Signs: These construction, maintenance or emergency operation signs are generally diamond or rectangular shaped, orange with black letters or symbol and warn you that people are working on or near the roadway. These warning signs include re-duced speed, detours, slow moving construction equipment and poor or suddenly changing road surfaces. In a work area, a person with a sign or flag may control traffic. You must obey these persons.
Electronic Arrow Panels: Large electronic flashing arrow panels placed in the road-way or mounted on vehicles advise approaching motorists of lane closures. Begin your merge well in advance of the sign.
Railroad Crossing: Many railroad crossings have signs or signals to warn drivers. A round yellow warning sign with an “X” symbol and black “RR” letters is placed along the road before you get to a railroad crossing. A white, X-shaped sign or “cross buck” with “railroad crossing” on it is located at the railroad crossing. This sign has the same meaning as a “yield sign.” You must yield to crossing trains. At some crossings, along with the cross buck sign, you will see side-by-side lights that will flash alternately when a train is approaching. When the lights are flashing, you must stop. At some crossings, there is also a crossing gate that will lower when a train is coming.
GUIDE S IGNS These are signs that direct a motorist somewhere. Guide signs also help you find hospitals, service stations, restaurants and motels. Usually these signs are horizontal rectangles. Listed below are some that you will find frequently along the road.
Destination Signs: These signs are square or rectangular shaped and are green or brown with white lettering. They show directions and distance to various locations such as cities, airports, or state lines or to special areas such as national parks, histori-cal areas or museums
Service Signs: These signs are square or rectangular shaped and are blue with white letters or symbol. They show the location of various services such as rest areas, gas stations, campgrounds or hospitals.
Chapter 3

26
Route Number Signs: The shape and color of route number signs indicate the type of roadway: interstate, U.S. state, city or county road.
PAVEMENT MARKINGS Pavement markings guide and warn drivers as well as regulate traffic. These lines and symbols on the roadway divide lanes, tell you when you may pass other vehicles or change lanes, which lanes to use for turns, define pedestrian walkways and where you must stop for signs or traffic signals. These markings may either be yellow or white. Each have different meaning.
Edge and Lane Lines: Solid lines along the side of the road show you where the
edge of the road is located. A dashed white line between lanes of traffic means that you may cross it to change
lanes.
A solid white line between lanes of traffic means that you should stay in your lane unless a special situation requires you to change lanes. These lines also designate turn lanes and arrows are used to show direction. Crosswalk and stop lines: You must stop your vehicle before it reaches the stop line or crosswalk. A crosswalk defines the areas where pedestrians may cross the road way. You must yield to pedestrians in or entering a crosswalk. Not all crosswalks are marked. Yellow lane markings: The yellow center line indicated two way traffic, flowing in opposite directions. A dashed yellow line between opposing lanes of traffic means that you may cross it to pass if it safe to do so. Some passing zones have signs that tell you where passing is permitted and where you cannot pass.
Chapter 3
Road Rules (continued )
27
Road Rules (continued)
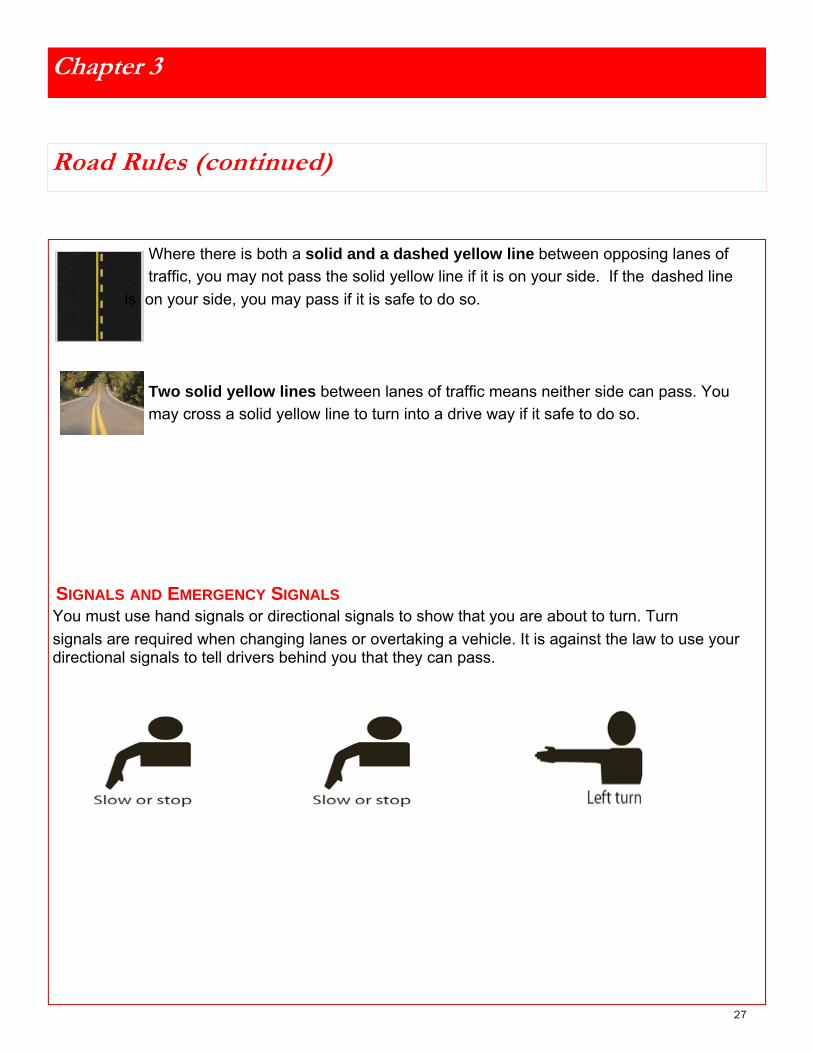
Where there is both a solid and a dashed yellow line between opposing lanes of traffic, you may not pass the solid yellow line if it is on your side. If the dashed line is on your side, you may pass if it is safe to do so. Two solid yellow lines between lanes of traffic means neither side can pass. You may cross a solid yellow line to turn into a drive way if it safe to do so. SIGNALS AND EMERGENCY SIGNALS You must use hand signals or directional signals to show that you are about to turn. Turn signals are required when changing lanes or overtaking a vehicle. It is against the law to use your directional signals to tell drivers behind you that they can pass.
Chapter 3

28
Chapter 3

29
Driving Tips
No driver manual can teach your teen how to operate a vehicle or be a safe driver. Driving requires skills you can only gain through instruction and practice. The following offer some basic driving in-formation. USING YOUR LIGHTS It is much harder to see at night. Here are some things you can do that will help you see better:
USE HIGH BEAMS Use your high beams whenever there are no oncoming vehicles. High beams let you see twice as far as low beams. It is important to use high beams on unfamiliar roads in construction areas or where there may be people along the side of the road. Dim your high beams whenever you come within about a one-block distance of oncoming vehicles. USE LOW BEAMS Use your low beams when following another vehicle or when in heavy traffic. Use the low beams in fog or when it is snowing or raining hard. Light from high beams will reflect back, causing glare and making it more difficult to see ahead. Some vehicles have fog lights that you also should use under these conditions. While driving in the District of Columbia, when headlight lights are necessary, you must use your low beams at all times. USE PARKING LIGHTS Do not drive at any time with only your parking lights on. Parking lights are for parking only. WHEN GOING DOWN A LONG OR STEEP HILL Check your mirrors when you are going down hills or mountains. Vehicles often build up speed go-ing down a steep grade. Be alert for large trucks and buses that may be going too fast. USE EMERGENCY SIGNALS If your vehicle breaks down on a highway, make sure that other drivers can see it. All too often crashes occur because a driver did not see a stalled vehicle until it was too late to stop. If available, use your cell phone to notify authorities that your vehicle or someone else has broken down. Many roadways have signs that tell you the telephone number to call in an emergency. If you are having vehicle trouble and have to stop:
Chapter 4

30
♦ Turn on your emergency flashers to show you are having trouble.
♦ Try to stop where other drivers have a clear view of your vehicle if you cannot get your vehicle off the roadway. (Do not stop just over a hill or just around a curve.)
♦ Try to warn other road users that your vehicle is there. Place emergency flares behind the vehicle. This allows other drivers to change lanes if necessary.
♦ Never stand in the roadway. Do not try to change a tire if it means you have to be in a traf-fic lane.
♦ Lift the hood or tie a white cloth to the antenna, side mirror or door handle to signal an emergency.
WHEN FOLLOWING EMERGENCY VEHICLE You need to pull to the right and stop until the emergency vehicle passes. You should not follow any fire apparatus which is on an emergency run closer than 500 ft. If you see an emergency vehicle stopped on the next block, turn right or left to avoid the vehicle. Right–of–Way Where vehicles or pedestrians are likely to meet one another and there are no signs or signals to regulate traffic, there are rules that indicate who must yield the right-of-way. These rules tell who goes first and who must wait in different traffic situations. The law says who must yield the right of way; it does not give anyone the right of way. You must do everything you can to prevent striking a pedestrian or another vehicle, regardless of the circumstances. The following right-of-way rules apply:
♦ Drivers must yield the right of way at all time to pedestrians.
♦ Pedestrians using a guide dog or carrying a cane have absolute right of-way.
♦ Drivers turning left must yield to on coming vehicles going straight-ahead.
♦ Drivers entering a traffic circle or rotary must yield to drivers already in the circle.
♦ At a 4-way stop the driver reaching the intersection first, goes, first (after coming to a com-plete stop). If more than one vehicle arrives at the same time, the vehicle on the right goes.
Driving Tips (continued)
Chapter 4

31
Chapter 4
♦ Drivers entering a road from a driveway, alley or roadside must yield to vehicles already on the main road.
♦ Drivers may not enter an intersection unless they can get through it without having to stop. You should wait until traffic ahead clears so that you are not blocking the intersection.
♦ You must yield the right-of-way to a police vehicle, fire engine, ambulance or other emer-gency vehicle using a siren, air horn or a red or blue flashing light. Pull over to the right edge of the road or as near to the right as possible when you see or hear an emergency vehicle approaching from any direction. Follow any instructions given over the emergency vehicle’s loudspeaker. If you are in an intersection, drive through the intersection before you pull over.
♦ You must stop for a school bus that is stopped with its red lights flashing whether it is on your side of the road, the opposite side of the road or at an intersection you are approach-ing. You are not required to stop if the bus is traveling towards you and the roadway is separated by a median or other physical barrier. After the school bus red lights have stopped flashing, watch for children along the side of the road and do not proceed until they have completely left the roadway and it is safe to proceed.
No-Parking Zones There are many areas where you cannot park. Check for signs that may prohibit or limit parking. Some parking restrictions are indicated by colored curb markings. Do not park:
♦ In an intersection. ♦ On a crosswalk or sidewalk. ♦ In a construction area if your vehicle will block traffic. ♦ Within 40 ft. of an intersection or 25 ft. from an intersection on a non-approach side of a
one-way street. ♦ Within 5 ft. to the entrance of an alley or private driveway. ♦ Within 25 ft. of a pedestrian safety zone. ♦ Within 10 ft. of a fire hydrant. ♦ Blocking a driveway, alley, private road or area of the curb removed or lowered for access to the sidewalk. ♦ On a bridge, overpass, in a tunnel or underpass.
Driving Tips (continued)

32
Driving Tips
(No-Parking Zones continued) ♦ On the wrong side of the street. ♦ In a space marked for the disabled, unless you have a disability placard or tag. ♦ On the road side of a parked vehicle (double parking) On railroad tracks. ♦ Wherever a sign says you cannot park.
DRINKING AND DRIVING Why is Drinking and Driving So Dangerous? Alcohol reduces all of the important skills you need to drive safely. Alcohol goes from your stomach into your blood and to all parts of your body. It reaches your brain in 20 to 40 minutes. Alcohol affects those areas of your brain that control judgment and skill. This is one reason why drinking alcohol is so dangerous; it affects your judg-ment. Good judgment is important to driving. In a way, it’s like alcohol puts good judgment on hold. You do not know when you have had too much to drink until it is too late. It is a little like a sunburn, by the time you feel it, it is already too late. In the District of Columbia, drinking by anyone under the age of 21 is illegal in the District. Other Drugs And Driving Besides alcohol, there are many other drugs that can affect a person’s ability to drive safely. These drugs can have effects like those of alcohol or even worse. This is true of many prescription drugs and even many of the drugs you can buy without a prescription. Drugs taken for headaches, colds, hay fever or other allergies or those to calm nerves can make a person drowsy and affect their driv-ing. These drugs could multiply the effects of alcohol or have additional effects of their own. These effects not only reduce your ability to be a safe driver but could cause serious health problems, even death Parents remember to talk with your teen and set clear expectation and consequences and lets model the behavior they expect.
Chapter 4

33
Driving Skills
LEVEL 1 CHECK THE VEHICLE It is important that you read the vehicle manual for information related to the proper usage of the ve-hicle safety features. It is the duty of drivers to make certain that the vehicles they are driving are safe to operate. A vehi-cle that is in bad shape is unsafe and costs more to run than one that is properly maintained. It can break down or cause a collision. If a vehicle is in bad shape, you might not be able to get out of an emergency situation. A vehicle in good shape can give you an extra safety margin when you need it, and, you never know when you will need it. You should follow your vehicle owner’s manual for routine maintenance. Some you can do yourself and some must be done by a qualified mechanic. A few simple checks will help prevent trouble on the road.
Braking system Only your brakes can stop your vehicle. It is very dangerous if they are not working properly. If they do not seem to be working properly (making a lot of noise, smell funny, or the brake pedal goes to the floor) have a mechanic check them immediately.
Lights and warning lights Make sure that turn signals, brake lights, tail lights and headlights are operating properly. These should be checked from the outside of the vehicle. Brake lights tell other road users that you are stopping and turn signals tell them you are turning, hazard lights are used in emergencies. Most ve-hicles have warning lights for oil, battery problems, etc. Make sure your teen kept you abreast of any vehicle warning lights so you can assist or advise as soon as possible when lights come on. If you are having trouble seeing at night or if other drivers are constantly flashing their headlights at you, have a mechanic check the headlights.
Windshield and wipers Damaged glass can more easily break in a minor collision or when something hits the windshield. Have a damaged windshield repaired or replaced.
Windshield wipers keep the rain and snow off the windshield. Some vehicles also have wipers for rear windows and headlights. Make sure all wipers are in good operating condition. If the blades are not clearing water well, replace them.
Chapter 5

34
Driving Skills (continued)
Chapter 5
Tires Worn or bald tires can increase your stopping distance and make turning more difficult when the road is wet. Unbalanced tires and low-pressure cause faster tire wear, reduce fuel economy and make the vehicle harder to steer and stop. If the vehicle bounces, the steering wheel shakes or the vehicle pulls to one side, have a mechanic check it. Worn tires can cause “hydroplaning” and increase the chance of having a flat tire. Check tire air pressure with an air pressure gauge when the tires are cold. Check the vehicle owner’s manual or the side of the tires for the proper pressure. Check the tread with a penny. Stick the penny into the tread “head” first. If the tread does not come at least to Abe’s head, the tire is unsafe and you need to replace it. Steering System If the steering is not working properly, it is difficult to control the direction you want to go. If the vehi-cle is hard to turn when the steering wheel is first turned, have the steering checked by a mechanic. Suspension system Your suspension helps you control your vehicle and provides a comfortable ride over varying road surfaces. If the vehicle bounces a lot, after a bump or a stop, or is hard to control, you may need new shocks or other suspension parts. Have a mechanic check it out. Exhaust system The exhaust system helps reduce the noise from the engine, helps cool the hot gases coming from running the engine, and moves these gases to the rear of the vehicle. Gases from a leaky exhaust can cause death inside a vehicle in a very short time. Never run the motor in a closed garage. If you sit in a vehicle with the motor running for a long time, open a window. Engine A poorly running engine may lose power that is needed for normal driving and emergencies, may not start, gets poor fuel economy, pollutes the air and could stall on you when you are on the road. Follow the procedures recommended in the owner’s manual for maintenance. Horn The horn may not seem like it is important for safety, but as a warning device, it could save your life. Only use your horn as a warning to others in emergency situations.

35
Driving Skills (continued)
Glass Surfaces It is important that you are able to see clearly through the windows, windshield and mirrors. Here are some things you can do to help.
♦ Keep the windshield clean. Bright sun or headlights on a dirty windshield make it hard to
see. Carry liquid cleaner and a paper or cloth towel so you can clean your windshield whenever it is necessary.
♦ Keep your window washer bottle full. Use antifreeze washer fluid during the winter where the temperature is likely to fall below freezing.
♦ Keep the inside of your windows clean, especially if anyone has been smoking in the vehi-cle. Smoking causes a film to build up on the inside glass.
♦ Clear snow, ice or frost from all windows before driving. Make sure you clean the front, sides and back. If they become cloudy during heavy rain, snow or frost, stop driving until you clean off the windshield or windows. Also, clean snow and ice from all other vehicle surfaces to prevent it from flying off during driving and striking other vehicles.
♦ Do not hang items from your mirror or clutter up the windshield with unnecessary decals. They could block your view.
♦ Keep the headlights, backup, brake and taillights clean. Dirt on the lenses can reduce the effectiveness of the light by 50%.
♦ While driving do not place items on your dashboard.
Adjust Seat and Mirrors You should always check your seat and mirrors before you start to drive. Make any adjustments to the seat and mirrors before you drive off.
♦ Adjust your seat so that you are high enough to clearly see the road. If necessary, use a
seat cushion. Do not move the seat so far forward that you cannot easily steer. ♦ Adjust your rear view mirror and side mirrors. You should be able to see out the back win-
dow with the rear view mirror and to the sides with the side mirrors. A good adjustment for the side mirrors is to set them so that when you lean forward slightly, you can see just the side of your vehicle
♦ If you have a day/night mirror, make sure it is set for the time of day you are driving. ♦ Head restraints are designed to prevent whiplash if you are hit from behind. They should
be adjusted so the head restraint rests against the back of your head.
Chapter 5

36
Chapter 5
Driving Skills (continued)
USE SAFETY BELTS/SEAT BELT/CHILD RESTRAINT The District has one of the strongest, most comprehensive seat belt laws in the nation. After the law was enacted in 1997, seat belt use increased 24%. Injuries were prevented. Lives were saved. It takes a few seconds to fasten a seat belt. It's so simple. Yet it can be the most significant action you can take to protect your life and those you care about. Buckling up dramatically increases your chance of surviving a crash. And it's your best weapon against a drunk, tired, or aggressive driver. Seat Belts Must Be Worn The District of Columbia law requires that the driver and all passengers wear seat belts. Before you drive away, always fasten your safety belts and make sure all your passengers are using safety belts or child restraints.
♦ Make sure your seat back is straight up. The seat should be positioned so that you are at
least 10 inches from the steering wheel.
♦ Sit up straight with your hips and back against the seat back.
♦ Adjust the lap portion of the seat belt low across your hips and pelvis not across your stomach.
♦ Adjust the shoulder portion across your chest and collarbone not across the front of your neck or face, behind your back, or under your arm.
♦ The lap and shoulder belts should be snug. Wearing either part alone greatly reduces your protection. If you have an automatic shoulder belt, be sure to buckle your lap belt as well. Otherwise, in a collision you could slide out of the belt and be hurt or killed.
You Will Be Pulled Over Unlike many other states, District law allows police to stop a vehicle solely because its drivers and passengers are not properly buckled up. $50 Fine and 2 Points That's the penalty for not having your seat belt properly buckled at all times, for drivers and all passengers, in front and back seats—with few exceptions. Drivers are responsible for seat belt compliance for all passengers.

37
Persons with Physical Disabilities If a physician licensed to practice medicine determines and certifies in writing that the use of a seat belt by a person would prevent appropriate restraint due to a person’s physical disability or other medical reason, the seat belt provisions do not apply to that person. The physician’s certificate must state the nature of the physical disability and the reason that restraint by a seat belt is inappropriate. The certificate must be carried in the vehicle. A person who violates the provisions is subject to the penalties of the law. Child Restraint Law DC law requires that any child up to 16 years of age must be in a properly installed child safety seat or restrained in a seat belt. Children under 8 years of age must be properly seated in an in-stalled infant, convertible (toddler) or booster child seat, according to the manufacturer’s in-structions. Booster seats must be used with both lap and shoulder belts. The penalties for child safety seat and adult seat belt violations are as follows:
For Child Safety Seat Violations The penalty for violating DC's child safety seat law is a fine of at least $75 and two points on the driver's license. This applies to any person operating a motor vehicle in the District of Columbia. The police can stop a driver in the District solely for not having a child properly restrained.
Driving Skills (continued)
Chapter 5

38
LEVEL 1 CHECKLIST CHECK THE VEHICLE, GLASS SURFACES, ADJUST SEAT AND
MIRRORS, USE SAFETY BELTS Before leaving this level of instruction your teen should understand the vehicle features:
□ Braking system □ Lights □ Windshield and wipers □ Tires □ Steering System □ Suspension System □ Exhaust System □ Engine □ Horn □ Adjust Seat and Mirrors □ Use Safety Belts/Child Restraint
Chapter 5
Driving Skills (continued)

39
Driving Skills (continued)
LEVEL 2 – BLIND SPOTS, STARTING, ACCELERATING, STEERING, STOPPING THE VEHICLE,
REVERSING THE VEHICLE, AND MAKING TURNS STARTING
♦ Make sure the transmission is in park before you start the vehicle. If the vehicle has a manual transmission, it must not be in gear. In some vehicles the clutch must be de-pressed. For automatic transmissions, you must put the shift selector in park.
♦ Place your right foot on the brake and hold it down. ♦ Turn the key halfway on the “ON” position and allow the onboard computer to boot up.
Check the gauges and warning lights. ♦ Then turn the key the rest of the way to the “START” position and release immediately. ♦ Other accessories should be turned on – lights, climate control, wipers, etc., as require.
ACCELERATING Your teen should maintain a safe speed. Have your teen practice viewing the speed he or she is driving. Your teenager should also practice checking mirrors and for blind spots. They should accel-erate slowly and smoothly. Trying to start too fast can cause the wheels to spin, particularly on slip-pery surfaces and cause the vehicle to slide. With a manual shift vehicle, practice using the clutch and accelerator so that the engine does not over rev or stall when shifting between gears. STEERING
♦ Both hands should be placed on opposite sides of the steering wheel (left hand between 8 and 10 o’clock and the right hand between 2 and 4 o’clock.) This position is comfortable and on high-speed roads it allows you to make turns without taking your hands off the wheel.
♦ Look far down the road and on both sides of the road, and not just at the road in front of your vehicle. Look for traffic situations where you will need to steer, slow down or change lanes before you get to them. This will ensure that you have time to steer smoothly and safely.
♦ When turning sharp corners, turn the steering wheel using the “hand-over-hand” technique one hand grasps the wheel and pushes the wheel up, over, and down; at the same time the other hand releases the wheel and passes across the forearm to grip the wheel on the far side; this hand then pulls the side of the wheel up, over the top, and down; these
Chapter 5

40
Chapter 5
Driving Skills (continued)
movement should continue as long as necessary to make the turn. At no time during this technique are both hands off the wheel at the same time). When you complete a turn, straighten out the steering wheel by hand. Letting the wheel slip through your fingers could be dangerous.
STOPPING THE VEHICLE
♦ When teenagers just learn how to maintain a vehicle and it is time to stop, they often ap-ply to much pressure to the brake pedal. When you brake quickly, you could skid and lose control of your vehicle. You also make it harder for drivers behind you to stop without hit-ting you.
♦ Your teen should be alert so that they know when to stop well ahead of time. Stopping suddenly is dangerous and usually point to a driver who was not paying attention.
♦ Teenagers should apply adequate force at the beginning of the braking process to bring the vehicle to a smooth stop.
♦ Parents have the teen practice in a large parking lot using little to no acceleration. Have the teen stop at designated lines. Focus on smooth acceleration and stopping.
REVERSING THE VEHICLE Never back a vehicle in any travel lane except to parallel park. It is illegal and unsafe to do so. Driv-ers do not expect a vehicle to be backing towards them and may not realize it until it is too late. If you miss your turn or exit, do not back up, but go to where you can safely turn around. Here are some tips for reversing the vehicle:
♦ Practice with teen on a parking lot with no obstacles.
♦ Check behind your vehicle before you get in. Children or small objects cannot be seen from the driver seat.
♦ Place your left hand on the steering wheel while your right foot is on the brake ♦ Change gear to reverse ♦ Place your right arm on the back of the seat and turn around so that you can look directly
through the rear window. Do not depend on your rearview or side mirrors because you cannot see directly behind your vehicle.
♦ Lift your foot off the brake slowly and apply acceleration if necessary ♦ Back up slowly. Your vehicle is much harder to steer while you are backing up

41
Driving Skills (continued)
(Reversing the Vehicle continued)
♦ While backing up, if you are turning to the right, turn your steering wheel to the right and the opposite if you are going to the left.
♦ Once completed, press the brake to stop.
MAKING TURNS When first learning to make turns practice turns in an open area were there is no traffic or pedestrians. Be ready to give instructions on steering and be ready to grab the wheel. The following steps should help your teen with turns:
♦ Know where you want to turn. ♦ Signal to traffic at least 100 feet before you turn. ♦ Turn into the same lane as you near the intersection. When there is a two lane road in
both directions, an approach for the left turn should be in the part of the right half of the roadway nearest the center line.
♦ Reduce your speed while turning and yield to pedestrians including bicycles and vehicles coming from the opposite direction
Tips to remember when making turns: Right turns: When making a right turn, avoid swinging wide to the left before making the turn. If you swing wide, the driver behind you may think you are changing lanes or going to turn left and may turn to pass you on the right. If you swing wide as you complete the turn, drivers who are in the far lane will not expect to see you there. Left turns: When making a left turn, avoid cutting the corner so sharply that you run into someone approaching from the left. However, be sure to leave room for oncoming vehicles to turn left in front of you. Multiple turning lanes: If there are signs or lane markings that allow for two or more turning lanes, stay in your lane during the turn.
Chapter 5
42
Driving Skills (continued)
Chapter 5
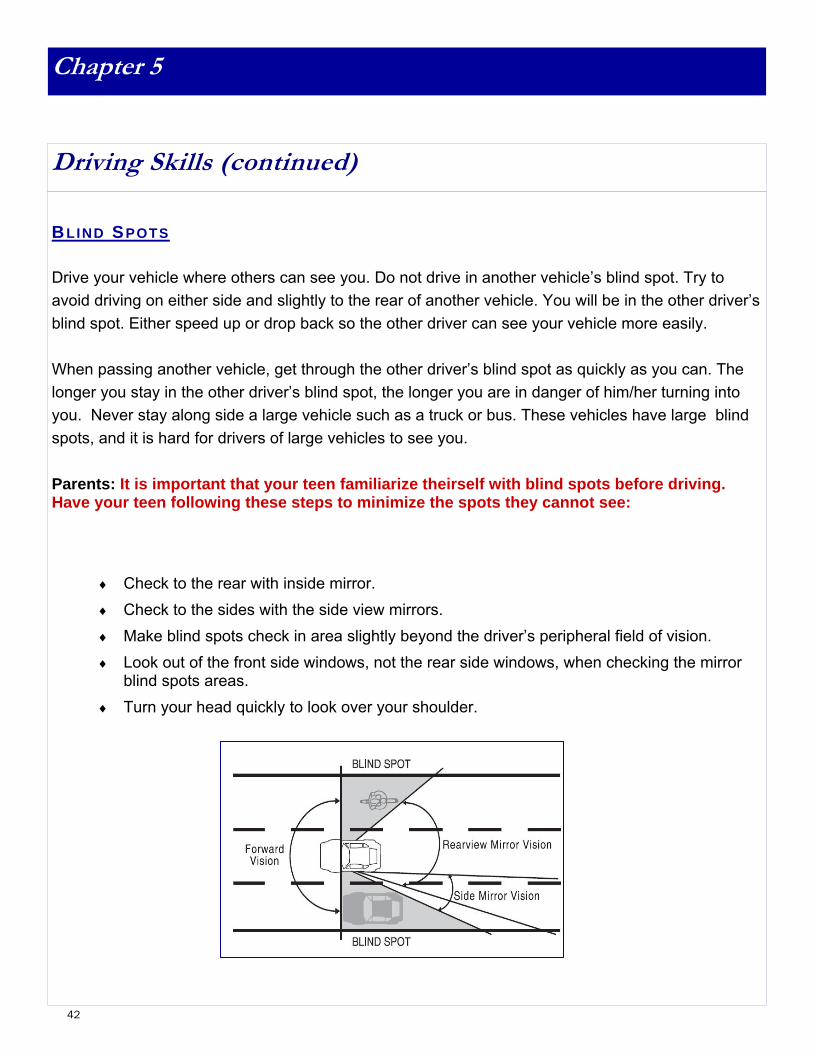
BLIND SPOTS Drive your vehicle where others can see you. Do not drive in another vehicle’s blind spot. Try to avoid driving on either side and slightly to the rear of another vehicle. You will be in the other driver’s blind spot. Either speed up or drop back so the other driver can see your vehicle more easily. When passing another vehicle, get through the other driver’s blind spot as quickly as you can. The longer you stay in the other driver’s blind spot, the longer you are in danger of him/her turning into you. Never stay along side a large vehicle such as a truck or bus. These vehicles have large blind spots, and it is hard for drivers of large vehicles to see you. Parents: It is important that your teen familiarize theirself with blind spots before driving. Have your teen following these steps to minimize the spots they cannot see:
♦ Check to the rear with inside mirror. ♦ Check to the sides with the side view mirrors. ♦ Make blind spots check in area slightly beyond the driver’s peripheral field of vision. ♦ Look out of the front side windows, not the rear side windows, when checking the mirror
blind spots areas. ♦ Turn your head quickly to look over your shoulder.

43
Driving Skills (continued)
LEVEL 2 CHECKLIST BLIND SPOTS, STARTING, ACCELERATING, STEERING, STOPPING THE VEHI-
CLE, REVERSING THE VEHICLE, AND MAKING TURNS Before leaving this level of instruction your teen should be able to describe and demonstrate the fol-lowing:
□ Know Blind Spots □ Checks mirrors □ Starting vehicle smoothly □ Maintaining correct speed □ Stop the vehicle smoothly □ Signal before turn □ Making both left and right turns safely □ Back the vehicle safely and in straight line □ Yields to pedestrians □ Stops safely when necessary
Chapter 5

44
Driving Skills (continued)
LEVEL 3 - NAVIGATING INTERSECTIONS, MAKING LANE CHANGES, AND MAINTAINING SPACE
NAVIGATING INTERSECTIONS
Intersections with Signals Intersections are any place where traffic merges or crosses. They include: cross streets, side streets, driveways and shopping center or parking lot entrances. When approaching an intersection with a traffic light, be aware of vehicles in the intersection and be ready to brake and ensure that there is enough space between you and the vehicle in front of you. If there is traffic in the intersection, do not enter the intersection, even if the light is green. If you block the intersection due to traffic, you may receive a ticket. Look in all directions when approach-ing an intersection for vehicles and pedestrians. Yield for pedestrians in the crosswalk and watch for vehicles making illegal turns. Parents: Please practice with your teen on how to tell when it is safe to stop or proceed when a light turns yellow. Intersections without Signals or Signs When approaching a blind intersection, where you cannot see the cross traffic, slow to 15 miles per hour. This will allow you the time to safely stop, if needed. Look in cross streets for approaching ve-hicles or pedestrians. If all is clear, proceed through the intersection. Roundabouts A roundabout is a circular intersection at which all traffic travels counterclockwise, always to the right, around a central island. Vehicles entering from each leg of the intersection must yield to the traffic already in the roundabout, which is coming from the left. Vehicles exit the roundabout by mak-ing a simple right turn onto the desired street or highway. Approaching the Roundabout When you are approaching the roundabout, decide as early as possible which exit you need to take to get into the correct lane. Reduce your speed and if possible, adjust it to meet a gap in the traffic in the roundabout.
Chapter 5

45
Driving Skills (continued)
Entering the Roundabout Upon reaching the roundabout, yield to the traffic coming from the left. Watch out for traffic already in the roundabout, especially cyclists and motorcyclists. Do not enter a roundabout when an emer-gency vehicle is approaching on another leg. This will enable traffic already in the roundabout to clear in front of the emergency vehicle. Traveling Within a Roundabout Always keep to the right of the central island within the roundabout and travel in a counterclockwise direction around the center island. Do not stop except to avoid a collision; you have the right of way. Where the roundabout is wide enough to allow two or more vehicles to travel side-by-side, do not overtake other vehicles. Watch out for traffic crossing in front of you on the roundabout, especially those vehicles intending to leave at the next exit. When an emergency vehicle is approaching, pro-vide a clear path to turn through the roundabout.
Exiting the Roundabout Maintain a slow speed upon exiting a roundabout. Always indicate your exit by using your right turn signal. On roundabouts having a wide roadway, watch for vehicles to your right, including bicycles, whose paths you may cross while exiting. Make sure they intend to yield before you exit. Watch for and yield to pedestrians. Do not accelerate until you are beyond the pedestrian crossing point at the exit.
MAKING LANE CHANGES Whenever you want to change lanes, you must check that there are no vehicles in the lane you want to enter. This means you must check for traffic to the side and behind your vehicle before you change lanes and make sure it is safe to do so. Changing lanes includes: changing from one lane to another, merging onto a roadway from an entrance ramp and entering the roadway from the curb or shoulder. Changing lanes smoothly may prove to be difficult for your teen. Therefore, it is important to practice this maneuver frequently. Here are tips to ensure that lane changes are safe: ♦ Check mirrors for breaks in traffic ♦ Signal ♦ Be sure to check your blind spot by glancing over your shoulder
Chapter 5

46
(Making Lane Changes Continued) ♦ Change lanes ♦ Center the car into the center of the new lane ♦ Turn off signal Please monitor the teen for the following:
1. Failure to check mirrors
2. Failure to look over shoulder
3. The vehicle drifts when looking over shoulder Note: Please have the teen inform you when they think that it is
safe to change lanes. When you agree, then they can change lanes.
MAINTAINING SPACE Leave as much space as possible between your vehicle and the one in front of you. Most rear-end collisions are caused by following too closely. Watch the car ahead of you when it passes a refer-ence point, such as a sign or overpass. Then count “one thousand one, one thousand two, one thousand three, one thousand four.” If you pass the same spot before you are finished counting to one thousand four, you are following too closely. When you are following vehicles which stop often (buses, post office vans) you should allow more following distance than usual. When driving in bad weather, you should increase the distance between your vehicle and the one ahead of you to four or five seconds.
Remember: Don’t cut trucks off. It takes much more time and distance for a truck to stop. Three to Four Second Following Distance Rule for Stopping Distance The distance in which you can stop your vehicle is important in helping you to choose a safe driving speed. The picture that follows can be used as a rough guide, but your actual stopping distance will depend upon many factors, including:
♦ The length of time it takes a driver to see and recognize that there is a dangerous situa-tion.
Chapter 5
Driving Skills (continued)

47
(Three to Four Second Following Distance Rule for Stopping Distance continued)
♦ The length of time it takes from the perception of danger to the start of braking - 3/4 sec-ond.
♦ Type and condition of the pavement. ♦ Kind and condition of tire treads. ♦ Vehicle design and condition of shock absorbers. ♦ Type and condition of brakes. ♦ Direction and speed of the wind.
When a driver “cuts” you off, the usual response is to slam on the brakes and swerve to miss the vehicle. Unfortunately, this response may cause an accident or cause you to drive off the road. If another driver “cuts” in front of you, simply take your foot off the gas. This response will give you enough space between both vehicles without swerving into another lane. Parents: If your teen driver is being tailgated, your teenager should ensure there is enough space between his or her car and the car in front. This will allow them ample time to react in an emer-gency. Your teen can slow down slightly to allow the tailgater to pass. Please inform your student not to drive in the blind spot of others. The other driver may attempt to change lanes and collide with your teen’s car.
Driving Skills (continued)
Chapter 5

48
Driving Skills (continued)
LEVEL 3 CHECKLIST Before leaving this level of instruction, your teen should be able to describe and demonstrate the following: Navigating Intersections
□ Approaches with caution □ Does not stop in intersection □ Checks cross streets for traffic □ Sees and responds to open/closed space areas □ Yields to pedestrians □ Stops safely when necessary
Making Lane Changes
□ Signals □ Checks mirrors □ Checks blind spot □ Maintains lane while checking blind spot □ Maintains speed or slightly accelerates during lane change □ Ensures enough space before changing lanes □ Changes lanes safely □ Changes lanes smoothly □ Does not cross multiple lanes at one time
Maintaining Space
□ Keeps a safe following distance
Chapter 5

49
Driving Skills (continued)
LEVEL 4 - PARKING, PARKING ON HILLS, PARALLEL PARKING, ANGLE PARKING,
PERPENDICULAR PARKING PARKING Drivers are responsible for making sure that their vehicle is not a hazard when it is parked. When-ever you park, be sure to stop the engine, lock the ignition, remove the key and set the hand brake. Make sure your vehicle is in a place that is far enough from any travel lane to avoid interfering with traffic and visible to vehicles approaching from either direction.
♦ Check traffic before you open the door. Get out of the vehicle on the curbside if you can. If
you have to use the street side, check traffic before you get out and make sure it is clear. Shut the door as soon as you can after getting out.
♦ If you must park on a roadway, park your vehicle as far away from traffic as possible. Back into the space to so that you can park as close to the curb as you can. You should not park closer than 3 feet to the next vehicle.
PARKING ON HILLS When you park on a hill or upgrade, turn your wheels sharply towards the side of the road or curb. This way, if your vehicle starts to roll downhill, it will roll away from traffic.
♦ Signal ♦ Check for traffic or pedestrians ♦ If you are is facing up hill with the curb, turn your wheels left sharply towards the side of
the road ♦ If you are facing down hill with the curb, turn your wheels right away from curb ♦ If there is no curb, turn your wheels away from the traffic. ♦ Once your vehicle is parked, put the parking brake on.
Entering back into Traffic
♦ Signal ♦ Release emergency brake ♦ Check your mirrors for traffic or pedestrians ♦ Check your blind spots ♦ If clear pull back into the traffic safely
Chapter 5

50
Chapter 5
Driving Skills (continued)
PARALLEL PARKING Parents when practicing parking, take your teen to an open parking lot and use cones first. Then once your teen is capable, find a space where they can safely get the vehicle in and out without hit-ting another vehicle. The steps for parallel parking are as follow:
♦ Signal and pull two to three feet from the vehicle you are parking behind back bumpers should be about even.
♦ Once traffic is clear shift your car in reverse
♦ Turn the steering wheel hard to the right and release the brake slowly than look over your shoulder and begin back up until you are at a 45 degree angle and stop.
♦ Turn the wheels all the way to the left.
♦ Slowly back up until you are parallel with the curb.
♦ While backing up make sure you do not hit any vehicles or pedestrians.
Exiting Parallel Parking When exiting you should:
♦ Look to make sure there are no vehicles or pedestrians in your way. ♦ Signal to traffic ♦ Check again for traffic including blind spots. ♦ Turn your wheels all the way to the left then put the vehicle in drive and slowly pull forward ♦ Make sure you have enough room to clear the car in front of you. ♦ Turn wheel slowly to the right when you are half way out of the parking space.

51
Driving Skills (continued)
ANGLE PARKING Parents take your teen to a parking lot that has angle parking for practice. The steps to angle park-ing are as follow:
♦ Signal ♦ Drive very slow as you approach the space ♦ Check your blind spot for traffic and pedestrians ♦ Begin turning when you can see the center of the parking space ♦ Drive slow and turn the wheel sharply toward the center of the space ♦ Once you enter the space, straighten the wheels and center the vehicle in the space ♦ Stop even with the curb or parking line ♦ Secure your vehicle
Tips: Stay at a safe distance from the parked cars so that you can see and maneuver better once you have found and empty space. Stay alert for cars backing out. Exiting Angle Parking When exiting you should:
♦ Check to make sure there are no vehicles or pedestrians in your way. ♦ With foot on the brake, shift to reverse ♦ Back out straight and slow, make sure to clear the other vehicles ♦ Check the front of the vehicle when backing out to make sure it swings clear of the other vehi-
cle ♦ Continue to check for traffic and pedestrians as you straighten the vehicle in the proper lane ♦ Stop smoothly and shift to drive.
Chapter 5

52
Driving Skills (continued)
PERPENDICULAR PARKING Perpendicular parking is similar to angle parking, but requires more care in turning, Perpendicular parking is found in most parking lot. When parking bring your vehicle to a spot while keeping enough space from the row of parked vehicles. Parent take your teen to a parking lot that have per-pendicular parking for practice. The step to perpendicular parking are as follow:
♦ Signal and get 6—8 feet from the parking vehicle or as far to the left as possible ♦ Check for traffic behind you ♦ Slowly drive and turn the wheel sharp to the right of the space ♦ Check your rear bumper for clearance ♦ Straighten the wheel when you are centered in the space ♦ If necessary, shift to reverse and slowly back slightly turning wheel to the left than shift
back to drive and pull forward ♦ Stop with your wheel straight and your vehicle centered in the space. ♦ Secure your vehicle
Exiting Perpendicular Parking When exiting you should:
♦ Check to make sure there are no vehicles or pedestrians in your way. ♦ With foot on the brake, shift to reverse ♦ Back out straight and slow, make sure to clear the other vehicles ♦ Check the front of the vehicle when backing out to make sure it swings clear of the other vehi-
cle ♦ Continue to check for traffic and pedestrians as you straighten the vehicle in the proper lane ♦ Stop smoothly and shift to drive.
Chapter 5

53
Driving Skills (continued)
LEVEL 4 CHECKLIST
PARKING, PARKING ON HILLS, PARALLEL PARKING, ANGEL PARKING, AND PERPENDICULAR PARKING
Before leaving this level of instruction, your teen should be able to describe and demonstrate the fol-lowing:
□ Parallel Parking □ Angle Parking □ Parking on uphill and downhill with and without a curb □ Perpendicular Parking
Chapter 5

54
Chapter 5
Driving Skills (continued)
LEVEL 5 - INTERSTATE DRIVING
Once you determine your teen is ready to drive on the interstate, please go over the following infor-mation before entering the interstate.
ENTERING THE INTERSTATE Interstate and highways are usually reached by an entrance ramp and acceleration or deceleration lane. The entrance ramp gets you going in the desired direction, and the acceleration lane gives you the opportunity to get up to the speed of the traffic. When entering an interstate, the solid painted lines that divide the entrance and the interstate should not be crossed. If there is a short entrance to the interstate, where there is no acceleration lane, you should speed up on the entrance only after you have found a gap in the traffic. In general, you should stop before entering an interstate when waiting for a break in the traffic. If entering an inter-state from the left entrance, compare what you see in your mirrors with what you see when looking over your shoulder.
Here Are a Few Tips to Help You: ♦ Keep up with the flow of traffic without exceeding the speed limit. ♦ Maintain the proper amount of space. (three second rule) ♦ Look out for merging vehicles at on-ramps. ♦ Stay in the far right lane as much as possible. ♦ If the traffic ahead slows, tap your brake pedal several times to warn drivers behind you
that you are slowing down.
LANE CHANGING AND PASSING ON AN INTERSTATE H IGHWAY Because of the sustained high speeds on an interstate and highways, careful lane changing and passing are essential. Here Are a Few Tips to Help You:
♦ It is legal in the District of Columbia to pass on the left or on the right, but slow moving ve-hicles must stay in the right lane. Thus, most of your passing should be on the left. Also, you can not pass on the shoulder of the road.

55
Driving Skills (continued)
♦ Safe passing depends on cooperation between drivers. Don’t speed up when being passed. ♦ Quick movements at high speeds can be fatal. Don’t return to the other lane too soon af-
ter passing. ♦ Always signal a lane change. ♦ Check your blind spots by glancing over your shoulder. ♦ Check the outside mirror or look over your shoulder toward the left rear or right rear before changing into another lane. ♦ Never cruise in the blind spot of the vehicle ahead of you.
LEAVING THE INTERSTATE Get into the right hand lane well before reaching the exit. Don’t slow down on the main highway. Start slowing down as soon as you get to the deceleration lane and continue slowing at the begin-ning of the exit ramp. Signal your exit four or five seconds before the off-ramp. Do not drive over solid lines when exiting. Slow down to the posted advisory speed for the ramp or you may have trouble getting around curves. If you exit at the wrong place on an interstate, continue until you are off the exit ramp and look for a way to re-enter the interstate.
Chapter 5

56
LEVEL 5 CHECKLIST ENTERING THE INTERSTATE, LANE CHANGING AND PASSING ON AN INTERSTATE H IGH-
WAY, LEAVING THE INTERSTATE
Before leaving this level of instruction, your teen should be able to describe and demonstrate the following:
□ Checks the flow of traffic when merging
□ Signals merge early □ Checks over shoulder (i.e. blind spots) when merging into gap in traffic □ Smoothly merges onto interstate □ Maintains proper speed □ Maintains proper space behind vehicles □ Checks mirror when changing lanes □ Checks blind spots when changing lanes □ Prepares for exit by getting into proper lane □ Signals timely when exiting
Driving Skills (continued)
Page 56 Chapter 5

57
Chapter 6
Parents: all drivers sooner or later will find themselves in an emergency situation. As careful as they are, there are situations that could cause a problem for your teens. If you properly prepare your teen, you may be able to prevent any serious outcomes. VEHICLE EMERGENCIES There is always a chance of a vehicle problem while driving. You should follow the recommended maintenance schedule listed in the vehicle owner’s manual. Following these preventive measures greatly reduces the chance your vehicle will have a problem. Possible vehicle failures and what you can do if they happen are listed below. Brake Failure If your brakes stop working:
♦ Pump the brake pedal several times. This will often build up enough brake pressure to al-low you to stop. Or, if you have anti-lock brakes, do not pump, but apply constant pres-sure.
♦ If that does not work, use the parking brake. Pull on the parking brake handle slowly so you will not lock the rear wheels and cause a skid. Be ready to release the brake if the ve-hicle does start to skid.
♦ If that does not work, start shifting to lower gears and look for a safe place to slow to a stop.
♦ Make sure the vehicle is off the roadway. Do not drive the vehicle without brakes.
Tire Blowout If a tire suddenly goes flat:
♦ Hold the steering wheel tightly and keep the vehicle going straight. ♦ Slow down gradually. Take your foot off the gas pedal and use the brakes lightly. ♦ Do not stop on the road if at all possible. Pull off the road in a safe place.
What To Do In Emergencies

58
Chapter 6
What To Do In Emergencies (continued)
Power Failure If the engine dies while you are driving:
♦ Keep a strong grip on the steering wheel. Be aware that the steering may be difficult to turn, but you can turn it.
♦ Pull off the roadway. The brakes will still work but you may have to push very hard on the brake pedal.
Headlight Failure If your headlights suddenly go out:
♦ Try the headlight switch a few times. ♦ If that does not work, put on the emergency flashers, turn signals or fog lights on if you
have them. ♦ Pull off the road as soon as possible.
Gas Pedal Sticks
The motor keeps going faster and faster: ♦ Keep your eyes on the road. ♦ Quickly shift to neutral. ♦ Pull off the road when safe to do so. ♦ Turn off the engine.
AVOIDING COLLISIONS Most accidents are caused by the driver. When it looks like a collision may happen, many drivers panic and fail to act. In some cases they do act, but they do something that does not help to reduce the chance of the collision. There almost always is something you can do to avoid the crash or re-duce the impact of the crash. In avoiding a collision, drivers have three options: stop, turn or speed up.
Stopping Quickly Many newer vehicles have an ABS (Antilock Braking System). Be sure to read the vehicle owner’s manual on how to use the ABS. The ABS system will allow you to stop without skidding. In general, if you need to stop quickly:

59
What To Do In Emergencies (continued)
With ABS If you have an antilock braking system and you need to stop quickly:
♦ Press on the brake pedal as hard as you can and keep pressing on it. ♦ You might feel the brake pedal pushing back when the ABS is working. Do not let-up on
the brake pedal. The ABS system will only work with the brake pedal pushed down.
Without ABS If you must stop quickly and you do not have an antilock braking system:
♦ You can cause the vehicle to go into a skid if you brake too hard.
♦ Apply the brakes as hard as you can without locking them.
♦ If the brakes lock-up, you will feel the vehicle start to skid. Quickly let up on the brake pedal.
♦ As soon as the vehicle stops skidding, push down on the brake pedal again. Keep doing this until the vehicle has stopped.
Turning Quickly In most cases, you can turn the vehicle quicker than you can stop it. You should consider turning in order to avoid a collision.
♦ Make sure you have a good grip with both hands on the steering wheel. Once you have
turned away or changed lanes, you must be ready to keep the vehicle under control. Some drivers steer away from one collision only to end up in another.
Always steer in the direction you want the vehicle to go.
With ABS One aspect of having ABS, is that you can turn your vehicle while braking, without skidding. This is very helpful if you must turn, stop or slow down. Without ABS If you do not have ABS, you must use a different procedure to turn quickly. You should step on the brake pedal, then let-up and turn the steer wheel. Braking will slow the vehicle, put more weight on the front tires, and allow for a quicker turn. Do not lock-up the front wheels while braking or turn so sharply that the vehicle can only plow ahead.
Chapter 6

60
Remember that generally it is better to run off the road (unless you are on a bridge or cliff) than to crash head on into another vehicle.
Speeding up Sometimes it is best or necessary to speed up to avoid a collision. This may happen when another vehicle is about to hit you from the side or behind and there is room in front of you to get out of dan-ger. Be sure to slow down once the danger has passed. Dealing With Skids Any road that is safe under normal conditions can be dangerous when it is wet or has snow or ice on it. High speeds under normal conditions also increase the possibility of a skid if you must turn or stop suddenly. Skids are caused when the tires can no longer grip the road.
As you cannot control a vehicle when it is skidding, it is best not to cause your vehicle to skid in the first place.
If your vehicle begins to skid:
♦ Stay off the brake. Until the vehicle slows, your brakes will not work and could cause you to skid more.
♦ Steer. Turn the steering wheel in the direction the car is skidding. As soon as the vehicle begins to straighten out, turn the steering wheel back the other way. If you do not do so, your vehicle may swing around in the other direction and you could start a new skid.
♦ Continue to steer. Continue to correct your steering, left and right, until the vehicle is again moving down the road under your control.
Protect Yourself in Collisions You may not always be able to avoid a collision. Try everything you can to keep from getting hit. If nothing works, try to lessen any injuries that could result from the crash. The most important thing you can do is to use your lap and shoulder belts. Besides your safety belts, there are a couple of other things that could help prevent more serious injuries.
Hit From the Rears If your vehicle is hit from the rear, your body will be thrown backward. Press yourself against the back of your seat and pull your head against the head restraint. Be ready to apply your bake so that you will not be pushed into another vehicle.
What To Do In Emergencies (continued)
Chapter 6

61
Hit From the Side If your vehicle is hit from the side, your body will be thrown towards the side that is hit. Unless your vehicle is equipped with side impact air bags, traditional air bags will not help in this situation. Your lap and shoulder belts are needed to help keep you behind the wheel. Get ready to steer or brake to prevent your vehicle from hitting something else.
Hit From the Front If your vehicle is about to be hit from the front it is important to try and have a “glancing blow” rather than being struck head on . This means that if a collision is going to happen, you should try to turn the vehicle. At worse, you hit with a glancing blow. You might miss it. If your vehicle has an air bag, it will inflate. It also will deflate following the crash, so be ready to prevent your vehicle from hitting something else. You must use your lap and shoulder belts to keep you behind the wheel and to pro-tect you if your vehicle has a second crash.
CRASHES No matter how good a driver you are, there may be a time when you are involved in a crash. If you are involved in an accident, you must stop. If you are involved in an accident with a parked vehicle, you must try and locate the owner. If any person is injured or killed, the police must be no-tified. It is a crime for you to leave a crash site where your vehicle was involved if there is an injury or death before police have talked to you and gotten all the information they need about the crash. You may want to carry a basic vehicle emergency kit. These kits have emergency flares, first aid supplies and basic tools. At the accident scene:
♦ Stop your vehicle at or near the accident site. If your vehicle can move, get it off the road so that it does not block traffic or cause another crash.
♦ Do not stand or walk in traffic lanes. You could be struck by another vehicle. ♦ Turn off the ignition on wrecked vehicles. Do not smoke around wrecked vehicles. Fuel
could have spilled and fire is a real danger. ♦ If there are power lines down with wires in the road, do not go near them. ♦ Make sure that other traffic will not be involved in the crash. Use flares or other warning
devices to alert traffic of the accident.
What To Do In Emergencies (continued)
Chapter 6

62
What To Do In Emergencies (continued)
If someone is injured:
♦ Get help. Make sure the police and emergency medical or rescue squad have been called. If there is a fire, tell this to the police when they are called.
♦ Do not move the injured unless they are in a burning vehicle or in other immediate danger of being hit by another vehicle. Moving a person can make their injuries worse.
♦ First help anyone who is not already walking and talking. Check for breathing, then check for bleeding.
♦ If there is bleeding, apply pressure directly on the wound with your hand or with a cloth. Even severe bleeding can almost always be stopped or slowed by putting pressure on the wound.
♦ Do not give injured persons anything to drink, not even water.
♦ To help prevent an injured person from going into shock, cover them with a blanket or coat to keep them warm.
Report the Accident:
♦ Get the names and addresses of all people involved in the accident and any witnesses including injured persons.
♦ Exchange driver and vehicle information with other drivers involved in the crash. Driver license number, vehicle information (license plate, make, model and year of vehicle) and insurance company and policy number if available.
♦ Record any damage to the vehicles involved in the crash. ♦ Provide information to the police or other emergency officials if requested. ♦ Should the accident involve a parked vehicle, try to find the owner. If you cannot, leave a
note in a place where it can be seen with information on how the owner can reach you and the date and time of the accident.
Chapter 6

63