“gophishing” to boost your security awareness training
TRANSCRIPT

“Gophishing” to Boost your Security Awareness Training Any information security program must consider how users react to phishing campaigns. It is undeniable that constant training helps to defend against deceptive tactics. Many of these tactics entice employees to click on malicious links or provide credentials. Gathering credentials is a simple method for an attacker to establish a foothold in a targeted organization.
In most cases, the desirable training is obtained through third-party vendors that offer pre-established phishing campaigns with limited customization. However, for organizations looking for a more flexible and affordable process to train their employees, freely available tools can be easily integrated into the network infrastructure.
Gophish is an excellent example of these types of open-source tools. As described in its documentation portal, “Gophish is a powerful, easy-to-use, open-source phishing toolkit designed to help pentesters and businesses conduct real-world phishing simulations.”1 It also provides all the flexibility sought by system administrators to launch in-house phishing campaigns.
In this article, we’ll walk through the setup of the Gophish toolkit. The goal is to design a phishing platform that will help network administrators to conduct tailored phishing campaigns in a short amount of time.
1. For easy deployment, we will be using an AWS LightSail instance. This is also known as a virtual private server (VPS). After signing up for AWS, go to the Home page and choose “Create Instance.”
2. Then select the location of the instance (AWS Region and Availability Zone). Under Pick instance image, select Linux/Unix and OS only – Ubuntu 18.04.1 LTS.
3. Choose an instance plan and label the instance. For our example, we selected a 40 GB Storage plan and labeled it “Gophish.” Next, click on “Create instance.” For more info on how to create an instance, see a reference here. Once the process is complete, make a note of the provided PublicIP_AWS_Instance.

4. To allow HTTPS communication (Hypertext Transfer Protocol Secure), it is necessary to enable port 443 on the newly created instance. Click on “⋮” :
Then Manage:
Under the Networking tab, set the port number (443) in the Firewall section:
5. (OPTIONAL) To avoid dealing with SSH keys during the configuration process, SSH-Password authentication can be enabled (Also, we can allow logging as root). Use the following link for details: https://serverpilot.io/docs/how-to-enable-ssh-password-authentication/

Note: If you enable this option, use secure passwords – If logging as root was also enabled, DO NOT FORGET to revert this setting upon finishing the steps on this blog post.
6. It is necessary to understand the infrastructure and how to connect to it. The following diagram will help us to visualize the connection paths. Here, we use a Kali Linux box to connect to our AWS instance via SSH. We could use any other Linux distribution or Windows OS to establish an SSH connection to Gophish.
• Gophish = VPS hosted on AWS • Kali Linux = The remote host to access the Gophish instance (used for Web Console and SSH
access to Gophish).
7. Using the following command, SSH to the Gophish instance from the Kali host:
ssh root@[PublicIP_AWS_Instance] -p22
8. Visit the Gophish repository and download the latest release. In our example, we downloaded the
following zipped binary (gophish-v0.11.0-linux-64bit.zip):
cd /tmp
wget https://github.com/gophish/gophish/releases/download/v0.11.0/gophish-v0.11.0-linux-
64bit.zip
9. Create a Gophish destination folder and unzip the downloaded binary:
mkdir /opt/gophish-v0.11.0-linux-64bit
unzip gophish-v0.11.0-linux-64bit.zip -d /opt/gophish-v0.11.0-linux-64bit/
10. Change the access permissions on the Gophish binary and run the application:
cd /opt/gophish-v0.11.0-linux-64bit/
cdmod +x gophish
./gophish
11. Here, we are ready to access the Gophish console. Since the console is only accessible through
the browser, we need to establish a Local Port Forwarding to the AWS instance. Let’s open another terminal in the Kali host and use the following command (Gophish’s default console port is 3333):
ssh -L3333:localhost:3333 root@[PublicIP_AWS_Instance] -p22
Then, open the local browser (e.g., Firefox) and go to:
https://localhost:3333/login
*Default Credentials for Gophish: Admin / Gophish

*Note Gophish v0.11.0 :
This release adds a basic password policy for administrators, and removes the default password "gophish". Instead, an initial password is randomly generated and printed in the terminal when Gophish is launched for the first time. 2
12. After confirming console access, we need to set Gophish as a service. It will allow us to execute Gophish in the AWS instance background. For this, we set the following script in the /etc/init.d path:
nano /etc/init.d/gophish
Then add the following content – The script can be found here if you want to copy and paste.
Note: if you copy and paste the script from the repository, make sure to review its syntax. You may have to replace every ellipsis (…) with three periods and every quote (“) and half-quote (‘) manually. This is because the formatting might change during the copying process.

CTRL + X to exit, then ‘y’ and ‘enter’ to save changes.
13. Set the Gophish log directory:
mkdir /var/log/gophish
14. Now make the Gophish script file executable:
chmod +x /etc/init.d/gophish
15. We have to add the Gophish service to “update-rc.d” to ensure it’s initiated every time the AWS
server starts:
update-rc.d gophish defaults
16. Start the Gophish service:
service gophish start
17. After the above settings, we need to test access to the Gophish console - See step 11.
18. At this point, we should be ready to start using Gophish. Before exploring the console, we need
to address a Gophish limitation related to the number of SSL connections that Gophish can handle. As of today, Gophish (v.0.11.0) only supports one (1) SSL connection (defined on its config file “config.json”). This limitation restricts us from using multiple domains and phishing landing pages over HTTPS. To address this issue, we need to use a reverse proxy. The proxy will manage the SSL connections and redirect the traffic to Gophish. To achieve the goal, we use Caddy. “Caddy is an open source web server with automatic HTTPS written in Go”.3 Caddy will also auto-deploy the Let’s Encrypt SSL certificates for the phishing domains through Certbot. The diagram below provides a visual representation for the wanted infrastructure:

Before moving on, we need to stop the Gophish service. Let’s use the following command to identify the Gophish service process ID (PID):
netstat -plnt
Gophish PID = 2027
Then kill the Gophish process: kill -9 <Gophish _PID>:
kill -9 2027
Let’s now install Certbot (For our ubuntu distribution):
apt-get update
apt-get install software-properties-common
add-apt-repository universe
add-apt-repository ppa:certbot/certbot
apt-get updateb
apt-get install certbot
Installing Caddy:
curl https://getcaddy.com | bash -s personal
This will put the Caddy binary in /usr/local/bin/caddy
Once Caddy is installed, let’s create a caddy config file:
cd to any location where you want to keep you caddy file.
cd /root
then create a caddy config file:
nano Caddyfile
The content of the Caddyfile should have the following structure:

CTRL + X to exit and ‘y’ and ‘enter’ to save changes.
Note: As you can see, we are adding to the Caddyfile all domains used for the phishing campaigns. Also, we need to make sure the domains are pointing to the AWS instance (details here DNS “A” records). Caddy will fetch the certs from Let’s Encrypt and will do everything to set the reverse proxy.
19. To point Gophish to Caddy (reverse proxy), we need to edit the Gophish config file (config.json):
nano /opt/gophish-v0.11.0-linux-64bit/config.json
And change the "listen_url" port from 80 to 8080.
20. Restart the Gophish service to load the changes:
service gophish start
21. Now, we are ready to run Caddy:
Type caddy in the same location where you put the Caddyfile (e.g., /root)

22. Check that Caddy and Gophish services are listening: netstat -plnt
23. Finally, we can access the Gophish console to run the first phishing campaign: https://localhost:3333/login

24. Click on Sending Profiles, then on + New Profile. Enter the SMTP information for the sender’s phishing email. We could use GoDaddy or any other DNS registrar to get a custom email address.
25. Next, Let’s clone a landing page to use with the phishing campaign. The cloned page will help us to collect usernames and passwords. In this example, we’ll be cloning a CITRIX portal (Please be aware that AWS might detect the use of intellectual property, and the phishing campaign may get flagged). Click on Landing Pages, then click on + New Page, name the landing page, and click on Import Site.
We’ll be asked to enter the URL for the page we want to clone. Then, click on Import to complete the process. Next, Gophish will import the HTML code needed for the landing page. In the next step, we’ll go through the HTML code to format the fields that Gophish needs for capturing the credentials.

26. Click on Source and look for the HTML tag “<form”.
Make sure the username and password input fields are defined as follows:
Here is the HTML code for our cloned Citrix page:
We might want to verify how the cloned page is rendered in the browser, so click on the preview icon. Before saving the page, at the bottom of the window, we select the Capture Submitted Data and Capture Passwords options. If we want to redirect users to another site after entering credentials, we could use the “Redirect to” field. Finally, we click on Save Page.

Preview – cloned Citrix portal:
27. We are ready to create the first email template. Click on Email Templates, then give it a name.
Fill out the Subject and the verbiage for the phishing email using the HTML tab. Click on Save Template when done.

Here is an example of a HTML phishing email:
We can use the following HTML variables within the phishing email:

28. Before putting all the settings together, we need to create a Users’ group; This is the list of users to be phished. Click on Users & Groups, then on + New Group. Name the group and add each user to the group: <First Name>, <Last Name>, <Email>, and <Position (job title)>. Finally, click on Save Changes.
29. Lastly, Click on Campaigns, then on + New Campaign. Name the campaign and select all the corresponding options previously set.

When ready to send out the phishing campaign, click on Launch Campaign. We’ll be asked to confirm the action.

30. Once the campaign is sent, the targeted users will receive the email below.
Upon clicking on the “https://secure.citrix.com” link, the users will be pointed to the landing page.
After entering credentials, users are then redirected to the URL set on step 26.
All Testing results will be displayed on the Dashboard:
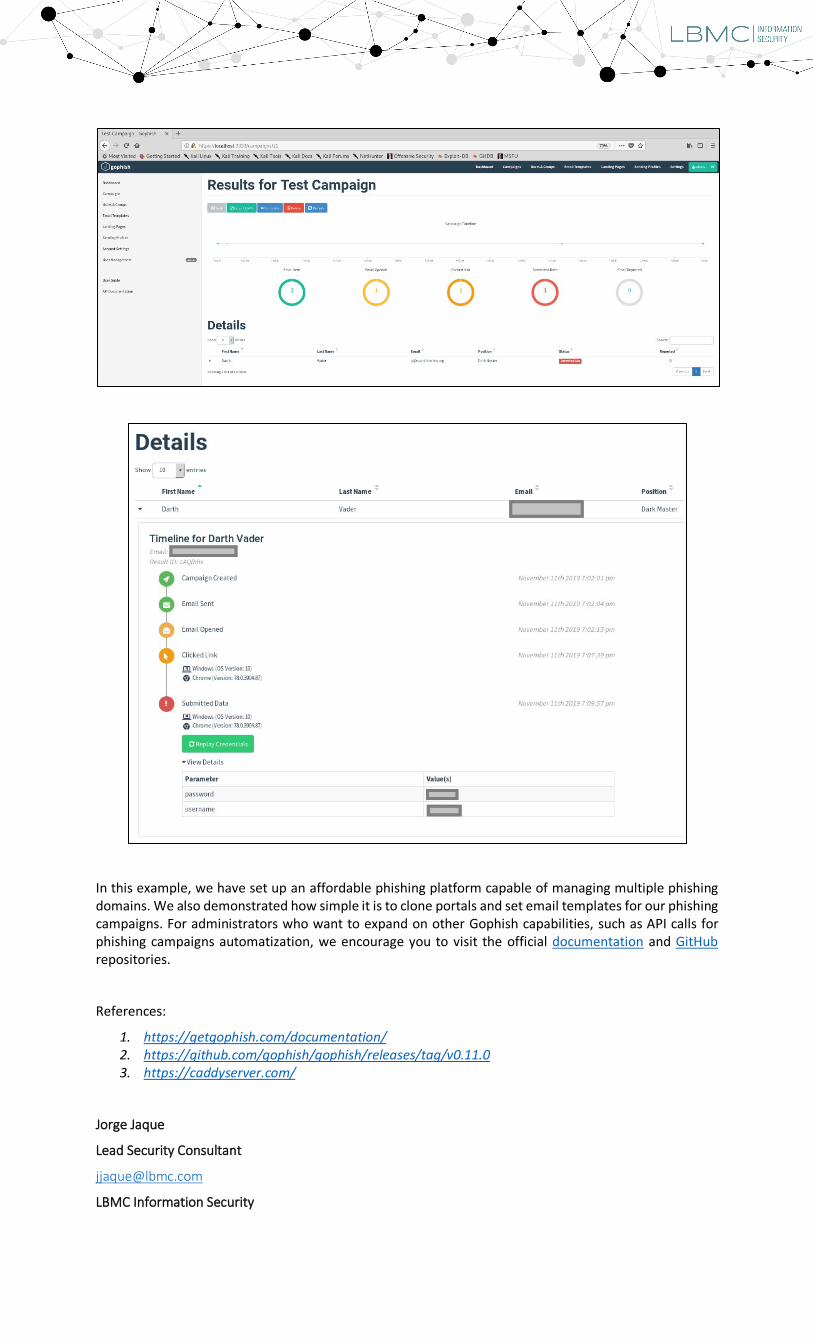
In this example, we have set up an affordable phishing platform capable of managing multiple phishing domains. We also demonstrated how simple it is to clone portals and set email templates for our phishing campaigns. For administrators who want to expand on other Gophish capabilities, such as API calls for phishing campaigns automatization, we encourage you to visit the official documentation and GitHub repositories.
References:
1. https://getgophish.com/documentation/ 2. https://github.com/gophish/gophish/releases/tag/v0.11.0 3. https://caddyserver.com/
Jorge Jaque
Lead Security Consultant
LBMC Information Security